FA LA LA LA LA….. LA LA LA LA….Happy eve of Christmas! What better way to celebrate the holidays than with the sweet and spicy flavor of ginger…in donut form! There is nothing better.
This donut is ideal for Christmas morning(or any other morning)..Warm and sweet, bright and tangy….The perfect balance to make everyone happy! It’s really fast and easy, so you can make a batch while the coffee is brewing, or you can even make them tonight and maybe leave a donut out for santa. Have guests over for the holidays…Dazzle them with a homemade donut. Hanging out at home by yourself…make some donuts…..traveling….well you are kind of screwed at the moment… but think about making donuts when you get where your going.
It all started a few Christmases back when the mister gifted me with a wonderful addition to my kitchen bakeware….a donut pan…. and it was a game changer. If you do not have a donut pan I suggest that you immediately go buy one.. No joke, it’s so worth it. The pan elevates a simple cake recipe to something more… A round of frosted soft cakeness. Circles with holes…..happiness. Hopefully you already have a donut pan, but if not, I trust you will soon.(you can still make this recipe without the pan, just bake it in a 9×9 pan. Yes, it will still taste amazing, but it’s that much better as a donut!)
I am really excited to finally share a donut recipe with you all. I haven’t made a batch yet that hasn’t won a round of applause or at least a super double thumbs up. If you haven’t made donuts yet, bookmark this recipe and make it priority for your next baking adventure
.What I started with….flour, baking soda, baking powder and salt whisked together. A little bowl of fresh ginger, powdered ginger and cinnamon. Molasses, brown sugar, vanilla, and egg, melted butter and milk. Not a bad line up
The spiced mixed in to the dry….I used fresh and powered ginger but if you don’t have any fresh.. just add more powdered…but fresh adds that extra bit of gingery spiciness.
The wet ingredients all mix together. Molasses first, then the butter, vanilla, and the brown sugar, mix that then add the egg and the milk last.(avoid adding egg and melted butter together so it doesnt scramble) Mix wet mixture with the dry until fully incorporated and smooth.
A beautiful donut batter….Scoop small spoonfuls of batter into very well greased donut pan …smooth tops with a spoon or spatial….I may have added just a little too much batter the first round, , which is totally cool, it’s just the donuts came our with a bit of a spare tire around the bottom…a little more to eat I say.Out of the oven and turned onto a cooling rack…This beauties smell so very nice.
While the donuts are cooling, prepare the icing. Mix 1/4 cup of cream cheese with 1/2 cup of sifted powdered sugar. Half of a lemons worth of juice with a teaspoon of lemon zest and mix… add a splash or two of milk to get the desired consistency(this is a cream cheese glaze, it won’t harden like a sugar glaze)When the donuts are full cooled, dip into glaze….
Flip and let drip……and admire. I had to beat a few hands away while taking these pictures..I am telling you, people will do crazy things for a donut…..CRAZY THINGS…Just look at these. And for real, they really don’t take much time. You could totally whip these up in less than 30 minutes.. just make sure to have someone else do all the dishes!!!
Ingredients……Makes about 8
1 cup all purpose flour
1 teaspoon baking powder
1/2 teaspoon baking soda
1/2 teaspoon salt
1 teaspoon cinnamon
1 teaspoon powdered ginger
1 teaspoon fresh grated ginger
1/2 cup brown sugar
1 egg
2 tablespoons molasses
1/2 cup milk
1/2 teaspoon vanilla extract
3 tablespoon melted butter
Lemon Cream Cheese Glaze
1/2 cup powdered sugar
1/4 cup cream cheese
1 teaspoon lemon zest
half a lemon worth of lemon juice
a splash or two of milk
Instructions Preheat oven 350
Grease donut pan In a large bowl, whisk together flour, baking powder, baking soda, cinnamon, salt, powdered and fresh ginger. In a small bow mix molasses, vanilla, brown sugar and melted butter. Stir and add milk and egg last.
Mix the wet with dry ingredients and until just combined. Scoop small amounts of batter to each donut mold… fill to about 2/3 full. and level out with a spoon if spatula. Stick in oven and bake for 10 minutes or until edges just start to turn golden brown and a cake test comes out clean.
While donuts are cooling, stir together cream cheese, sugar, lemon juice and zest. Add small splashes of milk until you reach the desired consistency(not to runny, think dish soap) Dip baked side of donuts into glaze, flip and return to wire rack.
And then you open your mouth…..EAT DONUT……..EAT!!!
The past week has been pack full of everything.. Birthdays (3 nephews within the week), Christmas, family family family…..Its a lot, but its been great. Not going to lie, I am ready for a little quite time, maybe a nice long day of locked doors and dead phones….we will see. But anyway, here are a few little bits of happy that I managed to snap photos of(I have been slack on picture taking this week)This is an amazing book, full of pictures and information about 123 different varieties of apples….I am so excited to read it! My love got it for me for Christmas….So nice, so sweet. Its been a weird weather week..warm and gray.. This touch of blue really stood out.I found my favorite rag wool socks (Hooray!!!!).. and wore them all week.(don’t judge)
Ice Skating!!! One of my nephews was born on Christmas so we always do a skating party at the ice rink on Christmas eve……….another of my favorite family traditions…Always a super blast. Here my sister and nick were giving this little her first ever skating lessons. All I can say is good thing she was wearing a helmet.
Another gift from the mister…a weck juice jar……If you know me or are getting to know me, you will know that I am jar obsessed and weck jars are some of my favorite. I eat, drink, store everything in jars. This beauty is destined for tea and or coffee.
I am not saying this because he is my lover, but Nick is an amazing artist. He has really gotten into using spray paint and has been doing some really awesome large scale images(nothing illegal…….yet!!) He did this whale a few days ago.. I am always blown away at he talent.
Popcorn drizzled in melted peanut butter….. WHOA!!!!! I also like to add garlic salt and chunks of fresh apple. It is the best most fantastic movie snack ever………Maybe I’ll share with you sometime.An early morning walk with the pup to the waterfront…We watched the sun come up…I am so lucky to live in such a beautiful place.
I hope everyone is having a wonderful holiday.. eating some good food, relaxing, spending time with loved ones. So soon it will be 2015(Holly f***!!) Lets get ready!!!!!
I needed something quick, something everyone would like and I needed it to come from food I had in the house……Pretzels, peanut butter and chocolate chips turned into little nutty nuggets. A last minute christmas treat. I have stumbled apron something that I am sure to make many more times to come. People were really into them and for real, so easy and took so little time to make.. Fast, happy, peanut butter and pretzels dipped in chocolate, I mean, do you know anyone that would say no to that? And just because I made them for Christmas does not mean that we cannot make these for any occasion, like New Years, maybe a birthday party or even laundry day. You can even make these as a fun afternoon activity with the kiddos.…Make them whenever you need a fun little treat! Note….This is one of those treats that is vegan, gluten-free (just get gluten-free pretzels) and doesn’t have a ton of sugar..Eveyone can eat them! Hooray!!!!!! (Maybe don’t feed them to a child with a peanut allergy)
Simple as this….Half a bag of pretzel rods(any shape would work)… A big scoop of peanut butter and some chocolate chips…
. Pretzels go into the food processor and pulsed until a mostly fine crumbly crumble. Now in goes the big ol scoop of peanut butter. Pulse until mixture comes togetherGo ahead and take a bite……so good right?..Start turning the mixtures into small balls..think grape sized.
Once the mixture is all rolled out, stick into the fridge or freezer for a little about a 1/2 hour to set up.
Right before you take the balls out of the fridge…melt down the chocolate. Like my make shift double boiler? I know….jealous. If you have one, use it, but if not, a big pot with water and a smaller thin metal or a glass bowl works.. The pot or bowl should fit onto the big pot, but I was having a hard time and couldn’t find any of my bowls…..so i did what I could. Bring water to a boil then turn to simmer. Place chocolate in small bowl on big pot and stir until chocolate is melted, silky and smooth. Remove bowl from boiler and start to dip those balls! Reheat chocolate if needed but be careful to not get any water into chocolate or else it will seize up and you won’t be able to melt it anymore.
Drop a few balls into the melted chocolate. I was doing 2-3 at a time. Take a spoon or spatula and gently roll or coat entire nugget. Remove and place on a parchment lined baking sheet.
That’s it…Imperfect little perfect candy nugget truffle thingys….I sprinkled the tops with colored sugar.. you know, for a little holiday fun.. 3 simple ingredients( oil doesn’t count).. and 10 minutes of hands on time…can’t get much better then that.
Ingredients
3/4 cup Peanut Butter
10-12 Pretzel rods
1 1/4 cup chocolate chips
tablespoon coconut oil
Pretzels go into food processor and pulse until a fine mealy constancy.. Add peanut butter and pulse until combined and is easily handled. Add a bit more peanut butter if the mixture seems to dry or another pretzel if mixture is too loose.
Line a baking sheet with wax paper. Roll mixture into small grape sized balls. Pace in the fridge or freezer for 1/2 hour.
After the balls have chilled, place chocolate chips and coconut oil into a double boiler and heat until chocolate is fully melted. Place balls 2-3 at a time into melted chocolate, roll around to completely coat, then transfer back onto wax paper. Once all balls are chocolate coated, sprinkle with something( if you want) and place back in fridge to set up.
Look at that old man face…. how can anyone stay mad at him? (there was a recent incident involving bananas, you can read about it in the last post.)
Before we get started on the leash, I’ll give you a little background about Washer the trash dog. A little over 9 years ago, Nick brought home this 8 week old little ball of fur for us as a Christmas present. Oh man, he was so so so freaking cute, but that didn’t stop me from crying… Why you ask? Because I didn’t want a golden retriever, we never talked about getting a golden, we talked about getting a husky or a german shepherd. And so I cried.(I was so pissed) But it didn’t last long. A few hours after he was home, I fell in love and we have been a little family ever since. Mind you that the first two years of his life, he was a terrible beast of a dog. Nick and I were really young and neither of us had ever had a puppy before so we kind of let him do whatever he wanted…..not a great idea. He was a shit. He would eat everything and anything. Seriously anything; book shelves, linoleum floors, windowsills.. You name it, he ate it. He also started to act a little jerky, growling at little people and getting aggressive around food which ended with us having to hand feed him for about 8 months. But eventually he grew out of his eating parts of the house, now he just eats anything food or trash .He doesn’t mind little people so much anymore just as long as they don’t try to play with him, and he now sits in front of his food bowl leaving great big puddles of drool until he is told he is allowed to eat. Oh how he has grown
One question that people always ask us is,”Where did that name Washer come from?” Truth is, it was kind of joke. We had had him for a few days and hadn’t named him by the time we went to my Dads house on Christmas. Sitting around with my family, we came up with all sorts of stupid and inappropriate names. At one point appliances were named off and I guess the name Washer just kind of stuck out. We had planned on changing it right away, but as you can see, we still haven’t gotten around to that.
Anyway, Washer has had the same leash for about 7 years. (His first 2 years he ate a few) That’s a long time for a leash, especially if you think of all the times that it has been dragged through the mud, pulled into the lake, or my favorite, peed on. Yup, his current leash is ripe and it’s about time we made the old man a new one.(Ok, its more for us, but he seriously has been peeing on it a lot lately and I am not a fan of handling a pee soaked leash)
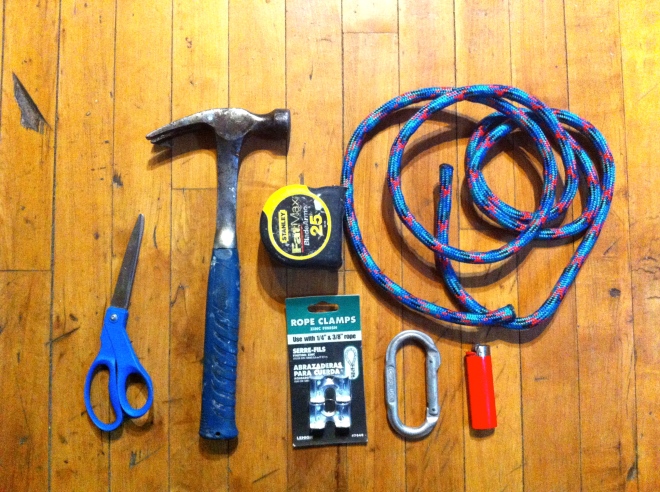
1 custom sized leash. Super simple and cheapy cheap.
What you will need is….
6-7 feet of 3/8 rope(or however long you want it)
two 3/8 inch rope clamps(1 package comes with 2)
carabiner
scissors
hammer
lighter
measuring tape if you want exact measurements(it’s not necessary)
Note: You can get the rope, clamps and the carabiner at any hardware store, but I think the big ones like Home Depot or Lowes sell rope by the foot so you don’t have to buy a 50 ft piece…unless you want it.
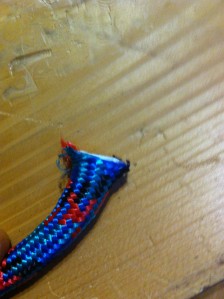
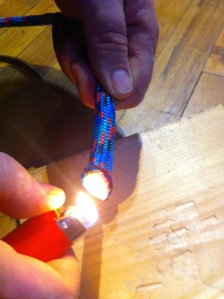
First thing.Trim the ends of the rope nice and clean. Take the lighter and melt the nylon around the end of the rope so it will stop it from fraying…BE CAREFUL….And do it over the sink or somewhere with water…It’s not hard to do, I just don’t want anyone to burn themselves or the burn their house down.(not that I think you are going to)
Once the nylon is melted and no longer hot…Make a small loop and place rope into rope clamp. Make sure to leave the loop big enough for the carabiner to fit. Now hammer the clamp around the rope, I mean, really smack that thing We used a scrap piece of wood to hammer on… and I suggest you do the same.
For the handle, make a large loop, whatever size that works for you, and do the same hammer clamp situation on the ends here.
Pretty freaking simple….Thats it, you are done and now you have an awesome customized and pee free leash.
New and old. Hopefully he won’t pee on this one for a while.
Have a great weekend and l would love to hear from anyone that makes themselves a sweet ass new leash!
My motive for this drink…get rid of a few candy cane….. And maybe make a little kid happy, but that was just a bonus… I would have made him drink this even if he didn’t like it. (I am awful like that)
I have noticed lately people are really into peppermint in their hot drinks and I have an excess of candy canes in my house, so this was the perfect drink to make. I was initially just going to make hot peppermint milk but added the cocoa for an extra treat. If you want, omit the cocoa and just make peppermint milk.. Or you might want to replace 1/2 the milk and add coffee! Or for those adults out there..maybe add a spash of vodka.. my version of .a hot black and white peppermint Russian(I just made that a thing)
A little advise ….check the temperature of the drink if you are giving it to a kid..What I thought was not too hot turned out to be a too hot. My little niece took a big gulp, and instantly sprayed the drink all over the kitchen and my clean hat, scarf and mittens… and then proceeded to cry….Hot chocolate is supposed to make the kids happy….so yeah…
All you need is a cup of milk(cow, soy, rice..whatever) a tablespoon of cocoa powder, a tiny pinch of salt and a candy cane. We don’t need to add any extra sugar because the candy cane is sugar.
Peel plastic off candy cane and place in a baggy and smash with something hard (rolling pin worked great)Stick all ingredients into a pot on medium heat and whisk until the candy cane is melted and the milk is as hot as you like it.
It you want(we did) top with a dollop of whipped cream(or whipped coconut cream) and sprinkle with a little more crushed candy cane…..Best served after a long afternoon of playing in the snow!
Go for it, watch your tongue and enjoy!
Ingredients (Makes one serving)
1 normal sized candy cane
1 tablespoon powdered cocoa
1 1/4 cup of milk(cow, soy, rice, hemp…what ever milk you want)
pinch of salt
Place unwrapped candy cane in baggy and smash. Place all but a sprinkle of the candy cane, the milk, and the cocoa in pot on medium heat and whisk until candy cane is fully melted and the cocoa is you preferred temperature.
Top with whipped cream and sprinkle with crushed candy cane.
Another week has flown by….whew……. But it was such a good week. The mister had a birthday that I think went pretty good. We received a fair amount of snow that turned the world into a snow globe. We took our first road trip in the new car down to NYC to visit Nicks brother his girlfriend.(They were awesome..We had a great time) And now we are home. .…. a lot of happy things this week.It’s kind of turned into a Nick birthday tradition for us to hike up Mount Philo. We started with a couple inches of snow and a little freezing rain at the bottom of the trail and ended at the summit hiking in a foot of snow. So beautiful. Our Christmas tree tradition. Every year after we cut our tree down, we string up the lights, pop a giant bowl of popcorn and string it up for the tree while watching Elf. I look forward to this night for weeks. We started stringing popcorn too many years ago when we were living in our first apartment. We didn’t have any ornaments or money so we just did popcorn. Then we added Elf to the tradition. How can it get better? It’s really the highlight of the season. The tree…….minus the ornaments. I am still up in the air about putting anything else on it this year, I love the way it looks now.
A kitchen supply store in NYC. I could have spent the entire day in this store. There was something for everything. I walked out with nothing. It’s ok, I can always go back.
The Chelsea Market in NYC was really fun. Its located in such a sweet building with a bunch of neat little shops. We made our way there for the Etsy craft fair which was really cool. We even made it early enough for the door prizes! And just look at these light! By far the best light display I have seen this year.Nick and I always joke about getting a bike with a side car…..I think it was meant to be.Waking up earlier then everyone else and hitting the streets. Walking around the lower east side at 6 am on a saturday is really fascinating. The streets were almost complexity empty and there was less of a hurry hurry energy. I got to see the sun coming up. A bowl of delicious grapes. Can make anyone happy, right.
Ahh,, and back to Sunday. I am going to clean, unpack, shovel a bit and get ready for the week. Then I am going to hang with the puppy(I missed him) and I am also going to drink to much coffee, read and nap throughout the day. A low key kind of day. I think I kind of deserve it, and I think you deserve a day to do what you want too!
Made from necessity, a seat near the door to sit and remove shoes, store winter stuff and doesn’t look like I threw a bunch of milk crates together..I threw them together and added a nice blanket, I’m classy like that. I do love a good milk crate…there has always been something so satisfying to me about a free plastic receptacle that has a world of uses. These three crates and some scrap wood have changed my entire living situation. The entryway of our 200 sq ft loft is now super functional, looks fantastic, and makes me happy. .All from a the scrape pile. It’s not what you think…we have a barn that is pretty much dedicated to scrap wood and some other building material that has come from buildings we have worked on. This picture does not do our scrap wood(and junk) pile any justice. It is pretty crazy, and drives me nuts. I don’t know how many times I have threatened a 30 yard dumpster, but you know what? When Nick or I are in need of some wood, we always find ourselves rummaging through the pile and can almost always find a piece of what we are looking for. The pile somehow always redeems itself, for that reason it still lives on(for now). Being that you as a sane person, you probably don’t have a barn full of scrap wood(and junk), so what you will need for this project is..
Materials
Two 39.5 X13 inches pieces of 3/4 inch ply wood(top and bottom)
Two pieces 13X13 of 3/4 inch plywood(sides)
Four 10 inch 2×4 (Legs)
about twenty-five 2 inch finishing screws
3 milk crates(you can do 2 or 4…just have to measure out for wood)
Tools
Drill
circular saw
measuring tape
t square or a long straight edge.
pencil
Note: If you are not comfortable buying a full sheet of ply wood and cutting it down or you don’t own necessary tools, go to Home Depot or Lowes and have them cut the pieces to size for you.. Also, I have never really gone through a project step by step so if you are making this and somethings seems off or you have any questions, totally email or comment to me… but I will try my best to make each step clear…..
Three milk crates..What I found was that there are some milk crates that are not the same size so make sure that you have three that are the same. These crates are 13x13x11.
Measure and cut ply wood. The top and a bottom are the same measurements…Here comes some math…. three milk crates that are 13 inches long = 39 inches. One crate deep is 13 inches. . Cut two pieces 39.5 inches by 13 inches. (The extra 1/2 inch is so the crates can move in and out easier)
Now measure and cut sides. Two pieces at 13×13.The crates are 11 inches high, but you need to add the extra 1.5 inches because of the thickness of the plywood. If your milk crates are a different height, use that measurement plus 1.5 inches.
If you haven’t heard this saying before, it will change your life…Measure TWICE!! cut once. Dont get overly cocky, cause even the seasoned wood worker screws up measurements.. I screw up sometimes so the saying is not lost on me.
Once you have all four pieces cut, its time to assemble. Having an extra hand will help a lot, but you can do this on your own.
Screw the side pieces into the top and bottom. We stood the top and bottom vertically and place and lined up the side. Now sink four screws into both sides to secure to the other pieces. When sinking the screws, make sure you are drilling straight down so your drew doesn’t come out of the side of the wood. If that happens, just remove and start again, no biggy. Once you have done one size, flip and screw in the other.
I caught that piece of wood he is throwing at me. Ok, not really, but I could have. Here Nick is cutting four 10 inch pieces of 2×4 for the legs. We decided on 10 inch legs because we wanted a bench that was a little taller than the average chair, which is about 18 inches floor to seat. If you wanted to make the legs shorter or taller, by all means, I just wouldn’t go to much taller or you might not be able to sit conformably on it.
After you have all your legs cut, mark out where you want to place them. We did a one inch recessed from the front and the side…but do whatever looks best to you. Mark where the legs go and place two screws into inch leg, screwing from the inside of the bench. And thats it… ..now you have the frame. Take a minute here to admire your handy wood working skills. If you are not into the raw wood look, this would be the time to paint it.
With the crates inserted…Doesn’t it look magnificent! I choose these 3 crates for the colors and the patterns..I wish I has a grey crate that fit. That would have looked awesome.
Test one……….the crate slides out perfectly and my mittens fit!!
Now for the big test……….and it works!! My butt safely seated. My feet touch the ground and I can bend over and tie my shows… can’t get any better…
But it did. The addition of a folded blanket as a cushion. I was going to make a cushion but found a really pretty blanket at the second-hand store that was perfect. It was 2 bucks and is actually way more practical than a cushion. I can wash this blanket, a hand-made cushion, I probably wouldn’t want to mess with that, plus a piece of foam alone cost like 25 bucks. The blanket was meant to be.
A great success.. This bench is really great, I definitely recommend it to anyone and everyone.. It’s the perfect place to sit and remove wet shoes, store all of our hats, mittens and canvas shopping bags and it just looks cool. It was really simple to make, cheap, and took very little time. You could even make two, one for you and one for a friend(think holiday gift)
A perfect weekend project!! DO IT!!!! and if you make one, please, send a pic on over, I would love to see it!
Wowzers.. What was I thinking! I know, the same thing you are…YES YES YES!!! Gluten free what now.. My lovely sister is on that ban wagon. She has been having”issues” lately(so many, it’s hard to pin point) and says she is feeling better without the gluten. Me being the lovely person that I am want to feed my poor sister, make her happy with food. I HAD to prepare that lady a dinner and it had to be pizza cause I know how much she likes her pizza. So I brain storm. What would be a good gluten-free pizza crust? I could do the obvious and get gluten-free flour, but to be honest, that’s some expensive stuff and I really didn’t feel like going to the store. I wanted to work with what I had in the house….and ah ha, there it is, cornmeal.. With a little bit of water I can turn that into some polenta and a super gluten-free pizza crust.
So in walks polenta(if polenta could walk) What goes good with polenta? Caramelized onions, mushrooms and yes, my last delicate squash.(I am too nice) A nice base of marinara sauce and a bit of parmesan cheese mixed into the crust and sprinkled on top…..a complete work of genius that I was proud to serve to the gluten free lady.
Note. I have to make this clear, just because this pizza is gluten-free doesn’t mean that a person that is not gluten-free cannot eat this. Anyone and Everyone should eat this pizza.
There really isn’t a whole lot of ingredients to this pizza… Cornmeal for the polenta. Marinara sauce….I used jarred marinara because it was a little easier and we don’t always need to make things from scratch…Lots of onions(2 finely sliced), handful of sliced mushrooms, thinly sliced squash and parmesan cheese. Most of the prep takes place at the same time, but that’s good, we can multi task, just have everything pre chopped and ready to go. First thing first, start the polenta
There are so many different ratios and directions on how to prepare polenta, so if you feel like your way is better, I trust you. What I did for this crust was 1 cup cornmeal to about 2 1/4 cups water. The main thing is the finished product. You want a pasty paste that is spreadable but not overly watery.
Bring the water to a boil and constantly whisk while gradually pouring in the cornmeal. After a minute to two, it should be pretty well incorporated and there shouldn’t be to many lumps. Turn the heat down to simmer and stir a lot until the polenta starts to pull away for the sides of the pot. Really scrap the bottom of the pot so it doesn’t burn. Once its done, add in a 1/4 cup of parmesan( if you want to keep it vegan, just don’t add it) and salt and pepper.
On a well oiled baking sheet or pizza sheet..spread the polenta into the shape of your desire. I went with a somewhat circular shape, but now that I think of it, I wish I had been more creative, like maybe a triangle or even the shape of a bus….Yeah, a bus shaped pizza would have been cool.
This crust needs to be pre baked so stick it in the oven.It should take about 20ish minutes.
You can do this pre crust or at the same time, but roast your sliced squash. Place single layers squash on an oiled pan, salt and pepper, then into the oven. It should take 10 minutes on each side.
You got the crust in, the squash in, now we need to caramelize the onions. You may be thinking that 2 onions is a lot, and it kind of is, but you want a lot. A tiny bit of oil into a skillet and all the onions. medium low heat with a lid, string on occasion. When the onions start to caramelize, add the mushrooms and cook until onions are nice and soft and the mushrooms are no longer raw. By the time you done with this task…everything should be ready….time to assemble!
First marinara…then the roasted squash.
I Sprinkle a layer of parmesan cheese and pile on those onions and mushrooms,. Sprinkle with a little more cheese. ( use vegan cheese or no cheese if you want it vegan) Back into the oven for another 15 minutes to give everything some time to crisp and melt. Remove from oven and appreciate…That is one good looking pizza. I took a long spatial and run under the crust just to make sure if wasn’t stuck. I also found that if you let it cool for a few minutes before serving, the polenta gets a little stiffer and easier to handle, but not necessary.
Its time to eat! And I know that it was a success. This is my gauge for how good it was…I stopped by the next day to drop a xmas tree stand off to her(again, look at how nice I am) and she was eating lunch…the left over pizza. That might not seem like anything to you but to me… She doesn’t eat leftovers. Sure, she will stick them in the fridge, but that’s where they stay until she tosses into the garbage. The pizza was leftover good….That is good!
Ingredients
1 cup polenta (Cornmeal)
1 tablespoon olive oil, plus more for the pan
2 1/4 cup water
1/2 cup grated Parmesan(omit if making vegan)
1/2 of Marinara sauce
1 small delicata squash
2 medium onions
8-10 mushrooms
2 gloves garlic
Directions
Pre heat oven to 425
In a medium saucepan, bring 2¼ cups water to a boil. Whisking constantly, slowly add the cornmeal while constantly whisking. Once full incorporated, turn to low and stir for a few minutes until the polenta starts to thicken and pull away from the sides. Stir in 1/4 cup of parmesan (if using). Salt and pepper to taste. Genously oil a pizza sheet to a cookie sheet and spread the polenta mixture about a 1/2 thick. Place into oven and bake for 20-25 minutes or until crust is a nice golden brown.
While the crust is cooking, place thinly sliced squash on an oiled baking sheet and sprinkle with salt and pepper. Place in oven at the same time as crust, flipping squash after 10 minutes. Cook until fork tender, about 20 minutes.
While the crust and squash is baking, caramelize the onions. In a large skillet with a bit of oil. toss in onions and a little salt. Cook on medium low heat with a lid, giving them a good stir every now and then. Once onions are nicely cooked down, toss in the mushrooms. Continue to cook unit mushrooms are no longer raw.
Remove crust and squash from oven and let cool for a minute. Now just pile stuff on. Spread marinara sauce evenly around crust. Add squash and top with cheese. Dump the onions and mushroom on top and sprinkle with a bit more cheese.(Again, use vegan or no cheese to keep it vegan) Place back into oven for another 20 minutes.
Remove and let cool for a few minutes………..and then eat eat eat!!!
A good side dish for this pizza…a nice light arugula salad. Hey, you could even just toss some greens right on top of this pie, that would be fantastic too!
Sometimes, no matter whats going on with the week, Monday seems like, well, like a Monday. I drag a little on Mondays. I think it stems from the Monday through Friday school week that was beaten into me for 16 plus years. Hate Mondays, Love Fridays.. Yup, I blame the public educational system(I have to blame someone) I want my day back. I don’t want to feel the drag today. I am going to have a fantastic day. I’m getting excited, pumped up and ready for the week. I am turning my Mondays into fun days. Funday Monday…Yes, yes I did just say that. . See, don’t we all feel better already?
On this Funday, I don’t want to worry all day what I am going to make for dinner, I just want something tasty and easy. .Whats better than a plate of fries?……. a plate of roasted rutabaga fries! Yes! See, we are already having a great day. A plate of fries, easy, delicious and nutritious. Not a bad start to the week. You can eat them with just about anything, a grilled cheese tomato and avocado sandwich, a bowl of curried lentil soup..or just straight up eat a big old pile of these roasted rutafries (That a word, I swear) Just have fun with it. Its funday Monday after all.
One large rutabaga… This one fed 2 as a side… but if your eating just the fries, eat a whole one to your face. It’s totally cool.Chop the rutabaga into fries and toss with a smidge of oil, salt, pepper and ground up rosemary. Don’t like the rosemary… don’t use it. Maybe try something else like sage or garlic and onion powder or curry powder. Just use whatever you like. Throw into a 425 degree oven for 20 minutes, give them a flip and back in for another 15, Simple. Easy.
Remove from oven when crisped to your liking and eat.
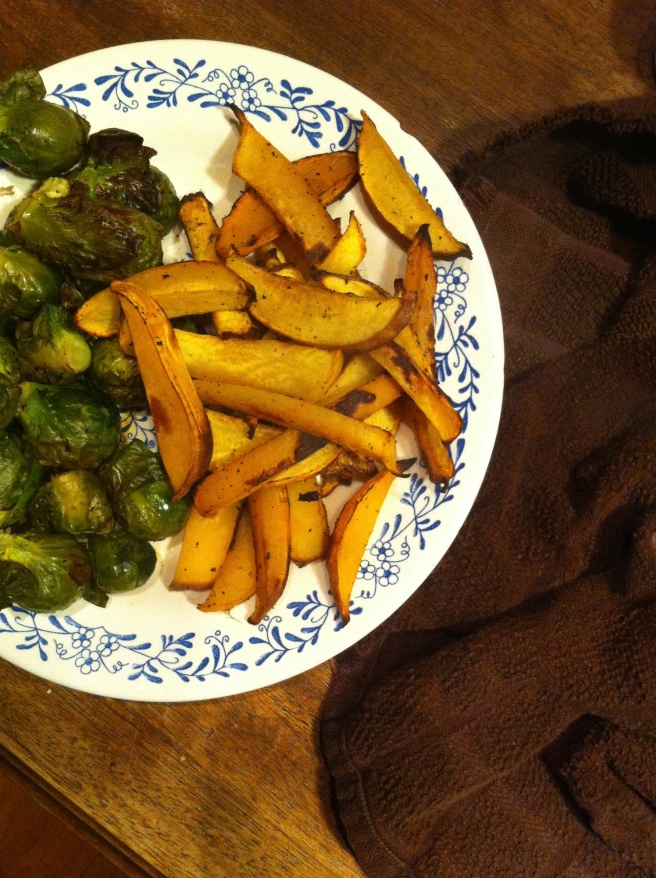
Yes, this was a dinner of rutafries and brussel sprouts, is that a problem? I don’t think so .A suggestion, .dip in mustard….its fantastic, but go the ketchup route if that s your fancy.
Alright people..Have a great day and remember to not let today be a drag of a Monday, make it fun, looking forward to a plate of rutafries for dinner and think of how great the rest of the week is going to be!( I might have been a motivational speaker in a past life)
Oh, it definitely was a long week. Did a lot of holiday stuff, watched a lot of littles( got peed on) got sick and lost my voice for a couple of days.(that was fun). All sorts of good stuff. But for real, I had a great week. Here are some bits. Persimmons.,,,,,,,,,,,. Do I need to say more?
This new tea… I wasn’t sure I was going to like it but oh do I. It’s so freaking good, I have been drinking it every day. I must stock up before its gone!
Everything about getting our Christmas tree makes me happy. Every year, the mister, the dog, and I drive down to the rangers station,, get our tree tag , and hike into the Green Mountain National Forest to hunt for and cut down our Christmas tree. The tree is the thing for me. I don’t want presents, no shopping, take the food, just the tree and I will be happy. Its our most fantastical tradition. We make is a whole day event. A nice drive, lunch, listening to Christmas music, lots of hot coffee, a long hike in the most beautiful place in the world. The perfect day. Look at how happy this guy is. Its hunting season and we forgot his bright colors so we improvised. Yellow trash bag ribbons. His new nickname is now Trash dog. It fits him.
Watching this little. She is an amazing human being and I love love love her.. I think she might be mine. She really likes soup..
My elf candle holders I got from CB2. I wanted them so bad for years and finally the last year they sold them I bought myself these guys. I heart them
Oh you like my new milk crate show bench? Its awesome,, one of the best uses of scrap wood and milk crate that I have ever done(Yes there has been other scape wood milk crate projects) Well you are in luck..I will show you how to made it.. watch for it next week!
I love old strainers. I kind of have a thing for them. This big guy is now in my collection. Bonus, green AND purple kale….
Hanging out with my sister. I haven’t seen her for what seems like the past 4 months(she is in nursing school). This was her last day of classes so we cleaned her house, folded laundry while listening to music and I made her dinner.We wrapped up the night by mass texting our other sisters inappropriate pictures of the elf on the shelf. It got pretty crazy. It was such a great night. I love my sisters.
Hope you found some bits of happy this week, if not, your not doing it right.

 This is an amazing book, full of pictures and information about 123 different varieties of apples….I am so excited to read it! My love got it for me for Christmas….So nice, so sweet.
 Its been a weird weather week..warm and gray.. This touch of blue really stood out.
 I found my favorite rag wool socks (Hooray!!!!).. and wore them all week.(don’t judge)
 Ice Skating!!! One of my nephews was born on Christmas so we always do a skating party at the ice rink on Christmas eve……….another of my favorite family traditions…Always a super blast. Here my sister and nick were giving this little her first ever skating lessons. All I can say is good thing she was wearing a helmet.
 Another gift from the mister…a weck juice jar……If you know me or are getting to know me, you will know that I am jar obsessed and weck jars are some of my favorite. I eat, drink, store everything in jars. This beauty is destined for tea and or coffee.
 I am not saying this because he is my lover, but Nick is an amazing artist. He has really gotten into using spray paint and has been doing some really awesome large scale images(nothing illegal…….yet!!) He did this whale a few days ago.. I am always blown away at he talent.
 Popcorn drizzled in melted peanut butter….. WHOA!!!!! I also like to add garlic salt and chunks of fresh apple. It is the best most fantastic movie snack ever………Maybe I’ll share with you sometime.
 An early morning walk with the pup to the waterfront…We watched the sun come up…I am so lucky to live in such a beautiful place.
 I needed something quick, something everyone would like and I needed it to come from food I had in the house……Pretzels, peanut butter and chocolate chips turned into little nutty nuggets. A last minute christmas treat. I have stumbled apron something that I am sure to make many more times to come. People were really into them and for real, so easy and took so little time to make.. Fast, happy, peanut butter and pretzels dipped in chocolate, I mean, do you know anyone that would say no to that? And just because I made them for Christmas does not mean that we cannot make these for any occasion, like New Years, maybe a birthday party or even laundry day. You can even make these as a fun afternoon activity with the kiddos.…Make them whenever you need a fun little treat! Note….This is one of those treats that is vegan, gluten-free (just get gluten-free pretzels) and doesn’t have a ton of sugar..Eveyone can eat them! Hooray!!!!!! (Maybe don’t feed them to a child with a peanut allergy)
 Simple as this….Half a bag of pretzel rods(any shape would work)… A big scoop of peanut butter and some chocolate chips…

 Pretzels go into the food processor and pulsed until a mostly fine crumbly crumble. Now in goes the big ol scoop of peanut butter. Pulse until mixture comes together
 Go ahead and take a bite……so good right?..Start turning the mixtures into small balls..think grape sized.
 Once the mixture is all rolled out, stick into the fridge or freezer for a little about a 1/2 hour to set up.
 Right before you take the balls out of the fridge…melt down the chocolate. Like my make shift double boiler? I know….jealous. If you have one, use it, but if not, a big pot with water and a smaller thin metal or a glass bowl works.. The pot or bowl should fit onto the big pot, but I was having a hard time and couldn’t find any of my bowls…..so i did what I could. Bring water to a boil then turn to simmer. Place chocolate in small bowl on big pot and stir until chocolate is melted, silky and smooth. Remove bowl from boiler and start to dip those balls! Reheat chocolate if needed but be careful to not get any water into chocolate or else it will seize up and you won’t be able to melt it anymore.
 Drop a few balls into the melted chocolate. I was doing 2-3 at a time. Take a spoon or spatula and gently roll or coat entire nugget. Remove and place on a parchment lined baking sheet.

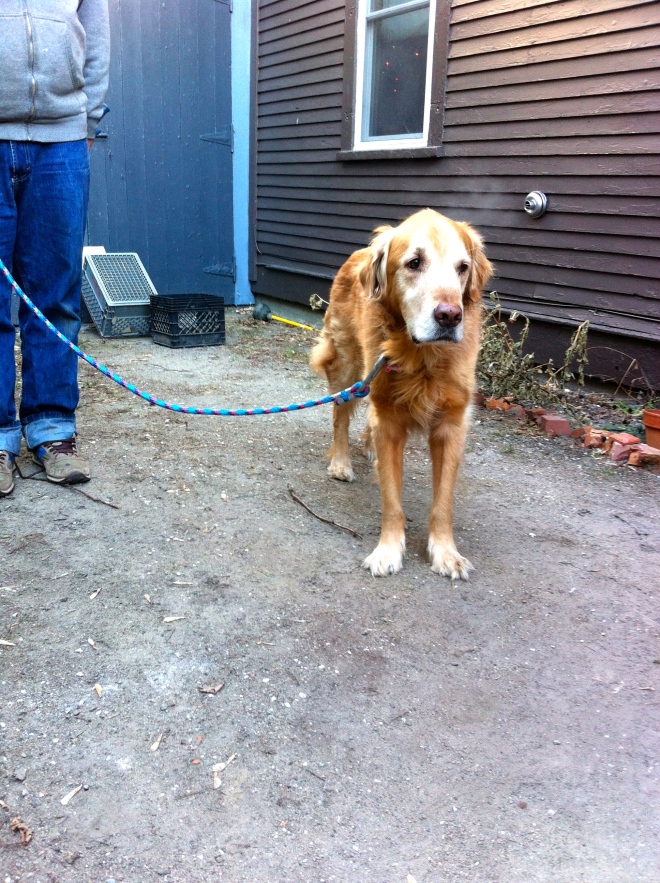 Look at that old man face…. how can anyone stay mad at him? (there was a recent incident involving bananas, you can read about it in the last post.)

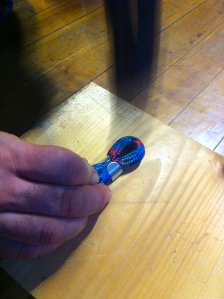

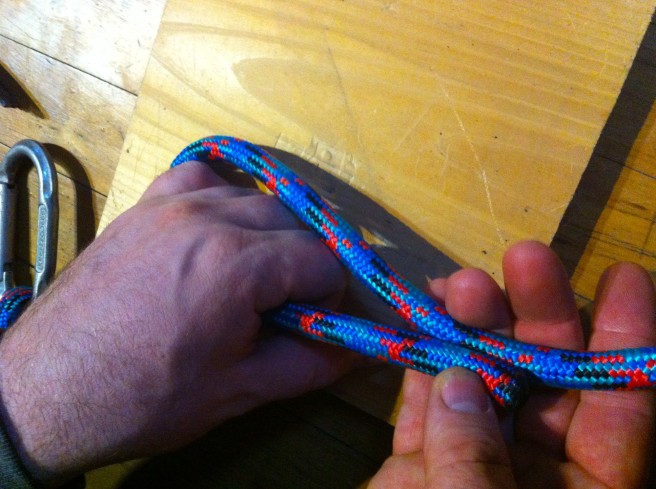 For the handle, make a large loop, whatever size that works for you, and do the same hammer clamp situation on the ends here.
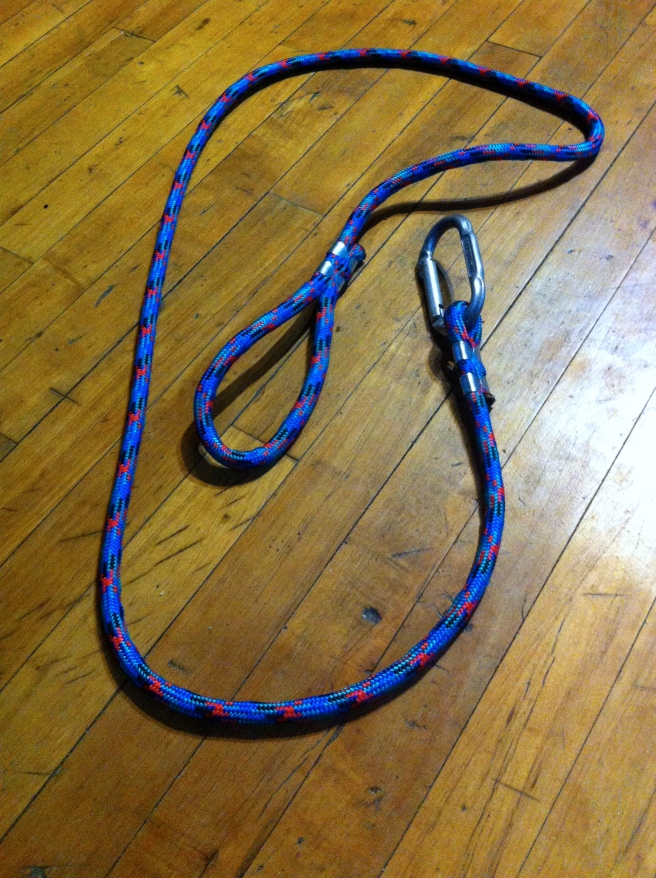
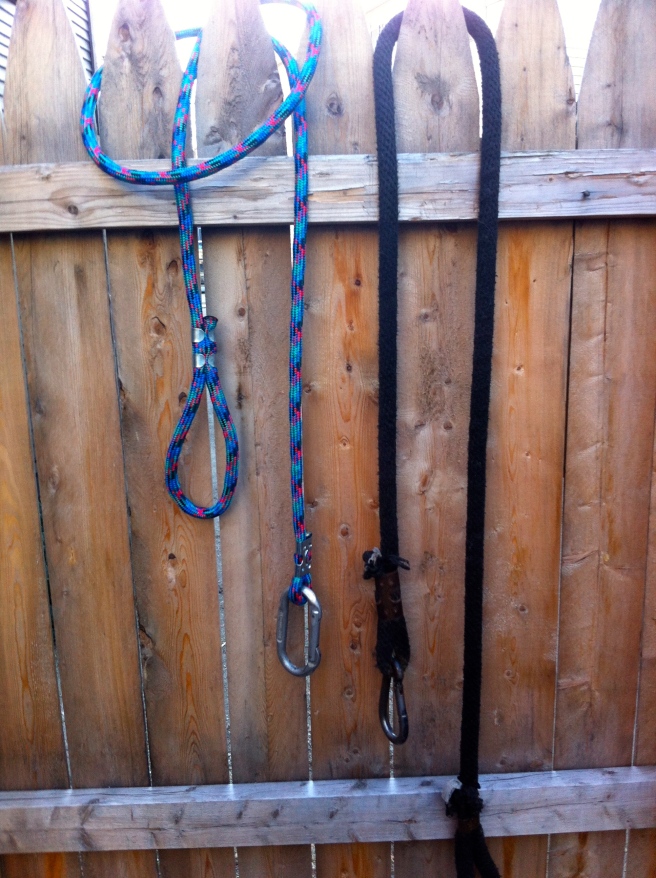 New and old. Hopefully he won’t pee on this one for a while.
 My motive for this drink…get rid of a few candy cane….. And maybe make a little kid happy, but that was just a bonus… I would have made him drink this even if he didn’t like it. (I am awful like that)
 All you need is a cup of milk(cow, soy, rice..whatever) a tablespoon of cocoa powder, a tiny pinch of salt and a candy cane. We don’t need to add any extra sugar because the candy cane is sugar.
 Stick all ingredients into a pot on medium heat and whisk until the candy cane is melted and the milk is as hot as you like it.
 It you want(we did) top with a dollop of whipped cream(or whipped coconut cream) and sprinkle with a little more crushed candy cane…..Best served after a long afternoon of playing in the snow!
 It’s kind of turned into a Nick birthday tradition for us to hike up Mount Philo. We started with a couple inches of snow and a little freezing rain at the bottom of the trail and ended at the summit hiking in a foot of snow. So beautiful.
 Our Christmas tree tradition. Every year after we cut our tree down, we string up the lights, pop a giant bowl of popcorn and string it up for the tree while watching Elf. I look forward to this night for weeks. We started stringing popcorn too many years ago when we were living in our first apartment. We didn’t have any ornaments or money so we just did popcorn. Then we added Elf to the tradition. How can it get better? It’s really the highlight of the season.

 The tree…….minus the ornaments. I am still up in the air about putting anything else on it this year, I love the way it looks now.
 The Chelsea Market in NYC was really fun. Its located in such a sweet building with a bunch of neat little shops. We made our way there for the Etsy craft fair which was really cool. We even made it early enough for the door prizes! And just look at these light! By far the best light display I have seen this year.
 Nick and I always joke about getting a bike with a side car…..I think it was meant to be.
 Waking up earlier then everyone else and hitting the streets. Walking around the lower east side at 6 am on a saturday is really fascinating. The streets were almost complexity empty and there was less of a hurry hurry energy. I got to see the sun coming up.
 A bowl of delicious grapes. Can make anyone happy, right.
 Made from necessity, a seat near the door to sit and remove shoes, store winter stuff and doesn’t look like I threw a bunch of milk crates together..I threw them together and added a nice blanket, I’m classy like that. I do love a good milk crate…there has always been something so satisfying to me about a free plastic receptacle that has a world of uses. These three crates and some scrap wood have changed my entire living situation. The entryway of our 200 sq ft loft is now super functional, looks fantastic, and makes me happy. .All from a the scrape pile.
 It’s not what you think…we have a barn that is pretty much dedicated to scrap wood and some other building material that has come from buildings we have worked on. This picture does not do our scrap wood(and junk) pile any justice. It is pretty crazy, and drives me nuts. I don’t know how many times I have threatened a 30 yard dumpster, but you know what? When Nick or I are in need of some wood, we always find ourselves rummaging through the pile and can almost always find a piece of what we are looking for. The pile somehow always redeems itself, for that reason it still lives on(for now). Being that you as a sane person, you probably don’t have a barn full of scrap wood(and junk), so what you will need for this project is..
 Three milk crates..What I found was that there are some milk crates that are not the same size so make sure that you have three that are the same. These crates are 13x13x11.
 Measure and cut ply wood. The top and a bottom are the same measurements…Here comes some math…. three milk crates that are 13 inches long = 39 inches. One crate deep is 13 inches. . Cut two pieces 39.5 inches by 13 inches. (The extra 1/2 inch is so the crates can move in and out easier)
 Now measure and cut sides. Two pieces at 13×13.The crates are 11 inches high, but you need to add the extra 1.5 inches because of the thickness of the plywood. If your milk crates are a different height, use that measurement plus 1.5 inches.


 I caught that piece of wood he is throwing at me. Ok, not really, but I could have. Here Nick is cutting four 10 inch pieces of 2×4 for the legs. We decided on 10 inch legs because we wanted a bench that was a little taller than the average chair, which is about 18 inches floor to seat. If you wanted to make the legs shorter or taller, by all means, I just wouldn’t go to much taller or you might not be able to sit conformably on it.
 After you have all your legs cut, mark out where you want to place them. We did a one inch recessed from the front and the side…but do whatever looks best to you. Mark where the legs go and place two screws into inch leg, screwing from the inside of the bench.
 And thats it… ..now you have the frame. Take a minute here to admire your handy wood working skills. If you are not into the raw wood look, this would be the time to paint it.
 With the crates inserted…Doesn’t it look magnificent! I choose these 3 crates for the colors and the patterns..I wish I has a grey crate that fit. That would have looked awesome.
 Test one……….the crate slides out perfectly and my mittens fit!!
 Now for the big test……….and it works!! My butt safely seated. My feet touch the ground and I can bend over and tie my shows… can’t get any better…
 But it did. The addition of a folded blanket as a cushion. I was going to make a cushion but found a really pretty blanket at the second-hand store that was perfect. It was 2 bucks and is actually way more practical than a cushion. I can wash this blanket, a hand-made cushion, I probably wouldn’t want to mess with that, plus a piece of foam alone cost like 25 bucks. The blanket was meant to be.
 Wowzers.. What was I thinking! I know, the same thing you are…YES YES YES!!! Gluten free what now.. My lovely sister is on that ban wagon. She has been having”issues” lately(so many, it’s hard to pin point) and says she is feeling better without the gluten. Me being the lovely person that I am want to feed my poor sister, make her happy with food. I HAD to prepare that lady a dinner and it had to be pizza cause I know how much she likes her pizza. So I brain storm. What would be a good gluten-free pizza crust? I could do the obvious and get gluten-free flour, but to be honest, that’s some expensive stuff and I really didn’t feel like going to the store. I wanted to work with what I had in the house….and ah ha, there it is, cornmeal.. With a little bit of water I can turn that into some polenta and a super gluten-free pizza crust.
 There really isn’t a whole lot of ingredients to this pizza… Cornmeal for the polenta. Marinara sauce….I used jarred marinara because it was a little easier and we don’t always need to make things from scratch…Lots of onions(2 finely sliced), handful of sliced mushrooms, thinly sliced squash and parmesan cheese. Most of the prep takes place at the same time, but that’s good, we can multi task, just have everything pre chopped and ready to go. First thing first, start the polenta


 On a well oiled baking sheet or pizza sheet..spread the polenta into the shape of your desire. I went with a somewhat circular shape, but now that I think of it, I wish I had been more creative, like maybe a triangle or even the shape of a bus….Yeah, a bus shaped pizza would have been cool.

 You can do this pre crust or at the same time, but roast your sliced squash. Place single layers squash on an oiled pan, salt and pepper, then into the oven. It should take 10 minutes on each side.


 I Sprinkle a layer of parmesan cheese and pile on those onions and mushrooms,. Sprinkle with a little more cheese. ( use vegan cheese or no cheese if you want it vegan) Back into the oven for another 15 minutes to give everything some time to crisp and melt.
 Remove from oven and appreciate…That is one good looking pizza. I took a long spatial and run under the crust just to make sure if wasn’t stuck. I also found that if you let it cool for a few minutes before serving, the polenta gets a little stiffer and easier to handle, but not necessary.
 Sometimes, no matter whats going on with the week, Monday seems like, well, like a Monday. I drag a little on Mondays. I think it stems from the Monday through Friday school week that was beaten into me for 16 plus years. Hate Mondays, Love Fridays.. Yup, I blame the public educational system(I have to blame someone) I want my day back. I don’t want to feel the drag today. I am going to have a fantastic day. I’m getting excited, pumped up and ready for the week. I am turning my Mondays into fun days. Funday Monday…Yes, yes I did just say that. . See, don’t we all feel better already?
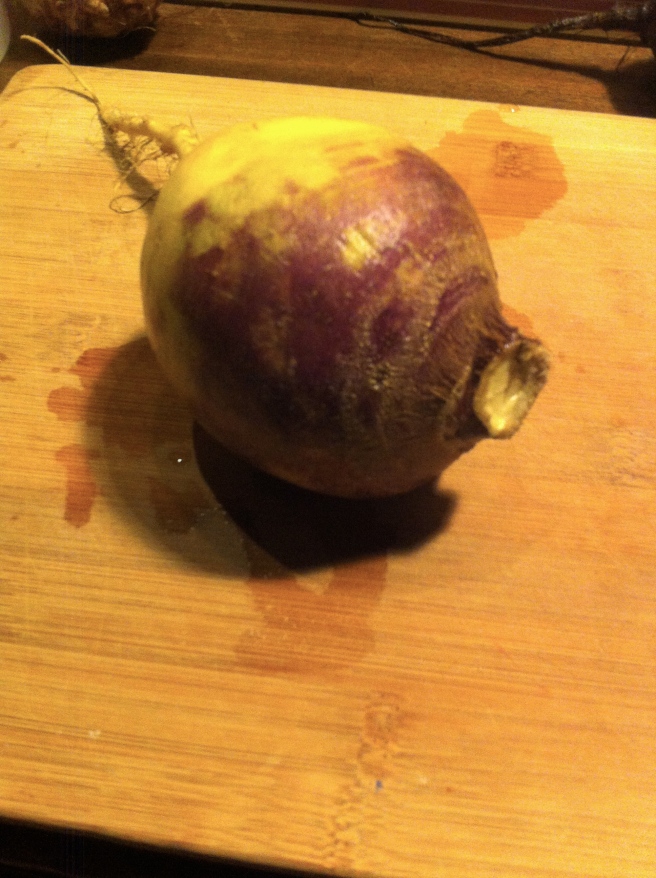 One large rutabaga… This one fed 2 as a side… but if your eating just the fries, eat a whole one to your face. It’s totally cool.
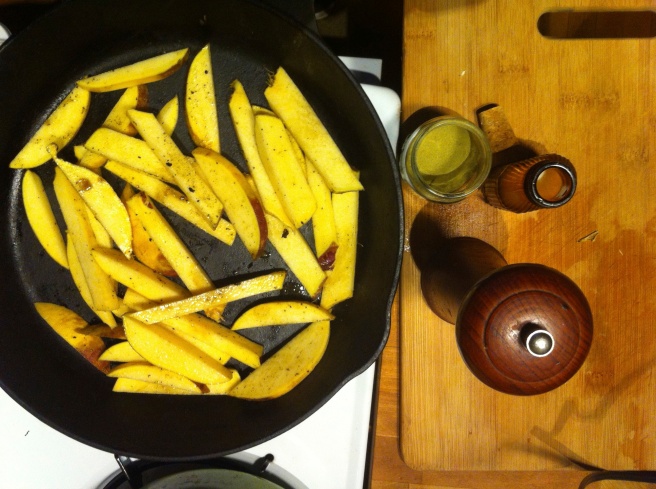 Chop the rutabaga into fries and toss with a smidge of oil, salt, pepper and ground up rosemary. Don’t like the rosemary… don’t use it. Maybe try something else like sage or garlic and onion powder or curry powder. Just use whatever you like. Throw into a 425 degree oven for 20 minutes, give them a flip and back in for another 15, Simple. Easy.

 Persimmons.,,,,,,,,,,,. Do I need to say more?
 This new tea… I wasn’t sure I was going to like it but oh do I. It’s so freaking good, I have been drinking it every day. I must stock up before its gone!
 Look at how happy this guy is. Its hunting season and we forgot his bright colors so we improvised. Yellow trash bag ribbons. His new nickname is now Trash dog. It fits him.
 Watching this little. She is an amazing human being and I love love love her.. I think she might be mine. She really likes soup..
 My elf candle holders I got from CB2. I wanted them so bad for years and finally the last year they sold them I bought myself these guys. I heart them
 Oh you like my new milk crate show bench? Its awesome,, one of the best uses of scrap wood and milk crate that I have ever done(Yes there has been other scape wood milk crate projects) Well you are in luck..I will show you how to made it.. watch for it next week!
 I love old strainers. I kind of have a thing for them. This big guy is now in my collection. Bonus, green AND purple kale….
 Hanging out with my sister. I haven’t seen her for what seems like the past 4 months(she is in nursing school). This was her last day of classes so we cleaned her house, folded laundry while listening to music and I made her dinner.We wrapped up the night by mass texting our other sisters inappropriate pictures of the elf on the shelf. It got pretty crazy. It was such a great night. I love my sisters.
Gingerbread Donuts with Lemon Cream Cheese Glaze — The Lovely Crazy
February 14, 2016 by maximios • Blog
This donut is ideal for Christmas morning(or any other morning)..Warm and sweet, bright and tangy….The perfect balance to make everyone happy! It’s really fast and easy, so you can make a batch while the coffee is brewing, or you can even make them tonight and maybe leave a donut out for santa. Have guests over for the holidays…Dazzle them with a homemade donut. Hanging out at home by yourself…make some donuts…..traveling….well you are kind of screwed at the moment… but think about making donuts when you get where your going.
It all started a few Christmases back when the mister gifted me with a wonderful addition to my kitchen bakeware….a donut pan…. and it was a game changer. If you do not have a donut pan I suggest that you immediately go buy one.. No joke, it’s so worth it. The pan elevates a simple cake recipe to something more… A round of frosted soft cakeness. Circles with holes…..happiness. Hopefully you already have a donut pan, but if not, I trust you will soon.(you can still make this recipe without the pan, just bake it in a 9×9 pan. Yes, it will still taste amazing, but it’s that much better as a donut!)
.What I started with….flour, baking soda, baking powder and salt whisked together. A little bowl of fresh ginger, powdered ginger and cinnamon. Molasses, brown sugar, vanilla, and egg, melted butter and milk. Not a bad line up
A beautiful donut batter….Scoop small spoonfuls of batter into very well greased donut pan …smooth tops with a spoon or spatial….I may have added just a little too much batter the first round, , which is totally cool, it’s just the donuts came our with a bit of a spare tire around the bottom…a little more to eat I say. Out of the oven and turned onto a cooling rack…This beauties smell so very nice.
Flip and let drip……and admire. I had to beat a few hands away while taking these pictures..I am telling you, people will do crazy things for a donut…..CRAZY THINGS… Just look at these. And for real, they really don’t take much time. You could totally whip these up in less than 30 minutes.. just make sure to have someone else do all the dishes!!!
Ingredients……Makes about 8
Lemon Cream Cheese Glaze
Instructions Preheat oven 350
Grease donut pan In a large bowl, whisk together flour, baking powder, baking soda, cinnamon, salt, powdered and fresh ginger. In a small bow mix molasses, vanilla, brown sugar and melted butter. Stir and add milk and egg last.
Mix the wet with dry ingredients and until just combined. Scoop small amounts of batter to each donut mold… fill to about 2/3 full. and level out with a spoon if spatula. Stick in oven and bake for 10 minutes or until edges just start to turn golden brown and a cake test comes out clean.
While donuts are cooling, stir together cream cheese, sugar, lemon juice and zest. Add small splashes of milk until you reach the desired consistency(not to runny, think dish soap) Dip baked side of donuts into glaze, flip and return to wire rack.
And then you open your mouth…..EAT DONUT……..EAT!!!