Guess what guys ….I got myself a sick vintage waffle/ griddle iron. I couldn’t be more thrilled!!! I found this thing at the local recycled goods store the other day, along with a very beautiful old white pyrex mixing bowl. It was one of my best thrift store scores! (Checking out the inventory and the condition of all the old things that day, I would say an old lady had just died and all her perfectly keep, mint condition kitchen stuff had just been donated. But it’s cool, cause I get the feeling that she was at least 90, with a big loving family, and was happy until the day she died. And I am sure she would be pleased that I have taken over the waffle maker. Thanks old lady!)
And now I am pretty sure that everything I make for the next week will be cooked on said waffle/griddle. I am serious, I already have a list of things to try and cook on it; cookies, biscuits, granola bars, potatoes, fruit, some type of pasta situations…. the list of possibilities is endless and I bet that at least 1/2 of these things will be totally awesome and amazing.
But first thing first. I need to make dinner.
So waffles for dinner!!
Note. These waffles are completely 100% fantastic for any meal you want to make them for. They consist of nothing more then beans, a shit ton of veggies, and just a bit of cornmeal. But don’t let that fool you because they are super packed full of so much flavor, have a really soft tender inside, with a nice crispy outside and are so super pretty. They are wonderful! The stuff. First, we got a big old pile of shredded up veggies which include; carrot, beet, sweet potato, onion, parsnip, celeriac, and a little bit of kale. A we got a bowl of rinsed and strained white beans, a little bit of cornmeal and salt, pepper, and garlic powder.
The makings of something amazing!Before you do anything. get your waffle iron out and preheat it.
While thats going on, take you beans, add 3/4 cup water and puree until smooth with whatever blending device want to like to use. (I used my hand blender…less to clean)Now collect all the shredded veggies and dump into a big bowl with the bean puree, the spices and the cornmeal. Mix until combined. The batter should be thick, but not dry. If its seems to wet, add more corn meal, or too dry, add a little more water.
Note how my batter turned a magical pink… I love beets, they make everything pretty! And check out that bowl!When your waffle iron is preheated, oil it if needed (if your not sure, add a little oil just to really make sure your waffles don’t stick) and take appropriate size spoonfuls of the batter and stick on iron. Close it and wait…..My iron has a little light that turns on when the waffles are done cooking, so I waited patiently (ok iI did open it a few time) until light tuned on and removed the perfectly cooked waffles.
Did I mention how awesome my new/old vintage iron is?
SO AWESOME!!
I made a little gaucamole and gave the mister and little bowl of plain Greek yogurt with lemon juice, but feel free to top, drizzle, or dump whatever you want onto these beauties…
Happy waffle Wednesday!!!
-C
Veggie Bean Wonder Waffles
Makes 8-10 waffles (in my iron) feeds 2-3 peeps
1 small carrot shredded
1 small parsnip shredded
1/2 a small celeriac root
1 small beet shredded
2 kale leaves chopped into tiny bits
1/2 an onion, shredded
1/2 a small sweet potato shredded
1/2 cup cornmeal
2 cups(or 1 can) cooked, rinsed and strained white beans
2 teaspoons garlic powder
teaspoon each salt and pepper
oil for iron(if needed)
Note on veggies… I used what I had in the fridge and shredded, it came to about 3 cups. If you don’t have these specific veggies or only want to use a few.. go for it. Just make sure to have 3 cups of whatever veggies you use.
Take you beans and blend them up with whatever device you would like to use. Once creamy, add to a bowl with the rest of the ingredients. Stir until combined.
Once the waffle iron is preheated, oil it( if needed) and place the recommended amount of batter right on it there. Close and cook until golden brown and waffly.
Serve on a plate with topping of your choice, A few suggestions.. Guacamole, salsa, hummus, mustard, greek yogurt… anything that tastes good to you.
Eat as breakfast, lunch or dinner…
Fork into face
Happy Cinco de Mayo! And what better day to share my version of my oh so fantastic pico de gallo, or as I call it, super freshy salsa.
I love me some freshy salsa, It makes me oh so happy.
I make this stuff all the time, especially during the warmer months and tomato season. I usually make a batch right before a meal, just enough to eat right away, but sometimes I ‘ll make a big batched of it, thinking I’ll save some for the next day. It never makes it past the second day in the fridge because it’s just one of those things that when you see it, you want to eat it. Weird but true. And it’s totally ok to do so cause it’s basically eating a big bowl of healthy goodness, so eat on!
It takes no time to prepare, tastes super refreshing, goes on everything, and it’s just so freaking tasty. You can eat it with tacos and chips (the mister) or like me, I like to add it to everything; salads, popcorn, or directly in my mouth.
Make one batch, make 4, it doesn’t matter cause you will eat it all, and need to make more.
The stuff. Chopped Roma tomatoes, chopped red onion, a diced jalapeño, lemon, a bunch of cilantro, and salt.
Stick all the chopped stuff into a jar and add in the juice of the lemon. Roughly chop the cilantro and add that on in with a sprinkle of salt.
Mix it up….And thats it. Now eat… with something or without.
A spoon out of the jar is one of my favorite ways to go at it.
Happy Cinco de Mayo, Happy Tuesday!
-C
Pico de Gallo… Freshy Salsa
4-5 Roma Tomatoes
1 small red onion
1-2 jalapeños (Depending on heat preference)
1 lemon or lime
salt
1 bunch of cilantro (don’t use it if you don’t like it)
Chop tomatoes and onion and toss into a bowl or jar. Cut seeds from jalapeño(s) and dice up into little bitty pieces and add that to the tomato and onion. Roughly chop the cilantro and toss that in as well with the juice of the lemon or lime. Sprinkle with salt. Stir, let sit for a minutes, taste and then add more salt if needed.
Eat right away or make ahead and store in the fridge until ready to use.
Goes great with corn chips, tacos, toss onto salads or eat as is standing in front of the fridge. If someone is judging you, they are stupid.
I have never in my life seen, let alone received, a kohlrabi as big as the one I picked up from my farm share last week. It was, no joke, bigger then my head. (completely nuts) If I didn’t know the farm and the farmers of my CSA, I would have to question whether or not it was grown in radioactive sludge…(kind of like the dandelions in the Teenage Mutant Ninja Turtle movie from the 90’s)
What is a kohlrabi you ask? It’s kind of a cross between a turnip and a cabbage that is usually the size of a baseball. It can be eaten raw (I like chunks dipped in mustard) or cooked. (roasted chunks dipped in mustard) It pairs well with sweet stuff like apples and honey, or in any savory stuff. Its one of my favorite vegetables (I say that about them all!)
So now that you know about kohlrabi (if you didn’t already) its time to get yourself some and make this soup. Because for real, I am not kidding when I say that this is one of the best soups that I have ever made. You really must try it. And do it soon because hopefully in the next few weeks the soup weather will turn into fresh pea weather and we might not want soup as much (I eat soup all year long)
A gigantic kohlrabi cut in half ( I only used one of the halts) A whole yellow onion and 2 large carrots. I also added in 4 cloves or garlic
Peel the kohlrabis tough skin off and chop up into chunks. Chop the carrot, garlic and onion as well .
All of those chopped veggies get thrown into a pot with two cups of water and a good sprinkle of salt and pepper. Cover and place on medium heat for about 20-25 minutes. (give a stir ever now and then) Keep cooking until the veggies are fork tender.
Once the chunks are all cooked up, its time for the immersion blender. (or into a regular blender) Add in at least 3 cups of water, but more to thin out to your desired consistency and let it rip. Stop blending once the soup is nice and creamy. Taste and season with salt and pepper to taste. Leave on low heat to bring back to a good soup eating temperature.
Now the soup is done.. and you can eat it just as it is, but you should really add in the asparagus. It is just so f*ing good. Just grab a few spears, dice them nice and small, and throw into the soup pot. Let it cook for another 5 minutes and wa la.. Soup is done. Ladle into bowls and if you want a little fancy presentation, add a swirl of mustard (it’s so good) and a whole cooked asparagus spear.
And eat one of the greatest soups ever!
Happy Day Wednesday!
-C
Creamy Kohlrabi Soup with Asparagus
3-4 kohlrabi (or 4 cups chopped Kohlrabi)
2 large carrots
1 large onion
4 or more cloves of garlic
Salt and Pepper
4-6 spears of Asparagus (extra if you want to garnish)
Yellow Mustard (optional)
Peel outer layer of kohlrabis. Roughly chop the onion, carrot, kohlrabi and garlic and stick it all into large dutch oven or stock pot. Add water until veggies are half submerged . Add a good sprinkle of salt and pepper and place on burner on medium heat and cover. Check ever 5 or so minutes and give the pot a good stir. After about 25 minutes, all the veggies should be very tender and almost fall apart when stuck with a fork. With an immersion blender or regular blender, blend till smooth, adding water until soup is at your desired constancy. Return soup to medium heat. Small dice asparagus and add to pot. (I added 2 extra whole pieces and fished them put once cooked for garnish.) Keep on heat for another 5-10 minutes until asparagus is cooked.
Scoop into bowl and squirt top with yellow mustard and top with a spear of cooked asparagus.
Eat with a spoon and lick bowl clean.
I was informed yesterday that if I was going to make tortilla chips, that I better make some sweet ass dips to go with them. I kind of agree… tortilla chips need dip… or better yet, two dips. Queso and guacamole. It’s what needed to be done, and so I did it.
Guacamole is amazing… anything avocado is amazing…this guacamole is amazing. White bean guacamole is amazing. And not that we really care, but this guac is half the fat then straight up guacamole. Plus it’s packed full of protein making it a kind of super duper, must eat all of it, kind of dip. And sweet potato anything will make me happy. Making queso dip with sweet potato and cauliflower is probably one of my best food combos so far. (after eating a butt load, I felt like I was a genius and made an amazing discovery) Again, not that we need it to be, but this is also a fat-free, vegan, gluten-free, super healthy, packed full of B12, fiber and nutrients, dip for all kind of dip.…. just another reason why you cannot feel bad when you finish off half a batch before you get a chance to stick it in a serving bowl. (I might have done that)
Here is what you need for a good time:
−These tortilla chips ….Check.
−Some Chopped Veggies (I want the veggies)…..Check
−Cauliflower Sweet Potato Queso.…Check.
−White Bean Guacamole…Check.
You are now ready for it. It being this party, that party, the Super Bowl, or a Wednesday afternoon.
To the left we have the makings for the cauliflower sweet potato queso.. Steamed cauliflower, a baked sweet potato, nutritional yeast, garlic, and chopped up red onion, red bell pepper and jalapeño. To make all you need to do it take the chopped peppers, onion, and garlic and sauté for a few minutes just to slightly soften and bring out flavors. While that’s going on, take the steamed cauliflower and sweet potato(skin off..but eat it, or save it for soup or feed it to the dog) and puree together with a blender or food processor. Add in nutritional yeast, about a tablespoon or two of hot water and, salt and pepper to taste. Blend for about 5 minutes until super creamy smooth. Add in sautéed stuff and pulse just enough to incorporated the veggies but not complete blend in. Stick in a bowl.
To the right we have white bean guacamole stuff. Two cups (or one can) rinsed white beans, one ripe avocado, a lime, a few cloves of garlic,(I also added a bit of garlic powered…I like my garlic) and some chopped up red onion and tomato. Place beans, garlic, avocado and lime juice in a blender or food processor and blend until smooth. Add salt to taste and toss in the chopped tomato and onion. Blend for sec to mix that in…Stick in a bowl
Perfect…
To think that both of these dips took about 10 minutes total to make. (I had pre baked the cauliflower and sweet potato) And for real, I would spend much more time if I had too because both of these dips are so freaking good, I definitely will be making these on the regular.
So there , dips for those sweet ass chips or whatever you want to dip or them spread them on.
And he guys…It’s FRIDAY! Have a fantastic day!
-C
White Bean Guacamole
2 cups white beans (or 1 can) rinsed and drained
1 ripe avocado
3 cloves garlic
1 lime
1/4 small red onion
1 small tomato
1-2 teaspoons salt
Finley chop onion and tomato. Set aside. Place the beans, avocado, garlic, garlic powder, 1 teaspoon salt and the juice from one lime into a blender or food processor and blend until smooth. Add a splash of water if needed to help keep things moving. Taste and add more salt if needed. When smooth, add the onion and tomato and pulse a few times to mix in. Scoop into a serving dish and finish with a squeeze of lime and a bit of chopped onion and tomato.
Cauliflower Sweet Potato Queso
1 1/2 cups pre cooked steamed or roasted cauliflower
1 medium pre baked sweet potato
1/2 cup nutritional yeast
1-2 tablespoons hot water
1/2 a small red pepper
1/4 small red onion
1 jalapeño
3 cloves garlic
salt and pepper
Finely dice the red pepper, jalapeño, onion and garlic and sauté in a skillet for a few minutes until slightly soften and fragrant. Take the pre-cooked cauliflower, sweet potato (skin removed), and nutritional yeast and place in a blender or food processor. Blend for about 5 minutes until creamy and smooth. Add in a tablespoon of water to keep things moving. When completely smooth, add in sautéed veggies and pulse a few times to combine. Scoop into a serving dish. If your feeling it, top with scallions and cracked pepper.
Serve dips with chips, veggies or anything you want. Also make great spreads for sandwiches and crackers too!
CHILI MONDAY!Well it is, but I am talking about making some super duper, yes I’ll have seconds, tummy filling, bone warming, pumpkin chili.. And heathy oh so healthy to boot. Reals, it’s the best.
This pumpkin chili recipe had evolved over the years. The first time I made pumpkin chili was for my very first dinner party that I threw back in college. Instead of cutting the pumpkin and adding it into the chili, I chopped the little pumpkins in half, roasted them, and used the halves as bowls..A good idea except no one at the pumpkin and I was left with a bunch of slobbered on roasted pumpkin halves. ( I probably should have said something, but being a few drinks in, I didn’t think to say anything about the edible bowls and I don’t think I noticed the abandoned pumpkins until the next morning). After that somewhat failed attempt, I started adding the pumpkin to the chili and left the drinking tip after the food is served. ( I learned so much in college)
But yeah, this recipe has traveled a few years with me and every time I make it, I always think, jeez, why don’t I make this every weekend. Well maybe now I will.
Don’t let this spread scare you.. it’s just veggies from the fridge, a chopped up pie pumpkin and pre soaked beans. Oh and some canned tomato and spices. It took about 10 minutes of hands on time and one big pot. No big mess to clean up and you can get rid of those veggies in the fridge that are on the way out. WIN WIN WIN!
All the chopped veggies, the chopped pumpkin go into the pot with salt. pepper , and spices.( I added a fresh jalapeno and about 5 cloves of garlic to this mixture) Let the mixture sweat for about 5 minutes, giving it a quick stir or two.
Now toss in the beans and the tomatoes… Add a cans worth of water as well. Bring to a boil, then turn to low heat and cover.
A last minute addition.. I added a few chopped up kale leaves. I wanted a little more bright color and adding kale to anything is a good idea.
I added a little sliced avocado to one of the bowls (I only had enough for one) and cut up some lime wedges to squeeze on top. (I did, Nick didn’t)
Best chili I have made in a long time…and yes, there is a bunch of left over which is fantastic because now I have lunch for the next couple days…
HOORAY FOR FOOD!!!
Have a good Monday!
-C
small sugar pie pumpkin
2 cups dried beans..I used a 1 1/2 cups black and 1/2 cup kidney or 2 cans of beans
28 oz can of crushed or diced tomatoes
1 small onion
1 small
1 carrot
1 /4 head of cabbage
a small broccoli crown
1/4 head of cauliflower
a few kale leaves
1 jalapeño
5 cloves garlic
2 tablespoons chili powder
2 tablespoons cumin
1 tablespoon coriander
salt and pepper
Either the night before or morning of, presoak dried beans..(beans in pot with about 4 cups water and a sprinkle of salt)
Take pumpkin and slice in half, de-seed and chop flesh into little chunks. (You can peel it if you want, but really, there is no reason to) Rough chop all the veggies (minus the kale) and stick into a large pot with the pumpkin. Pot on medium heat.. let the veggies sweat for about five minutes. Now add the garlic and the spices and let cook for a few more minutes.
When the mixture starts to become fragrant… drain, rinse and add presoaked (or canned) beans. Then the tomatoes, and 1 1/2 cans worth of water.
Bring chili to a boil then cover and reduce heat to low. Let cook for about an hour, giving it a stir every now and then………
Add in chopped kale a few minutes before serving
Serve in a bowl and top with sliced lime, avocado, a sprinkle of cheese….Whatever you want.
It’s Mother’s Day weekend which means that you and I and everyone out there should feel the slightest bit obligated to at least do a little something nice for your mom for the mere fact that you were borned. And really what better way to celebrate mom than with food… It really is the least that you can do. (I think mom’s also like flowers and cards and handmade pasta necklaces) My mom is defiantly about the food. (she has had her fair share or pasta necklaces) A many years back on Mother’s day, this sweet little girl (me) made her mother a special breakfast treat…blueberry scones. And ever since that day, for every freaking holiday, birthday, whatever day, my mother requests (demands) a batch of those scones. She is always saying that these are her favorite treat and that no one has ever made them as good as I do. (I guess that just reiterates that I am her number 1 child)
And for the last few months my mom has been up my butt, trying to get me to make her some. Not going to lie, I have been saying I’ll get her a batch, but for some reason, I haven’t gotten around to making them. So two birds here.. Make the scones and she gets off my back for a least a little while (a month.. maybe 2) and I give her a fantastic Mothers day gift that I know she will love.
So here they are , oh mother of mine. Blueberry scones!
The stuff. Flour, baking soda, baking powder and salt. A bit of sugar, vanilla, buttermilk, and butter (use vegan butter and nut milk if you want to make them vegan) And of course we need the blueberries which can be fresh or frozen. I usually use fresh, but the store I stopped at only had really big containers of fresh that were like $1000 dollars a piece and the organic frozen happen to be on super sale. So you know, the cheap in me won that battle. So into the bowl goes all the dry stuff; flour, baking powder and soda, salt, and the sugar. Give it a good whisk.
Now for my special trick for a perfectly distributed cold butter in a pastry. Freeze your butter and grate it!
With a large wholed grater, grate the frozen butter directly into the bowl with the dry, stoping a few times to toss the butter chunks around so you don’t end up with a huge pile of grated butter. When it’s all grated, gently toss around so the butter is evenly distributed. Now dump the blueberries into the flour mixture. Toss them around to give them a coat of flour. Add in the buttermilk and vanilla and give a little mix until liquid is absorbed. We are trying to handle the dough as little as possible.Turn mixture onto counter. It’s very loose, but thats what it should look like. Very gently and with as little handling as possible, gather dough up, knead a few times till everything just comes together. Press dough into a disk that is roughly an inch thick…. and it doesn’t need to be perfect. Cut the disk into even sized pieces. Do 6 big, 8 normal, maybe even 10 smaller. Whatever size you like. (I did 8) Place the scones onto a baking sheet, using a spatula to transfer, and sprinkle the tops with a little bit of sugar. Into a preheated oven for about 20 minutes.And when the scones look all nice and browned and a tester comes out clean. remove and either serve right away warm, preferably with huge cup of coffee or tea, or stick on a rack to cool before storing in air tight container.
Perfect to serve as a breakfast pastry, at brunch, or even as a dessert. A nice little treat for a special lady. (dudes can eat them too)
Happy Mothers Day Mom! Thanks for having me!
And Happy Weekend!!!
-C
Blueberry Scones
2 cups all purpose flour
1/3 cup sugar plus 2 tablespoons to sprinkle on top
1 teaspoon baking powder
1 teaspoon baking soda
1/2 teaspoon salt
1/2 cup (1 stick) unsalted butter frozen or really cold (use non dairy butter like Earth Balance for vegan)
1 cup blueberries (fresh or frozen)
1 teaspoon vanilla
3/4 cup buttermilk (use non dairy milk for vegan)
Preheat oven t0 400 degrees
In a large bowl, whisk together flour, baking soda, baking powder, sugar, and salt. Take the frozen butter and grate directly into flour mixture, tossing around to evenly disrupted. Add in blueberries and toss around till coated with flour, then lastly, add vanilla to buttermilk and mix into mixture until just barely coming together. Turn mixture out onto counter and with your hands, knead mixture a few times until it forms a solid dough. Shape into a disk and smoosh down until about an inch thick. Cut into 6-10 triangles and place on a non greases baking sheet and sprinkle tops with remaining sugar. Stick into oven and bake for 20 minutes or until tops start turning a golden brown and a tester in the middle of a scone comes out clean.
Remove from baking sheet and serve warm or let cool on a rack.
Mom gets first dibs, and if she is willing to share, eat one yourself with your face.
The Mr. and I went and took ourselves on a rainy day nature adventure. He did some fly fishing (worst day ever for fishing) and I did some wondering. It was fantastic. And the Mr, only lost one fly and I managed only about a dozen mosquito bites! Nature days are the best!
And then as we were leaving, the clouds broke and the sun came out. It was kind of perfect.
Are you sizzling? Is that pool of water next to you , in fact, your own sweat?
Yeah, I feel you…..stupid heat wave.
During these long extended periods of heat and humidity, my body starts to revolt. I get bitchy, by skin get itchy, my head goes foggy, my stomach starts to refuse food. and I generally just feel like crap. I love the summer, but I am not, by any means, a hot, high humidity person.
So during this nasty bout of heat, I do what I can to find comfort. And one of my comforts is watermelon. I am pretty sure that watermelon is a magical fruit. A giant green oblong ball that when cracked open is the brightest, sweetest bright pink fruit.. I mean, thats pretty f ing magical. It can make anything better, and is one of the few things that I want to eat when its a million degrees outside without barfing.
Watermelon is my official heatwave food. Watermelon all day long (Is it bad that I could literally eat an entire watermelon all to my face, in one sitting? ) And because I am me, I like to spice it up a bit and slather a big glob of basil pesto to the melon…. and that makes me happy. Plus it makes the fact that I am eating nothing but melon seem a little more substantial.
Do you have a heatwave food? If not, try this….It will be your food.
The stuff. A big hunk of watermelon, basil, a lemon, olive oil and salt.
Stick the basil, the juice of the lemon, and a pinch of salt into a blender. Turn on and blend, adding just a tad bit of olive oil until a nice green pesto is made.
Prepare your melon. Remove rinds if you want and save for later.. (seriously, we can make gazpacho with it) and cut into inch thick chunks.
And now if your feeling it, stick a skillet on the stove and preheat on medium high. Once heated, place watermelon chunks on hot skillet and sear each side for about 3-5 minutes per side.
If you want to go fresh, just skip searing it. Me, I do a bowl of both.
And now slather the melon with the pesto
And go to town
Stay cool my friends!
-C
Watermelon
a bunch of basil
a lemon
salt
olive oil
Place basil, a pinch of salt and the juice of the lemon into a blender. Turn on and blend, adding in a drizzle of olive oil until pesto forms.
Preheat a lightly oiled skillet (or a grill) on medium high heat. Take your watermelon and remove rinds (save for later) and cut into inch chunks.* When heated, add the watermelon. LEt each side sear for 3-5 minutes, or until caramelized. Tarnsfrer to a bowl.
*Note. The seared melon is fantastic cooked then cooled. Also, I know some people blot out the juice before grilling, but I think that is a waste and I find unnecessary, but if you don’t want a juicy piece of cooke melon, by all means, blot out the juice..
When something goes on sale at the grocery store, I tend to buy it. Being that it is Valentines Day this week, all the stores are having specials on all sorts of sexy things… and strawberries are one of them. Now I am not a huge fan of buying produce that is terribly out of season, but I can’t help myself…a good deal is a good deal and the strawberries were a super good deal. I was just going to make some sweet ass strawberry jam or maybe a lovely strawberry cake with them (and I probably still will), but these strawberries are actually super juicy and full of flavor, and it’s always nice to eat some full flavor freshy strawberries… especially soaked in balsamic vinegar. And yeah, I think that this salad is pretty sexy, so it makes for a perfect Valentines day dish.
A handful of ingredients and 5 minutes will get you to a fantastic salad experience.
A bowl of baby spinach, a few chopped up strawberries*, half a sliced avocado and a small handful of toasted almonds.. Oh, and don’t forget the balsamic vinegar….
*Note.. Strawberries are kind of heart shaped already so if you want, reserve a few slices to fancy up you salad presentation, but chop up the rest into smaller pieces.
Pour the vinegar on the strawberries and let sit for at least 5 minutes. (the longer the strawberries can sit with the vinegar, the better)
Pile it on.. thinly slice avocado.. rough chopped toasted almonds… It’s pretty much as easy as it can get.And last but not least, toss on the balsamic soaked strawberries and drizzle the remaining vinegar. (if you made hearts, place on top to make pretty) Sprinkle with a pitch of salt and pepper and pow! Fancy, sexy, delicious salad.
Not to shabby for 5 minutes and a handful of ingredients. Anyone (don’t feed to a person with nut allergies) would be so syked to be fed a salad like this… You yourself should be pretty excited to eat a salad like this. Heck, I am excited to eat a salad like this!
A love salad for everyone and everyday!
YAY for Thursday and Happy meal planning!!!!
-C
♥ Balsamic Strawberries on Spinach Almond Avocado Salad ♥
Ingredients for 1 large or 2 small salads
3-4 ripe strawberries
handful of roasted almonds (slivers or whole)
1/2 avocado
2 tablespoons Balsamic Vinegar
3 cups baby spinach
Pinch of salt and pepper
Dice strawberries into small pieces (reserve a few whole slices for heart shapes if you want) and toss in a small bowl with the balsamic vinegar. Let sit for at least 5 minutes. Rinse and dry spinach. Place in a bowl(s) and top with thinly sliced avocado, chopped almonds and balsamic soaked strawberries. Drizzle the residual vinegar on top and sprinkle with a pinch of salt and pepper.
Eat with a fork
I am such a sucker for the reduced price produce at the grocery store. I save at least half of the original price for stuff that might look a little weird or have a brown spot or something. Sometimes I can’t believe what ends up on in the bin, stuff that I wouldn’t consider reduced bin material, but hey, if they want to stick it in there, then I will be more than happy to buy it. A couple days ago I found some good looking roma tomatoes in that said reduced produce bin..the skins the tiniest bit wrinkled (like I could care less), least hen 50 cents a pound. Um, yea, I bought those and put them to good use.
Tomatoes roasted until they fell apart with a few other chunks of stuff, then piled onto a base of spinach and couscous. This meal cost me pennies and was stupid easy and fast to make. And pretty to boot. Perfect for a quick healthy meal on a busy day or maybe for those people looking for a tasty, not too completed dinner to make for a special someone for Valentines day? Or make just for yourself…its pretty much the perfectly dish. Anyone can get into it. And if you don’t happen to have a grocery store with a reduced produce bin full of tomatoes…it’s cool, you’ll just have to pay full price for the perfect ones.
So simple. A little olive oil in pan. Chunk the tomatoes and throw in pan with the chopped onion, carrot, cauliflower, garlic and chick peas. Drizzle a bit more oil and top with salt and pepper. Give it all a toss and stick into oven. That’s that. Just leave it in there until everything is so nice and soft and falling apart.
One of the best things about couscous is that you don’t even need to dirty a pot or a bowl to make it, just add dried couscous to the bowl you are going to eat out of with a cup of boiling water and a pinch of salt. (I added the spinach with the water too) After about 8 minutes, the couscous absorbs all the water and you just fluff it up with a fork. Easy, freaking Peasy!!! Out of the oven and piled on…..
I mean, if this isn’t one classy looking meal, then I don’t know what is.
Sprinkle with a little parmesan or nutritional yeast if you want and step back and admire. And now eat it to you face.
And barely any dishes to wash. No big mess to clean up. I could get used to that.
-C
Chunky Tomato and Stuff Couscous
Ingredients
Serves 2
3/4 cup Couscous
1 cup boiling water
Handful of chopped spinach
4-5 roma tomatoes chopped
1 medium carrot diced
Half of an onion diced
Cup or so of cauliflower (fresh or frozen)
Cup of prepared chick peas
4 or 5 cloves garlic minced
Olive oil to drizzle
Salt and pepper
Preheat oven to 400
Place onion, carrot, cauliflower,tomatoes, chick peas and garlic into a large skillet. Drizzle with olive oil, sprinkle with salt and pepper, and give everything a light toss. Stick into oven for 35-40 minutes until tomatoes are falling apart and everything is nice and roasted.
In a medium bowl, (or serving bowl) add cup of boiling water to dry couscous and spinach. Sprinkle with salt and cover. Let sit for at about 8 minutes, or until the couscous had fully absorbed all the water. Fluff with a fork and top with roasted tomato stuff.
Top with parmesan or nutritional yeast if you are into it.
Enjoy!
Because I love beets, I love celeriac and I love to pickle things…. And I love hearts. And Valentines Day is just around the corner so I though it appropriate to share these little darlings with you because even if you are not a fan of pickled beets or celeriac, you have to admit that these are just the cutest pickles you have ever seen. I have made a batch, sitting in the fridge, awaiting some sweet little dinner date that me and the mister will have come Valentines day. Or not, we might just eat them all before hand… because everyday is like Valentines day for us! (blah, barf, but awe, we are so cute!)
This is my basic pickling recipe….I figured you will want to pickle everything and anything once you realize (if you haven’t already) how amazing pickled everything is! And how easy it is to do it yourself.
My Pickling method……
Choose the jar that the pickles will live in
Prepare and pack the stuff that is going to be pickled into the jar… leave about and inch of head space
Fill the jar to the top with a half water and half vinegar solution (I usually use apple cider vinegar because I think it adds a bit of sweetness.. I don’t like to pickle with sugar)
If going for a crispy pickle (like green beans or crunchy carrots)…. strain liquid into a pot with a teaspoon of salt per cup of liquid and any spices* that you want to use and bring to a boil Add back to jar
If going for a more tender pickle (like beets or celeriac), dump the liquid and the veggies into a pot with a teaspoon of salt per cup of liquid and any spices* you want to use. Bring to a boil for a few minutes, then remove and replace back into jar.
Place lid and stick in fridge for at least a day….(I alway cheat and end up taking a bite within the first few hours) The flavor only gets better after being in the fridge for a couple of days.
*You can spice your pickles anyway you see fit…. I like to use peppercorns, garlic, mustard seeds, celery seeds red pepper flakes. Or for a little sweeter and more fragrant pickle, cinnamon stick, cardamom pods or star anise…the possibilities are endless.
Pickles are usually good for about a month, but I have never been able to keep them that long!
A little about these specific pickles……
I used one medium celeriac root, and 2 small beets. Sliced about a 1/4 inch thick and then used a cookie cutter to make the hearts. The chosen vinegar was apple cider, and yeah ,you must pickle both the inner and outer hearts….don’t waste the outer heart! And the spices I used were black mustard seed and peppercorns.
And they be amazing!!!!
Have a Fantastic Weekend!! Hopefully full of warm weather, fluffy clouds, and lots of pickles!
-C
Whenever me and the mister get invited / show up for dinner at someone’s house, I like to bring at least one thing to contribute to the meal. First, because I am nice like that. Secondly, because I get to make food for other people besides Nick and get new feedback on recipes. (Sometimes I think he tells me things taste amazing when they might not) And thirdly, its nice to mess up someone else’s kitchen besides my own. So last night we went to my sisters and I made a salad. A very easy and virtually mess free salad…….I still made a mess (I cleaned it up myself!)
The salad I made was a light, crisp, and citrusy thing of beauty. Not exactly what one would think to eat on a freezing my face off cold day, but hey, you can’t help what the body craves. Plus, if you make it for. lets say, a sister that is making french fries and hamburgers for dinner..then a light and citusy salad is just what you need. Feedback from the mouths that ate it….Fanstastic combo! Best Salad ever! Never going to eat anything else! Ok, not so dramatic, but this was a winner. And for real, this salad takes about five seconds to compile and all the ingredients are really accessible right now so really, why not?
Nice crisp kale. Thinly slices red onion for a nice bite. Orange for that sweet citrusy and juicy smack and avocado to add a perfect creamy finish. Lime to make it perfect. Start with the base layer of kale… then first goes the sliced onion. (Make sure it’s thinly sliced or else it will be to overpowering) Add thinly sliced oranges…oh boy, your half way there!!!
Top with thinly sliced avocado, a sprinkle of salt and drizzle with lime juice. I also served with an extra wedge of lime, there is never too much lime.
Now you can stand back, take a picture, send to all your friends and make them jealous of you fantastically pretty and oh so delicious salad. They will ask, “What is that amazing looking dish you are eating?” Your response will be..”Check out the blog..the lovely crazy…and make it yourself! ” (yes, I am shamelessly plugging myself here)
Anyway, enjoy the day and try to keep warm!
-C
Citrus Avocado Salad (Makes 2)
Ingredients
A few good handfuls of kale leaves
1 orange
1 avocado
1 lime
1/2 a red onion
Remove tough stems from kale and chop leaves into small month sized pieces. Thinly slice onion, peel and thinly slice orange and cut avocado into…yup you got it, thin slices.
Kale into bowls, top with onion, orange and avocado. Top with the juice of half a lime…Add a sprinkle of salt.
The past week was freaking gross hot, like sweaty, smelly, I want to live in the Costco walk in freezer hot. But today, well today was the most lovely day. A cool dry 70 with a nice breeze and sunshine. Then around dinnertime, a little bit of rain, followed by a rainbow. It was the most fantastic perfect weather.This is why I love living in Vermont. We get weather.
.Last night, dinner was all about trying to make some more room in the fridge for the farm share pick up tonight and to make something that I didn’t have to really watch. (the mr and I were moving the beehive to the roof of the house so I wanted to make something that I could leave on the stove and not have to babysit (just stir every now and then). With the weather being so freaking amazing, with a cool crispness in the air, I was craving something a little more on the warm and comfy side. And what do you know, the stuff I had left in the fridge (there is still a basket of zucchini on the table) was what was needed for a big pot of stewed summer ratatouille with lentils. It was everthing that I ever could need and want for a meal. Full of the best veggies and lentils, easy to make, nothing fancy to do. Just stick stuff into a pot and cook until done.
Cooler, light long sleeve, kind of weather. Enough rain where I didn’t have to water the garden, the most perfect pot of the best ratatouille shared with the mr. and a feeling of accomplishment and excitement (bees on the roof!).
The perfect night.
The stuff. Zucchini, yellow summer squash, eggplant, onion, tomatoes and lentils. And we have some fresh basil, fresh oregano, balsamic vinegar, olive oil, and some salt and pepper.
To get this party started, chop up the onion and toss it into a big heavy pot with a little olive oil and a sprinkle of salt. Stick on the stove on medium heat.
While the onions are cooking, mince up the garlic and chop up all the other veggie into medium sized chunks.
When the onions start to become translucent and smell fantastic, add in all the veggies and garlic. Give it a big stir and place back on the stove to cook for a few minutes to let the veggies release some of their liquid.
Then add in the lentils along with a equal amount of water and top with a lid.
After about 30 minutes, the lentils should be near done and the veggies tender, the tomatoes pretty much dissolved. Now chop up the basil and oregano and toss it in along with a few swigs of the balsamic vinegar. Give it a stir and keep on cooking for another 10ish more minutes or until the lentils are nice and tender.
Scoop onto bowl then into mouth. If you like, finish off with a bit more fresh basil or,ike the mr, top with parmesan cheese.
Have a fantastic day! So close to the weekend!!
-C
Makes 2-3 big servings (if serving with pastas or rice, its more like 4-5 servings)
1 medium zucchini
1 medium yellow summer squash
i medium onion
1 small eggplant
3-4 cloves garlic
1 cup dried lentils
1/2 cup water
3 medium to large tomatoes
handful fresh basil leaves
a few glugs of balsamic vinegar
couple sprigs of fresh oregano
olive oil
salt and pepper
Drizzle a little olive oil into a large pot. Dice up the onion and place on medium heat and cook for a few minutes. Mince up the garlic and chop up the remaining veggies into medium sized pieces. Once the onion is cooke a bit and strting to smell oh so nice, toss the veggies and garlic into the pot. Mix, sprinkle with salt and pepper and place a lid on it. Cook for a few minutes to draw out a bit of liquid from the veggies. Now add in the lentils and the water. Stick the lid back on and let cook for about 30 minutes on medium low heat or until the lentils are starting to soften.
When the lentils are mostly soft, but still have a bit of biet, dice the fresh herbs and toss into pot with a few swings of balsamic vinegar. Stir and cook for another 8-10 minutes or until the lentils are full cooked.
Remove from heat and ladle into bowls..
Serve with rice, pasta, bread, a big old pile of fresh greens, or just as it is.
Eats fantastic right aways, or cold late at night standing in front of the fridge..
And now the cucumbers are growing shit crazy.
Every time I open the fridge, at least one (if not a few) come falling out from all the places that I have managed to squeeze them in. (the egg tray in the door is not a safe place for cucumbers) This is a slight problem, but a problem that I kind of like having.
This past weekend I had planned on doing a bunch of pickling and canning. Like a whole day of music blasting, dancing around the kitchen in a cute little apron with wooden spoon in hand, (pretending its a microphone) canning all sorts of fruits and veggies that a piling up in massive amounts for the winter months.
That didn’t happen, and I still have a million cucumbers and not a whole heck of a lot of time this week to inact my canning day day dream.
My simple solution. Cut um up, stick in a bowl with a some fresh dill, a lithe vinegar and leave them on the counter….. And watch as they disappear. It’s crazy. I find if you leave a bowl of cut up anything on the counter, anyone that walks by will stop and eat a few pieces (if not the whole bowl) It’s a scientific fact (no not really, but maybe)
As for my blissful canning day. It will be happening soon. But until then, this is the way to go with those all those cucks. (this works fantastic will zucchinis too!)
The stuff. Cucumbers, onion, fresh dill, salt, pepper, and red wine vinegar.
Slice up the cucumber and onion and toss into a bowl. Spinkle with salt, pepper, and lots of fresh chopped up dill. Splash in the vinegar and toss it all around.
Let it sit on the counter for at least 2 minutes, but the longer they sit, the more pickley they taste.
And eat. Leave on the counter until they are all gone..which won’t take too long.
Enjoy the Tuesday!
-C
2-3 medium to large cucumbers
1 medium sweet onion
a bunch of fresh dill
salt and pepper (fresh cracked is best)
red wine vinegar
Slice cucumber and onion into thin slices. and stick in a big bowl. Sprinkle with salt. pepper, chopped up dill. Pour on a few glugs of vinegar. Toss around, taste and adjust seasoning if needed and let sit on the counter for a few minute… or as long as you want*.
Eat all day long or until they are gone.
IF there are still cucumbers left over after 2 hours and you are worried about leaving food out all day (I don’t worry, but that’s me), stick in the fridge until you ar ready to eat them.
Are you sizzling? Is that pool of water next to you , in fact, your own sweat?
Yeah, I feel you…..stupid heat wave.
During these long extended periods of heat and humidity, my body starts to revolt. I get bitchy, by skin get itchy, my head goes foggy, my stomach starts to refuse food. and I generally just feel like crap. I love the summer, but I am not, by any means, a hot, high humidity person.
So during this nasty bout of heat, I do what I can to find comfort. And one of my comforts is watermelon. I am pretty sure that watermelon is a magical fruit. A giant green oblong ball that when cracked open is the brightest, sweetest bright pink fruit.. I mean, thats pretty f ing magical. It can make anything better, and is one of the few things that I want to eat when its a million degrees outside without barfing.
Watermelon is my official heatwave food. Watermelon all day long (Is it bad that I could literally eat an entire watermelon all to my face, in one sitting? ) And because I am me, I like to spice it up a bit and slather a big glob of basil pesto to the melon…. and that makes me happy. Plus it makes the fact that I am eating nothing but melon seem a little more substantial.
Do you have a heatwave food? If not, try this….It will be your food.
The stuff. A big hunk of watermelon, basil, a lemon, olive oil and salt.
Stick the basil, the juice of the lemon, and a pinch of salt into a blender. Turn on and blend, adding just a tad bit of olive oil until a nice green pesto is made.
Prepare your melon. Remove rinds if you want and save for later.. (seriously, we can make gazpacho with it) and cut into inch thick chunks.
And now if your feeling it, stick a skillet on the stove and preheat on medium high. Once heated, place watermelon chunks on hot skillet and sear each side for about 3-5 minutes per side.
If you want to go fresh, just skip searing it. Me, I do a bowl of both.
And now slather the melon with the pesto
And go to town
Stay cool my friends!
-C
Watermelon
a bunch of basil
a lemon
salt
olive oil
Place basil, a pinch of salt and the juice of the lemon into a blender. Turn on and blend, adding in a drizzle of olive oil until pesto forms.
Preheat a lightly oiled skillet (or a grill) on medium high heat. Take your watermelon and remove rinds (save for later) and cut into inch chunks.* When heated, add the watermelon. LEt each side sear for 3-5 minutes, or until caramelized. Tarnsfrer to a bowl.
*Note. The seared melon is fantastic cooked then cooled. Also, I know some people blot out the juice before grilling, but I think that is a waste and I find unnecessary, but if you don’t want a juicy piece of cooke melon, by all means, blot out the juice..
Or if you don’t want to cook it, don’t
And lastly, toss in a big giant scoop of pesto
Now eat… eat eat eat.
Monday was kind of a suck until I made dinner. It was hot, I didn’t sleep well the night before, and I spent the morning calling the dentist over and over until someone picked up so I could get my butt in there to get my tooth fixed (sometime during eating on sunday I broke my back molar…. and that happened) . Whatever, I got the only appointment that they had available and was just happy that I was able to get in. So went about my morning, went to the gym, did my things then ran home, took a shower and headed to the appointment. When I got there, I checked in, sat down, and waited..Then waited some more, then was called in to the room and then did some more waiting. But finally, the doctor came in and took two minutes to check the tooth (the doctors said I was as badass… couldn’t believe that I don’t do novocain) and left the dental assistant lady to fix it. And ok, I know that people have to practice their craft to learn, but I am pretty sure that I was one of the first solo tooth fixings that this lady has ever done. And that’s cool, but I was hungry and just wanted to get the f out there.(did I mention that it was lunch time?) So taking her sweet time (at least she did a good job) she got it done. But then I had to wait some more, in the chair, for the doctor to come back and check. Holy hell I was there for way to long.
Then I got home and rushed out.. grabbing a carrot on the way. But I was still hungry.. And that just sent me to a dark place for the rest of the day.
So when I finally got home, I immediately went to the fridge to get dinner started. While aggressively riffling through bags of veggies and greens, I stubbled upon a big bag of mustard greens that I got last week at the farm….SCORE.., this made me happy.
Sure, I could have just eaten them right there, fresh and all spicy like, but I if I waited this long to eat, I could wait a little longer and I figured I would share.. and mabye do a little some thing fancy, like toss them with some cooked up onions and sweet potato and that left over quiona that was also in the fridge.
And thats what I did. And it was good. And the day didn’t seem so bad. (food always makes me better)
The stuff. Mustad greens oh lala. A small sweet potato and an onion (I used half of that big one). Cooked quinoa, garlic, salt and pepper, and a little olive oil.
Dice up the sweet potato into little chunks and toss into a big skillet with a drizzle of olive oil and a sprinkle of salt and pepper. Place skillet on medium heat and cook potato for a few minutes just to give it a little head start before adding the onions. When the potato starts to show a little browning, add in the onions and a splash or two of water. Stir around, stick a lid over it, and continue to cook until the onions are soft and the sweet potato is fork tender.
When the stuff is cooked, mince up the garlic and stir that in and cook for a little longer.
And now toss on the mustard greens. (Don’t worry if they are overflowing from the skillet, they will cook down really fast). Add another splash of water and place the lid back on. Cook for a couple minutes and mix everything together.
Place cooked quinoa (hot or cold) into a bowl.
And dump the stuff right on top. If your into it, drizzle with a bit of balsamic vinegar. (I highly recommend)
And eat to be happy.
Hears to a better day then yesterday!
-C
roughly 1/2 lb. of fresh mustard greens
1 small sweet onion or half a big onion
1 small sweet potato
3/4- 1 cup cooked quinoa*
few cloves of garlic
1-2 tablespoons balsamic vinegar(optional)
salt and pepper
olive oil
Note- To cook quinoa, use1 part quinoa- 2 parts water. Place quinoa in pot with water, bring to boil, place on a lid, then turn to simmer for 15 minutes. After 15, turn heat off and let sit of a few more minutes then fluff with fork. Also, i f you don’t have quinoa, just use rice or faro or nothing, the greens are good their own.
Dice up sweet potato into small picese and stick in a large, lightly oiled skillet on medium heat. Toss on some salt and pepper and cook potato for a few minutes until they start to slightly brown. Slice up onion and toss that into the skillet with the sweet potato. Add in a splash of water and place a lid on the skillet, giving it a stir ever now and then. (Watch the stuff carefully, it cooked pretty fast.) Cook until both the sweet potatoes and onion are browned and soft. Now mince garlic and mix that it and let cook for a few minutes..
Now everything is cooked, toss in the mustard greens. (It may seem like a lot, but its not) Hit with a splash of water, place a lid (it doesn’t have to be a snug fit) on top and cook for a few mites until greens are wilted. Toss everything around to mix together. Take your quinoa and place in a bowl. Top with cooked stuff and drizzle with balsamic vinegar.
Eat right away and maybe save a little for later cause it very much good cold too!
The mr. calls them the beached whales of the garden. One day you have these nice little green gems growing in the garden. You see them from a distance and think, “Oh look at those squash, those are oh so lovely” and then you look away. Maybe you leave and let them grow for a day or two. Then when you come back to look, they have turned into humongous squash that, in fact, look like giant green beached whales.
We have been eating a lot of those beached whale these past few weeks..
Take yesterday for example. I made zucchini bread, zucchini relish, zucchini pickles and these here zucchini noodles. And that was before I went to the garden and picked 4 more. And today is farm share pick up which means I’ll be receiving at least another 8-12 squash. And did I mention that there are currently 6 large zucchini sitting on my table.
My new life motto as of lately is ….When life gives you zucchini.. just eat the shit out of them.
These noodles are by far, one of the easiest, and most delicious ways to use up a butt load of zucchini. And you can do it every day. I know people that eat pasta like 5 time a week so I don’t think it’s that weird to be eating zucchini noodles every night. The mr. well he is eating them like a champ. For a guy that really likes his pasta, he really likes when I make these noodle. And as he said last night, “who wouldn’t like a bowl of carb free noodles that taste amazing and you can eat as much as you want and not feel like car?”. My responses was,” maybe some asshole? I don’t know”
So yeah, zucchini noodles is where its at.
The stuff. 2 big zucchinis, a large tomato, a few cloves of garlic, a lemon (or just some lemon juice) and a handful of fresh basil. Also grab a little olive oil and the and salt and pepper.
Firstly, turn you squash into noodles. Do it anyway you like.. I used my mandolin slicer to cut “spaghetti” but you can use a julienne slicer, a noodle maker, or even a box grater. Once made, set noodles aside.
Now chop tomato into chunks and mince garlic. Add to a large skillet with a drizzle of olive oil. Place on medium heat, mix around and cook for a few minutes unit garlic becomes fragrant and the tomatoes are soften.
Now add in the noodles. Just toss right into the pan with the galic and tomatoes. Add a splash of water, the juice of the lemon and salt and pepper. Keep heat on medium and mix noodles around until slightly soft (or cooked to you liking)
Once your happy with the doneness, remove from heat.
Roughly chop or tear the basil into smallish pieces and toss into noodles.
And noodles be done. Now to eating.. and be sure to eat as much as you can, its only zucchini.
Have a good today!
-C
2 medium to large medium zucchinis
a handful of fresh basil
1 large tomato or 2 handfuls of cherry tomatoes
3-4 cloves of garlic
1 lemon
salt and pepper
olive oil
Take zucchini and either with a veggie noodle maker, a juillene peeler, or madoline, a box grater, or just some sweets knife skills, make the noodles and set aside. Mince garlic and chop the tomatoes into chunks add to a large skillet with a drizzle of olive oil and place on medium heat and cook until the tomatoes are soft and the garlic is fragrant.Once that’s cooked, place the noodles into the skillet with about 1/4 cup water and the nice of the lemon. Season to taste with salt and pepper. Mix noodles around and cook until slightly tender (cook longer for a more well done noodle) Remove from heat. Chop or rip up your basil and toss into the noodles and mix around.
And now it’s time.
Place in bowls and fill you mouth hole.
This time of year, there are so many reasons for popsicles, but I think that main reason is that I don’t want to willingly turn on the oven for any amount of time. It’s just to f-ing hot.
Lately, it’s been hot. And humid. And gross. Just way too hot to make anything in the oven. So when I grabbed the rhubarb out of the fridge, knowing that if I didn’t use it soon it would go bad, I immediately thought to make pie. Then I was like,” hell no, not going to happen. I need to freeze this shit”. And freeze it I did..into the greatest, slightly sweet, slightly tart, bright pink popsicles of happiness. They are really the perfect little frozen treat. Not overly sweet and sticky, have a lot a fresh clean flavor, and takes the edge off of the super summer heat and humidity, even if only for a few minutes.
I love popsicles.
But sadly this is probably the last rhubarb for the season (Or maybe the second to last..I think I saw some for sale at the coop a few days ago)
So get it while you can and make these popsicles!
The stuff. Rhubarb, a lime and a little bit of honey (or any sweetener you like). Plus you are going to need some water, but I bet you have some of that on hand.
Chop the rhubarb into inch chunks and toss into a big pot with the water. Stick on the stove and bring to a boil then turn heat to low and let simmer.
Once the rhubarb is so soft that it falls apart, remove from heat and let cool for a few minutes.
With a fine mesh stainer, strain juice into a large jar or bowl.
Now you have the juice for the popsicles and the left over rhubarb stuff is the rhubarb butter.
Place the rhubarb butter into a jar, adding a little honey(or whatever) if you want and eat with anything and everything ( I’ve been adding it to the mr’s yogurt and just eating it with a spoon)
And now add the juice of the lime to the rhubarb juice and add a little honey or whatever sweetness to taste.
And add the rhubarb juice to your popsicle molds and stick in the freezer with sticks tops or wait two hours and add wooden sticks.
When frozen, run the mold under a little hot water and pop those suckers out.
A two for one deal here. And timed perfectly. You have the rhubarb butter to eat while you wait for the popsicles to freeze. So smart
Happy Tuesday.. Keep it cool!
-C
makes 6 4oz popsicles and about a cup of jam
3 cups chopped rhubarb
2 1/2 cups water
1 lime
Anywhere from 4 tablespoons honey (2 for popsicles and 2 for jam)
Chop the rhubarb into inch ish chunks and stick into a big pot with water. Turn on high heat and bring to a boil. Once boiling, turn heat to low and simmer until the rhubarb is so soft its falling apart. Remove from heat and let cool for a few minutes. Take a big jug or bowl with a fine mesh strainer,strain the liquid from the solids. You can use a wooden spoon to stir around to help get the juice flowing. Place remaining solids into a jar and add as little or as much or as little honey (any sweetener you like) and give it a stir. Thats your jam
Now for the popsicles. Add the juice of the lime and a tablespoon or two of honey (or whatever sweeteners you like) and mix around. Pour into popsicle molds and stick into freezer.Know your mold.. if you need to insert a stick, do so after about 2 hours.
When pops are frozen, remove from mold and eat your heart out.
I love summer!
All day, everyday, there is something new and delicious to pick and eat. I have my CSA with the Interval Community Farm, which is in full swing, so I am picking up thousands of pounds of fresh produce every week. (maybe not quite that much, but so so much) Plus our lovely garden is starting to reward up with the prettiest veggies as well. I have so much fresh produce that I find myself mindless eating just to make more room in the fridge.(not to mention that my counters are also covered and I have a laundry basket full of yellow squash and zucchini on the table). I guess its getting about time to do a little canning and pickling… but until then, I will just have to solider on and keep on eating!
So this salad is completely inspired by the ever exploding contents of my fridge (and table, and counters). Fresh zucchini, corn,and peaches roasted and tossed together with fresh tomato, creamy avocado, and herbs into one big bowl.. It’s like eating summer… And it fantastic.
The stuff. Zucchini, corn, tomato, peach, and avocado. A lemon (not shown..it rolled under the couch and I couldn’t find it for a little while) and salt and pepper. Also not shown is the bunch of fresh cilantro that I added at the last minute
I initially wanted to grill this stuff, but I didn’t feel like starting the charcoal and getting that all situated, so I just used the oven. So if you want, use the grill.
Cut zucchini into long wedges and cut the peaches into a few large slices. Place on a lightly oiled pan or baking sheet, sprinkle with a little salt and pepper and stick into the oven at 425 degrees. Toss you corn into the oven too.. but I just stuck that on the oven rack.
While the stuff is roasting in the oven, chop the tomato into mouth sized chunks, and mash the avocado with the juice of the lemon( I finally found it) and a pitch or more of salt. Add enough water to make it slightly runny.
Afer about 15 minutes, the stuff in the oven should be done. You want the corn slightly charred and the peach and zucchini to be soft, but not mushy. Remove from oven and stick everything on a plate or baking sheet and let cool for a few minutes, or until cool enough to handle it.
And now cut the corn from the cob and dice the zucchini and peaches into chunks.
Toss it all into a bowl, give it a mix and smother with the avocado dressing.
And lastly, dice up and add a big ass handful of some freshly chopped herb.. (Cilantro is great, but basil is also just as nice) and toss that on top too!
So much color, so much tasty. This is all summer!
Happy Friday
BYE!
-C
Makes a meal for 1 or a side for 2
1 ripe peaches
1 medium zucchini
1 ear of corn
l medium tomato
1 avocado
juice of 1 lemon
salt and pepper
bunch of fresh cilantro or basil
Note..If i had the time to light up the charcoal to grill, I would have. So Feel free to cook the corn, zucchini and peach on the grill if you so do please.
Slice peach into 4 equal chunks and zucchini into 4-5 wedges. Place in a lightly oiled skillet and sprinkle with salt and pepper. Stick the pan and the corn, husk removed, into oven at 425 degrees for about 10-15 minutes, or until the corn is charred and the zucchini and peach is browning and slightly tender. While this is going on, dice up the tomato into chunks and smash the avocadoin a jar until smoothish with the juice of the lemon, salt and pepper, and enough water to thin it out so that its kind of pasty. (make it any consistency you like)
When veggies are done cooking, remove from oven and place on the counter or a plate and let sit until its cool enough to handle. When cooled off, dice the peach and zucchini into chunks and remove corn from the cob. Toss together with the tomato, sprinkle with a little salt and pepper, dump the mixed lemony avocado all over and top wit a heavy handful of some freshly chopped herb.
Serve warm or cold. Can be eaten with a fork or spoon.
I am a mint lover, even when it grows at such a ferocious speed that it threatens the lives of all the plants near it. That just means that I have to be vilagent and harvest and use as much as I can.
This drink is a fantastic way to use up some of that mint. I have been making and drinking fresh, hot, mint tea almost ever night for the past few weeks, but this weekend was way to freaking hot to be doing hot tea. So using my little noggin, I figured I should just chill it and added some lime because mint and lime are oh so nice together. Now my favorite, and one of the most refreshing drinks after a long hot day.
And limes just happen to be on sale this week….
The stuff. A few stems of fresh mint, a couple juicy limes, and water. And if you want, a little sweetener of your choice. (I used a tiny bit of honey..not shown)
Start by placing the mint, leaves and stem, into a big pot. Take a wooden spoon and gently muddle the mint. Add in the water, making sure that all the mint is fully sumerged (stuff it down in the pot)
Now place pot on the stove and bring water to a boil. Once boiling, remove from heat and let sit for a few minutes.
After steeping for a few, pout tea into a big jug, straining out the mint leaves. Add any sweetener that you might like (just a little.. you can always add more later if you need it) and stick into fridge to cool, or just leave it on the counter if your want.
While you are waiting for the tea to cool, you might as well juice the limes (cause we need the lime juice)
After the tea is cool, add in the juice of the limes and mix/shake/stir around.
And thats it..
Serve in a cup with a few chunks of ice and a mint leaf garnish (not necessary but nice)
A nice tall glass of cold yumminess… Keeps one from melting completely in this crazy hot weather and keeps mint from killing everything around it.
Stay cool!
-C
4 full stems of fresh mint
6 cups water
2-3 limes (I used 2 1/2 which was almost a full cup of juice)
sweetener to taste (a tablespoon of honey is nice)
Place mint, stems and all, into a large pot large pot. With a wooden spoon or sme type of blunt object, lightly muddle the plant. Pour water over mint and place pot on the stove. Bring water to a boil, then remove and let cool for a few minutes. Pour the mint tea into a big jar, straining out the mint leaves..(A half gallon ball jar works perfectly) If using a sweetener, add it to the tea while it is still warm.( little goes a long way… you can alway add a little more later!) Place mint tea into the fridge to cool. When the tea is cool, juice you limes and dump the juice into the tea and mix or shake.
It is now done and ready to serve. Pour over ice (thats in a cup) and serve with a fresh mint leaf (if your fancy)
Because sometimes you just need to think of yourself and what will make you happy. Eating this makes me happy.
This flavor situation just made so much sense. All three flavors on their own are fantastic, but combined into one super amazing frozen sorbet treat.. I mean, like WHOA! I was inspired by the 4 really ripe and juicy mangos I had waiting on the counter. I had also just made a batch of jalapeño jam and was thinking about how nicely jalapeños and mangos go together. And I happened to have a can of coconut cream on hand. My first idea was to do a savory dinner type thing, but after a day of heat and humity, all I wanted was something cold and easy. Ding ding… Lets freeze this shit and turn it into a sorbet.
Such a good idea.
The Stuff. Simple as can be. 2 mangos, peeled, diced and frozen. A can of coconut cream, and some jalepno jam.
Frozen mango is really easy to blend. Just stick into a blending device and add a little bit of water. Mix until a nice creamy puree is formed. And try not to eat it all right now.
Whip up the coconut cream. You don’t need to go to crazy and make it all fluffy, just whisk it for a minute or two just to loosen it up.
Time to scoop. First a few big dollops of the frozen mango puree. Try to work fast to prevent the mango from completely thawing out.
Next, scoop some of the coconut cream and drop a few scoops of jalapeño jam right on in there to. Add more mango, more coconut , and more jam until you container is full.
Note.. My sister had the idea of mixing he jalapeño jam into the mango puree. I think I might try that next time.
Take a knife and cut through the sorbet, first width wise, then length, then width. or whatever. You’re just trying to kind of marble and swirl the flavors together.
Once your done playing and swirling, into the freezer it goes….
Remove from freezer when completely frozen and do what you need to do. I flipped the pan and sliced into slabs on a cooking sheet, and me, the sister and the mr. took turns with the fork and ate it off the pan. We be so classy. But go ahead and use o plate or scoop it or maybe even eat directly from the container with a fork. No judgement here.
Eat so good!
-C
2 1/2 cups fresh mango (2 large mangos), peeled, diced and frozen. (Or just buy frozen mango)
1/2 cup water
1/2 can of cold coconut cream (I used Ttrader Joes.. It’s the best)
around 1/3 cup Jalapeño Jam.. more if you like (Here is the recipe for that )
Place frozen mango into a blending device, add about 1/3- 1/2 cup water and blend until a smooth puree. Open coconut cream, drain the liquid, and place half the cream into a bowl. Whisk until loose and slightly fluffy .
In a freezer safe container. scoop a few dollops of the mango puree, add in a few dollops if coconut cream and then a few dollops of the jalapeño jam. Keep adding dollops of the stuff until you use up all of the ingredients. Take a knife and run through thet sorbet length and width wise a few times to swirl the flavors. Place in freezer for at least 3 hours or until fully frozen
Remove and either scoop, slice, or eat directly from container.
I probabaly have already told you, but August is for sure my favorite month of the year (well,one of my favorites)
There is bounties of bounties of fresh, sweet and colorful, oh so juicy, crispy crisp, just so f ing amazing, produce exploding all over the place. I have probably gained like 75 thousand pounds in the past month due to all of the fruits and veggies that I have been consuming. I am starting to consider it a full time job just to keep up with the eating.
Another reason why I love August so much is becauuse the days are still nice and warm, but the nights are starting to cool which means I get to make so much soup!!!!!.
This soup is the freshest freshy soup yet. Everything is from the farm and or the garden (except the salt pepper, vinegar and oil), some picked within hours of me making this.
. I am a lucky/spolied veggie brat.
Anyways. This soup. The fresh tomato base gives it a sweet, slightly acidic kick. So super creamy due to the lovely earthy stocks of the chard. Slightly spicy and earthy from the arugula* and chard green green. This soup… it just tastes so fresh and clean, yet hearty and satisfying. A perfect soup for a mid August night, eating outside, watching the sun slide behind the mountains and the temperature dropping just enough that you might want a light sweater. Or you can just eat it from the pot in the kitchen while watching TV. It’s good eating anyway you want.
*Here in America, it’s called arugula. Else where , it’s called rocket. I wish we all called it rocket, although I do like the name arugula, but for like my first born child or maybe a pet goldfish. Anyway, rocket is arugula, or vice versa.
Soup time!.
The stuff. Some big fresh tomatoes, a few stalks of chard, and a few handfuls of arugaula (aka rocket). A couple carrots, an onion, some garlic, salt and pepper and a bit of olive oil.. Oh, and I added some balsamic vinegar, which for some reason didn’t make it into the picture (sorry vinegar)
Start by removing the chard leaves from the stalks. Set aside leave with the arugula. Chop up the carrot, chard stems, onion and garlic and toss into a big pot with a drizzle of olive oil, a splash of water, and a sprinkle of salt and pepper. Stir around and stick o nthe stove on medium heat for about 10 minutes until the veggies start to soften up.
Now chop up the tomatoes into chunks and toss those right into the pot with the other stuff. Add in a few cups water and a few glugs of balazmic vinegar. Bring everything to a boil and then turn heat to medium low and place a lid on pot and let cook at medium heat for another 20 ish minutes, or until the tomatoes are falling apart.
Now that everything is all cooked up, blend it up.
And now take the chard leaves and the aruglula and chop into little pieces….into the pot they go.
Mix it all up.. and take the blender to the soup again….if you want a smaller sized bite.
Soup Into bowls..Then into mouth.
Happy August!!
And hey hey hey.. Have the best weekend!
-C
4-5 large fresh tomatoes
4 large stalks of rainbow chard
2-3 big handfuls of arugula
1 medium onion
1 large or 2 small carrots
4-5 garlic cloves
2-3glugs (about 2 tablespoons) balsamic vinegar
3 cups water
olive oil
salt and pepper
To start, remove stalks of chard from leaves and chop stalks, onion, carrot and garlic into chunks and place int a big pot with a drizzle of olive oil, a splash or water, and spinkle of salt and pepper. Place on stove on medium low heat sand cooke the veggies down until starting to soften and garlic is becoming fragrant. While that cooking, remove core from tomatoes and dice them up. Toss into pot with the cooked down veggies with the vinegar and water. Place a lid on the pot and let cook for about 20-25 minutes or until the tomatoes are falling apart.
When cooked, using with a hand blender or a normal blender, blend the soup until smooth. (if using blender, pour back into pot)
Now take the arugula and chard leaves and chop them into wee little picese and mix into soup. If you want to, blend the greens into the soup.. but not until smooth, unless thats what you want. Cook for another 5 minutes. Taste and season with more salt and pepper to taste.
Ladle into bowl and serve with lots of fresh cracked pepper, maybe a little balsamic drizzle or even some mustard (I at left overs with mustard and it rocked my world)
TGIF!!!! For reals, because Monday-Thurday were monster days. And now that its friday, I can dig a hole and hide in it until it’s at least 30 degrees with some sunshine. (I might never get to come out.)
A few things I will bring in my hole:
food (lots of food and coffee, lots of coffee)
a soft blanket and pillow
a few books, preferably with pictures, on farming and gardening (think spring!)
the entire series of the Fresh Prince of Bel-air and a device to watch it on
toothpaste (I can use my finger to brush my teeth)
But before I leave for my hole in the ground, I made these little cake bites to get my people through the weekend. Sweet little lemony bites of rich dense cake dipped into bittersweet chocolate. (I am just so nice) They have all the pleasure or cake without the need of a fork and are much easier to give away then a big slice of cake. Plus, they are fun to make. My little sister helped and did most of the chocolate dipping. Then she and another little used their mouths to clean up the chocolate mess. It was an afternoon of chocolate all over the kitchen fun day.
So make some bites to have and to share. Or if you, like me, are digging a hole to hide in, make a batch of bites to bring with you. That’s the beauty of cake covered in a harden chocolate shell, they travel really well.Simple lemon cake stuff. Flour, baking powder and salt whisked together, Sugar and soft butter in a bowl. An egg, some vanilla, milk, and of course, the lemon.
To make the batter, cream the soften butter with the sugar until light and fluffy. Zest lemon(1 big or 2 small) into bowl with the juice of the lemon(s), the vanilla and the egg. Beat until combined. Now beat in the dry and then the milk. Keep beating for another minute until all mixed. Batter should be light and fluffy.
Batter goes into a greased and floured 9×13 baking sheet and stuck into a 375 degree oven for about 30 minutes (You can use a 9×9 baking pan. Just bake fir another 10 minutes and you will end up with thicker bites). Remove from oven and let cool for a few minutes and flip to remove cake from baking sheet. Cut cake into small pieces (I cut 4×6 to get 24 bites) and place bake into sheet and into freezer (I stuck mine outside, it was -2 degrees ) for at least 2 hours.
Frozen bites ready for the chocolate coating… Bittersweet chocolate chips and a little bit of coconut oil. Melted together all nice and shiny smooth.Now dip and slather those bites in the melted chocolate.
Oh what a lovely sister I have.. Look at her dunk….. like a boss!Fully coated and placed on a rack for the chocolate to harden. I ended up sticking the rack in the freezer for 10 minutes…They harder really fast in there.
And now you have some it, bites of cake covered in chocolate. 1 bite, 2 bites…5 bites. Eat however many you want because its Friday and because there small little bites and just because you can.
Now if you need me, I’ll be in my hole.
-C
Chocolate Lemon Cake Bite
1 1/2 cups all purpose flour
1 teaspoon baking powder
1 teaspoons salt
1 cup white sugar
1/2 cup (1 stick) soft butter
1 egg
1 teaspoon vanilla
1 cup milk
1 large or 2 small lemons
2 cups bittersweet chocolate chips
2 tablespoons coconut oil
Add butter and sugar to a large bowl and beat on medium unit light and fluffy. Ass in vanilla egg, the zest of the lemon and the juice of the lemon. Beat to incorporate. Now beat in the dry and lastly the milk.
Grease and flour either a 9×9 pan or a 9×13 baking sheet. dump batter in and smooth out. Stick in oven and bake for about 3o minutes or until a toothpick stuck into the middle comes out clean. Remove and let cool for a few minutes on a wire rack. Flip cake to remove from pan. Cut cake into bit sized pieces, 4×6 is a good size, and place back on baking sheet and stick into freezer for at least 2 hours.
When cake bites are as good as frozen, get the chocolate ready. Take the chocolate and the coconut oil and either melt in a double boiler or the microwave. Mix until smooth and make sure to full incorporate the oil. Now remove the cake bites from the freezer and dip each bite into chocolate, trying to full coat all sides. Stick onto a wire rack or a parchment lined pan to harden. They can be stuck back into the freezer to harden faster.
I made a pie dough a little while ago with the intention of making a cherry pie…but I ate all the cherries . (I do that a lot… eat all of something that I was intending to use for something else)
And then I think about that saying.. The road to hell is paved in good intentions.
.Well I guess I am going to hell.
So no cherries, but I have a crap load of summer squash (and it’s only the beginning) and a few peaches that are in need of some eating. And what’s that, a container of ricotta in the fridge from lasagna a couple weeks back…. Meant to be and not in hell yet!
Sure, I could have made one single crust galette, sweet or savory, and thrown it to the masses for consumption, but I figured that I might as well just hit two birds with one stone. A dinner and a dessert, all at once, and call it a victory in time management and putting a dent in the pile of squash on the table. (don’t be fooled, I love excess amounts of squash.. It’s like the printer paper of the veggie world.. can be used for everything!) And bonus, only one set of dishes! I mean come on, this is so good, easy and just really pretty. I know, I know….. so smart.
Anyway, here, take a look, get inspired and make some pretty dinsert (dinner and dessert) galettes.
The stuff. For the base, we need one single crust pie dough (that’s going to be for two smaller galettes) and some ricotta cheese. The savory galette has summer squash, salt, pepper, lemon ( the zest) and a couple tomatoes. The sweet needs honey, a peach, and a few strawberries.
And if you want, change up your toppings. Pretty much any fruit or veggie combo would work. And spice up the ricotta if you wan. Garlic, fresh thyme, cinnamon… whatever will make you happy.
First things first. Roll ourt dough. You could cut the dough in half and roll two separate disks, but I just rolled out one big rectangle shape.
And onto the baking sheet and into the fridge to rest.
While the dough is chillin, take half of the ricotta and whip it up with some honey and thinly slice up your fruit.
Take the other half of the ricotta and add a bit os lemon zest, a sprinkle of salt and pepper, and mix that up. And thinly slice up the squashes and dice up the tomatoes.
Two crusts(or one cut in half. Smear the honey ricotta on one side, savory on the other, leaving a boarder so you can fold the dough over.
Now pile the fruits on the honey ricotta, veggies on the savory, and fold the uncheesed part of the crust over. just enough to keep everything from falling out. Sprinkle salt and pepper on the veggies.
Stick into a preheated oven and bake until the crust is cooked all nice and golden brown and crispy.
While the galettes are baking, toss the chunks of tomatoes into a skillet with a splash of oil, salt and pepper and stick it into the oven too. Just bake until the tomatoes are nice and soft. You can stick in the oven right away and let the tomatoes cool, or towards the end of the bake time so that you can eat them warm… these tomatoes are good hot or cold.
all baked up, removed from the oven, looking oh so pretty.
Pile the roasted tomatoes onto the savory tart. And if you got it, a bit of chopped freshy fresh basil
And drizzle a little bit more honey on the sweet.
And serve… Is it savory first or do you go sweet?
How about a pice of both. Dnner and dessert.. all on one plate!
Happy Tuesday!
Ba Bye!
-C
-Makes 2 small or one large galettes
a single pie crust (recipe here.. or use whatever dough you like)
1 cup of ricotta cheese
For the savory
2 cups thinly sliced green and yellow summer squash*
2 roma tomatoes
salt and pepper
teaspoon lemon zest
a few fresh basil leaves
olive oil
For the Sweet
2-3 tablesppons honey
1 peach thinly sliced*
3-4 strawberries thibky sliced*
*Note. Feeling like blueberry apricot or maybe potatoes and peas? Swap out any fruit and veggie (and spice) combination you want. The possibilities are endless! And if you want to do just one big galette, go for it.
Roll out pie dough in either 2 separate disks or one large rectange cut in half and.place on baking sheet and stick in fridge. While dough is resting, divide the ricotta into separate bowls. Add the salt, pepper and lemon zest to one, and the honey to the other. Using a fork, whip them up.
Preheat oven to 400 degrees
When the oven is preheated, grab the crust from fridge and smear the ricotta fillings evenly on the middle of each crust, leaving about an inch and a half boarder. Layer on the toppings, (sweet on honey, savory on lemon pepper.. or whatever floats your boat) and fold border over the edges of the filling. Place in oven and bake for about 35-40 minutes or until the crusts are nice and crispy and golden brown.
While those are baking, dice up the tomatoes and toss into a oven safe skillet with a little drizzle of oil and sprinkle of salt. Stick that into the oven for about 10 minutes or until the tomatoes are nice and soft. You can do this right away, or towards the end of the bake time of the galettes… roasted tomatoes are great warm or cold.
When the galettes are done baking, remove from oven and let sit for at least 5 minutes before serving. Top the savory galette with the roasted tomatoes and chopped fresh basil. Drizzle a little more honey on the one with the fruit .
Serve one, then the other, or both at the same time!
Eats good hot, warm, or cold. Utensils not required

 It’s Mother’s Day weekend which means that you and I and everyone out there should feel the slightest bit obligated to at least do a little something nice for your mom for the mere fact that you were borned. And really what better way to celebrate mom than with food… It really is the least that you can do. (I think mom’s also like flowers and cards and handmade pasta necklaces) My mom is defiantly about the food. (she has had her fair share or pasta necklaces) A many years back on Mother’s day, this sweet little girl (me) made her mother a special breakfast treat…blueberry scones. And ever since that day, for every freaking holiday, birthday, whatever day, my mother requests (demands) a batch of those scones. She is always saying that these are her favorite treat and that no one has ever made them as good as I do. (I guess that just reiterates that I am her number 1 child)
 The stuff. Flour, baking soda, baking powder and salt. A bit of sugar, vanilla, buttermilk, and butter (use vegan butter and nut milk if you want to make them vegan) And of course we need the blueberries which can be fresh or frozen. I usually use fresh, but the store I stopped at only had really big containers of fresh that were like $1000 dollars a piece and the organic frozen happen to be on super sale. So you know, the cheap in me won that battle.
  So into the bowl goes all the dry stuff; flour, baking powder and soda, salt, and the sugar. Give it a good whisk.
 Now dump the blueberries into the flour mixture. Toss them around to give them a coat of flour. Add in the buttermilk and vanilla and give a little mix until liquid is absorbed. We are trying to handle the dough as little as possible.
 Turn mixture onto counter. It’s very loose, but thats what it should look like.
  Very gently and with as little handling as possible, gather dough up, knead a few times till everything just comes together. Press dough into a disk that is roughly an inch thick…. and it doesn’t need to be perfect.
  Cut the disk into even sized pieces. Do 6 big, 8 normal, maybe even 10 smaller. Whatever size you like. (I did 8) Place the scones onto a baking sheet, using a spatula to transfer, and sprinkle the tops with a little bit of sugar. Into a preheated oven for about 20 minutes.
 And when the scones look all nice and browned and a tester comes out clean. remove and either serve right away warm, preferably with huge cup of coffee or tea, or stick on a rack to cool before storing in air tight container.
 When something goes on sale at the grocery store, I tend to buy it. Being that it is Valentines Day this week, all the stores are having specials on all sorts of sexy things… and strawberries are one of them. Now I am not a huge fan of buying produce that is terribly out of season, but I can’t help myself…a good deal is a good deal and the strawberries were a super good deal. I was just going to make some sweet ass strawberry jam or maybe a lovely strawberry cake with them (and I probably still will), but these strawberries are actually super juicy and full of flavor, and it’s always nice to eat some full flavor freshy strawberries… especially soaked in balsamic vinegar. And yeah, I think that this salad is pretty sexy, so it makes for a perfect Valentines day dish.
 A handful of ingredients and 5 minutes will get you to a fantastic salad experience.
 Pour the vinegar on the strawberries and let sit for at least 5 minutes. (the longer the strawberries can sit with the vinegar, the better)
 Pile it on.. thinly slice avocado.. rough chopped toasted almonds… It’s pretty much as easy as it can get.
 And last but not least, toss on the balsamic soaked strawberries and drizzle the remaining vinegar. (if you made hearts, place on top to make pretty) Sprinkle with a pitch of salt and pepper and pow! Fancy, sexy, delicious salad.
 I am such a sucker for the reduced price produce at the grocery store. I save at least half of the original price for stuff that might look a little weird or have a brown spot or something. Sometimes I can’t believe what ends up on in the bin, stuff that I wouldn’t consider reduced bin material, but hey, if they want to stick it in there, then I will be more than happy to buy it. A couple days ago I found some good looking roma tomatoes in that said reduced produce bin..the skins the tiniest bit wrinkled (like I could care less), least hen 50 cents a pound. Um, yea, I bought those and put them to good use.
 So simple. A little olive oil in pan. Chunk the tomatoes and throw in pan with the chopped onion, carrot, cauliflower, garlic and chick peas. Drizzle a bit more oil and top with salt and pepper. Give it all a toss and stick into oven. That’s that. Just leave it in there until everything is so nice and soft and falling apart.
 One of the best things about couscous is that you don’t even need to dirty a pot or a bowl to make it, just add dried couscous to the bowl you are going to eat out of with a cup of boiling water and a pinch of salt. (I added the spinach with the water too) After about 8 minutes, the couscous absorbs all the water and you just fluff it up with a fork. Easy, freaking Peasy!!!
  Out of the oven and piled on…..
 I mean, if this isn’t one classy looking meal, then I don’t know what is.


 Whenever me and the mister get invited / show up for dinner at someone’s house, I like to bring at least one thing to contribute to the meal. First, because I am nice like that. Secondly, because I get to make food for other people besides Nick and get new feedback on recipes. (Sometimes I think he tells me things taste amazing when they might not) And thirdly, its nice to mess up someone else’s kitchen besides my own. So last night we went to my sisters and I made a salad. A very easy and virtually mess free salad…….I still made a mess (I cleaned it up myself!)
 Start with the base layer of kale… then first goes the sliced onion. (Make sure it’s thinly sliced or else it will be to overpowering)
 Add thinly sliced oranges…oh boy, your half way there!!!
 Top with thinly sliced avocado, a sprinkle of salt and drizzle with lime juice. I also served with an extra wedge of lime, there is never too much lime.


 TGIF!!!! For reals, because Monday-Thurday were monster days. And now that its friday, I can dig a hole and hide in it until it’s at least 30 degrees with some sunshine. (I might never get to come out.)
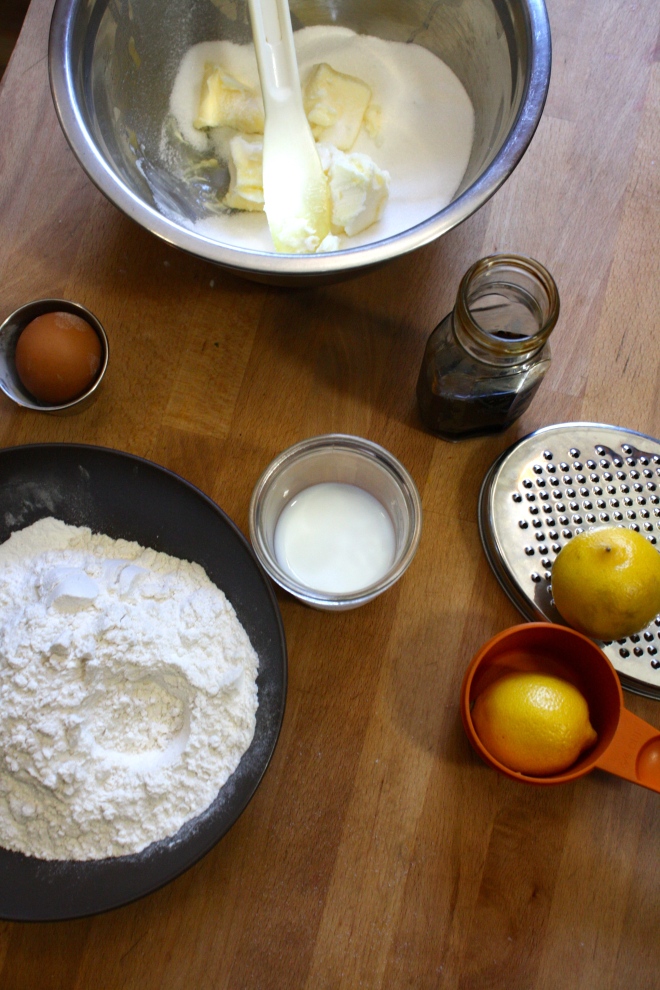 Simple lemon cake stuff. Flour, baking powder and salt whisked together, Sugar and soft butter in a bowl. An egg, some vanilla, milk, and of course, the lemon.
  Frozen bites ready for the chocolate coating… Bittersweet chocolate chips and a little bit of coconut oil. Melted together all nice and shiny smooth.
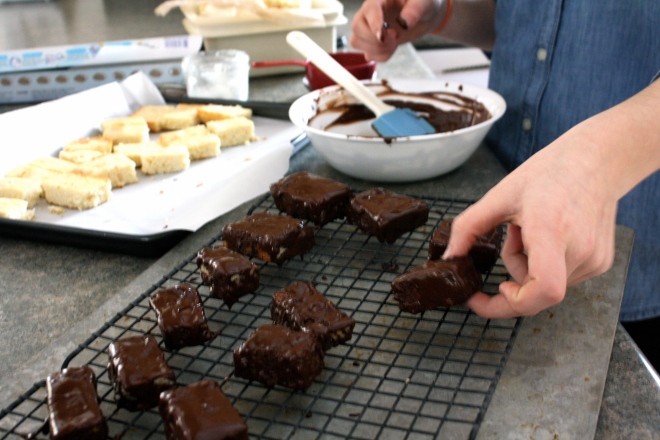 Now dip and slather those bites in the melted chocolate.
  Fully coated and placed on a rack for the chocolate to harden. I ended up sticking the rack in the freezer for 10 minutes…They harder really fast in there.

THE LOVELY CRAZY
September 19, 2015 by maximios • Blog
Guess what guys ….I got myself a sick vintage waffle/ griddle iron. I couldn’t be more thrilled!!! I found this thing at the local recycled goods store the other day, along with a very beautiful old white pyrex mixing bowl. It was one of my best thrift store scores! (Checking out the inventory and the condition of all the old things that day, I would say an old lady had just died and all her perfectly keep, mint condition kitchen stuff had just been donated. But it’s cool, cause I get the feeling that she was at least 90, with a big loving family, and was happy until the day she died. And I am sure she would be pleased that I have taken over the waffle maker. Thanks old lady!)
And now I am pretty sure that everything I make for the next week will be cooked on said waffle/griddle. I am serious, I already have a list of things to try and cook on it; cookies, biscuits, granola bars, potatoes, fruit, some type of pasta situations…. the list of possibilities is endless and I bet that at least 1/2 of these things will be totally awesome and amazing.
But first thing first. I need to make dinner.
So waffles for dinner!!
Note. These waffles are completely 100% fantastic for any meal you want to make them for. They consist of nothing more then beans, a shit ton of veggies, and just a bit of cornmeal. But don’t let that fool you because they are super packed full of so much flavor, have a really soft tender inside, with a nice crispy outside and are so super pretty. They are wonderful! The stuff. First, we got a big old pile of shredded up veggies which include; carrot, beet, sweet potato, onion, parsnip, celeriac, and a little bit of kale. A we got a bowl of rinsed and strained white beans, a little bit of cornmeal and salt, pepper, and garlic powder.
The makings of something amazing!Before you do anything. get your waffle iron out and preheat it.
While thats going on, take you beans, add 3/4 cup water and puree until smooth with whatever blending device want to like to use. (I used my hand blender…less to clean)Now collect all the shredded veggies and dump into a big bowl with the bean puree, the spices and the cornmeal. Mix until combined. The batter should be thick, but not dry. If its seems to wet, add more corn meal, or too dry, add a little more water.
Note how my batter turned a magical pink… I love beets, they make everything pretty! And check out that bowl!When your waffle iron is preheated, oil it if needed (if your not sure, add a little oil just to really make sure your waffles don’t stick) and take appropriate size spoonfuls of the batter and stick on iron. Close it and wait…..My iron has a little light that turns on when the waffles are done cooking, so I waited patiently (ok iI did open it a few time) until light tuned on and removed the perfectly cooked waffles.
Did I mention how awesome my new/old vintage iron is?
SO AWESOME!!
I made a little gaucamole and gave the mister and little bowl of plain Greek yogurt with lemon juice, but feel free to top, drizzle, or dump whatever you want onto these beauties…
Happy waffle Wednesday!!!
-C
Veggie Bean Wonder Waffles
Makes 8-10 waffles (in my iron) feeds 2-3 peeps
Note on veggies… I used what I had in the fridge and shredded, it came to about 3 cups. If you don’t have these specific veggies or only want to use a few.. go for it. Just make sure to have 3 cups of whatever veggies you use.
Take you beans and blend them up with whatever device you would like to use. Once creamy, add to a bowl with the rest of the ingredients. Stir until combined.
Once the waffle iron is preheated, oil it( if needed) and place the recommended amount of batter right on it there. Close and cook until golden brown and waffly.
Serve on a plate with topping of your choice, A few suggestions.. Guacamole, salsa, hummus, mustard, greek yogurt… anything that tastes good to you.
Eat as breakfast, lunch or dinner…
Fork into face
I love me some freshy salsa, It makes me oh so happy.
I make this stuff all the time, especially during the warmer months and tomato season. I usually make a batch right before a meal, just enough to eat right away, but sometimes I ‘ll make a big batched of it, thinking I’ll save some for the next day. It never makes it past the second day in the fridge because it’s just one of those things that when you see it, you want to eat it. Weird but true. And it’s totally ok to do so cause it’s basically eating a big bowl of healthy goodness, so eat on!
It takes no time to prepare, tastes super refreshing, goes on everything, and it’s just so freaking tasty. You can eat it with tacos and chips (the mister) or like me, I like to add it to everything; salads, popcorn, or directly in my mouth.
Make one batch, make 4, it doesn’t matter cause you will eat it all, and need to make more.
Stick all the chopped stuff into a jar and add in the juice of the lemon. Roughly chop the cilantro and add that on in with a sprinkle of salt.
Mix it up…. And thats it. Now eat… with something or without.
A spoon out of the jar is one of my favorite ways to go at it.
Happy Cinco de Mayo, Happy Tuesday!
-C
Pico de Gallo… Freshy Salsa
Chop tomatoes and onion and toss into a bowl or jar. Cut seeds from jalapeño(s) and dice up into little bitty pieces and add that to the tomato and onion. Roughly chop the cilantro and toss that in as well with the juice of the lemon or lime. Sprinkle with salt. Stir, let sit for a minutes, taste and then add more salt if needed.
Eat right away or make ahead and store in the fridge until ready to use.
Goes great with corn chips, tacos, toss onto salads or eat as is standing in front of the fridge. If someone is judging you, they are stupid.
What is a kohlrabi you ask? It’s kind of a cross between a turnip and a cabbage that is usually the size of a baseball. It can be eaten raw (I like chunks dipped in mustard) or cooked. (roasted chunks dipped in mustard) It pairs well with sweet stuff like apples and honey, or in any savory stuff. Its one of my favorite vegetables (I say that about them all!)
So now that you know about kohlrabi (if you didn’t already) its time to get yourself some and make this soup. Because for real, I am not kidding when I say that this is one of the best soups that I have ever made. You really must try it. And do it soon because hopefully in the next few weeks the soup weather will turn into fresh pea weather and we might not want soup as much (I eat soup all year long)
Peel the kohlrabis tough skin off and chop up into chunks. Chop the carrot, garlic and onion as well .
And eat one of the greatest soups ever!
Happy Day Wednesday!
-C
Creamy Kohlrabi Soup with Asparagus
Peel outer layer of kohlrabis. Roughly chop the onion, carrot, kohlrabi and garlic and stick it all into large dutch oven or stock pot. Add water until veggies are half submerged . Add a good sprinkle of salt and pepper and place on burner on medium heat and cover. Check ever 5 or so minutes and give the pot a good stir. After about 25 minutes, all the veggies should be very tender and almost fall apart when stuck with a fork. With an immersion blender or regular blender, blend till smooth, adding water until soup is at your desired constancy. Return soup to medium heat. Small dice asparagus and add to pot. (I added 2 extra whole pieces and fished them put once cooked for garnish.) Keep on heat for another 5-10 minutes until asparagus is cooked.
Scoop into bowl and squirt top with yellow mustard and top with a spear of cooked asparagus.
Eat with a spoon and lick bowl clean.
Guacamole is amazing… anything avocado is amazing…this guacamole is amazing. White bean guacamole is amazing. And not that we really care, but this guac is half the fat then straight up guacamole. Plus it’s packed full of protein making it a kind of super duper, must eat all of it, kind of dip. And sweet potato anything will make me happy. Making queso dip with sweet potato and cauliflower is probably one of my best food combos so far. (after eating a butt load, I felt like I was a genius and made an amazing discovery) Again, not that we need it to be, but this is also a fat-free, vegan, gluten-free, super healthy, packed full of B12, fiber and nutrients, dip for all kind of dip.…. just another reason why you cannot feel bad when you finish off half a batch before you get a chance to stick it in a serving bowl. (I might have done that)
Here is what you need for a good time:
−These tortilla chips ….Check.
−Some Chopped Veggies (I want the veggies)…..Check
−Cauliflower Sweet Potato Queso.…Check.
−White Bean Guacamole…Check.
You are now ready for it. It being this party, that party, the Super Bowl, or a Wednesday afternoon.
To the left we have the makings for the cauliflower sweet potato queso.. Steamed cauliflower, a baked sweet potato, nutritional yeast, garlic, and chopped up red onion, red bell pepper and jalapeño. To make all you need to do it take the chopped peppers, onion, and garlic and sauté for a few minutes just to slightly soften and bring out flavors. While that’s going on, take the steamed cauliflower and sweet potato(skin off..but eat it, or save it for soup or feed it to the dog) and puree together with a blender or food processor. Add in nutritional yeast, about a tablespoon or two of hot water and, salt and pepper to taste. Blend for about 5 minutes until super creamy smooth. Add in sautéed stuff and pulse just enough to incorporated the veggies but not complete blend in. Stick in a bowl.
To the right we have white bean guacamole stuff. Two cups (or one can) rinsed white beans, one ripe avocado, a lime, a few cloves of garlic,(I also added a bit of garlic powered…I like my garlic) and some chopped up red onion and tomato. Place beans, garlic, avocado and lime juice in a blender or food processor and blend until smooth. Add salt to taste and toss in the chopped tomato and onion. Blend for sec to mix that in…Stick in a bowl
So there , dips for those sweet ass chips or whatever you want to dip or them spread them on.
And he guys…It’s FRIDAY! Have a fantastic day!
-C
White Bean Guacamole
Finley chop onion and tomato. Set aside. Place the beans, avocado, garlic, garlic powder, 1 teaspoon salt and the juice from one lime into a blender or food processor and blend until smooth. Add a splash of water if needed to help keep things moving. Taste and add more salt if needed. When smooth, add the onion and tomato and pulse a few times to mix in. Scoop into a serving dish and finish with a squeeze of lime and a bit of chopped onion and tomato.
Cauliflower Sweet Potato Queso
Finely dice the red pepper, jalapeño, onion and garlic and sauté in a skillet for a few minutes until slightly soften and fragrant. Take the pre-cooked cauliflower, sweet potato (skin removed), and nutritional yeast and place in a blender or food processor. Blend for about 5 minutes until creamy and smooth. Add in a tablespoon of water to keep things moving. When completely smooth, add in sautéed veggies and pulse a few times to combine. Scoop into a serving dish. If your feeling it, top with scallions and cracked pepper.
Serve dips with chips, veggies or anything you want. Also make great spreads for sandwiches and crackers too!
CHILI MONDAY!Well it is, but I am talking about making some super duper, yes I’ll have seconds, tummy filling, bone warming, pumpkin chili.. And heathy oh so healthy to boot. Reals, it’s the best.
This pumpkin chili recipe had evolved over the years. The first time I made pumpkin chili was for my very first dinner party that I threw back in college. Instead of cutting the pumpkin and adding it into the chili, I chopped the little pumpkins in half, roasted them, and used the halves as bowls..A good idea except no one at the pumpkin and I was left with a bunch of slobbered on roasted pumpkin halves. ( I probably should have said something, but being a few drinks in, I didn’t think to say anything about the edible bowls and I don’t think I noticed the abandoned pumpkins until the next morning). After that somewhat failed attempt, I started adding the pumpkin to the chili and left the drinking tip after the food is served. ( I learned so much in college)
But yeah, this recipe has traveled a few years with me and every time I make it, I always think, jeez, why don’t I make this every weekend. Well maybe now I will.
Don’t let this spread scare you.. it’s just veggies from the fridge, a chopped up pie pumpkin and pre soaked beans. Oh and some canned tomato and spices. It took about 10 minutes of hands on time and one big pot. No big mess to clean up and you can get rid of those veggies in the fridge that are on the way out. WIN WIN WIN!
All the chopped veggies, the chopped pumpkin go into the pot with salt. pepper , and spices.( I added a fresh jalapeno and about 5 cloves of garlic to this mixture) Let the mixture sweat for about 5 minutes, giving it a quick stir or two.
Now toss in the beans and the tomatoes… Add a cans worth of water as well. Bring to a boil, then turn to low heat and cover.
A last minute addition.. I added a few chopped up kale leaves. I wanted a little more bright color and adding kale to anything is a good idea.
I added a little sliced avocado to one of the bowls (I only had enough for one) and cut up some lime wedges to squeeze on top. (I did, Nick didn’t)
Best chili I have made in a long time…and yes, there is a bunch of left over which is fantastic because now I have lunch for the next couple days…
HOORAY FOR FOOD!!!
Have a good Monday!
-C
Either the night before or morning of, presoak dried beans..(beans in pot with about 4 cups water and a sprinkle of salt)
Take pumpkin and slice in half, de-seed and chop flesh into little chunks. (You can peel it if you want, but really, there is no reason to) Rough chop all the veggies (minus the kale) and stick into a large pot with the pumpkin. Pot on medium heat.. let the veggies sweat for about five minutes. Now add the garlic and the spices and let cook for a few more minutes.
When the mixture starts to become fragrant… drain, rinse and add presoaked (or canned) beans. Then the tomatoes, and 1 1/2 cans worth of water.
Bring chili to a boil then cover and reduce heat to low. Let cook for about an hour, giving it a stir every now and then………
Add in chopped kale a few minutes before serving
Serve in a bowl and top with sliced lime, avocado, a sprinkle of cheese….Whatever you want.