
THE LOVELY CRAZY
I found another bag of frozen rhubarb in the chest freezer which is never a bad thing, but my rhubarb patch outside is growing strong and I will have all the fresh rhubarb I could possible eat within the next few weeks. So found rhubarb just means I need to eat it right fast before the fresh stuff comes in. (I haven%u2019t had a problem with that. it%u2019s almost gone already). Plus the other day while I was digging up and transplanting raspberry bushes to the back yard, my neighbor came over and gave me a gallon of frozen raspberries, harvested from said bushes that I was currently planting in my yard. Score for me! Free bushes and berries%u2026I have such nice neighbors.
So the logical thing to do with my new found and giving bounty was of course to hurry up and bake something. Cobbler. Why cobbler? Well, why not? I figured the mr would really like it and eat it and I also didn%u2019t want to make anything to fussy because I was just to dang busy spending all of my extra time outside doing outside things. And cobbler, it%u2019s not fussy because it is basically biscuits and jam baked up all together. Not a lot to think about and comes out looking all homey and sweet and smelling all nice and cozy. Doesn%u2019t that sound nice? And not a pain in the ass?
And best part. A made cobbler works as dessert or breakfasts or just a snack. Just asked the mr. He ate it for all the reasons. With a dollop of yogurt or cream of course because he is fancy like that.
And yeah the fruit I used was frozen, but fresh works just the same here too.
Now, lets get to that cobbler.

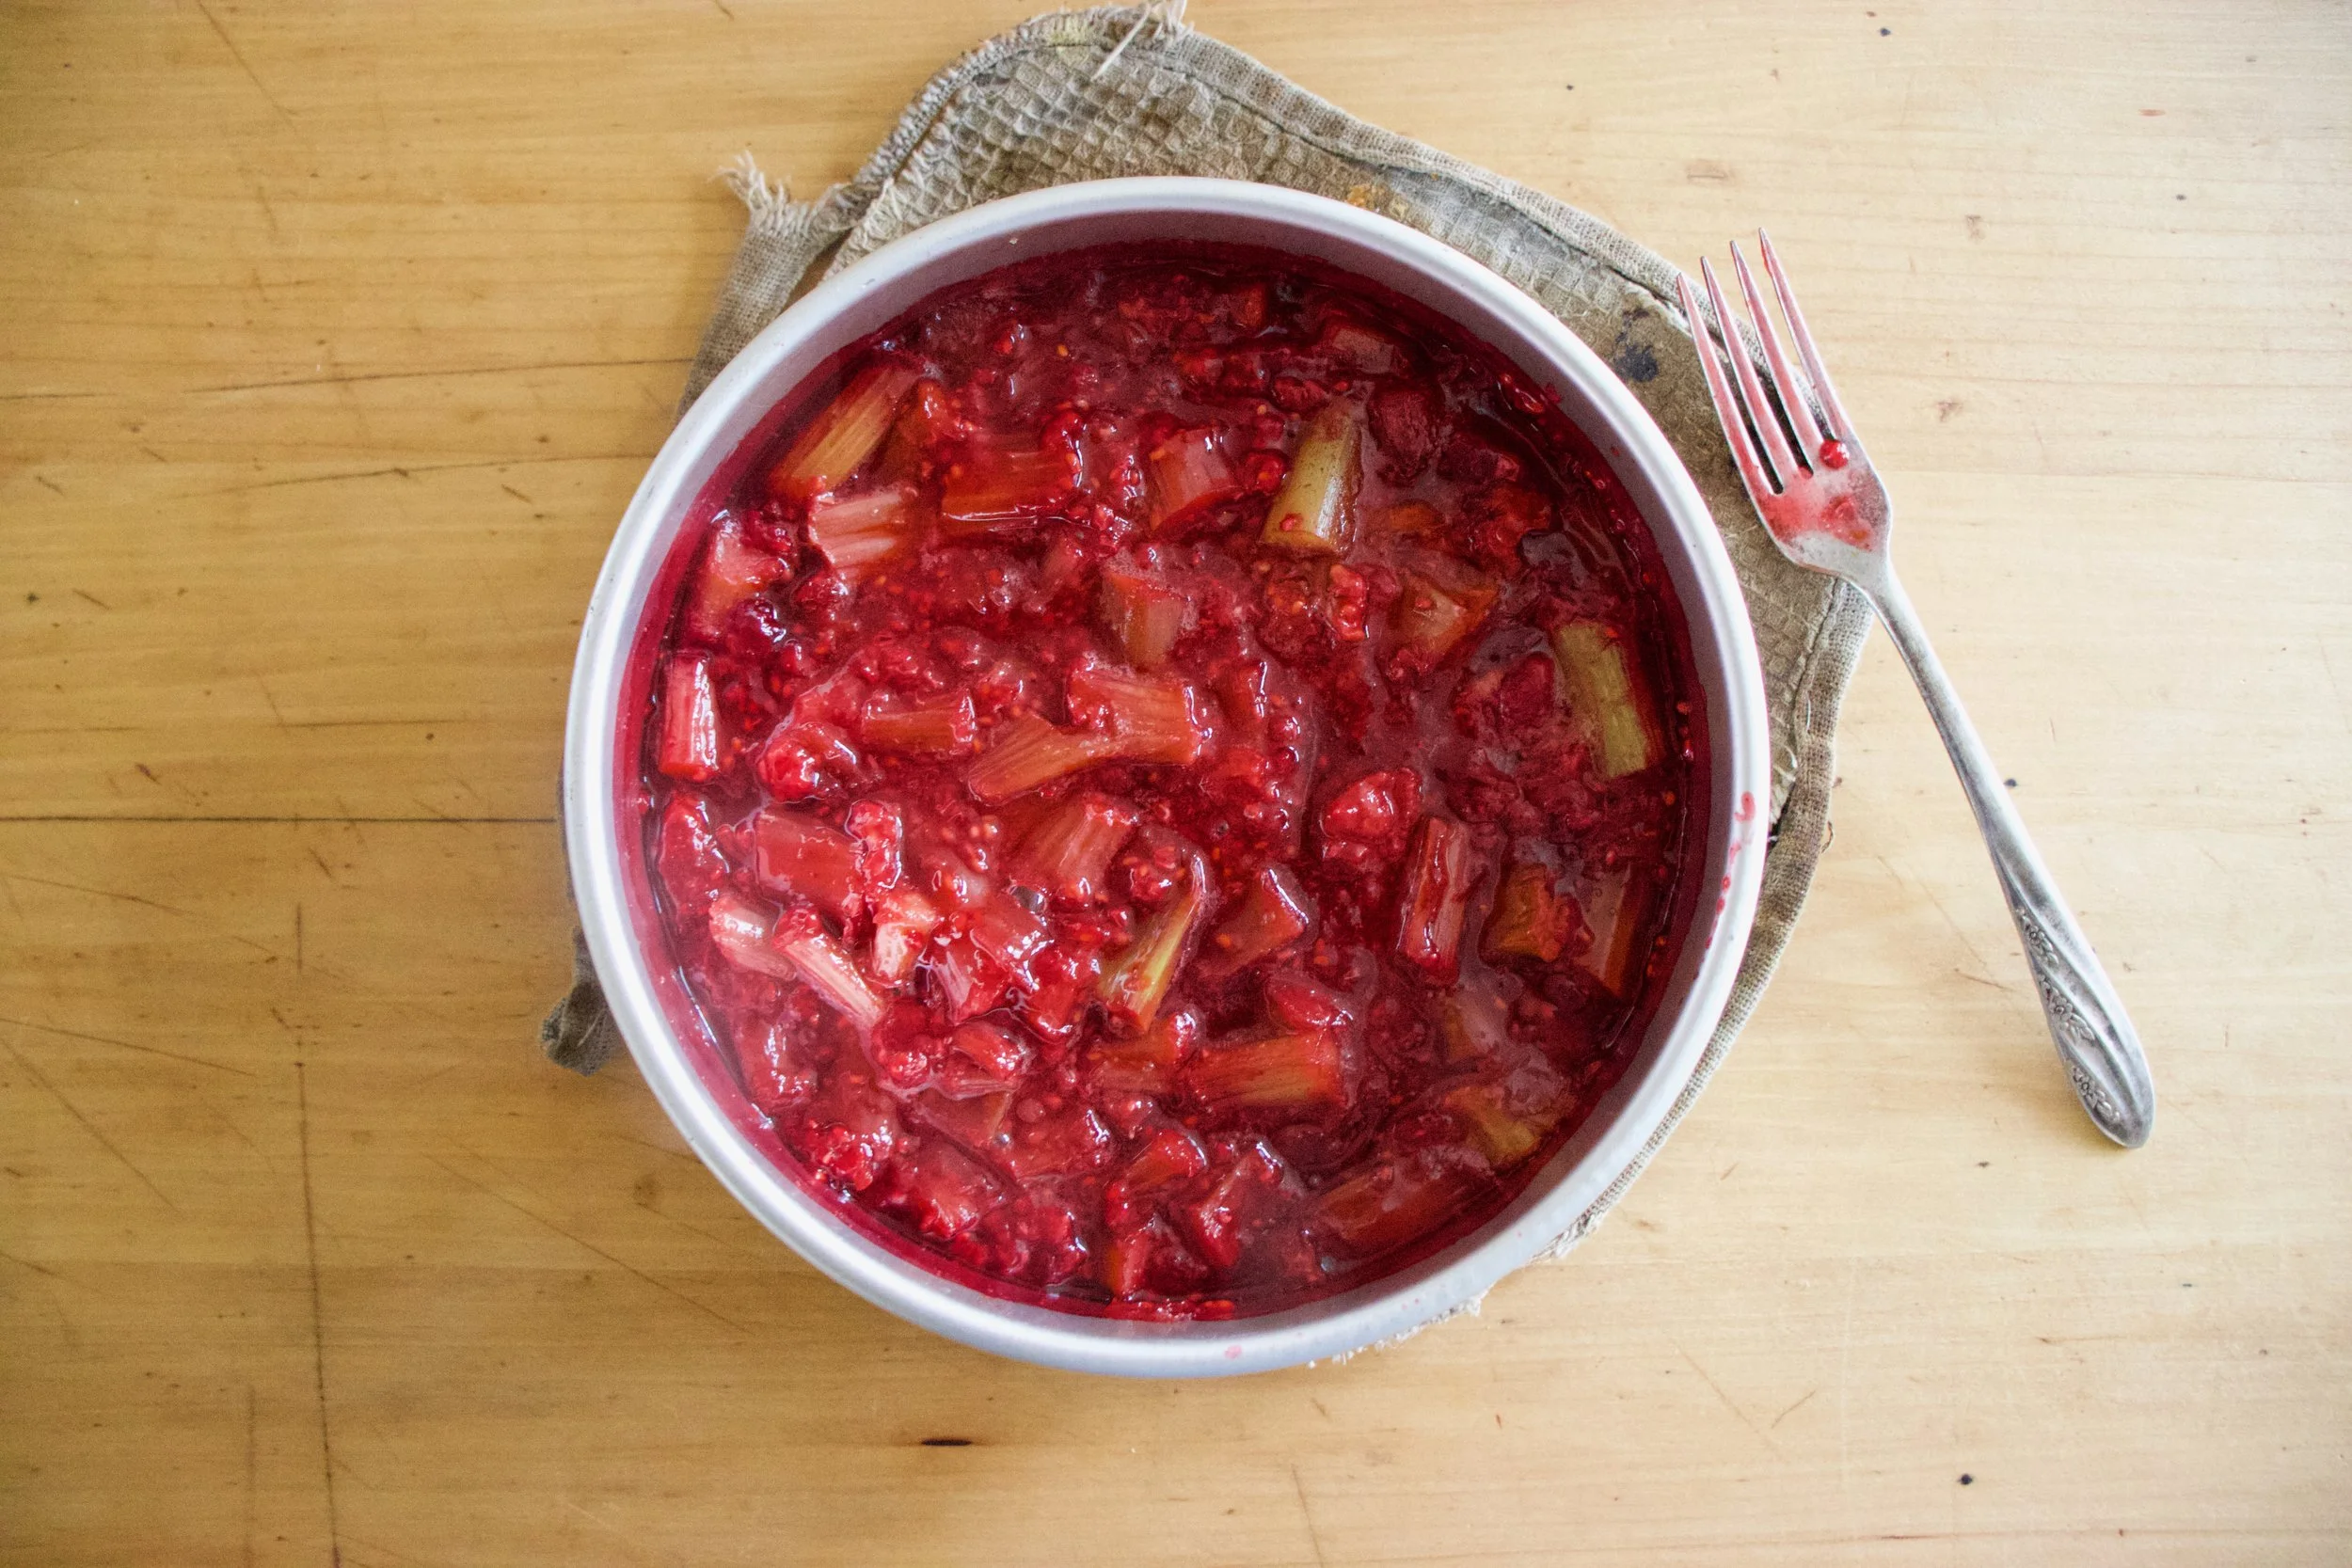
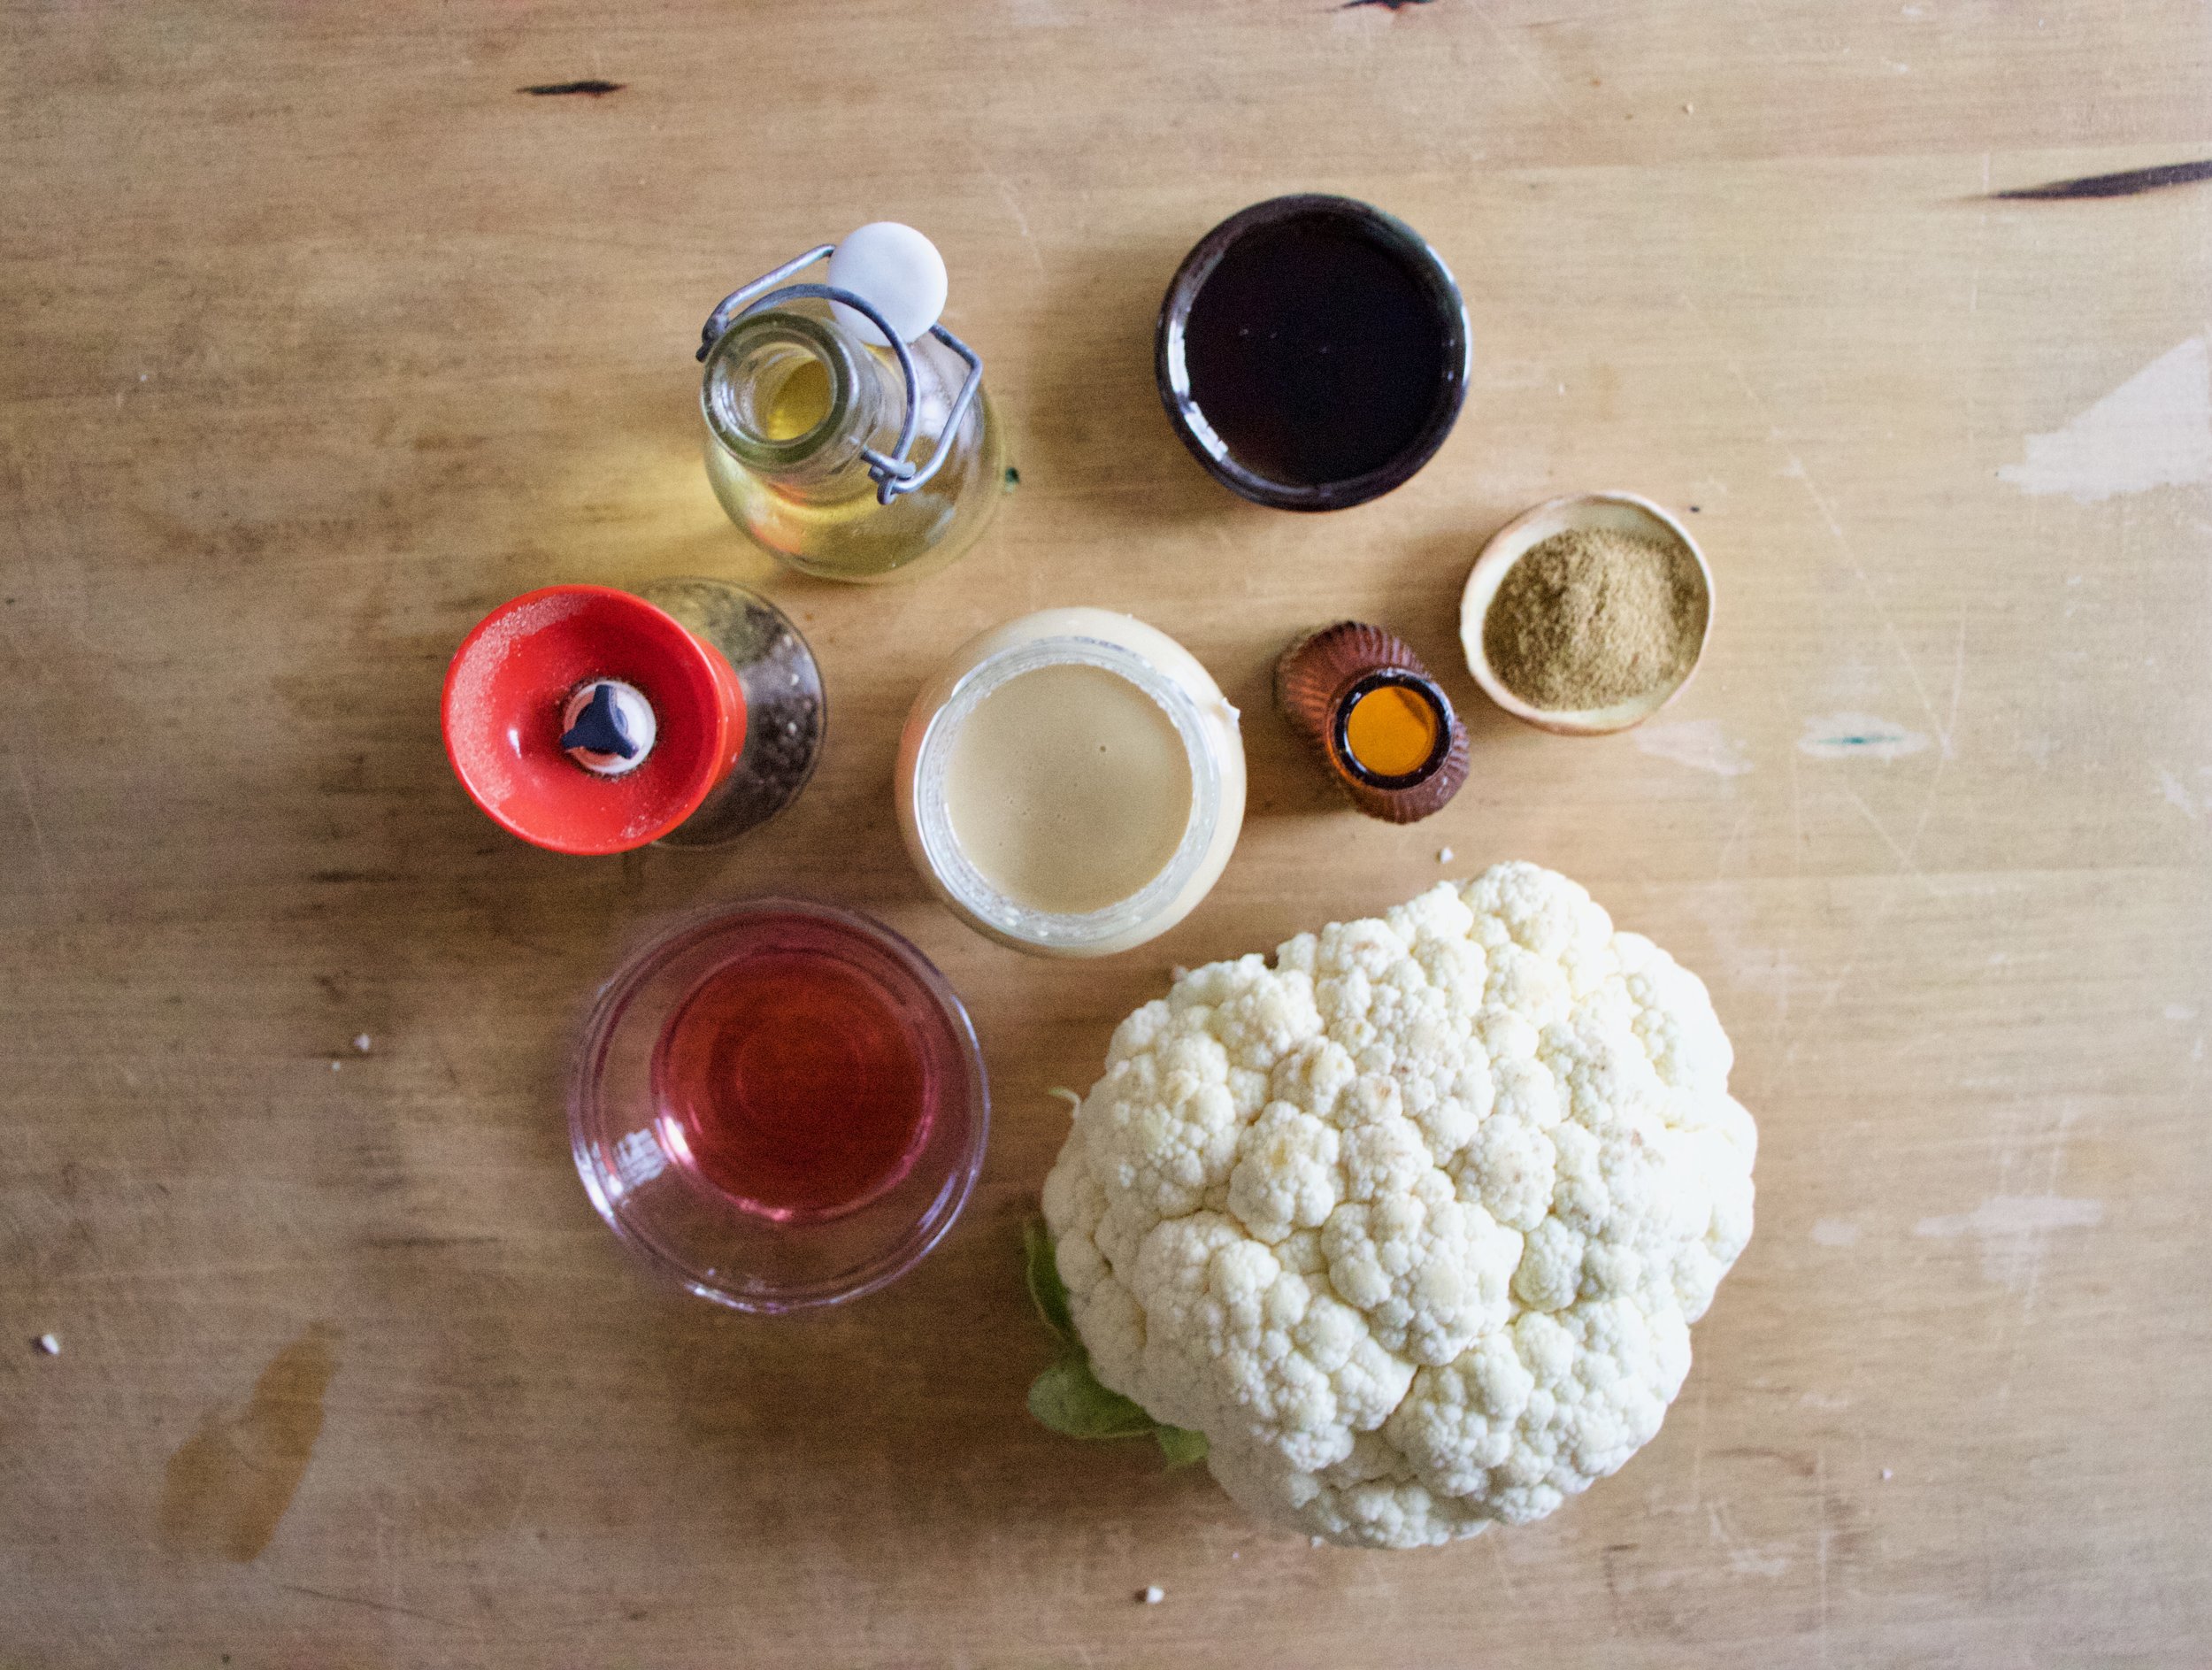
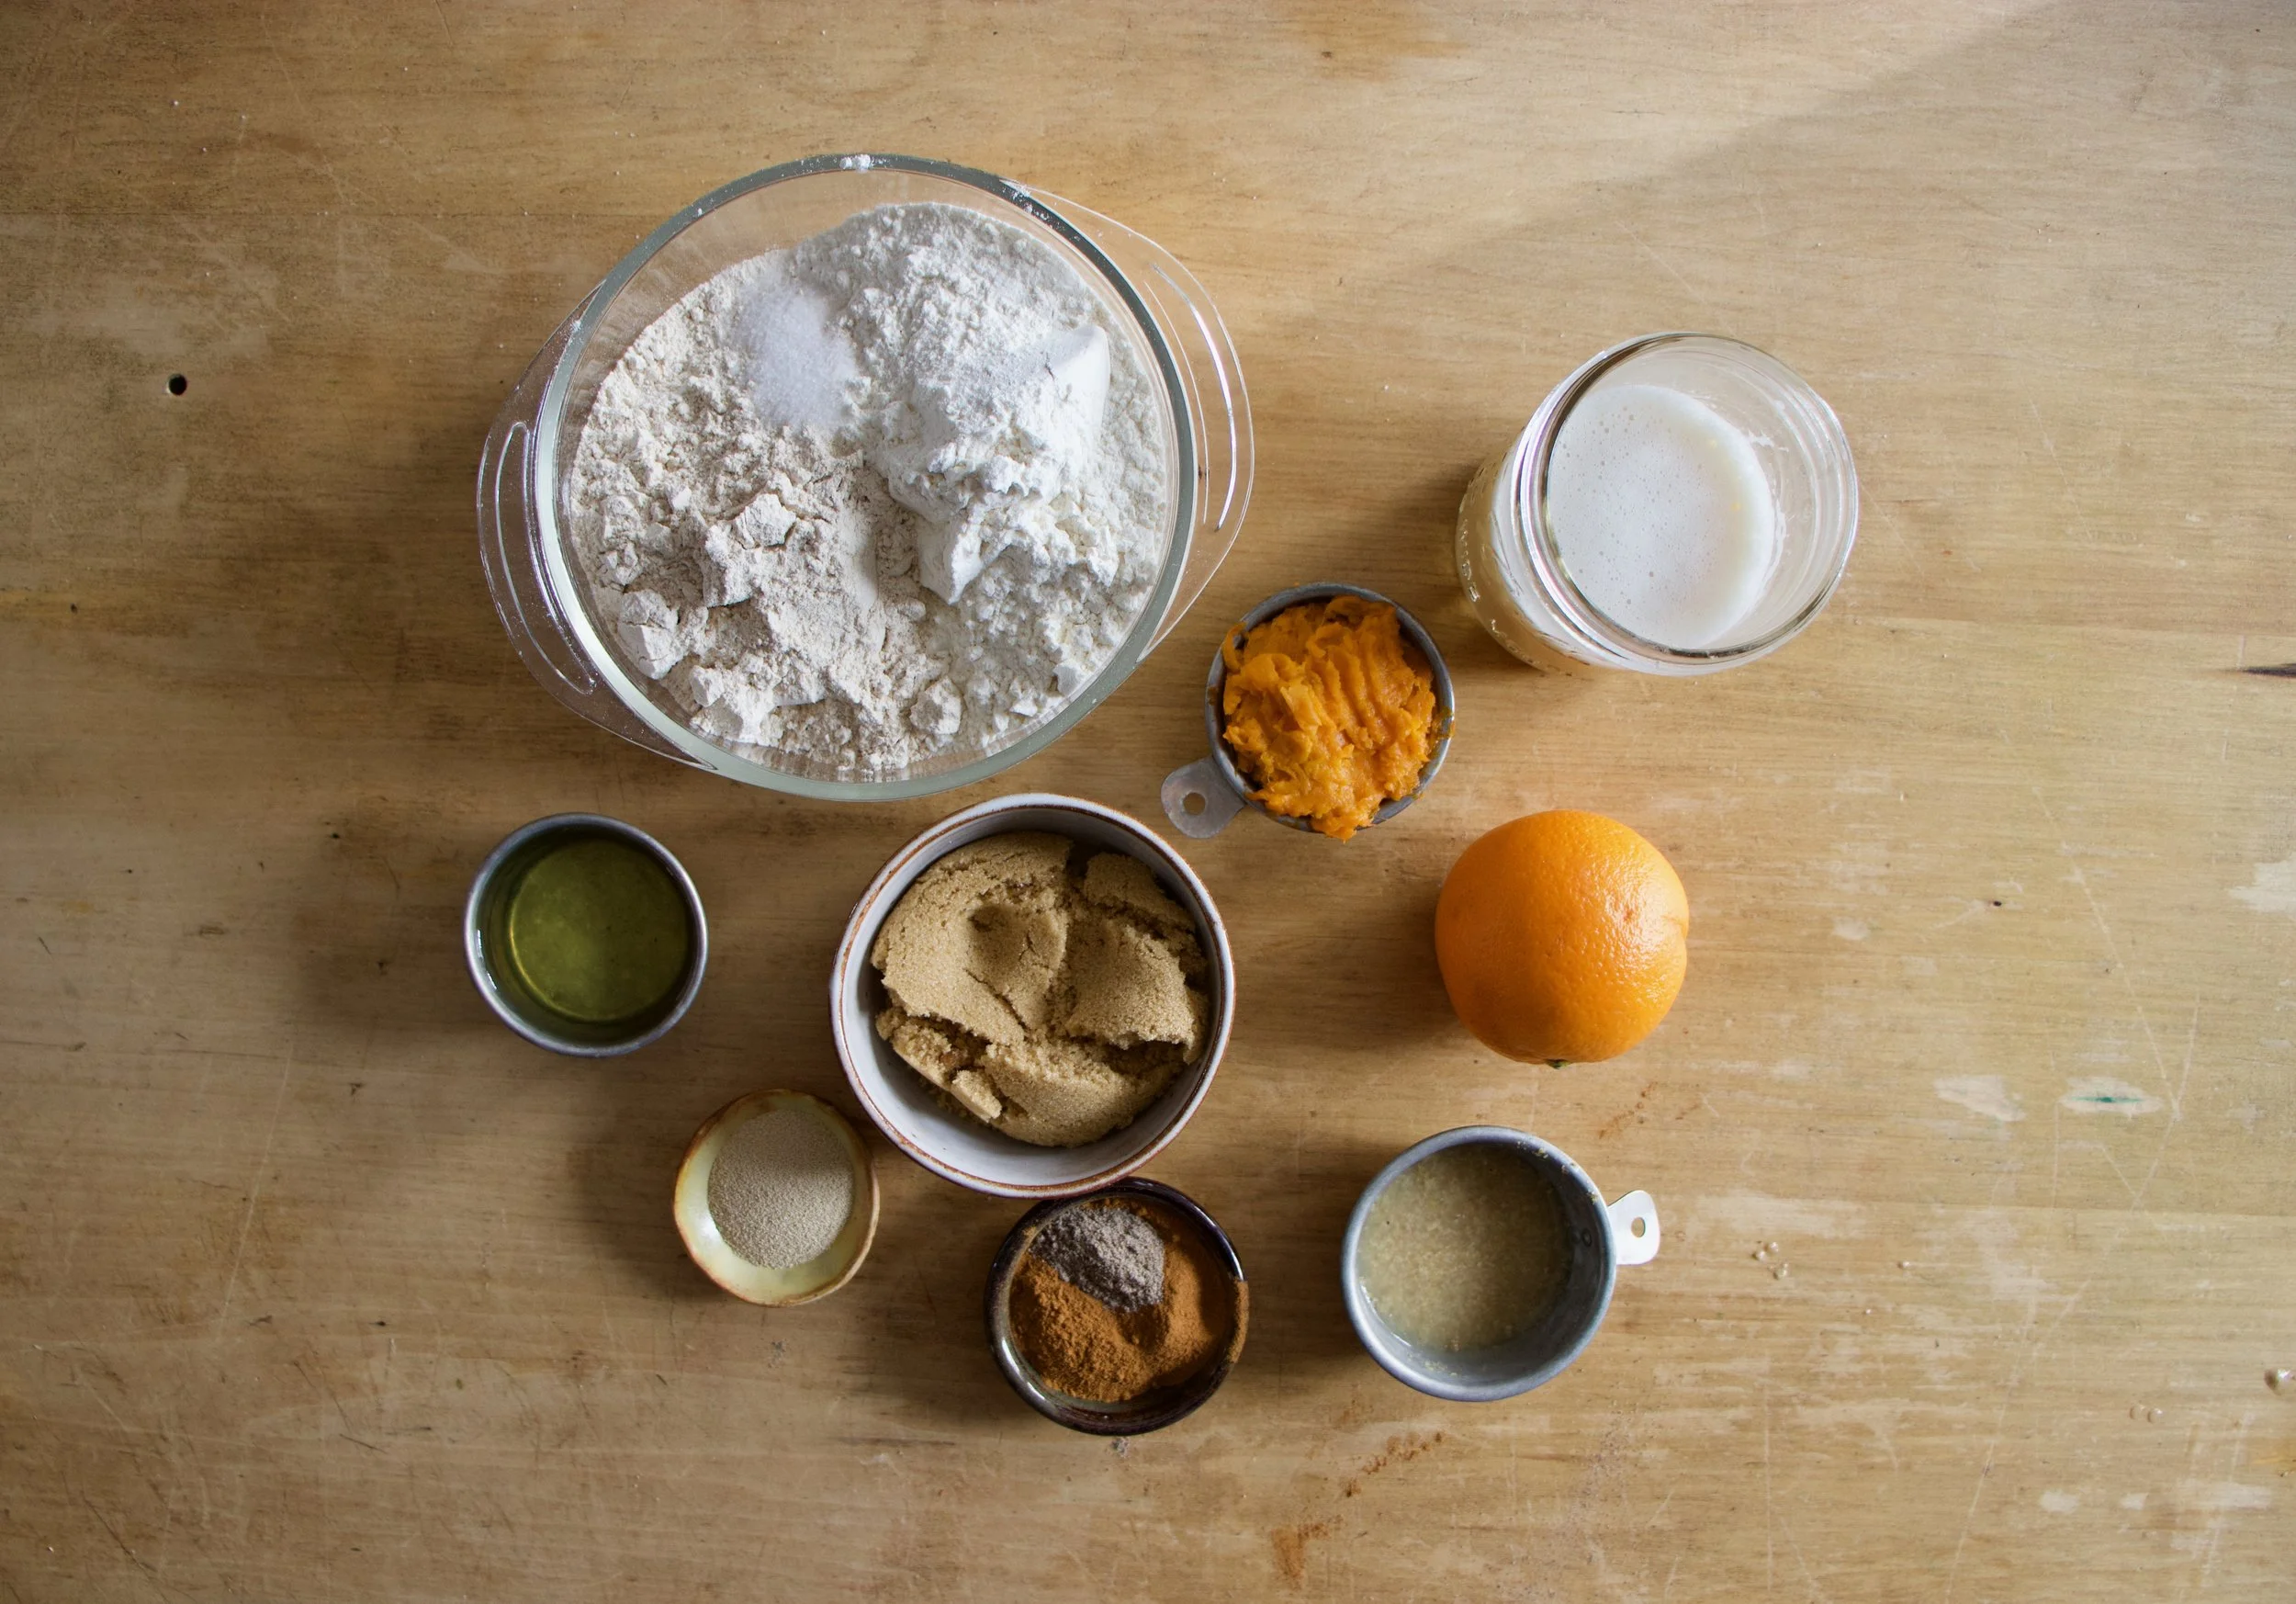
The stuff. Raspberries (frozen), rhubarb (frozen), sugar, flour, salt, baking power, cinnamon ,almond milk, apple cider vinegar, cornstarch, and oil.

Raspberries, rhubarb, sugar, cinnamon, cornstarch. Its all there in the bowl. Just needs to be mixed. So mix it.

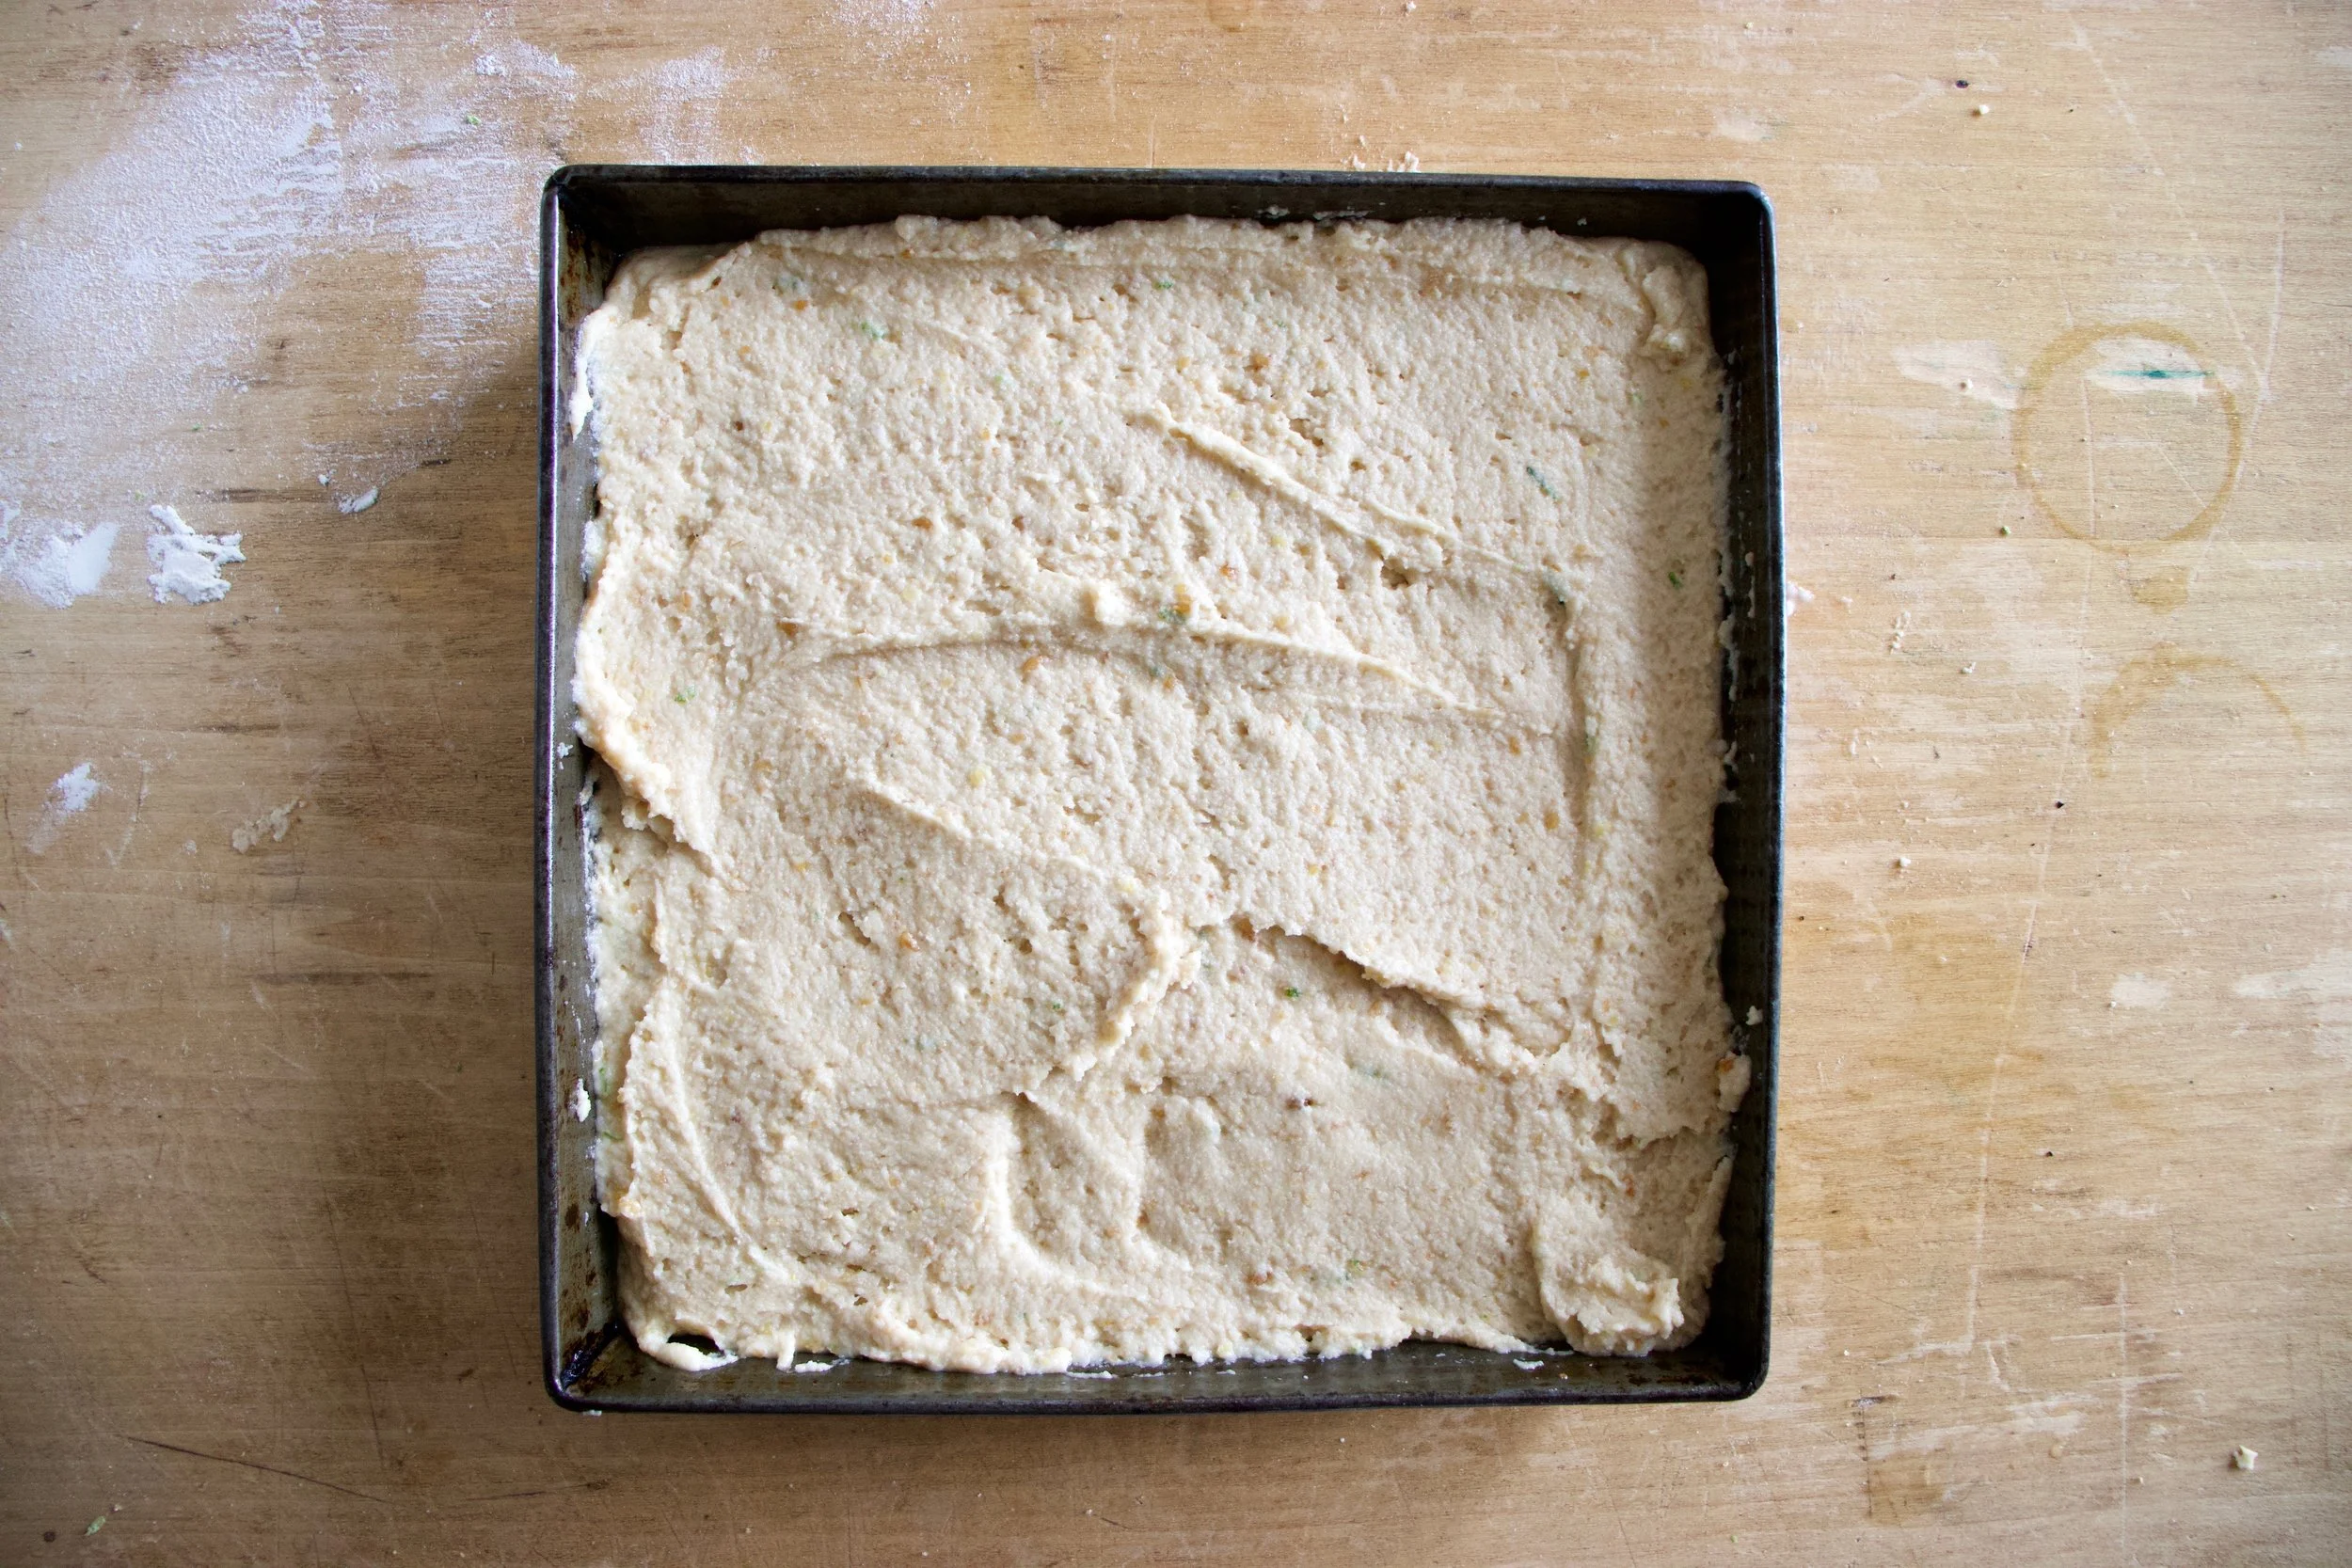
Dump fruit mixture into well greased 8 inch pan and pop it into a hot oven to get a head start on baking.
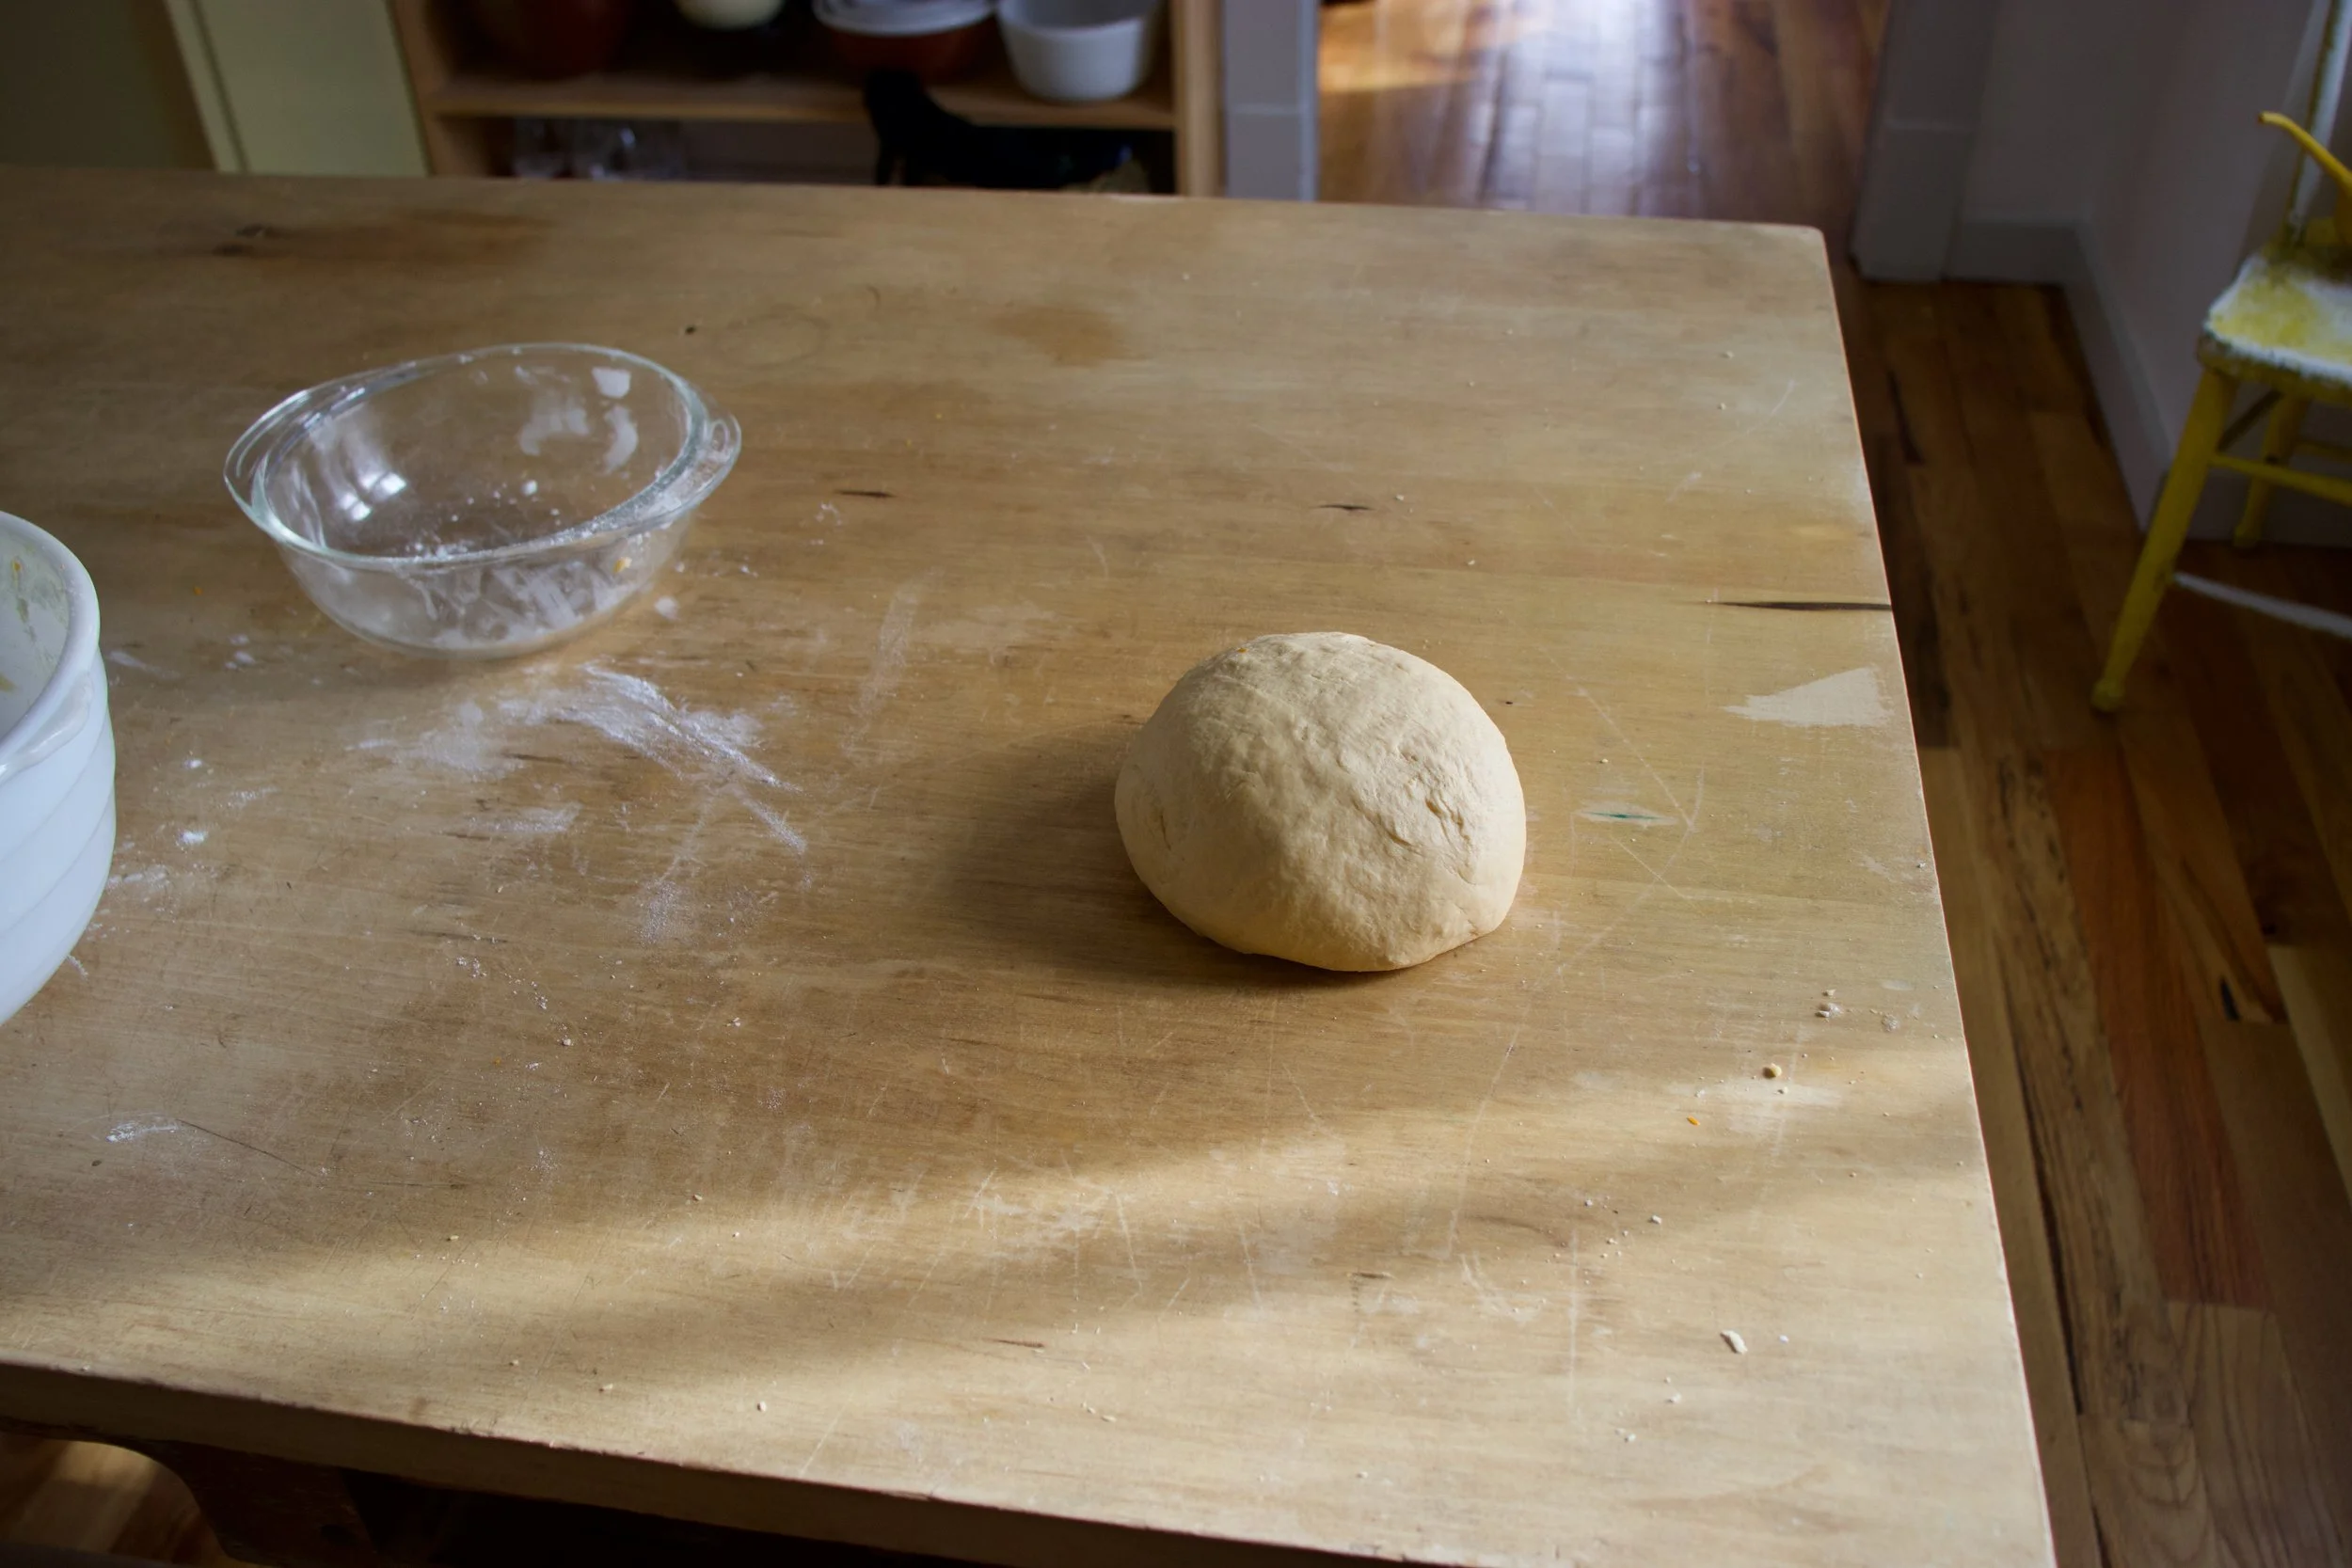
While the fruits in the oven, make the biscuit dough. Mix the dry together then mix in the wet until just incorporated and a sticky dough forms.
Pulled from the oven, the fruit is starting to cook down and whoa, it just smells so good!

Drop on the biscuits dough on top of the fruit (careful of the hot pan). Evenly if possible, but don%u2019t work to hard to make it look perfect. Imperfection makes it look perfect, you know?
Once biscuits are on, lightly brush the tops with a little milk and sprinkle with more sugar then pop it back into the oven for another 25-30 minutes or until the biscuits are baked.

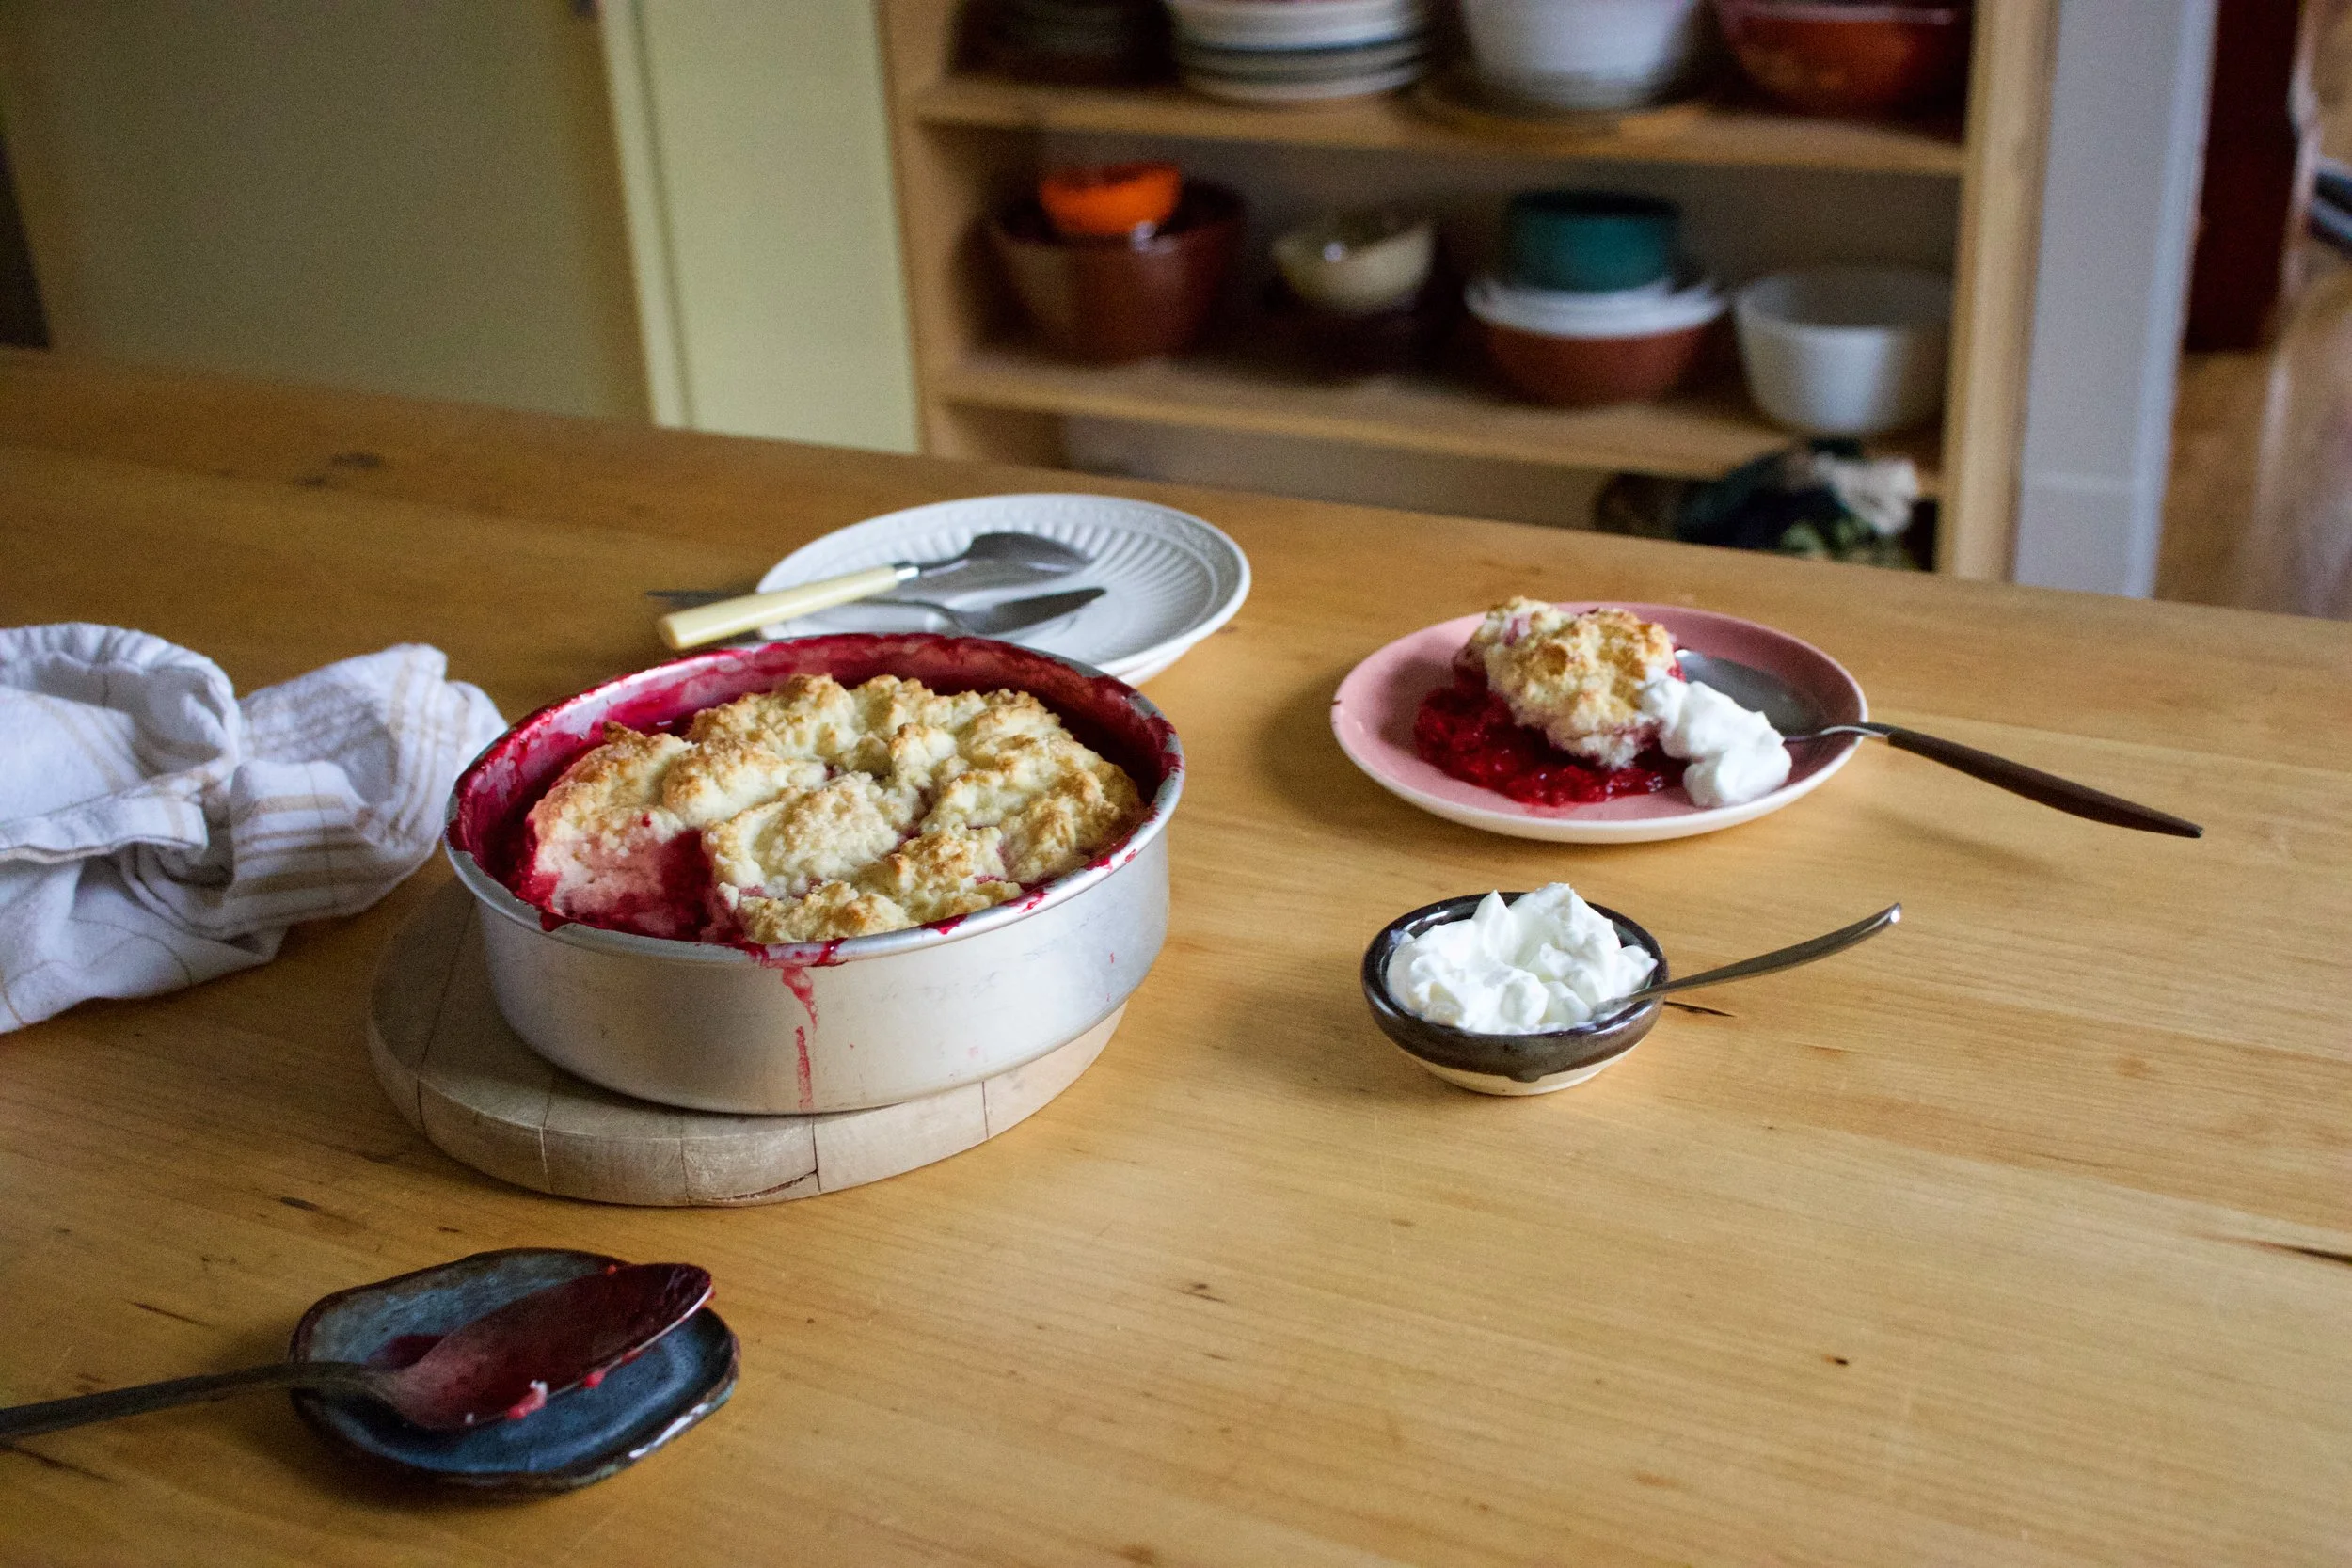
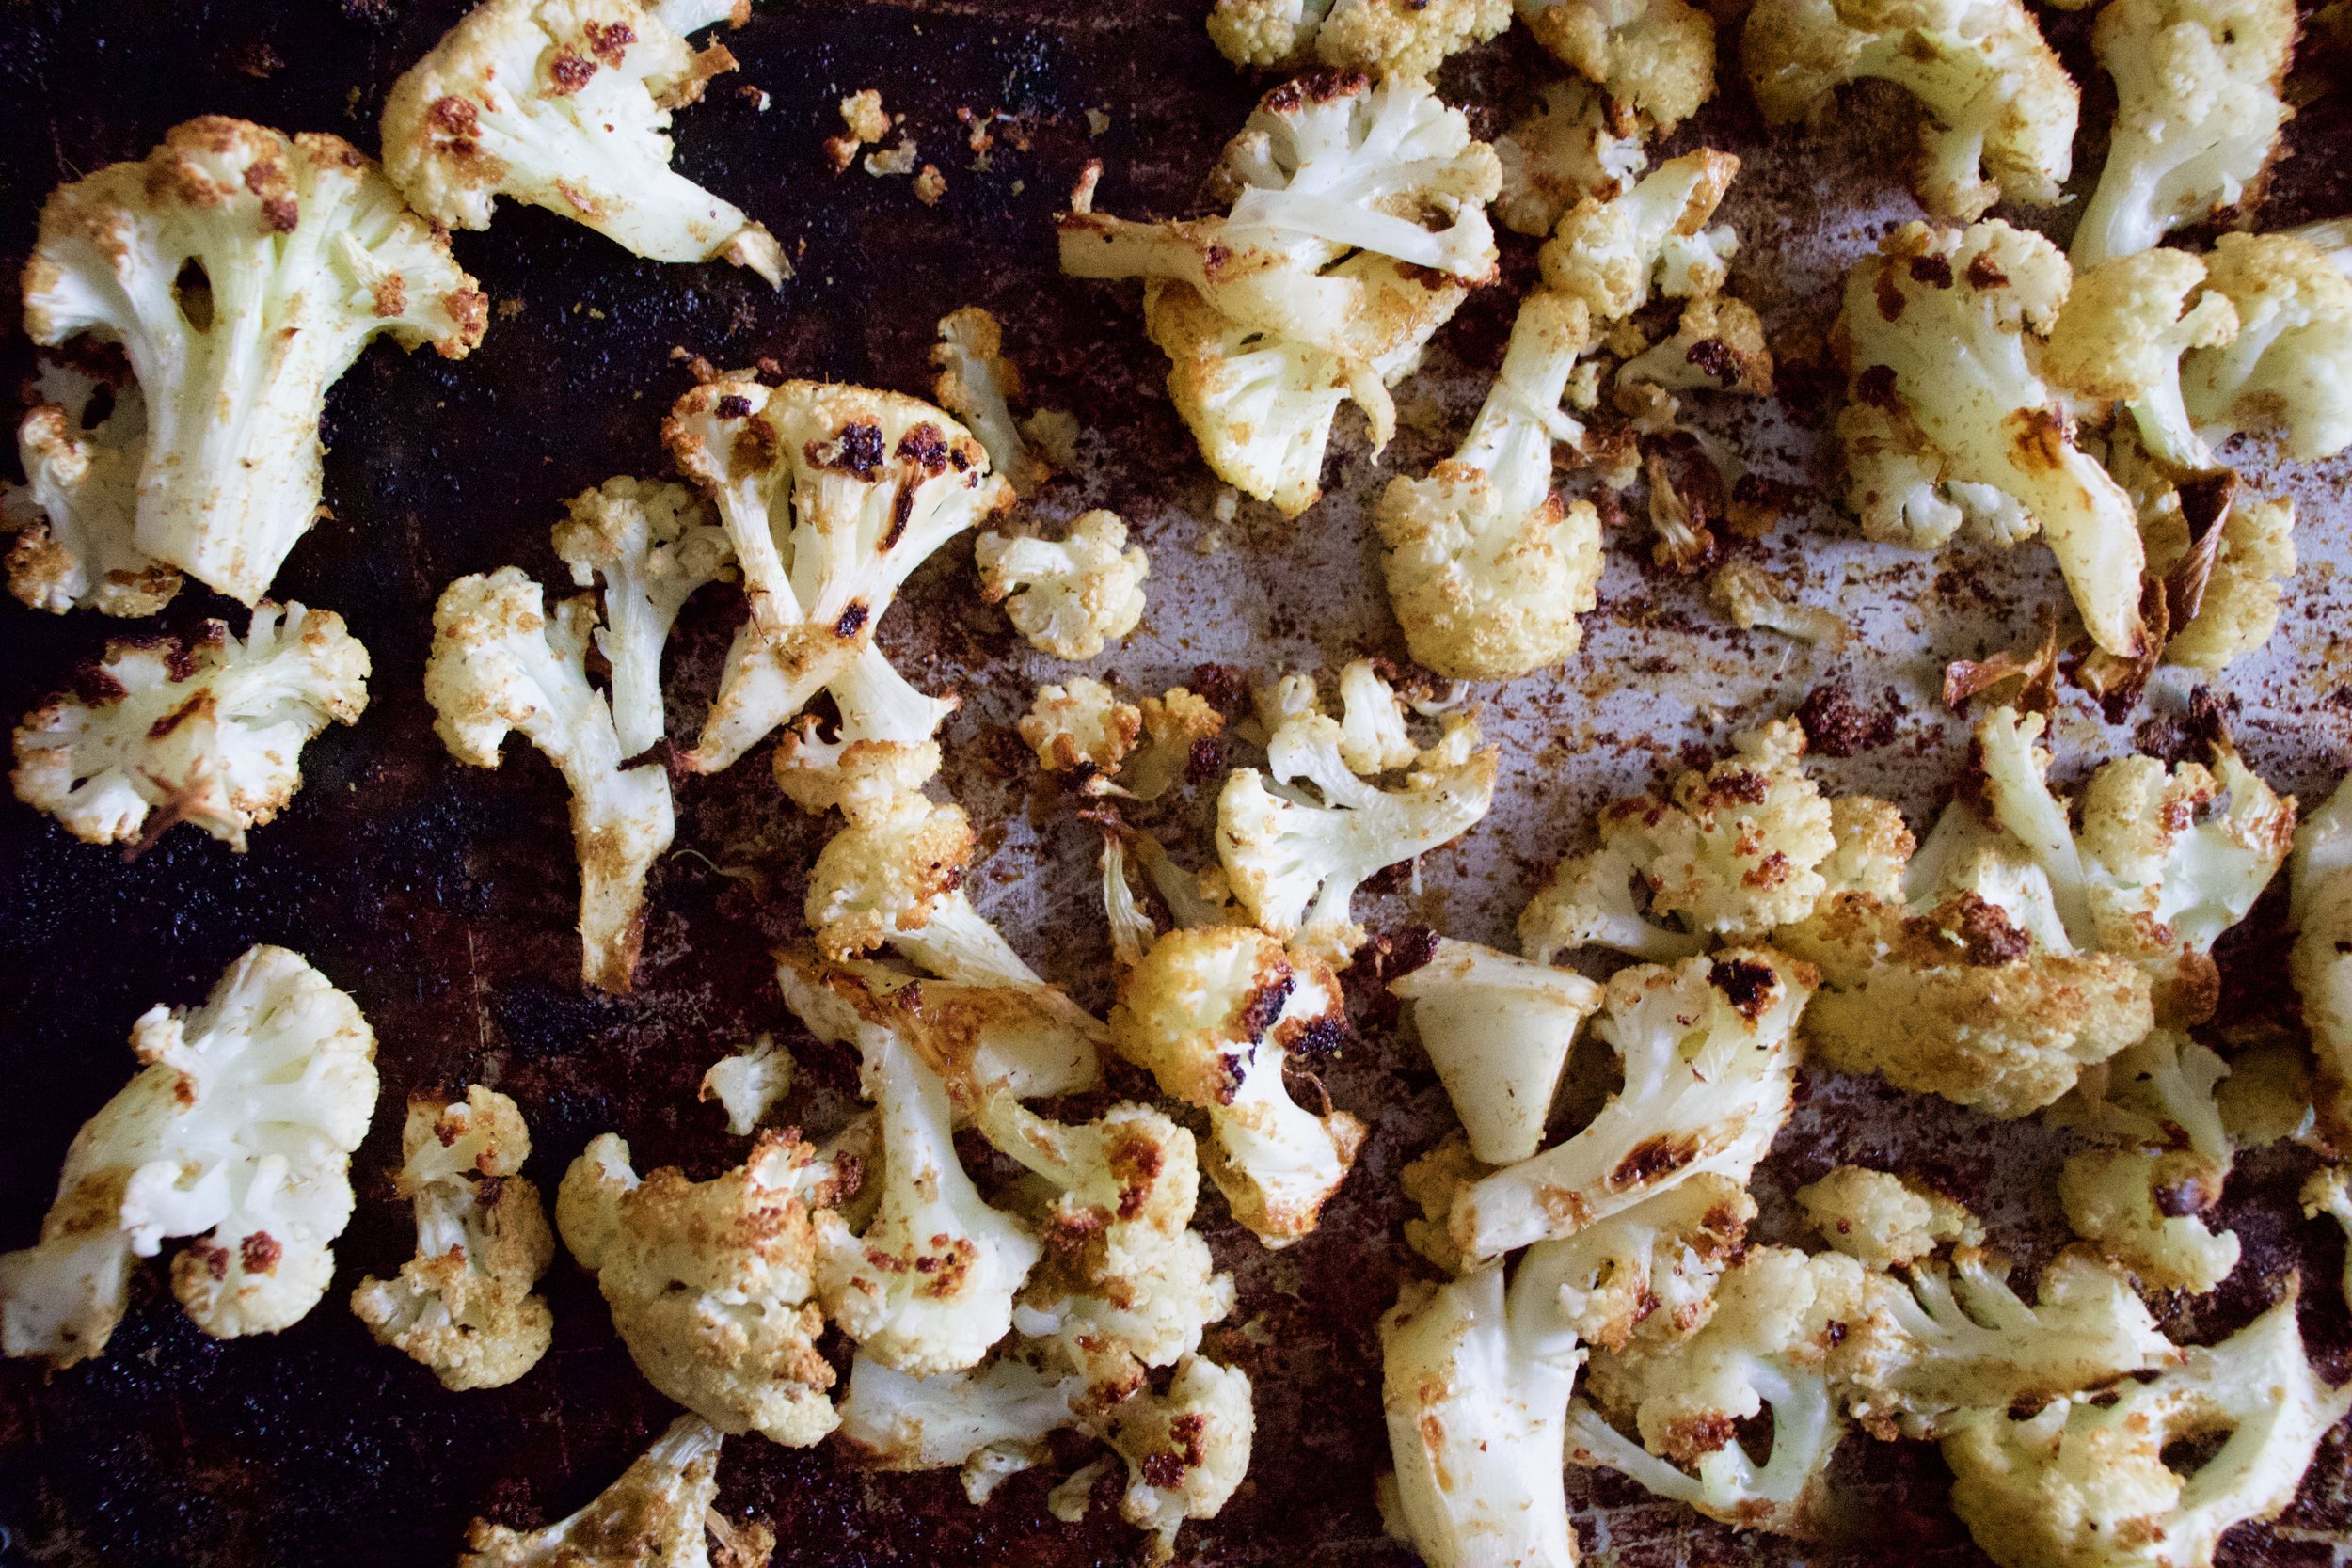
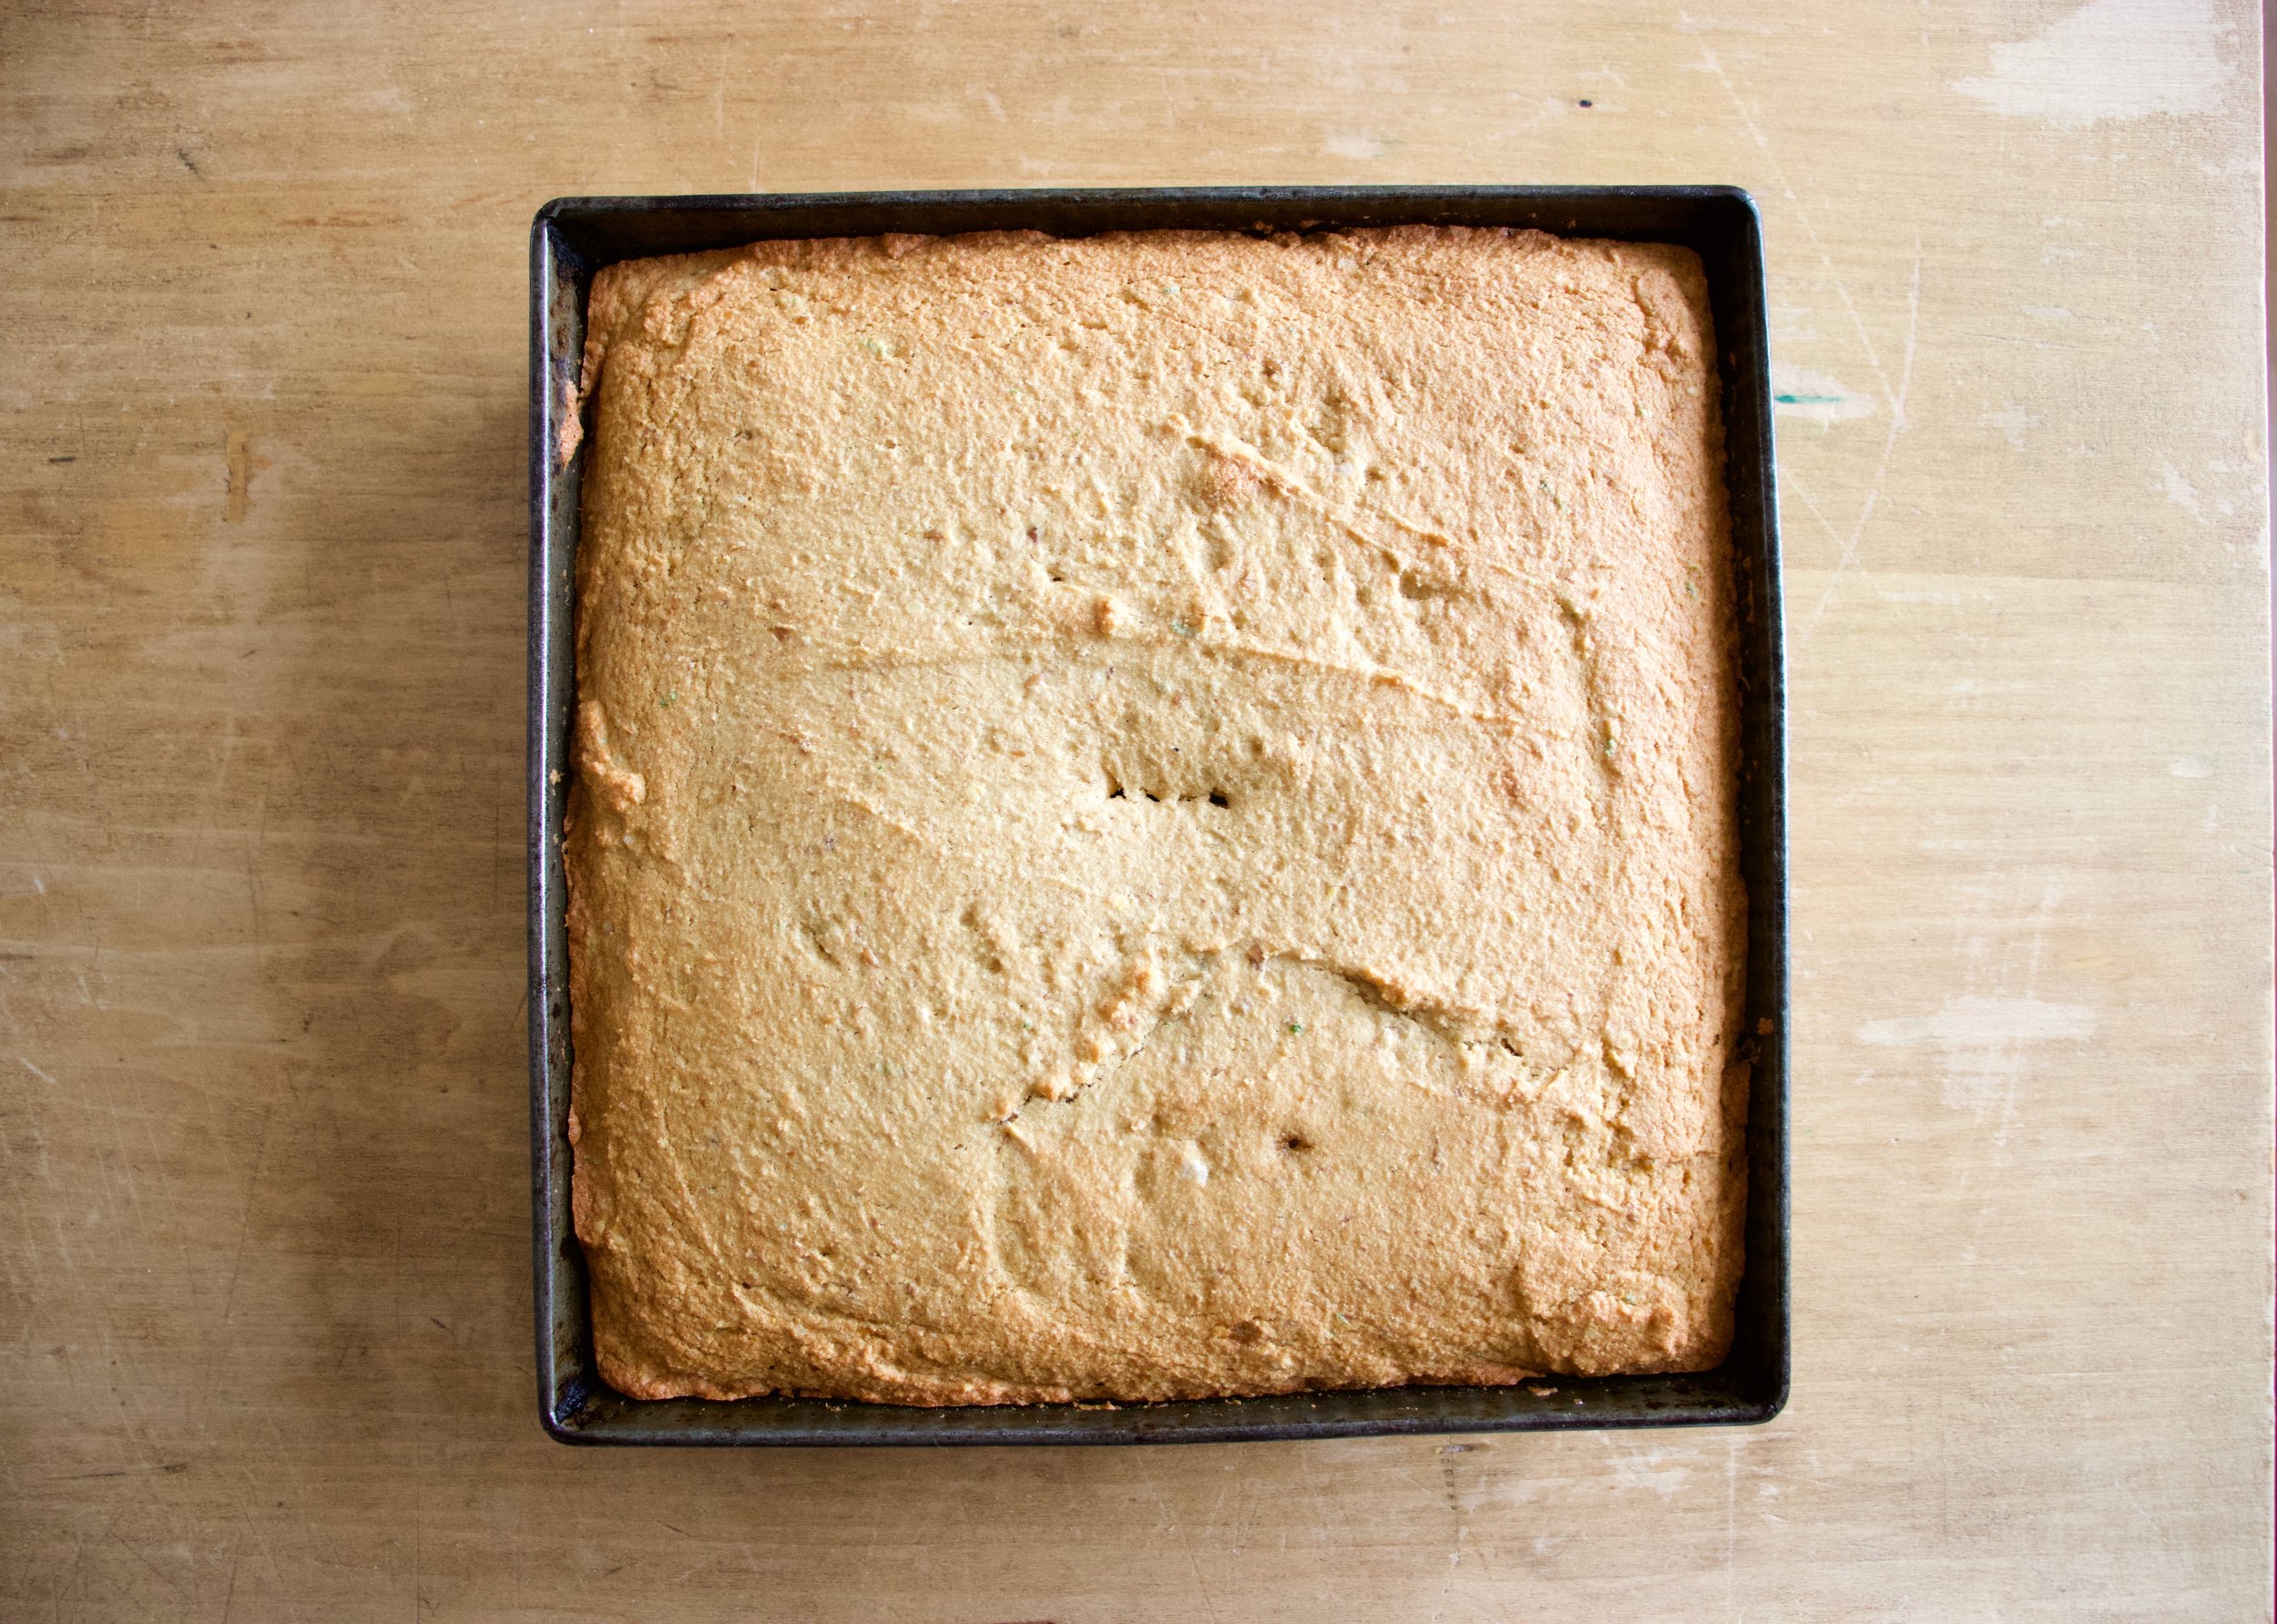
Pulled from the oven with a bubbly filling and a golden brown biscuity top. Things are looking good here.
And now it%u2019s time.
Dig on in my friend. Sever with something creamy like whipped coconut cream or some type of yogurt or ice cream situation of your choice. And again, this can be your breakfast.
Happy spring people!
-C
make a a 8 inch round which serves 5-6
For the Filling
-
2 cups raspberries (fresh or frozen)
-
2 cups rhubarb chopped into 1/2 inch to inch long pieces (fresh or frozen)
-
1 1/2 tablespoons corn starch
-
3/4 -1 cup sugar (lesser amount if you like a little more tartness. I used lesser amount)
-
1 teaspoon cinnamon
For the dough
-
1 cups all purpose flour
-
1 1/2 teaspoon baking powder
-
1/2 teaspoon salt
-
3 tablespoons sugar
-
3 tablespoons neutral flavored oil
-
1/2 cup plant based milk
-
1 teaspoon apple cider vinegar
Preheat oven to 350.
In a large bowl mix together the rhubarb and raspberries with the corn starch, sugar, and cinnamon. Grease a 8 inch round pan the is at least 2 inches deep (can use a slightly large pan or a square) and dump in fruit mixture. Place into oven to bake for about 15 minutes or the fruit starts to break down.
While fruit is baking, mix up biscuit dough. Flour, salt, 2 tablespoons sugar, and baking powder go in a large bowl and mixed until combined. Add in the oil, the milk, and the vinegar. Mix until just incorporated and a dough has formed.
Remove the fruit cooking from the oven. Turn heat up to 375.
Carefully drop spoonfuls of biscuit batter on top of fruit. Brush the top of the biscuits with a little milk and sprinkle with remaining tablespoon sugar. Place the pan back into the oven and bake for another 25-30 minutes or until the biscuits are all nice and golden brown on top.
Remove from oven and let cool for a few minutes before serving. Serve warm with a scoop or dollop of soothing creamy (coconut cream, yogurt, ice cream%u2026..whatever floats your boat.)
Left overs can be stored in pan, just cover it with something and place in fridge. Can be eaten cold to or reheated in microwave or oven.
It%u2019s a smoothie. And no, we have never really been smoothie people in this house, but what can I say, sometimes smoothies happen, especially when you have about 20 ripe bananas in the fruit bowl with no room in the freezer and no need for 7 loafs of banana bread.
So I smoothied. And I like it (a lot).
This is a smoothie of simplicity. Nothing fancy. Simplest of simple. Straight to the point. And all sorts of good.
You might think, does this simple smoothie you speak of taste very good? Yes, yes indeed it does. It is all sorts of fantastic. Basically if you like creamy, nutty, oaty, bananery things, you will like this. And it%u2019s a perfect breakfast, snack, dessert, or just wanting a little treat like thing that is not garbage food. A smoothie of all smoothies with the most basic ingredients. And takes about 15 seconds to whip up. Can%u2019t complain about that.
To the smoothie goodness!

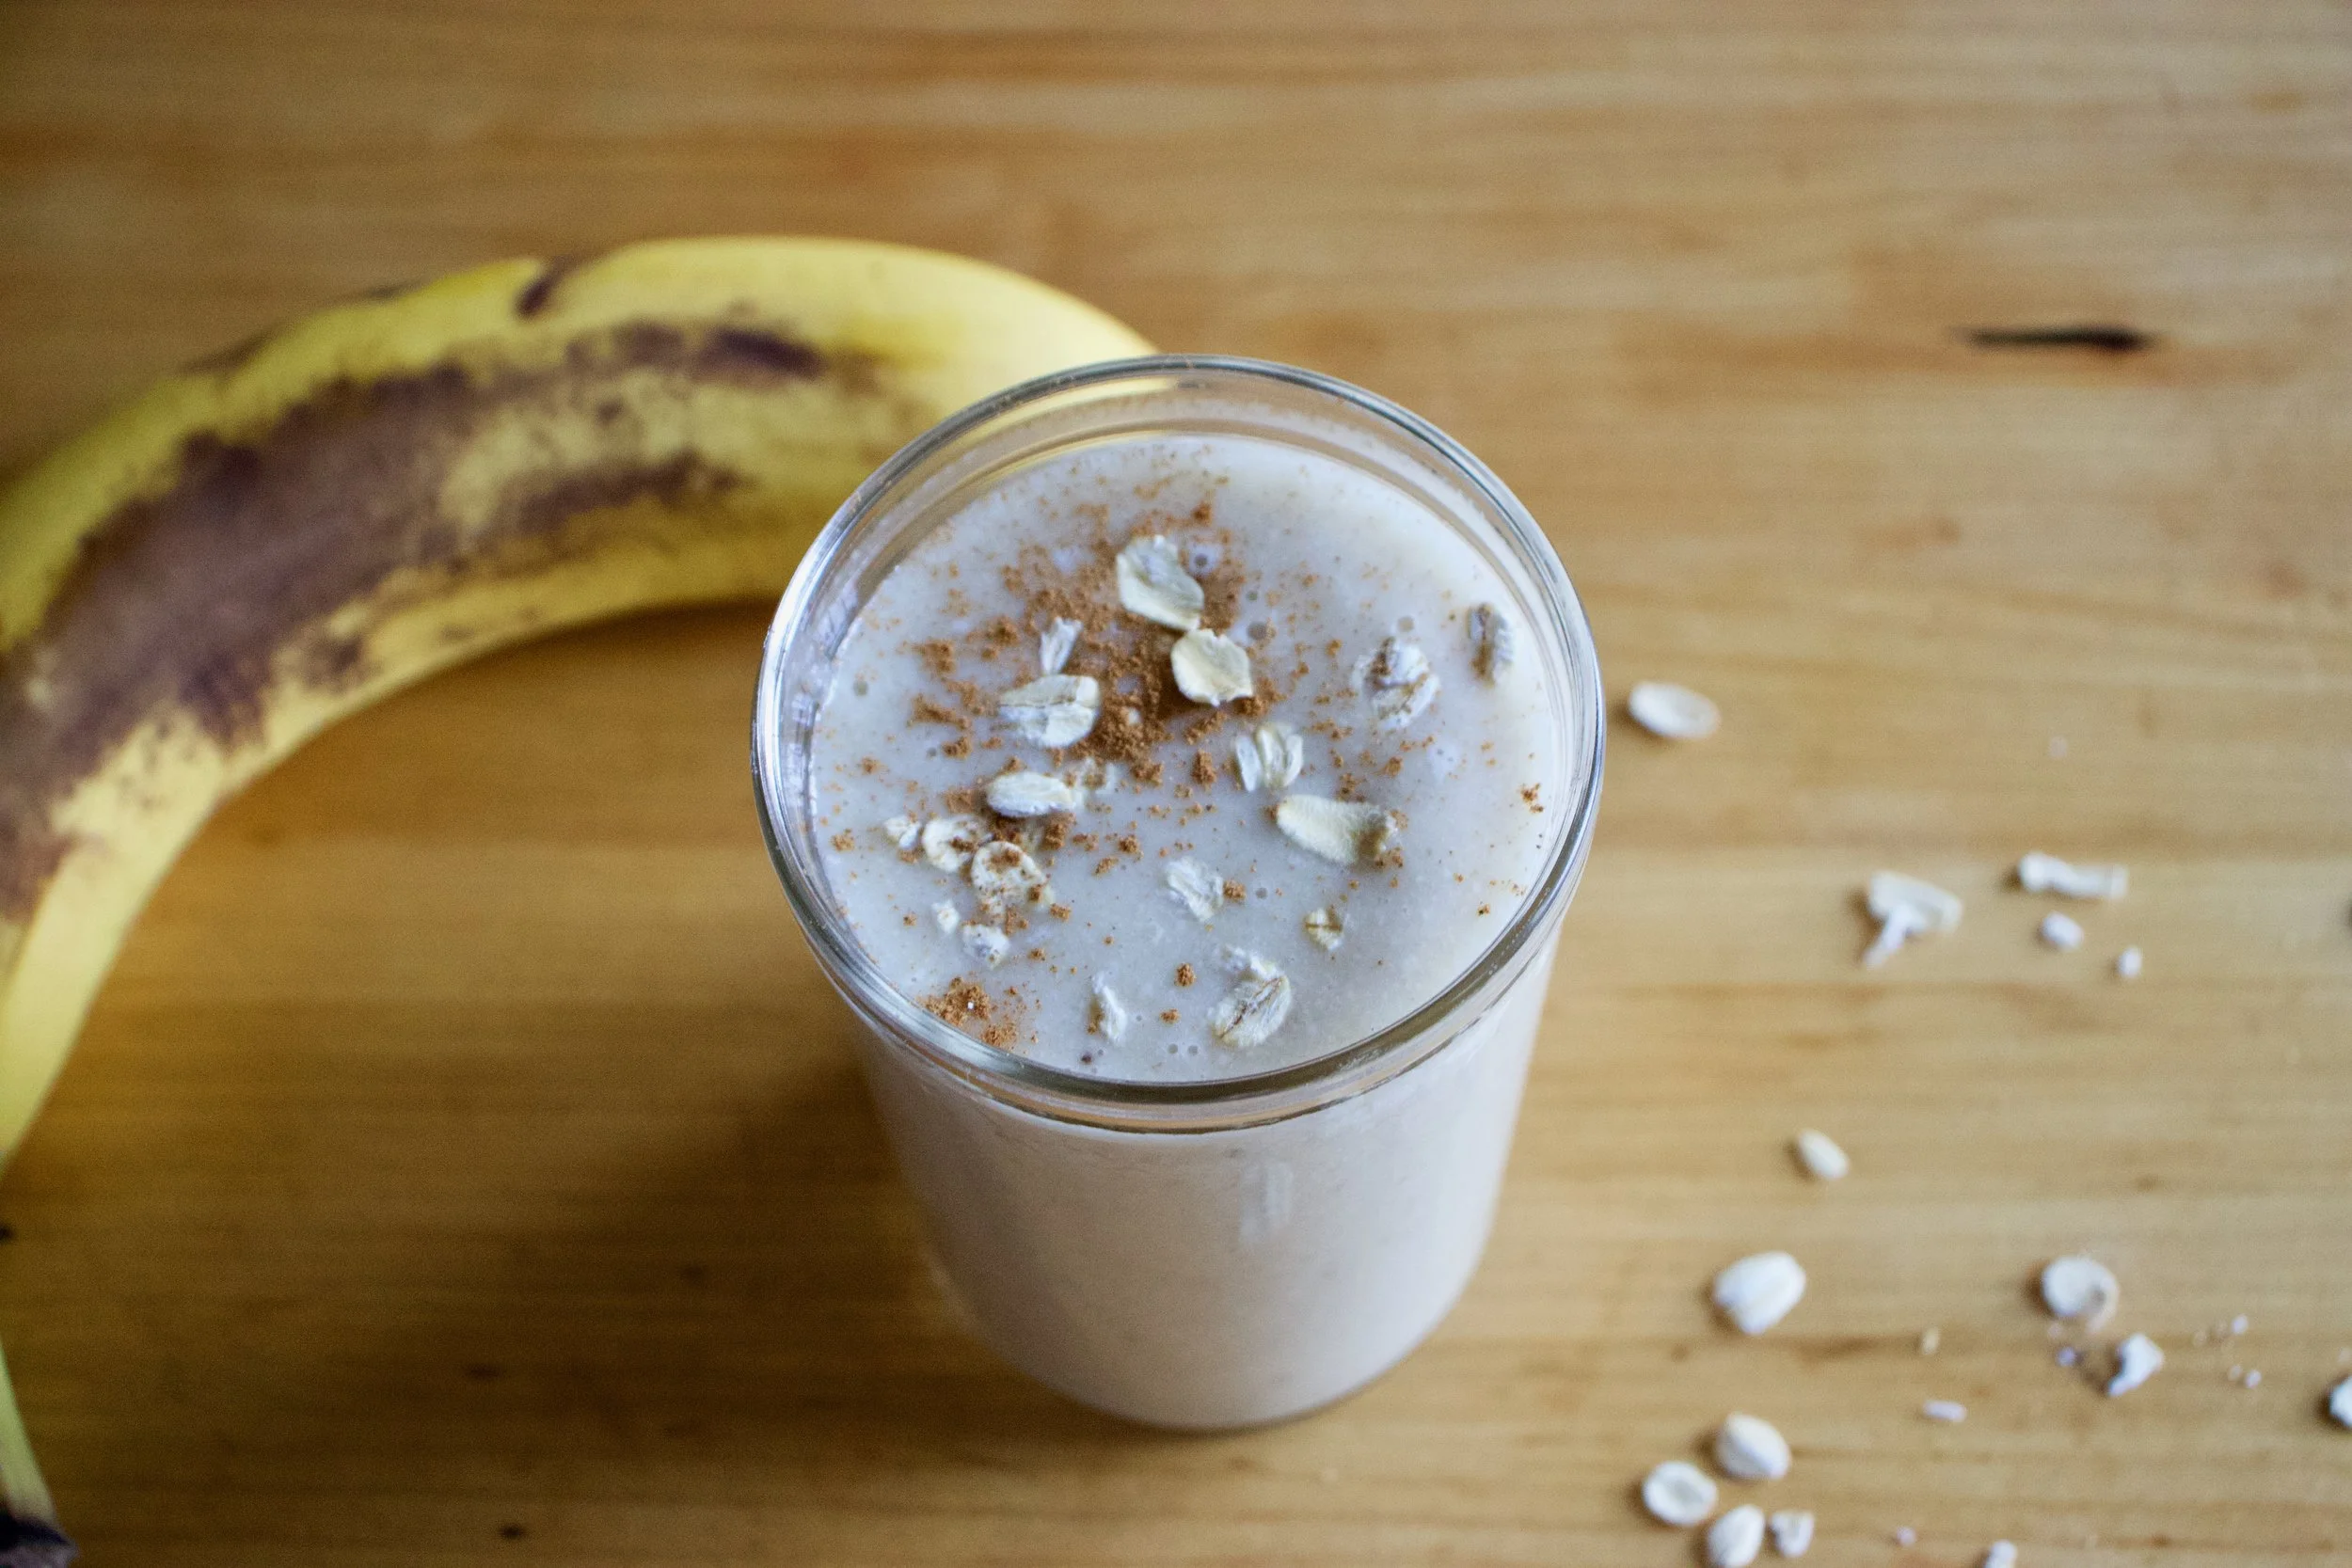
The stuff. A ripe banana, some old fashion rolled oats, a pinch of salt, water, and a smidge of maple syrup if you want it.
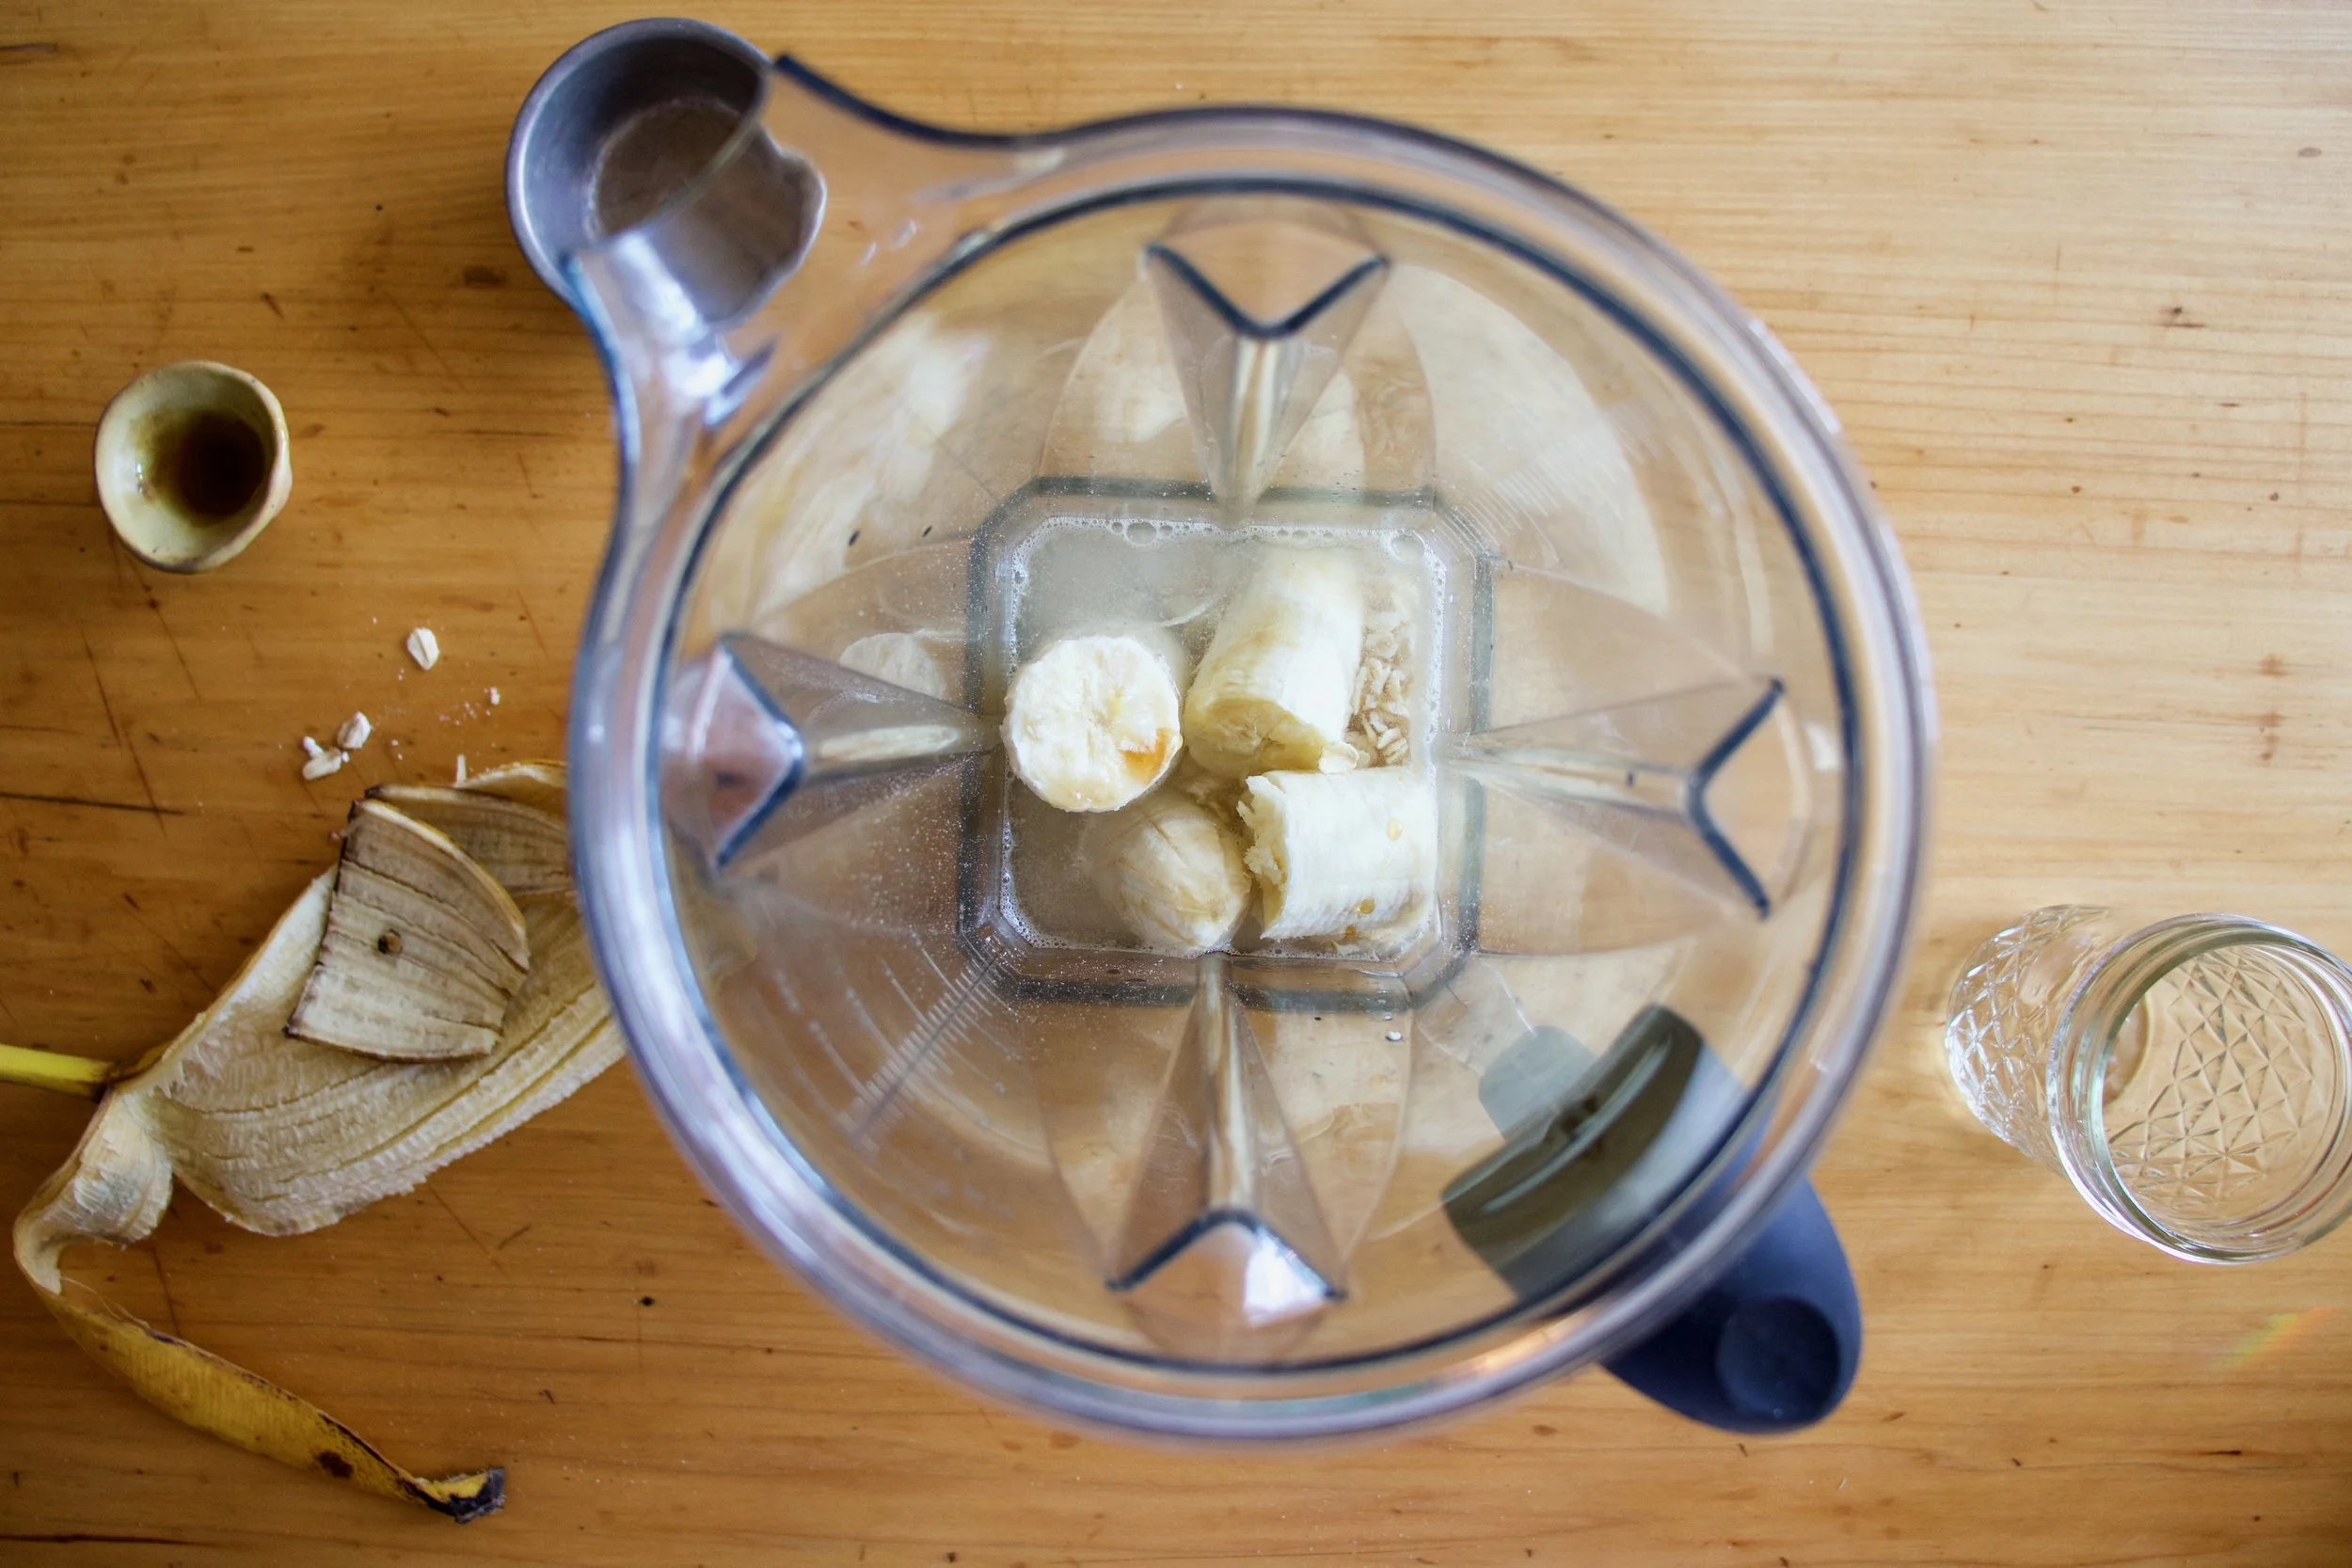
Everything goes into blender.

And blended until smooth. Hence the word smoothie.
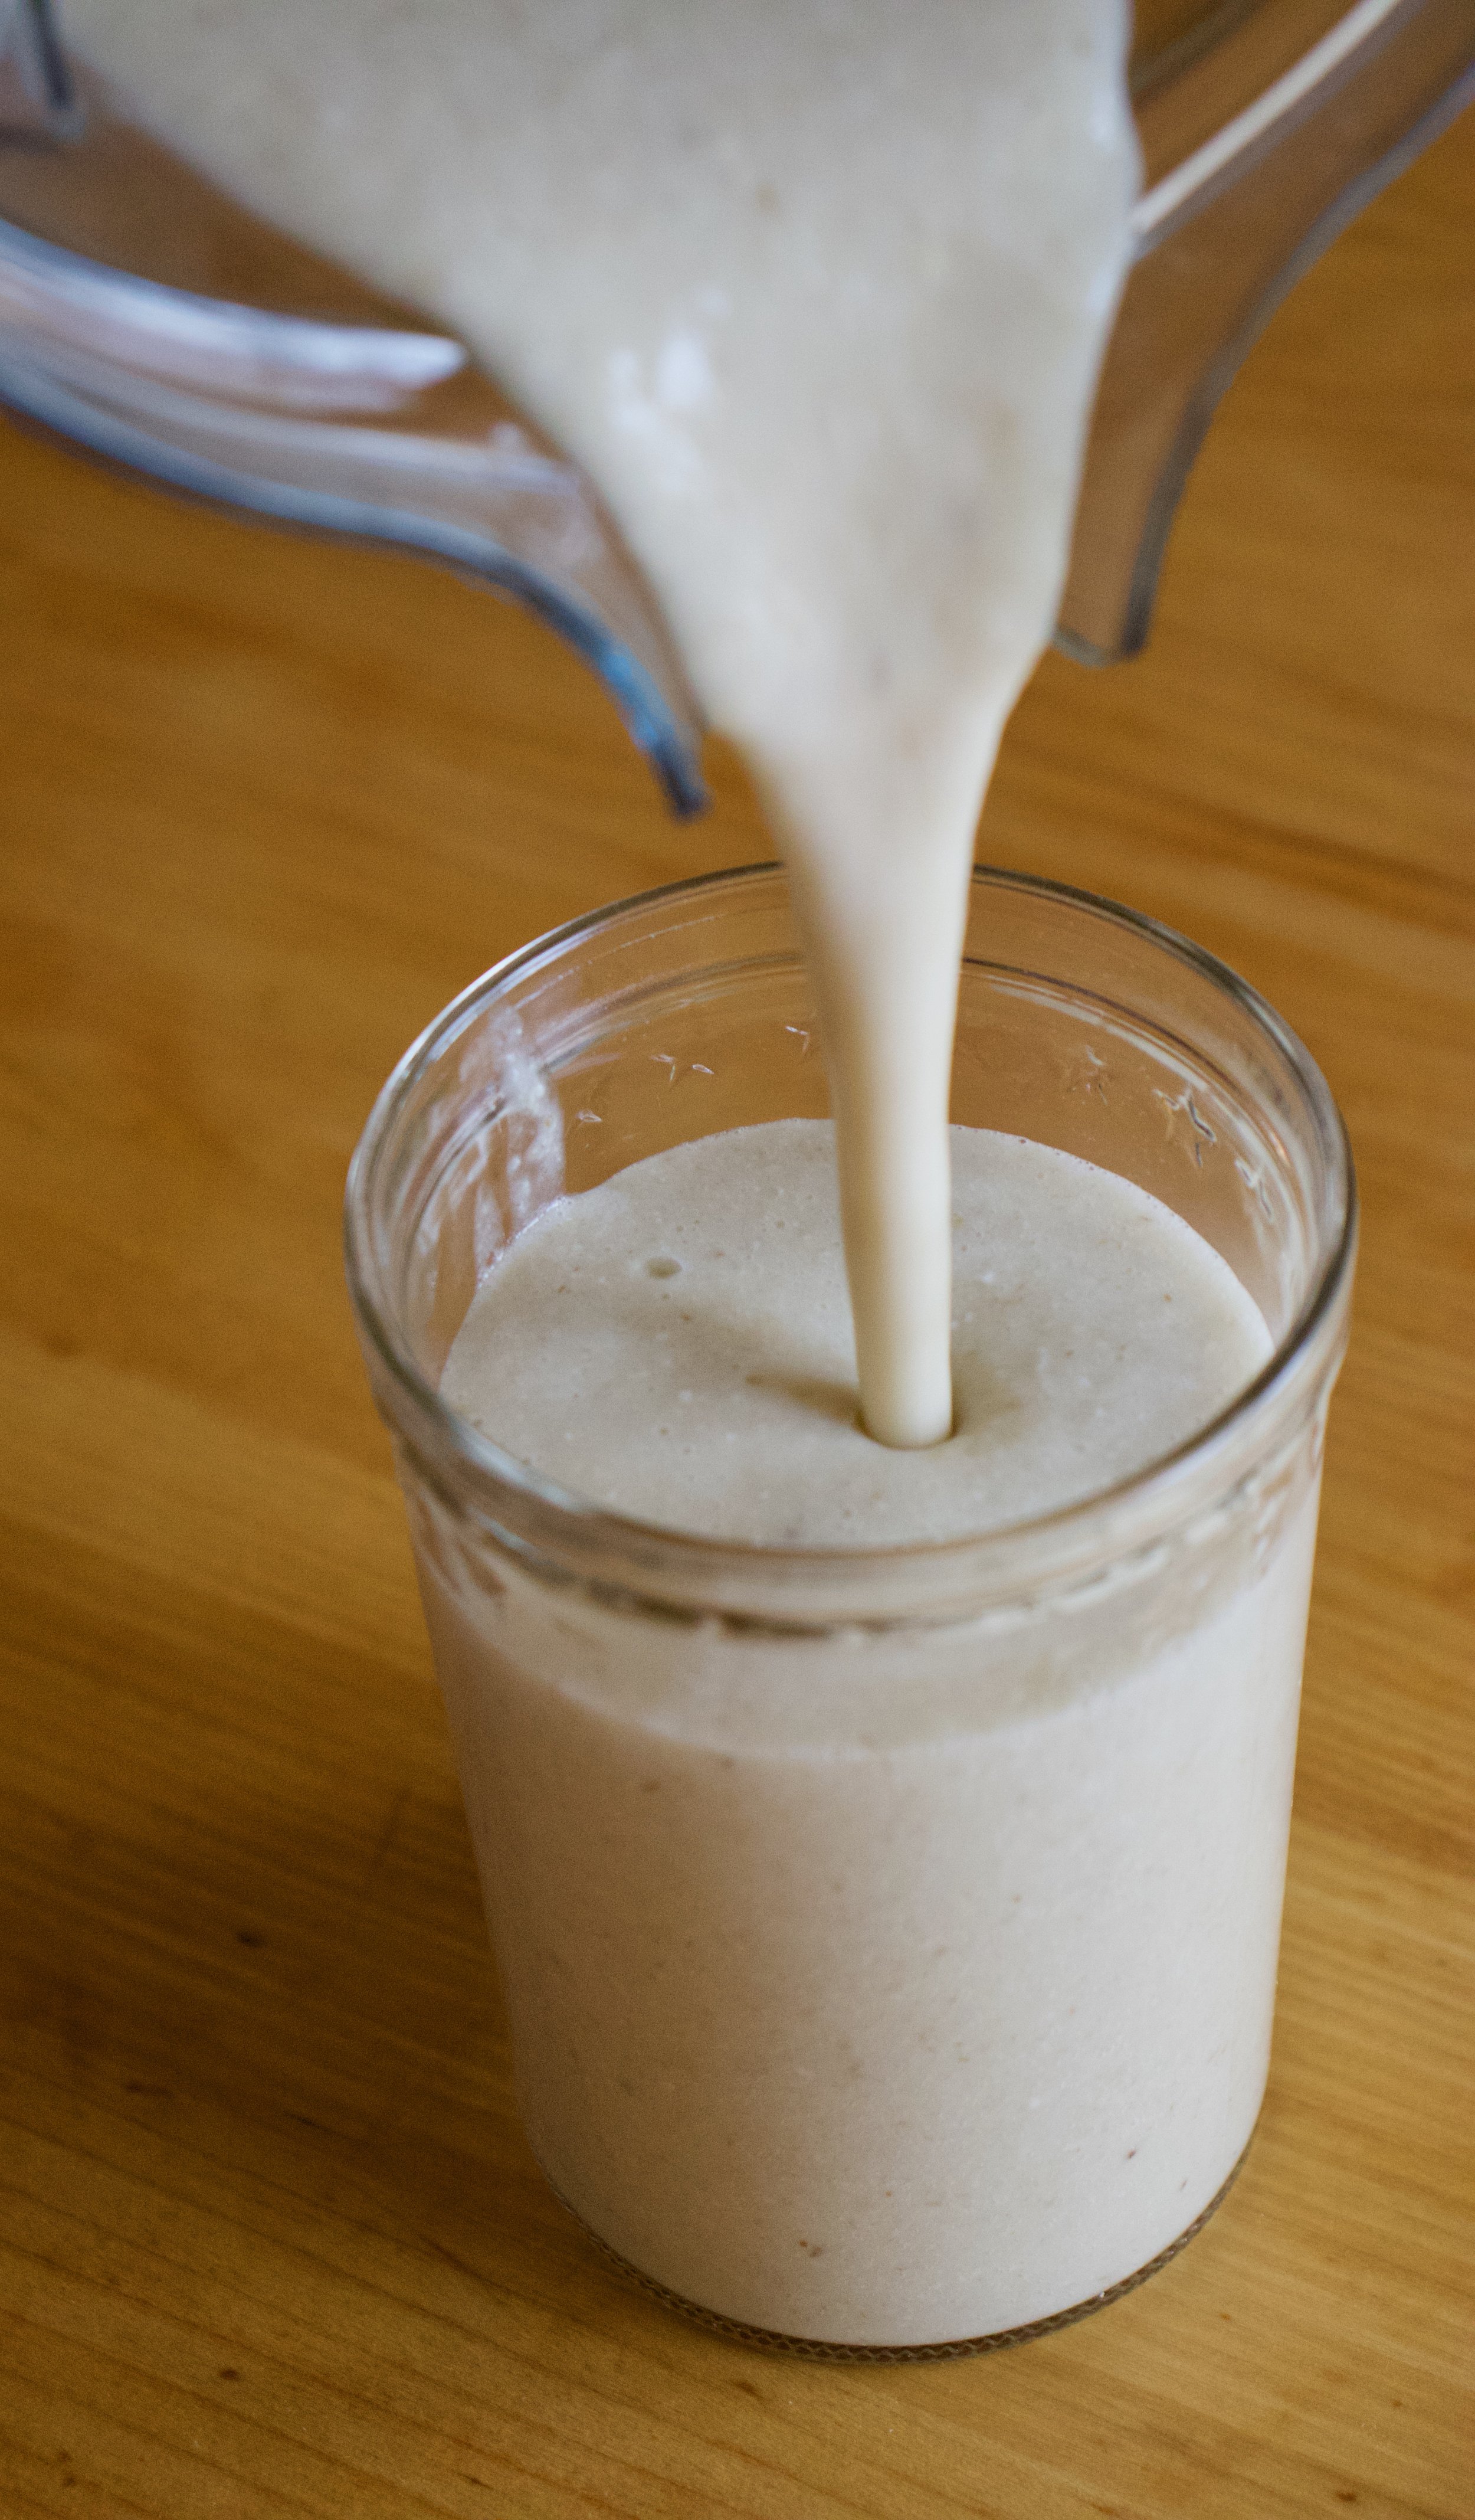
Pour it into a cup (or if you are feeling primal, drink it straight from the blender%u2026 it%u2019s totally cool)

And done.
A banana oat smoothie.
Let the good time roll!
-C
makes 1 smoothie
-
1 very ripe banana
-
1/3 cup raw old fashion oats
-
1 1/2 cups water
-
pinch of salt
-
a tablespoon or two of any sweetener you like (optional)
-
a pinch of cinnamon (optional)
Place everything into a blender and blend until smooth. Pour into a cup, sprinkle with cinnamon if you wish, and drink right away.

It’s melon season!%u00a0The past few farm shares have included at least 2,, if not 4, watermelons and cantaloupes… Can you imagine. eating 4 watermelons a week? That’s a tall order, even for someone like me who could probably eat a whole watermelon in one sitting, it’s just doing it 4 times a week might be a problem. %u00a0It’s a whole lot of melon and not enough stomach, you know what I mean?%u00a0
So what do I do with so much melon? Well first off, whenever anyone comes over I try to get them to %u00a0eat as much of it as they can, which helps a great deal. Secondly, I cut it up and freeze some. But here is the thing, I love eating chunks of frozen cantaloupe, but frozen watermelon,%u00a0never been my favorite so I usually just pass on sticking in the freezer, until now.
There is something magical that happens when you stick the frozen watermelon and cantaloupe together into a blender and making it into a slushy. It’s like eating a ray of sunshine or maybe even a rainbow, just really satisfying and juicy, and sweet but not overly sweet, and just really freaking good. Especially with all the stupid hot and humid weather we have had lately, these slushies have really been hitting the spot. %u00a0Even the mr who says he dislikes watermelon was all into these melon slushies. (he likes things that he says he doesn’t like all the time. I am pretty sure he is taste confused) Like %u00a0he was really into them. Usually I have to prompt him to tell me how something tastes, but not the slushy, he told me right away how good it was. I was like, I know dude, I just drank 2 of them myself. And I could have drank 2 more but I was trying to not get tot far ahead of myself. Moderation is key, plus I didn’t;t have any more of the melons frozen. Time to restock the freezer.%u00a0
Go make yourself a slushy, it’s juicy deliciousness will make you happy.%u00a0

The stuff. Watermelon and cantaloupe. There should be a lime in there too but it must have rolled away….%u00a0
Chop some of each of the melon up, remove the rinds, and place on a big baking sheet and stick into the freezer until frozen. You can do as little as 2 cups %u00a0of each or as much as a whole melon, it’s up to you. (I suggest freezing extra)

Frozen melon. And now you can slushy.
Equal parts watermelon and cantaloupe go into blender, along with the juice of half (or more to taste)%u00a0a lime and you are probably going to need to add about 1/2 a cup of water, to help the blender blend it all together. %u00a0And that’s it. You blend until it’s all slushy.

Pour into cups, garnish with a lime and/or little chunks of melon and you are good as golden.%u00a0

From now on, or until summer is over and I run out of melon, I will be keeping the freezer stocked, especially because I know that the next few weeks are suppose to be stupid hot again.%u00a0
Waterloupe slushies. Summertime goodness.%u00a0
-C
- about 2 cups %u00a0of a watermelon
- about 2 cups of a cantaloupe%u00a0
- 1 lime
- 1/2- 1 cup water%u00a0
Note. The amounts above are for two%u00a0 2 cup slushies. You can, and should,%u00a0freeze a crap load more melon for future slushies. %u00a0Also, no one would fault you for maybe adding a little nip of some clear alcohol to this slushy situation to make it more of an adult drink……
Cut up a watermelon and a cantalopjue. Eat some and reserve at least 2 cups of each. Remove the rinds from the melons and cut into cubes. Place melon on a baking sheet and stick into the freezer until frozen.%u00a0
Once frozen,%u00a0place equal parts frozen watermelon and cantaloupe into the blender with the juice of a lime. Turn blender on. Slowly add in water until the blender can handle blending the frozen fruit. Blend until smooth. Pour into cups, garnish if you want with more melon and lime, then get to drinking.%u00a0
Banana bread never goes out of style. It is a clsasic, everyday, everybody type of food. Have a slice for dessert, maybe drizzled with some chocolate, definitely.%u00a0%u00a0How about for a grab and go breakfast, sure sure.. A chunk slathered in peanut butter for snack time or anytime, well %u00a0isn’t that’s why you make it?%u00a0 And who doesn’t always have a banana bowl in the kitchen? A banana bowl that is always full of bananas because the banana just always makes it’s way home. They seem to pile up, even when I don’t mean for them to. And I know I am not the only one. I see it all the time. A fruit bowl in the kitchen with a least a couple of really really ripe bananas, waiting for that moment when you know there is no freaking way anyone in their right mind would eat those banana because gross. That’s when you have it, the perfect banana for some banana bread, or in this case, banana muffins. %u00a0
Here I went muffin style because I had already made a loaf of banana bread earlier in the week and because I wanted to send half of the muffins to the boys at the front desk at the gym. (They give me coffee, I give them muffins) And also, muffins cook a lot faster then bread so if you are a little low on time, muffins are the way to go. But if you would rather bread, you can make it bread. Bananas are there for you and are not fussy.%u00a0

The stuff. Ripe bananas, poppy seeds, brown sugar, oil, and apple cider vinegar. Also have flour, cinnamon, baking soda, baking powder, and a little salt in the bowl.%u00a0
Mash the bananas in a bowl, like really mash them up until it turns to a sugar banana slop.%u00a0Then add in the oil and the vinegar and mix together.

Dump in the dry and the poppy seeds and mix it all up until combined but then stop. Don’t over mix the batter or else you will get tuff muffins.%u00a0

Scoop into well greased muffin pans and pop them into the preheated oven to bake.%u00a0
Done! And in only took like 20 minutes appose to an hour if I made banana bread.%u00a0

And here is when you grab a coffee, a muffin, and have yourself a moment.
Stay good.
-C
makes 12-14 muffins
- 2 cups flour
- 1 teaspoon baking soda
- 1 teaspoon baking powder%u00a0
- 1 teaspoon salt
- 1 tablespoon cinnamon%u00a0
- 1/4 cup poppy seeds
- 2/3 cups packed %u00a0brown sugar
- 1/2 cup neutral flavored oil
- 4 really ripe bananas (they need to be really ripe of the mixture will be to dry)
- 1 tablespoon apple cider vinegar%u00a0
Preheat oven to 350
In a large bowl,%u00a0mash the bananas with the sugar until the mixture turns wet and sloppy, but there are still a few little chunks of banana.%u00a0%u00a0Mix in the oil and vinegar. In a separate bowl mix the %u00a0flour, cinnamon , baking powder and soda, salt, and poppy seeds together. Dump the dry into the wet and mix until all is combined but then stop. Don’t over mix batter.%u00a0
Scoop mixture into well greased muffin tins and place into oven once it has preheated.%u00a0Bake the muffins for about 20- 22 minutes or until nicely browned and a tester stuck into the middle of one comes out clean.
Remove from oven and let sit in tin for a few minutes until it cools down. Remove the muffins from the tin and let completely cool on a wire rack.%u00a0
Eat whenever and how many you want, store the rest in an air tight container for a couple of days or wrap a few and %u00a0freeze.%u00a0
I made this salad about a week ago right before the mr and I left town for the weekend. I had just gotten 2 very large canary watermelons from the farm, and had a million cucumbers and a trillion tomatoes from the garden. If a trillion tomatoes seems like a lot it is. But that is how many I had, and still do (this years garden just won’t quit) And with counters of all the fruit and veggies that I could possible want at one given time, we needed to eat some up before we left. But I really wanted watermelon and felt guilty about cutting into one when I would be fine left for a while and there were a million ripe and ready tomatoes to eat that would not last the weekend fresh. But guess what, went for it anyway and cut up a watermelon because damn it, I really wanted watermelon.
So a bazillion tomatoes (notice how the number keeps getting bigger, that’s because it’s truth) a million cucumbers, and now a watermelon that needs to be eaten. Salad it will be. (I had the littles over to eat the rest of the watermelon, they will always help a lady out)
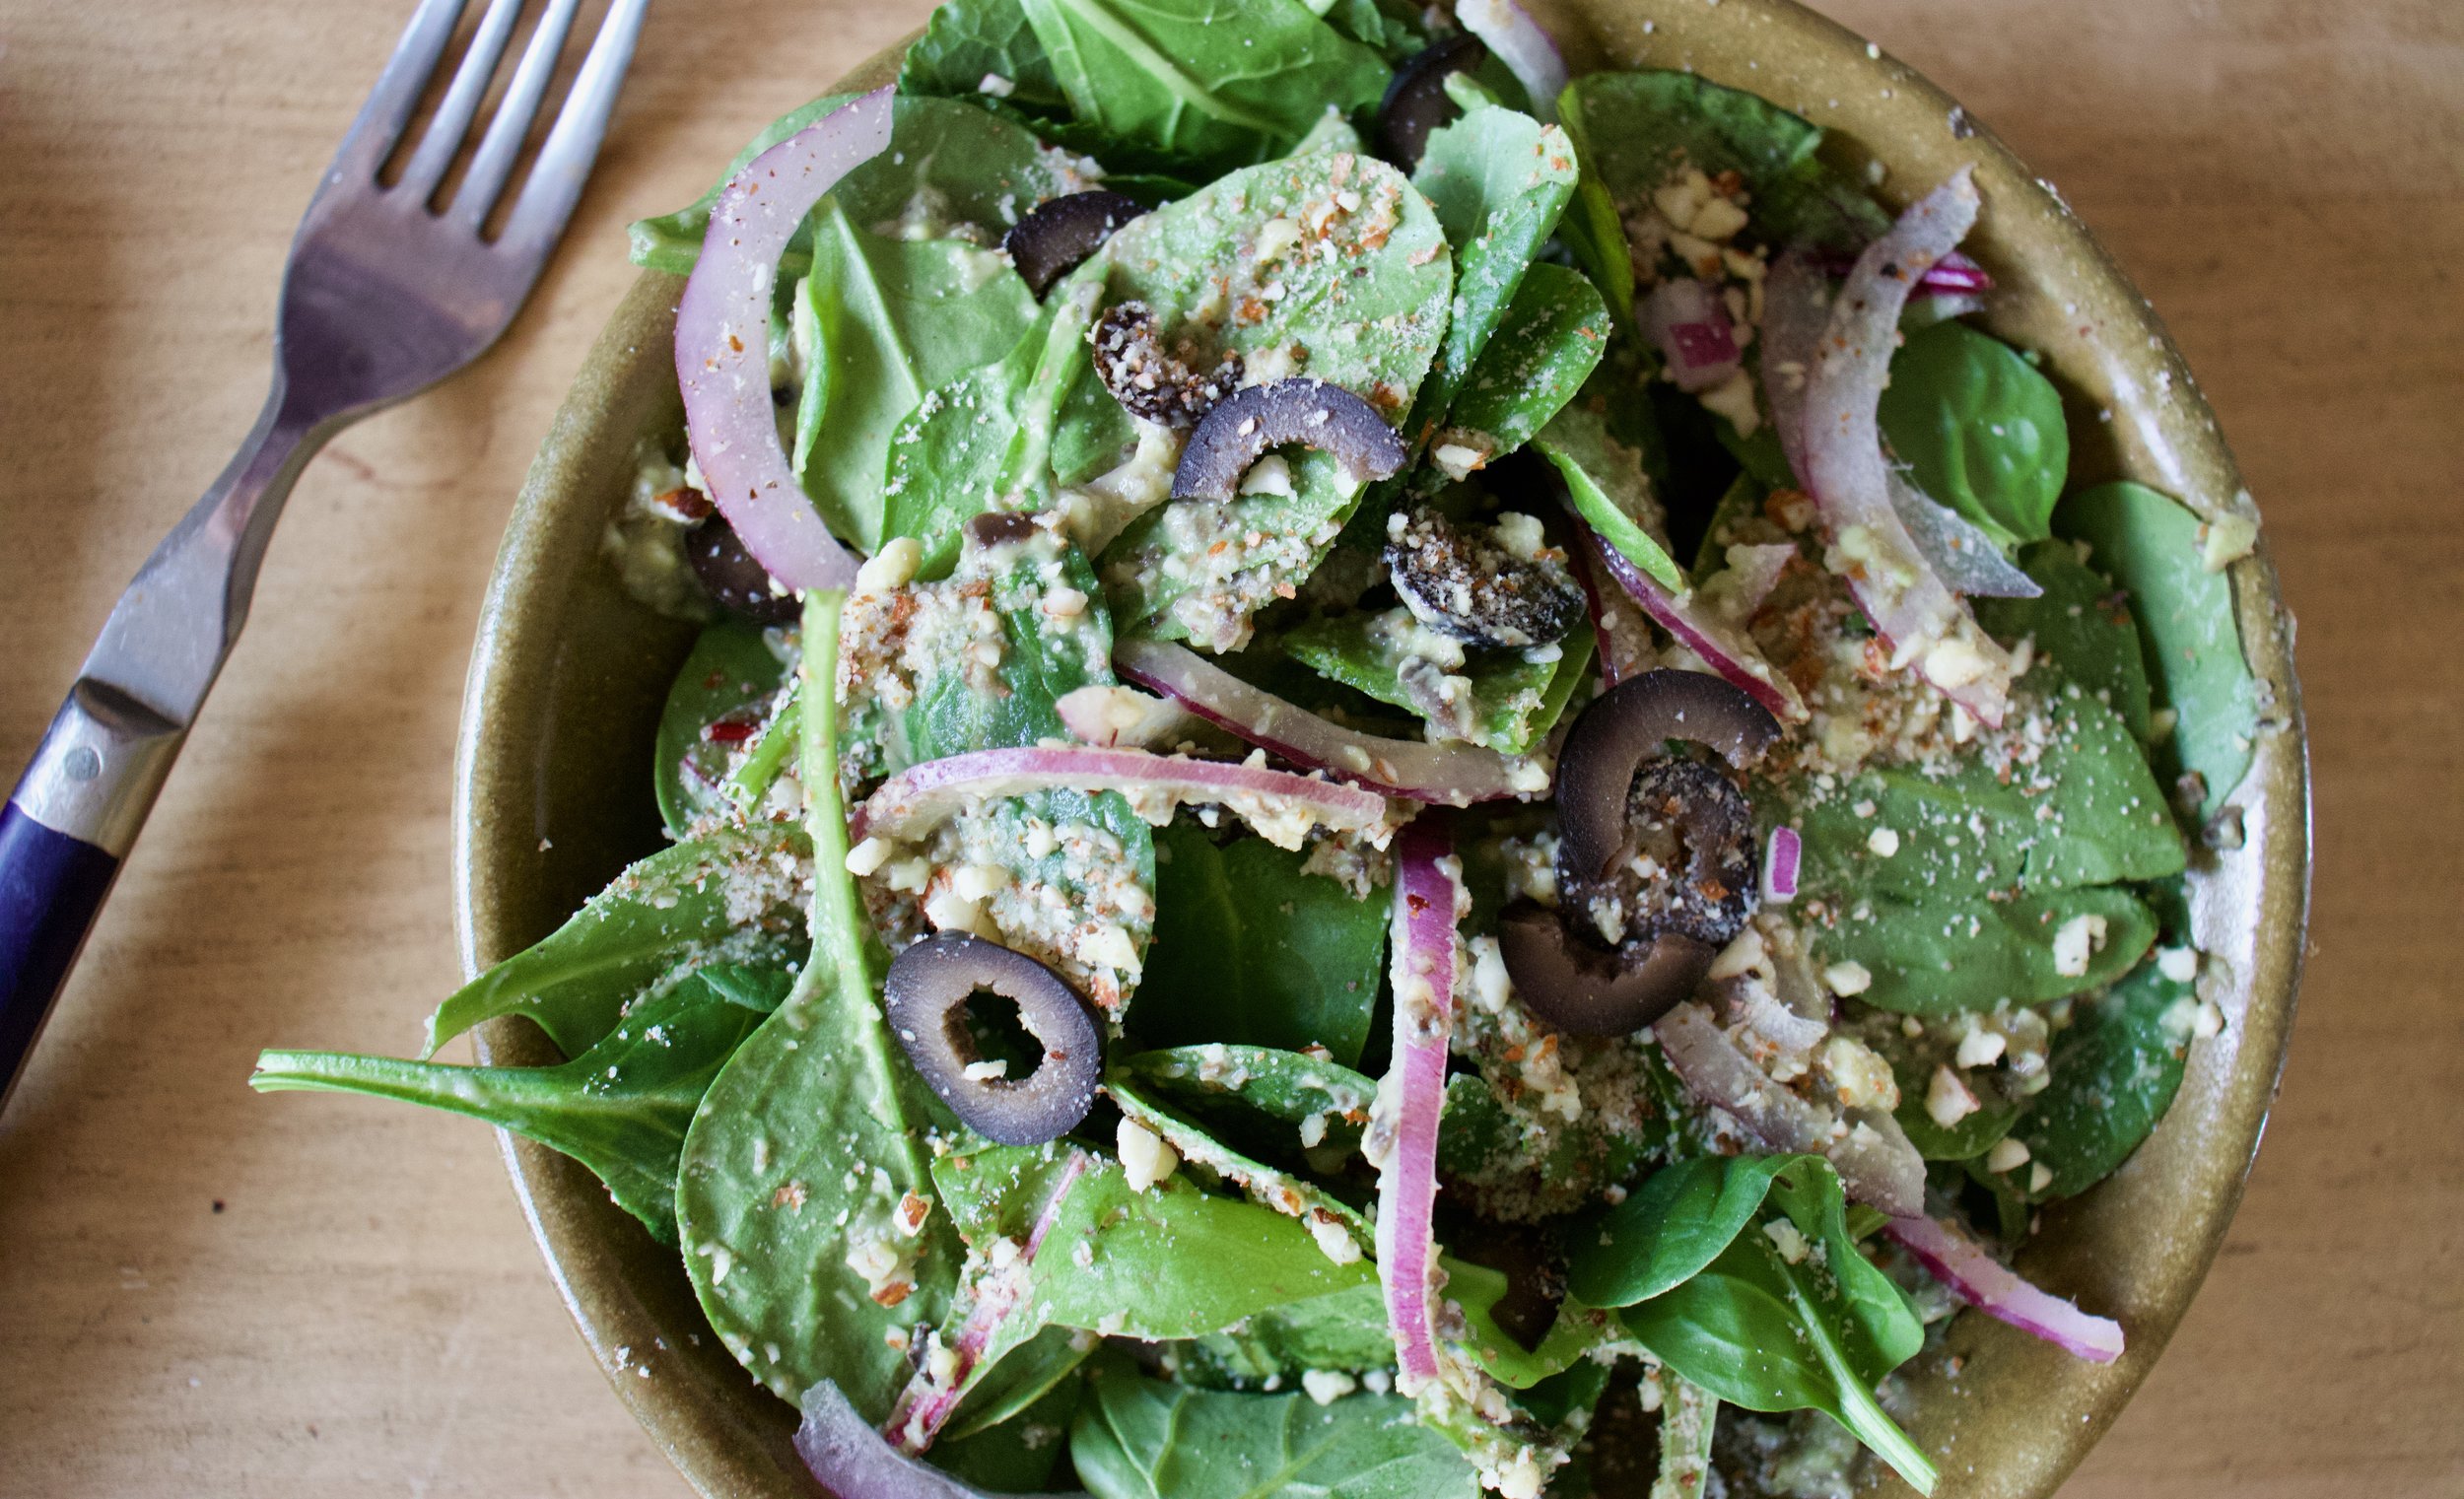
A big ass fruity, citrus-y, crispy, tangy salad. A party of all these fresh fantastic flavors all up in your mouth. The first time I made this, I thought there was a chance the mr might not like it, but as it turns out he like it very very much, enough to eat the whole entire big ass bowl of it. (I got a few measly little bits) I have since made this salad two other times and know well enough to save myself a bowl of my own. The mr forgets to share.

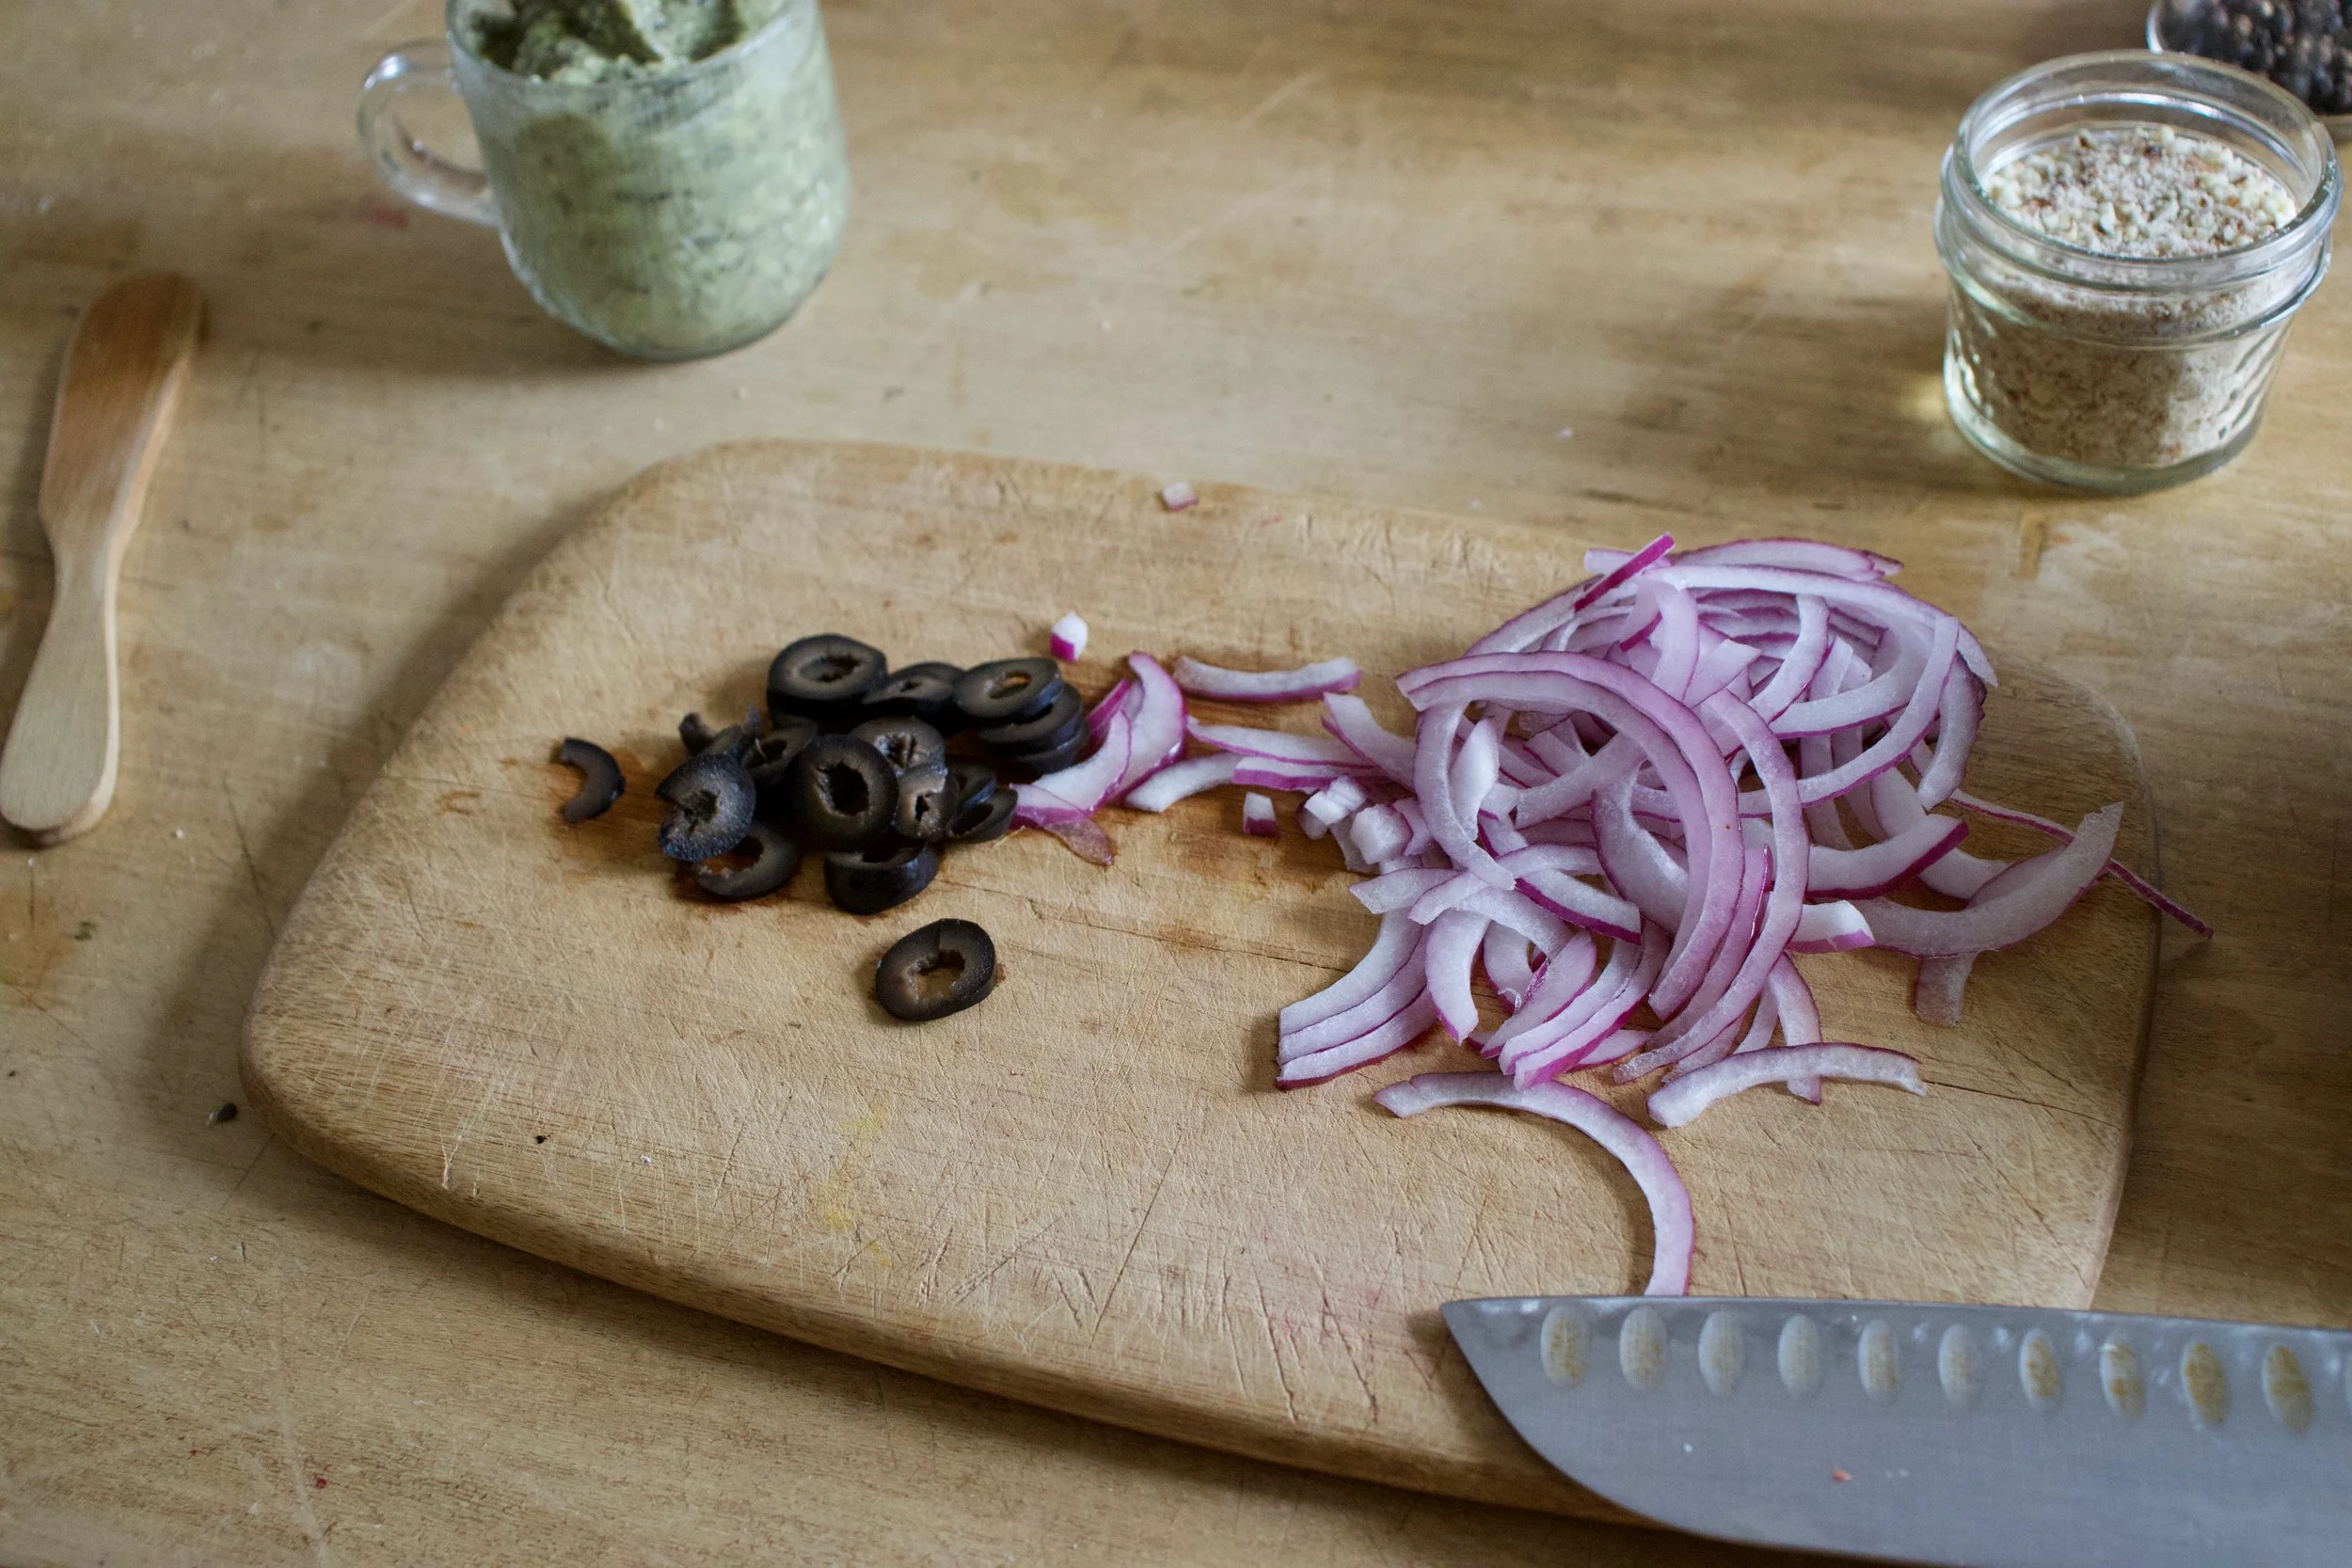
The stuff. Watermelon (I used a canary but a red watermelon works too) onion, cucumber and tomatoes. A jalapeno for a little heat, fresh basil and mint, a lemon and salt and pepper.
First the watermelon. You probably don’t want to eat the rind so remove that and chop up the fruit into mouth sized pieces. IF you have a really seedy melon, just remove what you can see and save them for roasting later (yes roast the seeds.. they are fantastic)
Now the cucumber, onion and jalapeno get their turn to be chopped up. Cucumber into smallish pieces. Onion thin and small pieces and jalapeno into very tiny little pieces. After those go into bowl, it’s tomato time. Just cut up into into mouth sided pieces and into the bowl too.
Red, yellow, and green tomatoes. The colors are so PRETTY!
Mint and bail minces up nice .

Topped with all the fresh herbs, salt and pepper, and lemon juice.
A thing of beauty and tastes better then it looks. A salad worth making over and over and lots of it too.
Make sure to save yourself a bowl if sharing, you might not get any otherwise.
Have a great weekend
-C
serves between 2-4 people
- 1/4 of a canary watermelon (around 3 cups cubed)
- 1 cucumber
- 2-3 tomatoes of any variety
- 1/2 of an onion (red or sweet white)
- handful of fresh basil and mint
- 1 small jalapeno
- 1 lemon
- salt and pepper
Take watermelon and remove rind then cut the melon into mouth sized chunks. If you melon has seeds, remove what you can (save for later to roast) and place into a large bowl. Grab cucumbers and cut into mouth sized chunks. Thinly slice onion into long thin ribbons then into smaller pieces and then cut up jalapeno.%u00a0 To cut the jalapeno, remove stem, cut in half length wise, then scrap the seeds and ribs from the inside out. Dice the pepper into very small pieces and toss everything you just cut up into the bowl with the melon.%u00a0 Tomatoes now get cut into chunks and those go into the bowl too. Sprinkle with a pinch of salt and pepper and the juice of the lemon. Cut or chop fresh basil and mint up and add on in. Mix it all up and that’s that.
Do you have a gazillion tomatoes, like so many that they are practically coming out of your ears? Me too…. Me too. This year the tomatoes have been gang busters, a explosion of the sweetest and most delicious fruit and now I have tomatoes littered everywhere, tucked into all the corners and baskets all over the house. It’s getting kinda tomato crazy over here.
%u00a0I can only eat so many tomatoes a day before all I have eaten are tomatoes and I start to feel slightly sick. Same with the mr, he has been a tomato eating champ as well but I think he was getting a little bored with all the tomato salads that I have been making. So I thought I would try something new and make a tomato cake. I figured why the heck not, tomatoes are technically a fruit and fruit and cake are great together and yeah. So tomato cake is going to be fantastic. I also wanted to make something that the mr would eat for breakfast. I have been doing this new thing in the mornings for the mr. I have coffee ready, some breakfast food (its been zucchini bread for a while), and a little vase of fresh flowers that I pick on my morning walk, all set out on the counter for when he wakes up. I know, I am so great right. Really I do it cause I want him to eat something before working all morning and plus if I am all sweet in the morning, he can’t be an old man cranky pants (at least he tries not to be).%u00a0 Now for the next few days the tomato cake is breakfast cake and all is good.
Anyway, the cake come out great. Bright reddish orange, dense but fluffy and most, and smells so good. The mr tells me it’s amazingand I shared a chunk with some of my family and everyone (minus a little) where fans. I am for sure going to be making this again soon, although I have been toying with the idea of eggplant sweet bread (too far??) but I’ll get to that later.
Now for the tomato cake!
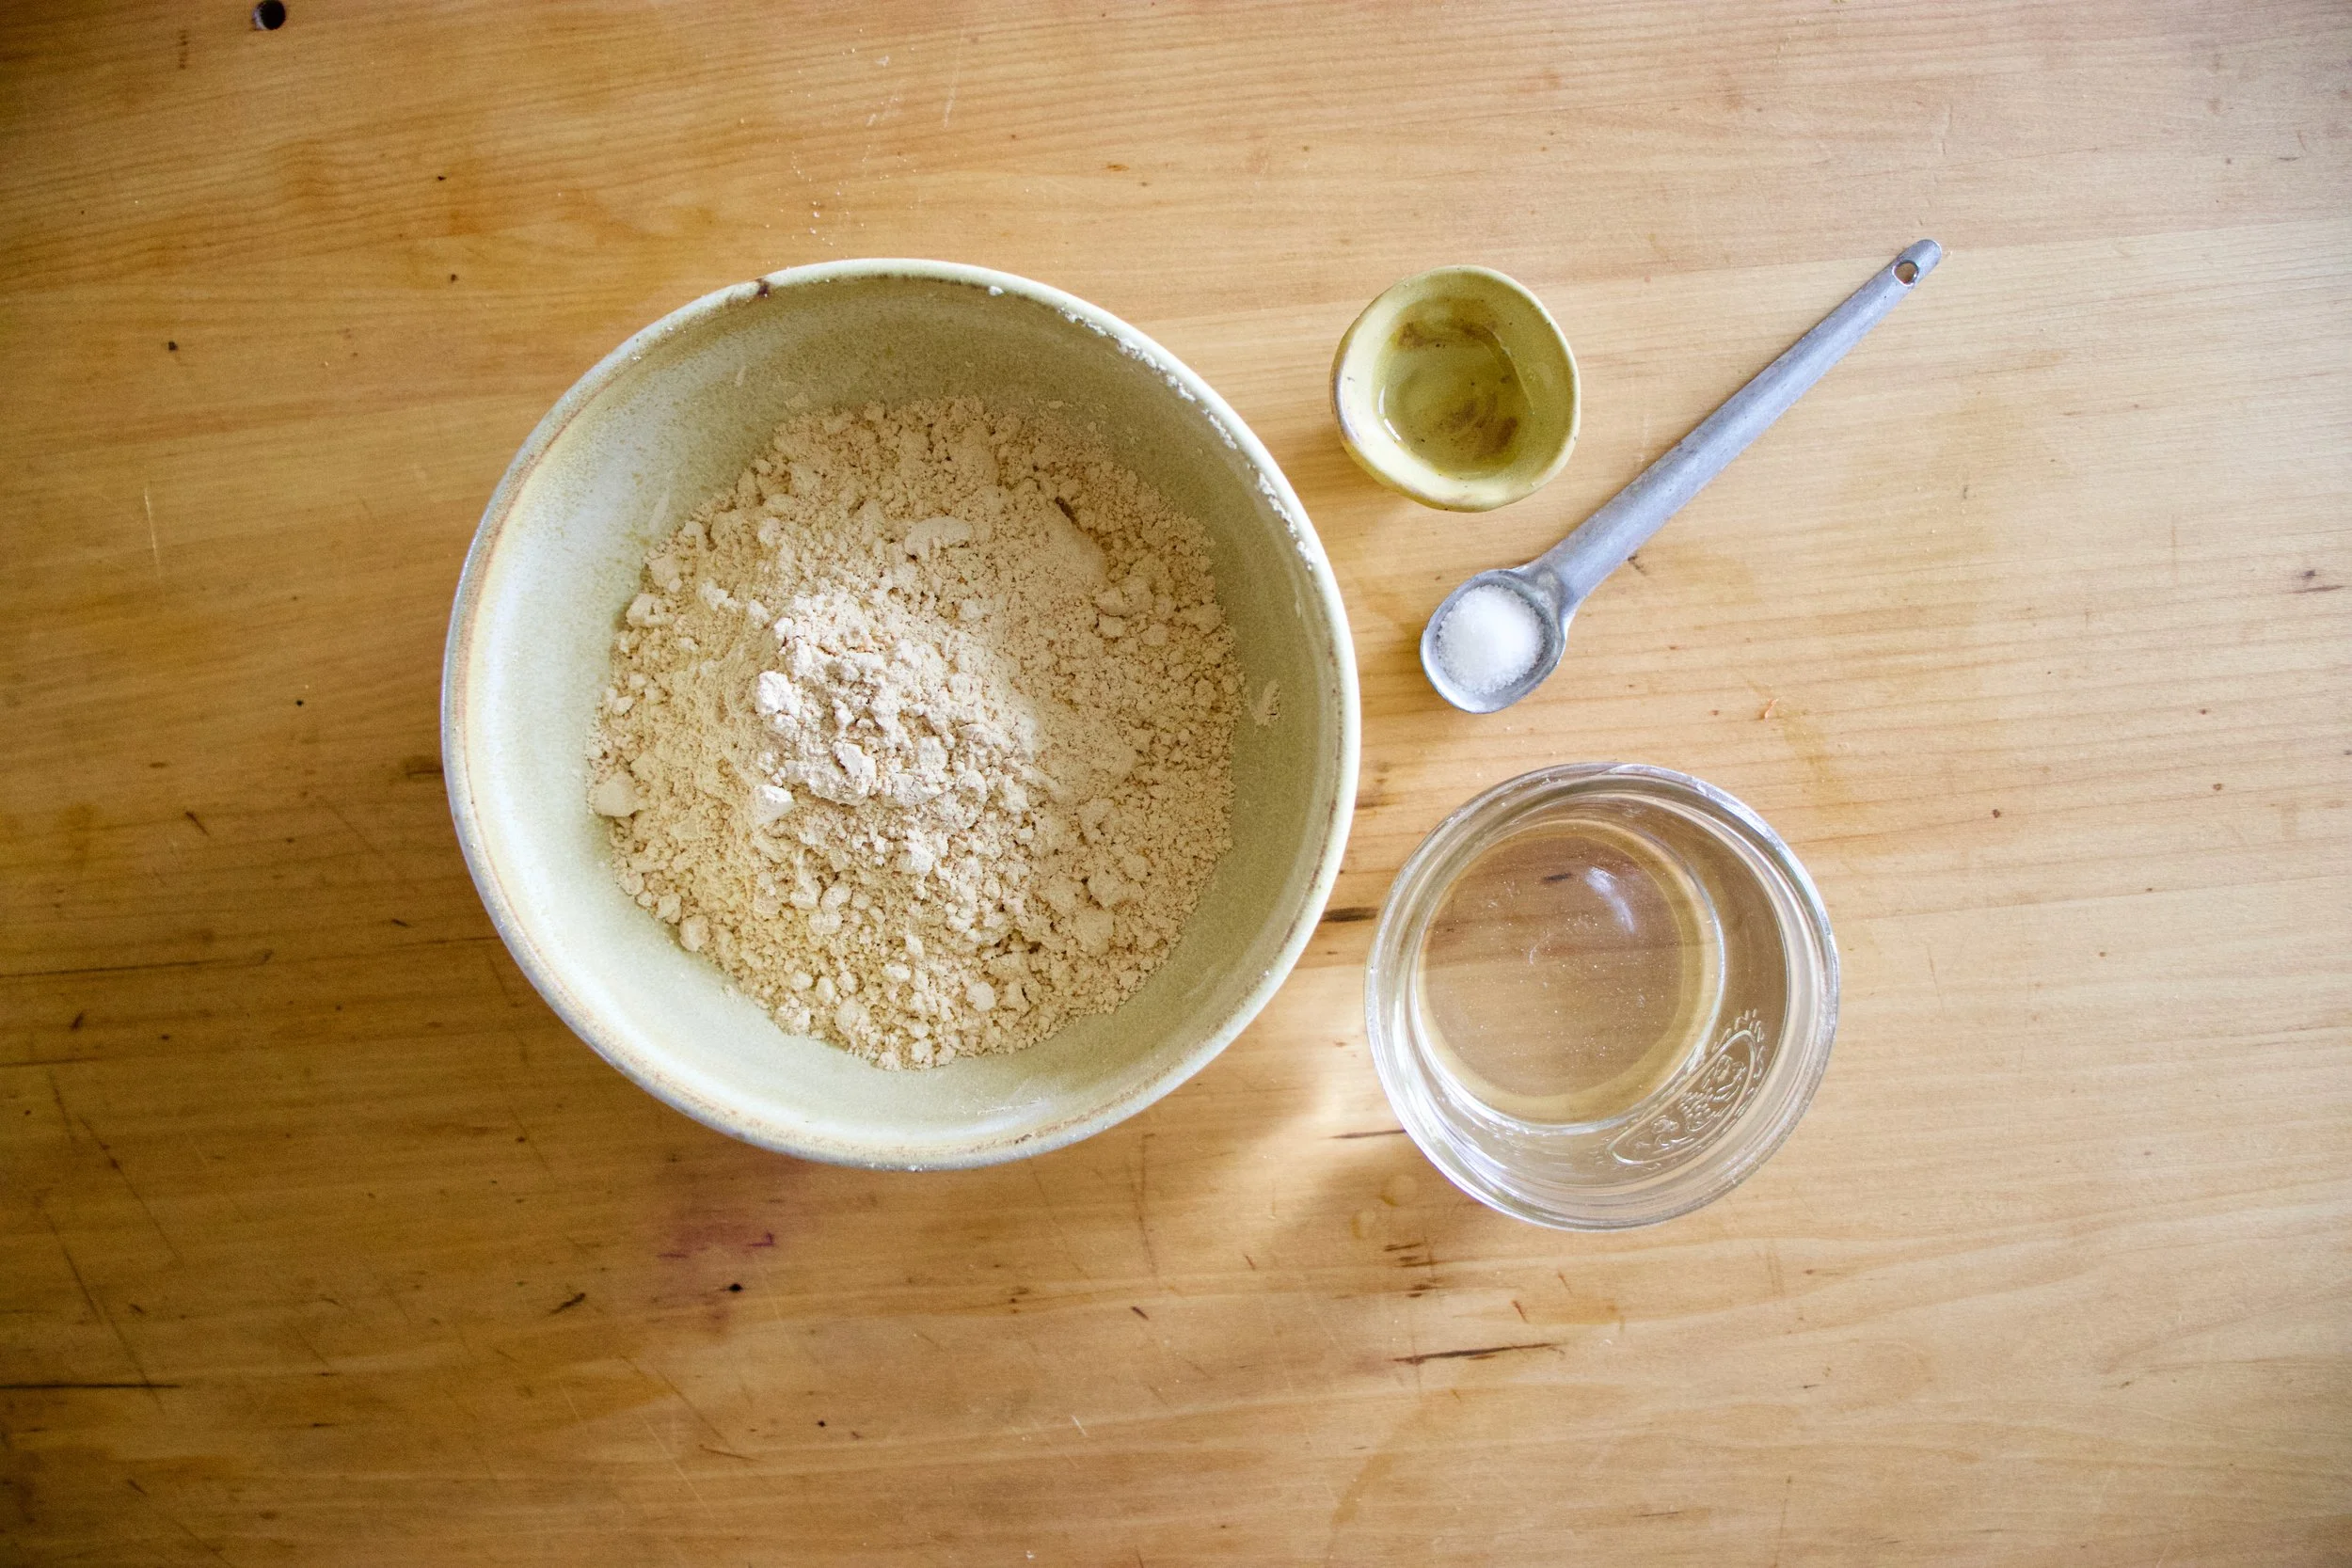
The stuff. Flour, baking soda, baking powder and salt (all in the bowl). Brown sugar, oil, vanilla, apple cider vinegar and a few nice and juicy tomatoes.
First off, remove the core from tomatoes and cut into some chunks. Stick the chunks into a blender and blend.
Fresh and smooth tomato puree.
Now just dump the rest of the liquid stuff into the blender now and give it a whirl to mix it all up.
And pour the blended wet into the dry and mix until incorporated.
Pretty pink batter goes in a well greases bundt pan. I had got brown sugar everywhere while I was measuring it out and decided to just toss it on the cake as not to waste it…doesn’t hurt.
And now the batter goes into a preheated oven to bake .
A bit of time later you have yourself a cake.
The scary part. Flip the pan and hope all that grease does it’s job and the cake pops out. Lucky me this one popped out like a champ.
One de-panned, let the cake cool for a bit before cutting into it.
And now all you have left to do it eat it, so eat it.
Have a great weekend. Eat lots of tomatoes and make lots of cake.
-C
Makes one bundt cake
- 2 -1/3 cup all purpose flour
- 1 teaspoon baking soda
- 1 -1/2 teaspoon powder
- 1/2 teaspoon salt
- 2-3 large tomatoes (2 -1/2 cups after blended)
- 1/2 cup brown sugar (for a tad sweeter, add another 1/4 cup)
- 1/2 cup of any neutral flavored oil
- 1 teaspoon vanilla
- 1 tablespoon apple cider vinegar
Preheat oven to 350
Start by whisking together all the dry ingredients into a big bowl. Take tomatoes, remove core, chop into chunks, and place into a blender. Blend tomatoes until a smooth and frothy puree. Now add in the sugar, oil, vanilla, and apple cider vinegar and blend until incorporated. Pour wet mixture into dry and stir until combined.
Pour the cake batter into a greased (and floured if you want. I find it helps to make sure all the nooks are greases) and stick into preheated oven. Bake for 45-50 minutes until it’s a dark reddish golden brown and a tester (I use a fork) comes out clean when stabbed.
Remove from oven and let cool for a minute or two then invert cake, give the pan a few tap taps and hope that it comes out all nice and clean. (don’t worry if a piece gets stuck, you can just dust the top with some powdered sugar)
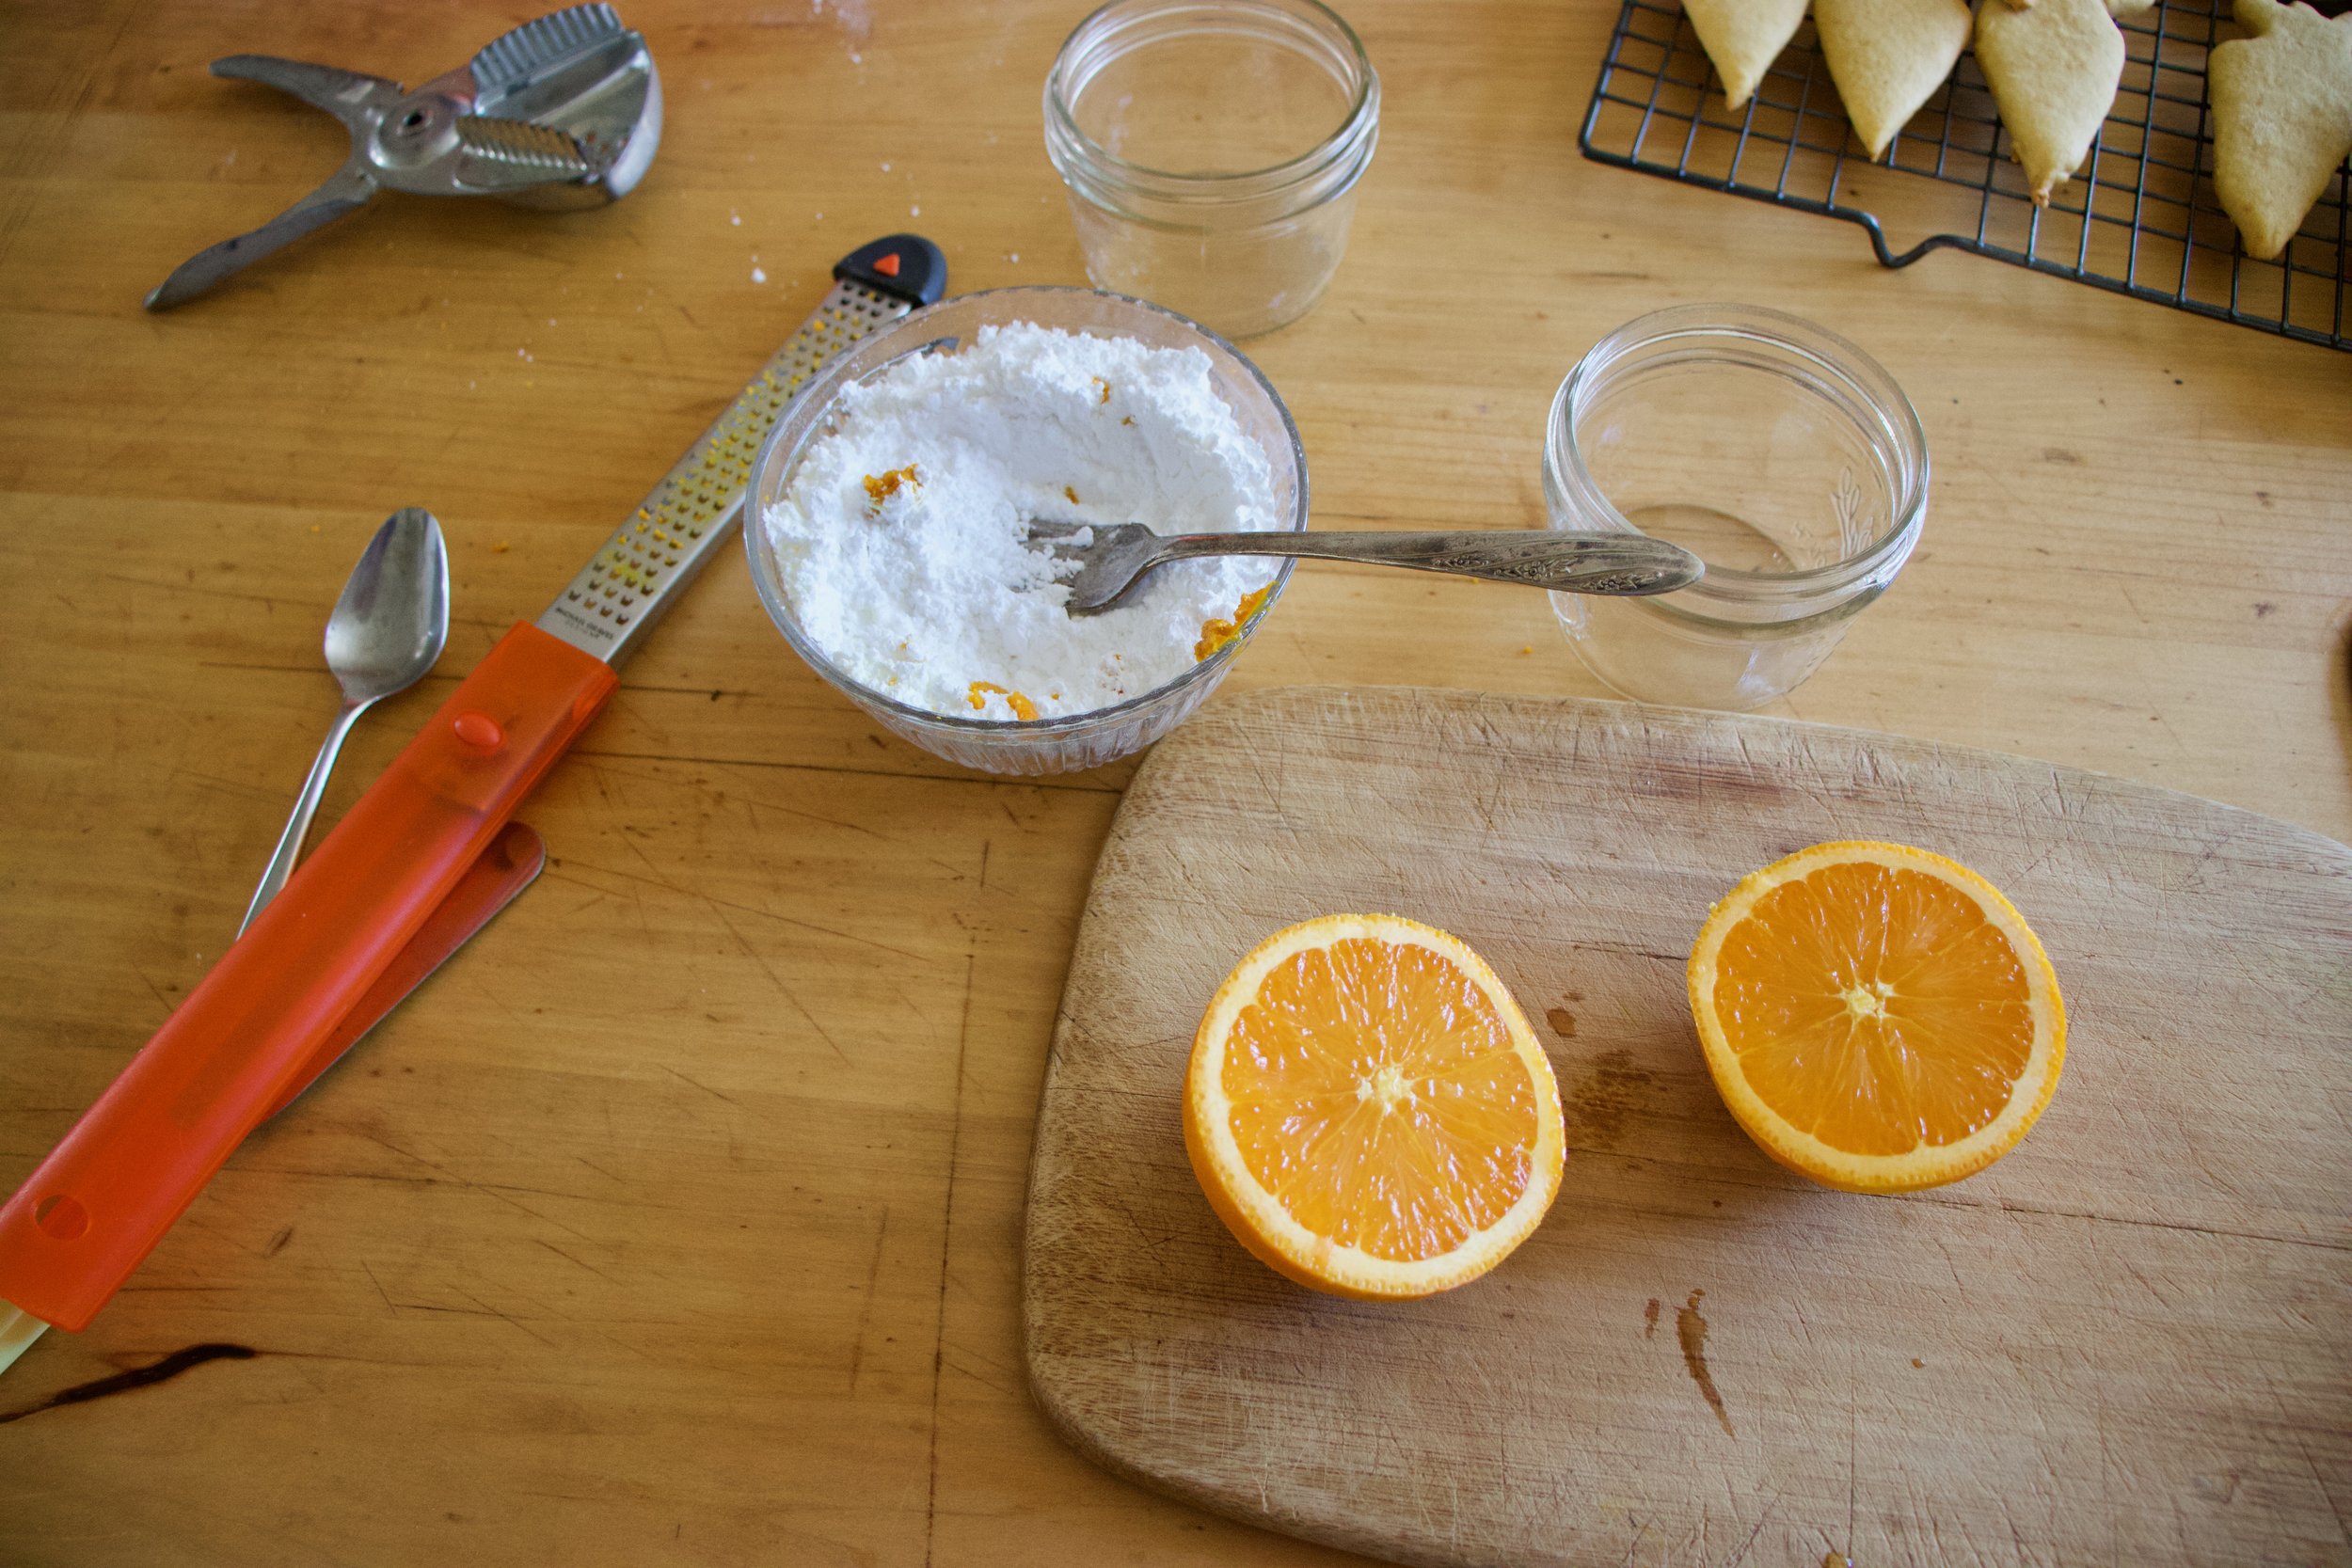
Let cake cool and when ready, cut a slice and eat it up. I was told no glaze, but I was going to make a simple lemon glaze (lemon juice and powdered sugar) for the top. The mr said it was perfect, but glaze would have been pretty.%u00a0 So glaze it up if you want.
I am channeling all my summer time feels here in hopes for warmer weather. As of yesterday there was still a pile of snow outside of my house and I am still leaving every morning in a hat, mittens, and a winter jacket.
I want t-shirts and shorts, I want sandals, and I want to set my winter jacket on fire (not really, but kinda).
This cold weather has crept back into my soul and I needed something to remind me that there will be warmer days to come and I will soon be bitching about how hot I am and blah blah blah.. you know how it goes.
So I make lemonade. This lemonade as inspired by my favorite tea as of late, raspberry zinger. It’s a nice and tangy tart and really tasty. I make great big jar of it at night and add a little squeeze or two of lemon to it for that little extra zing. I figured if it tastes good hot, it will taste great cold, which in fact, it does. It taste really freaking good. And it just occurred to me that there is probably a little subliminal inspiration from Beyonce in wanting lemonade, so thanks for the B.
Anyway, it’s suppose to me nice and seasonably warm this weekend. Maybe bust out your lemonade game and try a batch of this one.
The stuff. Lemons, a raspberry zinger tea bag, honey (or any sweetener you like to use) water and ice.
Bring some of that water to aalmost boil and pour it over the tea bag (make sure you stick the bag into a jar or pitcher)
While the tea is steeping, juice the lemons. And a personal preference, you can strain out the pulp or not. I use the strainer to catch the seeds but then stick the pulp back in cause I like pulp. All up to you.
While the tea is steeping and still hot, add in any sweetener that you want to use. ( I used a little honey) Stir until that sweetness is all dissolved.
And after the tea has had a good steep, dump the brewed tea into the pitcher with the lemon juice then add in the really cold water. Stir it all around.
Add acouple thin slices of lemon to make it all fancy anda few big chunks of ice to make it super cold
Refreshing, crispy, tangy with a touch of sweet….Perfect for all those warm summer days to come (hopefully)
Have a great weekend people.
-C
Makes 5 cups
- 1 raspberry zinger tea bag( I used Celestial Seasonings)
- 3/4 cup fresh lemon juice (3-5 lemons, depending on size)
- Anywhere between no to 1/2 cup of sweeter (can use sugar, honey or maple, I like a touch of honey)
- 4 cups water (2 hot, 2 cold)
- ice
Place tea bag in 2 cups of hot water (can be done directly in a pitcher) Add in the sweetener while its still hot and mix until completely dissolved. Let steep for about 10 minutes.
Remove tea bag and add in the lemon juice, 2 more cups of cold water and mix, Top with ice and garnish with a few more lemon slices if your feeling fanciful.
Serve in a glass full of ice with a wedge of lemon and a smile on you face.
This time next week the mr and I will be on our jolly (the word jolly is way underused) journey through the hill of the Irish countryside.%u00a0 I am getting a bit nervous. First off, we have yet to book a single b and b (we are air bnb-ing it the whole time.) We still haven’t reserved a car, have just starting looking at baggage requirements and have no clue how we are getting home from the airport. But we did print out the plane tickets last night, so that’s something!!%u00a0 I make it sound like we have been slacking, but it really isn’t our fault (most of it). We have most of the stuff we need to book ready to pay for, but our credit card we ordered for this trip was lost in the mail and we can’t book anything without it. Aagh!%u00a0 But hopefully the new one will be in the mailbox today and we can get on our way to planning the best trip ever
With the trip getting so close, my mind is doing this weird thing where it doesn’t want to research things anymore. It is sick of looking up attractions or prices of this, or how to translate that. I have done all the research that I can handle and am mentally tired. I just want to chill on the internet stuff and spend the rest of this week cleaning the house and baking things until we leave. You know, smash in as much domestic things as I can.
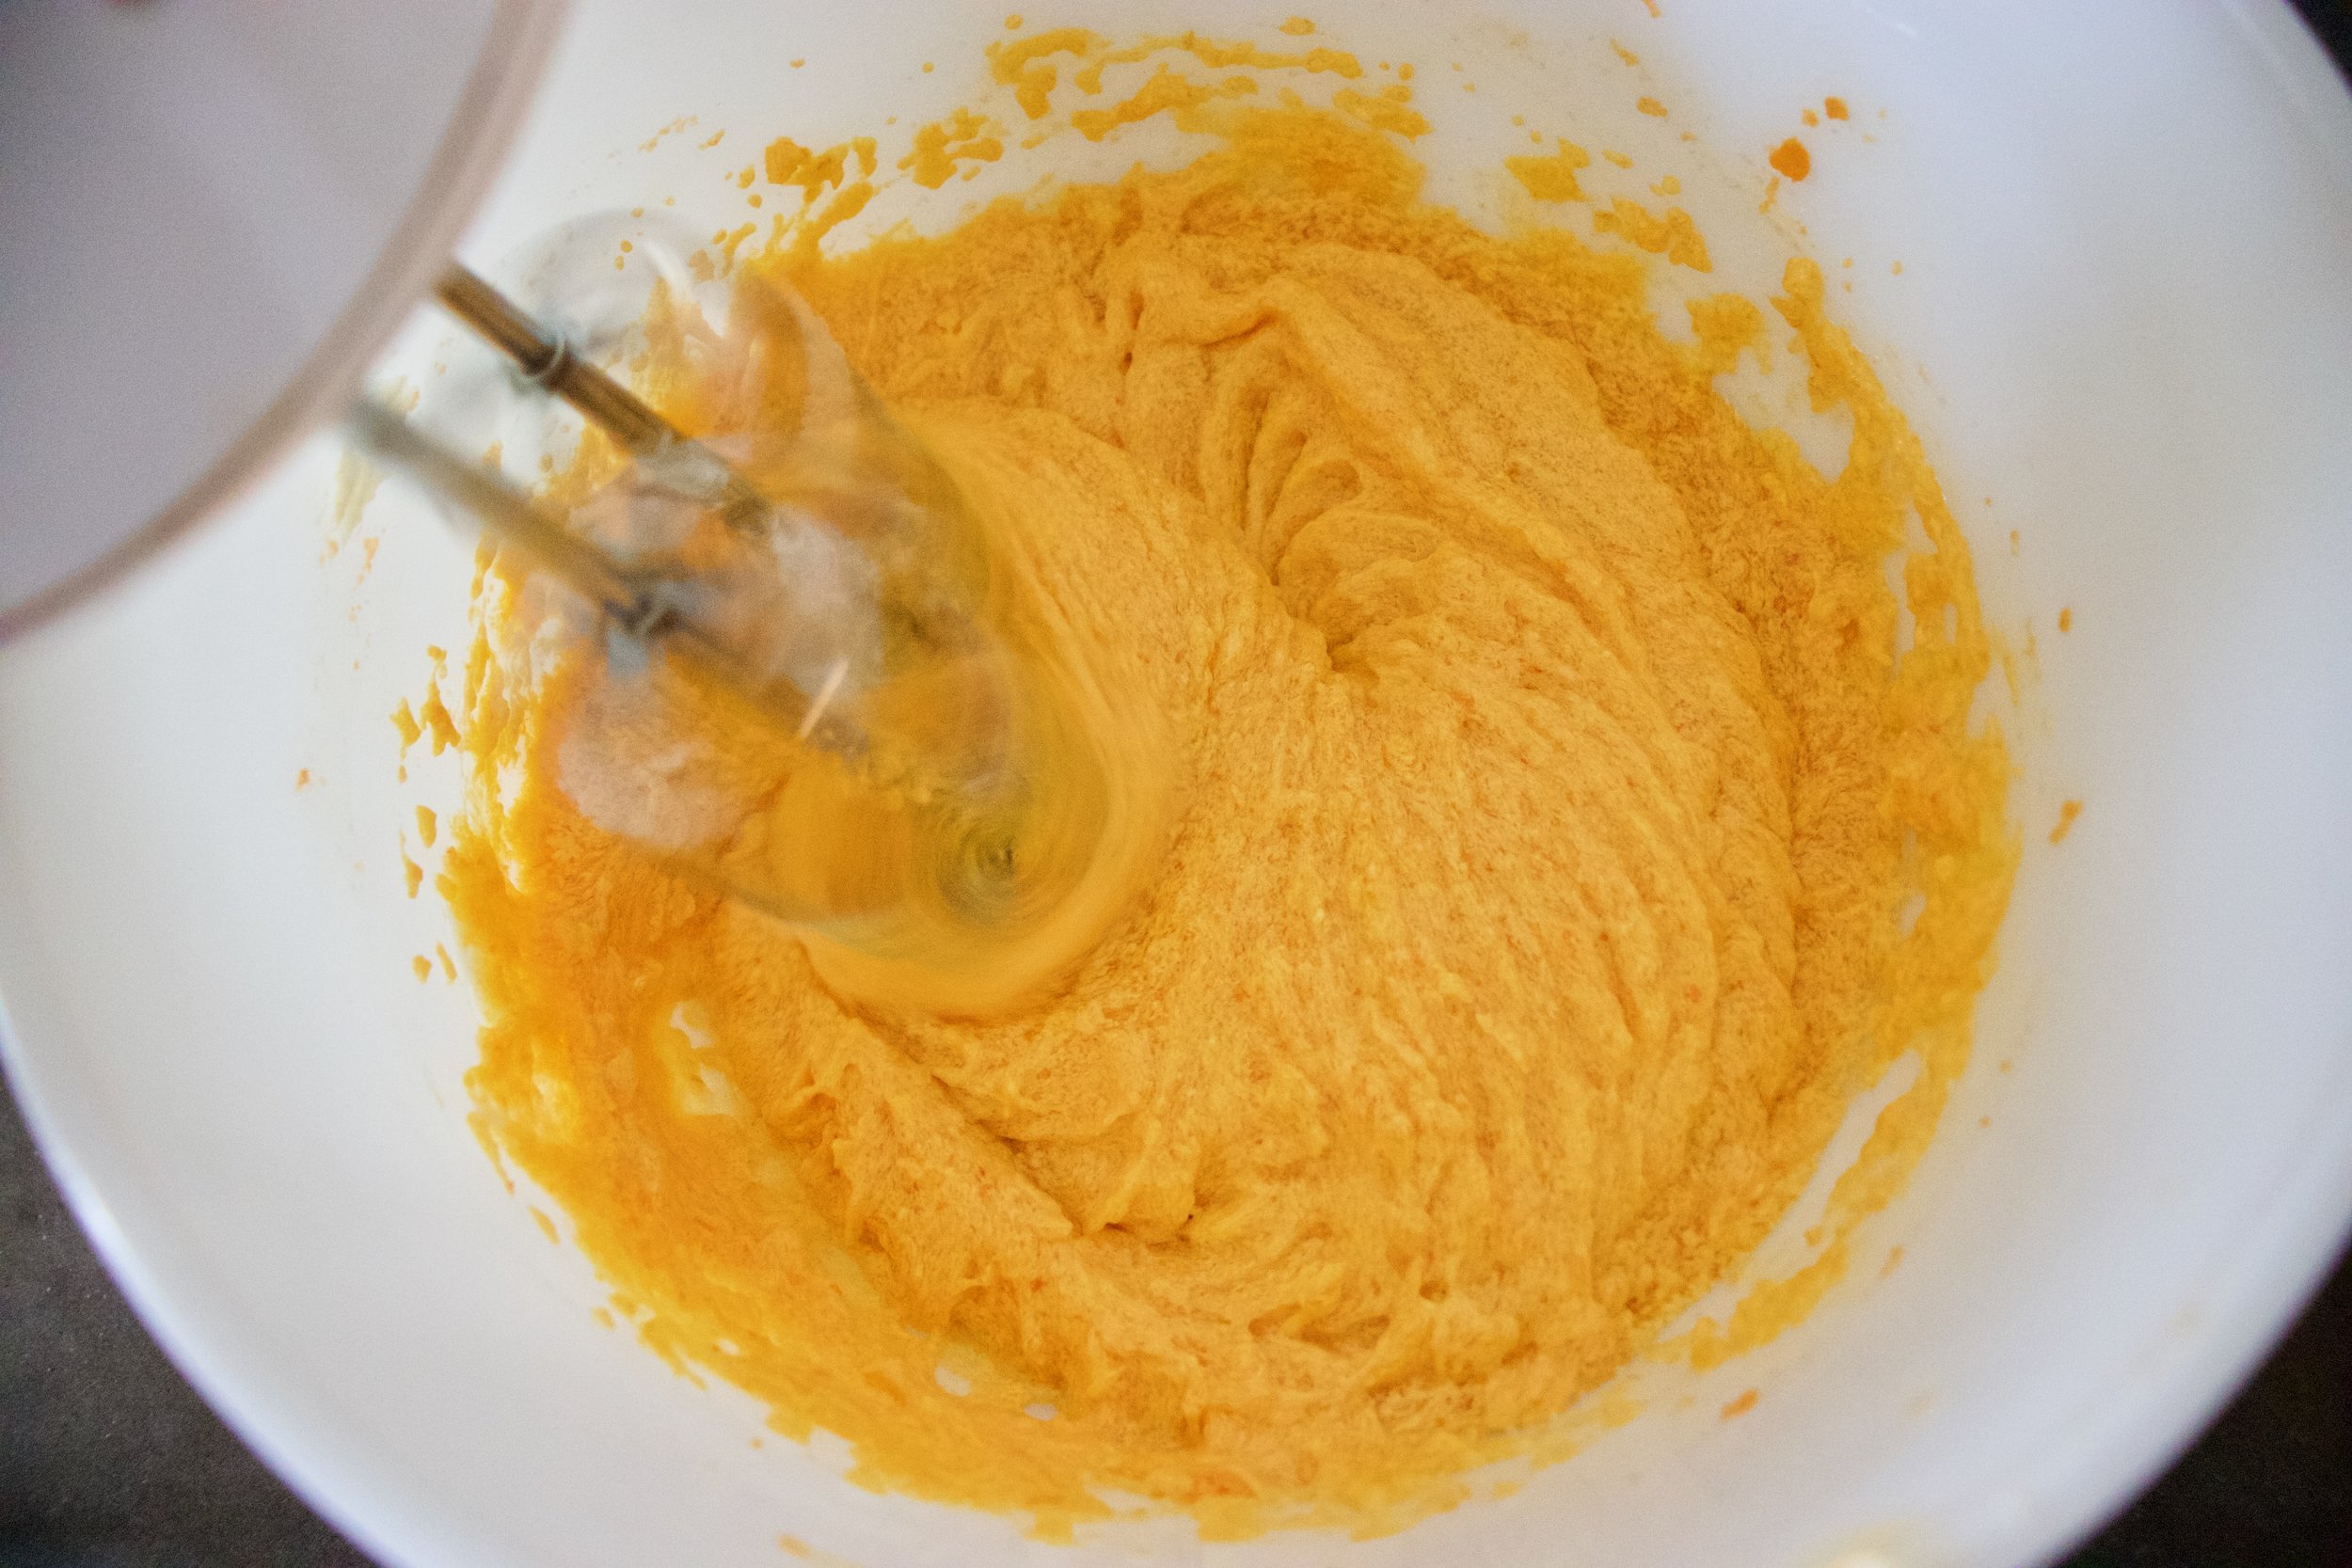
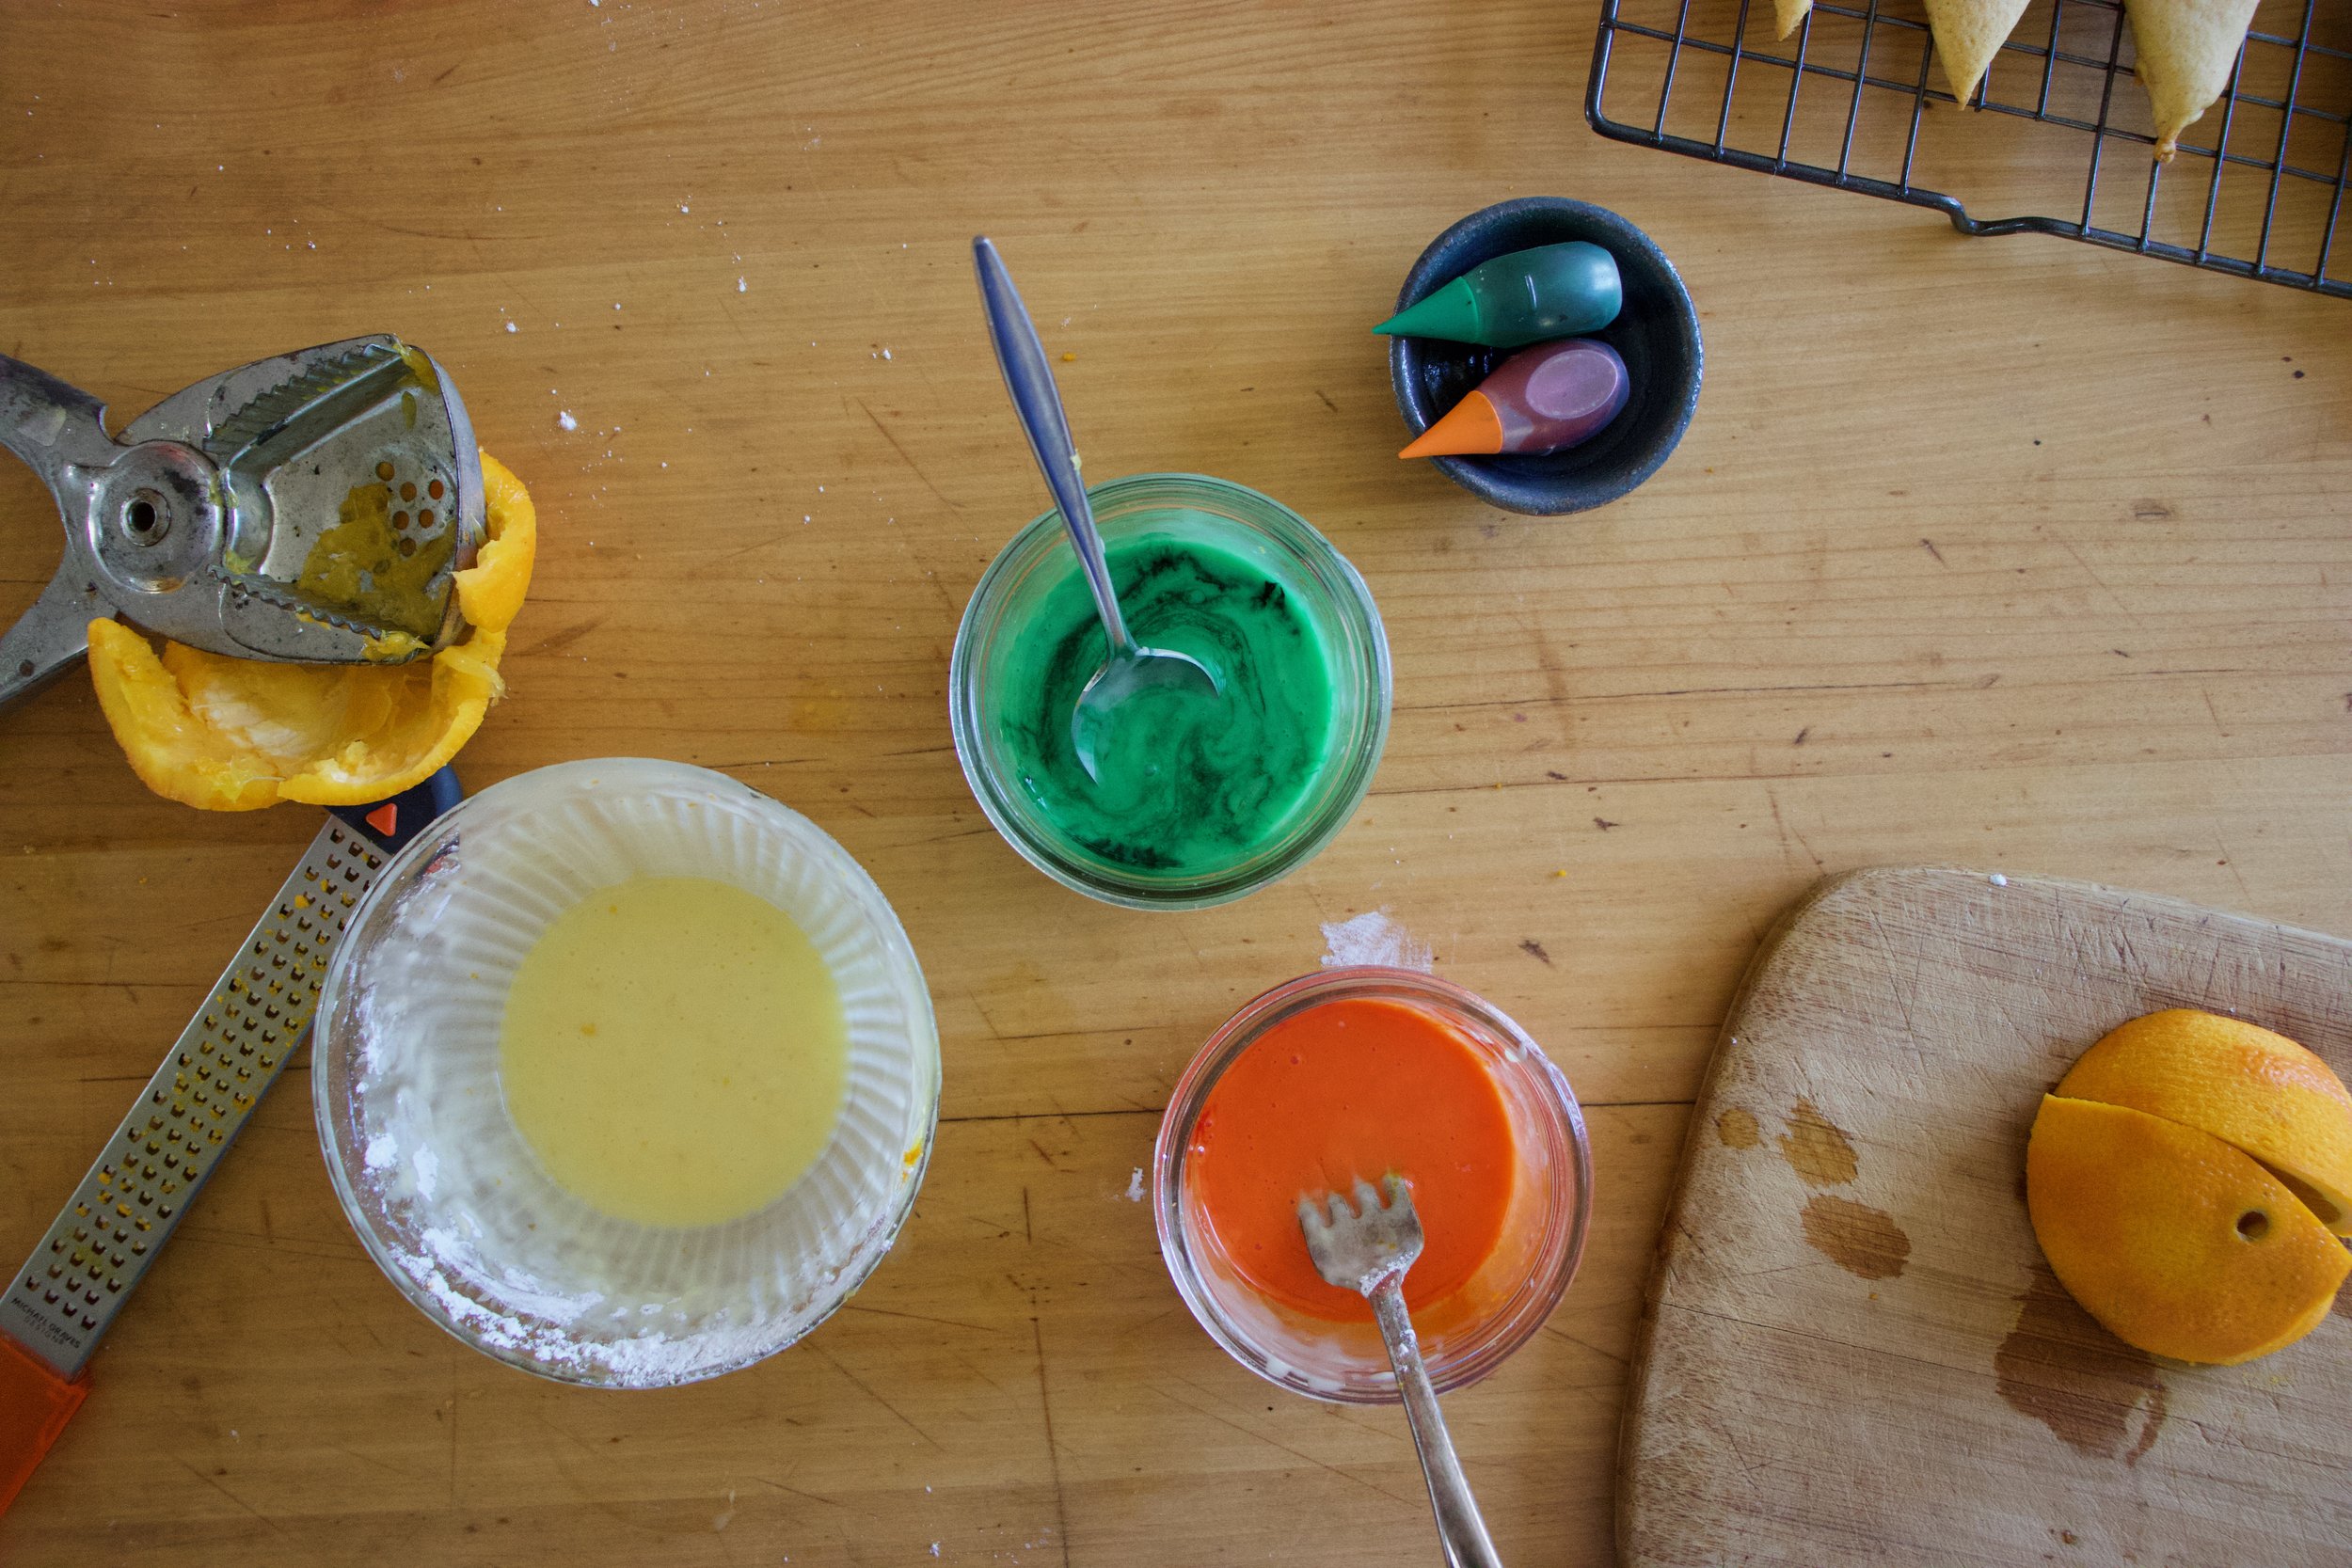
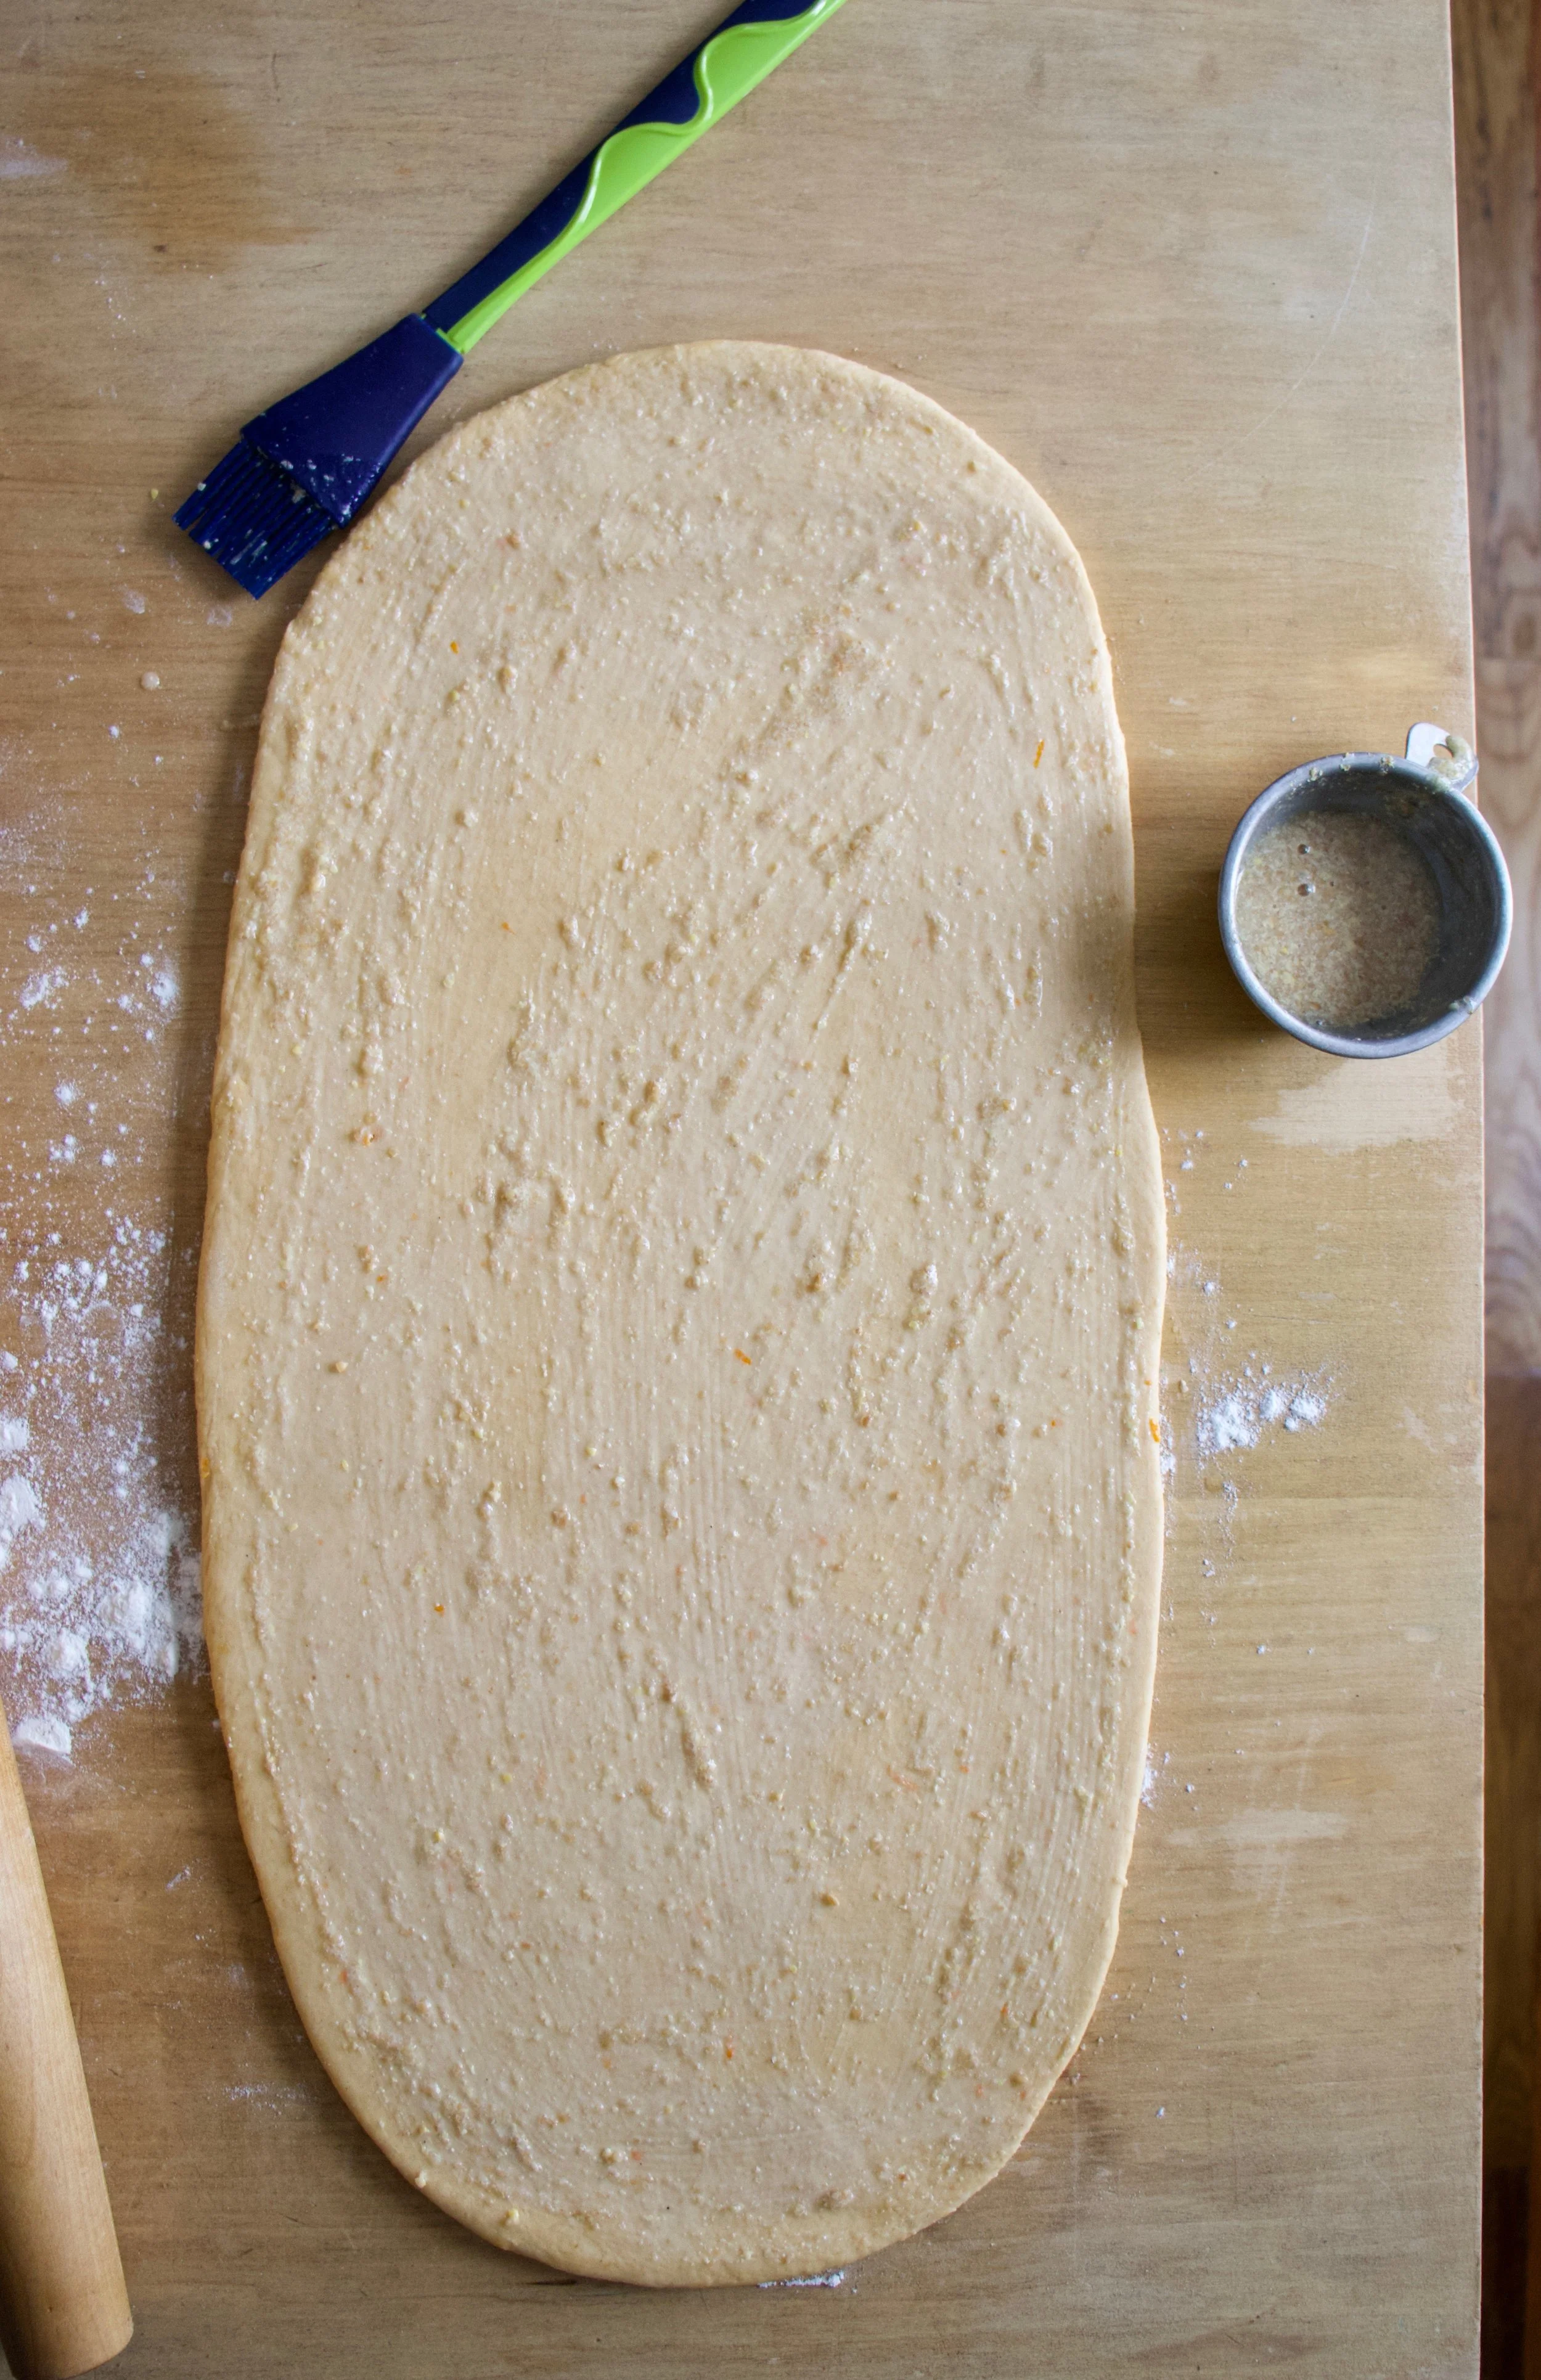
So clean I do and bake things I am. The other day I bought 4 beautiful vanilla persimmons (yeah persimmons!)%u00a0 and instead of hoarding them all to my face, I baked a little persimmon cornbread concoction for the mr(he doesn’t get excited about fresh persimmon like I do) This way he gets in on some of the persimmon action and I don’t feel as guilty about buying 4 persimmons.
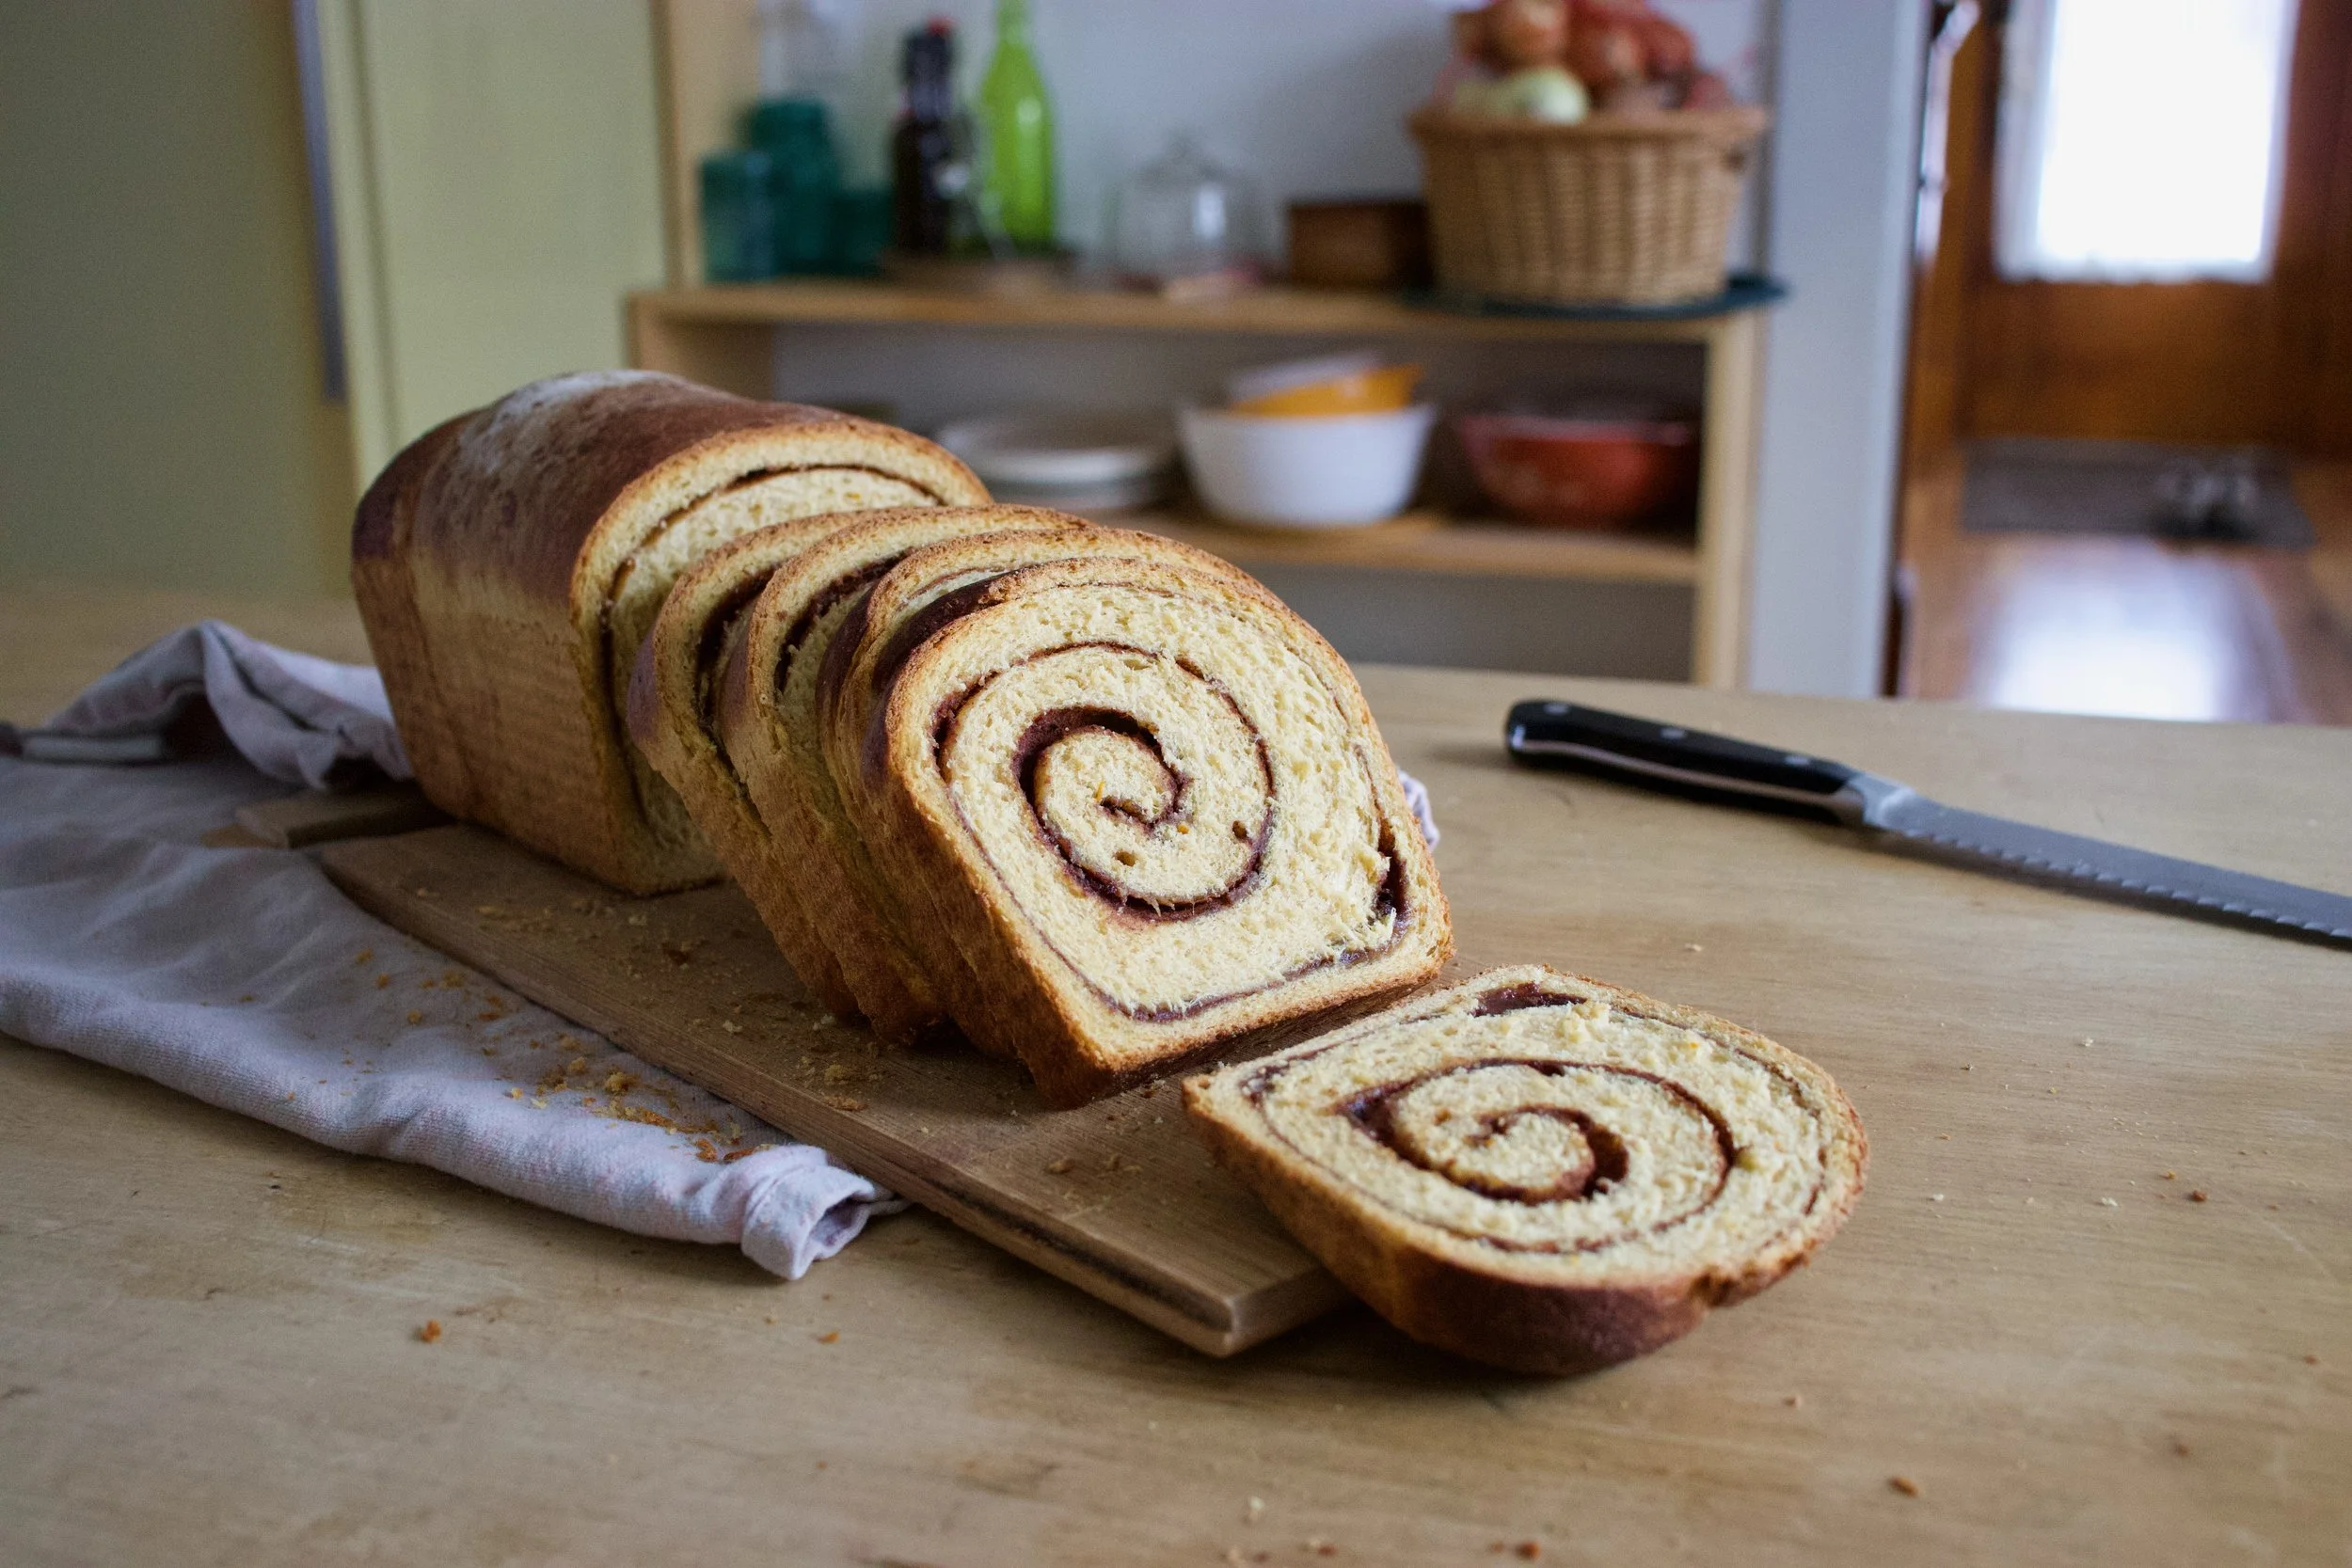
Dense, moist on the inside, crispy on the outside. A nice sweet maple glazed layer of soft persimmon nicely layered on top to take it to the next level .This bread, it’s and all sorts of good. It hugs the boarder of a bread and cake. but still makes a great side to a big bowl of squash soup, black bean chili, or whatever.%u00a0 The mr, he ate a piece for a snack after I made it, then a chunk with his dinner, a little slice for late night snacking and then a piece for breakfast. I might just make him a lunch situation with the rest of it for him today. And then it will be gone.. whoa.%u00a0 I guess that means it perfect for anytime and it’s just that good.
I am that good. But we can talk about me later, for now, the cornbread.
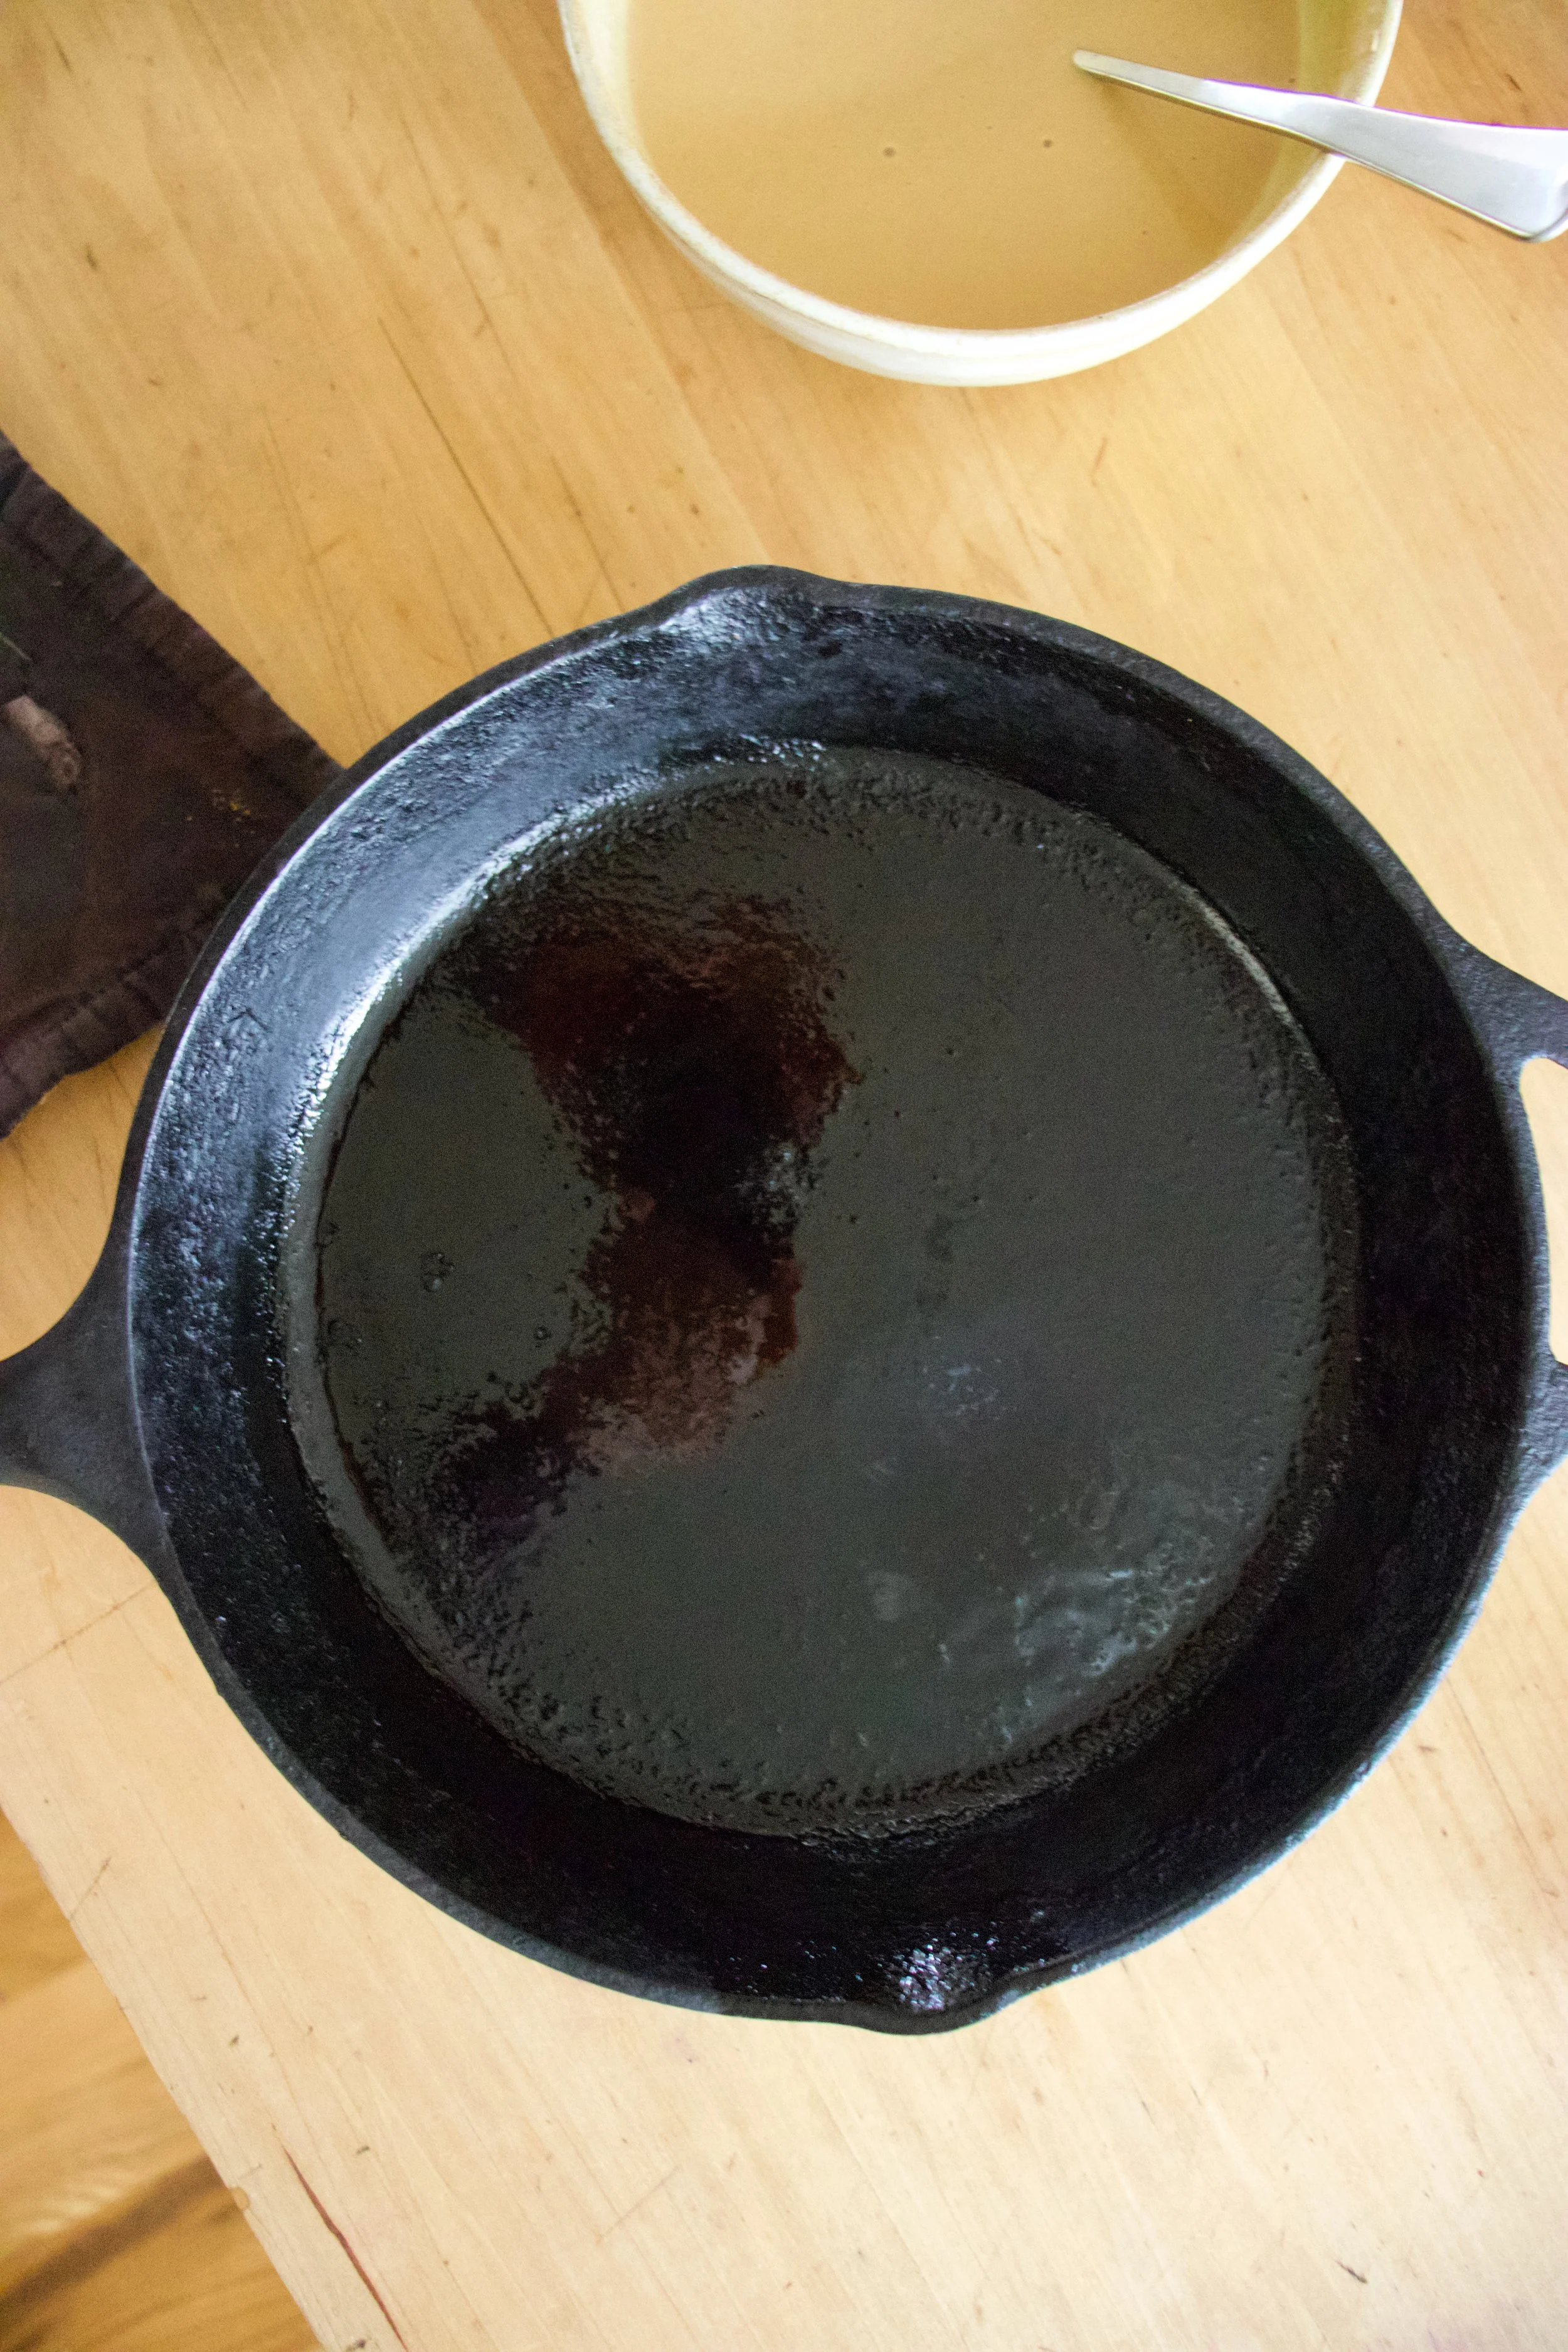
The stuff. A persimmon, some white whole wheat flour, yellow cornmeal, baking soda and powder and salt. Maple syrup, melted earth balance, and some soy milk are going in too.
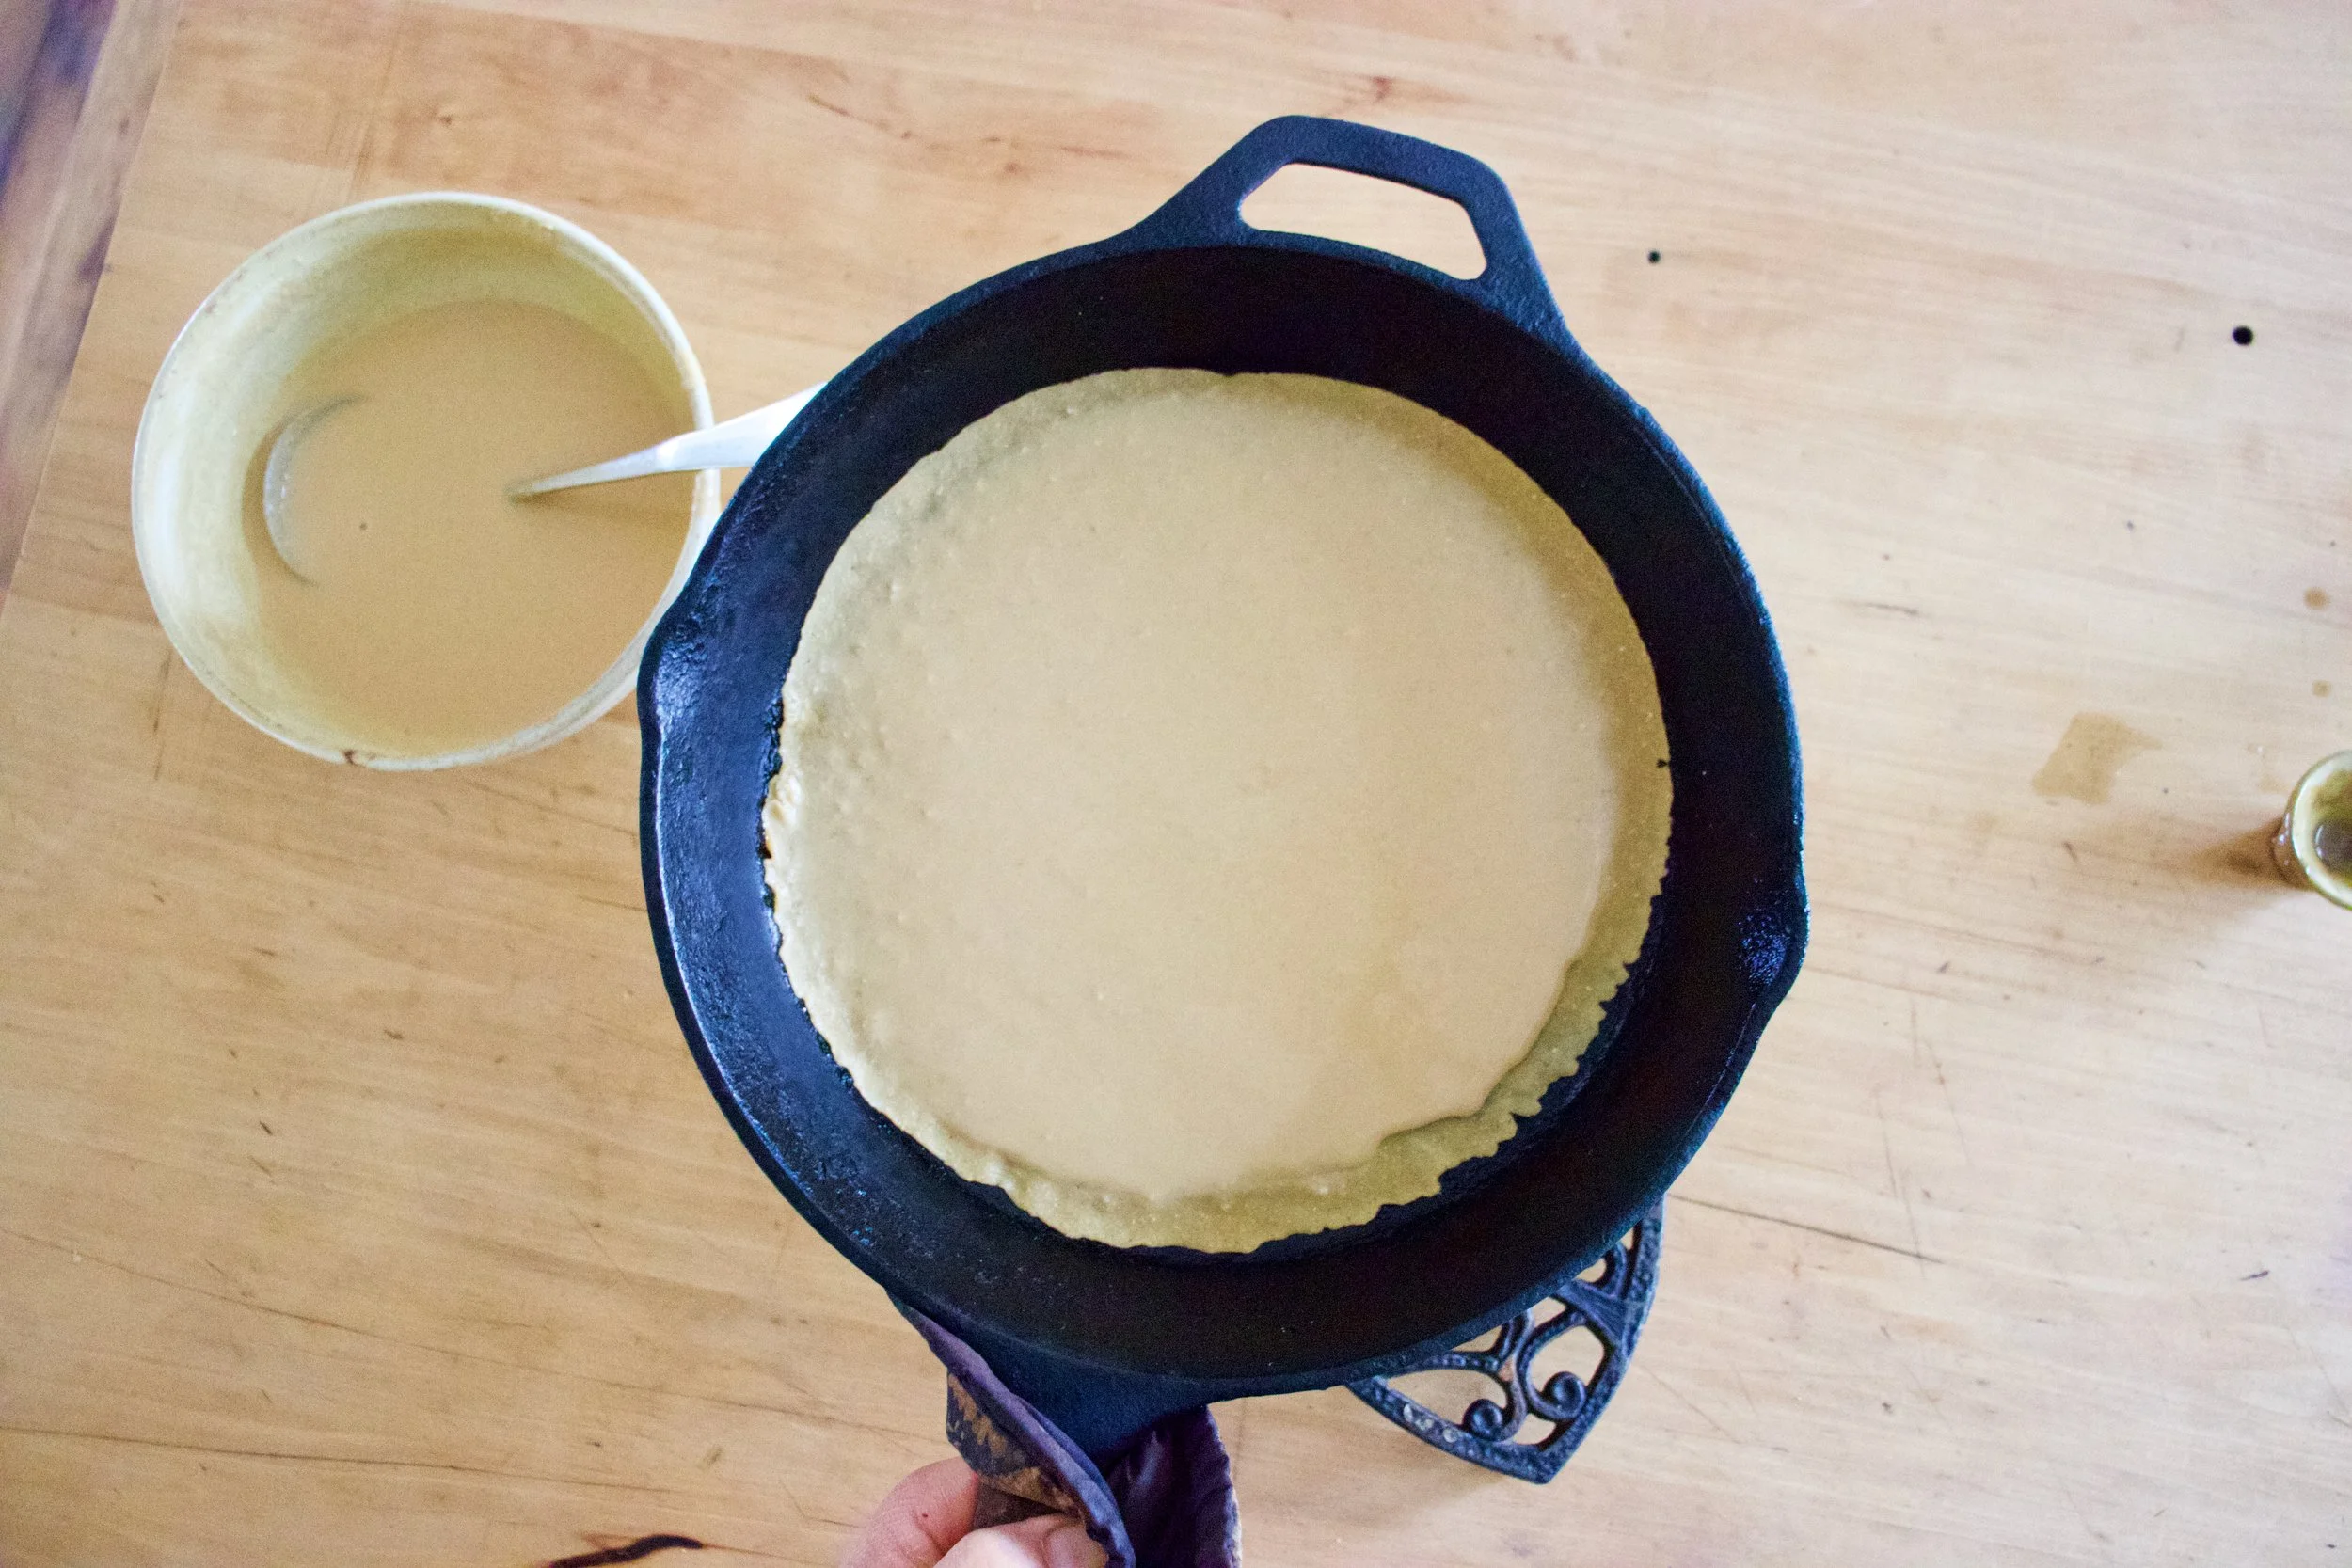
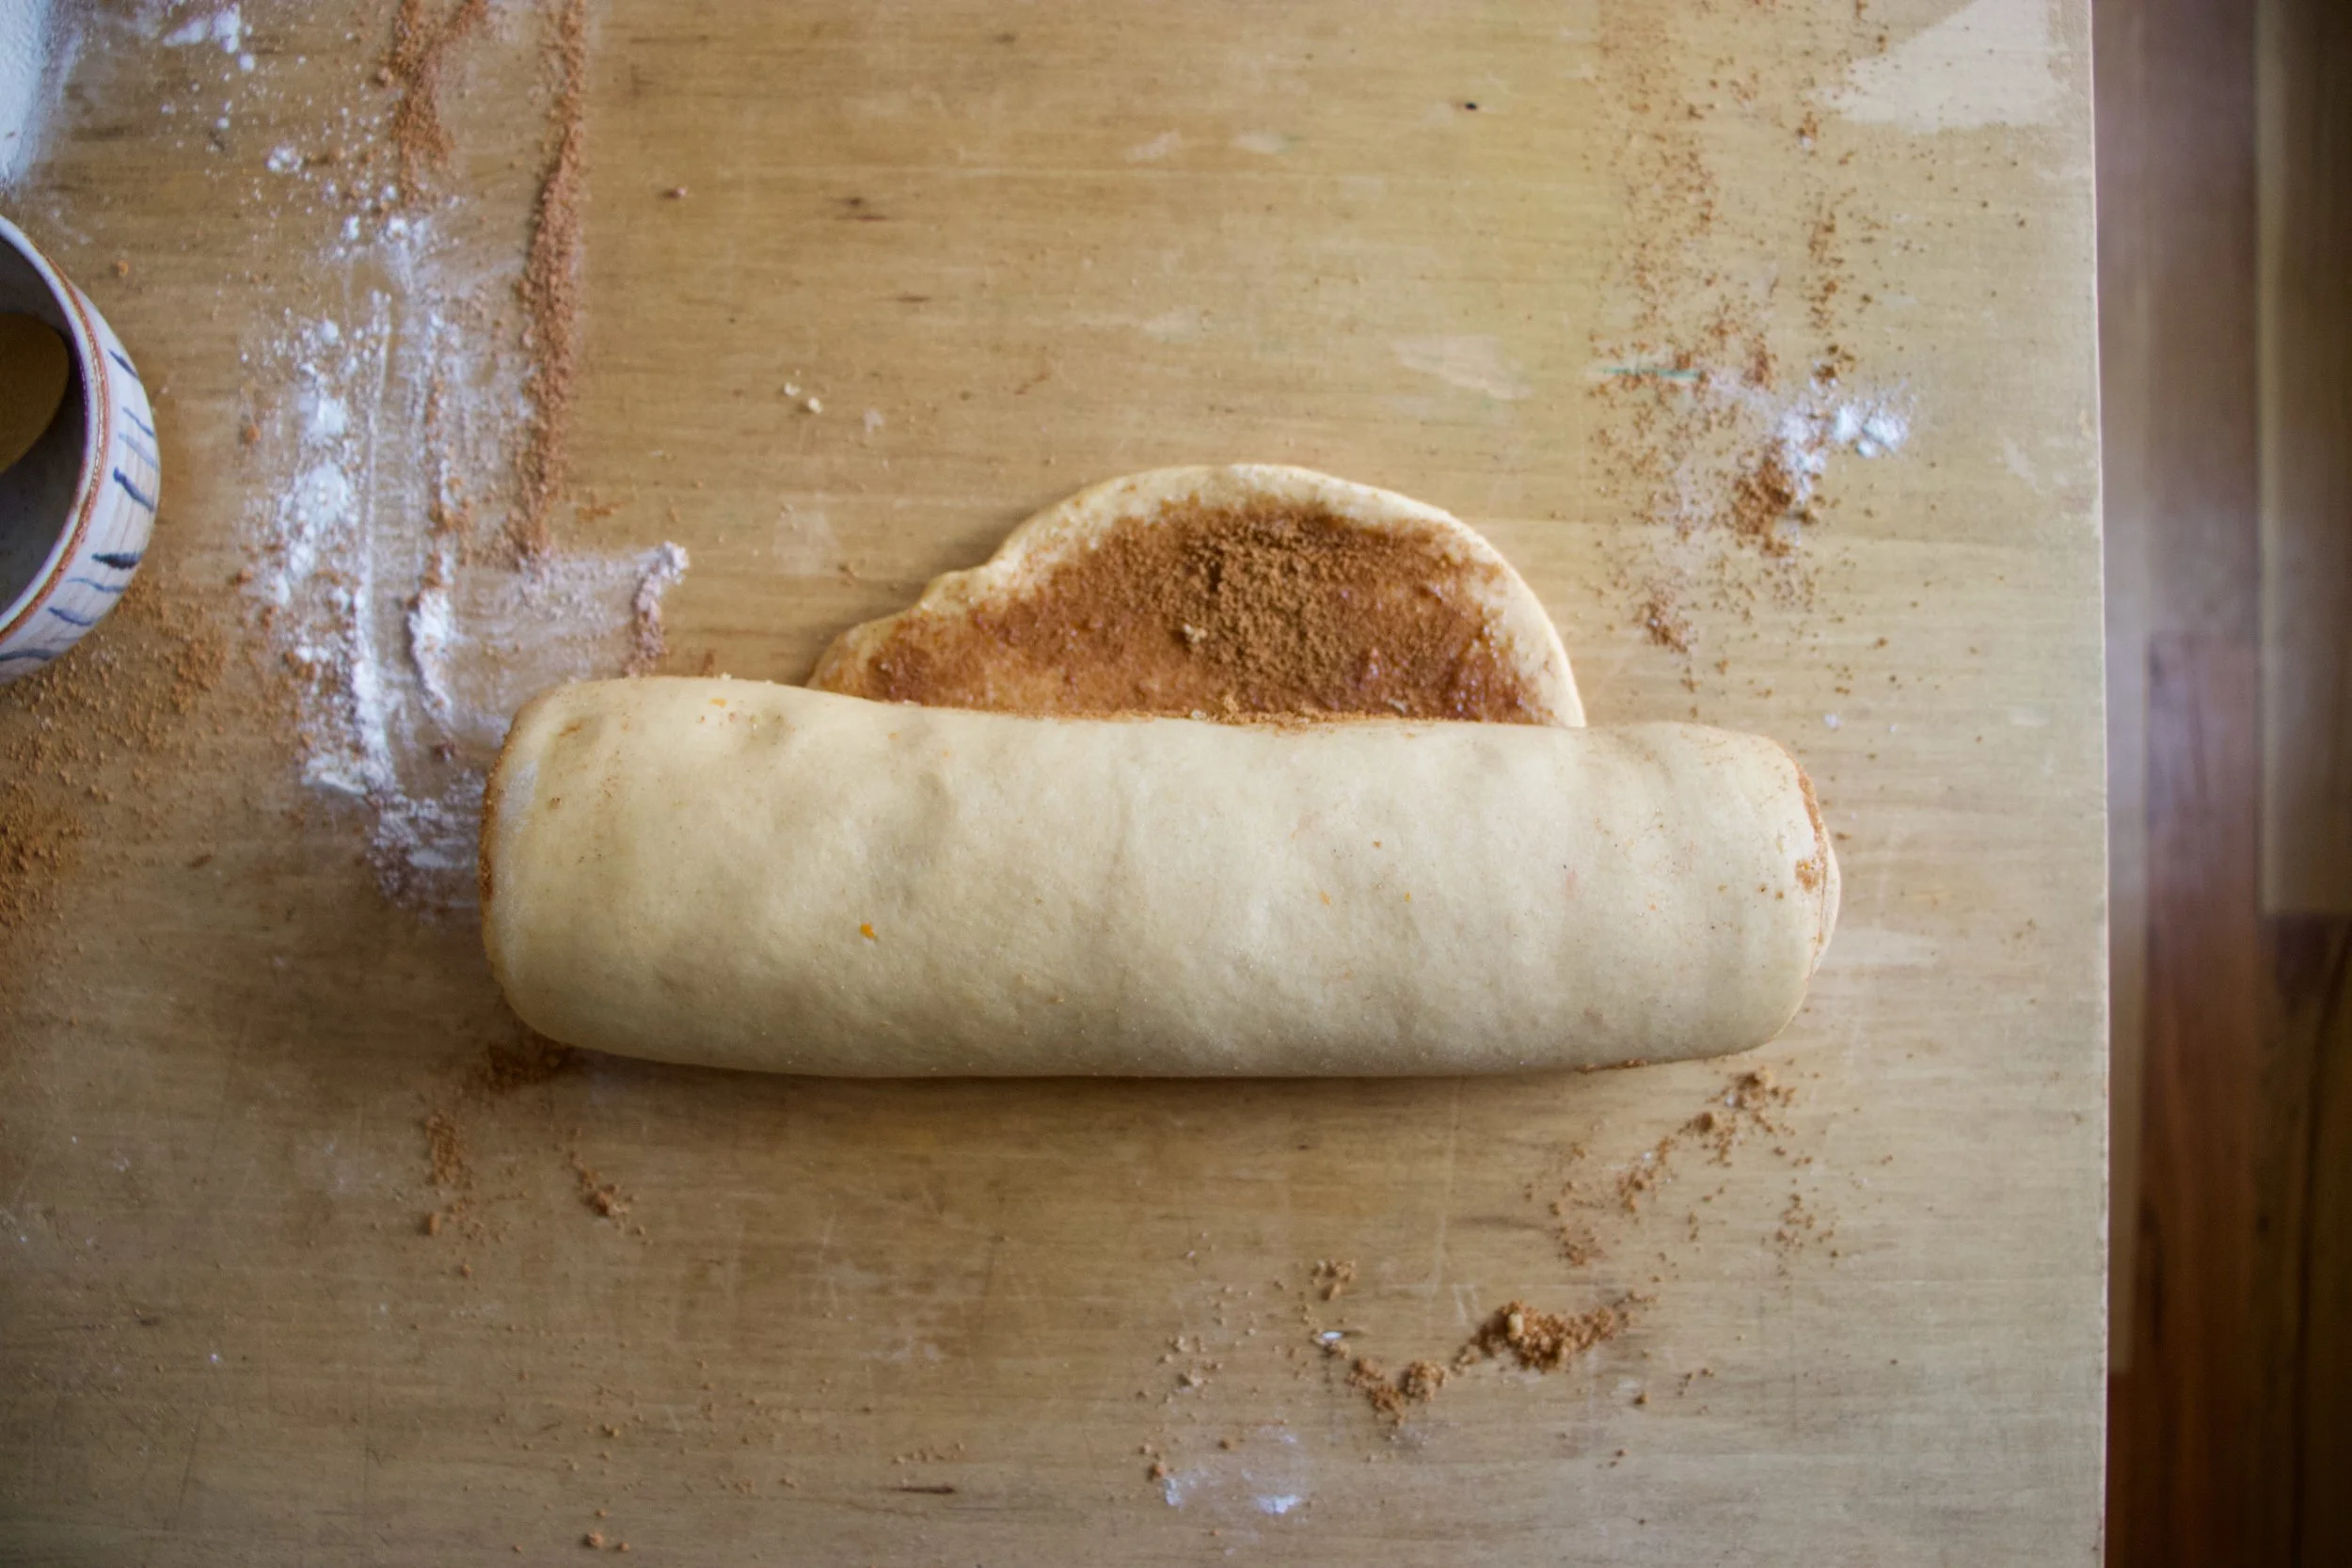
Start by preheating the oven and then thinly slicing the persimmon into the prettiest little rounds
And now whisk together all the dry stuff in a big bowl then dump in all the wet stuff.

Mix it all together until full just incorporated. (don’t over mix.)
Grease a 9 inch pan (can use a 9 inch square) and coat the grease with cornmeal.
Spread the mixture in the pan then layer the top with the sliced persimmon.
Lovely right.
Now stick it into the oven.
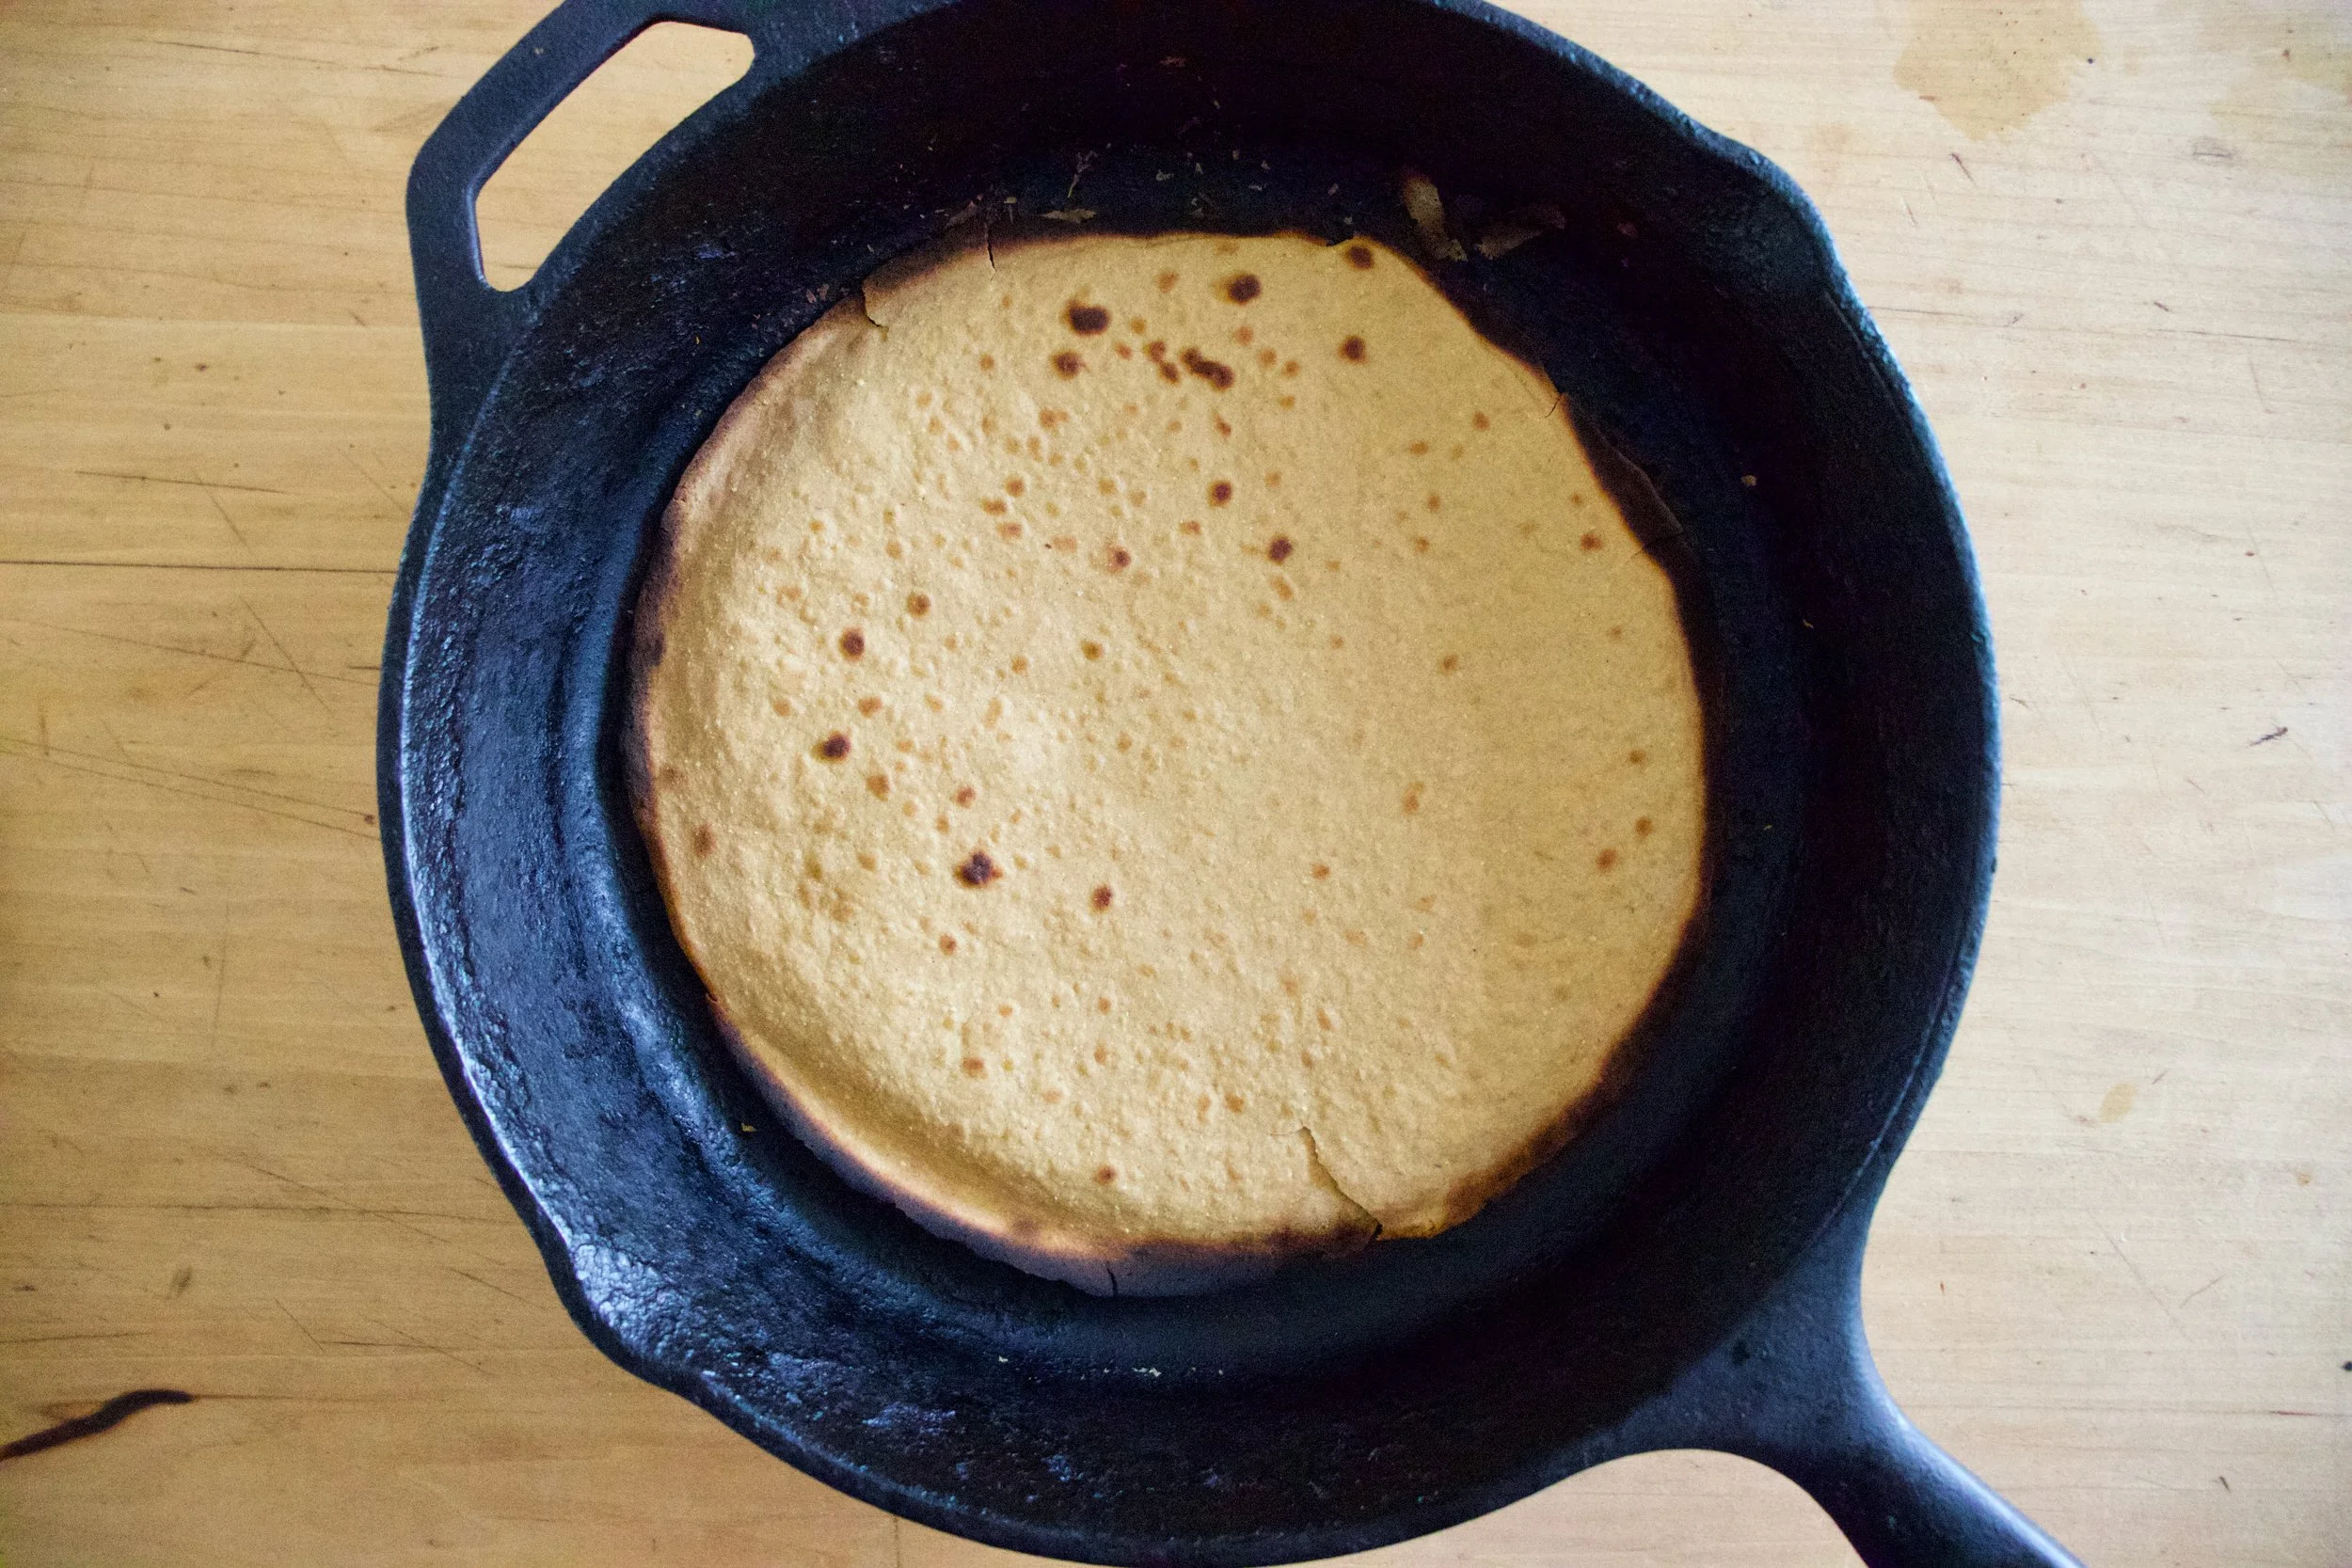
After about 25 minutes, the cake is just about done. Remove it from the oven and quickly brush the top with maple syrup then stick it back into the oven to finish baking.
And when the bread is completely baked, the persimmons nice and soft and glimmering,%u00a0 remove from the oven and sit on a rack to let cool.
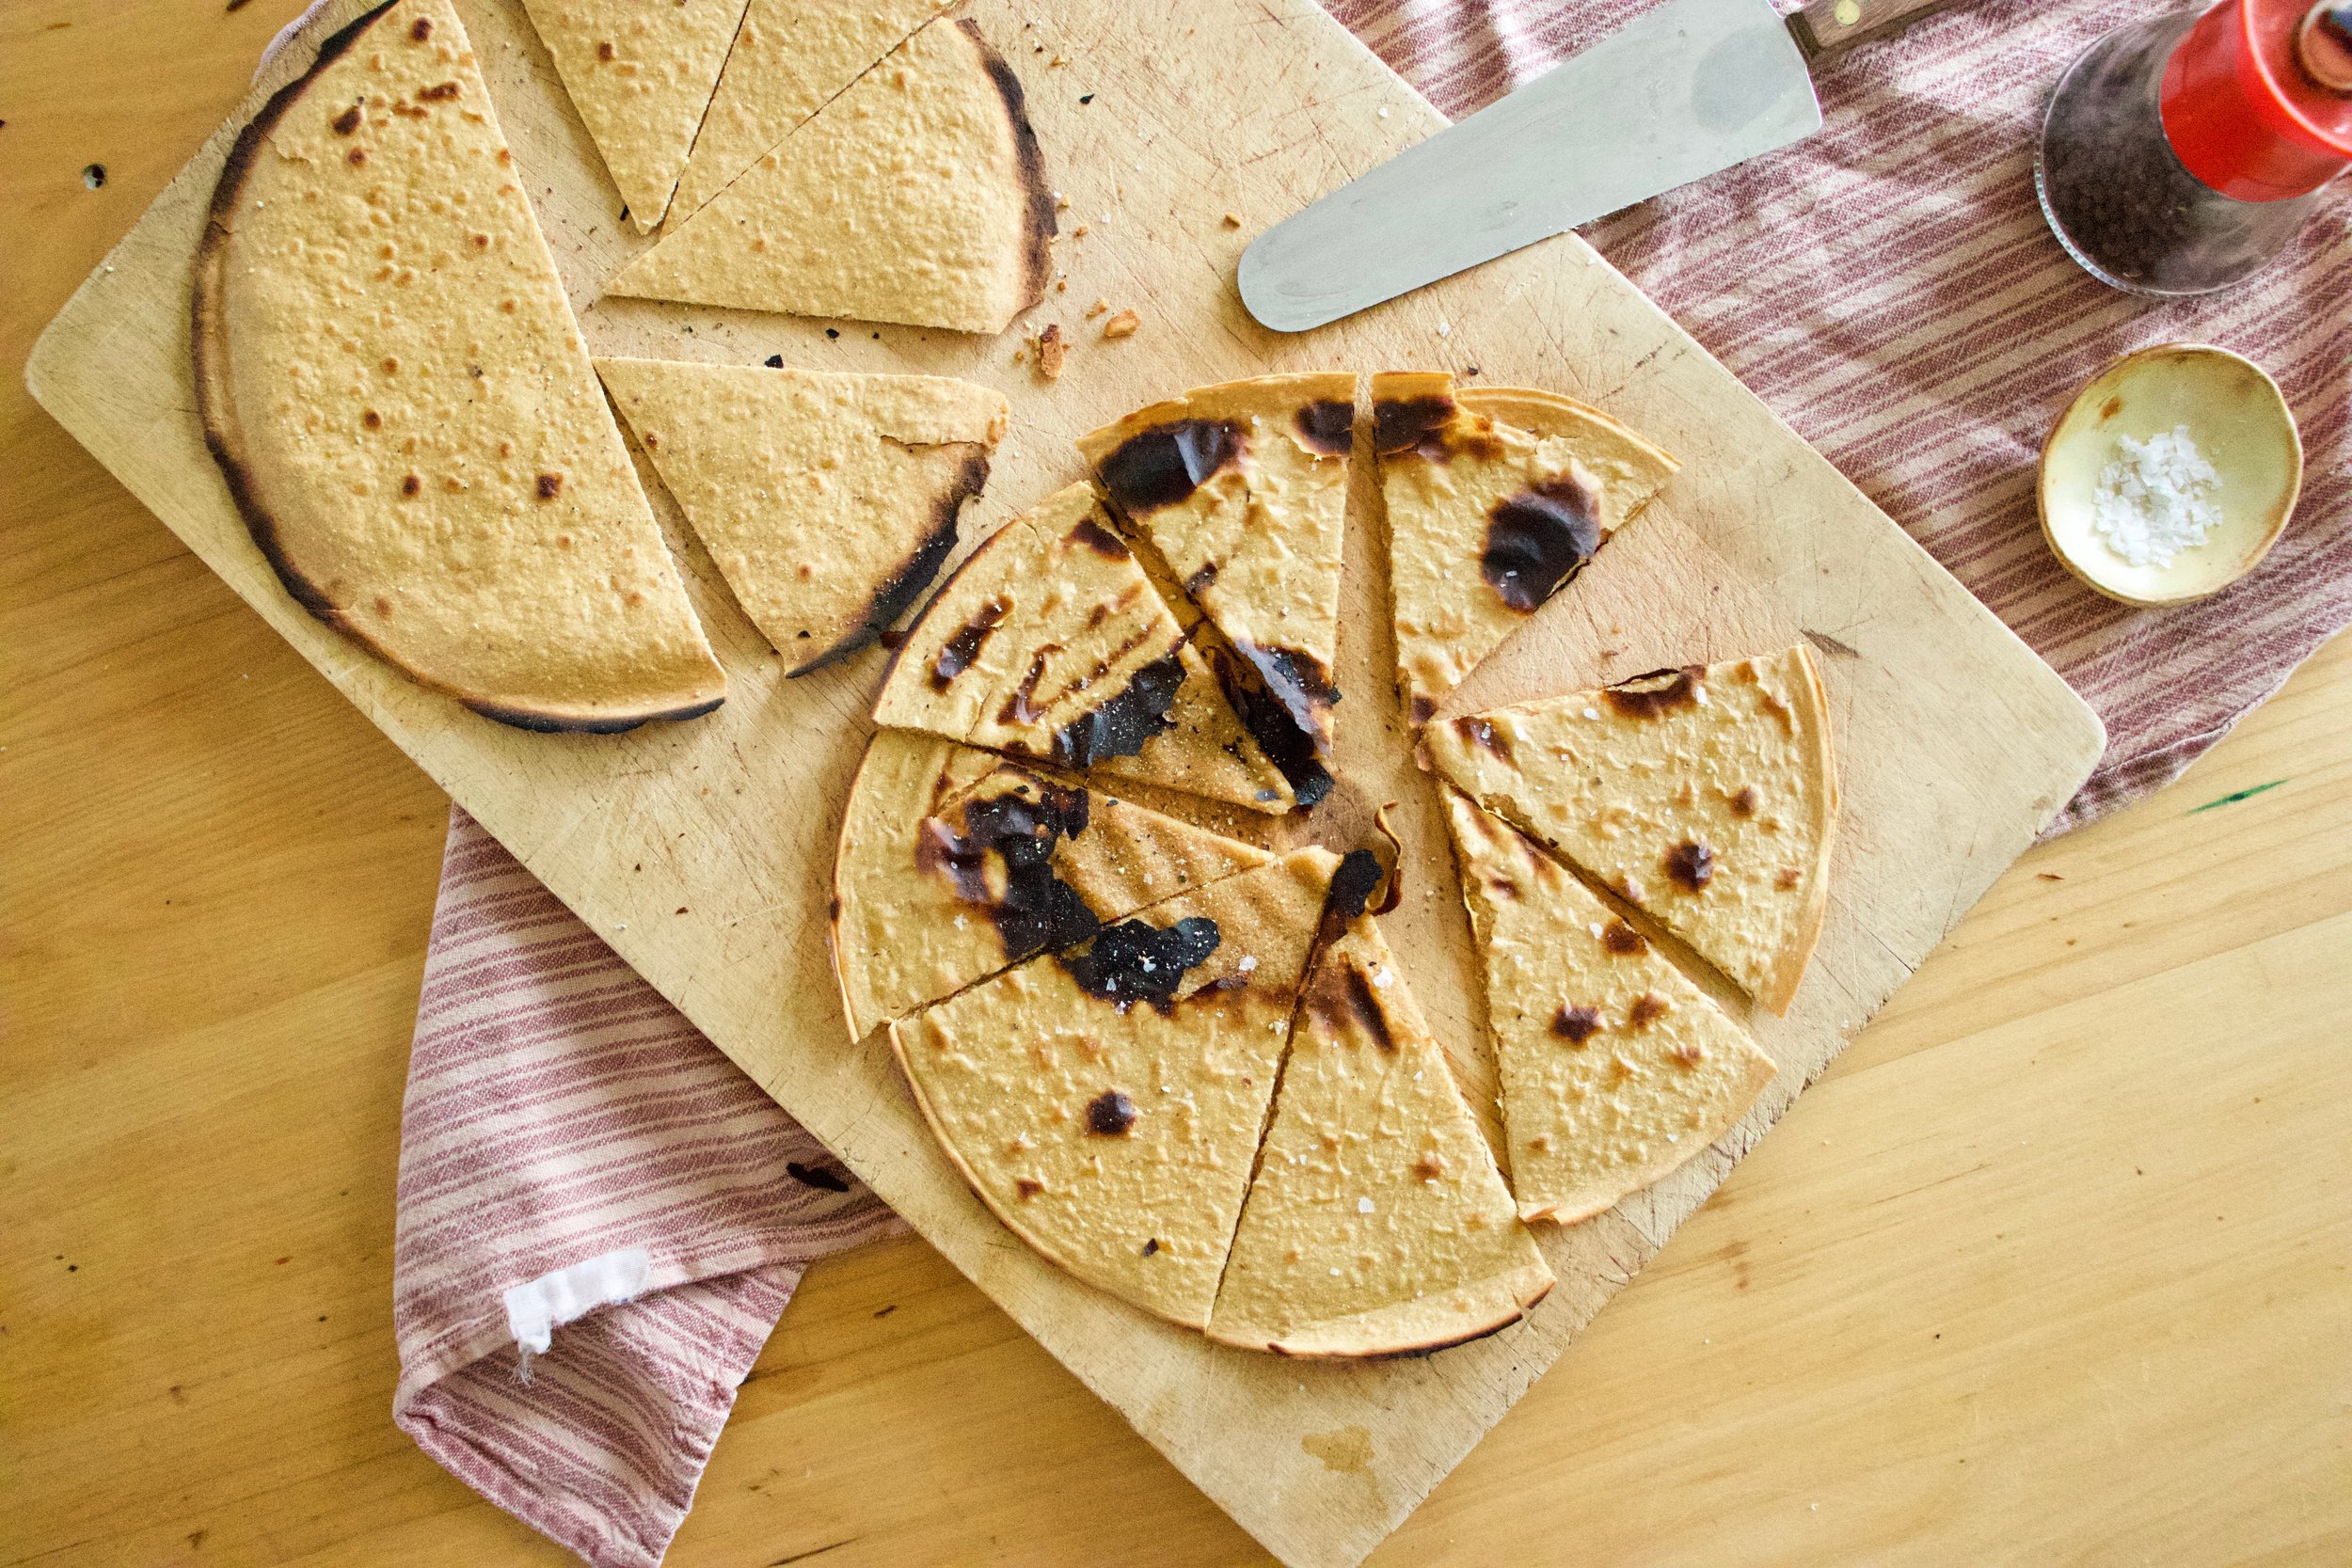
And when you can’t wait any longer….. cut yourself a big piece
Along with a cup of coffee…..
Nothing to worry about here.
Have a great day.. Wish me luck!
-C
make a 9 inch round bread cake
- 1 cup white wheat flour
- 1 cup yellow or white corn meal
- 1/3 cup melted earth balance
- 1/4 cup maple syrup plus about 2 tablespoons more for brushing the top of bread
- 1 1/2 cups soy milk
- 2 teaspoons baking soda
- 1 teaspoon baking powder
- 2 tablespoon apple cider vinegar
- pinch of salt
- 1 large ripe but firm vanilla or fuyu persimmon (If you have smaller ones, you might need 2)
Preheat oven to 375
First off, slice the persimmon into really thin slices.
Next, combine the flour, the cornmeal, baking soda powder, ans the salt into a large bowl and whisk together. Add in the maple syrup, the soy milk, the melted earth balance and the apple cider vinegar. Mix together until just combined.%u00a0 Dumb the batter into to a greased and cornflour coated 9 inch cake pan and layer persimmon slices on top, starting with the outer edge and layering inward (or whatever way you want to)
Place bread into oven and bake for about 25 minutes or until the cornbread has risen and is starting to brown, but could use a few more minutes. Take cake out and brush the persimmons with maple syrup. Place back into over to bake for another 8-10 minutes or until the cornbread is completely cooked.(tester comes out clean)
Remove from oven and let cool in pan on a wire rack
Slice, serve, and eat.


THE LOVELY CRAZY
May 20, 2019 by maximios • Blog
It%u2019s a smoothie. And no, we have never really been smoothie people in this house, but what can I say, sometimes smoothies happen, especially when you have about 20 ripe bananas in the fruit bowl with no room in the freezer and no need for 7 loafs of banana bread.
So I smoothied. And I like it (a lot).
This is a smoothie of simplicity. Nothing fancy. Simplest of simple. Straight to the point. And all sorts of good.
You might think, does this simple smoothie you speak of taste very good? Yes, yes indeed it does. It is all sorts of fantastic. Basically if you like creamy, nutty, oaty, bananery things, you will like this. And it%u2019s a perfect breakfast, snack, dessert, or just wanting a little treat like thing that is not garbage food. A smoothie of all smoothies with the most basic ingredients. And takes about 15 seconds to whip up. Can%u2019t complain about that.
To the smoothie goodness!
The stuff. A ripe banana, some old fashion rolled oats, a pinch of salt, water, and a smidge of maple syrup if you want it.
Everything goes into blender.
And blended until smooth. Hence the word smoothie.
Pour it into a cup (or if you are feeling primal, drink it straight from the blender%u2026 it%u2019s totally cool)
And done.
A banana oat smoothie.
Let the good time roll!
-C
makes 1 smoothie
1 very ripe banana
1/3 cup raw old fashion oats
1 1/2 cups water
pinch of salt
a tablespoon or two of any sweetener you like (optional)
a pinch of cinnamon (optional)
Place everything into a blender and blend until smooth. Pour into a cup, sprinkle with cinnamon if you wish, and drink right away.
It’s melon season!%u00a0The past few farm shares have included at least 2,, if not 4, watermelons and cantaloupes… Can you imagine. eating 4 watermelons a week? That’s a tall order, even for someone like me who could probably eat a whole watermelon in one sitting, it’s just doing it 4 times a week might be a problem. %u00a0It’s a whole lot of melon and not enough stomach, you know what I mean?%u00a0
So what do I do with so much melon? Well first off, whenever anyone comes over I try to get them to %u00a0eat as much of it as they can, which helps a great deal. Secondly, I cut it up and freeze some. But here is the thing, I love eating chunks of frozen cantaloupe, but frozen watermelon,%u00a0never been my favorite so I usually just pass on sticking in the freezer, until now.
There is something magical that happens when you stick the frozen watermelon and cantaloupe together into a blender and making it into a slushy. It’s like eating a ray of sunshine or maybe even a rainbow, just really satisfying and juicy, and sweet but not overly sweet, and just really freaking good. Especially with all the stupid hot and humid weather we have had lately, these slushies have really been hitting the spot. %u00a0Even the mr who says he dislikes watermelon was all into these melon slushies. (he likes things that he says he doesn’t like all the time. I am pretty sure he is taste confused) Like %u00a0he was really into them. Usually I have to prompt him to tell me how something tastes, but not the slushy, he told me right away how good it was. I was like, I know dude, I just drank 2 of them myself. And I could have drank 2 more but I was trying to not get tot far ahead of myself. Moderation is key, plus I didn’t;t have any more of the melons frozen. Time to restock the freezer.%u00a0
Go make yourself a slushy, it’s juicy deliciousness will make you happy.%u00a0
The stuff. Watermelon and cantaloupe. There should be a lime in there too but it must have rolled away….%u00a0
Chop some of each of the melon up, remove the rinds, and place on a big baking sheet and stick into the freezer until frozen. You can do as little as 2 cups %u00a0of each or as much as a whole melon, it’s up to you. (I suggest freezing extra)
Frozen melon. And now you can slushy.
Equal parts watermelon and cantaloupe go into blender, along with the juice of half (or more to taste)%u00a0a lime and you are probably going to need to add about 1/2 a cup of water, to help the blender blend it all together. %u00a0And that’s it. You blend until it’s all slushy.
Pour into cups, garnish with a lime and/or little chunks of melon and you are good as golden.%u00a0
From now on, or until summer is over and I run out of melon, I will be keeping the freezer stocked, especially because I know that the next few weeks are suppose to be stupid hot again.%u00a0
Waterloupe slushies. Summertime goodness.%u00a0
-C
Note. The amounts above are for two%u00a0 2 cup slushies. You can, and should,%u00a0freeze a crap load more melon for future slushies. %u00a0Also, no one would fault you for maybe adding a little nip of some clear alcohol to this slushy situation to make it more of an adult drink……
Cut up a watermelon and a cantalopjue. Eat some and reserve at least 2 cups of each. Remove the rinds from the melons and cut into cubes. Place melon on a baking sheet and stick into the freezer until frozen.%u00a0
Once frozen,%u00a0place equal parts frozen watermelon and cantaloupe into the blender with the juice of a lime. Turn blender on. Slowly add in water until the blender can handle blending the frozen fruit. Blend until smooth. Pour into cups, garnish if you want with more melon and lime, then get to drinking.%u00a0
Have you heard of switchel? A lot of people haven’t so don’t feel bad if you don’t know what the hell I am talking about (like my computer. It keeps auto correcting switchel to switched). So switchel. It’s basically a drink made from water and apple cider vinegar. But wait, don’t grimace and click away, it’s also has fresh ginger, lime, and maple syrup mixed in and is really really really freaking refreshing and tasty and just really good. I guess it was even used back I the day as a sort of sports drink, like Gatorade because it has all sorts of electrolytes and anti-inflammatory properties from the ginger.%u00a0%u00a0Plus apple cider vinegar has got all sorted or health benefits,%u00a0so it’s a tasty treat with benefits. Who doesn’t love the benefits?%u00a0
You can drink the switchel %u00a0straight up hot or cold, add it to seltzer for a bubbly soda like drink or even %u00a0mix some cocktails with it. I enjoy a nice cold glass when I am feeling thirsty but what I usually do it fill up half a %u00a0jar with boiling water, then fill the rest of the jar up with the cold switchel. It’s a nice tangy, spicy,%u00a0refreshing and warming drink that I look forward to every day. I even got the littles to try it.%u00a0%u00a0One thought it to be nasty (can’t win them all), but the other one really liked it too, so you know it’s not just me that thinks it good.%u00a0
The stuff. Apple cider vinegar (the good stuff that is raw and has the mother), fresh ginger, limes, maple syrup, and water.%u00a0
Fresh ginger is the best. Give it a little peel with a spoon, just to maximize gingerness exposure then chop into small pieces.%u00a0
Ginger and water goes into big pot. Bring it to a boil then turn down to a high simmer for 10-15 minutes to really get the ginger infused into that water.%u00a0
After it’s cooled a bit, strain the now ginger water into a pitcher or a big jar.
Add in the vinegar, the juice of the limes and a bit maple syrup. Start off with a little maple, you can alway add more later if needed.%u00a0
After the switchel has some time in the fridge to cool (at least 2 hours, but I like it best when it’s sat overnight) grab a glass ,some ice cubes, and a slice of lime. It’s go time.%u00a0
A drink to you my friends
-C
Makes bout 6%u00a0 cups%u00a0
With a spoon, gently peel ginger . Not perfectly, just get some of the skin off. Chop it into small pieces and place it into a large pot with the water. Bring to a boil then let simmer for 10-15 minutes. Strain ginger water int a large pitcher or jar.
Add in the apple cider vieager, the juice of the limes, and a tablespoon or two of maple syrup. Give it a good stir then place in the fridge until cold (about two hours but overnight is best)%u00a0
When it’s cold, give it a good stir again, taste, and if it needs more maple, add it in. And then it’s ready.
You can drink it on ice, maybe add some seltzer to it, or mix it into some fancy cocktail. It can also be reheated for a nice spicy warming treat.%u00a0
I love watermelon, I mean, who doesn’t, but i don’t often buy them for myself for one main reason. They are so freaking big and once you cut open a melon, the rest of what is not eaten needs to be refrigerated which would be fine but I have a very tiny fridge and sticking a watermelon in there takes up about half the space. And sure, I could maybe eat a whole melon all to may face in one sitting, but then I would explode. And yes, I know you can buy smaller wedges of melon at the store, but I refuse. Those wedges just seem gross and expensive and wrong to me.%u00a0 When I buy watermelon I take my chances and buy the whole thing and just eat the crap out of it until I make room for other food in the fridge.
It has been so hot out (too hot) and I really just needed a watermelon, so I bought a watermelon (the biggest one I could find because of course). I waited for a day until the fridge was near empty and cut the beast up. Half went into the fridge right away (I had just eaten the last of the greens to make room) and the other half, well only a 1/4 was eaten. I could have kept going and eaten the rest or I figured I would just make a nice tea drink with the rest. And that what I did and that’s this drink I show you here. Smooth, bright, and earthy iced green tea with fresh sweet watermelon, it’s all summertime up in you mouth. And pureeing up watermelon into a liquid definitely takes up way less space in the fridge. I am a genius.
The stuff. Some watermelon, a few green tea bags, a lime( or a lemon), a spring or two of mint, and some water.
Start off with making the tea. Hot water to tea bags, steep for 5 or so minutes then remove bags. Stick tea in fridge to cool.
Now for the watermelon. Remove the rind from the fruit , and cut it up into chunks. Toss in a few mint leaves and…..
So you have cooled tea, pureed watermelon and the juice of a lime.
Pour it all together and mix it all up.
And there you have it. Fresh watermelon green ice tea, ready for your drinking.
All you need now are glasses full of ice and little wedges of melon.
All the summertime, all the watermelon.
Hope you are all staying cool.
-C
make 6 1/2 cups
Bring water to an almost boil (I let my tea pot whistle, turn it off and sit for a minute or two) and pour hot water over tea bags. Let steep for about 5 minutes, then remove bags and refrigerate tea until cold.
When the tea has cooled, take you melon, remove the rind, and puree the fruit along with the mint, with a blending device of you choice. Squeeze in the juice of the lime and give it all a good stir.
Pour tea over ice, garnish with a sprig of mint and a slice of watermelon if you want some fancy.
I am channeling all my summer time feels here in hopes for warmer weather. As of yesterday there was still a pile of snow outside of my house and I am still leaving every morning in a hat, mittens, and a winter jacket.
I want t-shirts and shorts, I want sandals, and I want to set my winter jacket on fire (not really, but kinda).
This cold weather has crept back into my soul and I needed something to remind me that there will be warmer days to come and I will soon be bitching about how hot I am and blah blah blah.. you know how it goes.
So I make lemonade. This lemonade as inspired by my favorite tea as of late, raspberry zinger. It’s a nice and tangy tart and really tasty. I make great big jar of it at night and add a little squeeze or two of lemon to it for that little extra zing. I figured if it tastes good hot, it will taste great cold, which in fact, it does. It taste really freaking good. And it just occurred to me that there is probably a little subliminal inspiration from Beyonce in wanting lemonade, so thanks for the B.
Anyway, it’s suppose to me nice and seasonably warm this weekend. Maybe bust out your lemonade game and try a batch of this one.
The stuff. Lemons, a raspberry zinger tea bag, honey (or any sweetener you like to use) water and ice.
Bring some of that water to aalmost boil and pour it over the tea bag (make sure you stick the bag into a jar or pitcher)
While the tea is steeping, juice the lemons. And a personal preference, you can strain out the pulp or not. I use the strainer to catch the seeds but then stick the pulp back in cause I like pulp. All up to you.
While the tea is steeping and still hot, add in any sweetener that you want to use. ( I used a little honey) Stir until that sweetness is all dissolved.
And after the tea has had a good steep, dump the brewed tea into the pitcher with the lemon juice then add in the really cold water. Stir it all around.
Add acouple thin slices of lemon to make it all fancy anda few big chunks of ice to make it super cold
Refreshing, crispy, tangy with a touch of sweet….Perfect for all those warm summer days to come (hopefully)
Have a great weekend people.
-C
Makes 5 cups
Place tea bag in 2 cups of hot water (can be done directly in a pitcher) Add in the sweetener while its still hot and mix until completely dissolved. Let steep for about 10 minutes.
Remove tea bag and add in the lemon juice, 2 more cups of cold water and mix, Top with ice and garnish with a few more lemon slices if your feeling fanciful.
Serve in a glass full of ice with a wedge of lemon and a smile on you face.
For the longest time now, I have been drinking a little turmeric with a little lemon first thing in the morning. It started as a medicinal drink, but quickly became a tasty habit. I have some stupid weird circulation condition called raynaud’s where changes in temp turn my fingers and toes into icicles. And for me, the worst time of the year for this condition is the spring (but spring is still my favorite). All the up and down of temperature and the wet cold damp weather is my trigger, not to forget to mention that those temp swings can get a girl sick. (I can’t get sick!!)
So way back when I started to drink for my health and the feeling in my fingers. Turmeric, ginger, and cinnamon , all super warming spices that help greatly with blood circulation, not to mention a whole bunch of other good things. (I could tell you and go on and on, but you can just look it up yourself) Ever since I started drinking and eating lots of these spices, my raynauds has gotten soooo sooo soooo much better. I still get cold finger and toes, but no where as severe and the way less often.
Now a few weeks ago the mr started making himself an afternoon turmeric tea. He read something on the internet about how it’s the best anti-inflammatory and good for achy joints. (Sure dude, listen to the internet and not me) Being a big guy doing construction and such, he gets really achy joints and there is only so much arnica and frozen peas a guy can do. So now he drinks this and I think he is starting to notice a difference. (less time with the frozen peas) And since he is making himself tea every afternoon, I started to make a spicy tea for myself in the afternoons too. I figured that a little extra goodness to ward off the chills and any larking illness is only a plus. It’s our after lunch treat that tastes good, is warm and soothing and is doing the body all sorts of good.
Spicy turmeric tea. You will get addicted and feel like awesomeness.
The stuff. Ground turmeric, ground ginger, saigon cinnamon and hot water. Additional yums with a little lemon and some honey if you like it sweet or have a scratchy throat.
Spices into a drinking vessel (I like a big jar)
And in goes the hot water. Give it a good stir and a squeeze of lemon (and sweeten if your gonna)
And watch it swirl. A drink that keeps this girl happy and healthy.
Something great to look forward.
-C
Note… My measurements are just guidelines. You might like a little less turmeric or more ginger so make this drink any way that tastes best for you.
Grab yourself a big mug or jar, add in the spices and hot water, honey if you want it and a squeeze of lemon juice if using. Stir with a spoon and drink. Keep spoon handy to give it a good stir every now and then
A few month ago I read an article about NYC seltzer water (which I have still yet to have) and fell in love with those super cool glass seltzer bottles. (I really want to get my hands on a few). In the article, there was the mention of egg creams. Now at first I was kind of disgusted because who the hell drinks eggs, but then after doing super duper internet research (google) I found that egg creams are not actual egg.. It’s pretty much just bubbly chocolate milk.
Yesterday I was thinking of a non alcoholic beverage that people that are opting out of the alcohol can drink, something maybe a bit different and fun and I had that brain spark.. Egg creams! And I just so happen to be babysitting a gaggle of littles for the day and who better to serve a fun non alcohol drink too! (after that, save all he alcohol for me!) It was perfect cause these littles are down for anything with chocolate and it just so happened to be one of those littles birthday (HAPPY BIRTHDAY JUDAH BUG!) .so special party drinks were in order.
Here is how the egg creams when down. I made the chocolate syrup. The kids all loved it and where sticking there fingers in it. Then I assembled the egg creams. All the kids took a glass, drank some, and took off. I found 1/2empty cups of drinks around the house. But here is the thing. When I asked if they liked it, two said yes.,one said it was weird but good, and one little ran away from me with the bag of chocolate quinoa bark ! brought. (I didn’t run after her) The mr came by a few hours later and tried some of the dregs of one and he wasn’t into it at all , but then again he hates chocolate milk and it was sitting around for a while. So the verdict …. not sure.%u00a0 Kids like it if they like chocolate milk but treat it like they would treat any drink (drink half and abandon the rest). Adults could totally get into it if there is some nostalgia behind it or maybe a shot of vodka added.%u00a0 So yeah. I think anyone that is interested should definitely try it. And if you do, let me know. I am very curious what people think.
Oh, and to make the afternoon that much more interesting, I am currently still suffering from laryngitis (hahaha) So yesterday was some fun stuff.%u00a0
The stuff for the chocolate syrup. Cocoa powder, sugar, water, a pinch of salt and a little splash of vanilla. And for the actual egg cream.. milk (a plain plant, nut, or animal) and strawberry flavored seltzer water. (if you don’t like strawberry use any flavor or plain)
To make the syrup, combine the cocoa, sugar, water, vanilla and salt into a sauce pan and bring to a boil while whisking continuously. Keep whisking until sauce starts to thicken then remove from heat and pour into a jar and let cool.
Now for the egg cream assembly
Syrup goes into glass.
Milk into syrup and mix it all around.
Give it another little whirl with a spoon or straw and if you want a more bubbly head, blow into the straw(works the best!)
and get down to business.
HAPPY NEW YEARS!
-C
For the chocolate syrup (makes enough for a few egg creams but the syrup is good for anything calling for chocolate)
Stuff for one egg cream
To make the syrup, combine the cocoa, sugar, water, vanilla and salt into a sauce pan and bring to a boil while whisking continuously. turn heat down a little and keep whisking for another 2-3 minutes until sauce starts to thicken. Remove from heat and pour into a jar and let cool.
In a glass that holds are least 16 oz, add in the milk and the chocolate syrup. Mix together (can be shaken or stirred) then pour in about 1 cup of the seltzer water. Give the drink a good mix with a spoon and serve it on up. A straw is recommended to blow bubbles into drink!
Note.. I am aware that there are a few different ways to prepare an egg cream so if you know of a way that is better (milk in last. seltzer mixed with chocolate syrup..). then do it your way!
We have been super busy the past few weeks and haven%u2019t seen any of the littles for a while and I am starting to miss them. So the other day, (when it was actually kinda cold. its been way to warm here!) when I was in the neighborhood, I stopped by my sisters house after the kids got out of school with pumpkin hot chocolate supplies and to hang out. Unfortunately, one of those littles (Miley Lu) was to cool for me and went to hang out with her friend, but whatever, that just left enough hot chocolate supplies to make the one that stayed the biggest cup he could handle, look through all his pictures, and sit around talking about his fart hole.%u00a0
Pretty great visit it I do say so myself.
This hot chocolate is just a little seasonal twist on regular old hot chocolate. I bet that some of you out there might end up with a bit of extra pumpkin puree come next week and this is a great way to use some of that up. The pumpkin make the hot chocolate a little thicker, a bit more hearty,%u00a0and adds a nice smooth creaminess to the drink. And some fiber, which is always good.
%u00a0Now all we need is some snow.
The stuff. Milk (any kind you drink) pumpkin puree, cocoa powder, crown sugar, and a pinch or so of cinnamon.%u00a0
Oh, and pick out your most favorite kick ass mug (it will just sate better that way).%u00a0I brought over the rainbow bug cause Judah loves him some rainbows.%u00a0
Dump all the stuff into a pot and stick it on stove on medium heat.
Whisk it all around, and continue to whack until the its as hot as you want it to be.
Pour it into a cup (preferably one with rainbows on it)%u00a0and %u00a0top it off with whatever you like on top of your drink %u00a0(I added a bit more milk froth and a spinkle more of cinnamon)
And serve up, to yourself, or to the monster little waiting for his chocolate fix.
Have a great day!
-C
Makes 1 cup%u00a0
Take all ingredients and place into a pot. %u00a0Whisk everything together until fully incorporated. Place pot on medium heat and keep whisking until the hot chocolate is heated to your preferred temperature.
Pour into a mug and feel free to top with whipped cream, sprinkles, marshmallows or whatever you heart desires.