I don’t know about you guys, but I am JUMPING FOR JOY… cause its finally SPRING!!!!!!! I was really starting to doubt that it ever going to happen. So now that it is actually warm enough to be outside, what are your plans today? Are you going to spend it outside? Or at the very least, in a light filled house with all the windows an doors open? I hope so, cause I think everyone needs to take the day to finally de-thaw and get out of the winter funk that we, or at least me, having been living in for that past 2 months.
My Sunday list of things to do.
Wash the cat..and finally let him run free
Pick up all the trash that has been blowing up my driveway
Make bread
Put air in bike tires…. Go for a bike ride
Return and withdrawal a few books from library
Clean off the outdoor tables and chairs and eat meals OUTSIDE!!!
So yeah, do a few somewhat productive things, but mostly just enjoy this shit out of this day!
And here is some internet stuff from the week that might be of interest to you.
-Hold The Mammal: Daring To Make Dairy-Free Cheese From Nuts. I am into this.
-Hell YES!!!! Golden Girl Legos… What’s the hold up?
-Did you know about this? National Park Week!!! And if you can’t make it this time, I am pretty sure that there is a noter free week later in the season.
-Hey, if a a coloring book is what you need to get creative, this one looks pretty cool. Fantastic Cities is an architecture-themed coloring book for adults
-Being a Vermonter and a fan of stupid sick humor, the first movie was everything and more a stoned kid for ask for. For Fans Of ‘Super Troopers,’ Meow They’re Getting A Sequel….
-I was very happy to hear about this. Lunch, Not Landfill: Nonprofit Rescues Produce Rejected At U.S. Border. I have experienced having all my fresh produce confiscated at the border. I was so pissed and the food the guy took was my lunch and dinner. I was starving and angry. (Not a good combination on me) So at least now that food can be put to good use.
-This is almost exactly what the mister had been wanting to o for a few years now(before it was cool)..BEFORE & AFTER: 1971 SHASTA CAMPER MAKEOVER
And a few pics from the week.
Oh little little. I picked him up from school and all he wanted to do was cut out paper snowflakes. It then proceeded to snow 3 inches … I blamed him. Snow covered world. I admit, very pretty, but I am hopping that this was it, that I won’t see snow again unlit November.A day with blue skies and amazing cloudsThe most perfect little and the trash dog. These two spent a good hour fighting over sticks. It was fantastic.
And this salad. I have been eating it all week long. Pineapple and dill… So freaking good.
I know that it it spring, but I still have a winter farm share for another month and will be cooking and eating roots and squash until the summer share starts in early June. And I am good with that cause I love me some root veggies and butternut squash. But, yes, it is spring and my body isn’t craving the super hearty, rich foods that it was just a few short weeks ago (more like last week) When the temperatures first start to go up, I usually want my food to not feel as heavy or my spices to be quite at warming (I am still all over curries and hot hot hot sauces in the summer). It’s like I have said before, I tend to change up my spices with the seasons.
So to give a lighter feel to a heartier squash, I busted out one of my favorite spices, the oh so lovely tarragon. It has a sweet, light, fruity and floral taste that pairs beautifully with the squash and onions. It give the dish a nice spring like flavor that will leave you feeling satisfied without wanting to move directly onto the couch and hide under a blanket. This is a eat and ride you bike kind of dish ( you don’t actually have to go for a bike ride if you don’t want to)
Note. If I had a grill, I would definitely cook this dish on it. As of now, I don’t own one so I am left to cook on the stove. But by all means, if you have a grill, do it up!
Half of a medium sized butternut squash (or use a whole one.. I had a half in the fridge that was waiting to be cooked) and one whole onion (two if you use a whole squash) Apple cider vinegar, olive oil, salt , pepper, garlic powder, and, last but not least, the oh so fragrant and tasty, tarragon.
Chop the onion and the squash into big chunks. If you don’t like the skin of the squash, you can peel it, but I like it so I don’t peel. Drizzle olive oil in a pan or a baking sheet, toss the veggies in and add the garlic powder, tarragon, salt and pepper and a few splashes of apple cider vinegar. Toss around. Stick into oven at 425 degrees for about 30-40 minutes. When the squash is tender and the onions are cooked, remove from oven.
I am pretty sure you can figure out the rest.
Happy day!
-C
Tarragon Butternut and Onions
Half of Medium Butternut Squash
1 Large Onion
1 Tablespoon Dried Tarragon (use fresh if you have it.. 2 tablespoons)
2 Tablespoons Apple Cider Vinegar
1 Teaspoon Garlic Powder
Salt ans Pepper
Olive Oil
Chop squash and onions into similar size pieces. Toss in a skillet or on a oiled baking sheet and add the rest of the ingredients. Toss around and place into a 425 degree oven for about 30-40 minutes or until squash is fork tender.
Remove from oven and eat.
Make as a side dish or add to a salad. Eat as a light lunch, or a midnight snack… eat it however you want.
Peas scream spring to me. The bright green color with that nice bright fresh taste….. kind of like a fresh spring day. Ah spring, so lovely, so nice, so hasn’t made its way here yet. So I guess I am left to eat my spring. And what better way to highlight those lovely spring tastes? A fantastic pesto my friends, and it can be made lickidy split.
Pesto is one of those things that I am constantly making, and not just the kind most people think of with basil and nuts, I pesto everything..peppers, greens, carrots, squash. And yea, I used this post to make a pesto pasta dish, but pesto has so many other fantastic uses. Like as a sandwich or wrap spread or a dip for veggies and crackers. I have used it as a soup base, a pizza sauce, on roasted potatoes and marinated tofu with pestos. It can also be thinned down and used as a salad dressing. See, so many uses.
And this pea pesto is no exception. It has such a great light, almost fruity, super bright taste. I mean, it’s peas so it taste just like peas but somehow even better. It really works in my mouth. I could eat a bowl of this stuff and be happy.
Whatever you plan on using it for, make the pesto. You will be thanking me later.
Pesto Stuff. We got the peas, garlic, lemon, oil, cheese if you please, and salt. Take a handful of peas and set aside for later. Juice the lemon and take that and the rest of the stuff and stick in a food processor and puree until smooth.
Oh my, so green, so good. I first made it without cheese and scooped a little out for me. It was perfect. Like the most brilliant bright pea flavor ever. It made me happy. After I added in the cheese, the mister said it tasted even better…. so cheese or not, it’s going to be good!The pesto is made, and it only took about 2 seconds, now boil up the pasta. If you were a thinker, you could start the pasta and make the pesto while its boiling. (I wasn’t being a thinker) I used bow ties cause they are super cute, but use whatever pasta you’re feeling. Shells or the ones that look like little brains would be good options.
Once the pasta is cooked, strain, reserving about 1/4 cup of the water. Add that bit of water back to the pot, add in the pesto, give a stir and dump pasta back into the pot. Toss in a handful of peas, maybe sprinkle some cheese and give it a good crack of some pepper.
Into a bowl and served with a fork to eat it with. A super green fresh springy meal of happiness. And all under 15 minutes in the kitchen.
Oh you want to thank me for this…
Hey, not a problem….not a problem at all.
-C
Makes enough pesto to coat a pound of cooked pasta and have some left over for sandwiches or to spread on crackers.
1 lb. fresh or frozen peas (thawed if frozen)
1 lemon
4-5 cloves garlic
2 ish tablespoons of olive oil
1/4 cup parmesan, really or vegan (optional)
salt
1 lb (an average box) of bow tie pasta (use any whole wheat, vegan, gluten free variety)
Place peas, (remove a handful and set aside to toss into the pasta) garlic, the juice of the lemon, olive oil and the parmesan (if you are using) into a food processor. Blend until smooth. Taste and salt as needed.
Pasta… Boil per instructions on box. Strain pastas but save about a 1/4 cup of starchy water. Toss pasta, starchy water and pesto together, adding in the handful or more of the whole peas. Sprinkle with more parmesan and or cracked pepper ,if wanted, and serve in big bowls.
Hooray! It’s that time of the year again. Warm weather, the days are getting longer, the mud is making its way into every little crevice in my house. But it’s ok because I love spring dirt. It means the snow is gone, the ground is thawing out, and that it will be warm everyday soon enough. It also marks a good time to get the seeds started and the garden plans figured out!!!!!!. So yea, dirt is good. And sickly, I also love to clean.(it might actually be OCD and not love, but whatever, it get the house clean) Whatever it is, spring, with all its lovely dirt, really works for me. This week has been a up and down weather week, but there has been enough sunshine to melt the ice and create lots of mud in from of my door. So this weekend I think I am going to get down and dirty with my bad self and do an extensive spring clean. And when I say down and dirty, I mean down, on my hands and knees with a toothbrush and a bucket, hand scrubbing every inch of my house. (Good thing my house is the size of a postage stamp) And for that, and every other time I clean, I make my super awesome all purpose lemon rosemary vinegar clearer.
I like to make and use my own cleaning solution for the following reasons.
I hate chemicals
I can make it with the stuff that I have in the kitchen
It’s a natural disinfectant
It might smell faintly like vinegar for a few minutes, but then the vinegar smell goes away and is left with a nice citrus rosemary smell. Chemical smell makes me want to yak.
The cost of non chemy cleaners at the store costs like WHAT!
This is cheap as hell to make
In a pinch, can use on my salad
Works like a boss
And I use it on everything. (EXCEPT MARBLE!!!!!!) The toilet, shower, kitchen sink, floors, windows, the dog. (Not the dog, but i though about it) Sometimes if I have a really grimy gross surface I’ll make a paste out of the AP cleaner and some baking soda, let it sit for a while, and then scrub it off. When I do the tolilet, I sprinkle some baking soda in the bowl then squirt the cleaner all around. Let it sit for a few minutes and scrub with a brush. If I am really deep cleaning the floors (this weekend) I’ll dump a half cup of the cleaner into a pail, add a squirt of dish soap and top it off with a few more cups or warm water and then scrub away. I could keep going on and on and name every single use, but I won’t cause thats annoying and because the name in itself tells it all…….ALL PURPOSE CLEANER!!!!
With that, I leave you with my method of making the super awesome, non chenmail, nicely smelling, cleaner.
Lemon Rosemary All Purpose Cleaner
Makes 2 cups of cleaner.. which last me about 2 weeks.
1 Lemon
1 tablespoon Rosemary*
1 cup white vinegar
1 cup water
*Note.. You can use any herb that like.. Lavender, Sage, Thyme.. all nice smelling… Use what you like.
Zest a lemon and then juice the lemon. Save the juice and use in your water or on you salad. Stick the zest and the rind (chop into a few chunks) into a pot with the vinegar , the rosemary and water. Turn pot on low and let mixture simmer for about 10 minutes. Remove from heat and let cool. Place in a jar and let sit for a day or more (up to two weeks). When ready to use, strain and transfer solution to a empty bottle or squirt bottle.
Clean the crap out of anything! (Except marble….don’t use citrus anything on marble)
So next time you use lemon, keep the rind and make this cleaner. OR better yet, get a lemon to make this cleanser and you will then have the juice for a glass of lemonade. Either way…
My Moms birthday was this past week, and naturally, I made the cake for our big family birthday gathering. (and I bought and made dinner and cleaned everything up, although the mister did do all the dinner dishes) Word to my sisters… You guys suck! (but I still love you)
Every year my mom asks for the same cake. Strawberry with Lemon frosting. Then a few years ago, other people in the family started asking for the same one. Now there is a weird strawberry cake thing going on between some of my family members. They have taken claim of the strawberry cake and don’t want me to make it for anyone else but them. They think that because I make them this awesome cake that they are somehow special. Well guess what people.. Your only special for one day, then you go back to being normal.
I have a family full of a bunch of weirdoes.
Anyways, My mom said she wanted the usual strawberry cake, but as cup cakes, or actually she asked me to make the little square cakes. I was kind of confused when she said square cakes because well, what the hell was she talking about? But then I remembered that a long time ago I use to have a square cupcake pan. (I lost in somehow) So no, I couldn’t make the cakes square, but I sure could make them cute. And cute as hell is what I did.
Cake Stuff. Flour, baking soda, baking powder, and salt whisked together in a bowl. Butter, a little oil, vanilla, eggs and buttermilk. Then of course we have strawberries cause it wouldn’t be a strawberry cake with out them.First things first. Wash, trim and dice up the strawberries. Stick them into a pot and sprinkle with a few tablespoons of sugar. Heat on low and let the strawberries cook for about 10 minutes, stirring frequently, until they turn into a thick syrup. The sugar and the butter get beaten together until light and fluffy. Then goes in the oil, eggs, and vanilla. The milk is then added to the strawberry mixture. Add half the dry mixture to the wet, mix, then mix in half the strawberry mixture to that. Mix the rest of the dry in and finish off with the strawberry mixture.
Pour batter into well greased and parchment lined baking sheet (or pans). Stick cake into preheated oven for about 35 minutes, rotating cakes after 15 minutes. Cake is done when it starts turning a light gold brown and a cake tester stuck in the middle comes out clean. Cake gets pulled from the oven and set on a rack to cool.
I actually wrapped the cake when it was cool enough and stuck outside for a few hours. It didn’t completely freeze, but it was close. Frozen cake is easier to cut then soft non frozen cake. No necessary, but if you have the time….
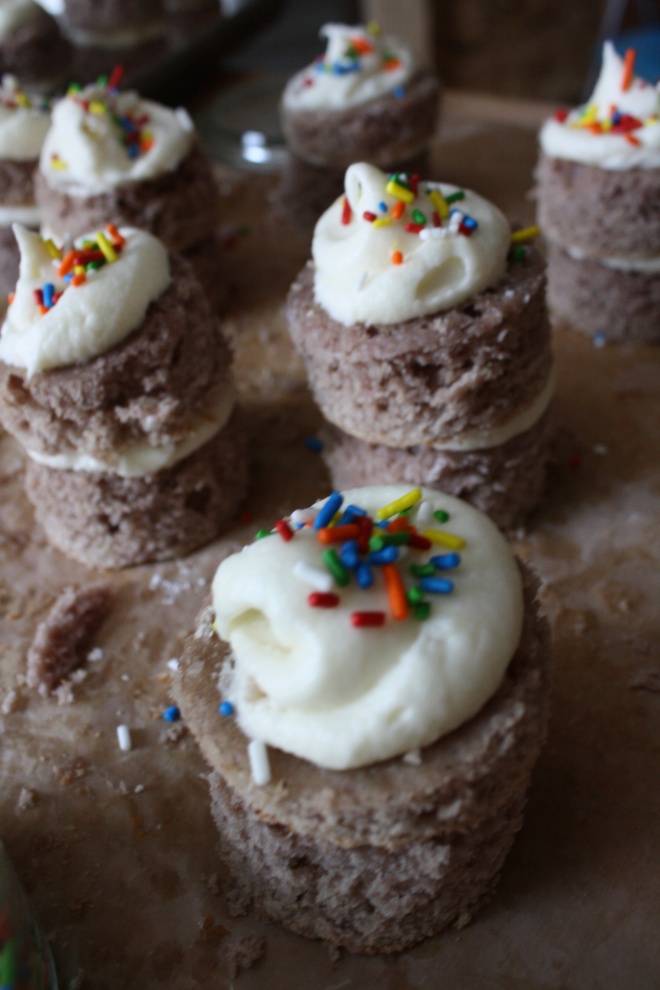
While the cake is cooling, make the frosting. Powdered Sugar, a stick of butter, cream cheese, lemon zest, lemon juice, and vanilla get mixed together until it turns into a big bowl of thick lemony frosting. Tomato can cutout. (I couldn’t find my biscuit cutters) A biscuit or cookie cutter would probably work a little better.. The cakes kept getting stuck in the can. Frost the cake!! Place frosting into a piping bag or a big plastic zip lock with the tip cut off. 2 rounds to a cake. A squeeze of frosting goes on one, topped with another and given a little smoosh. A nice big dollop of frosting on top then…. Sprinkles!!!! Or sliced strawberries (my mom doesn’t like sprinkles..I know)
So freaking cute. I don’t know if I can make a normal cake again.
Mom gets the bigger 3 tiered cake.. and a few more of the little ones.
HAPPY BIRTHDAY MOM!
-C
Strawberry Cake with Lemon Cream Cheese Frosting
makes 16 two tiers cupcakes or can be made in three 8 inch cake pans
The Cake
3 Cups All Purpose Flour
1 Teaspoon Salt
1 Teaspoon Baking Soda
1 Teaspoon Baking Powder
1/2 Cup or one Stick Soften Butter
1/3 Cup Vegetable Oil
3 Eggs
1 teaspoon Vanilla
1 Cup milk
1 Cup Sugar plus 2 Tablespoons
1 lb Fresh Strawberries (Can use Frozen, just let them thaw )
The Frosting
4 1/2 Cups Powdered Sugar
1 Stick Soften Butter
4 oz Cream Cheese (Half a block)
Zest of a Lemon
1-2 Tablespoons Lemon Juice
1 teaspoon Vanilla
pinch of salt
Preheat oven to 375
Grease a parchment lined 13×18 high rimmed baking sheet and dust with flour. If you baking sheet isn’t as big as mine, use whatever size you have and make a few cupcakes on the side. Or make one , 3 tiered cake with 8 inch cake pans. I trust that you can find a way to bake all this cake batter.
Wash, trim and dice strawberries. Toss them in a medium sauce pan and sprinkle with 2 tablespoons of sugar. Place on low heat and cook for about 10 minutes until strawberries break down and turn into a thick syrup. Take of heat and let cool.
Combine flour, salt, baking powder and soda in a bowl and whisk together, In another large bowl, add butter and sugar together and beat on medium until light and fluffy. Add in oil, vanilla and eggs. Beat together. Now add the milk to the strawberries and mix together. Beat in half the dry into the wet, add in half the strawberry mixture, then the rest of the dry, and finish off with the rest of the strawberry mixture.
Pour batter into prepare baking sheet (or pans) and place in oven. Check cake after about 15 minutes and rotate to help insure an even bake. Bake for another 15- 20 minutes, or until cake starts to turn golden brown and a tester (toothpick) comes out clean.
Remove from oven and let completely cool. (Not necessary, but once cake is cooled , wrap with plastic wrap and stick cake into the freezer of a little while before cutting the circles.. its makes it a little easier)
While cake is cooling, make the frosting. Place all ingredients in a big bowl and beat together until a nice soft but sturdy frosting forms. If. you frosting seems to thick add in a splash of milk. To thin.. add a little more sugar.
When the cake is cooled, get to it. With you cookie or biscuit cuter dipped in powdered sugar, cut as many circles as you can.
Fun Time!! Frost the cakes. Place frosting into a pastry bag, or like me, a large zip lock bag with the tip cut off. Partner up all the cake rounds and go through and give one of each of the pairs a good dollop of frosting. Top with the remaining cake, give it a lithe smooshto make sure they stick, and squeeze a nice dollop of frosting on top. Finish off with sliced strawberries and lots of sprinkles.
The bounty of spring is upon us. Asparagus is everywhere and I have been embracing it.. smelly pee and all. And along with all my spring veggies and smells, I have grabbing for more springy spices. I go through seasonal spice kicks, like cinnamon and ginger in the fall, curries and chills in the winter. And for spring, I am big on sumac. If you haven’t heard of it or tasted it, it kind of taste like a tangy salty lemon..without actually having any salt. And its a really pretty, a bright red, almost purple color. I use it on a lot of things, especially veggies and bean dishes, sometimes as a lemon replacer, but mostly to add another level of tangy flavor. It’s fantastic, really great for all those springy time dishes. Nice and bright!
This dish is perfect made and eaten right away, but it’s one of those dishes that tastes even better the day after. Also it’s good and safe to serve room temperature. (think lunch box or a picnic!) And did I mention healthy? Protein packed quinoa and the lean green asparagus, I mean come on. You won’t feel an ounce of guilt for eating a hugmongo bowl of this stuff because you should, so it’s totally ok.
Eat away!
The stuff of the stuff. Quinoa and asparagus for the base. Sumac, lemon, garlic, onion, salt and pepper and a little splash of oil for the dressing.
Note. Sumac is not always the easiest spice to find. I know that its available online (what isn’t) and that some health food store or herbal apothecaries carry it, but i have ye tot see it at a conventional supermarket. And once you find it, buy a good amount cause you will also fall in love with it and use it on everything.
Start by making the dressing. You want to have it sit for at least 10 minutes. It will be perfect by the time the quinoa is done. Mince the garlic, dice the onion and juice the lemon. Stick it all into a jar with the sumac, a pinch of salt and pepper and about a teaspoons worth of olive oil. Stick a lid on the jar and shake shake shake. and let it sit.
Now you should make the quinoa.. Water and quinoa go into pot, high heat until boiling, topped with a lid and set to simmer for about 15 minutes.
When the quinoa is simmering, cook up the asparagus. Add a drizzle of oil, to a pan and a few splashes of water. Place trimmed and chopped asparagus to pan and sprinkle with salt. Cook on medium heat for about 8 minutes, or until cooked but still has a nice crunch to it. Take off heat and add the dressing to pan. Let it sit and marinate for a few minutes.When the quinoa is tender, fluff with a fork and add to the skillet with the asparagus and dressing. Toss around to make sure all the quinoa gets dressed. Take a taste.. does it need a little salt and pepper? Add a pinch if it does.Pile into a bowl, add a bit of cracked pepper.. and eat.
Or… Idea! Make this dish and pack it into a jar. Maybe grab a baguette and some hummus os some other tasty foods and take yourself and a friend out for a picnic.
So much good .
Keep it real yo
-C
serves 3-4 as a side dish or 2 as a main meal.
1 cup quinoa
2 cups water
8-10 asparagus
olive oil
For the Dressing
1 tablespoon sumac
1/2 small red onion
2-3 cloves garlic
Juice of 1 jumbo lemon or 2 small lemons
2 teaspoons olive oil
salt and pepper
Start but making the dressing. Mince the garlic and finely dice the onion. Place in a jar with the sumac, the juice of the lemon, a pinch of salt and pepper, and a little splash of oil. Top the jar and shake the crap out of it for a minute. Let sit and meld. (This dressing can be made ahead of time and is fantastic on all sorts of everything)
In a large pot, add water, quinoa and a spindle of salt. Bring to a boil, cover , and reduce heat to simmer. Let cook for about 15 minutes or until water has completely absorbed. When the quinoa gets going, trim the woody parts of the asparagus and chop the remain asparagus into inch long pieces. Toss into a lightly oiled skillet with a few splashes of water, sprinkle with salt and put on medium heat for about 8 minutes, or until asparagus is cooked, but still crispy. Take off heat and add the sumac dressing. Once the quinoa is done, fluff it with a fork and toss it with the sumac dressed asparagus. Scoop into a bowl, add some cracked pepper. Bring food to face and eat.
Any leftover? This dish is fantastic serves cold or at room temperature.
Is it really for real April? Where has all the time gone and where the hell is the warm weather? It’s not funny anymore. I am officially OVER winter! Ok, so now that I got that off my chest…..
Last night the misters Dad came over for a long awaited dinner accompanied by talk of life goals and what her referred to as “narratives” or the story of our lives. Some deep shit to be talking about at dinner, especially with zero alcohol to be had.
Me, being so super awesome, was all up in taking charge in making the food. Except that last night I didn’t have a bunch of time and honestly, much energy to be doing anything. And sure, I could have just made a pot of spaghetti, but that just felt like cheeping out. So Polenta it was. And because I just made a hug pot of navy bean, those were going into the polenta too.
Beany polenta baked in the oven with a tomato sauce cooked on the stove. About 5 minutes of hands on time and an hour to cook it all. It’s the perfect meal to make when you have guests coming over. Fast prep, into the oven and on the stove, and then you have an hour to clean and make yourself presentable. See, I am a thinker. (I ended up skipping the making myself presentable part… I stayed in my gym clothes.. no need to impress family right?) Then after about and hour you end up with a hearty healthy pretty meal, all from scratch, that seems like you spent the afternoon cooking. When in fact you spent the past hour vacuuming and watching Gilmore Girls.
The Stuff. Cornmeal, water, navy beans and parmesan for the polenta. Crushed tomatoes, garlic, dried basil, onion, carrot, zucchini, and summer squash for the sauce. Salt, pepper, and olive oil all around.
Cornmeal and water go into a cast iron skillet (or any oven safe dish) with a pinch of salt and pepper. Give it a little mix and stick it into the oven at 400 degrees .
Once the polenta is in the oven, make the sauce. Chop up all the veggies and stick into a dutch oven or sauce pot with a pinch of salt, the basil and a good drizzle of olive oil. Stick on medium heat and let veggies cook down a bit. When the veggies are tender, add in minced garlic, crushed tomatoes and another drizzle or oil. Turn burner to lowest setting and simmer (giving it a stir every now and then) for about 45 minutes or until the polenta is done. After about 30 minutes when the water had pretty much all cooked down, take the polenta out of the oven and stir in the beans, the parmesan, a tablespoon or two of olive oil and salt and pepper. Smooth top out and sprinkle with more pepper, parmesan and drizzle with a bit more oil. Stick back into oven for another 1/2 or until polenta has formed a crust and no longer giggles when you wiggle the pan.
Pull polntna from the oven and let sit for at least 1o minutes.
Two big spoons and a pile of plates. Have the people serve themselves!
Have a Happy Day!
-C
Baked Navy Bean Polenta with Chunky Tomato Sauce
Serves 4 hungry people
For the Polenta
1 1/2 Cups Course Ground Corn Meal
4 Cups Water
3 Cups Prepared Navy Beans (Or just use to cans)
1/2 Cup Parmesan Cheese or Vegan Parmesan (Optional)
3 Tablespoons Olive Oil
Salt and Pepper
For the Sauce
One 28oz Can of Crushed Tomatoes
1 large Carrot
1 Small Onion
4 (or more ) Cloves Garlic
1 teaspoon Dried Basil
1 Small Zucchini
1 Small Summer Squash
Olive Oil
Salt and Pepper
Preheat oven to 400
In a large skillet, mix together the cornmeal and the water and add a good pinch of salt and pepper. Place into oven for about 30 minutes or until the polenta starts to congeal at the edge of the skillet nd most of the waster has cooked down.
Remove skillet from oven and with a whisk or wooden spoon, mix in the beans, the parmesan (if using) and 2-3 tablespoons of olive oil. Smooth out mixture, sprinkle with salt, pepper, parmesan and drizzle with olive oil. Stick back into oven for another 30 minutes or so. Polenta is done when it no longer wiggles when you giggle the skillet.
For the sauce
Small dice the carrot and the onion and stick into a medium dutch oven oor sauce pan with a drizzle of olive oil. Place on medium heat and cook until the veggies are tender. Add in tomato, minced up garlic and basil. stir and let simmer on stove top for about 45 minutes. When you place the polenta back into the oven for the second bake, dice up zucchini and squash and add to sauce. Stir and keep on simmer until ready to serve.
Once the polenta has completely cooked, remove from oven and let sit for at least 5 minutes…10 is better to solidify.
Spoon big piles of polenta on a plate or in a bowl, top with a big heap of tomato sauce. Sprinkle with a little more parm and maybe another dash of pepper .
What is better for a bake sale then Oreo cookies? Oreo cookies made from scratch!.
So when my sister called and asked me to make something for my nephews bake sale to raise money for his basketball team, I couldn’t say no. (or I didn’t want to say no cause any good excuse to bake right!) Plus I had just found this awesome recipe on one of my favorite blogs, my name is yeh, for home made Oreos that I have been super excited to try, so it kind of worked out. But before I committed to the Oreo, I wanted to just double check with my nephew and see what he might want me to make because it was his bake sale.
This is the conversation we had. And yes, it was through text.
Me- “Hey bud, what do you want me to make for your bake sale? Cupcakes, cookies, donuts, or brownies”
Jack- ” Yea!”
Me- “Yea what?”
Jack- “Make that.”
Me- “Make what?….Hello!! What do you want me to make? Should I make Oreos?”
Jack- I WANT OREOS!”
Ok.. So it took a little while, but we got there. And after the the basketball game and the super successful bake sale..
ME-“Did you see the Oreos?”
Jack- “What do you mean?”
Me- “The Oreos I made for the bake sale…the ones you wanted me to make”
Jack- “There was a bake sale? I want Oreos”
Yup, that’s the attention span of my 13 year old nephew. Little shit head. But for real, I had so much fun making these cookies and I am definitely going to be making them again. Plus they were a super hit at the sale.
I am the best aunt! (and sister!)
Cookie Time! Whats going on here is brown sugar and butter have be beaten together until nice and fluffy Then a good big splash of vanilla and another 2 big splashes of coffee are added to that.(I sacrificed my last few sips of my coffee for these cookies) The dry stuff, flour, salt and cocoa powder, are whisked together, waiting to be added to the wet. Mix the dry ingredients into the wet and mix. I ended up just using my hand and kind of squish mixing everything together until in tuned into a nice lovely uniformed dough. Form the dough into 2 balls and give each a few kneads to get any air bubbles out. Place dough back into bowl and stick in the fridge to sit for 10-15 minutes( it makes the dough a little easier to work with)
Once the dough has had a little time to rest and cool, remove from fridge, one ball at a time. Place on a lightly cocoa or powdered sugar dusted surface and roll out the dough. Grab any size circle (or other shape) cookie cutter and get to shaping the cookies. Notice the tin can in the bowl? I could’t find my biscuit cutters anywhere but the can was the perfect size, and it worked really well. Keep a little bowl of either powered sugar of cocoa to dip the cutter in in between making the cookies. It really helps the dough from sticking and breaking.
When you have cut out your cookies, use a spatial and place them on a baking sheet. You can try to transfer with you hands, but you end up messing up the shape and most of them will break anyway.
Stick the cookies in the oven for about 15 minutes a batch and continute to roll and cut out the cookies until you have no dough left.
While the cookies are getting their cool on, make the cream filling. All you need is a stick of butter, about 4 cups of powdered sugar, some vanilla and a few splashes of heavy cream. Beat that all up until nice and creamy thick and spoon it into a pastry bag (I used a big old ziplock bag) to be piped on the cookies. Filling the cookies is for sure the best part. Separate the cookies into pairs and pipe a big blob of filling onto one of the two cookies. Take the names cookie and place on top, giving it a little smooth to the disperse the cream. Keep doing that until the cookies are all filled.
Stacks of cookies… Sold to the highest bidder! I was told that they sold out within the first half hour at $1.50 a pop….Should have charged $5…. for a good cause right?
And yes, even though he was being a space head and didn’t even care that I just made him like 50 bucks for his team, I still saved the kid one.He just had to give me either a hug or 5 bucks for it.
I got a hug. (I really wanted the 5 dollars)
-C
From Scratch Oreo Cookies
Adapted by Molly Yeh from My Name is Yeh!
The cookie (makes about 18 3 inch Oreos)
2 cups all purpose flour
1 cup cocoa powder
3/4 cup brown sugar
1 cup or 2 sticks soften butter (use earth balance for vegan)
1 teaspoon salt
1 teaspoon vanilla extract
2 tablespoons brewed coffee
The filling
1 stick soft butter (us earth balance for vegan)
2 tablespoons heavy or whipping cream (use a nut or soy milk for vegan)
4 cups powdered sugar
2 teaspoons vanilla extract
Cookies- In a large bowl cream together sugar and butter until light and fluffy. Add in vanilla and coffee and mix together. In another bowl, whisk together the flour, salt and cocoa powder. Add dry to wet and mix together unit a uniform dough forms. Dump out onto a lightly cocoa or powdered sugared surface and knead dough a few times. Split ball into two balls, place in bowl, and stick in the fridge for 15 or so minutes.
Preheat oven t0 325 degrees
When dough is chilled, remove one ball at a time, and roll dough out on a cocoa or powdered sugar dusted counter until its about 1/4 inch thick. With a round (any shape would work) cookie cutter, cut out as many cookies as you can. In between sits, dip cutter in a sugar and cocoa to keep the cookie from sticking. Transfer cut out cookies onto a baking sheet with a spatula. Take scraps, roll into a ball, and roll out again. Keep doing that until you can’t cut out any more. (You can either bake a weird shape cookie or just eat the dough)
Bake cookies for about 15 minutes or until the cookie has risen a bit and the tops have lost their glossiness and look cooked. Remove from oven and let cookies dry on a wire rack.
Make the filling
Filling- Beat together butter, sugar, vanilla, and cream until completely mixed and is at your optimal consistency. Add a drizzle more cream if you want to thin out or add more sugar for a thicker cream.
Stick the filling into a piping bag or ziplock bag an snip the end. With cookies in pairs, pipe a big dollop of filling onto one of the two cookies. Place the naked cookie onto the filled cookie and give a smooth to distribute the filling.
lick your fingers and eat a cookie.
If selling at a bake sale, charge $3 a cookie…. If it’s for a good cause.
Whenever my little sister comes over for dinner, I always end up making lentils in some form or another because she, like me, is awesome and loves a good lentil. It makes me so happy that she has such great taste in food and wants to eat what I make. It’s validation from a teenage girl which is the best kind of validation.
So last night when she came over after school for dinner and trash talk (she likes to verbally abuse Nick) we decided to make both of our favorites … Lentils AND sweet potatoes. How can you go wrong with that combo? Well I am telling you that you can’t. The rich creamy soft and slightly sweet sweet potato mixed up with the hearty, earthy, oh so fantastically tasty lentil. Add in a bit of kale and cheese if you wish and serve with salsa and guac… Whoa, it’s the best!!!
Such a great evening, I get to the cooking, the sister gets to the verbal abuse and the mister, begin the champ that he is, takes it and dishes it right back.
I am the greatest(coolest) sister.
Baked sweet potatoes, cooked lentils, chopped up kale and monetary jack cheese (Cheese is optional.. and make it vegan cheese if you want) And you don’t need then, but salsa and guacamole are the best toppings.. So you have them.
Cut the cooked potato in half lengthwise and scoop the flesh out into a bowl. With a fork, smooth the potato , sprinkle with salt and pepper and mix in lentils and kale.
Stuff the mixture back into the skins of the potato.
And add some cheese (The mister and the sister wanted lots of cheese, no cheese for me) and stick the potatoes into the oven and let bake for another 5 or so minutes or until the cheese is all melty or the top is nice and crispy.
Remove and plate… Serve with salsa and guacamole and maybe some corn chips.
I am the greatest sister
-C
Makes 2 serving
1 Large Sweet Potato
1 cup Prepared Lentils
1 cup Chopped Kale
1/2 cup Grated Monetary Jack Cheese (Vegan style or not)
Salsa (optional)
Guacamole(optional)
Place potato in oven at 400 degrees for 30-40 minutes or until soft a baked throughout.
While potato is baking, prepare lentils. 2 cups water to 1 cup lentils. Add water and lentil to pot, bring to a boil, add a sprinkle of salt, and reduce to simmer until lentils are tender.
When potato is cooked, remove potato and let cool for a few minutes. Cut in half lengthwise and scoop out most of the flesh out of the skins and place into a big bowl. WIth a fork, mash the potato a bit Add in the lentils and the kale, a sprinkle of salt and pepper, and mix to combine. Stuff the mixture back into the skins of the potatoes and top with cheese. (if using ) Place potatoes back into oven for 5-10 minutes until cheese is melty and bubbly or the top of the potato is a bit crispy. Remove from oven and serve on a plate with salsa and guacamole.
This has been the week of broken things. My immersion blender broke. 2 of the 4 new bowls I bought were smashed. The hand mixer broke while I was making frosting (F**CK). The steam mop is finally completely broken and the mister smashed the screen on his phone. All in a weeks time. Oh, and not broken, but the front end of my car got stuck in a muddy sink hole. It took five badass farmers to help me push it out. It was crazy, but thankfully the car and I survived. But’s it cool. I can replace all that crap and my arms are getting a great workout now that I have to hand mix everything and hand wassh the floor on my hands and knees. ( I do it like a beast!) Because what I really am having a hard time with is that it is nearly April and still have most of my winter clothes out. I just want to but the boots away and get my chaco sandals out. It’s getting a bit ridiculous if you ask me.
Things I tell myself to keep from losing my shit
20 degrees.. That’t tropical compared to the -30 we were having
I will be bitching about how hot it is in just a few short months so try to enjoy the cold now.
Hopefully most of the mosquito population all dies this winter and only enough survive to be eaten by things that eat them
Because it still so cold, its ok to spend an entire day at home in my pjs baking cookies and bread and binge watching Kimmy Schmidt.
See.. there is a bright side.
Here is some cool internet stuff form the week
-Love this house and will some someday have plants in every nook and crank of my home. PEEK INSIDE WORLD’S END FARM + SAIPUA PLANT SALE
-I am ready to move into a tree, if only for a little while. This one would work for me
-I looked before I read. and didn’t realize what I was seeing. Behold! The Cosmos Created From The Contents Of A Kitchen
-The Most Effective Alarm Clock Ever Brews Your Morning Joe If only it came in jumbo size.
-I love/ hate this story. I get so excited for the produce that is marked down because its not perfect. If people realize how silly it is to look for “perfection in food” then I won’t get awesome stuff for cheap. Think Nobody Wants To Buy Ugly Fruits And Veggies? Think Again
And here are a few life pictures
WHAT WHAT!!! The first sign of green that I have seen in the neighborhood.
This little came over and hung out with me. I gave him a muffin and a bowl of “Carrot Chips” (really thinly sliced carrots) He at a few bites of the muffin but ate all the carrots and wanted more…… I love him!
Oh the old man trash dog. His butt hair is finally starting to grow back after he chewed himself a big hot spot. I love this pattern for a driveway.
March 29, 2011. Yeah sure we were in California, but still, we were camping outside.
COME ON SPRING!!!!And who doesn’t love a pineapple, or 4?
Have a fantastic Day!
We are looking at a high in the 30’s here in VT.. WA HOO!

 I know that it it spring, but I still have a winter farm share for another month and will be cooking and eating roots and squash until the summer share starts in early June. And I am good with that cause I love me some root veggies and butternut squash. But, yes, it is spring and my body isn’t craving the super hearty, rich foods that it was just a few short weeks ago (more like last week) When the temperatures first start to go up, I usually want my food to not feel as heavy or my spices to be quite at warming (I am still all over curries and hot hot hot sauces in the summer). It’s like I have said before, I tend to change up my spices with the seasons.
  Half of a medium sized butternut squash (or use a whole one.. I had a half in the fridge that was waiting to be cooked) and one whole onion (two if you use a whole squash) Apple cider vinegar, olive oil, salt , pepper, garlic powder, and, last but not least, the oh so fragrant and tasty, tarragon.
  Chop the onion and the squash into big chunks. If you don’t like the skin of the squash, you can peel it, but I like it so I don’t peel. Drizzle olive oil in a pan or a baking sheet, toss the veggies in and add the garlic powder, tarragon, salt and pepper and a few splashes of apple cider vinegar. Toss around. Stick into oven at 425 degrees for about 30-40 minutes.
  When the squash is tender and the onions are cooked, remove from oven.
  Peas scream spring to me. The bright green color with that nice bright fresh taste….. kind of like a fresh spring day. Ah spring, so lovely, so nice, so hasn’t made its way here yet. So I guess I am left to eat my spring. And what better way to highlight those lovely spring tastes? A fantastic pesto my friends, and it can be made lickidy split.
 Pesto Stuff. We got the peas, garlic, lemon, oil, cheese if you please, and salt.
  Take a handful of peas and set aside for later. Juice the lemon and take that and the rest of the stuff and stick in a food processor and puree until smooth.
  The pesto is made, and it only took about 2 seconds, now boil up the pasta. If you were a thinker, you could start the pasta and make the pesto while its boiling. (I wasn’t being a thinker) I used bow ties cause they are super cute, but use whatever pasta you’re feeling. Shells or the ones that look like little brains would be good options.
 Into a bowl and served with a fork to eat it with. A super green fresh springy meal of happiness. And all under 15 minutes in the kitchen.
 Hooray! It’s that time of the year again. Warm weather, the days are getting longer, the mud is making its way into every little crevice in my house. But it’s ok because I love spring dirt. It means the snow is gone, the ground is thawing out, and that it will be warm everyday soon enough. It also marks a good time to get the seeds started and the garden plans figured out!!!!!!. So yea, dirt is good. And sickly, I also love to clean.(it might actually be OCD and not love, but whatever, it get the house clean) Whatever it is, spring, with all its lovely dirt, really works for me. This week has been a up and down weather week, but there has been enough sunshine to melt the ice and create lots of mud in from of my door. So this weekend I think I am going to get down and dirty with my bad self and do an extensive spring clean. And when I say down and dirty, I mean down, on my hands and knees with a toothbrush and a bucket, hand scrubbing every inch of my house. (Good thing my house is the size of a postage stamp) And for that, and every other time I clean, I make my super awesome all purpose lemon rosemary vinegar clearer.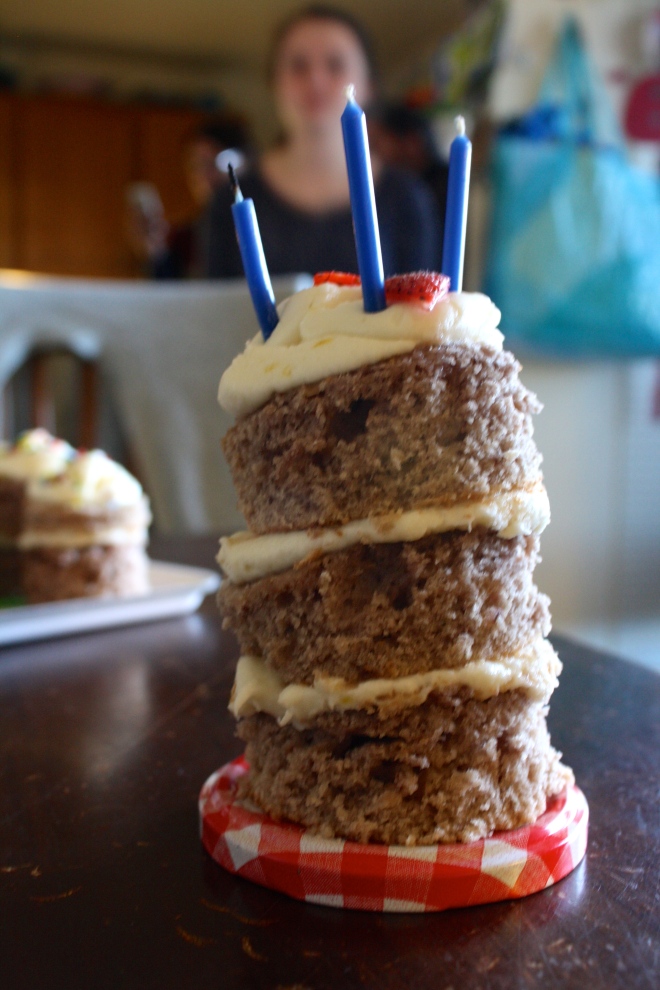

 My Moms birthday was this past week, and naturally, I made the cake for our big family birthday gathering. (and I bought and made dinner and cleaned everything up, although the mister did do all the dinner dishes) Word to my sisters… You guys suck! (but I still love you)
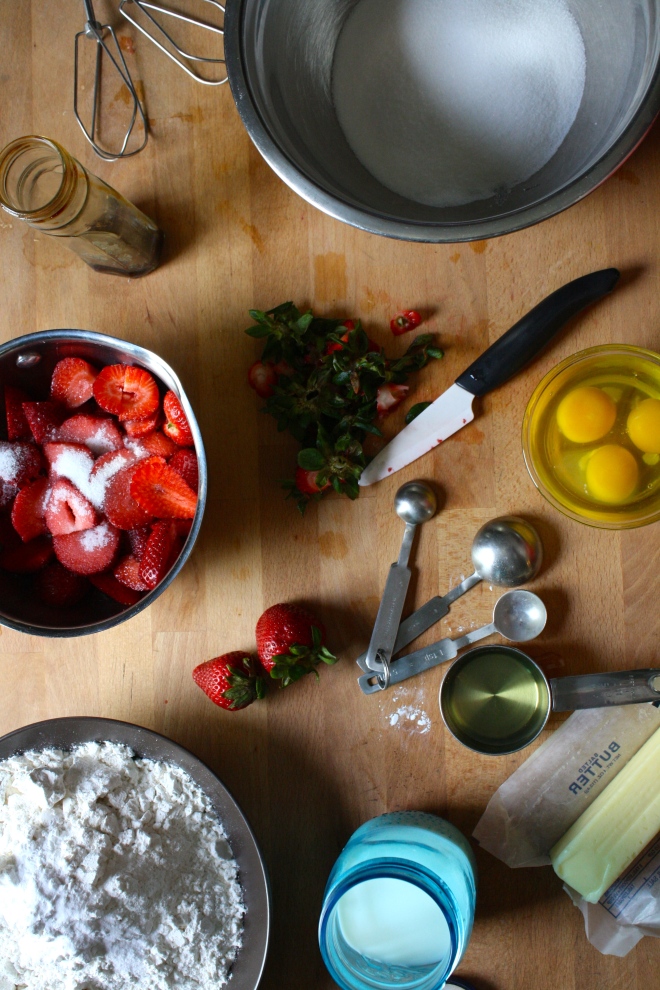 Cake Stuff. Flour, baking soda, baking powder, and salt whisked together in a bowl. Butter, a little oil, vanilla, eggs and buttermilk. Then of course we have strawberries cause it wouldn’t be a strawberry cake with out them.
 First things first. Wash, trim and dice up the strawberries. Stick them into a pot and sprinkle with a few tablespoons of sugar. Heat on low and let the strawberries cook for about 10 minutes, stirring frequently, until they turn into a thick syrup.
  The sugar and the butter get beaten together until light and fluffy. Then goes in the oil, eggs, and vanilla. The milk is then added to the strawberry mixture. Add half the dry mixture to the wet, mix, then mix in half the strawberry mixture to that. Mix the rest of the dry in and finish off with the strawberry mixture.
 Cake gets pulled from the oven and set on a rack to cool.
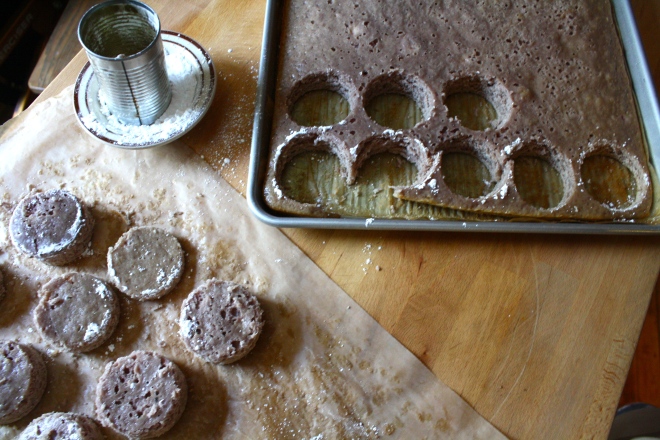 Tomato can cutout. (I couldn’t find my biscuit cutters) A biscuit or cookie cutter would probably work a little better.. The cakes kept getting stuck in the can.
 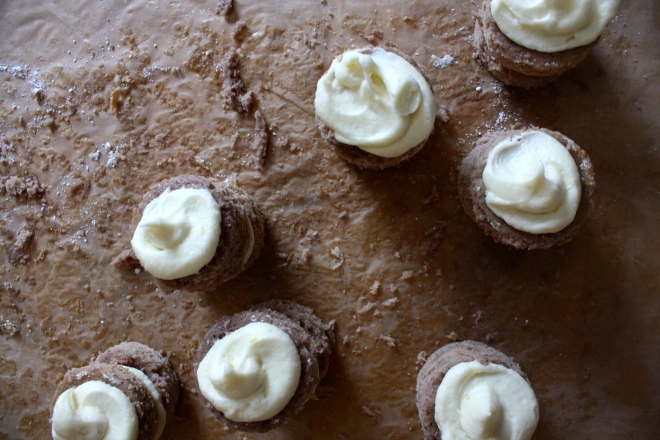 Frost the cake!! Place frosting into a piping bag or a big plastic zip lock with the tip cut off. 2 rounds to a cake. A squeeze of frosting goes on one, topped with another and given a little smoosh. A nice big dollop of frosting on top then….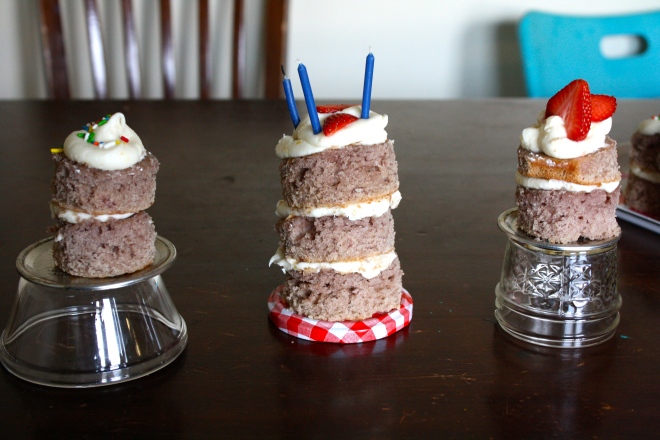
 The bounty of spring is upon us. Asparagus is everywhere and I have been embracing it.. smelly pee and all. And along with all my spring veggies and smells, I have grabbing for more springy spices. I go through seasonal spice kicks, like cinnamon and ginger in the fall, curries and chills in the winter. And for spring, I am big on sumac. If you haven’t heard of it or tasted it, it kind of taste like a tangy salty lemon..without actually having any salt. And its a really pretty, a bright red, almost purple color. I use it on a lot of things, especially veggies and bean dishes, sometimes as a lemon replacer, but mostly to add another level of tangy flavor. It’s fantastic, really great for all those springy time dishes. Nice and bright!
 The stuff of the stuff. Quinoa and asparagus for the base. Sumac, lemon, garlic, onion, salt and pepper and a little splash of oil for the dressing.
 Start by making the dressing. You want to have it sit for at least 10 minutes. It will be perfect by the time the quinoa is done. Mince the garlic, dice the onion and juice the lemon. Stick it all into a jar with the sumac, a pinch of salt and pepper and about a teaspoons worth of olive oil. Stick a lid on the jar and shake shake shake. and let it sit.
 When the quinoa is simmering, cook up the asparagus. Add a drizzle of oil, to a pan and a few splashes of water. Place trimmed and chopped asparagus to pan and sprinkle with salt. Cook on medium heat for about 8 minutes, or until cooked but still has a nice crunch to it. Take off heat and add the dressing to pan. Let it sit and marinate for a few minutes.
 When the quinoa is tender, fluff with a fork and add to the skillet with the asparagus and dressing. Toss around to make sure all the quinoa gets dressed. Take a taste.. does it need a little salt and pepper? Add a pinch if it does.
 Pile into a bowl, add a bit of cracked pepper.. and eat.
 Is it really for real April? Where has all the time gone and where the hell is the warm weather? It’s not funny anymore. I am officially OVER winter! Ok, so now that I got that off my chest…..
 The Stuff. Cornmeal, water, navy beans and parmesan for the polenta. Crushed tomatoes, garlic, dried basil, onion, carrot, zucchini, and summer squash for the sauce. Salt, pepper, and olive oil all around.
 Cornmeal and water go into a cast iron skillet (or any oven safe dish) with a pinch of salt and pepper. Give it a little mix and stick it into the oven at 400 degrees .
 Once the polenta is in the oven, make the sauce. Chop up all the veggies and stick into a dutch oven or sauce pot with a pinch of salt, the basil and a good drizzle of olive oil. Stick on medium heat and let veggies cook down a bit. When the veggies are tender, add in minced garlic, crushed tomatoes and another drizzle or oil. Turn burner to lowest setting and simmer (giving it a stir every now and then) for about 45 minutes or until the polenta is done.
  After about 30 minutes when the water had pretty much all cooked down, take the polenta out of the oven and stir in the beans, the parmesan, a tablespoon or two of olive oil and salt and pepper. Smooth top out and sprinkle with more pepper, parmesan and drizzle with a bit more oil. Stick back into oven for another 1/2 or until polenta has formed a crust and no longer giggles when you wiggle the pan.
 Pull polntna from the oven and let sit for at least 1o minutes.
 What is better for a bake sale then Oreo cookies? Oreo cookies made from scratch!.
 Cookie Time! Whats going on here is brown sugar and butter have be beaten together until nice and fluffy Then a good big splash of vanilla and another 2 big splashes of coffee are added to that.(I sacrificed my last few sips of my coffee for these cookies) The dry stuff, flour, salt and cocoa powder, are whisked together, waiting to be added to the wet.
  Mix the dry ingredients into the wet and mix. I ended up just using my hand and kind of squish mixing everything together until in tuned into a nice lovely uniformed dough. Form the dough into 2 balls and give each a few kneads to get any air bubbles out. Place dough back into bowl and stick in the fridge to sit for 10-15 minutes( it makes the dough a little easier to work with)
 Once the dough has had a little time to rest and cool, remove from fridge, one ball at a time. Place on a lightly cocoa or powdered sugar dusted surface and roll out the dough. Grab any size circle (or other shape) cookie cutter and get to shaping the cookies. Notice the tin can in the bowl? I could’t find my biscuit cutters anywhere but the can was the perfect size, and it worked really well. Keep a little bowl of either powered sugar of cocoa to dip the cutter in in between making the cookies. It really helps the dough from sticking and breaking.
  While the cookies are getting their cool on, make the cream filling. All you need is a stick of butter, about 4 cups of powdered sugar, some vanilla and a few splashes of heavy cream. Beat that all up until nice and creamy thick and spoon it into a pastry bag (I used a big old ziplock bag) to be piped on the cookies.
  Filling the cookies is for sure the best part. Separate the cookies into pairs and pipe a big blob of filling onto one of the two cookies. Take the names cookie and place on top, giving it a little smooth to the disperse the cream. Keep doing that until the cookies are all filled.


 This has been the week of broken things. My immersion blender broke. 2 of the 4 new bowls I bought were smashed. The hand mixer broke while I was making frosting (F**CK). The steam mop is finally completely broken and the mister smashed the screen on his phone. All in a weeks time. Oh, and not broken, but the front end of my car got stuck in a muddy sink hole. It took five badass farmers to help me push it out. It was crazy, but thankfully the car and I survived. But’s it cool. I can replace all that crap and my arms are getting a great workout now that I have to hand mix everything and hand wassh the floor on my hands and knees. ( I do it like a beast!) Because what I really am having a hard time with is that it is nearly April and still have most of my winter clothes out. I just want to but the boots away and get my chaco sandals out. It’s getting a bit ridiculous if you ask me.
 WHAT WHAT!!! The first sign of green that I have seen in the neighborhood.
  This little came over and hung out with me. I gave him a muffin and a bowl of “Carrot Chips” (really thinly sliced carrots) He at a few bites of the muffin but ate all the carrots and wanted more…… I love him!
 Oh the old man trash dog. His butt hair is finally starting to grow back after he chewed himself a big hot spot.
  I love this pattern for a driveway.
  March 29, 2011. Yeah sure we were in California, but still, we were camping outside.
 And who doesn’t love a pineapple, or 4?
Sunday Happy Bits — The Lovely Crazy
March 12, 2016 by maximios • Blog
My Sunday list of things to do.
So yeah, do a few somewhat productive things, but mostly just enjoy this shit out of this day!
And here is some internet stuff from the week that might be of interest to you.
-Hold The Mammal: Daring To Make Dairy-Free Cheese From Nuts. I am into this.
-Hell YES!!!! Golden Girl Legos… What’s the hold up?
-Did you know about this? National Park Week!!! And if you can’t make it this time, I am pretty sure that there is a noter free week later in the season.
-Hey, if a a coloring book is what you need to get creative, this one looks pretty cool. Fantastic Cities is an architecture-themed coloring book for adults
-Being a Vermonter and a fan of stupid sick humor, the first movie was everything and more a stoned kid for ask for. For Fans Of ‘Super Troopers,’ Meow They’re Getting A Sequel….
-I was very happy to hear about this. Lunch, Not Landfill: Nonprofit Rescues Produce Rejected At U.S. Border. I have experienced having all my fresh produce confiscated at the border. I was so pissed and the food the guy took was my lunch and dinner. I was starving and angry. (Not a good combination on me) So at least now that food can be put to good use.
-This is almost exactly what the mister had been wanting to o for a few years now(before it was cool)..BEFORE & AFTER: 1971 SHASTA CAMPER MAKEOVER
And a few pics from the week.
Have the best Spring filled Sunday!
-C