I have the best winter CSA..(Intervale Community Farm) its an every other week pick up containing lots of roots, cabbage, winter squashes and fresh greens. Due to the holidays this past month, the farm hasn’t had a pick up in a since the middle of December. So the past few weeks I have been rationing out my stash of root veggies and winter squash, trying to make it all last until the next pick up. It was hard……There was the great freeze and thaw day where most of my winter squash froze had to be cooked and eaten. Then there was the holiday gatherings where I kindly shared some of my root loot with people, making lots of dishes to share. Plus its been really cold and all I want to do is cook and eat. It was close, but I got to the beginning of this week and relized I had nothing left..My stock was depleted. I had to buy beets this week. Tragic, I know.
Hooray!!! Today was farm share pick up day!!!! I got me a butt load of root veggies, a gaiagaitc butternut and so much kale. I finally feel complete again. So Happy! And so having a fantastic dinner! I went with……Roasted winter hash! And if you haven’t noticed yet, I like to add greens to everthing so I add that winter hash to a big pile of kale. It just needed to happen.
Salt, pepper, garlic. Kale, chopped up rutabaga, chopped up sweet potato, and yes, that is a gorgeous red potato, all chopped up. I also had chick peas in the fridge so those were going in too.
Toss all the chopped roots and chick peas into an oiled skillet. Top with salt and pepper. Stick skillet in oven to roast for 30ssh minutes, or until the veggies are tender and brown. Look at how pretty it all is! I may never war a white potato again.
When I took the skillet out, I tossed in a few cloves of grated garlic.. for a little extra bite. Served on a plate with a a fork to eat it with. (I am so smart)
And a suggestion, if you are feeling like you need something to add to this hash, add a fried egg .(I fried eggs for Nicks dinner)
Happy Friday! Keep it cool!
-C
Roasted Winter Root Hash
Ingredients ( Serves 2)
1 small rutabaga.. around 1 cup chopped
1 small sweet potato …about 1 cup chopped
1 large red potato (or any potato)….about 1 1/2 chopped
1 cup prepared chick peas
3 cloves of garlic
3-4 Kale leaves (optional)
Salt and pepper
Oil of pan
Preheat oven to 425 degrees
Rinse and strain chick peas. Wash and chop root veggies into small chunks. Toss veggies and into a large oiled skillet with chickpeas. Season generously with salt and pepper. Place in oven for for 30- 40 minutes or until all veggies are fork tender. Remove skillet from oven and toss in freshly grated (or chopped) garlic and mix in… If you want a little more, add a bed of greens (Kale, spinach, arugula) It will make you happy.
I need a good snack.. Something healthy, hardy, fast, and of course, something tasty.
Rice cakes……..basically a flat somewhat crispy disk of puffed rice. Kind of boring, kind of dull, kind of blah. But Add a little somethin somethin….say like this here rice cake that I smeared with peanut stock, topped with banana, sprinkled with coconut flakes and cinnamon and a few raisins…well thats just freaking fantastic!
And because they are pretty much nothing but air.. there is no need to feel guilty about eating a few. Have a rice cake snack party… spreads of nut butters, bean dips, smashed fruit, avocado, mashed sweet potato, heck…just some mustard or hot sauce would be nice. The list of topping goes on and on. And shelf stable for a long time to boot. I mean, you can keep a bag hanging around for quite a bit of time, just as long as you keep them air tight.
What I am trying to say is…rice cakes are awesome little vessels for all things nice.
So the mister wants to know…”Why would anyone ever buy those crappy english muffins from the store when they could be eating these?”
Good question…And we will all answer….”Never again! Because I now make the sickest E.M.s around.!”(E.M.s is the cool short way to say english muffins and now that you are going to make your own….man, your so cool!)
These E.M.s are perfect. Easy to make, not overly fussy, and you end up with a super yummy, extremely versatile, individually portion super sweet little disk of bread. And the best part is..nooks and crannies! I think that is why I decided to make these E.M.s, so Nick and I can talk the about nooks and crannies…(Sometimes we need light conversation)
We start with flour and salt whisked together in a bowl. The honey, yeast and warm water are getting on proofing in a jar. An egg waiting to be cracked, some milk, and 2 tablespoons of butter. All this good stuff equals…nooks and crannies!
Oh you like my nifty dough whisk….me too, I use it all the time. Maybe I should have a dough whisk give away ……maybe…..
Everything all mixed together, dumped onto a floured surface and kneaded for 10 minutes by hand…..If you have a stand mixer, you can use it if you want, but you are missing out on the fun of doing it by hand….
When the dough has been sufficiently kneaded, gather dough into a nice ball, coat with a little oil and place back into bowl. Cover with a towel and stick in a warm place to rise for about an hour or until it has doubled in size.
When dough has doubled, punch down and plop out onto floured surface. Dust the bottom of a griddle or in my case, two cast iron pans, with corn meal. Divide dough into 8-10 equal balls and smash into 2 inch thick disks.
Place on griddle or pans and sprinkle more corn meal on top of each E.M. Cover and let rise for another 15 minute.
Now the E.M.s have rested, turn the griddle (or pans) on to low heat. Once your griddle (or pans) gets hot, continue to cook that side for another 7-10 minutes, or until golden brown. Flip and cook other side for 10-12 minutes or until golden brown. Once browned, check for doneness with a thermometer. The inside should reach 200 degrees.( if you don’t have a thermometer, fork split one open and check…. you are going to eat it anyway) If the outside cooked faster then the inside, no worries, just pop them into the oven at 350 for 8-10 minutes. I had to pop mine into the oven for to cook completely.
Remove form griddle, let cool a bit, and ……Fresh, fluffy fat, fantastic….Everything and more that a real english muffin should be. Split open with a fork and……. the nooks and crannies! So spot on. Serve with anything your heart desires…I served these with whipped honey butter…. and eat the only kind of E.M. you will ever again eat. Grocery store english muffins be damned!
Enjoy and Happy Tuesday!
-C
English Muffins
Ingredients
2 1/2 cups unbleached all-purpose flour
2 teaspoons honey
1 teaspoon salt
2 tablespoon butter at room temperature
1 1/4 teaspoons active dry yeast
1/4 cup warm water
3/4 cup milk
1 egg
cornmeal for pan
Combine warm water, honey and yeast in a bowl to active..about 5-10 minutes or until yeast is foamy.
In a separate bowl, whisk together flour and salt. Mix in butter(I use my fingers) When yeast mixture is done proofing, whisk together mixture with the egg and milk. Add wet to dry and mix until just incorporated Dump out onto floured surface and knead dough for 8 minutes, adding a bit of flour whenever dough starts to get too sticky. Roll into a ball, coat with oil and place back into bowl and cover with a towel. Let rise for 60 minutes or until sought has doubled in size.
Once the first rise is done, deflate dough and divide into 8 equal pieces(10 for a slightly smaller muffin). Smoosh each ball into a flat disk, about 2 inches thick) and place on a cold cornmeal dusted cast iron griddle. (I used 2 cast iron pans) Sprinkle tops of muffins with more corn meal and let dough rest for another 15 minted. Turn burners on low heat. Let griddle get hot and continue to cook the muffins for another 10 minutes or until golden brown. Flip and cook opposite side until gold brown and remove from griddle. To make sure the muffins are cooked completely, stick an instant read thermometer into the center…it should read 200 degrees. (if you don’t have a thermometer, split one open… the tester E.M.) If the E.M.s are not completely cook, just stick in the oven on 350 for 5-10 minutes or until cooked throughout.
Remove and let cool. To serve, split open with a fork and give a light toast. Spread with butter, jam, peanuts butter, anything you want…maybe make E.M pizzas!
I have been meaning do a post on seltzer and syrups for a while now and this one is perfect… Everyone around me has been getting sick and I am trying my hardest to not get anything.
Citrus and ginger…. Two of my favorite things, combined into one super refreshing, light and crisp, thirst quenching drink. Tasty and packed full of vitamin C from the citrus and blood warming, tummy healing ginger. Its kind of a feel better elixir, a good for you drink, a sparkler pop. A drink everyone can get into (the mister even liked it), And it has no added sugars or nasty coloring, it can’t get much better.
Feeling Happy, feeling crappy, or just plain feeling, this drink is a good for it all.
I made the ginger date simple syrup ahead of time.. All I did what chop 2 1/2 tablespoons fresh ginger and about 3 tablespoons pitted dates and added to a pot with a cup of water. Simmered the stuff until the dates were mostly dissolved, about 15 minutes, took off the heat and pureed it. I let it steep for another 5 minutes and strained….no biggy. This is a milder sweet simple syrup. If you like sweeter add more dates or even add a bit of honey… Do what tastes the best to you.
Juice the lime and blood orange…..so much pretty!
I ended up with about 12 tablespoons of juice from a the lime and the orange.. If you need or want to, juice an additional orange and lime.
Add 2-3 tablespoons of the fresh juice per 12oz glass and add about 2-3 tablespoons of the ginger date syrup…(adjust amounts to you taste) Top off with cold plain seltzer water and maybe an ice-cube or two. ( I would have if I had thought to make ice)
So lovely…. so nice. I really got into these flavors. This drink has the ability to make you feel warm and cozy while being cold and fresh. It makes me happy.
Double thumbs up here!
Stay un-sick!
-C
Ingredients
2 1/2 tablespoons fresh chopped ginger
3 tablespoons chopped dates (more if you want sweeter)
1 cup water
1 lime
1 blood orange
Plain Seltzer water
Ice (optional)
For the ginger date syrup
In a small pot on low heat, add chopped dates and ginger to a cup of water. Simmer until dates have mostly dissolved, about 15 minutes. remove from heat and puree with either a blender to a hand emulsifier. Let steep for another 5 minutes and strain, reserving the pulp (add it to soup or salad dressing). Let completely cool.
To assemble drink, juice blood orange, and lime. Add about 3 tablespoons of the ginger syrup and 2-3 tablespoons of the citrus juice per 12 0z cup. Top with plain seltzer water, give it a light swirl with a spoon or straw and add ice cube if you want. Now have at it!
It started last month when I decided to make cool shaped pillows for all the little littles in family. (they all got fruit or veggies shapes…so cool. I wish I took some pictures) I needed to make a bunch so I went a bought this humongo box of stuffing thinking that I would end up using most of it and maybe have a little left over to make myself a pill or two. Oh man was I wrong. Those hug boxes could stuff a hundred pillows…the stuffers of stuffing really stuff those boxes stuffed! Now I had this giant box of stuffing and a bunch of extra fabric so I just figured that I’d make everyone in my family a pillow. I didn’t want to make the any more food shapes but still wanted to do something fun and pretty and huggable. …and then it came to me, A mountain! I mean, who wouldn’t want to hug a mountain?
So I made all the adults in my family a mountain for Christmas. (I am so nice). A couple of weeks went by, I had a little extra time and thought, “I should make a mountain pillow for me!”And if you are anything like me (super awesome), one mountain is just not enough and you will make an entire mountain range of pillows…… Mountains all over!
This pillow is so easy, no fuss, and can be made any size you like. I made mine on the smaller side, but if you have the fabric and the stuffing, why not go big? Do what feels right to you.
And I have to add, these pillows are really great gifts… I am thinking maybe a lovely Valentines day mountain? Doesn’t that sound fantastic?
What you will need:
Sewing machine.(you can hand sew but machine is much much faster)
Two pieces(or one piece folded in half) of fleece* for the mountain
One small piece of fleece in another color for the mountain top
Needle
Thread
Stuffing
Note: You can use other fabrics, but fleece is more forgiving because it had a little stretch, plus it soft and cuddly.
To start, take you main color of fleece and cut into a mountainy triangle shape. You can go tall and skinny or short and fat….. any shape you want. If you feel like you need to make a paper template and use that to cut, go for it, but I don’t think you really need to.
Next, take the contrasting color fleece (the peak) and cut a large square. Line up with the top of the mountain peak underneath.
Cut the piece for the peak in a jagged up and down pattern. Place right side up onto the base of the mountain and trim away excess fabric.
Using the zig zag stitch on your machine, sew the jagged edges of the mountain peak right side up onto the right side of the mountain. Go slowly, but don’t worry about making it perfect, just make sure to sew over all the jagged edges.
Now turn the two pieces right sides facing in on each other. Change the stitch on you machine to a straight stitch and sew around the perimeter of the mountain, leaving a small hole in the bottom.
And make sure to check your seams!
Fold it right side out and stuff it. I started with little bits of the stuffing in each of the corners, then filled in the middle, it makes it easier to fill.
Once you are happy with your stuff job, thread a needle and hand sews the hole shut.
A soft, huggable, and oh so grand mountain.
I know, so fantastic…one is just not enough. And if you have gone to the trouble of pulling out the sewing machine, you might as well make a bunch. Just do it!
All I want to do is make everything into hearts and turn everything pink…Is that a problem?
I’m going to admit it, I am one of those girls that love Valentines day! And no, I don’t love it for the flowers (although I do love flowers..but never roses..yuk) No, I don’t want a box of candy or the silly store-bought cards. I don’t want to get all gused up and go out to dinner, and I definitely would be pissed if the mister bought me any jewelry. What I love is a day of spending time with my lover. We always take the day to do something special together, and for each other, and to be happy……and there is always hearts involved. I love hearts.
I want to spread that loving love love feeling because no matter what your love situation is during this holiday..we should all be happy and spread love to each other and to ourselves… And what better way to spread happy and love then with a pretty heart shaped baked good? Chocolate because almost everyone is into chocolate. Coconut because I can’t stop eating whipped coconut cream and pink coconut sprinkle because that’s what make me happy. (I am a little obsessed with sprinkling things) These little hand-held pies of love are really easy to make and always a big hit, especially with the little ones.(I am thinking they are perfect for a Valentines Day school party) And yes, they are vegan so you can share with all your vegan friends!
So in the spirit of the coming Valentines Day holiday….Lets make WHOOPIE!!!! (pies)
Flour, baking soda and powder, salt and cocoa powder. Soy milk with vinegar. Vanilla, coconut oil, and chia seeds jelling. Brown and white sugar…. you know whoopie stuff.
The dry in one bowl… sugar and all the wet in another.
All the whoopie stuff mixed together and scooped into a large zip top bag. So fancy with my bag…a real pro here!
Snip the tip of the bag, do a little squeeze test, and have at it. squeeze hearts onto a lightly oiled baking sheet or use a piece of parchment paper.
You might get a little frustrated if you are trying for perfect. I was for the first two batches, but once I stopped trying to hard, I really got into how cool some of the hearts came out. Embrace the funky lop -sided hearts, because any heart is a good heart.So lovely. Shadow hearts while the whoopie hearts cool.
Whoopies all paired up
Stuffed with a generous dollop of whipped coconut cream ( a cold can of coconut cream whipped with a splash of vanilla and a tad bit of sweetener) and sprinkled with my home-made beet dyed coconut sprinkles…..
Are you happy now? Because I know that I couldn’t stop smiling when I was making these… they are just to cute!
A couple bits of advice… Try to assemble before serving.. I was trying to put them together while a punch of kids were trying to eat them. Things got a little messy and sprinkles ended up everywhere. Also, The coconut cream should stay fairly cold, so my suggestion is to make the hearts and fill only when you are going to serve them. Or if you want to make far in advanced, cover and refrigerate to keep from coconut cream from melting….But other than that…
To start, make chia eggs( chia seeds in water) and add the vinegar to the milk. Let both sit for 5 minutes.
In a bowl, whisk together flour, cocoa powder, baking soda,baking powder, and salt.
In a large bowl, mix together chia eggs, sugars, and coconut oil. Add in dry ingredients and mix while slowly adding in the milk and vinegar mixture until fully combined.
Scoop Mixture into a large ziplock bag or piping bag. Clip tip and gently squeeze out heart shapes onto a lightly oiled or parchment lined cookie sheet. Bake each batch for 8-11 minutes, or until a toothpick come out clean.
Let hearts cool completely on a wire rack. Pair up like sized hearts and fill with desired amount of *coconut cream. If your feeling festive, dust sides and or tops of cake with sprinkles
* To make coconut cream, refrigerate a can or coconut milk or coconut cream for at least 4 hours. Open can, drain liquid and place the remaining coconut cream in a large cold bowl. Beat with a splash of vanilla and 2 tablespoons of the sweetener of your choice. …. (careful because this stuff is super addictive)
Now share.. and watch how happy everyone is when they receive a heart shaped whoopie pie!! That’s love!
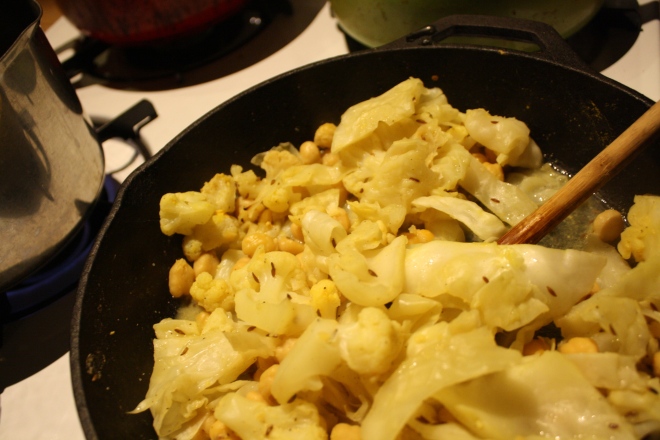
What a way to start the day, with a mouth full of c words…….Caraway, cauliflower, chick peas and cabbage…What did you think I meant?
This week has been nippy, no, its been chilly…..nah, it’s been freaking freezing! Yeah, freezing cold. When I woke up this morning to walk the pup, it was 5 degrees. So needless to say, when it gets this cold, I like to keep inside. Tying not to be a complete lazy bones, I went to town on my spices… refilling jars with all the little baggies scattering the kitchen, screwing on lids, and wiping down the shelves. Not a bad accomplishment for a day. While cleaning I came upon a little bag or caraway seeds, Not enough to warrant a jar on the wall, but defiantly enough for one dish.
When I think of the bright, somewhat sweet and peppery caraway, I think cabbage.(anything cabbage and I am sold) A big pan cabbage, added cauliflower for the mister,(his favorite) creamy chick peas because we need protein and they be tasty, and of course mustard, because everything tastes better with mustard.(I’ll let you in on a little secret.I eat a lot of mustard, I am kind of obsessed. Mustards of all kind; grainy, homemade, dijon…but usually just plan old yellow. And I eat it on everything.. but my go to is French’s yellow mustard and carrots…don’t judge) A warm, bright and filling dish, perfect for a freezing cold evening stuck inside. You can eat it as main dish or add a pile of quinoa or wild rice, or even a big plate of greens. What ever say you eat it, you and your stomach will be happy.(If your worries about cabbage bloat..don’t be. Cooking cabbage helps breaks down the enzymes that create gas, plus caraway has anti bloating properties…WIN!)
Cabbage, cauliflower,(fresh of frozen….I used frozen in this recipe) pre-cooked or canned chick peas, caraway seeds, yellow mustard, and salt..(I added pepper too)
Chop the cabbage and toss into a lightly oiled pan with the rest of the stuff. Heat pan with everything but water for a couple of minutes.. to warm the caraway and give everything a cooking head start, then add the water. Stick a lid on it and let simmer. After about 15 minutes, give it a stir or two and do a taste test. At this point, it’s up to you…how cooked you want the veggies? I kept mine cooking for another 10 minutes. I also added another 1/2 cup of water. Not enough water and the pan will burn, a little extra water is good, it creates a yummy broth.
When you are happy with the flavor and doneness, eat it. I made myself a bowl with a heap of pickled beets(holy yes!). I am sorry if you don’t have any pickled beets, but the dish is still amazing without them. Fresh ground pepper really does the trick too!
So there you go, make it tonight, it will make you warm,smart and happy
-C
serves 2-3
1/2 small head of green cabbage(about 2 cups chopped)
2 cups cauliflower(fresh or frozen)
1 cup cooked chick peas
1 1/2 -2 cups water
1 tablespoon caraway seed
2 tablespoons yellow mustard
salt and pepper to taste
Lightly oil a medium sized skillet and add all ingredients except water. Heat for a few minutes to warm up veggie and caraway seeds then add a 1 1/2 cups of water. Keep on medium heat with a lid and stir on occasion If water evaporates completely out, add another 1/2 cup. Dish is done when veggies are tender.. about 20 minutes….but whenever tastes best to you!
I spent a lot of time indoors this week, due to the fact that my eyelids would freeze shut when going out for more than a few minute..(for real, walking to the gym the other day, I had my head tightly wrapped and the condensation from my breath went up, into my eyes, and froze.) I mean, I love winter, I love the cold, but I am not a huge fan of -30 with wind chill… I get cold bones. After that morning, the mister insisted on diving me…Love. So we (me, Nick, and especially Washer) might have felt a little trapped this week, and when trapped inside, we get a little antsy, but we have been trying to make the most of it. Cooking, baking, cleaning, drawing, reading, knitting, drinking lots of coffee and tea, and overall trying to stay warm (and sane) Yup. trying to ward of the cabin fever, especially this year, living in a little tiny bit of a room with one window..has been a little difficult. And I know it’s going to be a bitch when it hits. But it’s all cool, We have plans in the making, places to look forward to, things to see. It always helps to have an adventure awaiting to keep the fever at bay.
Anyway, not a bad week, maybe a little stuffy, but nothing to complain to much about. Here are a few of highlights that made(make) me happy.
The kitchen, living room, dinning room, office…all over great room., covered in piles of clothes. Sometimes listening to music and folding laundry can be so, I don’t know, peaceful. I just felt happy at this moment. (might be the fact that I know have some clean clothes and dish cloths)
The trash dog and I went for a lovely little hike by ourselves…It was so nice to get out of the house. We both really really really needed it that day. And look how handsome he looks.. so red against the world.
Standing in line at the grocery store, saw this magazine and started to laugh. I love Oprah…but now…I really love Oprah. Best magazine cover ever!
Another picture of the pup. Letting his rino toy have the bed. A little pathetic…A lot cute
I am doing little recipe testing and this situation in this pot is so freaking good! Just trying to work out a few technical kinks.
I love to look up… don’t forget to look up.
I made a large quantity of banana dream (what I call banana ice cream). This stuff is like crack.. Once I start eating it, I can’t stop. I might overdose on bananas but I am ok with that.
I went to a granite and marble showroom this week. And like whoa, so freaking cool. Walking among huge pieces of gorgeous slabs of stone is kind of magical… and a little cold.
A basket of roots….More like a basket of rainbows.
I currently don’t have a pretty vase of zinnias on my table, (these beauts are from this past summer) but I really wish I did. Fresh flowers are one of my favorite things. This picture has inspired me, I am on the hunt for some pretty fresh.
I usually base my meals on what I know I have for food in the house and what I know needs to be eaten. I was a little surprised when muling around in the freezer to find a block of extra firm tofu. (I don’t remember buying). Maybe a tofu fairy left it in there for me, or maybe it has been in there for years and I just am now stumbling upon it. Either way, I found it and it had to be eaten. So I cooked it up, and I cooked it up nice and good. Tofu is a pretty vertical food, being that its basically a flavorless block of protein. It can go sweet or savory, mashed, chopped or blended. Add fresh garlic, any type of sauce or even peanut butter. (the possibilities are quite endless) I was going for a dinner dish so I decided on a simple cubed tofu with lots of ginger and garlic (so good to ward of those winter sicko bugs out there) and baked it up nice and crispy with fresh bright green broccoli and soba noodle. Quick, easy, tasty and healthy.. I did it again. Thanks tofu fairy!
This noodle dish is super easy to make and take only about a half hour. We start with extra firm tofu, a package of buckwheat soba noodle, a nice big broccoli crown, honey, fresh ginger, garlic and soy sauce. oil for pan and lime for a finish. Nothing fancy. Dice the tofu into small cubes and place onto a clean dish towel and pat dry…It really helps the tofu suck in more flavor and become nice a and crispy.
Tofu get moved into a lightly oiled skillet, ready to go into a hot oven. Why baked instead of sautéed on the stove? I find that the tofu keeps it shape and crisps up better when baked. But do whatever you want….. But just bake it.
While the tofu is baking, make up the sauce. Grate about 2 tablespoons of fresh ginger and4 large cloves of garlic into a bowl. Whisk together with 2 tablespoons honey, 1/3 cup soy ( tamari or brags aminos works too) and 1/3 cup of warm water. Taste it, and if you think it needs more anything, add it. I actually used 6 cloves of garlic, but I really wanted a garlic packed sauce.
Oh and start a pot of water to boil noodles in.
After 15 ish minutes, give tofu a flip, then after about 25 minutes, the tofu should be nearly done. Remove from the oven and toss in the chopped broccoli and 1/3 cup of the sauce. Its a little watery but thats what you want, it will cook down in the oven. Now stick the skillet goes back into the oven and boil the soba noodle.
Another 10 minutes in the oven and the sauce starts to caramelize and the broccoli is cooked but still nice and crisp. Remove skillets from oven and toss in the cooked noodles and the rest of the dressing. Toss and toss and place on a plate, or a bowl, or if your into it, just eat out of the pan. (it happens)
I added a small handful of fresh shopped cabbage to add a bit more crunchy bite. I also added a squeeze of lime juice on top for a nice acidic finish. Lemon works and even a slash of vinegar would be nice, but plain is good too. What ever you do, just EAT!
A quicky yummy, noodley dinner! And leave a little extra for left overs because these noodles are fantastic cold… think lunch, or a later that night fridge snack.
keep it in the reals!
-C
Ingredients
1 package of extra firm tofu
1 package Soba noodle
1 large crown of fresh Broccoli
2 tablespoons grated fresh ginger
3-4 cloves garlic
1/3 cup low sodium soy sauce
1/3 cup water
2 tablespoons honey (or brown sugar for vegan)
Lime wedges(Optional)
Chopped cabbage(optional)
coconut or oil for skillet
Preheat oven to 425
Remove tofu from package, cut into cubes and lay on a clean dish towel and pat dry.
Tofu goes into a oiled skillet and placed in oven for 25 minutes. Give tofu a flip after about 15 minutes. While tofu is baking, make the dressing, chop the broccoli and boil water for soba noodles.
For dressing, grate fresh ginger and garlic into a bowl. Whisk together with soy, water and honey (or brown sugar).
When water is at a boil, add soba noodle and cook until done ( about 6-8 minutes..Follow instructions of package)
When tofu has baked for 20 minutes, remove skillet, toss in chopped broccoli and 1/2 cup of soy ginger dressing Return skillet to oven for another 10 minutes or until dressing just starts to caramelize. Remove for oven and toss in cooked soba noodles and the rest of dressing. If you want a little more veggie bit, add in some fresh chopped cabbage. Plate and serve with a wedge of lime or lemon or even a sprinkle of red wine vinegar.

 I need a good snack.. Something healthy, hardy, fast, and of course, something tasty.
 So the mister wants to know…”Why would anyone ever buy those crappy english muffins from the store when they could be eating these?”
 Everything all mixed together, dumped onto a floured surface and kneaded for 10 minutes by hand…..If you have a stand mixer, you can use it if you want, but you are missing out on the fun of doing it by hand….
 When dough has doubled, punch down and plop out onto floured surface. Dust the bottom of a griddle or in my case, two cast iron pans, with corn meal. Divide dough into 8-10 equal balls and smash into 2 inch thick disks.
  Place on griddle or pans and sprinkle more corn meal on top of each E.M. Cover and let rise for another 15 minute.
  Now the E.M.s have rested, turn the griddle (or pans) on to low heat. Once your griddle (or pans) gets hot, continue to cook that side for another 7-10 minutes, or until golden brown. Flip and cook other side for 10-12 minutes or until golden brown. Once browned, check for doneness with a thermometer. The inside should reach 200 degrees.( if you don’t have a thermometer, fork split one open and check…. you are going to eat it anyway) If the outside cooked faster then the inside, no worries, just pop them into the oven at 350 for 8-10 minutes. I had to pop mine into the oven for to cook completely.
 Remove form griddle, let cool a bit, and ……Fresh, fluffy fat, fantastic….Everything and more that a real english muffin should be. Split open with a fork and……. the nooks and crannies! So spot on. Serve with anything your heart desires…I served these with whipped honey butter…. and eat the only kind of E.M. you will ever again eat. Grocery store english muffins be damned!

 I have been meaning do a post on seltzer and syrups for a while now and this one is perfect… Everyone around me has been getting sick and I am trying my hardest to not get anything.


 So lovely…. so nice. I really got into these flavors. This drink has the ability to make you feel warm and cozy while being cold and fresh. It makes me happy.
 Soft huggable mountains…..happy all over!
 To start, take you main color of fleece and cut into a mountainy triangle shape. You can go tall and skinny or short and fat….. any shape you want. If you feel like you need to make a paper template and use that to cut, go for it, but I don’t think you really need to.
 Cut the piece for the peak in a jagged up and down pattern. Place right side up onto the base of the mountain and trim away excess fabric.
 Using the zig zag stitch on your machine, sew the jagged edges of the mountain peak right side up onto the right side of the mountain. Go slowly, but don’t worry about making it perfect, just make sure to sew over all the jagged edges.
  Now turn the two pieces right sides facing in on each other. Change the stitch on you machine to a straight stitch and sew around the perimeter of the mountain, leaving a small hole in the bottom.
 Fold it right side out and stuff it. I started with little bits of the stuffing in each of the corners, then filled in the middle, it makes it easier to fill.
 All I want to do is make everything into hearts and turn everything pink…Is that a problem?


 So lovely. Shadow hearts while the whoopie hearts cool.
 Whoopies all paired up
 Stuffed with a generous dollop of whipped coconut cream ( a cold can of coconut cream whipped with a splash of vanilla and a tad bit of sweetener) and sprinkled with my home-made beet dyed coconut sprinkles…..
 Nothing to fancy….. just a little warmth and spice to fancy up a quick snack. Word!


 The kitchen, living room, dinning room, office…all over great room., covered in piles of clothes. Sometimes listening to music and folding laundry can be so, I don’t know, peaceful. I just felt happy at this moment. (might be the fact that I know have some clean clothes and dish cloths)
 Standing in line at the grocery store, saw this magazine and started to laugh. I love Oprah…but now…I really love Oprah. Best magazine cover ever!
 Another picture of the pup. Letting his rino toy have the bed. A little pathetic…A lot cute
 I am doing little recipe testing and this situation in this pot is so freaking good! Just trying to work out a few technical kinks.


 I usually base my meals on what I know I have for food in the house and what I know needs to be eaten. I was a little surprised when muling around in the freezer to find a block of extra firm tofu. (I don’t remember buying). Maybe a tofu fairy left it in there for me, or maybe it has been in there for years and I just am now stumbling upon it. Either way, I found it and it had to be eaten. So I cooked it up, and I cooked it up nice and good. Tofu is a pretty vertical food, being that its basically a flavorless block of protein. It can go sweet or savory, mashed, chopped or blended. Add fresh garlic, any type of sauce or even peanut butter. (the possibilities are quite endless) I was going for a dinner dish so I decided on a simple cubed tofu with lots of ginger and garlic (so good to ward of those winter sicko bugs out there) and baked it up nice and crispy with fresh bright green broccoli and soba noodle. Quick, easy, tasty and healthy.. I did it again. Thanks tofu fairy!
 This noodle dish is super easy to make and take only about a half hour. We start with extra firm tofu, a package of buckwheat soba noodle, a nice big broccoli crown, honey, fresh ginger, garlic and soy sauce. oil for pan and lime for a finish. Nothing fancy.
 Dice the tofu into small cubes and place onto a clean dish towel and pat dry…It really helps the tofu suck in more flavor and become nice a and crispy.
 Tofu get moved into a lightly oiled skillet, ready to go into a hot oven. Why baked instead of sautéed on the stove? I find that the tofu keeps it shape and crisps up better when baked. But do whatever you want….. But just bake it.
 While the tofu is baking, make up the sauce. Grate about 2 tablespoons of fresh ginger and4 large cloves of garlic into a bowl. Whisk together with 2 tablespoons honey, 1/3 cup soy ( tamari or brags aminos works too) and 1/3 cup of warm water. Taste it, and if you think it needs more anything, add it. I actually used 6 cloves of garlic, but I really wanted a garlic packed sauce.
  After 15 ish minutes, give tofu a flip, then after about 25 minutes, the tofu should be nearly done. Remove from the oven and toss in the chopped broccoli and 1/3 cup of the sauce. Its a little watery but thats what you want, it will cook down in the oven. Now stick the skillet goes back into the oven and boil the soba noodle.
 Another 10 minutes in the oven and the sauce starts to caramelize and the broccoli is cooked but still nice and crisp. Remove skillets from oven and toss in the cooked noodles and the rest of the dressing. Toss and toss and place on a plate, or a bowl, or if your into it, just eat out of the pan. (it happens)
Roasted Winter Roots Hash — The Lovely Crazy
February 27, 2016 by maximios • Blog
Hooray!!! Today was farm share pick up day!!!! I got me a butt load of root veggies, a gaiagaitc butternut and so much kale. I finally feel complete again. So Happy! And so having a fantastic dinner! I went with……Roasted winter hash! And if you haven’t noticed yet, I like to add greens to everthing so I add that winter hash to a big pile of kale. It just needed to happen.
And a suggestion, if you are feeling like you need something to add to this hash, add a fried egg .(I fried eggs for Nicks dinner)
Happy Friday! Keep it cool!
-C
Roasted Winter Root Hash
Ingredients ( Serves 2)
Preheat oven to 425 degrees
Rinse and strain chick peas. Wash and chop root veggies into small chunks. Toss veggies and into a large oiled skillet with chickpeas. Season generously with salt and pepper. Place in oven for for 30- 40 minutes or until all veggies are fork tender. Remove skillet from oven and toss in freshly grated (or chopped) garlic and mix in… If you want a little more, add a bed of greens (Kale, spinach, arugula) It will make you happy.