alz-il.net
  • Home
  • Blog
  • YouTube
  • TikTok
  • Instagram
RSS

THE LOVELY CRAZY

September 19, 2015 by maximios • Blog

The conversation I had with my little brother on his birthday…

Me- “Happy Birthday!”

Bro- “Thanks”

Me- “What do you want to do.. want to come over, I’ll make you something, anything you want…donuts, cake, pizza…”

Bro- “Make me a shelf, I got like seven books for my birthday”

Me- “Um, ok… what are you thinking?”

Bro- “Something to hold like seven books”

Yup, he got “like seven” books and needed a shelf……. I guess I didn’t realize that “like seven” was a unit of measurement. Man, I love my little brother,  but sometime I wonder about the kid. Anyway, Being that coolest big sister he’s got (and coolest big brother in law who did most of the work), we went along and made him a  shelf. Hopefully it holds those “like seven books”.

Here is the list of what you will need to make the exact shelf with the same measurements that we used…but feel free to use and adjust the measurements to your want or need.

  • 2 pieces of 1×8 common pine measuring 25 1/2 inches (sides)
  • 2 pieces of 1×8 common pine measuring 17 1/2 (top and bottom)
  • 1  piece od 1×8 common pine measuring 16 inches (middle shelf)
  • 2 pieces of 1×8  common pine measuring 4 inches (legs)
  • Wood glue
  • About 20 (having a few extra never hurt) 2 1/4 inch finishing screws

Tools

  • Drill
  • Either a circular saw or a chop box to cut the legs
  • Measuring tape
  • Speed Square or something to make a perfect straight line

The legs are the hardest part to make and really, it’s so not hard. Take both 4″ pieces of pine and cut in half ( each piece will end up being 3  5/8″.. how is that you ask? Well here is some knowledge… 1×8  pine actually measures 7  1/2 “…. nuts right?) With each piece, measure an inch in on the bottom and side…Draw a vertical line to connect and  then cut the line. Repeat last step with the second piece you just cut, then repeat the whole processes with the second piece  of 4” pine. These words seem a little confusing, just look at the picture above, it has all the measurements on it too. In the end, you should end up with 4 legs.

Take one of the 17 1/2″ pieces and with a straight edge, draw two lines form opposite corners to find dead center.  Measure 8″ from center on each line, that is where the legs are going to be placed. Working with one leg at a time, add a smear of wood glue to each leg as you are about to screw it down. Place leg on mark and sink a screw about an inch up from the inside of the leg, screwing at a slight angle (see photo)..

Phew.. this is the most complicated part of the whole shelf so once you get the legs on… its all smooth sailing.

Flip bottom onto legs and sink a screw in (1 inch in on both sides) into each leg.

Now grab the top piece (17 1/2 “) piece and the two sides pieces (25 1/2”). Add a bit of wood glue to the side ends and line up top piece with the sides.  Sink 2 screws into each side. If you have another person helping, have them hold the pieces for you while you screw the top into the sides.. if not, use the bottom to rest a side against (like in picture). 

Now flip over and screw the bottom piece into the sides……

Take a minutre…. Look at what you have accomplished! You have a kick ass square with legs!

Now place the shelf. We went for just about center.. 12 1/2″  from the bottom. Mark the measurements on both sides and use a square edge to draw a line.

Place shelf on the lines (The wood should fit in tight, you might even have to bang it a bit to get it into place….but you want it to fit nice and snug.) Now screw the shelf…two screws on each side.

Flip onto legs and ……….TA DA!!!! So Fancy!

 You now have a shelf to shelf things.. Simple as that. And I tested it out…It holds more the “like seven” books. A success! 

Note……If you are feeling like you need to, use a little wood putty to fill in the screw holes. You can sand it if you want. You might even want to stain or paint it. Up to you. The shelf is made and is yours to do what you will. Me, I like it just the way it is.

If anyone out there takes this little shelf project up.. let me know how it goes, maybe even send a picture…and feel free to ask any questions!

Have fun building awesomeness!

-C

THE LOVELY CRAZY

September 19, 2015 by maximios • Blog

I have been meaning to make this jam for a while now. I’ll buy a bunch of jalapeños, then slowly, before I get to cooking them down, end up eating them all. But not today, and the rewards are great, Fresh jalapeño jam. So much potential for the greatest of things (I am thinking mango jalapeño sorbet… no, I am making jalapeño mango sorbet) And if you, like me are a jalapeño fan, this is going to make your life amazing. You will find yourself jamming up everything, or maybe just eating it with a spoon.

Whatever you want to do with it, just make it. 

Honey and jalapeños.. All you need, well a little salt and water too, but that’s it.

What you need to do is remove the stems,, most of the ribs and half of the seeds removed. (You could remove all or none of the seeds depending on you heat preference) Chop the peppers into small chunks, toss into a pot, sprinkle with a bit of salt, add in a splash of water. Place the pot on medium heat. Top it with a lid, and give the peppers a good stir every few minutes. While the peppers are cooking, you want to make sure the bottom isn’t sticking and buringin. If that starts to happen, just turn the heat down a bit and add in a little splash more of water.

After about 20 minutes, the peppers are fully cooked and falling apart. The liquid is cooked down and the peppers are starting to caramelize on the bottom of the pan. When that happened, remove the pot from heat.

Now you can either blend the peppers, mash the peppers with a fork, or leave it chunky. Thats a choice Ill leave to you. ( I like to blend, but keep some chunks)

And drizzle in a bit o honey. As little or as much as you like.

And scoop into a jar. Eat the jam on anything you want. (I found myself eating it with a spoon)

Keep it Real!

-C

Makes about 1 1/2 cups of jam

  • 10 large jalapeño peppers
  • a pinch of salt
  • About 1 tablespoon of honey, but add more if you like (And if you want to keep it vegan, use agave or sugar)

Wash, remove ribs and most seeds (the more seeds you leave the hotter it will be) and dice jalapenos into small chunks. Place in a pot with a few splashes of water and a sprinkle of salt. Turn on medium heat and cover, stirring every few minutes. If the peppers seem to be sticking  o the pot and burning, turn heat down and add another splash of water. After about 20 minutes, the peppers should be really tender and falling apart. The liquid should be completely cooked out and the peppers will start to caramelized at the bottom of the pot. When that starts to happen, remove from heat.  Now either mash with a fork, blend with a hand blender, or leave superr chunky. Drizzle in honey (or sweetener) and stir. 

Eat right away or stick in a jar and store in the fridge for up to a week (It won’t last that long)

      And that’s how I know that this is a winner. As an awesome aunt, when I have any of my nieces or nephews,  I feel the need to make something special for dinner, something that the kiddos might not get very often, but also keep it on he healthy side. I have 2 littles for the night which gives me the perfect opportunity for a trash food recipe. You know trash food, things like boxed mac and cheese, beefaroni in a can, or, in this case, sloppy joes.

Sloppy yes, trashy, not so much. These are made with beans and bulgur. No meat.

And I figured it is nice enough out that I can make the kiddos some messy food and then just bring them out back and hose them off… I mean, why not right?

The stuff… We start with onion and green pepper, chopped into pieces. Black beans, bulgur, can crushed tomatoes. Chili powder, garlic powder, a bit o apple cider vinegar (which I forgot to picture) ,and some salt and pepper. Oh and cheese if you want… Plus a bun of some sort is necessary.      Toss the chopped onion and peppers into a deep skillet or pot with a drizzle of oil. Cook on medium heat until tender and toss in the spices. Give a stir. Add in the beans, bulgur, and tomato, a splash of vinegar. Stir it all up, cover, and let simmer for about 15 minutes, or until the bulgur has absorbed the liquid and is nice and tender.

If you are a bun toaster… toast while waiting. If not, just get the buns ready And Then dump a good heaping pile right onto a bun. Add some cheese, or not..and eat with wild abandonment,  making sure to get as much on your face as you get in you mouth. 

Fantastic Friday!! Live it up. 

-C

Black Bean and Bulgur Sloppy Joes 

  • 2 cups or 1 can cooked black beans
  • 1 16 oz can crushed tomatoes
  • 1/2 cup bulgur
  • 1/2 cup water
  • 1 small onion
  • 1 green pepper
  • 1 teaspoon garlic powder 
  • 1 teaspoon chili powder
  • salt and pepper
  • a splash of apple cider vinegar
  • olive oil
  • 4-6 burger or bulky buns
  • cheese (optional)

Dice the onion and the pepper and toss with a drizzle of olive oil into a large skillet. Sauté on medium heat until veggies become tender. Add in the spices, stir in and let cook for a minutes, then add in the beans, the tomato,water and the bugler. Cover skillet and let simmer until bugler becomes soft.

When the slop is ready, either toasted or not, scoop a generous portions onto buns. If so inclined, add some cheese. 

Eat with hands… Sloppy is good.

Happy Friday!

A simple post for the simplest of soups. Minimal ingredients, no fuss, fast to make but can be left all day to simmer……. And oh so very very good. 

This has been one of my go to soups this winter. Warming, hardy, comforting….every kind of soft cozy feeling that I need when I can’t leave my house because it’s so cold out that all I want to do is sit on the couch wrapped up in a blanket, with a book, and eat hot soup. (That’s the my plan for the weekend) But it’s also good for any type of weekend activities you might have… it’t kind of the perfect soup.

The Stuff. A medium sized butternut squash, seeded and diced (no need to peel, but go for it if you want) About a pound of broccoli, (fresh or frozen) and a few shallots. Salt, pepper and a few cups of water. 

Note.. I didn’t add any spices to this batch because I really love the flavor without anything. With that being said, I have made this same soup with sage, rosemary, turmeric, even curry. Almost any flavor works in this soup. 

    The chopped squash and broccoli go into a big pot with about 2-3 cups of water. Add about a tablespoon of salt and pepper. Lid up the pot and place on medium low heat for about a half hour, or unitl squash and broccoli is fork tender. Now blend together with either a emulsion stick blender or place in a blender for 3-5 minutes until completely smooth. Add enough water to keep things moving. Add more water if you want a thinner soup, less for a thicker soup. Season with more salt and pepper to taste. Once blended, place back in pot on simmer until ready to serve. 

When the soup is simmering, thinly slice the shallots and toss into a pan. Sauté until soft and fragrant. 

 Finish off with a drizzle of balsamic vinegar and top with the  sautéed shallots.

Soup and a spoon. So simple, so good.

Have a great weekend…..Try and stay warm!

-C

Butternut Broccoli Soup

The Stuff 

  • 1 medium butternut squash 
  • 1 pound of broccoli (crown and stem and can use frozen)
  • 4 shallots
  • Balsamic Vinegar
  • salt and pepper

Split squash in half, remove seeds, and dice into chunks.  Place in big pot. Chop up broccoli and add to pot. (or just add frozen chopped broccoli) Add water until stuff is about half way summered. Place a lid on the pot and cook on medium low heat for about 30 minutes or  until squash and broccoli are fork tender. Blend together with either a stick blender or place in a blender. Add enough water to keep things moving. Add more water if you want a thinner soup, less for a thicker soup. Add more salt and pepper to taste. Once blended, place back in pot on simmer until ready to serve. 

When the soup is on simmer, thinly slice the shallots and place in a pan to sautee until soft and fragrant.  

To serve, ladle soup into bowl, drizzle with balsamic vinegar, and top with sautéed shallot.

Eat with a spoon

     Before we get to the fries, I just want to mention that  yesterday was one of those fantastic winter days that reminds me why I love living in Vermont.  Pretty white snow everywhere, the sun was out, and 20 degrees without a gust of wind. The trash dog an I were even able to go for a little hike.  It was so nice and soooo sooo needed!  Anyways, the other day as me, my sister and the mister where putting together  one more piece of Ikea furniture, (I am the master at Ikea assembling!)  a little runs into the room and presents the mister with a Dominos pizza. Yup, a whole pizza just for him. Why you might ask? Well I guess my sister was  delivered the wrong pizza and the place didn’t want it back and she didn’t want it, so she gave it to him.

A whole pizza to himself. I didn’t mind too much..he was just going to be eating it for lunch and dinner until it was out of the fridge. But for dinner I did want him to eat something of the vegetable matter that didn’t come out of a box. I was going to make him a big salad, but then realized that would mean sharing the last of the greens that I had for MY dinner and I was not about to do that, so I made him parsnip and carrot fries instead. No biggy, just some slicing, a little tossing and a bit of time in the old oven. And I figured I might as well make a nice sauce for those fries because I be so very nice.

The biggest problem that I ran into when I made these fries was that I didn’t make enough, so you should probably make twice as many as you think you will eat. If you end up not eating them all (which you probably will), well then you now have a great start for a soup or a nice addition to a salad. Either way, you will eat them because they are amazing and addicting… and as healthy as can be!

The carrots and the parsnips are all sliced up into big matchsticks and ready to be baked to crispy browned perfection.  I added the oil to the pan to toss the fries in and then sprinkled with a fair amount of salt and pepper.  If you don’t have and or want to use a cast iron pan, a baking sheet works just the same.

   Oh saucy sauce stuff. Tomato puree, sriracha, and yellow mustard. Add a little bit of honey to lighten it up (can use brown sugar if keeping it vegan), a splash of apple cider vinegar and a couple minced cloves of garlic. Topped off with the smokey delightful spice of cumin. I cold eat this on everything…and I kind of did. 

All mixed up in an oven safe dish, I stuck it into the oven for a about 8 minutes until it got a little bubbly, just to let all the flavors fuse together…

Fries are done, Sauce is ready. Served in super cute tea cups.(from now on I want to serve everything in tea cups.) A perfect side dish, snack, or even a light meal.  It lead the mister to ask the question…What pizza? 

Happy Day!

-C

Parsnip and Carrot Fries with Smokey Sriracha Sauce

The Stuff

For the Fries

  • 2 large parsnips
  • 2 large carrot
  • salt and pepper
  • 1 tablespoon oil

For the Sauce

  • 1 tablespoon Sriracha
  • 1 tablespoon mustard
  • 2 tablespoon tomato puree (or 1 tablespoon tomato paste and 1 tablespoon water)
  • 2 cloves or garlic
  • 1 teaspoon honey or brown sugar
  • 1 teaspoon cumin
  • a splash of apple cider vinegar
  • a pinch of salt

Preheat oven to 425.

Wash and trim carrots and parsnips and cut into large matchsticks (any shape is good, just make them all uniform) Toss with oil and sprinkle with salt and pepper. Place on cast iron pan or baking sheet and stick in oven for 30 or so minutes, and rotating after about 20. The fries are done when  crispy and brown.

For the sauce. Mince garlic and add to all the sauce ingredients in an oven safe bowl. stick into oven for about 8 minutes until slightly bubbly and hot.

Dip fries in sauce

One of the best things about winter is that I can have something in the oven at any time and not worry about how hot the house is going to get.  I get to spend my free time (or my in between free minutes) baking up all the thing that I would not dare bake in the summer. (lots of bread and cakes) Yeah, I might complain a little about how cold it is outside (to my defense, -20 is kind of a bitch) but then I think of the super hot humid days that come during the summer and cringe.  At least when its cold out I am able to get warm, (que oven)  but when its super hot and humid, I just turn into something that border lines a wet towel and the rabbit animal… Not so pleasant.   I much prefer cooler weather. So no big surprise….I made bread.. or focaccia to be exact. And now you should too because first off, you want to eat it, and secondly, you can probably whip this up faster then it would take to get all of you winter warmies on and leave the house. Don’t leave, just turn the oven on.  The stuff, which isn’t a whole lot… Flour and salt.  A mixture of honey, water, and yeast. And olive oil. Its pretty much my pizza dough recipe, tweaked with the addition of oil, less flour and no kneading.  Mix together the wet and dry…I used my nifty dough whisk, but a wooden spoon or even your hand works. Mix mix mix. The dough should  be really slack and sticky.  And guess what.. no need to knead! Just make sure the dough is uniformly incorporated…hehe.. uniformly incorporated… sounds weird.         Drizzle the dough (don’t worry about making it into a ball, a blob is good) with a little oil and place in a nice warm place topped with a towel to rise for about an hour or until dough has doubled in size. Once is has fully risen, drizzle 2 tablespoons oil in two 9 inch cake pans.  Divide dough in half, and kind of smoosh dough into pans. Cover and let rise for another 20 minutes or so. When dough has finished its second rise, drizzle each  with another tablespoon of oil and with your fingers, fill out the pan and indent the dough, kind of like playing a piano or tickling a puppy(?)….Then layer your toppings (if you want any)  Start with any herbs, then the veggies. Then last, any cheese you got. I used thyme, cracked black pepper, tomato, onion, topped with parmesan cheese. And the other one is just plain old salt.  Pulled from the oven when nice and golden brown..set on a wire rack to cool for a few minute and removed from the pans. The mister was practically salivating waiting for a slice… and he was so not disappointed. Crispy outside with soft airy insides… Everything a perfect focaccia should be. The one with the toppings was the favorite for the first night, but for a peanut butter and cheese panini for lunch the next day…plain is the way to go.. My suggestion, do what I did, jazz one up and leave one plain. And then make more if you need too because the forecast call for another week of below zero!!! Oh the things that I’ll get to make! (me being positive) Stay warm! -C

Focaccia with out without stuff

  • 3 cups all-purpose flour 
  • 1 tablespoon salt plus 2 teaspoons for topping (can use more or less if you want)
  • 2 teaspoons active yeast (or one package)
  • 1 1/2 cups warm water
  • 1 tablespoon honey (or sugar if vegan)
  • 6 tablespoons olive oil

Optional toppings

  • Fresh cracked pepper
  • Thyme or any other spices
  • Thinly sliced tomato
  • Thinly sliced onion 
  • Parmesan Cheese 
  • Anything you want!

In a bowl or jar, mix honey (or sugar), yeast and warm water together and let sit for about 5 minutes or until yeast is activated and starts to foam In a large bowl, whisk together flour and 1 tablespoon of salt. With either a wooden spoon, dough whisk, or if you have one, a stand mixer with a dough hook, mix the yeast mixture with the flour. The dough is going to be really sticky so mixing might get a little gloppy, but keep at it until everything is full incorporated.. for about 3-5 minutes and don’t be afraid to use your hand… you can wash it off.  Once mixed drizzle with oil and cover with a towel. Let rise for about an hour or until dough has dubbed in size. When dough has double, coat two 8 or 9 inch cake pans each with 2 tablespoons olive oil. Dump dough onto floured surface and cut in half. Take each half a place in pan. cover and let rise again for another 20ish minutes. preheat over to 400 degrees After second rise, lightly take your fingers and push down dough, making little indents all over the surface. Drizzle each with another tablespoon of olive oil and sprinkle each with a teaspoon of salt. If using spices or any other toppings, nows the time to layer them on. And do any cheese last! Place in oven and bake for about 30 minutes or until the tops are golden brown. When done, place on a wire rack and let cool a bit before removing  from pans. Done!!  To store, place in a paper bag.. best eaten within a few days!

What a way to start the day, with a mouth full of c words…….Caraway, cauliflower, chick peas and cabbage…What did you think I meant?

This week has been nippy, no, its been chilly…..nah, it’s been freaking freezing! Yeah, freezing cold. When I woke up this morning to walk the pup, it was 5 degrees. So needless to say, when it gets this cold, I like to keep inside. Tying not to be a complete lazy bones, I went to town on my spices… refilling jars with all the little baggies scattering the kitchen, screwing on lids, and wiping down the shelves. Not a bad accomplishment for a day. While cleaning I came upon a little bag or caraway seeds,  Not enough to warrant a jar on the wall, but defiantly enough for one dish.  

When I think of the bright, somewhat sweet and peppery caraway, I think cabbage.(anything cabbage and I am sold) A big pan cabbage, added cauliflower for the mister,(his favorite) creamy chick peas because we need  protein and they be tasty, and of course mustard, because everything tastes better with mustard.(I’ll let you in on a little secret.I eat a lot of mustard, I am kind of obsessed. Mustards of all kind; grainy, homemade, dijon…but usually just plan old yellow. And I eat it on everything.. but my go to is French’s yellow mustard and carrots…don’t judge) A warm, bright and filling dish, perfect for a freezing cold evening stuck inside. You can eat it as main dish or add a pile of quinoa or wild rice, or even a big plate of greens. What ever say you eat it, you and your stomach will be happy.(If your worries about cabbage bloat..don’t be. Cooking cabbage helps breaks down the enzymes that create gas, plus caraway has anti bloating properties…WIN!) 

Cabbage, cauliflower,(fresh of frozen….I used frozen in this recipe) pre-cooked or canned chick peas, caraway seeds, yellow mustard, and salt..(I added pepper too)

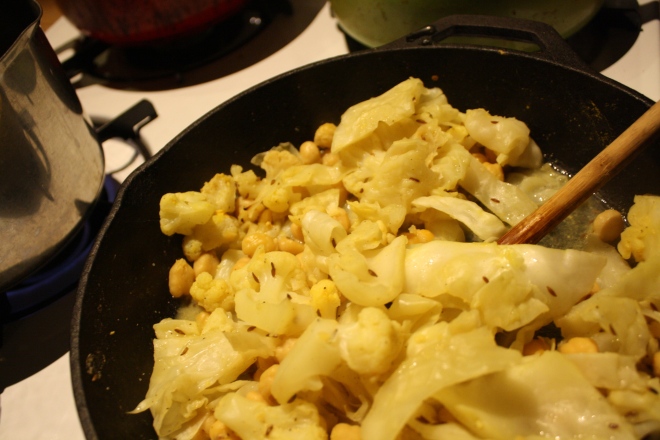
Chop the cabbage and toss into a lightly oiled pan with the rest of the stuff. Heat pan with everything but water  for a couple of minutes.. to warm the caraway and give everything a cooking head start, then add the water. Stick a lid on it and let simmer. After about 15 minutes, give it a stir or two and do a taste test. At this point, it’s up to you…how cooked you want the veggies? I kept mine cooking for another 10 minutes. I also added another 1/2 cup of water. Not enough water and the pan will burn, a little extra water is good, it creates a yummy broth.

When you are happy with the flavor and doneness, eat it. I made myself a  bowl with a heap of pickled beets(holy yes!). I am sorry if you don’t have any pickled beets, but the dish is still amazing without them.  Fresh ground pepper really does the trick too!

So there you go, make it tonight, it will make you warm,smart and happy

-C

serves 2-3

  • 1/2 small head of green cabbage(about 2 cups chopped)
  • 2 cups cauliflower(fresh or frozen)
  • 1 cup cooked chick peas
  • 1 1/2 -2 cups water
  • 1 tablespoon caraway seed
  • 2 tablespoons yellow mustard
  • salt and pepper to taste

Lightly oil a medium sized skillet and add all ingredients except water. Heat for a few minutes to warm up veggie and caraway seeds then add a 1 1/2 cups of water. Keep on medium heat with a lid and stir on occasion If water evaporates completely out, add another 1/2 cup.  Dish is done when veggies are tender.. about 20 minutes….but whenever tastes best to you!

Can’t wait until my lover comes home! I chopped him a pepper heart.

THE LOVELY CRAZY

September 19, 2015 by maximios • Blog

Last night I had my sister and her kiddos come over for dinner. Nothing fancy, nothing to complicated,  just something  fast and something that I knew the littles would eat.  Spaghetti and meatballs, except replace meatballs were bean balls So they came, we played, did a little drawing and had a bit of first grad gossip. Then came  dinner time  when I was told by one little that she was not going to eat.. She had pasta for lunch. Well I made her sit anyway and she mainly just ate carrots (I was ok with that) Then the other little was all into his pasta and bean balls, 1 down, 3 more to go, when the mister let slip that the meatballs were not really meat. He ate around the remaining balls, said he didn’t want them anymore. And my sister, well she doesn’t eat anything that is not pizza.

Good thing a neighbor stopped by while we were eating. He had a few of the balls and told me that they were amazing. I needed someone to tell me that.  

So yeah, the littles were not overly enthused with the ball, but the Mister the Neighbor, and I thought that they were awesome and delicious. Maybe next time I will make sure that  pasta was not lunch and tell Nick to keep his mouth shut and stop talking about balls at the dinner table.

I feel like I don’t need to tell you how to boil pasta or heat up the sauce, so I left that portion of the recipe out. I have faith that you are capable in doing that part without my instruction.

The bean ball stuff. Chickpeas (soaked and cooked or canned), sweet potato, carrot, onion, and some chick pea flour. Dried garlic, basil and oregano. Salt and pepper and a little bit of olive oil. Small chop all the veggies and toss them and the dry spices into a skillet with a drizzle or two of olive oil. Stick on medium  heat and add about 1/4 cup of water to pan. Top with  slid and let veggies cook down until soft and fragrant.

Add the cooked veggies to a food processor or blender with  the rinsed and drained chickpeas. The mixture gets pulsed until combined,  keeping a little bit of chunkiness.  Now go warhead and taste  the mixture. Add another pinch or two of salt , pepper or any of the spices that you think it need.  Dump the mixture into a bowl and mix in the chickpea flour than stink the mixture into the fridge for a least a 1/2 hour. Cooling to off is really important to forming the balls. If you don’t, it’s much harder to keep mixture from falling apart and sticking to your hands.

After the mixture has had time to cool and set, start rolling the mixture into balls roughly the size of ping pong balls. In a shallow bowl, add a few tablespoons of the chickpea flour with a pinch of salt, pepper and garlic powder. Take each ball and roll in flour and place each ball on a well oiled baking sheet. When the balls are all rolled, stick into the oven and bake away for about 30-40 minutes, flipping balls after about 20.  After you flip the balls, get the pasta ready so its finished about the same time the balls are done.You pasta and sauce is cooked and the balls are all crispy and oh so nice.

Serve balls over pasta with sauce and eat with a fork.

Your day is now complete.. balls and all.

Happy Weekend!

-C

Spaghetti and Bean Balls

makes about 20 balls

  • 4 Cups (or 2 cans) Cooked, Rinsed and Drained ChickPeas
  • 1 Small Sweet Potato
  • 1 Small Onion
  • 1 Carrot
  • 1/4 Cup Chickpea Flour plus extra to roll balls in
  • 1 Heaping Teaspoon Basil
  • 1 Heaping Teaspoon Oregano
  • 1 Heaping Teaspoon Garlic Powder
  • Olive or Vegetable Oil
  • Salt and Pepper
  • Your choice of Spaghetti (Use Vegan and or Gluten Free if needed)  Prepared as package recommends
  • Marinara or Pasta Sauce of your choice

Preheat Oven to 425 degrees

Small dice the carrot, onion and sweet potato and toss into a skillet on medium high heat with a splash of oil. Add in the dry spices and add in about a quarter cup of water. stir and cover the skillet with a lid and let the veggies cook down until the water has evaporated and the veggies are tender. 

Add rinsed and drained chickpeas to a food processor with the cooked veggie mixture. Pulse together until the mixture is combined and slightly smooth, but still with a little bit of texture left.Place bean mixture in a bowl  and mix in the 1/4 cup of chickpea flour. and stick in the fridge for a least a 1/2 hour to cool. (Mixture can be made a day ahead if you want)

Once the mixture has time to cool and set up , remove from fridge and with a light head, roll mixture into ping-pong sized balls. In a separate shallow dish add a bit of chickpea flour with a pinch of salt and pepper. Roll each ball in the flour mixture and place balls on a well oiled baking sheet. Once balls ae made, stick into the oven and bake for about 30-40 minutes, flipping after about 20 minutes. The balls are done when the outsides are once and golden brown and crispy. After about 30 minutes, get to cooking your pasta and mariana sauce.

Once the pasta and sauce is done, plate it and toss on some of those awesome bean balls!

Bean balls also make fantastic bean ball sandwiches or bean balls on a toothpick. 

THE LOVELY CRAZY

September 19, 2015 by maximios • Blog

Happy St Patricks Day!!!! As a kid, St Patricks day always meant green milk, green eggs, and those nasty gold foil covered chocolate coins. (you know, from the pot of gold) Not to mention all the leprechaun hunting and  pinching.  In my family, if you were unlucky enough to forget to wear green, you ended up as a walking target. It all started out nice an innocent, a pinch here or there, but by the end of the day, someone would end up pinching a little to hard or maybe just one too many times and the game would go from pinches to punches.   

Ahh, memories. 

Now as an adult (kinda adult) St Patricks is celebrated a little differently. The little ones in the family still get their green milk (which they are told is leprechaun pee) and those nasty gold coins, but I think the pinching has stopped.( a great tradition lost)  I myself don’t have any littles at home so no little leprechaun games or gross dyed food for me.  Nope, in my house we celebrate with a few beers and a more traditional irish dish, Colcannon. Mashed up potatoes with cabbage and kale… I mean, can it get much better? It can when you use red potatoes and red cabbage. Not only is it so tasty tasty, but it is so pretty pretty. No need for green milk or nasty candy. 

But I still make sure to wear green and you might find me doling out a pinch or two. 

  The stuff…. Super pretty red potatoes, red cabbage, shallots, kale, salt and pepper, and olive oil.

Note. If you do not have or want to use red potatoes, russet or white will work, it just won’t be as pretty. 

   Dice up the pretty potatoes and stick them into a pot and fill up with water and add in a good tablespoon of salt.  Stick on high heat and bring to a boil, then turn the heat down to medium  and cook those taters until super fork tender. (bring them to the edge of falling apart)

While the potatoes are boiling, chop up the cabbage, shallots, and the kale and stick into a big skillet with a good drizzle of olive oil. Sauté on medium heat until soft and tender.

Once the potatoes are super tender, drain the water and dump them into the pan with the sautéed veggies. With a potato masher or a fork, mash up the potatoes and mix in the veggies, adding a drizzle or more of olive oil as you go. (Start with a drizzle and work your way up until it tastes good to you) Salt and pepper to  taste. 

The most pretty pan of smashed up potatoes that I have ever seen. Eat as a side dish or even a light main dish. Fork is a good utensil to use, but I found that my fingers worked just as well.

Have a great happy day full of green, potatoes, and pinches. Maybe even a leprechaun or two!

-C

  • 5-10 Red potatoes Red Potatoes depending on the size (about 3 1/2 – 4 chops chopped)
  • 1 Cup Chopped Red or Green Cabbage
  • 1 Cup Chopped Kale
  • 1-2 Shallots
  • Olive Oil
  • Salt and Pepper

Rinse and dice potatoes and place into big pot. Cover potatoes with water and add about a tablespoon of salt. Place on high high heat and bring to a boil. Turn heat to medium low and let potatoes cook until super fork tender. While potatoes are boiling, chop up cabbage, shallots and kale and sauté in a large cast iron skillet (or any skillet) with a good drizzle of olive oil.  Once the potatoes are done, drain water and add potatoes to the skillet with the sautéed veggies. With a potato masher or fork, mash the potatoes and mix with the veggies, adding a drizzle or two (depending on your taste) of olive oil as you go. Salt and pepper to taste.

Serve from skillet or dump into a fancy dish with a big spoon.

Eat as a main dish or as a side….Good hot, warm and cold.

THE LOVELY CRAZY

September 19, 2015 by maximios • Blog

The past few weeks, whenever the mr and I have a free couple of hours, we have been hitting the countryside, in such of the best rivers (for me to play in and for him to fly fish) 

We have been to many, but this one is my new favorite. There is shade to sit in, sun to bath in, and hiking trails to hike. There are little wading pools, deep spots that are great for fishing, and lost and lots of the most amazing rock formations. And bonus, the was not a mere person in site, only a few cute little frogs.

 No matter that I think I broke the bottom of my foot walking barefoot in the water and jumping hard onto a rock, or that the mr came back with a touch of poison ivy (poison something). We still both love it and are looking forward to our next trip back with shoes and long sleeves!

You got any plans this weekend? If not, I am recommending that you hit a river. Bring a book, bring a picnic, and bring a little bucket for your river treasures. Soak up the last bits of the summer, take a break from the crazy, and just go. Trust, you will be happy you did.

Sometime the best things in life are the simplest things. For example; a walk through the woods, a really pretty smooth rock, a perfectly timed 80’s ballad song for the last push during a workout, or falling asleep on the couch and managing to not drool all over the newly washed pillows.(You know what I am talking about). I mean, can one really ask for much more?

Same goes with food. The simplest foods can really the best. Take this cashews cheese for example. All it is is soaked and blended up cashews with a bit of seasoning to cheese it up. Nothing fancy, nothing labor intensive, just straight up and straight out. You can up the greatness by adding thick cuts of fresh, sun kissed, bright and happy tomato, and a chunk of fresh bread…Not much better then that. So simple and yet so good.

 And bonus. No need to turn on any heating units in order to make this cause that would suck, given that we are again having another fucking heat wave. 

Agh stupid hot weather. STUPID!!!! But enough about that..

Cheese time.

The stuff. Cashews that be soakin for a while in some water, nutritional yeast (to give it that cheesy flavor), lemon, garlic, and salt and pepper. That’s for the cheese, but you are, and should, want to eat it with a large, so fresh and juicy, tomato and some kind of fresh bread situation. So you need that too!

Simple as can be. Strain cashews from soaking water and dump into a food processor with the garlic, nutritional yeast, juice of the lemon, a pinch of salt and pepper, and a little water.  Turn on processor.

And it’s done when its all smooth and creamy .Adjust salt and pepper to taste.

Tranfer  the goodness to a lovely jar 

And that’s that.. some cheese of the cashew.

But wait, you need to eat it.. Smear all over the bread situation, cut up the tomato, place big fat slabs directly onto cashew butter and spinkle with a salt and pepper.

SImply the best… Better then all the rest!

Happy today! Stay cool my friends…stay cool.

-C

makes about 1 1/2 cups of creamy, cheesy goodness

  • 1 cup of raw unsalted cashew soaked in water for about an hour 
  • 1/2 cup fresh water
  • 2-4 tablespoons nutrional yeast 
  • juice of a lemon
  • 2-3 cloves garlic (optional )
  • salt and pepper

And not that you have to, but having some freshy tomatoes and some nice bread to eat the cheese on is pretty fantastical. 

After you cashews have been soaking for about an hour, strain water and add them and all of the other ingredients to a food processor. Blend until smooth and creamy. Scoop into a jar.

Eat some right away on a hunk of fresh bread with lots of thick cuts of fresh tomato and place the rest in the fridge.

The cheese will get a bit thicker after being refrigerated for a while.

Use on anything , in anything, or all on it’s own. Licking jar clean is encouraged.

HEY Hey Hey… It’s Taco TUESDAY, which means that you are obligated as consumer of food to eat some tacos today!

So ok, I am not going to lie, these tacos were not actually made on a Tuesday (GASP) but were made in lu of pizza Friday (another GASP!!) 

But guess what? No one died. People were happy. Food was fantastic, and there was no mention of the pizza that was not.  So sure, taco tuesday is totally a thing around here, but  you know how “Nobady puts baby in a corner”..  well nobody buts tacos in a corner. We don’t let the day of the week depict when tacos are eaten cause we think tacos are for everyday!

And these tacos, well, I got down with these. Made with lentils, cause lentils are the best, and topped with a hearty scoop of super fresh, chunky veggie salsa…. Not much is better then that. Easy and fast with lots of pretty in every bite, these tacos are a great addition to any taco dinner rotation!

Now lets get taco-ing!!!

The stuff. First off, you are going to need some type of taco shell.. soft or hard or both , that is entirely up to you.( I made taco shells a little early in the day, but store bought is totally cool.) Also need lentils, water to cook the lentils, a jalapeño (optional), taco seasoning (pre blended or your own blend) and onion. Also needed is a gigantic tomato, some red cabbage, a few kale leaves, a lime, and salt and pepper.

To get this party started, chop up half the onion, the tomato, cabbage ,and kale and toss into a big bowl. Oh, and chop up the cilantro and toss that in as well.

Sprinkle with salt and add the juice of the lime. Mix oh mix and set aside to let all the flavors meld.

Now that the salsa is doing it’s thing, chop up the jalapeño and the other half of onion and toss into a big skillet and place on medium heat.

And when the bits start to brown like so…

Dump the lentils in to the pan with water.Bring it all  to a boil then turn heat down to low.. Add in the taco seasoning and sprinkle of salt and pepper and place some type of lid on ithe pan.

And simmered until cooked.

Note. Check the lentils every few minutes while they are cooking. If you think they seems to dry, add in another 1/2 cup of water.

Now it’s ssembly time! Lentils in shell, topped with a generous amount of  salsa. That’s it! Maybe some guacamole would be nice (I had an avocado saved for guac, but it was rotten on the inside.. I was super pissed) But with or without, these are some freak yeah yummy tacos! I served my next to a bed of some jasmine rice which was nice, but do what you want my friends. 

Happy Taco Tuesday! (or any taco day!)

-C

Makes about 8 -10 tacos

For the Lentil Filling

  • 1 cup dried lentils
  • 2 1/2 -3 cups water
  • 2 tablespoons taco seasoning*
  • 1/2 of an onion
  • 1 jalapeño 

Fot the Garden Veggie Salsa

  • 2 big tomatoes (or one gigantic tomato)
  • 1/4 head of red(or green) cabbage (about 2 cups shredded)
  • 1/2  of an onion
  • 4-5 kale leaves
  • 1 juicy lime (2 if they are not very juicy)
  • a bunch of cilantro 
  • salt and pepper

And don’t forget the taco shells!

*Note. You can use any type of taco seasoning that you like, store bought or home made. I make my own with cumin, chili powder, onion powder, garlic powder, and a little coriander. 

Dice the tomato and 1/2 the onion into small chunks and toss into a big bowl. Finely chop the cabbage an the kale into small shreds and toss that into the bowl. And chop up as much cilantro as you would like and that goes into the bowl as well. Spinkle with some salt and add in the juice of the lime.  Mix everything all around and set aside.

Once the salsa is made and sitting, chop the jalapeño and other half of onion and toss into a large skillet. Place on medium heat for a few minutes until the pepper and onion start to brown. Now dump in dried lentils and 2 1/2 cups of water. Turn heat to high and bring to a boil, them back down to low. Seaosn with salt, add in the taco seasoning, and stick a lid (or cover with something), and let simmer for about 20- 25 minutes or until the lentils have absorbed  all the water and are nice and soft. If you find the lentils are still hard and there is no liquid, , add in another 1/2 cup of water. 

Once the lentils are cooked to your liking, remove from heat and get assemble tacos. 

Scoops some lentil mixture into shells. Add on a big scoop of the fresh veggie salsa and eat with you face.

Guacamole, cheese, sour cream, or whatever are optional topping that you may consider adding but are definitely not necessary.  . 

Hey there people! How’s it going? Good right.. cause it’s SUNDAY!

Ok, so I know that some people don’t like sundays, but me, it’s my day. The one day of the week that I try to do as little crap as possible and relax, It also means the house is spotless, the fridge is stocked, (so so so stocked..a farm share and garden explosion!) and the sheets have been changed on the bed…. I LOVE clean sheets!  

This past week was for sure one of those dragging, nagging, just want it to be over type of weeks. Why? I am not exactly sure. We have  had us some good time; a back to school dinner, banana ice cream cake, garden time and a few playground trips. But I think I am just feeling the pull towards fall and am just clicking the days away until  we have the crisp cold days full of apple, pumpkins, cozy sweaters, and colorful leaves. Call me crazy, but I can’t wait for the warm weather to GO AWAY!

Anyway,  today I am going to relax a bit. Maybe I’ll finish my book, restart my knitting (I have knitted about 3 hats and keep pulling them apart because I don’t end up liking them.. I have pattern commitment issues) or do a little more painting. (on canvas, not walls).  I hope to take the mr and the pup for a little hike and of course, drink a much coffee as my heart can handle. 

How about you? Got any plans for the day? 

Note about picture above…. Saw the stuffed bear on a walk with the pup.. He went BATSHIT when he saw it. I don’t know how I even managed to take a picture cause he was barking like an ass at the thing…. Thats my dog.

Here is internet stuff from the week

-No more squares on Instagram. I am not going to lie, haven’t noticed 

-Uh, no shit. Turns Out Sarcastic People Really Are Better at Everything 

-Can You Use That In A Sentence? Dictionary Adds New Words…Awesomsauce!

-Plants all around!!! 

– This house and this house

-Why isn’t this happening everywhere? Streamlined Berlin Grocery Store Creates No Packaging Waste

–If only I had a library.. These are tops! 

-The Complete Guide to Gluten Free Baking. Thanks King Arthur Flour!

-Human Face Coffee Lids.. hahaha 

-Indiana Brewery Is Now Making a Beer for Dogs. I know my pup would like one.

And a few pictures from the week (All taken with my I phone 4.. I kept forgetting my camera)

You ever have that problem where your clothes start to smell a little on the funky side, even when you wash them, remember to swtcich to dryer right away (I forget to switch a lot, which leads to a bad smell as well), and really, fully dry them?  Maybe it’s just our washer and dryer or maybe it’s because we use the non smelly non yucky laundry soup that might actually just be made of thickened water, or maybe it’s because we are just extra dirty people. But no matter what it is, our clothes as of late have been coming out of the dryer kind of stale..

. I want my clothes to smell fresh, or else why do I bother washing them (ok, I know why, but still)

Being the  problem solver that I am, I made these little satchels of good smelling herbs. Sure I could go and buy dryer sheets, but those just smell like chemical ass to me and I might actually prefer the smell of stale clothes. I also  have a ton of the nieces oh nice smelling rosemary growing outside my door. It just made sense. Good smelling herbs stuck into a sack and tossed  into the dryer with the clothes.

It works like a charm! Our clothes have been smelling nice and freshy fresh! No more stale ass clothes!

Stuff you will need

  • A bunch of fresh or a handful of dried, good smelling herbs (rosemary, lavender, cinnamon stick. dill..whatever smells good to you)
  • citrus peels (totally optional)
  • Scrap faric
  • needle and thread or use your sewing machine

Directions .

Just sew up a little sack roughly the size of your hand,, leaving one side open. Stuff with herbs and peels of your choice and sew the last side up and toss into your next dryer load… 

Can be reused 4-5 times. And when it starts to lose its effectiveness, the sack can be riped open on one side and refilled with fresh herbs.

Happy Clothes Washing!

-C

It’s official, all of the littles started school yesterday……HOORAY! (I say hooray cause school is cool and the start of school means it’s going to be fall so soon!. Also I like hanging out with the littles more when they are in school. There is more to talk about and any time away from school is cool time so they like to do more stuff and not just be summer bums)

One of the littles had his very first ever day of school. So me, being the bestest most awesomest aunt ever, made that little a celebration, hooray for school, banana ice cream cake.

This little  has been bugging me for a while now to make him an ice cream cake. It all started a few months ago when I gave him a bowl of banana ice cream and told him that when he sleeps over he can have ice cream for breakfast  That blew his little mind. We then proceeded to have a converastawtion about healthy food and what was ok to eat for breakfast. (He is very interested in being healthy) I then told him that whenever he sleeps over I would make a banana ice cream cake for breakfast cause bananas are healthy. But every time he is over, I never seems to have enough bananas.

Well I had the bananas and there is no better excuse then the first day of kindergarten to make a cake.. A very delicious peanut butter banana ice cream cake!  And no, it wasn’t for breakfast, but the left overs can be! (there were no left overs here)

The stuff… Crispy rice cereal, peanut butter (I have some chiunky stuff  at the moment, but any nut butter is good) and 4 frozen  chopped up bananas.

Rice ceareal goes into a food processor with the peanut butter. Pulse until everything is all combined and starts to come togerter.

And ump the mixture into a spring for pan. If you do not have a spring form pan, a pie plate will work just as well.

Such a nice looking crust if I do say so myself. Now stick it in the freezer while you make your ice cream.

Frozen bananas go into the processor, get blended for a few mounters, and come out as ice cream…. freaking magic!

Now dump the magic ice cream into the crust.

And smooth it all nice like..and into the freezer it goes until its frozen.

After a few hours, you take it out of the freezer, remove from the pan (or leave it in the pan)

And gather your toppings. A handful of the rice cereal, some melted peanut butter, and a little melted nutella. (use whatever you want.. fruit would be great, some nuts, graham crackers, sprinkles. You get the idea)

 Now, Wait for it….

Go crazy! Toppings all over!

And serve up, and watch out.. I almost got my hand eaten for kids going for seconds..

Have a fantastic day and happy back to school. to littles and parents alike!

-C

Makes a 6 inch cake 

For the cake

  • 4-5 frozen bananas
  • 2 1/2 cups crispy rice cereal
  • 4 tablespoon peanut butter 

To garnish (use any, all or none of what you would like… and maybe not the super sugary ones if a breakfast cake)

  • melted peanut butter
  • melted chocolate
  • Nutella
  • handful of rice cereal
  • fresh fruit
  • jam
  • coconut flakes
  • sprinkles
  • anything else you would like!

Place cereal and peanut butter into a food processor and pulse until crumbly and combined and starts to come away from bowl.

Dump mixture into a 6 in spring form pan (or if you not have one, a pie plate works too) and press it down evenly on the bottom. Stick into freezer

Take bananas out of freezer and place into food processor. Blend until smooth. If needed, you can drizzle a tiny amount of water into it if you think it needs a little help to blend. 

Once smooth, take crust from freezer and dump the nanaer ice cream on top and carefully smooth it out. Stick back into freezer (a pier of plastic over to prevent ice crystals )for at least 2 hours, or until the ice cream has completely frozen.

When it’s time to serve, remove cake from spring form (or leave it in the pie plate).and drizzle the top with melted peanut butter, melted, chocolate and another handful of crispy cereal. Or leave it bare. Or add sprinkles… the toppings are all unto you!

Eat like a camp, for breakfast or dessert.. Or eat some for dessert and then some for breakfast.

Finally, it’s safe to turn the oven back on. No more heatwave (PLEASE NO MORE!!!) Last week was such a bust of life, I still feel like I am recovering. But let’s not talk about anymore. Lets talk about this cauliflower situation that was a highlight of my week.

I have been meaning to do this for a while now. And I have attempted, I’ll have the intention, get the cauliflower and peppers,  then somehow forget that I was going to cook it and just feed it to the mr raw, or he will just start eating at it and then the head is not intact anymore (He loves raw cauliflower). And sure, you don’t need to have a whole head of cauliflower to roast it and enjoy it, but come on, doesn’t it look super badass and pretty whole? And you can slices of it like you would a cake, a really yummy veggie cake. So yeah, it should be a whole head. Anyways, besides being pretty, this thing was freaking amazing. I love cauliflower, roasted cauliflower even more. Add to it some slightly sweet and cheesy pepper sauce, holy ho…I almost ate the entire thing myself. It was everything and more how I wanted it to turn out and am now forever going eat my cauliflower exactly like this (but probably not always). And the sauce…. I am going to make giant jars of it and stick it on everything. So good.

Now lets get to it.

The stuff. A whole head of cauliflower, a couple colorful peppers, nutritional yeast, garlic, lemon, salt and pepper, and a little bit of olive oil. 

Start with the cauliflower, Trim away any big leaves from the bottom and stick the whole head into a oven safe pot big enough to hold it.. Add in a little water and stick on the stove top on medium heat to cook for a few minutes, just to give it a little head start.

And preheat the oven

Pre roasted, slightly streamed cauliflower goes into the oven until a nice golden brown and all pretty like.

While the cauliflower is roasting, roasted the peppers too.I place mine whole onto a lightly oiled cast iron pan* and stick into the oven.

Once the peppers are starting to char and have become soft and tender, remove from the oven and let cool for a few minutes or long enough for you to handle them. When cooled enough, remove the stem, seeds and any of the skin that is coming off.

*Last year I used the same cast iron pan over and over to rasot peppes and never cleaned it, or bothered to oil it. By the end of the summer, there was a 1/2 inch thick layer of hard as rock caramelized pepper juice that I had to chip it away with a chisel… so yeah. be careful of pepper juice.

Toss the roasted peppers into a food processor along with the garlic, lemon juice, nutritional yeast, a splsh of oil and s little salt and pepper.  

And taste.. and try not to eat it all right now (It is so f ing good) 

And take that sweet, so delocouis sauce and smother all over the roasted cauliflower.

If you want, stick it back into the oven for a few minutes to crust up a little bit, but not a necessary.You can call it here and go to town.

I stuck in back in the oven for a few minutes… But again, not necessary.

And now you have this giant, amazing, head of delicious cauliflower, waiting to be eaten. I recommend removing the head and sticking it on a cutting board, you know, for easier cutting, and also it looks pretty badass. 

Cut into chunks and serve right away.  

Goodness gracious was this thing so freaking good!

Have a fantastic day!

-C

  • 1 fresh head of cauliflower
  • 2 red(yellow or orange work too) peppers
  • 2 -3 tablespoons nutritional yeast (the more the cheesier)
  • 4-5 cloves of garlic
  • juice of a lemon
  • salt and pepper
  • olive oil

Take whole head of cauliflower and trim any big leaves or stem off bottom. Stick into a big oven safe pot with about 1/2 inch of water. Place a lid on pot and stick on medium heat for about 8-10 minutes, or until water has evaporated. and cauliflower is slightly tender.

Preheat oven to 425.

After the brief cook on the stove top, remove lid, drizzle cauliflower with a tiny bit of oil and sprinkle with a little salt and pepper. Stick into oven without the lid.

Now that the oven is on, toss peppers into oven, either on a baking sheet, pan, or on the rack if you have the space and cook until all roasted and soft (should take about 15 minutes). Remove when cooked and let cool off for a few minutes. Once cool enough to handle, remove seeds and stem and any of the skin that want to come off and stick into a food processor. Add in the garlic, nutritional yeast, lemon juice and a tiny drizzle of olive oil. Blend until smooth. Add salt and pepper to taste.

Once the head of cauliflower is cooked and browned, remove from oven and dump/ smear with the red pepper sauce. If you want, place back into oven for a few more minutes, or not. Good both ways.

Remove from pot and cut into big ass chunks. Garnish with something green and eat until you can’t eat anymore.

If by chance you have any left overs (which I highly doubt) try blending it up as soup. It is freaking fantastic!

How was your week? Was it as straight up nasty humid and gross as mine was? Stupid heat wave.. I was not impressed. 

I will be the first person to admit it, that I am not my best person when the tempature rises and humidity levels get so high that it starts to creep into my soul. I go a little crazy/ crazy bitch and just am not pleasant to be around.  Or maybe it’s that everyone around me is not pleasant to be around. Either way…. just not good. 

And I forget things, like to pick up the  farm share this week. Now I am forced to go grocery shopping to buy most of our veggies (we are still getting a good clip from the garden) until next week. And Let’s not mention the pup.. cause he is just as miserable, if not more then we are.

So to beat the heat, the mr and I found ourselves traveling around, river hopping. He fished, I stuck my feet in the water and read, did some watercoloring, or knitted. It was fantastic and probably saved a few of the lives of the people around me. 

We also took my little brother and sister up to the Bio dome in Montreal for the day, which was pretty cool. And of course we didn’t leave the city without making the manditory stop at Ikea, where I got myself a nice new green jar and my sister ate not 1, but 4!!!! hotdogs, and topped it off with a dessert frozen yogurt. It was the highlight of her summer. and maybe the lowlight as well. Now that I think of it, it makes sense why she was so  quite on the way home. She was in a Ikea hotdog coma.

So yeah, the heat and humidity have finally broke and we are now (hopefully) going to finish off the rest of summer with a delightfully non humid and hot, weather pattern.

And then it will be fall and  we will go APPLE PICKING!!!! 

Some stuff  on the internet this week.

–Is coffee a vitamin? I think so.

-Finally, a fantastic spork. 

-Vermont Farms Grow Some Surprising Fruits

-Pop Tart beer… Where will they stop?

–Do animals blow their noses? Good question. 

-Good to know. Is washing fruit effective in reducing exposure to pesticides?

–I think I want to be a Globe Maker

-This is my house in Sweden (Someday!?!)

-And my house in San Francisco(One more to my collection)

-An NPR Story About Homemade Vegetable Broth 

And pictures from the week.

THE LOVELY CRAZY

September 19, 2015 by maximios • Blog

My winter farm share is coming to an end this week. One more pick and then a three week stretch until the summer share starts… WHAT AM I GOING TO DO!!! Stock up as much as I can is what.

I have been strategic about the roots and veggies that I have chosen to bring home the past few weeks.(My farm lets you pick what you want)  I know what I can buy at the store, things like carrots and potatoes, so I have been passing those up, but the roots like beets and celeriac… I have been bringing home baskets of those and hoarding them in the fridge and basement in preparation for the laps in farm fresh food and knowing that if I want to by these at the store it s going to coast me a million dollars  a pound. (a for real million dollars)

Yup, lots of roots around here, especially celeriac root which is fantastic. I am kind of obsessed with celeriac, with its fibrous, knobby exterior, soft but almost meaty texture inside, and a flavor that  is close to celery but so much better.  I don’t know why it has taken me so long to do a posting featuring this amazing root vegetable  (I eat it almost every day)

So here, an amazingly tasty, hearty but not heavy, celeriac recipe.  Perfect for spring and the change into summer…. Mustard roasted celeriac with an fanatic split peas gravy that will have you licking you bowl clean.

 The stuff….For the split pea gravy we have a carrot, a parsnip and a large onion chopped into small chunks.  Salt, thyme, a bay leaf and of course the split peas. Then there is the celeriac root* sliced into 1/2 inch thick rounds and some plain old yellow mustard .

*Note. I don’t peel my celeriac root. I really enjoy the fibrous exterior but realize that some don’t(The mister does not like it) so peel it if you want. 

Toss the chopped parsnip, carrot, onion and the spices into a pot on medium heat and let veggies sweat a few minutes until tender.  Add in the split peas and enough water to cover everything.  Turn pot on high and bring to a boil, then cover and turn to low. Make sure to give the pot a good stir ever few minutes and add more water if needed 

While the gravy is cooking,  take the celeriac rounds and brush each side with yellow mustard, sprinkle with pepper, and place on a baking sheet. Stick into the oven to roast for about 25 minutes, flipping the rounds after about 10 minutes.

Once the peas have soften, remove the bay leaf and puree until smooth and oh so creamy. Taste and add more salt and pepper if needed. If you find that the gravy seems to thick, just add in more water until it’s the consistency that you want. The gravy is made, the celeriac is roasted… now we are ready to eat!! Stick the celeriac on a plate and dump good amount of that gravy right on top. Feel free to add a bed of spinach, or a grain or anything you want, because why not, and also some chopped tomatoes for a little acid and prettiness.

Serve with the fanciest knife and fork you can find. Extra yellow mustard and sriracha sauce are great condiments to have close by.

Happy Tuesday!

-C

  • 2 medium celeriac roots
  • 6 tablespoons mustard
  • 1 large carrot
  • 1 medium parsnip
  • 1 large yellow onion
  • 2/3 cup split peas
  • 2-3 cups water 
  • 1 bay leaf
  • 2 teaspoons thyme or italian spice mix
  • salt and pepper
  • spinach (optional)
  • diced tomatoes(optional)

Preheat oven to 400 degrees

Small dice the carrot, parsnip and onion and throw into a large pot. Spinkle with salt and pepper, add in the thyme and bay leaf and add a splash of water. Stick on stove on medium heat and stir. Let cook until the veggies become soft and fragrant. Now add in the split peas and 2 cups of water. Bring to a boil then cover and turn heat down to medium low. Let cook until the split peas become tender (about 25 minutes) string on occasion and adding more water if the peas are not completely summered while cooking.

Once the peas are tender, let cool for a few minutes, remove bay leaf, and either dump into a blender or blend with an immersion blender until nice and creamy. If gravy seems to thick, add in more water. 

Scrub or peel celeriac roots and slice them into 1/2 inch think rounds. Place on a baking sheet and brush mustard on both sides and spindle with pepper. Stick into oven for about 10 minutes, flip, then back into the oven for another 15 or so minutes, or unit the celeriac is tender.

When the celeriac is done remove from oven and  stick a few rounds on a bed of spinach (or not, or any kind of grain or green you like) Top with a hearty helping of the gravy and toss on some chopped up tomatoes.

Eat with at knife and fork like a fancy person.

THE LOVELY CRAZY

September 19, 2015 by maximios • Blog

 All I want to do is make everything into hearts and turn everything pink…Is that a problem?

I’m going to admit it, I am one of those girls that love Valentines day! And no, I don’t love it for the flowers (although I do love flowers..but never roses..yuk) No, I don’t want a box of candy or the silly store-bought cards. I don’t want to get all gused up and go out to dinner, and I definitely would be pissed if the mister bought me any jewelry. What I love is a day of spending time with my lover. We always take the day to do something special together, and for each other, and to be happy……and there is always hearts involved. I love hearts. 

 I want to spread that loving love love feeling because no matter what your love situation is during this holiday..we should all be happy and spread love to each other and to ourselves… And what better way to spread happy and love then with a pretty heart shaped baked good?  Chocolate because almost everyone is into chocolate. Coconut because I can’t stop eating whipped coconut cream and pink coconut sprinkle because that’s what make me happy. (I am a little obsessed with sprinkling things) These little hand-held pies of love are  really easy to make and always a big hit, especially with the little ones.(I am thinking they are perfect for a Valentines Day school party)  And yes, they are vegan so you can share with all your vegan friends! 

So in the spirit of the coming Valentines Day holiday….Lets make WHOOPIE!!!! (pies)

 Flour, baking soda and powder, salt  and cocoa powder. Soy milk with  vinegar. Vanilla, coconut oil, and chia seeds jelling. Brown and white sugar…. you know whoopie stuff.

The dry in one bowl… sugar and all the wet in another. 

All the whoopie stuff mixed together and scooped into a large zip top bag. So fancy with my bag…a real pro here!

Snip the tip of the bag, do a little squeeze test, and have at it. squeeze hearts onto a lightly oiled baking sheet or use a piece of parchment paper.  

You might get a little  frustrated if you are trying for perfect. I was for the first two batches,  but once I stopped trying to hard, I really got into how cool some of the hearts came out. Embrace the funky lop -sided hearts, because any heart is a good heart.So lovely. Shadow hearts while the whoopie hearts cool.

Whoopies all paired up

Stuffed with a generous dollop of whipped coconut cream ( a cold can of coconut cream whipped with a splash of vanilla and a tad bit of sweetener)  and sprinkled with my home-made beet dyed coconut sprinkles…..

Are you happy now? Because I know that I couldn’t stop smiling when I was making these… they are just to cute!

A couple bits of advice… Try to assemble before serving.. I was trying to put them together  while a punch of kids were trying to eat them. Things got a little messy and sprinkles ended up everywhere. Also, The coconut cream should stay fairly cold, so my suggestion is to make the hearts and fill only when you are going to serve them. Or if you want to make far in advanced, cover and refrigerate to keep from coconut cream from melting….But other than that…

Have fun making Whoppies!

-C

Coconut filled Chocolate Heart Whoopie Pies

Ingredients

  • 1 1/3 cups all-purpose flour
  • 2/3 cups cocoa powder
  • 1 teaspoon baking soda
  • 1 teaspoon baking powder
  • 1 tsp salt
  • 3/4 cup  soy milk or milk of choice
  • 1 Tablespoon  apple cider vinegar
  • 2 Chia eggs ( 2 tablespoons seed mixed with 6 tablespoons warm water)
  • 1/3 cup coconut oil
  • 1/2 cup  brown sugar
  • 1/2 cup white sugar
  • 1 teaspoon vanilla extract

Preheat oven to 375

To start, make chia eggs( chia seeds in water) and add the vinegar to the milk. Let both sit for 5 minutes.

In a bowl, whisk together flour, cocoa powder, baking soda,baking powder, and salt. 

In a large bowl, mix together chia eggs, sugars, and coconut oil. Add in dry ingredients and mix while slowly adding in the milk and vinegar mixture until fully combined.

Scoop Mixture into a large ziplock bag or piping bag. Clip tip and gently squeeze out heart shapes onto a lightly oiled or parchment lined cookie sheet. Bake each batch for 8-11 minutes, or until a toothpick come out clean.

Let hearts cool completely on a wire rack. Pair up like sized hearts and fill with desired amount of *coconut cream. If your feeling festive, dust sides and or tops of cake with sprinkles

* To make coconut cream, refrigerate a can or coconut milk or coconut cream for at least 4 hours. Open can, drain liquid and place the  remaining coconut cream in a large cold bowl. Beat with a splash of vanilla and 2 tablespoons of the sweetener of your choice. …. (careful because this stuff is super addictive)

Now share.. and watch how happy everyone is when they receive a heart shaped whoopie pie!! That’s love!

Follow my blog with Bloglovin

THE LOVELY CRAZY

September 19, 2015 by maximios • Blog

Guess what guys ….I got myself a sick vintage waffle/ griddle iron. I couldn’t be more thrilled!!! I found this thing at the local recycled goods store the other day, along with a very beautiful old white pyrex mixing bowl. It was one of my best thrift store scores! (Checking out the inventory and the condition of all the old things that day, I would say an old lady had just died and all her perfectly keep, mint condition kitchen stuff had just been donated.  But it’s cool, cause I get the feeling that she was at least 90, with a big loving family, and was happy until the day she died. And I am sure she would be pleased that I have taken over the waffle maker. Thanks old lady!)

 And now I am pretty sure that  everything I make for the next week will be cooked on said waffle/griddle. I am serious, I already have a list of things to try and cook on it; cookies, biscuits, granola bars, potatoes, fruit, some type of pasta situations…. the list of possibilities is endless and I bet that at least 1/2 of these things will be totally awesome and amazing.

But first thing first. I need to make dinner.

So waffles for dinner!! 

Note. These waffles are completely 100% fantastic for any meal you want to make them for. They consist of nothing more then beans, a shit ton of veggies, and just a bit of cornmeal. But don’t let that fool you because they are super packed full of so much flavor, have a really soft tender inside, with a nice crispy outside and are so super pretty. They are wonderful! The stuff. First, we got a big old pile of shredded up veggies which include; carrot, beet, sweet potato, onion, parsnip, celeriac, and a little bit of kale.  A we got a bowl of rinsed and strained white beans, a little bit of cornmeal and salt, pepper, and garlic powder. 

The makings of something amazing!Before you do anything. get your waffle iron out and preheat it. 

While thats going on, take you beans,  add 3/4 cup water and puree until smooth with whatever blending device want to like to use. (I used my hand blender…less to clean)Now collect all the shredded veggies and dump into a big bowl with the bean puree, the spices and the cornmeal. Mix until combined. The batter should be thick, but not dry. If its seems to wet, add more corn meal, or too dry, add a little more water.

Note how my batter turned a magical pink… I love beets, they make everything pretty! And check out that bowl!When your waffle iron is preheated, oil it if needed (if your not sure, add a little oil just to really make sure your waffles don’t stick) and take appropriate size spoonfuls of the batter and stick on iron. Close it and wait…..My iron has a little light that turns on when the waffles are done cooking, so I waited patiently (ok iI did open it a few time) until light tuned on and removed the perfectly cooked waffles.

Did I mention how awesome my new/old vintage iron is?

SO AWESOME!!

I made a little gaucamole and gave the mister and little bowl of plain Greek yogurt with lemon juice, but feel free to top, drizzle, or dump whatever you want onto these beauties… 

Happy waffle Wednesday!!!

-C

Veggie Bean Wonder Waffles

Makes 8-10 waffles (in my iron) feeds 2-3 peeps

  • 1 small carrot shredded
  • 1 small parsnip shredded
  • 1/2 a small celeriac root
  • 1 small beet shredded
  • 2 kale leaves chopped into tiny bits
  • 1/2 an onion, shredded
  • 1/2 a small sweet potato shredded
  • 1/2 cup cornmeal
  • 2 cups(or 1 can) cooked, rinsed and strained white beans
  • 2 teaspoons garlic powder
  • teaspoon each salt and pepper
  • oil for iron(if needed)

Note on veggies… I used what I had in the fridge and shredded, it came to about 3 cups. If you don’t have these specific veggies or only want to use a few.. go for it. Just make sure to have 3 cups of whatever veggies you use.

Take you beans and blend them up with whatever device you would like to use. Once creamy, add to a bowl with the rest of the ingredients. Stir until combined.

Once the waffle iron is preheated, oil it( if needed) and place the recommended amount of batter right on it there. Close and cook until golden brown and waffly.

Serve on a plate with topping of your choice, A few suggestions.. Guacamole, salsa, hummus, mustard, greek yogurt… anything that tastes good to you.

Eat as breakfast, lunch or dinner…

Fork into face

My winter farm share is coming to an end this week. One more pick and then a three week stretch until the summer share starts… WHAT AM I GOING TO DO!!! Stock up as much as I can is what.

I have been strategic about the roots and veggies that I have chosen to bring home the past few weeks.(My farm lets you pick what you want)  I know what I can buy at the store, things like carrots and potatoes, so I have been passing those up, but the roots like beets and celeriac… I have been bringing home baskets of those and hoarding them in the fridge and basement in preparation for the laps in farm fresh food and knowing that if I want to by these at the store it s going to coast me a million dollars  a pound. (a for real million dollars)

Yup, lots of roots around here, especially celeriac root which is fantastic. I am kind of obsessed with celeriac, with its fibrous, knobby exterior, soft but almost meaty texture inside, and a flavor that  is close to celery but so much better.  I don’t know why it has taken me so long to do a posting featuring this amazing root vegetable  (I eat it almost every day)

So here, an amazingly tasty, hearty but not heavy, celeriac recipe.  Perfect for spring and the change into summer…. Mustard roasted celeriac with an fanatic split peas gravy that will have you licking you bowl clean.

 The stuff….For the split pea gravy we have a carrot, a parsnip and a large onion chopped into small chunks.  Salt, thyme, a bay leaf and of course the split peas. Then there is the celeriac root* sliced into 1/2 inch thick rounds and some plain old yellow mustard .

*Note. I don’t peel my celeriac root. I really enjoy the fibrous exterior but realize that some don’t(The mister does not like it) so peel it if you want. 

Toss the chopped parsnip, carrot, onion and the spices into a pot on medium heat and let veggies sweat a few minutes until tender.  Add in the split peas and enough water to cover everything.  Turn pot on high and bring to a boil, then cover and turn to low. Make sure to give the pot a good stir ever few minutes and add more water if needed 

While the gravy is cooking,  take the celeriac rounds and brush each side with yellow mustard, sprinkle with pepper, and place on a baking sheet. Stick into the oven to roast for about 25 minutes, flipping the rounds after about 10 minutes.

Once the peas have soften, remove the bay leaf and puree until smooth and oh so creamy. Taste and add more salt and pepper if needed. If you find that the gravy seems to thick, just add in more water until it’s the consistency that you want. The gravy is made, the celeriac is roasted… now we are ready to eat!! Stick the celeriac on a plate and dump good amount of that gravy right on top. Feel free to add a bed of spinach, or a grain or anything you want, because why not, and also some chopped tomatoes for a little acid and prettiness.

Serve with the fanciest knife and fork you can find. Extra yellow mustard and sriracha sauce are great condiments to have close by.

Happy Tuesday!

-C

Mustard Roasted Celeriac with Split Pea Gravy

  • 2 medium celeriac roots
  • 6 tablespoons mustard
  • 1 large carrot
  • 1 medium parsnip
  • 1 large yellow onion
  • 2/3 cup split peas
  • 2-3 cups water 
  • 1 bay leaf
  • 2 teaspoons thyme or italian spice mix
  • salt and pepper
  • spinach (optional)
  • diced tomatoes(optional)

Preheat oven to 400 degrees

Small dice the carrot, parsnip and onion and throw into a large pot. Spinkle with salt and pepper, add in the thyme and bay leaf and add a splash of water. Stick on stove on medium heat and stir. Let cook until the veggies become soft and fragrant. Now add in the split peas and 2 cups of water. Bring to a boil then cover and turn heat down to medium low. Let cook until the split peas become tender (about 25 minutes) string on occasion and adding more water if the peas are not completely summered while cooking.

Once the peas are tender, let cool for a few minutes, remove bay leaf, and either dump into a blender or blend with an immersion blender until nice and creamy. If gravy seems to thick, add in more water. 

Scrub or peel celeriac roots and slice them into 1/2 inch think rounds. Place on a baking sheet and brush mustard on both sides and spindle with pepper. Stick into oven for about 10 minutes, flip, then back into the oven for another 15 or so minutes, or unit the celeriac is tender.

When the celeriac is done remove from oven and  stick a few rounds on a bed of spinach (or not, or any kind of grain or green you like) Top with a hearty helping of the gravy and toss on some chopped up tomatoes.

Eat with at knife and fork like a fancy person.


Because I love beets, I love celeriac and I love to pickle things…. And I love hearts. And Valentines Day is just around the corner so I though it appropriate to share these little darlings with you because even if you are not a fan of pickled beets or celeriac, you have to admit that these are just the cutest pickles you have ever seen. I have made a batch, sitting in the fridge, awaiting some sweet little dinner date that me and the mister will have come Valentines day. Or not, we might just eat them all before hand… because everyday is like Valentines day for us! (blah, barf, but awe, we are so cute!)

This is my basic pickling recipe….I figured you will want to pickle everything and anything once you realize (if you haven’t already) how amazing pickled everything is! And how easy it is to do it yourself.

My Pickling method……

  1. Choose the jar that the pickles will live in
  2. Prepare and pack the stuff  that is going to be pickled into the jar… leave about and inch of head space
  3. Fill the jar to the top with a half water and half vinegar solution (I usually use apple cider vinegar because I think it adds a bit of sweetness.. I don’t like to pickle with sugar)
  4. If going for a crispy pickle (like green beans or crunchy carrots)…. strain liquid into a pot with a teaspoon of salt per cup of liquid and any spices* that you want to use and bring to a boil  Add back to jar
  5. If going for a more tender pickle (like beets or celeriac), dump the liquid and the veggies into a pot with a teaspoon of salt per cup of liquid and any spices* you want to use. Bring to a boil for a few minutes, then remove and replace back into jar.
  6. Place lid and stick in fridge for at least a day….(I alway cheat and end up taking a bite within the first few hours) The flavor only gets better after being in the fridge for a couple of days.

*You can spice your pickles anyway you see fit…. I like to use peppercorns, garlic, mustard seeds, celery seeds red pepper flakes. Or for a little sweeter and more fragrant pickle, cinnamon stick, cardamom pods or star anise…the possibilities are endless.

Pickles are usually good for about a month, but I have never been able to keep them that long!

A little about these specific pickles……

I used one medium celeriac root, and 2 small beets. Sliced about a 1/4 inch thick and then used a cookie cutter to make the hearts.  The chosen vinegar was apple cider, and yeah ,you must pickle both the inner and outer hearts….don’t waste the outer heart! And the spices I used were black mustard seed and peppercorns. 

And they be amazing!!!!

Have a Fantastic Weekend!! Hopefully full of  warm weather, fluffy clouds, and lots of pickles!

-C


THE LOVELY CRAZY

September 19, 2015 by maximios • Blog

Before we left for the weekend, I was was trying my hardest to empty the fridge out of all food with the intention of leaning it empty so I could leave it open to defrost while were were gone. Unfortunately I was not able to make it happen. What I did make happen was emptying it almost completely so that when we got home, we had pretty much no food in the house, except for a few things that probably should be eaten.  Plus one of the last things that I want to do after sitting in a car for 6 hours is go to the grocery store, or anywhere for that matter, so I was determined to make with what wet had in the fridge:

  • Carrots
  • half of a gigantic kohlrabi
  • soy milk
  • iced tea
  • bananas that needed to be frozen
  • strawberries

Perfect!  A few carrots and half of a gigantic kohlrabi.. plus at the hotel we were staying at, there were fruit bowls in he lobby full apples. Every time I went past the apples (which was a lot) I grab one or two, so I have a few apples (I actually have a lot of apples now). All the things I need for a super awesome salad slaw. Apples with their  nice sweet crispiness and kohlrabi with its cabbagey, crunchy earthiness, tossed together with some vinegar, some toasted walnuts and some carrots, I mean, so freaking good. And to make it a bit more of a meal, I made some lentils to go with it. But the best part was there was no need to leave the house!!

     The stuff… A huge hunk of a bigger then my head kohlrabi (or 2 normal bulbs). A carrot, an apple, toasted walnuts, red wine vinegar, and some salt.

Pretty simple stuff going on here. Just peel and julienne the kohlrabi, carrot and apple. (no need to peel the carrot or apple unless you want too) and stick it all into a bowl.  I used my mandolin, which is one of my favorite kitchen tools ever, but if you don’t have one, a box grater works too.Sprinkle with salt and a good glug glug of red wine vinegar. Chop up the walnuts (some big chunks and some very small pieces makes for good eating), toss it all together and, well that’s it. But wait…. let it sit for a few minutes before serving to really let the flavors draw out.And there we have it. Super fast, full of flavors and crunchy texture. A salad slaw after my own heart.

Serve it as it or add to a bed of greens, rice, or lentils… and make sure to save at least as little… cause its an awesome little pre-bed snack.

Happy Week!!

-C

  • 2 medium sized Kohlrabis 
  • 1 medium apple   
  • 1 small carrot
  • 1/2 cup toasted walnuts
  • red wine vinegar
  • salt

In a large bowl, julienne kohlrabi (after peeled) apple and carrot. Sprinkle with salt, add in vinegar. Rough chop walnuts and toss the whole bit together. Let sit for at least 10 minutes, if not longer before serving. (A great salad to make ahead of time)

Eat as is, or toss onto a bed of greens, plate of rice or a bowl of lentils.

Any left overs only end up tasting better the next day.

THE LOVELY CRAZY

September 19, 2015 by maximios • Blog

My oldest sister graduated from nursing school this past weekend (wahoo!) and the friends and family had a party for her. I made these cupcakes for the party.But really, I made them just for her.

See, she is not a lady big on sweets. When I asked her what kind of dessert she wanted me to make her, she said if I could make a cake out of french fries, well that would be great. (I was close to making a french fry cake) But instead, I went a slightly different route and made cakes out of thing that I know she loves and can eat. Jalapeños because she is obsessed. Strawberries cause she likes her some fruit and are in season and I think, go with everything. Avocado frosting because she loves avocado and cornmeal because it makes the cakes a tad less sweet and a little more hearty. I also used GF flour cause she is GF. 

 Wow, I am the best sister. And here are a few more reasons why..

  • I went to the party (I am not a big party person.. But I did have fun and her friends were cool)
  • I changed into a clean outfit for her party (I really didn’t want to)
  • I stayed out past my 6 (I made it until 7.. what!!!)
  • I make her food
  • I am awesome (I think so anyway)

So yeah. The cupcakes. The Nurse lady totally got down with these. I am pretty sure that I heard the words, amazing and oh my good,  while they were being noshed on. The day after,  the nurse lady told me that they were the talk of the party (bullshit, but thanks)

Whatever, I was just glad she liked them.

The stuff. For the cupcakes; cornmeal and some pre blended gluten free flour. Sugar, salt, baking powder and baking soda. Soy milk (use whatever milk you want) oil, apple cider vinegar, strawberries and a couple jalapeños . For the icing; an avocado, a lemon, and some powdered sugar.

This is not a hard batter to work, no need for a mixer or to cream anything, it can all be done with a wooden spoon.

 First, preheat the oven.

Then trim and tiny dice the strawberries, remove seeds and tiny dice the jalapeños and toss it all into a bowl. Sprinkle with a bit of sugar.

In a large mixing bowl, whisk together the flour, cornmeal, baking soda and powder, salt and sugar. Then add in the rest of the stuff. Stir together until combined.Now fold in the chopped berries and jalapeños and scoop batter into a well greased (or lined) cupcake tin.

Stick into oven to bake…

Check cakes after 20 minutes and remove from oven when they are golden brown and a tester comes out clean when poked.

Remove from pan and place on a wire rake to cool. 

While the cakes are a coolin, add avocado to a blender with the zest of half a lemon and the juice of that half of lemon and blend smooth.  Add in the sugar and blend.  

The icing should be thick, but spreadable. Using your judgement and you taste buds, add more sugar  if the icing seems to thin or lemon juice if it seems to dry.

And once the cakes are cooled, spread with icing and top with sliced strawberries.

Your welcome Nurse Shannon!

Happy Friday!!!

-C

Jalapeño Strawberry Cornmeal Cupcakes with Avocado Frosting

makes 24 cupcakes

  • 1 1/2 cup gluten-free flour blend (if you don’t need or want it gluten-free, just use all-purpose flour)
  • 1 1/2 cups cornmeal
  • 3/4 cup white sugar
  • 1 teaspoon salt
  • 2 teaspoons baking soda
  • 2 teaspoons baking powder
  • 1 tablespoon apple cider vinegar
  • 2 cups nut or plant milk
  • 1/2 cup oil
  • 1 1/2 cups diced fresh strawberries
  • 2 jalapeños

For the frosting

  • 1 whole avocado
  • 1/2 lemon (zest and juice)
  • 2-2 1/2 cups powdered sugar

Pre heat oven to 350

Wash, trim and dice strawberries into little pieces and toss into a bowl. Remove stem and seeds from jalepenos and dice into small pieces.. add to bowl. Sprinkle with a little sugar.

In a large bowl, combine flour, cornmeal, baking soda, powder, salt, and sugar and whisk together. Now add in the oil, milk, and vinegar and mix together with a wood spoon until combined. Lastly, fold in the strawberries and jalapeños.

Scoop mixture into well greased (or lined) cupcake tin and stick into oven. Bake for about 20-25 minutes, or until cakes are gold brown and a tester comes out clean. Remove from oven, remove form tin, and sick on a wire rack to cool. 

While the cakes are cooling, take the avocado, sugar, and the zest and juice of half a lemon and blend with your choice of blending drive until smooth.  The icing should be thick enough to If the icing is to runny, add more sugar, or to thick, a little more lemon juice.

Now Ice cupcakes and top with sliced strawberries.

Eat for breakfast, lunch, dinner or dessert.

No utensils required, just some teeth. 

«‹ 172 173 174 175›»

Recent Posts

  • Super Cute DIY Heart Pins — STEM+NODE CERAMICS
  • Pineapple Jalapeño Hot Sauce — STEM+NODE CERAMICS
  • Mulled Licorice Spice Tea — STEM+NODE CERAMICS
  • Spring Cleaning the Refrigerator and Use it up Soup — STEM+NODE CERAMICS
  • Cinnamon Star Bread — STEM+NODE CERAMICS
@lonelyplanet
STUDIO ESCAPE Creative Getaways Quiet stays and bright worktables for a weekend reset. See Places
MAKER ROUTE World Nomads Travel-ready planning and practical coverage for makers. Read Tips

Flere spillere vælger en velkomstbonus uden indbetaling for at prøve casinoet gratis.