First day of Spring!! Well kind of I guess. I think it actually starts at like 6:20 tonight, when the temperature is going to dip back done to 10.(Spring my ass) I don’t know about you people out there but here in Vermont, we are really hanging on to winter. I have to keep telling myself…” It will be warmer soon and you’ll be looking forward to this weather in a few months.. so stop bitching!” I give myself good pep talks.
Anyway, last week at the farm share pick up, there was a nice little surprise. We got a few pounds of some sweet locally grown and milled whole wheat flour. There was a little sign with the information about the wheat and where it came from, but in my haste of gathering all of my other veggies, I failed to take notes and forgot the name of the farm that it came from. But I do know that my farm traded some celeriac for the wheat. I was really excited because I am really into the idea of using locally grown grains and I don’t know, it just made me really happy, especially because it was a trade. Food framing and local sharing is stuff that makes me happy.
I wanted to make something to kind of showcase the hearty, nutty flavor of the wheat and I also wanted to make something that my mister would eat for breakfast. Well what better way to do that then with muffins! Banana coconut whole wheat (that just happen to be vegan) Hearty, fruity, and smells like the word lovely and the color yellow. A few to eat and a few to share. Hanging at home, running away or getting ready for a day of spring cleaning….This is a great weekend to make muffins!
The stuff… Light, nutty local whole wheat flour, ripe oh ripe bananas and coconut flakes are the stars in this muffin… But we need the other stuff too. Brown sugar, vanilla, coconut oil and a chia egg. Baking powder, baking soda, and last but not least, salt.
Yup, that sounds about right The salt, baking soda, and baking powder are whisked together. The banana and all the rest of the stuff are mixed up… Then mix the wet mixture into the dry. Stir until combined and then add in the coconut flakes,Scoop mixture into 12 lined muffin cups… A scoop like mine works very nicely. Don’t have one, well I recommend you get yourself one. Until then, use a spoon. Something I always do when baking any muffin is sprinkle the tops of each muffin with a bit of sugar or brown sugar. It melts and caramelizes and adds a sweet little crunch to the tops.
Now stick the muffins into the oven. Remove from oven when they look like this, nice and golden brown. Also good idea to check with a tester stuck into the middle. When it comes out clean, they are done.12 happy little muffins cooling on a rack, waiting to be eaten with you mouth.
Doesn’t the sight of pretty food make you happy, like sing a song happy? Muffins, whoa yah!! Friday yah yah!! Spring…What, Yah!! Yah…Yah Yah!!!
Terrible I know, but at least you were spared hearing my actual voice.
Have a great weekend. Do lots of springy stuff!
-C
2 Cups Whole Wheat Flour
4 Ripe bananas
1 Teaspoon Baking Soda
1/2 Teaspoon Baking Powder
1 teaspoon Salt
1 teaspoon Vanilla Extract
3/4 Cup Brown Sugar
1/3 cup melted Coconut Oil
1 Tablespoon Chia Seeds + 3 Tablespoons warm water
1/2 Cup Unsweetened Coconut Flakes
Preheat oven to 350
In a small bowl, mix 3 tablespoons warm water to the chia seeds and let sit for at least 5 minutes (10 is better) In a large bowl, peel and mash the bananas until they turn into a kind of chunky soupy puree. Add in brown sugar, chia seed mixture, vanilla extract, and the melted coconut oil (make sure it’s melted or it won’t incorporate into the mixture) Mix together. In another bowl, whisk together the flour, baking soda, baking powder and salt. Mix the wet mixture with the dry until combined then mix in the coconut flakes.
Line a 12 cup muffin tin and fill each cup about 3/4 the way up with batter. Sprinkle each muffin with brown sugar and place in oven on center rack. Bake for 25-30 minutes or until the tops 0f the muffins are golden brown and a tester inserted into the middle comes out clean.
Remove muffins from tin and let cool.
Serve as is or maybe with a smudge of coconut butter, or anything you want really.
With that being said, the nature of my soups change seasonally. My summertime soups are usually on the lighter side, made with the fresh bounty of the season, and spiced more on the light and floral side, opposed to the really deep and warm spices that I use all winter long,
This corn chowder is made just right. It had the perfect balance of hearty and creamy from the potatoes and use of pureed onion cream, but still light and refreshing from the sweet fresh corn and the lemony fresh thyme. It is for sure a great summertime soup (chowder) Even the Mr. was even really into it, and he claims he doesn’t like corn. (I say bullshit to that.. he eats corn all the time)
Now to chowder!
The Stuff. Some super fresh corn on the cob, a couple onions, a few chopped up potatoes and a chopped up carrot. Then we have a little oil, a lemon, dried thyme and salt and pepper.
To start, take an onion, chop it up, and toss into a large heavy pot with a little olive oil and a sprinkle of salt. Stick pot on stove on medium heat and cook until onions are soft and traslutcent. When the onions are done, remove and add to a blender or bowl. (if using a hand blender) Add in the juice of the lemon and blend it all up until nice a smooth.
You have now made a nice creamy cream that will help make the final product more, well more creamy without the use of cream (lets say cream on more time !) .Set aside.
When the pot is empty again, add in the rest of the stuff, including the cobs of the corn, (they hold a butt load of flavor) the dried thyme, and salt and pepper. Place on stove and add enough water to completely submerge the veggies. Keep pot on a medium heat, add a lid, and stir ever once in a while. Cook until the potatoes are nice and tender. (when the potatoes are done, so is everything else)
Now that everything is all cooked up, remove the cobs and stir in the onion puree.
Now with a hand blender, blend up until the chowder is thick and smooth, but still nice and chunky. (If you are working with a blender, just remove about half of the soup and blend up, then dump back in) The optimal chunkiness is up to you , so blend, check the chunk, then blend a little more if needed. If you feel that the soup is to thick, add in a little more water, or to thin, just cook down o little longer.
Once you like the constituency,season to taste with salt and pepper and place pot back on a simmer until you are ready to serve.
And thats how we make corn chowder
It tastes best serves in the daintiest of the cups, sprinkled heavily with cracked pepper, and with a side of some cracker situation (Saltines would be best, but sometime there are only triscits in the house)
Summertime is for chowder!
HAPPY Humpday Wednesday!!!
-C
Makes a pot big enough for 4-6 nice decent sized servings
2 fresh ears of corn
3 medium (tennis ball sized) red or white potatoes
2 white or yellow onions
1 carrot
Juice of a lemon
1 tablespoon olive oil
1 1/2 tablespoons dried thyme
salt and pepper
To start, peel and dice one whole onion and toss into pot with olive oil and stick on medium heat. Cook onions until translucent and fragrant. Remove from pot and add cooked onions and the lemon juice to a blender and puree until smooth and set aside.
While you are cooking down the onions, dice up the carrot and onion, remove the corn kernels from the cob, and chop up the potatoes. Once you have removed the first batch of onions, toss in corn, onions, carrot, potatoes, and the dried thyme. Stir around in the pot on medium heat for a few minutes just to warm up the spices. Add the cobs into the pot and fill with enough water to cover the stuff in the pot. Place back on medium heat with a lid and cook for another 20ish minutes, or until potatoes are super tender and almost falling apart.
Remove cobs from pot and add in the onion puree. Now either remove about half the soup and place in the bender and blend up til smooth, or use a hand blender and blend up chowder until you get your desired chunkiness. If you think the chowder seems to thick, add in more water, or to thin, just cook down a little longer on the stove.
When ready to eat, ladle chowder into a cup or bowl and add lots of fresh cracked pepper.
No matter what is going on in my day, seeing a blue sky like this puts a smile on my face….To bad that smile turned to ice and my face froze in place. Because for some reason, winter around here now means below zero all the time. I mean, I love winter, but I am not going to lie… I wouldn’t mind if the wind would stop blowing and we had a couple of days of above zero weather.. and maybe a good foot of snow. I guess I’ll just have to be patient, cause its bound to happen. I mean, we live in Vermont, and if nothing else, we get weather.
Anyways.. another week full of stuff that fills. I am a little taken aback that its already February… when was it January? Time just keeps going by fast and faster, (especially when I get cabin fever) and I think, “What have I done in the past year?” Well, I have done a lot. I was just looking through pictures from a year ago and found some of our tiny home in working progress. Not to many people can remodel a five unit house and a meat locker to live in, within a year.. by ourselves. (ourselves being Nick and I)..So yeah, that made me feel pretty freaking awesome and accomplished. (I needed to remember that because I haven’t been feeling it) But now I am feeling inspired and am looking forward to some new projects and fun things to come! (hopefully getting my pottery studio up and running, maybe another house remodel and lots of traveling!!…. take that winter blues!)
Anyway.. here are a few little bits from my week that made me happy.
The mister called these snow mounds goosebumps… I think that is exactly what they are
The only warm day this week. (20..woo whoo!) Took the little out for a sled ride. She spent the entire time dragging her hands in the fresh snow.
And oh how I cannot handle how freaking cute she is!! Plus, a shout out to my brother in law….MADLOVE!
Fresh snow..Even though it was -15, I had to stop and take this picture. The colors were amazing
Cabbage at the farm share pick up! Love ICF!!!
89 cents a pound for fresh organic cranberries. Score!! Made these Oatmeal fresh cranberry coconut chocolate chip cookies with them. Big hit.
This picture was taken exactly a year ago…..The mister and I were finally putting in the bathroom of our tiny little home…. And look at that awesome sink! (another amazing salvage yard find) If you ever need or want to remodel a bathroom, I suggest using a old cast iron utility sink. So practical, so functional, so pretty.….it makes me happy everyday!
Happy Sunday!
Happy February!
And if you are into it….
Happy Football Super bowl Game and or party! ( If you need any awesome fast party recipes, I have bunch, just check out the recipes page!)
First day of Spring!! Well kind of I guess. I think it actually starts at like 6:20 tonight, when the temperature is going to dip back done to 10.(Spring my ass) I don’t know about you people out there but here in Vermont, we are really hanging on to winter. I have to keep telling myself…” It will be warmer soon and you’ll be looking forward to this weather in a few months.. so stop bitching!” I give myself good pep talks.
Anyway, last week at the farm share pick up, there was a nice little surprise. We got a few pounds of some sweet locally grown and milled whole wheat flour. There was a little sign with the information about the wheat and where it came from, but in my haste of gathering all of my other veggies, I failed to take notes and forgot the name of the farm that it came from. But I do know that my farm traded some celeriac for the wheat. I was really excited because I am really into the idea of using locally grown grains and I don’t know, it just made me really happy, especially because it was a trade. Food framing and local sharing is stuff that makes me happy.
I wanted to make something to kind of showcase the hearty, nutty flavor of the wheat and I also wanted to make something that my mister would eat for breakfast. Well what better way to do that then with muffins! Banana coconut whole wheat (that just happen to be vegan) Hearty, fruity, and smells like the word lovely and the color yellow. A few to eat and a few to share. Hanging at home, running away or getting ready for a day of spring cleaning….This is a great weekend to make muffins!
The stuff… Light, nutty local whole wheat flour, ripe oh ripe bananas and coconut flakes are the stars in this muffin… But we need the other stuff too. Brown sugar, vanilla, coconut oil and a chia egg. Baking powder, baking soda, and last but not least, salt.
Yup, that sounds about right The salt, baking soda, and baking powder are whisked together. The banana and all the rest of the stuff are mixed up… Then mix the wet mixture into the dry. Stir until combined and then add in the coconut flakes,Scoop mixture into 12 lined muffin cups… A scoop like mine works very nicely. Don’t have one, well I recommend you get yourself one. Until then, use a spoon. Something I always do when baking any muffin is sprinkle the tops of each muffin with a bit of sugar or brown sugar. It melts and caramelizes and adds a sweet little crunch to the tops.
Now stick the muffins into the oven. Remove from oven when they look like this, nice and golden brown. Also good idea to check with a tester stuck into the middle. When it comes out clean, they are done.12 happy little muffins cooling on a rack, waiting to be eaten with you mouth.
Doesn’t the sight of pretty food make you happy, like sing a song happy? Muffins, whoa yah!! Friday yah yah!! Spring…What, Yah!! Yah…Yah Yah!!!
Terrible I know, but at least you were spared hearing my actual voice.
Have a great weekend. Do lots of springy stuff!
-C
2 Cups Whole Wheat Flour
4 Ripe bananas
1 Teaspoon Baking Soda
1/2 Teaspoon Baking Powder
1 teaspoon Salt
1 teaspoon Vanilla Extract
3/4 Cup Brown Sugar
1/3 cup melted Coconut Oil
1 Tablespoon Chia Seeds + 3 Tablespoons warm water
1/2 Cup Unsweetened Coconut Flakes
Preheat oven to 350
In a small bowl, mix 3 tablespoons warm water to the chia seeds and let sit for at least 5 minutes (10 is better) In a large bowl, peel and mash the bananas until they turn into a kind of chunky soupy puree. Add in brown sugar, chia seed mixture, vanilla extract, and the melted coconut oil (make sure it’s melted or it won’t incorporate into the mixture) Mix together. In another bowl, whisk together the flour, baking soda, baking powder and salt. Mix the wet mixture with the dry until combined then mix in the coconut flakes.
Line a 12 cup muffin tin and fill each cup about 3/4 the way up with batter. Sprinkle each muffin with brown sugar and place in oven on center rack. Bake for 25-30 minutes or until the tops 0f the muffins are golden brown and a tester inserted into the middle comes out clean.
Remove muffins from tin and let cool.
Serve as is or maybe with a smudge of coconut butter, or anything you want really.
No need for fork, just use you mouth.
It hasn’t stopped snowing, the temperature is dropping fast (it’s getting to the point the dog doesn’t even want to be outside) and the mister is busy hand shoveling three long driveways. So I figured that in between all the laundry folding, plant watering , and all around sitting on my butt that I am doing INSIDE, that I would be so super nice and crank the stove up and make my love some cookies. I love making cookies, especially when I have chores to do. I think part of it is that cookies are baked in batches which breaks up the chores and gives a sort of rhythm to things. Plus everything is nice when the house smells like cookies. I was going to make chocolate chocolate chocolate cookies, but realized that I didn’t have cocoa powder, so I went with fresh cranberries (I just scored a pound of organic cranberries for 89 cents!) coconut flakes and chocolate chips. Plus I wanted to make them oatmeal because the mister likes oatmeal and oatmeal makes the cookies a little more hardy. (We need hardy when the temperature dips below zero) The verdict….. chewy, soft, slightly sweet oatmeal, bittersweet chocolate, nutty floral coconut, and the zing and pop of the fresh cranberries. He told me to hide them… hide so he will stop eating them….. because they be amazing!
The base of this cookie….We are using regular old fashion oats and flour. Salt, baking soda and baking powder. Vanilla, chia seeds in hot water, coconut oil white and brown sugar…. You know, all the cookie stuff. Then all the goodness.. Chocolate chips, coconut flakes, and fresh cranberries. Goodness. Oh yeah, and they are vegan…if that matters to you. Warm the coconut oil and mix with the white and brown sugars. Then add the chia seeds soaked in hot water. Stir until nice and silky smooth. In goes some more stuff. I just dumped all the dry right on in that bowl and mixed it up nice and nice. Chopped the fresh cranberries into chunks… One at a time…… Just kidding, I actually laid a cutting board on top of the cranberries, applied a little pressure and sliced through the cranberries.. Does that make sense? I hope so, because its is much easier and faster and the cranberries don’t all roll away. The chopped cranberries, coconut flakes and the chocolate chips go in to be mix all up. I used my hands to form the balls and gave each mound a little smoosh, but not completely flat. Then into a preheated 375 degree oven for about 13-15 minutes or until a nice golden brown. A cup of hot coffee and a plate of warm cookies… I am the nicest, right! (After his nice cookie rest I proceeded to do a little nagging, so the day evened out) So today is probably a great day for everyone to make cookies. It’s freezing out, its saturday and well, just cause. You might even be looking for a great recipe to make for that big party your going to. You should make these cookies. Have a Fantastic Weekend!!! -C
Preheat oven to 375 To start, take the chia seed and soak them in the 4 tablespoon hot water for a few minutes. Then in a large bowl, mix together the white and brown sugar with warmed coconut oil. Add in the gelled chia seeds and vanilla and stir until silky and combined. (the warm chia seeds will help everything mix together nicely) Now mix in all the dry. I start with the oats, dump on flour, toss in the baking powder and soda and salt. Mix until fully combines. If the dough seems to dry, add in another tablespoon or two of hot water. Chop the fresh cranberries into halves or smaller and dump them, the coconut and chocolate chips into the bowl of dough and mix. Using a scoop, spoons, or your hands, make little balls and place on a cookie sheet, giving each ball a little smoosh. Into the oven for 13-15 minutes or until golden brown. Remove and cool on rack. Eat a few and hide the rest for later.
All I want to do is make everything into hearts and turn everything pink…Is that a problem?
I’m going to admit it, I am one of those girls that love Valentines day! And no, I don’t love it for the flowers (although I do love flowers..but never roses..yuk) No, I don’t want a box of candy or the silly store-bought cards. I don’t want to get all gused up and go out to dinner, and I definitely would be pissed if the mister bought me any jewelry. What I love is a day of spending time with my lover. We always take the day to do something special together, and for each other, and to be happy……and there is always hearts involved. I love hearts.
I want to spread that loving love love feeling because no matter what your love situation is during this holiday..we should all be happy and spread love to each other and to ourselves… And what better way to spread happy and love then with a pretty heart shaped baked good? Chocolate because almost everyone is into chocolate. Coconut because I can’t stop eating whipped coconut cream and pink coconut sprinkle because that’s what make me happy. (I am a little obsessed with sprinkling things) These little hand-held pies of love are really easy to make and always a big hit, especially with the little ones.(I am thinking they are perfect for a Valentines Day school party) And yes, they are vegan so you can share with all your vegan friends!
So in the spirit of the coming Valentines Day holiday….Lets make WHOOPIE!!!! (pies)
Flour, baking soda and powder, salt and cocoa powder. Soy milk with vinegar. Vanilla, coconut oil, and chia seeds jelling. Brown and white sugar…. you know whoopie stuff.
The dry in one bowl… sugar and all the wet in another.
All the whoopie stuff mixed together and scooped into a large zip top bag. So fancy with my bag…a real pro here!
Snip the tip of the bag, do a little squeeze test, and have at it. squeeze hearts onto a lightly oiled baking sheet or use a piece of parchment paper.
You might get a little frustrated if you are trying for perfect. I was for the first two batches, but once I stopped trying to hard, I really got into how cool some of the hearts came out. Embrace the funky lop -sided hearts, because any heart is a good heart.So lovely. Shadow hearts while the whoopie hearts cool.
Whoopies all paired up
Stuffed with a generous dollop of whipped coconut cream ( a cold can of coconut cream whipped with a splash of vanilla and a tad bit of sweetener) and sprinkled with my home-made beet dyed coconut sprinkles…..
Are you happy now? Because I know that I couldn’t stop smiling when I was making these… they are just to cute!
A couple bits of advice… Try to assemble before serving.. I was trying to put them together while a punch of kids were trying to eat them. Things got a little messy and sprinkles ended up everywhere. Also, The coconut cream should stay fairly cold, so my suggestion is to make the hearts and fill only when you are going to serve them. Or if you want to make far in advanced, cover and refrigerate to keep from coconut cream from melting….But other than that…
To start, make chia eggs( chia seeds in water) and add the vinegar to the milk. Let both sit for 5 minutes.
In a bowl, whisk together flour, cocoa powder, baking soda,baking powder, and salt.
In a large bowl, mix together chia eggs, sugars, and coconut oil. Add in dry ingredients and mix while slowly adding in the milk and vinegar mixture until fully combined.
Scoop Mixture into a large ziplock bag or piping bag. Clip tip and gently squeeze out heart shapes onto a lightly oiled or parchment lined cookie sheet. Bake each batch for 8-11 minutes, or until a toothpick come out clean.
Let hearts cool completely on a wire rack. Pair up like sized hearts and fill with desired amount of *coconut cream. If your feeling festive, dust sides and or tops of cake with sprinkles
* To make coconut cream, refrigerate a can or coconut milk or coconut cream for at least 4 hours. Open can, drain liquid and place the remaining coconut cream in a large cold bowl. Beat with a splash of vanilla and 2 tablespoons of the sweetener of your choice. …. (careful because this stuff is super addictive)
Now share.. and watch how happy everyone is when they receive a heart shaped whoopie pie!! That’s love!
Yesterday The mister and I went for a walk, a long walk. I was wearing a sweater, a light jacket and I left the mittens and hat at home. There was sunshine, huge puddles and mud. Birds were chirping. It was amazing.
After our nice long walk, we got home and I needed to start dinner. It was a little later than I usually so I wanted fast and easy I usually always have pesto in my fridge (I had to make some, but it only takes 5 minutes) because when it’s in there, I can whip up a big awesome meal in the time it takes to boil some pasta or quinoa or smear on toast or toss with potatoes. It really can be used on everything and can be made out of just about anything. Kale and walnuts are just one of so many fantastic combos. And frozen ravioli is always in the freezer too. I used just plain cheese, but use whatever kind you like.
Together, pesto and ravioli, well that’s a quick, easy, and tasty meal, perfect for a spring evening, And yea, there will be left over pesto from this recipe… just stick it in the fridge or freezer….you will be glad you have it.
Pesto stuff. Kale, walnuts, parmesan cheese(nutritional yeast to keep it vegan), garlic, lemon, olive oil, and salt and pepper.
A few little pre steps before the blending.. Toast the walnuts. Just toss onto a dry skillet and stick on medium heat for about 5 minutes or until they start to become née and fragrant. Remove from skillet and add in a bit of water. Add in chopped or ripped kale and cover to let the kale tenderize, but only for about 2 minutes. (you want the kale to still be crispy and fresh tasting) Drain water and add kale, garlic, toasted walnuts, cheese and the juice of the lemon into a food processor. Turn on and slowly add in olive oil until you get to a nice paste, adding more oil to get to your desired consistency. Oh and don’t forget to salt and pepper to taste!
Straight up frozen ravioli goes onto an oiled baking sheet.(make sure that non are overlapping) Place into an oven at 400 degrees for about 15-18 minutes, flipping after 10. If you want to add mushroom and a few more walnuts, just toss them onto the ravioli when you are flipping over the ravioli.
When the ravioli is nice and brown and crispy, remove from oven and dump the ravioli and the mushrooms into a bowl. Add a big old scoop of the freshly made pesto and toss around.
Look at this… fresh, crunchy, light and happy. Kinda like a spring day.
I am the best lady, making the mister a pretty yummy dinner.
Have a great Tuesday!
-C
Kale Pesto and Baked Ravioli
4-5 cups chopped Kale
1/2 cup Parmesan Cheese ( Nutritional Yeast to make it vegan)
1/2 cup Walnuts
1/4-1/2 cup Olive Oil
4-5 Cloves Garlic
1 Lemon
Salt and Pepper
1 bag of frozen ravioli(use vegan or gluten-free if you want)
3-4 mushrooms
Note..There will be plenty of left over pesto… Just fridge or freeze it
Place walnuts in a skillet and toast on medium heat for about 3-5 minutes or until the nuts become fragrant. In the same skillet, add enough water to cover bottom and add in all the kale. Place a lid on it and let kale wilt on medium heat for about a minutes or 2, Take off heat. Add walnuts. garlic, cheese, salt and pepper, and juice of lemon to a food processor. Blend. Now add in the kale and blend, slowly adding olive oil until a thick paste forms. You can add as much oil as you want to make it as thick or thin as you like.
Preheat oven to 400
Place frozen ravioli on an oiled baking sheet, making sure none are overlapping. Place into oven for about 15-18 minutes, removing after 8 minutes to flip. When you take the ravioli out to flip, slice up the mushrooms and grab a few more walnuts and toss onto baking sheet with the ravioli. When the ravioli’s are nicely browned and toasty, remove (mushrooms and walnuts too) and place into bowl. Add a big scoop of pesto and toss to mix.
Serve and eat.. fork is optional.
Note..Add a thin layer to the top of any left over pesto to keep it fresh and from turning black
No matter what is going on in my day, seeing a blue sky like this puts a smile on my face….To bad that smile turned to ice and my face froze in place. Because for some reason, winter around here now means below zero all the time. I mean, I love winter, but I am not going to lie… I wouldn’t mind if the wind would stop blowing and we had a couple of days of above zero weather.. and maybe a good foot of snow. I guess I’ll just have to be patient, cause its bound to happen. I mean, we live in Vermont, and if nothing else, we get weather.
Anyways.. another week full of stuff that fills. I am a little taken aback that its already February… when was it January? Time just keeps going by fast and faster, (especially when I get cabin fever) and I think, “What have I done in the past year?” Well, I have done a lot. I was just looking through pictures from a year ago and found some of our tiny home in working progress. Not to many people can remodel a five unit house and a meat locker to live in, within a year.. by ourselves. (ourselves being Nick and I)..So yeah, that made me feel pretty freaking awesome and accomplished. (I needed to remember that because I haven’t been feeling it) But now I am feeling inspired and am looking forward to some new projects and fun things to come! (hopefully getting my pottery studio up and running, maybe another house remodel and lots of traveling!!…. take that winter blues!)
Anyway.. here are a few little bits from my week that made me happy.
The mister called these snow mounds goosebumps… I think that is exactly what they are
The only warm day this week. (20..woo whoo!) Took the little out for a sled ride. She spent the entire time dragging her hands in the fresh snow.
And oh how I cannot handle how freaking cute she is!! Plus, a shout out to my brother in law….MADLOVE!
Fresh snow..Even though it was -15, I had to stop and take this picture. The colors were amazing
Cabbage at the farm share pick up! Love ICF!!!
89 cents a pound for fresh organic cranberries. Score!! Made these Oatmeal fresh cranberry coconut chocolate chip cookies with them. Big hit.
This picture was taken exactly a year ago…..The mister and I were finally putting in the bathroom of our tiny little home…. And look at that awesome sink! (another amazing salvage yard find) If you ever need or want to remodel a bathroom, I suggest using a old cast iron utility sink. So practical, so functional, so pretty.….it makes me happy everyday!
Happy Sunday!
Happy February!
And if you are into it….
Happy Football Super bowl Game and or party! ( If you need any awesome fast party recipes, I have bunch, just check out the recipes page!)
It seems that everywhere I turn this week, there corn. So much so that its coming out of my ears…..get it.. ears! (yes I am that lame)
Yup, its now officially (but unofficially) summer and that means 2 things, well 3 things. First, we eat corn. Secondly, It’s hot out, and get so hot in our little tiny loft that having the oven on is like torture so I avoid it at all costs. And lastly, I seem to always have less time(or forget) to make dinner cause, you know, I am outside running around with my head cut off.
The solution to the last two…..Quesadillas.
I probably make the mister quesadillas at least 5 time a week. They are just so easy to make (takes about 8 minutes) are full of some kind of veggie situation and lots of cheese (which is the misters favorite food group). You can make one, for a quick lunch, or very easily make 10 to feed a few people for a easy dinner. (everyone likes a quesadilla!). And even though I cooked these particular ones inside, quesadillas are great made outside on the grill. They just make so much sense.
And so it goes.
Summertime + corn = Charred corn and kale quesadillas.
The Stuff. Freshy freshy corn on the cob. A few flour tortillas, a bunch of chopped kale and some shredded cheese. (I used pepper jack)
With a sharp knife, cut the corn off the cob. I find using a deep bowl works best to catch corn, and you could even invert another little bowl inside to rest the cob for easier cutting (I skipped extra bowl.. once less dish to wash)
While you are cutting the corn, preheat a large pan on medium high heat.
Once the pan is hot, toss the corn kernels right on into it and sprinkle with salt and pepper Let cook for a minutes or two, then give it a stir and cook for another minute.
After about 4 minutes the corn turns bright yellow and starts to char. Remove pan from heat and toss in the chopped up kale.
And compile the quesadilla. Tortilla, grated cheese, corn and kale, more cheese if you please, and top with anther tortilla. Place assembled quesadilla into the pan and place on medium heat. Cook both sides until brown and cheese is ooey gooey.
Remove from pan and cut into triangles (or any shape you want)
Serve right away. Can be eaten on a napkin, plate, or directly off the counter.
Not needed, but it would be nice of you to serve with a little avocado, salsa, or sour cream.
Happy Tuesday!
-C
Makes two 8 inch quesadillas
Four 8 inch flour tortillas (use gluten free if needed)
2 ears of fresh corn
3-4 larges kale leaves
1 cup* shredded pepper jack cheese (use vegan cheese if needed)
*Note. Use more cheese if you want
Preheat a large pan on medium high. While the pan is heating up, cut the corn from the cob. Once pan is hot, toss corn kernels into hot skillet and sprinkle with a pinch of salt and pepper. Give corn a stir after a few minutes. Once the kernels start to turn bright yellow and get a little charred, remove pan from heat. Chop up kale into little pieces and toss into pan with the corn while the pan is still hot. Mix around and let the kale wilt a bit from the residual heat.
Ready your tortilla. Place half the cheese onto totilla, add on half of the corn and kale mixture, sprinkle with a bit more cheese and top with another tortilla. Place onto now empty pan and heat up quesadilla until brown on both sides and chesse is melty. Remove from skillet and cut into triangle. Repeat for the second quesadilla.
Serve right away with or without some guacamole, salsa, or sour cream.
My winter farm share is coming to an end this week. One more pick and then a three week stretch until the summer share starts… WHAT AM I GOING TO DO!!! Stock up as much as I can is what.
I have been strategic about the roots and veggies that I have chosen to bring home the past few weeks.(My farm lets you pick what you want) I know what I can buy at the store, things like carrots and potatoes, so I have been passing those up, but the roots like beets and celeriac… I have been bringing home baskets of those and hoarding them in the fridge and basement in preparation for the laps in farm fresh food and knowing that if I want to by these at the store it s going to coast me a million dollars a pound. (a for real million dollars)
Yup, lots of roots around here, especially celeriac root which is fantastic. I am kind of obsessed with celeriac, with its fibrous, knobby exterior, soft but almost meaty texture inside, and a flavor that is close to celery but so much better. I don’t know why it has taken me so long to do a posting featuring this amazing root vegetable (I eat it almost every day)
So here, an amazingly tasty, hearty but not heavy, celeriac recipe. Perfect for spring and the change into summer…. Mustard roasted celeriac with an fanatic split peas gravy that will have you licking you bowl clean.
The stuff….For the split pea gravy we have a carrot, a parsnip and a large onion chopped into small chunks. Salt, thyme, a bay leaf and of course the split peas. Then there is the celeriac root* sliced into 1/2 inch thick rounds and some plain old yellow mustard .
*Note. I don’t peel my celeriac root. I really enjoy the fibrous exterior but realize that some don’t(The mister does not like it) so peel it if you want.
Toss the chopped parsnip, carrot, onion and the spices into a pot on medium heat and let veggies sweat a few minutes until tender. Add in the split peas and enough water to cover everything. Turn pot on high and bring to a boil, then cover and turn to low. Make sure to give the pot a good stir ever few minutes and add more water if needed
While the gravy is cooking, take the celeriac rounds and brush each side with yellow mustard, sprinkle with pepper, and place on a baking sheet. Stick into the oven to roast for about 25 minutes, flipping the rounds after about 10 minutes.
Once the peas have soften, remove the bay leaf and puree until smooth and oh so creamy. Taste and add more salt and pepper if needed. If you find that the gravy seems to thick, just add in more water until it’s the consistency that you want. The gravy is made, the celeriac is roasted… now we are ready to eat!! Stick the celeriac on a plate and dump good amount of that gravy right on top. Feel free to add a bed of spinach, or a grain or anything you want, because why not, and also some chopped tomatoes for a little acid and prettiness.
Serve with the fanciest knife and fork you can find. Extra yellow mustard and sriracha sauce are great condiments to have close by.
Happy Tuesday!
-C
Mustard Roasted Celeriac with Split Pea Gravy
2 medium celeriac roots
6 tablespoons mustard
1 large carrot
1 medium parsnip
1 large yellow onion
2/3 cup split peas
2-3 cups water
1 bay leaf
2 teaspoons thyme or italian spice mix
salt and pepper
spinach (optional)
diced tomatoes(optional)
Preheat oven to 400 degrees
Small dice the carrot, parsnip and onion and throw into a large pot. Spinkle with salt and pepper, add in the thyme and bay leaf and add a splash of water. Stick on stove on medium heat and stir. Let cook until the veggies become soft and fragrant. Now add in the split peas and 2 cups of water. Bring to a boil then cover and turn heat down to medium low. Let cook until the split peas become tender (about 25 minutes) string on occasion and adding more water if the peas are not completely summered while cooking.
Once the peas are tender, let cool for a few minutes, remove bay leaf, and either dump into a blender or blend with an immersion blender until nice and creamy. If gravy seems to thick, add in more water.
Scrub or peel celeriac roots and slice them into 1/2 inch think rounds. Place on a baking sheet and brush mustard on both sides and spindle with pepper. Stick into oven for about 10 minutes, flip, then back into the oven for another 15 or so minutes, or unit the celeriac is tender.
When the celeriac is done remove from oven and stick a few rounds on a bed of spinach (or not, or any kind of grain or green you like) Top with a hearty helping of the gravy and toss on some chopped up tomatoes.
The conversation I had with my little brother on his birthday…
Me- “Happy Birthday!”
Bro- “Thanks”
Me- “What do you want to do.. want to come over, I’ll make you something, anything you want…donuts, cake, pizza…”
Bro- “Make me a shelf, I got like seven books for my birthday”
Me- “Um, ok… what are you thinking?”
Bro- “Something to hold like seven books”
Yup, he got “like seven” books and needed a shelf……. I guess I didn’t realize that “like seven” was a unit of measurement. Man, I love my little brother, but sometime I wonder about the kid. Anyway, Being that coolest big sister he’s got (and coolest big brother in law who did most of the work), we went along and made him a shelf. Hopefully it holds those “like seven books”.
Here is the list of what you will need to make the exact shelf with the same measurements that we used…but feel free to use and adjust the measurements to your want or need.
2 pieces of 1×8 common pine measuring 25 1/2 inches (sides)
2 pieces of 1×8 common pine measuring 17 1/2 (top and bottom)
1 piece od 1×8 common pine measuring 16 inches (middle shelf)
2 pieces of 1×8 common pine measuring 4 inches (legs)
Wood glue
About 20 (having a few extra never hurt) 2 1/4 inch finishing screws
Tools
Drill
Either a circular saw or a chop box to cut the legs
Measuring tape
Speed Square or something to make a perfect straight line
The legs are the hardest part to make and really, it’s so not hard. Take both 4″ pieces of pine and cut in half ( each piece will end up being 3 5/8″.. how is that you ask? Well here is some knowledge… 1×8 pine actually measures 7 1/2 “…. nuts right?) With each piece, measure an inch in on the bottom and side…Draw a vertical line to connect and then cut the line. Repeat last step with the second piece you just cut, then repeat the whole processes with the second piece of 4” pine. These words seem a little confusing, just look at the picture above, it has all the measurements on it too. In the end, you should end up with 4 legs.
Take one of the 17 1/2″ pieces and with a straight edge, draw two lines form opposite corners to find dead center. Measure 8″ from center on each line, that is where the legs are going to be placed. Working with one leg at a time, add a smear of wood glue to each leg as you are about to screw it down. Place leg on mark and sink a screw about an inch up from the inside of the leg, screwing at a slight angle (see photo)..
Phew.. this is the most complicated part of the whole shelf so once you get the legs on… its all smooth sailing.
Flip bottom onto legs and sink a screw in (1 inch in on both sides) into each leg.
Now grab the top piece (17 1/2 “) piece and the two sides pieces (25 1/2”). Add a bit of wood glue to the side ends and line up top piece with the sides. Sink 2 screws into each side. If you have another person helping, have them hold the pieces for you while you screw the top into the sides.. if not, use the bottom to rest a side against (like in picture).
Now flip over and screw the bottom piece into the sides……
Take a minutre…. Look at what you have accomplished! You have a kick ass square with legs!
Now place the shelf. We went for just about center.. 12 1/2″ from the bottom. Mark the measurements on both sides and use a square edge to draw a line.
Place shelf on the lines (The wood should fit in tight, you might even have to bang it a bit to get it into place….but you want it to fit nice and snug.) Now screw the shelf…two screws on each side.
Flip onto legs and ……….TA DA!!!! So Fancy!
You now have a shelf to shelf things.. Simple as that. And I tested it out…It holds more the “like seven” books. A success!
Note……If you are feeling like you need to, use a little wood putty to fill in the screw holes. You can sand it if you want. You might even want to stain or paint it. Up to you. The shelf is made and is yours to do what you will. Me, I like it just the way it is.
If anyone out there takes this little shelf project up.. let me know how it goes, maybe even send a picture…and feel free to ask any questions!
I have been meaning to make this jam for a while now. I’ll buy a bunch of jalapeños, then slowly, before I get to cooking them down, end up eating them all. But not today, and the rewards are great, Fresh jalapeño jam. So much potential for the greatest of things (I am thinking mango jalapeño sorbet… no, I am making jalapeño mango sorbet) And if you, like me are a jalapeño fan, this is going to make your life amazing. You will find yourself jamming up everything, or maybe just eating it with a spoon.
Whatever you want to do with it, just make it.
Honey and jalapeños.. All you need, well a little salt and water too, but that’s it.
What you need to do is remove the stems,, most of the ribs and half of the seeds removed. (You could remove all or none of the seeds depending on you heat preference) Chop the peppers into small chunks, toss into a pot, sprinkle with a bit of salt, add in a splash of water. Place the pot on medium heat. Top it with a lid, and give the peppers a good stir every few minutes. While the peppers are cooking, you want to make sure the bottom isn’t sticking and buringin. If that starts to happen, just turn the heat down a bit and add in a little splash more of water.
After about 20 minutes, the peppers are fully cooked and falling apart. The liquid is cooked down and the peppers are starting to caramelize on the bottom of the pan. When that happened, remove the pot from heat.
Now you can either blend the peppers, mash the peppers with a fork, or leave it chunky. Thats a choice Ill leave to you. ( I like to blend, but keep some chunks)
And drizzle in a bit o honey. As little or as much as you like.
And scoop into a jar. Eat the jam on anything you want. (I found myself eating it with a spoon)
Keep it Real!
-C
Makes about 1 1/2 cups of jam
10 large jalapeño peppers
a pinch of salt
About 1 tablespoon of honey, but add more if you like (And if you want to keep it vegan, use agave or sugar)
Wash, remove ribs and most seeds (the more seeds you leave the hotter it will be) and dice jalapenos into small chunks. Place in a pot with a few splashes of water and a sprinkle of salt. Turn on medium heat and cover, stirring every few minutes. If the peppers seem to be sticking o the pot and burning, turn heat down and add another splash of water. After about 20 minutes, the peppers should be really tender and falling apart. The liquid should be completely cooked out and the peppers will start to caramelized at the bottom of the pot. When that starts to happen, remove from heat. Now either mash with a fork, blend with a hand blender, or leave superr chunky. Drizzle in honey (or sweetener) and stir.
Eat right away or stick in a jar and store in the fridge for up to a week (It won’t last that long)
And that’s how I know that this is a winner. As an awesome aunt, when I have any of my nieces or nephews, I feel the need to make something special for dinner, something that the kiddos might not get very often, but also keep it on he healthy side. I have 2 littles for the night which gives me the perfect opportunity for a trash food recipe. You know trash food, things like boxed mac and cheese, beefaroni in a can, or, in this case, sloppy joes.
Sloppy yes, trashy, not so much. These are made with beans and bulgur. No meat.
And I figured it is nice enough out that I can make the kiddos some messy food and then just bring them out back and hose them off… I mean, why not right?
The stuff… We start with onion and green pepper, chopped into pieces. Black beans, bulgur, can crushed tomatoes. Chili powder, garlic powder, a bit o apple cider vinegar (which I forgot to picture) ,and some salt and pepper. Oh and cheese if you want… Plus a bun of some sort is necessary. Toss the chopped onion and peppers into a deep skillet or pot with a drizzle of oil. Cook on medium heat until tender and toss in the spices. Give a stir. Add in the beans, bulgur, and tomato, a splash of vinegar. Stir it all up, cover, and let simmer for about 15 minutes, or until the bulgur has absorbed the liquid and is nice and tender.
If you are a bun toaster… toast while waiting. If not, just get the buns ready And Then dump a good heaping pile right onto a bun. Add some cheese, or not..and eat with wild abandonment, making sure to get as much on your face as you get in you mouth.
Fantastic Friday!! Live it up.
-C
Black Bean and Bulgur Sloppy Joes
2 cups or 1 can cooked black beans
1 16 oz can crushed tomatoes
1/2 cup bulgur
1/2 cup water
1 small onion
1 green pepper
1 teaspoon garlic powder
1 teaspoon chili powder
salt and pepper
a splash of apple cider vinegar
olive oil
4-6 burger or bulky buns
cheese (optional)
Dice the onion and the pepper and toss with a drizzle of olive oil into a large skillet. Sauté on medium heat until veggies become tender. Add in the spices, stir in and let cook for a minutes, then add in the beans, the tomato,water and the bugler. Cover skillet and let simmer until bugler becomes soft.
When the slop is ready, either toasted or not, scoop a generous portions onto buns. If so inclined, add some cheese.
Eat with hands… Sloppy is good.
Happy Friday!
A simple post for the simplest of soups. Minimal ingredients, no fuss, fast to make but can be left all day to simmer……. And oh so very very good.
This has been one of my go to soups this winter. Warming, hardy, comforting….every kind of soft cozy feeling that I need when I can’t leave my house because it’s so cold out that all I want to do is sit on the couch wrapped up in a blanket, with a book, and eat hot soup. (That’s the my plan for the weekend) But it’s also good for any type of weekend activities you might have… it’t kind of the perfect soup.
The Stuff. A medium sized butternut squash, seeded and diced (no need to peel, but go for it if you want) About a pound of broccoli, (fresh or frozen) and a few shallots. Salt, pepper and a few cups of water.
Note.. I didn’t add any spices to this batch because I really love the flavor without anything. With that being said, I have made this same soup with sage, rosemary, turmeric, even curry. Almost any flavor works in this soup.
The chopped squash and broccoli go into a big pot with about 2-3 cups of water. Add about a tablespoon of salt and pepper. Lid up the pot and place on medium low heat for about a half hour, or unitl squash and broccoli is fork tender. Now blend together with either a emulsion stick blender or place in a blender for 3-5 minutes until completely smooth. Add enough water to keep things moving. Add more water if you want a thinner soup, less for a thicker soup. Season with more salt and pepper to taste. Once blended, place back in pot on simmer until ready to serve.
When the soup is simmering, thinly slice the shallots and toss into a pan. Sauté until soft and fragrant.
Finish off with a drizzle of balsamic vinegar and top with the sautéed shallots.
Soup and a spoon. So simple, so good.
Have a great weekend…..Try and stay warm!
-C
Butternut Broccoli Soup
The Stuff
1 medium butternut squash
1 pound of broccoli (crown and stem and can use frozen)
4 shallots
Balsamic Vinegar
salt and pepper
Split squash in half, remove seeds, and dice into chunks. Place in big pot. Chop up broccoli and add to pot. (or just add frozen chopped broccoli) Add water until stuff is about half way summered. Place a lid on the pot and cook on medium low heat for about 30 minutes or until squash and broccoli are fork tender. Blend together with either a stick blender or place in a blender. Add enough water to keep things moving. Add more water if you want a thinner soup, less for a thicker soup. Add more salt and pepper to taste. Once blended, place back in pot on simmer until ready to serve.
When the soup is on simmer, thinly slice the shallots and place in a pan to sautee until soft and fragrant.
To serve, ladle soup into bowl, drizzle with balsamic vinegar, and top with sautéed shallot.
Eat with a spoon
Before we get to the fries, I just want to mention that yesterday was one of those fantastic winter days that reminds me why I love living in Vermont. Pretty white snow everywhere, the sun was out, and 20 degrees without a gust of wind. The trash dog an I were even able to go for a little hike. It was so nice and soooo sooo needed! Anyways, the other day as me, my sister and the mister where putting together one more piece of Ikea furniture, (I am the master at Ikea assembling!) a little runs into the room and presents the mister with a Dominos pizza. Yup, a whole pizza just for him. Why you might ask? Well I guess my sister was delivered the wrong pizza and the place didn’t want it back and she didn’t want it, so she gave it to him.
A whole pizza to himself. I didn’t mind too much..he was just going to be eating it for lunch and dinner until it was out of the fridge. But for dinner I did want him to eat something of the vegetable matter that didn’t come out of a box. I was going to make him a big salad, but then realized that would mean sharing the last of the greens that I had for MY dinner and I was not about to do that, so I made him parsnip and carrot fries instead. No biggy, just some slicing, a little tossing and a bit of time in the old oven. And I figured I might as well make a nice sauce for those fries because I be so very nice.
The biggest problem that I ran into when I made these fries was that I didn’t make enough, so you should probably make twice as many as you think you will eat. If you end up not eating them all (which you probably will), well then you now have a great start for a soup or a nice addition to a salad. Either way, you will eat them because they are amazing and addicting… and as healthy as can be!
The carrots and the parsnips are all sliced up into big matchsticks and ready to be baked to crispy browned perfection. I added the oil to the pan to toss the fries in and then sprinkled with a fair amount of salt and pepper. If you don’t have and or want to use a cast iron pan, a baking sheet works just the same.
Oh saucy sauce stuff. Tomato puree, sriracha, and yellow mustard. Add a little bit of honey to lighten it up (can use brown sugar if keeping it vegan), a splash of apple cider vinegar and a couple minced cloves of garlic. Topped off with the smokey delightful spice of cumin. I cold eat this on everything…and I kind of did.
All mixed up in an oven safe dish, I stuck it into the oven for a about 8 minutes until it got a little bubbly, just to let all the flavors fuse together…
Fries are done, Sauce is ready. Served in super cute tea cups.(from now on I want to serve everything in tea cups.) A perfect side dish, snack, or even a light meal. It lead the mister to ask the question…What pizza?
Happy Day!
-C
Parsnip and Carrot Fries with Smokey Sriracha Sauce
Wash and trim carrots and parsnips and cut into large matchsticks (any shape is good, just make them all uniform) Toss with oil and sprinkle with salt and pepper. Place on cast iron pan or baking sheet and stick in oven for 30 or so minutes, and rotating after about 20. The fries are done when crispy and brown.
For the sauce. Mince garlic and add to all the sauce ingredients in an oven safe bowl. stick into oven for about 8 minutes until slightly bubbly and hot.
Dip fries in sauce
One of the best things about winter is that I can have something in the oven at any time and not worry about how hot the house is going to get. I get to spend my free time (or my in between free minutes) baking up all the thing that I would not dare bake in the summer. (lots of bread and cakes) Yeah, I might complain a little about how cold it is outside (to my defense, -20 is kind of a bitch) but then I think of the super hot humid days that come during the summer and cringe. At least when its cold out I am able to get warm, (que oven) but when its super hot and humid, I just turn into something that border lines a wet towel and the rabbit animal… Not so pleasant. I much prefer cooler weather. So no big surprise….I made bread.. or focaccia to be exact. And now you should too because first off, you want to eat it, and secondly, you can probably whip this up faster then it would take to get all of you winter warmies on and leave the house. Don’t leave, just turn the oven on. The stuff, which isn’t a whole lot… Flour and salt. A mixture of honey, water, and yeast. And olive oil. Its pretty much my pizza dough recipe, tweaked with the addition of oil, less flour and no kneading. Mix together the wet and dry…I used my nifty dough whisk, but a wooden spoon or even your hand works. Mix mix mix. The dough should be really slack and sticky. And guess what.. no need to knead! Just make sure the dough is uniformly incorporated…hehe.. uniformly incorporated… sounds weird. Drizzle the dough (don’t worry about making it into a ball, a blob is good) with a little oil and place in a nice warm place topped with a towel to rise for about an hour or until dough has doubled in size. Once is has fully risen, drizzle 2 tablespoons oil in two 9 inch cake pans. Divide dough in half, and kind of smoosh dough into pans. Cover and let rise for another 20 minutes or so. When dough has finished its second rise, drizzle each with another tablespoon of oil and with your fingers, fill out the pan and indent the dough, kind of like playing a piano or tickling a puppy(?)….Then layer your toppings (if you want any) Start with any herbs, then the veggies. Then last, any cheese you got. I used thyme, cracked black pepper, tomato, onion, topped with parmesan cheese. And the other one is just plain old salt. Pulled from the oven when nice and golden brown..set on a wire rack to cool for a few minute and removed from the pans. The mister was practically salivating waiting for a slice… and he was so not disappointed. Crispy outside with soft airy insides… Everything a perfect focaccia should be. The one with the toppings was the favorite for the first night, but for a peanut butter and cheese panini for lunch the next day…plain is the way to go.. My suggestion, do what I did, jazz one up and leave one plain. And then make more if you need too because the forecast call for another week of below zero!!! Oh the things that I’ll get to make! (me being positive) Stay warm! -C
Focaccia with out without stuff
3 cups all-purpose flour
1 tablespoon salt plus 2 teaspoons for topping (can use more or less if you want)
2 teaspoons active yeast (or one package)
1 1/2 cups warm water
1 tablespoon honey (or sugar if vegan)
6 tablespoons olive oil
Optional toppings
Fresh cracked pepper
Thyme or any other spices
Thinly sliced tomato
Thinly sliced onion
Parmesan Cheese
Anything you want!
In a bowl or jar, mix honey (or sugar), yeast and warm water together and let sit for about 5 minutes or until yeast is activated and starts to foam In a large bowl, whisk together flour and 1 tablespoon of salt. With either a wooden spoon, dough whisk, or if you have one, a stand mixer with a dough hook, mix the yeast mixture with the flour. The dough is going to be really sticky so mixing might get a little gloppy, but keep at it until everything is full incorporated.. for about 3-5 minutes and don’t be afraid to use your hand… you can wash it off. Once mixed drizzle with oil and cover with a towel. Let rise for about an hour or until dough has dubbed in size. When dough has double, coat two 8 or 9 inch cake pans each with 2 tablespoons olive oil. Dump dough onto floured surface and cut in half. Take each half a place in pan. cover and let rise again for another 20ish minutes. preheat over to 400 degrees After second rise, lightly take your fingers and push down dough, making little indents all over the surface. Drizzle each with another tablespoon of olive oil and sprinkle each with a teaspoon of salt. If using spices or any other toppings, nows the time to layer them on. And do any cheese last! Place in oven and bake for about 30 minutes or until the tops are golden brown. When done, place on a wire rack and let cool a bit before removing from pans. Done!! To store, place in a paper bag.. best eaten within a few days!
What a way to start the day, with a mouth full of c words…….Caraway, cauliflower, chick peas and cabbage…What did you think I meant?
This week has been nippy, no, its been chilly…..nah, it’s been freaking freezing! Yeah, freezing cold. When I woke up this morning to walk the pup, it was 5 degrees. So needless to say, when it gets this cold, I like to keep inside. Tying not to be a complete lazy bones, I went to town on my spices… refilling jars with all the little baggies scattering the kitchen, screwing on lids, and wiping down the shelves. Not a bad accomplishment for a day. While cleaning I came upon a little bag or caraway seeds, Not enough to warrant a jar on the wall, but defiantly enough for one dish.
When I think of the bright, somewhat sweet and peppery caraway, I think cabbage.(anything cabbage and I am sold) A big pan cabbage, added cauliflower for the mister,(his favorite) creamy chick peas because we need protein and they be tasty, and of course mustard, because everything tastes better with mustard.(I’ll let you in on a little secret.I eat a lot of mustard, I am kind of obsessed. Mustards of all kind; grainy, homemade, dijon…but usually just plan old yellow. And I eat it on everything.. but my go to is French’s yellow mustard and carrots…don’t judge) A warm, bright and filling dish, perfect for a freezing cold evening stuck inside. You can eat it as main dish or add a pile of quinoa or wild rice, or even a big plate of greens. What ever say you eat it, you and your stomach will be happy.(If your worries about cabbage bloat..don’t be. Cooking cabbage helps breaks down the enzymes that create gas, plus caraway has anti bloating properties…WIN!)
Cabbage, cauliflower,(fresh of frozen….I used frozen in this recipe) pre-cooked or canned chick peas, caraway seeds, yellow mustard, and salt..(I added pepper too)
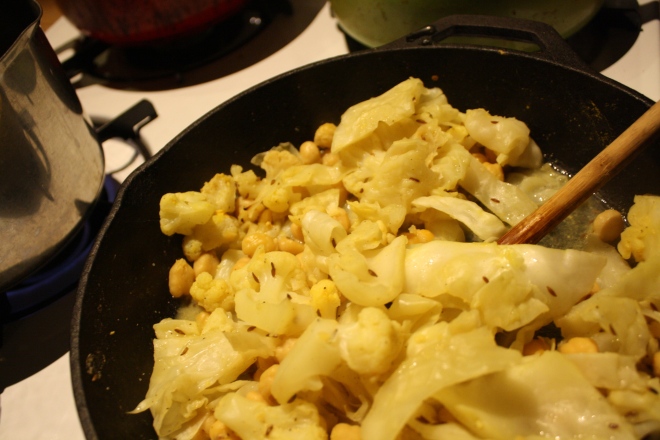
Chop the cabbage and toss into a lightly oiled pan with the rest of the stuff. Heat pan with everything but water for a couple of minutes.. to warm the caraway and give everything a cooking head start, then add the water. Stick a lid on it and let simmer. After about 15 minutes, give it a stir or two and do a taste test. At this point, it’s up to you…how cooked you want the veggies? I kept mine cooking for another 10 minutes. I also added another 1/2 cup of water. Not enough water and the pan will burn, a little extra water is good, it creates a yummy broth.
When you are happy with the flavor and doneness, eat it. I made myself a bowl with a heap of pickled beets(holy yes!). I am sorry if you don’t have any pickled beets, but the dish is still amazing without them. Fresh ground pepper really does the trick too!
So there you go, make it tonight, it will make you warm,smart and happy
-C
serves 2-3
1/2 small head of green cabbage(about 2 cups chopped)
2 cups cauliflower(fresh or frozen)
1 cup cooked chick peas
1 1/2 -2 cups water
1 tablespoon caraway seed
2 tablespoons yellow mustard
salt and pepper to taste
Lightly oil a medium sized skillet and add all ingredients except water. Heat for a few minutes to warm up veggie and caraway seeds then add a 1 1/2 cups of water. Keep on medium heat with a lid and stir on occasion If water evaporates completely out, add another 1/2 cup. Dish is done when veggies are tender.. about 20 minutes….but whenever tastes best to you!
Can’t wait until my lover comes home! I chopped him a pepper heart.


 No matter what is going on in my day, seeing a blue sky like this puts a smile on my face….To bad that smile turned to ice and my face froze in place. Because for some reason, winter around here now means below zero all the time. I mean, I love winter, but I am not going to lie… I wouldn’t mind if the wind would stop blowing and we had a couple of days of above zero weather.. and maybe a good foot of snow. I guess I’ll just have to be patient, cause its bound to happen. I mean, we live in Vermont, and if nothing else, we get weather.
  The mister called these snow mounds goosebumps… I think that is exactly what they are
 And oh how I cannot handle how freaking cute she is!! Plus, a shout out to my brother in law….MADLOVE!
 Fresh snow..Even though it was -15, I had to stop and take this picture. The colors were amazing
 Cabbage at the farm share pick up! Love ICF!!!
 89 cents a pound for fresh organic cranberries. Score!! Made these Oatmeal fresh cranberry coconut chocolate chip cookies with them. Big hit.
 This picture was taken exactly a year ago…..The mister and I were finally putting in the bathroom of our tiny little home…. And look at that awesome sink! (another amazing salvage yard find) If you ever need or want to remodel a bathroom, I suggest using a old cast iron utility sink. So practical, so functional, so pretty.….it makes me happy everyday!


 It hasn’t stopped snowing, the temperature is dropping fast (it’s getting to the point the dog doesn’t even want to be outside) and the mister is busy hand shoveling three long driveways. So I figured that in between all the laundry folding, plant watering , and all around sitting on my butt that I am doing INSIDE, that I would be so super nice and crank the stove up and make my love some cookies. I love making cookies, especially when I have chores to do. I think part of it is that cookies are baked in batches which breaks up the chores and gives a sort of rhythm to things. Plus everything is nice when the house smells like cookies. I was going to make chocolate chocolate chocolate cookies, but realized that I didn’t have cocoa powder, so I went with fresh cranberries (I just scored a pound of organic cranberries for 89 cents!) coconut flakes and chocolate chips. Plus I wanted to make them oatmeal because the mister likes oatmeal and oatmeal makes the cookies a little more hardy. (We need hardy when the temperature dips below zero) The verdict….. chewy, soft, slightly sweet oatmeal, bittersweet chocolate, nutty floral coconut, and the zing and pop of the fresh cranberries. He told me to hide them… hide so he will stop eating them….. because they be amazing!
 The base of this cookie….We are using regular old fashion oats and flour. Salt, baking soda and baking powder. Vanilla, chia seeds in hot water, coconut oil white and brown sugar…. You know, all the cookie stuff. Then all the goodness.. Chocolate chips, coconut flakes, and fresh cranberries. Goodness. Oh yeah, and they are vegan…if that matters to you.
  Warm the coconut oil and mix with the white and brown sugars. Then add the chia seeds soaked in hot water. Stir until nice and silky smooth.
  In goes some more stuff. I just dumped all the dry right on in that bowl and mixed it up nice and nice.
  Chopped the fresh cranberries into chunks… One at a time…… Just kidding, I actually laid a cutting board on top of the cranberries, applied a little pressure and sliced through the cranberries.. Does that make sense? I hope so, because its is much easier and faster and the cranberries don’t all roll away.
  The chopped cranberries, coconut flakes and the chocolate chips go in to be mix all up.
  I used my hands to form the balls and gave each mound a little smoosh, but not completely flat. Then into a preheated 375 degree oven for about 13-15 minutes or until a nice golden brown.
 A cup of hot coffee and a plate of warm cookies… I am the nicest, right! (After his nice cookie rest I proceeded to do a little nagging, so the day evened out) So today is probably a great day for everyone to make cookies. It’s freezing out, its saturday and well, just cause. You might even be looking for a great recipe to make for that big party your going to. You should make these cookies. Have a Fantastic Weekend!!! -C
 All I want to do is make everything into hearts and turn everything pink…Is that a problem?


 So lovely. Shadow hearts while the whoopie hearts cool.
 Whoopies all paired up
 Stuffed with a generous dollop of whipped coconut cream ( a cold can of coconut cream whipped with a splash of vanilla and a tad bit of sweetener) and sprinkled with my home-made beet dyed coconut sprinkles…..
 HOORAY FOR SPRING!!!!!!!
 Pesto stuff. Kale, walnuts, parmesan cheese(nutritional yeast to keep it vegan), garlic, lemon, olive oil, and salt and pepper.
 Straight up frozen ravioli goes onto an oiled baking sheet.(make sure that non are overlapping) Place into an oven at 400 degrees for about 15-18 minutes, flipping after 10. If you want to add mushroom and a few more walnuts, just toss them onto the ravioli when you are flipping over the ravioli.
  Look at this… fresh, crunchy, light and happy. Kinda like a spring day.


 My winter farm share is coming to an end this week. One more pick and then a three week stretch until the summer share starts… WHAT AM I GOING TO DO!!! Stock up as much as I can is what.
 The stuff….For the split pea gravy we have a carrot, a parsnip and a large onion chopped into small chunks. Salt, thyme, a bay leaf and of course the split peas. Then there is the celeriac root* sliced into 1/2 inch thick rounds and some plain old yellow mustard .
 Toss the chopped parsnip, carrot, onion and the spices into a pot on medium heat and let veggies sweat a few minutes until tender. Add in the split peas and enough water to cover everything. Turn pot on high and bring to a boil, then cover and turn to low. Make sure to give the pot a good stir ever few minutes and add more water if needed
  Once the peas have soften, remove the bay leaf and puree until smooth and oh so creamy. Taste and add more salt and pepper if needed. If you find that the gravy seems to thick, just add in more water until it’s the consistency that you want.
  The gravy is made, the celeriac is roasted… now we are ready to eat!!
  Stick the celeriac on a plate and dump good amount of that gravy right on top. Feel free to add a bed of spinach, or a grain or anything you want, because why not, and also some chopped tomatoes for a little acid and prettiness.
 The conversation I had with my little brother on his birthday…
 Here is the list of what you will need to make the exact shelf with the same measurements that we used…but feel free to use and adjust the measurements to your want or need.
 Take one of the 17 1/2″ pieces and with a straight edge, draw two lines form opposite corners to find dead center. Measure 8″ from center on each line, that is where the legs are going to be placed. Working with one leg at a time, add a smear of wood glue to each leg as you are about to screw it down. Place leg on mark and sink a screw about an inch up from the inside of the leg, screwing at a slight angle (see photo)..
 Now grab the top piece (17 1/2 “) piece and the two sides pieces (25 1/2”). Add a bit of wood glue to the side ends and line up top piece with the sides. Sink 2 screws into each side. If you have another person helping, have them hold the pieces for you while you screw the top into the sides.. if not, use the bottom to rest a side against (like in picture).
  Now flip over and screw the bottom piece into the sides……
 Place shelf on the lines (The wood should fit in tight, you might even have to bang it a bit to get it into place….but you want it to fit nice and snug.) Now screw the shelf…two screws on each side.
 And that’s how I know that this is a winner.
  As an awesome aunt, when I have any of my nieces or nephews, I feel the need to make something special for dinner, something that the kiddos might not get very often, but also keep it on he healthy side. I have 2 littles for the night which gives me the perfect opportunity for a trash food recipe. You know trash food, things like boxed mac and cheese, beefaroni in a can, or, in this case, sloppy joes.
 The stuff… We start with onion and green pepper, chopped into pieces. Black beans, bulgur, can crushed tomatoes. Chili powder, garlic powder, a bit o apple cider vinegar (which I forgot to picture) ,and some salt and pepper. Oh and cheese if you want… Plus a bun of some sort is necessary.
 Toss the chopped onion and peppers into a deep skillet or pot with a drizzle of oil. Cook on medium heat until tender and toss in the spices. Give a stir. Add in the beans, bulgur, and tomato, a splash of vinegar. Stir it all up, cover, and let simmer for about 15 minutes, or until the bulgur has absorbed the liquid and is nice and tender.
 And Then dump a good heaping pile right onto a bun. Add some cheese, or not..and eat with wild abandonment, making sure to get as much on your face as you get in you mouth.
  Happy Friday!
 The Stuff. A medium sized butternut squash, seeded and diced (no need to peel, but go for it if you want) About a pound of broccoli, (fresh or frozen) and a few shallots. Salt, pepper and a few cups of water.
 The chopped squash and broccoli go into a big pot with about 2-3 cups of water. Add about a tablespoon of salt and pepper. Lid up the pot and place on medium low heat for about a half hour, or unitl squash and broccoli is fork tender. Now blend together with either a emulsion stick blender or place in a blender for 3-5 minutes until completely smooth. Add enough water to keep things moving. Add more water if you want a thinner soup, less for a thicker soup. Season with more salt and pepper to taste. Once blended, place back in pot on simmer until ready to serve.
  Finish off with a drizzle of balsamic vinegar and top with the sautéed shallots.

 Before we get to the fries, I just want to mention that yesterday was one of those fantastic winter days that reminds me why I love living in Vermont. Pretty white snow everywhere, the sun was out, and 20 degrees without a gust of wind. The trash dog an I were even able to go for a little hike. It was so nice and soooo sooo needed! Anyways, the other day as me, my sister and the mister where putting together one more piece of Ikea furniture, (I am the master at Ikea assembling!) a little runs into the room and presents the mister with a Dominos pizza. Yup, a whole pizza just for him. Why you might ask? Well I guess my sister was delivered the wrong pizza and the place didn’t want it back and she didn’t want it, so she gave it to him.
 The carrots and the parsnips are all sliced up into big matchsticks and ready to be baked to crispy browned perfection. I added the oil to the pan to toss the fries in and then sprinkled with a fair amount of salt and pepper. If you don’t have and or want to use a cast iron pan, a baking sheet works just the same.
 Oh saucy sauce stuff. Tomato puree, sriracha, and yellow mustard. Add a little bit of honey to lighten it up (can use brown sugar if keeping it vegan), a splash of apple cider vinegar and a couple minced cloves of garlic. Topped off with the smokey delightful spice of cumin. I cold eat this on everything…and I kind of did.
  Fries are done, Sauce is ready. Served in super cute tea cups.(from now on I want to serve everything in tea cups.) A perfect side dish, snack, or even a light meal. It lead the mister to ask the question…What pizza?
  One of the best things about winter is that I can have something in the oven at any time and not worry about how hot the house is going to get. I get to spend my free time (or my in between free minutes) baking up all the thing that I would not dare bake in the summer. (lots of bread and cakes) Yeah, I might complain a little about how cold it is outside (to my defense, -20 is kind of a bitch) but then I think of the super hot humid days that come during the summer and cringe. At least when its cold out I am able to get warm, (que oven) but when its super hot and humid, I just turn into something that border lines a wet towel and the rabbit animal… Not so pleasant. I much prefer cooler weather. So no big surprise….I made bread.. or focaccia to be exact. And now you should too because first off, you want to eat it, and secondly, you can probably whip this up faster then it would take to get all of you winter warmies on and leave the house. Don’t leave, just turn the oven on.
  The stuff, which isn’t a whole lot… Flour and salt. A mixture of honey, water, and yeast. And olive oil. Its pretty much my pizza dough recipe, tweaked with the addition of oil, less flour and no kneading.
  Mix together the wet and dry…I used my nifty dough whisk, but a wooden spoon or even your hand works. Mix mix mix. The dough should be really slack and sticky. And guess what.. no need to knead! Just make sure the dough is uniformly incorporated…hehe.. uniformly incorporated… sounds weird.
 Drizzle the dough (don’t worry about making it into a ball, a blob is good) with a little oil and place in a nice warm place topped with a towel to rise for about an hour or until dough has doubled in size. Once is has fully risen, drizzle 2 tablespoons oil in two 9 inch cake pans. Divide dough in half, and kind of smoosh dough into pans. Cover and let rise for another 20 minutes or so.
  When dough has finished its second rise, drizzle each with another tablespoon of oil and with your fingers, fill out the pan and indent the dough, kind of like playing a piano or tickling a puppy(?)….Then layer your toppings (if you want any) Start with any herbs, then the veggies. Then last, any cheese you got. I used thyme, cracked black pepper, tomato, onion, topped with parmesan cheese. And the other one is just plain old salt.
  Pulled from the oven when nice and golden brown..set on a wire rack to cool for a few minute and removed from the pans.
  The mister was practically salivating waiting for a slice… and he was so not disappointed. Crispy outside with soft airy insides… Everything a perfect focaccia should be. The one with the toppings was the favorite for the first night, but for a peanut butter and cheese panini for lunch the next day…plain is the way to go.. My suggestion, do what I did, jazz one up and leave one plain. And then make more if you need too because the forecast call for another week of below zero!!! Oh the things that I’ll get to make! (me being positive) Stay warm! -C




 Can’t wait until my lover comes home! I chopped him a pepper heart.
THE LOVELY CRAZY
September 19, 2015 by maximios • Blog
First day of Spring!! Well kind of I guess. I think it actually starts at like 6:20 tonight, when the temperature is going to dip back done to 10.(Spring my ass) I don’t know about you people out there but here in Vermont, we are really hanging on to winter. I have to keep telling myself…” It will be warmer soon and you’ll be looking forward to this weather in a few months.. so stop bitching!” I give myself good pep talks.
Anyway, last week at the farm share pick up, there was a nice little surprise. We got a few pounds of some sweet locally grown and milled whole wheat flour. There was a little sign with the information about the wheat and where it came from, but in my haste of gathering all of my other veggies, I failed to take notes and forgot the name of the farm that it came from. But I do know that my farm traded some celeriac for the wheat. I was really excited because I am really into the idea of using locally grown grains and I don’t know, it just made me really happy, especially because it was a trade. Food framing and local sharing is stuff that makes me happy.
I wanted to make something to kind of showcase the hearty, nutty flavor of the wheat and I also wanted to make something that my mister would eat for breakfast. Well what better way to do that then with muffins! Banana coconut whole wheat (that just happen to be vegan) Hearty, fruity, and smells like the word lovely and the color yellow. A few to eat and a few to share. Hanging at home, running away or getting ready for a day of spring cleaning….This is a great weekend to make muffins!
The stuff… Light, nutty local whole wheat flour, ripe oh ripe bananas and coconut flakes are the stars in this muffin… But we need the other stuff too. Brown sugar, vanilla, coconut oil and a chia egg. Baking powder, baking soda, and last but not least, salt.
Yup, that sounds about right The salt, baking soda, and baking powder are whisked together. The banana and all the rest of the stuff are mixed up… Then mix the wet mixture into the dry. Stir until combined and then add in the coconut flakes,Scoop mixture into 12 lined muffin cups… A scoop like mine works very nicely. Don’t have one, well I recommend you get yourself one. Until then, use a spoon. Something I always do when baking any muffin is sprinkle the tops of each muffin with a bit of sugar or brown sugar. It melts and caramelizes and adds a sweet little crunch to the tops.
Now stick the muffins into the oven. Remove from oven when they look like this, nice and golden brown. Also good idea to check with a tester stuck into the middle. When it comes out clean, they are done.12 happy little muffins cooling on a rack, waiting to be eaten with you mouth.
Doesn’t the sight of pretty food make you happy, like sing a song happy? Muffins, whoa yah!! Friday yah yah!! Spring…What, Yah!! Yah…Yah Yah!!!
Terrible I know, but at least you were spared hearing my actual voice.
Have a great weekend. Do lots of springy stuff!
-C
Preheat oven to 350
In a small bowl, mix 3 tablespoons warm water to the chia seeds and let sit for at least 5 minutes (10 is better) In a large bowl, peel and mash the bananas until they turn into a kind of chunky soupy puree. Add in brown sugar, chia seed mixture, vanilla extract, and the melted coconut oil (make sure it’s melted or it won’t incorporate into the mixture) Mix together. In another bowl, whisk together the flour, baking soda, baking powder and salt. Mix the wet mixture with the dry until combined then mix in the coconut flakes.
Line a 12 cup muffin tin and fill each cup about 3/4 the way up with batter. Sprinkle each muffin with brown sugar and place in oven on center rack. Bake for 25-30 minutes or until the tops 0f the muffins are golden brown and a tester inserted into the middle comes out clean.
Remove muffins from tin and let cool.
Serve as is or maybe with a smudge of coconut butter, or anything you want really.
No need for fork, just use you mouth.