
THE LOVELY CRAZY


Yesterday I spent the entire day (ok maybe not the entire day), but a the better part of the afternoon defrosting my freezer. Sure, I do the occasional chip chop here and there, just enough from around the freezer door so it will close, but ever few months I notice that everything in the fridge is not staying cold and that the freezer is not freezing stuff. Thats when I know its for real time to defrost. So a few days ago when I noticed my bananas were turing to liquid in the freezer, I knew it what I had to do….Completely empty the fridge and melt/hack away the 2-4 inches of ice build up that accumulated. It is such a freaking pain in the ass.So on this defrosting day, I took all the stuff from the freezer, stuck it in a cooler, and the rest of the stuff, which is basically all veggies, I just tossed on the table. As I am hacking away with a metal spatual, a wooden spoon, and a constant rotation of pots of boiling water, I was thinking about dinner. I figured I might as well just eat up as much of the veggies as I could, you know, so I didn’t have to put them back in the fridge. And also, I was getting pretty annoyed because this particular defrosting session was taking way longer the anticipated, which made making dinner seem like another pain in the ass. I figured I might as well just eat everything that is already out on the table, which pretty much narrowed down the “whats for dinner” conversations because it was already all over the place. And so dinner was a humongo salad for me, and for the mister, I made him a monster of a veggie sandwich. (my salad was exactly the same stuff as the sandwich, minus the bagel) Easy, fast, super duper yummy, pretty and piled so high with tons of veggies that the fridge is pretty much empty now.
Look at the is beast. I don’t call it a monster sandwich for nothing.

The stuff included in this monster veggie sandwich..

Romaine lettuce, tomato, avocado for there is not real sandwich without them. Thinly sliced radishes, cucumber,a and onion for nice crispy crunch. Shredded beets, carrots, and purple cabbage to give more crunch and a bit of sweetness. Then of course there needs to be something pickled, so I used banana peppers cause they are the SHIT!! And lastly some hummus for a nice creamy finish (plus a bit of protein) and yellow mustard because mustard on everything is just right. Heres to a mountain if goodness that is no longer in the fridge! Served with a another mountain of roasted parsnips and carrots (more stuff from the fridge) and a tall glass of iced tea.
Lucky that today is farm share pick up cause the fridge is pretty much on empty.
Yea it’s Thursday!!!!
-C
A Monster Veggie Sandwich
Note. This is just a guide.. Feel free to use whatever veggies you fancy.
- Either a bagel, 2 slices of bread, or a big chunk of baguette (use a gluten free bread if you want or need too)
- Hummus- Homemade or store bought
- Mustard
- Something pickled like pickles, banana peppers , jalapeños or all three
- Lettuce, spinach or some kind of leafy green
- Tomato
- Avocado
- Onion
- Radishes
- Cucumber
- Shredded Carrots
- Shredded Beets
- Shredded Cabbage
To assemble. Ready your bread.. Toast if you want, and stick it on a plate
On either side, smear the hummus and the mustard.
Pick a side, start to stack by evenly disrupting veggies on top of veggies. Place the second piece of bread on top and giving a little smooth to keep it together.
And go at it. Cut in half or don’t. Have a napkin or a long sleeve ready to wipe your face.
 I know that it it spring, but I still have a winter farm share for another month and will be cooking and eating roots and squash until the summer share starts in early June. And I am good with that cause I love me some root veggies and butternut squash. But, yes, it is spring and my body isn’t craving the super hearty, rich foods that it was just a few short weeks ago (more like last week) When the temperatures first start to go up, I usually want my food to not feel as heavy or my spices to be quite at warming (I am still all over curries and hot hot hot sauces in the summer). It’s like I have said before, I tend to change up my spices with the seasons.
So to give a lighter feel to a heartier squash, I busted out one of my favorite spices, the oh so lovely tarragon. It has a sweet, light, fruity and floral taste that pairs beautifully with the squash and onions. It give the dish a nice spring like flavor that will leave you feeling satisfied without wanting to move directly onto the couch and hide under a blanket. This is a eat and ride you bike kind of dish ( you don’t actually have to go for a bike ride if you don’t want to)
Note. If I had a grill, I would definitely cook this dish on it. As of now, I don’t own one so I am left to cook on the stove. But by all means, if you have a grill, do it up!
 Half of a medium sized butternut squash (or use a whole one.. I had a half in the fridge that was waiting to be cooked) and one whole onion (two if you use a whole squash) Apple cider vinegar, olive oil, salt , pepper, garlic powder, and, last but not least, the oh so fragrant and tasty, tarragon.
 Chop the onion and the squash into big chunks. If you don’t like the skin of the squash, you can peel it, but I like it so I don’t peel. Drizzle olive oil in a pan or a baking sheet, toss the veggies in and add the garlic powder, tarragon, salt and pepper and a few splashes of apple cider vinegar. Toss around. Stick into oven at 425 degrees for about 30-40 minutes.
  When the squash is tender and the onions are cooked, remove from oven.
I am pretty sure you can figure out the rest.
Happy day!
-C
Tarragon Butternut and Onions
- Half of Medium Butternut Squash
- 1 Large Onion
- 1 Tablespoon Dried Tarragon (use fresh if you have it.. 2 tablespoons)
- 2 Tablespoons Apple Cider Vinegar
- 1 Teaspoon Garlic Powder
- Salt ans Pepper
- Olive Oil
Chop squash and onions into similar size pieces. Toss in a skillet or on a oiled baking sheet and add the rest of the ingredients. Toss around and place into a 425 degree oven for about 30-40 minutes or until squash is fork tender.
Remove from oven and eat.
Make as a side dish or add to a salad. Eat as a light lunch, or a midnight snack… eat it however you want.
 As the weather gets warmer and the days get longer, my food brain turns to fresh colorful simple spring food. (which is totally a thing). Spring food is a combination of the last of the winters hardy root veggies combined with the springs bounty of fresh greens and early growers. Spring food is the best!
This lovely. oh so gorgeous salad has been on repeat in my meal repertoire. It’s so yummy and so simple. Beets and carrots roasted and sliced, tossed onto a bed of tender spinach and topped with a creamy, lemony avocado dressing. Fresh, fast, light, and filling. Everything a perfect spring salad needs. Not to mention it takes no time at all to make because with all this nice weather , we want to spend as much time basking in the warmth and glow of the sun. I might even take my spring salad outside today. Maybe.
 Dressing stuff. A nice and ripe avocado, the juice of a juicy lemon, a bit of garlic powder (raw garlic is nice too, but grate it super fine) and salt. Simple simple and sometimes simple can be the best.
 All stuff get mashed super mashed until smooth and scooped into a jar with a lid. Add about 1/4- 1/2 cup water (depending on how thick you like it) and shake that jar all around.
That’s it. You now have super creamy avocado lemon dressing. Drizzle on anything and everything… especially this roasted carrot and beet salad..
 A roasted beet and carrot, all sliced up
 Tossed onto a bed of tender baby spinach
 And topped with creamy avocado dressing. Fantastic, so pretty, and makes the day super springy!
A salad suggestion…. Add some roasted chickpeas toasted nuts, or sunflower seeds to this or any salad. Adds a little proteins and the crispy crunch is a nice addition.
Enjoy the day..Smile lots
-C
Roasted Carrot Beet Salad and Avocado Lemon Dressing
Salad
- 2-3 cups Baby Spinach
- 1 large carrot
- 1 medium beet
- Toasted nuts, beans, or seeds (Optional)
You can roast the veggies a few ways.. Slice the carrot and beet, place on a baking sheet and stick into the oven at 425 degrees until tender. Or you can just toss a the carrot and beet onto a baking sheet whole and roast.( What I usually do)
Once the veggies are roasted and cooled, thinly slice and toss onto the bed of baby spinach. Top with Avocado Lemon Dressing (recipe below) and some toasted crunchy thing.
Dressing
- 1 Ripe Avocado
- 1 lemon
- 1 teaspoon garlic powder
- 1 teaspoon salt
- 1/4- 1/2 cup water
Scoop avocado fruit into a bowl and mash with a fork until a paste is formed. Scoop mashed avocado into a jar and add remaining ingredients. Stick lid on jar and shake tip combined. Use on anything.
Dressing lasts a few days in the fridge. Should stay green, but add a layer of lemon juice to top to keep from browning.
 I am such a sucker for the reduced price produce at the grocery store. I save at least half of the original price for stuff that might look a little weird or have a brown spot or something. Sometimes I can’t believe what ends up on in the bin, stuff that I wouldn’t consider reduced bin material, but hey, if they want to stick it in there, then I will be more than happy to buy it. A couple days ago I found some good looking roma tomatoes in that said reduced produce bin..the skins the tiniest bit wrinkled (like I could care less), least hen 50 cents a pound. Um, yea, I bought those and put them to good use.
Tomatoes roasted until they fell apart with a few other chunks of stuff, then piled onto a base of spinach and couscous. This meal cost me pennies and was stupid easy and fast to make. And pretty to boot. Perfect for a quick healthy meal on a busy day or maybe for those people looking for a tasty, not too completed dinner to make for a special someone for Valentines day? Or make just for yourself…its pretty much the perfectly dish. Anyone can get into it. And if you don’t happen to have a grocery store with a reduced produce bin full of tomatoes…it’s cool, you’ll just have to pay full price for the perfect ones.

 So simple. A little olive oil in pan. Chunk the tomatoes and throw in pan with the chopped onion, carrot, cauliflower, garlic and chick peas. Drizzle a bit more oil and top with salt and pepper. Give it all a toss and stick into oven. That’s that. Just leave it in there until everything is so nice and soft and falling apart.
 One of the best things about couscous is that you don’t even need to dirty a pot or a bowl to make it, just add dried couscous to the bowl you are going to eat out of with a cup of boiling water and a pinch of salt. (I added the spinach with the water too) After about 8 minutes, the couscous absorbs all the water and you just fluff it up with a fork. Easy, freaking Peasy!!!
  Out of the oven and piled on…..
 I mean, if this isn’t one classy looking meal, then I don’t know what is.
Sprinkle with a little parmesan or nutritional yeast if you want and step back and admire. And now eat it to you face.
And barely any dishes to wash. No big mess to clean up. I could get used to that.
-C
Chunky Tomato and Stuff Couscous
Ingredients
Serves 2
- 3/4 cup Couscous
- 1 cup boiling water
- Handful of chopped spinach
- 4-5 roma tomatoes chopped
- 1 medium carrot diced
- Half of an onion diced
- Cup or so of cauliflower (fresh or frozen)
- Cup of prepared chick peas
- 4 or 5 cloves garlic minced
- Olive oil to drizzle
- Salt and pepper
Preheat oven to 400
Place onion, carrot, cauliflower,tomatoes, chick peas and garlic into a large skillet. Drizzle with olive oil, sprinkle with salt and pepper, and give everything a light toss. Stick into oven for 35-40 minutes until tomatoes are falling apart and everything is nice and roasted.
In a medium bowl, (or serving bowl) add cup of boiling water to dry couscous and spinach. Sprinkle with salt and cover. Let sit for at about 8 minutes, or until the couscous had fully absorbed all the water. Fluff with a fork and top with roasted tomato stuff.
Top with parmesan or nutritional yeast if you are into it.
Enjoy!
 There is a joke about Vermonters, that all we talk about is the weather. Well, it’s kind of true. But to our defense, we get a lot of weather, and it’s always changing and intense and both lovely and crazy and all over. So yeah, we talk. A lot, about the weather. And on that topic, I am trying so hard not to complain, but honestly, I am getting a little sick, both physically and mentally from all of these super, to freaking cold temperatures. Yesterday the high was 0 ( which was at like 2 in the morning) and factor in the windchill, the temp stayed at like 25 below. It f**king sucks. I can’t stay outside for too long or else I will probably die. The dog is having a hard time making it around the block before he gets ice paws, and the mister, well he even started wearing gloves (he wears a sweater all winter and never gets cold…..he is officially cold)
And not only is the cold keeping us all indoors, but its making us all borderline sick. We both have been fighting something for the past few week. The headaches, stuffy nose, chest congestions. The puppy is getting super dry skin and gave himself a hot spot. BLAh!! Ok, enough! No more complaining
Because I do really love the winter and all the pretty snow!!!!
But we are feeling kind of sick so to make us feel oh so much better, a fantastic, super tasty, healing, good for me, good for you, soup. Turmeric ginger carrot… oh man. Made with lots of ginger, turmeric and garlic and finished with a drizzle of raw honey. This soup is exactly what we need. All ingredients scream.. FEEL GOOD, BE WARM AND COZY! Almost everything in it has antibacterial and anti inflammatory properties. The veggies are hearty and heathy and just eating soup helps to keep hydrated. And the best part..it tastes so freaking amazing.
So whether you are feeling a little mah, or just a little hungry.…this soup is where it’s at!

Lots of chopped up carrots, a small onion, a little bit of cauliflower I had left over and a small beet. If you don’t have the cauliflower and or a beet, just use ares pepper or another 2 carrots.. no biggy.
Then we have the fresh ginger ( you can use powdered) turmeric and garlic. All the good healthy spicy and yummy stuff.
 I accidentally spilled the turmeric on the counter..but it kind of looks like I might have done it on purpose… yeah, let’s go with that. Chop the garlic and he ginger into chunks
 And toss into the pot to warm and activate. Just a little toasty toast.
 And the veggies are roasted and tender and smell so good. It took a lot of will power to not eat the whole pan right there.
 I added the roasted veggies and 3 cups water straight into my pot with the spices because I used an emulsion blender. If you are using normal blender, add the veggies, the toasted spices and the water to the blender and blend until smooth. Then transfer to a pot.
 Pretty much all blended together….(I left a few big chunks in there to snack on while I was waiting to eat serve…I was really hungry) and let to simmer for a little longer…

And now ladle into a bowl and get ready for a fantastic finish… drizzle a spoonful of raw honey into soup…….so so good. You could add the honey before serving, but heating it kills all the good antibacterial stuff so that’s why we wait. Then I sprinkle some chopped kale and chives. (do it if you want, but not necessary)
Now enjoy. Let the warmth wash over you and feel all those good spices helping to fight the good fight to keep you well and all the yummy to satisfy your hunger.
And lets hope for some warm (above 0!!) weather!
-C
Turmeric Ginger Carrot Soup
Ingredients
- 5 large carrots
- 1 small onion
- 1 small beet*
- quarter head cabbage ( or a cup of frozen)*
- 2-3 teaspoons turmeric
- 2-3 tablespoons fresh ginger (1/2 teaspoon if using powdered)
- 4-6 cloves garlic
- salt pepper
- raw honey (omit if vegan)
* If you don’t have or want to use beet and or the cauliflower, you can use a red pepper, a small sweet potato, or just use a few more carrots.
Chop all veggies into similar sized chunks and toss into a lightly oiled pan or on a baking sheet and sprinkle with salt. Stick in oven at 425 for about 30 minutes or until all veggies are fork tender.
In a large soup pot or dutch oven, toss chopped garlic, ginger and the turmeric and place on medium heat for a few minutes to activate the spices. Add the roasted veggies and 3 cups water to pot (if using emulsion blender) and blend until smooth. If using a blender, add the toasted spices, roasted veggie and 3 cups water and blend until smooth then transfer to a large pot or dutch oven. Add salt and pepper to taste. Turn heat down to simmer and let cook for an addition 10 minutes.
When ready to serve, ladle soup into bowl and drizzle a spoonful of raw honey into soup. Garnish with fresh chopped kale, chives, cabbage or whatever you want. (or nothing is good too)
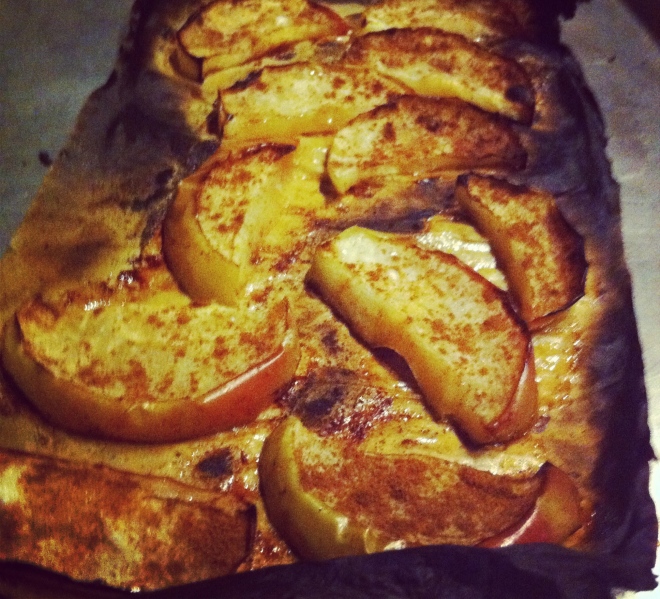 Nothing to fancy….. just a little warmth and spice to fancy up a quick snack. Word!
Sliced apples sprinkled with cinnamon and stuck in oven at 425 for 5-8 minutes. Easy Peasy. Topped with a squeezey….of lemon. (Yes..I am a dork)
Happy Friday!
-C


 My motive for this drink…get rid of a few candy cane….. And maybe make a little kid happy, but that was just a bonus… I would have made him drink this even if he didn’t like it. (I am awful like that)
 All you need is a cup of milk(cow, soy, rice..whatever) a tablespoon of cocoa powder, a tiny pinch of salt and a candy cane. We don’t need to add any extra sugar because the candy cane is sugar.
  Stick all ingredients into a pot on medium heat and whisk until the candy cane is melted and the milk is as hot as you like it.
 It you want(we did) top with a dollop of whipped cream(or whipped coconut cream) and sprinkle with a little more crushed candy cane…..Best served after a long afternoon of playing in the snow!


 The conversation I had with my little brother on his birthday…
 Here is the list of what you will need to make the exact shelf with the same measurements that we used…but feel free to use and adjust the measurements to your want or need.
 Take one of the 17 1/2″ pieces and with a straight edge, draw two lines form opposite corners to find dead center. Measure 8″ from center on each line, that is where the legs are going to be placed. Working with one leg at a time, add a smear of wood glue to each leg as you are about to screw it down. Place leg on mark and sink a screw about an inch up from the inside of the leg, screwing at a slight angle (see photo)..
 Now grab the top piece (17 1/2 “) piece and the two sides pieces (25 1/2”). Add a bit of wood glue to the side ends and line up top piece with the sides. Sink 2 screws into each side. If you have another person helping, have them hold the pieces for you while you screw the top into the sides.. if not, use the bottom to rest a side against (like in picture).
  Now flip over and screw the bottom piece into the sides……
 Place shelf on the lines (The wood should fit in tight, you might even have to bang it a bit to get it into place….but you want it to fit nice and snug.) Now screw the shelf…two screws on each side.


 Is it really for real April? Where has all the time gone and where the hell is the warm weather? It’s not funny anymore. I am officially OVER winter! Ok, so now that I got that off my chest…..
 The Stuff. Cornmeal, water, navy beans and parmesan for the polenta. Crushed tomatoes, garlic, dried basil, onion, carrot, zucchini, and summer squash for the sauce. Salt, pepper, and olive oil all around.
 Cornmeal and water go into a cast iron skillet (or any oven safe dish) with a pinch of salt and pepper. Give it a little mix and stick it into the oven at 400 degrees .
 Once the polenta is in the oven, make the sauce. Chop up all the veggies and stick into a dutch oven or sauce pot with a pinch of salt, the basil and a good drizzle of olive oil. Stick on medium heat and let veggies cook down a bit. When the veggies are tender, add in minced garlic, crushed tomatoes and another drizzle or oil. Turn burner to lowest setting and simmer (giving it a stir every now and then) for about 45 minutes or until the polenta is done.
  After about 30 minutes when the water had pretty much all cooked down, take the polenta out of the oven and stir in the beans, the parmesan, a tablespoon or two of olive oil and salt and pepper. Smooth top out and sprinkle with more pepper, parmesan and drizzle with a bit more oil. Stick back into oven for another 1/2 or until polenta has formed a crust and no longer giggles when you wiggle the pan.
 Pull polntna from the oven and let sit for at least 1o minutes.
 Being that it was St. Patricks day this week and lots of folks buy up a good amount of cabbage, I figured that this is a good time to get people to try one of my most favorite of favorite meals…..Beet bean and cabbage steaks. I love to play around with food, how to pair textures and colors plus tastes while trying to make whatever I am making healthy and balanced. This is one of my fav creations. And sure, this may seem like a somewhat weird combo, maybe a little like a extremely hippy dippy vegan fake meat thing, and you might be kind of right, but screw if it doesn’t taste like A-mazing. First off, notice how freaking dang pretty this thing is. The roasted beets bring a earthy hearty flavor but also pack a huge punch of color, especially when blended together with the ever so sweet white bean, which brings a nice mellow taste and a great serving of protein. (Beets and beans are meant for each other). Spread that brightly colored, tasty mixture onto of a huge slab of one of my favorites, roasted cabbage with all its crunch and cabbagy flavor and you got yourself a hearty healthy meal of deliciousness.
  Cabbage, white beans, and beets. There is a lemon involved, but it didn’t make it into the picture.
 Cabbage is cut into inch thick slabs… I like to us the inter most part of a cabbage head cause I like the core. But use any cut that you want. 2 beets are chopped into chunkers and both the cabbage and the beets are placed on a lightly oiled baking sheets, seasoned with salt and pepper, and stuck into the oven for 20-25 minutes at 400 degrees.
 Once the beets are tender and the cabbage is cooked to a nice withered golden pretty, take out of the oven, but leave the oven on. Leave the cabbage on the pan but throw the beets into a blender or a big bowl if using a hand blender with the white beans
 Beans and beets get pureed together. Add the juice of 1/2 a lemon (or the whole lemon, depending on your taste) and a pinch of salt and pepper. With a big spoon or spatula, scoop equal amounts of the bean/beet mixture on top of the cabbage steaks and spread around. Sprinkle with cracked pepper and place back into oven for another 5-10 minutes. (You could totally skip the second bake, but I like my cabbage well done and crispy)
 Oh ho boy… And with a good squirt of mustard to finish off… I could eat this all day, everyday
 Wowzers…Is it for real Memorial day weekend? Where has all the time gone? Let’s talk about a week gone by fast. My brain is on complete overdrive and I am having a hard time keeping it from exploding…SO MUCH TO DO! (Not bad stuff, just a lot of stuff) But lo, that’s life right? There is always a lots of “stuff” to do, but today I am going to try and let that stuff chill and maybe give myself a few hours of coffee, (so much coffee) reading a book in the sunshine, gardening, and just some overall chillin.
  Goodbye fiddleheads…. Hello ferns
  On our way to a geo catch…. And note clothing options for 2 in the afternoon. I am much fond of that little guy wearing a rain jacket without a shirt in when its sunny and 80 degrees. And a pink poke dot bath robe.. I mean, it’s so the cool thing to do.
  We didn’t find the geo, but we found this gigantic mushroom. Just as cool, maybe even cooler.
 I love brick and there is one street in all of burlington (that I know of) that has brick sidewalks. I like to walk down it a lot.
  Nurse lady making food… I compare this to a big foot sighting. I have heard stories that she cooks,but have never actually witnessed it myself. (Just kidding….kinda)
 No matter what is going on in my day, seeing a blue sky like this puts a smile on my face….To bad that smile turned to ice and my face froze in place. Because for some reason, winter around here now means below zero all the time. I mean, I love winter, but I am not going to lie… I wouldn’t mind if the wind would stop blowing and we had a couple of days of above zero weather.. and maybe a good foot of snow. I guess I’ll just have to be patient, cause its bound to happen. I mean, we live in Vermont, and if nothing else, we get weather.
  The mister called these snow mounds goosebumps… I think that is exactly what they are
 And oh how I cannot handle how freaking cute she is!! Plus, a shout out to my brother in law….MADLOVE!
 Fresh snow..Even though it was -15, I had to stop and take this picture. The colors were amazing
 Cabbage at the farm share pick up! Love ICF!!!
 89 cents a pound for fresh organic cranberries. Score!! Made these Oatmeal fresh cranberry coconut chocolate chip cookies with them. Big hit.
 This picture was taken exactly a year ago…..The mister and I were finally putting in the bathroom of our tiny little home…. And look at that awesome sink! (another amazing salvage yard find) If you ever need or want to remodel a bathroom, I suggest using a old cast iron utility sink. So practical, so functional, so pretty.….it makes me happy everyday!
THE LOVELY CRAZY
September 19, 2015 by maximios • Blog
I have been strategic about the roots and veggies that I have chosen to bring home the past few weeks.(My farm lets you pick what you want) I know what I can buy at the store, things like carrots and potatoes, so I have been passing those up, but the roots like beets and celeriac… I have been bringing home baskets of those and hoarding them in the fridge and basement in preparation for the laps in farm fresh food and knowing that if I want to by these at the store it s going to coast me a million dollars a pound. (a for real million dollars)
Yup, lots of roots around here, especially celeriac root which is fantastic. I am kind of obsessed with celeriac, with its fibrous, knobby exterior, soft but almost meaty texture inside, and a flavor that is close to celery but so much better. I don’t know why it has taken me so long to do a posting featuring this amazing root vegetable (I eat it almost every day)
So here, an amazingly tasty, hearty but not heavy, celeriac recipe. Perfect for spring and the change into summer…. Mustard roasted celeriac with an fanatic split peas gravy that will have you licking you bowl clean.
*Note. I don’t peel my celeriac root. I really enjoy the fibrous exterior but realize that some don’t(The mister does not like it) so peel it if you want.
While the gravy is cooking, take the celeriac rounds and brush each side with yellow mustard, sprinkle with pepper, and place on a baking sheet. Stick into the oven to roast for about 25 minutes, flipping the rounds after about 10 minutes.
Serve with the fanciest knife and fork you can find. Extra yellow mustard and sriracha sauce are great condiments to have close by.
Happy Tuesday!
-C
Mustard Roasted Celeriac with Split Pea Gravy
Preheat oven to 400 degrees
Small dice the carrot, parsnip and onion and throw into a large pot. Spinkle with salt and pepper, add in the thyme and bay leaf and add a splash of water. Stick on stove on medium heat and stir. Let cook until the veggies become soft and fragrant. Now add in the split peas and 2 cups of water. Bring to a boil then cover and turn heat down to medium low. Let cook until the split peas become tender (about 25 minutes) string on occasion and adding more water if the peas are not completely summered while cooking.
Once the peas are tender, let cool for a few minutes, remove bay leaf, and either dump into a blender or blend with an immersion blender until nice and creamy. If gravy seems to thick, add in more water.
Scrub or peel celeriac roots and slice them into 1/2 inch think rounds. Place on a baking sheet and brush mustard on both sides and spindle with pepper. Stick into oven for about 10 minutes, flip, then back into the oven for another 15 or so minutes, or unit the celeriac is tender.
When the celeriac is done remove from oven and stick a few rounds on a bed of spinach (or not, or any kind of grain or green you like) Top with a hearty helping of the gravy and toss on some chopped up tomatoes.
Eat with at knife and fork like a fancy person.
Yesterday I spent the entire day (ok maybe not the entire day), but a the better part of the afternoon defrosting my freezer. Sure, I do the occasional chip chop here and there, just enough from around the freezer door so it will close, but ever few months I notice that everything in the fridge is not staying cold and that the freezer is not freezing stuff. Thats when I know its for real time to defrost. So a few days ago when I noticed my bananas were turing to liquid in the freezer, I knew it what I had to do….Completely empty the fridge and melt/hack away the 2-4 inches of ice build up that accumulated. It is such a freaking pain in the ass.So on this defrosting day, I took all the stuff from the freezer, stuck it in a cooler, and the rest of the stuff, which is basically all veggies, I just tossed on the table. As I am hacking away with a metal spatual, a wooden spoon, and a constant rotation of pots of boiling water, I was thinking about dinner. I figured I might as well just eat up as much of the veggies as I could, you know, so I didn’t have to put them back in the fridge. And also, I was getting pretty annoyed because this particular defrosting session was taking way longer the anticipated, which made making dinner seem like another pain in the ass. I figured I might as well just eat everything that is already out on the table, which pretty much narrowed down the “whats for dinner” conversations because it was already all over the place. And so dinner was a humongo salad for me, and for the mister, I made him a monster of a veggie sandwich. (my salad was exactly the same stuff as the sandwich, minus the bagel) Easy, fast, super duper yummy, pretty and piled so high with tons of veggies that the fridge is pretty much empty now.
Look at the is beast. I don’t call it a monster sandwich for nothing.
The stuff included in this monster veggie sandwich..
Romaine lettuce, tomato, avocado for there is not real sandwich without them. Thinly sliced radishes, cucumber,a and onion for nice crispy crunch. Shredded beets, carrots, and purple cabbage to give more crunch and a bit of sweetness. Then of course there needs to be something pickled, so I used banana peppers cause they are the SHIT!! And lastly some hummus for a nice creamy finish (plus a bit of protein) and yellow mustard because mustard on everything is just right. Heres to a mountain if goodness that is no longer in the fridge! Served with a another mountain of roasted parsnips and carrots (more stuff from the fridge) and a tall glass of iced tea.
Lucky that today is farm share pick up cause the fridge is pretty much on empty.
Yea it’s Thursday!!!!
-C
A Monster Veggie Sandwich
Note. This is just a guide.. Feel free to use whatever veggies you fancy.
To assemble. Ready your bread.. Toast if you want, and stick it on a plate
On either side, smear the hummus and the mustard.
Pick a side, start to stack by evenly disrupting veggies on top of veggies. Place the second piece of bread on top and giving a little smooth to keep it together.
And go at it. Cut in half or don’t. Have a napkin or a long sleeve ready to wipe your face.
So if you are anything of a mustard connoisseur, you really must, at least once, make your own batch.(It’s so easy!) And you will love it and share it with all your friends and they will think you are a bad ass for making your own mustard and your life will just be so great. All because you are now a mustard maker. Yes.
Note- If you want, add in a pinch of any spice that you want.. Chili flakes, granulated garlic, turmeric…. And you can use the vinegar of your choice. I like apple cider because its mellow with a slight sweetness but white or sherry or any vinegar would be great. Even left over picked juice is fantastic too.
Taste and add another pinch of salt if its needed and……..
Enjoy and have a great Tuesday full of mustard and stuff!
-C
Whole Grain Mustard
Combine all ingredients into a large jar that has at least a few extras inches for the seed to expand. Leave on counter for 8-12 hours.
Once seeds are nice and soft and have expanded, either eat as is (Mustard seed caviar) or blend the seeds to desired consistency (I like it half smooth, half seedy) Add a pinch more or salt and another splash or two of vinegar to help blend.
Refrigerate and use on anything and everytihng.
So maybe this might seem a little out of your normal food routine, but why not try it? Trust me….you will love it and everyone you make it for will think you are a number 1 badass too.
Notes…. I used white beans, but I have also done this with chick peas and lentils. All are fantastic. Also, I did not peel my beets because I never do.(I do not peel anything the skin is full of goodness and I love the taste) If you don’t want to eat the skin, then peel them. Cabbage is cut into inch thick slabs… I like to us the inter most part of a cabbage head cause I like the core. But use any cut that you want. 2 beets are chopped into chunkers and both the cabbage and the beets are placed on a lightly oiled baking sheets, seasoned with salt and pepper, and stuck into the oven for 20-25 minutes at 400 degrees.
And now I am #1
Happy Wednesday… Keep it good!
-C
Beet and Bean Cabbage Steaks
Makes 2 Thick Cut Steaks
Preheat Oven to 4oo degrees
Cut two 1 ish inch thick rounds of cabbage from the widest part of the head. Place on a lightly oiled baking sheet. Chop beets into chunks and toss on same baking sheet.(Peel if you want) Sprinkle everything with salt and pepper. Stick into oven for 20-25 minutes or until the beets and cabbage are tender. Remove veggies from oven and place roasted beets into a blender (or bowl if using a hand blender) but leave the cabbage on the baking sheet. Add the white beans, the juice of half a lemon, and salt and pepper to the beets and puree until smooth. Scoop equal amounts of the mixture to each cabbage steak, sprinkle with pepper and place back into oven for another 5-10 minutes to give the beans and beets a nice crunchy crust (You can skip this step if you don’t want to be crusty)
Remove from oven, stick on a plate and drizzle with mustard….Fork and knife are good ways to eat it, but eating it with you fingers makes less dirty dishes.
What is a kohlrabi you ask? It’s kind of a cross between a turnip and a cabbage that is usually the size of a baseball. It can be eaten raw (I like chunks dipped in mustard) or cooked. (roasted chunks dipped in mustard) It pairs well with sweet stuff like apples and honey, or in any savory stuff. Its one of my favorite vegetables (I say that about them all!)
So now that you know about kohlrabi (if you didn’t already) its time to get yourself some and make this soup. Because for real, I am not kidding when I say that this is one of the best soups that I have ever made. You really must try it. And do it soon because hopefully in the next few weeks the soup weather will turn into fresh pea weather and we might not want soup as much (I eat soup all year long)
Peel the kohlrabis tough skin off and chop up into chunks. Chop the carrot, garlic and onion as well .
And eat one of the greatest soups ever!
Happy Day Wednesday!
-C
Creamy Kohlrabi Soup with Asparagus
Peel outer layer of kohlrabis. Roughly chop the onion, carrot, kohlrabi and garlic and stick it all into large dutch oven or stock pot. Add water until veggies are half submerged . Add a good sprinkle of salt and pepper and place on burner on medium heat and cover. Check ever 5 or so minutes and give the pot a good stir. After about 25 minutes, all the veggies should be very tender and almost fall apart when stuck with a fork. With an immersion blender or regular blender, blend till smooth, adding water until soup is at your desired constancy. Return soup to medium heat. Small dice asparagus and add to pot. (I added 2 extra whole pieces and fished them put once cooked for garnish.) Keep on heat for another 5-10 minutes until asparagus is cooked.
Scoop into bowl and squirt top with yellow mustard and top with a spear of cooked asparagus.
Eat with a spoon and lick bowl clean.
Yup, I eat this at least once a day. It’s that good (and easy). Now I must admit that I don’t usually have such pretty carrots (The mister gave me this rainbow of carrots for my birthday) and I usually don’t chop the carrots oh so nicely or have a little vessel of mustard, but I figured for the sake of a picture, you would rather see this then a picture of me standing with the fridge open, chomping on a huge unpeeled carrot, squirting mustard directly in my mouth. (that’s how I usually eat most of my snacks)
Today I kept it simple with plain yellow mustard, but I sometimes spice it up with horseradish or jalapeno mustard. Or once in a while I’ll do mustard and sprinkle on (or in my mouth) some nutritional yeast, garlic powder or even red pepper flakes for a little kick. The possibilities of mustard on carrots it endless.
You might be saying to yourself that this is crazy, but really, is it any weirder then some of the things that you eat that others find kind of strange? So maybe just try it. I promise, you won’t be disappointed.
Happy Monday!
-C
What a way to start the day, with a mouth full of c words…….Caraway, cauliflower, chick peas and cabbage…What did you think I meant?
This week has been nippy, no, its been chilly…..nah, it’s been freaking freezing! Yeah, freezing cold. When I woke up this morning to walk the pup, it was 5 degrees. So needless to say, when it gets this cold, I like to keep inside. Tying not to be a complete lazy bones, I went to town on my spices… refilling jars with all the little baggies scattering the kitchen, screwing on lids, and wiping down the shelves. Not a bad accomplishment for a day. While cleaning I came upon a little bag or caraway seeds, Not enough to warrant a jar on the wall, but defiantly enough for one dish.
When I think of the bright, somewhat sweet and peppery caraway, I think cabbage.(anything cabbage and I am sold) A big pan cabbage, added cauliflower for the mister,(his favorite) creamy chick peas because we need protein and they be tasty, and of course mustard, because everything tastes better with mustard.(I’ll let you in on a little secret.I eat a lot of mustard, I am kind of obsessed. Mustards of all kind; grainy, homemade, dijon…but usually just plan old yellow. And I eat it on everything.. but my go to is French’s yellow mustard and carrots…don’t judge) A warm, bright and filling dish, perfect for a freezing cold evening stuck inside. You can eat it as main dish or add a pile of quinoa or wild rice, or even a big plate of greens. What ever say you eat it, you and your stomach will be happy.(If your worries about cabbage bloat..don’t be. Cooking cabbage helps breaks down the enzymes that create gas, plus caraway has anti bloating properties…WIN!)
Cabbage, cauliflower,(fresh of frozen….I used frozen in this recipe) pre-cooked or canned chick peas, caraway seeds, yellow mustard, and salt..(I added pepper too)
Chop the cabbage and toss into a lightly oiled pan with the rest of the stuff. Heat pan with everything but water for a couple of minutes.. to warm the caraway and give everything a cooking head start, then add the water. Stick a lid on it and let simmer. After about 15 minutes, give it a stir or two and do a taste test. At this point, it’s up to you…how cooked you want the veggies? I kept mine cooking for another 10 minutes. I also added another 1/2 cup of water. Not enough water and the pan will burn, a little extra water is good, it creates a yummy broth.
When you are happy with the flavor and doneness, eat it. I made myself a bowl with a heap of pickled beets(holy yes!). I am sorry if you don’t have any pickled beets, but the dish is still amazing without them. Fresh ground pepper really does the trick too!
So there you go, make it tonight, it will make you warm,smart and happy
-C
serves 2-3
Lightly oil a medium sized skillet and add all ingredients except water. Heat for a few minutes to warm up veggie and caraway seeds then add a 1 1/2 cups of water. Keep on medium heat with a lid and stir on occasion If water evaporates completely out, add another 1/2 cup. Dish is done when veggies are tender.. about 20 minutes….but whenever tastes best to you!