HEY Hey Hey… It’s Taco TUESDAY, which means that you are obligated as consumer of food to eat some tacos today!
So ok, I am not going to lie, these tacos were not actually made on a Tuesday (GASP) but were made in lu of pizza Friday (another GASP!!)
But guess what? No one died. People were happy. Food was fantastic, and there was no mention of the pizza that was not. So sure, taco tuesday is totally a thing around here, but you know how “Nobady puts baby in a corner”.. well nobody buts tacos in a corner. We don’t let the day of the week depict when tacos are eaten cause we think tacos are for everyday!
And these tacos, well, I got down with these. Made with lentils, cause lentils are the best, and topped with a hearty scoop of super fresh, chunky veggie salsa…. Not much is better then that. Easy and fast with lots of pretty in every bite, these tacos are a great addition to any taco dinner rotation!
Now lets get taco-ing!!!
The stuff. First off, you are going to need some type of taco shell.. soft or hard or both , that is entirely up to you.( I made taco shells a little early in the day, but store bought is totally cool.) Also need lentils, water to cook the lentils, a jalapeño (optional), taco seasoning (pre blended or your own blend) and onion. Also needed is a gigantic tomato, some red cabbage, a few kale leaves, a lime, and salt and pepper.
To get this party started, chop up half the onion, the tomato, cabbage ,and kale and toss into a big bowl. Oh, and chop up the cilantro and toss that in as well.
Sprinkle with salt and add the juice of the lime. Mix oh mix and set aside to let all the flavors meld.
Now that the salsa is doing it’s thing, chop up the jalapeño and the other half of onion and toss into a big skillet and place on medium heat.
And when the bits start to brown like so…
Dump the lentils in to the pan with water.Bring it all to a boil then turn heat down to low.. Add in the taco seasoning and sprinkle of salt and pepper and place some type of lid on ithe pan.
And simmered until cooked.
Note. Check the lentils every few minutes while they are cooking. If you think they seems to dry, add in another 1/2 cup of water.
Now it’s ssembly time! Lentils in shell, topped with a generous amount of salsa. That’s it! Maybe some guacamole would be nice (I had an avocado saved for guac, but it was rotten on the inside.. I was super pissed) But with or without, these are some freak yeah yummy tacos! I served my next to a bed of some jasmine rice which was nice, but do what you want my friends.
Happy Taco Tuesday! (or any taco day!)
-C
Makes about 8 -10 tacos
For the Lentil Filling
1 cup dried lentils
2 1/2 -3 cups water
2 tablespoons taco seasoning*
1/2 of an onion
1 jalapeño
Fot the Garden Veggie Salsa
2 big tomatoes (or one gigantic tomato)
1/4 head of red(or green) cabbage (about 2 cups shredded)
1/2 of an onion
4-5 kale leaves
1 juicy lime (2 if they are not very juicy)
a bunch of cilantro
salt and pepper
And don’t forget the taco shells!
*Note. You can use any type of taco seasoning that you like, store bought or home made. I make my own with cumin, chili powder, onion powder, garlic powder, and a little coriander.
Dice the tomato and 1/2 the onion into small chunks and toss into a big bowl. Finely chop the cabbage an the kale into small shreds and toss that into the bowl. And chop up as much cilantro as you would like and that goes into the bowl as well. Spinkle with some salt and add in the juice of the lime. Mix everything all around and set aside.
Once the salsa is made and sitting, chop the jalapeño and other half of onion and toss into a large skillet. Place on medium heat for a few minutes until the pepper and onion start to brown. Now dump in dried lentils and 2 1/2 cups of water. Turn heat to high and bring to a boil, them back down to low. Seaosn with salt, add in the taco seasoning, and stick a lid (or cover with something), and let simmer for about 20- 25 minutes or until the lentils have absorbed all the water and are nice and soft. If you find the lentils are still hard and there is no liquid, , add in another 1/2 cup of water.
Once the lentils are cooked to your liking, remove from heat and get assemble tacos.
Scoops some lentil mixture into shells. Add on a big scoop of the fresh veggie salsa and eat with you face.
Guacamole, cheese, sour cream, or whatever are optional topping that you may consider adding but are definitely not necessary. .
I probabaly have already told you, but August is for sure my favorite month of the year (well,one of my favorites)
There is bounties of bounties of fresh, sweet and colorful, oh so juicy, crispy crisp, just so f ing amazing, produce exploding all over the place. I have probably gained like 75 thousand pounds in the past month due to all of the fruits and veggies that I have been consuming. I am starting to consider it a full time job just to keep up with the eating.
Another reason why I love August so much is becauuse the days are still nice and warm, but the nights are starting to cool which means I get to make so much soup!!!!!.
This soup is the freshest freshy soup yet. Everything is from the farm and or the garden (except the salt pepper, vinegar and oil), some picked within hours of me making this.
. I am a lucky/spolied veggie brat.
Anyways. This soup. The fresh tomato base gives it a sweet, slightly acidic kick. So super creamy due to the lovely earthy stocks of the chard. Slightly spicy and earthy from the arugula* and chard green green. This soup… it just tastes so fresh and clean, yet hearty and satisfying. A perfect soup for a mid August night, eating outside, watching the sun slide behind the mountains and the temperature dropping just enough that you might want a light sweater. Or you can just eat it from the pot in the kitchen while watching TV. It’s good eating anyway you want.
*Here in America, it’s called arugula. Else where , it’s called rocket. I wish we all called it rocket, although I do like the name arugula, but for like my first born child or maybe a pet goldfish. Anyway, rocket is arugula, or vice versa.
Soup time!.
The stuff. Some big fresh tomatoes, a few stalks of chard, and a few handfuls of arugaula (aka rocket). A couple carrots, an onion, some garlic, salt and pepper and a bit of olive oil.. Oh, and I added some balsamic vinegar, which for some reason didn’t make it into the picture (sorry vinegar)
Start by removing the chard leaves from the stalks. Set aside leave with the arugula. Chop up the carrot, chard stems, onion and garlic and toss into a big pot with a drizzle of olive oil, a splash of water, and a sprinkle of salt and pepper. Stir around and stick o nthe stove on medium heat for about 10 minutes until the veggies start to soften up.
Now chop up the tomatoes into chunks and toss those right into the pot with the other stuff. Add in a few cups water and a few glugs of balazmic vinegar. Bring everything to a boil and then turn heat to medium low and place a lid on pot and let cook at medium heat for another 20 ish minutes, or until the tomatoes are falling apart.
Now that everything is all cooked up, blend it up.
And now take the chard leaves and the aruglula and chop into little pieces….into the pot they go.
Mix it all up.. and take the blender to the soup again….if you want a smaller sized bite.
Soup Into bowls..Then into mouth.
Happy August!!
And hey hey hey.. Have the best weekend!
-C
4-5 large fresh tomatoes
4 large stalks of rainbow chard
2-3 big handfuls of arugula
1 medium onion
1 large or 2 small carrots
4-5 garlic cloves
2-3glugs (about 2 tablespoons) balsamic vinegar
3 cups water
olive oil
salt and pepper
To start, remove stalks of chard from leaves and chop stalks, onion, carrot and garlic into chunks and place int a big pot with a drizzle of olive oil, a splash or water, and spinkle of salt and pepper. Place on stove on medium low heat sand cooke the veggies down until starting to soften and garlic is becoming fragrant. While that cooking, remove core from tomatoes and dice them up. Toss into pot with the cooked down veggies with the vinegar and water. Place a lid on the pot and let cook for about 20-25 minutes or until the tomatoes are falling apart.
When cooked, using with a hand blender or a normal blender, blend the soup until smooth. (if using blender, pour back into pot)
Now take the arugula and chard leaves and chop them into wee little picese and mix into soup. If you want to, blend the greens into the soup.. but not until smooth, unless thats what you want. Cook for another 5 minutes. Taste and season with more salt and pepper to taste.
Ladle into bowl and serve with lots of fresh cracked pepper, maybe a little balsamic drizzle or even some mustard (I at left overs with mustard and it rocked my world)
HEY Hey Hey… It’s Taco TUESDAY, which means that you are obligated as consumer of food to eat some tacos today!
So ok, I am not going to lie, these tacos were not actually made on a Tuesday (GASP) but were made in lu of pizza Friday (another GASP!!)
But guess what? No one died. People were happy. Food was fantastic, and there was no mention of the pizza that was not. So sure, taco tuesday is totally a thing around here, but you know how “Nobady puts baby in a corner”.. well nobody buts tacos in a corner. We don’t let the day of the week depict when tacos are eaten cause we think tacos are for everyday!
And these tacos, well, I got down with these. Made with lentils, cause lentils are the best, and topped with a hearty scoop of super fresh, chunky veggie salsa…. Not much is better then that. Easy and fast with lots of pretty in every bite, these tacos are a great addition to any taco dinner rotation!
Now lets get taco-ing!!!
The stuff. First off, you are going to need some type of taco shell.. soft or hard or both , that is entirely up to you.( I made taco shells a little early in the day, but store bought is totally cool.) Also need lentils, water to cook the lentils, a jalapeño (optional), taco seasoning (pre blended or your own blend) and onion. Also needed is a gigantic tomato, some red cabbage, a few kale leaves, a lime, and salt and pepper.
To get this party started, chop up half the onion, the tomato, cabbage ,and kale and toss into a big bowl. Oh, and chop up the cilantro and toss that in as well.
Sprinkle with salt and add the juice of the lime. Mix oh mix and set aside to let all the flavors meld.
Now that the salsa is doing it’s thing, chop up the jalapeño and the other half of onion and toss into a big skillet and place on medium heat.
And when the bits start to brown like so…
Dump the lentils in to the pan with water.Bring it all to a boil then turn heat down to low.. Add in the taco seasoning and sprinkle of salt and pepper and place some type of lid on ithe pan.
And simmered until cooked.
Note. Check the lentils every few minutes while they are cooking. If you think they seems to dry, add in another 1/2 cup of water.
Now it’s ssembly time! Lentils in shell, topped with a generous amount of salsa. That’s it! Maybe some guacamole would be nice (I had an avocado saved for guac, but it was rotten on the inside.. I was super pissed) But with or without, these are some freak yeah yummy tacos! I served my next to a bed of some jasmine rice which was nice, but do what you want my friends.
Happy Taco Tuesday! (or any taco day!)
-C
Makes about 8 -10 tacos
For the Lentil Filling
1 cup dried lentils
2 1/2 -3 cups water
2 tablespoons taco seasoning*
1/2 of an onion
1 jalapeño
Fot the Garden Veggie Salsa
2 big tomatoes (or one gigantic tomato)
1/4 head of red(or green) cabbage (about 2 cups shredded)
1/2 of an onion
4-5 kale leaves
1 juicy lime (2 if they are not very juicy)
a bunch of cilantro
salt and pepper
And don’t forget the taco shells!
*Note. You can use any type of taco seasoning that you like, store bought or home made. I make my own with cumin, chili powder, onion powder, garlic powder, and a little coriander.
Dice the tomato and 1/2 the onion into small chunks and toss into a big bowl. Finely chop the cabbage an the kale into small shreds and toss that into the bowl. And chop up as much cilantro as you would like and that goes into the bowl as well. Spinkle with some salt and add in the juice of the lime. Mix everything all around and set aside.
Once the salsa is made and sitting, chop the jalapeño and other half of onion and toss into a large skillet. Place on medium heat for a few minutes until the pepper and onion start to brown. Now dump in dried lentils and 2 1/2 cups of water. Turn heat to high and bring to a boil, them back down to low. Seaosn with salt, add in the taco seasoning, and stick a lid (or cover with something), and let simmer for about 20- 25 minutes or until the lentils have absorbed all the water and are nice and soft. If you find the lentils are still hard and there is no liquid, , add in another 1/2 cup of water.
Once the lentils are cooked to your liking, remove from heat and get assemble tacos.
Scoops some lentil mixture into shells. Add on a big scoop of the fresh veggie salsa and eat with you face.
Guacamole, cheese, sour cream, or whatever are optional topping that you may consider adding but are definitely not necessary. .
Happy Cinco de Mayo! And what better day to share my version of my oh so fantastic pico de gallo, or as I call it, super freshy salsa.
I love me some freshy salsa, It makes me oh so happy.
I make this stuff all the time, especially during the warmer months and tomato season. I usually make a batch right before a meal, just enough to eat right away, but sometimes I ‘ll make a big batched of it, thinking I’ll save some for the next day. It never makes it past the second day in the fridge because it’s just one of those things that when you see it, you want to eat it. Weird but true. And it’s totally ok to do so cause it’s basically eating a big bowl of healthy goodness, so eat on!
It takes no time to prepare, tastes super refreshing, goes on everything, and it’s just so freaking tasty. You can eat it with tacos and chips (the mister) or like me, I like to add it to everything; salads, popcorn, or directly in my mouth.
Make one batch, make 4, it doesn’t matter cause you will eat it all, and need to make more.
The stuff. Chopped Roma tomatoes, chopped red onion, a diced jalapeño, lemon, a bunch of cilantro, and salt.
Stick all the chopped stuff into a jar and add in the juice of the lemon. Roughly chop the cilantro and add that on in with a sprinkle of salt.
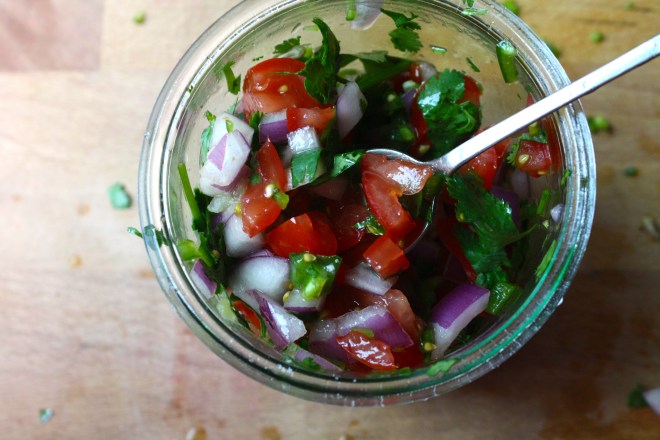
Mix it up….And thats it. Now eat… with something or without.
A spoon out of the jar is one of my favorite ways to go at it.
Happy Cinco de Mayo, Happy Tuesday!
-C
Pico de Gallo… Freshy Salsa
4-5 Roma Tomatoes
1 small red onion
1-2 jalapeños (Depending on heat preference)
1 lemon or lime
salt
1 bunch of cilantro (don’t use it if you don’t like it)
Chop tomatoes and onion and toss into a bowl or jar. Cut seeds from jalapeño(s) and dice up into little bitty pieces and add that to the tomato and onion. Roughly chop the cilantro and toss that in as well with the juice of the lemon or lime. Sprinkle with salt. Stir, let sit for a minutes, taste and then add more salt if needed.
Eat right away or make ahead and store in the fridge until ready to use.
Goes great with corn chips, tacos, toss onto salads or eat as is standing in front of the fridge. If someone is judging you, they are stupid.
I was informed yesterday that if I was going to make tortilla chips, that I better make some sweet ass dips to go with them. I kind of agree… tortilla chips need dip… or better yet, two dips. Queso and guacamole. It’s what needed to be done, and so I did it.
Guacamole is amazing… anything avocado is amazing…this guacamole is amazing. White bean guacamole is amazing. And not that we really care, but this guac is half the fat then straight up guacamole. Plus it’s packed full of protein making it a kind of super duper, must eat all of it, kind of dip. And sweet potato anything will make me happy. Making queso dip with sweet potato and cauliflower is probably one of my best food combos so far. (after eating a butt load, I felt like I was a genius and made an amazing discovery) Again, not that we need it to be, but this is also a fat-free, vegan, gluten-free, super healthy, packed full of B12, fiber and nutrients, dip for all kind of dip.…. just another reason why you cannot feel bad when you finish off half a batch before you get a chance to stick it in a serving bowl. (I might have done that)
Here is what you need for a good time:
−These tortilla chips ….Check.
−Some Chopped Veggies (I want the veggies)…..Check
−Cauliflower Sweet Potato Queso.…Check.
−White Bean Guacamole…Check.
You are now ready for it. It being this party, that party, the Super Bowl, or a Wednesday afternoon.
To the left we have the makings for the cauliflower sweet potato queso.. Steamed cauliflower, a baked sweet potato, nutritional yeast, garlic, and chopped up red onion, red bell pepper and jalapeño. To make all you need to do it take the chopped peppers, onion, and garlic and sauté for a few minutes just to slightly soften and bring out flavors. While that’s going on, take the steamed cauliflower and sweet potato(skin off..but eat it, or save it for soup or feed it to the dog) and puree together with a blender or food processor. Add in nutritional yeast, about a tablespoon or two of hot water and, salt and pepper to taste. Blend for about 5 minutes until super creamy smooth. Add in sautéed stuff and pulse just enough to incorporated the veggies but not complete blend in. Stick in a bowl.
To the right we have white bean guacamole stuff. Two cups (or one can) rinsed white beans, one ripe avocado, a lime, a few cloves of garlic,(I also added a bit of garlic powered…I like my garlic) and some chopped up red onion and tomato. Place beans, garlic, avocado and lime juice in a blender or food processor and blend until smooth. Add salt to taste and toss in the chopped tomato and onion. Blend for sec to mix that in…Stick in a bowl
Perfect…
To think that both of these dips took about 10 minutes total to make. (I had pre baked the cauliflower and sweet potato) And for real, I would spend much more time if I had too because both of these dips are so freaking good, I definitely will be making these on the regular.
So there , dips for those sweet ass chips or whatever you want to dip or them spread them on.
And he guys…It’s FRIDAY! Have a fantastic day!
-C
White Bean Guacamole
2 cups white beans (or 1 can) rinsed and drained
1 ripe avocado
3 cloves garlic
1 lime
1/4 small red onion
1 small tomato
1-2 teaspoons salt
Finley chop onion and tomato. Set aside. Place the beans, avocado, garlic, garlic powder, 1 teaspoon salt and the juice from one lime into a blender or food processor and blend until smooth. Add a splash of water if needed to help keep things moving. Taste and add more salt if needed. When smooth, add the onion and tomato and pulse a few times to mix in. Scoop into a serving dish and finish with a squeeze of lime and a bit of chopped onion and tomato.
Cauliflower Sweet Potato Queso
1 1/2 cups pre cooked steamed or roasted cauliflower
1 medium pre baked sweet potato
1/2 cup nutritional yeast
1-2 tablespoons hot water
1/2 a small red pepper
1/4 small red onion
1 jalapeño
3 cloves garlic
salt and pepper
Finely dice the red pepper, jalapeño, onion and garlic and sauté in a skillet for a few minutes until slightly soften and fragrant. Take the pre-cooked cauliflower, sweet potato (skin removed), and nutritional yeast and place in a blender or food processor. Blend for about 5 minutes until creamy and smooth. Add in a tablespoon of water to keep things moving. When completely smooth, add in sautéed veggies and pulse a few times to combine. Scoop into a serving dish. If your feeling it, top with scallions and cracked pepper.
Serve dips with chips, veggies or anything you want. Also make great spreads for sandwiches and crackers too!
Sometime the best things in life are the simplest things. For example; a walk through the woods, a really pretty smooth rock, a perfectly timed 80’s ballad song for the last push during a workout, or falling asleep on the couch and managing to not drool all over the newly washed pillows.(You know what I am talking about). I mean, can one really ask for much more?
Same goes with food. The simplest foods can really the best. Take this cashews cheese for example. All it is is soaked and blended up cashews with a bit of seasoning to cheese it up. Nothing fancy, nothing labor intensive, just straight up and straight out. You can up the greatness by adding thick cuts of fresh, sun kissed, bright and happy tomato, and a chunk of fresh bread…Not much better then that. So simple and yet so good.
And bonus. No need to turn on any heating units in order to make this cause that would suck, given that we are again having another fucking heat wave.
Agh stupid hot weather. STUPID!!!! But enough about that..
Cheese time.
The stuff. Cashews that be soakin for a while in some water, nutritional yeast (to give it that cheesy flavor), lemon, garlic, and salt and pepper. That’s for the cheese, but you are, and should, want to eat it with a large, so fresh and juicy, tomato and some kind of fresh bread situation. So you need that too!
Simple as can be. Strain cashews from soaking water and dump into a food processor with the garlic, nutritional yeast, juice of the lemon, a pinch of salt and pepper, and a little water. Turn on processor.
And it’s done when its all smooth and creamy .Adjust salt and pepper to taste.
Tranfer the goodness to a lovely jar
And that’s that.. some cheese of the cashew.
But wait, you need to eat it.. Smear all over the bread situation, cut up the tomato, place big fat slabs directly onto cashew butter and spinkle with a salt and pepper.
SImply the best… Better then all the rest!
Happy today! Stay cool my friends…stay cool.
-C
makes about 1 1/2 cups of creamy, cheesy goodness
1 cup of raw unsalted cashew soaked in water for about an hour
1/2 cup fresh water
2-4 tablespoons nutrional yeast
juice of a lemon
2-3 cloves garlic (optional )
salt and pepper
And not that you have to, but having some freshy tomatoes and some nice bread to eat the cheese on is pretty fantastical.
After you cashews have been soaking for about an hour, strain water and add them and all of the other ingredients to a food processor. Blend until smooth and creamy. Scoop into a jar.
Eat some right away on a hunk of fresh bread with lots of thick cuts of fresh tomato and place the rest in the fridge.
The cheese will get a bit thicker after being refrigerated for a while.
Use on anything , in anything, or all on it’s own. Licking jar clean is encouraged.
HEY Hey Hey… It’s Taco TUESDAY, which means that you are obligated as consumer of food to eat some tacos today!
So ok, I am not going to lie, these tacos were not actually made on a Tuesday (GASP) but were made in lu of pizza Friday (another GASP!!)
But guess what? No one died. People were happy. Food was fantastic, and there was no mention of the pizza that was not. So sure, taco tuesday is totally a thing around here, but you know how “Nobady puts baby in a corner”.. well nobody buts tacos in a corner. We don’t let the day of the week depict when tacos are eaten cause we think tacos are for everyday!
And these tacos, well, I got down with these. Made with lentils, cause lentils are the best, and topped with a hearty scoop of super fresh, chunky veggie salsa…. Not much is better then that. Easy and fast with lots of pretty in every bite, these tacos are a great addition to any taco dinner rotation!
Now lets get taco-ing!!!
The stuff. First off, you are going to need some type of taco shell.. soft or hard or both , that is entirely up to you.( I made taco shells a little early in the day, but store bought is totally cool.) Also need lentils, water to cook the lentils, a jalapeño (optional), taco seasoning (pre blended or your own blend) and onion. Also needed is a gigantic tomato, some red cabbage, a few kale leaves, a lime, and salt and pepper.
To get this party started, chop up half the onion, the tomato, cabbage ,and kale and toss into a big bowl. Oh, and chop up the cilantro and toss that in as well.
Sprinkle with salt and add the juice of the lime. Mix oh mix and set aside to let all the flavors meld.
Now that the salsa is doing it’s thing, chop up the jalapeño and the other half of onion and toss into a big skillet and place on medium heat.
And when the bits start to brown like so…
Dump the lentils in to the pan with water.Bring it all to a boil then turn heat down to low.. Add in the taco seasoning and sprinkle of salt and pepper and place some type of lid on ithe pan.
And simmered until cooked.
Note. Check the lentils every few minutes while they are cooking. If you think they seems to dry, add in another 1/2 cup of water.
Now it’s ssembly time! Lentils in shell, topped with a generous amount of salsa. That’s it! Maybe some guacamole would be nice (I had an avocado saved for guac, but it was rotten on the inside.. I was super pissed) But with or without, these are some freak yeah yummy tacos! I served my next to a bed of some jasmine rice which was nice, but do what you want my friends.
Happy Taco Tuesday! (or any taco day!)
-C
Makes about 8 -10 tacos
For the Lentil Filling
1 cup dried lentils
2 1/2 -3 cups water
2 tablespoons taco seasoning*
1/2 of an onion
1 jalapeño
Fot the Garden Veggie Salsa
2 big tomatoes (or one gigantic tomato)
1/4 head of red(or green) cabbage (about 2 cups shredded)
1/2 of an onion
4-5 kale leaves
1 juicy lime (2 if they are not very juicy)
a bunch of cilantro
salt and pepper
And don’t forget the taco shells!
*Note. You can use any type of taco seasoning that you like, store bought or home made. I make my own with cumin, chili powder, onion powder, garlic powder, and a little coriander.
Dice the tomato and 1/2 the onion into small chunks and toss into a big bowl. Finely chop the cabbage an the kale into small shreds and toss that into the bowl. And chop up as much cilantro as you would like and that goes into the bowl as well. Spinkle with some salt and add in the juice of the lime. Mix everything all around and set aside.
Once the salsa is made and sitting, chop the jalapeño and other half of onion and toss into a large skillet. Place on medium heat for a few minutes until the pepper and onion start to brown. Now dump in dried lentils and 2 1/2 cups of water. Turn heat to high and bring to a boil, them back down to low. Seaosn with salt, add in the taco seasoning, and stick a lid (or cover with something), and let simmer for about 20- 25 minutes or until the lentils have absorbed all the water and are nice and soft. If you find the lentils are still hard and there is no liquid, , add in another 1/2 cup of water.
Once the lentils are cooked to your liking, remove from heat and get assemble tacos.
Scoops some lentil mixture into shells. Add on a big scoop of the fresh veggie salsa and eat with you face.
Guacamole, cheese, sour cream, or whatever are optional topping that you may consider adding but are definitely not necessary. .
It’s official, all of the littles started school yesterday……HOORAY! (I say hooray cause school is cool and the start of school means it’s going to be fall so soon!. Also I like hanging out with the littles more when they are in school. There is more to talk about and any time away from school is cool time so they like to do more stuff and not just be summer bums)
One of the littles had his very first ever day of school. So me, being the bestest most awesomest aunt ever, made that little a celebration, hooray for school, banana ice cream cake.
This little has been bugging me for a while now to make him an ice cream cake. It all started a few months ago when I gave him a bowl of banana ice cream and told him that when he sleeps over he can have ice cream for breakfast That blew his little mind. We then proceeded to have a converastawtion about healthy food and what was ok to eat for breakfast. (He is very interested in being healthy) I then told him that whenever he sleeps over I would make a banana ice cream cake for breakfast cause bananas are healthy. But every time he is over, I never seems to have enough bananas.
Well I had the bananas and there is no better excuse then the first day of kindergarten to make a cake.. A very delicious peanut butter banana ice cream cake! And no, it wasn’t for breakfast, but the left overs can be! (there were no left overs here)
The stuff… Crispy rice cereal, peanut butter (I have some chiunky stuff at the moment, but any nut butter is good) and 4 frozen chopped up bananas.
Rice ceareal goes into a food processor with the peanut butter. Pulse until everything is all combined and starts to come togerter.
And ump the mixture into a spring for pan. If you do not have a spring form pan, a pie plate will work just as well.
Such a nice looking crust if I do say so myself. Now stick it in the freezer while you make your ice cream.
Frozen bananas go into the processor, get blended for a few mounters, and come out as ice cream…. freaking magic!
Now dump the magic ice cream into the crust.
And smooth it all nice like..and into the freezer it goes until its frozen.
After a few hours, you take it out of the freezer, remove from the pan (or leave it in the pan)
And gather your toppings. A handful of the rice cereal, some melted peanut butter, and a little melted nutella. (use whatever you want.. fruit would be great, some nuts, graham crackers, sprinkles. You get the idea)
Now, Wait for it….
Go crazy! Toppings all over!
And serve up, and watch out.. I almost got my hand eaten for kids going for seconds..
Have a fantastic day and happy back to school. to littles and parents alike!
-C
Makes a 6 inch cake
For the cake
4-5 frozen bananas
2 1/2 cups crispy rice cereal
4 tablespoon peanut butter
To garnish (use any, all or none of what you would like… and maybe not the super sugary ones if a breakfast cake)
melted peanut butter
melted chocolate
Nutella
handful of rice cereal
fresh fruit
jam
coconut flakes
sprinkles
anything else you would like!
Place cereal and peanut butter into a food processor and pulse until crumbly and combined and starts to come away from bowl.
Dump mixture into a 6 in spring form pan (or if you not have one, a pie plate works too) and press it down evenly on the bottom. Stick into freezer
Take bananas out of freezer and place into food processor. Blend until smooth. If needed, you can drizzle a tiny amount of water into it if you think it needs a little help to blend.
Once smooth, take crust from freezer and dump the nanaer ice cream on top and carefully smooth it out. Stick back into freezer (a pier of plastic over to prevent ice crystals )for at least 2 hours, or until the ice cream has completely frozen.
When it’s time to serve, remove cake from spring form (or leave it in the pie plate).and drizzle the top with melted peanut butter, melted, chocolate and another handful of crispy cereal. Or leave it bare. Or add sprinkles… the toppings are all unto you!
Eat like a camp, for breakfast or dessert.. Or eat some for dessert and then some for breakfast.
The past few weeks, whenever the mr and I have a free couple of hours, we have been hitting the countryside, in such of the best rivers (for me to play in and for him to fly fish)
We have been to many, but this one is my new favorite. There is shade to sit in, sun to bath in, and hiking trails to hike. There are little wading pools, deep spots that are great for fishing, and lost and lots of the most amazing rock formations. And bonus, the was not a mere person in site, only a few cute little frogs.
No matter that I think I broke the bottom of my foot walking barefoot in the water and jumping hard onto a rock, or that the mr came back with a touch of poison ivy (poison something). We still both love it and are looking forward to our next trip back with shoes and long sleeves!
You got any plans this weekend? If not, I am recommending that you hit a river. Bring a book, bring a picnic, and bring a little bucket for your river treasures. Soak up the last bits of the summer, take a break from the crazy, and just go. Trust, you will be happy you did.
Every year, the second weekend in August, the Stem family , siblings, cousins, even my 94 year old grandmother makes the trip from Easton PA, come together at, what we call, “the cabin.” (It’s more a house, but it started out as a cabin) . Its a little crazy, but such a good fun time.
This cabin, oh this place is magic. The air, the tree’s the streams, the mountains, and of course the people. It’s all the things that I love about life. Some of my earliest memories are from this place. Hanging out with my siblings, running around the meadow or through the woods. Playing in the swinging holes. My grandfather pulling taffy or making orange juice box houses with my grandmother. The giant rocking chair that my uncle made and all of us kids used to play on. So many camp fires and s mores. There are just so many memories because it’s been a part of my life, my whole life. It’s one of my favorite places in the world.
A little background on the place (what I can remember) Sometime in the late 70’s, my uncle and my grandparents bought a big chunk of land on the side of a mountain in the middle of nowhere Vt. After doing some clearing of trees, they went to building a cabin. (my aunt, grandmother, and dad helped a bit too). It was amazing, but quaint. A 2 story situation with a kitchen living area and one door to get in and out. At some point my grandparent ended up selling their share to my uncle and he took over the entry of the place. Over the years my uncle, (who is a carpenter, furniture designer,design professor, and all out crazy amazing person), continured to work on the place. He has added on a kitchen, a second floor bathroom, new this, and that, but never has it once felt like a patchworker pieced together place. And now the place is more like a amazing craftsman home, with just the right touches of cabin, but with two running toilets, a beautiful kitchen, electricity and running water ( There is even internet access, which sucks, but still).It is a little gem nestled on a side of a tiny mountain in one the most beautiful places.
So an awesome cabin in the woods with a bunch of crazy, but awesome people= Stem family reunion.
Here are some pictures of the shenanigans..
This past weekend, the mr, the pup, and I grabbed our stuff, chucked it into the back of the car and took of to the wood.
We ended up in Waterbury, at Little River State Park. Campsite 77 (the last one they had available!!) And from that we think, the best spot in the park.
First things first, set up camp. which involved the mr. popping up the tent and me making coffee and setting up the table.. Just cause we are in the woods doesn’t mean we can’t have a fruit bowl, right.
Then we spend the afternoon kicking around.. Into the woods we went. This place had so many hiking trails, we just let the pup lead the wayHe usually knows where he is going.
After a long afternoon of hiking and romping, we make our way back to our outdoor home for food. Dinner consisted of potato and sweet potato, squash and onions, kale, salsa and beans. It couldn’t have been any better. We did forget plates, but no matter, we managed.
Of course we needed to take an after dinner hike to the river and swim the pup. (We think he might be part fish)
He spent about an hour fetching stick and making sure that he couldn’t possibly smell any worse.
Playing with my camera and sticks. Then off to the tent for the three of us. (holy hell did the dog smell like shit)
Another morning hike and some time spent just hanging on the river. The mr fished, the pup swam and I collected rocks.
And then we went home, washed off the filth, and assed out…Then Washer got sick, but that’s a whole other story.
Camping is the best. I could live in a tent all year long. (not really all year long.. I would surely freeze to death)
So if you are thinking of camping, I highly recommend going to Little River State Park.
-C
For a little while now, we have been telling this lady (my little sis) we would take her to the big city up north. She had never been, (which is crazy cause we live so close) and wanted to just explore and take some pictures. So last week when she finally finished school for the summer, the mr, this lady, and I made the trip.
I guess the best way to start a little road trip is with a bowl or egg noodle covered in the smelliest teriyaki sauce ever ( it was 9 in the morning). Gross as hell, but i give her credit for creativity. This lady has a fantastic (and pretty freaking dirty) mind.
And really, what’s a trip to Montreal without stopping at Ikea. It’s like a house ware themed playground. So much tomfoolery!
The mr. wants to know, “is it really frozen yogurt, cause it’s too good to be yogurt?” The lady just wants an Ikea closer so she can eat ice cream and hot dogs all day, everyday.
The balls we plastic and full of water….and after wondering aloud if the balls ever dropped, this one fell onto my head.
Once in the city, we parked and set out on foot. The goal for the day was to walk, see some cool shit, and get a good cup of coffee. All of which we did. So after a few hours, tired, hot and sun burnt (we forgot the sunscreen), we dragged ass back to the car and drove home.
Until next time. (maybe we’ll take her to a strip club)
-C
The Mr. and I went and took ourselves on a rainy day nature adventure. He did some fly fishing (worst day ever for fishing) and I did some wondering. It was fantastic. And the Mr, only lost one fly and I managed only about a dozen mosquito bites! Nature days are the best!
And then as we were leaving, the clouds broke and the sun came out. It was kind of perfect.
It’s official, all of the littles started school yesterday……HOORAY! (I say hooray cause school is cool and the start of school means it’s going to be fall so soon!. Also I like hanging out with the littles more when they are in school. There is more to talk about and any time away from school is cool time so they like to do more stuff and not just be summer bums)
One of the littles had his very first ever day of school. So me, being the bestest most awesomest aunt ever, made that little a celebration, hooray for school, banana ice cream cake.
This little has been bugging me for a while now to make him an ice cream cake. It all started a few months ago when I gave him a bowl of banana ice cream and told him that when he sleeps over he can have ice cream for breakfast That blew his little mind. We then proceeded to have a converastawtion about healthy food and what was ok to eat for breakfast. (He is very interested in being healthy) I then told him that whenever he sleeps over I would make a banana ice cream cake for breakfast cause bananas are healthy. But every time he is over, I never seems to have enough bananas.
Well I had the bananas and there is no better excuse then the first day of kindergarten to make a cake.. A very delicious peanut butter banana ice cream cake! And no, it wasn’t for breakfast, but the left overs can be! (there were no left overs here)
The stuff… Crispy rice cereal, peanut butter (I have some chiunky stuff at the moment, but any nut butter is good) and 4 frozen chopped up bananas.
Rice ceareal goes into a food processor with the peanut butter. Pulse until everything is all combined and starts to come togerter.
And ump the mixture into a spring for pan. If you do not have a spring form pan, a pie plate will work just as well.
Such a nice looking crust if I do say so myself. Now stick it in the freezer while you make your ice cream.
Frozen bananas go into the processor, get blended for a few mounters, and come out as ice cream…. freaking magic!
Now dump the magic ice cream into the crust.
And smooth it all nice like..and into the freezer it goes until its frozen.
After a few hours, you take it out of the freezer, remove from the pan (or leave it in the pan)
And gather your toppings. A handful of the rice cereal, some melted peanut butter, and a little melted nutella. (use whatever you want.. fruit would be great, some nuts, graham crackers, sprinkles. You get the idea)
Now, Wait for it….
Go crazy! Toppings all over!
And serve up, and watch out.. I almost got my hand eaten for kids going for seconds..
Have a fantastic day and happy back to school. to littles and parents alike!
-C
Makes a 6 inch cake
For the cake
4-5 frozen bananas
2 1/2 cups crispy rice cereal
4 tablespoon peanut butter
To garnish (use any, all or none of what you would like… and maybe not the super sugary ones if a breakfast cake)
melted peanut butter
melted chocolate
Nutella
handful of rice cereal
fresh fruit
jam
coconut flakes
sprinkles
anything else you would like!
Place cereal and peanut butter into a food processor and pulse until crumbly and combined and starts to come away from bowl.
Dump mixture into a 6 in spring form pan (or if you not have one, a pie plate works too) and press it down evenly on the bottom. Stick into freezer
Take bananas out of freezer and place into food processor. Blend until smooth. If needed, you can drizzle a tiny amount of water into it if you think it needs a little help to blend.
Once smooth, take crust from freezer and dump the nanaer ice cream on top and carefully smooth it out. Stick back into freezer (a pier of plastic over to prevent ice crystals )for at least 2 hours, or until the ice cream has completely frozen.
When it’s time to serve, remove cake from spring form (or leave it in the pie plate).and drizzle the top with melted peanut butter, melted, chocolate and another handful of crispy cereal. Or leave it bare. Or add sprinkles… the toppings are all unto you!
Eat like a camp, for breakfast or dessert.. Or eat some for dessert and then some for breakfast.
This time of year, there are so many reasons for popsicles, but I think that main reason is that I don’t want to willingly turn on the oven for any amount of time. It’s just to f-ing hot.
Lately, it’s been hot. And humid. And gross. Just way too hot to make anything in the oven. So when I grabbed the rhubarb out of the fridge, knowing that if I didn’t use it soon it would go bad, I immediately thought to make pie. Then I was like,” hell no, not going to happen. I need to freeze this shit”. And freeze it I did..into the greatest, slightly sweet, slightly tart, bright pink popsicles of happiness. They are really the perfect little frozen treat. Not overly sweet and sticky, have a lot a fresh clean flavor, and takes the edge off of the super summer heat and humidity, even if only for a few minutes.
I love popsicles.
But sadly this is probably the last rhubarb for the season (Or maybe the second to last..I think I saw some for sale at the coop a few days ago)
So get it while you can and make these popsicles!
The stuff. Rhubarb, a lime and a little bit of honey (or any sweetener you like). Plus you are going to need some water, but I bet you have some of that on hand.
Chop the rhubarb into inch chunks and toss into a big pot with the water. Stick on the stove and bring to a boil then turn heat to low and let simmer.
Once the rhubarb is so soft that it falls apart, remove from heat and let cool for a few minutes.
With a fine mesh stainer, strain juice into a large jar or bowl.
Now you have the juice for the popsicles and the left over rhubarb stuff is the rhubarb butter.
Place the rhubarb butter into a jar, adding a little honey(or whatever) if you want and eat with anything and everything ( I’ve been adding it to the mr’s yogurt and just eating it with a spoon)
And now add the juice of the lime to the rhubarb juice and add a little honey or whatever sweetness to taste.
And add the rhubarb juice to your popsicle molds and stick in the freezer with sticks tops or wait two hours and add wooden sticks.
When frozen, run the mold under a little hot water and pop those suckers out.
A two for one deal here. And timed perfectly. You have the rhubarb butter to eat while you wait for the popsicles to freeze. So smart
Happy Tuesday.. Keep it cool!
-C
makes 6 4oz popsicles and about a cup of jam
3 cups chopped rhubarb
2 1/2 cups water
1 lime
Anywhere from 4 tablespoons honey (2 for popsicles and 2 for jam)
Chop the rhubarb into inch ish chunks and stick into a big pot with water. Turn on high heat and bring to a boil. Once boiling, turn heat to low and simmer until the rhubarb is so soft its falling apart. Remove from heat and let cool for a few minutes. Take a big jug or bowl with a fine mesh strainer,strain the liquid from the solids. You can use a wooden spoon to stir around to help get the juice flowing. Place remaining solids into a jar and add as little or as much or as little honey (any sweetener you like) and give it a stir. Thats your jam
Now for the popsicles. Add the juice of the lime and a tablespoon or two of honey (or whatever sweeteners you like) and mix around. Pour into popsicle molds and stick into freezer.Know your mold.. if you need to insert a stick, do so after about 2 hours.
When pops are frozen, remove from mold and eat your heart out.
Because sometimes you just need to think of yourself and what will make you happy. Eating this makes me happy.
This flavor situation just made so much sense. All three flavors on their own are fantastic, but combined into one super amazing frozen sorbet treat.. I mean, like WHOA! I was inspired by the 4 really ripe and juicy mangos I had waiting on the counter. I had also just made a batch of jalapeño jam and was thinking about how nicely jalapeños and mangos go together. And I happened to have a can of coconut cream on hand. My first idea was to do a savory dinner type thing, but after a day of heat and humity, all I wanted was something cold and easy. Ding ding… Lets freeze this shit and turn it into a sorbet.
Such a good idea.
The Stuff. Simple as can be. 2 mangos, peeled, diced and frozen. A can of coconut cream, and some jalepno jam.
Frozen mango is really easy to blend. Just stick into a blending device and add a little bit of water. Mix until a nice creamy puree is formed. And try not to eat it all right now.
Whip up the coconut cream. You don’t need to go to crazy and make it all fluffy, just whisk it for a minute or two just to loosen it up.
Time to scoop. First a few big dollops of the frozen mango puree. Try to work fast to prevent the mango from completely thawing out.
Next, scoop some of the coconut cream and drop a few scoops of jalapeño jam right on in there to. Add more mango, more coconut , and more jam until you container is full.
Note.. My sister had the idea of mixing he jalapeño jam into the mango puree. I think I might try that next time.
Take a knife and cut through the sorbet, first width wise, then length, then width. or whatever. You’re just trying to kind of marble and swirl the flavors together.
Once your done playing and swirling, into the freezer it goes….
Remove from freezer when completely frozen and do what you need to do. I flipped the pan and sliced into slabs on a cooking sheet, and me, the sister and the mr. took turns with the fork and ate it off the pan. We be so classy. But go ahead and use o plate or scoop it or maybe even eat directly from the container with a fork. No judgement here.
Eat so good!
-C
2 1/2 cups fresh mango (2 large mangos), peeled, diced and frozen. (Or just buy frozen mango)
1/2 cup water
1/2 can of cold coconut cream (I used Ttrader Joes.. It’s the best)
around 1/3 cup Jalapeño Jam.. more if you like (Here is the recipe for that )
Place frozen mango into a blending device, add about 1/3- 1/2 cup water and blend until a smooth puree. Open coconut cream, drain the liquid, and place half the cream into a bowl. Whisk until loose and slightly fluffy .
In a freezer safe container. scoop a few dollops of the mango puree, add in a few dollops if coconut cream and then a few dollops of the jalapeño jam. Keep adding dollops of the stuff until you use up all of the ingredients. Take a knife and run through thet sorbet length and width wise a few times to swirl the flavors. Place in freezer for at least 3 hours or until fully frozen
Remove and either scoop, slice, or eat directly from container.
It’s Mother’s Day weekend which means that you and I and everyone out there should feel the slightest bit obligated to at least do a little something nice for your mom for the mere fact that you were borned. And really what better way to celebrate mom than with food… It really is the least that you can do. (I think mom’s also like flowers and cards and handmade pasta necklaces) My mom is defiantly about the food. (she has had her fair share or pasta necklaces) A many years back on Mother’s day, this sweet little girl (me) made her mother a special breakfast treat…blueberry scones. And ever since that day, for every freaking holiday, birthday, whatever day, my mother requests (demands) a batch of those scones. She is always saying that these are her favorite treat and that no one has ever made them as good as I do. (I guess that just reiterates that I am her number 1 child)
And for the last few months my mom has been up my butt, trying to get me to make her some. Not going to lie, I have been saying I’ll get her a batch, but for some reason, I haven’t gotten around to making them. So two birds here.. Make the scones and she gets off my back for a least a little while (a month.. maybe 2) and I give her a fantastic Mothers day gift that I know she will love.
So here they are , oh mother of mine. Blueberry scones!
The stuff. Flour, baking soda, baking powder and salt. A bit of sugar, vanilla, buttermilk, and butter (use vegan butter and nut milk if you want to make them vegan) And of course we need the blueberries which can be fresh or frozen. I usually use fresh, but the store I stopped at only had really big containers of fresh that were like $1000 dollars a piece and the organic frozen happen to be on super sale. So you know, the cheap in me won that battle. So into the bowl goes all the dry stuff; flour, baking powder and soda, salt, and the sugar. Give it a good whisk.
Now for my special trick for a perfectly distributed cold butter in a pastry. Freeze your butter and grate it!
With a large wholed grater, grate the frozen butter directly into the bowl with the dry, stoping a few times to toss the butter chunks around so you don’t end up with a huge pile of grated butter. When it’s all grated, gently toss around so the butter is evenly distributed. Now dump the blueberries into the flour mixture. Toss them around to give them a coat of flour. Add in the buttermilk and vanilla and give a little mix until liquid is absorbed. We are trying to handle the dough as little as possible.Turn mixture onto counter. It’s very loose, but thats what it should look like. Very gently and with as little handling as possible, gather dough up, knead a few times till everything just comes together. Press dough into a disk that is roughly an inch thick…. and it doesn’t need to be perfect. Cut the disk into even sized pieces. Do 6 big, 8 normal, maybe even 10 smaller. Whatever size you like. (I did 8) Place the scones onto a baking sheet, using a spatula to transfer, and sprinkle the tops with a little bit of sugar. Into a preheated oven for about 20 minutes.And when the scones look all nice and browned and a tester comes out clean. remove and either serve right away warm, preferably with huge cup of coffee or tea, or stick on a rack to cool before storing in air tight container.
Perfect to serve as a breakfast pastry, at brunch, or even as a dessert. A nice little treat for a special lady. (dudes can eat them too)
Happy Mothers Day Mom! Thanks for having me!
And Happy Weekend!!!
-C
Blueberry Scones
2 cups all purpose flour
1/3 cup sugar plus 2 tablespoons to sprinkle on top
1 teaspoon baking powder
1 teaspoon baking soda
1/2 teaspoon salt
1/2 cup (1 stick) unsalted butter frozen or really cold (use non dairy butter like Earth Balance for vegan)
1 cup blueberries (fresh or frozen)
1 teaspoon vanilla
3/4 cup buttermilk (use non dairy milk for vegan)
Preheat oven t0 400 degrees
In a large bowl, whisk together flour, baking soda, baking powder, sugar, and salt. Take the frozen butter and grate directly into flour mixture, tossing around to evenly disrupted. Add in blueberries and toss around till coated with flour, then lastly, add vanilla to buttermilk and mix into mixture until just barely coming together. Turn mixture out onto counter and with your hands, knead mixture a few times until it forms a solid dough. Shape into a disk and smoosh down until about an inch thick. Cut into 6-10 triangles and place on a non greases baking sheet and sprinkle tops with remaining sugar. Stick into oven and bake for 20 minutes or until tops start turning a golden brown and a tester in the middle of a scone comes out clean.
Remove from baking sheet and serve warm or let cool on a rack.
Mom gets first dibs, and if she is willing to share, eat one yourself with your face.
I figured now is a good time to get this recipe out there before we get to far into spring and summer recipes because there is going to be a lot of banana ice cream filled recipe coming and I figured its a good idea to have the basic banana ice cream recipe ready for people to refer too. And because I made so much fantastic naner ice cream, I also made a cookies and cream naner ice cream for my sisters and the mister.
Comments that I got from my sisters and the mister when I made them this ice cream
-Sister one.”I give this my sister seal of approval.. It’s so good. The first dessert you have made that I liked! (not including all the other desserts that you have made that I liked)”
-Sister two- “Wow.. it looks like ice cream and feels like ice cream and tastes like ice cream.. You should make me this ice cream!” (I was confused too because I was pretty sure I just made her some)
-The mister- “I am so excited for my new fly fishing pole!”
Ok, so the naner ice cream isn’t new to the mister and he IS very much excited for his new fly fish pole. So excited that he forgot to tell me how amazing that I am and to thank me for making him a big bowl of yumminess. (It’s ok, I forgive him)
And yes, this is probably one of the easiest, most delicious, healthy and amazing frozen dessert that you will ever eat. You will probably find yourself buying mass amounts of bananas and stocking the freezer until things just start falling out. (which is also ok because it’s only bananas and you can’t have too many frozen bananas)
The stuff you need for this ice cream…. Nice and ripe bananas, peeled and then frozen* That’s it.
To make it, place frozen bananas into food processor and hit the on button. Process the crap out of the namers until nice and silky smooth.
*Note, the smaller the frozen chunks are , the faster and maybe a little easier for the blender to blend the naners into ice cream. So if you think of it, chop bananas into pieces before freezing or even after.
After all blended and smooth, either eat right away or scoop ice cream into a freezer safe container and stick in freezer. That’s the banana ice cream… And it is amazing and so so so so so addictive. I make a batch, think I am only going to eat a scoop, then find myself eating half of what I have made, but it’s ok cause it’s only bananas.
Now for the cookies and cream banana ice cream..One batch of banana ice cream, either freshly made, still in food processor or made ahead and placed in a food processor and given a good pulse to smooth it up.
Add cookies in, crushing a bit beforehand and pulse till combined. Now you have cookies and cream naner ice cream…. and everybody is happy.
Scoop into a cup, a bowl, a freezer safe container, or directly into your mouth. Be careful…. You can still get brain freeze from eating naner ice cream too fast!
Keep it real hump day drum bum!
-C
Basic Banana Ice Cream
Makes one batch. Good for 3-4 servings
4-5 ripe bananas peeled and frozen
Peel bananas and stick in a freezer bag or container and freeze. When bananas are completely frozen, break into pieces and stick into a food processor or blender and puree until silky smooth.
Eat right away or scoop into a freezer safe container for later.
Cookies and Cream Banana Ice Cream
1 batch banana ice cream
5-10 (depending on your cookie need) cream filled cookies like oreos or Trader Joe’s Joe Joe’s (These are gluten free)
In a food processor, blend banana ice cream with cookies.
Eat right away, with a utensil of choice in a container of choice.
Bowl licking is acceptable.
Spicy, crispy cauliflower… um yes please. I really like cauliflower. The mister loves it, or at least likes it better than any other vegetable. So when he asked for spicy cauliflower, well yea I am going to make it because I am so nice and really, could I say no to a veggie request? (I might have said no if it involved deep frying) Also, I found fresh cauliflower on sale! ($2.25) I don’t usually cook fresh cauliflower, but I figured at that price, it wouldn’t be bad to cook a head. (If I am cooking cauliflower, which I do a lot, I just use frozen….casue it be waaaay cheaper)
Fresh, cheap and requested veggies….those are must makes. And the mister was happy with I handed him the plate of oh so lovely looking crispy crunchy loveliness. (I kind of like to make him happy…sometimes)
The stuff. Cauliflower, chopped and broken into pieces. Corn meal mixed with salt, pepper, onion and garlic powder, and because I made this for the mister, parmesan cheese. And in the green bowl, srirsachi and a little oil. The cauliflower gets a coat of the hot sauce and then tossed around in the corn meal mixture. Handling as little as possible, place coated pieces on a lightly oiled baking sheet and stick those suckers in the oven for about a half hour, taking them out and flipping half way.And take them out of the oven when pieces tuned golden brown, stik them on a plate, and serve immediately.
A bit of spice, a bit of crispy , a lot a yum. Serve with some crunchy veggies, maybe a squeeze of lemon and definitely some type of avocado situation.
A beer would be lovely too!
Have a fantastic weekend!
-C
Spicy Crispy baked Cauliflower
1 head cauliflower, chopped or broken into florets
1/2 cup corn meal
3-4 tablespoon sriracha or your favorite hot sauce
1 tablespoon olive or coconut oil
salt and pepper
Any seasonings you might like (garlic or onion powder, parmesan cheese, national yeast…. whatever floats your boat)
Preheat oven to 400 degrees
In a bowl, mix together sriracha and oil. In a separate bowl, mix salt, pepper, any seasonings you might like, and corn meal. Take cauliflower and toss in sauce to coat. Remove from sauce and toss around in cornmeal mixture till fully coated, but try not to hand too much so the coating doesn’t come off. Place pieces on a lightly oiled baking sheet and stick into oven. Bake for about 15 minutes, remove and flip pieces. Back into the oven for another 15-20 minutes (depending on you crispy preference) Remove when golden brown (or darker if you like) and serve immediately.
Cucumber, celery, and carrots are great accompaniments.. also a little mashed avocado or guacamole is much appreciated.
TGIF!!!! For reals, because Monday-Thurday were monster days. And now that its friday, I can dig a hole and hide in it until it’s at least 30 degrees with some sunshine. (I might never get to come out.)
A few things I will bring in my hole:
food (lots of food and coffee, lots of coffee)
a soft blanket and pillow
a few books, preferably with pictures, on farming and gardening (think spring!)
the entire series of the Fresh Prince of Bel-air and a device to watch it on
toothpaste (I can use my finger to brush my teeth)
But before I leave for my hole in the ground, I made these little cake bites to get my people through the weekend. Sweet little lemony bites of rich dense cake dipped into bittersweet chocolate. (I am just so nice) They have all the pleasure or cake without the need of a fork and are much easier to give away then a big slice of cake. Plus, they are fun to make. My little sister helped and did most of the chocolate dipping. Then she and another little used their mouths to clean up the chocolate mess. It was an afternoon of chocolate all over the kitchen fun day.
So make some bites to have and to share. Or if you, like me, are digging a hole to hide in, make a batch of bites to bring with you. That’s the beauty of cake covered in a harden chocolate shell, they travel really well.Simple lemon cake stuff. Flour, baking powder and salt whisked together, Sugar and soft butter in a bowl. An egg, some vanilla, milk, and of course, the lemon.
To make the batter, cream the soften butter with the sugar until light and fluffy. Zest lemon(1 big or 2 small) into bowl with the juice of the lemon(s), the vanilla and the egg. Beat until combined. Now beat in the dry and then the milk. Keep beating for another minute until all mixed. Batter should be light and fluffy.
Batter goes into a greased and floured 9×13 baking sheet and stuck into a 375 degree oven for about 30 minutes (You can use a 9×9 baking pan. Just bake fir another 10 minutes and you will end up with thicker bites). Remove from oven and let cool for a few minutes and flip to remove cake from baking sheet. Cut cake into small pieces (I cut 4×6 to get 24 bites) and place bake into sheet and into freezer (I stuck mine outside, it was -2 degrees ) for at least 2 hours.
Frozen bites ready for the chocolate coating… Bittersweet chocolate chips and a little bit of coconut oil. Melted together all nice and shiny smooth.Now dip and slather those bites in the melted chocolate.
Oh what a lovely sister I have.. Look at her dunk….. like a boss!Fully coated and placed on a rack for the chocolate to harden. I ended up sticking the rack in the freezer for 10 minutes…They harder really fast in there.
And now you have some it, bites of cake covered in chocolate. 1 bite, 2 bites…5 bites. Eat however many you want because its Friday and because there small little bites and just because you can.
Now if you need me, I’ll be in my hole.
-C
Chocolate Lemon Cake Bite
1 1/2 cups all purpose flour
1 teaspoon baking powder
1 teaspoons salt
1 cup white sugar
1/2 cup (1 stick) soft butter
1 egg
1 teaspoon vanilla
1 cup milk
1 large or 2 small lemons
2 cups bittersweet chocolate chips
2 tablespoons coconut oil
Add butter and sugar to a large bowl and beat on medium unit light and fluffy. Ass in vanilla egg, the zest of the lemon and the juice of the lemon. Beat to incorporate. Now beat in the dry and lastly the milk.
Grease and flour either a 9×9 pan or a 9×13 baking sheet. dump batter in and smooth out. Stick in oven and bake for about 3o minutes or until a toothpick stuck into the middle comes out clean. Remove and let cool for a few minutes on a wire rack. Flip cake to remove from pan. Cut cake into bit sized pieces, 4×6 is a good size, and place back on baking sheet and stick into freezer for at least 2 hours.
When cake bites are as good as frozen, get the chocolate ready. Take the chocolate and the coconut oil and either melt in a double boiler or the microwave. Mix until smooth and make sure to full incorporate the oil. Now remove the cake bites from the freezer and dip each bite into chocolate, trying to full coat all sides. Stick onto a wire rack or a parchment lined pan to harden. They can be stuck back into the freezer to harden faster.
Finally, it’s safe to turn the oven back on. No more heatwave (PLEASE NO MORE!!!) Last week was such a bust of life, I still feel like I am recovering. But let’s not talk about anymore. Lets talk about this cauliflower situation that was a highlight of my week.
I have been meaning to do this for a while now. And I have attempted, I’ll have the intention, get the cauliflower and peppers, then somehow forget that I was going to cook it and just feed it to the mr raw, or he will just start eating at it and then the head is not intact anymore (He loves raw cauliflower). And sure, you don’t need to have a whole head of cauliflower to roast it and enjoy it, but come on, doesn’t it look super badass and pretty whole? And you can slices of it like you would a cake, a really yummy veggie cake. So yeah, it should be a whole head. Anyways, besides being pretty, this thing was freaking amazing. I love cauliflower, roasted cauliflower even more. Add to it some slightly sweet and cheesy pepper sauce, holy ho…I almost ate the entire thing myself. It was everything and more how I wanted it to turn out and am now forever going eat my cauliflower exactly like this (but probably not always). And the sauce…. I am going to make giant jars of it and stick it on everything. So good.
Now lets get to it.
The stuff. A whole head of cauliflower, a couple colorful peppers, nutritional yeast, garlic, lemon, salt and pepper, and a little bit of olive oil.
Start with the cauliflower, Trim away any big leaves from the bottom and stick the whole head into a oven safe pot big enough to hold it.. Add in a little water and stick on the stove top on medium heat to cook for a few minutes, just to give it a little head start.
And preheat the oven
Pre roasted, slightly streamed cauliflower goes into the oven until a nice golden brown and all pretty like.
While the cauliflower is roasting, roasted the peppers too.I place mine whole onto a lightly oiled cast iron pan* and stick into the oven.
Once the peppers are starting to char and have become soft and tender, remove from the oven and let cool for a few minutes or long enough for you to handle them. When cooled enough, remove the stem, seeds and any of the skin that is coming off.
*Last year I used the same cast iron pan over and over to rasot peppes and never cleaned it, or bothered to oil it. By the end of the summer, there was a 1/2 inch thick layer of hard as rock caramelized pepper juice that I had to chip it away with a chisel… so yeah. be careful of pepper juice.
Toss the roasted peppers into a food processor along with the garlic, lemon juice, nutritional yeast, a splsh of oil and s little salt and pepper.
And taste.. and try not to eat it all right now (It is so f ing good)
And take that sweet, so delocouis sauce and smother all over the roasted cauliflower.
If you want, stick it back into the oven for a few minutes to crust up a little bit, but not a necessary.You can call it here and go to town.
I stuck in back in the oven for a few minutes… But again, not necessary.
And now you have this giant, amazing, head of delicious cauliflower, waiting to be eaten. I recommend removing the head and sticking it on a cutting board, you know, for easier cutting, and also it looks pretty badass.
Cut into chunks and serve right away.
Goodness gracious was this thing so freaking good!
Have a fantastic day!
-C
1 fresh head of cauliflower
2 red(yellow or orange work too) peppers
2 -3 tablespoons nutritional yeast (the more the cheesier)
4-5 cloves of garlic
juice of a lemon
salt and pepper
olive oil
Take whole head of cauliflower and trim any big leaves or stem off bottom. Stick into a big oven safe pot with about 1/2 inch of water. Place a lid on pot and stick on medium heat for about 8-10 minutes, or until water has evaporated. and cauliflower is slightly tender.
Preheat oven to 425.
After the brief cook on the stove top, remove lid, drizzle cauliflower with a tiny bit of oil and sprinkle with a little salt and pepper. Stick into oven without the lid.
Now that the oven is on, toss peppers into oven, either on a baking sheet, pan, or on the rack if you have the space and cook until all roasted and soft (should take about 15 minutes). Remove when cooked and let cool off for a few minutes. Once cool enough to handle, remove seeds and stem and any of the skin that want to come off and stick into a food processor. Add in the garlic, nutritional yeast, lemon juice and a tiny drizzle of olive oil. Blend until smooth. Add salt and pepper to taste.
Once the head of cauliflower is cooked and browned, remove from oven and dump/ smear with the red pepper sauce. If you want, place back into oven for a few more minutes, or not. Good both ways.
Remove from pot and cut into big ass chunks. Garnish with something green and eat until you can’t eat anymore.
If by chance you have any left overs (which I highly doubt) try blending it up as soup. It is freaking fantastic!
We are having ourselves a very crazy busy week. But we area good at crazy so it’s cool. Needless to say, I have still been able to fit in some lovely outdoor activities, eating of an entire watermelon pretty much all by myself, and a little bit of light reading…. Sleep can wait right?
And a little news… I am remolding/ moving the blog!!! So next week posting is most likely going to be minimal. I am giving myself the week to get my shit together so that by this time next Sunday, I can roll out the new look. Hopefully it all works out, but you never know, I might and up deleting everything and end up with a goat sent to my house. (a goat might be nice???)
Anyway, here are a few internet things that are worth a look.
-I am all about picking peoples unwanted food. Urban food forest makes fruit free for the picking
–When to Use a Light-Colored Pan, and When to Use a Dark One Very good to know.
-The French folks are onto something good. France Passes a New Law Aimed at Cutting Food Waste.
–The Good Listener: Why Do Amusement Parks Still Crank Songs From The ’80s? Um, because 80’s music is totally RAD!
-This made me smile… Old people are cool. Awesome Elderly Street Artists Destroy Age Stereotypes In Portugal
And just a couple pictures.
The deepest green and tree airplane all over the world.
How does this bowl make me so happy?
And there was melon… And the cutest little little.

 Happy Cinco de Mayo! And what better day to share my version of my oh so fantastic pico de gallo, or as I call it, super freshy salsa.
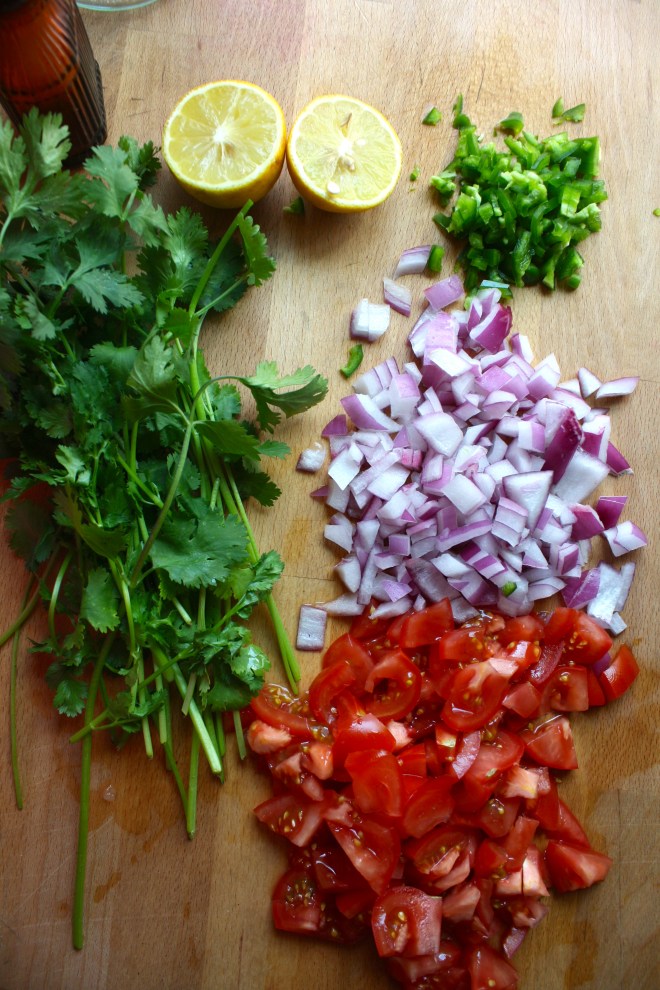 The stuff. Chopped Roma tomatoes, chopped red onion, a diced jalapeño, lemon, a bunch of cilantro, and salt.
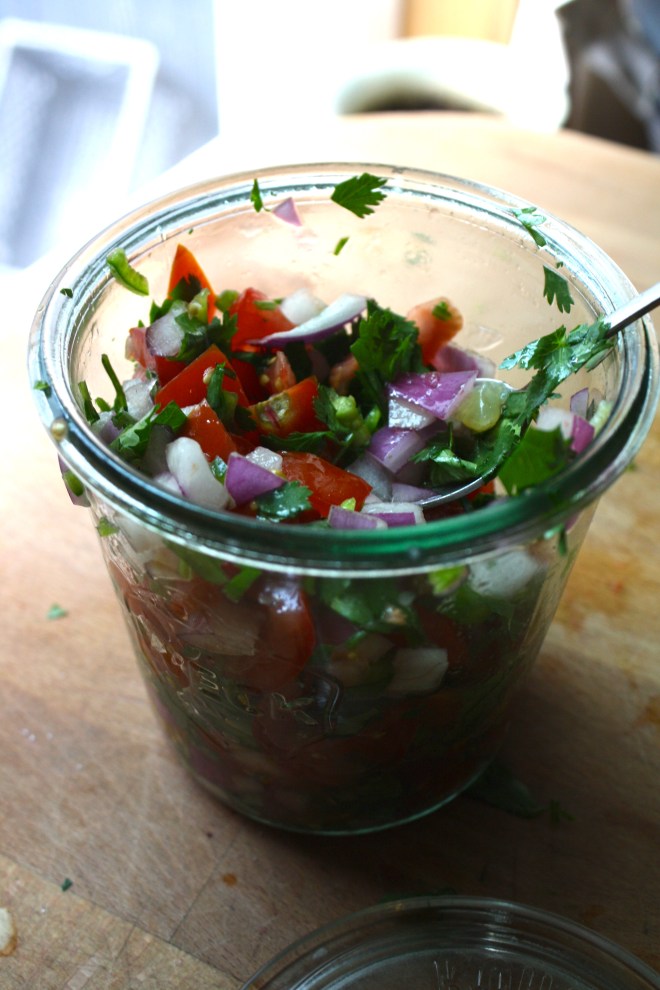 And thats it. Now eat… with something or without.
 I was informed yesterday that if I was going to make tortilla chips, that I better make some sweet ass dips to go with them. I kind of agree… tortilla chips need dip… or better yet, two dips. Queso and guacamole. It’s what needed to be done, and so I did it.

 Perfect…
 To think that both of these dips took about 10 minutes total to make. (I had pre baked the cauliflower and sweet potato) And for real, I would spend much more time if I had too because both of these dips are so freaking good, I definitely will be making these on the regular.


 It’s Mother’s Day weekend which means that you and I and everyone out there should feel the slightest bit obligated to at least do a little something nice for your mom for the mere fact that you were borned. And really what better way to celebrate mom than with food… It really is the least that you can do. (I think mom’s also like flowers and cards and handmade pasta necklaces) My mom is defiantly about the food. (she has had her fair share or pasta necklaces) A many years back on Mother’s day, this sweet little girl (me) made her mother a special breakfast treat…blueberry scones. And ever since that day, for every freaking holiday, birthday, whatever day, my mother requests (demands) a batch of those scones. She is always saying that these are her favorite treat and that no one has ever made them as good as I do. (I guess that just reiterates that I am her number 1 child)
 The stuff. Flour, baking soda, baking powder and salt. A bit of sugar, vanilla, buttermilk, and butter (use vegan butter and nut milk if you want to make them vegan) And of course we need the blueberries which can be fresh or frozen. I usually use fresh, but the store I stopped at only had really big containers of fresh that were like $1000 dollars a piece and the organic frozen happen to be on super sale. So you know, the cheap in me won that battle.
  So into the bowl goes all the dry stuff; flour, baking powder and soda, salt, and the sugar. Give it a good whisk.
 Now dump the blueberries into the flour mixture. Toss them around to give them a coat of flour. Add in the buttermilk and vanilla and give a little mix until liquid is absorbed. We are trying to handle the dough as little as possible.
 Turn mixture onto counter. It’s very loose, but thats what it should look like.
  Very gently and with as little handling as possible, gather dough up, knead a few times till everything just comes together. Press dough into a disk that is roughly an inch thick…. and it doesn’t need to be perfect.
  Cut the disk into even sized pieces. Do 6 big, 8 normal, maybe even 10 smaller. Whatever size you like. (I did 8) Place the scones onto a baking sheet, using a spatula to transfer, and sprinkle the tops with a little bit of sugar. Into a preheated oven for about 20 minutes.
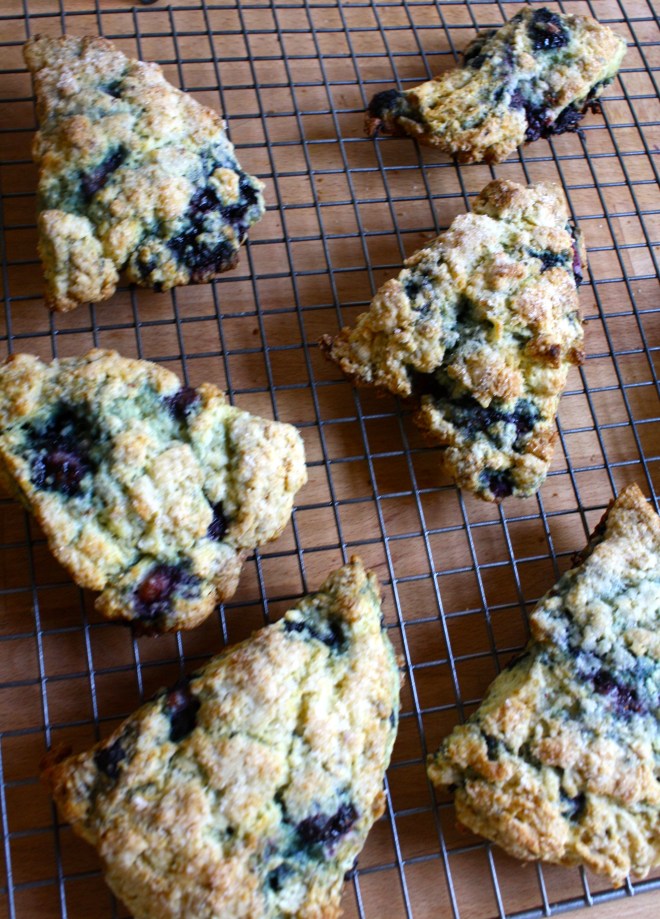 And when the scones look all nice and browned and a tester comes out clean. remove and either serve right away warm, preferably with huge cup of coffee or tea, or stick on a rack to cool before storing in air tight container.
 I figured now is a good time to get this recipe out there before we get to far into spring and summer recipes because there is going to be a lot of banana ice cream filled recipe coming and I figured its a good idea to have the basic banana ice cream recipe ready for people to refer too. And because I made so much fantastic naner ice cream, I also made a cookies and cream naner ice cream for my sisters and the mister.
 The stuff you need for this ice cream…. Nice and ripe bananas, peeled and then frozen* That’s it.
 After all blended and smooth, either eat right away or scoop ice cream into a freezer safe container and stick in freezer. That’s the banana ice cream… And it is amazing and so so so so so addictive. I make a batch, think I am only going to eat a scoop, then find myself eating half of what I have made, but it’s ok cause it’s only bananas.
  One batch of banana ice cream, either freshly made, still in food processor or made ahead and placed in a food processor and given a good pulse to smooth it up.
 Now you have cookies and cream naner ice cream…. and everybody is happy.
 Spicy, crispy cauliflower… um yes please. I really like cauliflower. The mister loves it, or at least likes it better than any other vegetable. So when he asked for spicy cauliflower, well yea I am going to make it because I am so nice and really, could I say no to a veggie request? (I might have said no if it involved deep frying) Also, I found fresh cauliflower on sale! ($2.25) I don’t usually cook fresh cauliflower, but I figured at that price, it wouldn’t be bad to cook a head. (If I am cooking cauliflower, which I do a lot, I just use frozen….casue it be waaaay cheaper)
  The stuff. Cauliflower, chopped and broken into pieces. Corn meal mixed with salt, pepper, onion and garlic powder, and because I made this for the mister, parmesan cheese. And in the green bowl, srirsachi and a little oil.
  The cauliflower gets a coat of the hot sauce and then tossed around in the corn meal mixture. Handling as little as possible, place coated pieces on a lightly oiled baking sheet and stick those suckers in the oven for about a half hour, taking them out and flipping half way.
 And take them out of the oven when pieces tuned golden brown, stik them on a plate, and serve immediately.
 TGIF!!!! For reals, because Monday-Thurday were monster days. And now that its friday, I can dig a hole and hide in it until it’s at least 30 degrees with some sunshine. (I might never get to come out.)
 Simple lemon cake stuff. Flour, baking powder and salt whisked together, Sugar and soft butter in a bowl. An egg, some vanilla, milk, and of course, the lemon.
  Frozen bites ready for the chocolate coating… Bittersweet chocolate chips and a little bit of coconut oil. Melted together all nice and shiny smooth.
 Now dip and slather those bites in the melted chocolate.
  Fully coated and placed on a rack for the chocolate to harden. I ended up sticking the rack in the freezer for 10 minutes…They harder really fast in there.
 We are having ourselves a very crazy busy week. But we area good at crazy so it’s cool. Needless to say, I have still been able to fit in some lovely outdoor activities, eating of an entire watermelon pretty much all by myself, and a little bit of light reading…. Sleep can wait right?
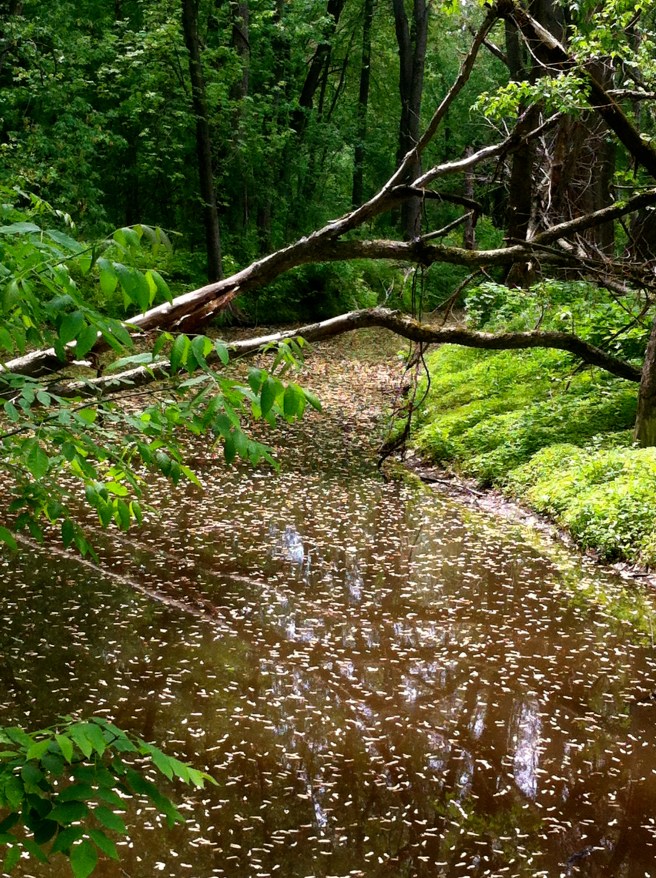 The deepest green and tree airplane all over the world.
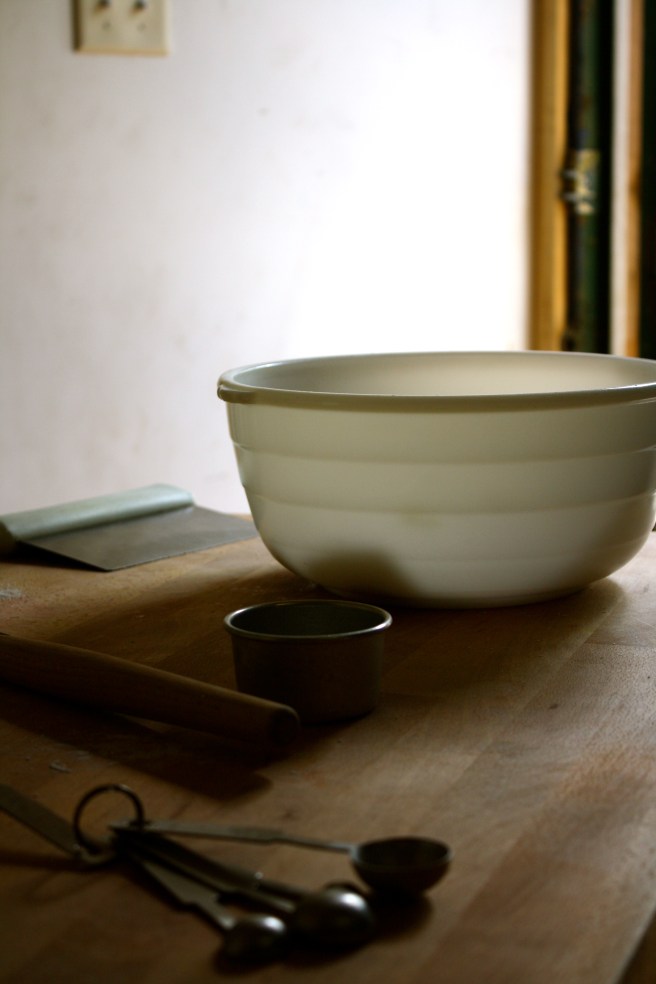 How does this bowl make me so happy?
 And there was melon… And the cutest little little.
THE LOVELY CRAZY
September 8, 2015 by maximios • Blog
HEY Hey Hey… It’s Taco TUESDAY, which means that you are obligated as consumer of food to eat some tacos today!
So ok, I am not going to lie, these tacos were not actually made on a Tuesday (GASP) but were made in lu of pizza Friday (another GASP!!)
But guess what? No one died. People were happy. Food was fantastic, and there was no mention of the pizza that was not. So sure, taco tuesday is totally a thing around here, but you know how “Nobady puts baby in a corner”.. well nobody buts tacos in a corner. We don’t let the day of the week depict when tacos are eaten cause we think tacos are for everyday!
And these tacos, well, I got down with these. Made with lentils, cause lentils are the best, and topped with a hearty scoop of super fresh, chunky veggie salsa…. Not much is better then that. Easy and fast with lots of pretty in every bite, these tacos are a great addition to any taco dinner rotation!
Now lets get taco-ing!!!
The stuff. First off, you are going to need some type of taco shell.. soft or hard or both , that is entirely up to you.( I made taco shells a little early in the day, but store bought is totally cool.) Also need lentils, water to cook the lentils, a jalapeño (optional), taco seasoning (pre blended or your own blend) and onion. Also needed is a gigantic tomato, some red cabbage, a few kale leaves, a lime, and salt and pepper.
To get this party started, chop up half the onion, the tomato, cabbage ,and kale and toss into a big bowl. Oh, and chop up the cilantro and toss that in as well.
Sprinkle with salt and add the juice of the lime. Mix oh mix and set aside to let all the flavors meld.
Now that the salsa is doing it’s thing, chop up the jalapeño and the other half of onion and toss into a big skillet and place on medium heat.
And when the bits start to brown like so…
Dump the lentils in to the pan with water.Bring it all to a boil then turn heat down to low.. Add in the taco seasoning and sprinkle of salt and pepper and place some type of lid on ithe pan.
And simmered until cooked.
Note. Check the lentils every few minutes while they are cooking. If you think they seems to dry, add in another 1/2 cup of water.
Now it’s ssembly time! Lentils in shell, topped with a generous amount of salsa. That’s it! Maybe some guacamole would be nice (I had an avocado saved for guac, but it was rotten on the inside.. I was super pissed) But with or without, these are some freak yeah yummy tacos! I served my next to a bed of some jasmine rice which was nice, but do what you want my friends.
Happy Taco Tuesday! (or any taco day!)
-C
Makes about 8 -10 tacos
For the Lentil Filling
Fot the Garden Veggie Salsa
And don’t forget the taco shells!
*Note. You can use any type of taco seasoning that you like, store bought or home made. I make my own with cumin, chili powder, onion powder, garlic powder, and a little coriander.
Dice the tomato and 1/2 the onion into small chunks and toss into a big bowl. Finely chop the cabbage an the kale into small shreds and toss that into the bowl. And chop up as much cilantro as you would like and that goes into the bowl as well. Spinkle with some salt and add in the juice of the lime. Mix everything all around and set aside.
Once the salsa is made and sitting, chop the jalapeño and other half of onion and toss into a large skillet. Place on medium heat for a few minutes until the pepper and onion start to brown. Now dump in dried lentils and 2 1/2 cups of water. Turn heat to high and bring to a boil, them back down to low. Seaosn with salt, add in the taco seasoning, and stick a lid (or cover with something), and let simmer for about 20- 25 minutes or until the lentils have absorbed all the water and are nice and soft. If you find the lentils are still hard and there is no liquid, , add in another 1/2 cup of water.
Once the lentils are cooked to your liking, remove from heat and get assemble tacos.
Scoops some lentil mixture into shells. Add on a big scoop of the fresh veggie salsa and eat with you face.
Guacamole, cheese, sour cream, or whatever are optional topping that you may consider adding but are definitely not necessary. .
I probabaly have already told you, but August is for sure my favorite month of the year (well,one of my favorites)
There is bounties of bounties of fresh, sweet and colorful, oh so juicy, crispy crisp, just so f ing amazing, produce exploding all over the place. I have probably gained like 75 thousand pounds in the past month due to all of the fruits and veggies that I have been consuming. I am starting to consider it a full time job just to keep up with the eating.
Another reason why I love August so much is becauuse the days are still nice and warm, but the nights are starting to cool which means I get to make so much soup!!!!!.
This soup is the freshest freshy soup yet. Everything is from the farm and or the garden (except the salt pepper, vinegar and oil), some picked within hours of me making this.
. I am a lucky/spolied veggie brat.
Anyways. This soup. The fresh tomato base gives it a sweet, slightly acidic kick. So super creamy due to the lovely earthy stocks of the chard. Slightly spicy and earthy from the arugula* and chard green green. This soup… it just tastes so fresh and clean, yet hearty and satisfying. A perfect soup for a mid August night, eating outside, watching the sun slide behind the mountains and the temperature dropping just enough that you might want a light sweater. Or you can just eat it from the pot in the kitchen while watching TV. It’s good eating anyway you want.
*Here in America, it’s called arugula. Else where , it’s called rocket. I wish we all called it rocket, although I do like the name arugula, but for like my first born child or maybe a pet goldfish. Anyway, rocket is arugula, or vice versa.
Soup time!.
The stuff. Some big fresh tomatoes, a few stalks of chard, and a few handfuls of arugaula (aka rocket). A couple carrots, an onion, some garlic, salt and pepper and a bit of olive oil.. Oh, and I added some balsamic vinegar, which for some reason didn’t make it into the picture (sorry vinegar)
Start by removing the chard leaves from the stalks. Set aside leave with the arugula. Chop up the carrot, chard stems, onion and garlic and toss into a big pot with a drizzle of olive oil, a splash of water, and a sprinkle of salt and pepper. Stir around and stick o nthe stove on medium heat for about 10 minutes until the veggies start to soften up.
Now chop up the tomatoes into chunks and toss those right into the pot with the other stuff. Add in a few cups water and a few glugs of balazmic vinegar. Bring everything to a boil and then turn heat to medium low and place a lid on pot and let cook at medium heat for another 20 ish minutes, or until the tomatoes are falling apart.
Now that everything is all cooked up, blend it up.
And now take the chard leaves and the aruglula and chop into little pieces….into the pot they go.
Mix it all up.. and take the blender to the soup again….if you want a smaller sized bite.
Soup Into bowls..Then into mouth.
Happy August!!
And hey hey hey.. Have the best weekend!
-C
To start, remove stalks of chard from leaves and chop stalks, onion, carrot and garlic into chunks and place int a big pot with a drizzle of olive oil, a splash or water, and spinkle of salt and pepper. Place on stove on medium low heat sand cooke the veggies down until starting to soften and garlic is becoming fragrant. While that cooking, remove core from tomatoes and dice them up. Toss into pot with the cooked down veggies with the vinegar and water. Place a lid on the pot and let cook for about 20-25 minutes or until the tomatoes are falling apart.
When cooked, using with a hand blender or a normal blender, blend the soup until smooth. (if using blender, pour back into pot)
Now take the arugula and chard leaves and chop them into wee little picese and mix into soup. If you want to, blend the greens into the soup.. but not until smooth, unless thats what you want. Cook for another 5 minutes. Taste and season with more salt and pepper to taste.
Ladle into bowl and serve with lots of fresh cracked pepper, maybe a little balsamic drizzle or even some mustard (I at left overs with mustard and it rocked my world)
spoons work eel las eating utencils.