I forgot how amazing fall baking smells. The spiciness floating throughout the house, lingering on my clothes, in my hair, up the stairs and into the bedroom. It goes everywhere. Unfortunately it didn’t last very long this time around because the mr made popcorn and then the whole house ended up smelling like a freaking movie theater, but for a little while it was so nice. I want to bake everyday just to stink the house up all nice. I might just do that.%u00a0
Everyone eats the pumpkin bread or the pumpkin this or pumpkin that. But why does’t everyone harness the greatness of all the other winter squashes in baking? This I do not know. Don’t get me wrong, I love pumpkin but I also think that it’s very interchangeable in most baking applications. Like this quick %u00a0bread. I am sure that some people would notice that it is not pumpkin, but these same people would also enjoy the subtle difference in flavor. Acorn squash is a sweet and delicious squash and makes a fine fine bread my friends. And the acorn squash is cheaper then sugar pumpkins which is aways a plus. And the winter squash keeps longer the pumpkins so the are available longer. Acorn squash bread all winter long. (Yup, I am thinking winter already)
This bread lasted less then a day. The mr got a couple slices but some littles came over and ate almost the entire loaf. The didn’t ask what kind of squash I used, they just ate it vigorously and left heir little crumbs all over. So Bean with her mouth full of bread declared it A-MAZING. From the mouth of a 5 year old.
The stuff. The flour, baking soda and powder, salt, and cinnamon are in one bowl. The squash puree, oil, brown sugar, maple syrup, and apple cider vinegar in another .Also need a little plant milk a bit more cinnamon and sugar for topping.
Simple simple. Whisk together the dry then whisk together the wet.
Pour wet into dry and mix until incorporated.
And there you have it. %u00a0Acorn squash bread batter.%u00a0
Batter goes into a well greased bread pan and sprinkles all over with cinnamon sugar. Then into the oven (preheated of course) it goes.
All baked up and cooling. Like what I did there? %u00a0More circulation to the bottom %u00a0so it cools faster.. I am so smart.
The mr came home right when I was contemplating whether it was cool enough to cut. %u00a0It wasn’t but I cut it anyway.%u00a0
Have a great fall weekend!
-C %u00a0
makes 1 loaf
1 1/2 cups acorn squash puree*
1 1/2 cups all purpose flour
1/2 cup whole wheat flour
1 teaspoon baking soda
2 teaspoon baking powder
1 teaspoon salt
2 teaspoons cinnamon plus 1 teaspoon
1/2 cup brown sugar plus 1 tablespoon
1/2 cup maple syrup
1/2 cup oil%u00a0
1/3 cup plant based milk
1 tablespoon apple cider vinegar%u00a0
*To make acorn squash puree, stick an acorn squash into a oven at 400 for about 40 minutes or until until fork tender. Remove from oven,%u00a0cut in half, and let cool until you can handle it. Scoop out seeds (save for roasting) then scoop out flesh (eat skin as snack)%u00a0and puree in blender. Add a splash of water if needed to get a smooth puree.
preheat oven to 350
In a large bowl mix together the squash, oil, sugar, maple, milk, and apple cider vinegar. Mix until well combined. In a smaller bowl, whisk together the baking soda and powder, the tablespoon cinnamon, salt, and flour. Pour wet into the dry and mix until combined. %u00a0Pour into a well greased loaf pan. Combine the tablespoon brown sugar and teaspoon cinnamon and sprinkle on top. Pop into oven and bake for 60-65 minutes or until a tester poked into middle comes out clean.
Once cooked, remove from oven and let cool for a few minutes. Remove form loaf pan and let completely cool.%u00a0
Eat what you want and store the rest in an air tight container for a few days. Can be sliced and frozen too.
Lets just start by saying that the world is a crazy crazy ass place. This past week, this past month, damn this past year has been trying to say the least. Natural disaster and human disasters alike, there had been a lot of anger and pain. It’s leaving me and my brain feeling a little drained and overwhelmed. The world right now, it’s feeling like a strange place and I am trying to figure out how to deal with it all. Feeling all the feelings.
So you know how I said last week I was going to get a new computer, well I still am, but haven’t yet. I had to borrow Barbs computer again like a big ass. (Thanks Barb, you be the best!!) And I tell you what, typing on a computer is so so so much more fantastic then trying to do a damn thing on a little Ipad mini. I can’t even access my blog on it, let alone do anything productive (like bills) on it. So number one priority this coming week is .. GET A GOD DAMN COMPUTER!
The past week, well, it happened. Alex turned 12 for party number one and Emerson turned 1 for party number two, and I basically went crazy and got kinda sick. An over abundance of tomatoes and now I am having some pretty funky acid reflux topped with some allergies and sprinkles with exhaustion.(not sleeping because reflux) So I am off tomatoes, taking a step back from coffee (want to bang my head against a wall) and sleeping sitting up. It’s been so much fun….Haha, no, no it has not been, but that goes life. I might feel like crap and that nothing that I needed to get done was actually done but we all have those weeks right?
And the mr, while I was feeling all crappy he was out and about putting up fencing like a boss, running around for the tenants, digging holes and running cords for other people then coming home and ripping the siding off the camper. (we need to name this thing) And plunging away at the bathroom, kinda. We are slightly stuck because we can’t decide on floor tile because everything looks weird so we have spent even more time this week looking for tile and not finishing the bathroom. But hey, I made a super awesome gorilla stuffed animal for Coco (Emerson) and lots of cakes this week so there is that. And now the camper is ripped wide open so the bathroom is not the only project that needs to be done asap.. (the mr was suppose to wait until the bathroom is done and at least the winter to start doing anything to it) That boy…❤️❤️❤️
Last night we had a packed house for party number three. David and Lori and the gang came up from Rhode Island so we had them and the sisters plus littles over for dinner.( I am really digging this seeing my extended family a lot more, I really like them) I made chili, bread, rice, and veggies. Then I made a apple cake, set out the honey pot, and let people go to town. Feed the littles then yourself is the way to go, no formal sit at the table. Especially when it’s family because they know they can just do what ever they want and I am not going to care. Plus the table is to dang small so that wouldn’t have worked anyway.
And we are back to Sunday, which already feels weird. The week had been so weird and off and I my time frame is off, plus no more Car Talk on Saturdays so how am I suppose to know the day anymore? . All I know is that I have a house to clean, a computer for shop for, and a skeleton to make to hang on the front door. And I am going to drink one cup of coffee today… I need it so so bad.
I still managed to look at stuff on the internet and here is some of it.
-Glass is the way to go. Which Items In Our Kitchens Contain BPA?
-I want a greenhouse just like this (and one that is actually used as a green house)
–Joyless Feds Order Bakery to Stop Pretending ‘Love’ Is a Real Granola Ingredient. What the hell dudes, not cool.
–Incredibly Lifelike Insects Crafted out of Bamboo. These are awesome and not real which makes them even cooler.
-This is the new reality. How to Survive a Natural Disaster. Know everything.
–WILL WE EVER RETURN TO NORMAL AFTER TRUMP? I hope to fuck so
-Oh Tom Petty your music was loved. RIP. Tom Petty’s final interview
–Brooklyn Gets its First All-Vegetarian School. Wish I had the option when I was in school. All I ever eat were pb and j’s or deep fried french fries. The choices were slim and mostly gross. Falafel would have been nice.
–How Your Body Keeps Time. Our circadian rhythm is pretty amazing. And I can 100 percent account for itchy skin at night.
–Louvre Pulls Sculpture, Saying It Was Sexually Explicit.…Hahaha.
Pictures from the week, mostly from birthday parties.
Both of us have been on all week while both of us have been fighting off a something that wants to invade our bodies. We have tried not no let it slow us down too much, but I tell you what. I, and the mr, are pretty fucking sick of feeling like crap. We have been pumping so much elderberry, zinc, teas, and witchcraft. We WILL get rid of this shit!!!
Even though feeling like ick, we powdered through and did life. The mr bought me a scroll saw for spoon carving (which is now his and I am getting a band saw instead) We had a dinner with the mr’s family, Qui, Adriana, and Evan came over for cookie baking and spoon carving and there was a pizza party with some littles and the bionic woman. Oh, and let’s not forget the tea party that included a horse and fake tea. Next time I go to a tea party, there better be real tea or I am out. The mr has had a couple of bigger jobs that he was doing and I had (still am doing) the stupid taxes to finish. Doing a lot of paper work really gives a lady who needs glasses a big freaking headache. I have been procrastinating the inevaadable for a little too long. I need to start wearing my glasses all the time in order to see like, a lot better. Problem is that the procrastination in me is strong. I have had this new prescription for 2, maybe 3 months, but seriously, finding glasses is such a bitch. I am doing it though because I need to see, which lead me to Costco. Costco, the land of giant sized tubs of mustard and 10 lb bags of organic carrots (I buy them both), which also has an optical center (what don’t they have?)
Got to Costco, took a look, got annoyed and stressed and walked away. Figured I was already there so might as well walk around, spotted a friend being a pharmacist, cruising the isles, and that’s when I saw it. The display of 10 lb bags of lentils. No joke, I have been waiting forever for this day to happen. I was so freaking excited, like way, way more then anyone should ever get over a bag of lentils, but I was. I mean, come on, A giant bag of lentils … it is just so fantastic. I grabbed my bag of lentils and bounced out of there with a smile on my face and thoughts of dinner and large Costco sized pickle jars full of goodness. (I had already forgot about the glasses) I am already planning on another Costco trip just so I can but 5 more bags…. You can never have too many lentils. And I did end up buying glasses, I just ordered them off the internet. I figured I don’t care what they look like, I would just like to see. And I will, in like 1-2 weeks or whenever they come in the mail.
Last night Jeff Dad came to town to take some more care of his bionic daughter, although the lady is walking like a champ already and probably could start training for a marathon now. (You can go home now Dad, haha) We did dinner with him and her and missed out on the him that was suppose to be there, but at least we got to see Jackson with his arms full of a suit and tie on the way to the ball. Jackson just loves dress up and high school dances. He lives so hard for them.
Today is all about watching the ice melt away from the skating rink in front of the house that we call a walkway. I spent a little time chipping away at the thick sheet of ice with a spade shovel and am now determined to get at least a narrow path of safety for not just us, but the poor mailman that has been risking his life to deliver my junk flyers and sign up cards for AARP. It is suppose to be above freezing all day so I have a good feeling about it. While I watch and wait I will probably be reading, carving some wood, or napping. But it will all be productive because I am making sure the ice melts. I am doing it for the mailman.
The places the internet took me this week.
-Is it even possible? How Do I Avoid Catching Cold or Flu From My Sick Partner?
–Starlings Perform Acrobatic Life-Or-Death Dance With A Hungry Falcon. My mind was blown. I have watched it many many times.
–Are Biscuits and Scones the Same? I have always thought them interchangeable. A, Call them what you will, type deal.
-Holy shit Nutella.France Descends Into Chaos Over Nutella Sales.
-Sunday Reading: In the Air. Probably not great reading if you are afraid of heights. OR maybe it is.
-Kind of fantastic why you know why they did. The Guggenheim Offers The White House A Gold Toilet.
–The Far Out History Of How Hippie Food Spread Across America. I spent a good amount of time with the Moose Wood Cookbooks when I was a teen.
-I have killed at least 10 mosquitos in the past week. I think there is a nest in the house and they are waiting for warmth to attack me. How To Teach Mosquitoes To Leave You Alone
–The Imaginative Powers of a Brain on Autopilot. It’s when all the creative stuff happens.
I forgot how amazing fall baking smells. The spiciness floating throughout the house, lingering on my clothes, in my hair, up the stairs and into the bedroom. It goes everywhere. Unfortunately it didn’t last very long this time around because the mr made popcorn and then the whole house ended up smelling like a freaking movie theater, but for a little while it was so nice. I want to bake everyday just to stink the house up all nice. I might just do that.%u00a0
Everyone eats the pumpkin bread or the pumpkin this or pumpkin that. But why does’t everyone harness the greatness of all the other winter squashes in baking? This I do not know. Don’t get me wrong, I love pumpkin but I also think that it’s very interchangeable in most baking applications. Like this quick %u00a0bread. I am sure that some people would notice that it is not pumpkin, but these same people would also enjoy the subtle difference in flavor. Acorn squash is a sweet and delicious squash and makes a fine fine bread my friends. And the acorn squash is cheaper then sugar pumpkins which is aways a plus. And the winter squash keeps longer the pumpkins so the are available longer. Acorn squash bread all winter long. (Yup, I am thinking winter already)
This bread lasted less then a day. The mr got a couple slices but some littles came over and ate almost the entire loaf. The didn’t ask what kind of squash I used, they just ate it vigorously and left heir little crumbs all over. So Bean with her mouth full of bread declared it A-MAZING. From the mouth of a 5 year old.
The stuff. The flour, baking soda and powder, salt, and cinnamon are in one bowl. The squash puree, oil, brown sugar, maple syrup, and apple cider vinegar in another .Also need a little plant milk a bit more cinnamon and sugar for topping.
Simple simple. Whisk together the dry then whisk together the wet.
Pour wet into dry and mix until incorporated.
And there you have it. %u00a0Acorn squash bread batter.%u00a0
Batter goes into a well greased bread pan and sprinkles all over with cinnamon sugar. Then into the oven (preheated of course) it goes.
All baked up and cooling. Like what I did there? %u00a0More circulation to the bottom %u00a0so it cools faster.. I am so smart.
The mr came home right when I was contemplating whether it was cool enough to cut. %u00a0It wasn’t but I cut it anyway.%u00a0
Have a great fall weekend!
-C %u00a0
makes 1 loaf
1 1/2 cups acorn squash puree*
1 1/2 cups all purpose flour
1/2 cup whole wheat flour
1 teaspoon baking soda
2 teaspoon baking powder
1 teaspoon salt
2 teaspoons cinnamon plus 1 teaspoon
1/2 cup brown sugar plus 1 tablespoon
1/2 cup maple syrup
1/2 cup oil%u00a0
1/3 cup plant based milk
1 tablespoon apple cider vinegar%u00a0
*To make acorn squash puree, stick an acorn squash into a oven at 400 for about 40 minutes or until until fork tender. Remove from oven,%u00a0cut in half, and let cool until you can handle it. Scoop out seeds (save for roasting) then scoop out flesh (eat skin as snack)%u00a0and puree in blender. Add a splash of water if needed to get a smooth puree.
preheat oven to 350
In a large bowl mix together the squash, oil, sugar, maple, milk, and apple cider vinegar. Mix until well combined. In a smaller bowl, whisk together the baking soda and powder, the tablespoon cinnamon, salt, and flour. Pour wet into the dry and mix until combined. %u00a0Pour into a well greased loaf pan. Combine the tablespoon brown sugar and teaspoon cinnamon and sprinkle on top. Pop into oven and bake for 60-65 minutes or until a tester poked into middle comes out clean.
Once cooked, remove from oven and let cool for a few minutes. Remove form loaf pan and let completely cool.%u00a0
Eat what you want and store the rest in an air tight container for a few days. Can be sliced and frozen too.
Banana bread never goes out of style. It is a clsasic, everyday, everybody type of food. Have a slice for dessert, maybe drizzled with some chocolate, definitely.%u00a0%u00a0How about for a grab and go breakfast, sure sure.. A chunk slathered in peanut butter for snack time or anytime, well %u00a0isn’t that’s why you make it?%u00a0 And who doesn’t always have a banana bowl in the kitchen? A banana bowl that is always full of bananas because the banana just always makes it’s way home. They seem to pile up, even when I don’t mean for them to. And I know I am not the only one. I see it all the time. A fruit bowl in the kitchen with a least a couple of really really ripe bananas, waiting for that moment when you know there is no freaking way anyone in their right mind would eat those banana because gross. That’s when you have it, the perfect banana for some banana bread, or in this case, banana muffins. %u00a0
Here I went muffin style because I had already made a loaf of banana bread earlier in the week and because I wanted to send half of the muffins to the boys at the front desk at the gym. (They give me coffee, I give them muffins) And also, muffins cook a lot faster then bread so if you are a little low on time, muffins are the way to go. But if you would rather bread, you can make it bread. Bananas are there for you and are not fussy.%u00a0
The stuff. Ripe bananas, poppy seeds, brown sugar, oil, and apple cider vinegar. Also have flour, cinnamon, baking soda, baking powder, and a little salt in the bowl.%u00a0
Mash the bananas in a bowl, like really mash them up until it turns to a sugar banana slop.%u00a0Then add in the oil and the vinegar and mix together.
Dump in the dry and the poppy seeds and mix it all up until combined but then stop. Don’t over mix the batter or else you will get tuff muffins.%u00a0
Scoop into well greased muffin pans and pop them into the preheated oven to bake.%u00a0
Done! And in only took like 20 minutes appose to an hour if I made banana bread.%u00a0
And here is when you grab a coffee, a muffin, and have yourself a moment.
Stay good.
-C
makes 12-14 muffins
2 cups flour
1 teaspoon baking soda
1 teaspoon baking powder%u00a0
1 teaspoon salt
1 tablespoon cinnamon%u00a0
1/4 cup poppy seeds
2/3 cups packed %u00a0brown sugar
1/2 cup neutral flavored oil
4 really ripe bananas (they need to be really ripe of the mixture will be to dry)
1 tablespoon apple cider vinegar%u00a0
Preheat oven to 350
In a large bowl,%u00a0mash the bananas with the sugar until the mixture turns wet and sloppy, but there are still a few little chunks of banana.%u00a0%u00a0Mix in the oil and vinegar. In a separate bowl mix the %u00a0flour, cinnamon , baking powder and soda, salt, and poppy seeds together. Dump the dry into the wet and mix until all is combined but then stop. Don’t over mix batter.%u00a0
Scoop mixture into well greased muffin tins and place into oven once it has preheated.%u00a0Bake the muffins for about 20- 22 minutes or until nicely browned and a tester stuck into the middle of one comes out clean.
Remove from oven and let sit in tin for a few minutes until it cools down. Remove the muffins from the tin and let completely cool on a wire rack.%u00a0
Eat whenever and how many you want, store the rest in an air tight container for a couple of days or wrap a few and %u00a0freeze.%u00a0
Every year I play this game with myself.. Is it allergies or am I sick. The past few days I have been feeling kinda crappy, waking up with itchy, gunky eyes. My throat hurts, my head is like a balloon, and I am just feeling beat..%u00a0
I think it’s that I am sick (because I don’t want to have allergies) but whatever it is, it sucks, but usually goes away after a week (like every year because its really allergies). Blah.
But enough about my balloon head, lets talk these maple banana walnut oat squares. These yummy gems of the oat square world are just what you need in your life. Healthy, protein packed, nutty, and a touch sweet. No junk, just good stuff all made with little to no effort. If you like banana bread, you will be all into them. I was inspired to make these by the extremely ripe bananas that need to be eaten asap and the mr’s lack of eating a healthy breakfast (I want him to eat, and I want it be oatmeal). I know him well enough that if I make a snack like thing and leave it out to eat, that he will eat it. For breakfast.
So weather or not you are looking for a good way to get in some good stuff into your tummy or just want some good tasting stuff in your mouth, this is the breakfast/dessert for you.
The stuff. A couple of ripe bananas, a bunch of rolled oats, some yummy walnuts, real maple syrup, cinnamon, baking soda and a wee bit of water.
Start with the walnuts in a food processor. Turn it on and process until….
You got this walnut butter. Do not eat it, it’s for the squares (it is so good).
Add in the oats, cinnamon and baking soda and turn the processor back on until you get a nice unified crumbly mixture.
Now in goes the bananas and the maple syrup. And you guessed it, blend some more. While you are blending, if the mixture seems to dry, add in a splash of water, to wet, just toss in another handful of oat. The mixture should be like a muffin batter consistency.
And that’s it. If you want some nut chunks, add in a handful more of walnuts (do it) and pulse just to get them mixed into batter.
Then pourthe mixture into a well greased 9×9 baking pan and spread out evenly. Toss those suckers into the oven to bake.
Oh so good bananas give off the best smell when baking. After about a 1/2hour, these bars are nice and golden brown and a fork stuck in the center comes out clean, which means, they are done.
Cut into square , eat one or two, and save the rest. Eat for breakfast, as a snack, or for dessert. And a smear of peanut butter on top is aces too!
Later dudes.
-C
3 cups old fashion rolled oats (gluten free ones to keep in GF)
1 cup plus a a small handful walnuts
1/2 cup maple syrup
2 rip bananas
1 /2 teaspoon baking soda
1 teaspoon cinnamon (optional)
Place 1 cup of walnuts into a food processor and blend until it turns into walnut butter.. about 3 minutes. Add in the oats and blend together until it becomes a crumbly mixture. Add in the maple, baking soda, cinnamon and the bananas (break into chunks) and blend until incorporated. If the mixture seems lie its too dry, add in a splash of water, and if to wet, add in another handful of oats. The batter should resemble a muffin batter.%u00a0 Once blended, mix in the remaining walnuts and pulse just to mix them in.
Pour mixture into a well greased 9×9 baking pan and stick into the fridge for 10ish minutes and preheat oven 350
And after the time in the fridge, remove the pan and slide them into the oven. Bake until golden brown and a tester stuck into te middle comes out clean. (about 30 minutes)
Remove and let cool. Pop out of pan, cut into square, and eat to you face.
Squares will last 3-4 days in a airtight container or freeze them and they will last until you eat them.
%u00a0This week was good. %u00a0Two days in a row the front door was open, the window was open and the heater was off, which pretty much made me that happiest person in the world. My spring cleaning brain has kicked in and I want to clean everything (even the walls). I even spent a good part of an afternoon moving and rearranging furniture. (The house ended up basically the same as when I started) And one of the best parts of the week%u2026.most of the snow melted! I am getting super hyped to start raking, cleaning, planting and weeding and and just getting really dirty! Oh how I love the spring!
Here are a few internet things from the week
-%u00a0Ancient Grains are new again%u00a0About time!
-%u00a0This article about the chemistry of cookies is a good one%u2026.
– Oooohh pretty. %u00a0String art
-How to Do Fishtail or Herringbone Braids Step by Step%u00a0 I need to start doing something with my hair besides a really sloppy pony tail that I don’t take out for days on end.%u00a0
-I think I want to make this Honeycomb shelves.
And %u00a0some real life happy%u00a0Oh Intervale Community Farm..I love you. I picked up my farm share and was especially pumped %u00a0for another gigantic kohlrabi and some locally grown, locally milled wheat flour.
%u00a0%u00a0The trees, they are a budding
%u00a0The perfect ripeness, destined for naner ice-cream!
My sister and I took this little for a sled ride through the wood where there was snow (but it was 45 degrees!) The hike ended up with me %u00a0pulling her through a field of mud. It was fantastic.%u00a0
One year ago today. Dinner with my favorite people.%u00a0
Hope your weeks was awesome and warm..Spring is just about here to stay!
This past Christmas, my (kinda)mother- in-law gave me and the mr these really cool honey bee pins in our stockings. Nothing fancy, just a little pin, but I think it was one of the best gifts that I had gotten all year. The pin lives on my winter jacket.
And now I am into pins.
So a couple of the little’s came over yesterday after school for crafts and dinner and I figured a bit of pin making would be a perfect little project for us to do. And being that it’s the big V day coming up,%u00a0 making these pins heart shaped was more then overly appropriate. (What’s Valentines day without cute little hearts?) Well pin making we did, or I did, not so much for them. They made a few, but in the end, they were more excited to beat the crap out of the mr and to eat carrot shavings with peanut butter and nutella.. Totally ok with me because really, I was the one that wanted a little craft time and the mr did need to get his butt kicked.
Sure I made these pins pretty much for myself, but imagine the possibilities. Make a bunch to give out to your friends, family, neighbors, or even the mail man!? Or if you have yourself a little, how great would these pins be make and to give to all their little classmates. I know that if received one of these pins in my homemade shoe box mail box meant to collect all of my candy studded, drugstore bought valentines. I would have been elated and rocked that pin all year long on my super cool backpack.(grade schooler, they have all the fun) Right after I finished painting and gluing all my pins, Miley then decided that they were freaking awesome and wanted to make a bunch more…. Well little little, to late, time to go home. But I did give her a bunch to bring back with her. She will just have to bug her mom to make some more.
And sure, I mention valentines day when talking about these pins, but really, hearts are for everyday, and are still really great long after V day is over.
Handmade heart pins = love!
Stuff you need for some awesome pins.
Polymer clay (I used white but any color will do)
red and white paint (preferably enamel or a high gloss paint) and a paint brush
bar pin backs (I bought these at Michael ‘s craft store. 64 for like 3 bucks!)
industrial strength glue (E600 is great and is used and recommended by many a crafters)
rolling pin or wooden dowel
small heart shaped cutter
sharpie pen to write on pins (optional)
Glitter( also optional)
A couple notes. You could use red clay but I have found that when I buy the red dyed clay, its always harder to work with and plus, it stainsyour hands. Also, I like to seal the clay and enamel paint does the trick. If you don’t want to paint it, just pain on a coat of clear sealer.
Start buy kneading a chunk of clay a little bit to get it to a workable state, then roll into a ball and roll out flat. I rolled mine out about 1/3 of an inch, but I also knew I wanted to squish it out a little flatter once I cut the shapes out.
Cut out your hearts, or if you want, free form them.%u00a0 What I did was used my tiny heart cookie cutter to cut the initial shape, but then used my thumb and squished them all out a bit bigger.
Note here.. Hears are awesome and amazing, but other shapes….Go for it. You probably have a shit tone of those pin backs.
And just before you bake them, make sure that the pins you are using will fit behind the hearts. (if you notice any visible pin, just smoosh the heart out a little more).
Into the oven,, out of the oven. Read the package to make sure, but the stuff I used only needed to be baked for 15 minutes at 275
Once out of the oven, let completely cool and harden.
Once the hearts are cooled, go ahead and paint them. Use straight up one color, or mix and make a few different shades. (red, white and pink are nice together)
You can add some glitter to the wet paint to add a little bling….
Or add designs or what have you. Do whatever feels right.
Now stick a pin thingy on the back of each heart with a blob of glue. (If you use the E600, make sure to use it near a window or somewhere ventilated.. it really stinks for a few minutes)
Let the glue dry (this glue was completely dry within an hour, but follow glue package instructions)
And if you want, grab the sharpie, make sure the paint is really dry (at least an hour) and write a little something on the hearts.
And now the hard part.. which one goes to who and which one (or 4) do you keep for yourself. (you can always make more!)
Have fun!
-C
It’s Mother’s Day weekend which means that you and I and everyone out there should feel the slightest bit obligated to at least do a little something nice for your mom for the mere fact that you were borned. And really what better way to celebrate mom than with food%u2026 It really is the least that you can do. (I think mom’s also like flowers and cards and handmade pasta necklaces) My mom is defiantly about the food. (she has had her fair share or pasta necklaces) %u00a0A many years back on Mother’s day, this sweet little girl (me) made her mother a special %u00a0breakfast treat%u2026blueberry scones. And ever since that day, for every freaking holiday, birthday, whatever day, my mother requests (demands) a batch of those scones. She is always saying that these are her favorite treat and that no one has ever made them as good as I do. (I guess that just reiterates that I am her number 1 child)
And for the last few months my mom has been up my butt, trying to get me to make her some. Not going to lie, I have been saying I’ll get her a batch, but for some reason, I haven’t gotten around to making them. So two birds here.. Make the scones and she gets off my back for a least a little while (a month.. maybe 2) and I give her a fantastic Mothers day gift that I know she will love.
So here they are , oh mother of mine. Blueberry scones!
The stuff. Flour, baking soda, baking powder and salt. A bit of sugar, vanilla, buttermilk, and butter (use vegan butter and nut milk if you want to make them vegan) And of course we need the blueberries which can be fresh or frozen. I usually use fresh, but the store I stopped at only had really big containers of fresh that were like $1000 dollars a piece and the organic frozen happen to be on super sale. So you know, the cheap in me won that battle.%u00a0So into the bowl goes all the dry stuff; flour, baking powder and soda, salt, and the sugar. Give it a good whisk.
Now for my special trick for a perfectly distributed cold butter in a pastry. Freeze your butter and grate it!
With a large wholed grater, grate the frozen butter directly into the bowl with the dry, stoping a few times to toss the butter chunks around so you don’t end up with a huge pile of grated butter. When it’s all grated, gently toss around so the butter is evenly distributed.%u00a0Now dump the blueberries into the flour mixture. Toss them around to give them a coat of flour. Add in the buttermilk and vanilla and give a little mix until liquid is absorbed. We are trying to handle the dough as little as possible.Turn mixture onto counter. It’s very loose, but thats what it should look like. Very gently and with as little handling as possible, gather dough up, knead a few times till everything %u00a0just comes together. Press dough into a disk that is roughly an inch thick%u2026. and it doesn’t need to be perfect.%u00a0Cut the disk into even sized pieces. Do 6 big, 8 normal, maybe even 10 smaller. Whatever size you like. (I did 8) Place the scones onto a baking sheet, using a spatula to transfer, and sprinkle the tops with a little bit of sugar. Into a preheated oven for about 20 minutes.And when the scones look all nice and browned and a tester comes out clean. remove and either serve right away warm, preferably with huge cup of coffee or tea, or stick on a rack to cool before storing in %u00a0air tight container.
Perfect to serve as a breakfast pastry, at brunch, or even as a dessert. A nice little treat for a special lady. (dudes can eat them too)%u00a0
Happy Mothers Day Mom! Thanks for having me!
And Happy Weekend!!!
-C
Blueberry Scones%u00a0
2 cups all purpose flour
1/3 cup sugar plus%u00a02 tablespoons %u00a0to sprinkle on top
1 %u00a0teaspoon baking powder
1 teaspoon baking soda
1/2 teaspoon salt
1/2 cup (1 stick) unsalted %u00a0butter frozen or really cold (use non dairy butter like Earth Balance for vegan)
1 cup blueberries (fresh or frozen)
1 teaspoon %u00a0vanilla%u00a0
%u00a03/4 cup buttermilk (use non dairy milk for vegan)
Preheat oven t0 400 degrees
In a large bowl, whisk together flour, baking soda, baking powder, sugar, and salt. Take the frozen butter and grate directly into flour mixture, tossing around to evenly disrupted. Add in blueberries and toss around till coated with flour, then lastly, add vanilla to buttermilk and mix into mixture until just barely coming together. Turn mixture out onto counter and with your hands, knead mixture a few times until it forms a solid dough. Shape into a disk and smoosh down until about an inch thick. Cut into 6-10 triangles %u00a0and place on a non greases baking sheet and sprinkle tops with remaining sugar. Stick into oven and bake for 20 minutes or until tops start turning a golden brown and a tester in the middle of a scone comes out clean.%u00a0
Remove from baking sheet and serve warm or let cool on a rack.
Mom gets first dibs, and if she is willing to share, eat one yourself with%u00a0your face.%u00a0
This weekend I made a stand of paper hearts that live all around the house. An early Valentines for my mister. We don’t do fancy dinners, %u00a0store bought cards or gifts%u2026.. Handmade and pretty is what we do.
These hearts hang from the ceiling and toss pretty heart shadows on the walls%u2026..and make both of us smile.%u00a0
%u00a0 The making of stringed paper hearts is so very simple. What you need is..
One or more different colors of card stock paper
scissors
A sewing machine with thread..(can be hand sewn for sure)
To start, cut out a bunch of hearts, as many as you want. You can free form cut them (that’s what I did) or you can either make a template and rouse %u00a0a cookie cutter or something and trace, if you want perfect uniform hearts.%u00a0
Decide on a color pattern (I did red, pink, white, brown, repeat) or random is nice too.
Start sewing the hearts. (I used a scrap to get started..and use the scrap piece for tacking to the ceiling). You can either sew hearts close together or leave an inch or two in between each. One trick I have learned when sewing strands of paper is to give a little tension to the strand as you are sewing%u2026it helps keep the machine from jamming up.
You are done when all the hearts are sewn%u2026 And hang them up or, if you want to save them for a surprise for Valentines day, wrap strand around a piece of cardboard. %u00a0Leave up for a day, for a week, or like us, all year long.
Hearts everywhere%u2026so simple, so pretty, so much love!
-C
Made from necessity, a seat near the door to sit and remove shoes, %u00a0store winter stuff and doesn’t look like I threw a bunch of milk crates together..I threw them together and added %u00a0a nice blanket, I’m classy like that. I do love a good milk crate%u2026there has always been something so satisfying to me about a free plastic receptacle that has a world of uses. These three crates and some scrap wood %u00a0have changed my entire living situation. The entryway of our 200 sq ft loft is now super functional, looks fantastic, and makes me happy. .All from a the scrape pile. It’s not what you think%u2026we have a barn that is pretty much dedicated to scrap wood and some other building material that has come from buildings we have worked on. This picture does not do our scrap wood(and junk) pile any justice. It is pretty crazy, and drives me nuts. I don’t know how many times I have threatened a 30 yard dumpster, but you know what? When Nick or I are in need of some wood, we always find ourselves rummaging through the pile and can almost always find a piece of what we are looking for. The pile somehow always redeems itself, %u00a0 for that reason it still lives on(for now). Being %u00a0that you as a %u00a0sane person, you probably don’t have a barn full of scrap wood(and junk), so what you will need for this project is..
Materials
Two 39.5 X13 inches pieces %u00a0of 3/4 inch ply wood(top and bottom)
Two pieces %u00a0 13X13 of 3/4 inch plywood(sides)
Four 10 inch 2×4 (Legs)
about twenty-five 2 inch finishing screws
3 milk crates(you can do 2 or 4%u2026just have to measure out for wood)
Tools
Drill
%u00a0circular saw
measuring tape
t square or a long straight edge.
pencil
Note: If you are not comfortable buying a full sheet of ply wood and cutting it down or you don’t own necessary tools, go to Home Depot or Lowes and have them cut the pieces to size for you.. Also, I have never really gone through a project step by step so if you are making %u00a0this and somethings seems off or you have any questions, totally email or comment to me%u2026 but I will try my best to make each step clear%u2026..
Three milk crates..What I found was that there are some milk crates that are not the same size so make sure that you have three that are the same. These crates are 13x13x11.
Measure%u00a0and cut ply wood. The %u00a0top and a bottom %u00a0are the same measurements%u2026Here comes some math%u2026. three milk crates that are 13 inches long = 39 inches. One crate deep is 13 inches. . Cut two pieces %u00a039.5 inches by 13 inches. (The extra 1/2 inch is so the crates can move in and out easier)
Now measure and cut sides. Two pieces at 13×13.The crates are 11 inches high, but you need to add the extra 1.5 inches %u00a0because of the thickness of the plywood. If your milk crates are a different height, %u00a0use that measurement plus 1.5 inches.
If you haven’t heard this saying before, it will change your life%u2026Measure TWICE!! cut once. Dont get overly cocky, cause even the seasoned wood worker screws up measurements.. I screw up sometimes so the saying is not lost on me.
%u00a0 %u00a0%u00a0
Once you have all four pieces cut, its time to assemble. Having an extra hand will help a lot, but you can do this on your own.
Screw the side pieces into the top and bottom. We stood the top and bottom vertically and place and lined up the side. Now sink four screws into both sides to secure to the other pieces. %u00a0When sinking the screws, make sure you are drilling straight down so your drew doesn’t come out of the side of the wood. If that happens, just remove and start again, no biggy. Once you have done one size, flip and screw in the other.
I caught that piece of wood he is throwing at me. Ok, not really, but I could have. Here Nick is cutting %u00a0four 10 inch pieces of 2×4 for the legs. We decided on 10 inch legs because we wanted a bench that was a %u00a0little taller than the average chair, which is about 18 inches floor to seat. If you wanted to make the legs shorter or taller, by all means, I just wouldn’t go to much taller or you might not be able to sit conformably on it.
After you have all your legs cut, mark out where you want to place them. We did a one%u00a0inch recessed from the front and the side%u2026but do whatever looks best to you. Mark where the legs go and place two screws into inch leg, screwing from the inside of the bench.%u00a0And thats%u00a0it%u2026 ..now you have the frame. Take a minute here to admire your handy wood working skills. If you are not into the raw wood look, this would be the time to paint it.
With the crates inserted%u2026Doesn’t it look magnificent! I choose these 3 crates for the colors and the patterns..I wish I has a grey crate that fit. That would have looked awesome.
Test one%u2026%u2026%u2026.the crate slides out perfectly and my mittens fit!!
Now for the big%u00a0test%u2026%u2026….and it works!! My butt safely seated. My feet touch the ground and I can bend over and tie my shows%u2026 can’t get any better%u2026
But it did. The addition of a folded blanket as a cushion. I was going to make a cushion but found a really pretty blanket at the second-hand store that was perfect. It was 2 bucks and is actually way more practical than a cushion. I can wash this blanket, a hand-made cushion, I probably wouldn’t want to mess with that, plus a piece of foam alone cost like 25 bucks. The blanket was meant to be.
A great success.. This bench is really great, I definitely recommend it to anyone and everyone.. It’s the perfect place to sit and remove wet shoes, store all of our hats, mittens and canvas shopping bags and it just looks cool. It was really simple to make, cheap, and took very little time. You could even make two, one for you and one for a friend(think holiday gift)
A perfect weekend project!! DO IT!!!! and if %u00a0you make one, please, send a pic on over, I would love to see it!
Do you realize that Christmas is just a handful and a half of days away? I knew it, but like didn’t really register it. And now I am like, fa la la la fuck! We have been so busy and distracted that I haven’t really focused to much on the holiday, but at least we decorate the tree. And if I am remembering correctly, there were a few years, long ago, that the mr and I wouldn’t even start celebrating or get our tree until a few days before Christmas so if I am judging us on my past selves, well we are golden. And now we let the celebrating begin!
One of our Christmas traditions is to string popcorn while watching elf for the tree. This is a big deal night because I won’t let myself watch it until that night, but after that, I can watch it as many times that I want. (once a day) We got our tree like two weeks ago, and finally late last week we did the popcorn, watched some elf, and a few days after that we decorated, kinda.%u00a0 It was much lacking in ornaments. We had the lights, the popcorn garland, the paper chain (we made it a few years back), and the carved wooden carrots, but the bulbs we usually stick on it, I just wasn’t feeling. The tree was looking pretty good but was still lacking something. That’s when I went to my fruit bowl and grabbed an orange, a clementine and the dehydrator out of the basement over at the loft and went to work. I turned on the Christmas music (A very special Christmas, the red cover) sliced the citrus, stuck it in the dehydrator, and then, well, then I waited a good few hours. During those hours, the music was going, the house smelled up like citrus and lovely, and I felt that slight holiday tingle.
I think these orange slices are going to be a new holiday tree decorating tradition. I will probably tweak it next year ans spend the 6 hours waiting for the fruit to dry baking cookies and not pouring concrete, but maybe not.
And if you are thinking its too late to make any more holiday stuff, well you are wrong. And honestly, I might just make a sting of these slices to hang up all year long.
To make the orange slice ornaments..
All you need is..
oranges or whatever citrus you want to use
a sharp knife
needle and thread or ornament hangers
a dehydrator or a baking sheet.
The dirty work. Slice the orange about a 1/4 inch thick. Try to make all the slices the same thickness.
I am using my dehydrator so the slices go single layer onto a rack. If you are using the oven, line a baking sheet with parchment and single layer the slices. Pop those suckers into the oven at the lowest possible setting you got. Either way you do it, the slices are going to take anywhere between 5-8 hours to completely dehydrate. It all depends on how juicy your oranges are. Just keep an eye on them after the first few hours. You want them to dehydrate, not burn into crisp.
They are done when they look like so, all dried and crispy and delicate. They should feel dry to the touch.
%u00a0Once the slices have cooled off a bit, they are ready to be handled and hung. I used thread to hang my orange slices, but feel free to use whatever you want.(I was going to use ornament hangers but didn’t have any and I was not about to go buy some)
Slices of orange so pretty. They look so good with the wooden carrots, the popcorn garland, and the glittery acorns on the tree.
I definitely will be making more.
Enjoy!
-C
This past Christmas, my (kinda)mother- in-law gave me and the mr these really cool honey bee pins in our stockings. Nothing fancy, just a little pin, but I think it was one of the best gifts that I had gotten all year. The pin lives on my winter jacket.
And now I am into pins.
So a couple of the little’s came over yesterday after school for crafts and dinner and I figured a bit of pin making would be a perfect little project for us to do. And being that it’s the big V day coming up,%u00a0 making these pins heart shaped was more then overly appropriate. (What’s Valentines day without cute little hearts?) Well pin making we did, or I did, not so much for them. They made a few, but in the end, they were more excited to beat the crap out of the mr and to eat carrot shavings with peanut butter and nutella.. Totally ok with me because really, I was the one that wanted a little craft time and the mr did need to get his butt kicked.
Sure I made these pins pretty much for myself, but imagine the possibilities. Make a bunch to give out to your friends, family, neighbors, or even the mail man!? Or if you have yourself a little, how great would these pins be make and to give to all their little classmates. I know that if received one of these pins in my homemade shoe box mail box meant to collect all of my candy studded, drugstore bought valentines. I would have been elated and rocked that pin all year long on my super cool backpack.(grade schooler, they have all the fun) Right after I finished painting and gluing all my pins, Miley then decided that they were freaking awesome and wanted to make a bunch more…. Well little little, to late, time to go home. But I did give her a bunch to bring back with her. She will just have to bug her mom to make some more.
And sure, I mention valentines day when talking about these pins, but really, hearts are for everyday, and are still really great long after V day is over.
Handmade heart pins = love!
Stuff you need for some awesome pins.
Polymer clay (I used white but any color will do)
red and white paint (preferably enamel or a high gloss paint) and a paint brush
bar pin backs (I bought these at Michael ‘s craft store. 64 for like 3 bucks!)
industrial strength glue (E600 is great and is used and recommended by many a crafters)
rolling pin or wooden dowel
small heart shaped cutter
sharpie pen to write on pins (optional)
Glitter( also optional)
A couple notes. You could use red clay but I have found that when I buy the red dyed clay, its always harder to work with and plus, it stainsyour hands. Also, I like to seal the clay and enamel paint does the trick. If you don’t want to paint it, just pain on a coat of clear sealer.
Start buy kneading a chunk of clay a little bit to get it to a workable state, then roll into a ball and roll out flat. I rolled mine out about 1/3 of an inch, but I also knew I wanted to squish it out a little flatter once I cut the shapes out.
Cut out your hearts, or if you want, free form them.%u00a0 What I did was used my tiny heart cookie cutter to cut the initial shape, but then used my thumb and squished them all out a bit bigger.
Note here.. Hears are awesome and amazing, but other shapes….Go for it. You probably have a shit tone of those pin backs.
And just before you bake them, make sure that the pins you are using will fit behind the hearts. (if you notice any visible pin, just smoosh the heart out a little more).
Into the oven,, out of the oven. Read the package to make sure, but the stuff I used only needed to be baked for 15 minutes at 275
Once out of the oven, let completely cool and harden.
Once the hearts are cooled, go ahead and paint them. Use straight up one color, or mix and make a few different shades. (red, white and pink are nice together)
You can add some glitter to the wet paint to add a little bling….
Or add designs or what have you. Do whatever feels right.
Now stick a pin thingy on the back of each heart with a blob of glue. (If you use the E600, make sure to use it near a window or somewhere ventilated.. it really stinks for a few minutes)
Let the glue dry (this glue was completely dry within an hour, but follow glue package instructions)
And if you want, grab the sharpie, make sure the paint is really dry (at least an hour) and write a little something on the hearts.
And now the hard part.. which one goes to who and which one (or 4) do you keep for yourself. (you can always make more!)
Have fun!
-C
I think of myself as a problem solver. I see a problem and I look for a solution. And not to sound like a broken record, but the problem that I am having now is that it is winter here in Vermont, but you wouldn’t know it cause it’s 50 degrees and there is no f-ing snow. Yes, this is a problem for me. I don’t think its just me, everything around here is acting weird.%u00a0 My plants are not going into winter mode and are starting to droop and be sad. My fall allergies are coming back, plants are starting to bud again, Washer is shedding like crazy, and my snowshoes have not left the barn. It’s just weird and it makes me sad.Vermont is suppose to be cold ans snowy right now. Sure, there are people that might like this wonky weather, think they are getting a little extra treat, but not me. NOT ME!%u00a0 So this is the problem. And the solution that I have come up with, short of moving, is to cover all the windows with wax paper snowflakes.
See. Problem solver.
We have been spending a good amount of time over at the new house working away so this is where I decided to plaster my flakes. In between cleaning up pieces of broken wall and moving 500 lb bags of trash out of the house, I sat down at the little table, plugged in the Christmas lights, turned on some Christmas music, and totally zoned out. Sipping coffee and sniping away..it felt so right. And the results were quite good if I do say so myself. A window full of flakes that made me smile. Maybe the snow gods will see my effort and grace us with a huge ass storm. Wouldn’t that be so lovely!
All you need to make some flakes is
wax paper (mine is slightly tan because it’s not bleached)
scissors
tape
Optional things
glitter/glue
paint/brush
Christmas music
A hot beverage such as coffee or cocoa
Note. Why wax, well wax paper is really thin and makes cutting through all the folds easy. It also lets light shine through rather nicely and best part, the wax keeps the paper from getting soggy and gross from window condensation. But if you want, use paper. I don’t mind.
This is how learned to make a snowflake… Start with a square piece of wax paper (any size you like) and fold it in half on the diagonal. Then fold that in half at the point.%u00a0 And fold old again at the point. One more time after that. (from start to finish, 4 folds) You end up with a little dart like triangle with a little extra point at the top. Cut that extra bit off.
And snip away.. It can be thought-out or random (I like random snips)%u00a0 Just make sure that you don’t cut off all the folded paper parts cause that is what is holding it together.
Now for the most exciting part. Open (very gently) and see your snowflake creation.
Note. This is important to remember.. No snowflake is the same, and no snowflake is ugly.
Now tape the flake to where ever it should land (the window)
Stand back and enjoy all of the snow you can handle. I have gotten to one window, just 10 more to go!
This one is my favorite.
Happy weekend full of snow!
-C
I love me a good tree, pretty much any tree, real or fake.%u00a0 And come December, my house if full of different little trees, of all sizes, shapes and colors. It’s my holiday thing because really, there is nothing better then a tree.
And yeah, I was feeling crafty, and maybe a little bit sad that there is no snow around here. And we still hadn’t gotten our real tree yet (but we just got it!) so I wanted to make some more little trees to make me feel better, and this time I wanted them to light up. I was also thinking that it might be nice to bring a few little tree decorations over to the new house so I have happy little trees over there while we are working. So yeah, I needed some more little trees. And I figure you do too, that’s why I am sharing this.
This is a great project to do with a few littles (they make the trees, you use the hot glue and sharp blade) or make while baking bread and watching a festive movie.%u00a0 You could even make and share with a loved one as a sweet little gift. And best part…it doesn’t need to be packed away after the holidays because trees are not just for Christmas. These are pretty little winter trees, for everyone who is awesome and likes a tree to enjoy all winter long!(even if winter hasn’t come yet)
The stuff you will need
A piece of cardboard about 12×16 (I used an old pizza box I found in the recycling)
assorted paper of size an color
white tissue paper (optional)
a strand of 20 lights (colored or white)
a ruler
scissors
hot glue gun
glue stick
tape
pencil
xacto knife
Note. If you have an empty shallow box that is a good size for you, just use that. And hot glue works best, bt can be subed out with any glue, or tape for that matter (if you don’t mind seeing tape on your trees)
Start with making the cardboard box base. Measure each corner in 1 inch and cut our the corner. Repeat with all corners. Once they are allcut, fold each side at the cuts to make the sides.
Tape the corners together and now you got yourself a sallow box. (now you can make boxes for everything !!!) Set box aside
Now to make the trees. Take a piece of paper and, depending if it is already a square or not, but it into a square. (does not have to be perfect, just eyeball it)
Got your square paper, now take an edge and fold it over about 1/2 inch. And then taking you scissors and snip of the corner edge at an angle (again, not going for perfections here)
The poin is the tip that was cut, now fold the two sides together.
So you can stop here ans glue or if you want light holes…..
Unfold the paper and with a pencil, mark off where you wnt the holes (random is good). Take the xacto blade and cut little x’x over each hole.
Then push through each x with the eraser end of the pencil
Now glue the cone together using the hot glue gun.
You will have a weird tail left on the bottom of the cone, so just trim that off and any extra that needs to come off to make it stand up straight.
Ta Da!! A paper cone tree. Now make a bunch of them, all different sizes and colors (or all the same size and color.. up to you) And not all of them need to have light holes in them either, a couple non light trees are good.
Once you have made all the cone trees, grab the box base and set up the trees how you want them to be on the base
Take the trees off and mark the spots with the pencil. Grab the xacto and cut X’s into the marks.
Take your lights and push the bulbs through (there will be a extra bulbs on the underside…. it makes the box glow.)
And tape down the trees back into place
So cute!
Note.. I stuck a couple extra lights through the box that have no trees. They will be covered in a minute with snow.. So you can do the same. (if you want)
Now you check it out!!! Love it right?%u00a0 And stop here if you like, or go one more step and add some fake snow.
Before you tape down the trees, take glue stick and glue random pieces of tissue paper all over the box, leaving the lights uncovered. (I covered over the extra lights I popped through to make it look like glowing snow)
Stick trees back on.. same way with the tape (You might need to fanagle the trees a little bit to get them to stay)%u00a0 and plug it in.
This makes me happy.
Now go get some paper and start making some trees.
Have fun!
-C
I am not a fancy person by any means, like super, no frills, no one would ever consider me fancy. EVER.%u00a0With that said, I am always and forever a cloth napkin lady. I have a drawer full of them, in all sizes and color. I use one with every meal %u00a0(I am a sloppy eater).And napkin use is not just about functionality, it is also about looking pretty.%u00a0 When I go for a clean napkin, I like to pick one that looks good with the meal that I am eating. I think a pretty clean napkin really makes any meal just a tiny bit better. Does that sound weird? I don%u2019t know but this is just a little look into how my mind works.
And recently I have set a few too many of my kitchen textiles on fire (towels, napkins, and potholders) so I am in need of a few new, nice looking napkins.%u00a0
And let’s get this straight. Cloth napkins are not about being fancy, they are about wiping you hands and face with something lovely, that doesn’t need to be tossed into the trash after use. Cloth napkins are also a great way to add a nice splash of color tot a table settings or a nice doth barrier between your lap and all the food that ends up landing on it. I have even been known to do a cloth napkin-tuck into the shirt- type situation if I am eating something particularly messy and have on decent, clean shirt (doesn’t happen too often).%u00a0Cloth napkins also double up as a rag when the inevitable spill happens at the table. See, not just for fancy people. Cloth napkins just make sense. And sure, if you are introducing them at the Thanksgiving table that happens to set a bunch of guests, or maybe making a few, wrapping them up with a ribbon and gifting them for Hanukah to Christmas%u2026that would totally be cool and not at all showy and over fancy. You just seem like a leveled headed person that uses and or gifts totally cool and useful things. And whatever if it makes you badass for making them yourself%u2026. cause you probably are badass anyway.%u00a0
So if you got the desire and a little bit of time (this project is great to do while watching a good holiday movie) you should make yourself (or someone else ) some cool ass cloth napkins.
What you will need, besides a sew machine
Cotton Fabric that you would like to wipe you face with.%u00a0I use around a 15-20 inch square piece per napkin but you can make it any size you want.. just as log as it has 90 degree conners So count how many napkins you ant to make and get hat touch in fabric.
scissors%u00a0
sewing pins
thread that looks good with your fabric
ruler or tape measurer
iron (optional)
Step 1.
Start by laying out you fabric flat, and if you want, run an iron over it to remove creases %u00a0(I would haven but my iron%u2026 can’t find it anywhere!)
When your ready, fold all the edges in 1 inch and crease with either an iron, or a flat edge (my ruler works great here)
Step 2.
Unfold last fold and the refold %u00a0each side 1/2 inch and crease.
. You now have 1/2 inch and a 1 inch crease on all sides of your fabric.
Step 2.
Now go back to the 1/2 inch crease and stick few pins in otto hold it in place.%u00a0
Start with any corner %u00a0and fold the corner over 1 inch and crease.%u00a0
Step 3.
Take a fabric marker and mark that crease Repeat with all corners.
Step 4.
Grab a marked corner and fold the napkin in half, right side together,making sure the line you just marked match up, Stick a pin in it so it stays put.
Step 5.
Run a stitch through that line.
Step 6.
Snip off the remaining tip of fabric
Repeat step 3-6 with all corners.
Step 7.
And for the most fgratifing part,%u00a0fold over %u2026 Repeat to all corners
ALmost done!
Step 8.
Lastly, run a nice stitch around the border. I went with a simple stitch, but if you are feeling a little zig zag or some other funky-ness your machine can do.. go for it.%u00a0
See, fancy(but not), pretty, made by you. napkins.. and they are so easy!%u00a0
Have fun and if you know me and end up making yourself some, let me know so I don’t end up giving you more napkins for the holidays.
Have fun!
-C
A simple little artsy craft project to get down with%u2026 apple printing. ALmost the same as potato print, except smells better and your apple comes with an interior fun shape to print with. And you have to use apple this time of year cause its apple season and there are apples everywhere!
I usually do things like this with a little or two, but at the time, I had no littles in my possession, so I went it did it all by my lonesome.%u00a0(which was actually a lot of fun)%u00a0I made myself big cup of hot coffee, put on some tunes, and zoned out and did a bunch of prints. It was a great little afternoon project that anyone, little or not so much, can do. And the best part about printing is%u2026 you can’t screw it up
And I know that this is going to be a cold dreary weekend%u2026 so this might just be the perfect indoor project to do!%u00a0
Things you are going to need..
apple(s).. And the apple that I use are fallen apples.. so I don’t feel bad about using them.
paper
a knife (or something sharp enough to cut the apple)
paint ( I used cheap-o acrylic paint, but any paint would work)
paint-brush
Cup of water (to rinse brush)
rag (to wipe hands)
Start by slicing your apple. If you cut in in half, you get the cool star shape in the middle, or just chop it into cool shaped pieces.%u00a0
Apply paint to the apple. I found that if I dipped the apple, then remove to much excess paint with a paint brush to work the best for me.. My suggestion is to play around with what works best for you.
Apple goes paint side down on paper%u2026 and that’s how it goes. Now repeat, either with the same shape, or use a new one. OR change up the color.. it’s all how you want to do it.%u00a0
If%u00a0
. I got a little excited with my fist print turned out a little chaotic(note print above)%u00a0but then I rained myself in.%u00a0
And did a few more simpler designs. %u00a0%u00a0
But do it anyway you want cause it’s going to look cool no matter what.
Have fun!
-C
I never can really tell how I honestly feel about halloween. I love fall, I love pumpkins and cider, but thats fall ,not halloween.%u00a0%u00a0I love to see all the happy little littles running around being super cute. all jacked up on way to much sugar.%u00a0%u00a0And %u00a0I know when I was a kid I was all about it. I mean, what kid doesn’t get jazzed to run around, dressed up (I was alway a black cat),%u00a0with a pillowcase full of candy all night long? That is just magic.%u00a0But as an adult, I haven’t really done too much. Sure I help wit the costumes of the littles and sometime I hand out candy, but where we live now, it’s not possible to give out candy. And the littles, they go do stuff with there friends, not there old lady aunt.%u00a0And I guess me and the mr could dress up and go to a party or something, but %u00a0honestly, we are not really party people%u2026. So yeah, don’t know. I think when I finally have my own kids It will be more fun.%u00a0But whatever, at least I can do a little decorating.
For as long as I have been as adult with my own living place, I have really gotten into holiday decoataing. But here is the thing. I like my decor to be minimalistic,%u00a0not to over the top, or super cheesy. (although I really do like when other people go super overboard and cheesy) But no, you won’t find a 20 foot blow up of a witch or severed hands in my front lawn.(maybe a few dead mice, but thats the cat, not me)%u00a0And I like to make my decorations. I even like to get some littles in one it, cause hand made kiddo decorations are the best.%u00a0
These bats are the perfect bit of halloween decoration. I made a ton of them a few years back and lost them, so I just whipped up a new strand.%u00a0Fast and easy to make, are not overly crazy or gory, and can be hung anywhere. An yeah, making them with a few littles is fun, but you don’t need them. I made them all on my lonesome%u2026. Oh me..
Anyway, to the bat mobile (garland)!
The bat stuff
2-3 pieces of Black card stock (construction paper %u00a0is fine, but will the color will fade over time)
scissors
pencil
needle and thread*
clear tape or tacks (not shown.. to hang bats)
Note. You can use embroidery floss instead of thread, but the thread is much more visible and you are going to need a tapestry needle.%u00a0
Take a piece of paper and fold in half, either length or width wise.( If you do lenght wise, you can cut out a few more bats per piece of a paper, width wise, the bats wings are longer.. up to you, do it both ways if you want)%u00a0
Outline a bat.
Bats are all jagged %u00a0lines.. nothing too complicated so I figured a stencil is not needed. If you really need a stencil, I can email you one…
Cut out bat and open up.
See, easy. And now you have a bat. If you do not like the exact way it looks, fold in again and cut a little more, but don’t get to picky, you have many more to cut.
Now make yourself a %u00a0bat army. As many or as few as you like. I think 12 is a good number. If you want, take the first bat that you cut out and use that as a stencil. Me, actually just free form cut the guys, so none of them look the same.
Bats are ready, now thread you needle.%u00a0%u00a0Don’t cut the end loose or tie the two ends together.
Fold bats back flat and thread them through the upper portion of the wings.%u00a0%u00a0Do that to all your bats.. and make sure that you are threading them on all the dame direction (if you care)
Once all the bats are threaded on. remove needle and tape the end of the thread. Space the bats out evenly or however you like, and hoe ever far apart you like, and cut thread of spool. Tape that end off too.
And hang them%u2026.%u00a0Most of my bats stay where I placed them, but a couple wanted to slide around on the thread, so I just stuck a tiny piece of tape on the inside of the wing over the thread to stop that.
They can fly threw the air%u2026.
Or drape on the wall.%u00a0
Any way, these bats are freaking bad ass and the coolest!
This past Christmas, my (kinda)mother- in-law gave me and the mr these really cool honey bee pins in our stockings. Nothing fancy, just a little pin, but I think it was one of the best gifts that I had gotten all year. The pin lives on my winter jacket.
And now I am into pins.
So a couple of the little’s came over yesterday after school for crafts and dinner and I figured a bit of pin making would be a perfect little project for us to do. And being that it’s the big V day coming up,%u00a0 making these pins heart shaped was more then overly appropriate. (What’s Valentines day without cute little hearts?) Well pin making we did, or I did, not so much for them. They made a few, but in the end, they were more excited to beat the crap out of the mr and to eat carrot shavings with peanut butter and nutella.. Totally ok with me because really, I was the one that wanted a little craft time and the mr did need to get his butt kicked.
Sure I made these pins pretty much for myself, but imagine the possibilities. Make a bunch to give out to your friends, family, neighbors, or even the mail man!? Or if you have yourself a little, how great would these pins be make and to give to all their little classmates. I know that if received one of these pins in my homemade shoe box mail box meant to collect all of my candy studded, drugstore bought valentines. I would have been elated and rocked that pin all year long on my super cool backpack.(grade schooler, they have all the fun) Right after I finished painting and gluing all my pins, Miley then decided that they were freaking awesome and wanted to make a bunch more…. Well little little, to late, time to go home. But I did give her a bunch to bring back with her. She will just have to bug her mom to make some more.
And sure, I mention valentines day when talking about these pins, but really, hearts are for everyday, and are still really great long after V day is over.
Handmade heart pins = love!
Stuff you need for some awesome pins.
Polymer clay (I used white but any color will do)
red and white paint (preferably enamel or a high gloss paint) and a paint brush
bar pin backs (I bought these at Michael ‘s craft store. 64 for like 3 bucks!)
industrial strength glue (E600 is great and is used and recommended by many a crafters)
rolling pin or wooden dowel
small heart shaped cutter
sharpie pen to write on pins (optional)
Glitter( also optional)
A couple notes. You could use red clay but I have found that when I buy the red dyed clay, its always harder to work with and plus, it stainsyour hands. Also, I like to seal the clay and enamel paint does the trick. If you don’t want to paint it, just pain on a coat of clear sealer.
Start buy kneading a chunk of clay a little bit to get it to a workable state, then roll into a ball and roll out flat. I rolled mine out about 1/3 of an inch, but I also knew I wanted to squish it out a little flatter once I cut the shapes out.
Cut out your hearts, or if you want, free form them.%u00a0 What I did was used my tiny heart cookie cutter to cut the initial shape, but then used my thumb and squished them all out a bit bigger.
Note here.. Hears are awesome and amazing, but other shapes….Go for it. You probably have a shit tone of those pin backs.
And just before you bake them, make sure that the pins you are using will fit behind the hearts. (if you notice any visible pin, just smoosh the heart out a little more).
Into the oven,, out of the oven. Read the package to make sure, but the stuff I used only needed to be baked for 15 minutes at 275
Once out of the oven, let completely cool and harden.
Once the hearts are cooled, go ahead and paint them. Use straight up one color, or mix and make a few different shades. (red, white and pink are nice together)
You can add some glitter to the wet paint to add a little bling….
Or add designs or what have you. Do whatever feels right.
Now stick a pin thingy on the back of each heart with a blob of glue. (If you use the E600, make sure to use it near a window or somewhere ventilated.. it really stinks for a few minutes)
Let the glue dry (this glue was completely dry within an hour, but follow glue package instructions)
And if you want, grab the sharpie, make sure the paint is really dry (at least an hour) and write a little something on the hearts.
And now the hard part.. which one goes to who and which one (or 4) do you keep for yourself. (you can always make more!)
The mr was being awesome and spent the afternoon in the pantry adding a few finishing touches I requested ( more shelves and more supports) There really isn’t enough room in there for the both of us and the air compressor, but I needed to be close by to tell him what to do (in a non annoying way) so I figured the best way I could help was to be in the kitchen and make cookies. That’s helpful right? Answer is yes, cookies are always helpful.%u00a0
It’s been a while since I made cookies and I am pretty sure that these were the first cookies that I have made in this kitchen which seems crazy and I should go on a cookie making binge. I finally moved all of my food and baking stuff over from the loft so now I can bake on a whim. Cookies, cakes, bread… whatever I want whenever I want.%u00a0 It is so nice having my baking things all around me. I feels like home.
And I think from now on whenever we have a house project that I am not to interested in doing (like we need to empty and clean out he basement) I will just make cookies instead. I’ll be like “Oh, I could help with that or….I can make you favorite cookies” (with a wink, wink and a kissy face)%u00a0 We will see if that floats with the mr. I’ll let you know.
The stuff. Coconut flour, regular flour, and a little bit of salt. Sugar, coconut oil, ground chia seeds with water and a lime.
Zest the limeand mix into the flour.%u00a0 Add the juice to the chia seeds.
Mix together the chia seeds, sugar and melted coconut oil until evenly combined
Then dump dry into wet and mix until it turns into dough.
Take any liberties in shape you want here. I rolled some into balls and some I made into hearts. These cookies don’t spread so pretty much any shape you make it’s going to stay that way. Just make sure to smoosh the doughwith you hand or a fork to an even 1/2 inch so it bakes evenly.
Once the baking sheet is full, stick it in the preheated oven.
12-15 minutes laterthe kitchen smells all nice and the cookies are golden and ready. Stick them on a rack to cool.
Oh but wait, why not add some chocolate drizzle.%u00a0 Easy easy. Justmelt some chocolate chips with a bit of coconut oil.
And drizzle it all like yeah
Sweet coconut lime goodness. My pantry is all done and the mr got some love cookies. All in a days work.
bye!
-C
makes about 12-15 cookies
1/2 cup flour
1/2 cup coconut flour
1/2 cup sugar
1/2 cup coconut oil (melted and cooled)
1 lime (juice and zest)
1/2 teaspoon salt
2 tablespoons plus 4 tablespoons water
1/4 cup chocolate chips and teaspoon coconut oil for drizzling (optional)
Preheat oven to 350
In a medium bowl, whisk the flours, the salt and the zest of the lime. After zesting lime, juice it and mix2 tablespoons of the juice into the chia seeds along with the water. In a separate larger bowl, mix together the sugar and coconut oil until combined then mix in the chia seeds. Dump the dry mixture into the wet and mix until combined and dough has formed.
Roll cookie dough into balls the size of walnuts. Place on cookie sheet and about 1/2 inch smoosh flat with either your hand or a fork. If you want, shape the dough into a shape (like a heart) just make sure to flatten it so it bakes evenly. The cookies don’t spread so you can place then really close together on the cookie sheet. Place i oven and bake for about 13-15 minutes or until the bottoms of the cookies are a nice deep golden brown. Place cookies on a wire rack to cool. Now they don’t need it, but I was told the chocolate drizzle was awesome…
Place chocolate chips and coconut oil in a microwave safe bowl and place in microwave at 30 second intervals until the chocolate and oil can be mixed together into a drizzable consistency. Now take that and drizzle all over tops of cookies.
Eat. Store uneaten cookies in airtight container
This past Christmas, my (kinda)mother- in-law gave me and the mr these really cool honey bee pins in our stockings. Nothing fancy, just a little pin, but I think it was one of the best gifts that I had gotten all year. The pin lives on my winter jacket.
And now I am into pins.
So a couple of the little’s came over yesterday after school for crafts and dinner and I figured a bit of pin making would be a perfect little project for us to do. And being that it’s the big V day coming up,%u00a0 making these pins heart shaped was more then overly appropriate. (What’s Valentines day without cute little hearts?) Well pin making we did, or I did, not so much for them. They made a few, but in the end, they were more excited to beat the crap out of the mr and to eat carrot shavings with peanut butter and nutella.. Totally ok with me because really, I was the one that wanted a little craft time and the mr did need to get his butt kicked.
Sure I made these pins pretty much for myself, but imagine the possibilities. Make a bunch to give out to your friends, family, neighbors, or even the mail man!? Or if you have yourself a little, how great would these pins be make and to give to all their little classmates. I know that if received one of these pins in my homemade shoe box mail box meant to collect all of my candy studded, drugstore bought valentines. I would have been elated and rocked that pin all year long on my super cool backpack.(grade schooler, they have all the fun) Right after I finished painting and gluing all my pins, Miley then decided that they were freaking awesome and wanted to make a bunch more…. Well little little, to late, time to go home. But I did give her a bunch to bring back with her. She will just have to bug her mom to make some more.
And sure, I mention valentines day when talking about these pins, but really, hearts are for everyday, and are still really great long after V day is over.
Handmade heart pins = love!
Stuff you need for some awesome pins.
Polymer clay (I used white but any color will do)
red and white paint (preferably enamel or a high gloss paint) and a paint brush
bar pin backs (I bought these at Michael ‘s craft store. 64 for like 3 bucks!)
industrial strength glue (E600 is great and is used and recommended by many a crafters)
rolling pin or wooden dowel
small heart shaped cutter
sharpie pen to write on pins (optional)
Glitter( also optional)
A couple notes. You could use red clay but I have found that when I buy the red dyed clay, its always harder to work with and plus, it stainsyour hands. Also, I like to seal the clay and enamel paint does the trick. If you don’t want to paint it, just pain on a coat of clear sealer.
Start buy kneading a chunk of clay a little bit to get it to a workable state, then roll into a ball and roll out flat. I rolled mine out about 1/3 of an inch, but I also knew I wanted to squish it out a little flatter once I cut the shapes out.
Cut out your hearts, or if you want, free form them.%u00a0 What I did was used my tiny heart cookie cutter to cut the initial shape, but then used my thumb and squished them all out a bit bigger.
Note here.. Hears are awesome and amazing, but other shapes….Go for it. You probably have a shit tone of those pin backs.
And just before you bake them, make sure that the pins you are using will fit behind the hearts. (if you notice any visible pin, just smoosh the heart out a little more).
Into the oven,, out of the oven. Read the package to make sure, but the stuff I used only needed to be baked for 15 minutes at 275
Once out of the oven, let completely cool and harden.
Once the hearts are cooled, go ahead and paint them. Use straight up one color, or mix and make a few different shades. (red, white and pink are nice together)
You can add some glitter to the wet paint to add a little bling….
Or add designs or what have you. Do whatever feels right.
Now stick a pin thingy on the back of each heart with a blob of glue. (If you use the E600, make sure to use it near a window or somewhere ventilated.. it really stinks for a few minutes)
Let the glue dry (this glue was completely dry within an hour, but follow glue package instructions)
And if you want, grab the sharpie, make sure the paint is really dry (at least an hour) and write a little something on the hearts.
And now the hard part.. which one goes to who and which one (or 4) do you keep for yourself. (you can always make more!)


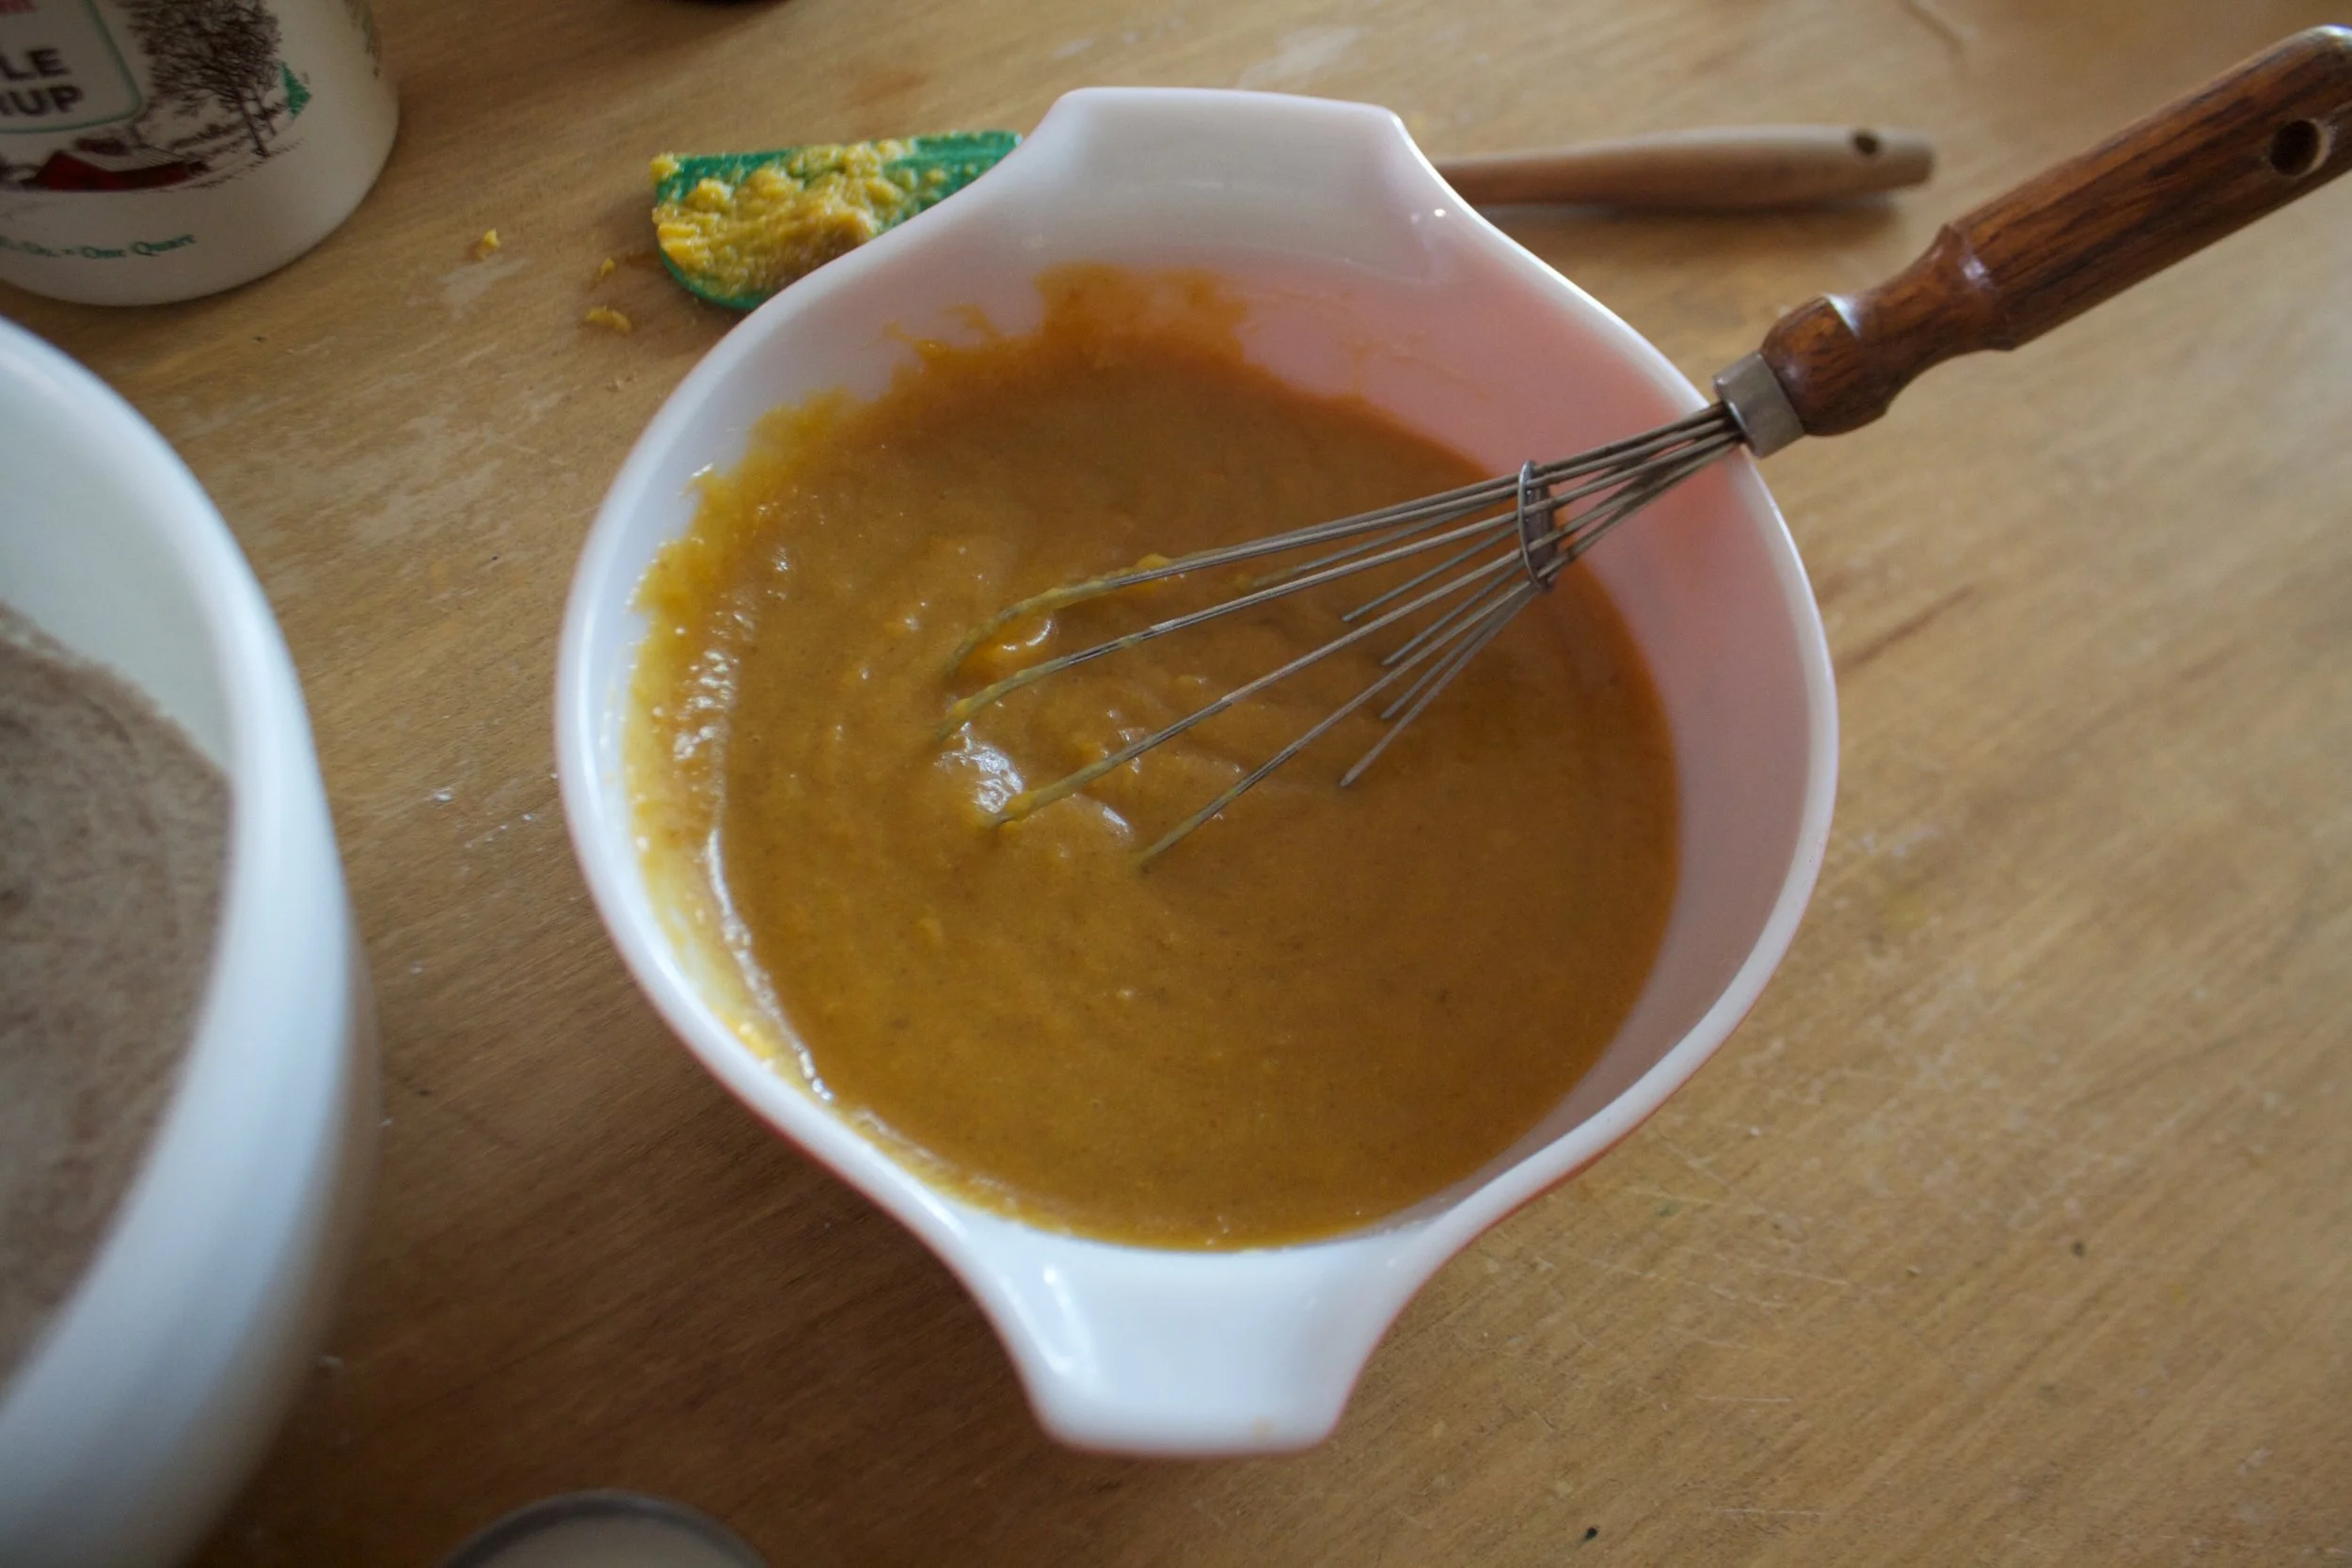
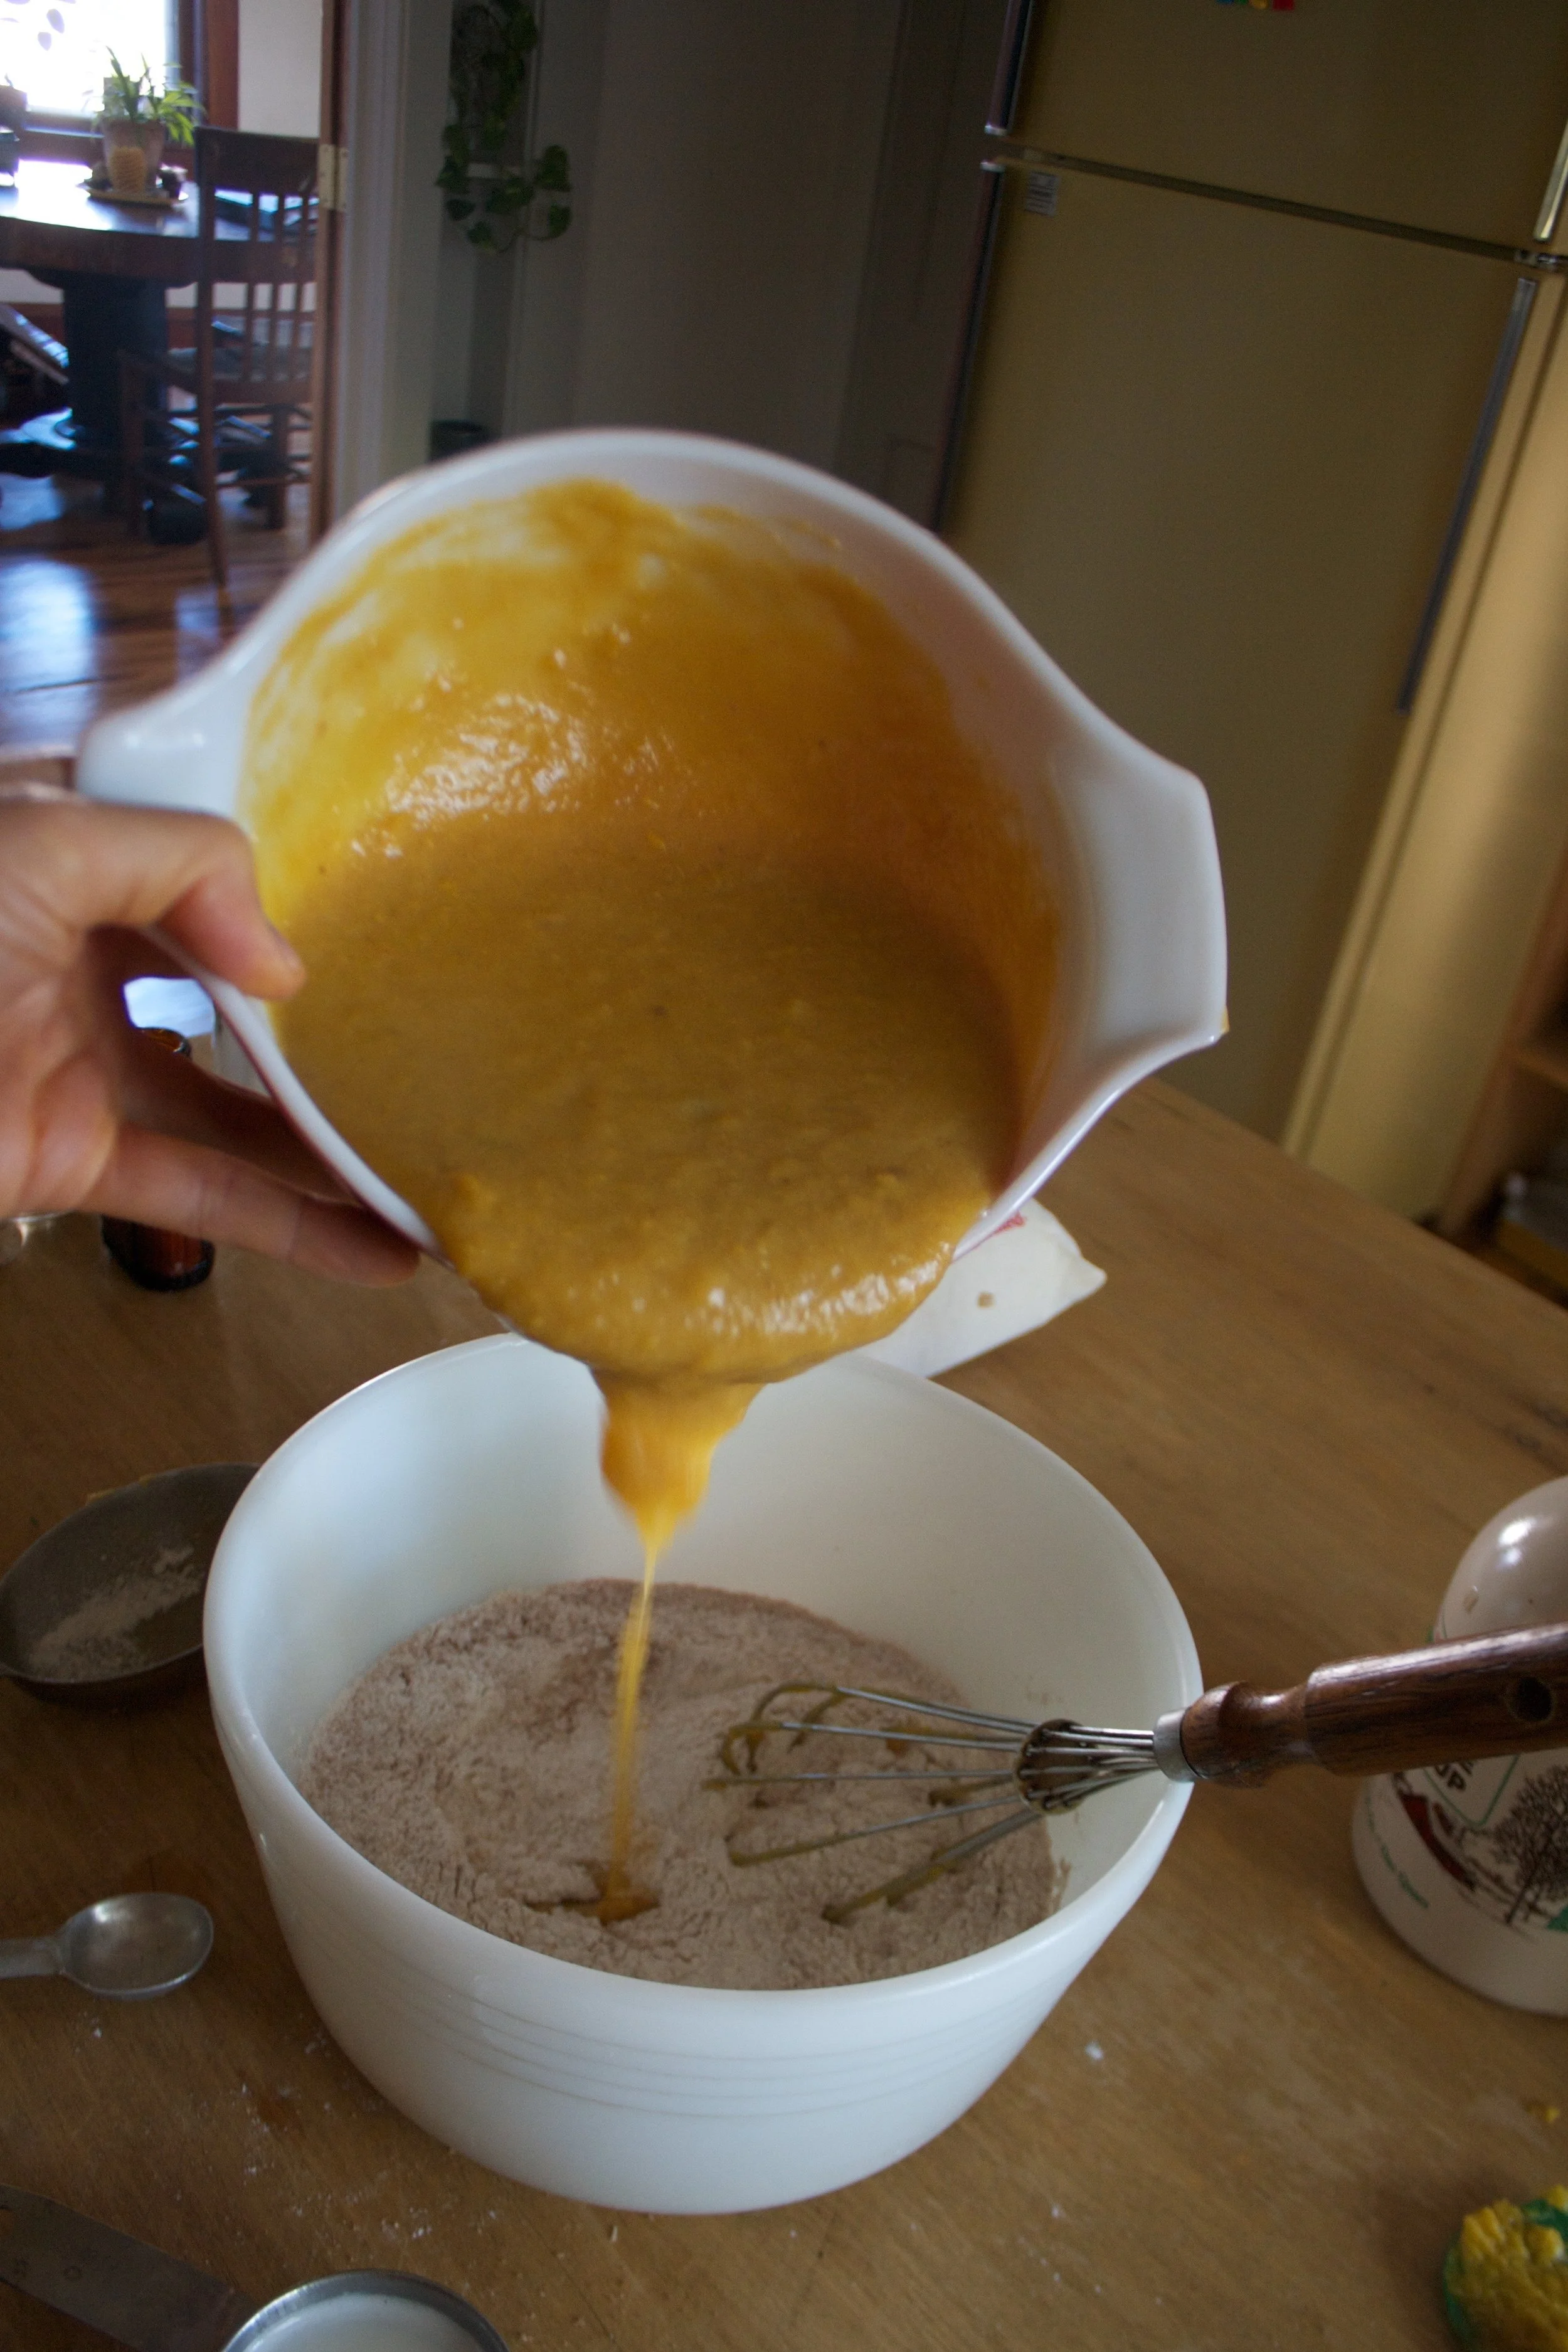
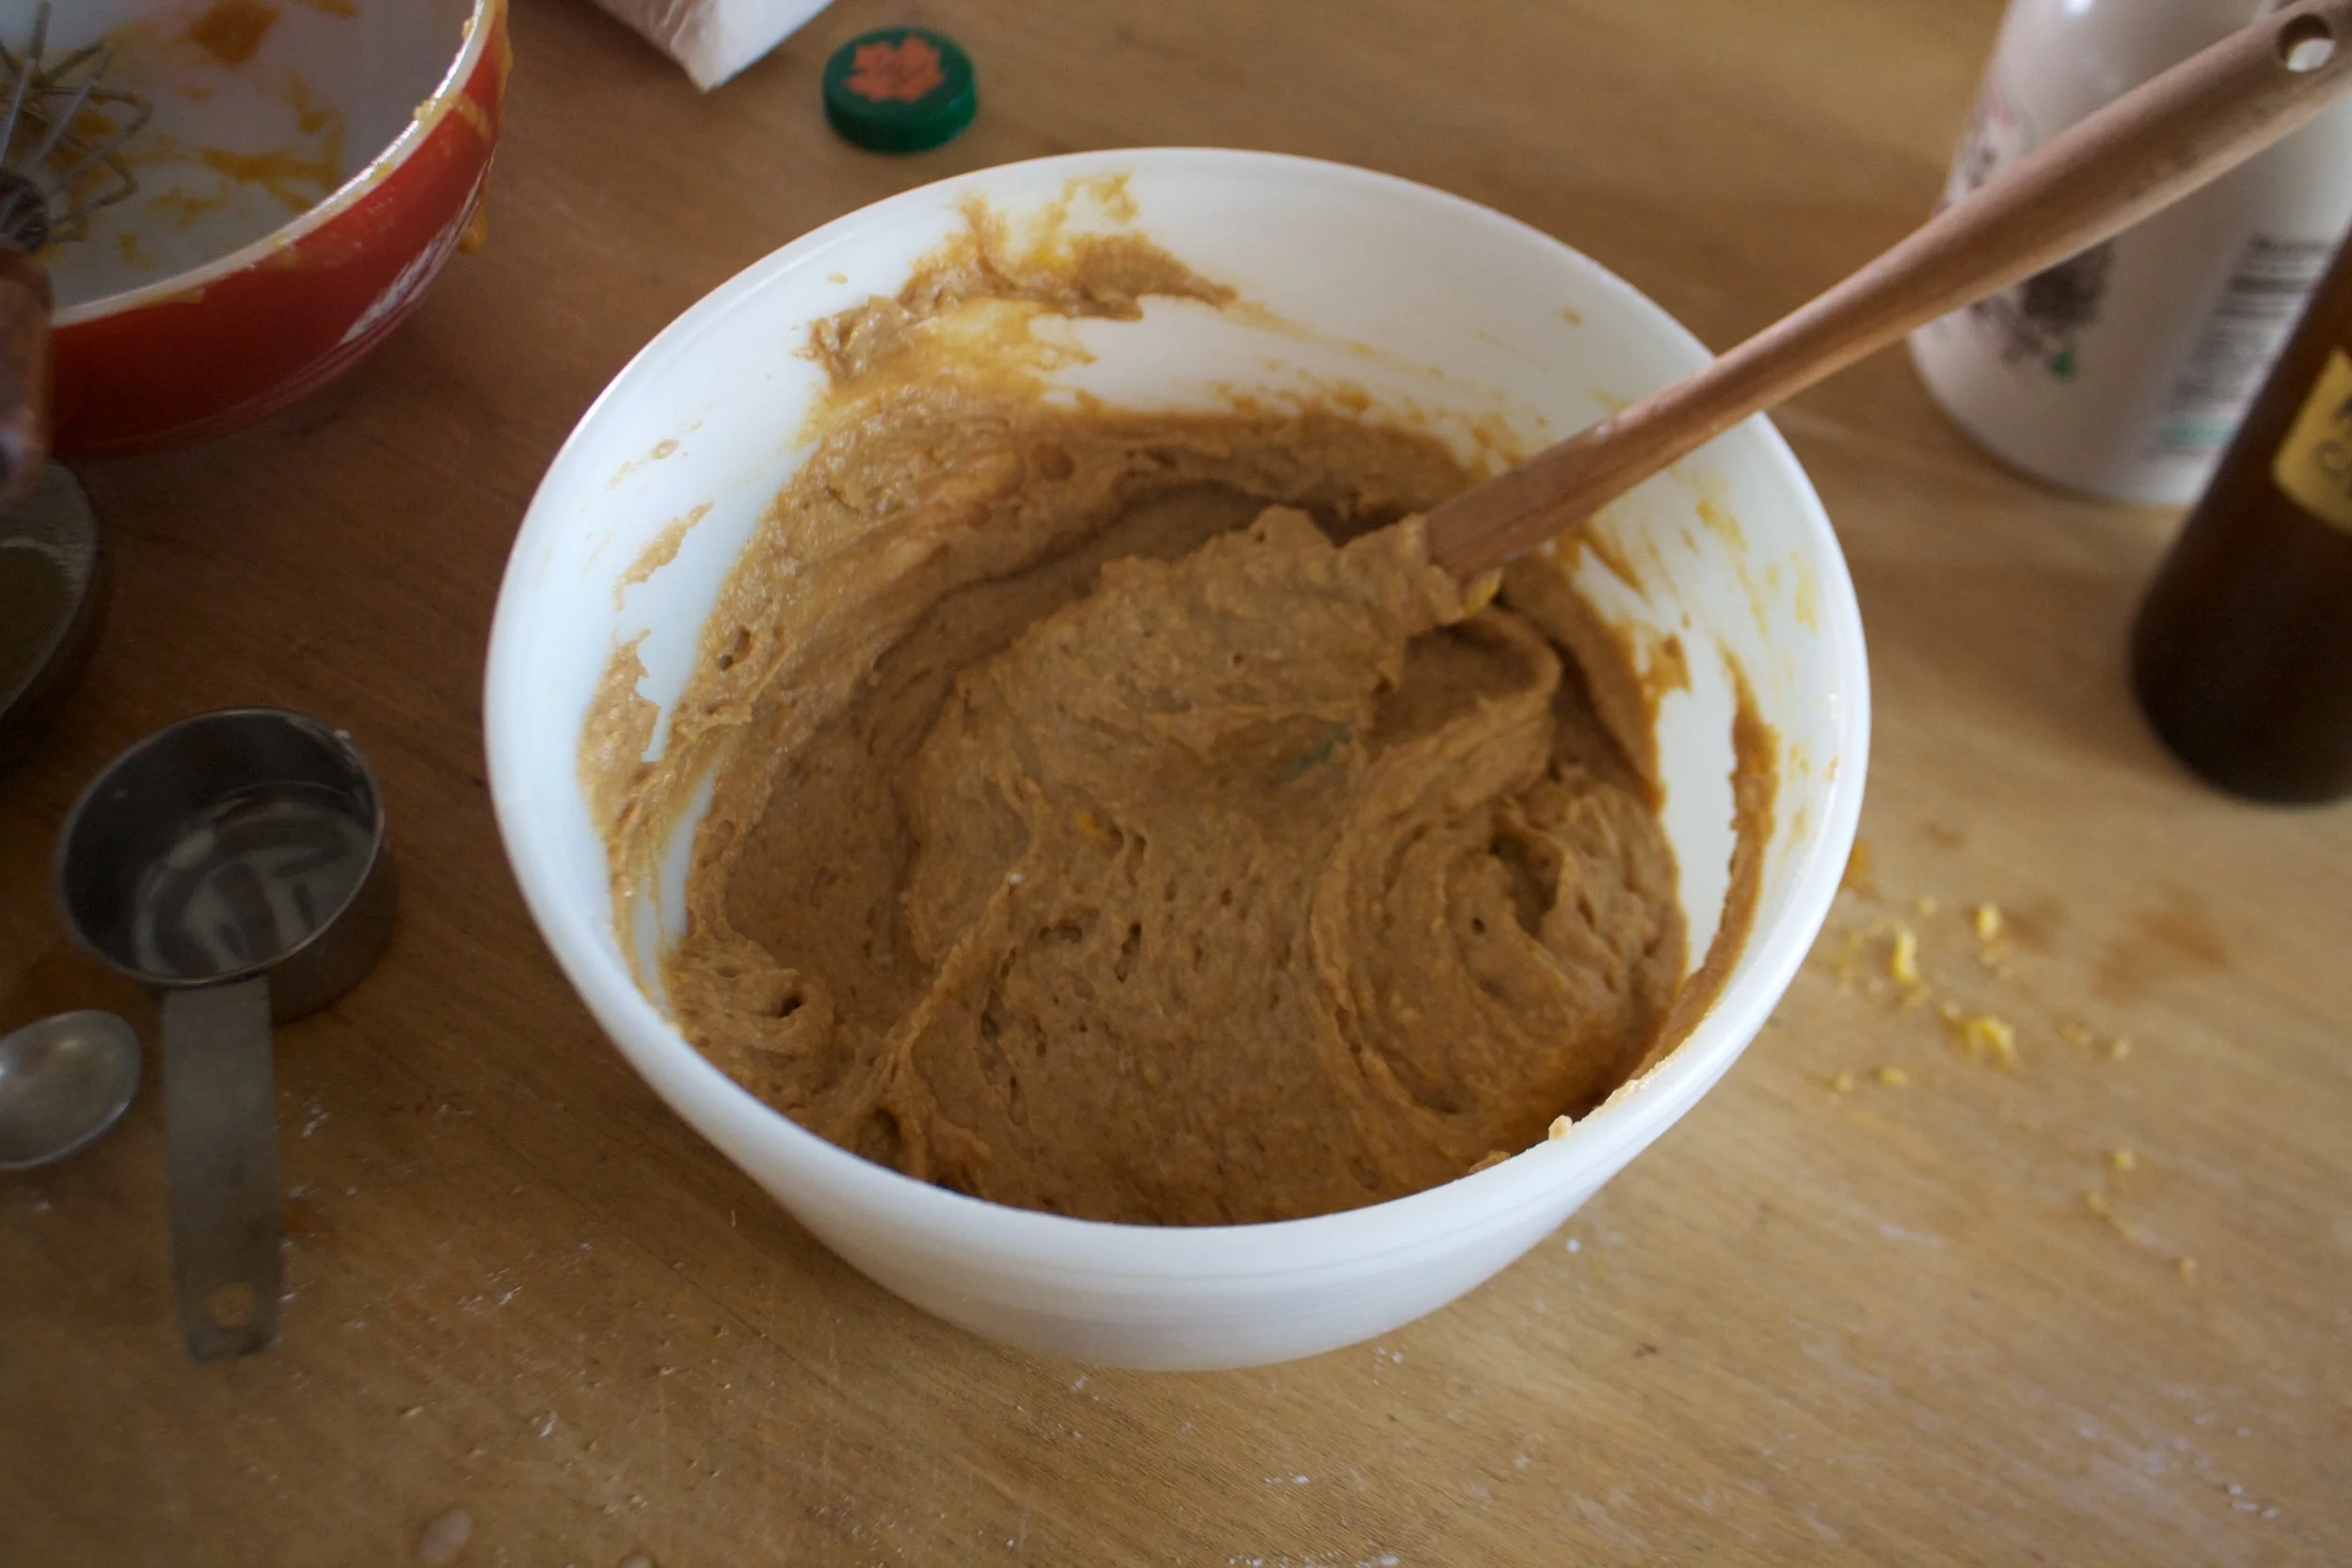

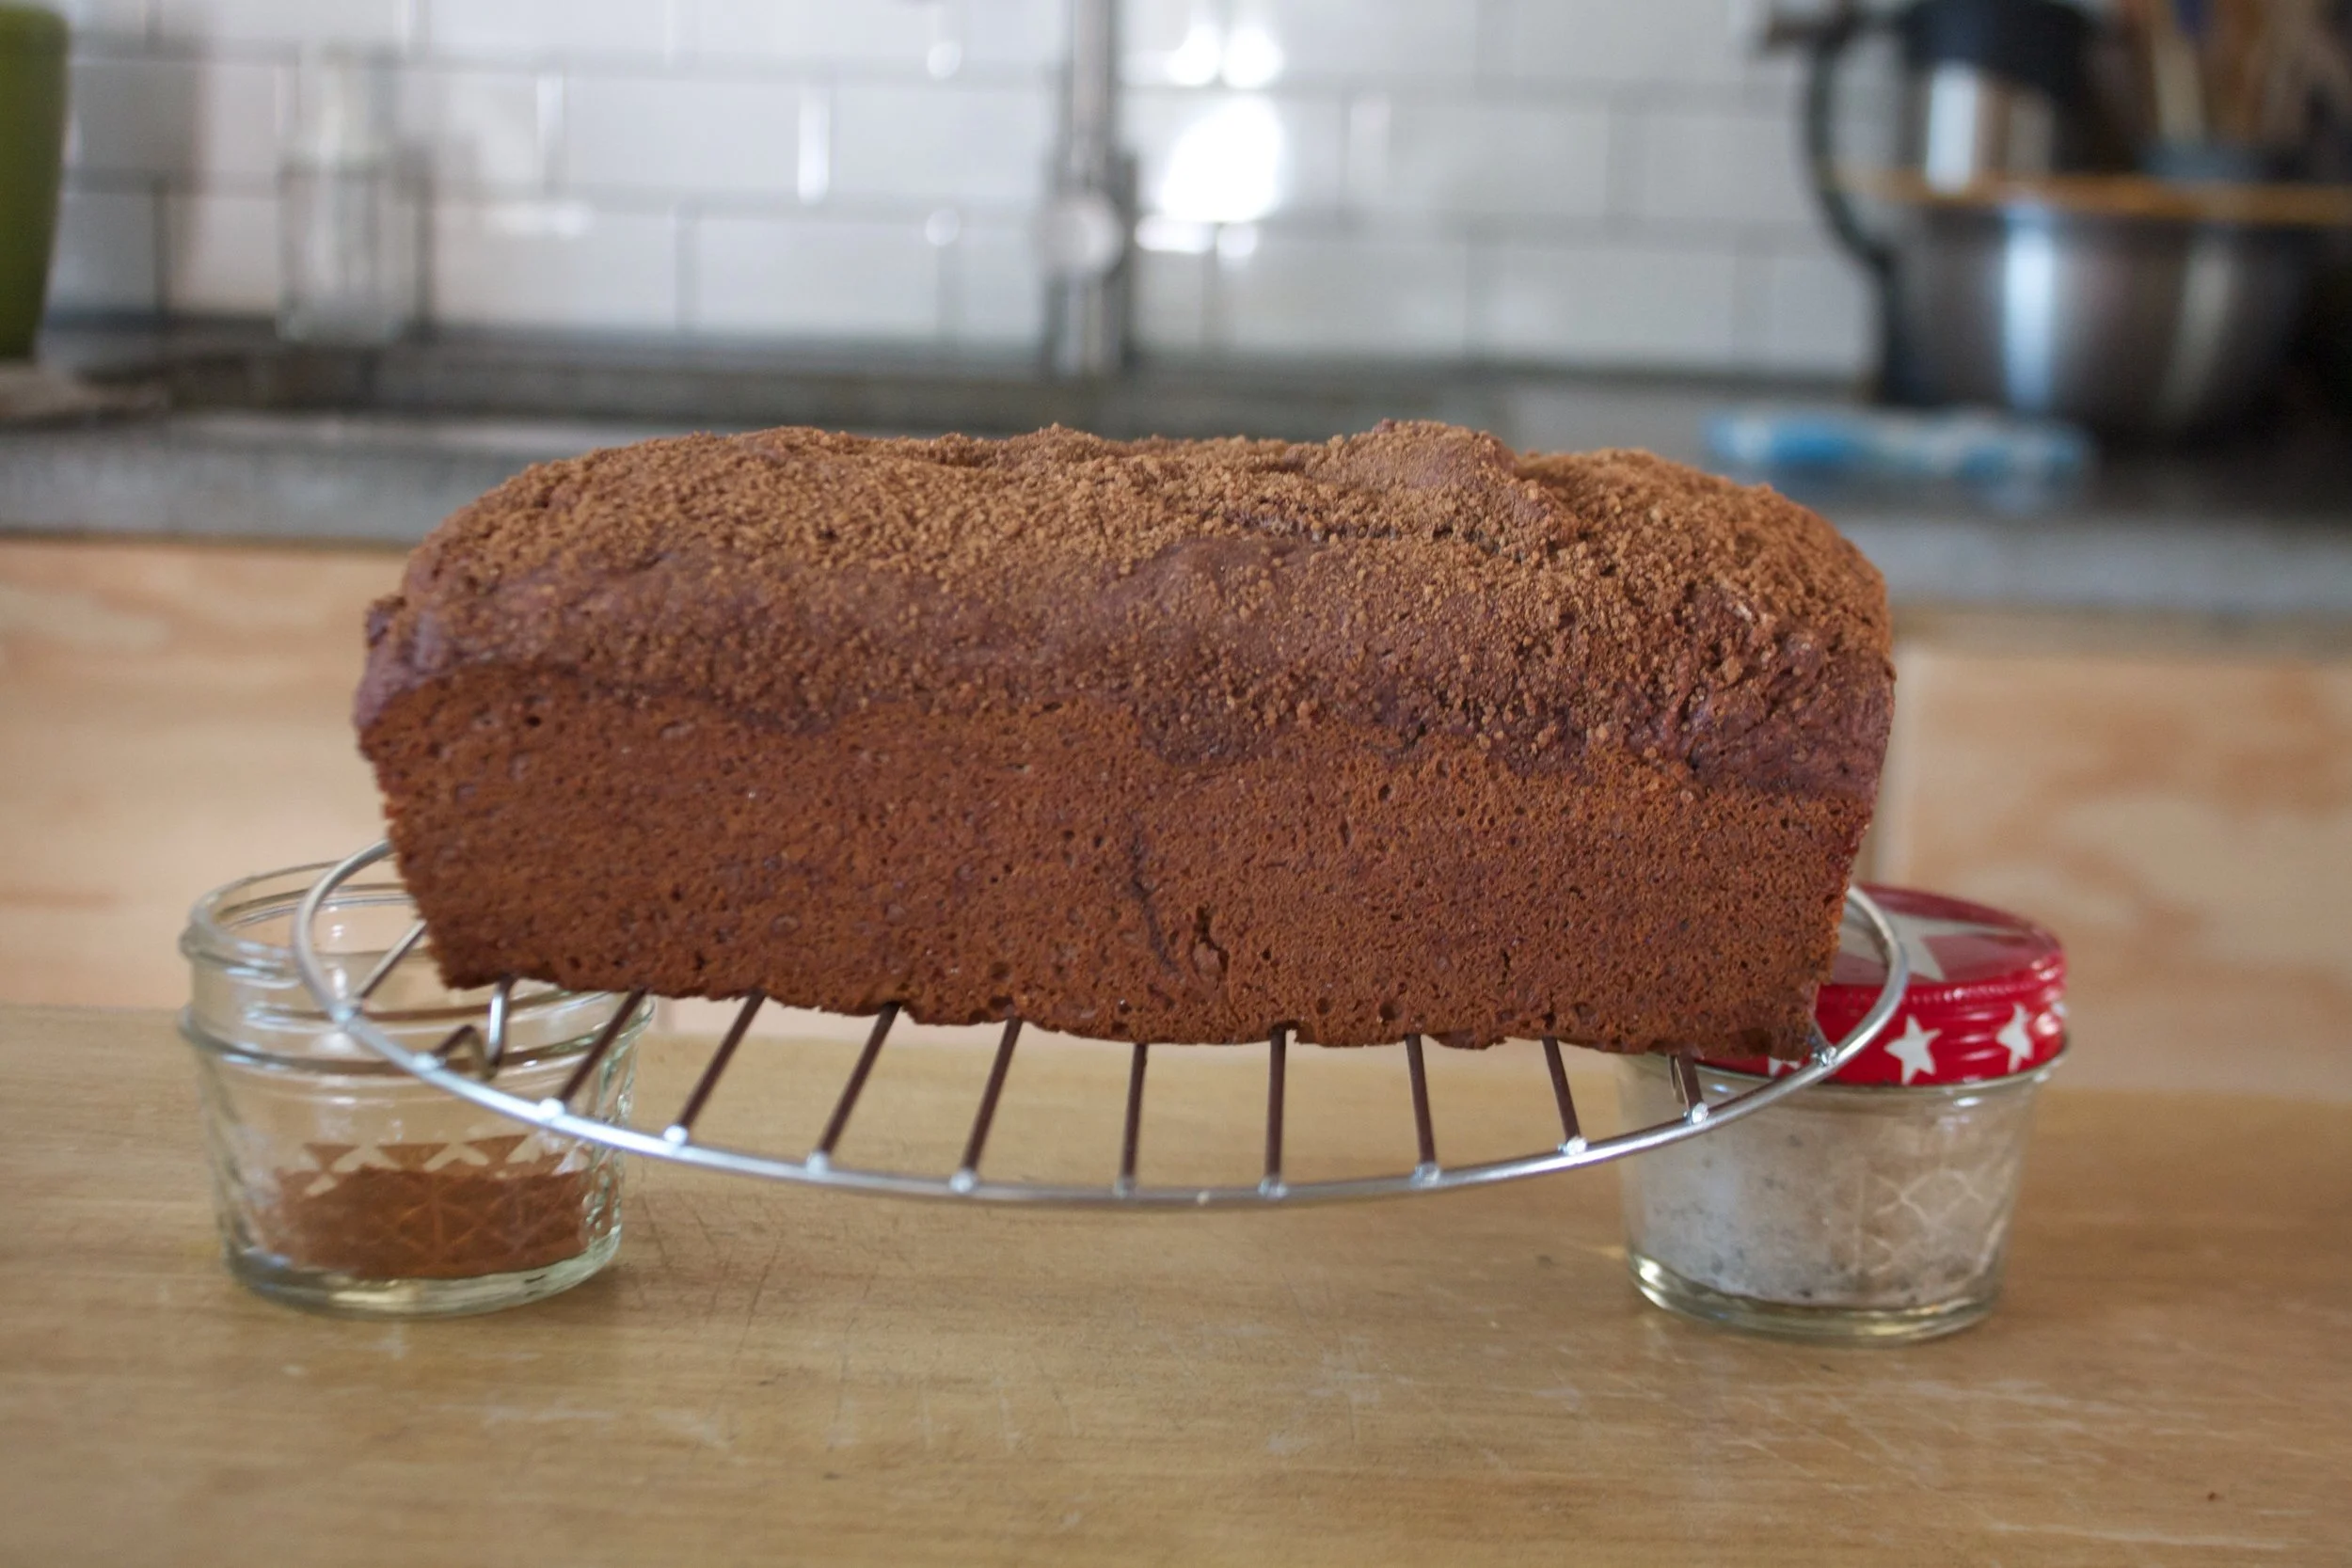
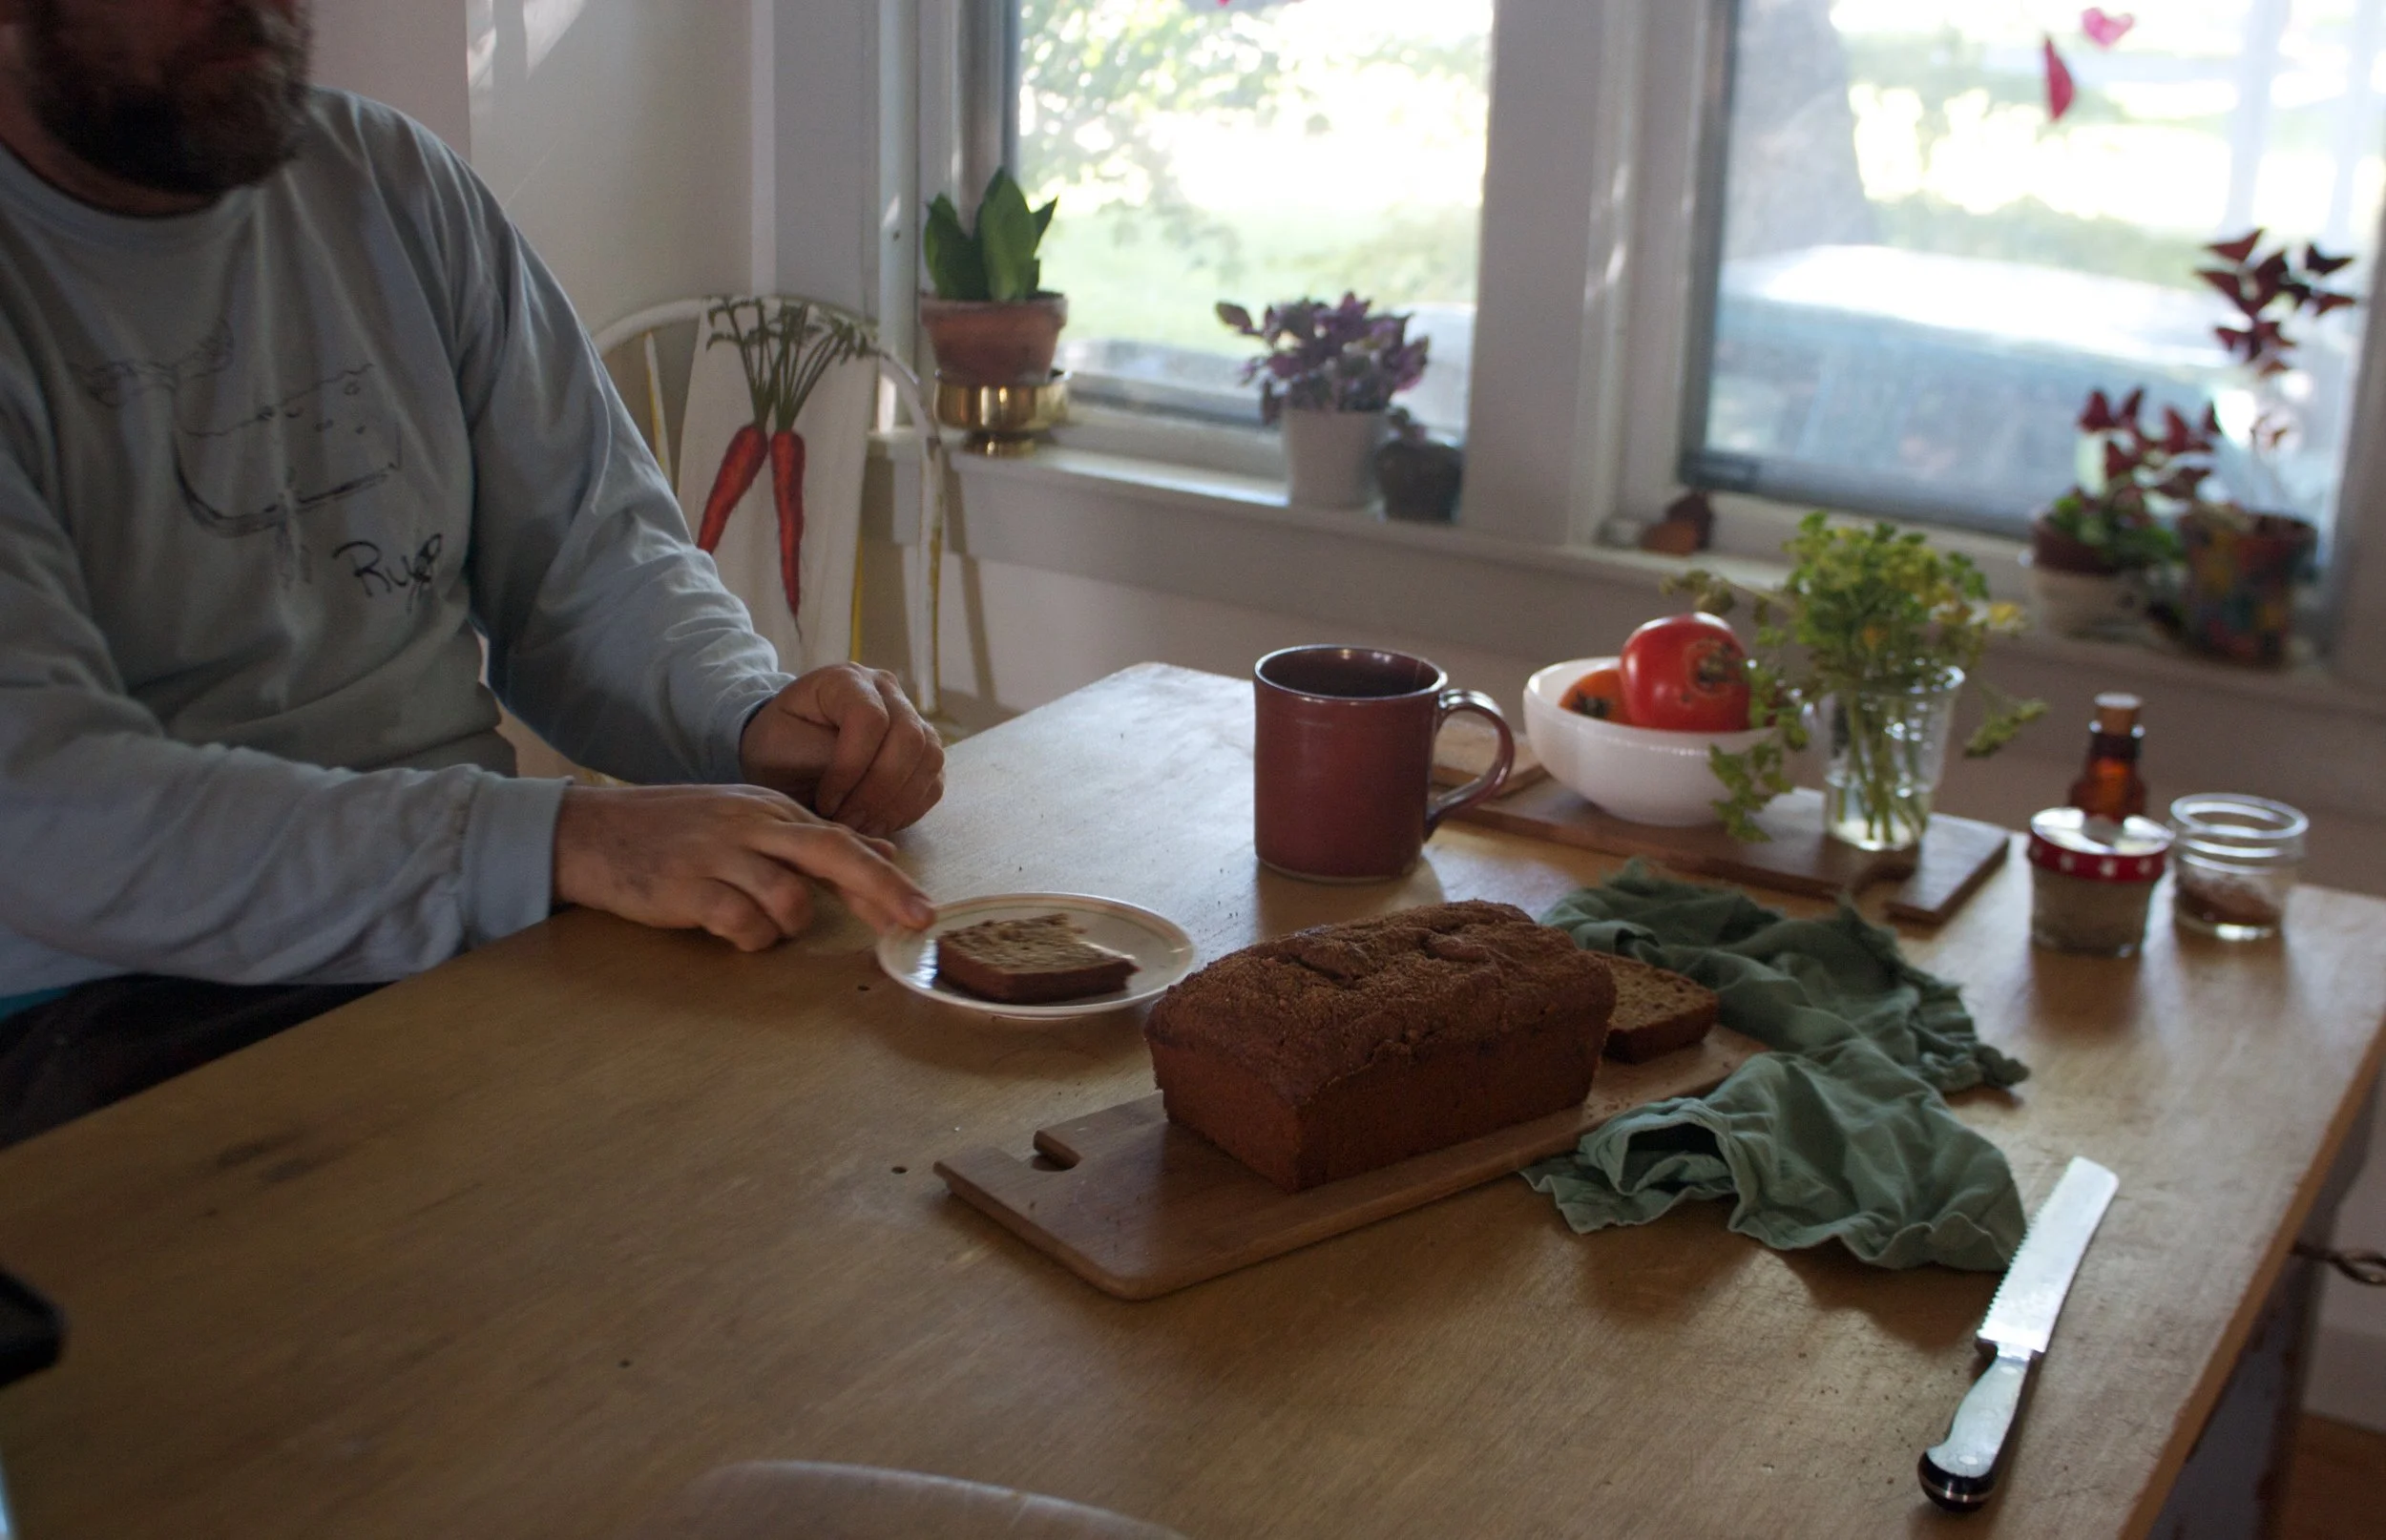

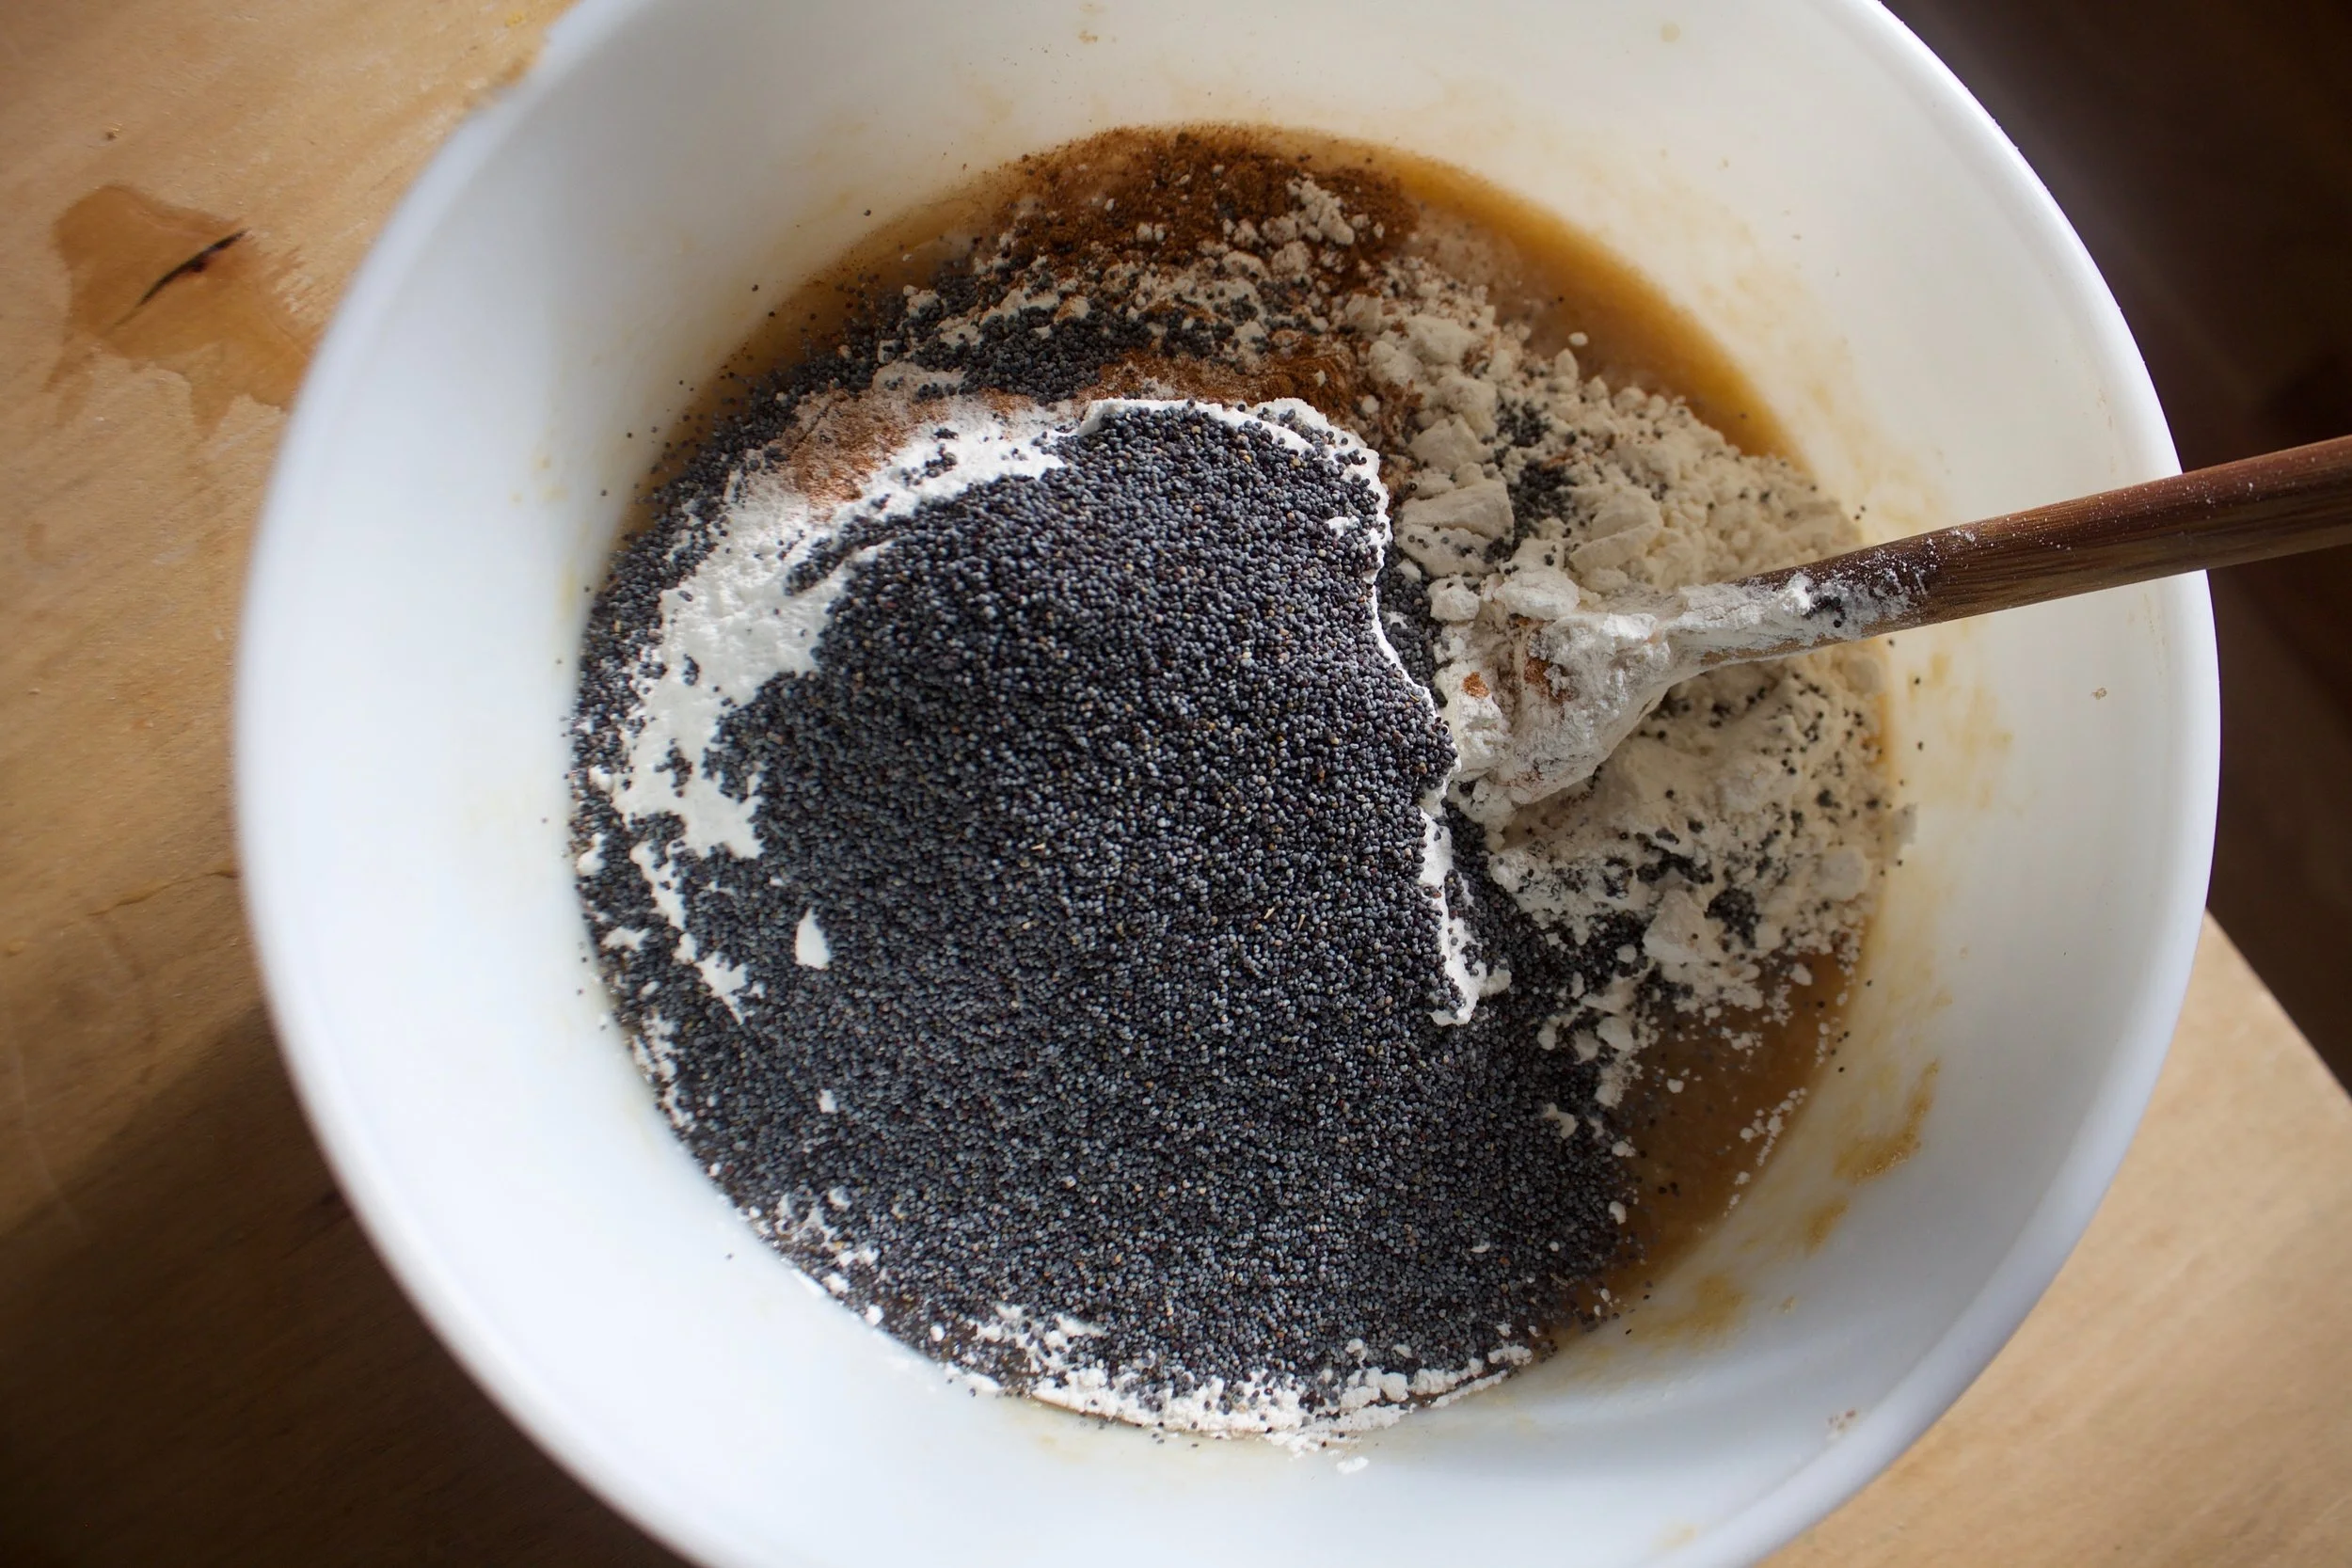
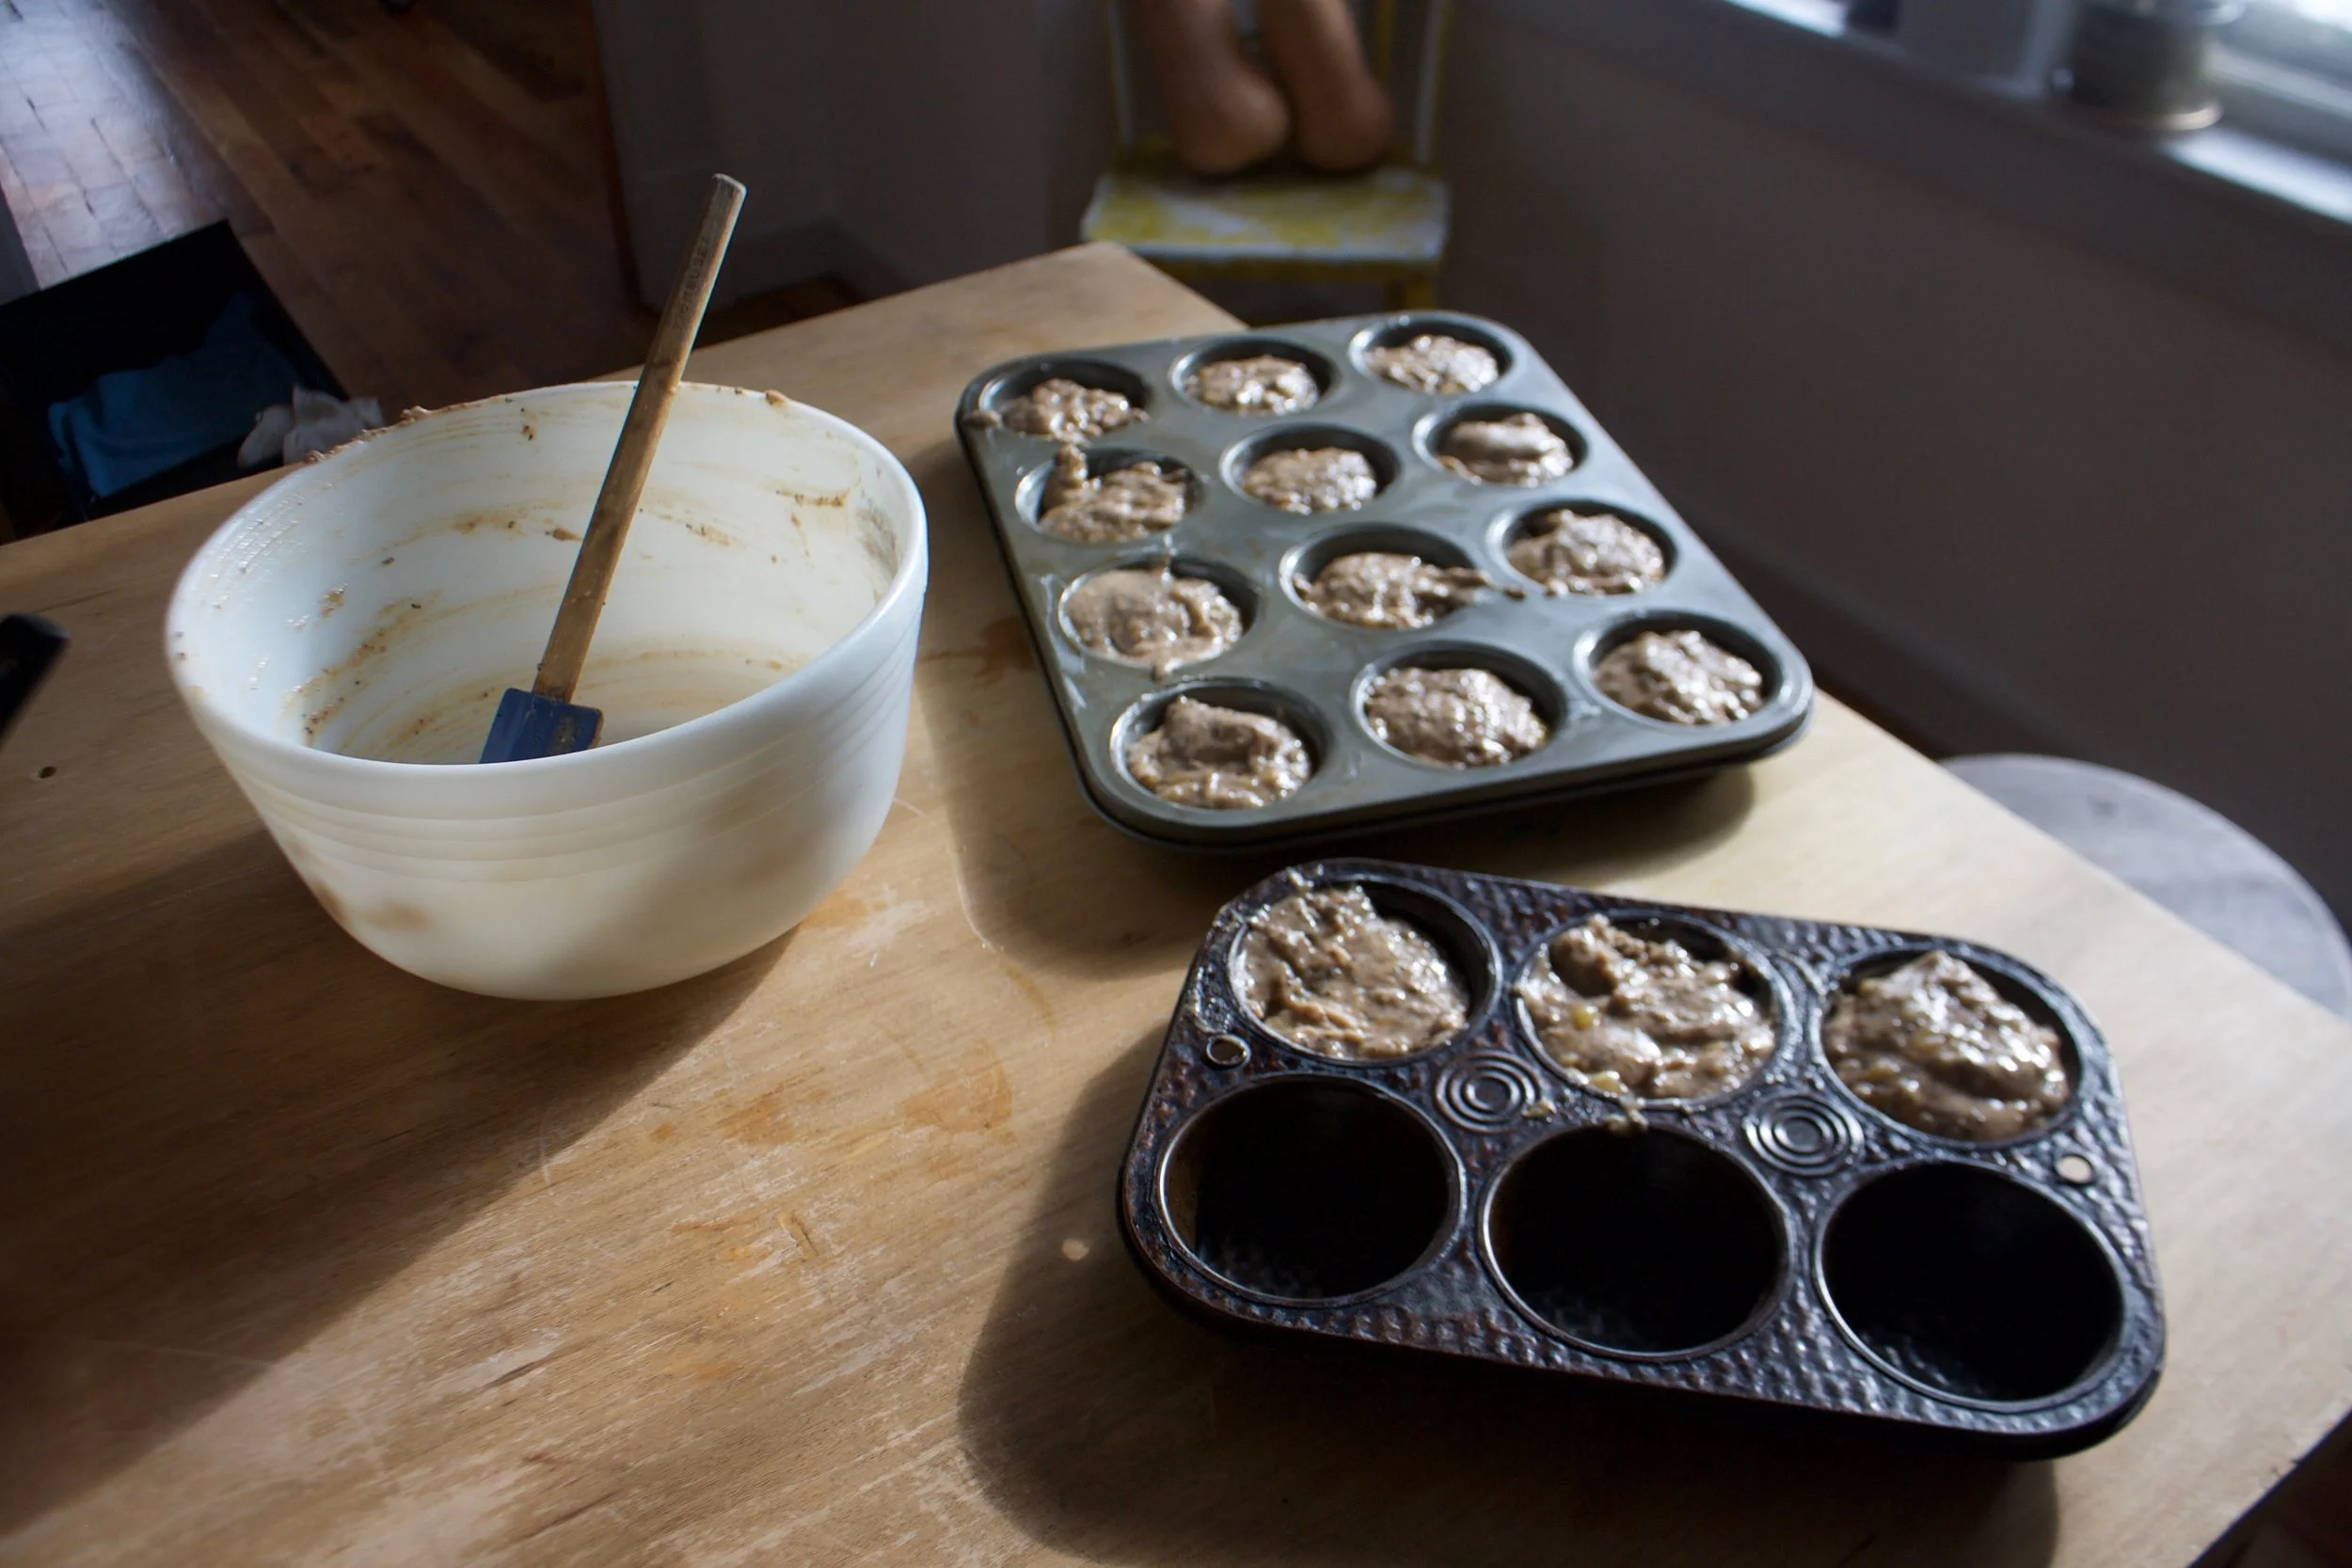
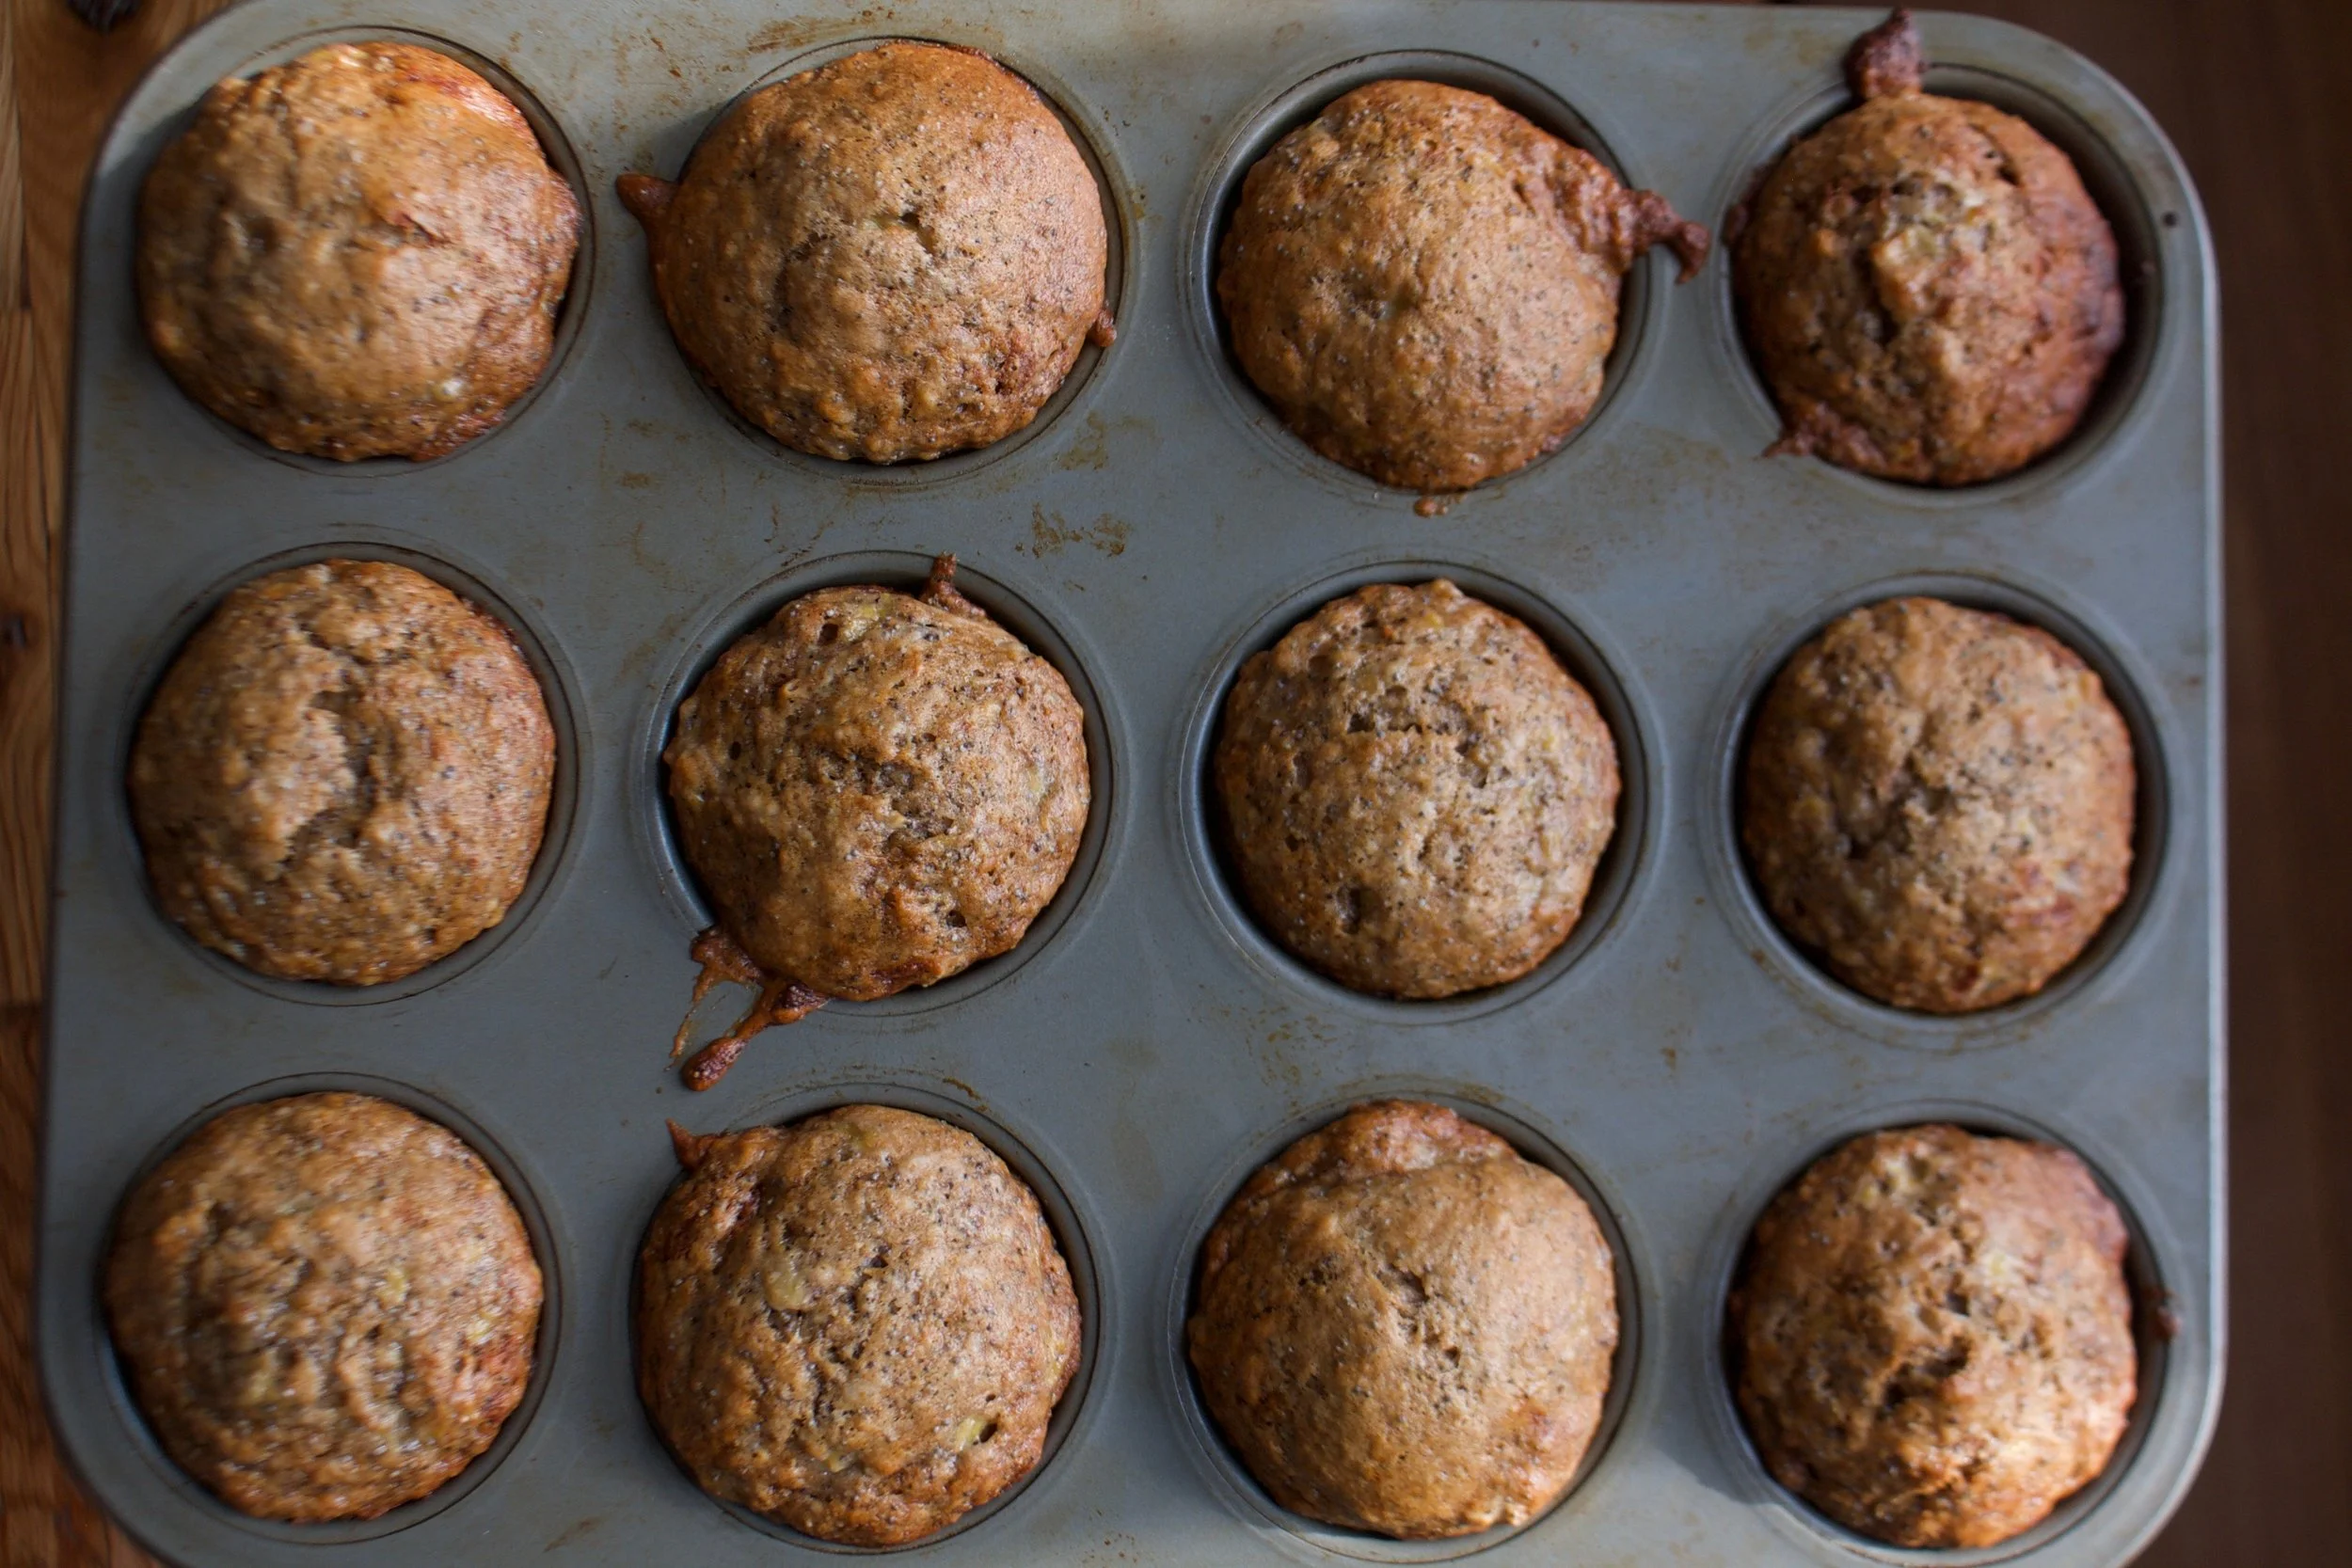


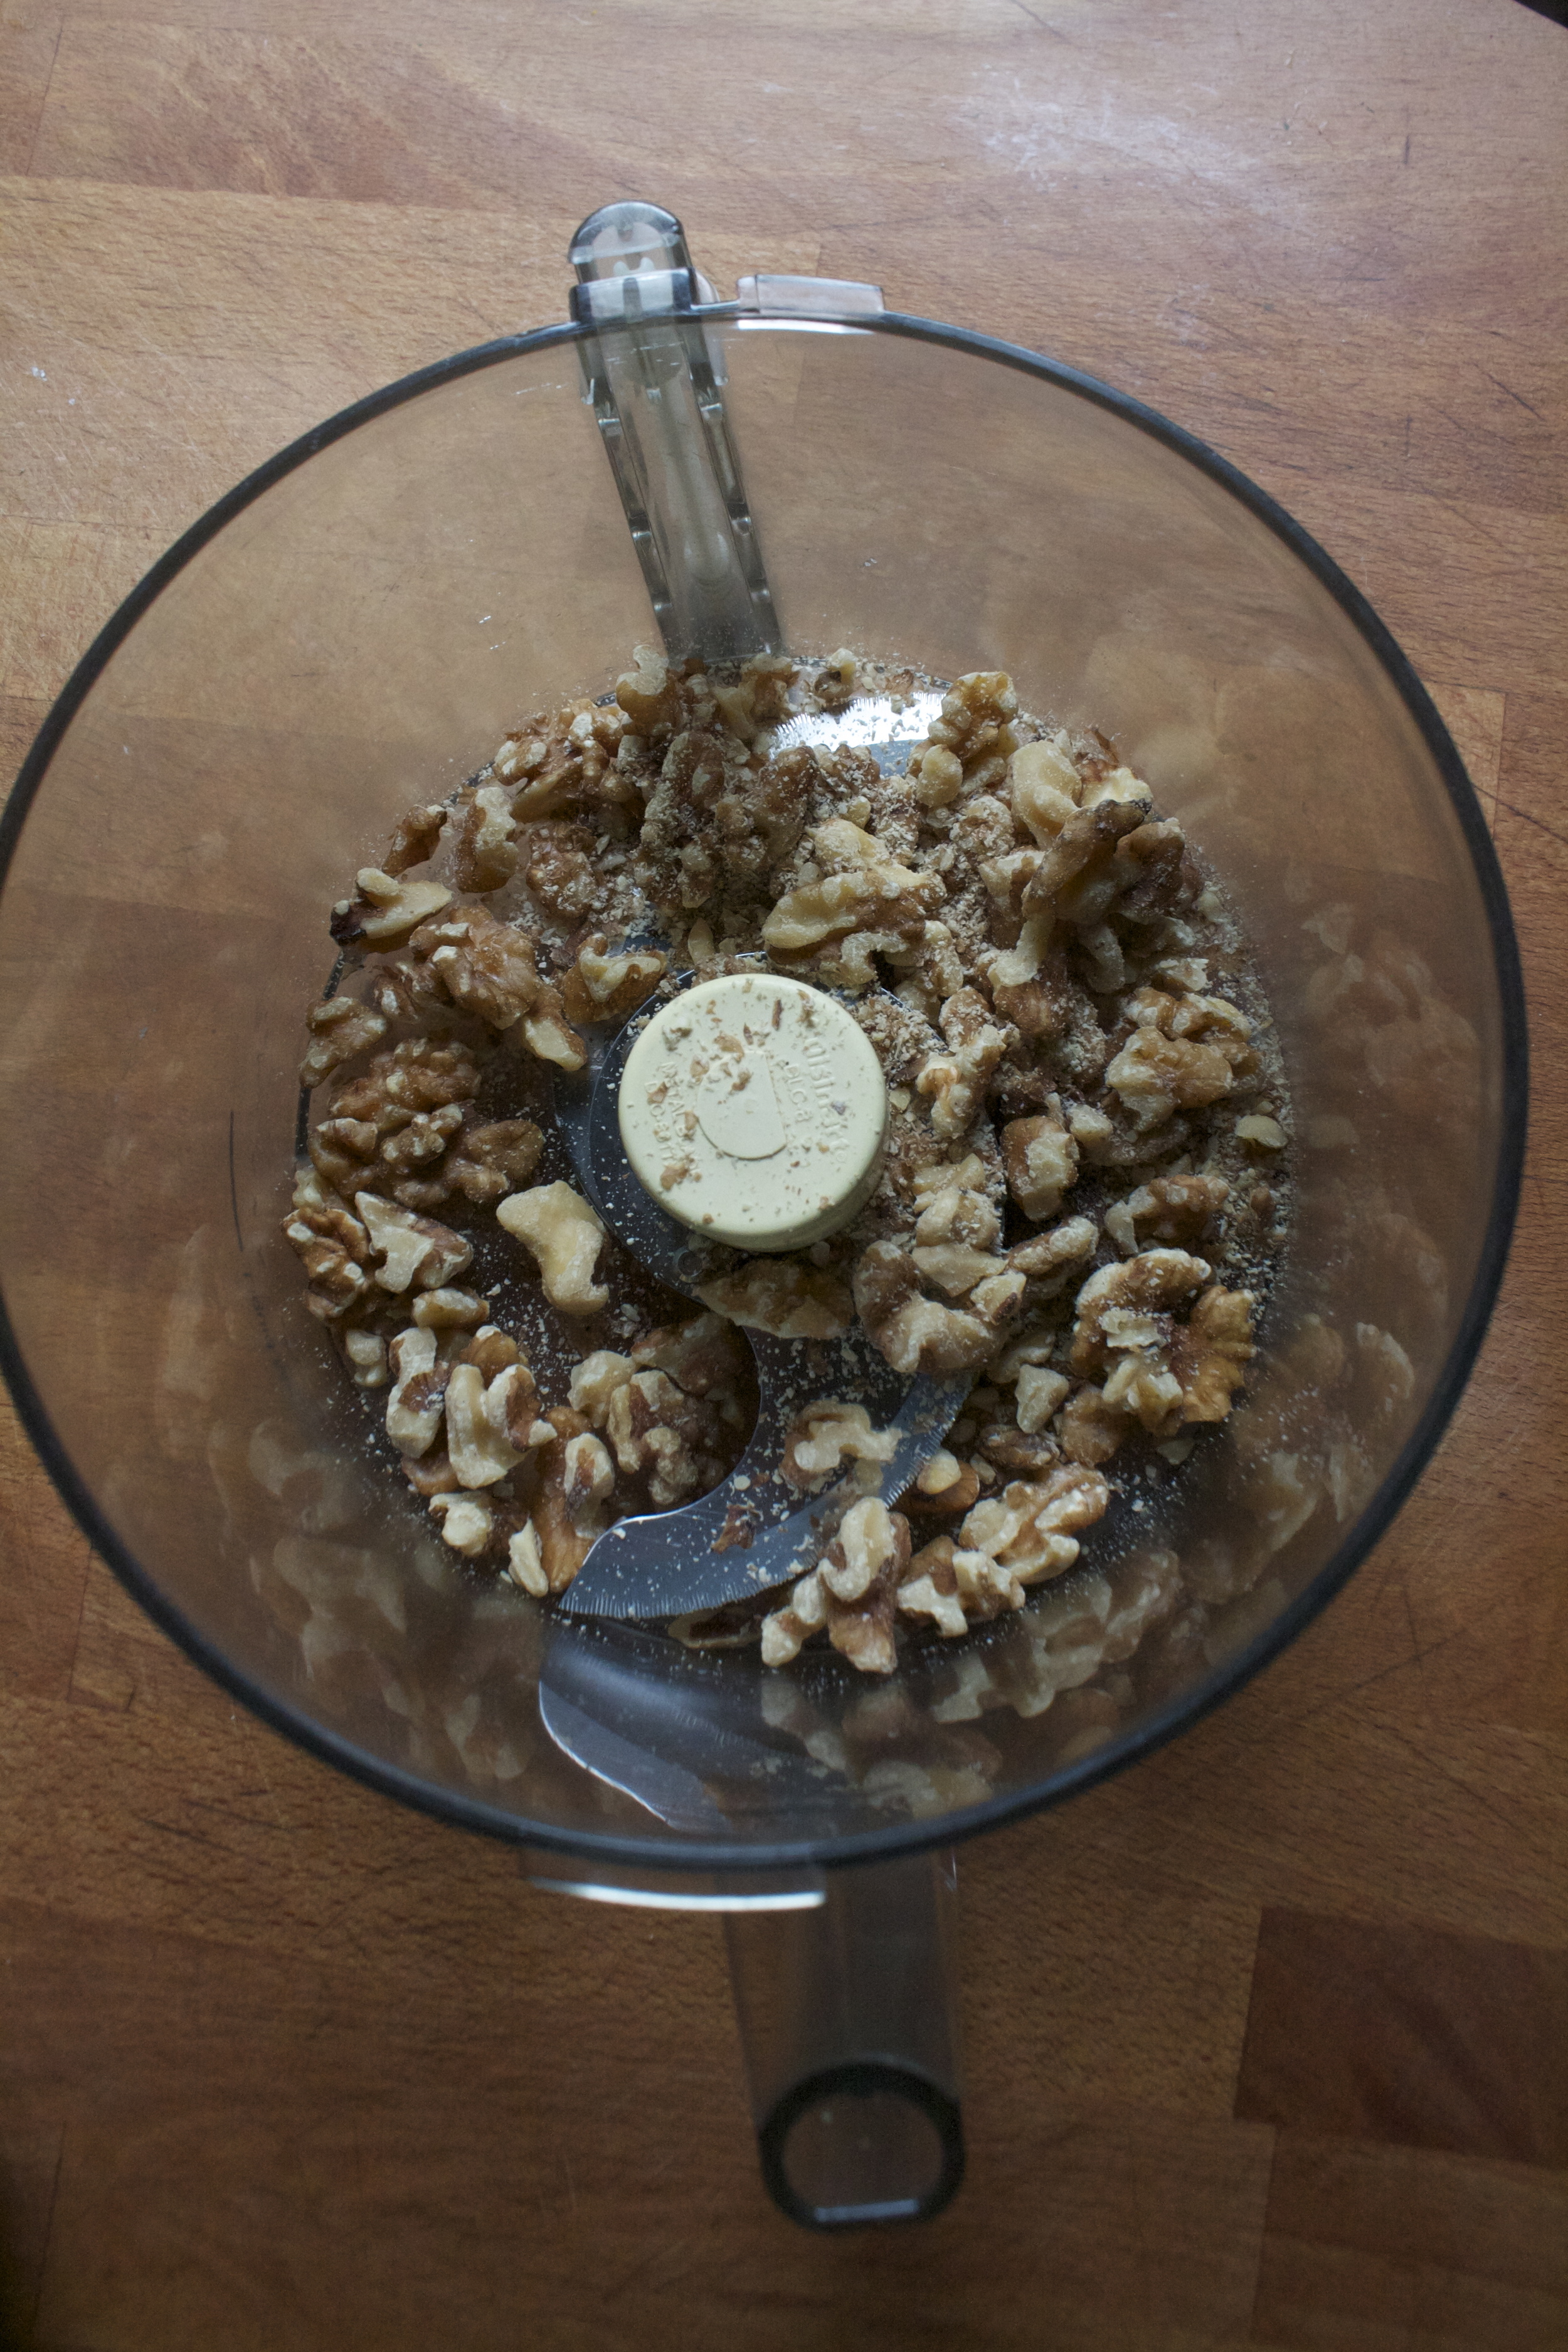
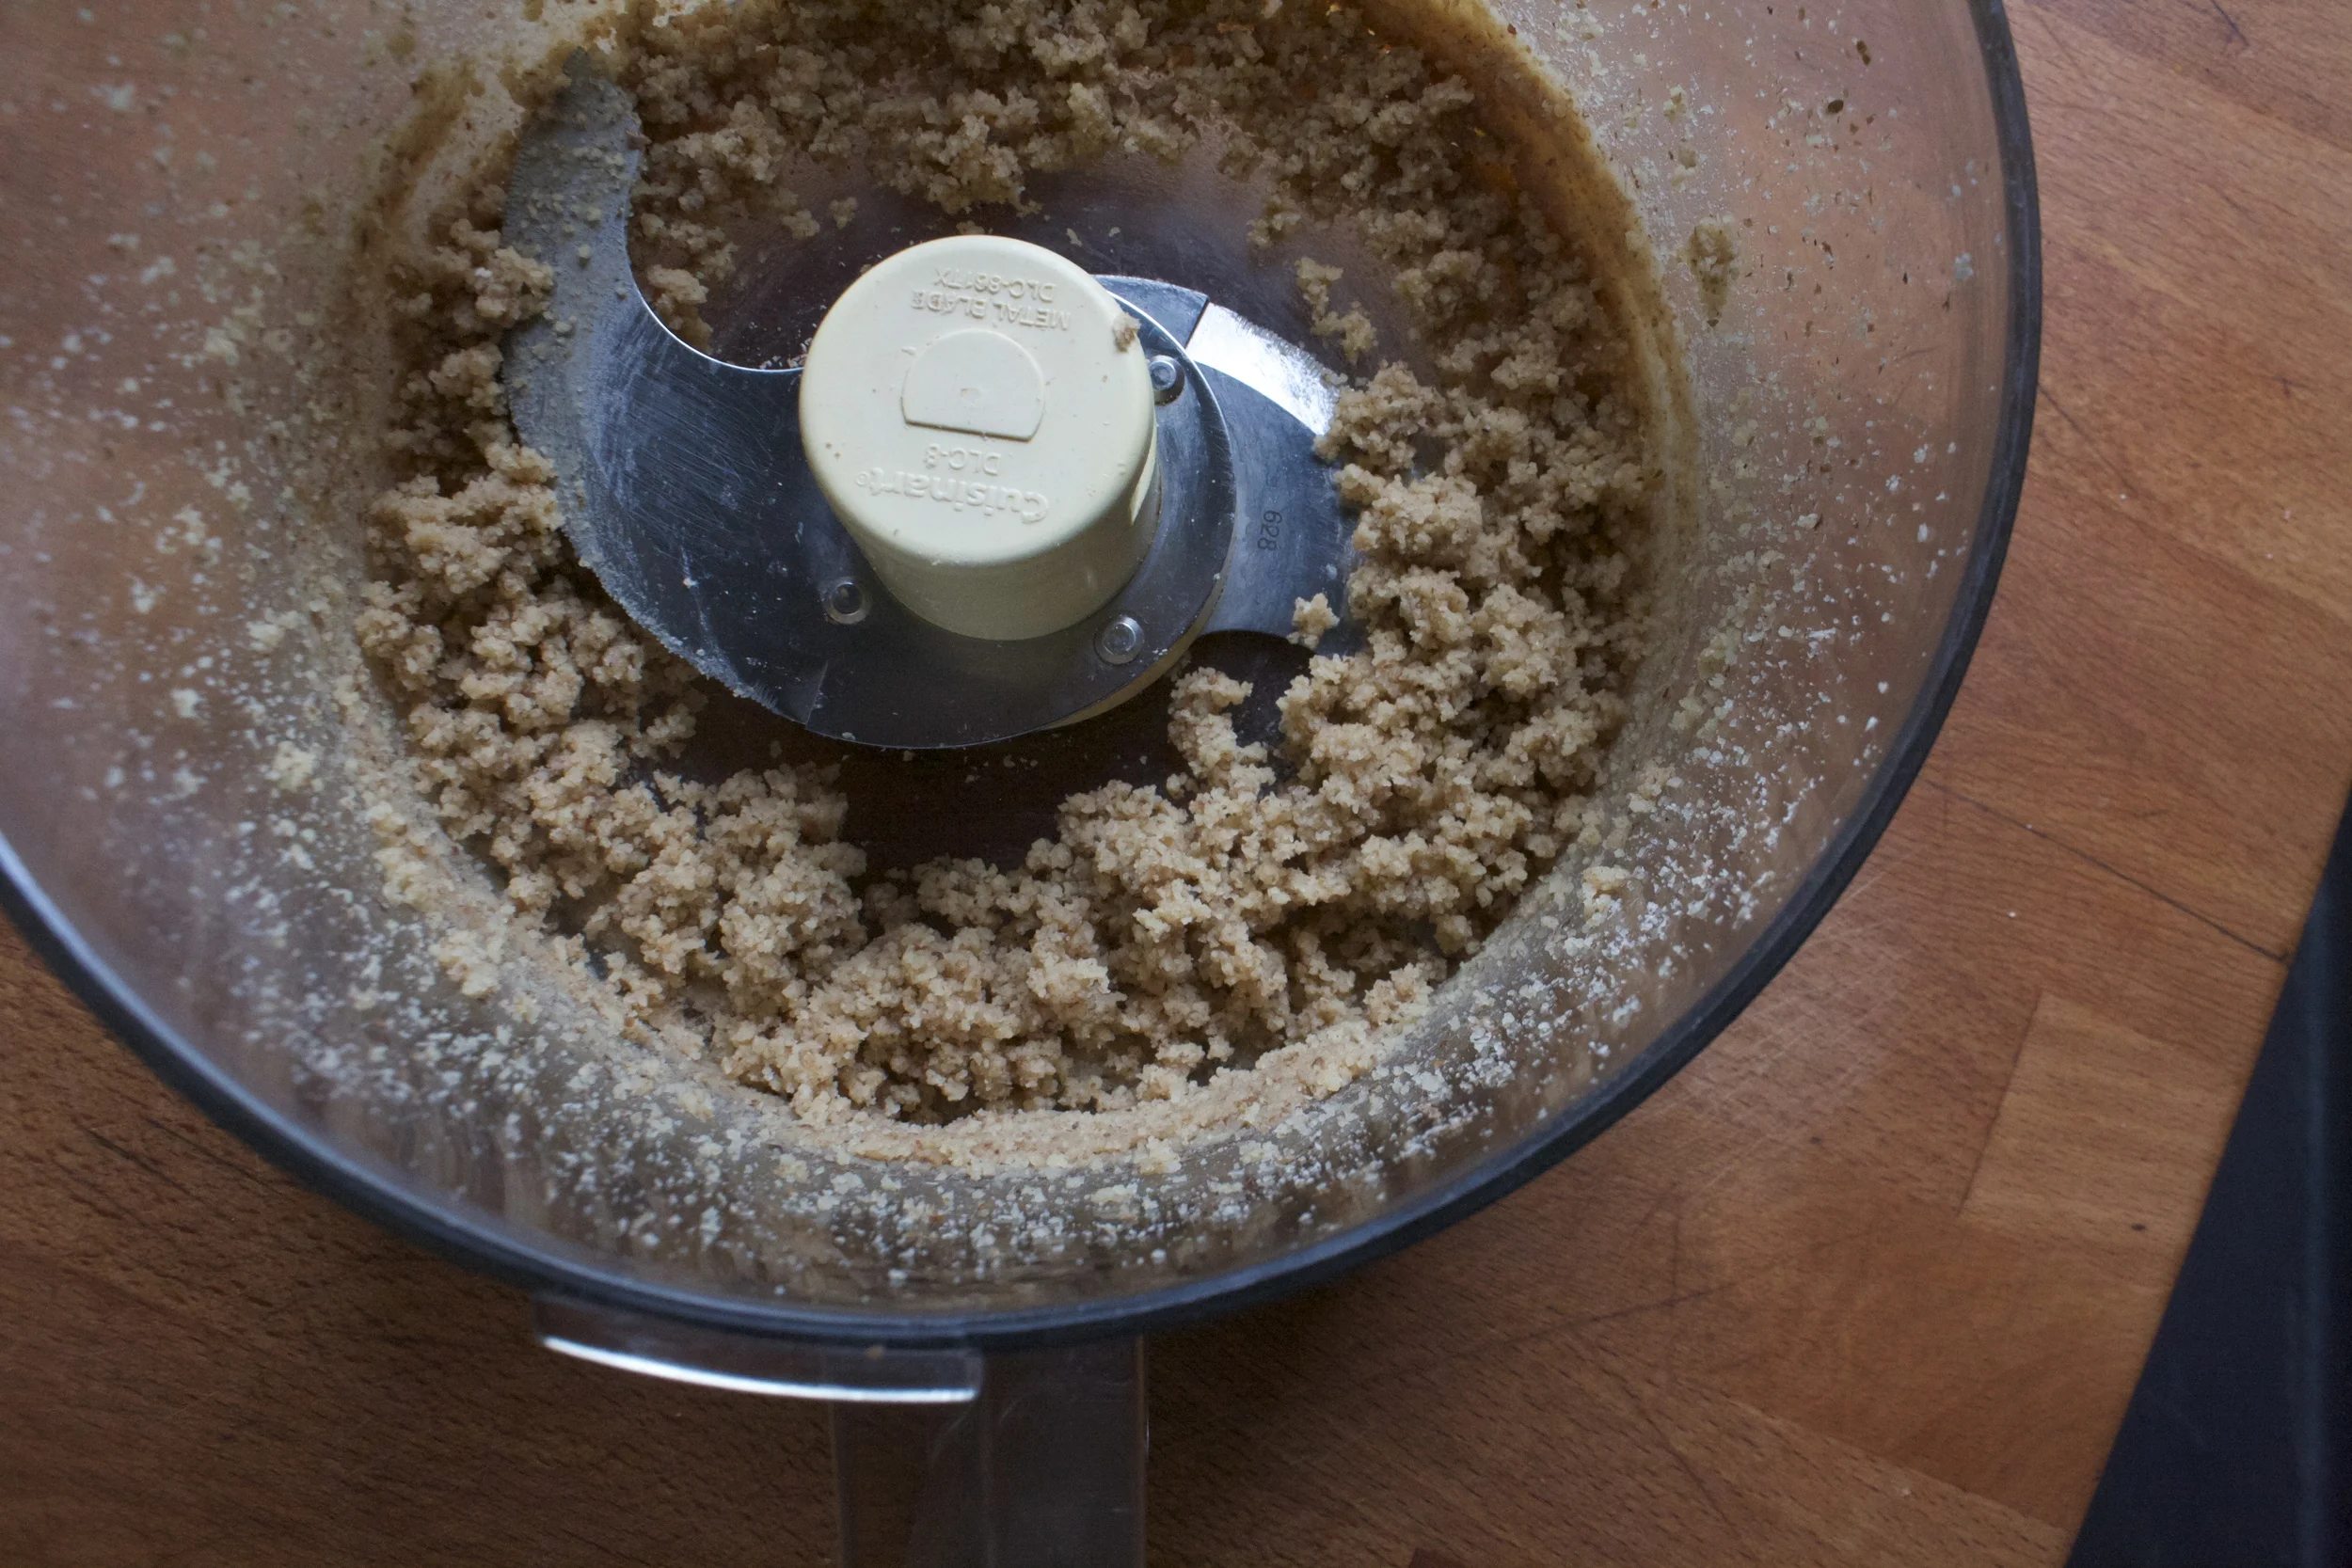


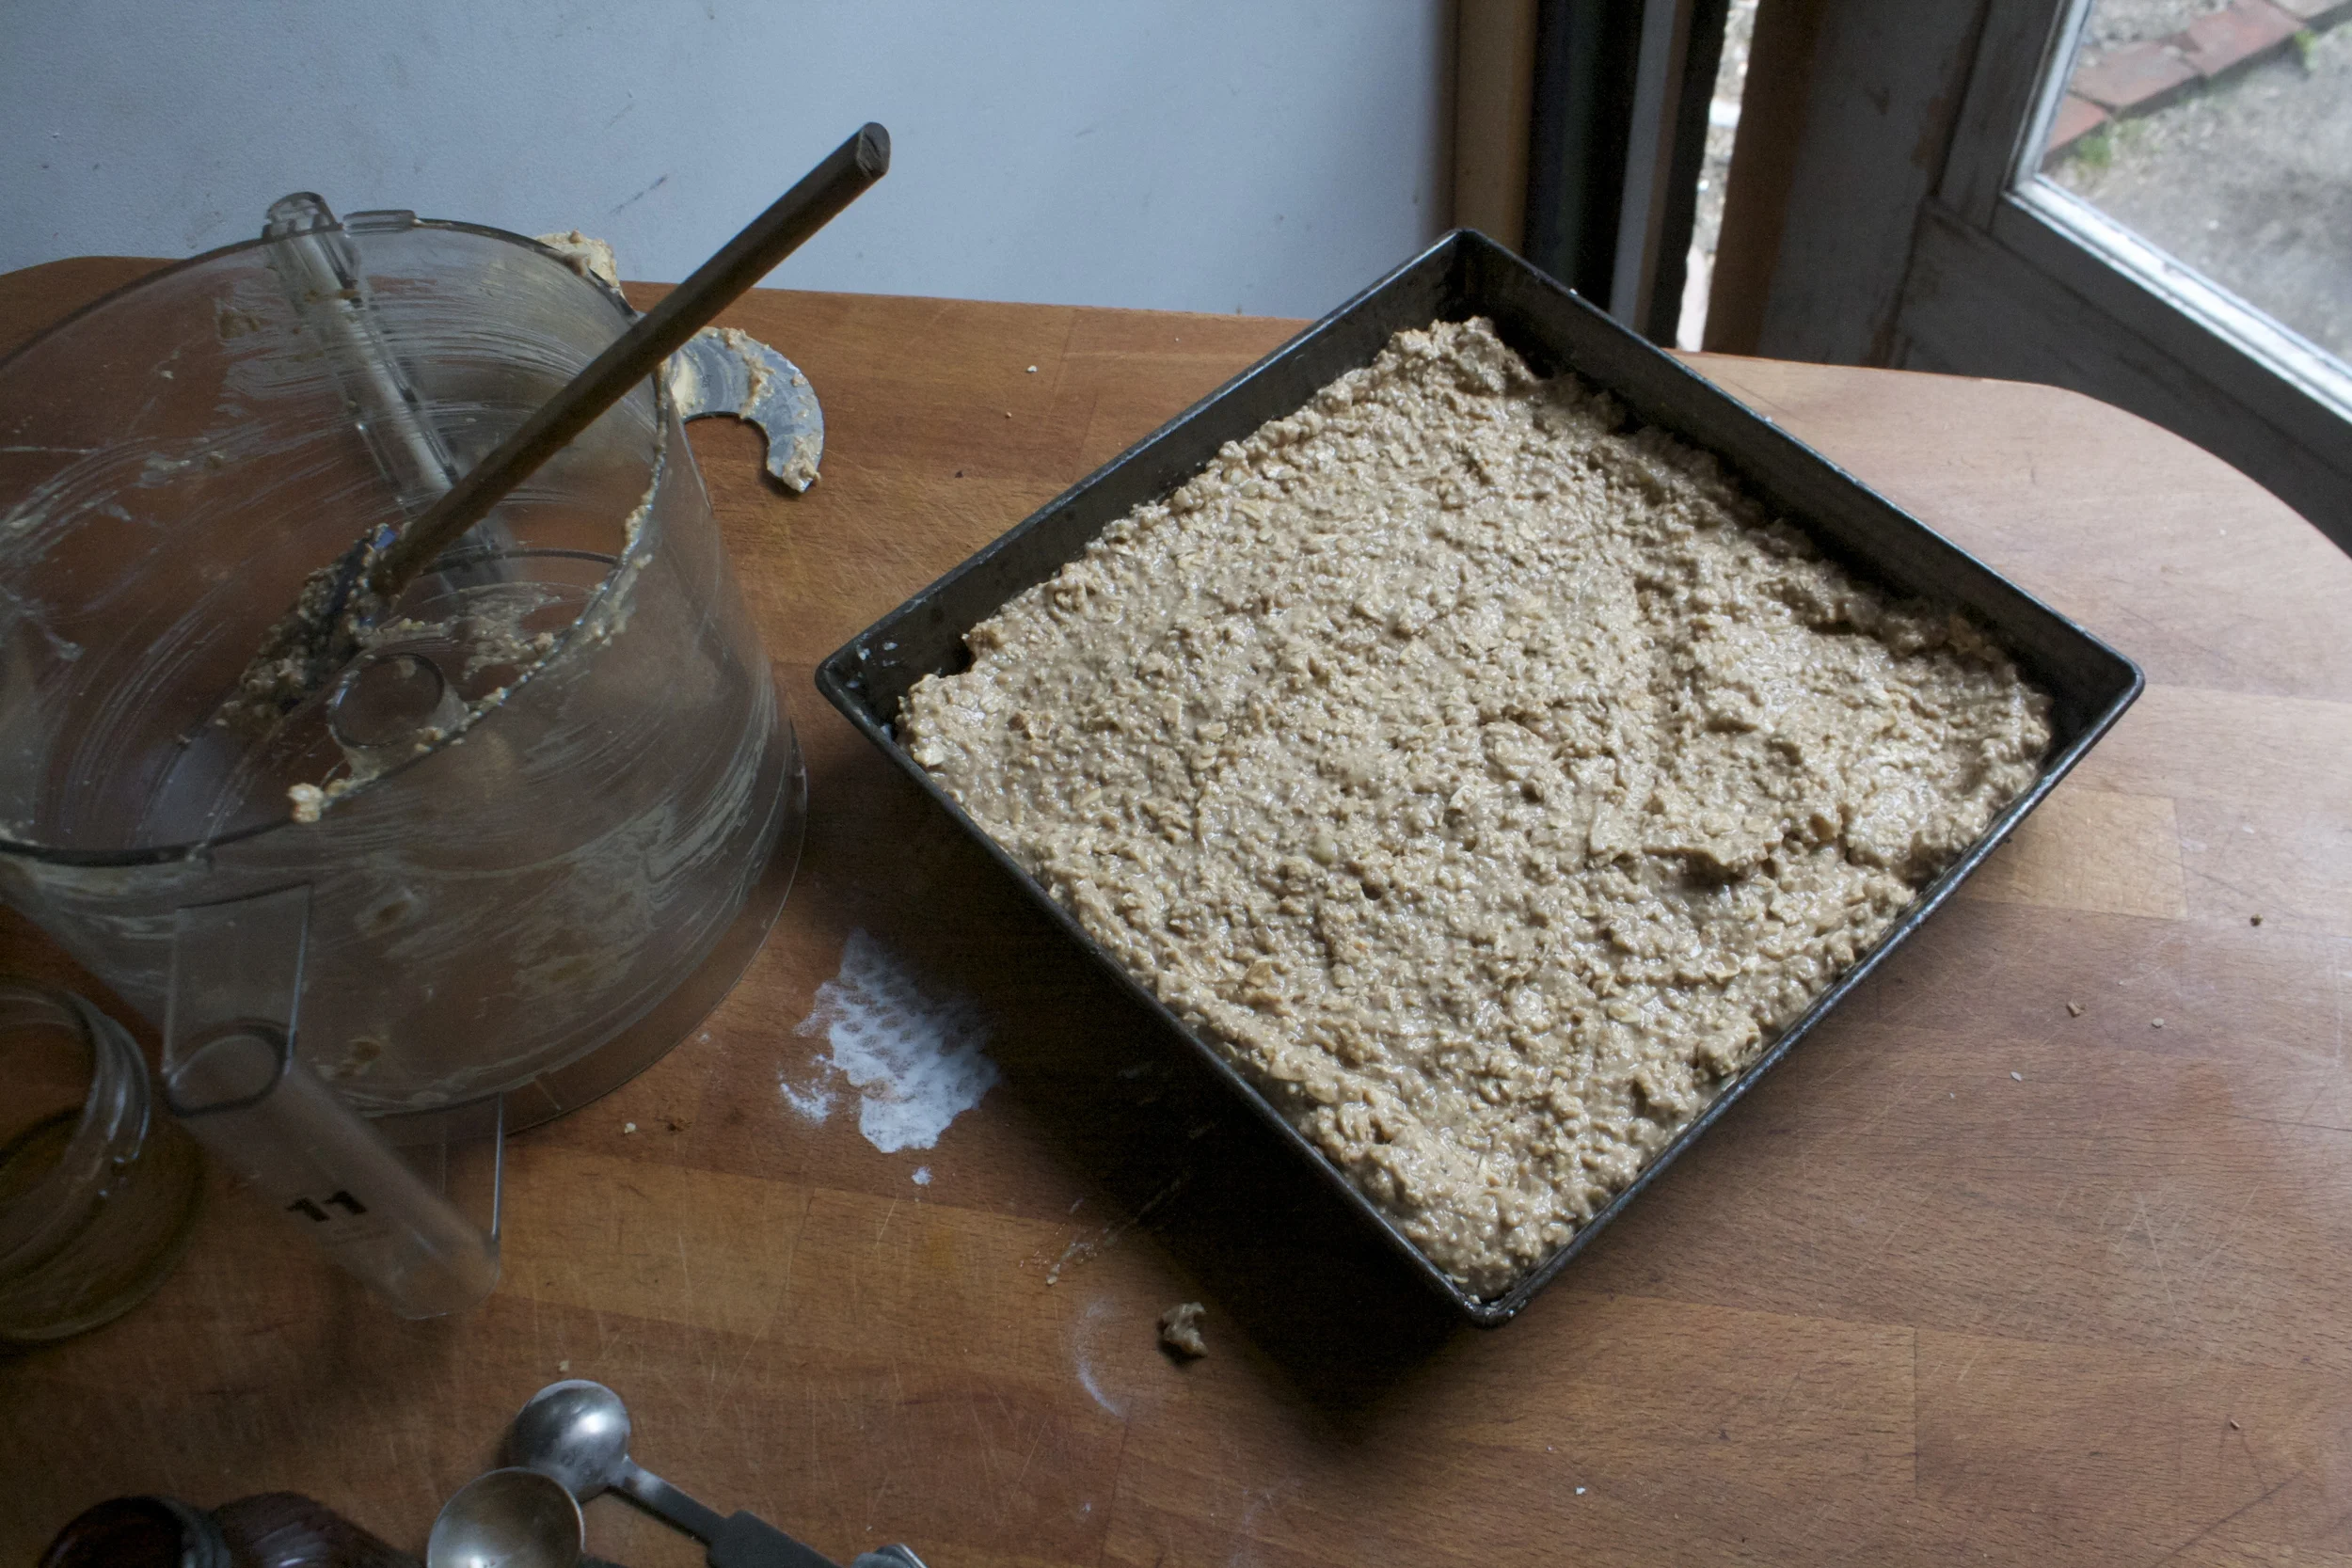

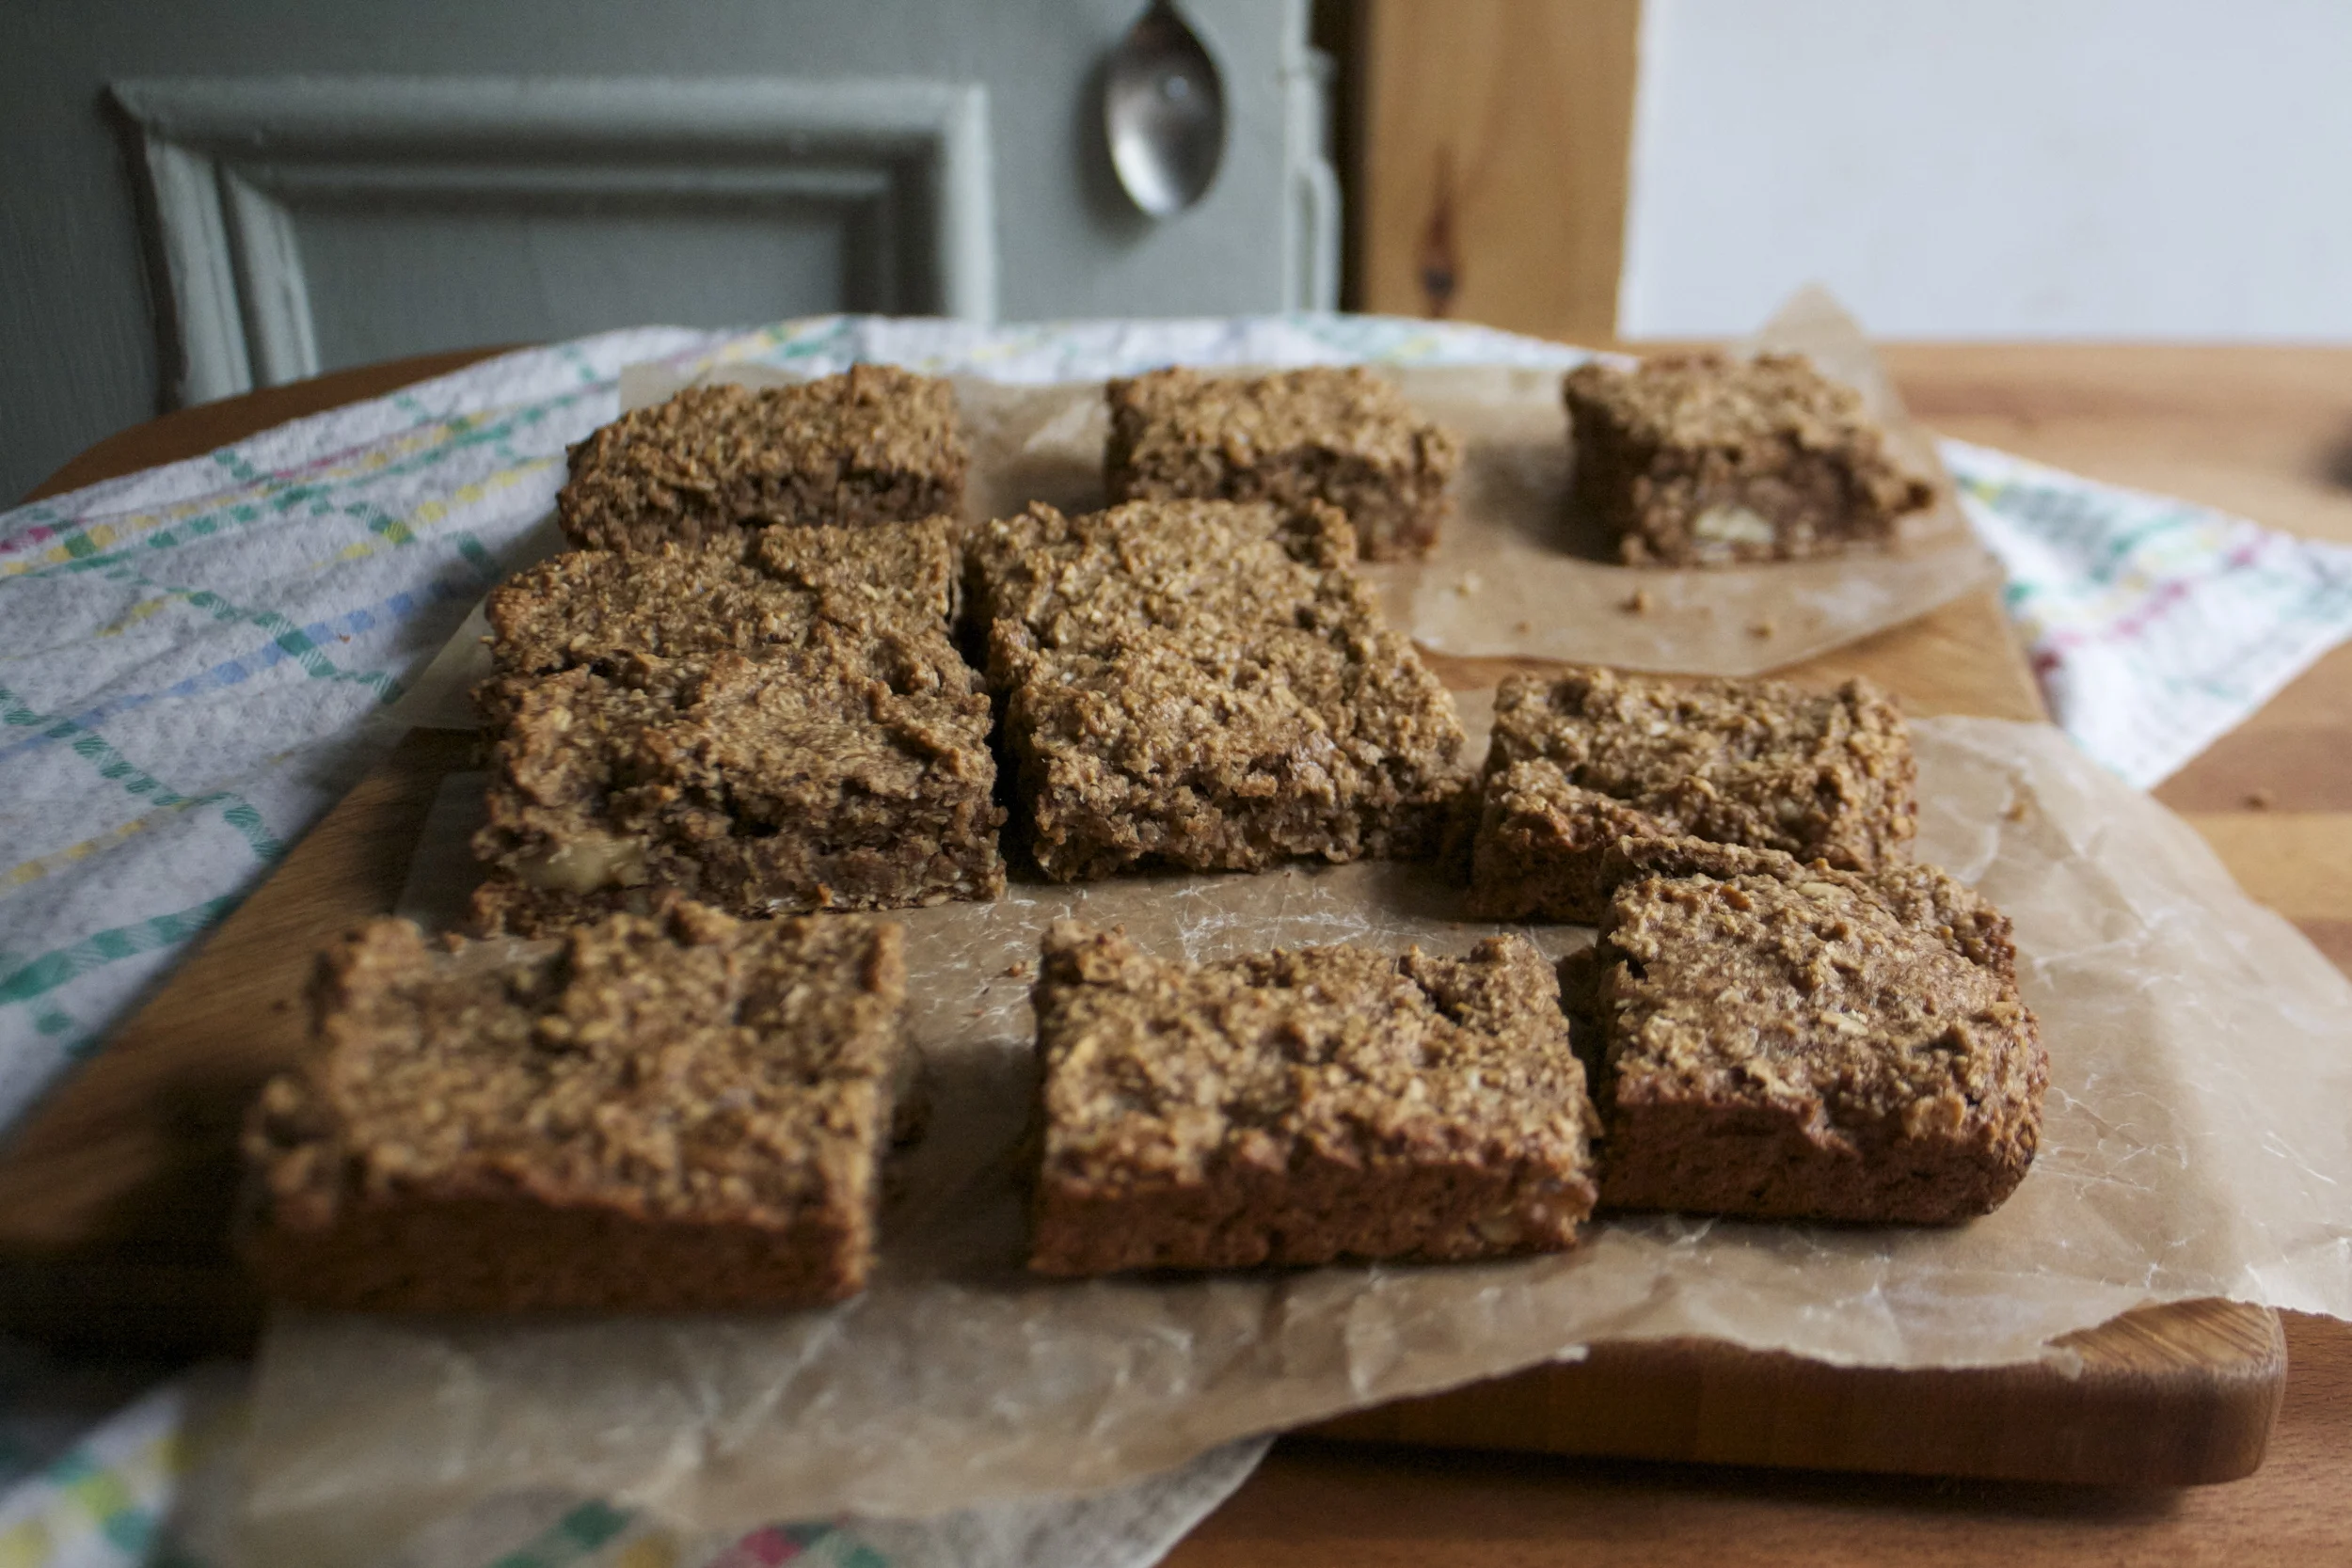
 %u00a0This week was good. %u00a0Two days in a row the front door was open, the window was open and the heater was off, which pretty much made me that happiest person in the world. My spring cleaning brain has kicked in and I want to clean everything (even the walls). I even spent a good part of an afternoon moving and rearranging furniture. (The house ended up basically the same as when I started) And one of the best parts of the week%u2026.most of the snow melted! I am getting super hyped to start raking, cleaning, planting and weeding and and just getting really dirty! Oh how I love the spring!
 Oh Intervale Community Farm..I love you. I picked up my farm share and was especially pumped %u00a0for another gigantic kohlrabi and some locally grown, locally milled wheat flour.
 %u00a0The trees, they are a budding
 %u00a0The perfect ripeness, destined for naner ice-cream!
 My sister and I took this little for a sled ride through the wood where there was snow (but it was 45 degrees!) The hike ended up with me %u00a0pulling her through a field of mud. It was fantastic.%u00a0
 One year ago today. Dinner with my favorite people.%u00a0
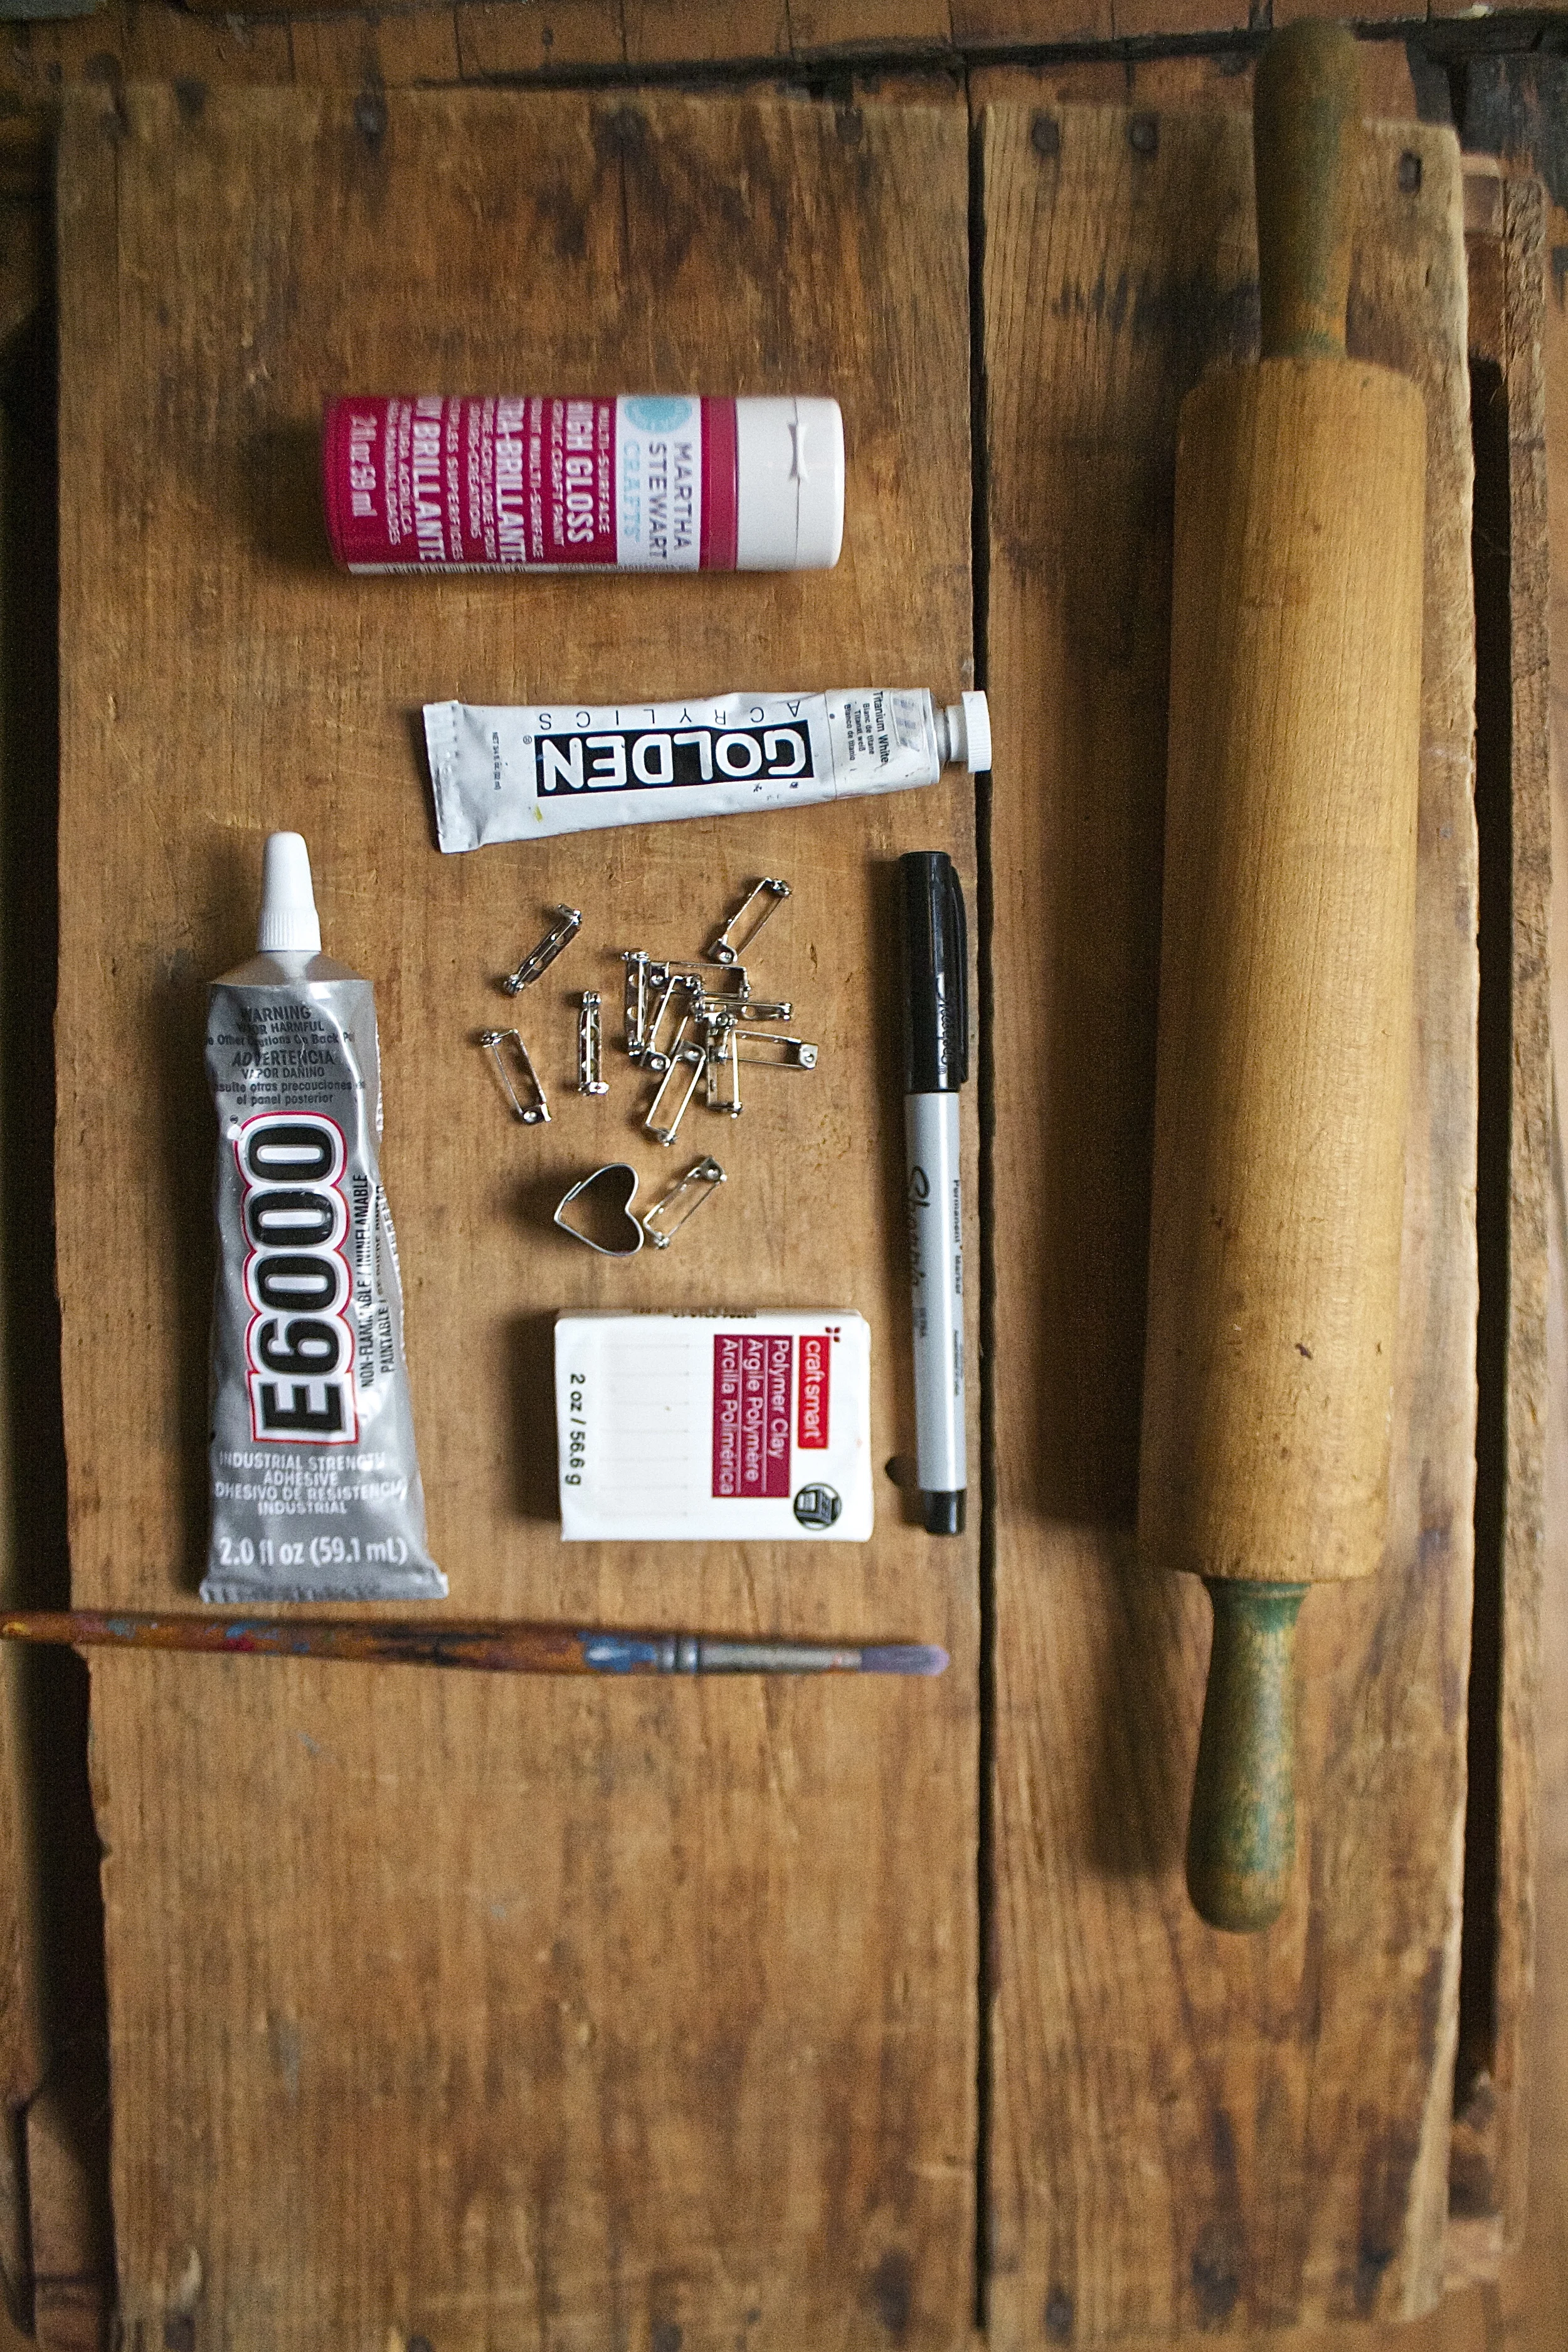
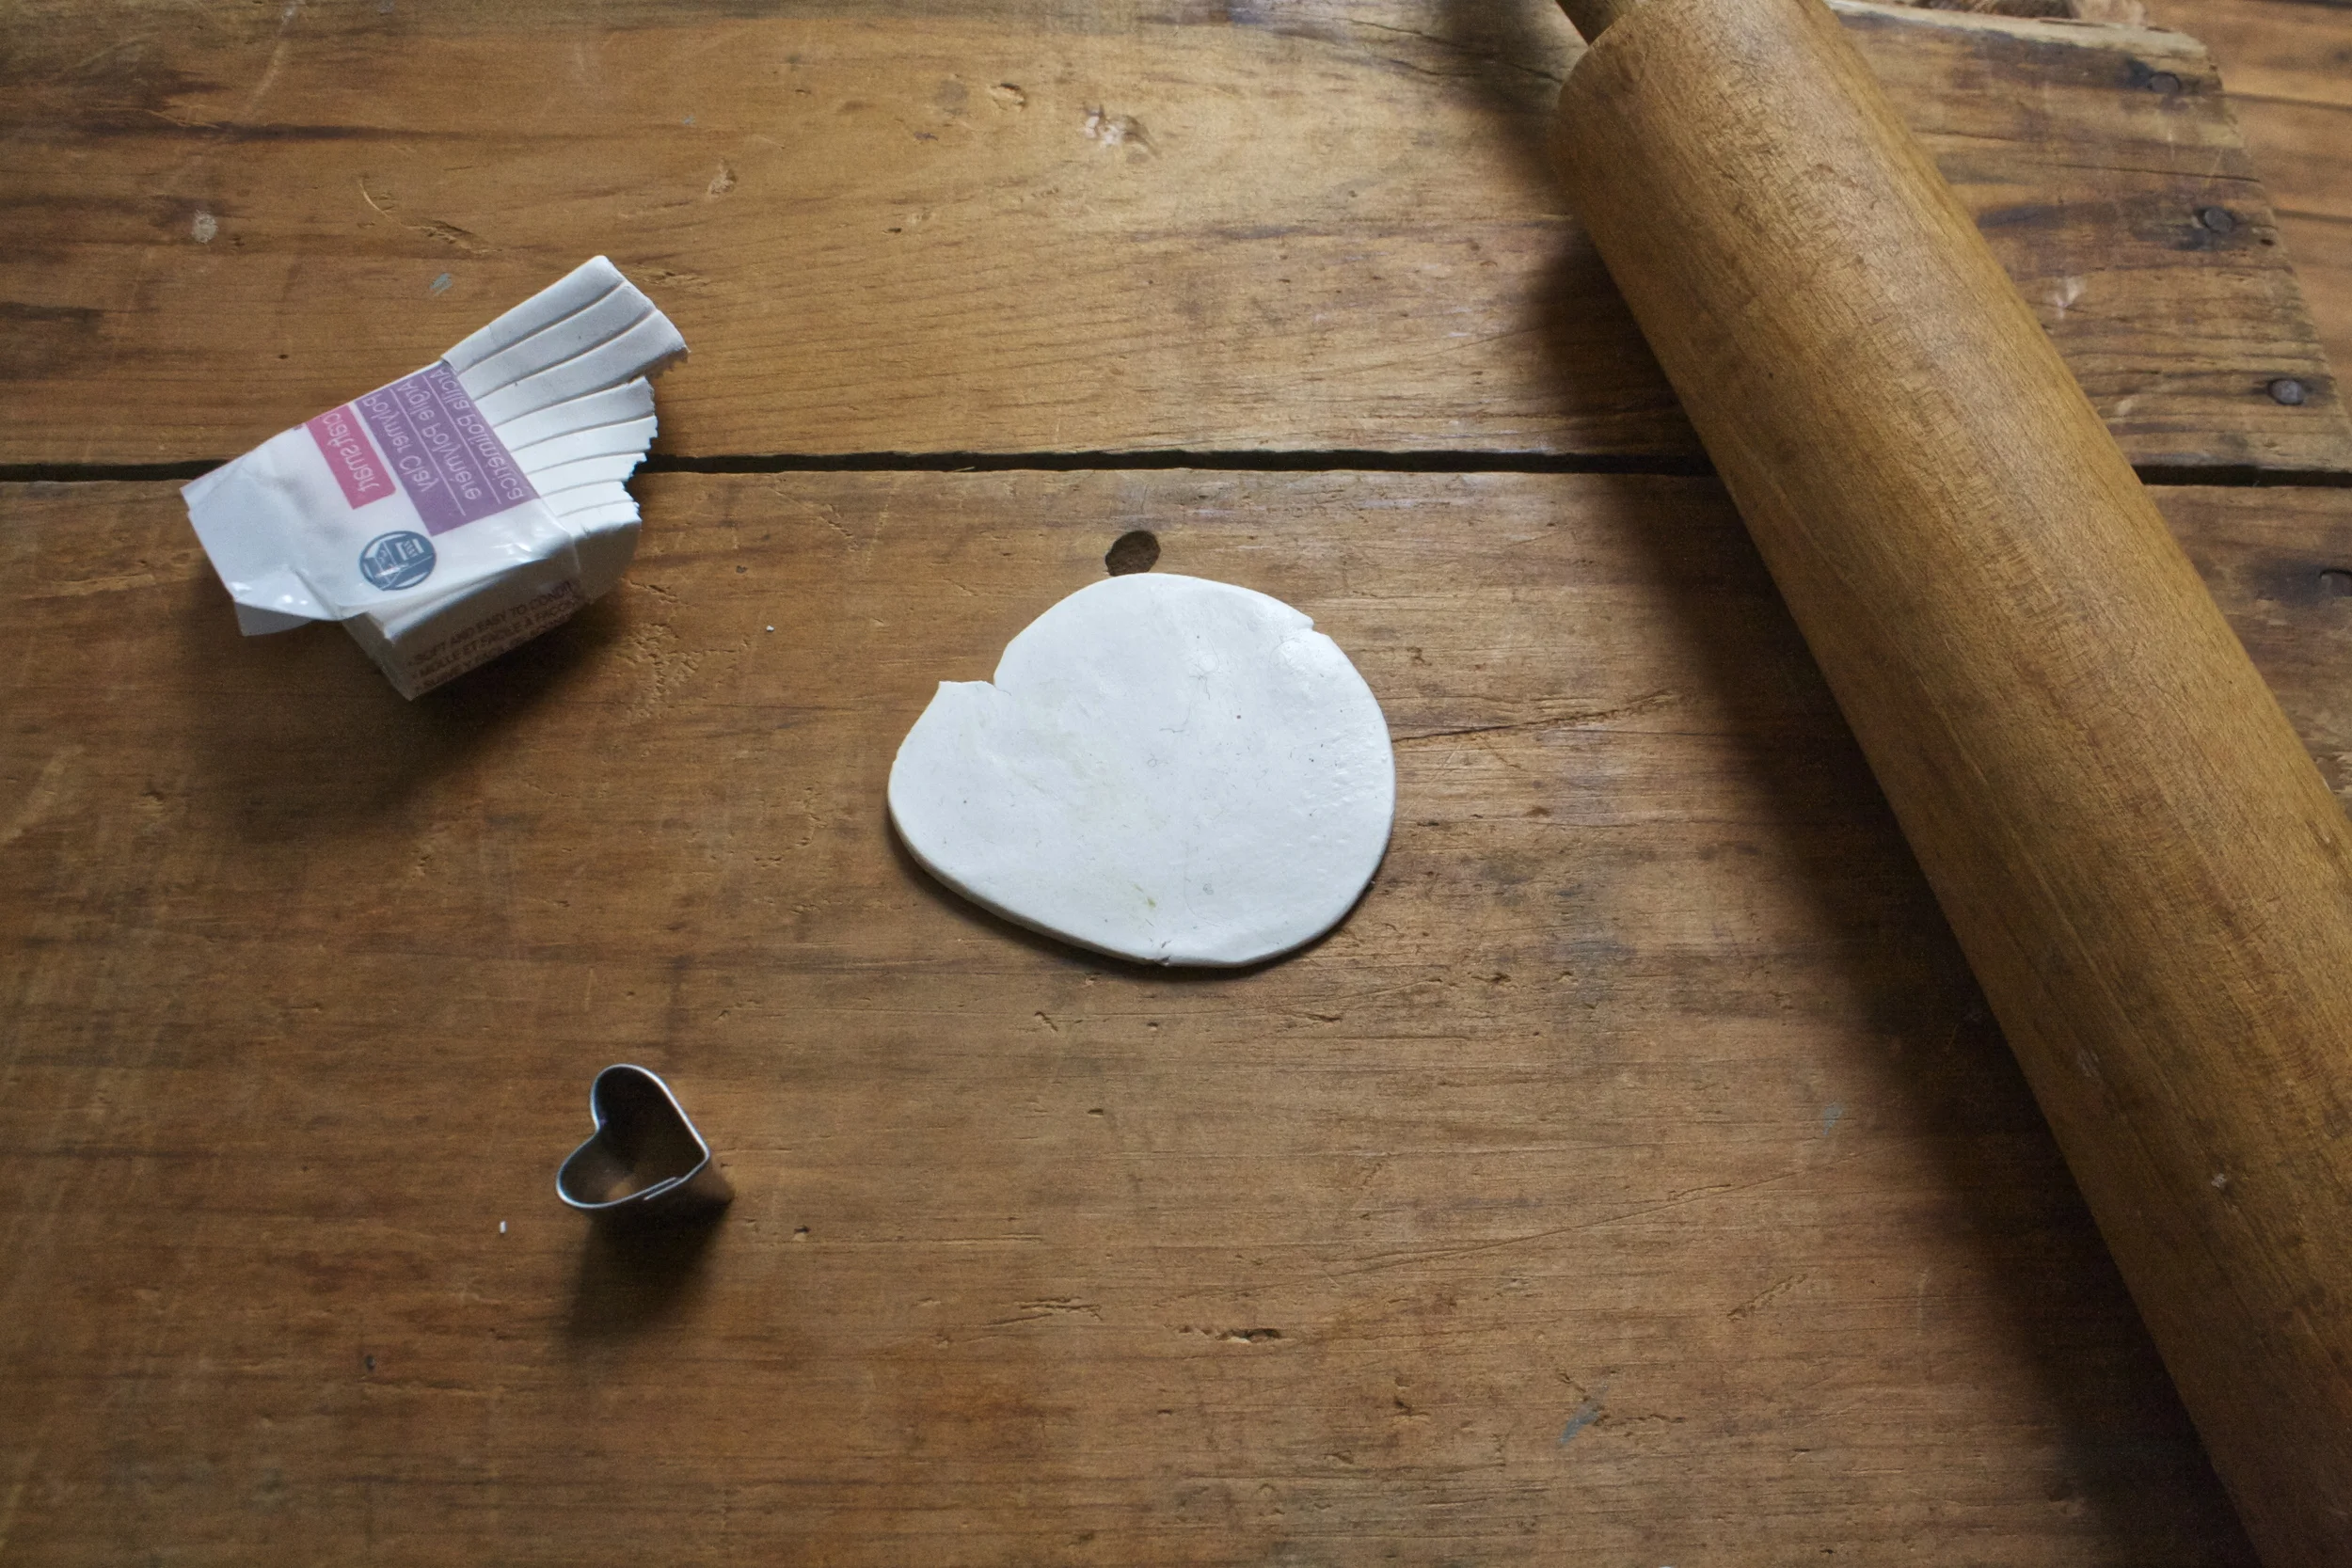


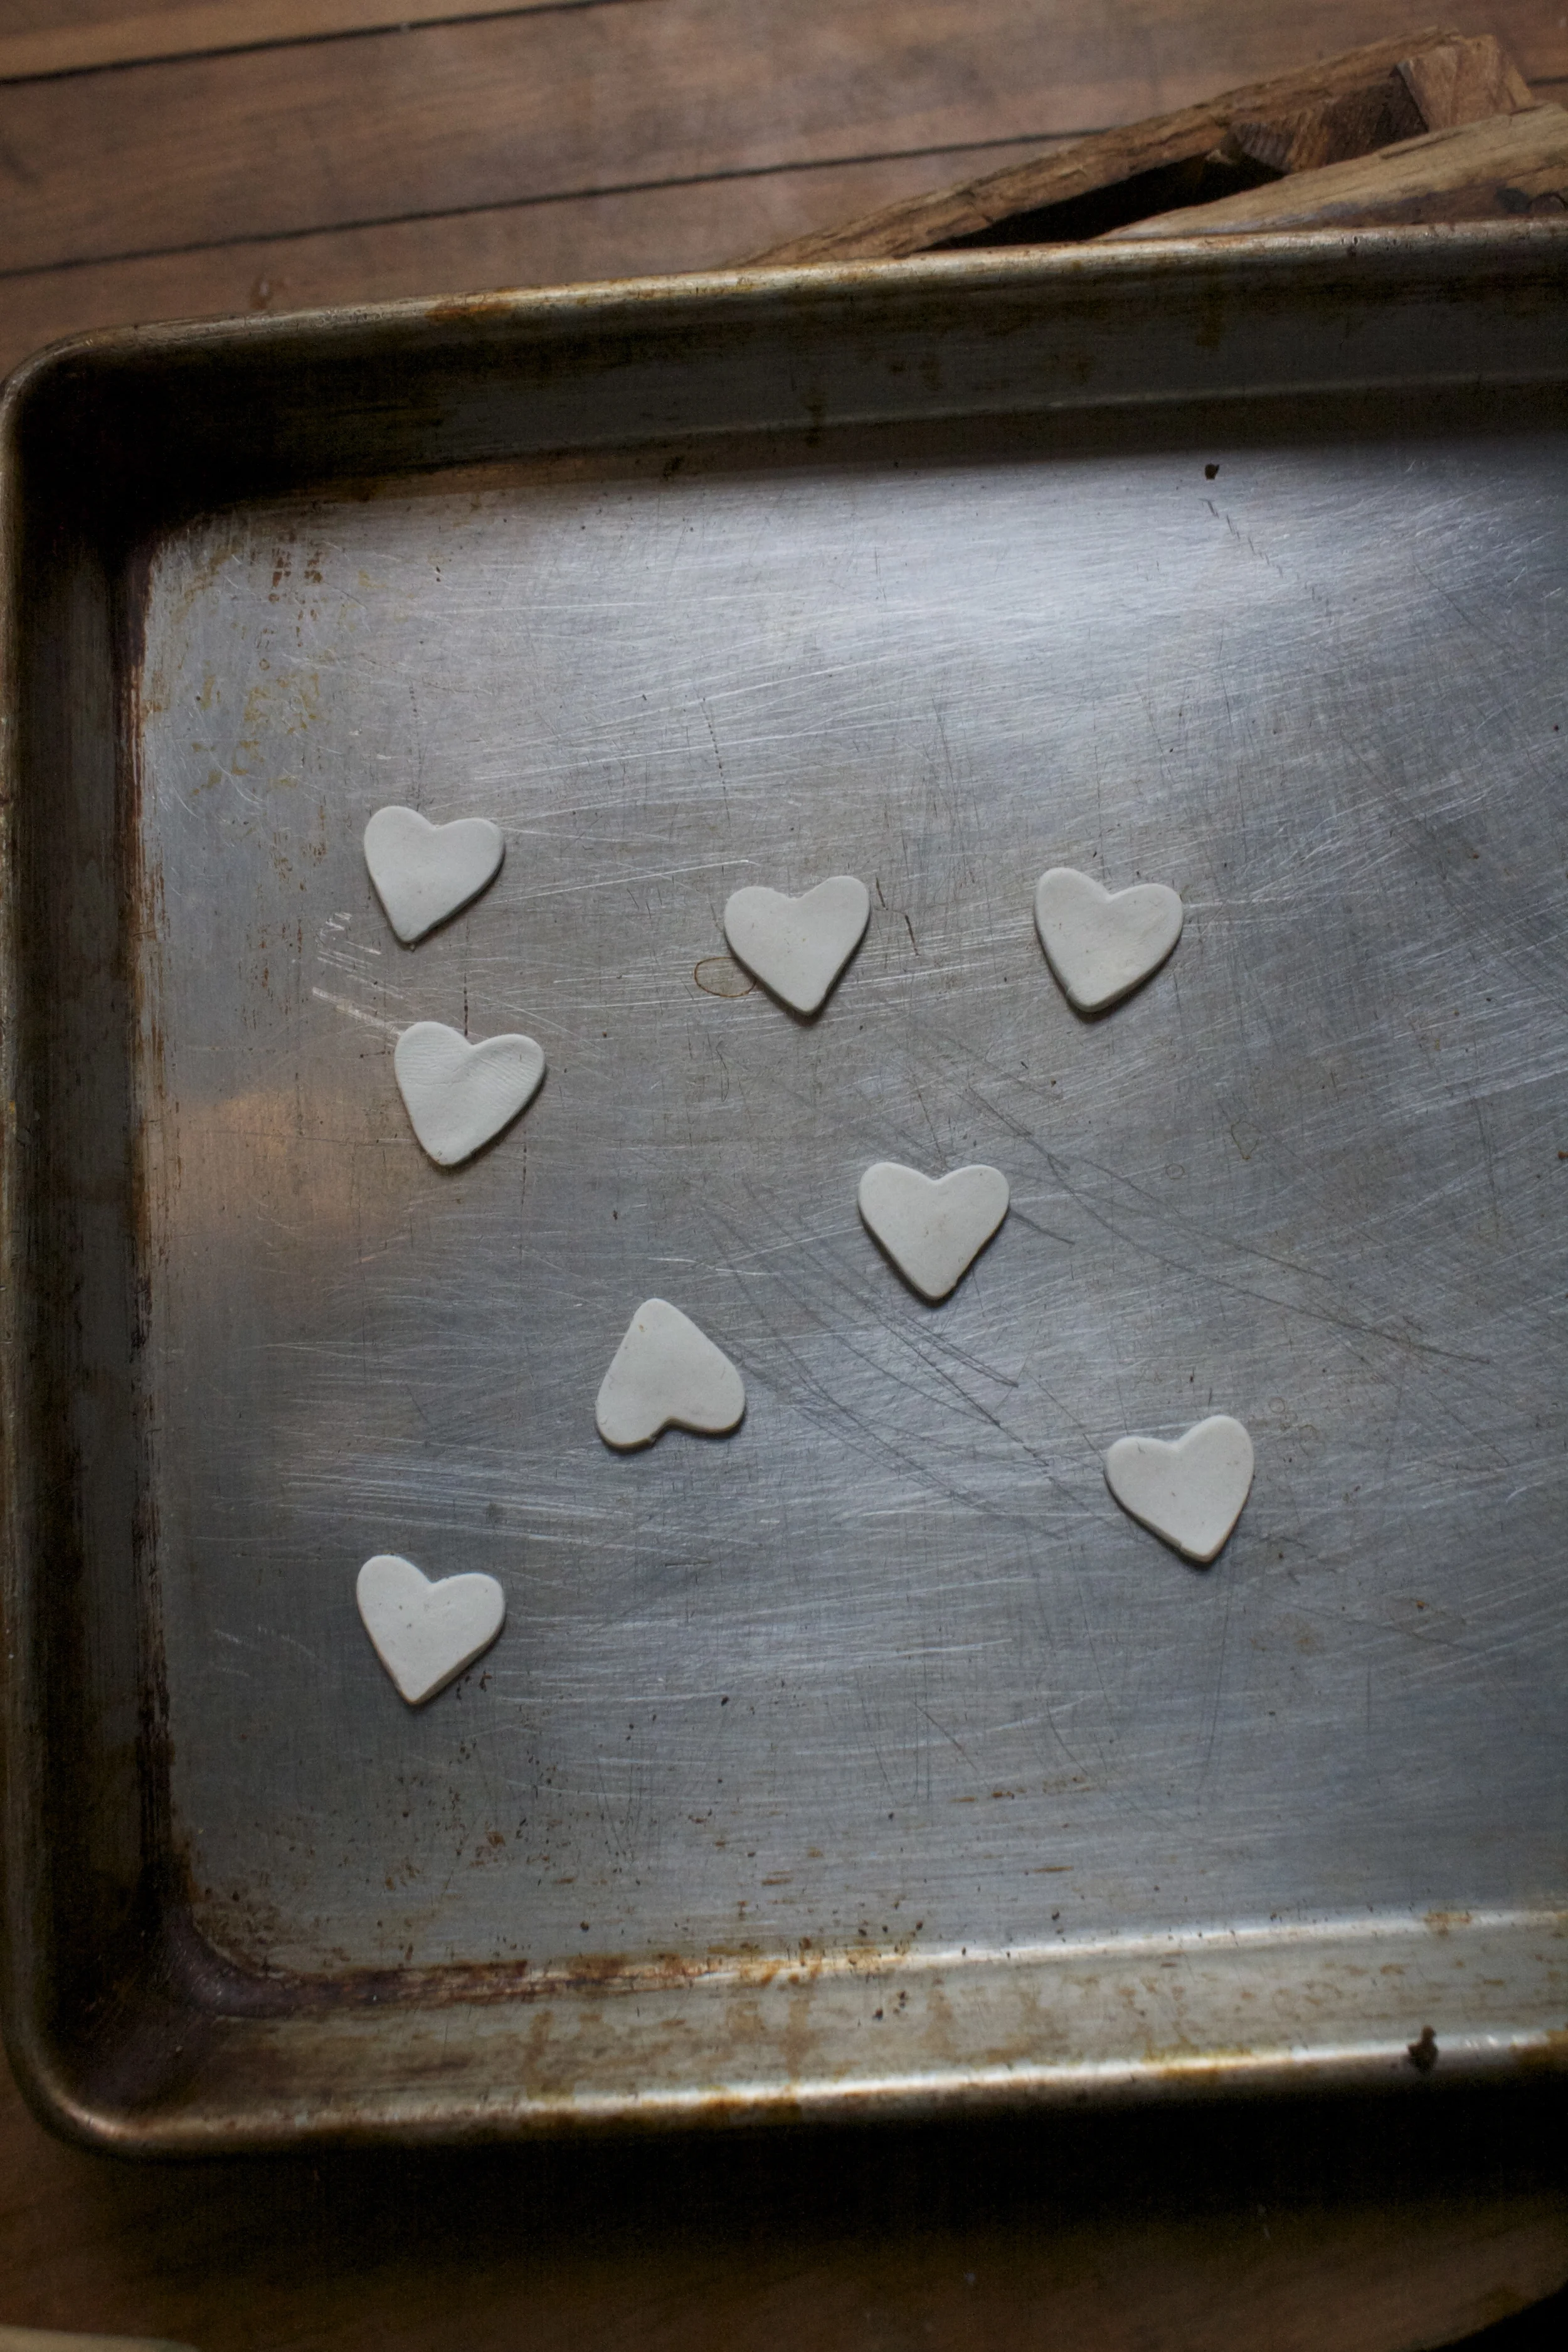

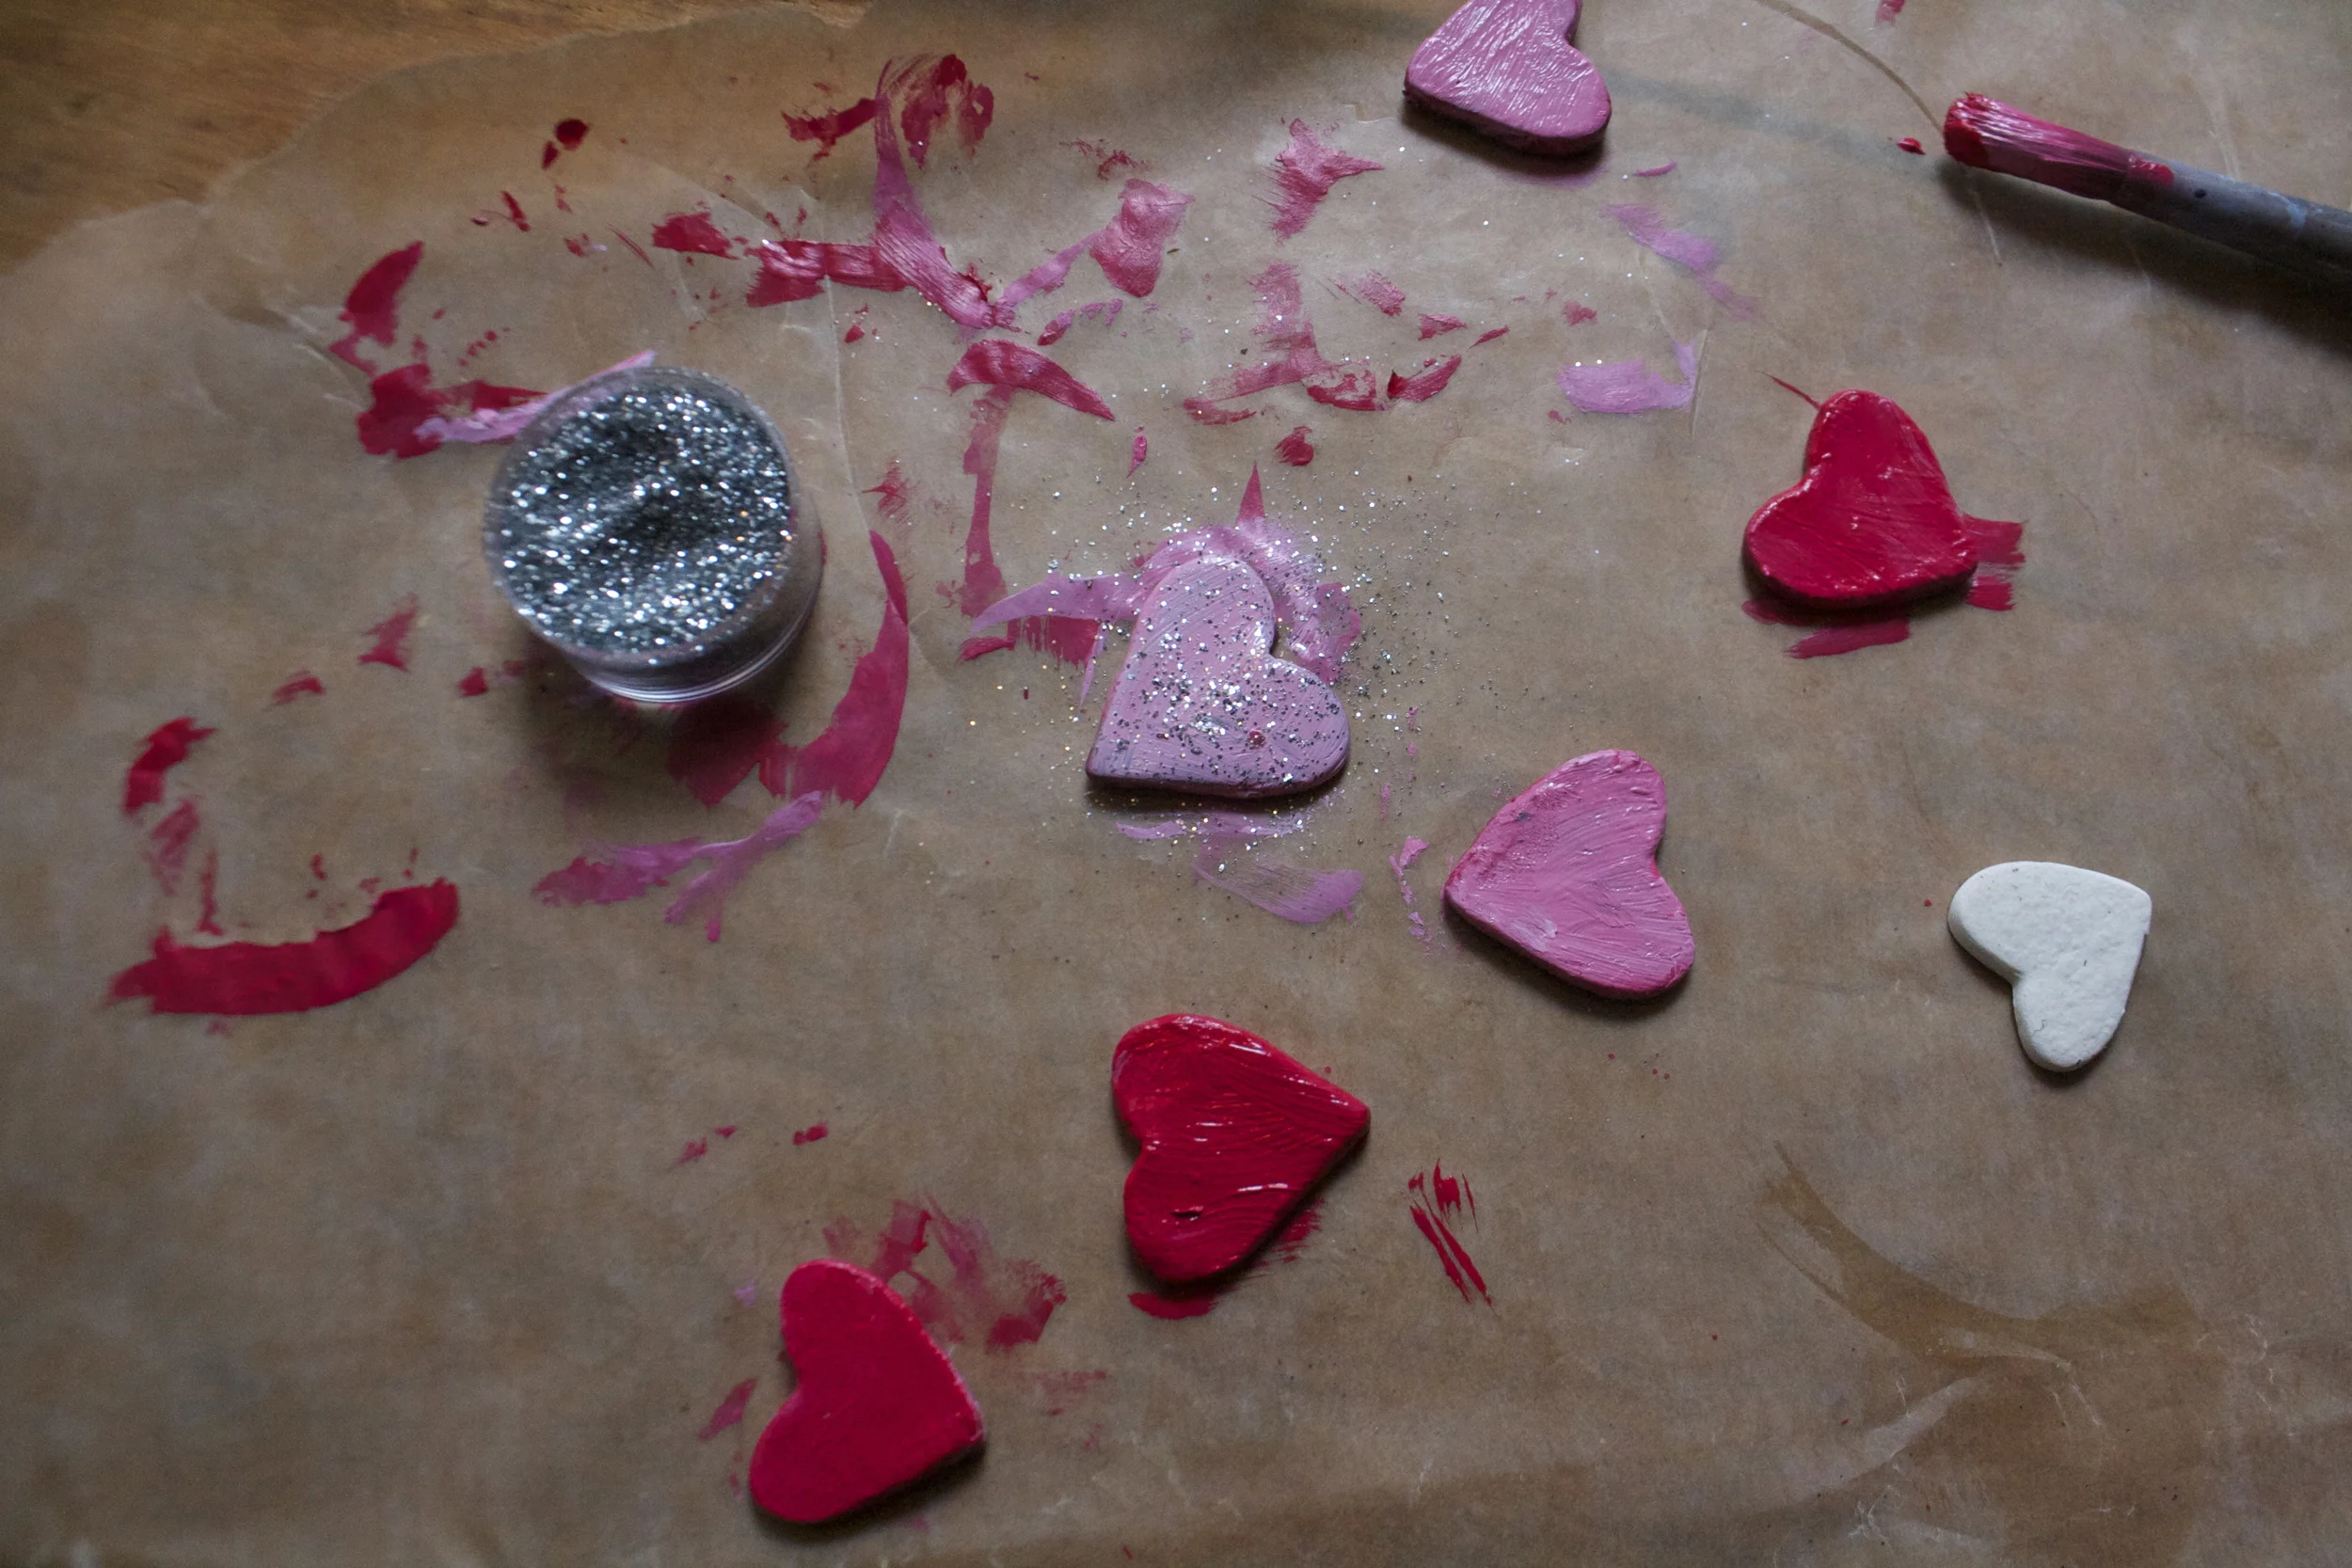


 It’s Mother’s Day weekend which means that you and I and everyone out there should feel the slightest bit obligated to at least do a little something nice for your mom for the mere fact that you were borned. And really what better way to celebrate mom than with food%u2026 It really is the least that you can do. (I think mom’s also like flowers and cards and handmade pasta necklaces) My mom is defiantly about the food. (she has had her fair share or pasta necklaces) %u00a0A many years back on Mother’s day, this sweet little girl (me) made her mother a special %u00a0breakfast treat%u2026blueberry scones. And ever since that day, for every freaking holiday, birthday, whatever day, my mother requests (demands) a batch of those scones. She is always saying that these are her favorite treat and that no one has ever made them as good as I do. (I guess that just reiterates that I am her number 1 child)
 The stuff. Flour, baking soda, baking powder and salt. A bit of sugar, vanilla, buttermilk, and butter (use vegan butter and nut milk if you want to make them vegan) And of course we need the blueberries which can be fresh or frozen. I usually use fresh, but the store I stopped at only had really big containers of fresh that were like $1000 dollars a piece and the organic frozen happen to be on super sale. So you know, the cheap in me won that battle.%u00a0
 So into the bowl goes all the dry stuff; flour, baking powder and soda, salt, and the sugar. Give it a good whisk.
 Now dump the blueberries into the flour mixture. Toss them around to give them a coat of flour. Add in the buttermilk and vanilla and give a little mix until liquid is absorbed. We are trying to handle the dough as little as possible.
 Turn mixture onto counter. It’s very loose, but thats what it should look like.
  Very gently and with as little handling as possible, gather dough up, knead a few times till everything %u00a0just comes together. Press dough into a disk that is roughly an inch thick%u2026. and it doesn’t need to be perfect.%u00a0
 Cut the disk into even sized pieces. Do 6 big, 8 normal, maybe even 10 smaller. Whatever size you like. (I did 8) Place the scones onto a baking sheet, using a spatula to transfer, and sprinkle the tops with a little bit of sugar. Into a preheated oven for about 20 minutes.
 And when the scones look all nice and browned and a tester comes out clean. remove and either serve right away warm, preferably with huge cup of coffee or tea, or stick on a rack to cool before storing in %u00a0air tight container.


 Made from necessity, a seat near the door to sit and remove shoes, %u00a0store winter stuff and doesn’t look like I threw a bunch of milk crates together..I threw them together and added %u00a0a nice blanket, I’m classy like that. I do love a good milk crate%u2026there has always been something so satisfying to me about a free plastic receptacle that has a world of uses. These three crates and some scrap wood %u00a0have changed my entire living situation. The entryway of our 200 sq ft loft is now super functional, looks fantastic, and makes me happy. .All from a the scrape pile.
  It’s not what you think%u2026we have a barn that is pretty much dedicated to scrap wood and some other building material that has come from buildings we have worked on. This picture does not do our scrap wood(and junk) pile any justice. It is pretty crazy, and drives me nuts. I don’t know how many times I have threatened a 30 yard dumpster, but you know what? When Nick or I are in need of some wood, we always find ourselves rummaging through the pile and can almost always find a piece of what we are looking for. The pile somehow always redeems itself, %u00a0 for that reason it still lives on(for now). Being %u00a0that you as a %u00a0sane person, you probably don’t have a barn full of scrap wood(and junk), so what you will need for this project is..
 Three milk crates..What I found was that there are some milk crates that are not the same size so make sure that you have three that are the same. These crates are 13x13x11.
 Measure%u00a0and cut ply wood. The %u00a0top and a bottom %u00a0are the same measurements%u2026Here comes some math%u2026. three milk crates that are 13 inches long = 39 inches. One crate deep is 13 inches. . Cut two pieces %u00a039.5 inches by 13 inches. (The extra 1/2 inch is so the crates can move in and out easier)
 Now measure and cut sides. Two pieces at 13×13.The crates are 11 inches high, but you need to add the extra 1.5 inches %u00a0because of the thickness of the plywood. If your milk crates are a different height, %u00a0use that measurement plus 1.5 inches.
 %u00a0 %u00a0%u00a0
 I caught that piece of wood he is throwing at me. Ok, not really, but I could have. Here Nick is cutting %u00a0four 10 inch pieces of 2×4 for the legs. We decided on 10 inch legs because we wanted a bench that was a %u00a0little taller than the average chair, which is about 18 inches floor to seat. If you wanted to make the legs shorter or taller, by all means, I just wouldn’t go to much taller or you might not be able to sit conformably on it.
 After you have all your legs cut, mark out where you want to place them. We did a one%u00a0inch recessed from the front and the side%u2026but do whatever looks best to you. Mark where the legs go and place two screws into inch leg, screwing from the inside of the bench.%u00a0
 And thats%u00a0it%u2026 ..now you have the frame. Take a minute here to admire your handy wood working skills. If you are not into the raw wood look, this would be the time to paint it.
 With the crates inserted%u2026Doesn’t it look magnificent! I choose these 3 crates for the colors and the patterns..I wish I has a grey crate that fit. That would have looked awesome.
 Test one%u2026%u2026%u2026.the crate slides out perfectly and my mittens fit!!
 Now for the big%u00a0test%u2026%u2026….and it works!! My butt safely seated. My feet touch the ground and I can bend over and tie my shows%u2026 can’t get any better%u2026
 But it did. The addition of a folded blanket as a cushion. I was going to make a cushion but found a really pretty blanket at the second-hand store that was perfect. It was 2 bucks and is actually way more practical than a cushion. I can wash this blanket, a hand-made cushion, I probably wouldn’t want to mess with that, plus a piece of foam alone cost like 25 bucks. The blanket was meant to be.

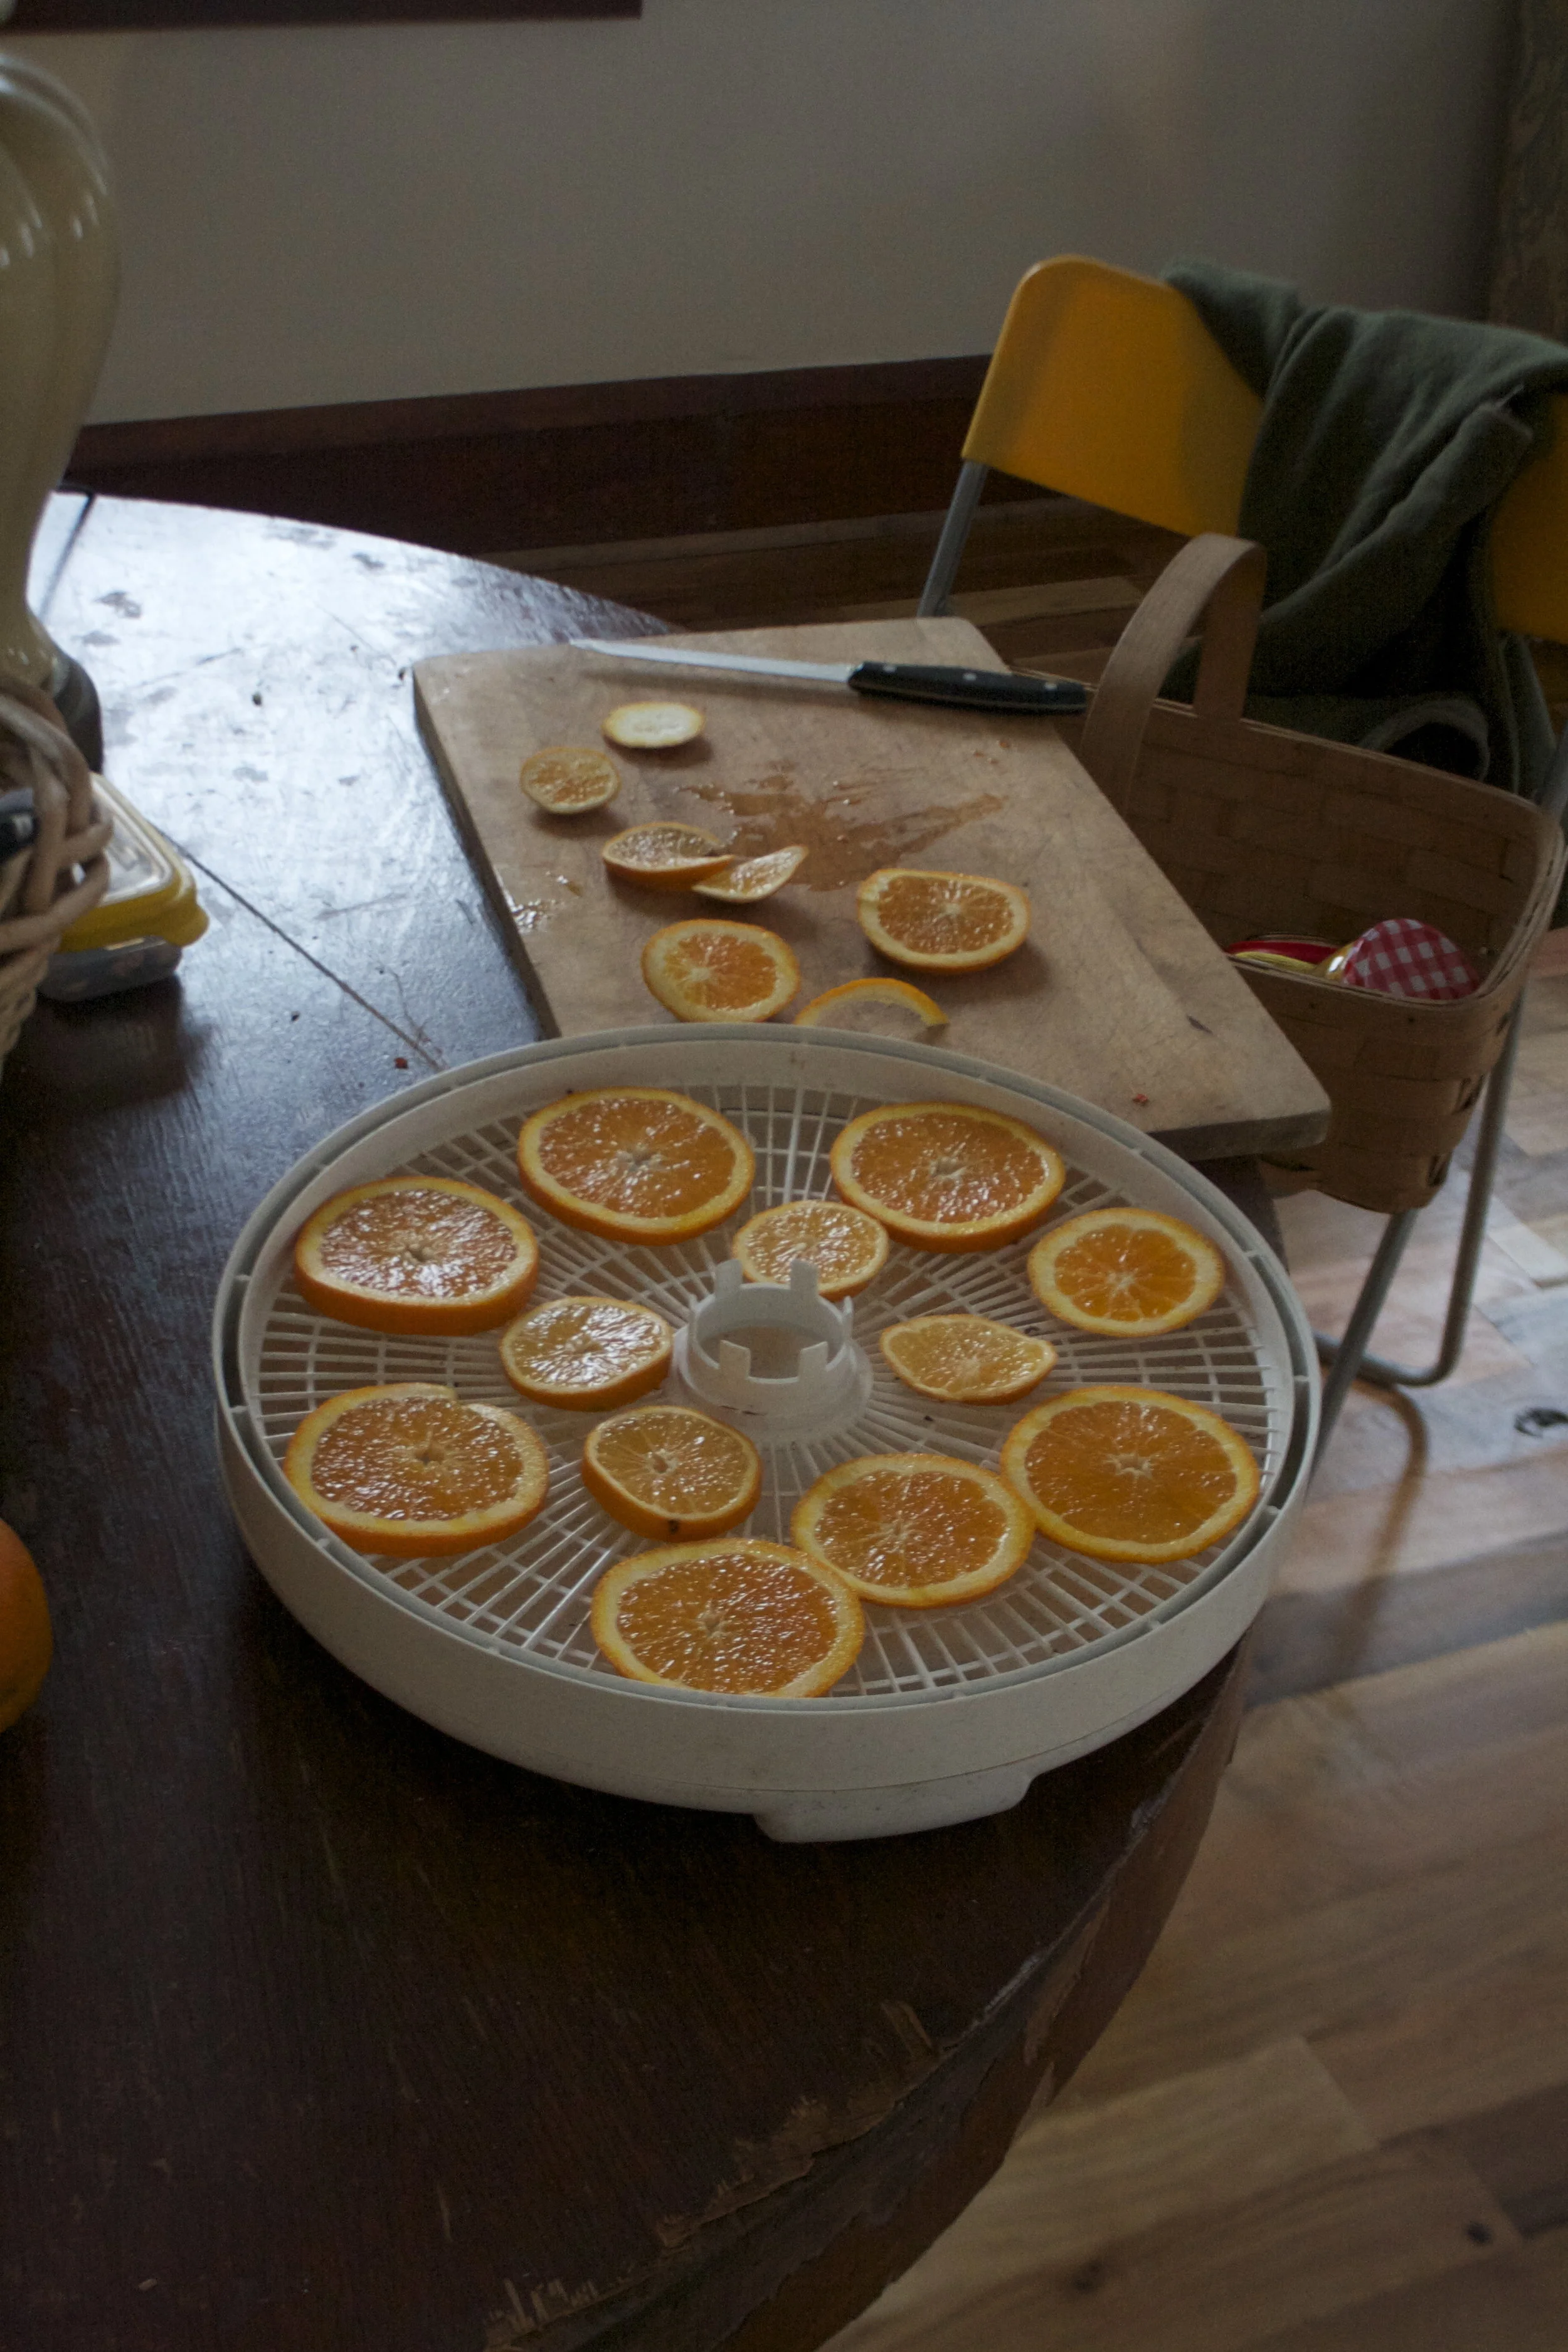

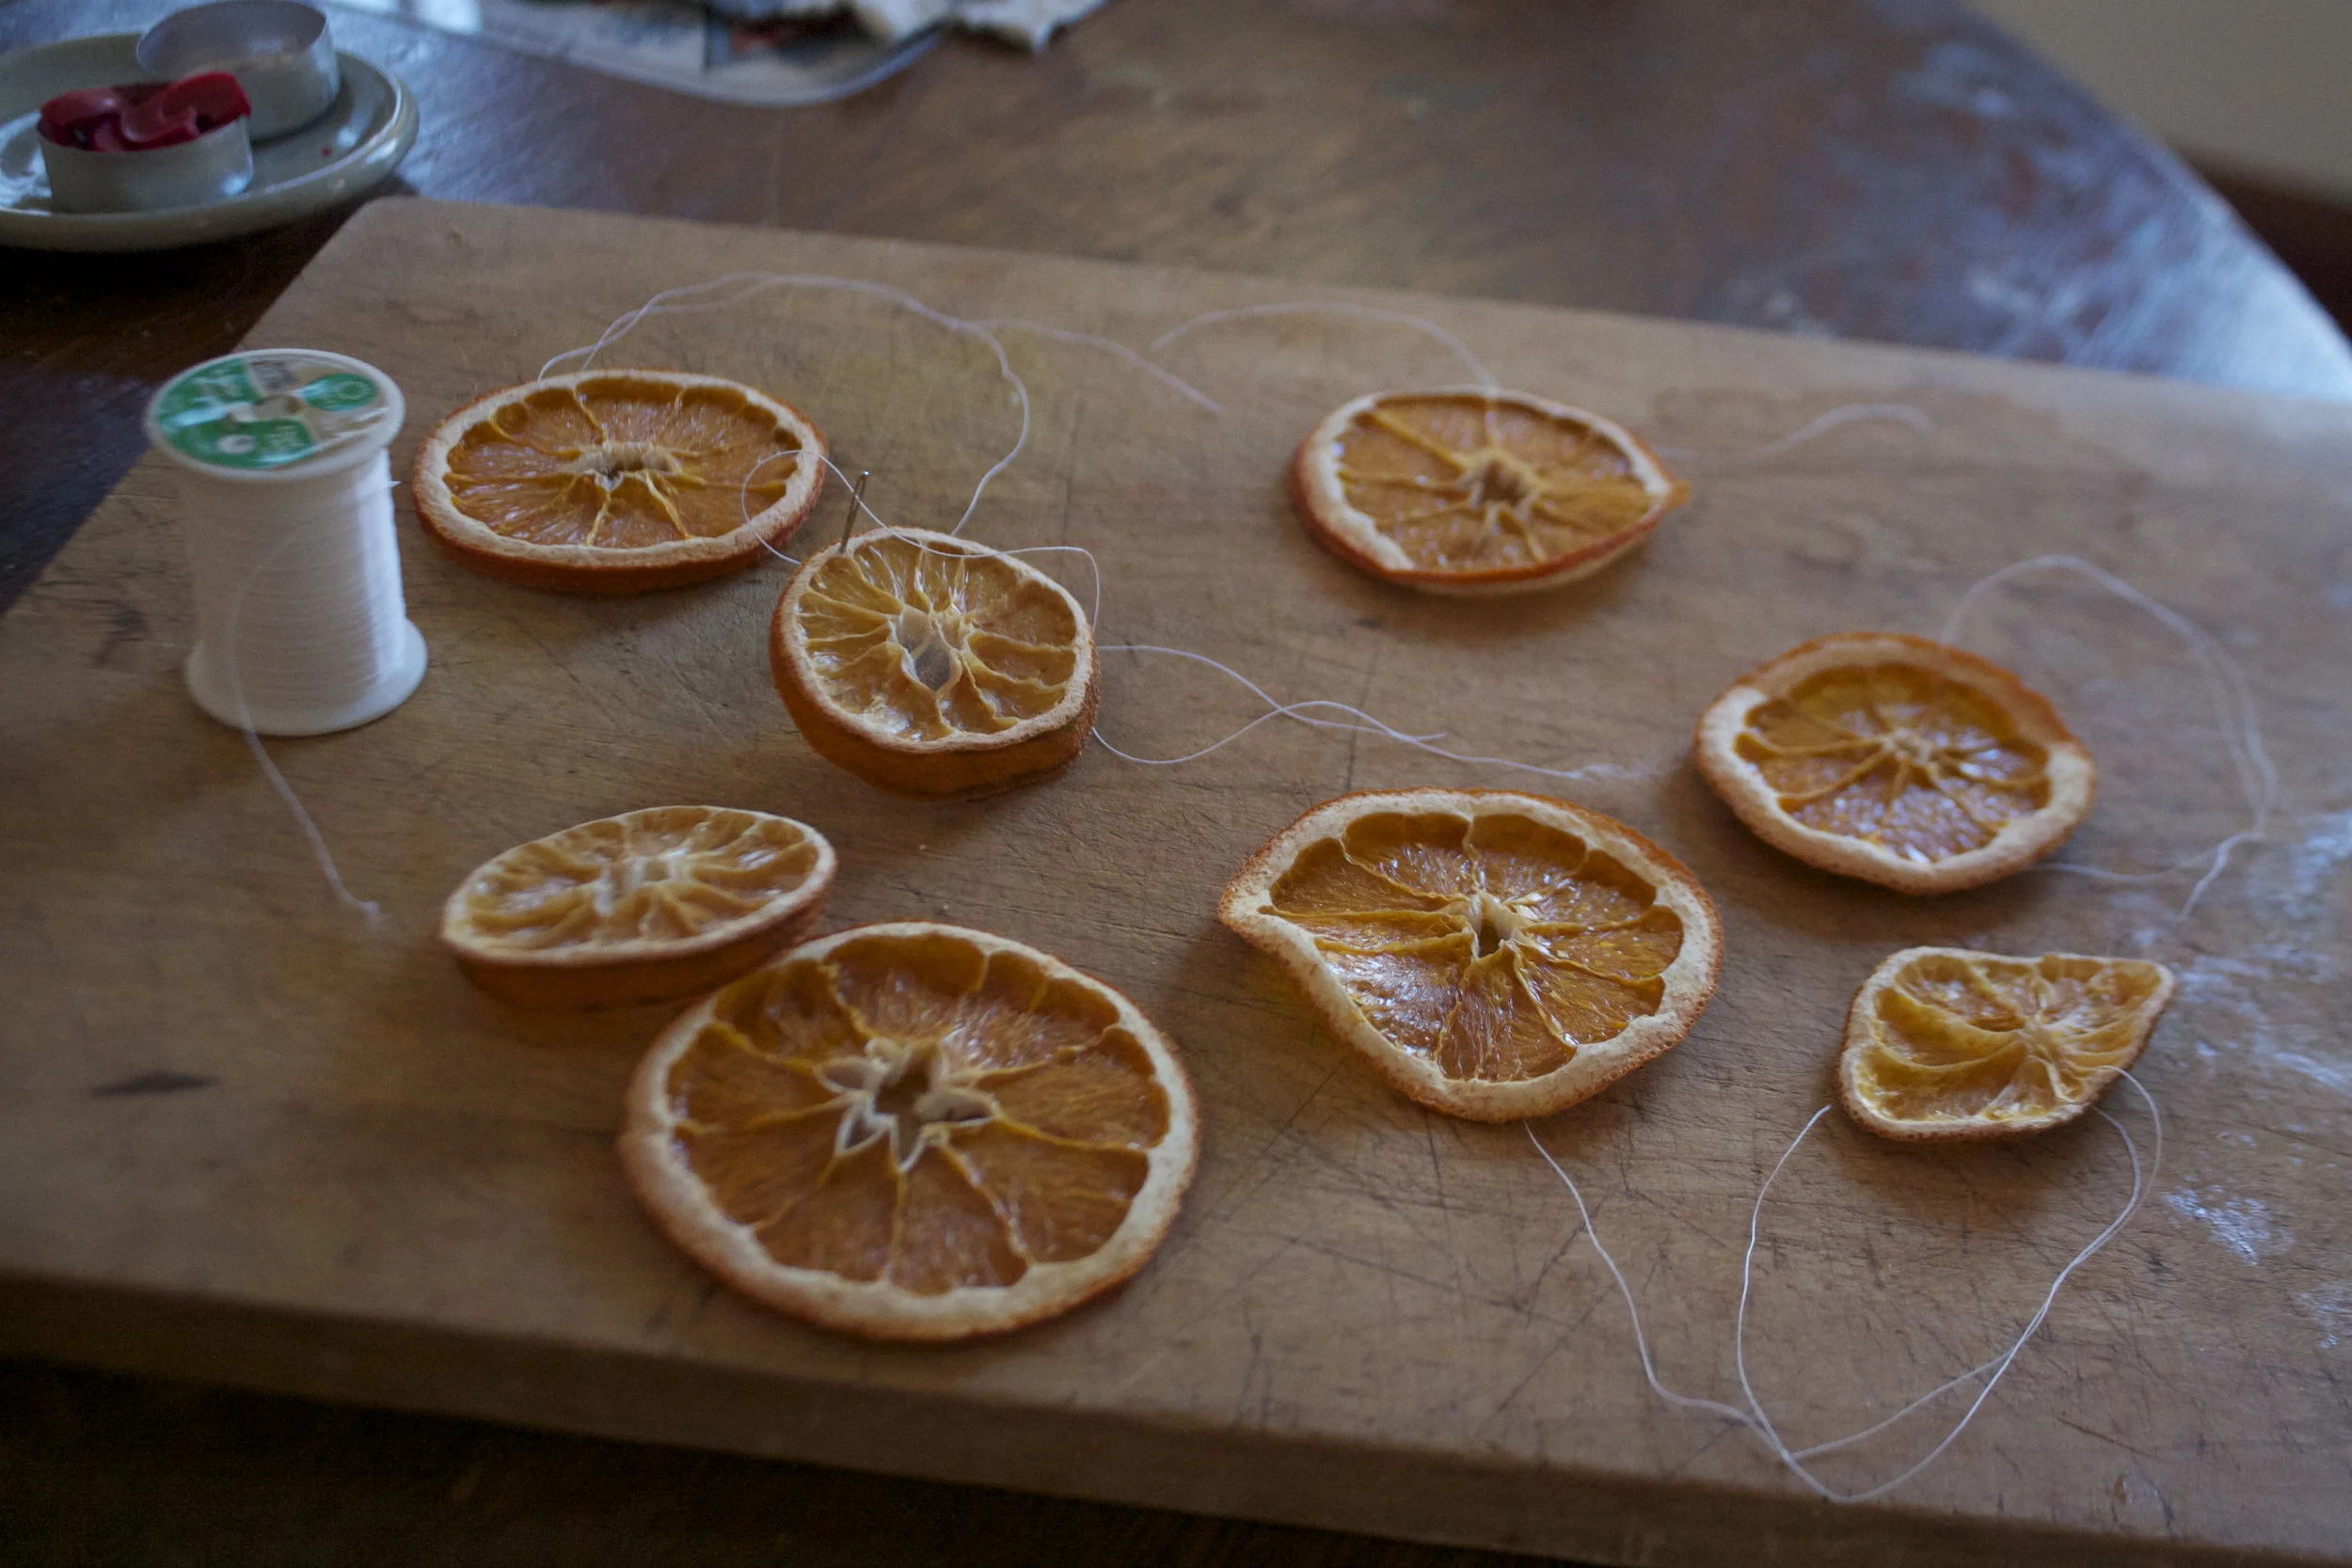
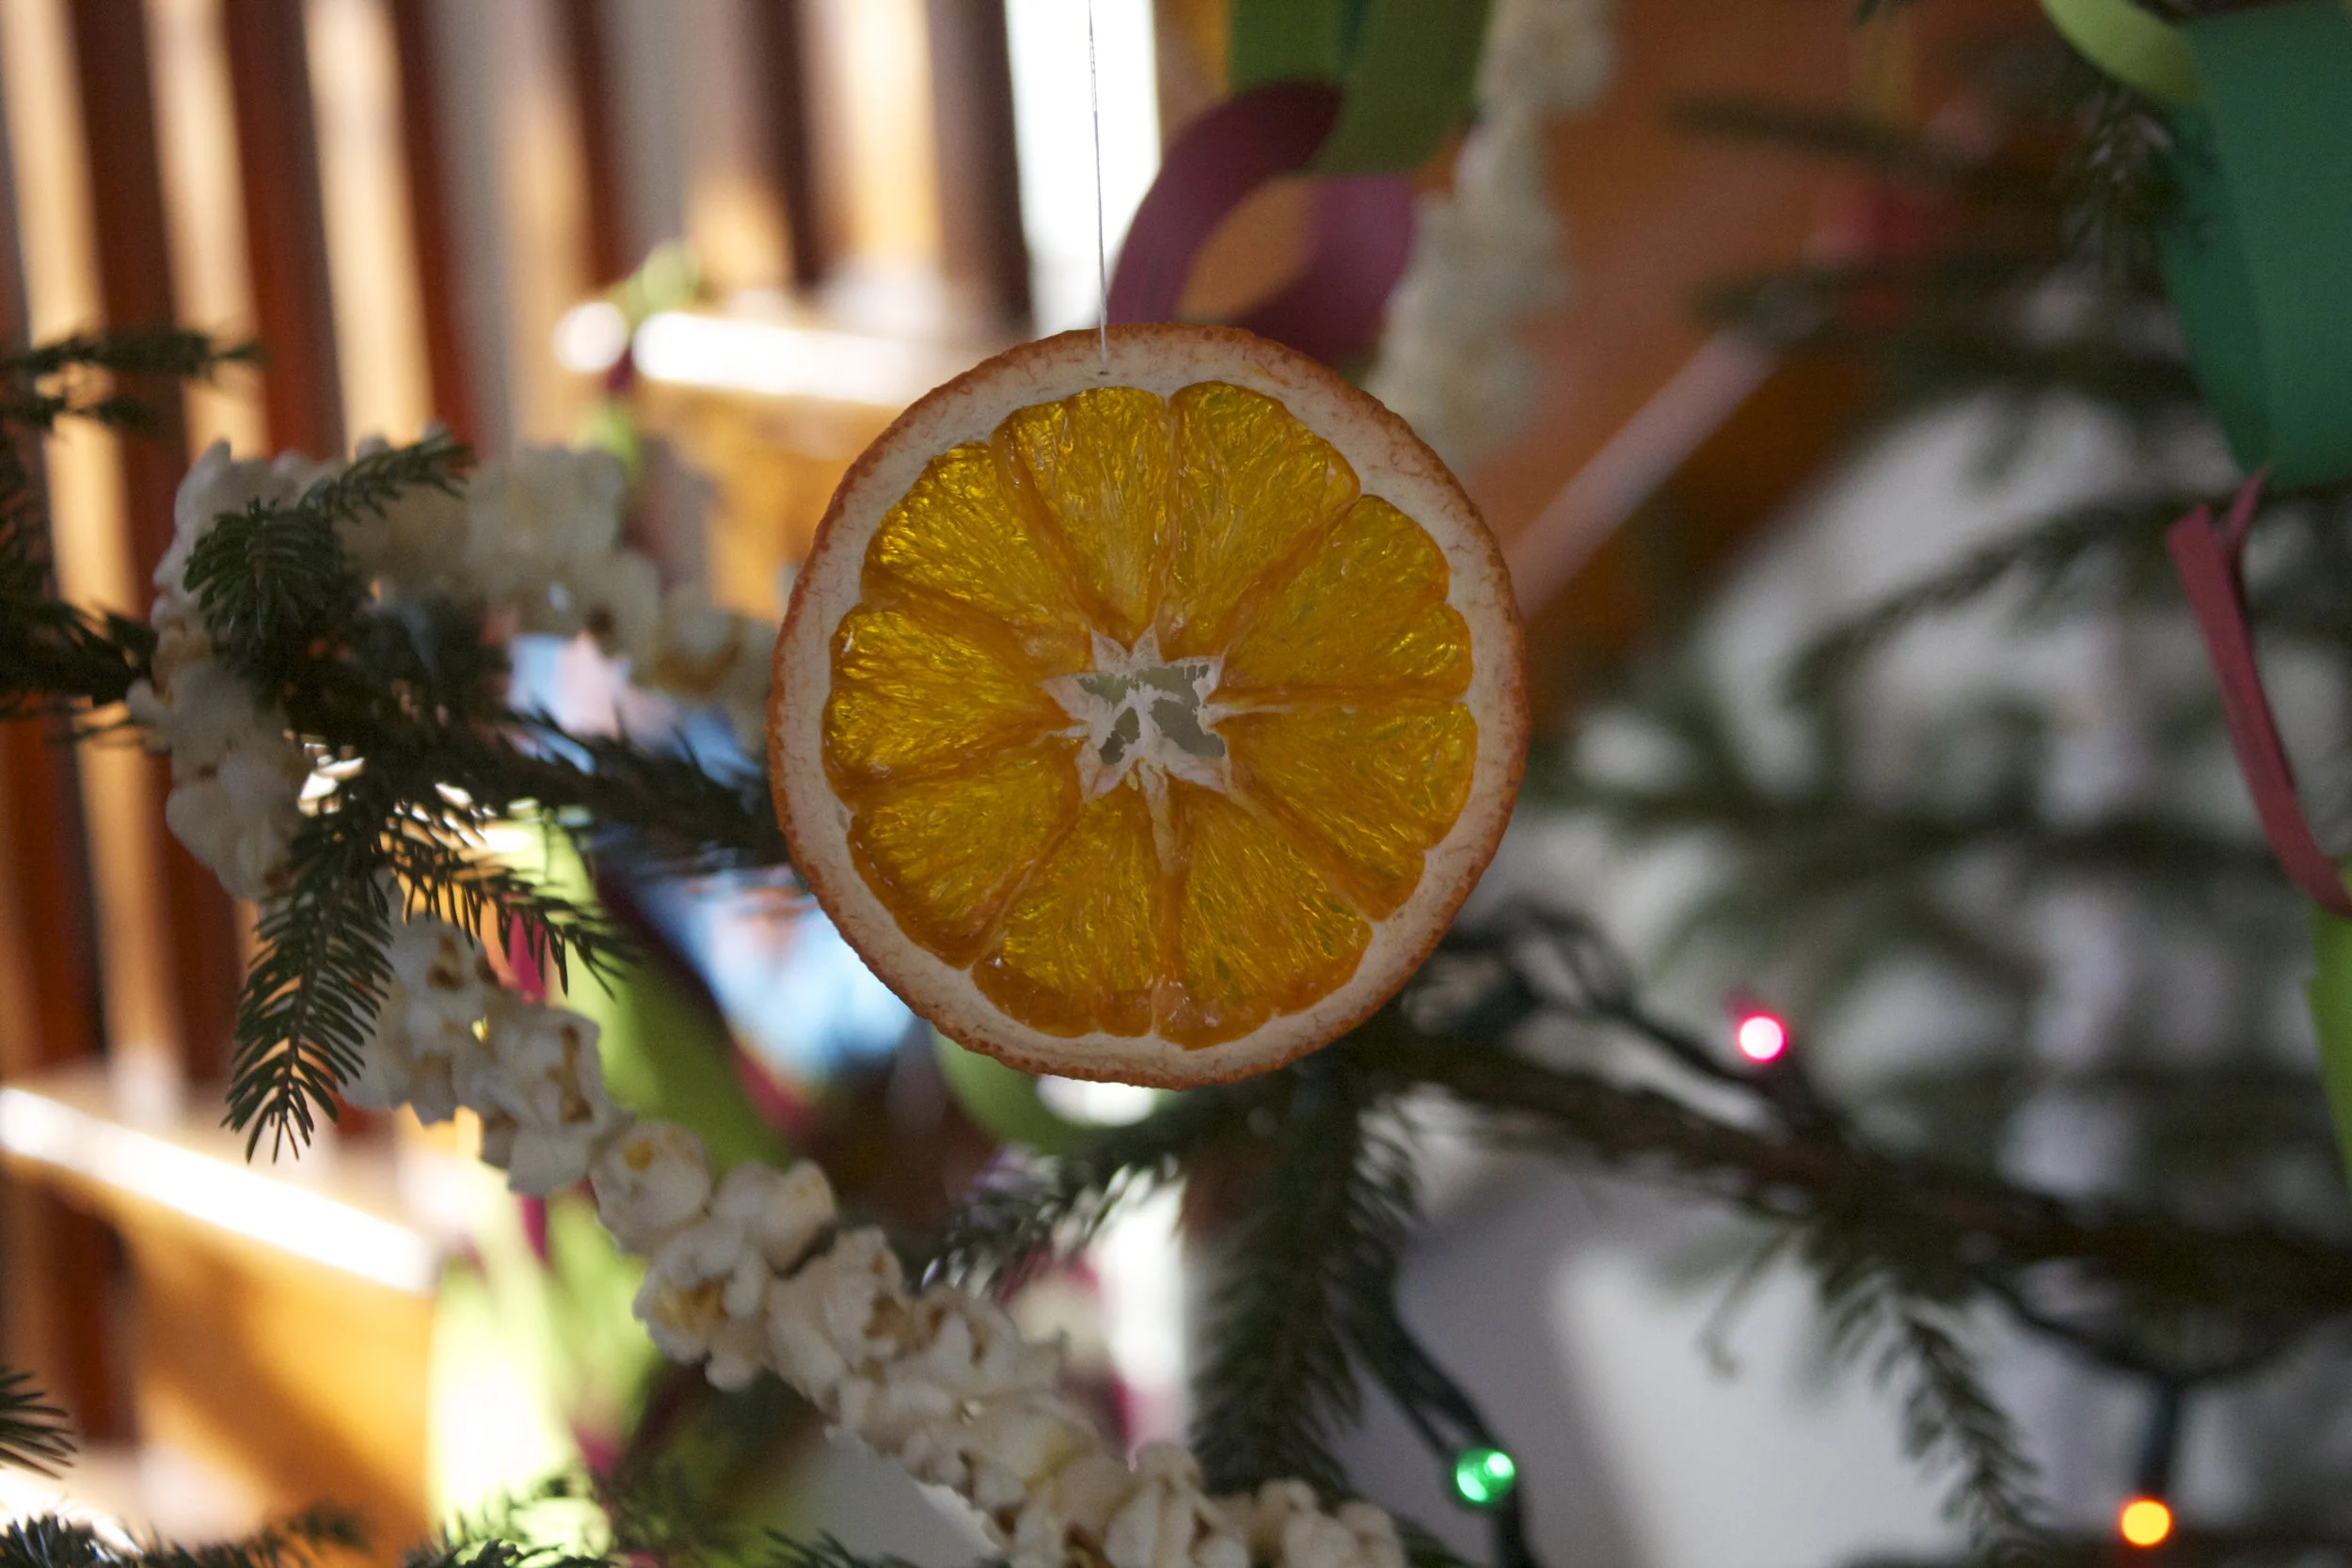


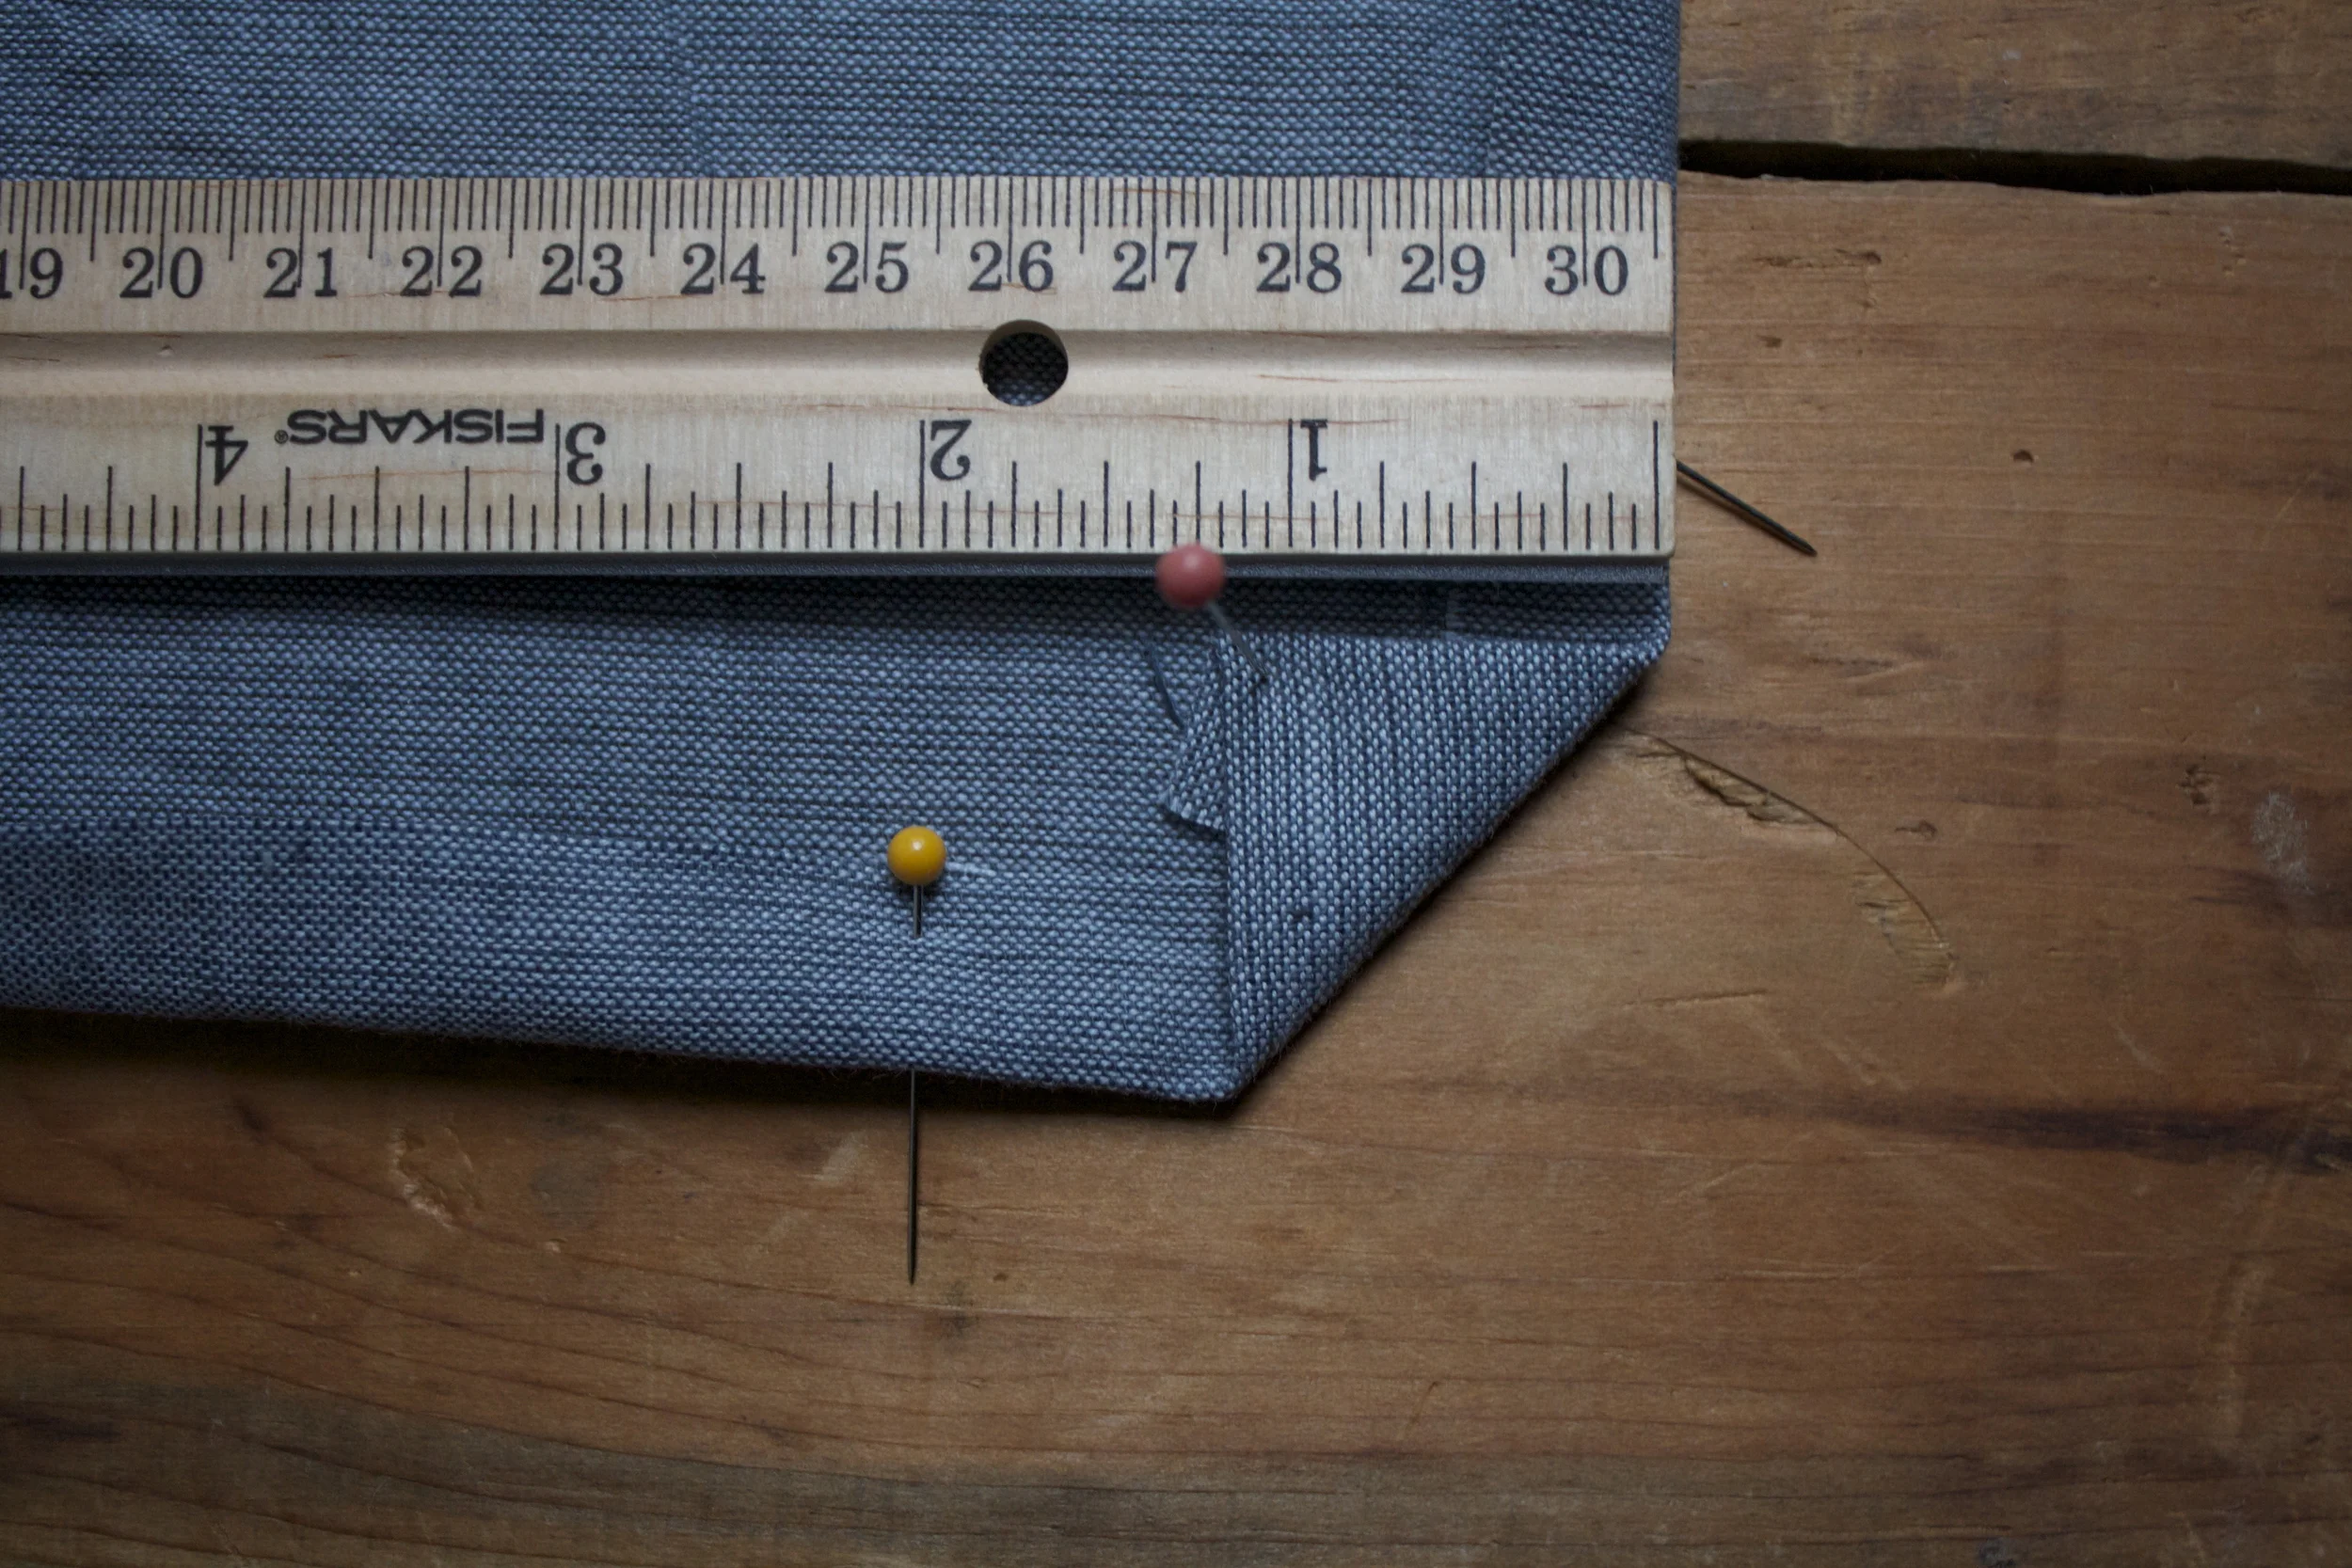
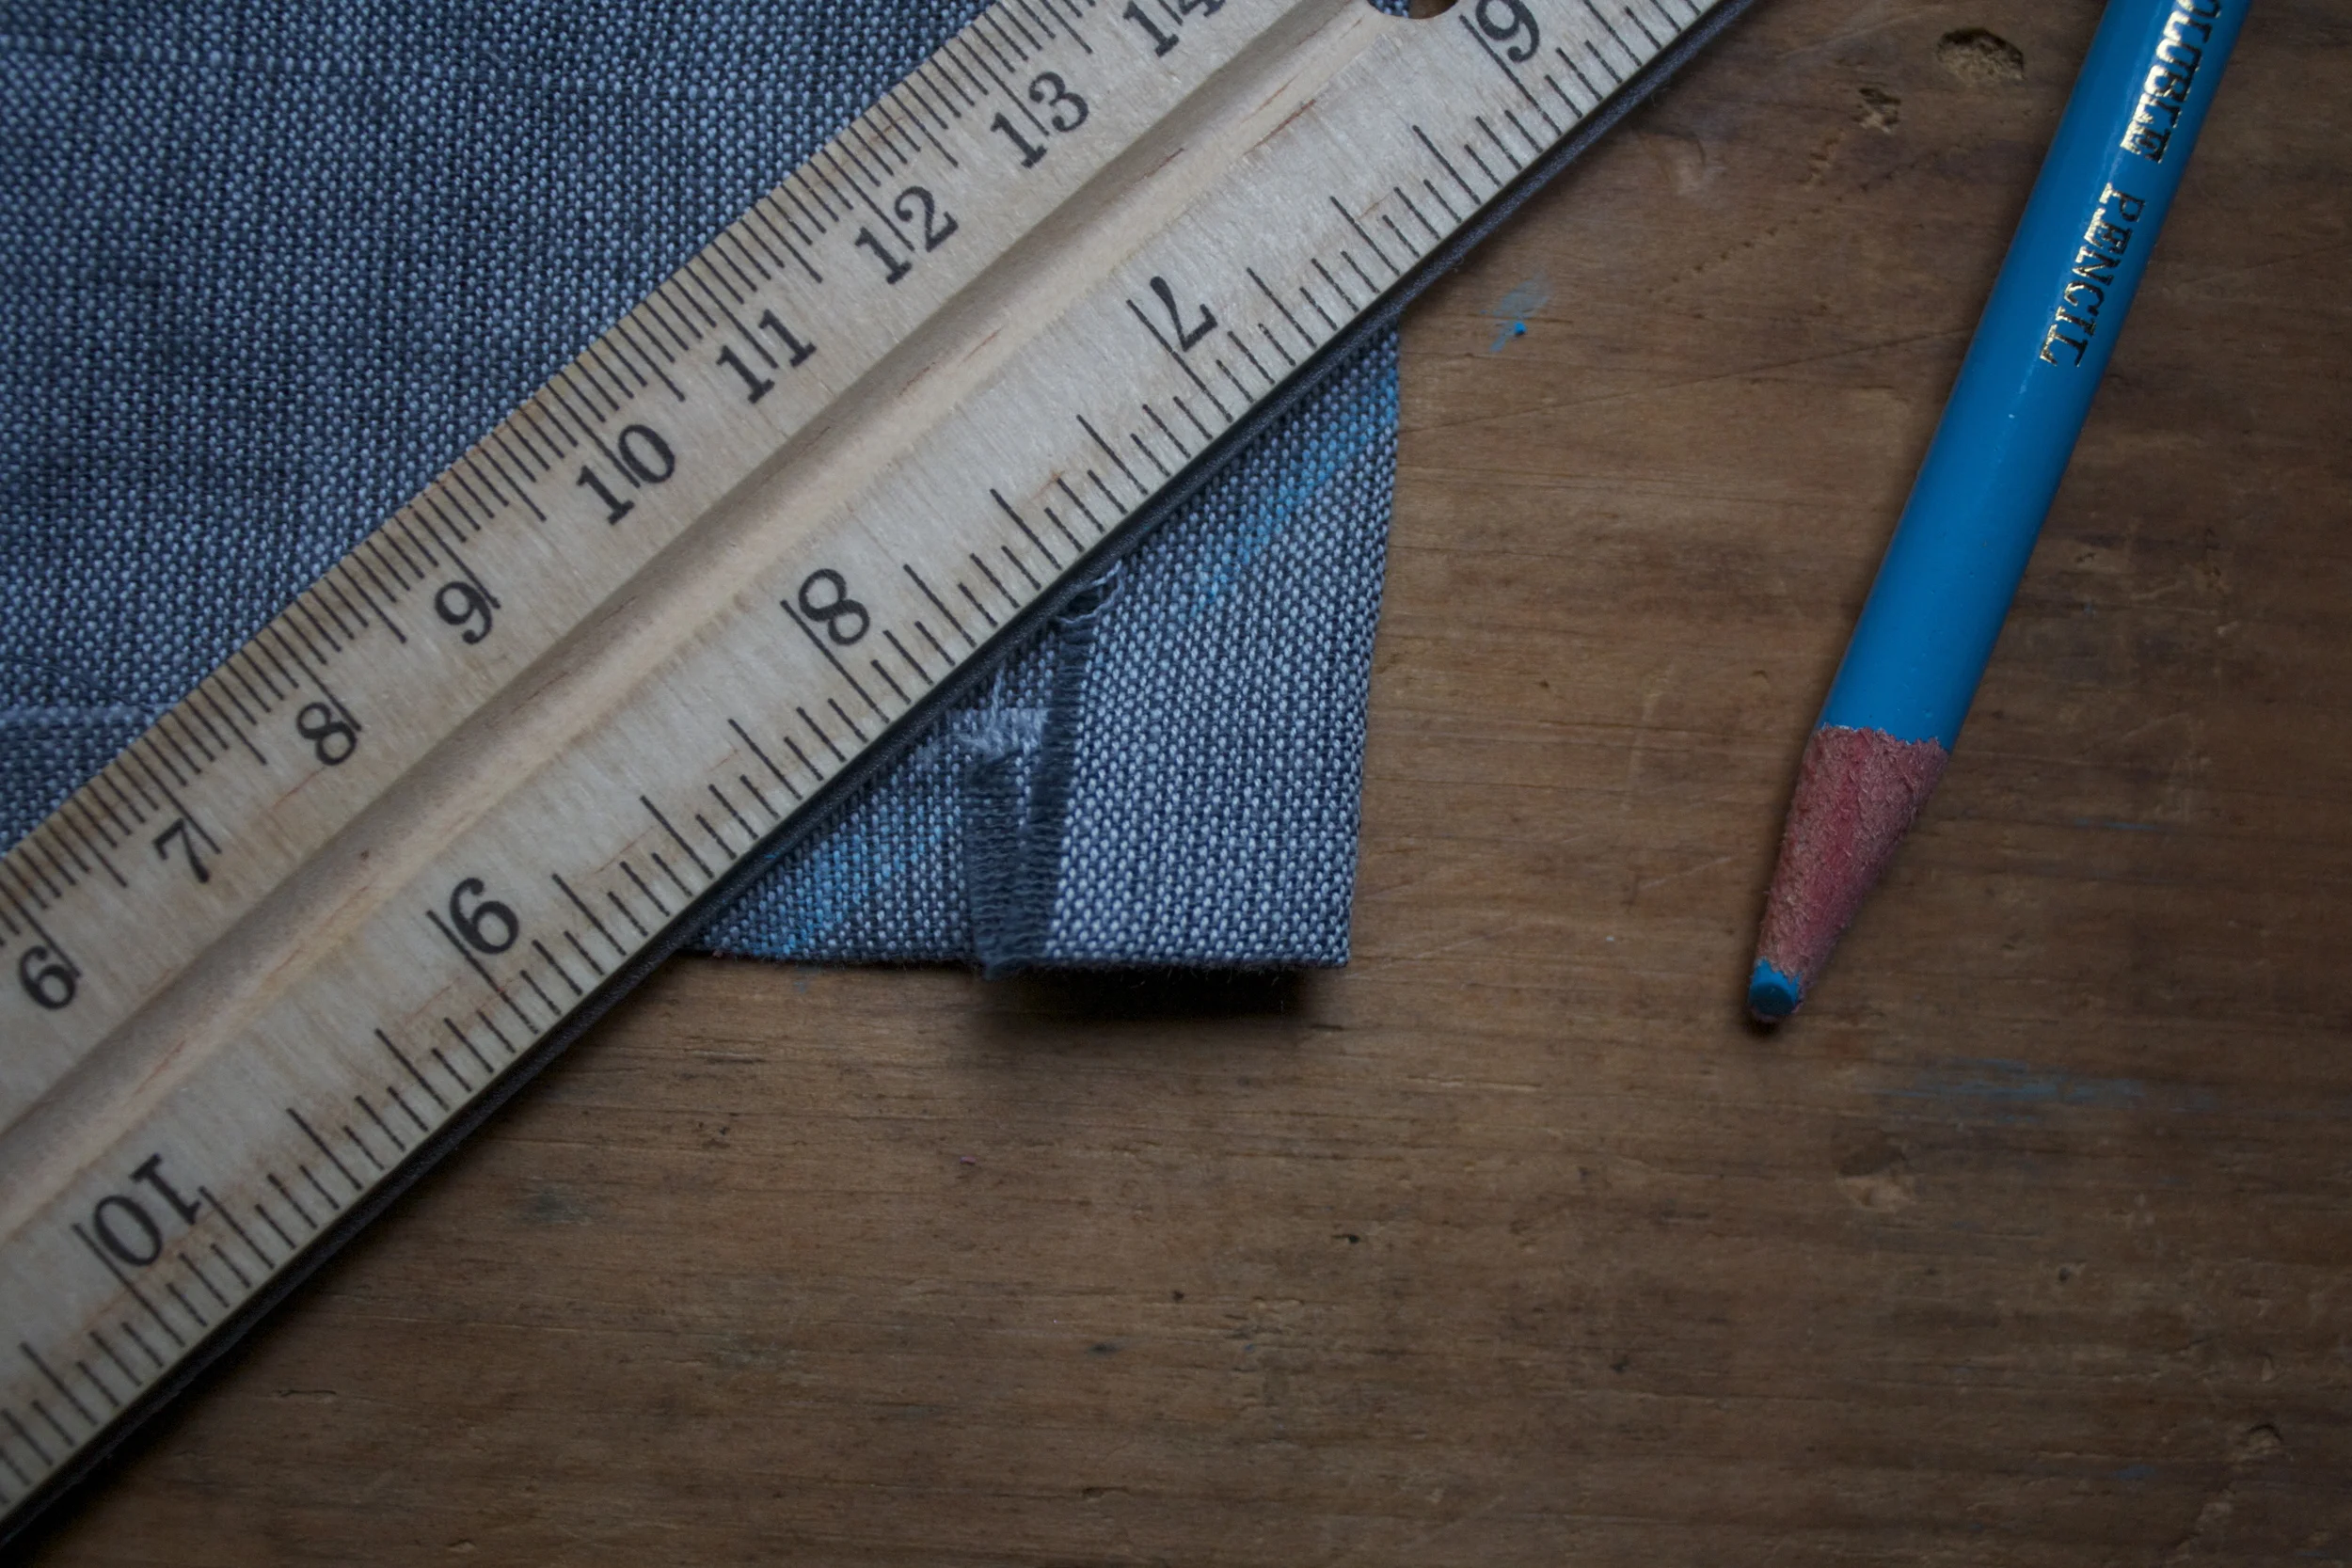
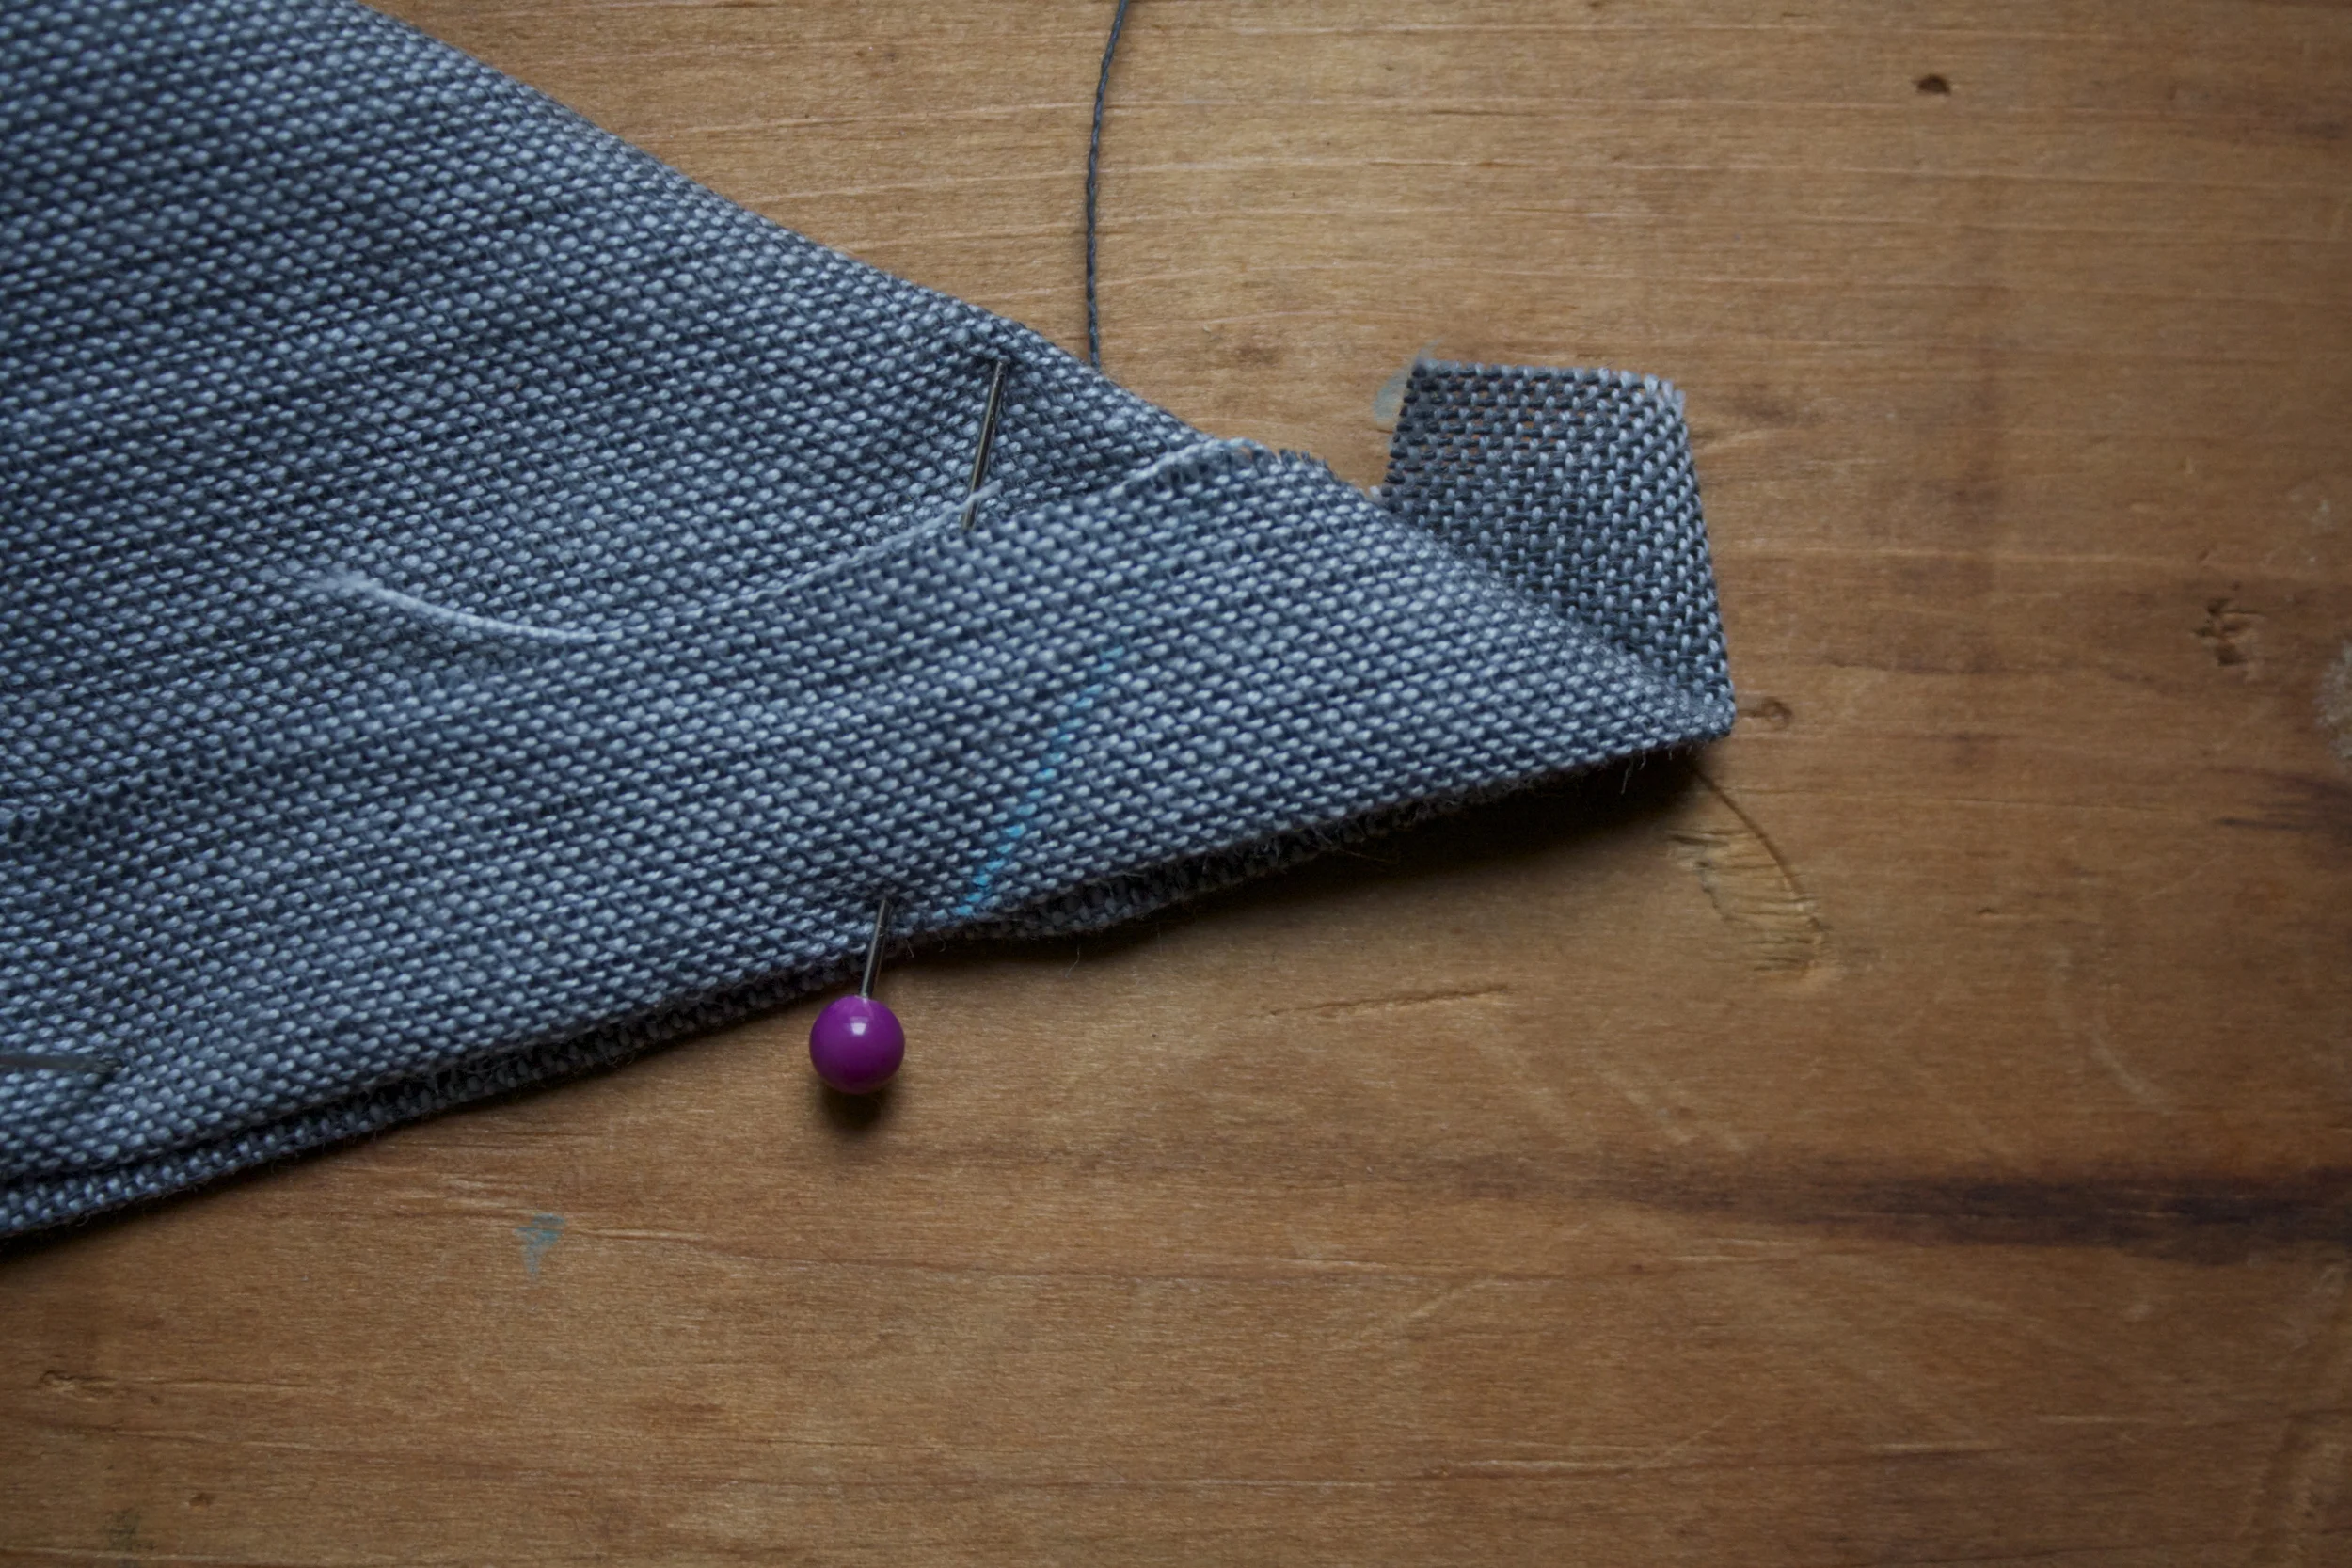

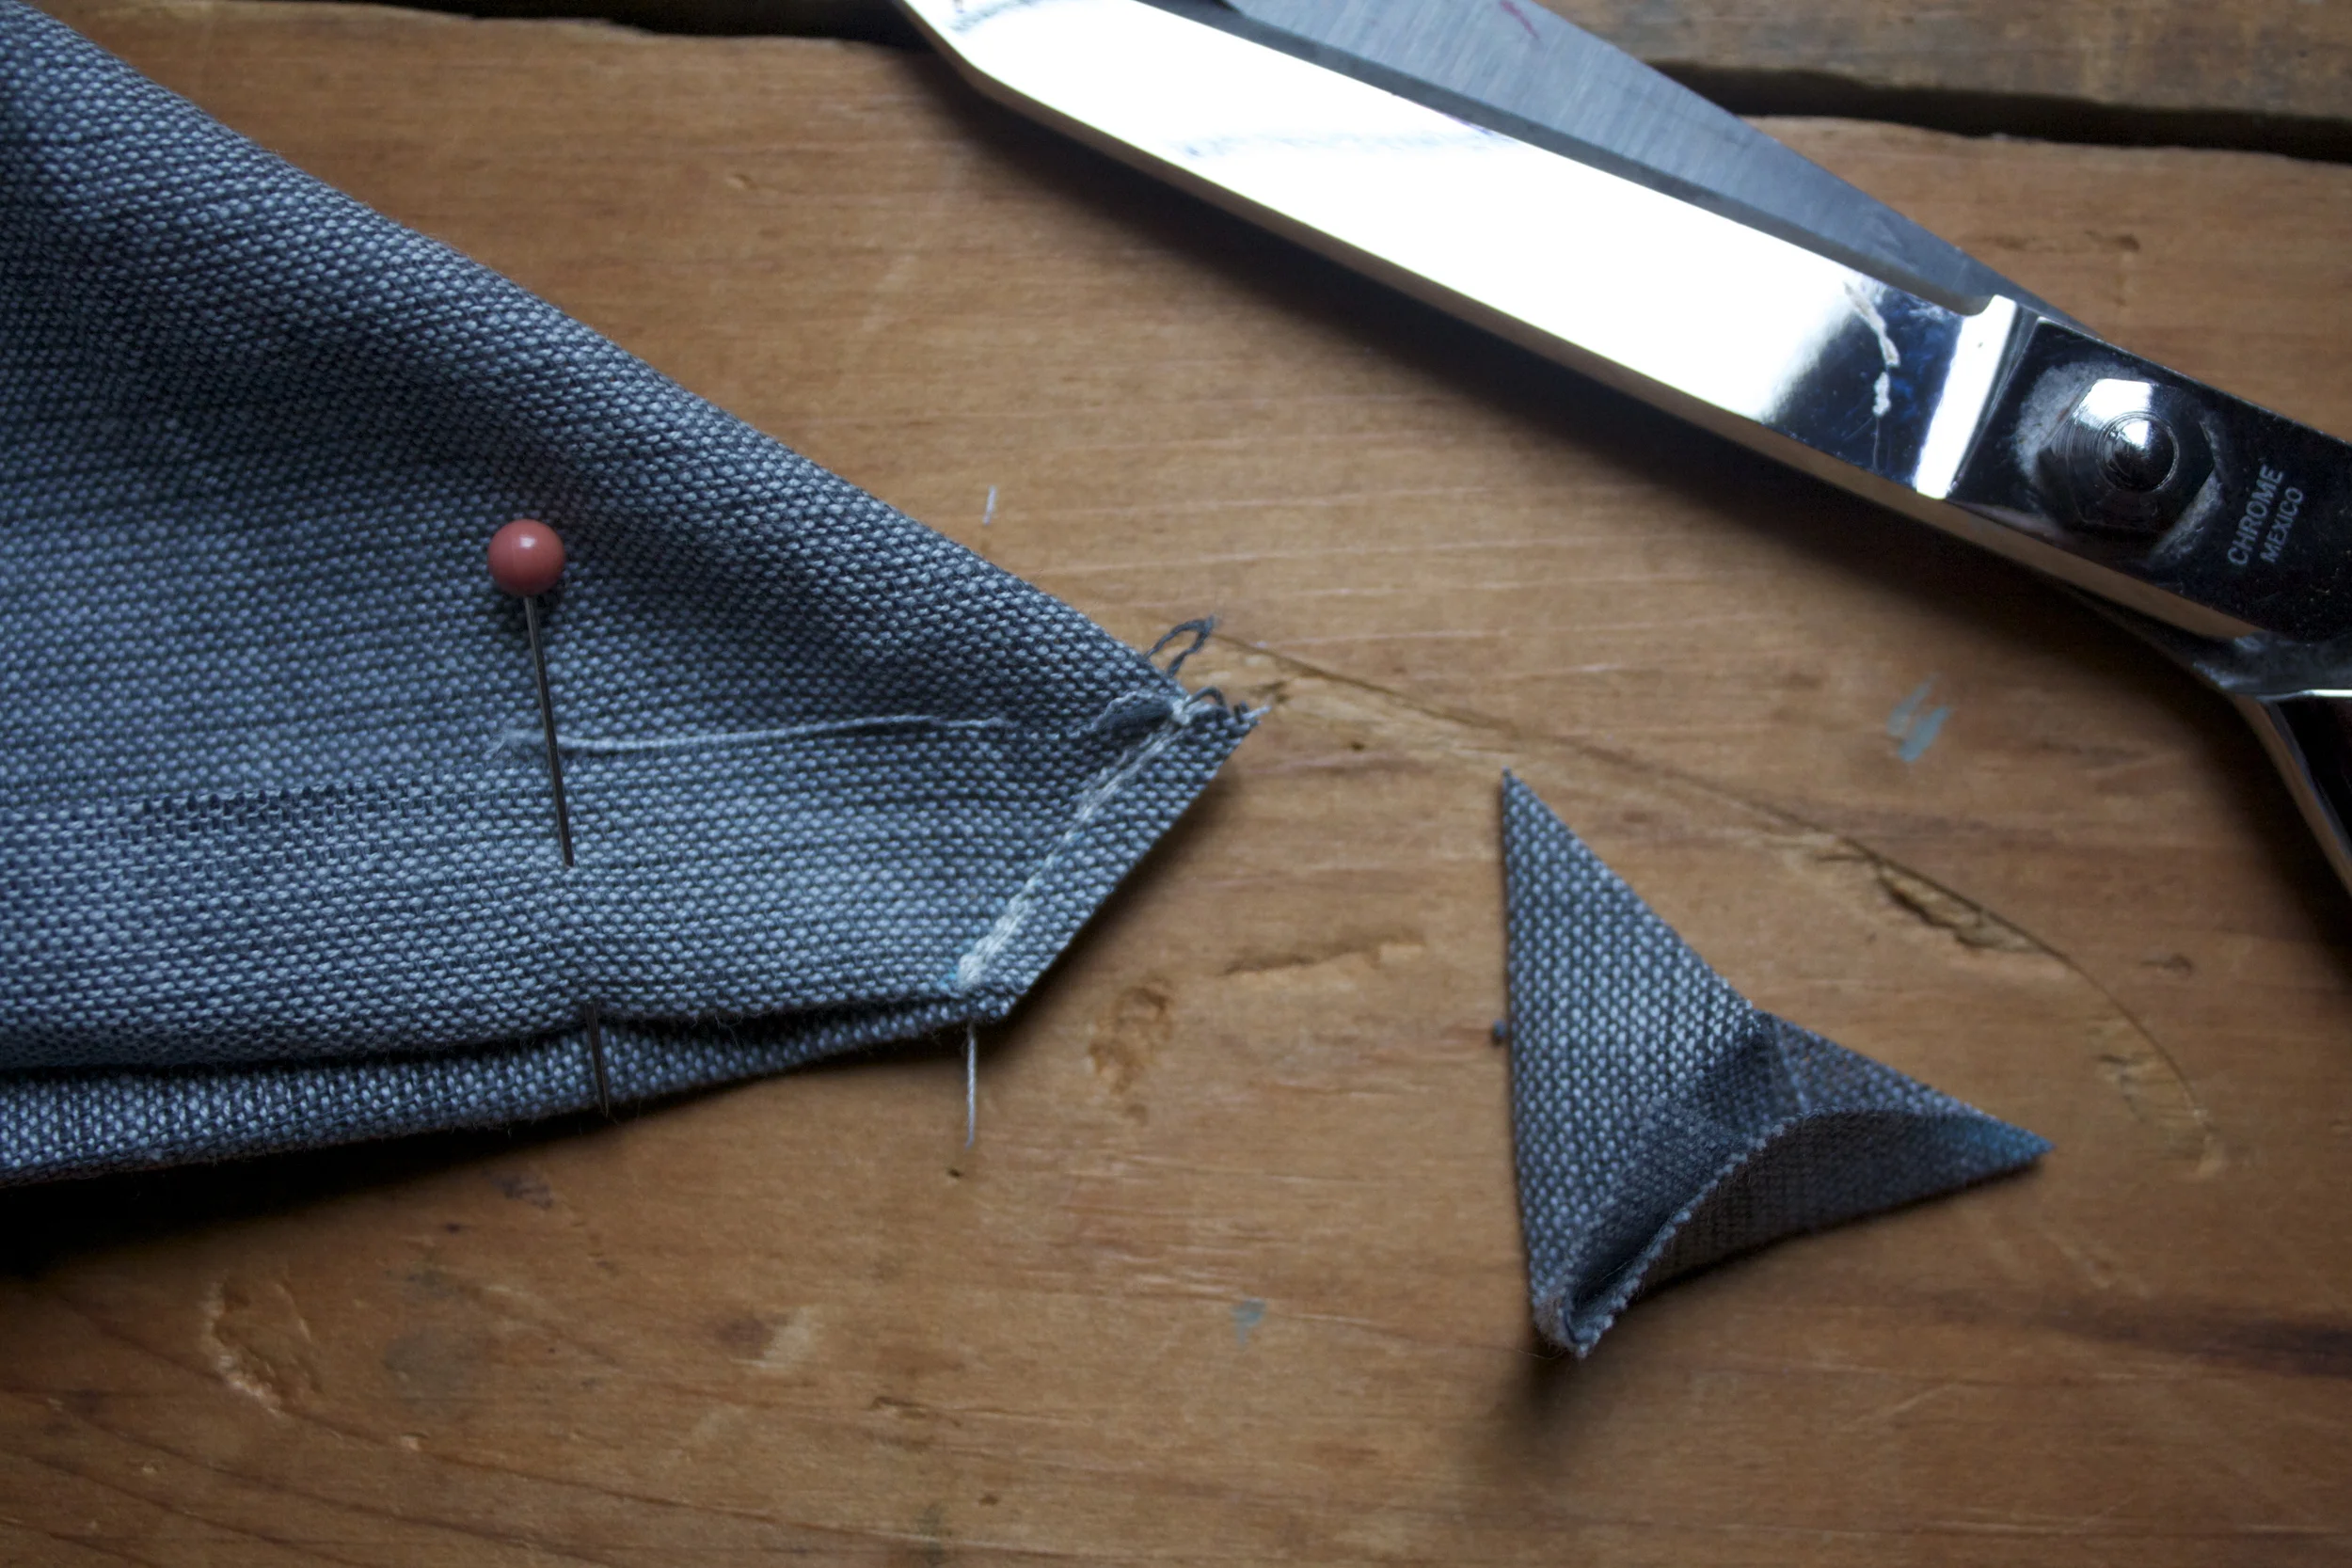


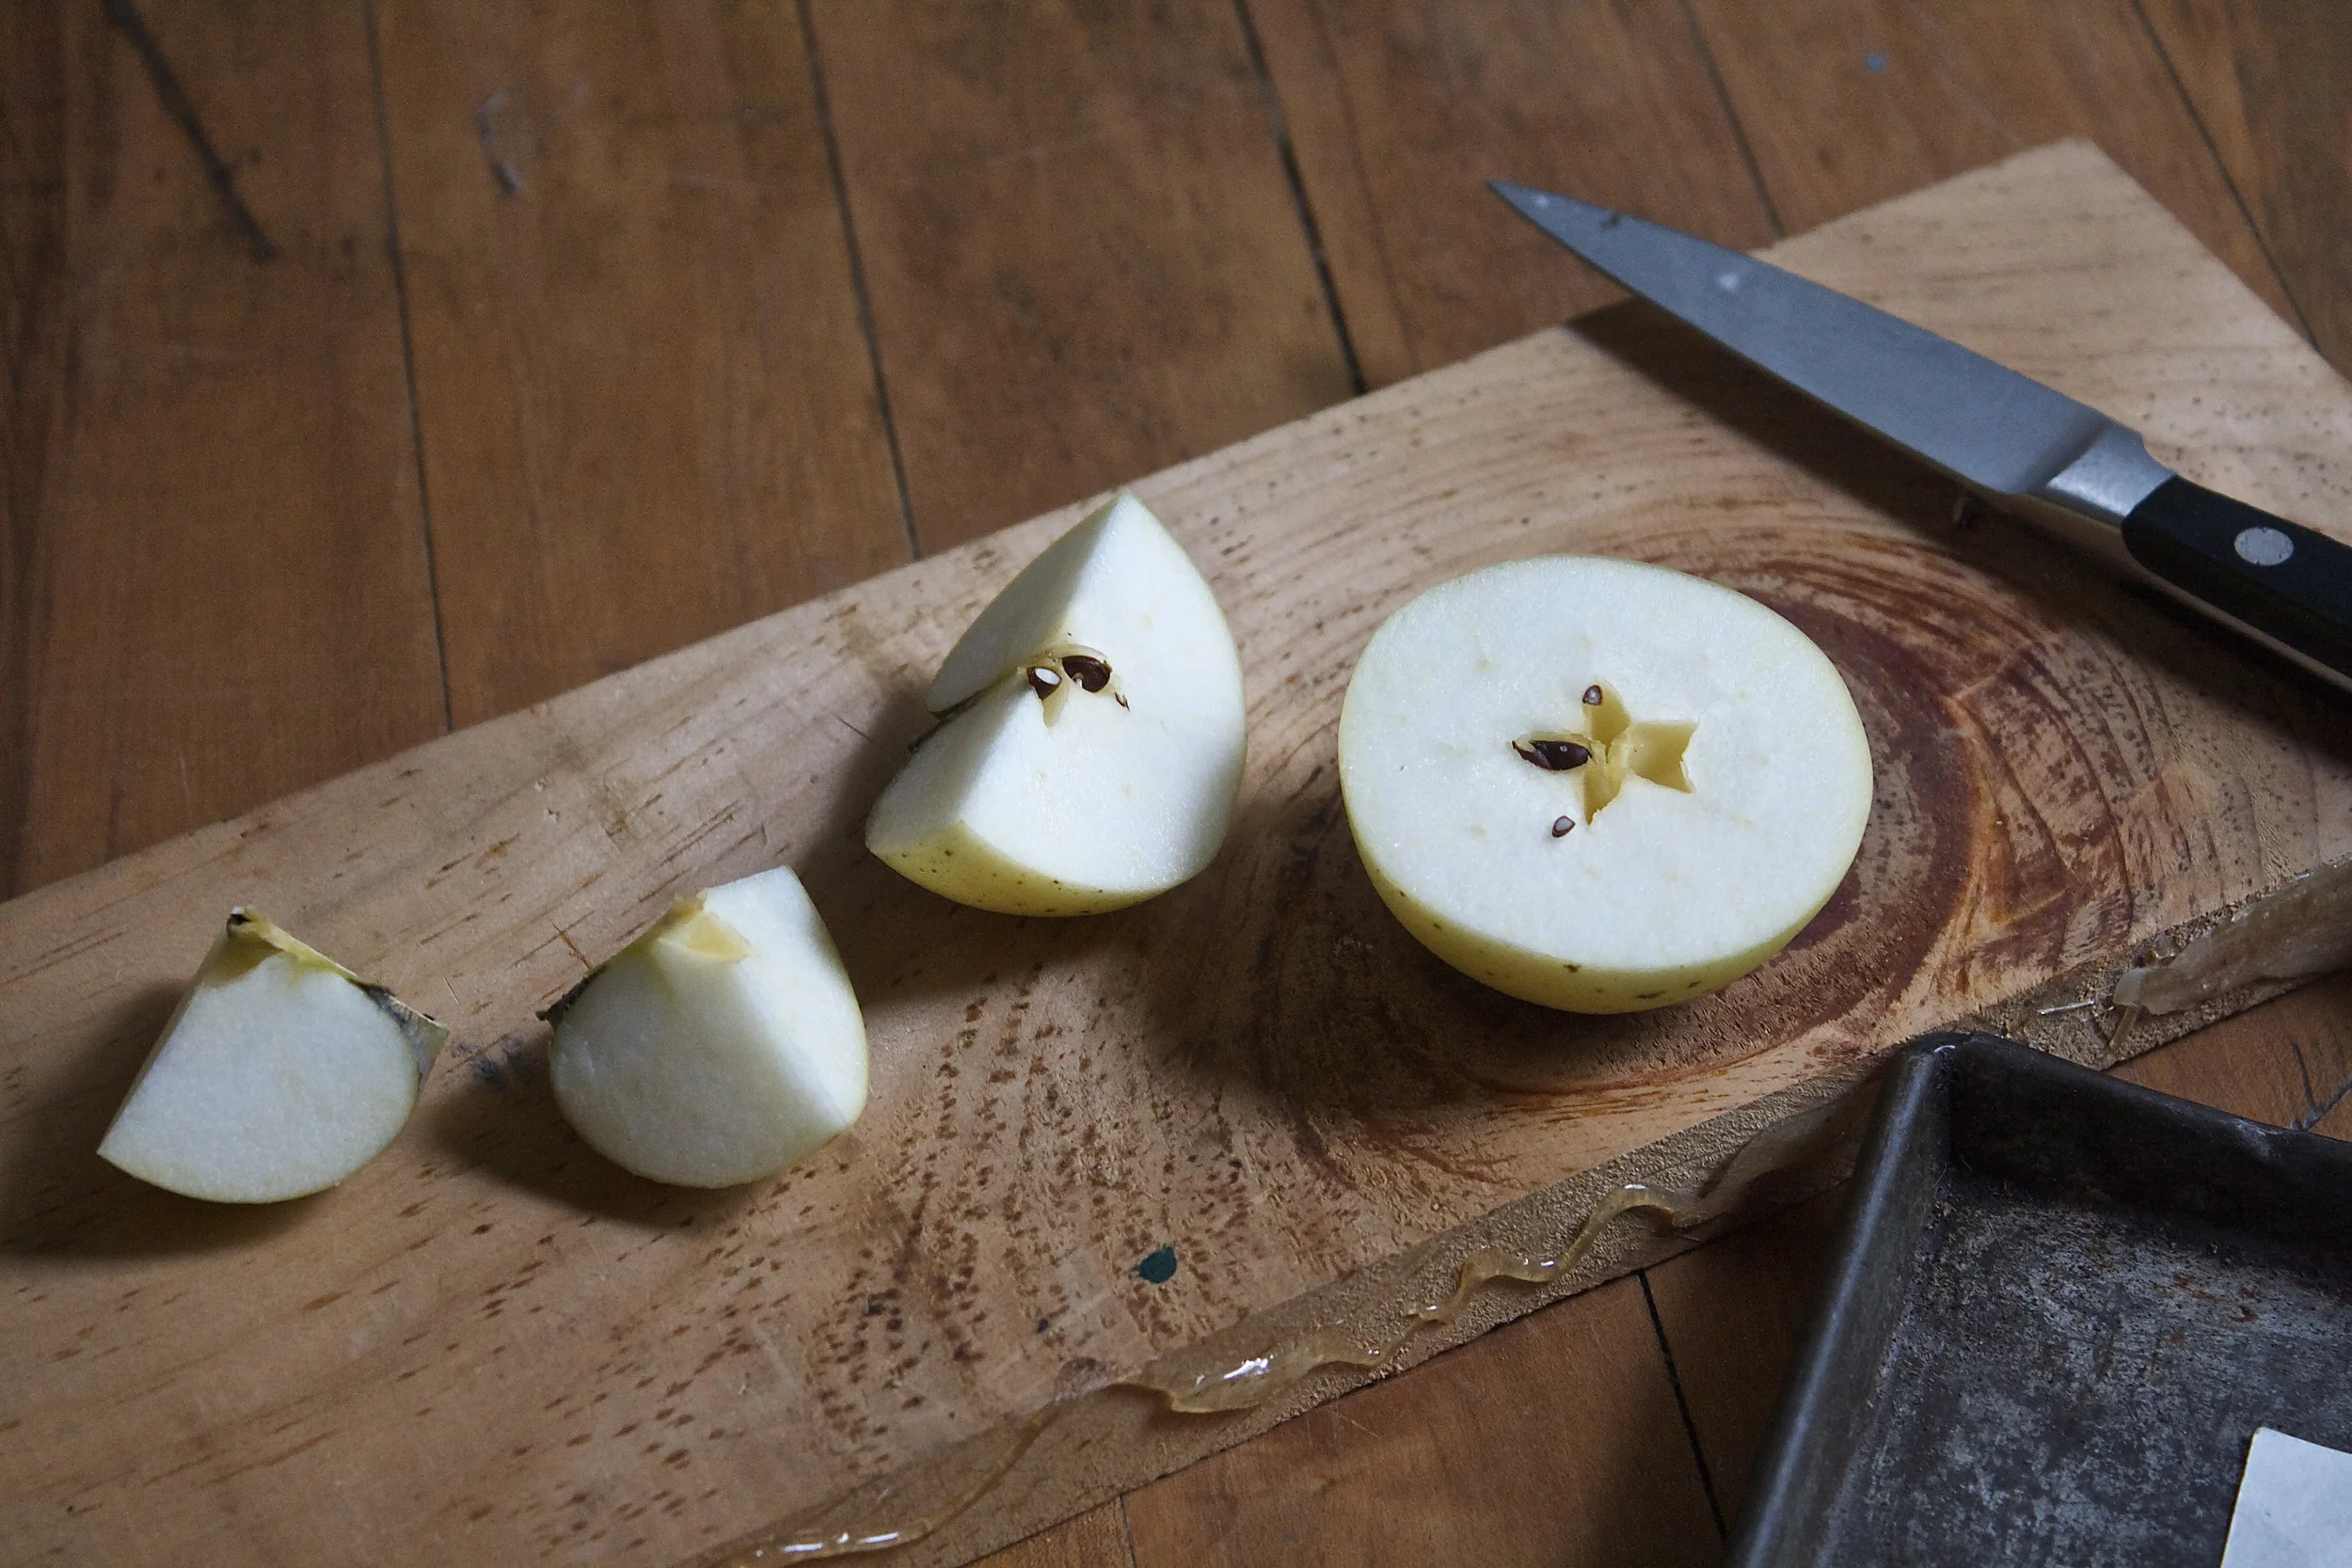
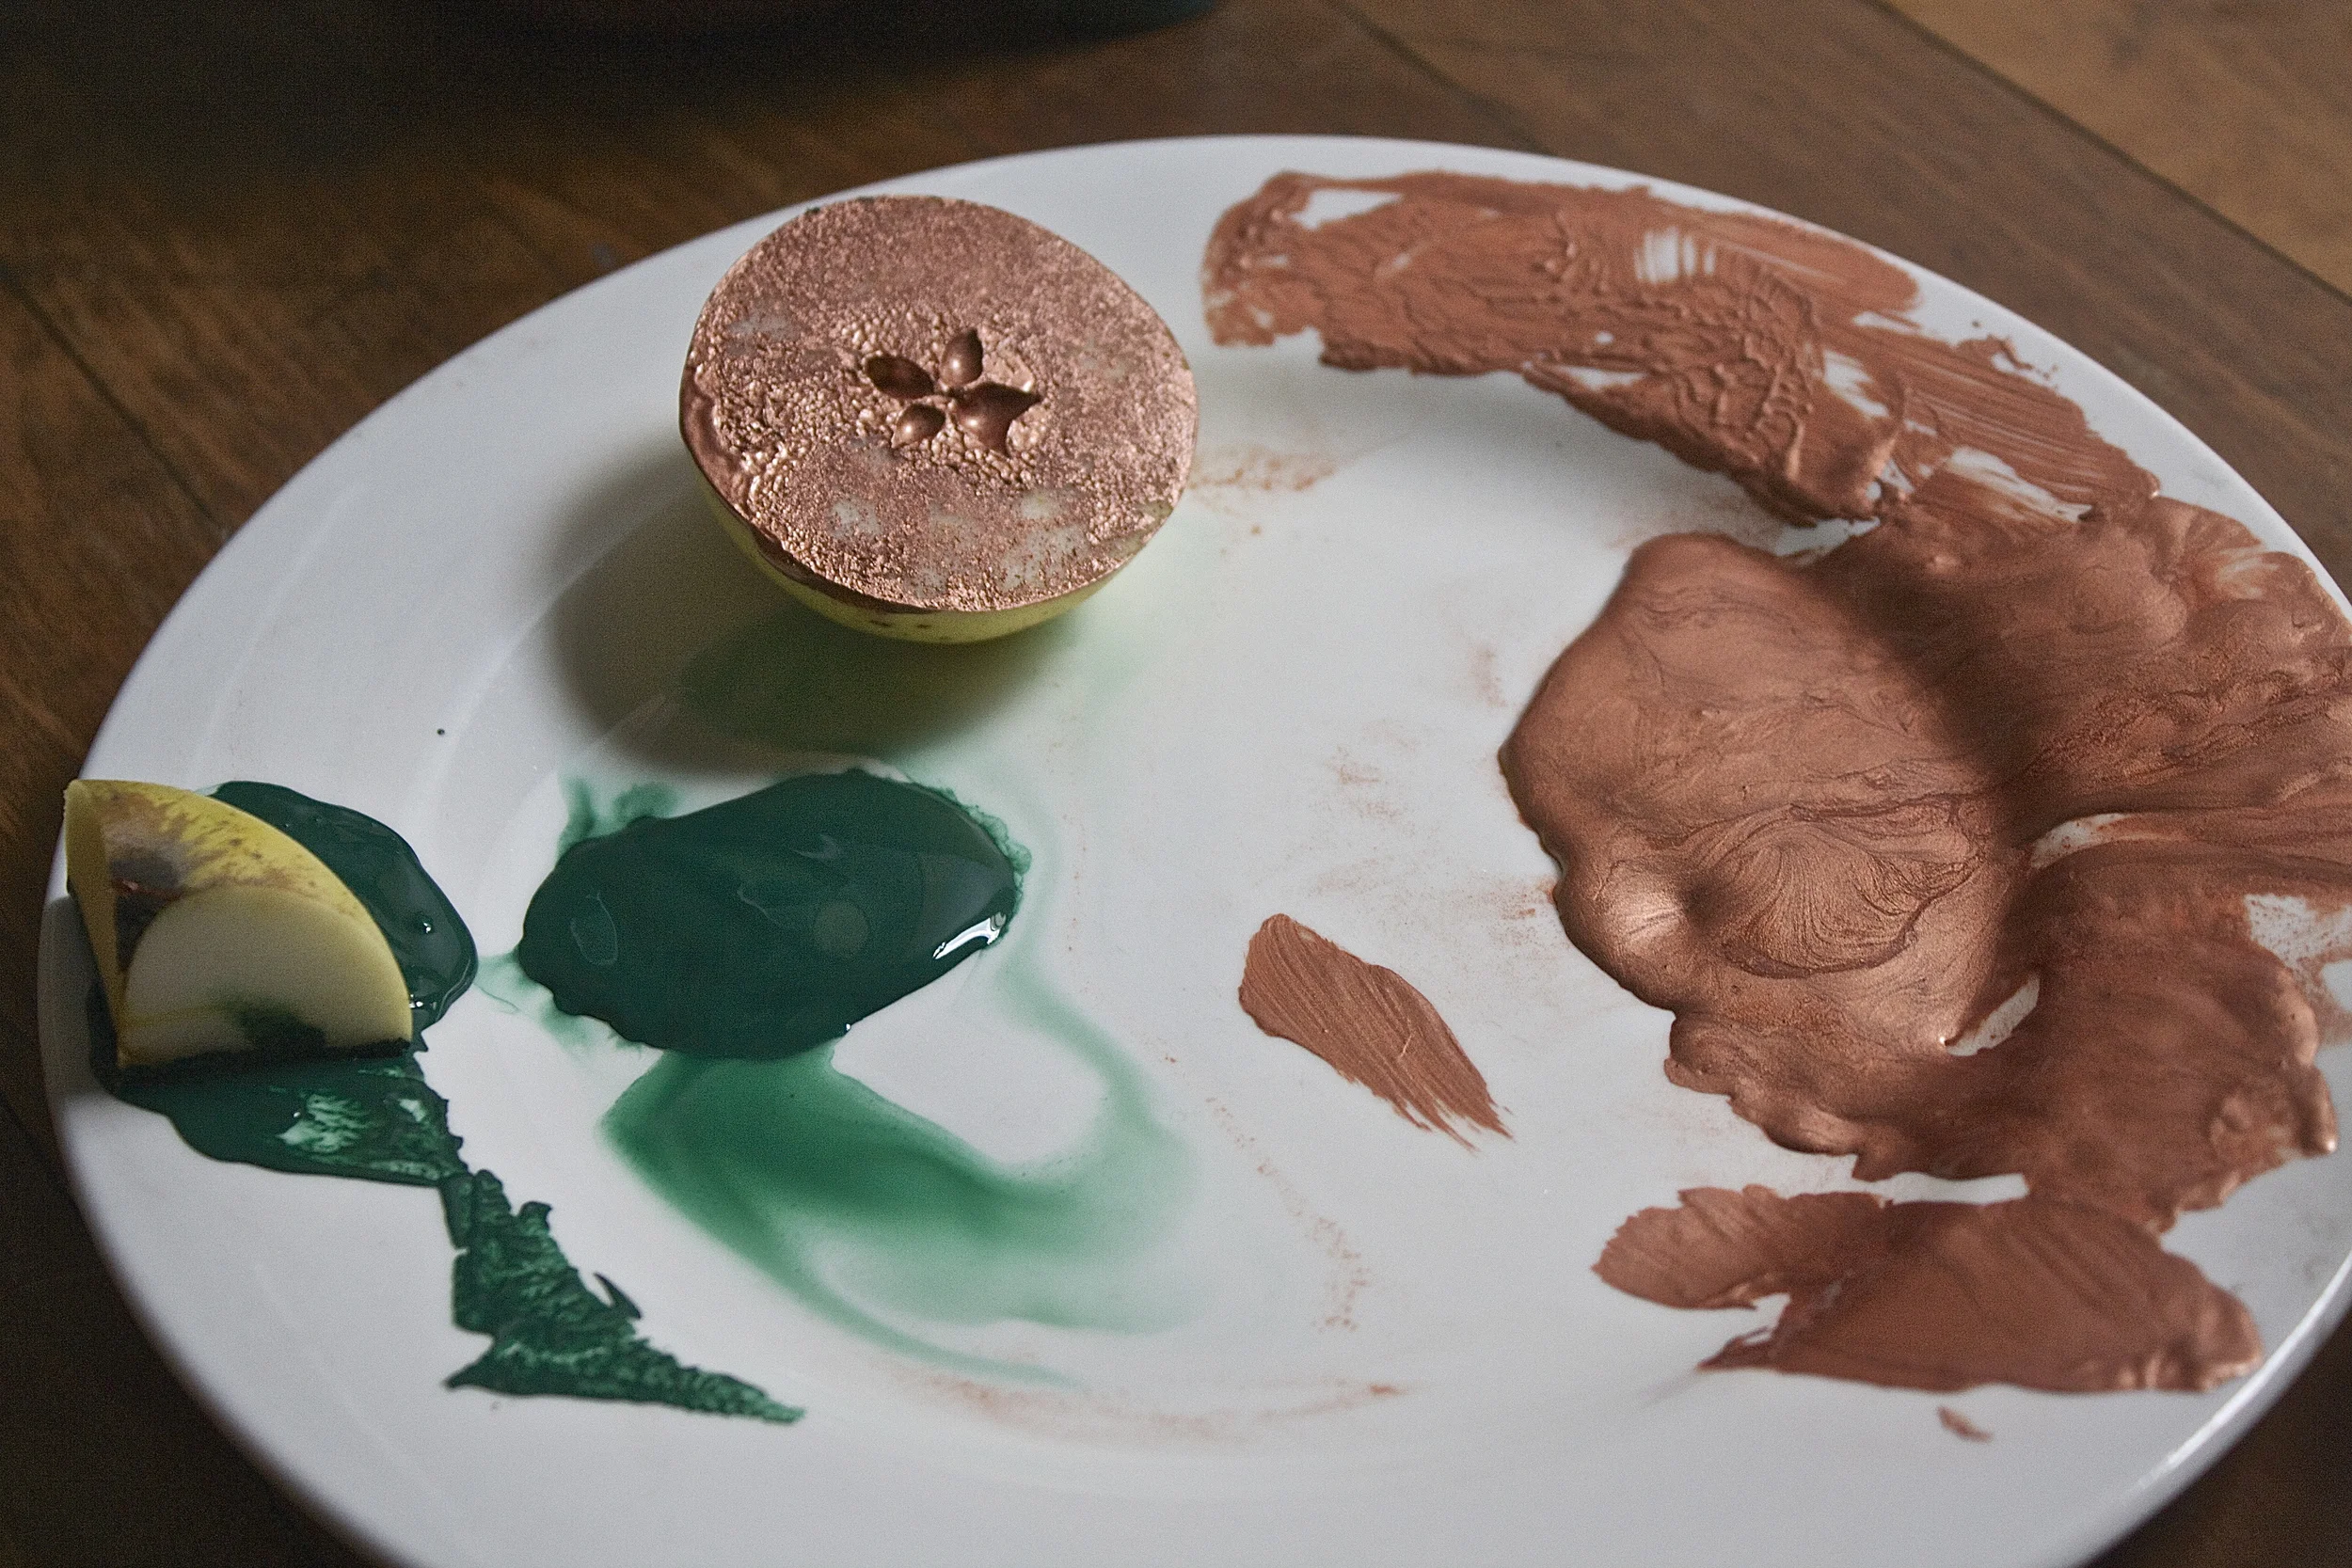
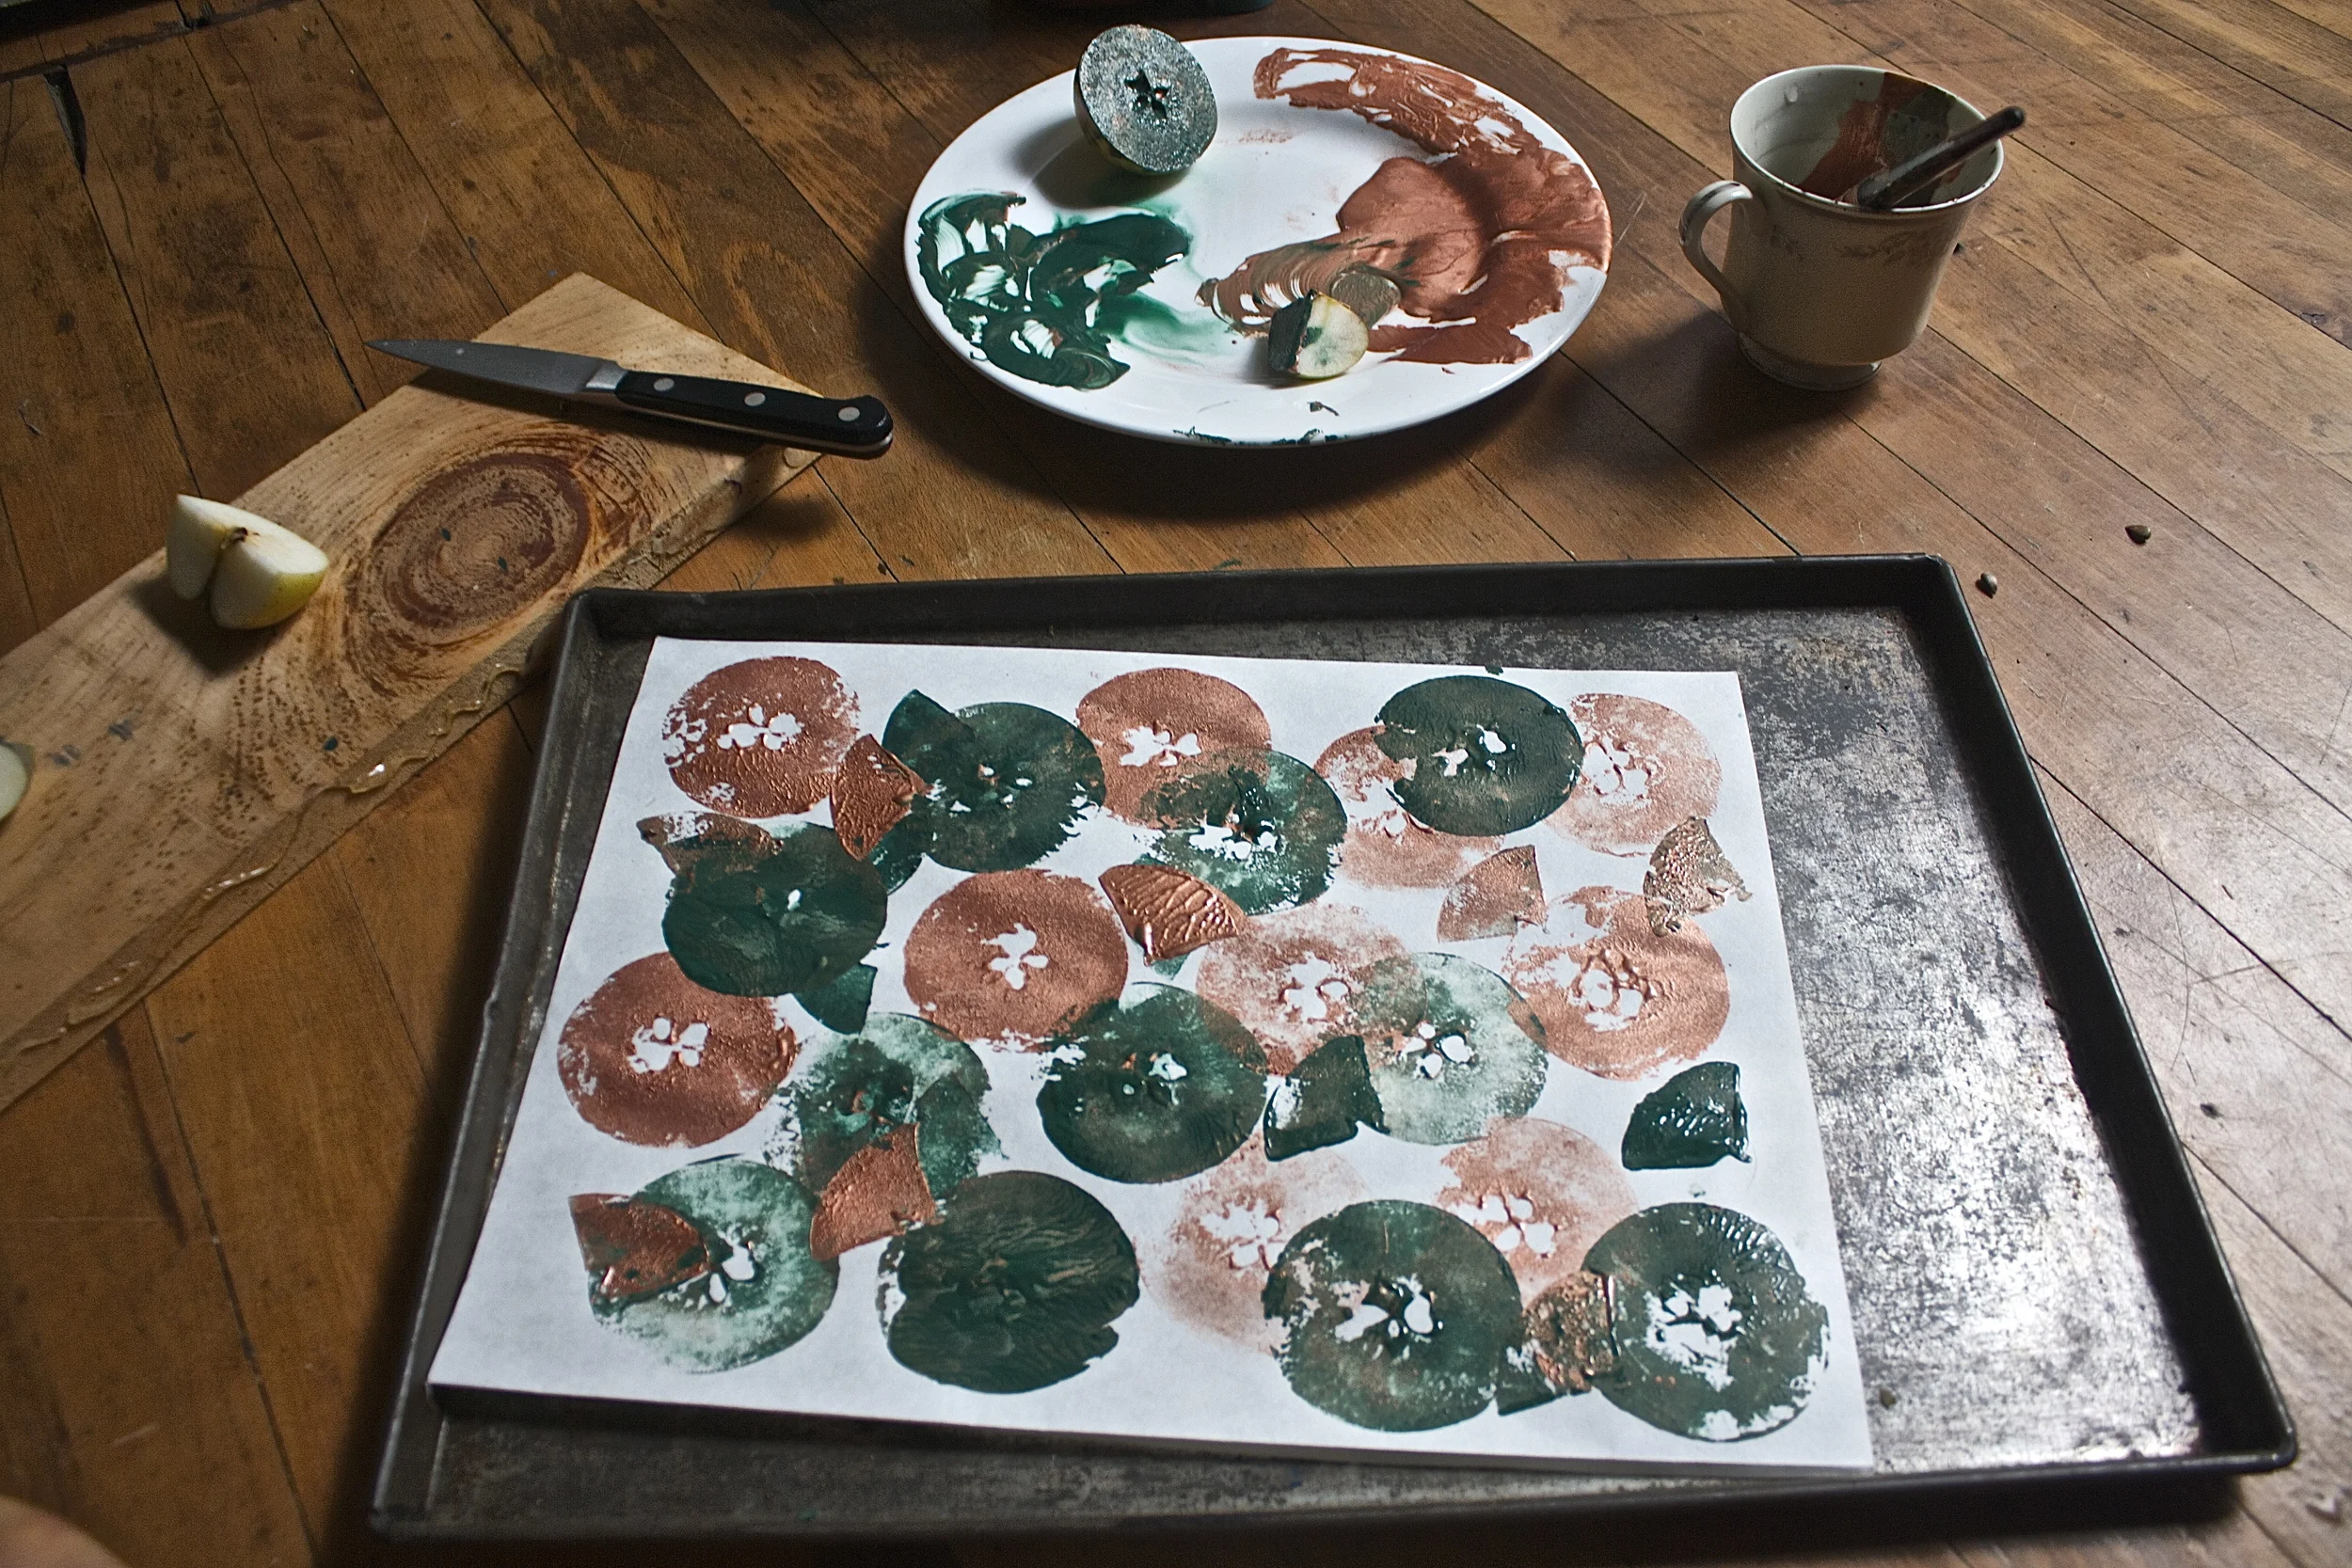
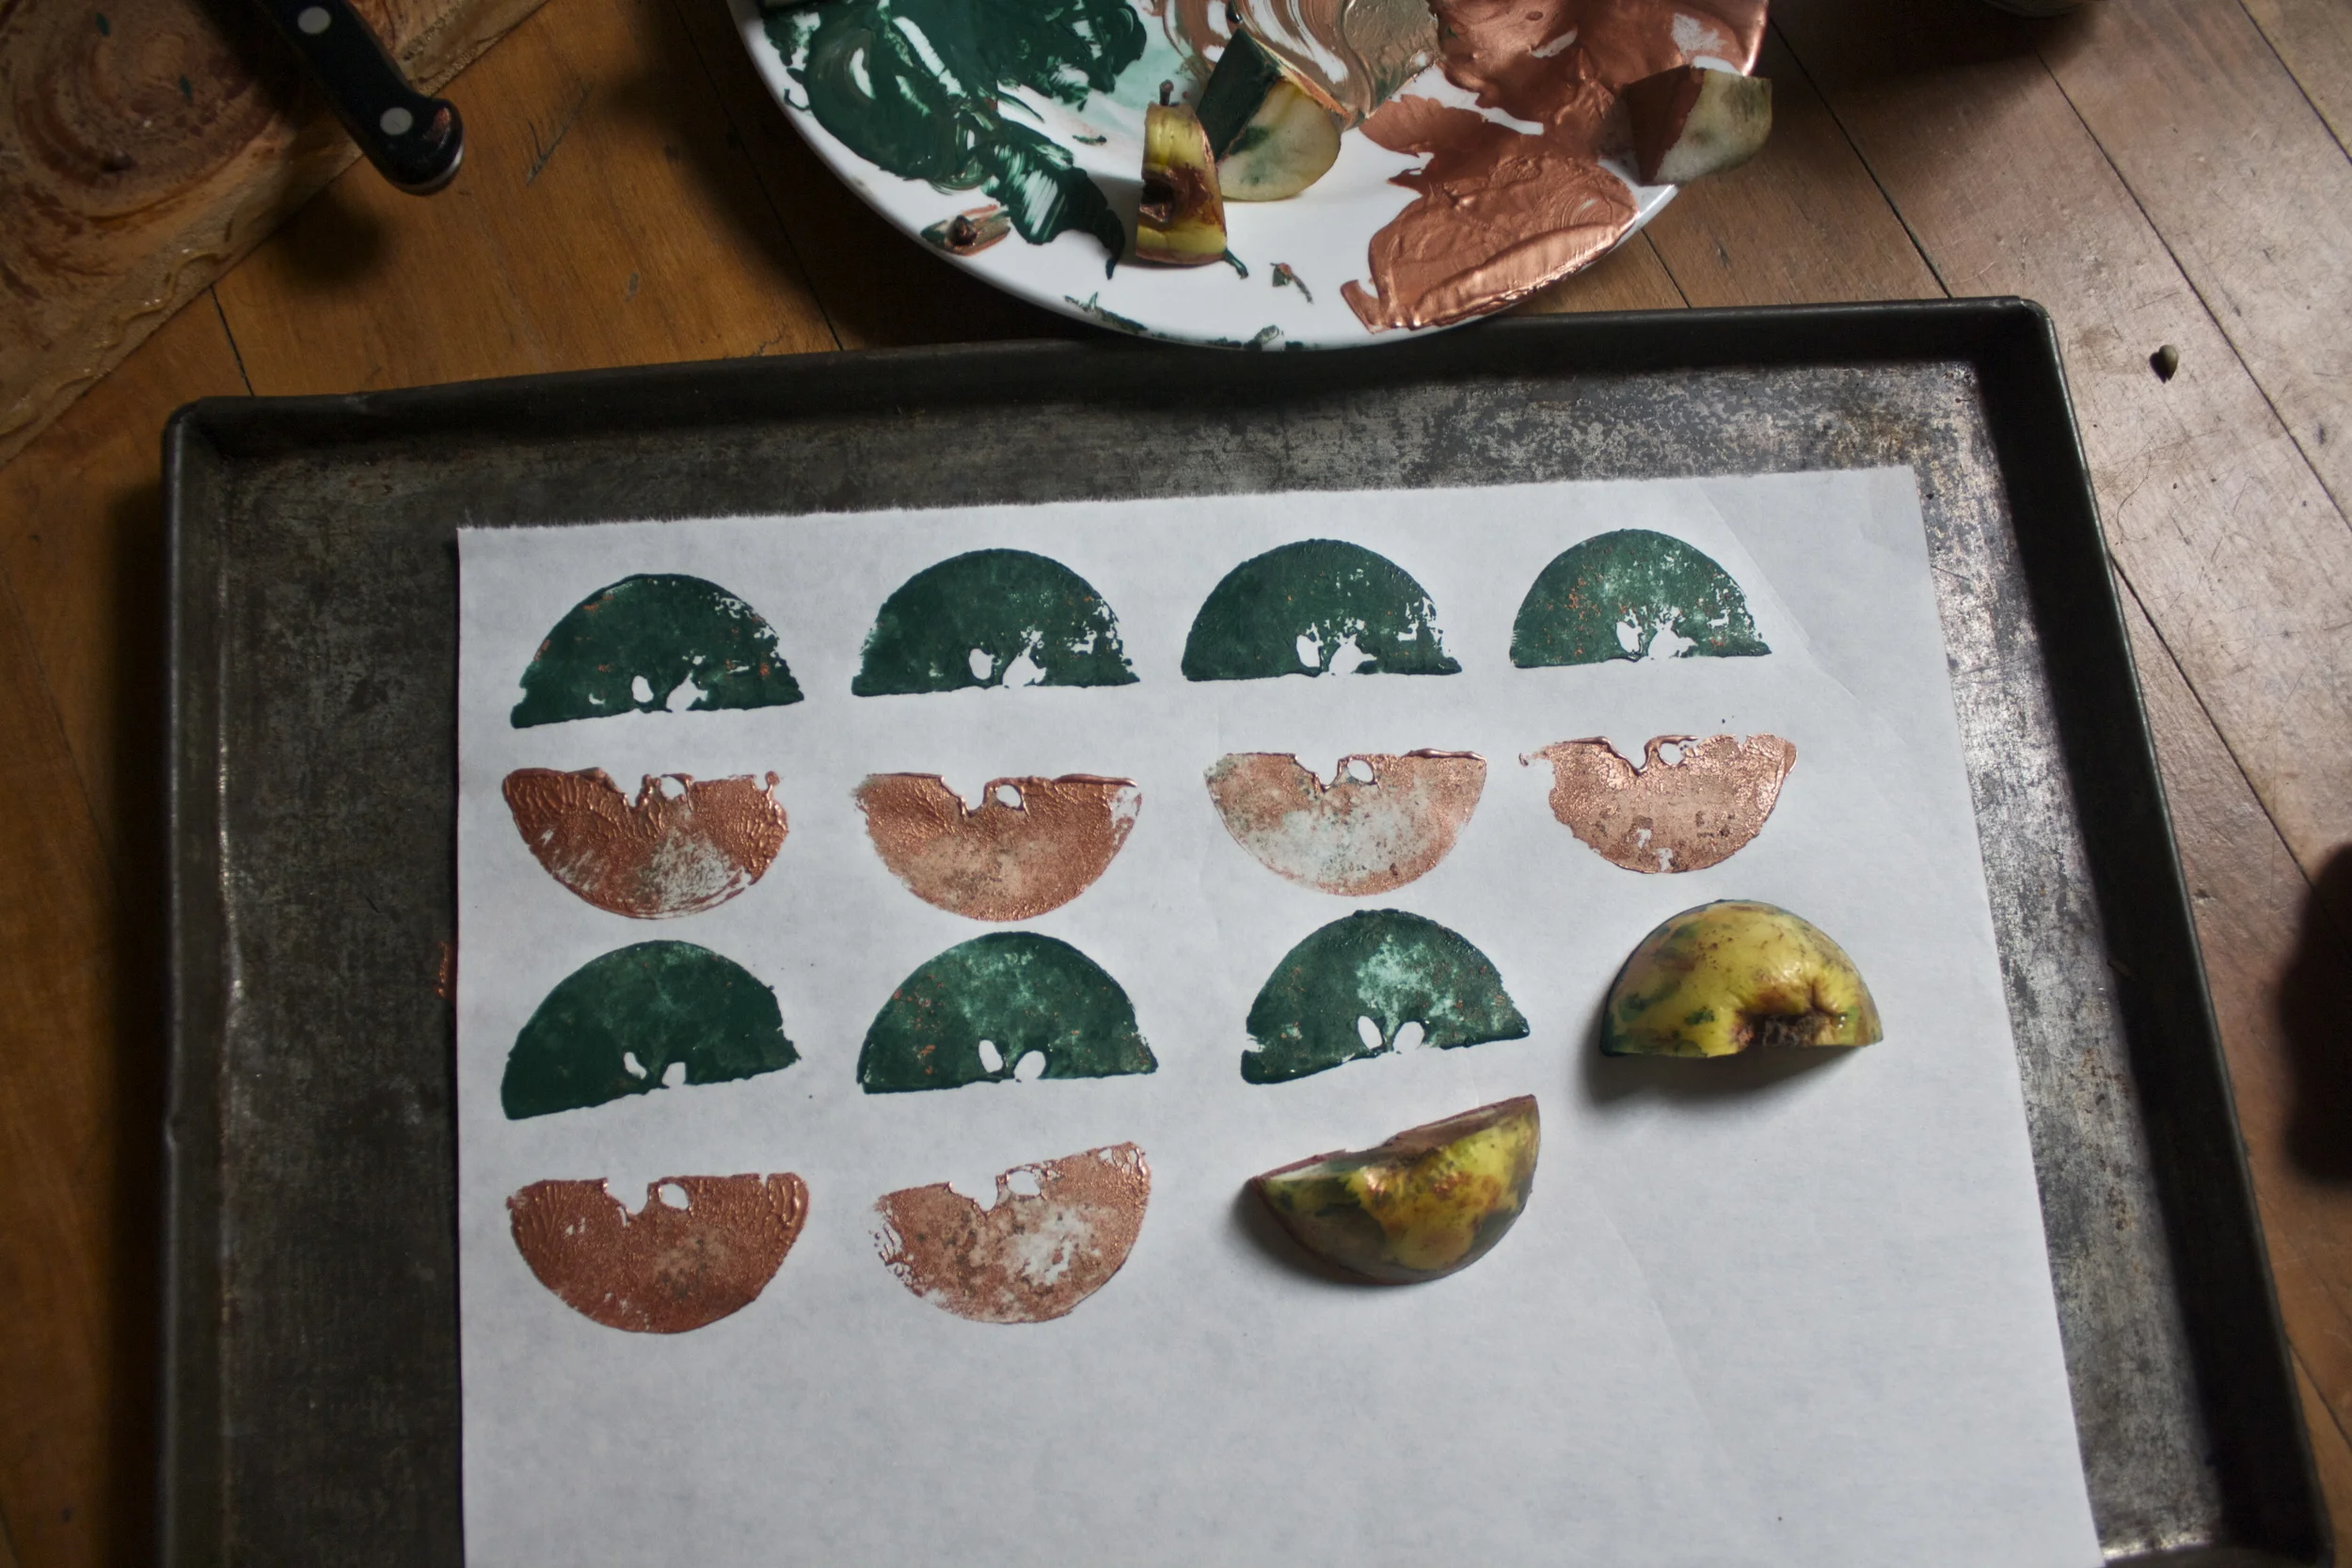
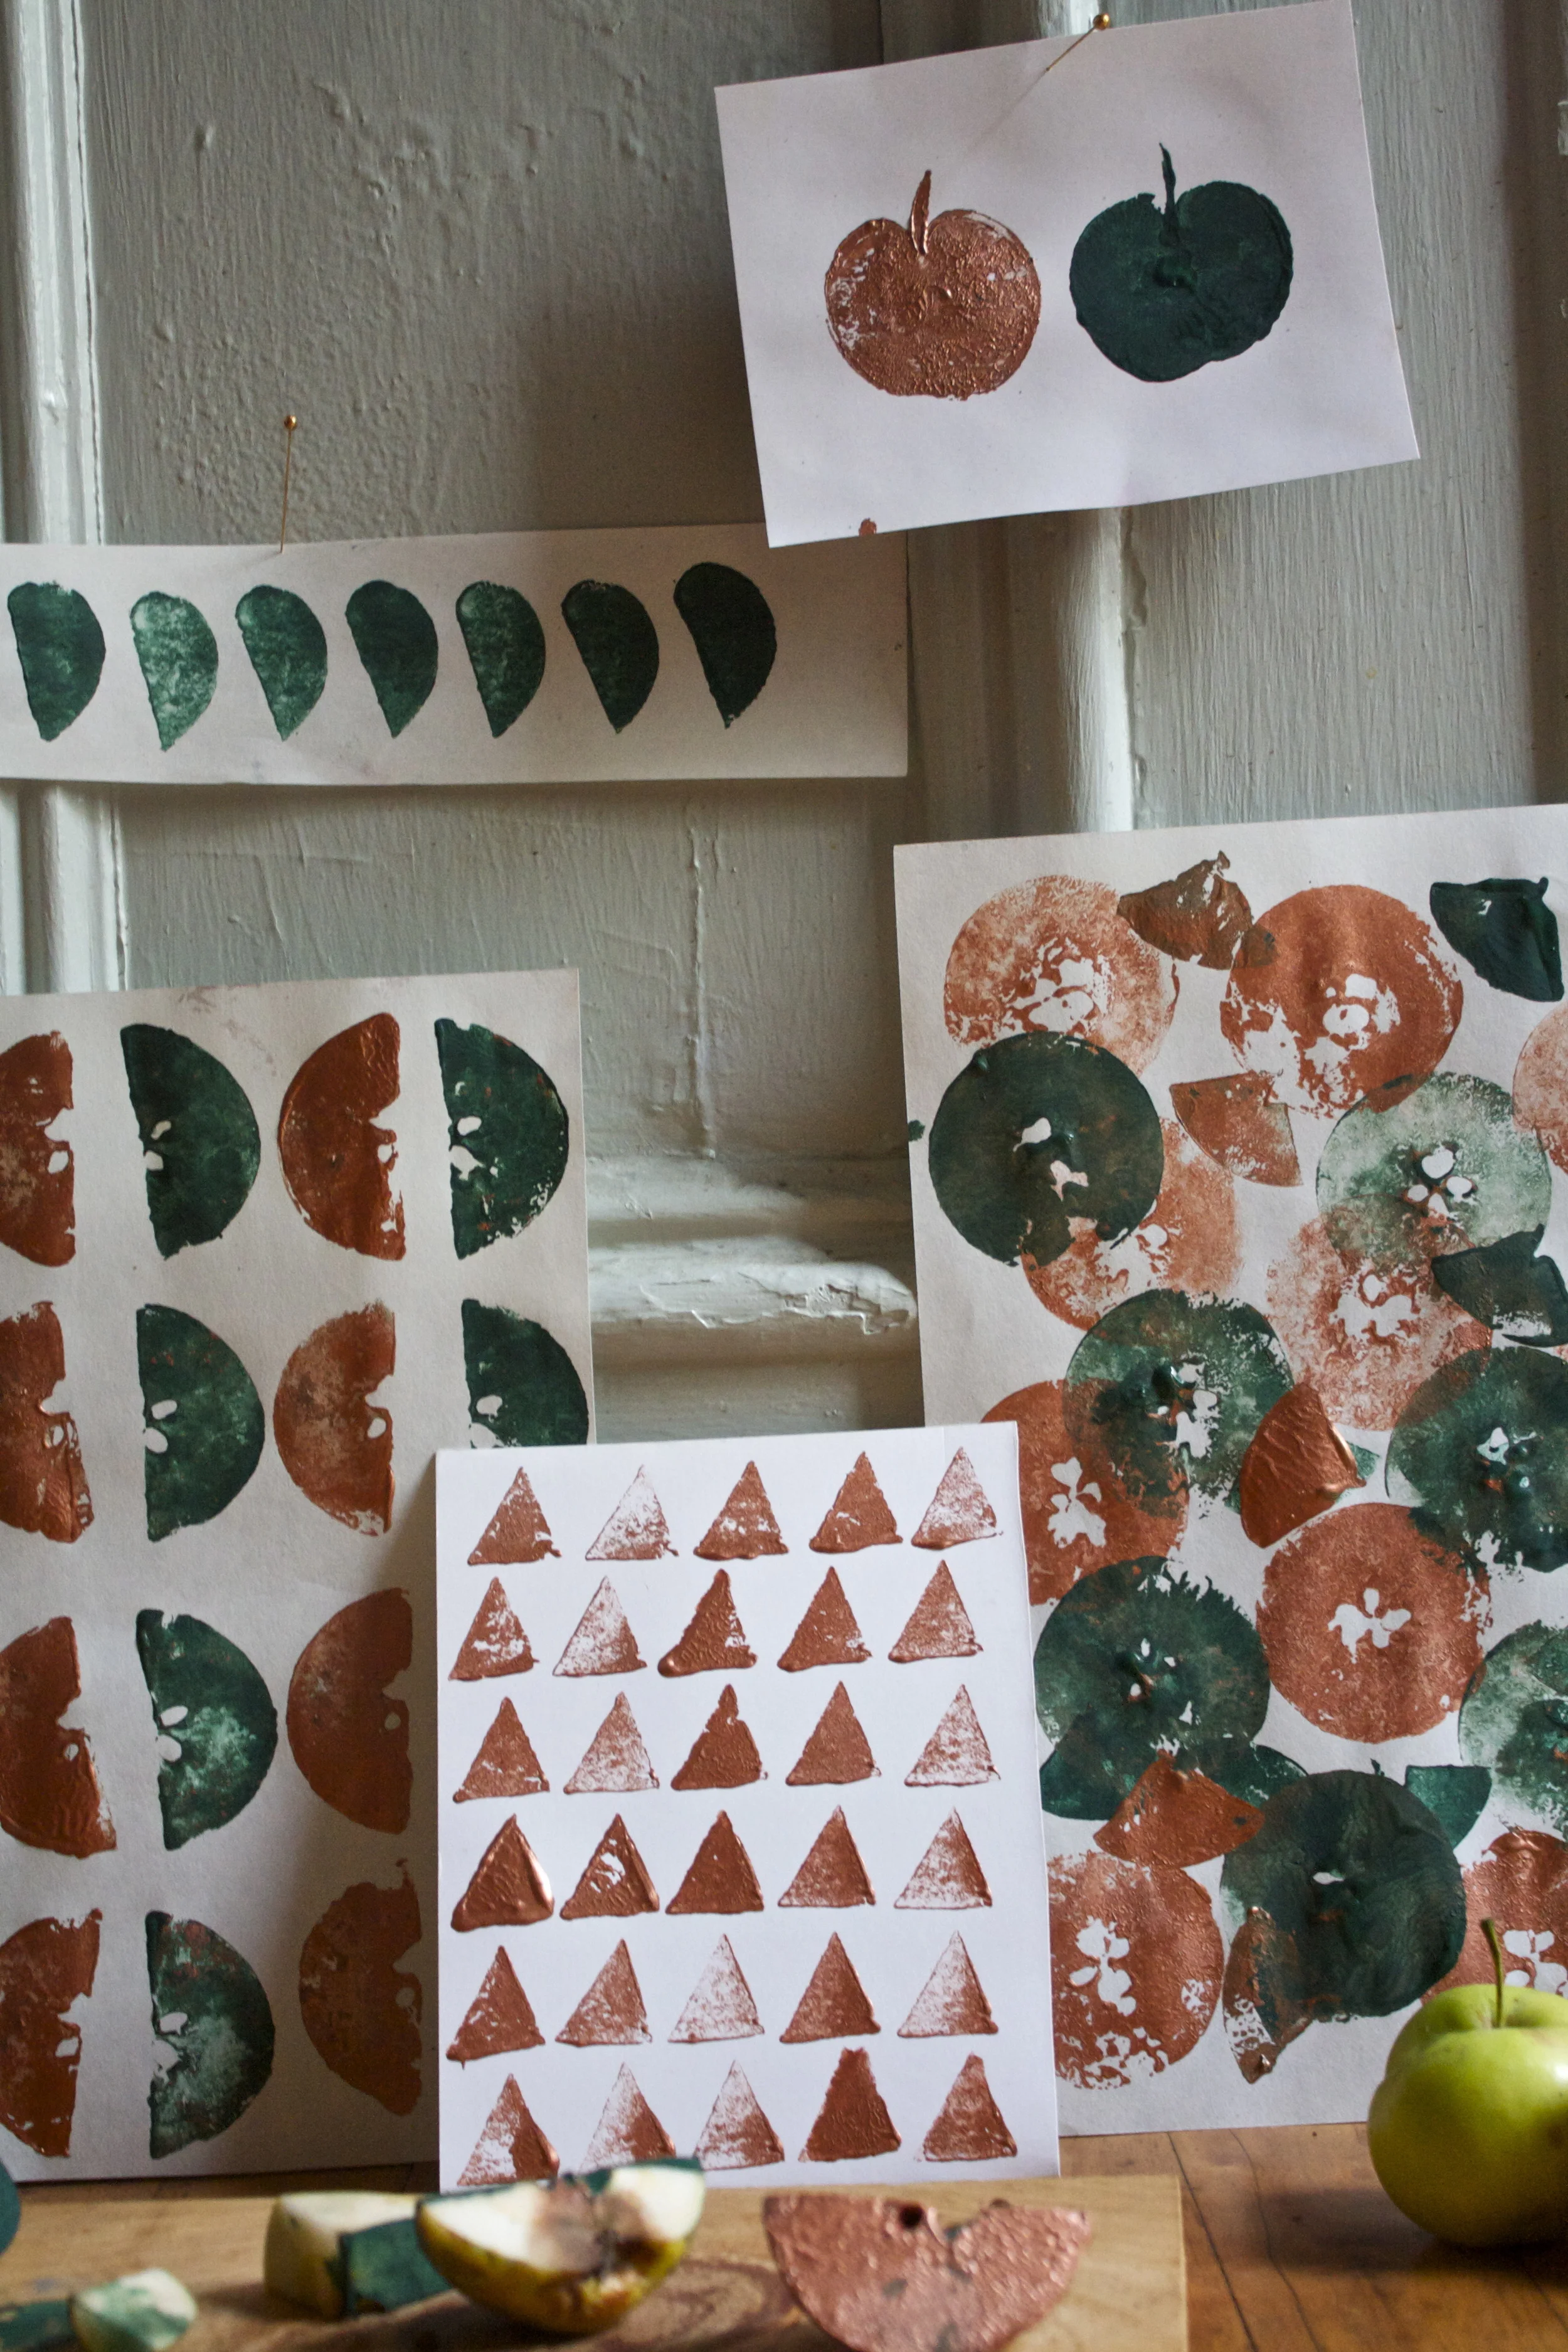
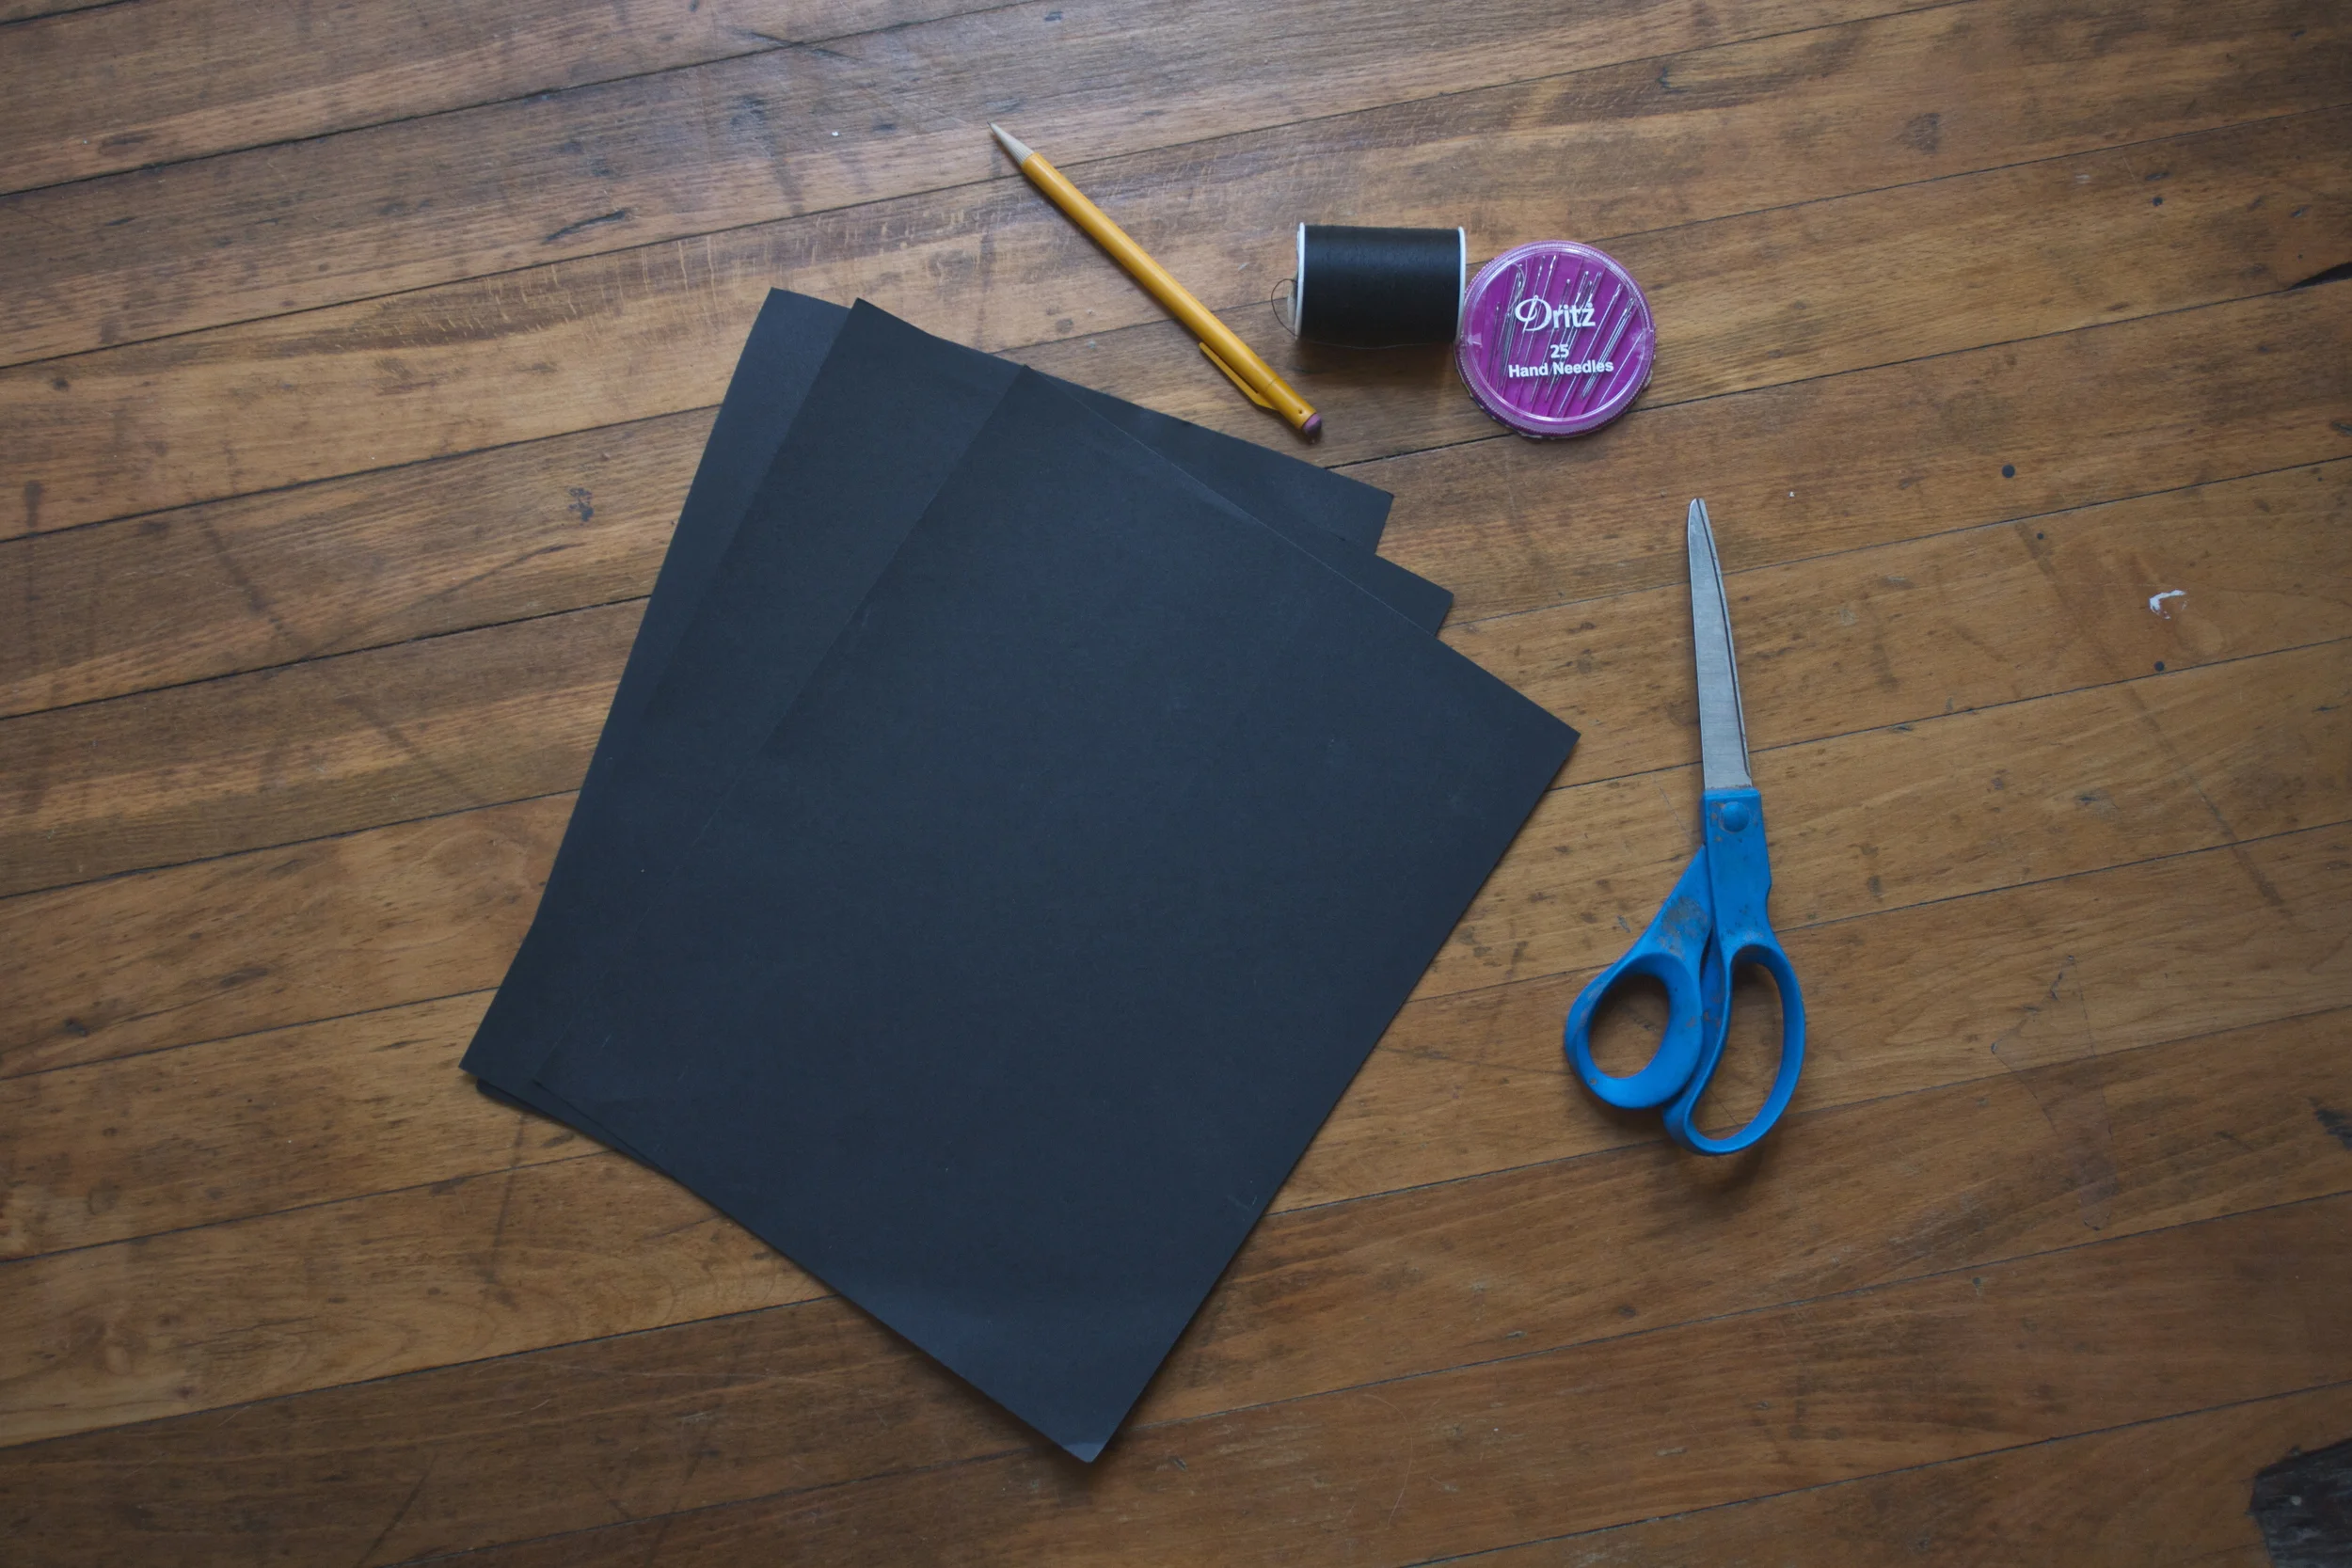


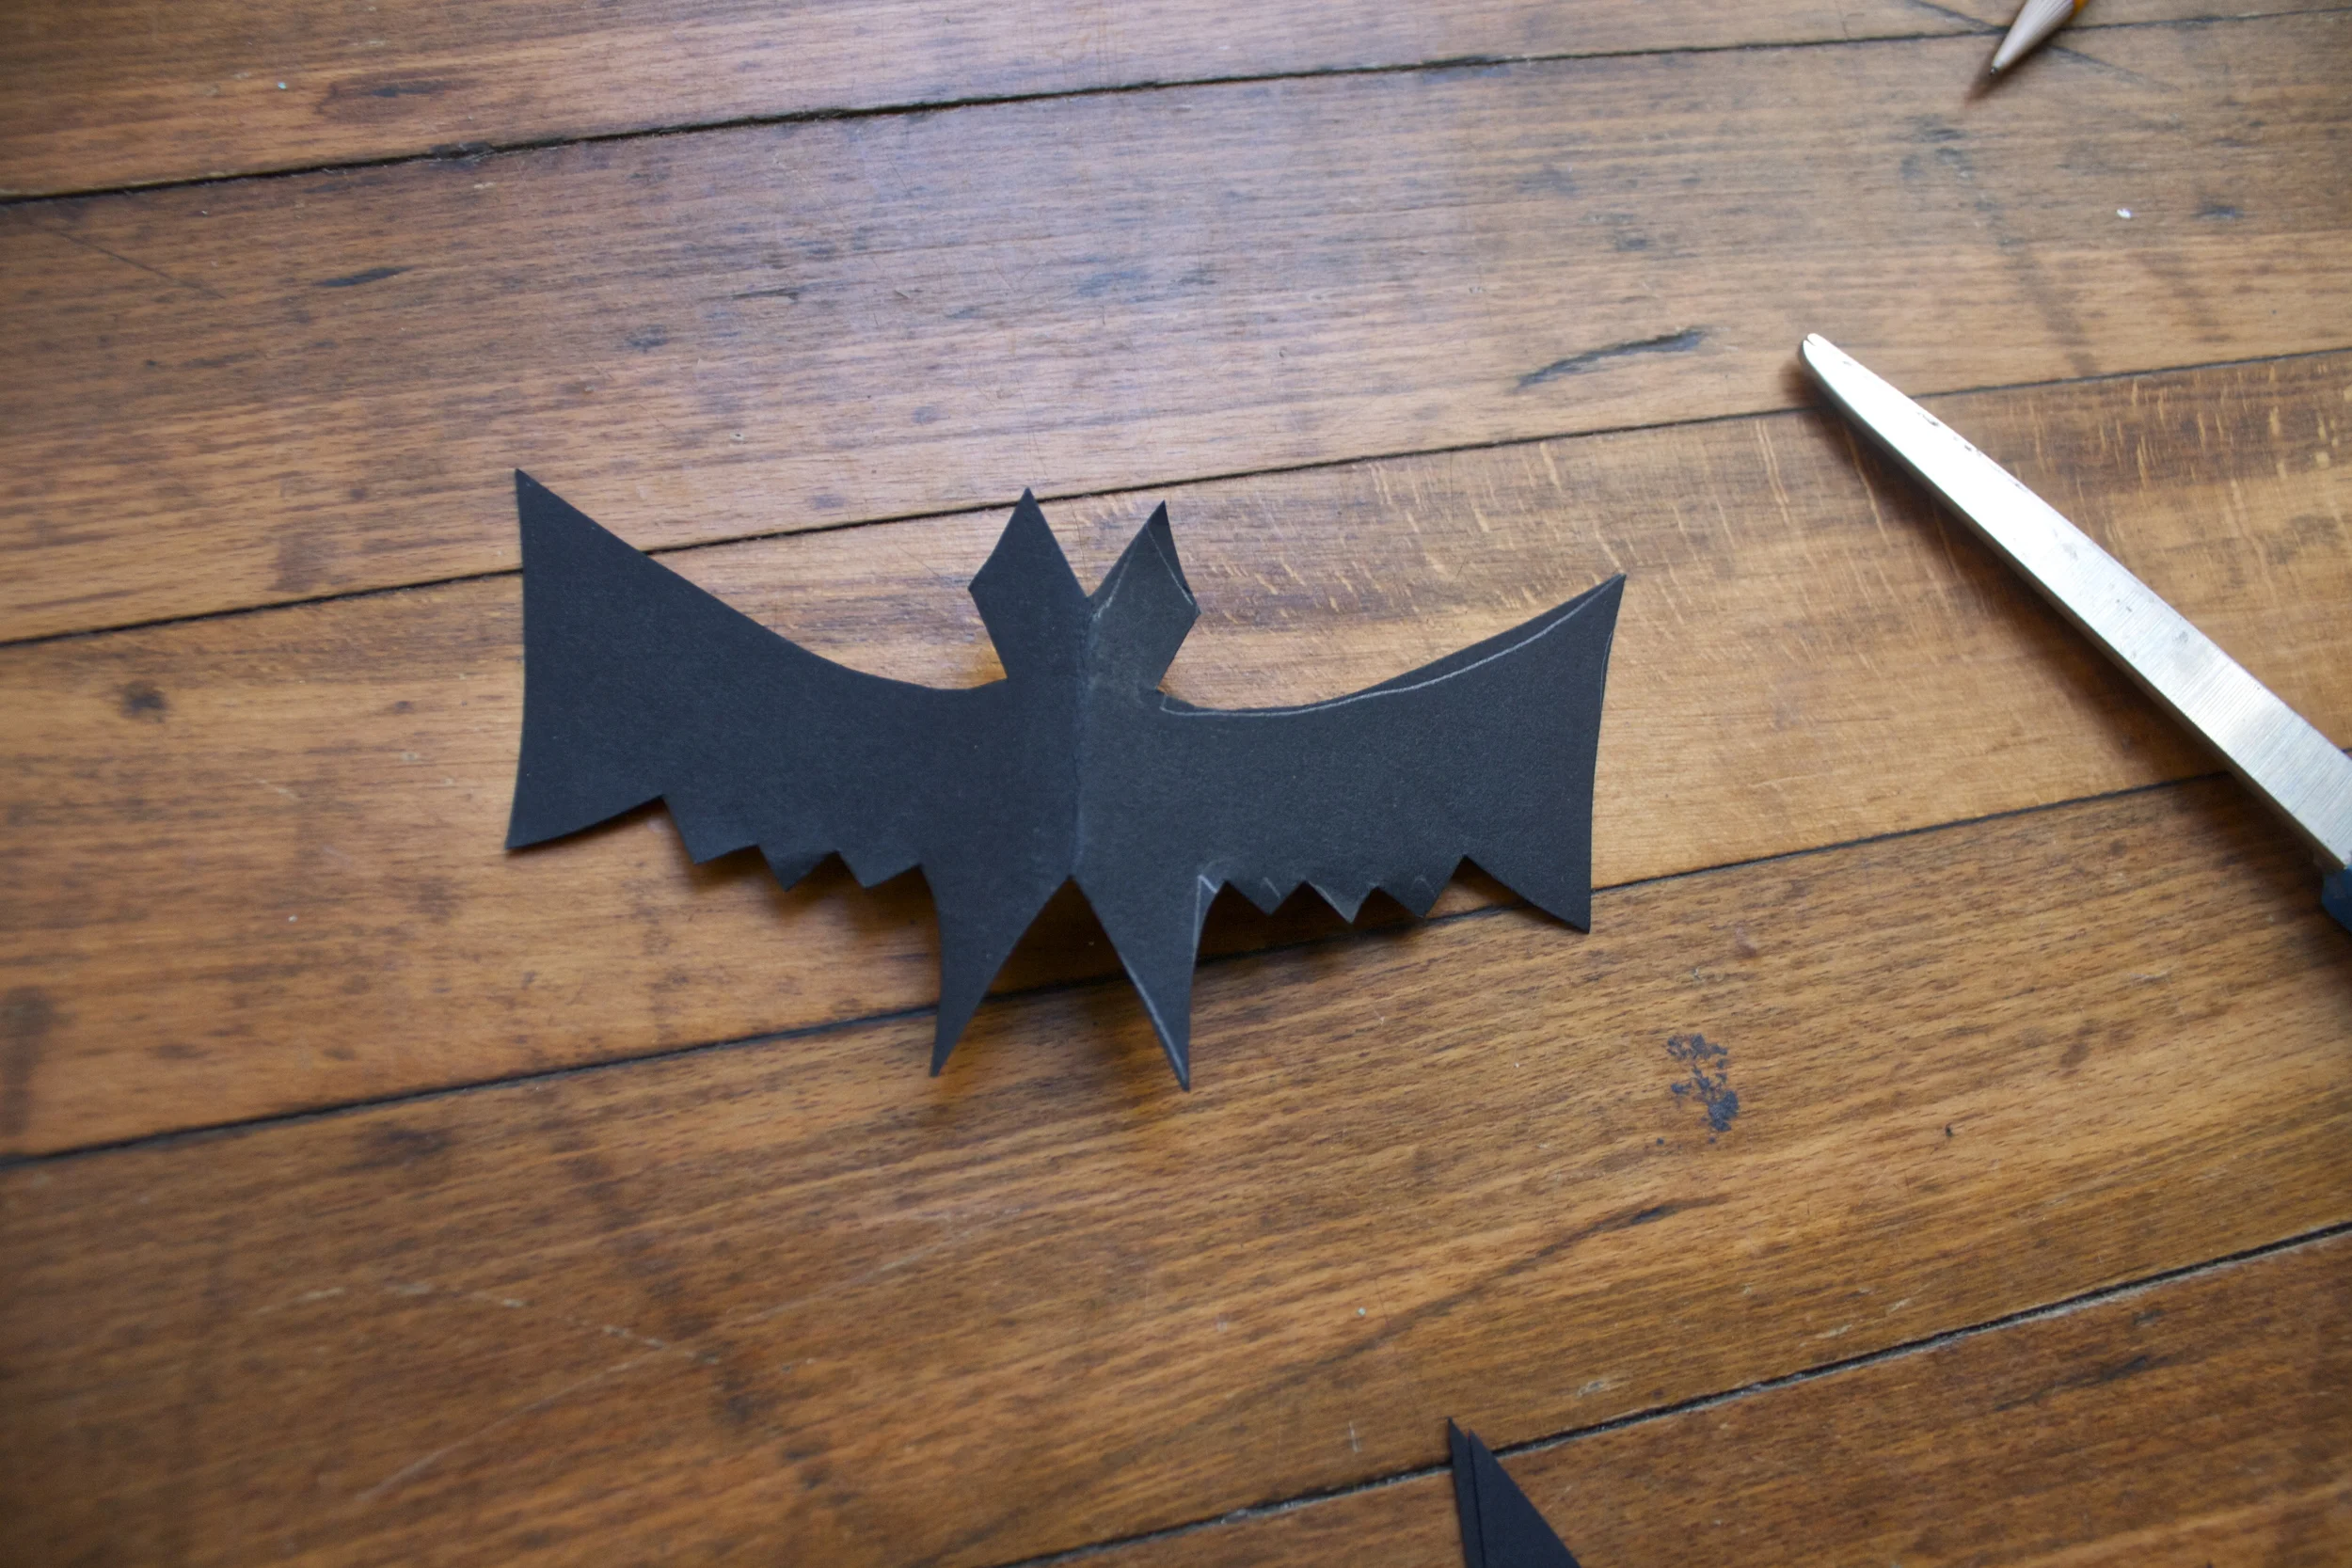
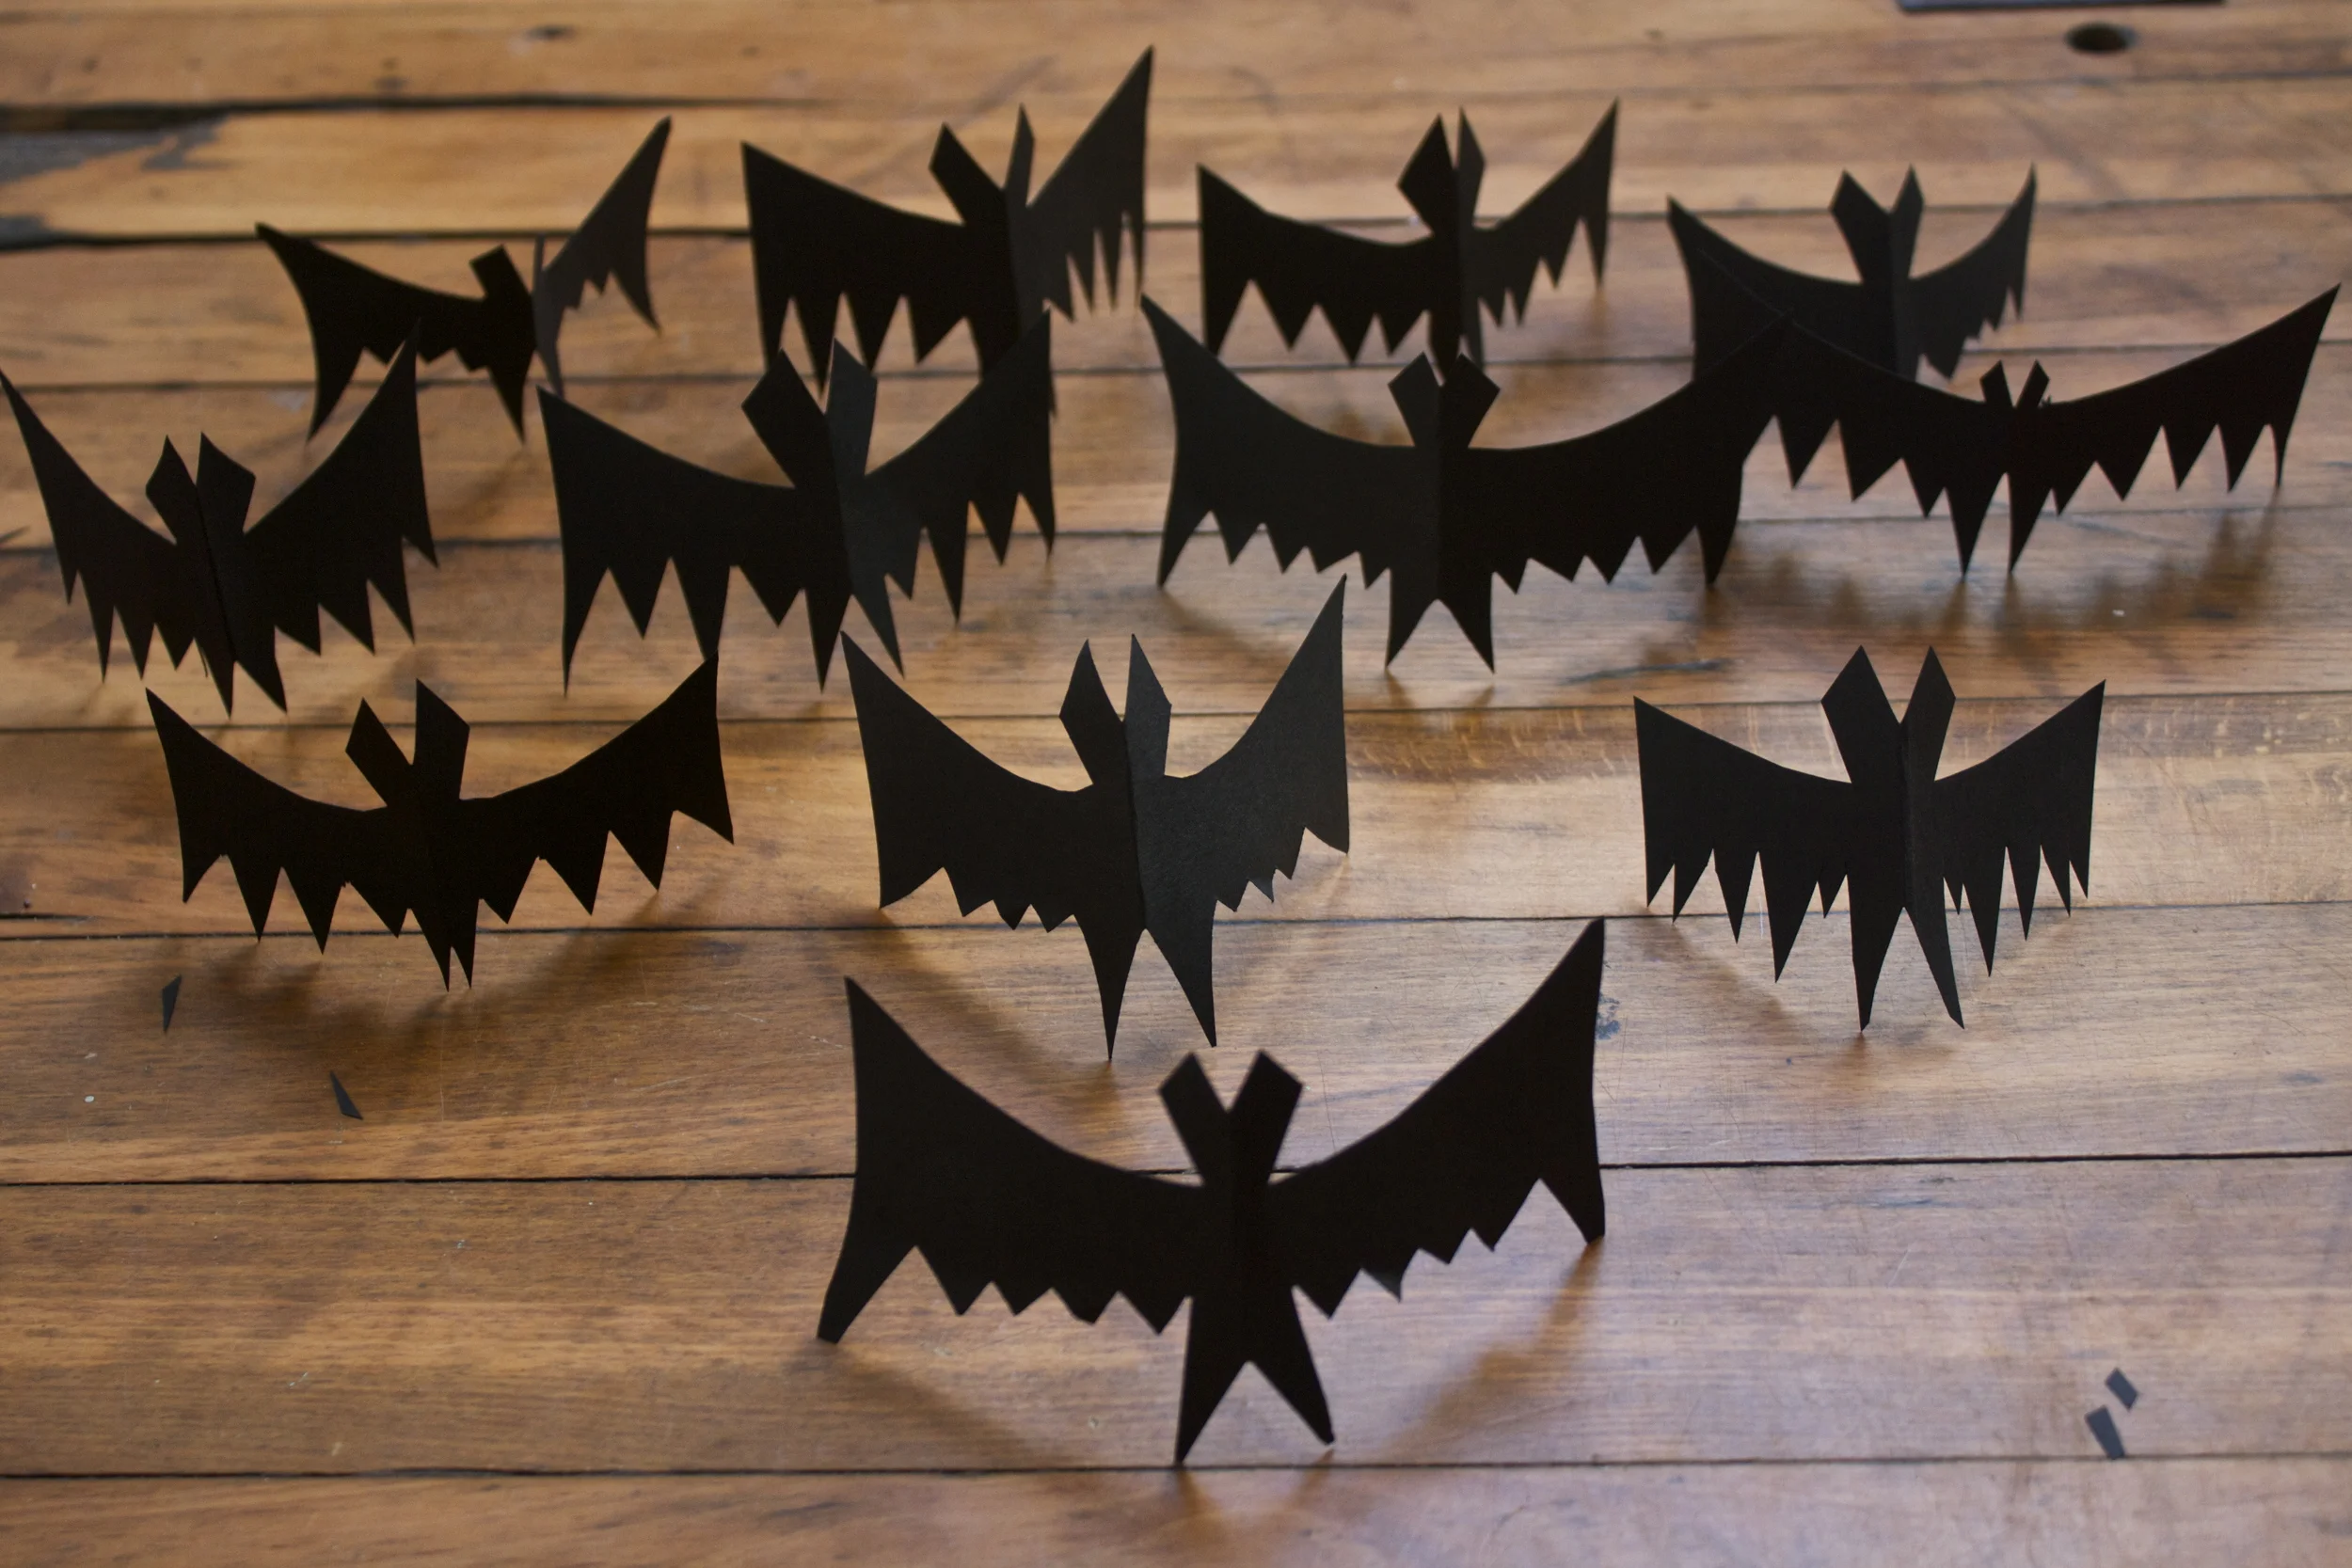
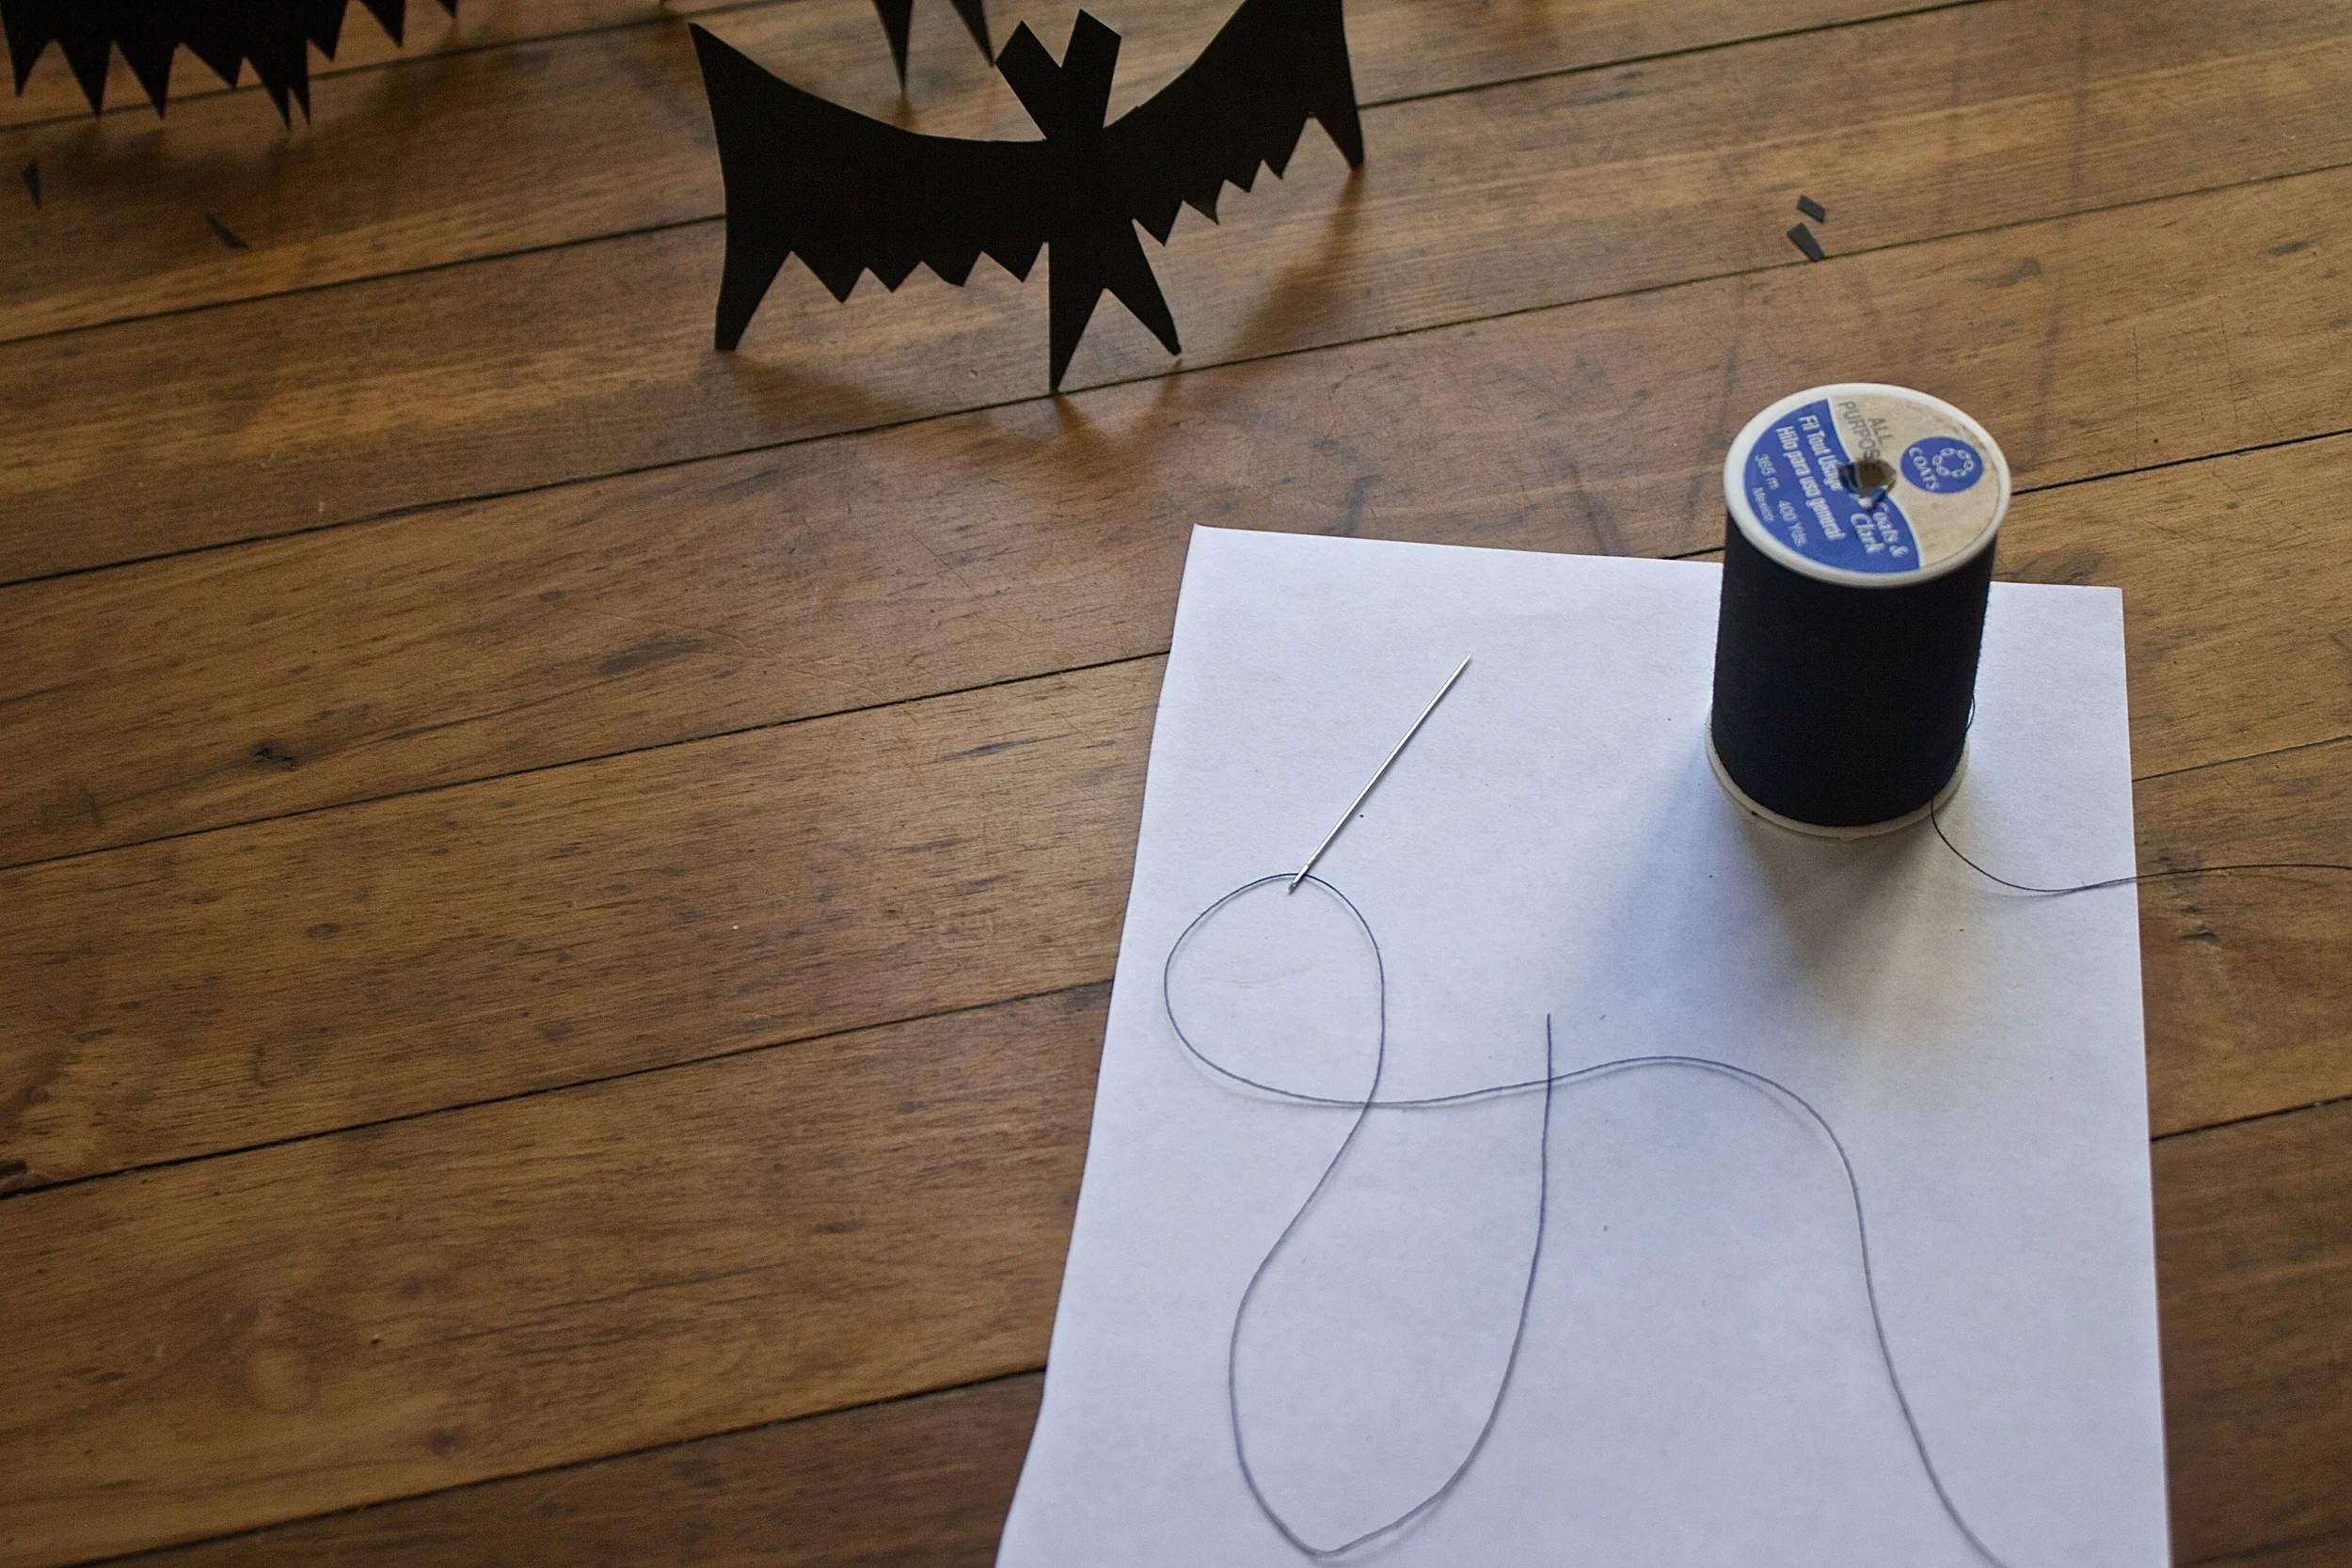
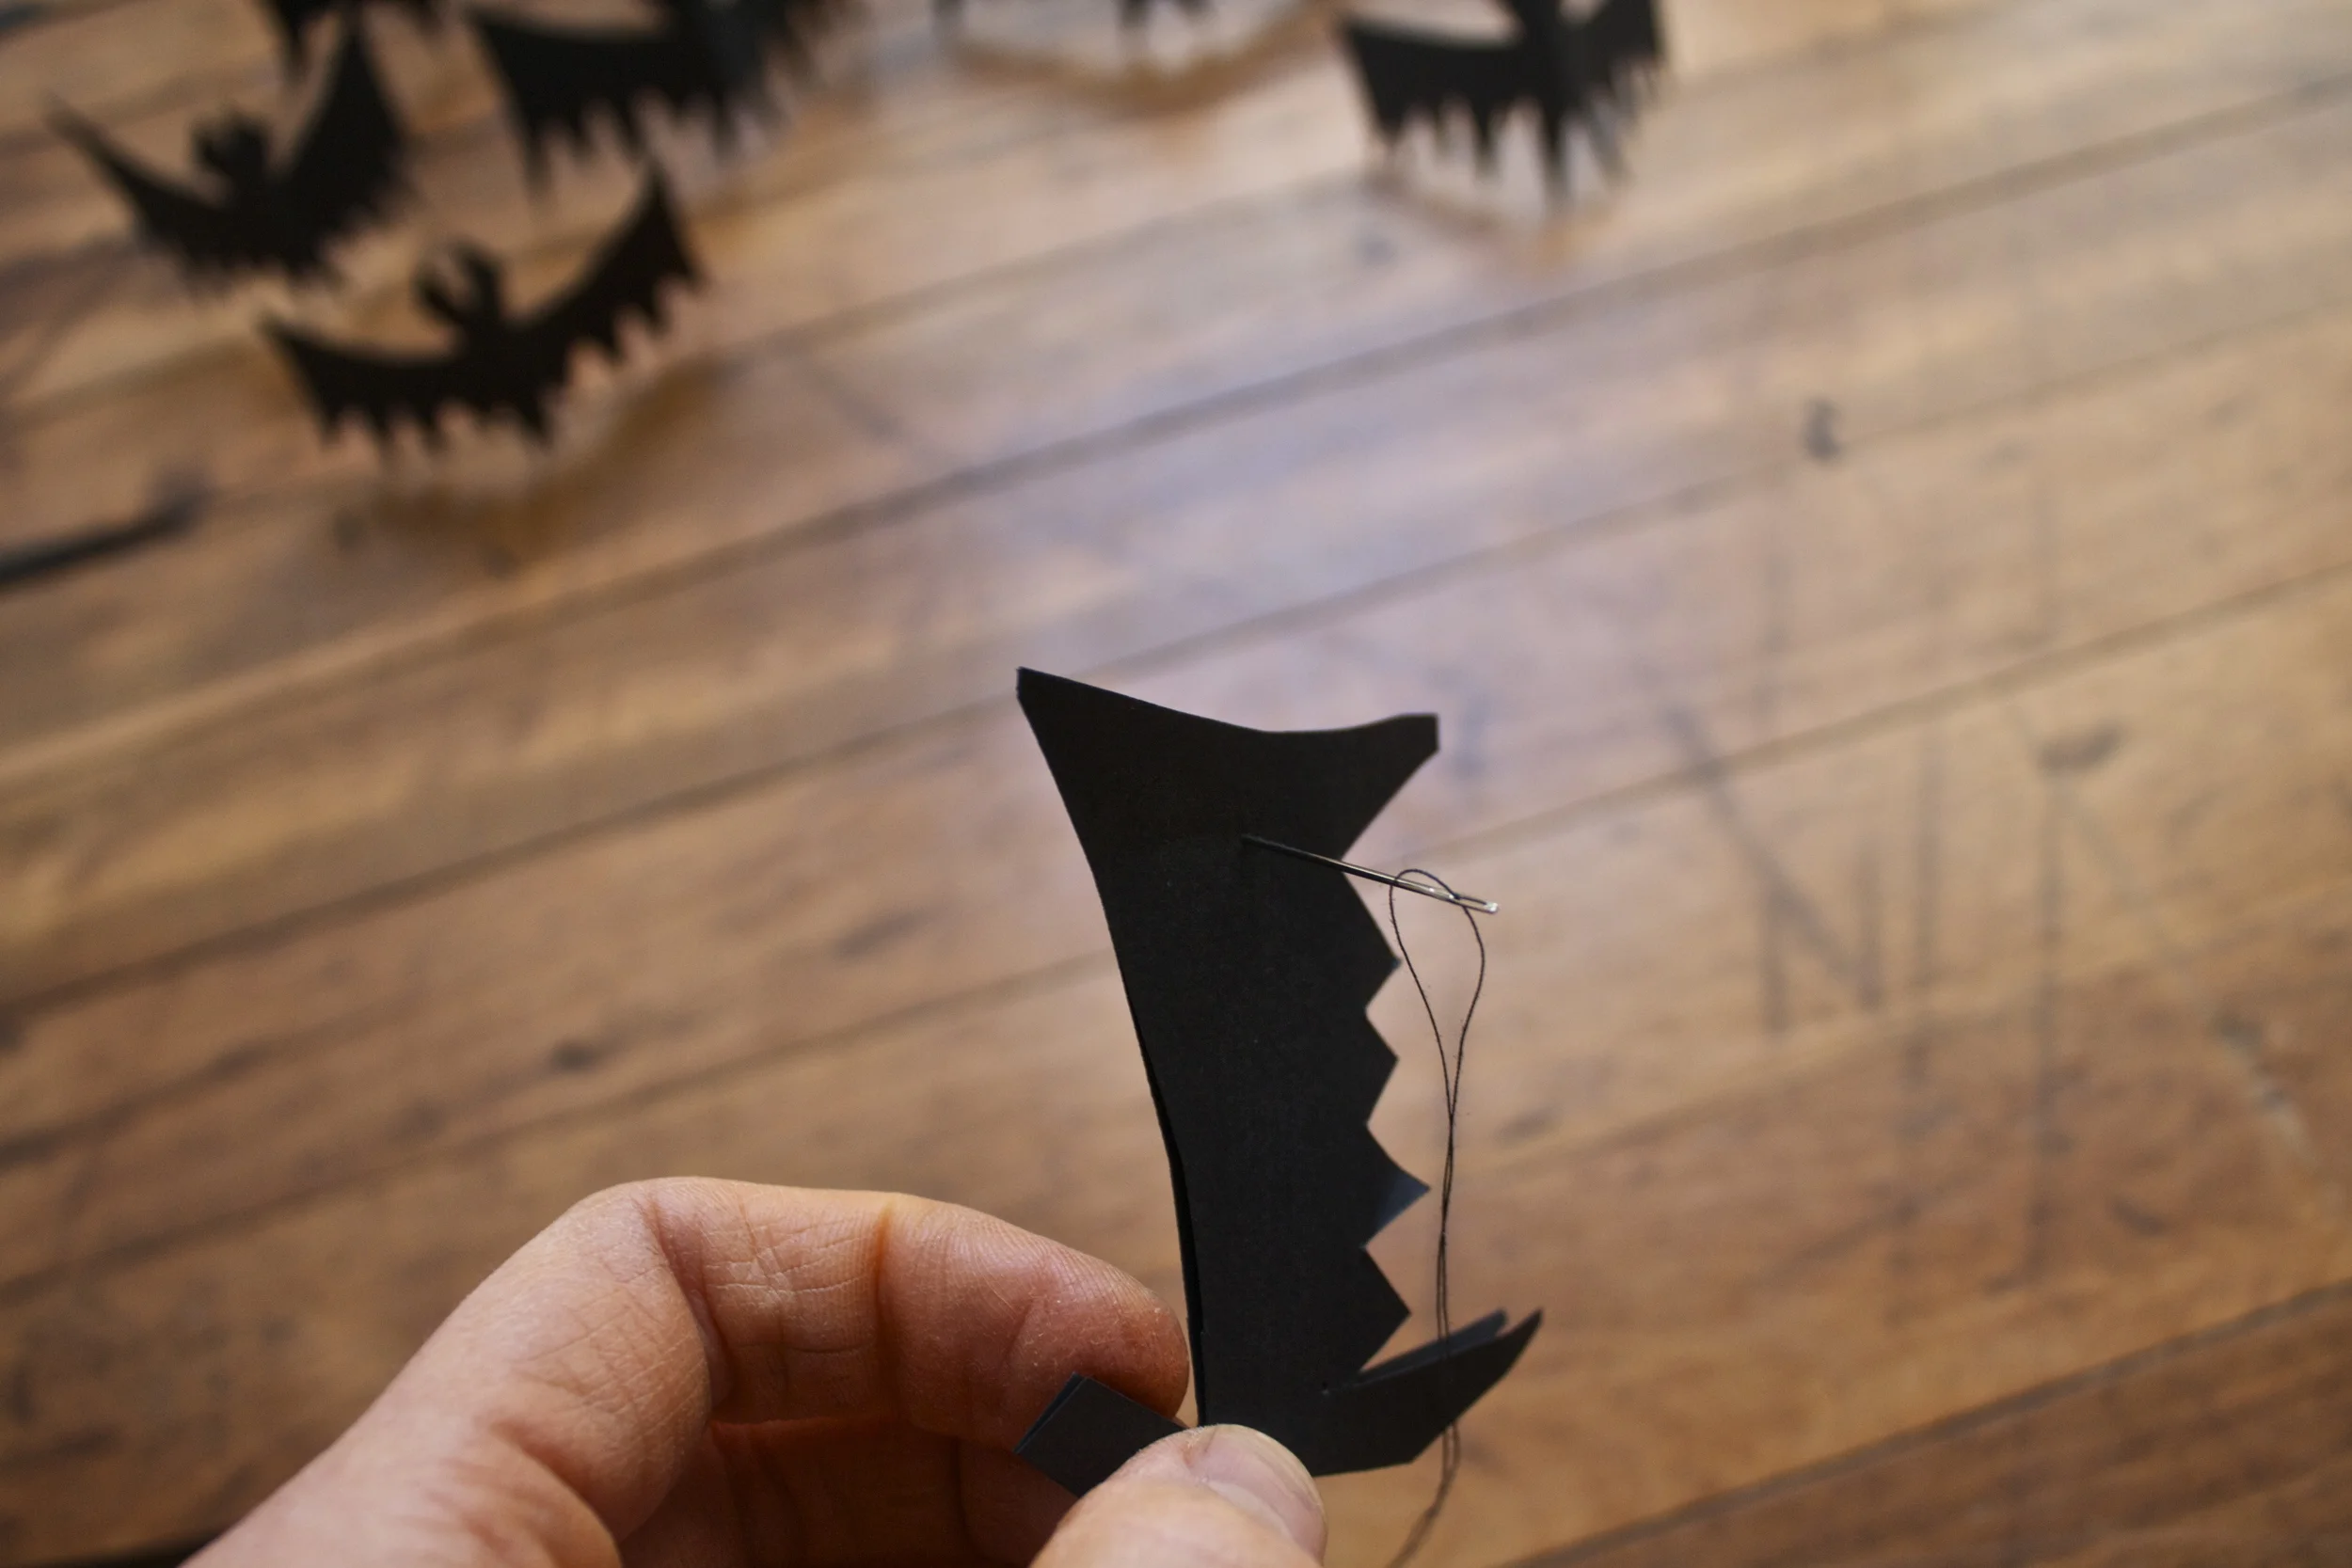
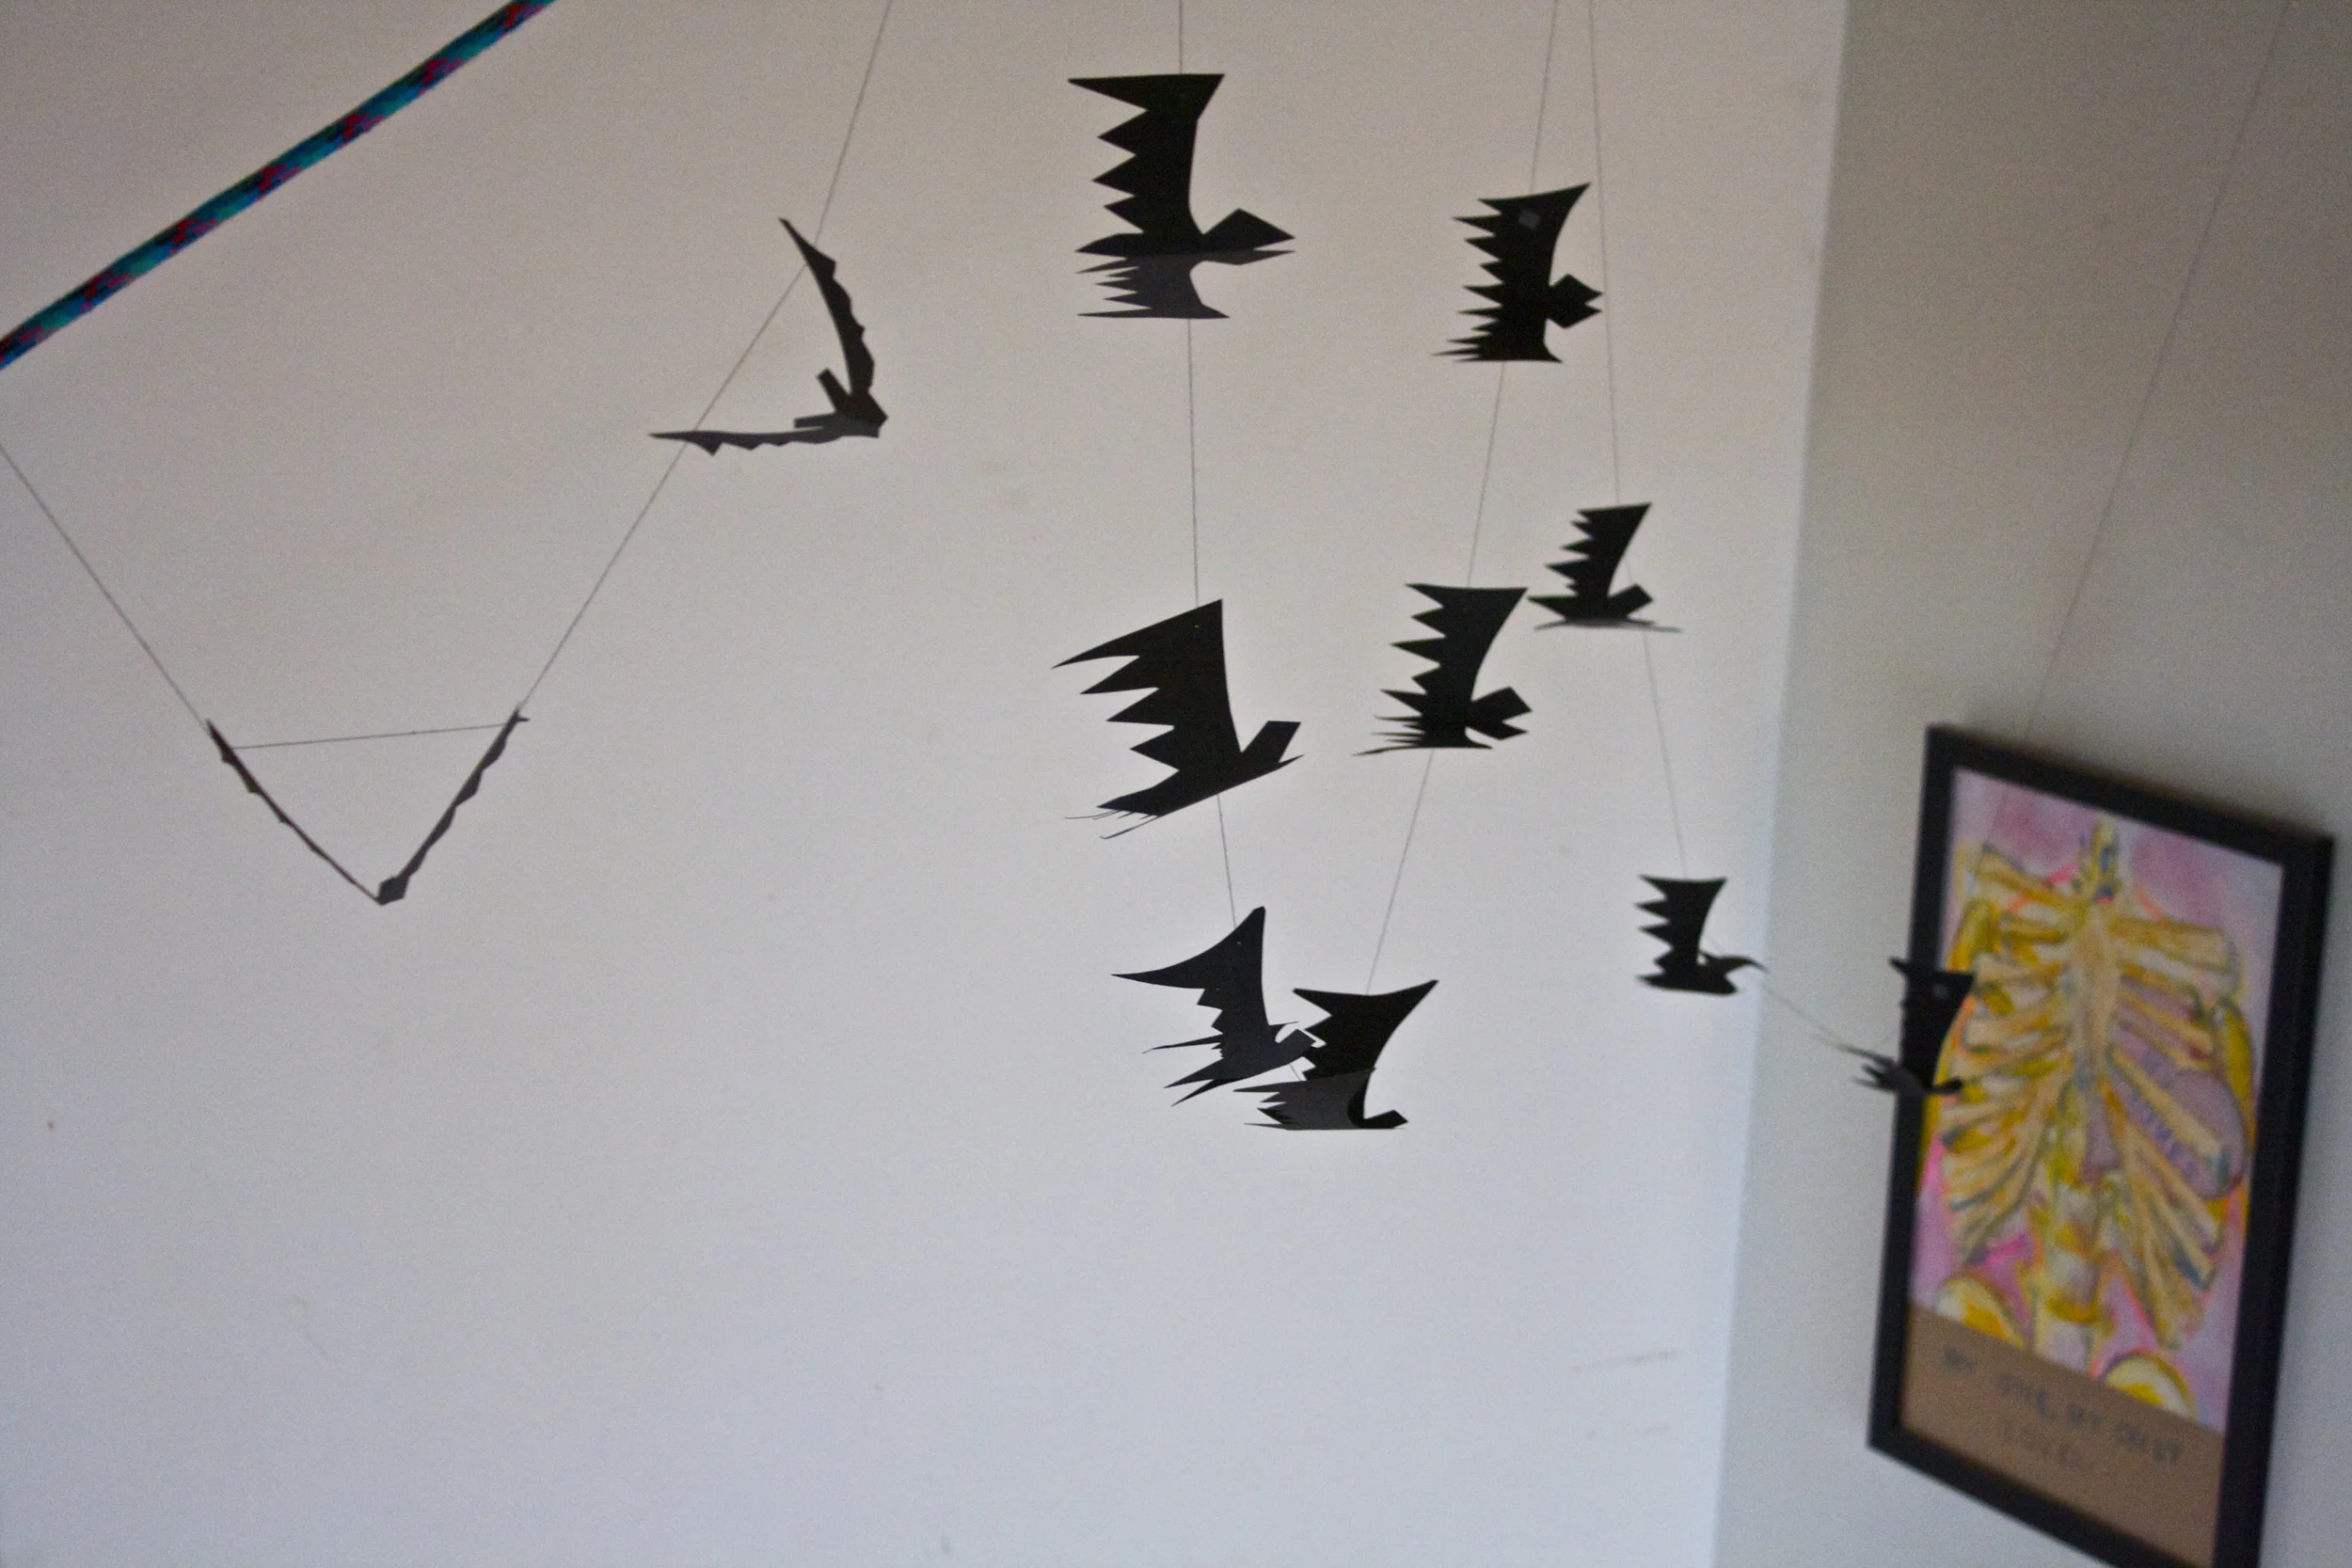


THE LOVELY CRAZY
January 8, 2020 by maximios • Blog
I forgot how amazing fall baking smells. The spiciness floating throughout the house, lingering on my clothes, in my hair, up the stairs and into the bedroom. It goes everywhere. Unfortunately it didn’t last very long this time around because the mr made popcorn and then the whole house ended up smelling like a freaking movie theater, but for a little while it was so nice. I want to bake everyday just to stink the house up all nice. I might just do that.%u00a0
Everyone eats the pumpkin bread or the pumpkin this or pumpkin that. But why does’t everyone harness the greatness of all the other winter squashes in baking? This I do not know. Don’t get me wrong, I love pumpkin but I also think that it’s very interchangeable in most baking applications. Like this quick %u00a0bread. I am sure that some people would notice that it is not pumpkin, but these same people would also enjoy the subtle difference in flavor. Acorn squash is a sweet and delicious squash and makes a fine fine bread my friends. And the acorn squash is cheaper then sugar pumpkins which is aways a plus. And the winter squash keeps longer the pumpkins so the are available longer. Acorn squash bread all winter long. (Yup, I am thinking winter already)
This bread lasted less then a day. The mr got a couple slices but some littles came over and ate almost the entire loaf. The didn’t ask what kind of squash I used, they just ate it vigorously and left heir little crumbs all over. So Bean with her mouth full of bread declared it A-MAZING. From the mouth of a 5 year old.
The stuff. The flour, baking soda and powder, salt, and cinnamon are in one bowl. The squash puree, oil, brown sugar, maple syrup, and apple cider vinegar in another .Also need a little plant milk a bit more cinnamon and sugar for topping.
Simple simple. Whisk together the dry then whisk together the wet.
Pour wet into dry and mix until incorporated.
And there you have it. %u00a0Acorn squash bread batter.%u00a0
Batter goes into a well greased bread pan and sprinkles all over with cinnamon sugar. Then into the oven (preheated of course) it goes.
All baked up and cooling. Like what I did there? %u00a0More circulation to the bottom %u00a0so it cools faster.. I am so smart.
The mr came home right when I was contemplating whether it was cool enough to cut. %u00a0It wasn’t but I cut it anyway.%u00a0
Have a great fall weekend!
-C %u00a0
makes 1 loaf
*To make acorn squash puree, stick an acorn squash into a oven at 400 for about 40 minutes or until until fork tender. Remove from oven,%u00a0cut in half, and let cool until you can handle it. Scoop out seeds (save for roasting) then scoop out flesh (eat skin as snack)%u00a0and puree in blender. Add a splash of water if needed to get a smooth puree.
preheat oven to 350
In a large bowl mix together the squash, oil, sugar, maple, milk, and apple cider vinegar. Mix until well combined. In a smaller bowl, whisk together the baking soda and powder, the tablespoon cinnamon, salt, and flour. Pour wet into the dry and mix until combined. %u00a0Pour into a well greased loaf pan. Combine the tablespoon brown sugar and teaspoon cinnamon and sprinkle on top. Pop into oven and bake for 60-65 minutes or until a tester poked into middle comes out clean.
Once cooked, remove from oven and let cool for a few minutes. Remove form loaf pan and let completely cool.%u00a0
Eat what you want and store the rest in an air tight container for a few days. Can be sliced and frozen too.