
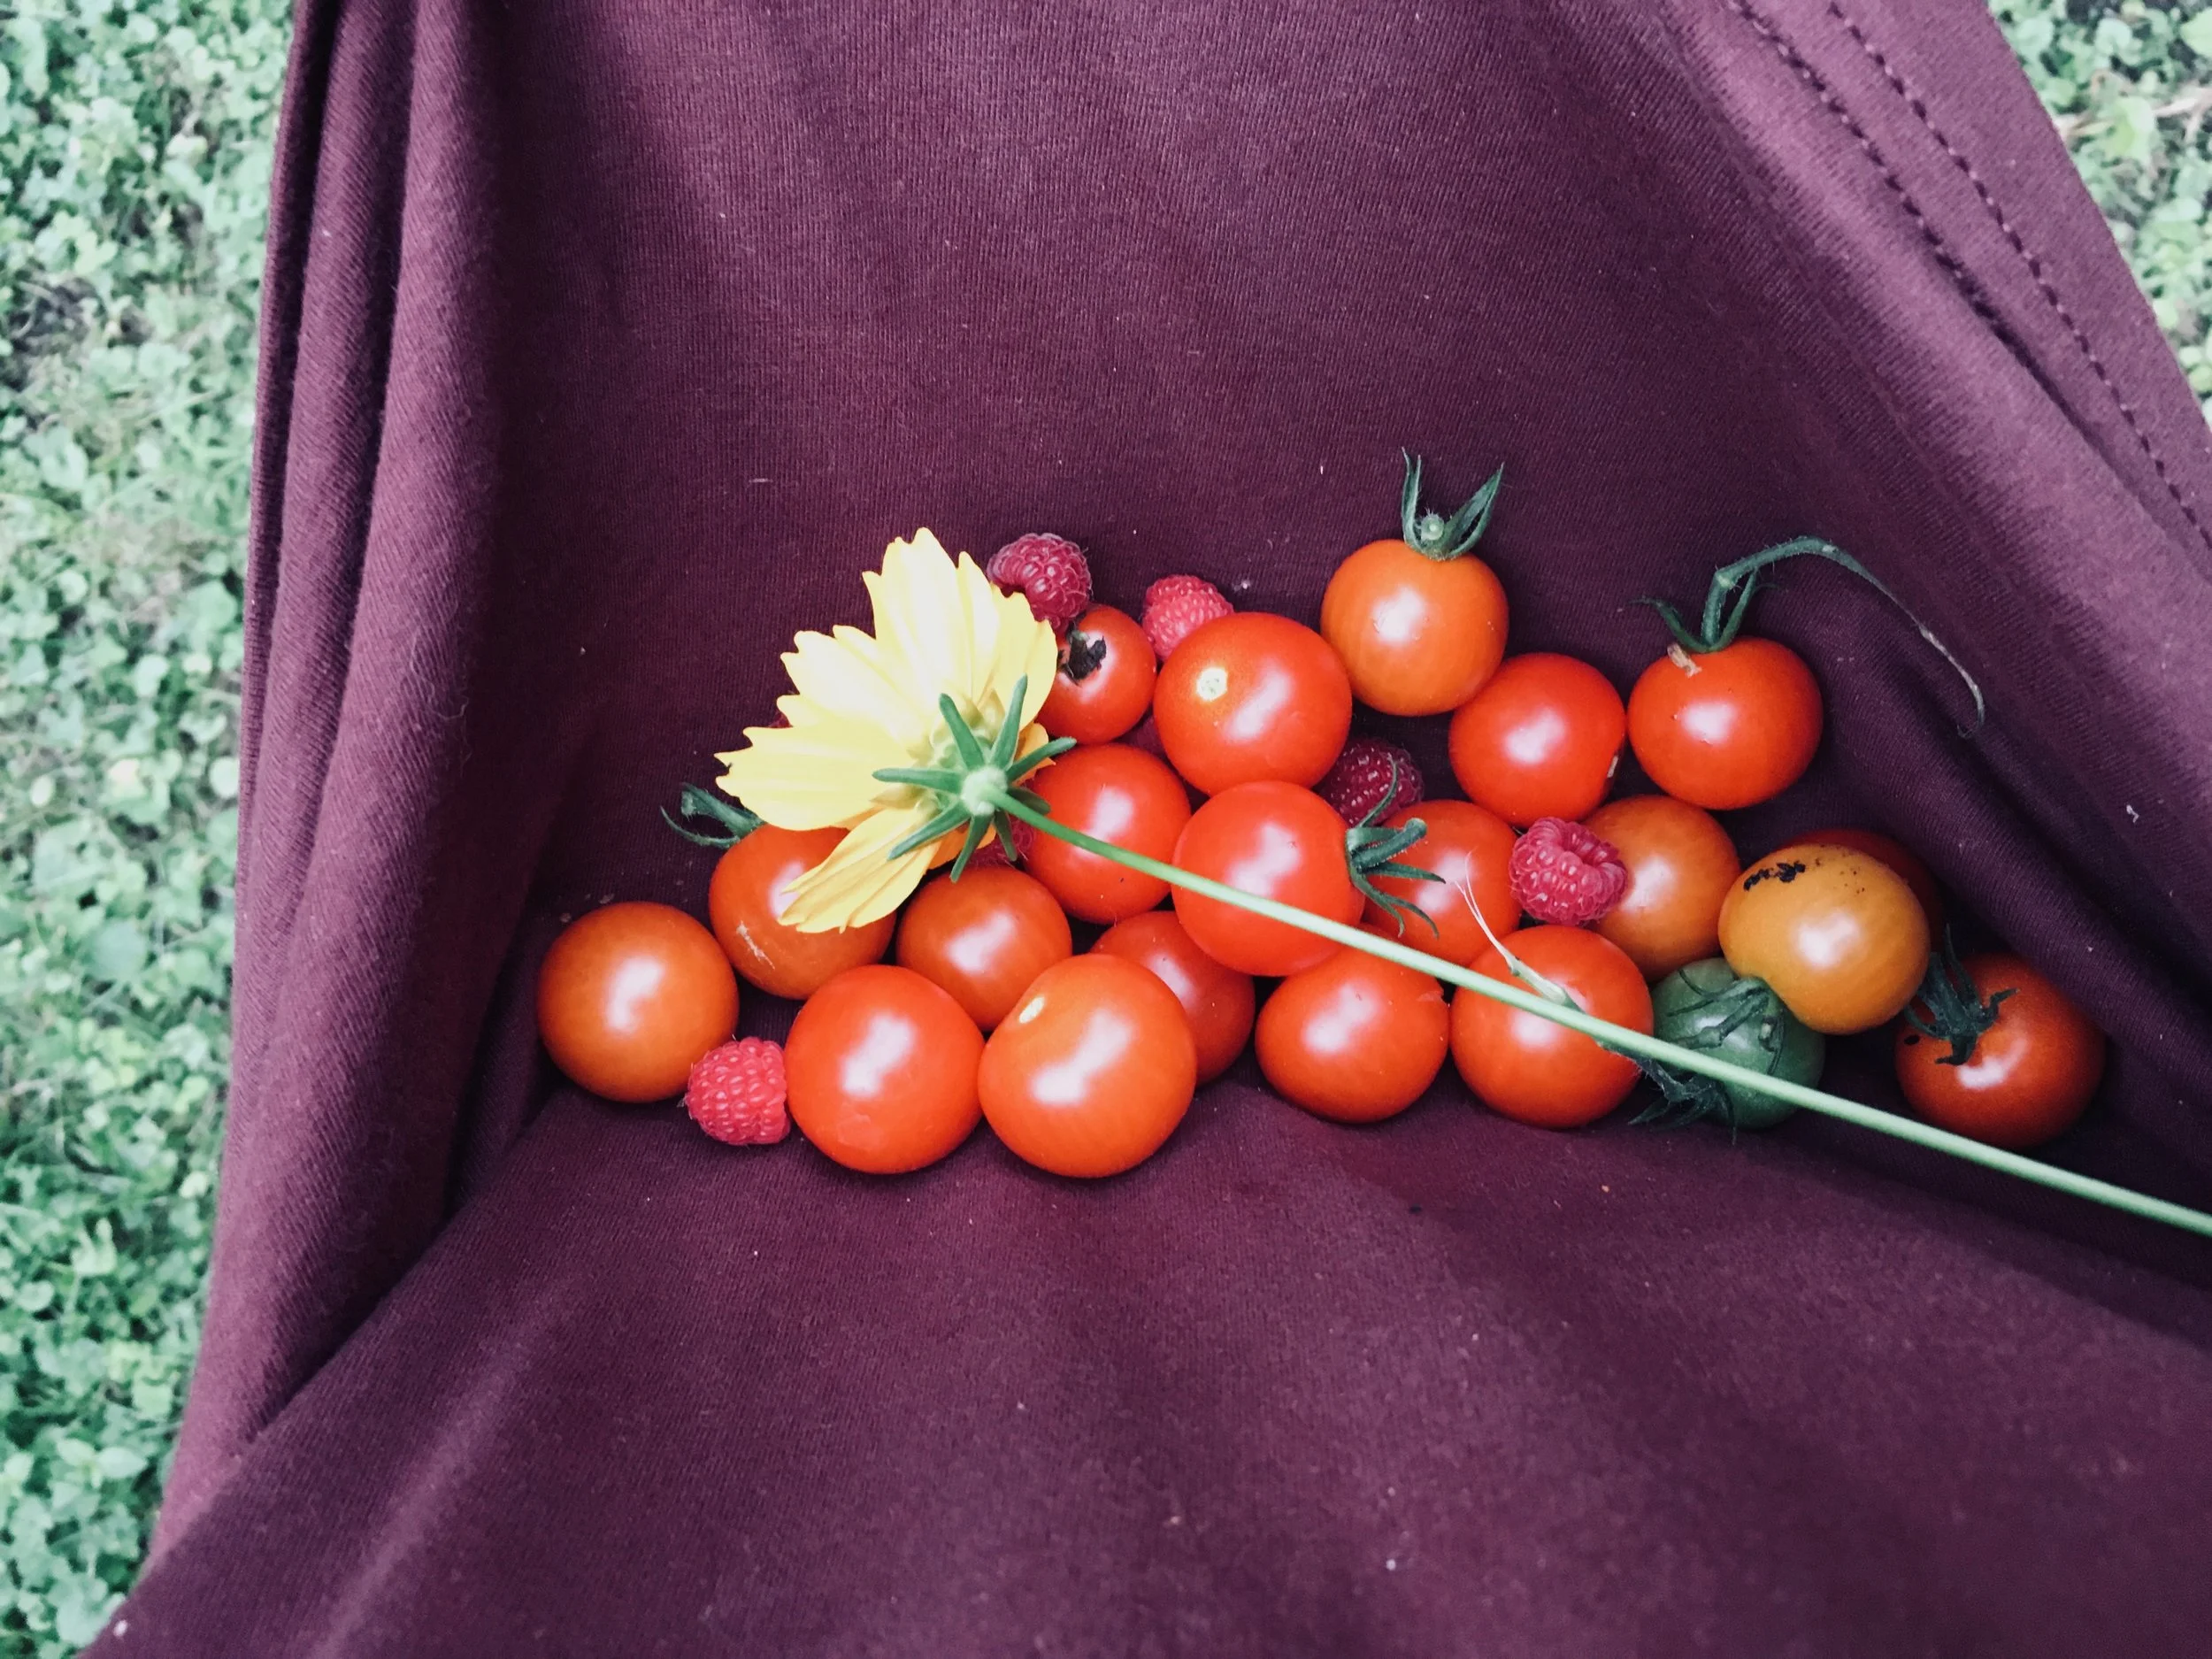
THE LOVELY CRAZY
Corn is the name of the game, and this game I won!
The mr doesn%u2019t much like to eat corn. But I do. And this time of year I get like 10 ears of corn every week from farm share, which is a lot of corn for one person to have to eat every week and sometimes I just can%u2019t do it. So every now and then I make something that I think the mr will tolerate, if not like, to get him to help me eat the stash of a hundred ears or corn that I have going on in the fridge.
These fritters helped me with that and I think with all the future corn that I will get from the farm. They are soooo good! The mr liked them! As for me, I couldn’t stop eating them and almost didn’t want to share because they we just so dang good. Sweet fresh corn, nutty and slightly chewy oats. Scallions. And that%u2019s pretty much it. So fresh and clean and yummy tasting. A summertime fritter situation that takes corn to a place where even the corn hater likes it.
Although who the hell hates corn? I know one person. One. And I live with him. Weirdo.
Anyway, to the fritters!

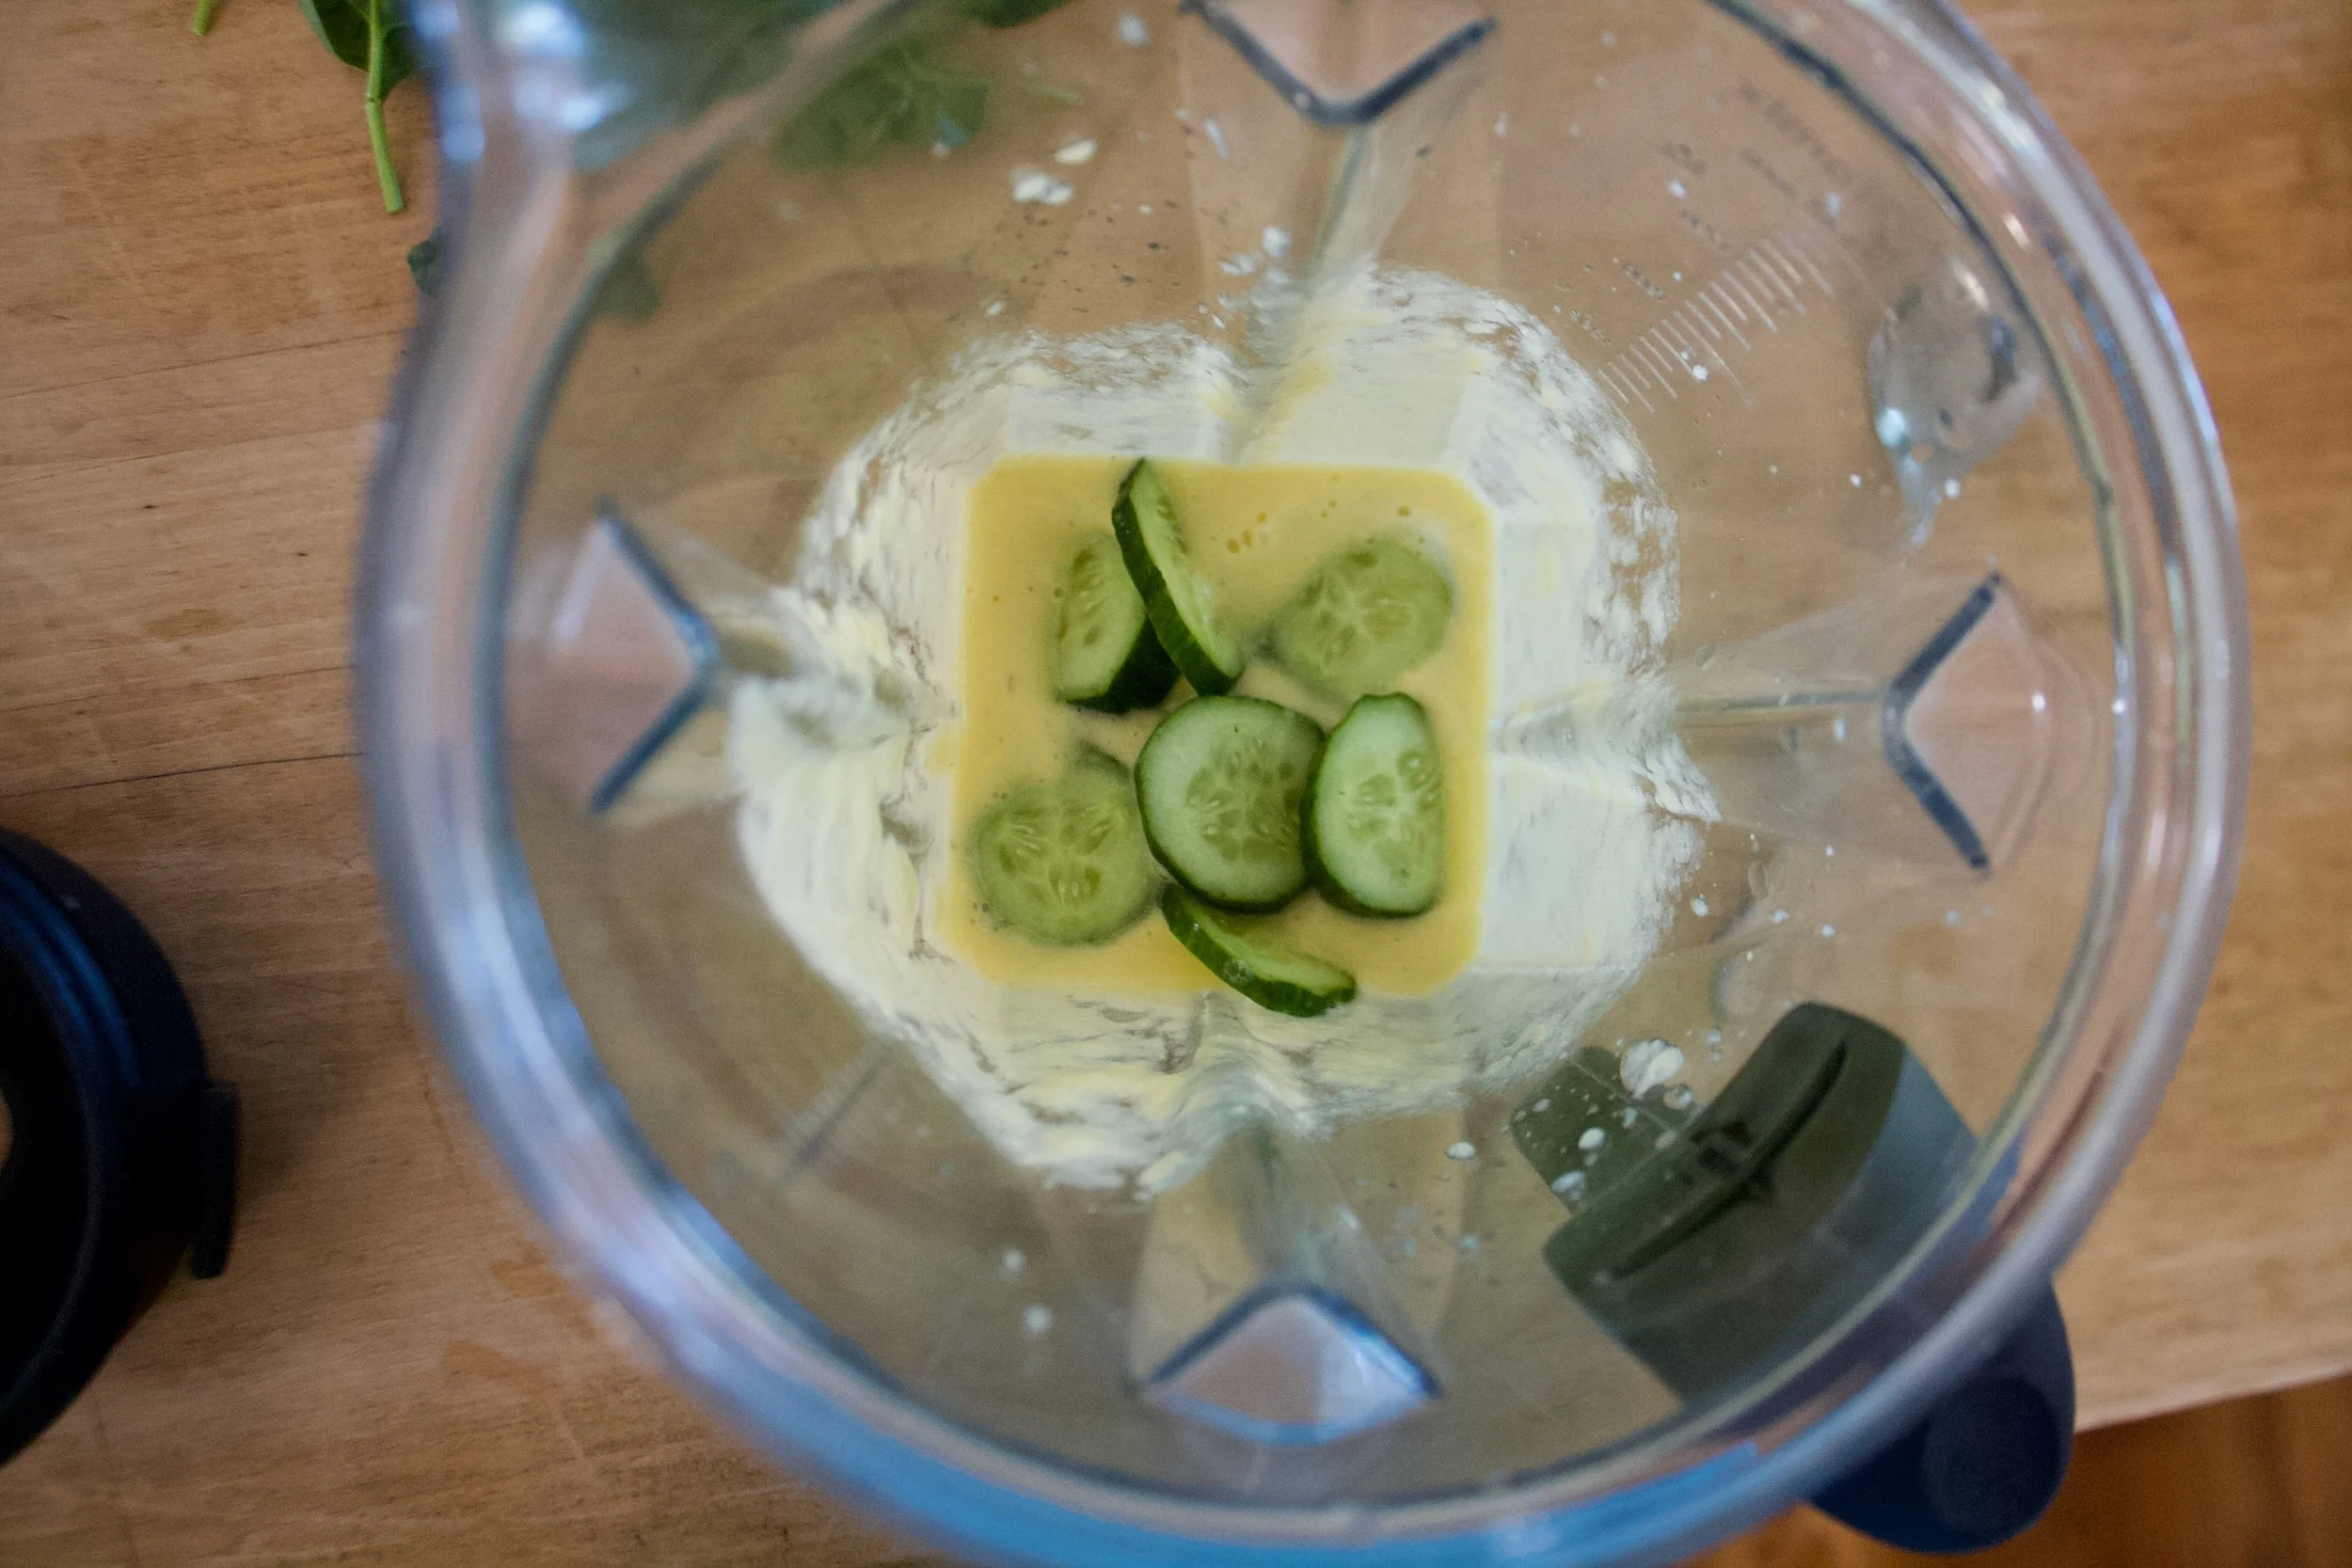
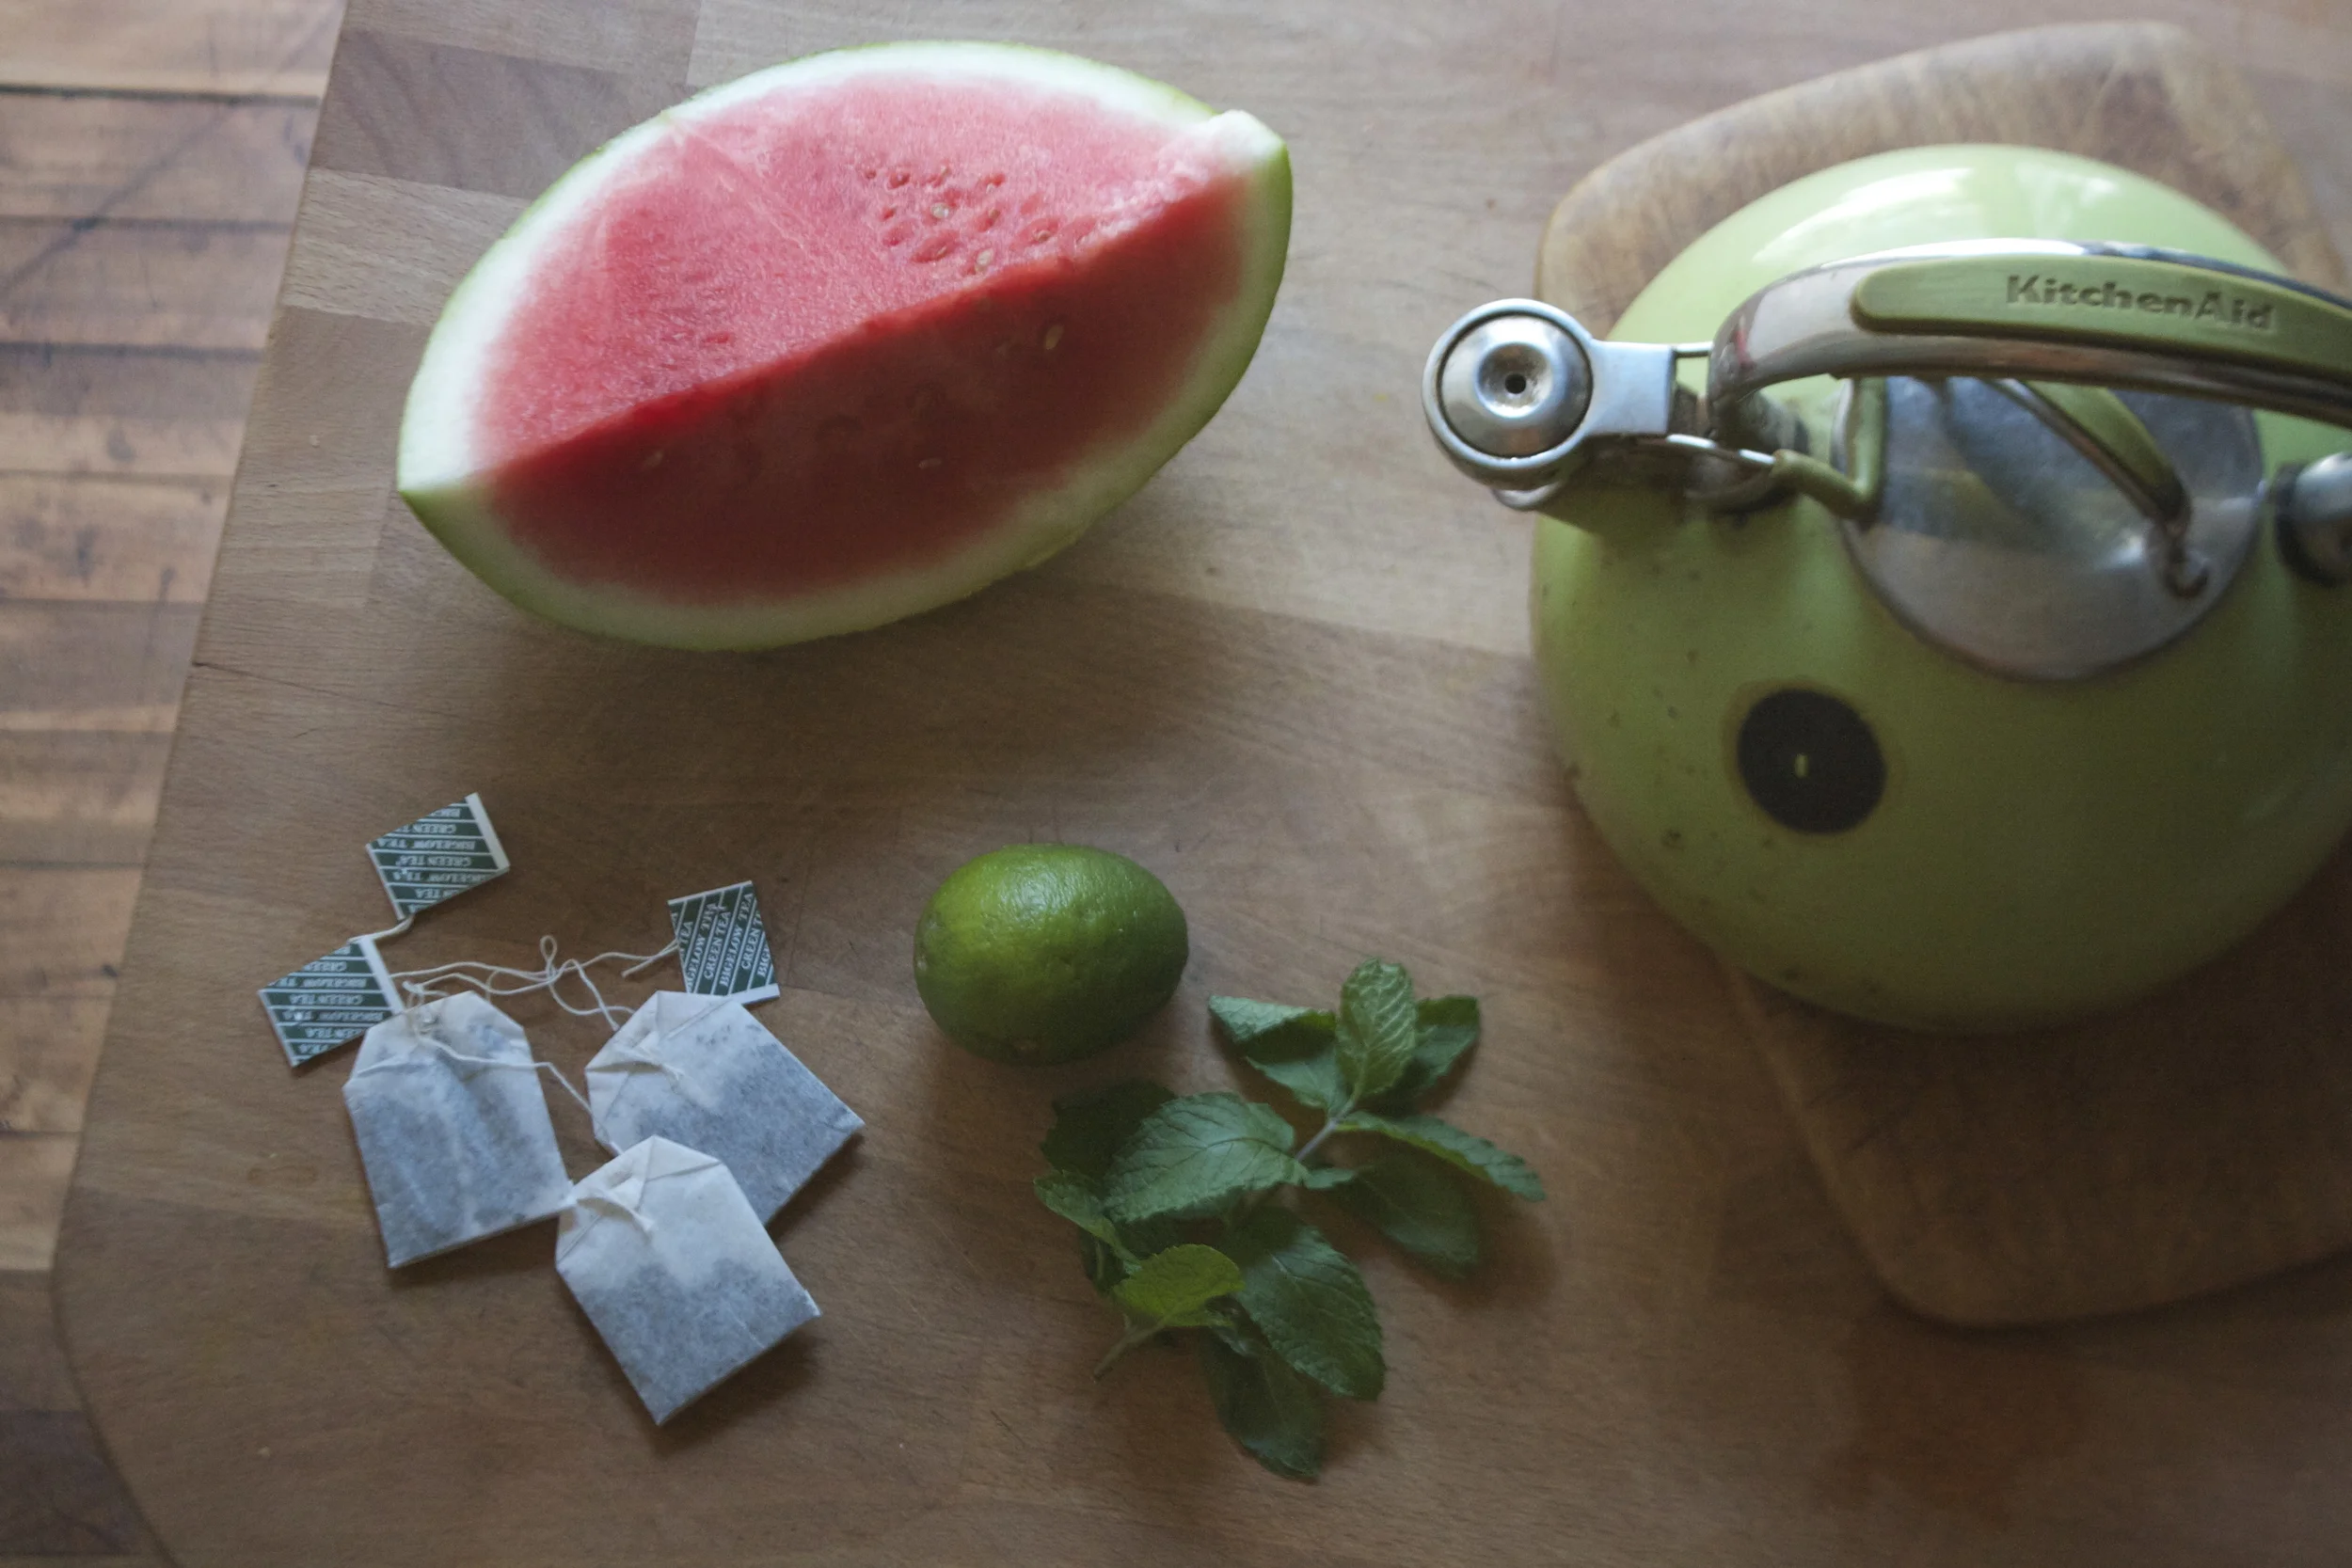
The stuff. Fresh sweet corn, old fashion rolled oats, and a few scallion. Also some ground flax seed, water, baking powder, salt and pepper, and a little oil.
Start with oats. Add most of what we need to a blender and blend until it becomes oat flour.
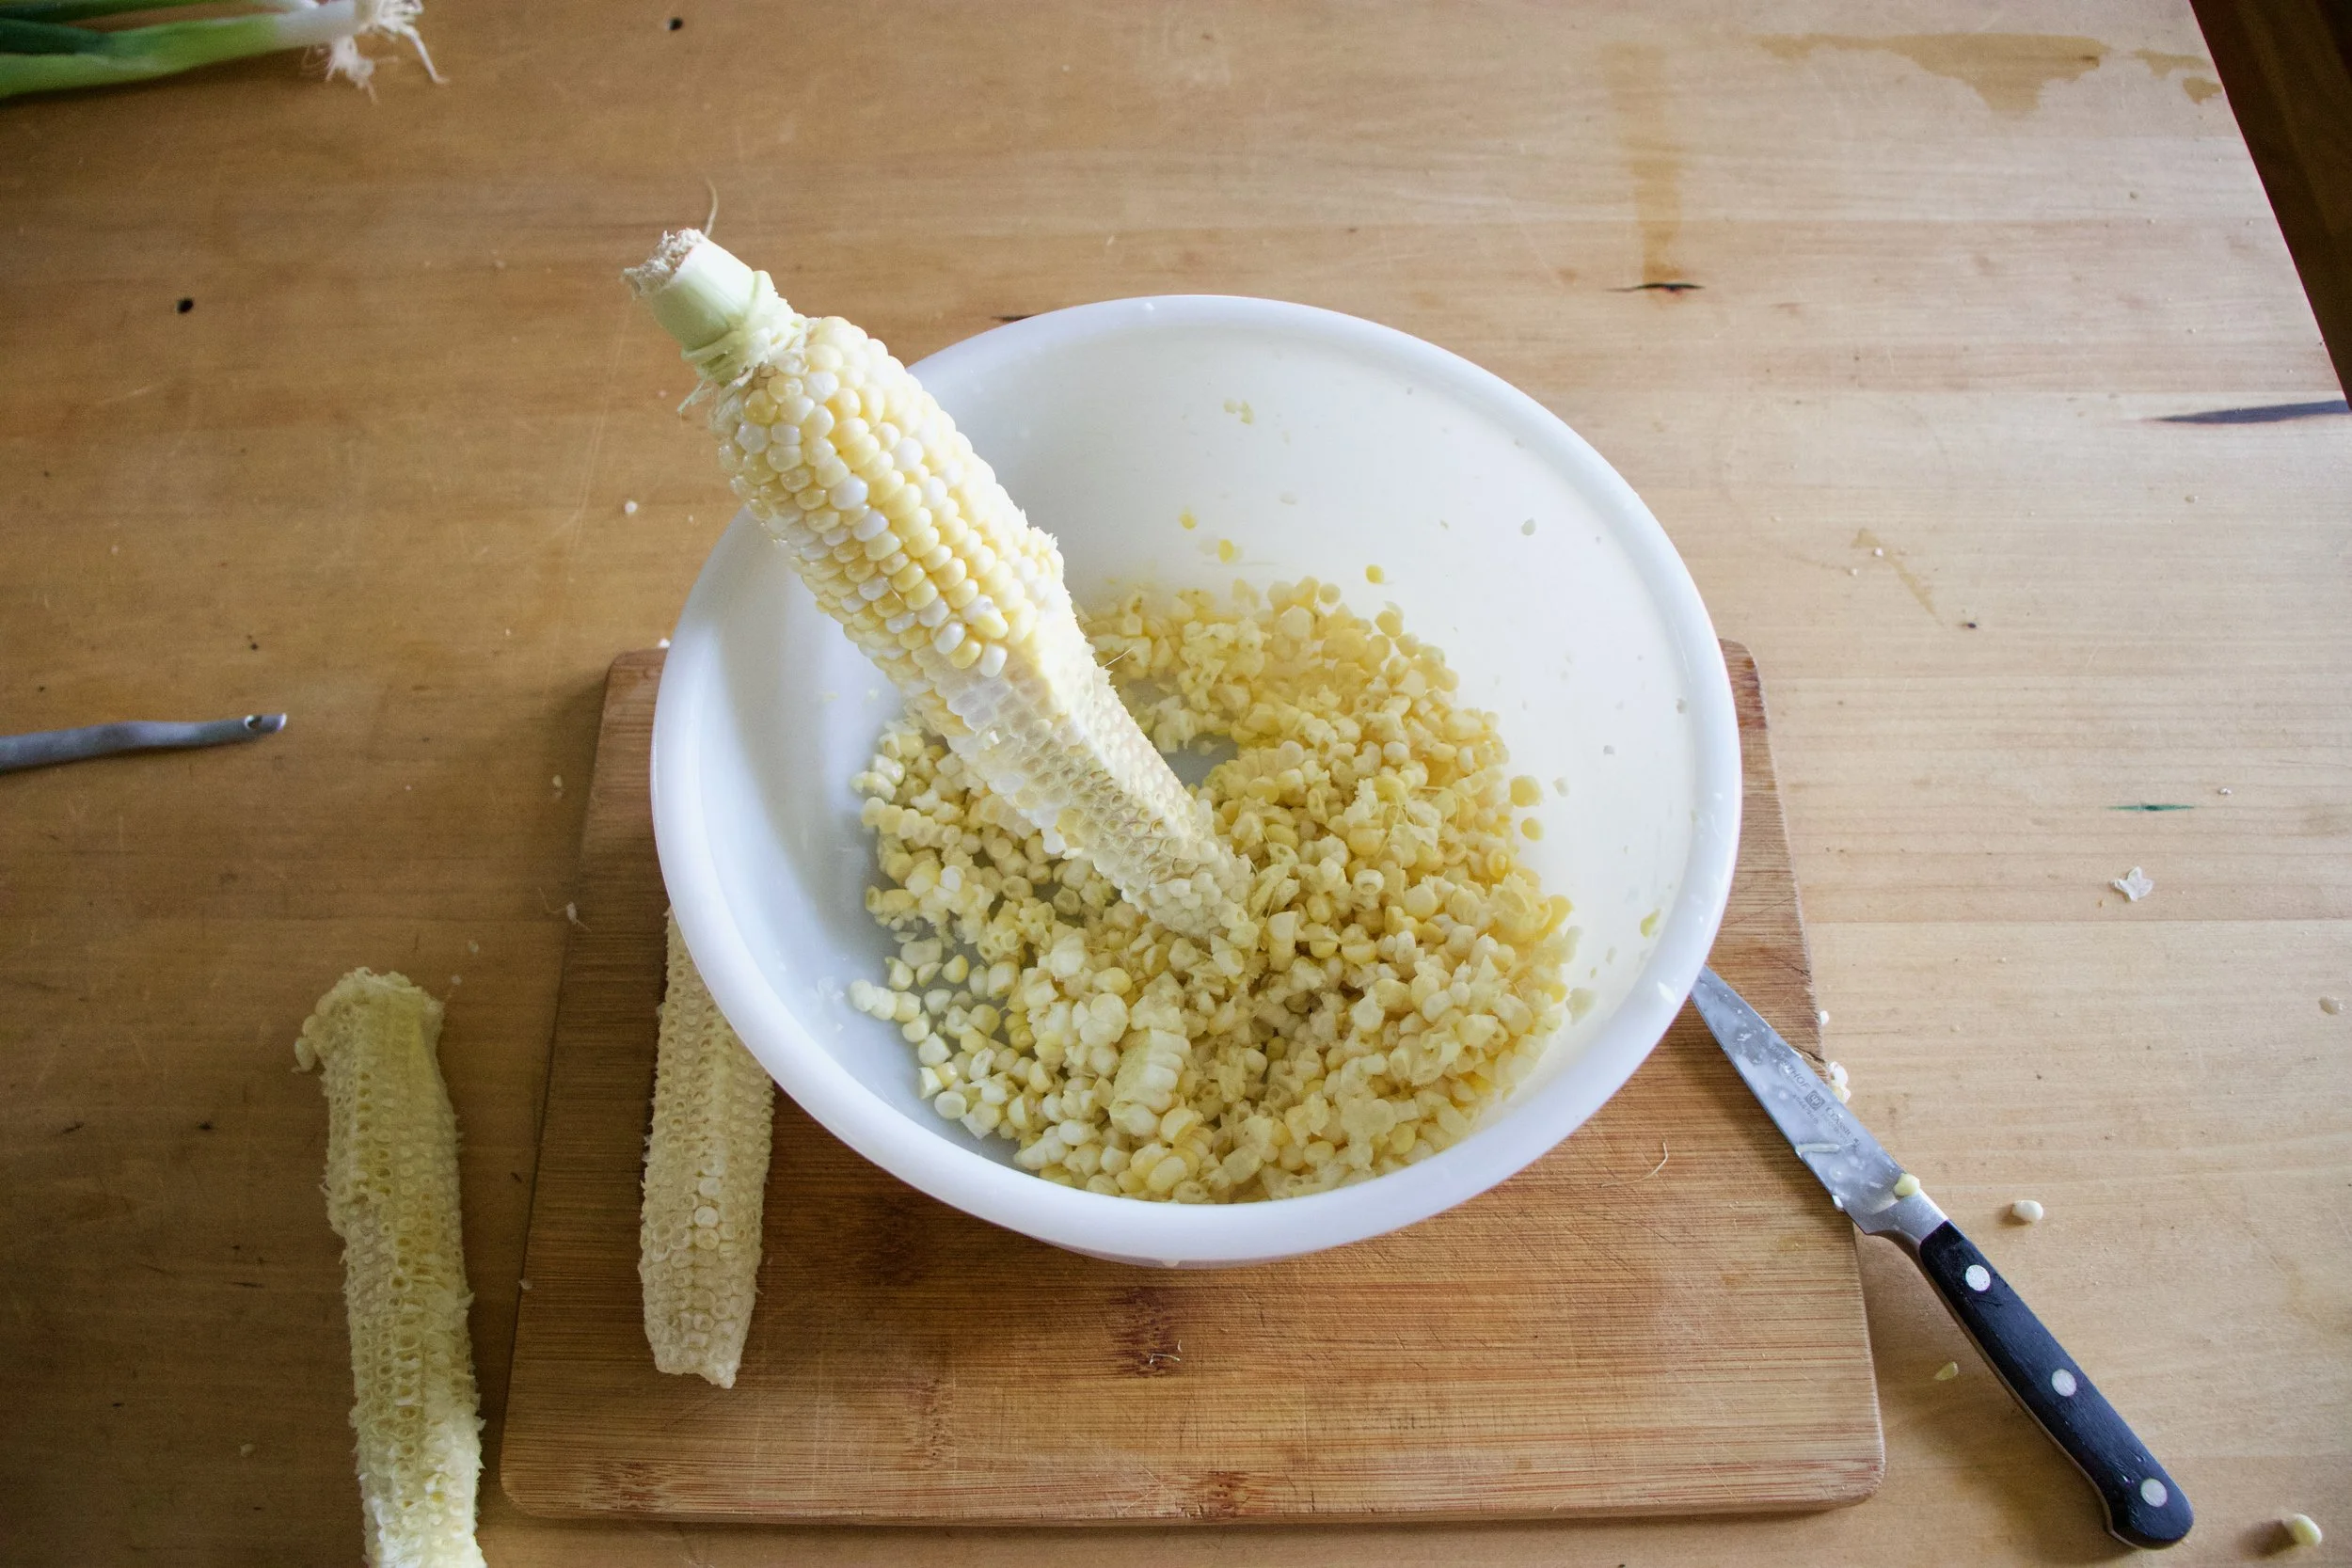
Then the corn. Remove the kernels from the cobs. Best way is to hold corn in a large bowl and cut downward. Don%u2019t want corn flying all over the place!
Add most of the corn you just cut off the cob to the blender with the oat flour, along with with flax and water. Blend until smooth.
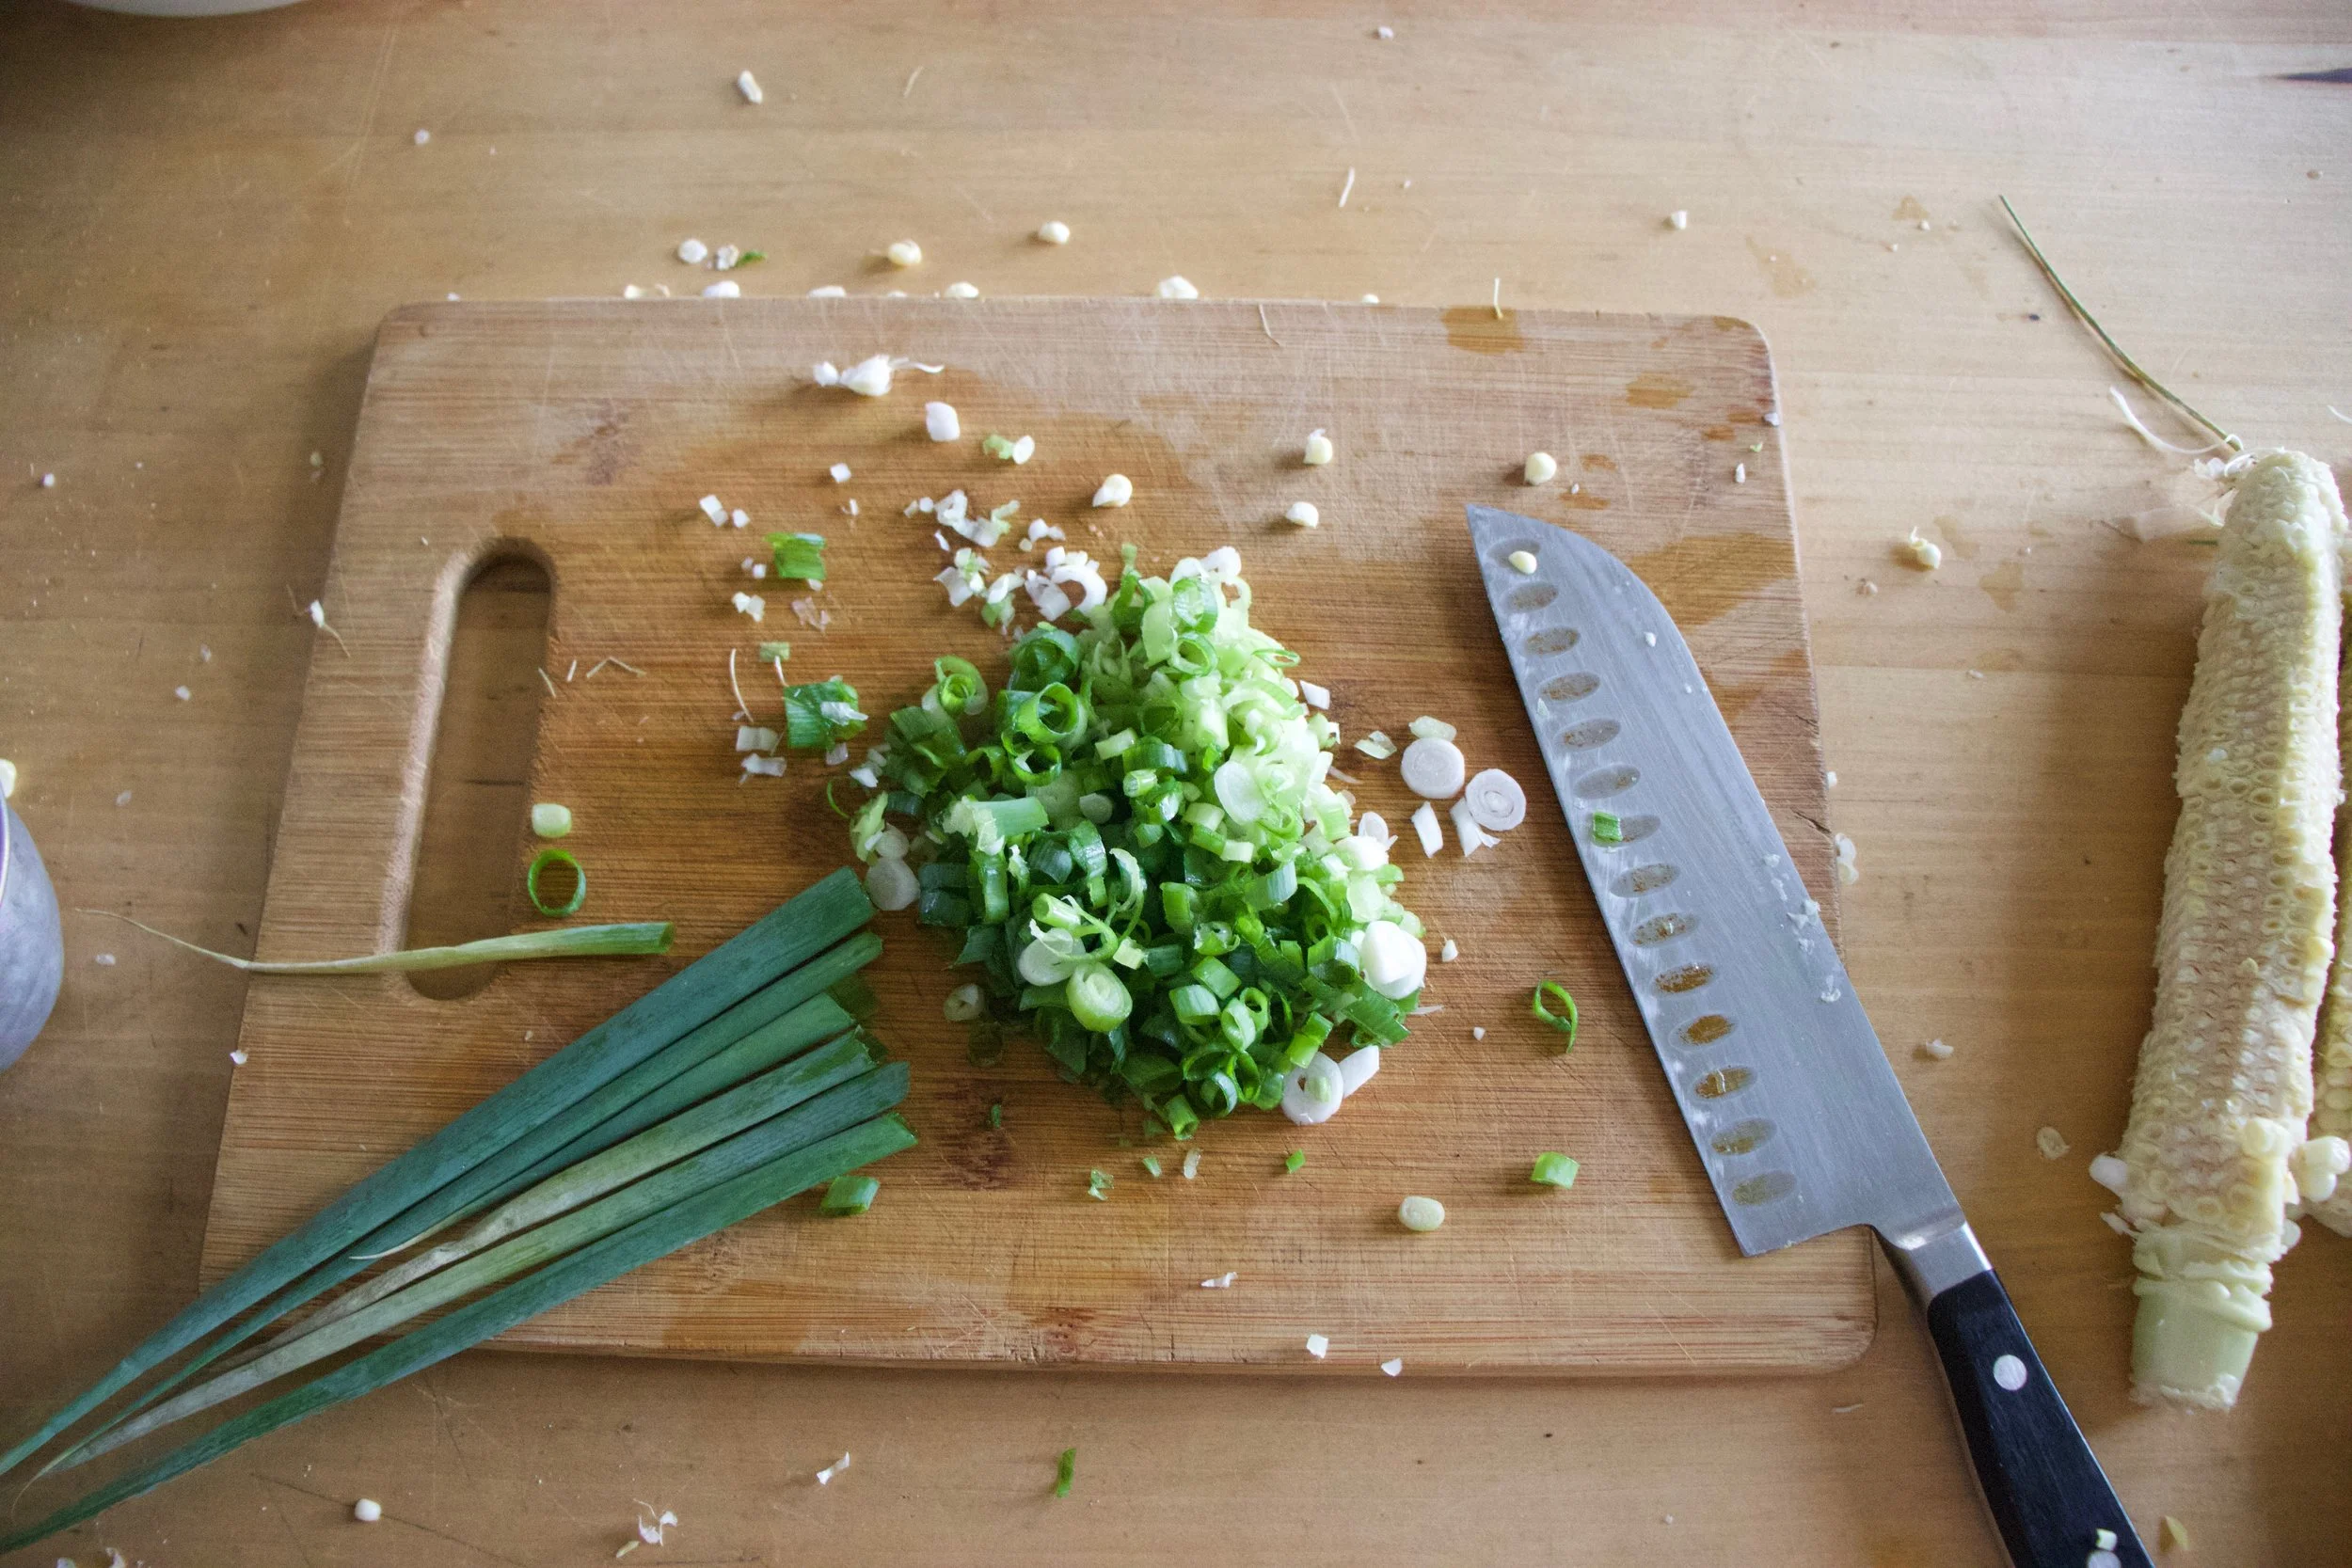
Chop the scallions into thin and tiny pieces.

Now dump the contents of the blender into a bowl, add in the scallions, the baking powder, and the extra oats and corn. Mix it all up and then let the batter rest for a few minutes (like 10) so the oats have a chance to really absorb all the liquid.

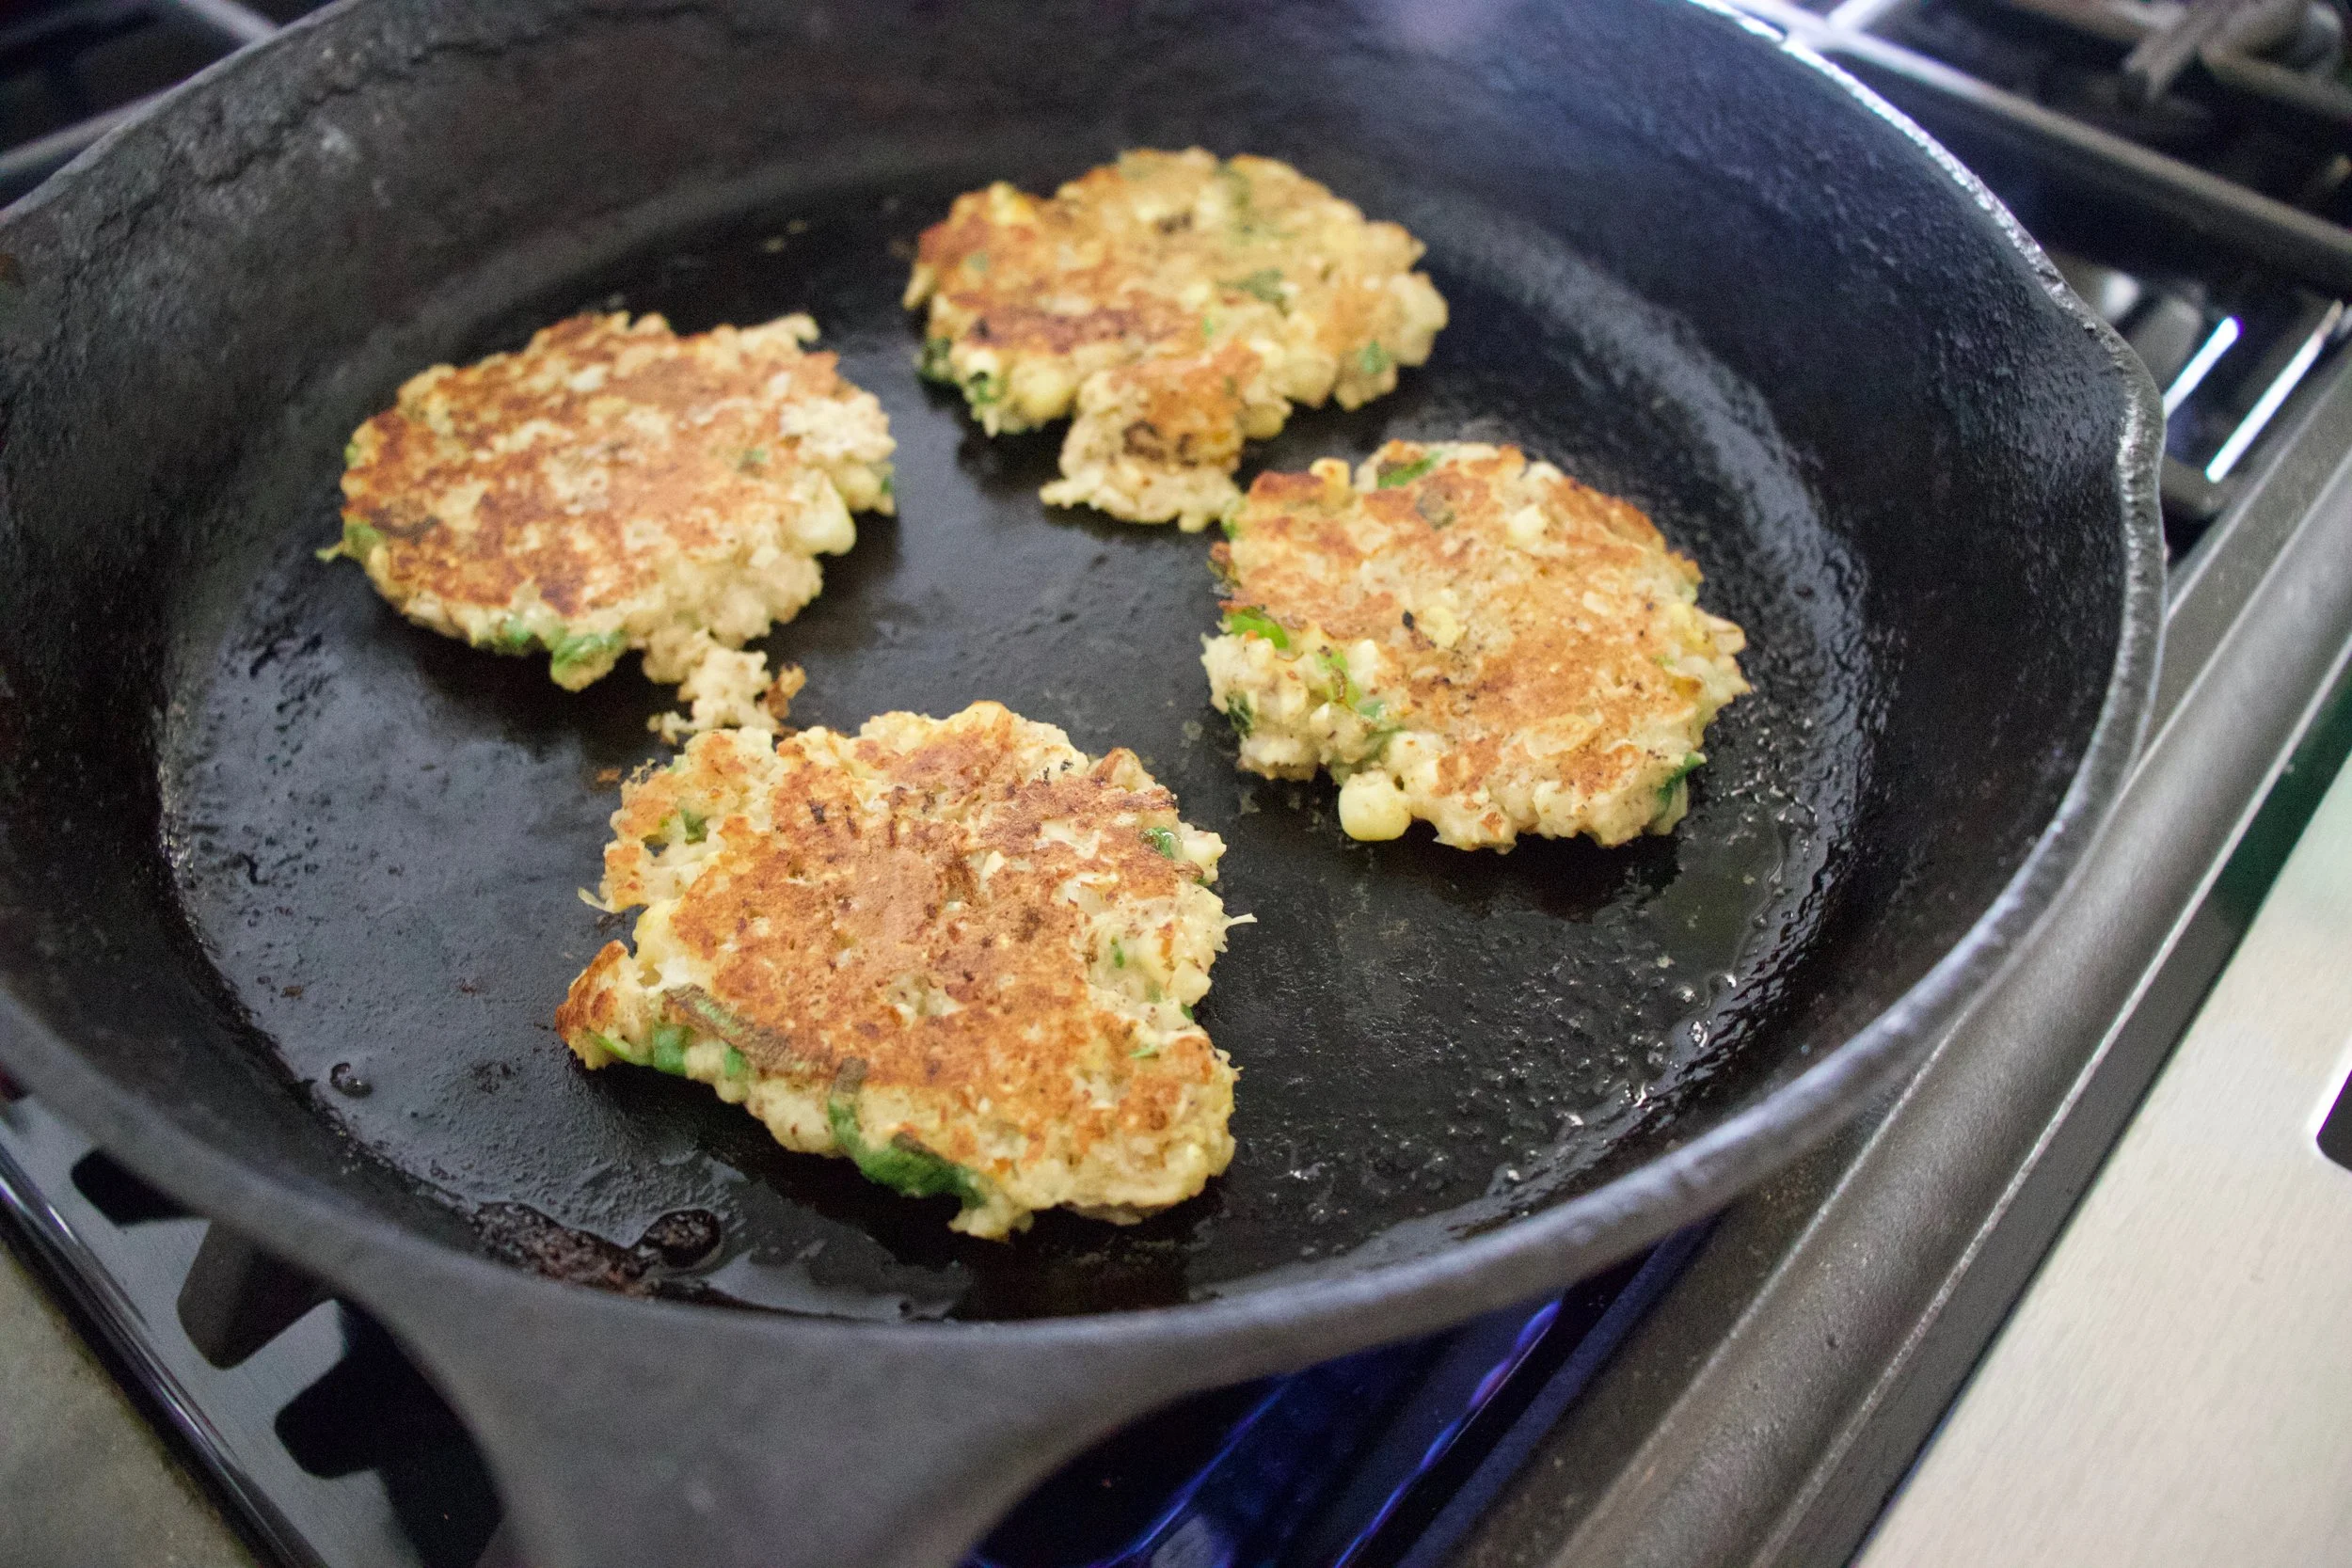
And then to cook them. Heat a lightly oiled skillet to medium high heat. Once skillet is hot, drop scoops of batter into it. Cook for 3-4 minutes or until the bottom is a nice deep golden brown. Flip and cook the other side the same.
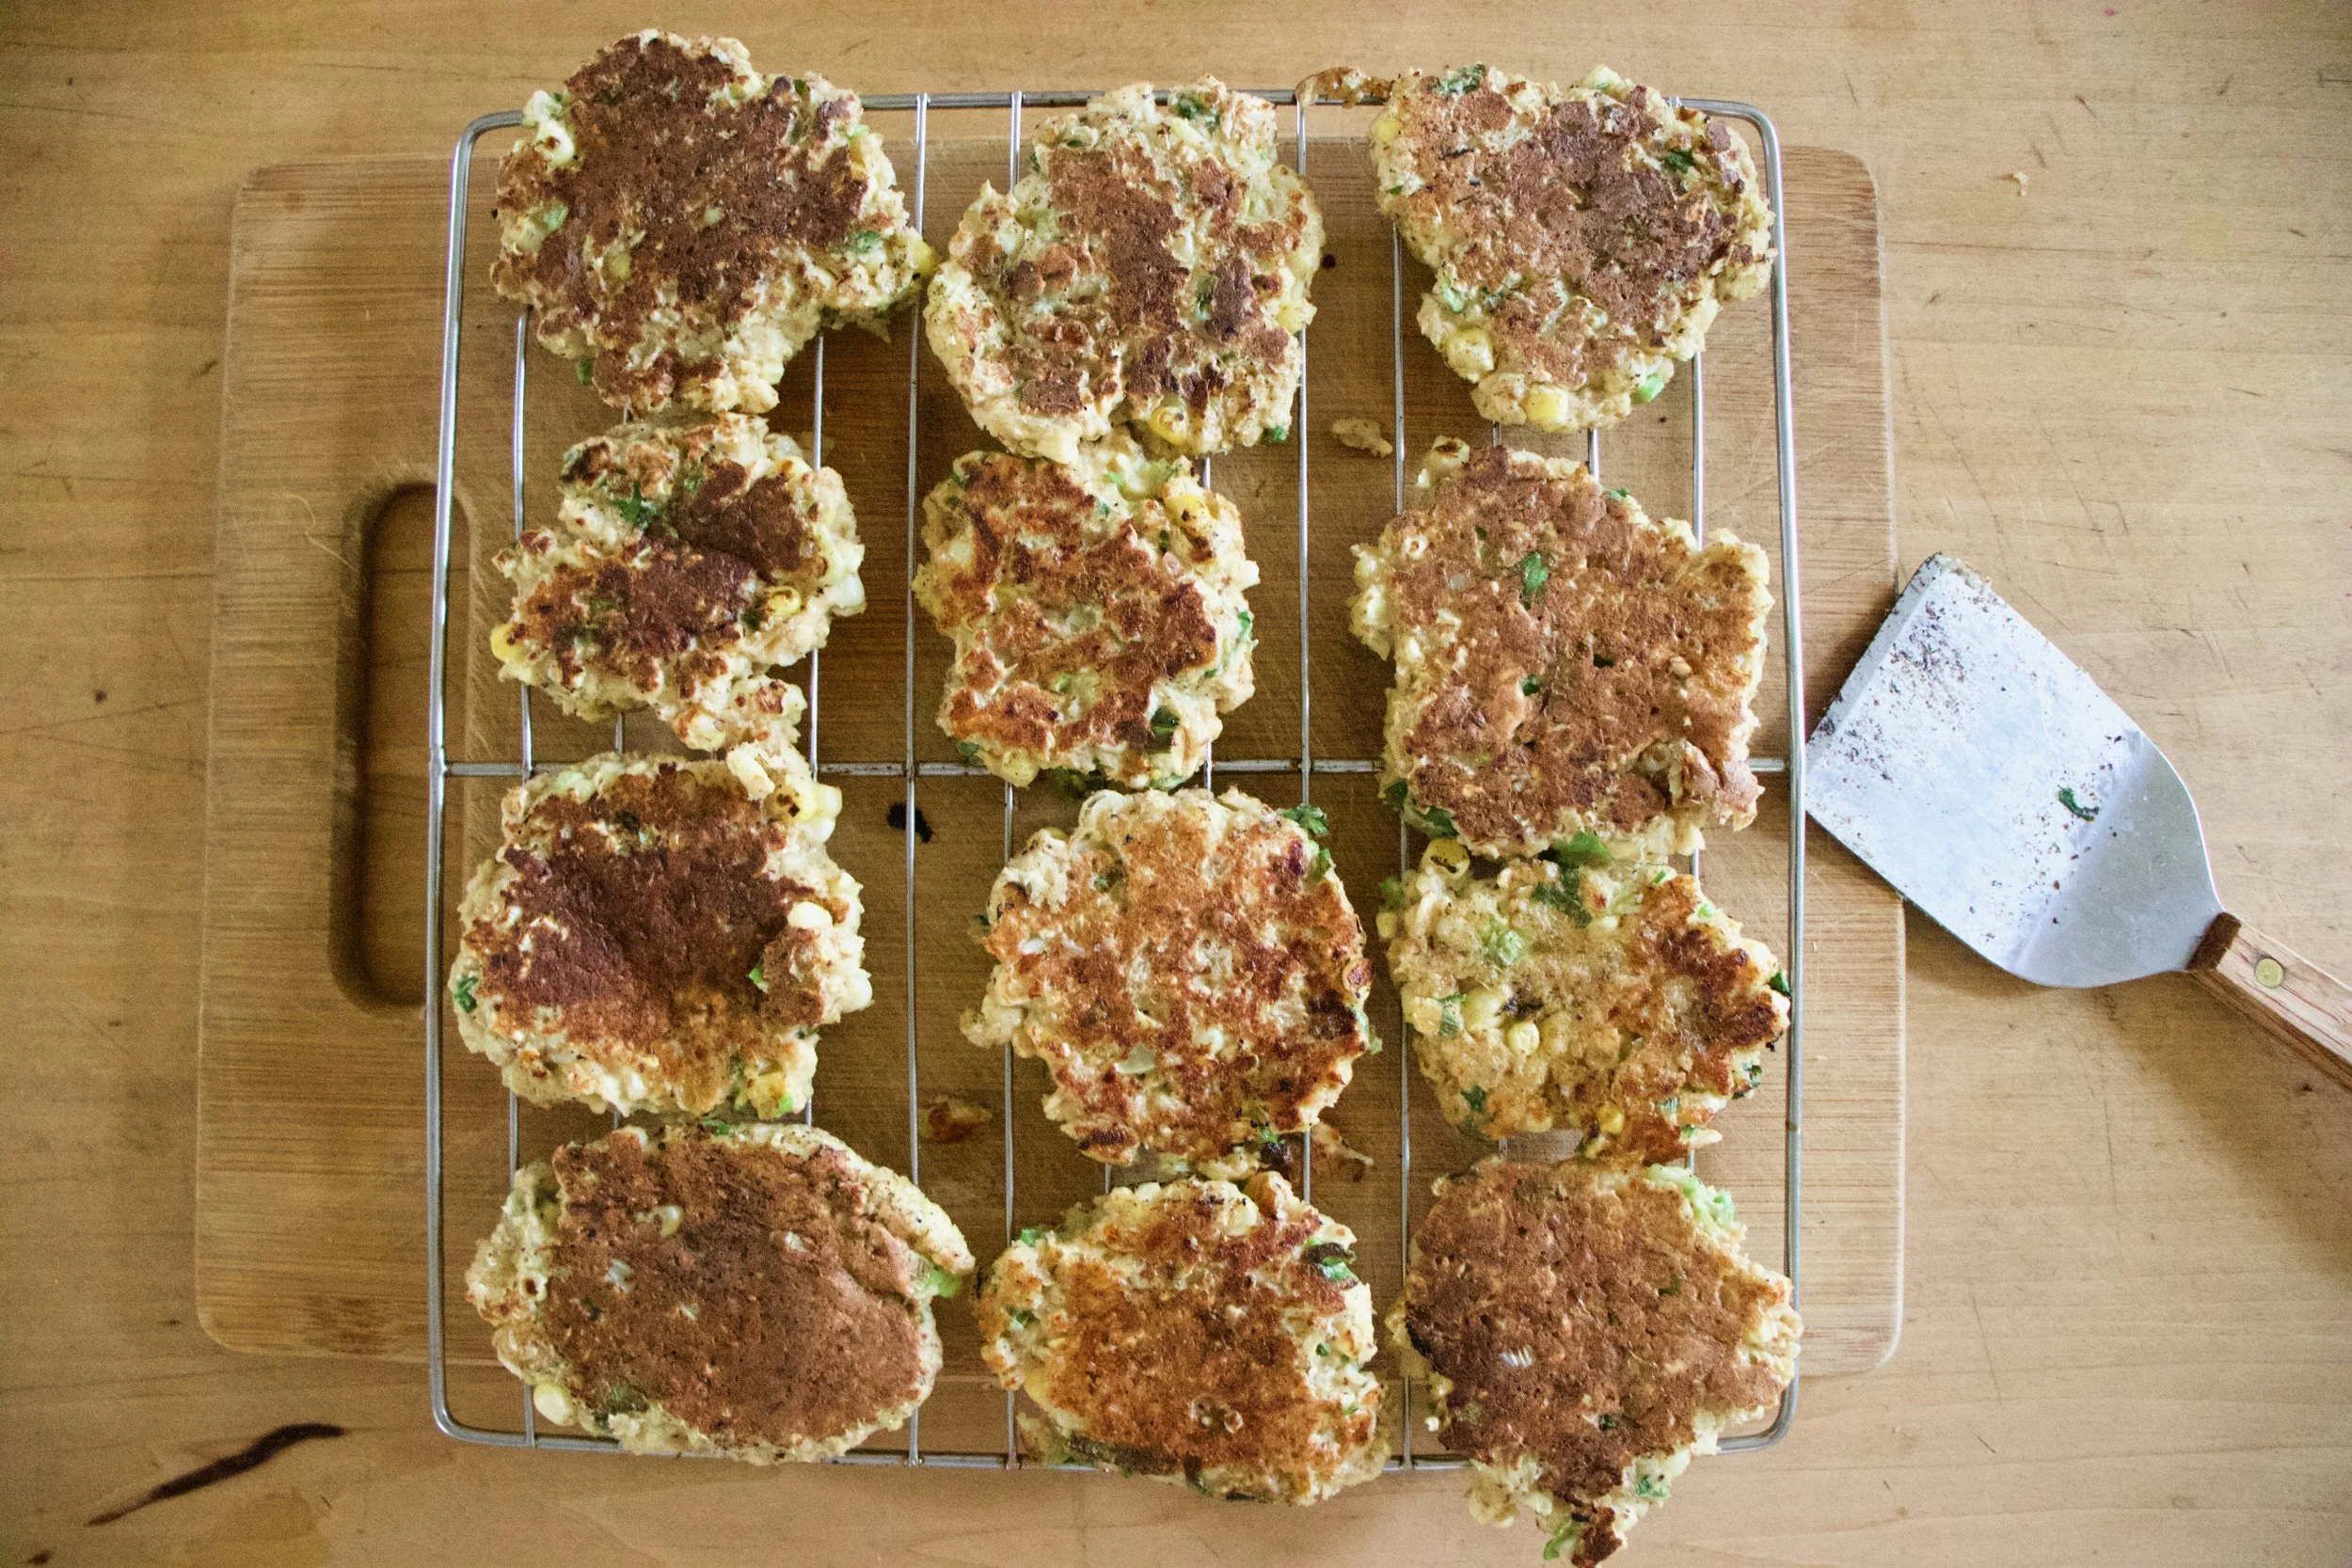
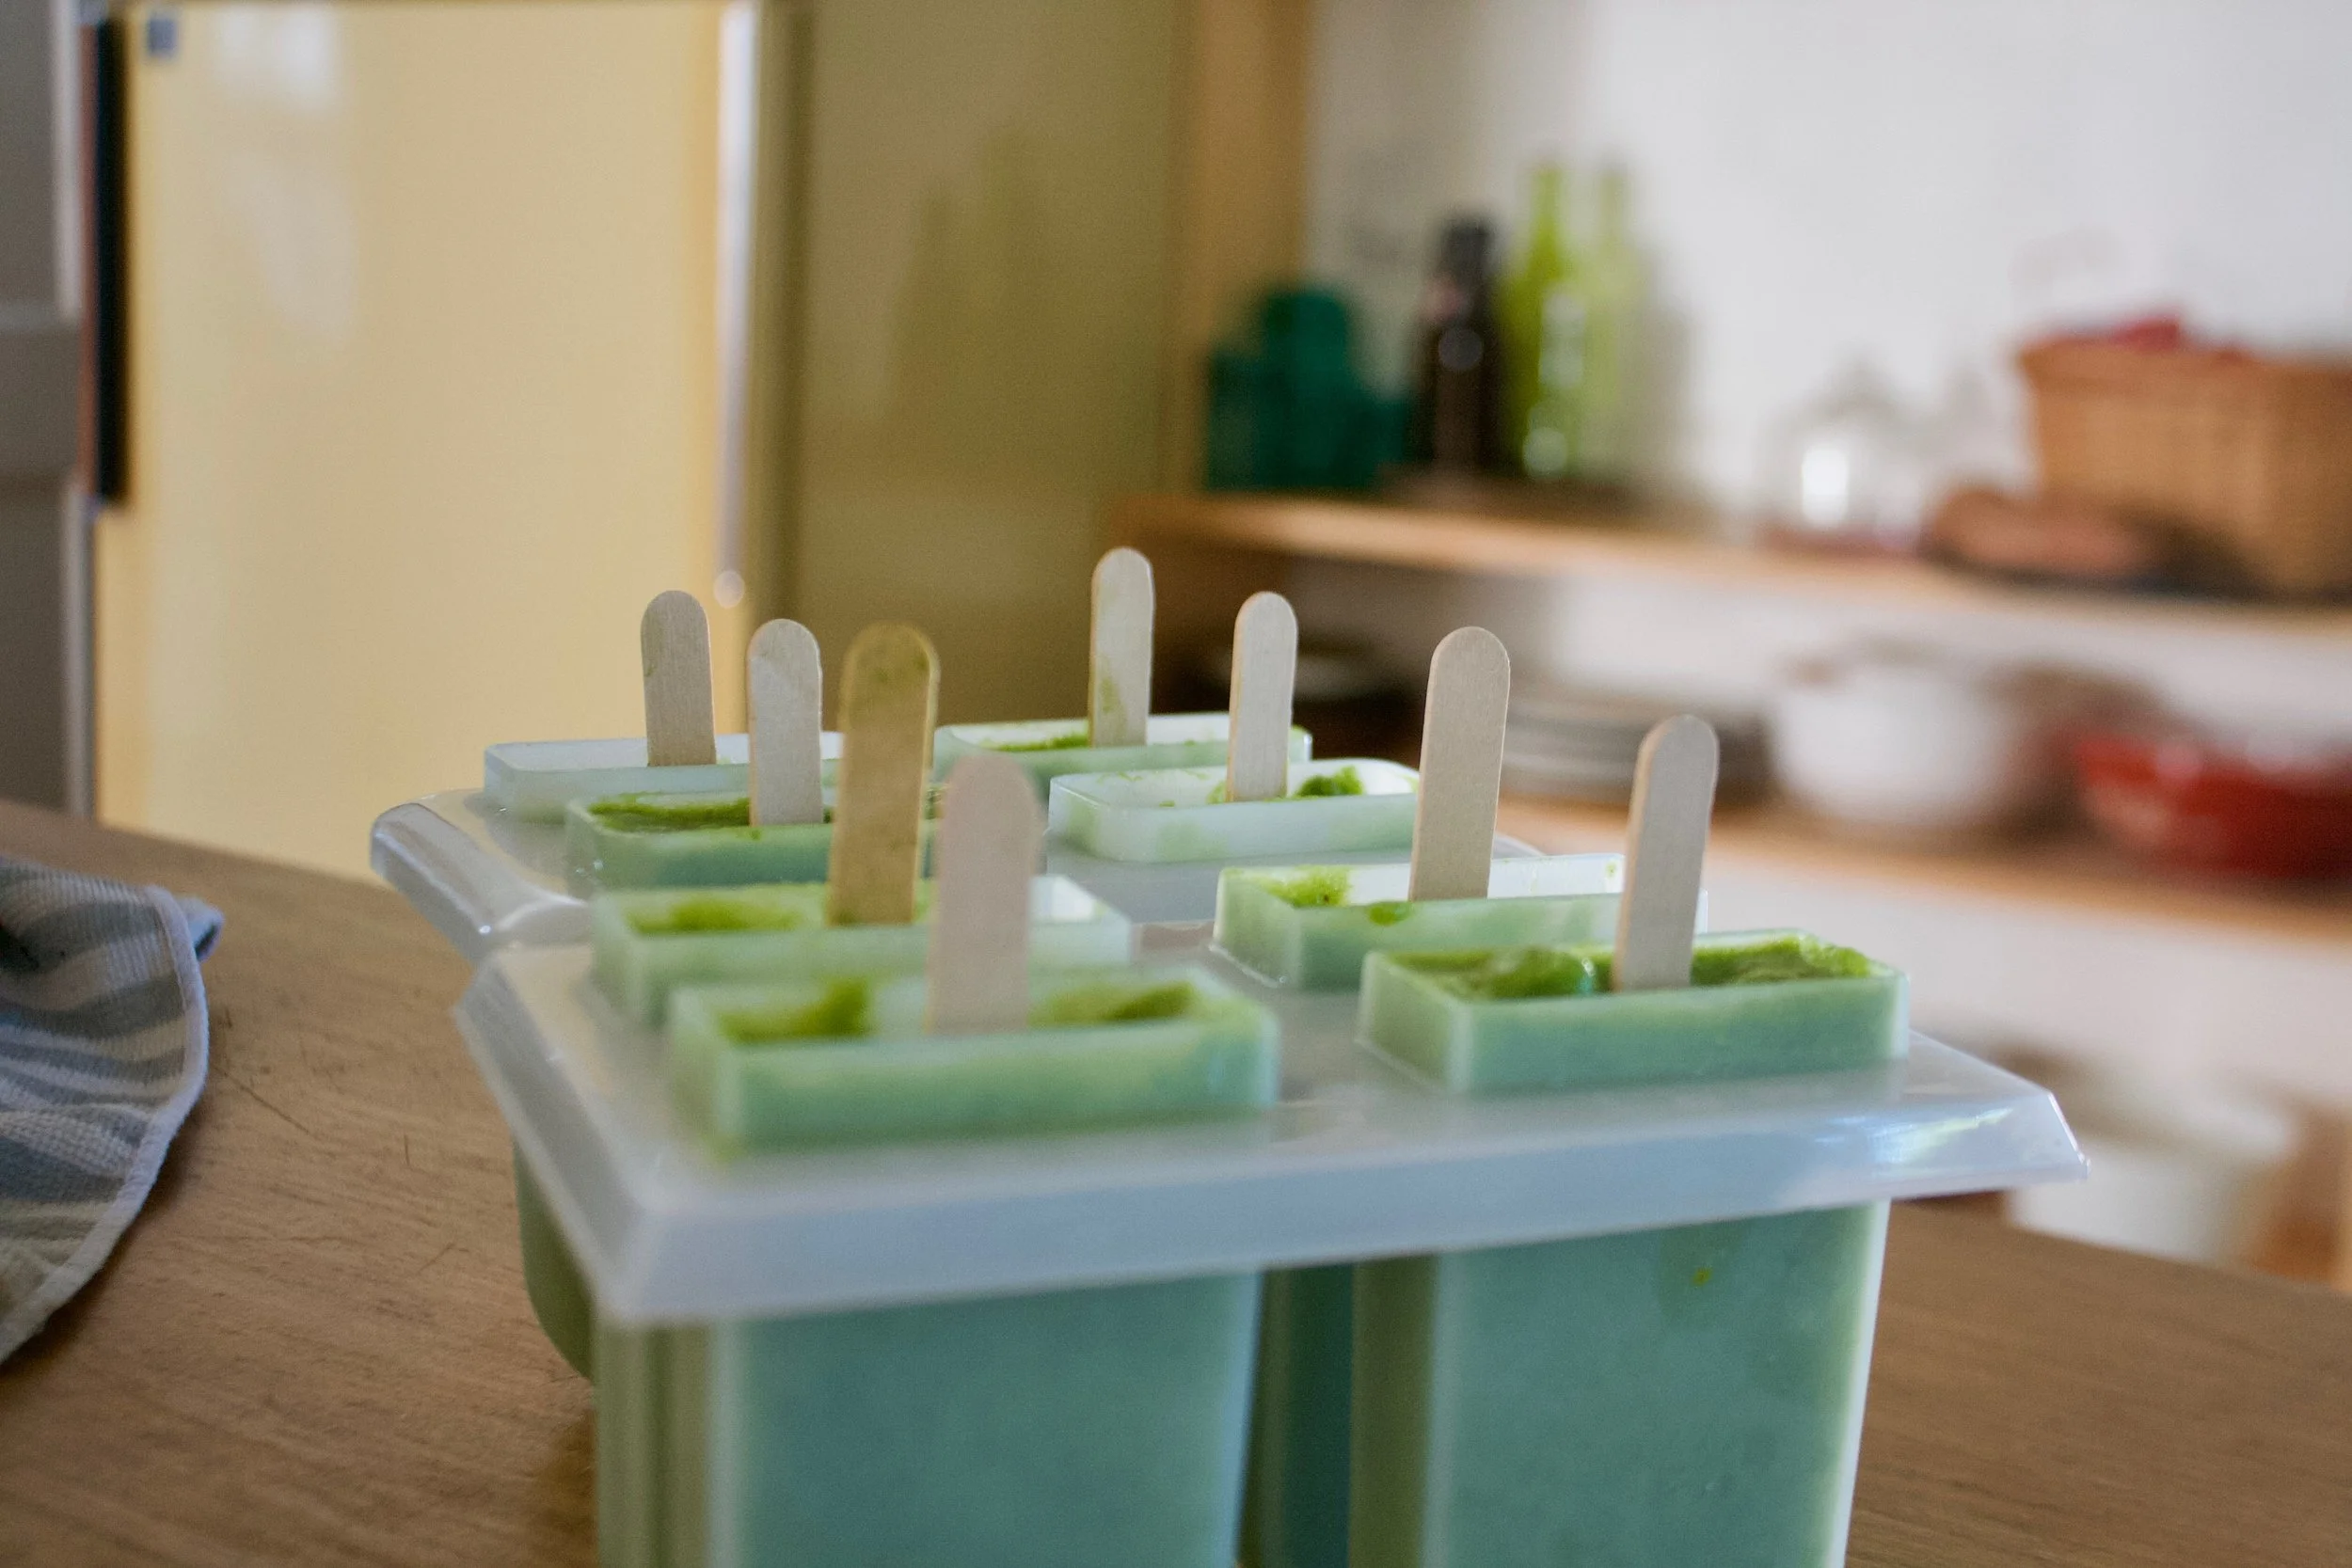
When fritters are done cooking, place them on a wire rack. So they don%u2019t get soggy.

And then serve them right away. I ate mine with fresh salsa. Definitely the way to go. So GOOD!
Now eat your corn.
-C
makes about 12 fritters
-
3 ears fresh corn ( about 1 1/2 cups of kernels)
-
1 1/2 cups rolled oats (gluten free if needed)
-
1/2 teaspoon baking powder
-
2-3 scallions
-
1 tablespoon flax meal
-
3 tablespoons water
-
salt and pepper
-
a little oil for skillet
Combine water and flax meal, mix and set aside.
Place 1 cup of oats into blender or food processor and blend for about a minutes or until the oats are a fine flour.
Grab corn and remove from cob. Best way to do this is to place corn vertically in a big bowl and cut downwards so the bowl catches all the kernels. Cut enough corn until you have about 1 1/2 cups of kernels. Also, garb scallions and chop into very small, thin pieces.
Add in a cup of the corn, the flax and water mixture, baking powder, and a pinch of salt and pepper. Pulse or blend until completely combined and the mixture is mostly smooth.. Dump mixture into a bowl and add in the remaining corn, chopped scallions, and oats and mix together. The mixture should not be runny, but also should not be dry enough to pack together. If the mixture seems too dry and tight, add in a tablespoon or two more or water. To wet, add in a small handful of oats.
Once batter is mixed, set aside for about 10 minutes to rest.
Grab skillet and place on medium high heat. Add a touch of oil to pan and make sure it evenly coats the bottom. Once pan is preheated, add scoops batter into pan (about 2 tablespoons each). Cook first side for about 3-4 minutes or until dark golden brown, then flip and cook the other sides for another 2-3 minutes until a dark golden brown. Remove from pan and either place on a wire rack or a plate. ( I recommend a wire rack just to keep them from getting soggy.)
Serve right away. Fresh salsa goes amazingly with them!
Any left overs can be stored in fridge and reheated in the oven.
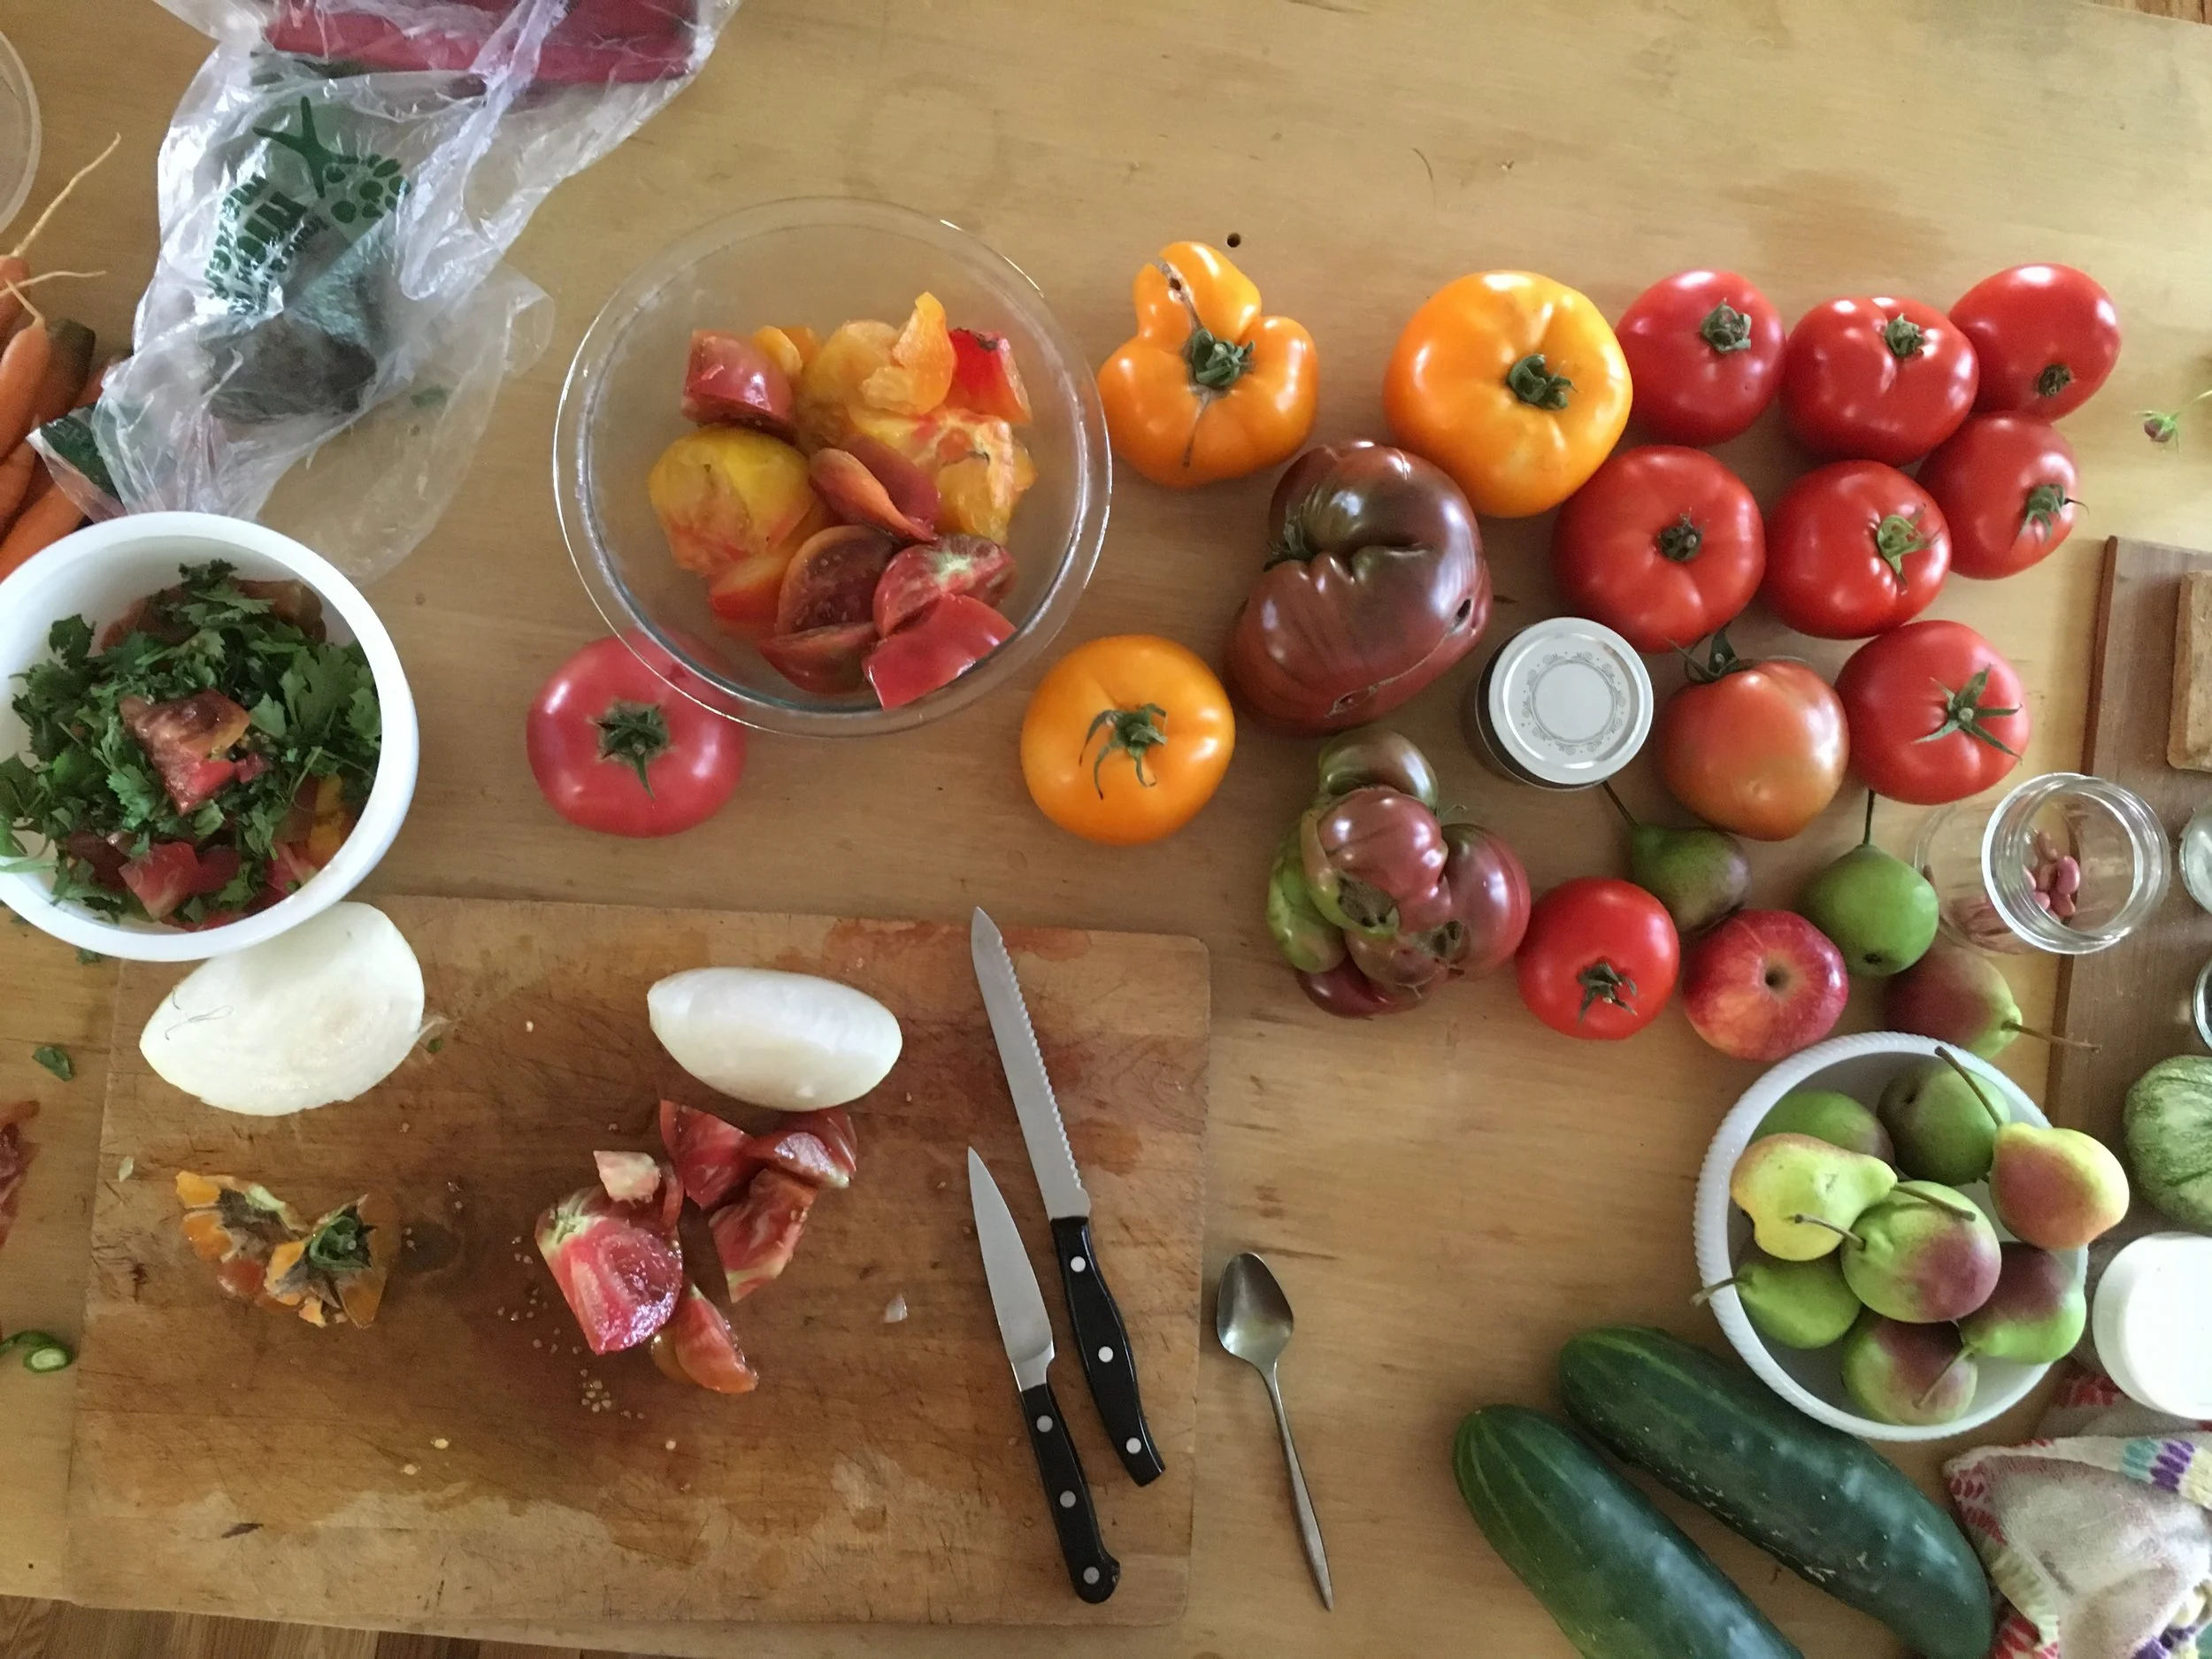
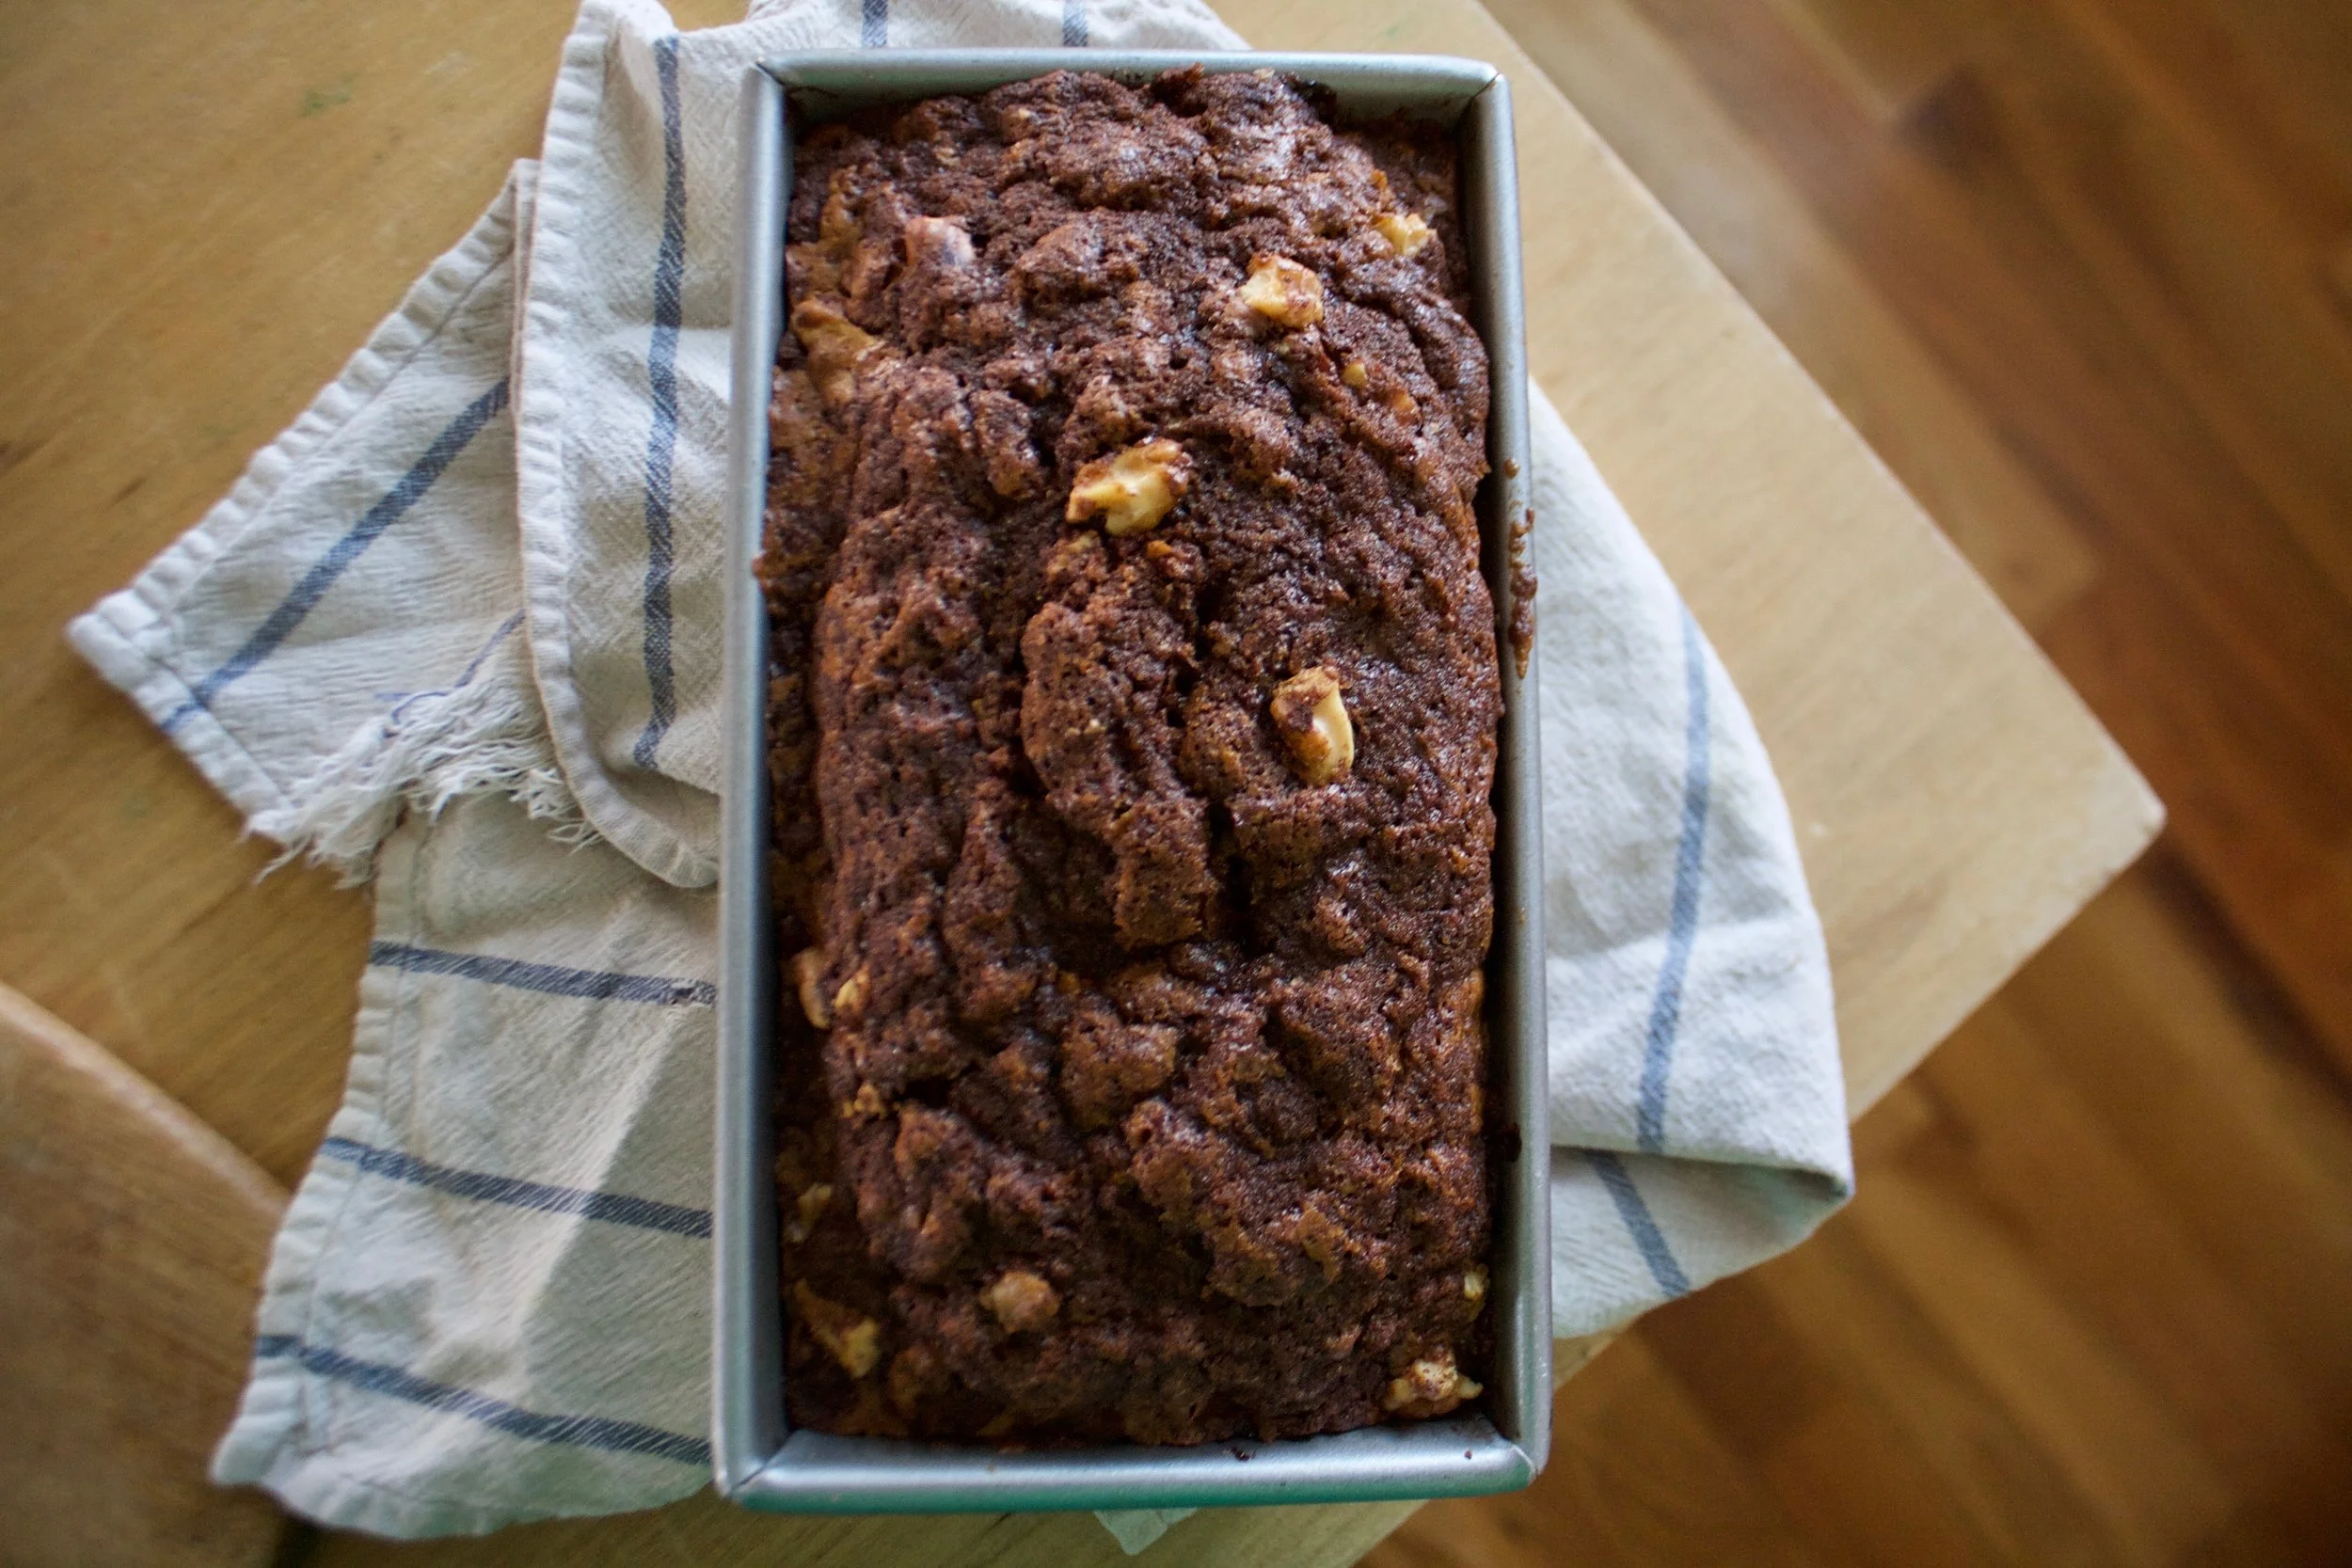
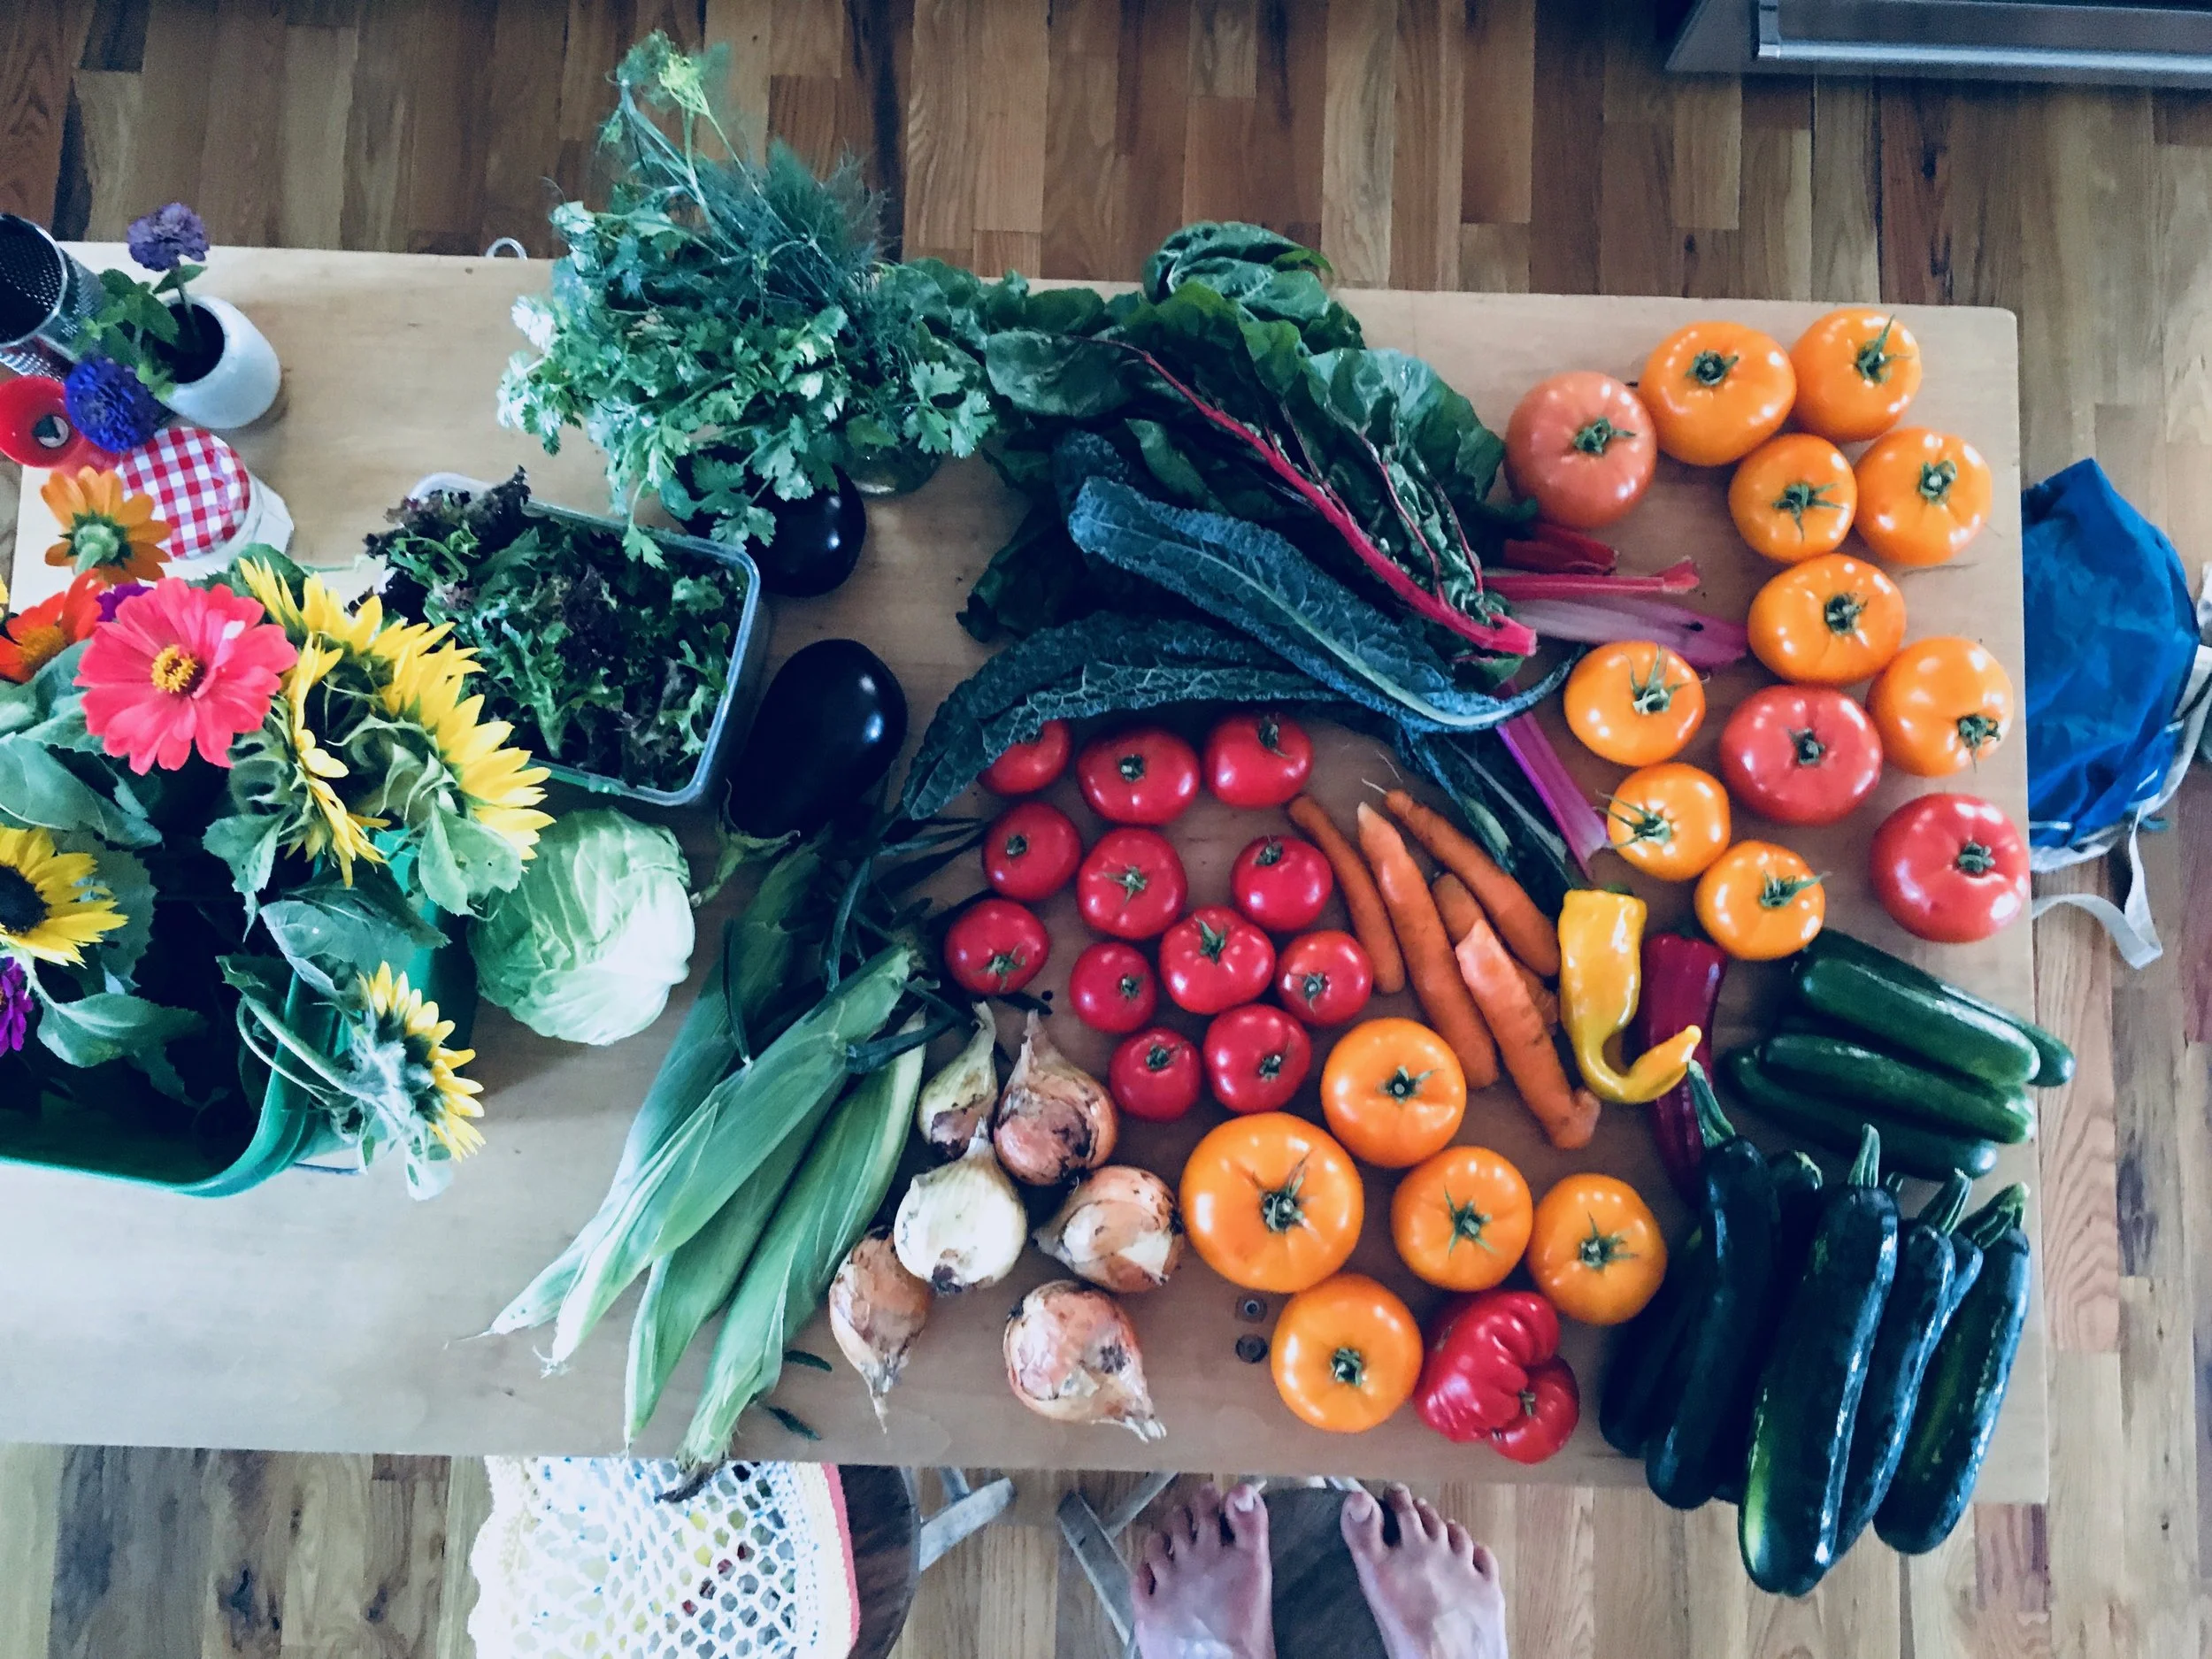
I am sadly at my last few bags of frozen garden foods from last season. As of now I have a bag of tomatoes, a couple bags of shredded zucchini, and a bag of rhubarb. Well, had a bag of rhubarb. I think I have eaten almost all of it already. My rhubarb patch better get up and producing stalks soon. And as for the rest of the veggies that I will require. Guess I am going to be surviving mostly on roots from farm share (we are getting a lot more greens though!!!!) and probably doing a bit more grocery shopping then I care too. A few more months. I can do it.
Anyway, enough about my freezer and lack of fresh produce problems.
Here in Vermont maple season is well on it%u2019s way making it a perfect time for anything maple. And rhubarb. Yeah I am using my frozen rhubarb from last year, but any time now (after the snow melts) there will be plenty of stalks for the taking. There will be so much maple and so much fresh rhubarb which are the perfect taste combination. Exciting times! And when added to oatmeal, things just get more gooder. (I know gooder is not a word but I think it should be) Oatmeal, especially baked, is the stuff where all gooder things start.
Have you had baked oatmeal yet? It truly is fantastic. Not at all gummy and gloopy like stove topped cooked oatmeal (but I like it like that too). It still has a good bite to it while still being soft and creamy and boy oh boy is it just the bees knees. With the addition of some crunchy almond friends, well even better. Trust me. If you are a oatmeal eater, you must try it baked. Best part is that it can be eaten as breakfast but also I have been serving it to the mr for dessert with a healthy drizzle of more maple. It%u2019s that good friends. From breakfast to dessert. Everyone is happy.
To the baked oatmeal.

The stuff. Old fashion oats, cinnamon, salt, baking powder, rhubarb (fresh or frozen), REAL maple syrup, some plant milk, a few flax eggs, a bit of tahini, and some almonds.
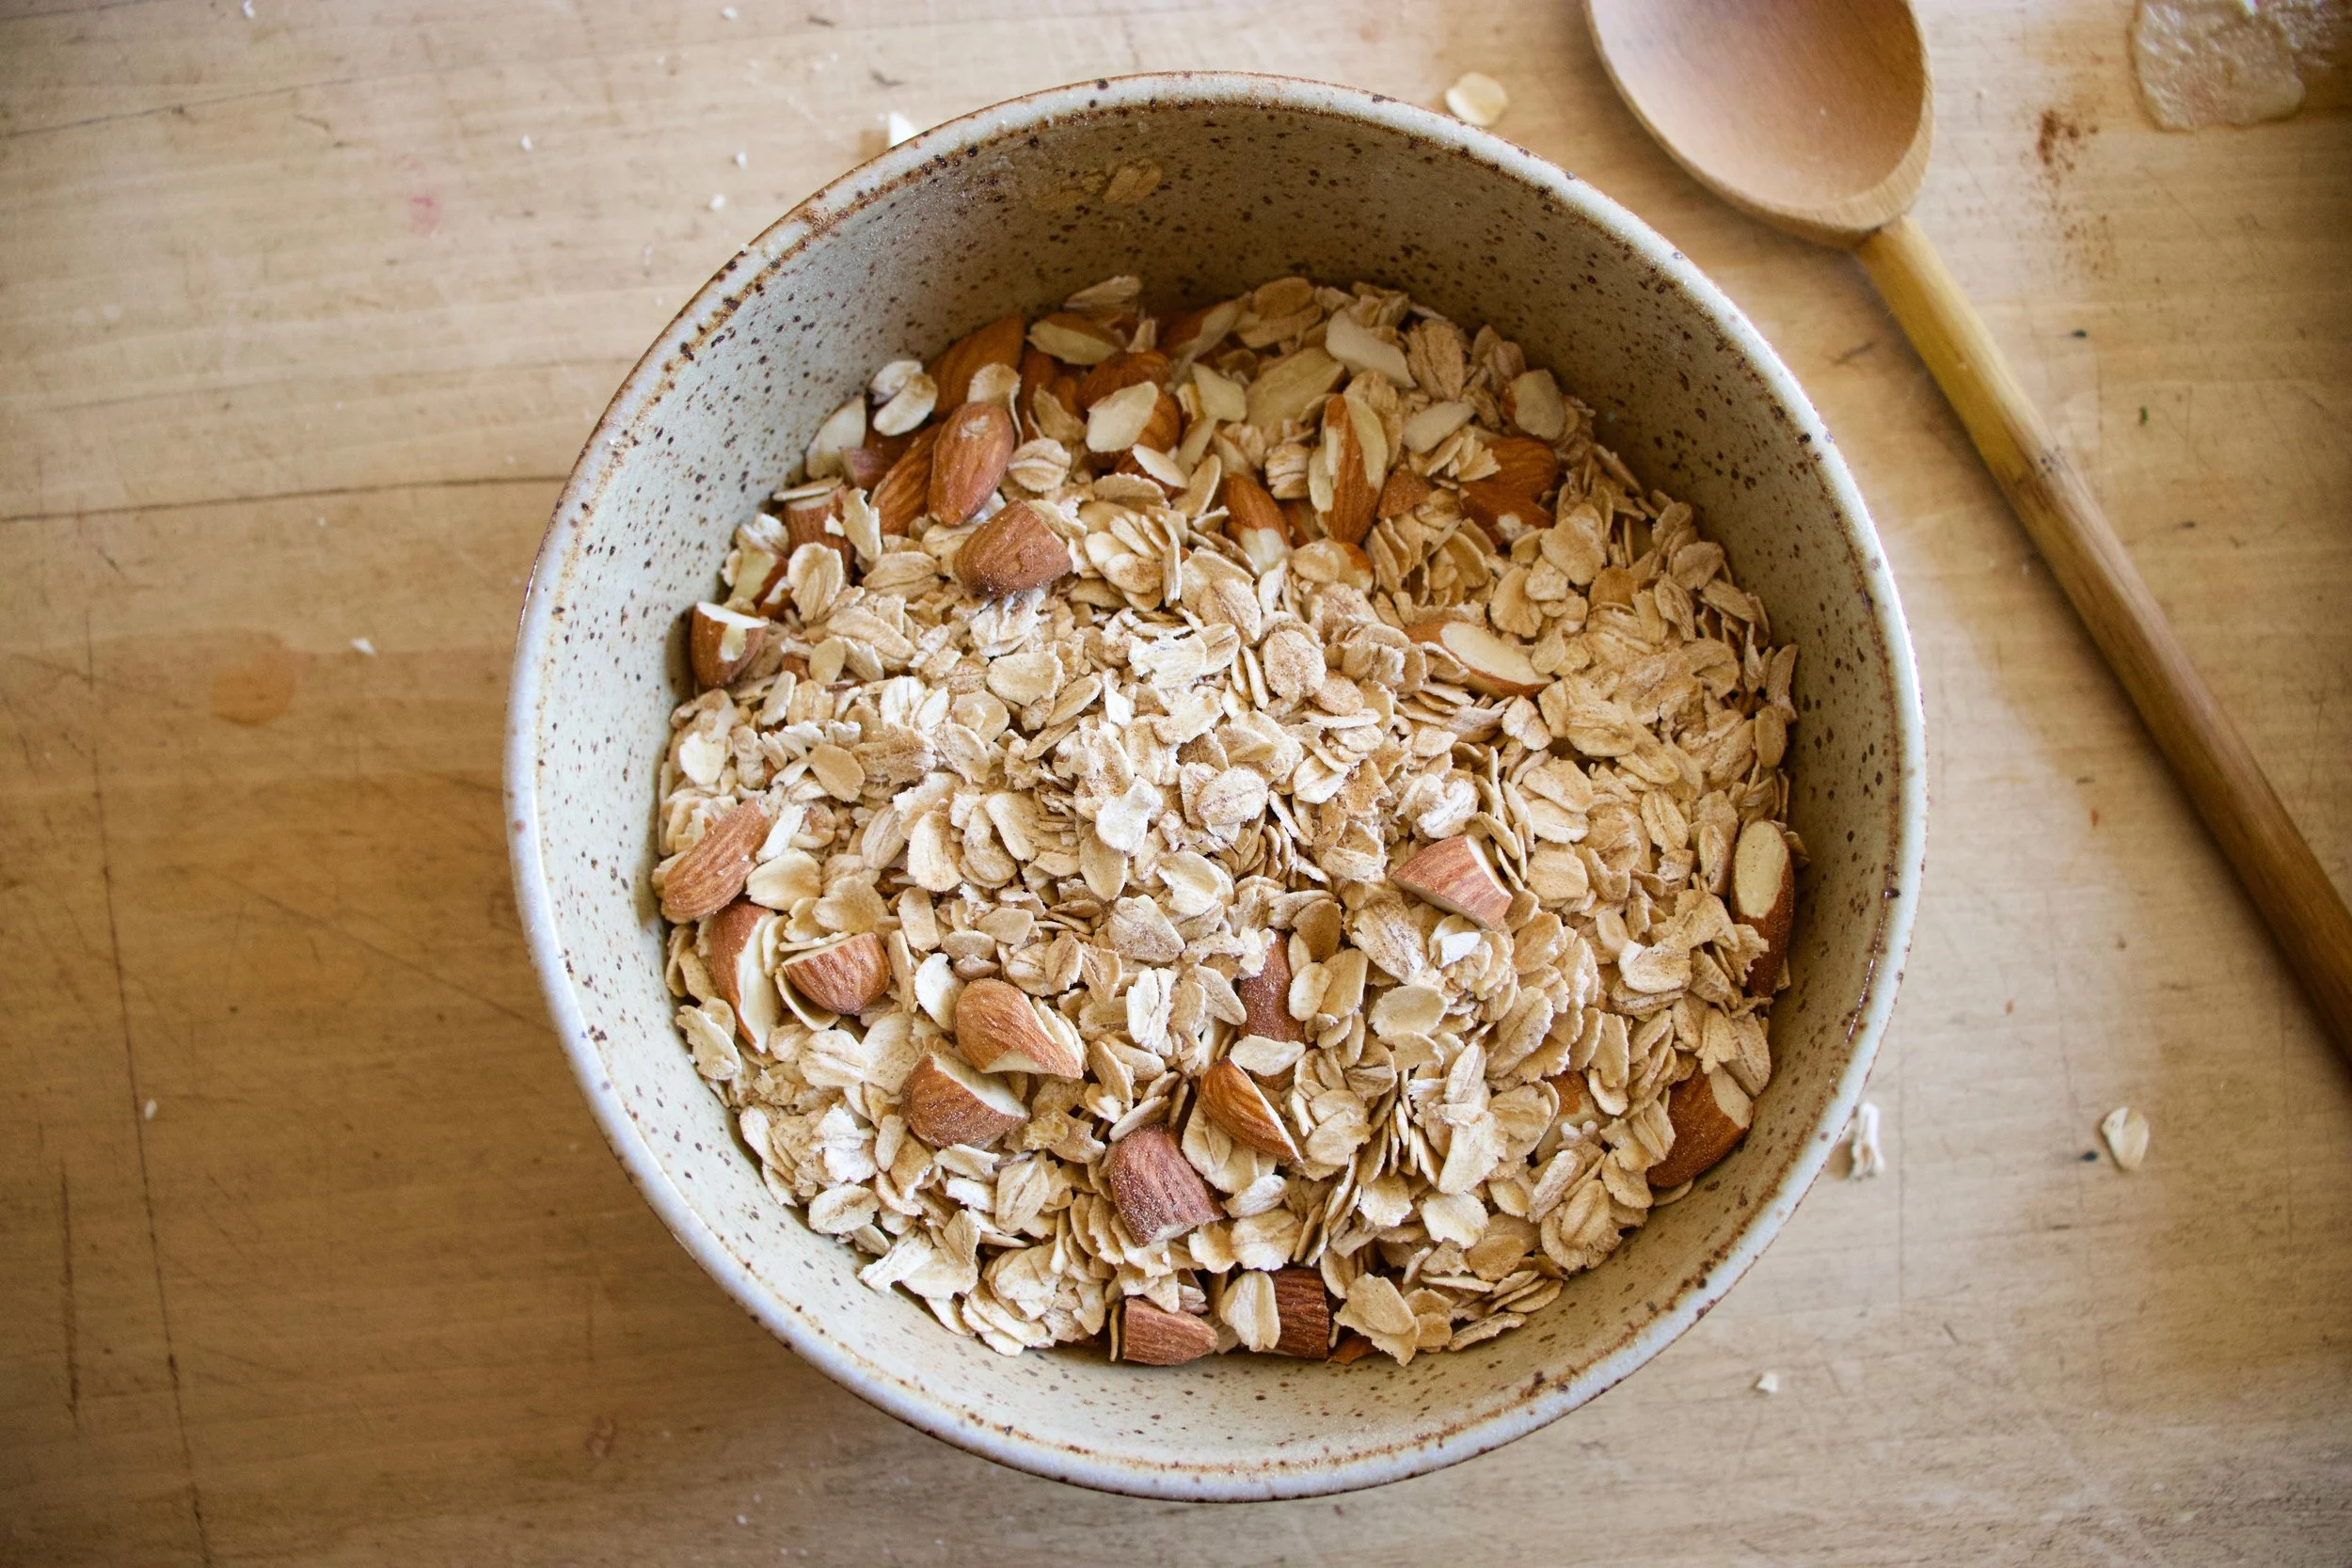
To start. Oats, cinnamon. salt, baking powder and almonds get a quick toss together in a big bowl.
If you rhubarb is not already chopped up into inch long pieces, do that. I already did before freezing it so yea me. Once its chopped, layer almost all of it (reserve a few small needful to toss on top) into a lightly greased 9×9 inch baking dish then cover evenly with the oat mixture.

In now empty bowl mix together the milk, the flax eggs, the tahini, and the maple until evenly incorporated.

Pour the wet mixture all over the oats and let it absorb.

Once the liquid is all absorbed , top with any left over almonds and the left over rhubarb. For good looks.
Pop into a hot oven to bake.
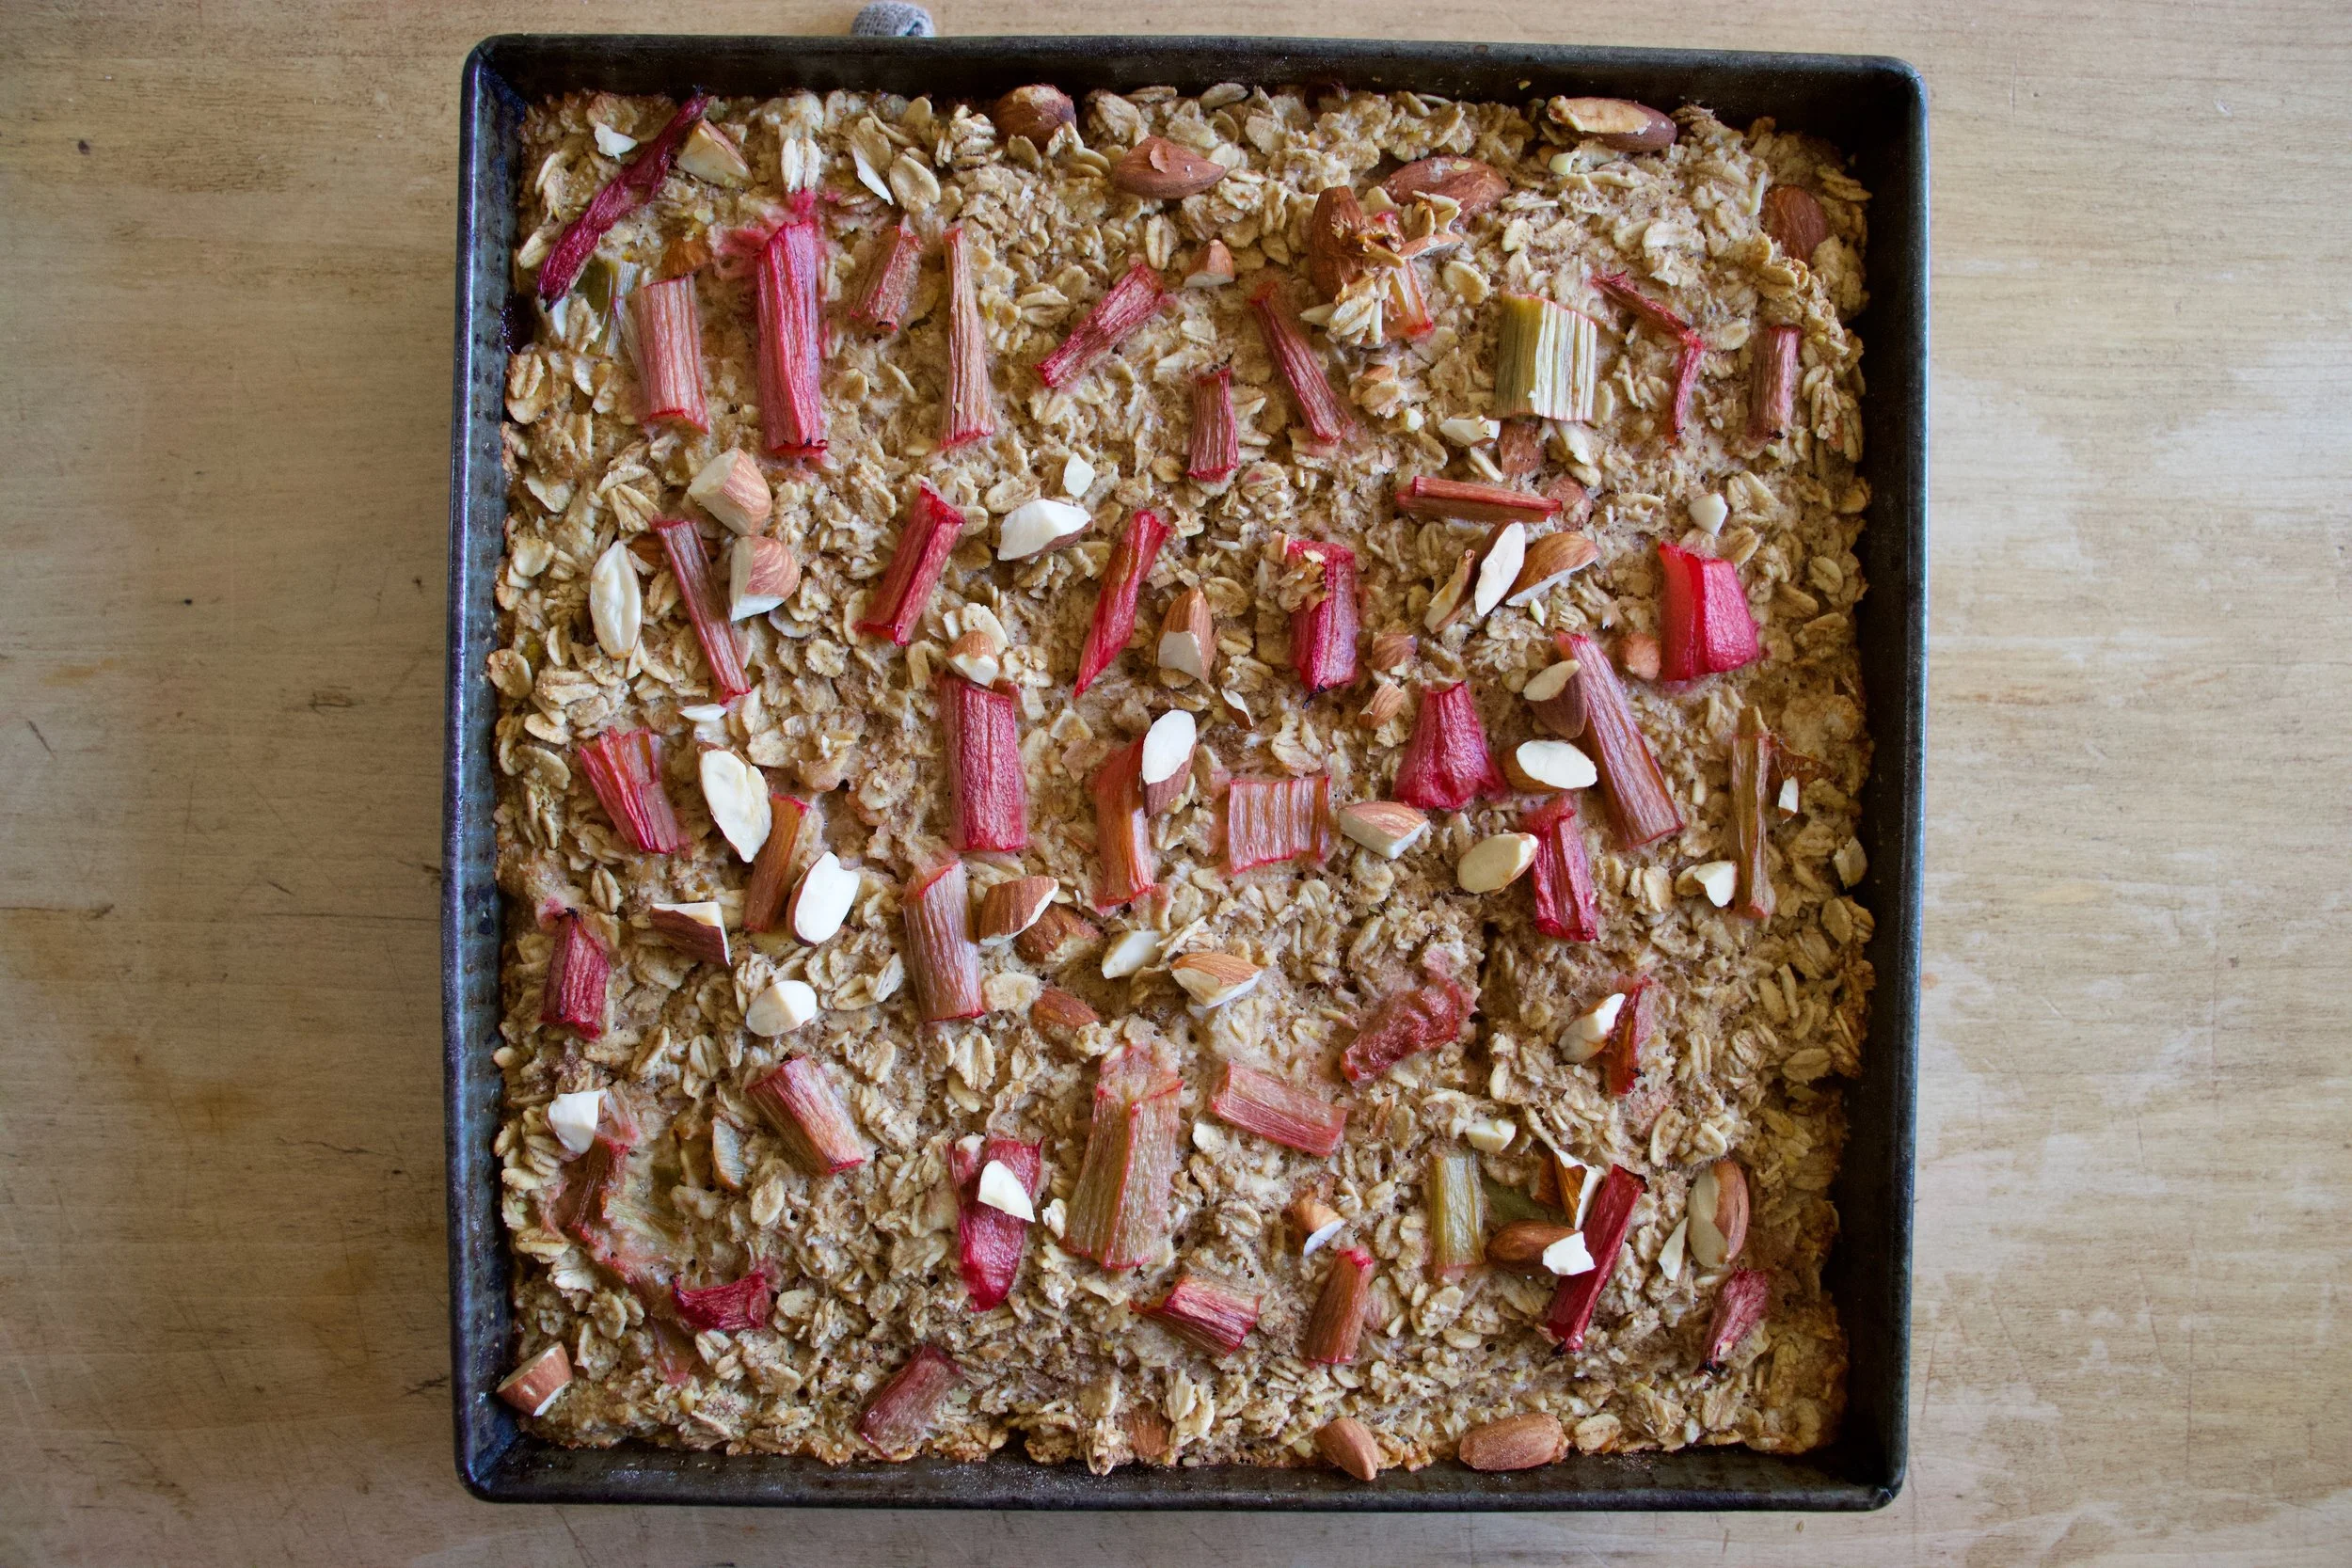
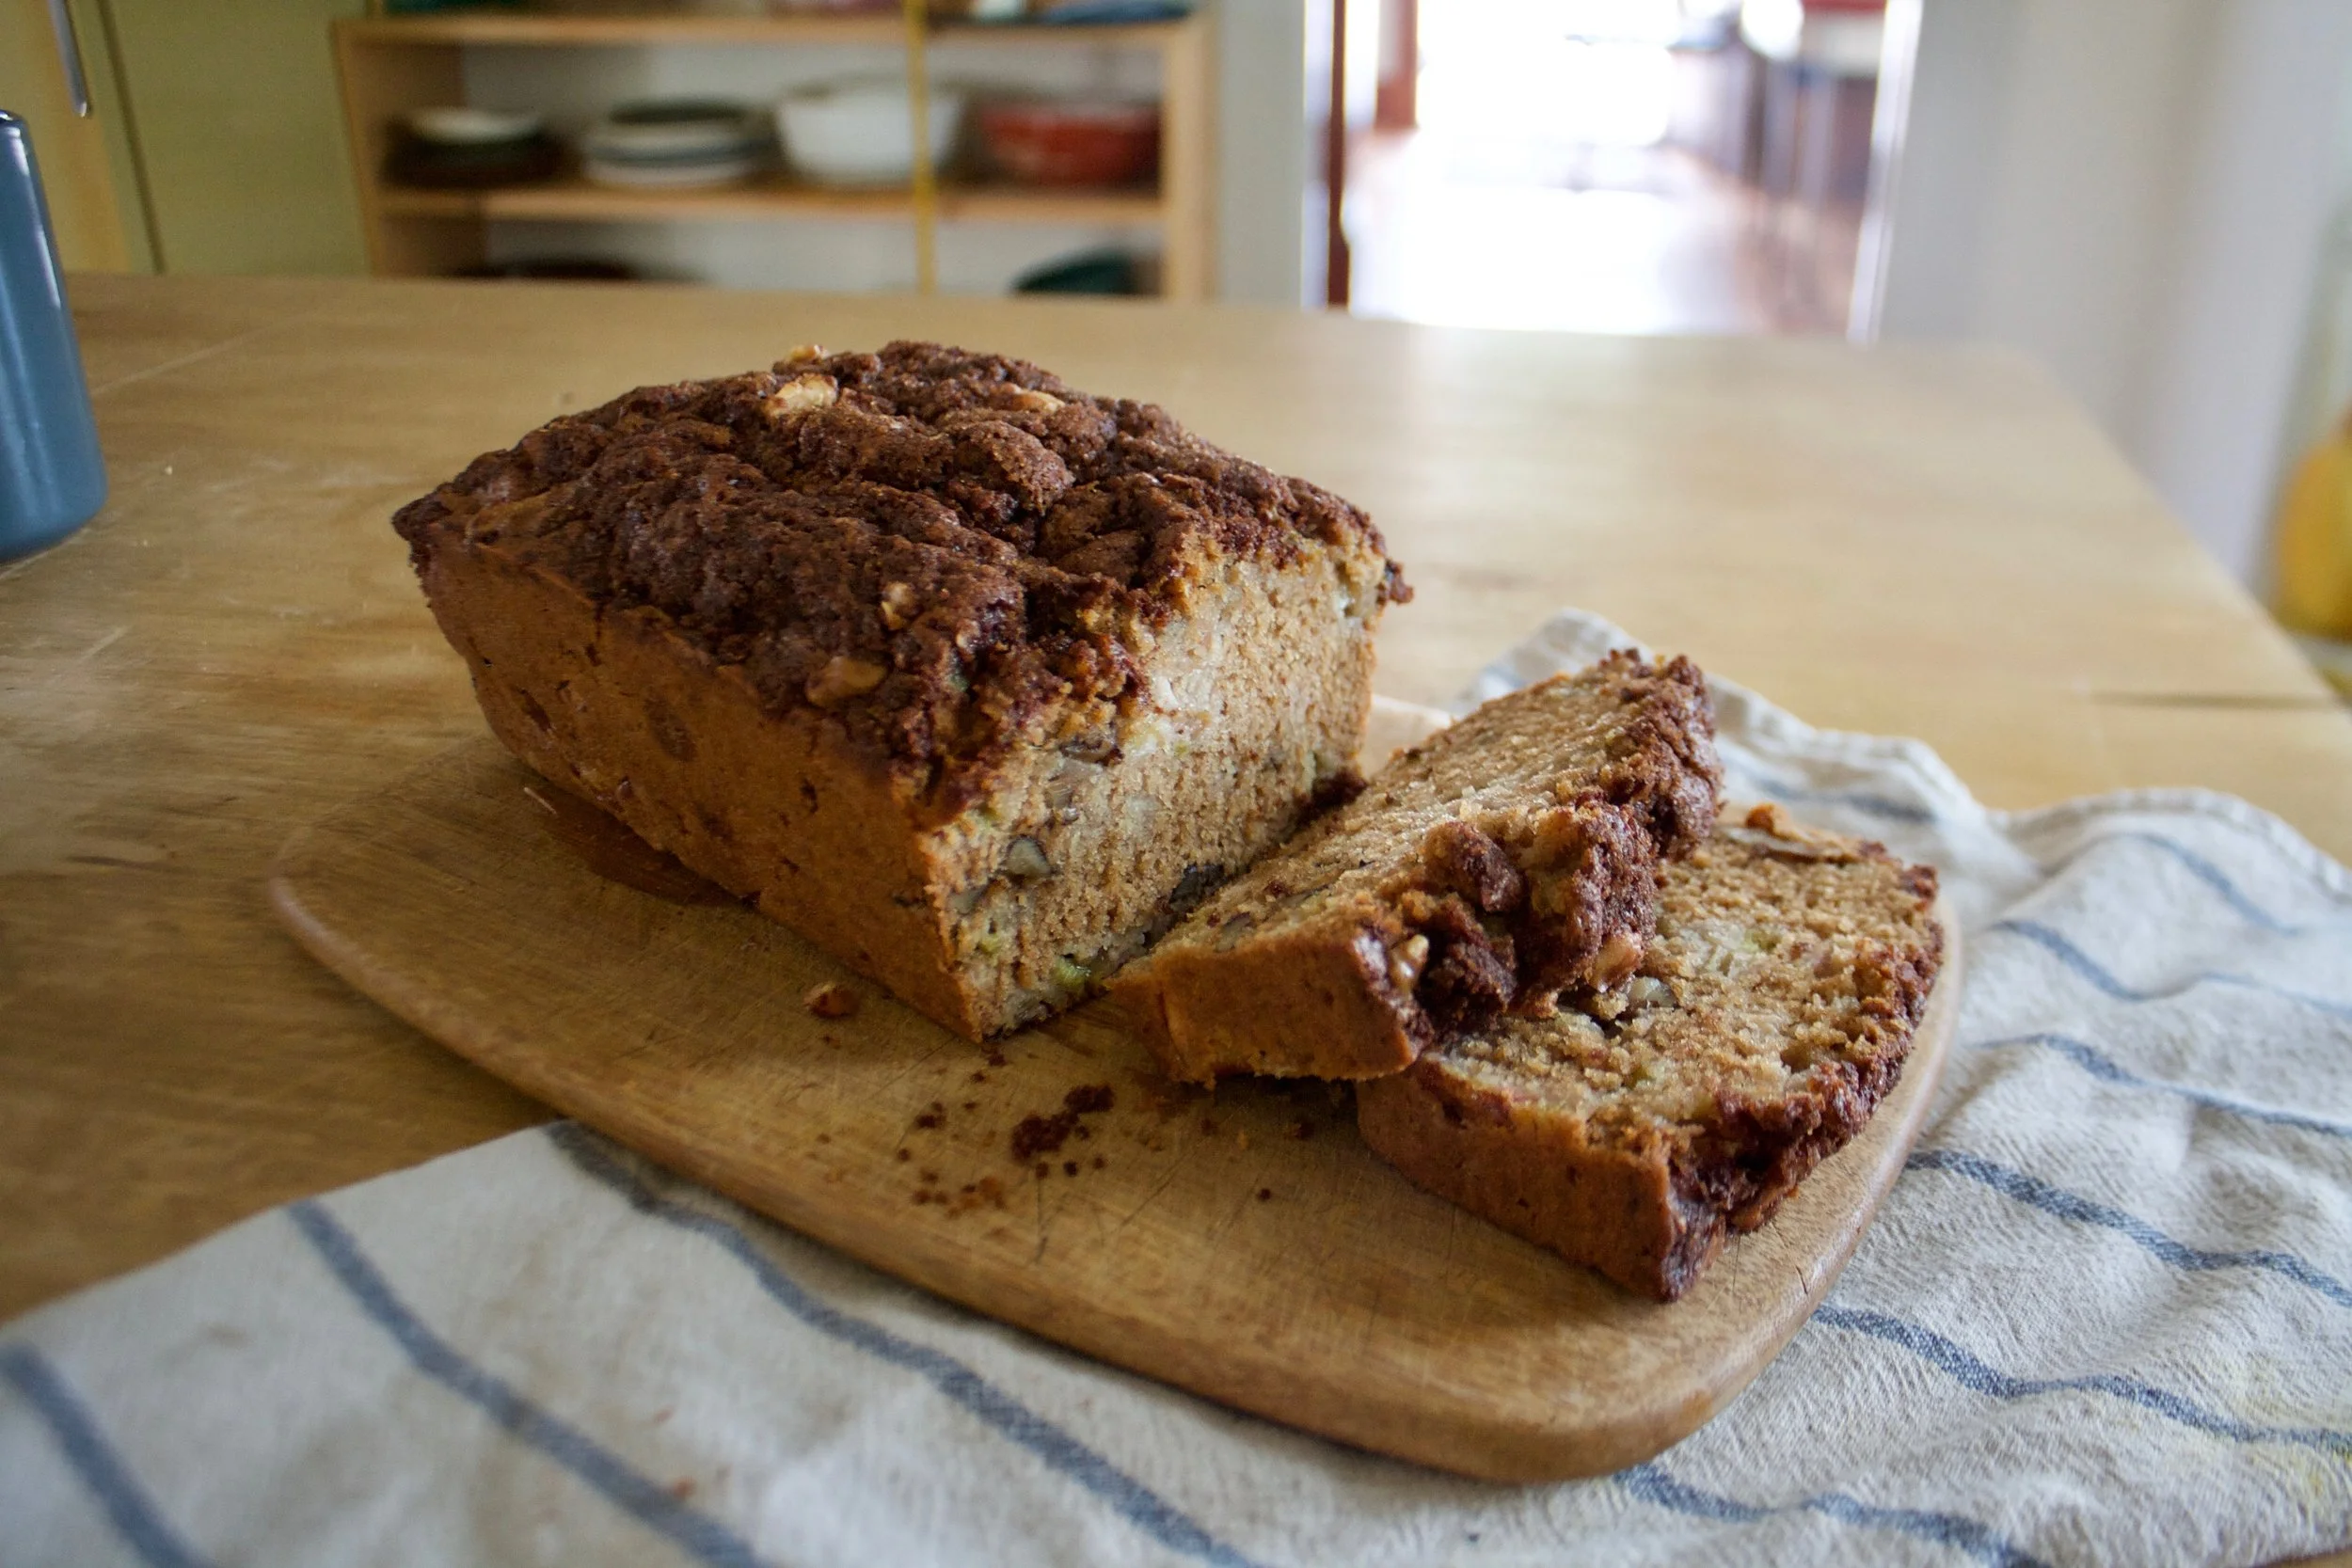
Golden brown with crispy edges. Rhubarb and maple baked oatmeal for all your maple, oaty and rhubarbie needs.
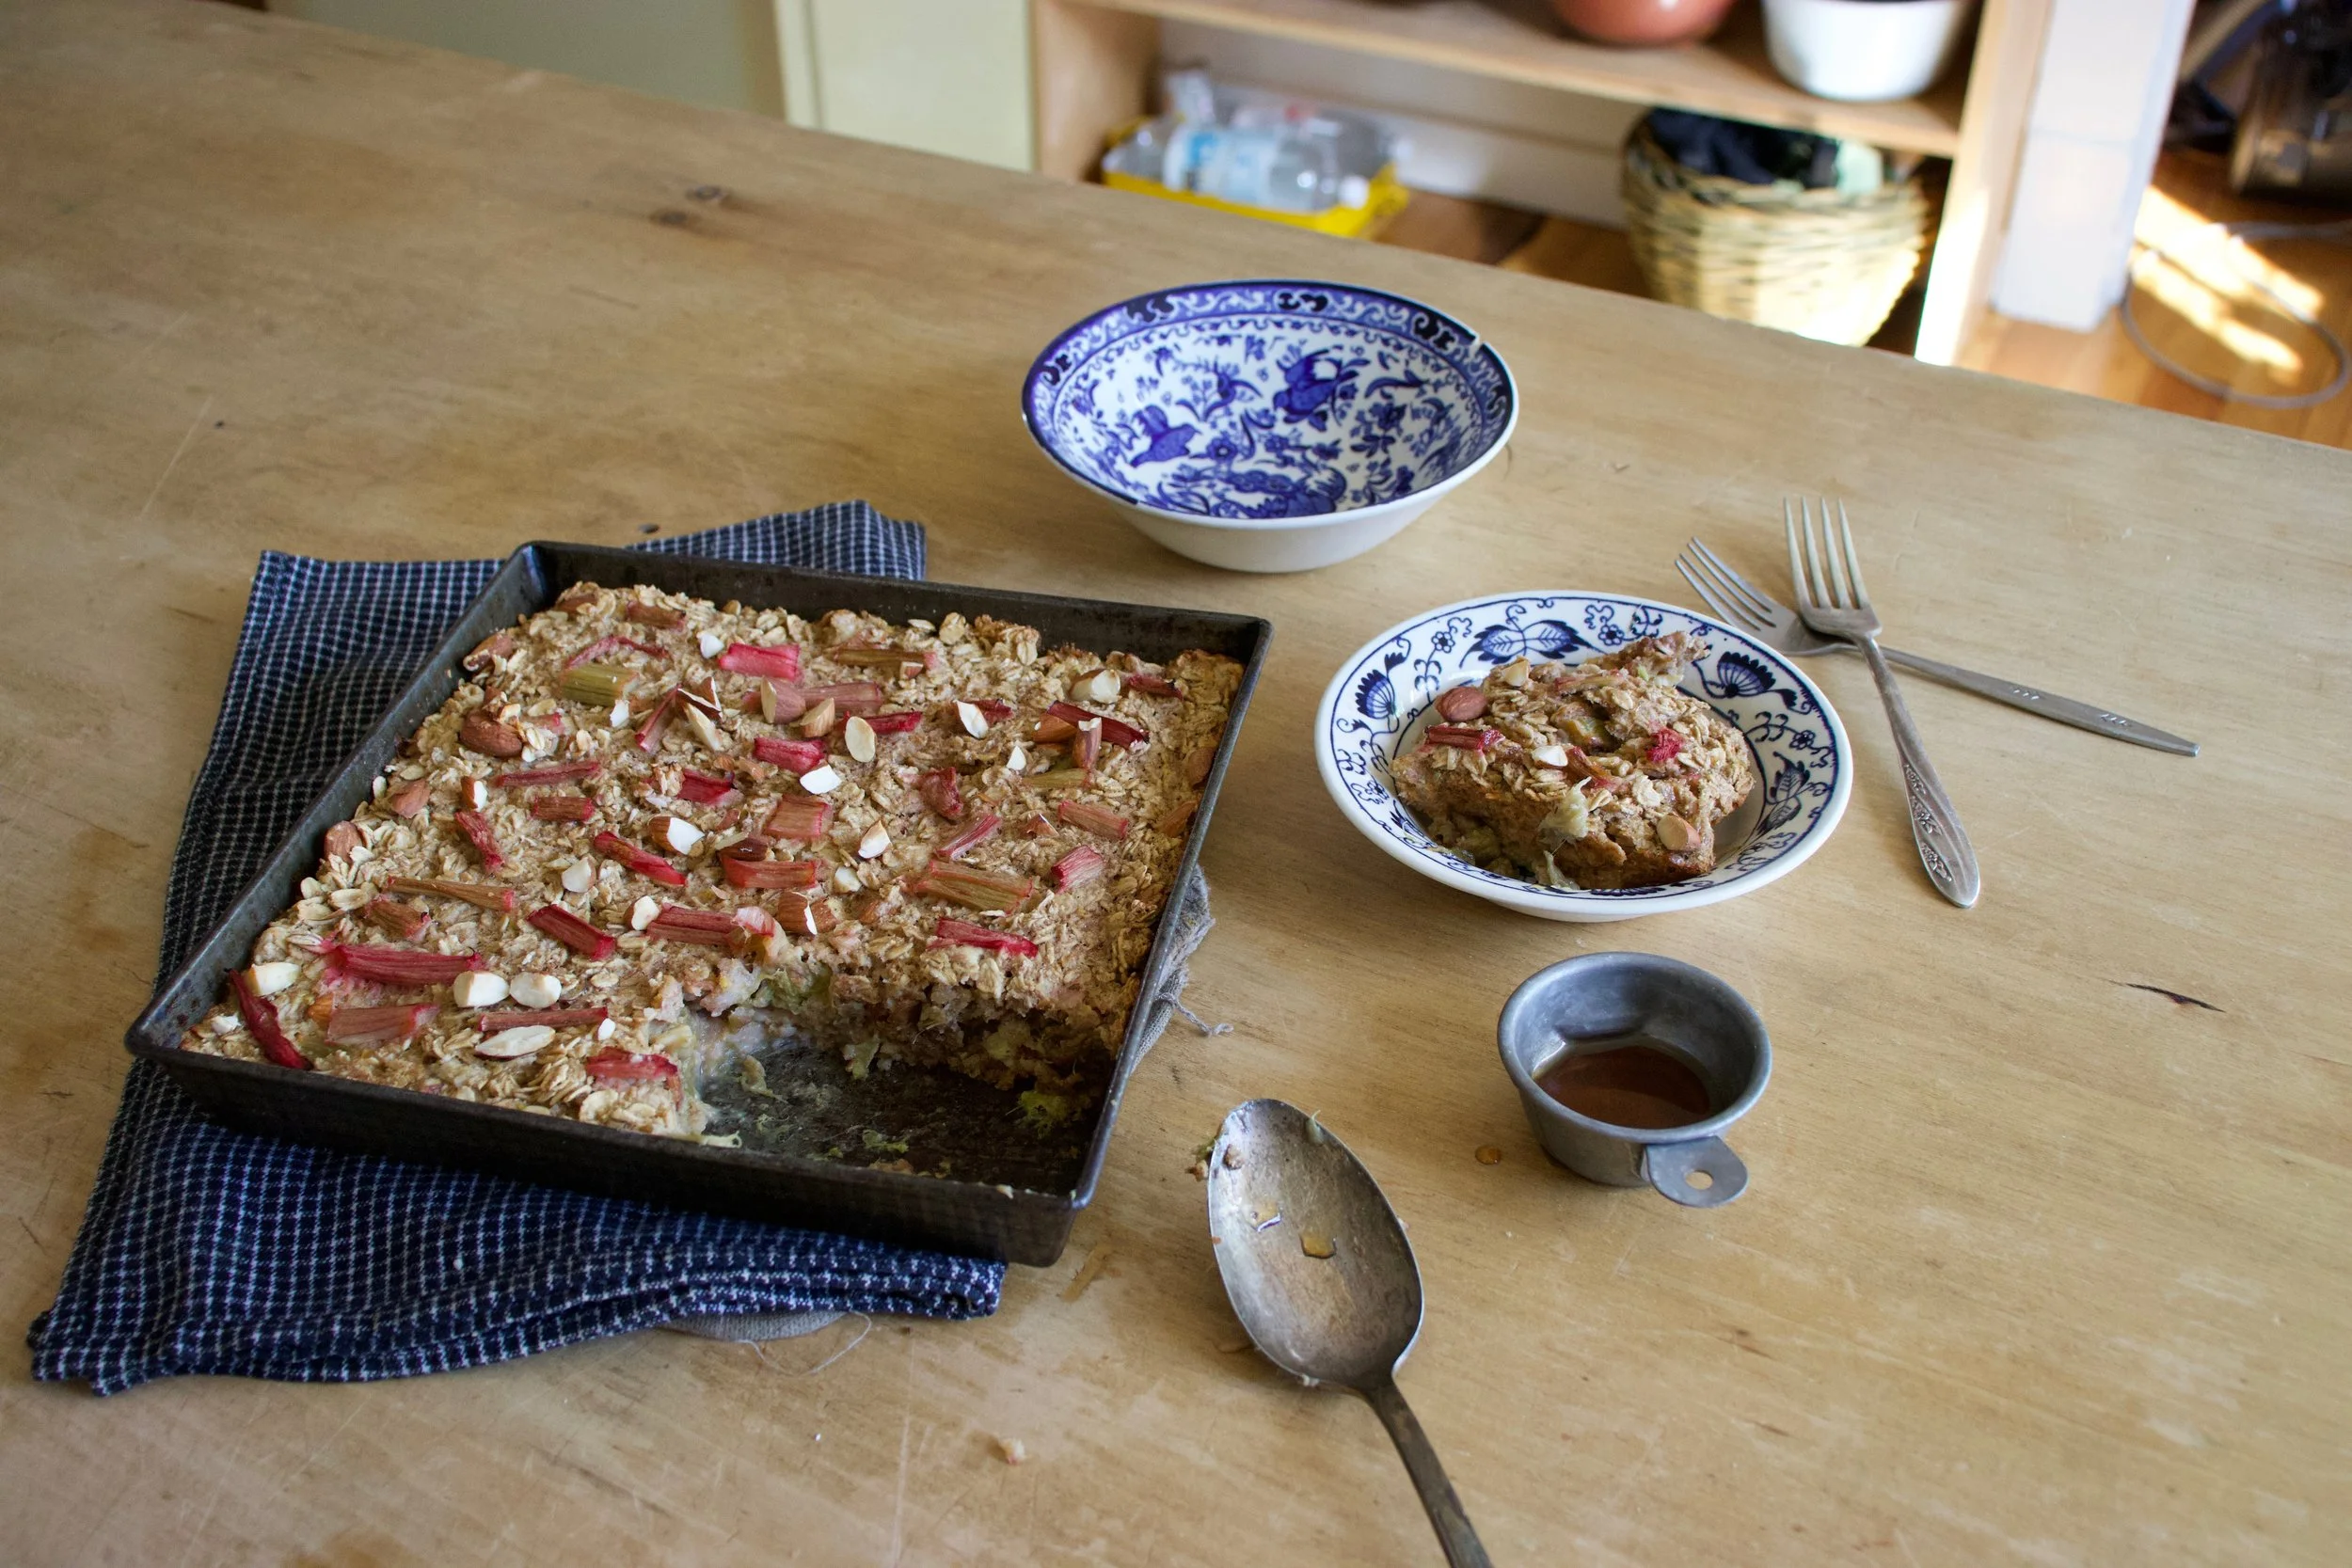
Fresh from the oven scooped warm into bowls. Top with extra maple if thats what you should want do.
Enjoy and happy maple season!
-C
Make a 9×9 pan of oatmeal
-
2 1/2 cups old fashion oats (make sure gluten free if need be)
-
1 teaspoon baking powder
-
1/2 teaspoon salt
-
2 teaspoon cinnamon
-
1/3 cup maple syrup plus more for serving
-
1 tablespoon tahini or any other nut butter
-
2 flax eggs (2 tablespoons ground flax seed with 6 tablespoons warm water)
-
2 1/2 cups fresh or frozen rhubarb chopped into inch long pieces
-
1 1/2 cup plant milk (water works but it won%u2019t be as creamy)
-
1/2 cup chopped almonds (optional)
Preheat oven to 375
Lightly grease a 9×9 inch baking pan (I used metal because it makes for crisper edges but glass works too) and dump 2 cups of the rhubarb in and evenly distribute on the bottom. In a large bowl mis the oats, the baking powder, salt, and cinnamon together. Mix in chopped nuts if you are using. Evenly cover rhubarb with oat mixture. In now empty bowl mix together the milk, flax eggs, maple syrup, and tahini until evenly incorporated. Pour mixture over oats. Let the mixture sit for a few minutes until the oats have abosbed all the liquid. Toss the rest of the diced rhubarb and a few more chop nuts to the top and pop into the oven to bake.
Bake for 30-40 minutes (shorter time for a wetter oatmeal, longer for a denser crispier oatmeal)
Once baked to your likeness, remove from oven and let cool for a few minutes just so it is not super hot. Scoop into bowls and serve warm with extra maple and milk or whatever you might want to serve with it.
Left overs last great in fridge for 3-4 days or individual portions can be frozen for a month or two. Just pop into microwave for a couple minutes to warm up.
What is any good holiday season without some sort of gingerbread? Am I right, or am I right? I am right. The smell alone smacks a smile on my face. Spicy and sweet and all sorts of comforting. If smells could be objects, the smell of gingerbread would be a warm soft blanket that you can curl up next to a fire, with hot beverages and a good book. Yup, that is exactly what gingerbread smells like.
Gingerbread cookies were an option for all the gingerbread goodness but right now there is a heavy influx of people making cookies of the gingerbread variety so I figured I should do something a little different and honestly, a heck of a lot easier and faster. Plus scones are a way more expectable breakfast food then cookies (who am I kidding, cookies are a completely expectable for breakfast) and I was looking for a good breakfast treat to feed the mr this week because its his birthday week and I wanted a little something special for him for breakfast. I know, I am just so great.
Anyway, these scones fit the holiday gingerbread bill. I mixed them up, added the chocolate chips for a little extra something, then tossed them into the oven and bathed in the smell as they were baking. Pulled them from the oven, poured some coffee, and set out a delightful afternoon snack for the mr, right after he was finished laying on the freezing ground trying to fix the tire on the truck. I think he really appreciated the smell of a warm blanket. And he really enjoyed the scones too. All birthday week long.
So what are you doing this weekend? I think probably making scones. Yeah, do that.
Here we go.
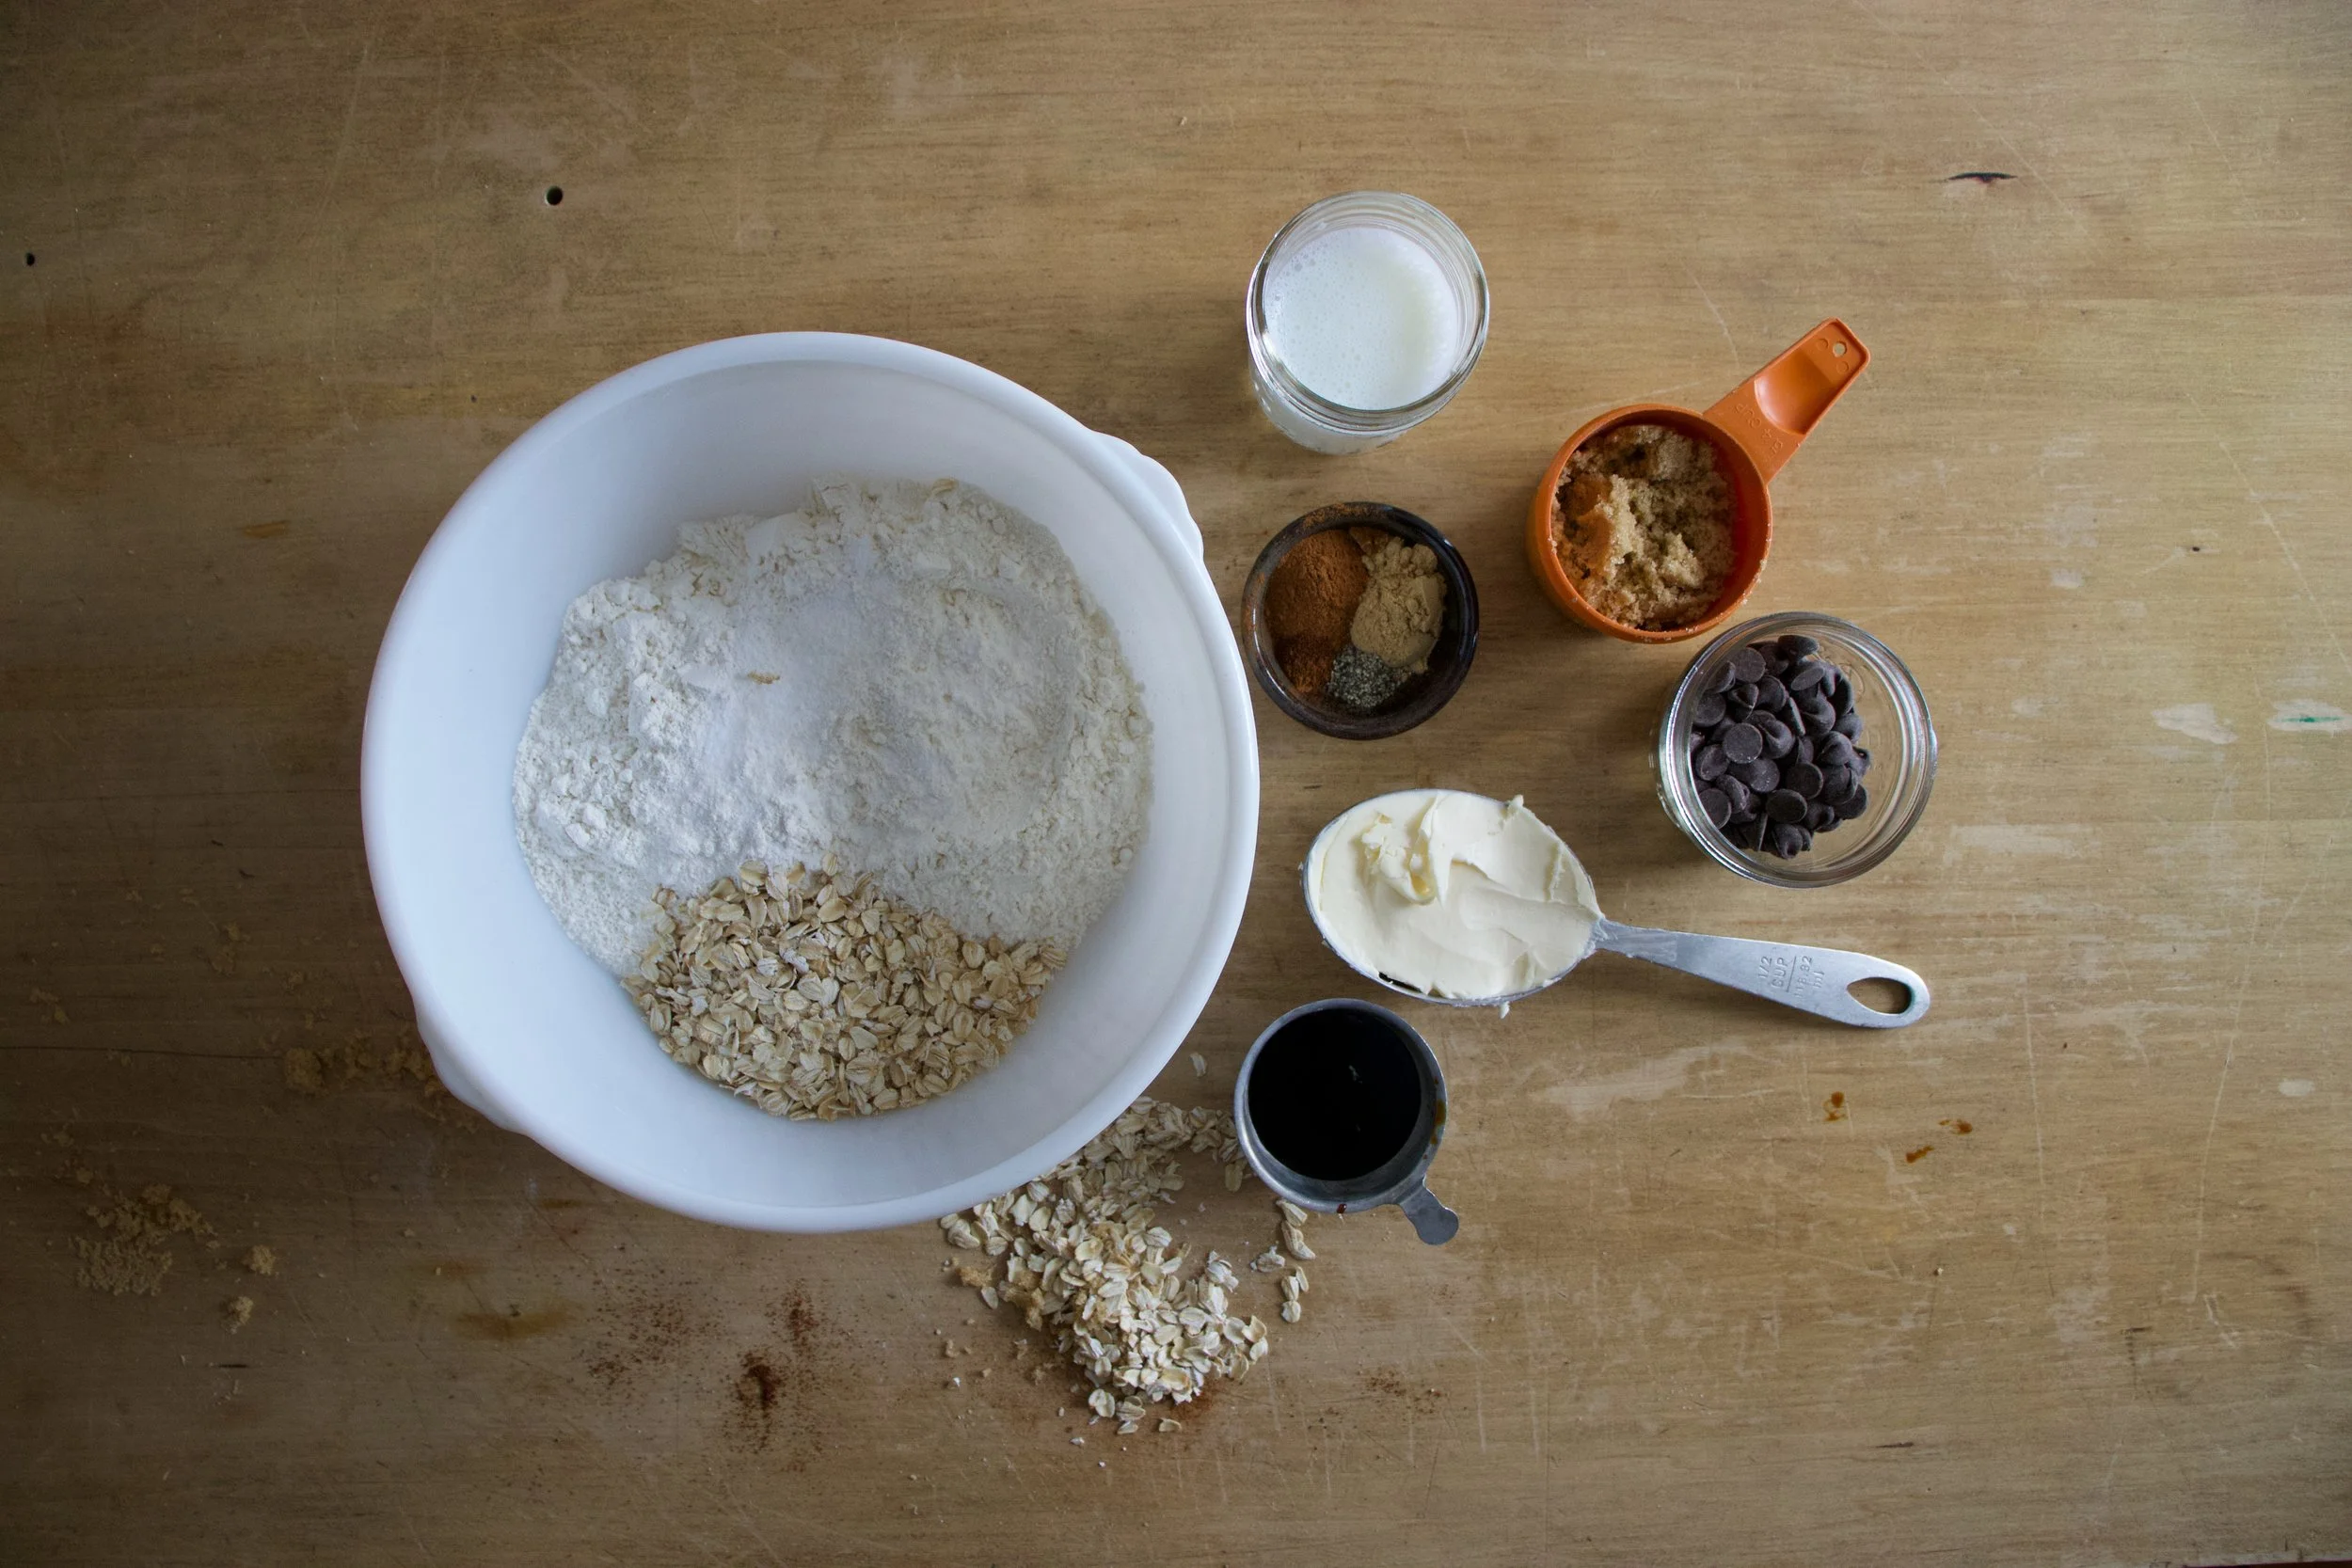
The stuff. In the bowl there is flour, old fashion oats, baking soda and baking powder, and salt. Also need the spices of ginger, cinnamon, clove, and black pepper. Molasses, brown sugar, vegan butter, soy milk, and chocolate chips finish of the list.
In the bowl add in all the spices and the brownl sugar. Mix until completely combined and there are no brown sugar lumps. Drop in the cold butter and cut it in with a fork. You don%u2019t want it blended, you want the butter in little bits.

You want it to look like this. Crumbly.
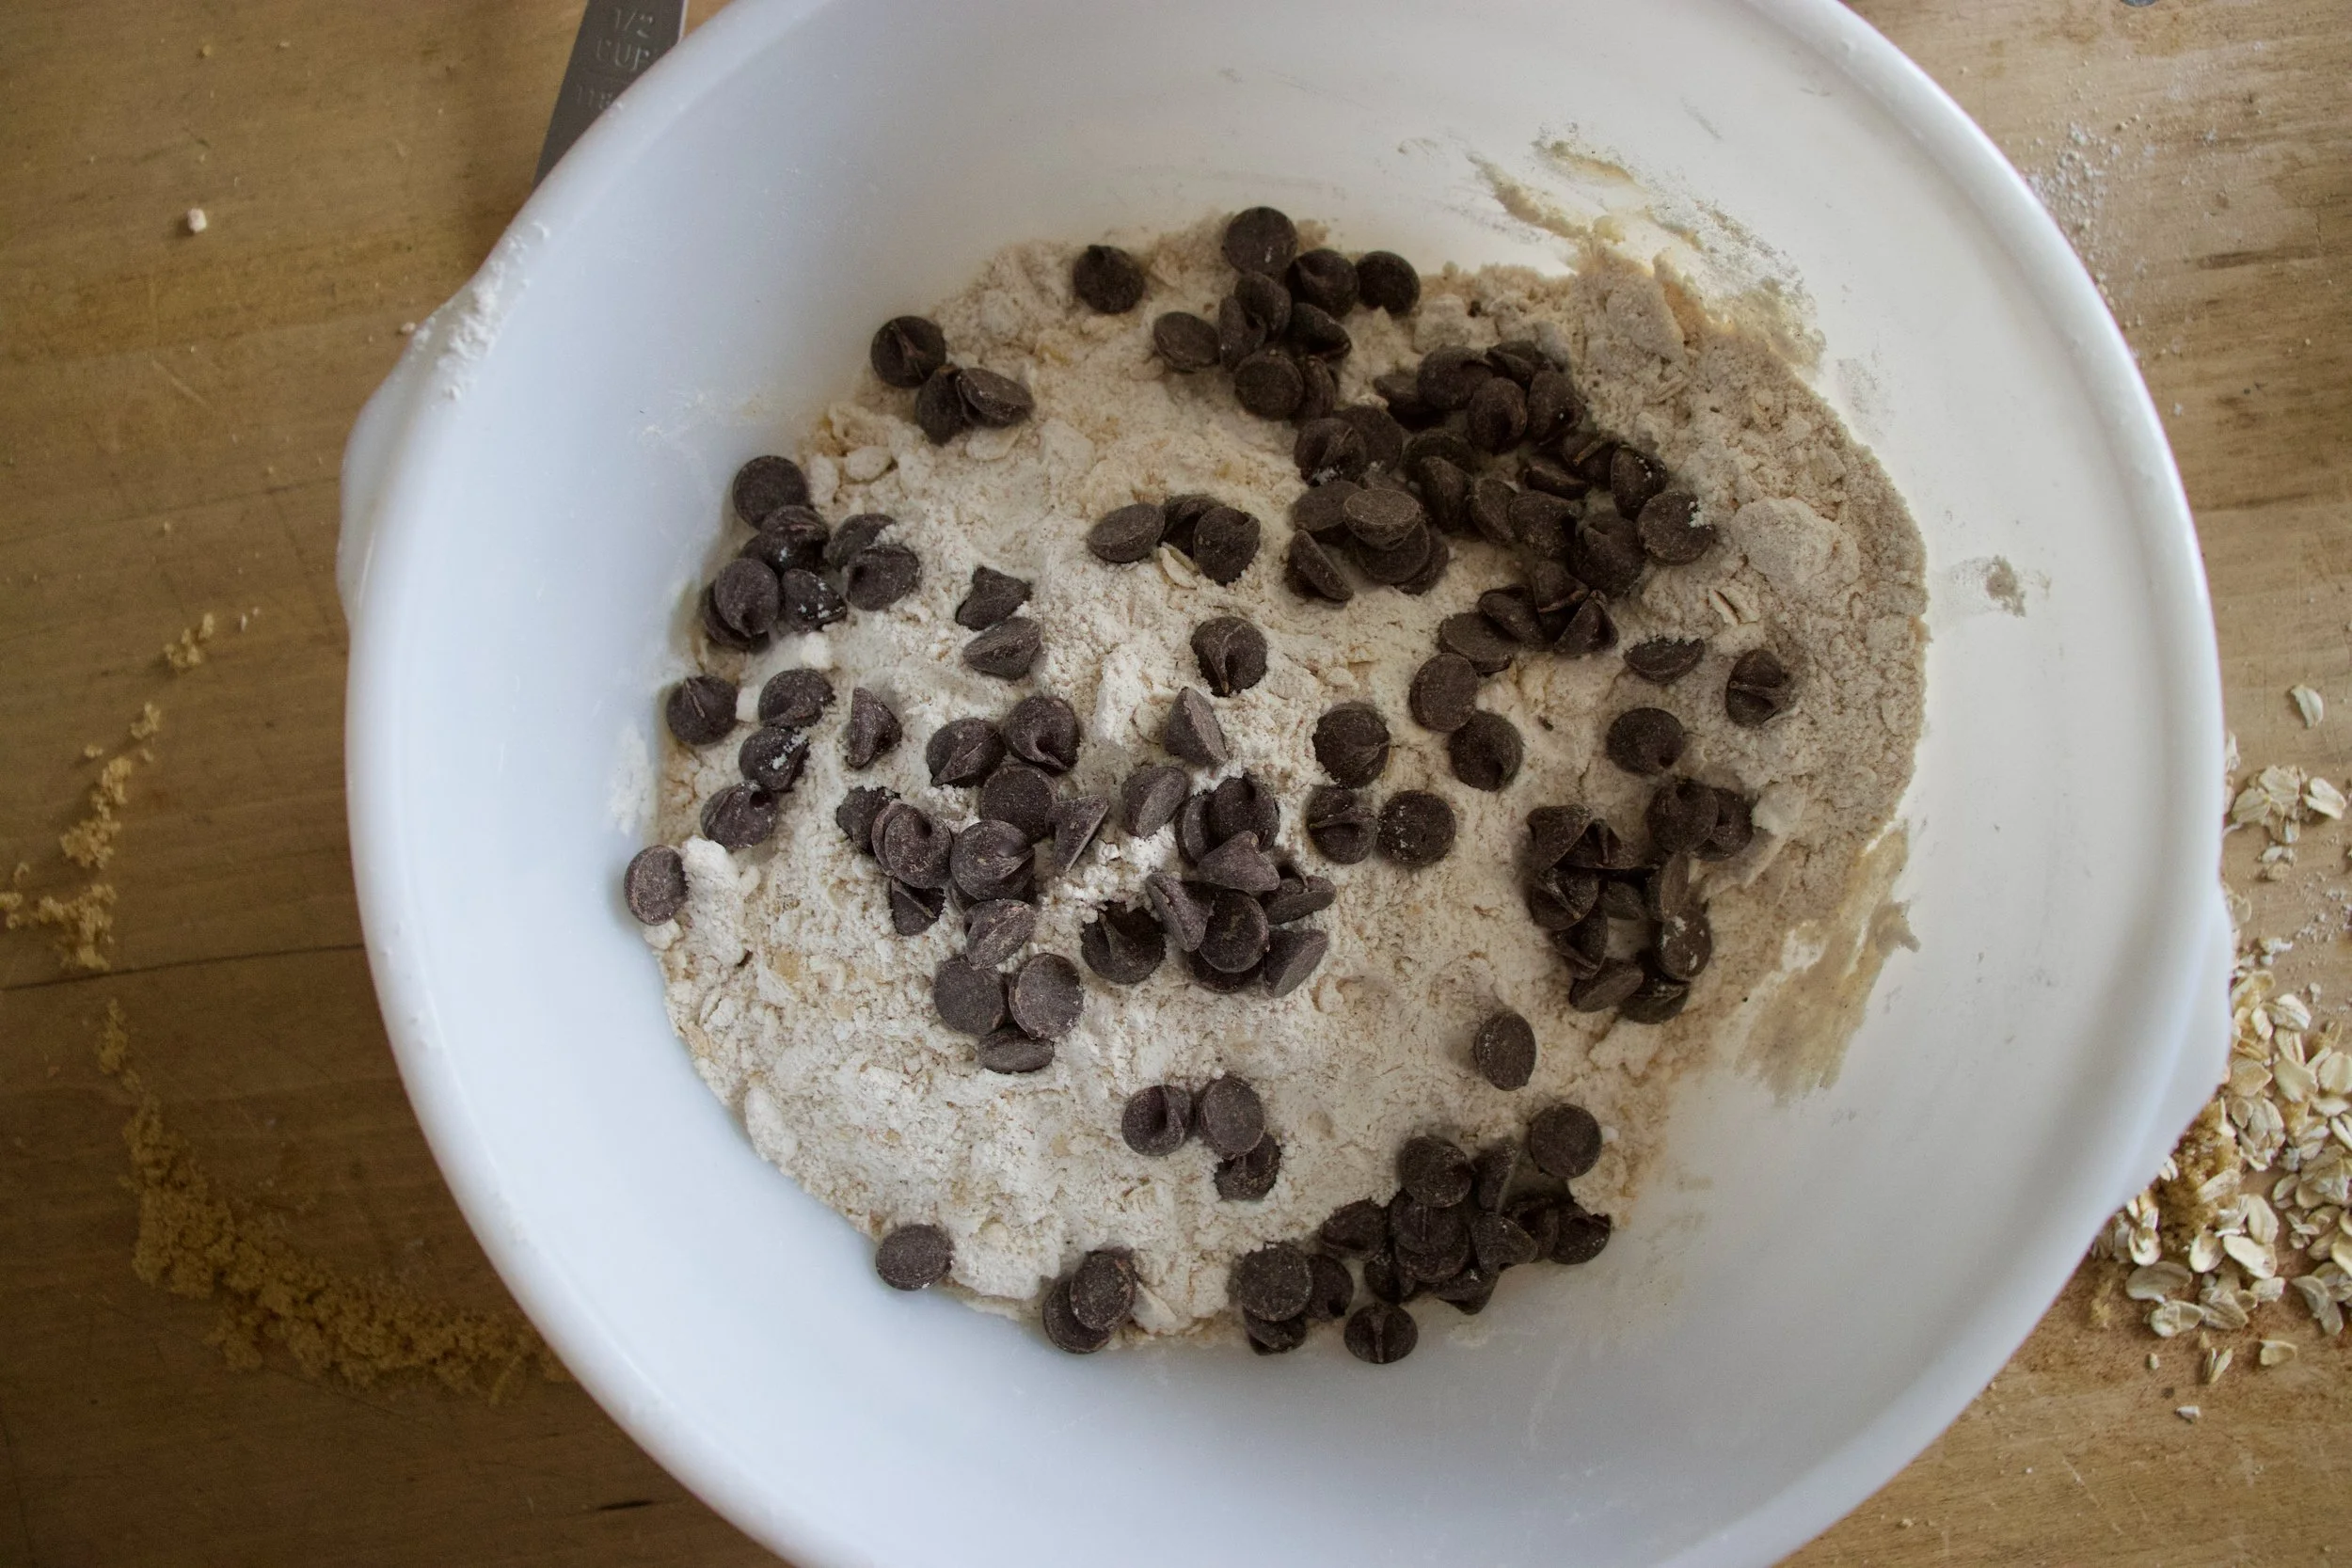
Toss in the chocolate chip.

Dump the molasses into the milk and mix until combined. Doing this helps minimize the amount of mixing you do which will help make sure your scones are not tuff. So don%u2019t not do this.

Pour the molasses milk into the mixture
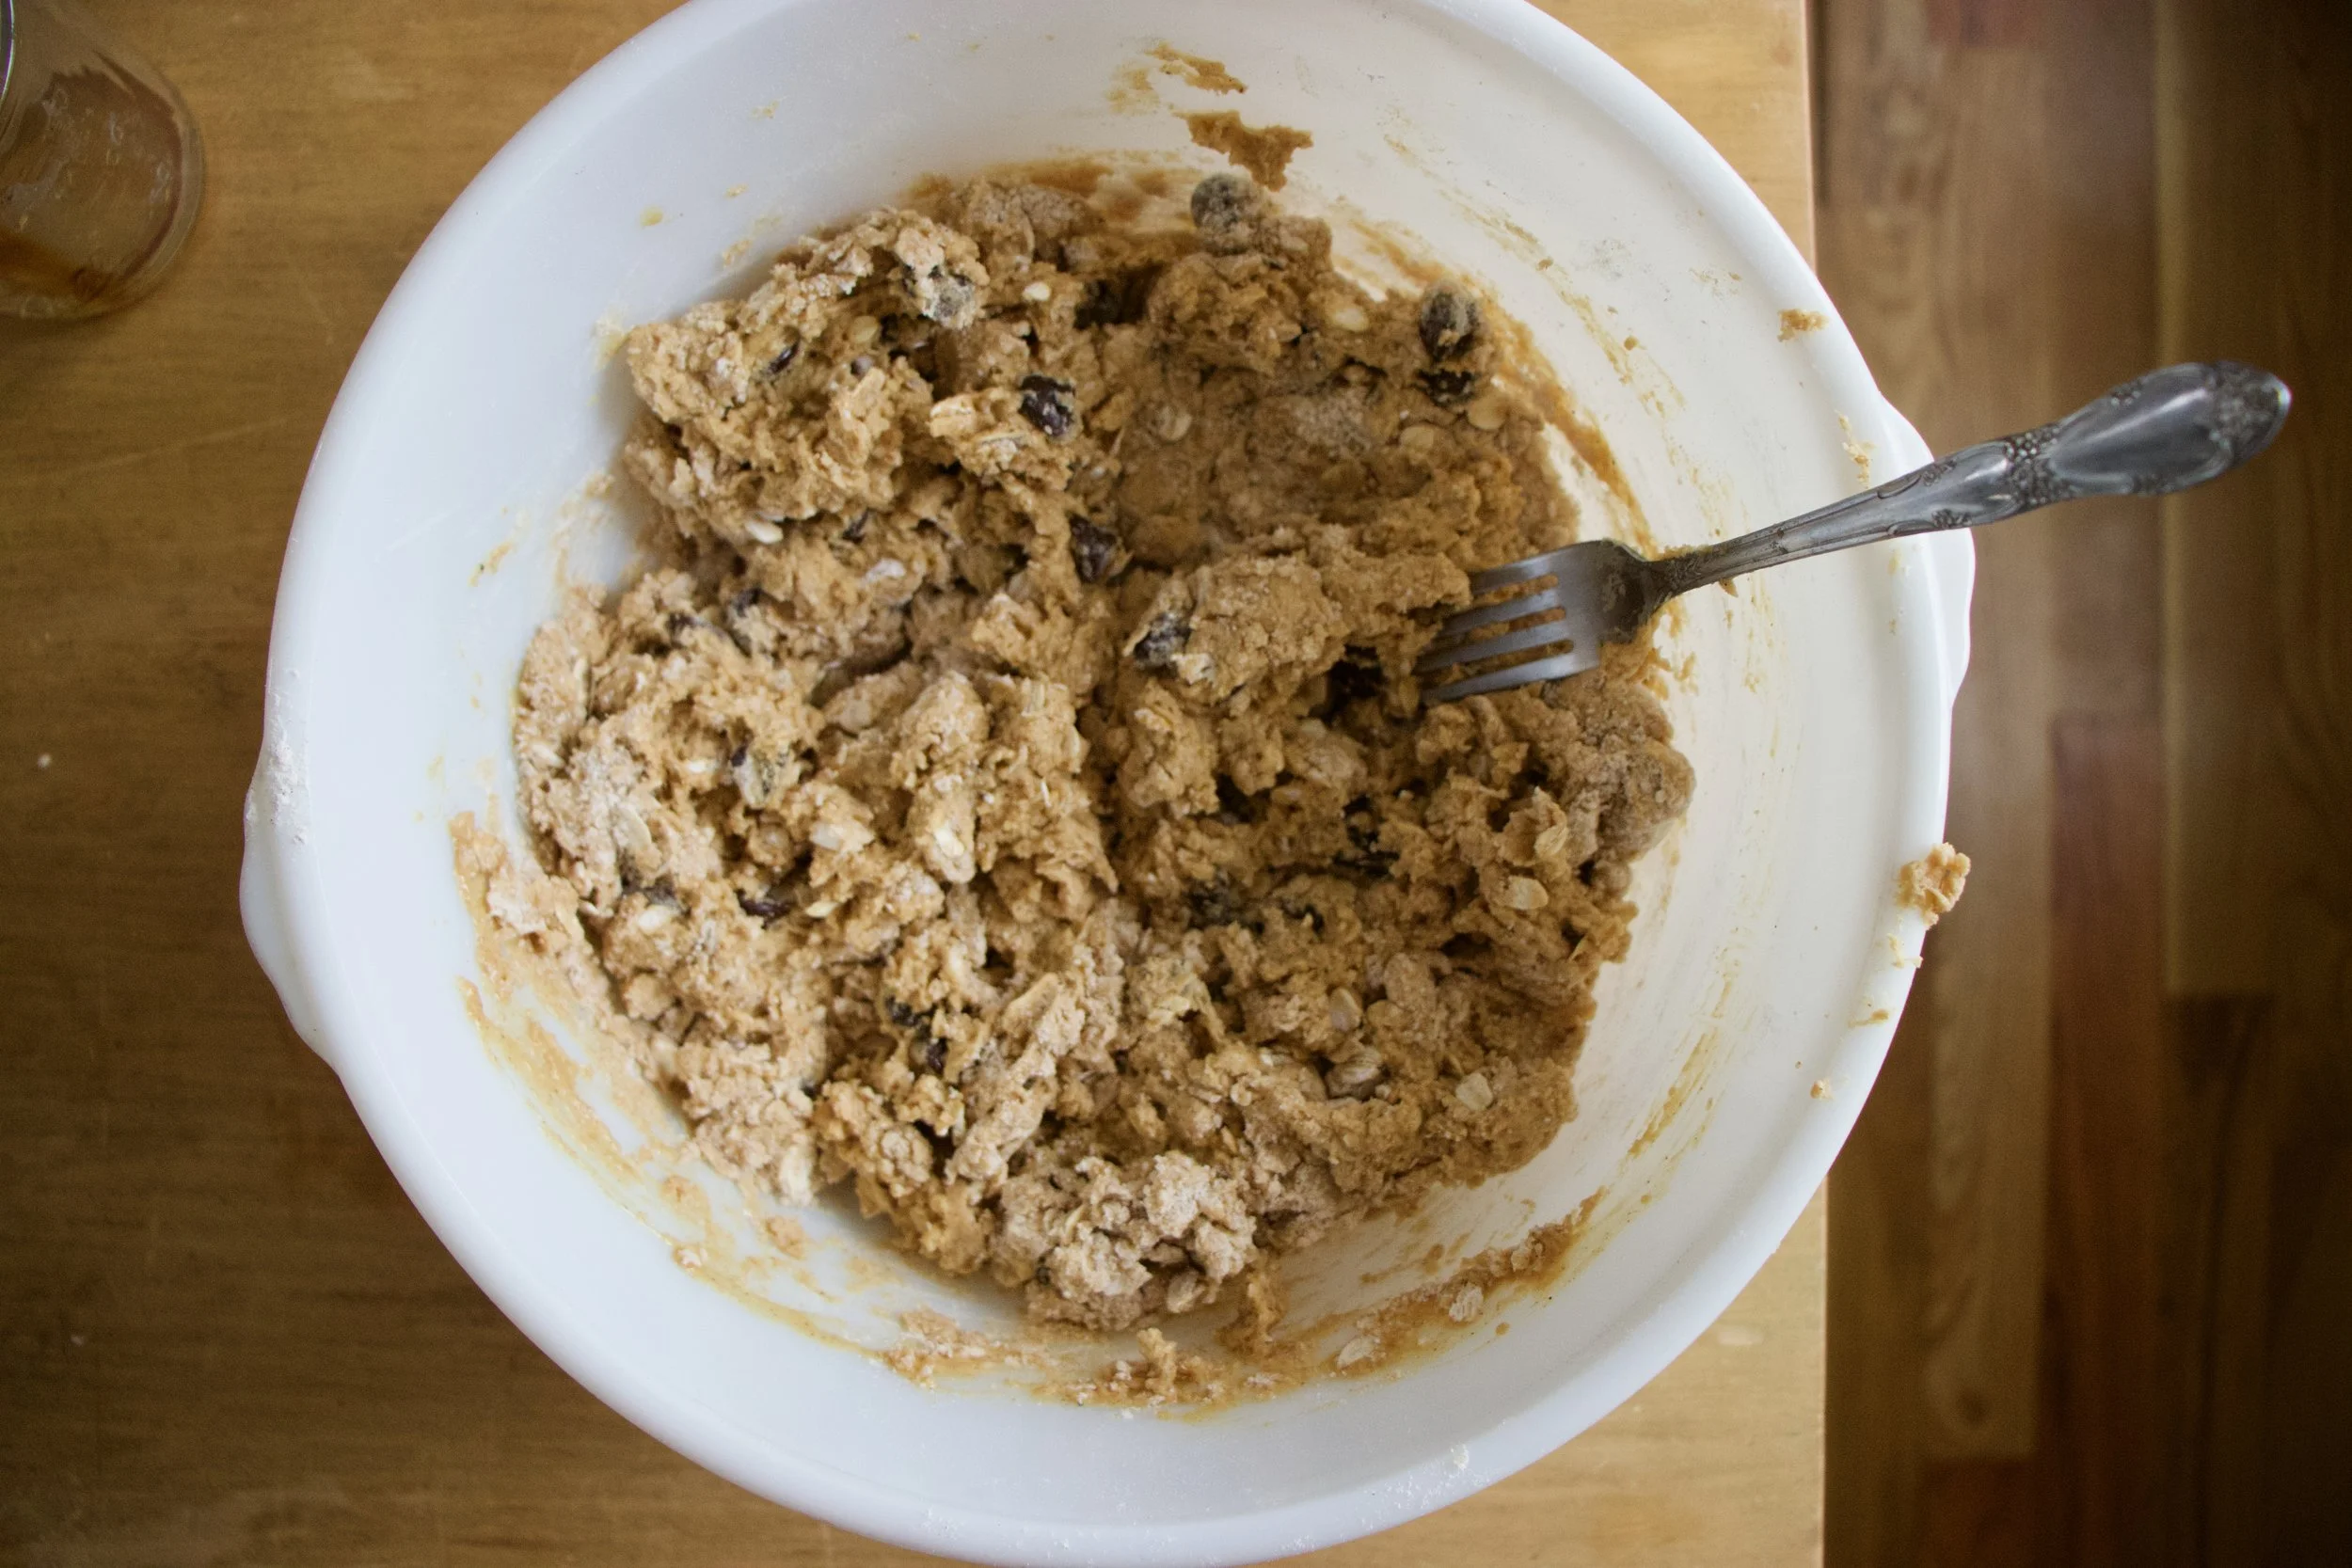
With a fork, lightly fold and mix batter until it just starts to come together.

Dump dough out onto a lightly flour surface and gather together with your hands.

Flatten into a big disk and cut into 8 equal wedges. Or as equal as you want to make them%u2026 you could even make a few more wedges if you want more. You do you.

Place the scones onto a baking sheet. Brush a little milk on each then sprinkle the tops with a little brown sugar and some oats.
Pop them into preheated oven and let bake.

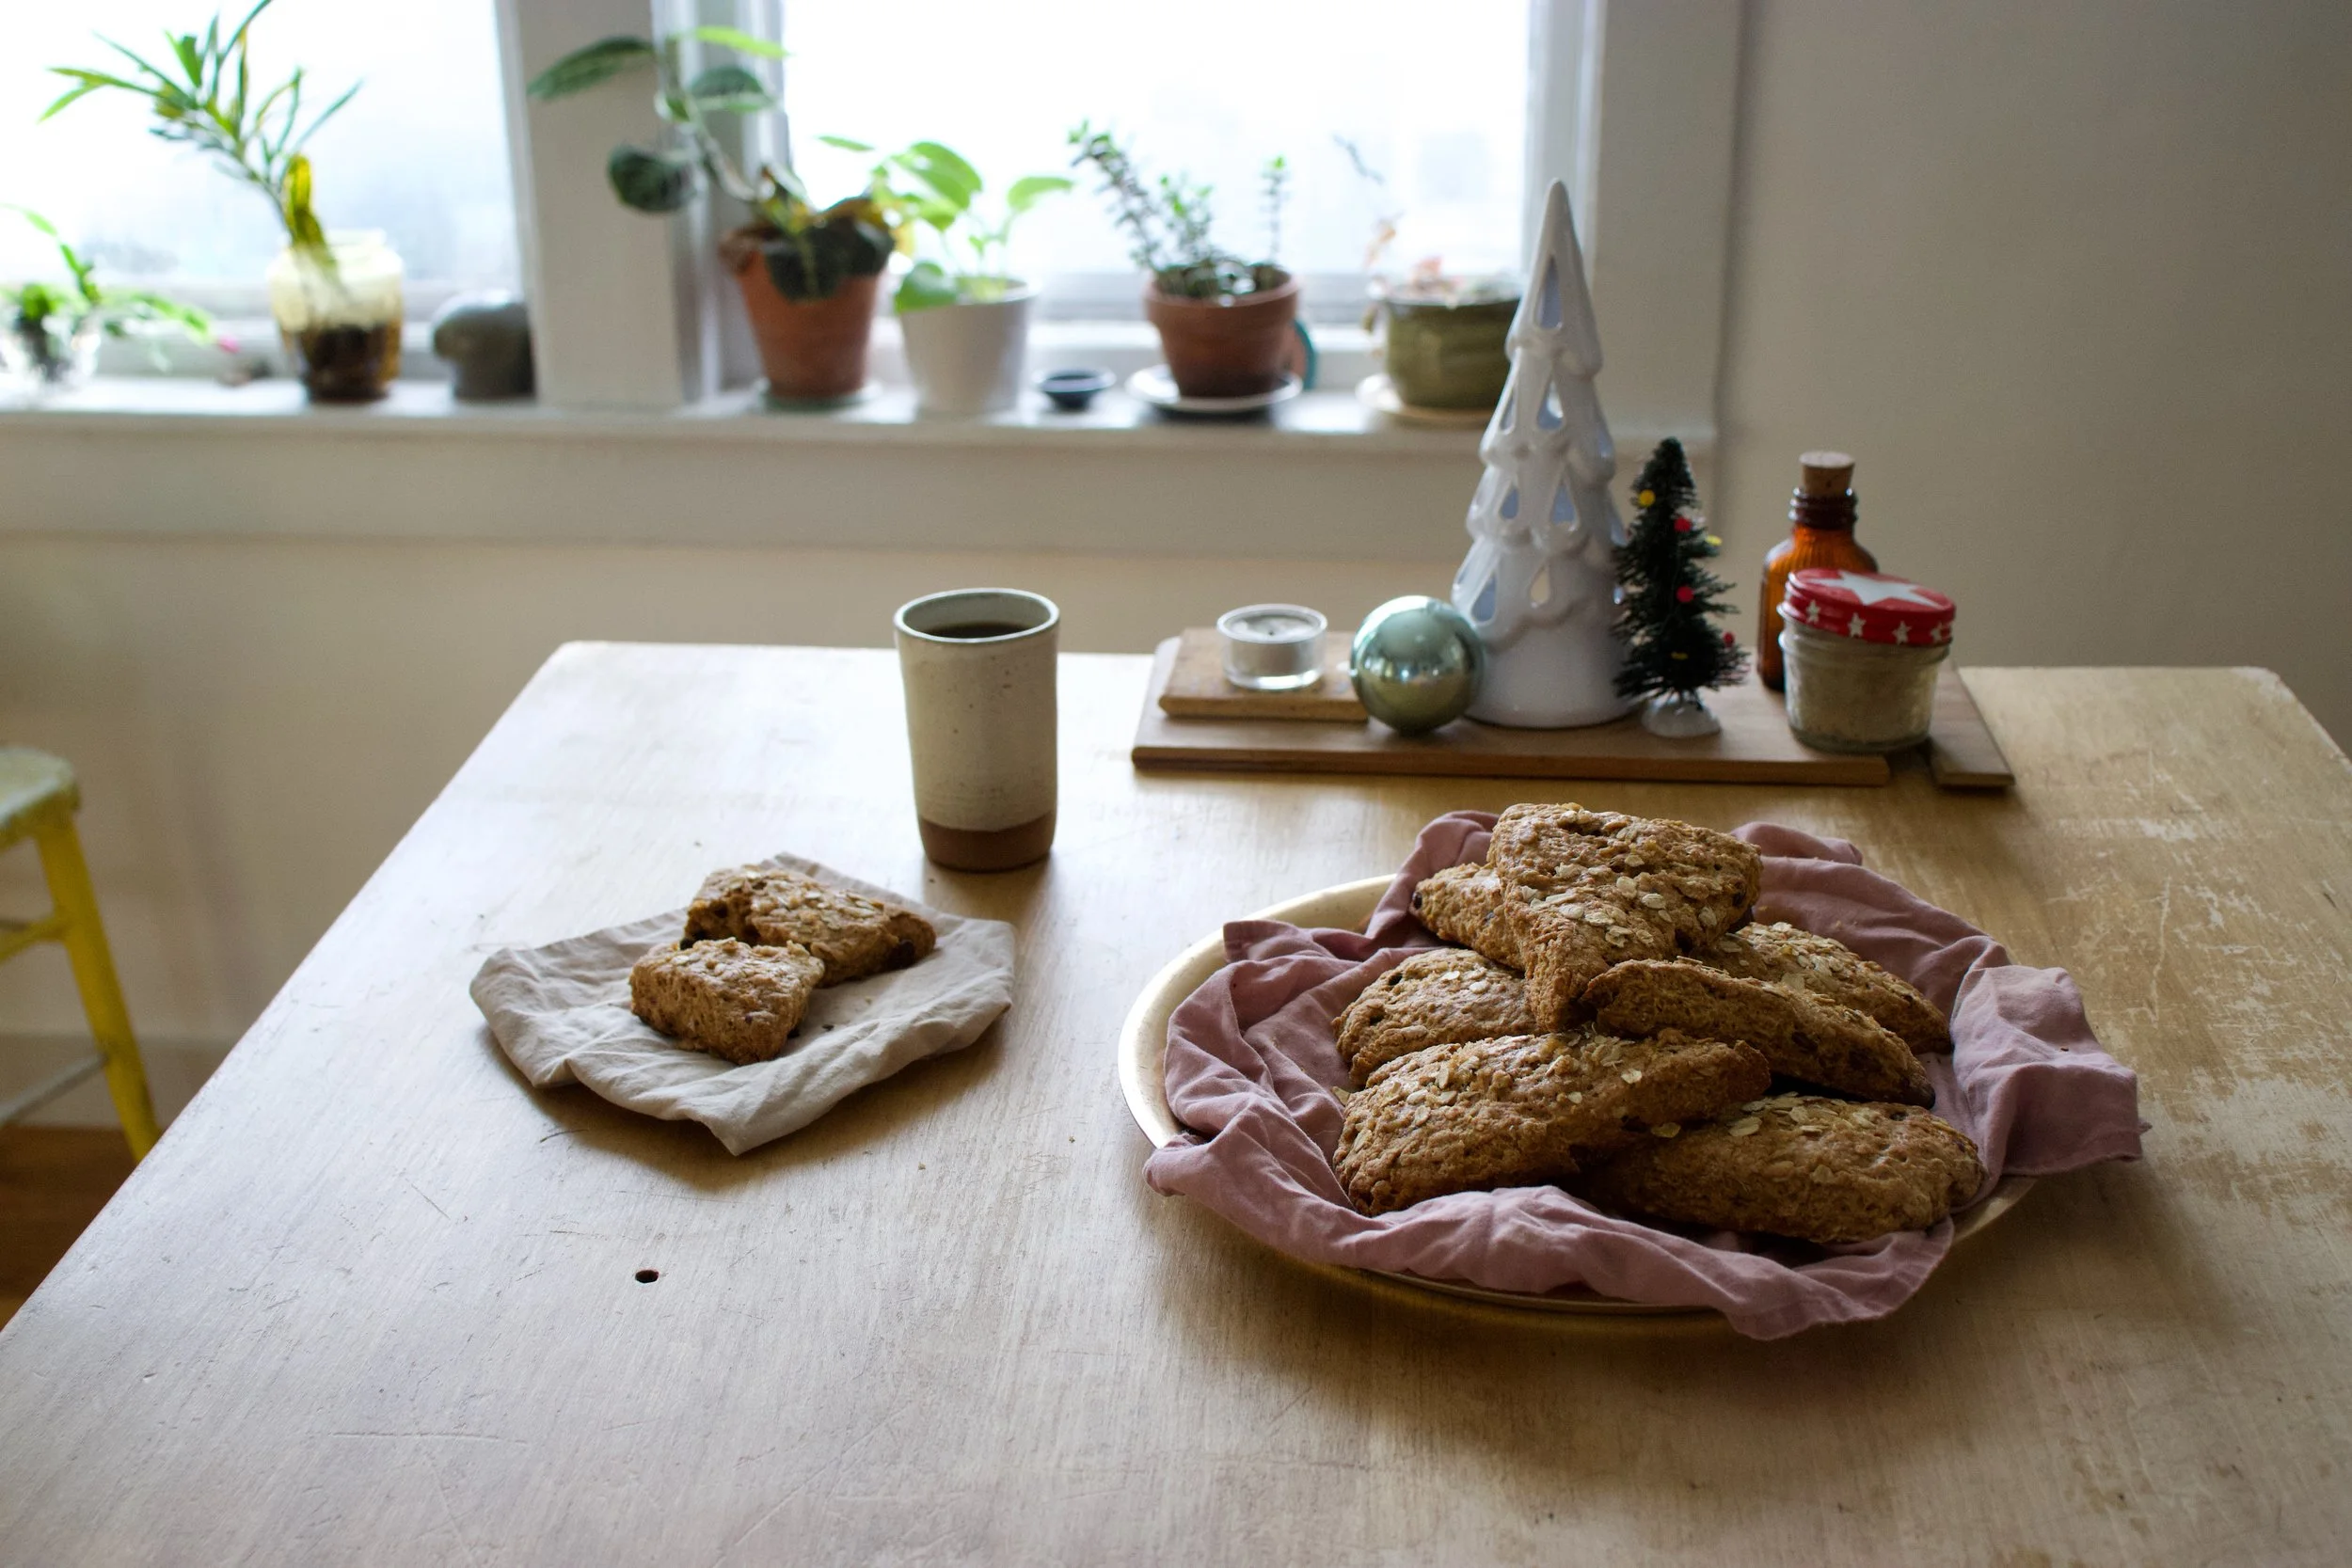
Gold brown and ready for the world.
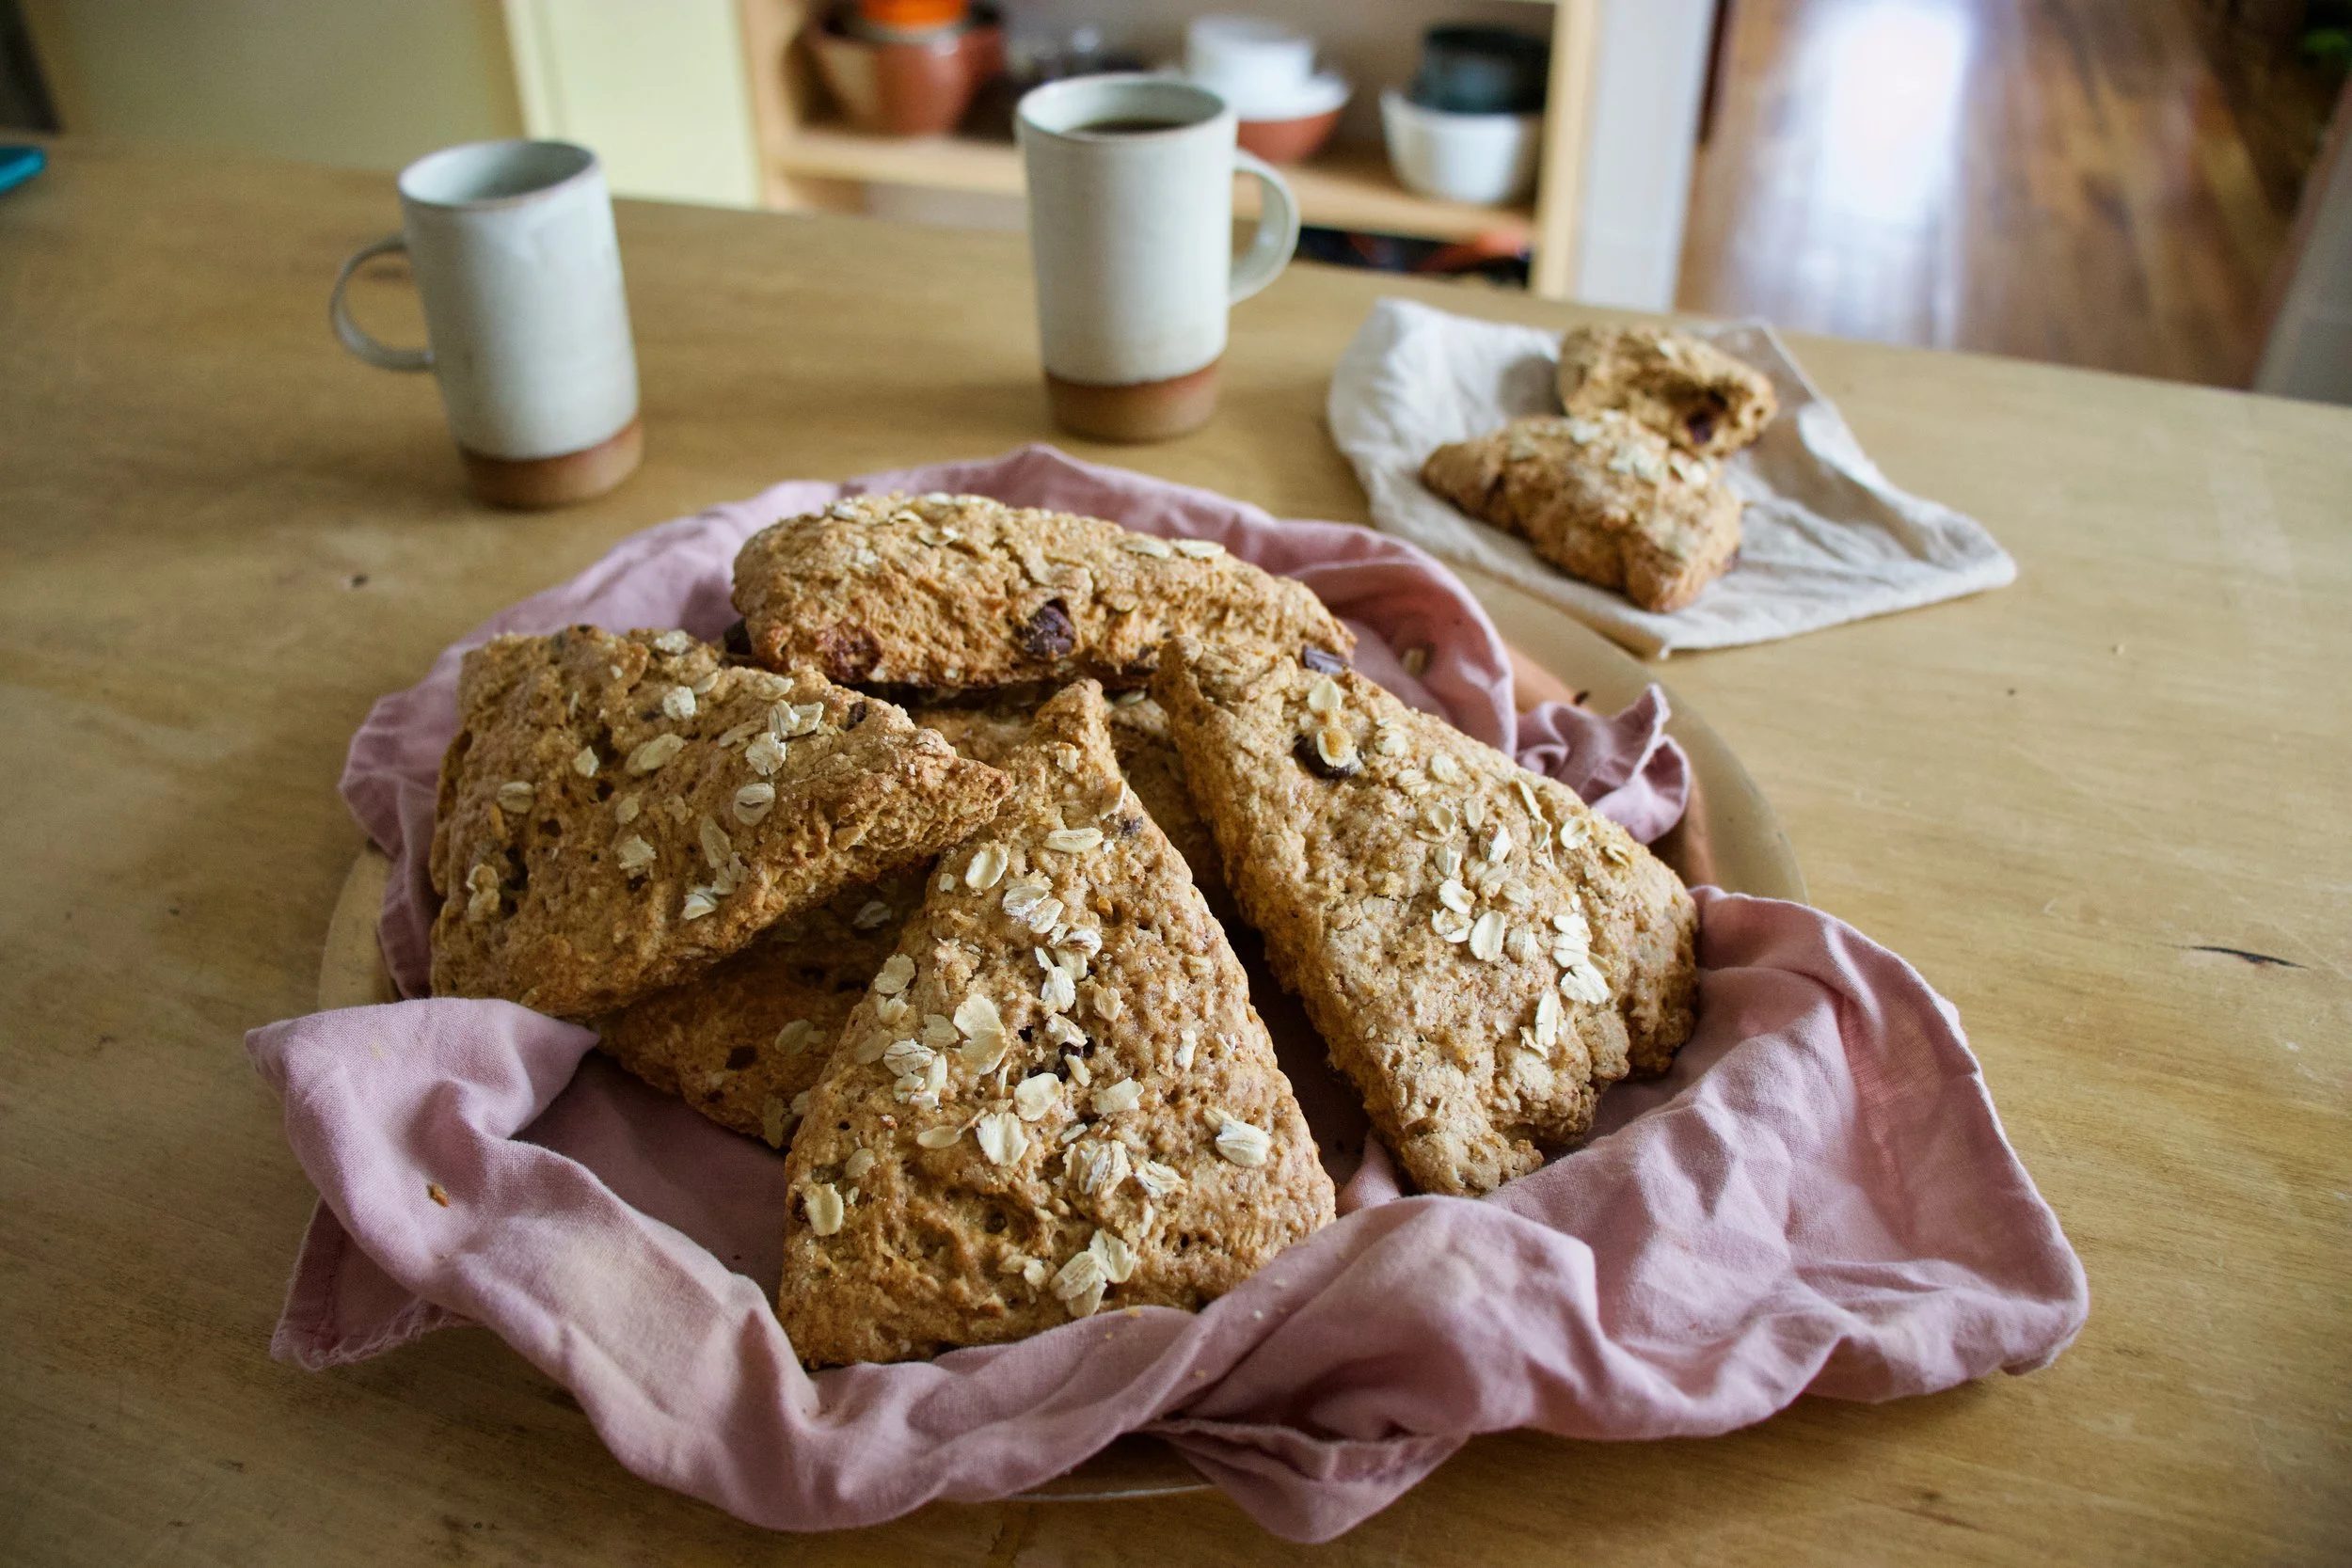
After letting them cool for a bit on a wire rack, stack onto a plate and feed them to your people. And yourself of course.
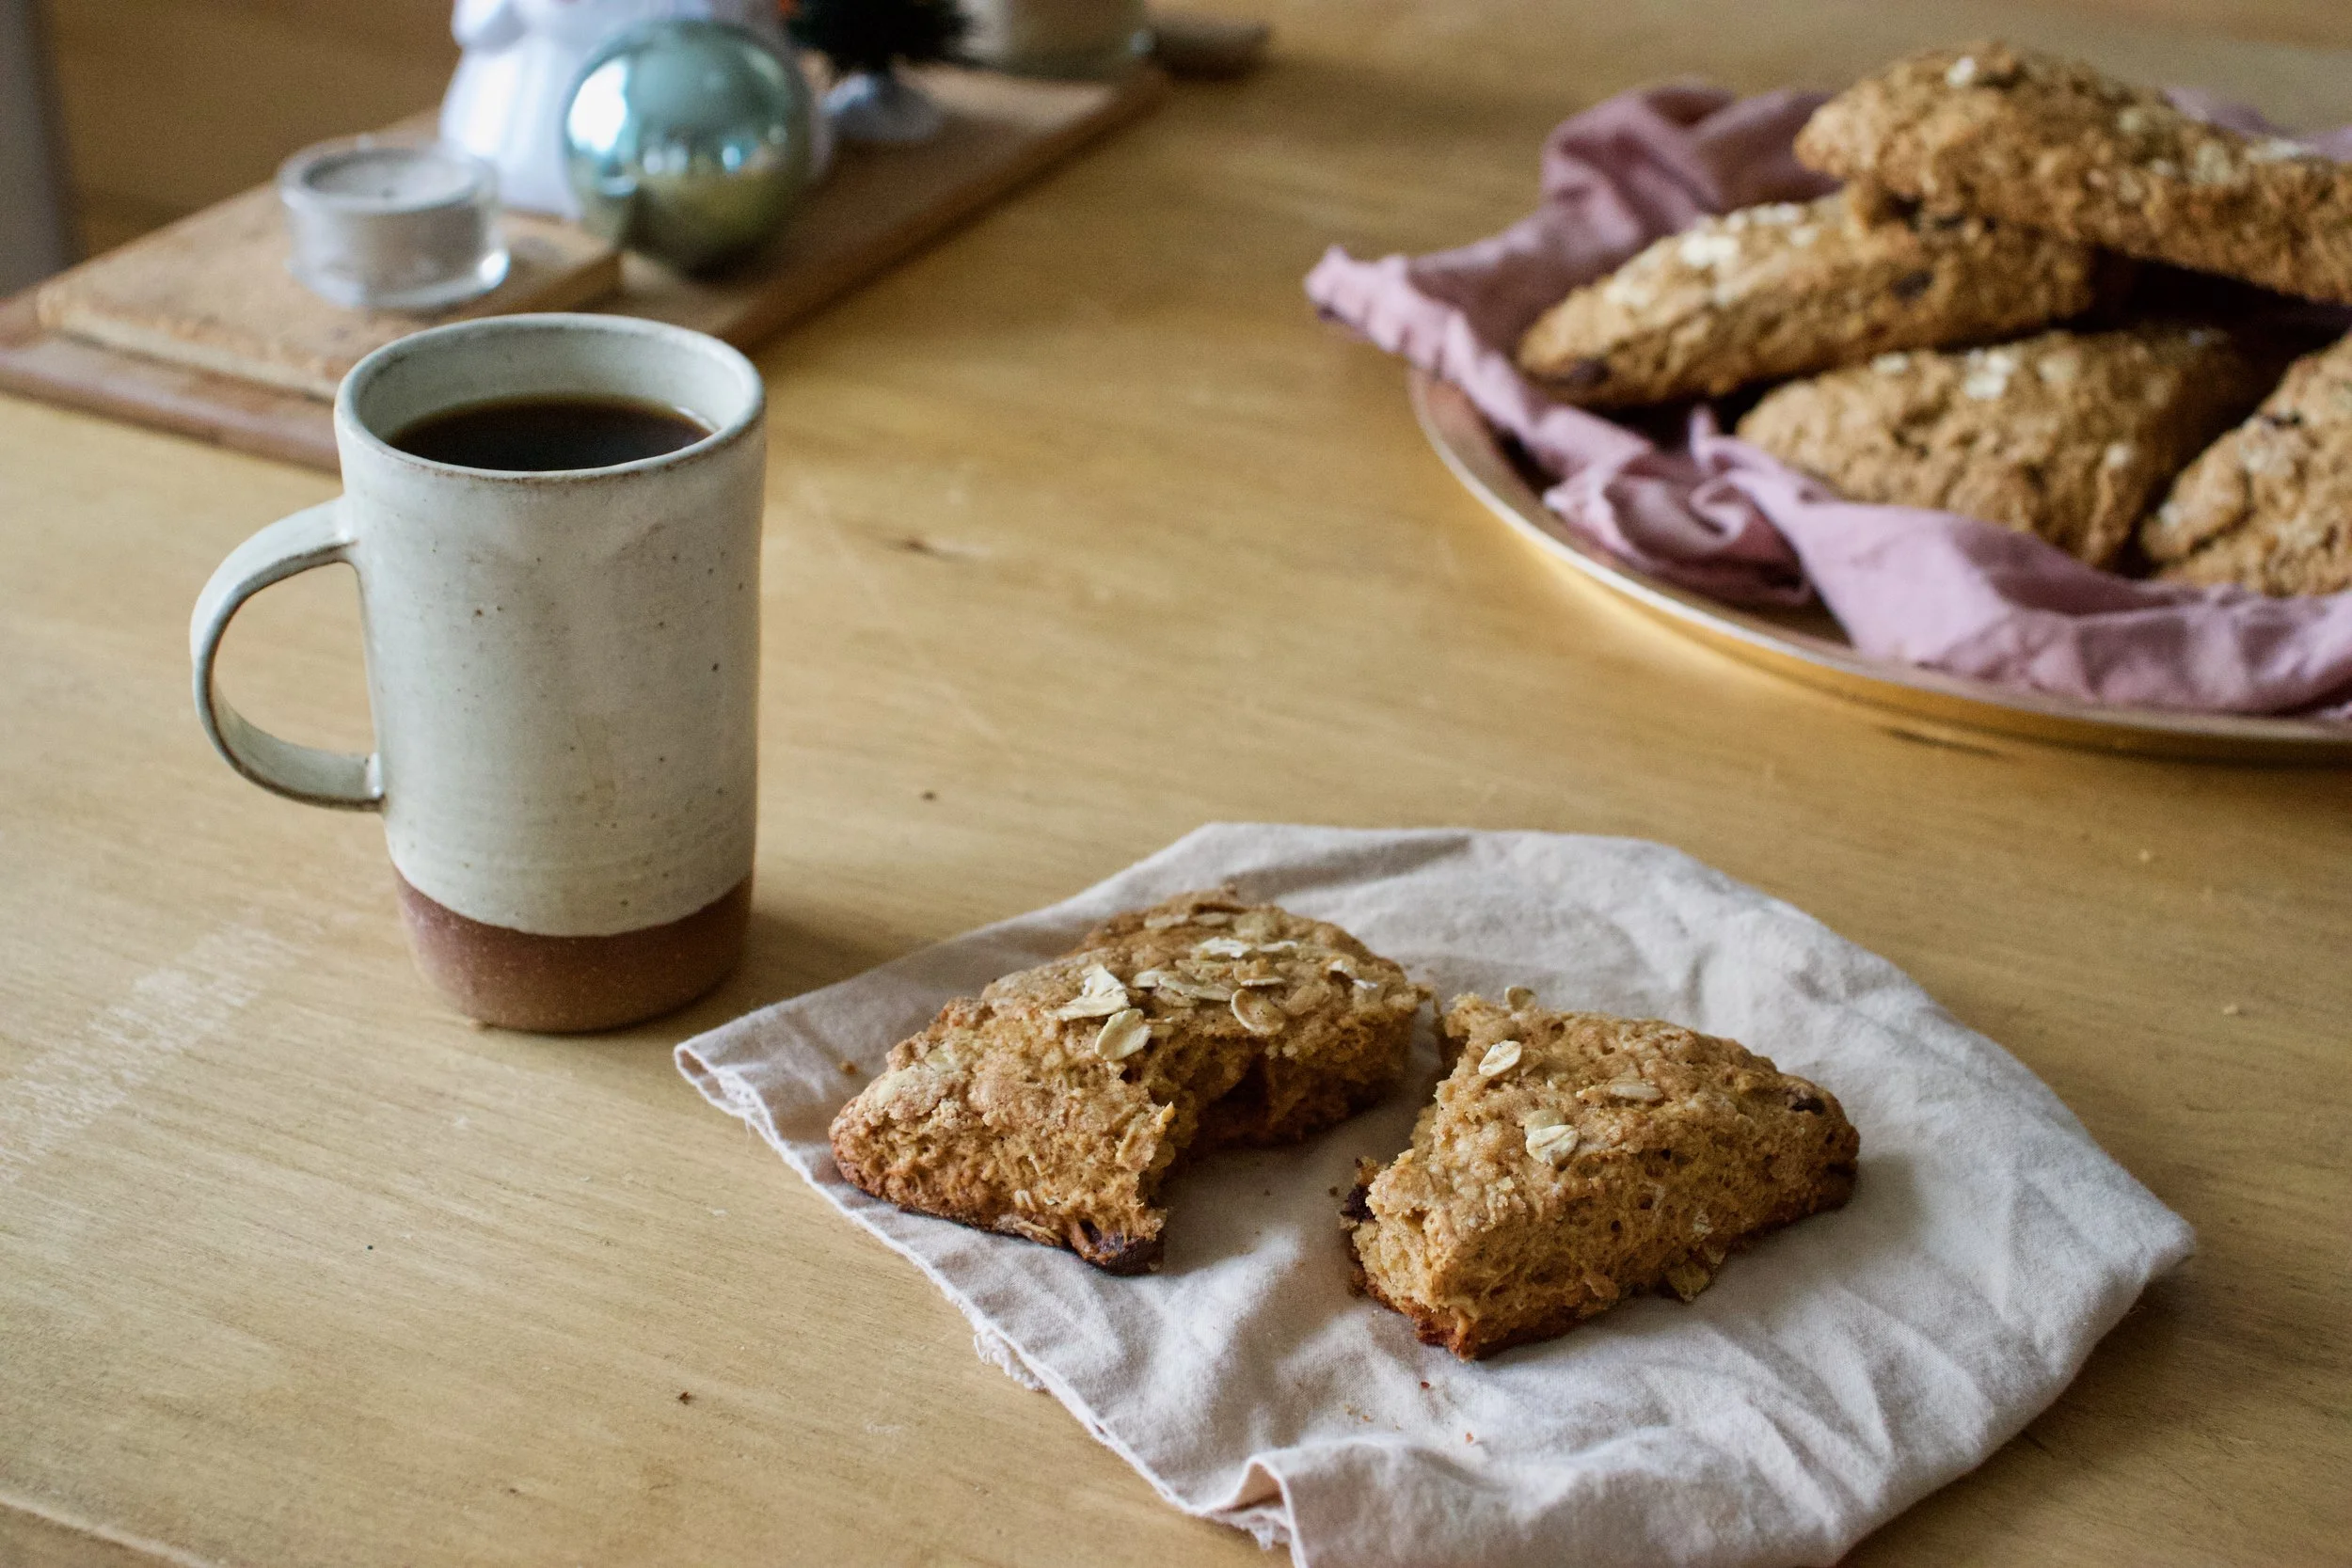
Chocolate chip oatmeal gingerbread scone and a cup of coffee. A perfection in all the ways.
Enjoy the weekend. It will be great, especially if you make some of these scones.
-C
Makes 8 scones
-
2 cups all purpose flour
-
1/2 cup old fashion oats plus 1/4 cup to sprinkle on top
-
1 1/2 teaspoons baking powder
-
1/2 teaspoon baking soda
-
1 teaspoon salt
-
2 teaspoons ground ginger
-
2 teaspoon cinnamon
-
1/2 teaspoon fresh ground pepper
-
1/4 teaspoon cloves
-
1/3 cup packed light brown sugar plus 2 tablespoons more to sprinkle on top
-
2 tablespoons molasses
-
1/2 cup cold vegan butter
-
2/3 cup soy or your favorite plant milk
-
2/3 cup semi sweet chocolate chips
Preheat oven to 375
In a large bowl, whisk together the flour, oats, baking powder and soda, salt, all the spices, and the brown sugar. Make sure there are no big lumps of brown sugar in the mixture. Once dry mixture is all mixed up, cut in (do not blend in) the cold vegan butter until the mixture looks crumbly. Toss in the chocolate chips.
Grab your measure out milk and mix in the molasses until completely mixed together. Dump the mixture into the bowl of dry and lightly mix with a fork until a dough forms. Dump out the dough onto a lightly floured surface and bring it all together with your hands .Flatten dough out into a circle about and inch thick them with a knife or dough scraper, cut into 8 even sized wedges. Place scones onto a baking sheet and lightly brush a little milk onto the tops.. Mix together the extra oats and brown sugar and sprinkle on the tops. Place into preheated oven and bake for 25-28 minutes, or until nice and golden brown. Once baked, remove and place on a wire rack to cool.
Eat. Store left over scones in an airtight container at room temperature for 3-4 days. Individual scones freeze well.

One of the mr’s little brothers really likes peanut butter cookies. He is always asking me to make them for him so this past weekend, for his 24h birthday, I did just that. Peanut butter chocolate chip birthday cookies,%u00a0 Just for him. (I know, I am the best)
After rushing home the evening before to make this awesome cookies for the boy, I waited until a decent time the next day and I shot him a text.. “Happy Birthday! Where are you?, I want to bring you cookies!”. That was at noon. I get a text back around 3… “just woke up, I’ll come get them later.” (Sleeping until 3pm.. that must have been a crazy ass birthday morning!)
Well guess what. That little shit didn’t come get the cookie that I made all special like for him so now the mr has slowly been picking them off. And the mr. says that these cookies are like magic. That they are so freaking good, probably the best peanut butter cookie he has ever had.%u00a0 (he doesn’t usually say things like that about cookies so the really must be amazing)
So if you are reading this Qui.. you have a a few magic cookies left…but I can’t promise anything after tonight.%u00a0 The sister is coming over for dinner and I’ll just give them to her for dessert……….

The stuff. Rolled oats, peanut butter, brown sugar, sea salt and chocolate chips. Also a bit of baking soda, some vanilla extract and a bit of water.%u00a0 You need no flour, eggs or butter, these cookies are all about simple goodness.
Notes. Chunky or smooth peanut butter is cool here and you can use natural or skippy.. the skippy cookie will just be a bit sweeter. And the sea salt. If you don’t have sea salt, add a teaspoon of table salt to the cookie batter. The sea salt is for the tops of the cookies and you should NOT use table salt for that.
Start by sticking the oats into a food processor and blending until your oats become oat flour.

Then dump everything else in (water first), EXCEPT the chocolate chips.

And pulse until it all comes together into a yummy peanut butter cookie dough.
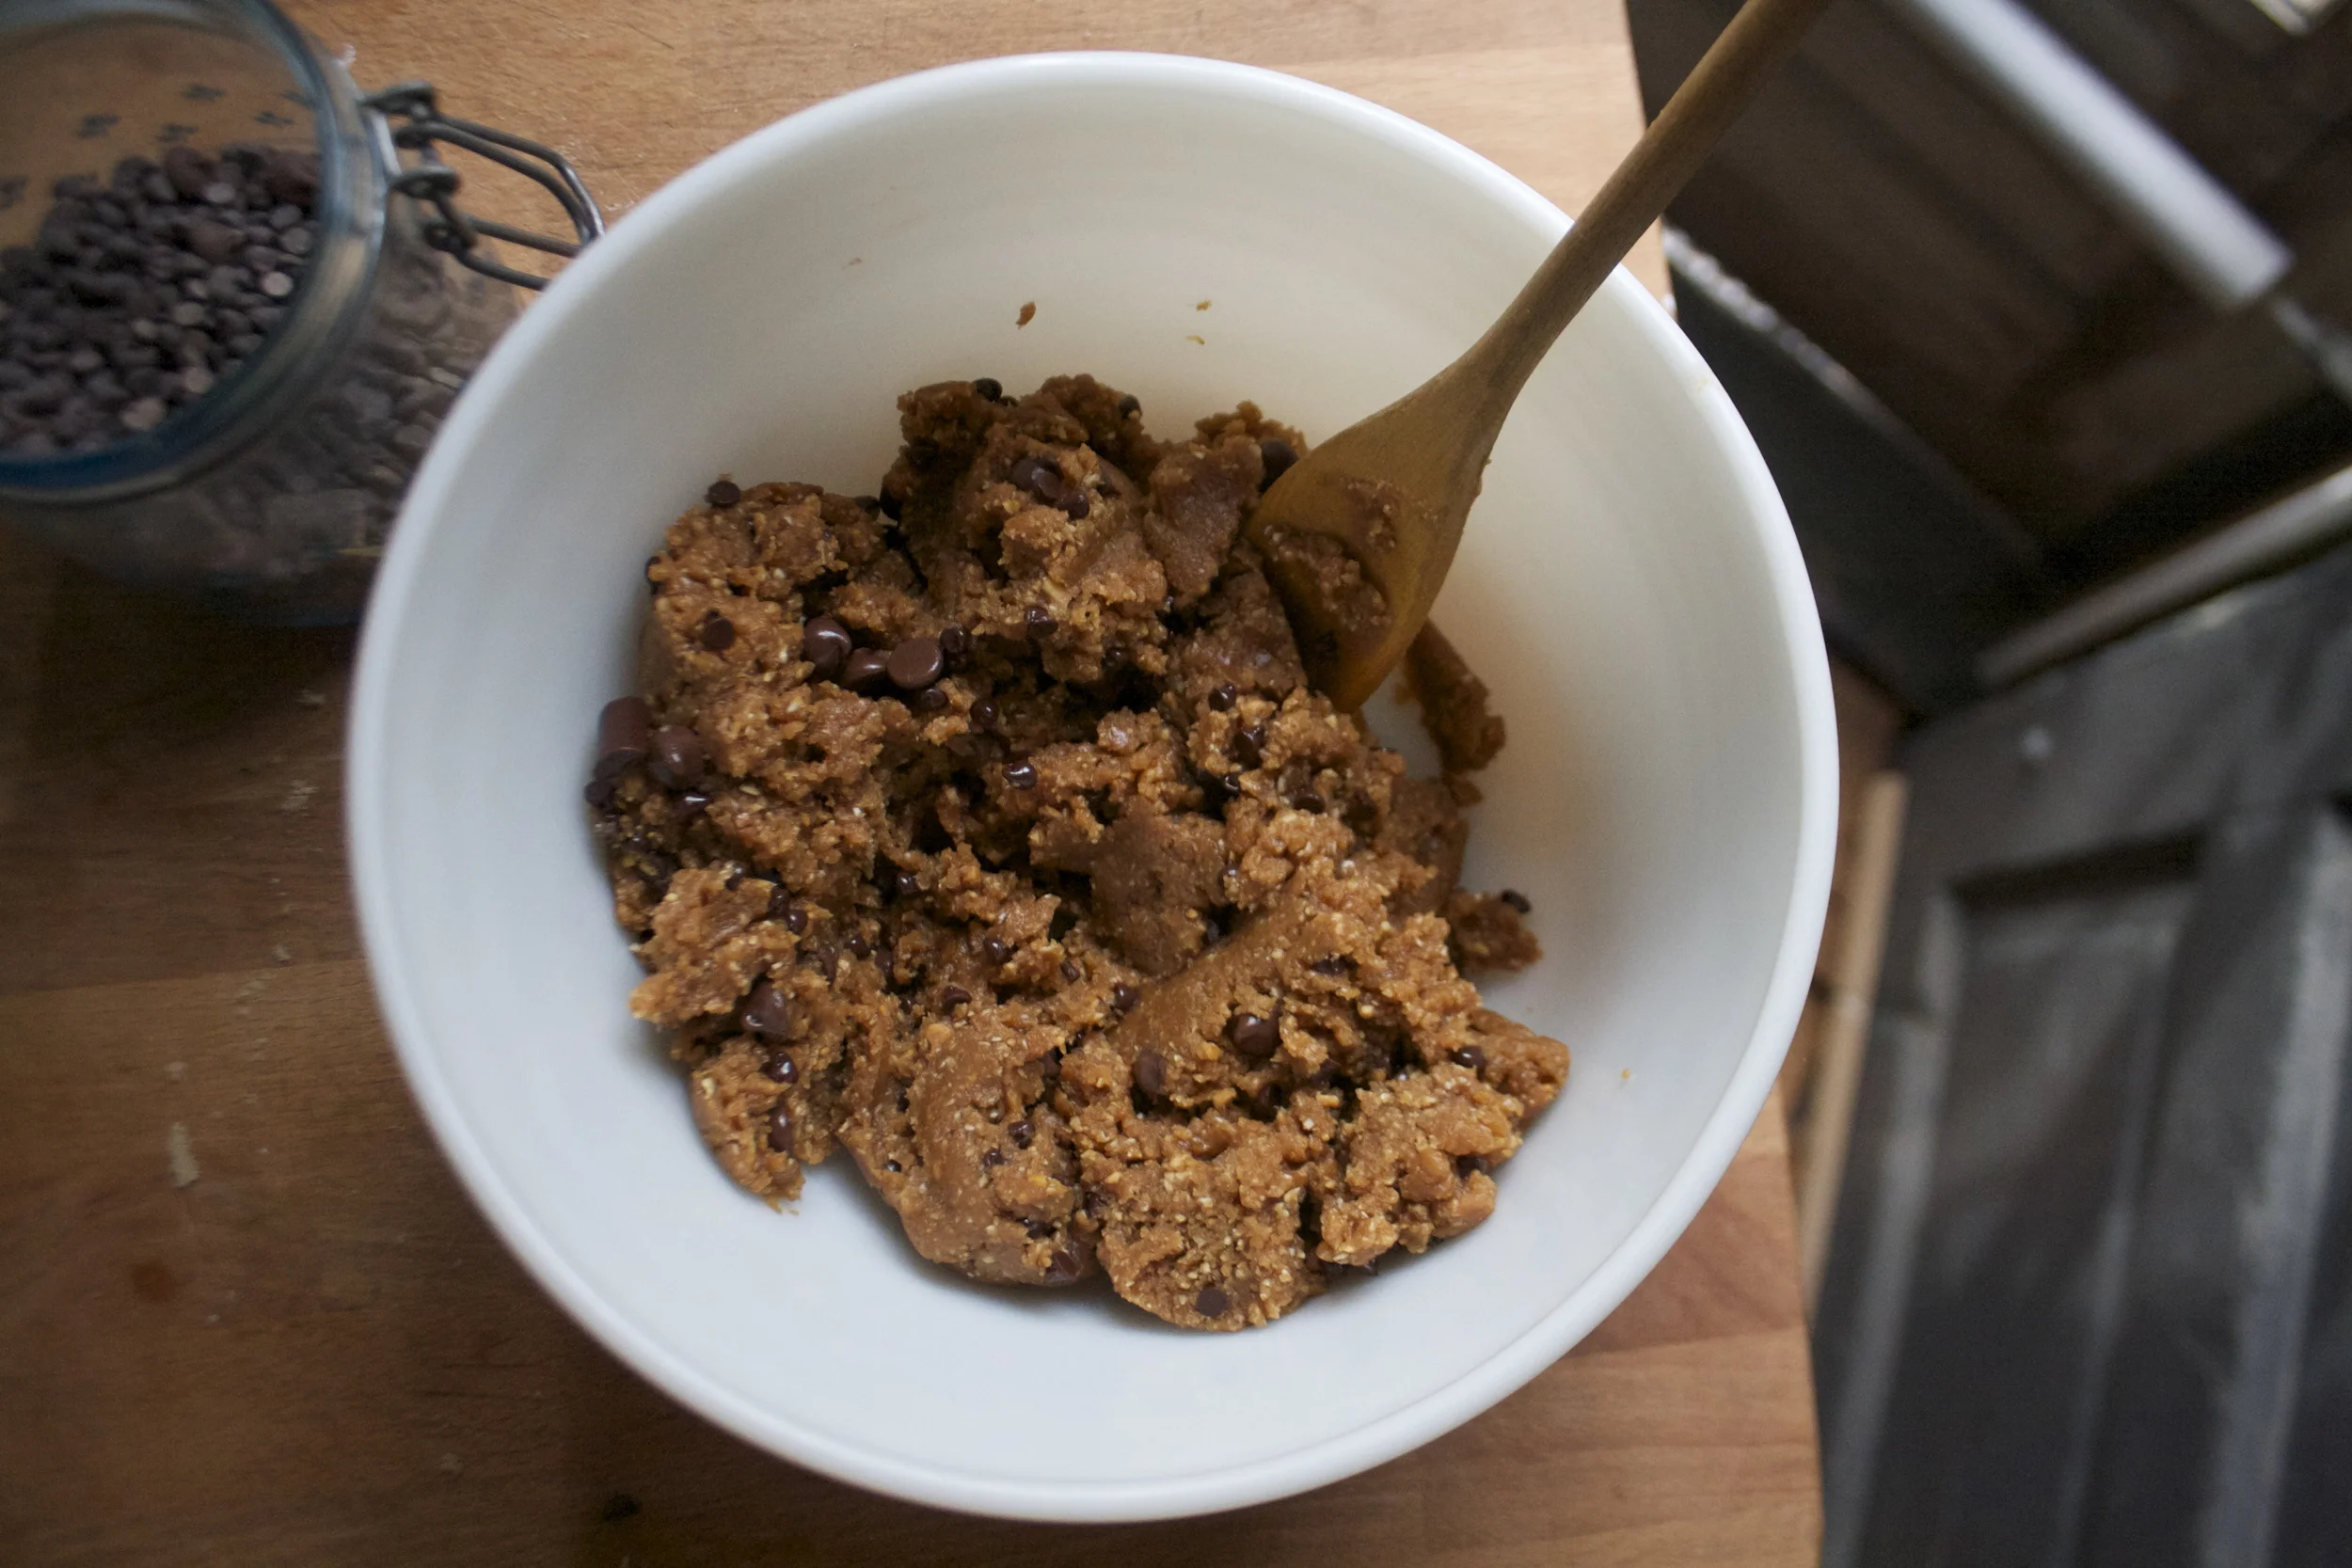
Dump the dough into a bowl and now mix in the chocolate chip.%u00a0 Once you do that, stop eating the dough and stick the bowl in the fridge for 10-15 minutes to slightly chill….%u00a0

After the bout in the fridge, grab your dough and scoop out like sized balls of dough and place them on baking sheet. Give each ball a smoosh (use a fork or your fingers) and sprinkle the tops with a small little pinch of sea salt (again, if you don’t have sea salt, so not use table salt… just skip this)
And into the oven they go…

Only until slightly golden brown and just starting to look almost done….. that’s when they are done (about 8 minutes)
Let the cookies cool for a minutes on the baking sheet then transfer to a wire rack to finish.

Super awesome and super duper duper good. Made with love and good intentions for a little shit… but left to be eaten by others
But really these are so easy and fast to make. I’ll probably just end up making the boy a new batch. (again, so nice)
Have a super duper day!
-C
Make about a dozen
- 1 cup old fashion oats
- 1/2 cup warm water
- 1 heaping cup peanut butter (creamy or chunky)
- 2/3 cup brown sugar
- 1/2 teaspoon baking soda
- 1 teaspoon vanilla extract
- 1/2 ish cup chocolate chips/chunks (the tiny chips work the best)
- flaked sea salt (optional)
Note. Flaked sea salt is a perfect finish for the cookie but if you don’t have it or don’t want to use it, add a teaspoon of table salt to the cookie batter but don’t sprinkle the tops with it.
Place oats in food processor ans blend until it turns into flour. Add in water, pulse, then add in the rest, EXCEPT the chocolate chip.%u00a0 Pulse until a dough forms. Dump the dough into a bowl and now mix in the chocolate chips.
Stick the dough in the fridge for about 15-20 minutes…. In the mean time, do the dishes and a little cookie dance.
Preheat oven to 350.
With a scoop or spoon. scoop out your preferred sized cookies onto a baking sheet. Give each cookie ball a little smoosh with either a fork for a pattern or just your fingers. Sprinkle each smooshed cookie with a pinch of sea salt.
Stick the cookies in oven and bake for 8-9 minutes, until just barely golden brown. Remove from oven, let cool for a minutes then remove from sheet to cool on a wire rack.
Place a cookie or two on a plate, stash the rest away (or else you will eat them all) grab a nice cold glass of some milk situation or a pipping hot cup of coffee and sit down with a good book or even a smutty magazine (no judgment here), read, eat cookies and be happy.
Enjoy!
I wanted to be in the kitchen so I asked the mr what he wanted me to make him. Anything he wanted, like a cake, or cookies, or donuts.
He asked for granola bars. (so cute)
I think the reason that he requested granola bars was that he knew I wanted to test out the golden syrup that I brought back from Ireland and I had mentioned that I was going to make myself some granola.%u00a0 (not him, me) but I went with it. And really, I was excited to bust out the golden syrup.
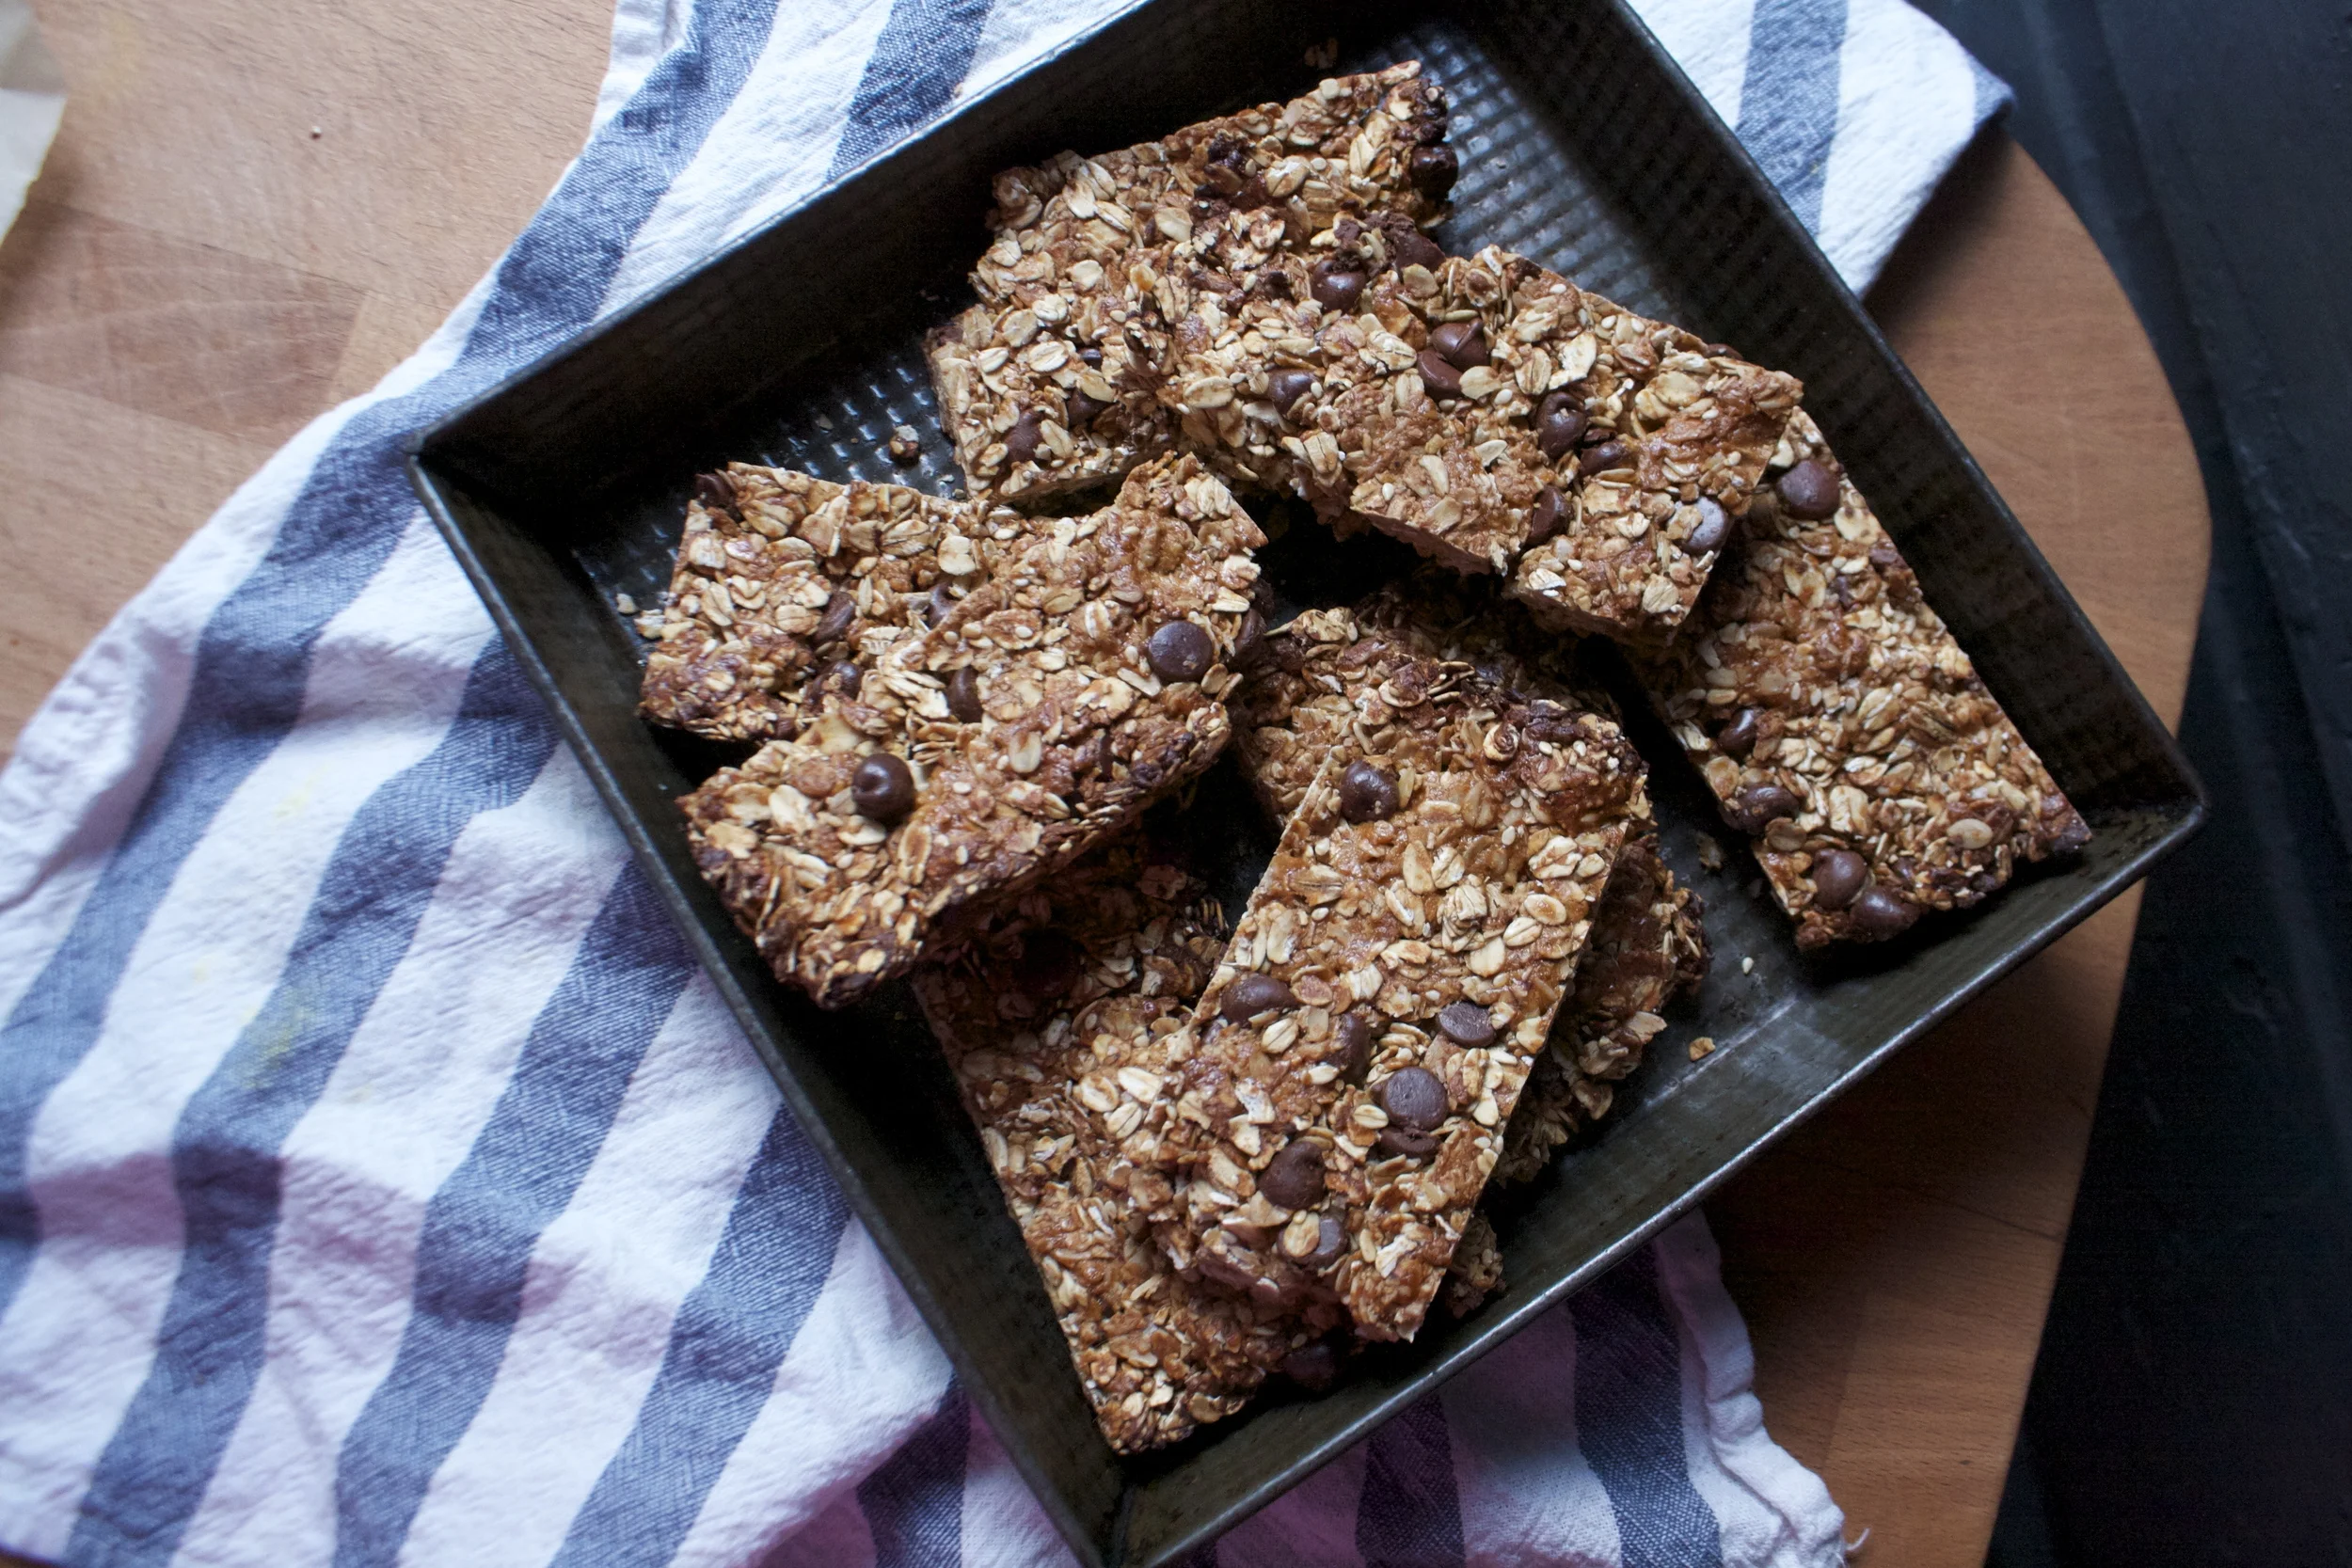
Now what kind of granola bars was the question, but I didn’t even ask him I just went with tahini chocolate chip. Tahini cause its amazing, chocolate chips because, just because. And the golden syrup. The bit of research that I have done on golden syrup had told me that this stuff is like glue (it really is) and that it can be used in lu of other binders that I would normally add to granola bars (like dates) It is pure can sugar that has been turned into a thick, golden syrup (hence the name) and has a more nutty, earthy flavor then just sugar, which went together quite nicely with the oats ans tahini in these bars. (next thing to try it with.. rice crispy treats!)
%u00a0So I got some kitchen time, the bars where made, the syrup was used, the mr was happy.
Win win win. WIN!

The stuff. Oats, tahini, golden syrup, cinnamon, sesame seeds, chocolate chips, and sea salt. Not a whole lot of stuff and nothing else is needed. But if you are feeling it, add some more. (cranberries, chopped dates, coconut, some nuts)
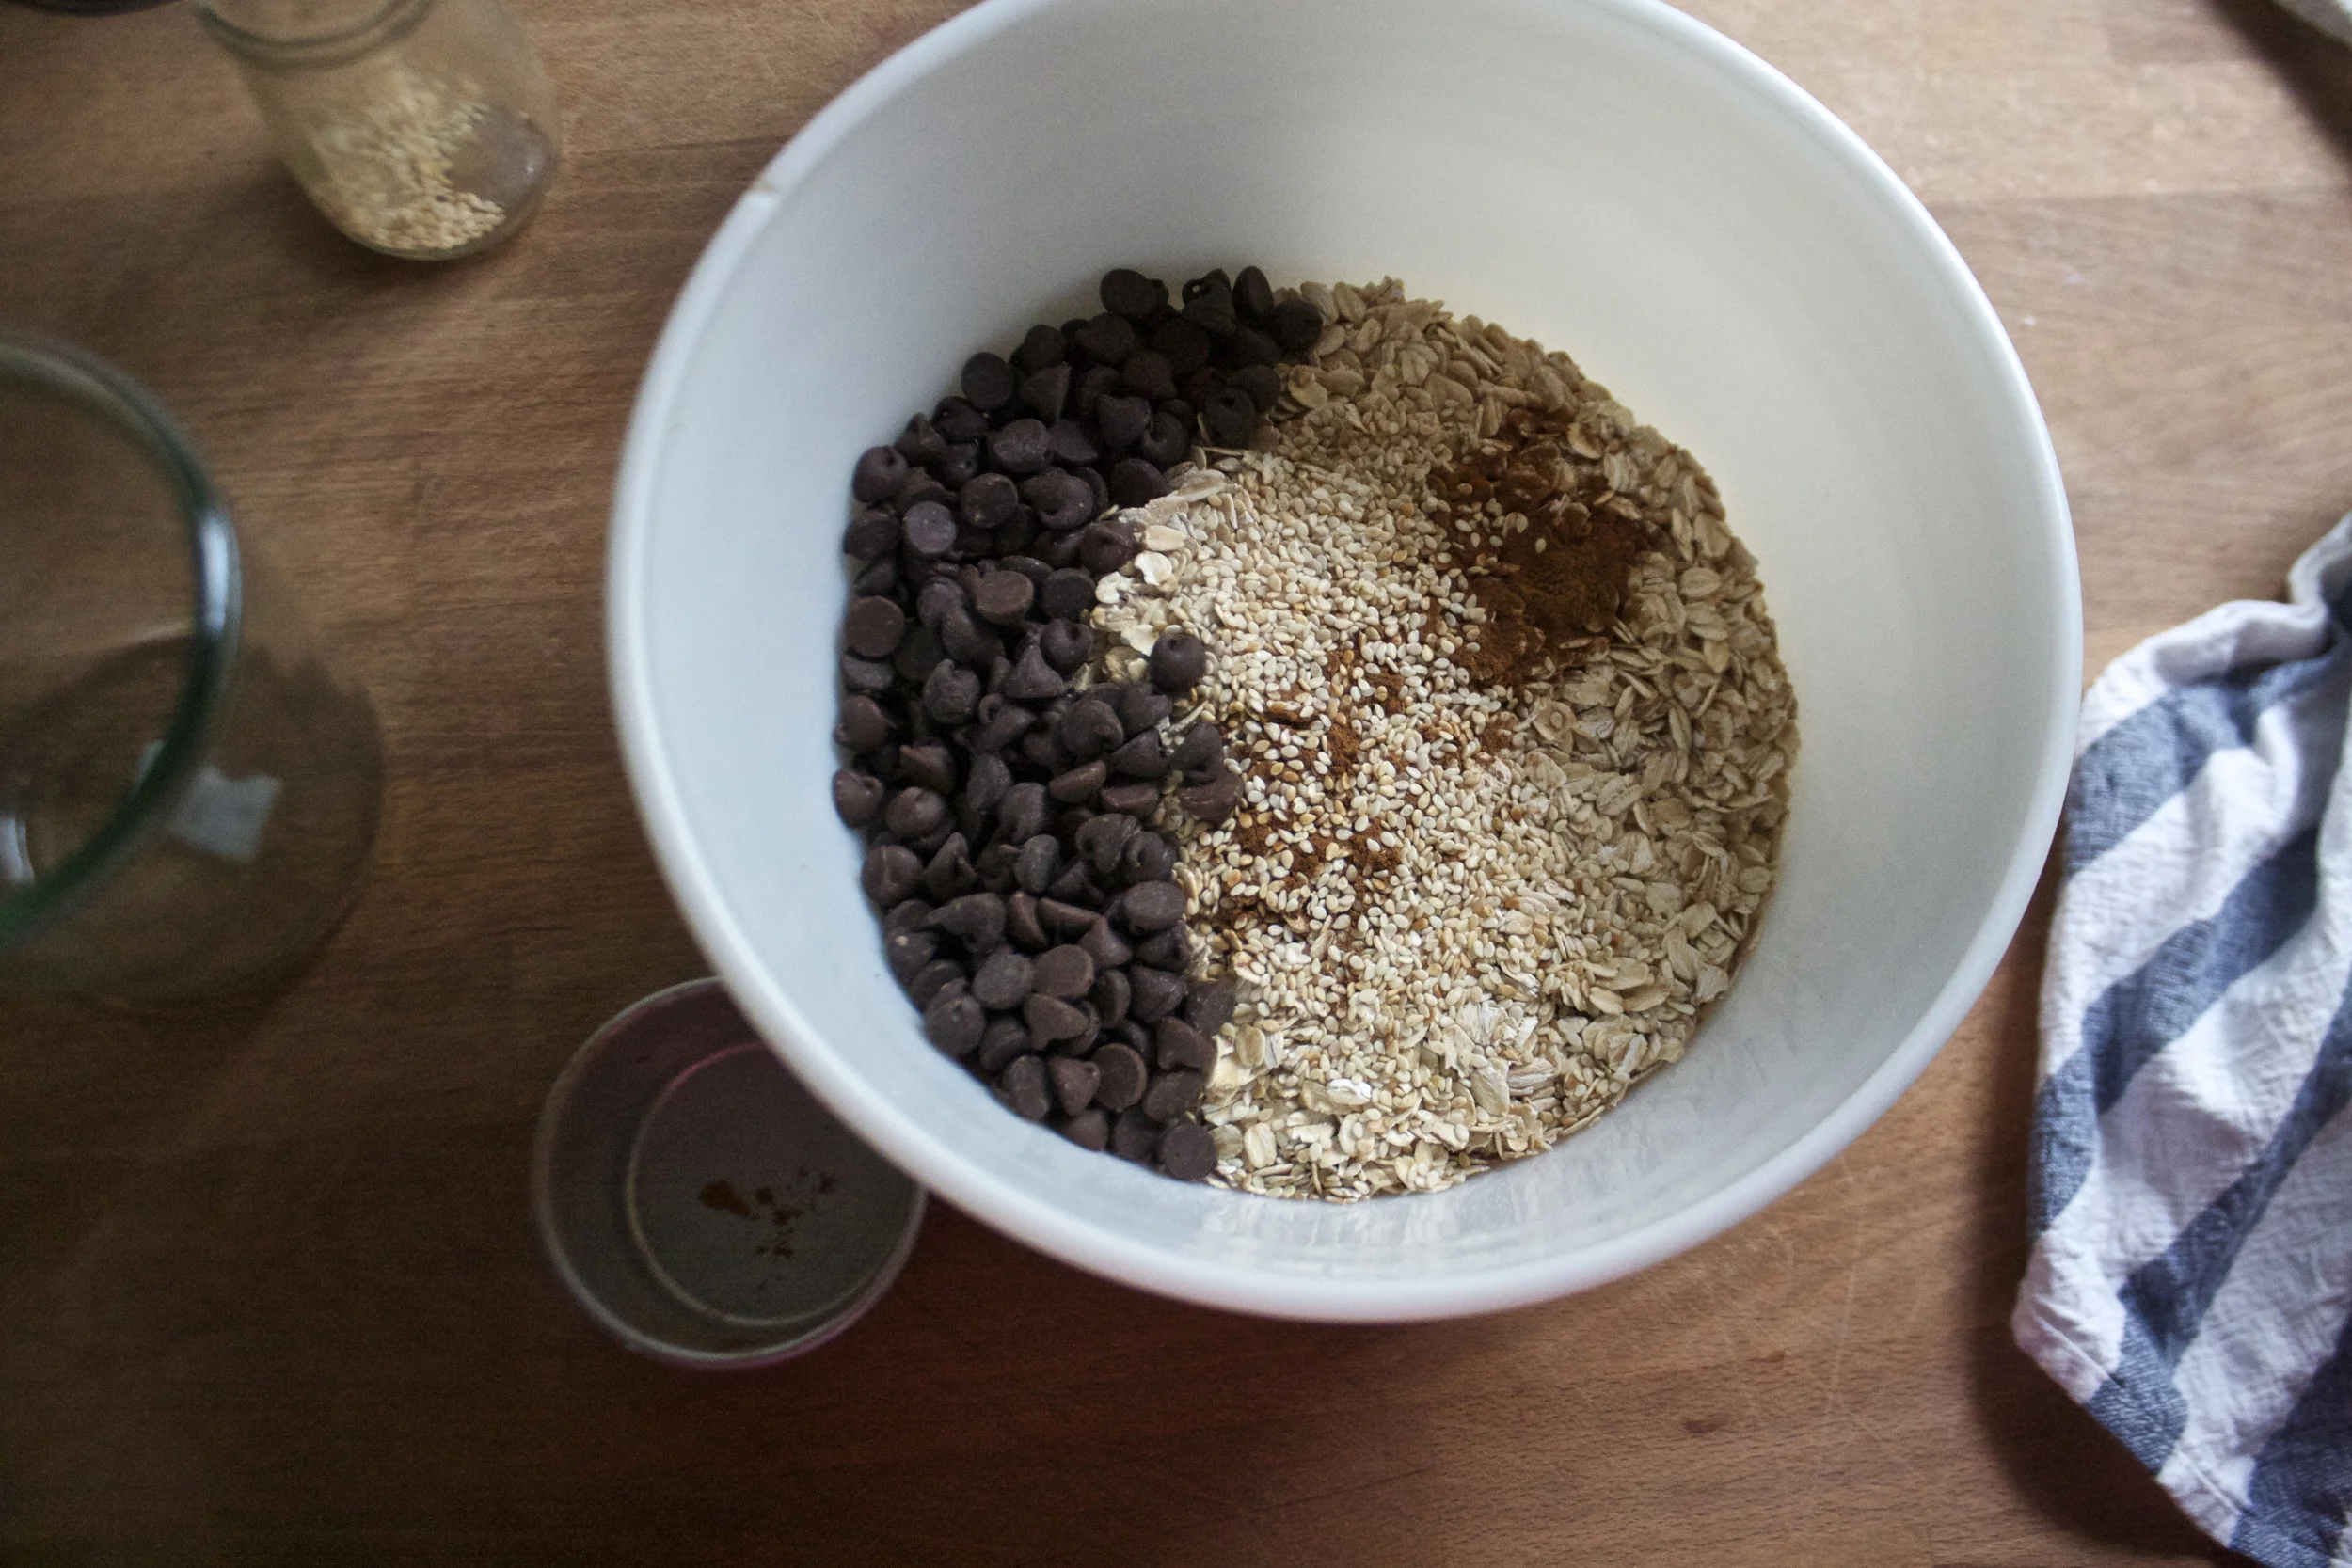
In a big bowl, combine the oats, cinnamon, sesame seed and chocolate chips.

In a separate (microwave safe) bowl or jar mix together the golden syrup and the tahini. Stick it in the microwave for 15 seconds, take it out, stir it, then another stick it in for another 15 seconds. You just want the mixture to be runny. Another way you could do this is on the stove top or, Like me, place jar in the oven and stir until loose. (I don’t have a microwave and I didn’t want to dirty a pot)
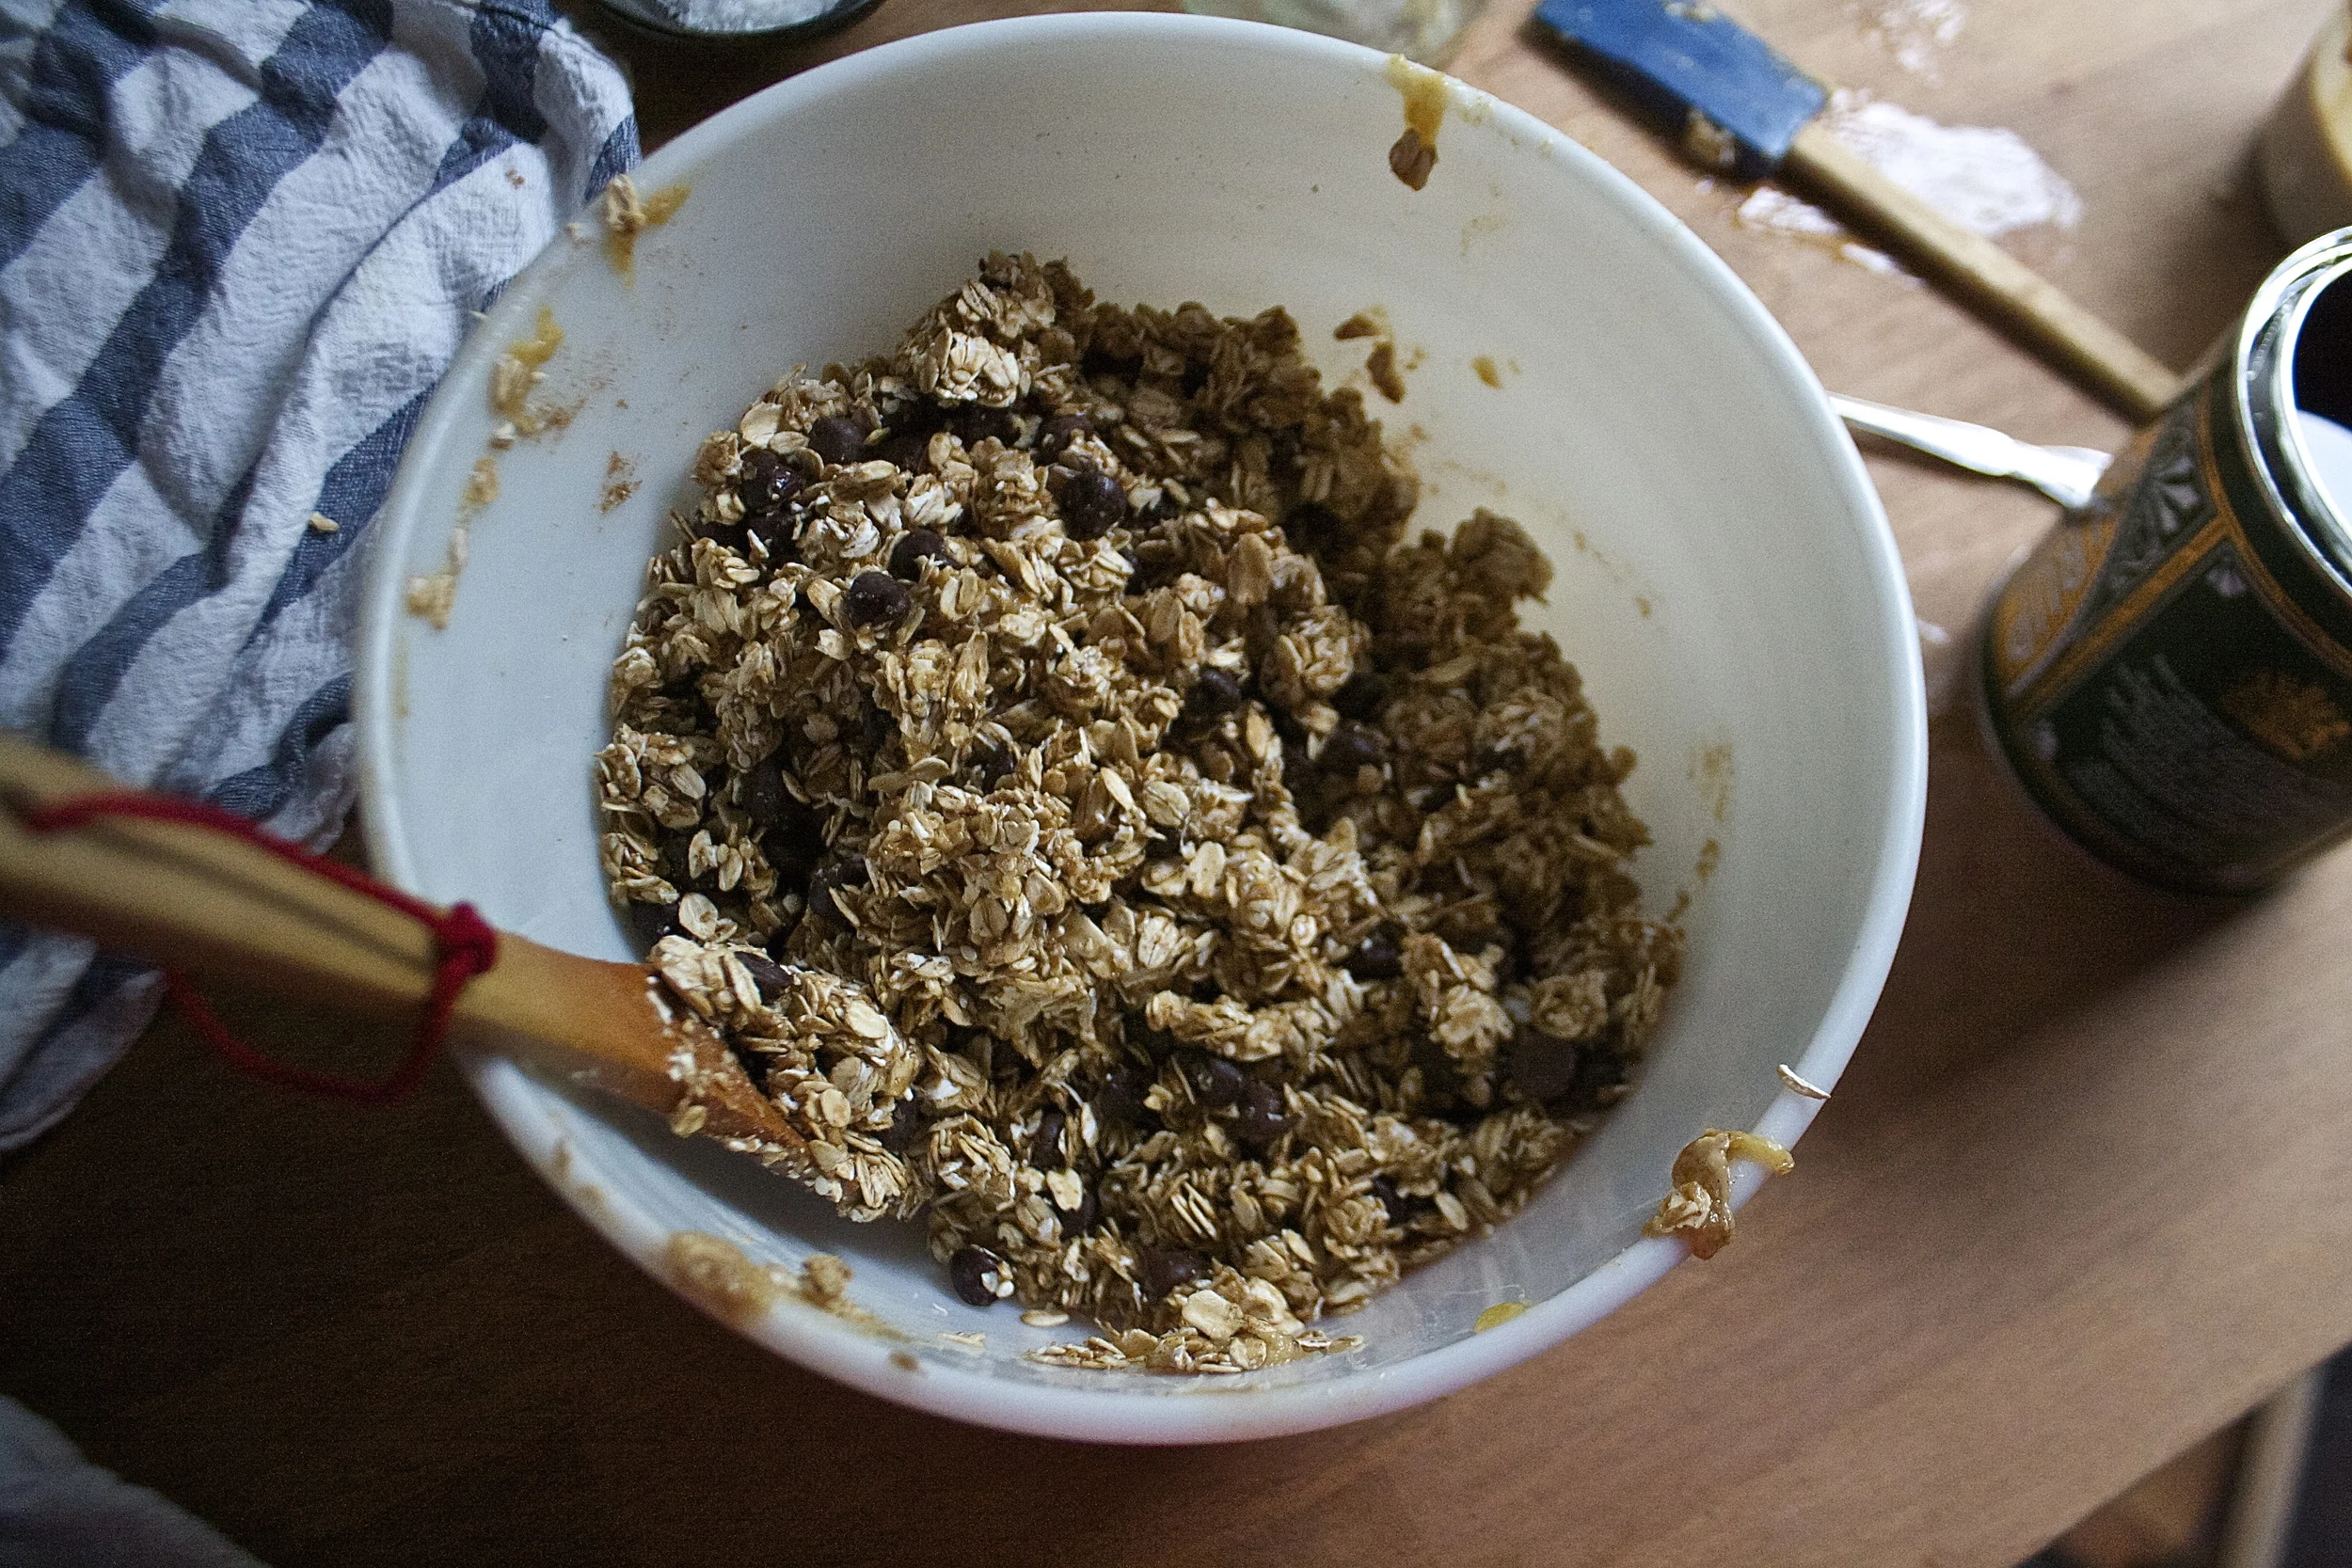
Pour the warm mixture into the oat mixture and stir until all the oats and stuff are all coated.
Dump the mixture into a parchment lined pan and press it down as hard as you can with your hands or a bottom of a glass
And optional, but really good, sprinkle the top with sea salt. (do not use table salt)
Now here is the deal. You can do one of two things. If you want a chewer granola bar, place these bars in the fridge for at least an hour until they set up and call them done. For a cruncher bar,%u00a0 stick the granola into the oven for a little bit to give them a slightly crunchier texture
I tossed my into the oven, just for like 12 minutes, just to give them a little color and a bit of crunch. (the longer you leave them in there, the harder and crunchier they become)
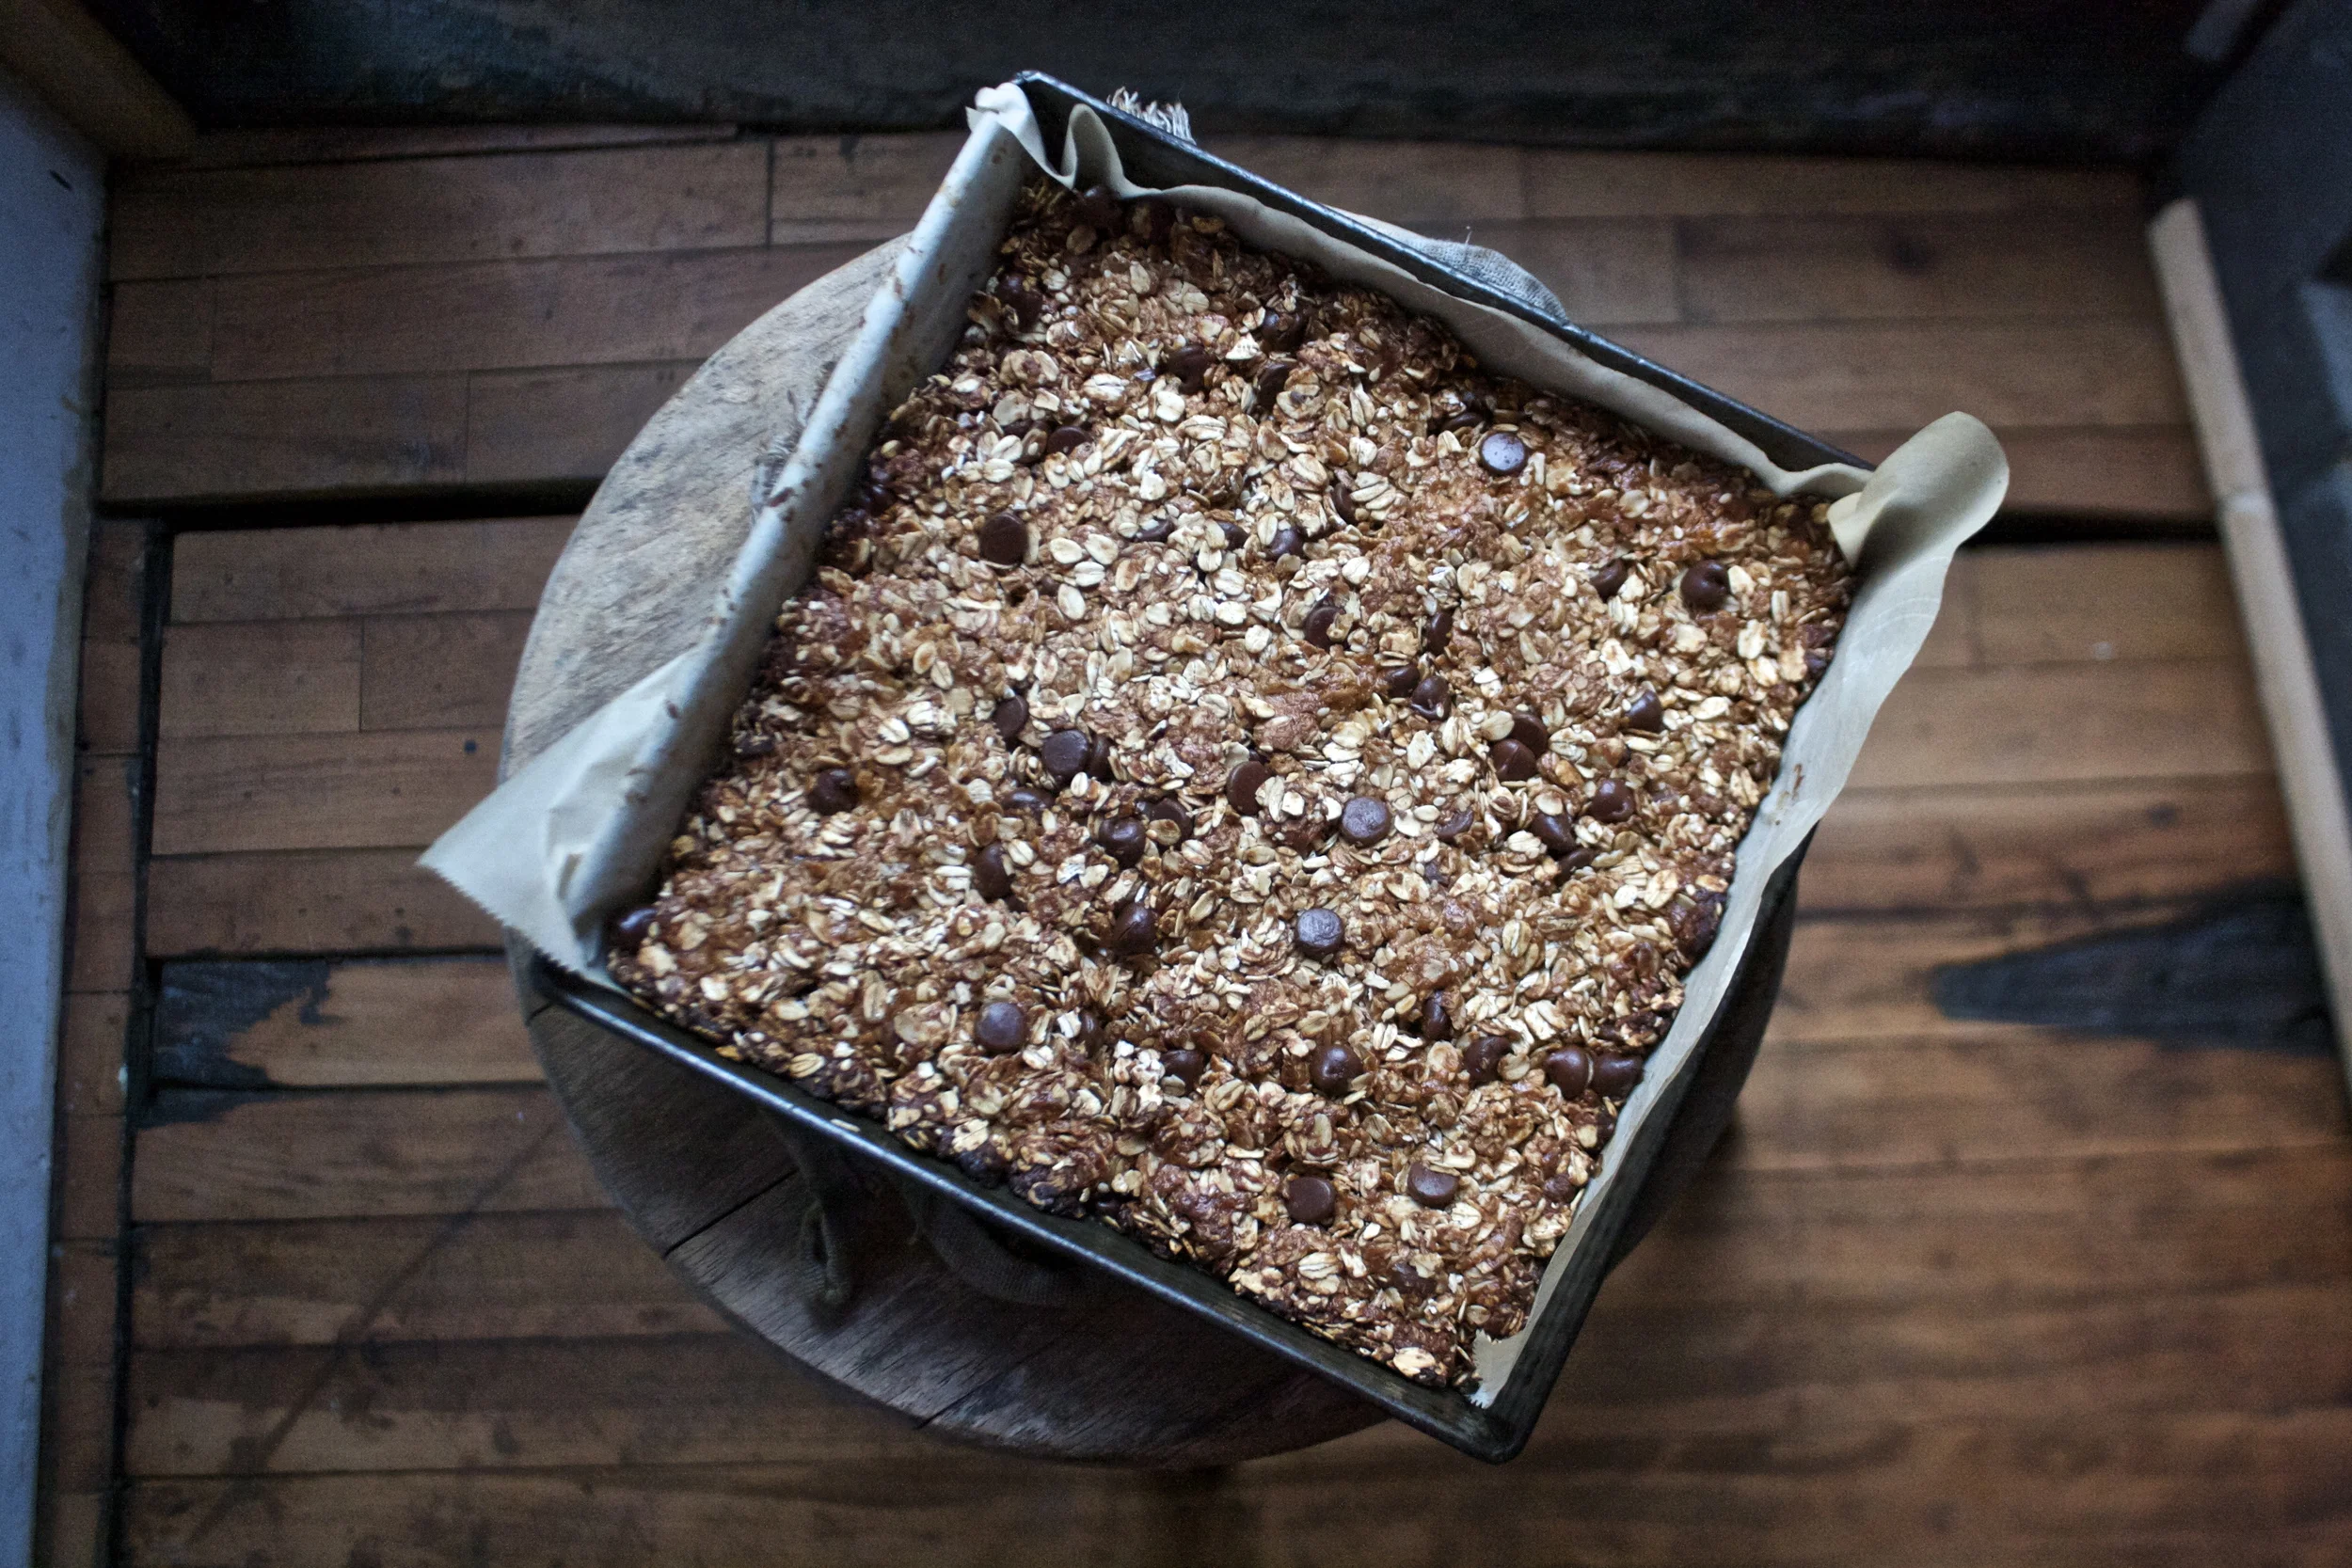
Pulled from the oven, chillin out and waiting to be cut.
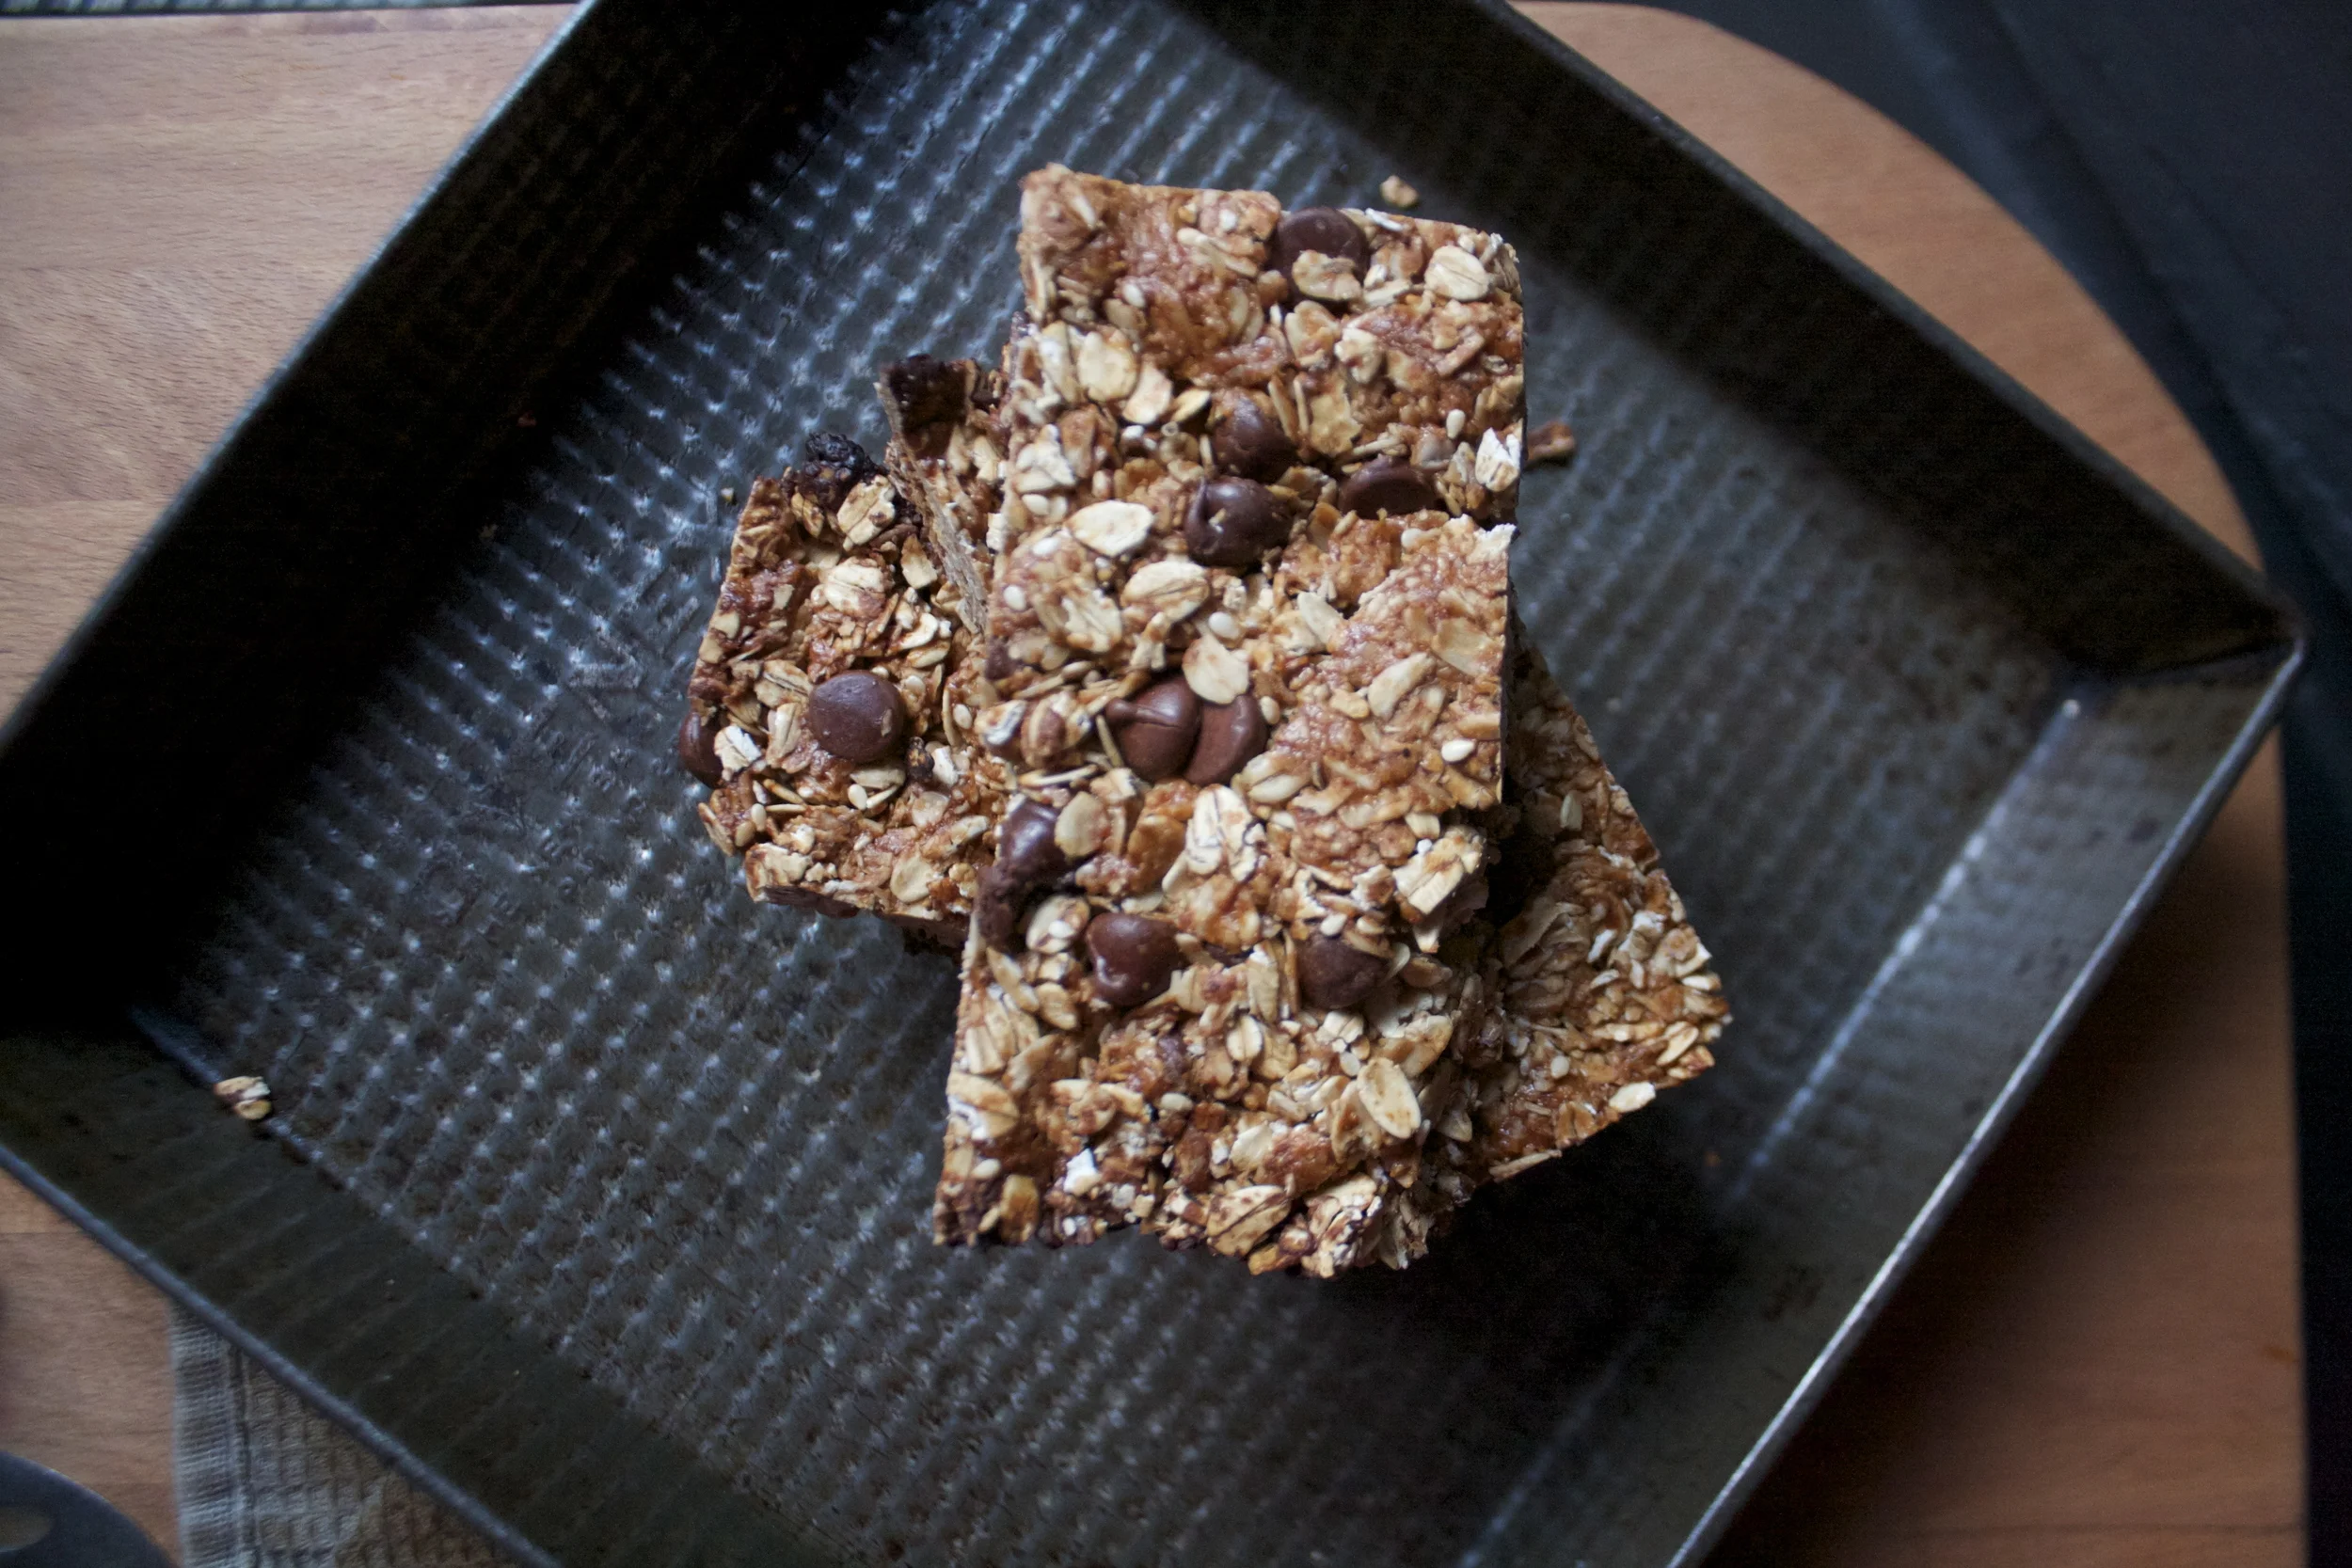
And piled high. a stack of bars, awaiting a mouth to eat them.
What a bar. The mr is a lucky guy.
Happy day to you!
-C
makes 8 Bars
- 3 cups oats (gluten free if needed)
- 1/3 heaping cup golden syrup (can be bought at some grocery stores but can be found online as well)
- 1/3 heaping cup tahini
- teaspoon of cinnamon
- 1/2-1 cup of chocolate chips
- a few pinches of sea salt(optional)
Note. Feel free to add more mix ins if you want (nuts, coconut, dried fruit) just don’t add more then another 1/2 cup of stuff.
In a large bowl toss together the oats, cinnamon, sesame seeds and chocolate chips. In a separate microwave safe bowl (or a pot), combine the golden syrup and the tahini. Place in microwave for 15 second increments,%u00a0 stirring in between until the mixture is loose and pourable. (or heat on stove on low heat until pourable)
Add tahini mixture into oat mixture and mix until all the oats are evenly coated.%u00a0 Dump into a parchment lined, 9×9 inch baking pan and evenly press the granola down as hard as you can with either your hands or a bottom of a glass (or whatever) Sprinkle the top with sea salt.
And now you have two decide if you want a more chewy granola bar or or a slightly crunchier bar. For a chewier one,%u00a0 stick the pan into the fridge for at least an hour until they firm up. For a but more crunch,. place bars in the oven for 10-15 minutes at 350, just until they get a slight golden brown and a little bit of crunch on top.%u00a0 Remove from oven and let cool.
Once bars are ready, remove from pan, grab a knife, cut into bars (or whatever shape you want) and eat them. Store extra in an airtight container (raw ones in the fridge, baked ones are ok on the counter)


Sunday was the first, and probably the biggest Thanksgivings we are going to this week. It was my family, which consists of my mom, 8 siblings (plus a few spouses) and 9 little%u2019s. A small little house bursting at the seems with a bunch of shit heads. There was a pumpkin pie food fight, secret Santa%u2019s name picking that had to be redone 3 times (because we cant count) and much to much time devoted to sister selfies.%u00a0 It was a blast.
%u00a0And my mom always requests everyone to bring something to diner so I of course wanted to contribute a pie.%u00a0One pie, something that would appeal to as many of those crazies with dietary restrictions as possible, that was a not gross, but still not full of crap, and that people would want to eat. So I went with an apple and acorn squash pie that happen to be vegan, gluten free, and a little on the less sweet side. (Look at me trying to be all nice an accommodating)
%u00a0But guess what. My mom, well she bought 5 other freaking pies from the farm stand to supplement my pie. And yeah, when the time came for dessert my pie got a few nibbles, and I was told that it was fantastic, but they all went for the super sugary, full on butter and fat, custard pies%u2026 Dietary restrictions thrown aside. And I am ok with that because my pie got divided up between a few of the ladies and they ended up easting it for breakfast. So my pie turned out to be the day after thanksgiving breakfast pie. And that might even be better then being the night of pie cause everyone knows that left over pie eaten for breakfast is the best kind of pie!
So if you are looking for a good pie that is great the day of Thanksgiving and be good for breakfast the next day, this is the pie for you.

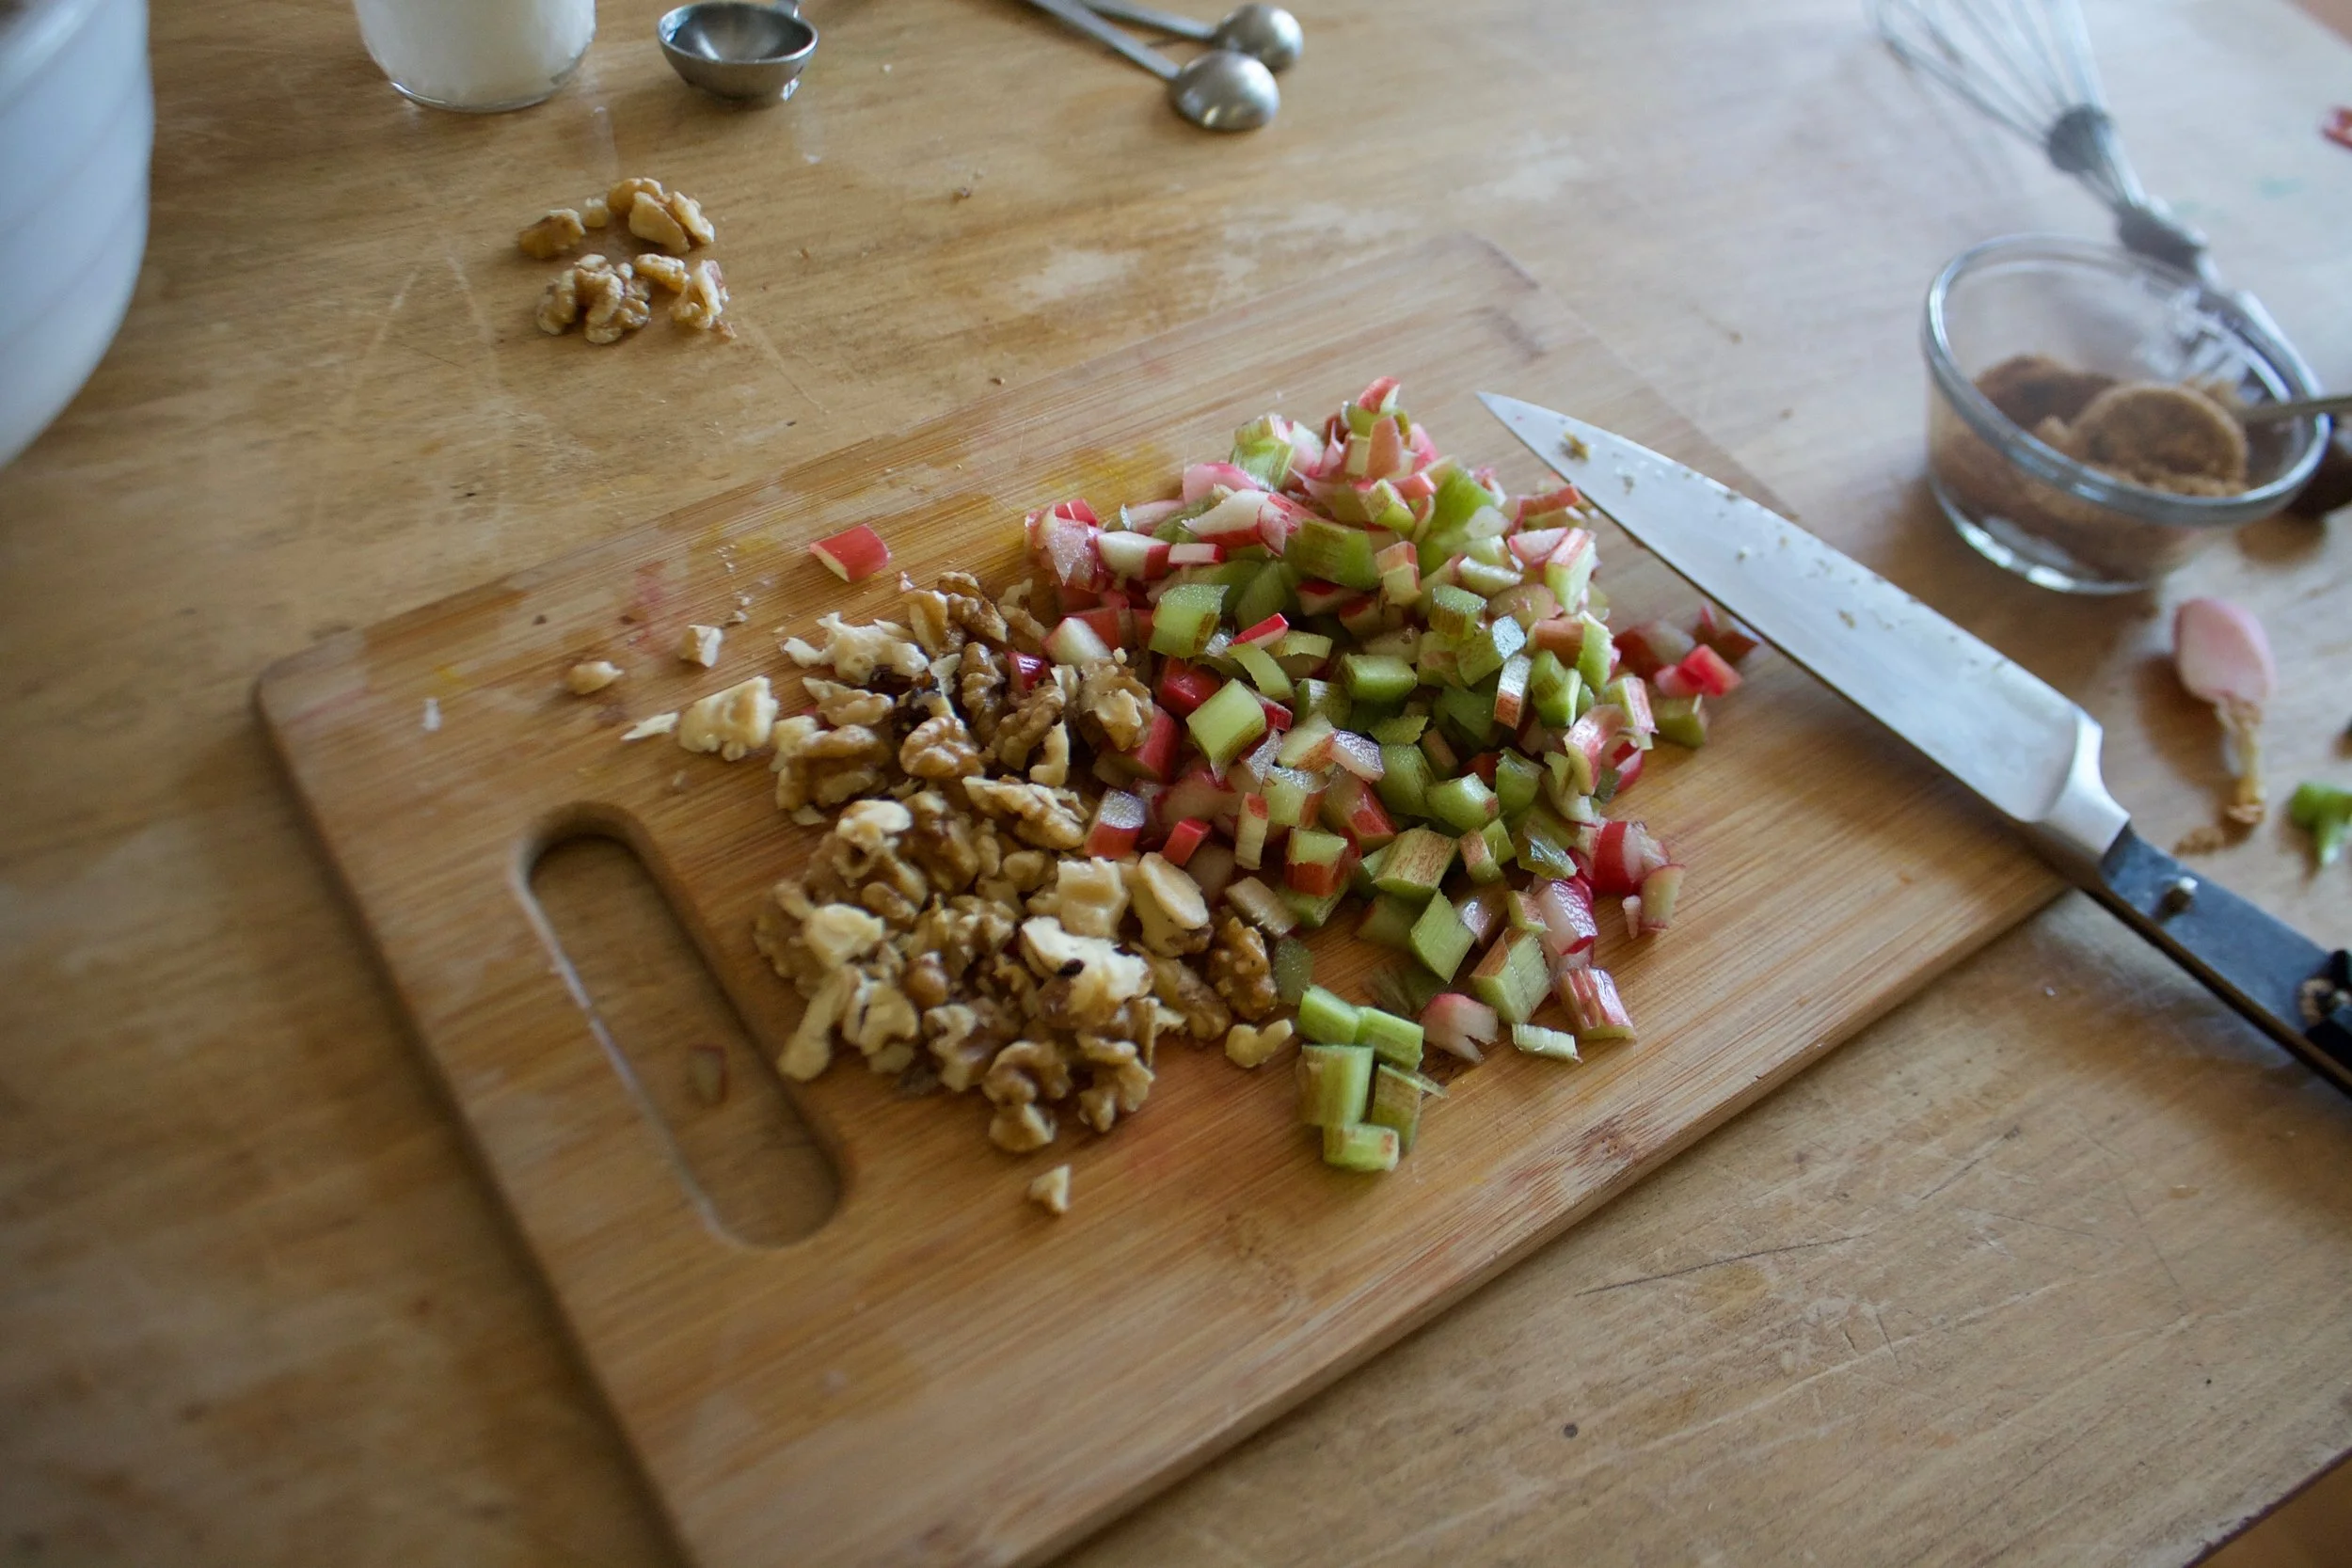
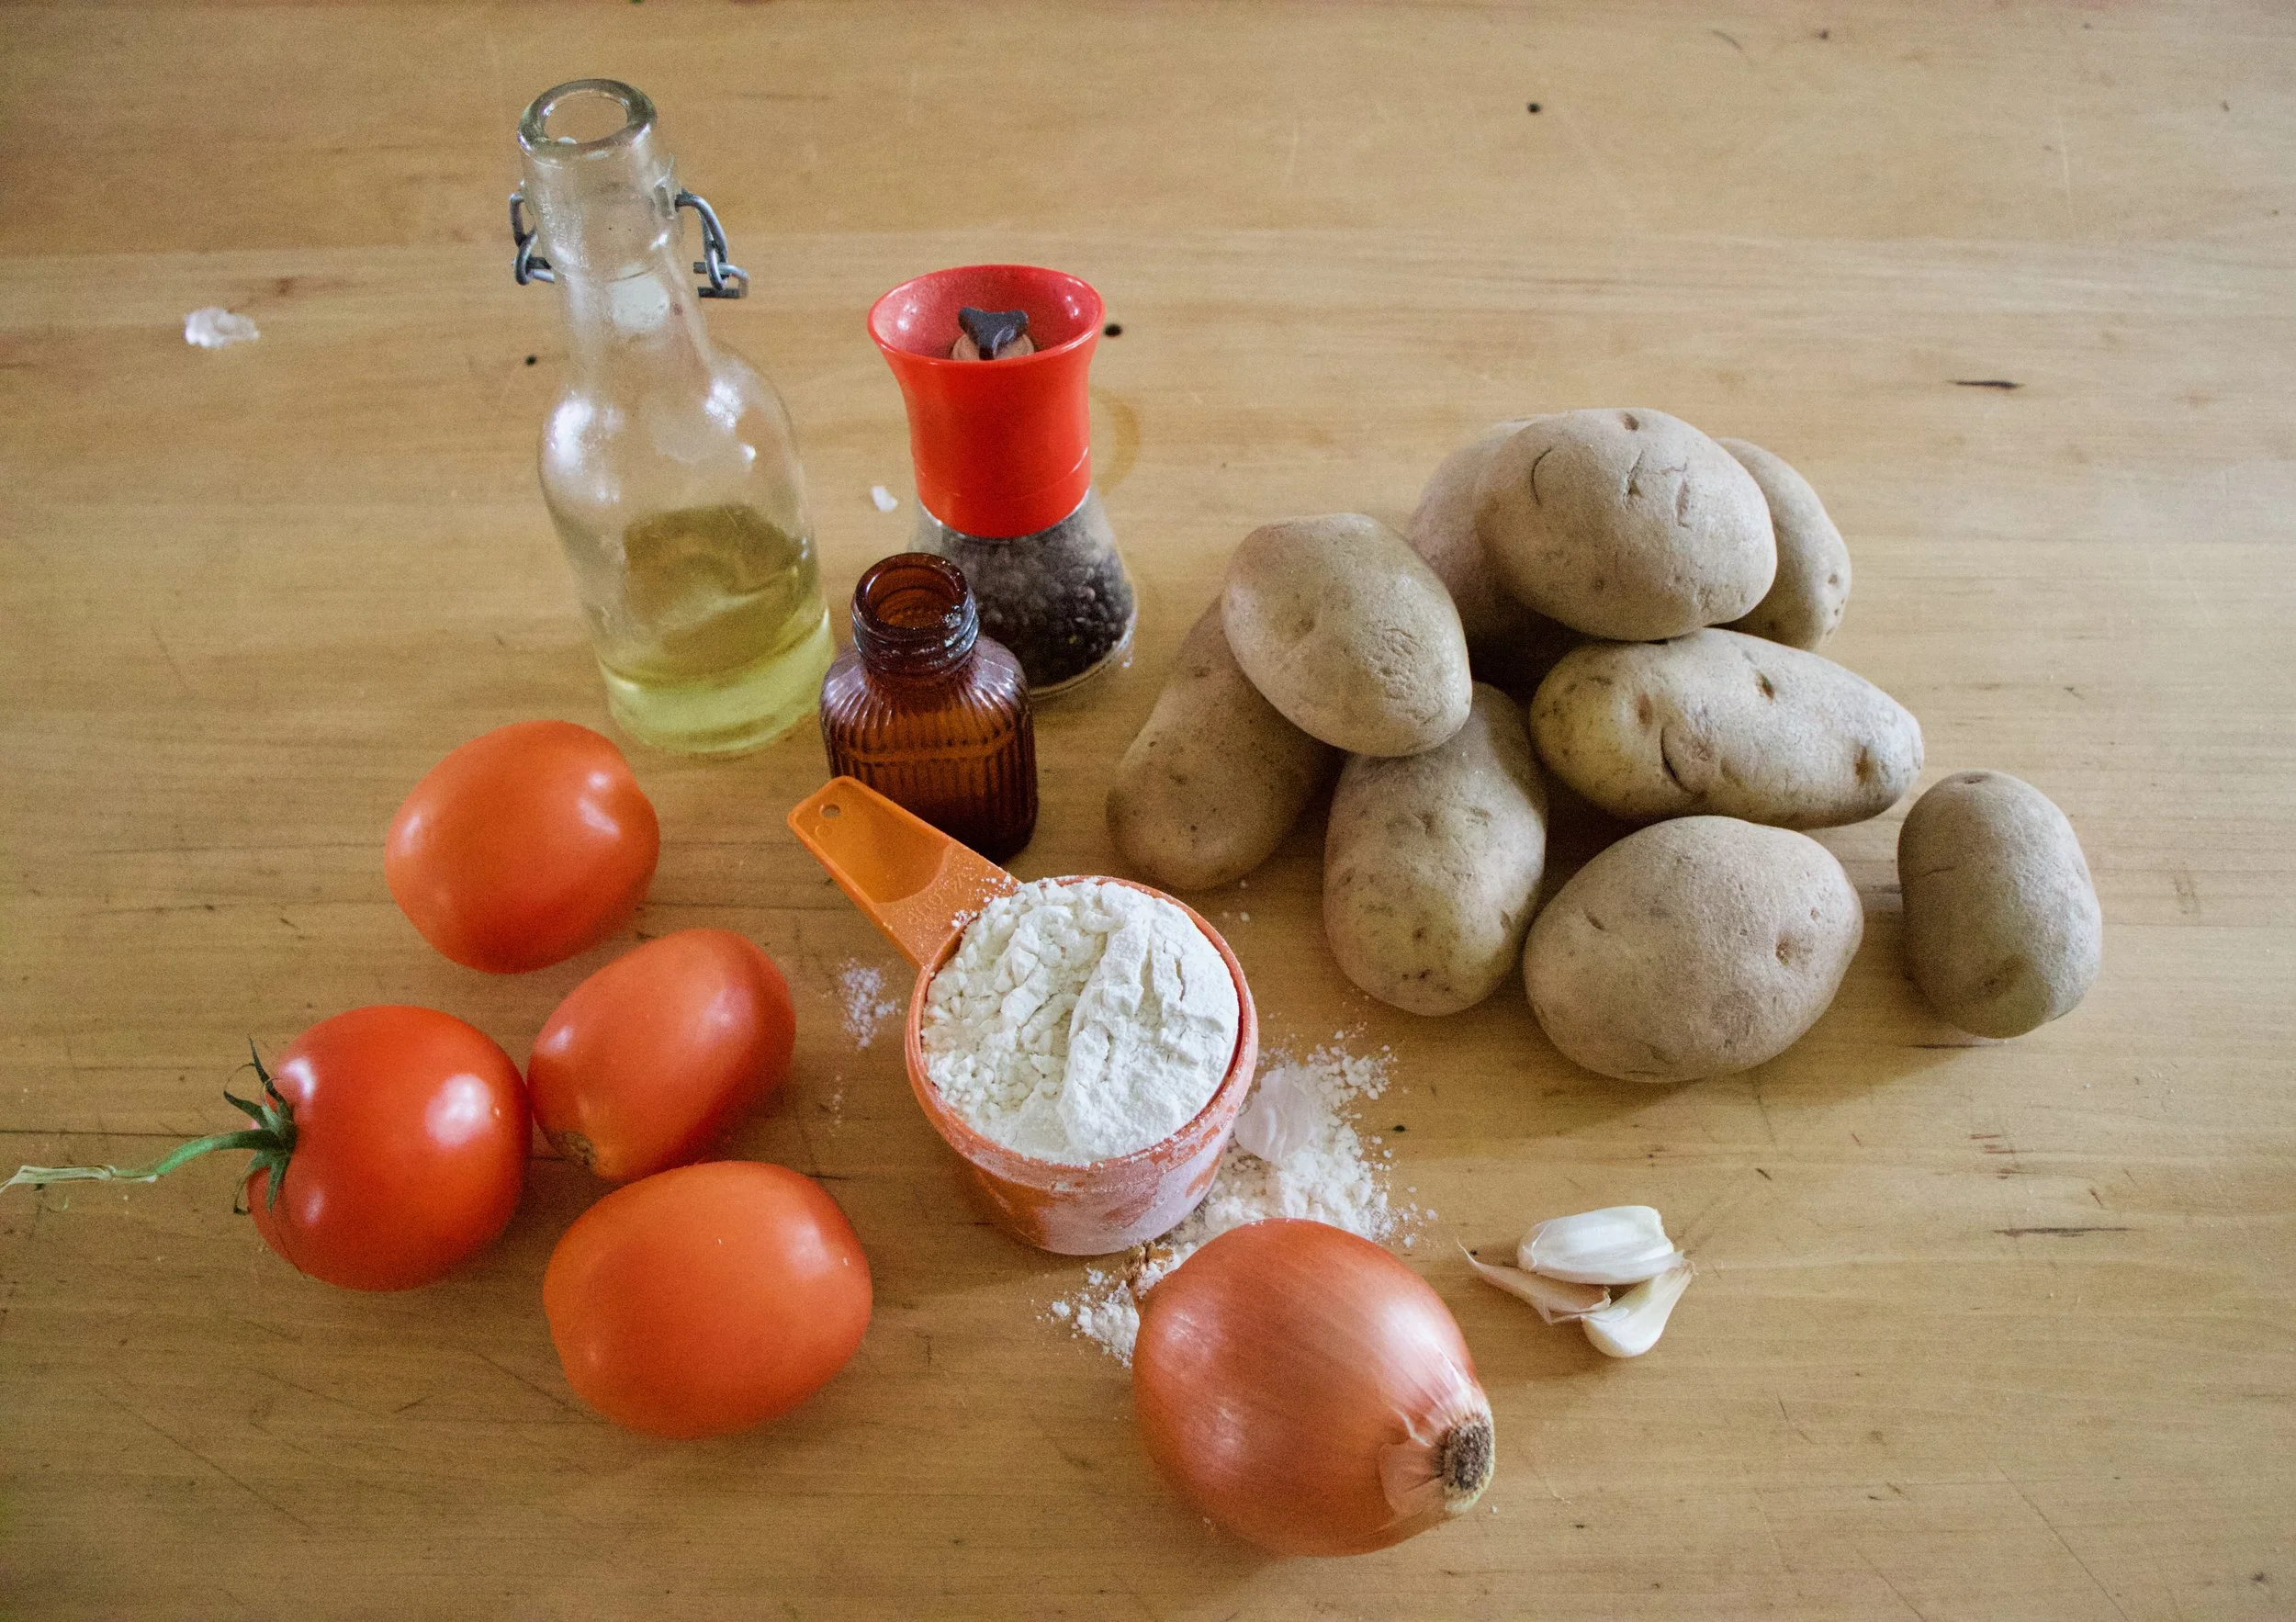
The stuff. Apples, an acorn squash (only going to need half), some old fashion oats, earth balance, brown sugar and a lemon. Also need a little bit of cinnamon, ginger, and salt. oh, and a bit of water.
Oats, earth balance, some sugar, a pinch of salt and a bit of cinnamon all go into a food processor to blend.%u00a0While its blending, add in a tablespoon or two of water to help all the stuff come together. %u00a0Once it starts to pull away from the sides, turn off and call it ready.%u00a0

remove about 1/2 a cup of the crumb and set aside for topping and dump the rest into a pie plate. Press into the dish until it looks like a pie crust.
Stick into the oven to pre bake.%u00a0
The crust is in the oven and the apples and the squash are not going to cut themselves up so you are going to have to do it. And personal preference here, peel the stuff or don’t (I wouldn’t usually but I know the people eating %u00a0the pie and they are peeled people) So remove all seed and stems and slice both the apple and squash intto 1/2 inch slices. Cut the squash into pieces that are similar to the apple,%u00a0

Earth balance into the skillet first then topped with all the chopped stuff, the spices and some sugar and stick it on the stove to cook down. You want to get the pan hot with a medium high heat then turn it down to a low heat, stirring and them placing a lid on the stuff until the squash and apples are slightly tender (not falling apart)%u00a0and the sugar has caramelized.
And note.. If you notice that the sugar is caralized before the squash and apples are tender, just add in a splash of water and mix around to prevent the sugar from burning.

Filling all ready to go, just add in the juice of the lemon here.

The left over crust crumble, some more earth balance, cinnamon, oats and sugar get mix together to make a little crumble to sprinkle on top.%u00a0
And now all there is left to do is to put it all togehert. Filling goes into pre-baked crust.

And gets topped with the crumble.%u00a0
Into the oven it goes (give it about 45-50 minutes to bake)

And pulled out when the top is all golden brown and smelling pretty.

Left to cool for a few minutes, then sliced into thinck pieces and shared all around!
Now thats a pie that’s meant for breakfast!
-C
Apple Acorn Squash Pie with an Oat Crust%u00a0
Makes 1 pie
The Crust%u00a0
- 3 cups %u00a0old fashion oats
- 2 tablesppon brown sugar
- 4 tabelsoons earth balance
- 1 teaspoon cinnamon
- 1-2 tablespoons water
Filling
- 1/2 %u00a0acorn squash (about 3 cups chopped)
- 4-5 %u00a0apples (any kind will do)
- 1 tablespoon cinnamon
- 1/2 teaspoon ginger
- 1 lemon
- 4 tablespoons earth balance
- 6 tablespoons brown sugar
Crumb topping
- 1/2 crumb that is set aside
- 1/2 cup old fashion oats
- 2 tablespoon earth balance
- 1 teaspoon cinnamon
- 3-5 tablespoon brown sugar (more if you like it sweeter)
Start by making the crust. This crust is going to be prebaked so preheat the oven to 375.
Stick the oats, some super soft or even melted earth balance, brown sugar, a pinch of salt and cinnamon, and a splash of water into a food processer and pulse until a fine crumbly crumb is made. Remove about 1/2 %u00a0cup of the crumb and dump the rest into a pie plate. Press into the dish evenly and once you are happy with the looks of the crust, stick it into the oven. Bake for about 20 minutes or until the crust is just starting to brown.
While crust is prebaking, peel (if you want),%u00a0core and slice apples into %u00bd inch pieces. Now grab the squash while you are at it and cut it in half, remove seeds, peel (if you want) and slice into %u00bd inch pieces (make them about the same size as the apple pieces.) Get yourself a big skillet and add in the earth balance, all the chopped up apples and squash, the spices and the sugar and stick on the stove one medium high heat. When the skillet is nice and hot, the butter all melted and the sugar is starting to melt, turn heat down to medium low, stick a lid on the pan, and cook for a few more minutes (like 7 minutes) until the squash and apples are slightly fork tender , but not falling apart. If the sugar starts to caramelizes before the stuff is tender, add in a splash or two of water to stop the sugar from burning.%u00a0Remove from heat, add in the juice of the lemon,%u00a0and set aside.
%u00a0And for the crumble. Just add all the crumble ingredients together and mix around (I used my fingers).
So crust is pre-baked, filling is precooked, and crumble is ready. So now all you need to do is put it together.
Dump the filling into the crust and then top with the crumble. Stick the pie into the oven and bake for about 45-50 minutes or until the filling is fork tender and the crumble on top is nice and golden brown.
Remove from oven and let cool for at least 5 minutes (15 minutes is even better), and serve it on up!
 Chomp Chomp Chomp%u2026 The sound I make as I eat this freaking fantastic crunchy granola. You know it’s good when the person sitting next to you is annoyed by the sound of you face while eating.%u00a0 I eat a lot of crunchy stuff. And I am pretty sure I annoy the mister a lot.%u00a0
Oh well, he will live, and he eats his fair share of annoying stuff too so we can just call it even.
So granola. I love it. I make a batch every few weeks or so, and I usually make it just for me. (I almost never make things just for me) I like to keep it simple but flavorful. A tad sweet, but not really, and crunchy, without the oily fried taste. I also like a variety of sizes, some big clusters and some small pieces.%u00a0
This granola fits the bill perfectly. Made with 5 ingredients, no oil, and the perfect sweetness level. %u00a0It’s one of my favorite flavors yet. And I know I said I made it just for me, but the mister really liked it too. (I can’t help sharing)
 The simplest of stuff. 1 smashed banana, a cup of pureed butternut squash, Vietnamese cinnamon*, honey, and old fashion oats. (and a dash of salt, not shown)
*Note. I only ever use Vietnamese cinnamon because once I start using it, regular old cinnamon just won’t %u00a0cut it anymore. It is a bit sweeter and a lot more spicy. If you don’t have it or don’t want to use it, use regular cinnamon and add in 1/2 a teaspoon of all spice. Toss the cinnamon and salt with the oats. Mix together the banana, squash and the sweetener and combine with the oats until full incorporated.%u00a0
Another note. Because I made this granola for me and no body else, I actually omitted the honey (I think that banana abs squash make it sweet enough) But if I was making this for lets say, the mister, or a friend, I would use add a bit. The sweetness level and sweetener of choice is up to you, but 2-3 teaspoons of honey or maple syrup is usually sweet enough for %u00a0people.
 Dump the mixture on a parchment lined baking sheet and give it a little pat, you know, to settle all the bit and pieces together, all cozy and evenly spread out. Now stick into a preheated oven and after about 20 minutes, take out of oven and give the granola a toss, breaking apart any super big chunks or overly wet pieces. Put back into oven for another 20 minutes. (I like my granola super crispy crunchy so I cook it a little longer, like 30 more minutes)
 And when you are happy with the crunchiness of you granola, remove from oven and let cool, trying not to eat all of it while it sit’s on the counter looking all pretty and smelling like happiness.%u00a0
Grab a bowl, stick the rest into a jar with a lid, hide it from others, and chomp chomp chomp away!
-C
Banana Butternut Granola
- 3 cups old fashion oats (use gluten free oats if needed)
- 1 ripe banana, mashed%u00a0
- 1 cup butternut squash puree (can use canned)
- 2 tablespoons Vietnamese cinnamon (or 2 tablespoons regular cinnamon and 1/2 teaspoon of allspice)
- 1-3 tablespoon honey or sweetener of choice (use greater amount for sweeter)
- dash of salt
Preheat oven to 375
In a large bowl, mix together oats, cinnamon and salt. Mix the mashed banana, squash, and sweetener of choice together and combine with the oats. If the mixture%u00a0seems really dry, add in a very small splash of water to loosen just enough to mix.
Dump mixture onto a parchment lined baking sheet and evenly disperse the mixture. Give it a kind of smoosh to compact the oats and to make sure all its all the same thickness on the pan.
Stick into oven for 20 minutes. Remove and give granola a little toss, maybe breaking apart any really big chunks (unless you like really big chunks) and put back into oven for another 20 minutes. (30 for a crunchier granola) Remove from oven and let cool on %u00a0baking sheet before storing in an air%u00a0tight container. If you find that it is not as crunchy as you would like or is a few days old and lost some of its crunchiness, just stick it back into the oven for a few minutes to re crunch.
Eat as is, as a cold cereal, %u00a0dip in peanut butter, add to popcorn or whatever way you want to eat it. No utensil required.

It hasn’t stopped snowing, the temperature is dropping fast (it’s getting to the point the dog doesn’t even want to be outside) and the mister is busy hand shoveling three long driveways. So I figured that in between all the laundry folding, plant watering , and all around sitting on my butt %u00a0that I am doing %u00a0INSIDE, that %u00a0I would be so super nice and crank the stove up and make my love some cookies.I love making cookies, especially when I have chores to do. I think part of it is that cookies are baked in batches which breaks up the chores and gives a sort of rhythm to things. Plus everything is nice when the house smells like cookies. %u00a0I was going to make chocolate chocolate chocolate cookies, but realized that I didn’t have cocoa powder, so I went with fresh cranberries (I just scored a pound of organic cranberries for 89 cents!) coconut flakes and chocolate chips. Plus I wanted to make them oatmeal because the mister likes oatmeal and oatmeal makes the cookies a little more hardy. (We need hardy when the temperature dips below zero)The verdict%u2026.. chewy, soft, slightly sweet oatmeal, bittersweet chocolate, nutty floral coconut, and the zing and pop of the fresh cranberries. He told me to hide them%u2026 hide so he will stop eating them%u2026.. because they be amazing!


The base of this cookie%u2026.We are using regular old fashion oats and flour. %u00a0Salt, baking soda and baking powder. %u00a0Vanilla, chia seeds in hot water, coconut oil %u00a0white and brown sugar%u2026. You know, all the cookie stuff.%u00a0 Then all the goodness.. Chocolate chips, coconut flakes, and fresh cranberries. Goodness.Oh yeah, and they are vegan%u2026if that matters to you.Warm%u00a0the coconut oil and mix with the white and brown sugars. Then add the chia seeds soaked in hot water. %u00a0Stir until nice and silky smooth.In goes some more stuff.%u00a0%u00a0I just dumped all the dry right on in that bowl and mixed it up nice and nice.Chopped the fresh cranberries into chunks%u2026 One at a time%u2026%u2026Just kidding, I actually laid a cutting board on top of the cranberries, applied a little pressure and sliced through the cranberries.. Does that make sense? I hope so, because its is much easier and faster and the cranberries don’t all roll away.The chopped cranberries, coconut flakes and the chocolate chips go in to be mix all up.%u00a0I used my hands to form the balls and gave%u00a0each mound a little smoosh, but not completely flat. %u00a0Then into a preheated 375 degree oven for about 13-15 minutes or until a nice golden brown.A cup of hot coffee and a plate of warm cookies%u2026 I am the nicest, right! (After his nice cookie rest I proceeded %u00a0to do a little nagging, so the day evened out)So today is probably a great day for everyone to make cookies. It’s freezing out, %u00a0its saturday and well, just cause. You might even be looking for a great recipe to make for that big party your going to.You should make these cookies.%u00a0Have a Fantastic Weekend!!!-C
Oatmeal Fresh Cranberry Coconut Chocolate Chip Coookies
Ingredients
- 1 cup old fashion oats
- 1 1/4cup all purpose flour
- 1 teaspoon salt
- 1 teaspoon baking soda
- 1/2 teaspoon baking powder
- 1/2 cup coconut oil
- 3/4 cup sugar
- 3/4 cup brown sugar
- 1 teaspoon vanilla
- 1 tablespoon chia
- %u00a04-6 tablespoons hot water
- 1/2 cup chocolate chips
- 1/2 cup fresh chopped cranberries
- 1/2 cup coconut flakes
Preheat oven to 375To start, take the chia seed and soak them in the 4 tablespoon hot water for a few minutes. Then in a large bowl, mix together the white and brown sugar with warmed coconut oil. Add in the gelled chia seeds and vanilla and stir until silky and combined. (the warm chia seeds will help everything mix together nicely)%u00a0Now mix in all the dry. I start with the oats, dump on flour, toss in the baking powder and soda and salt. Mix until fully combines. If the dough seems to dry, add in another tablespoon or two of hot water.%u00a0Chop the fresh cranberries into halves or smaller and dump them, the coconut and chocolate chips into the bowl of dough and mix.Using a scoop, spoons, or your hands, make little balls and place on a cookie sheet, giving each ball a little smoosh. Into the oven for 13-15 minutes or until golden brown.Remove and cool on rack.Eat a few and hide the rest for later.

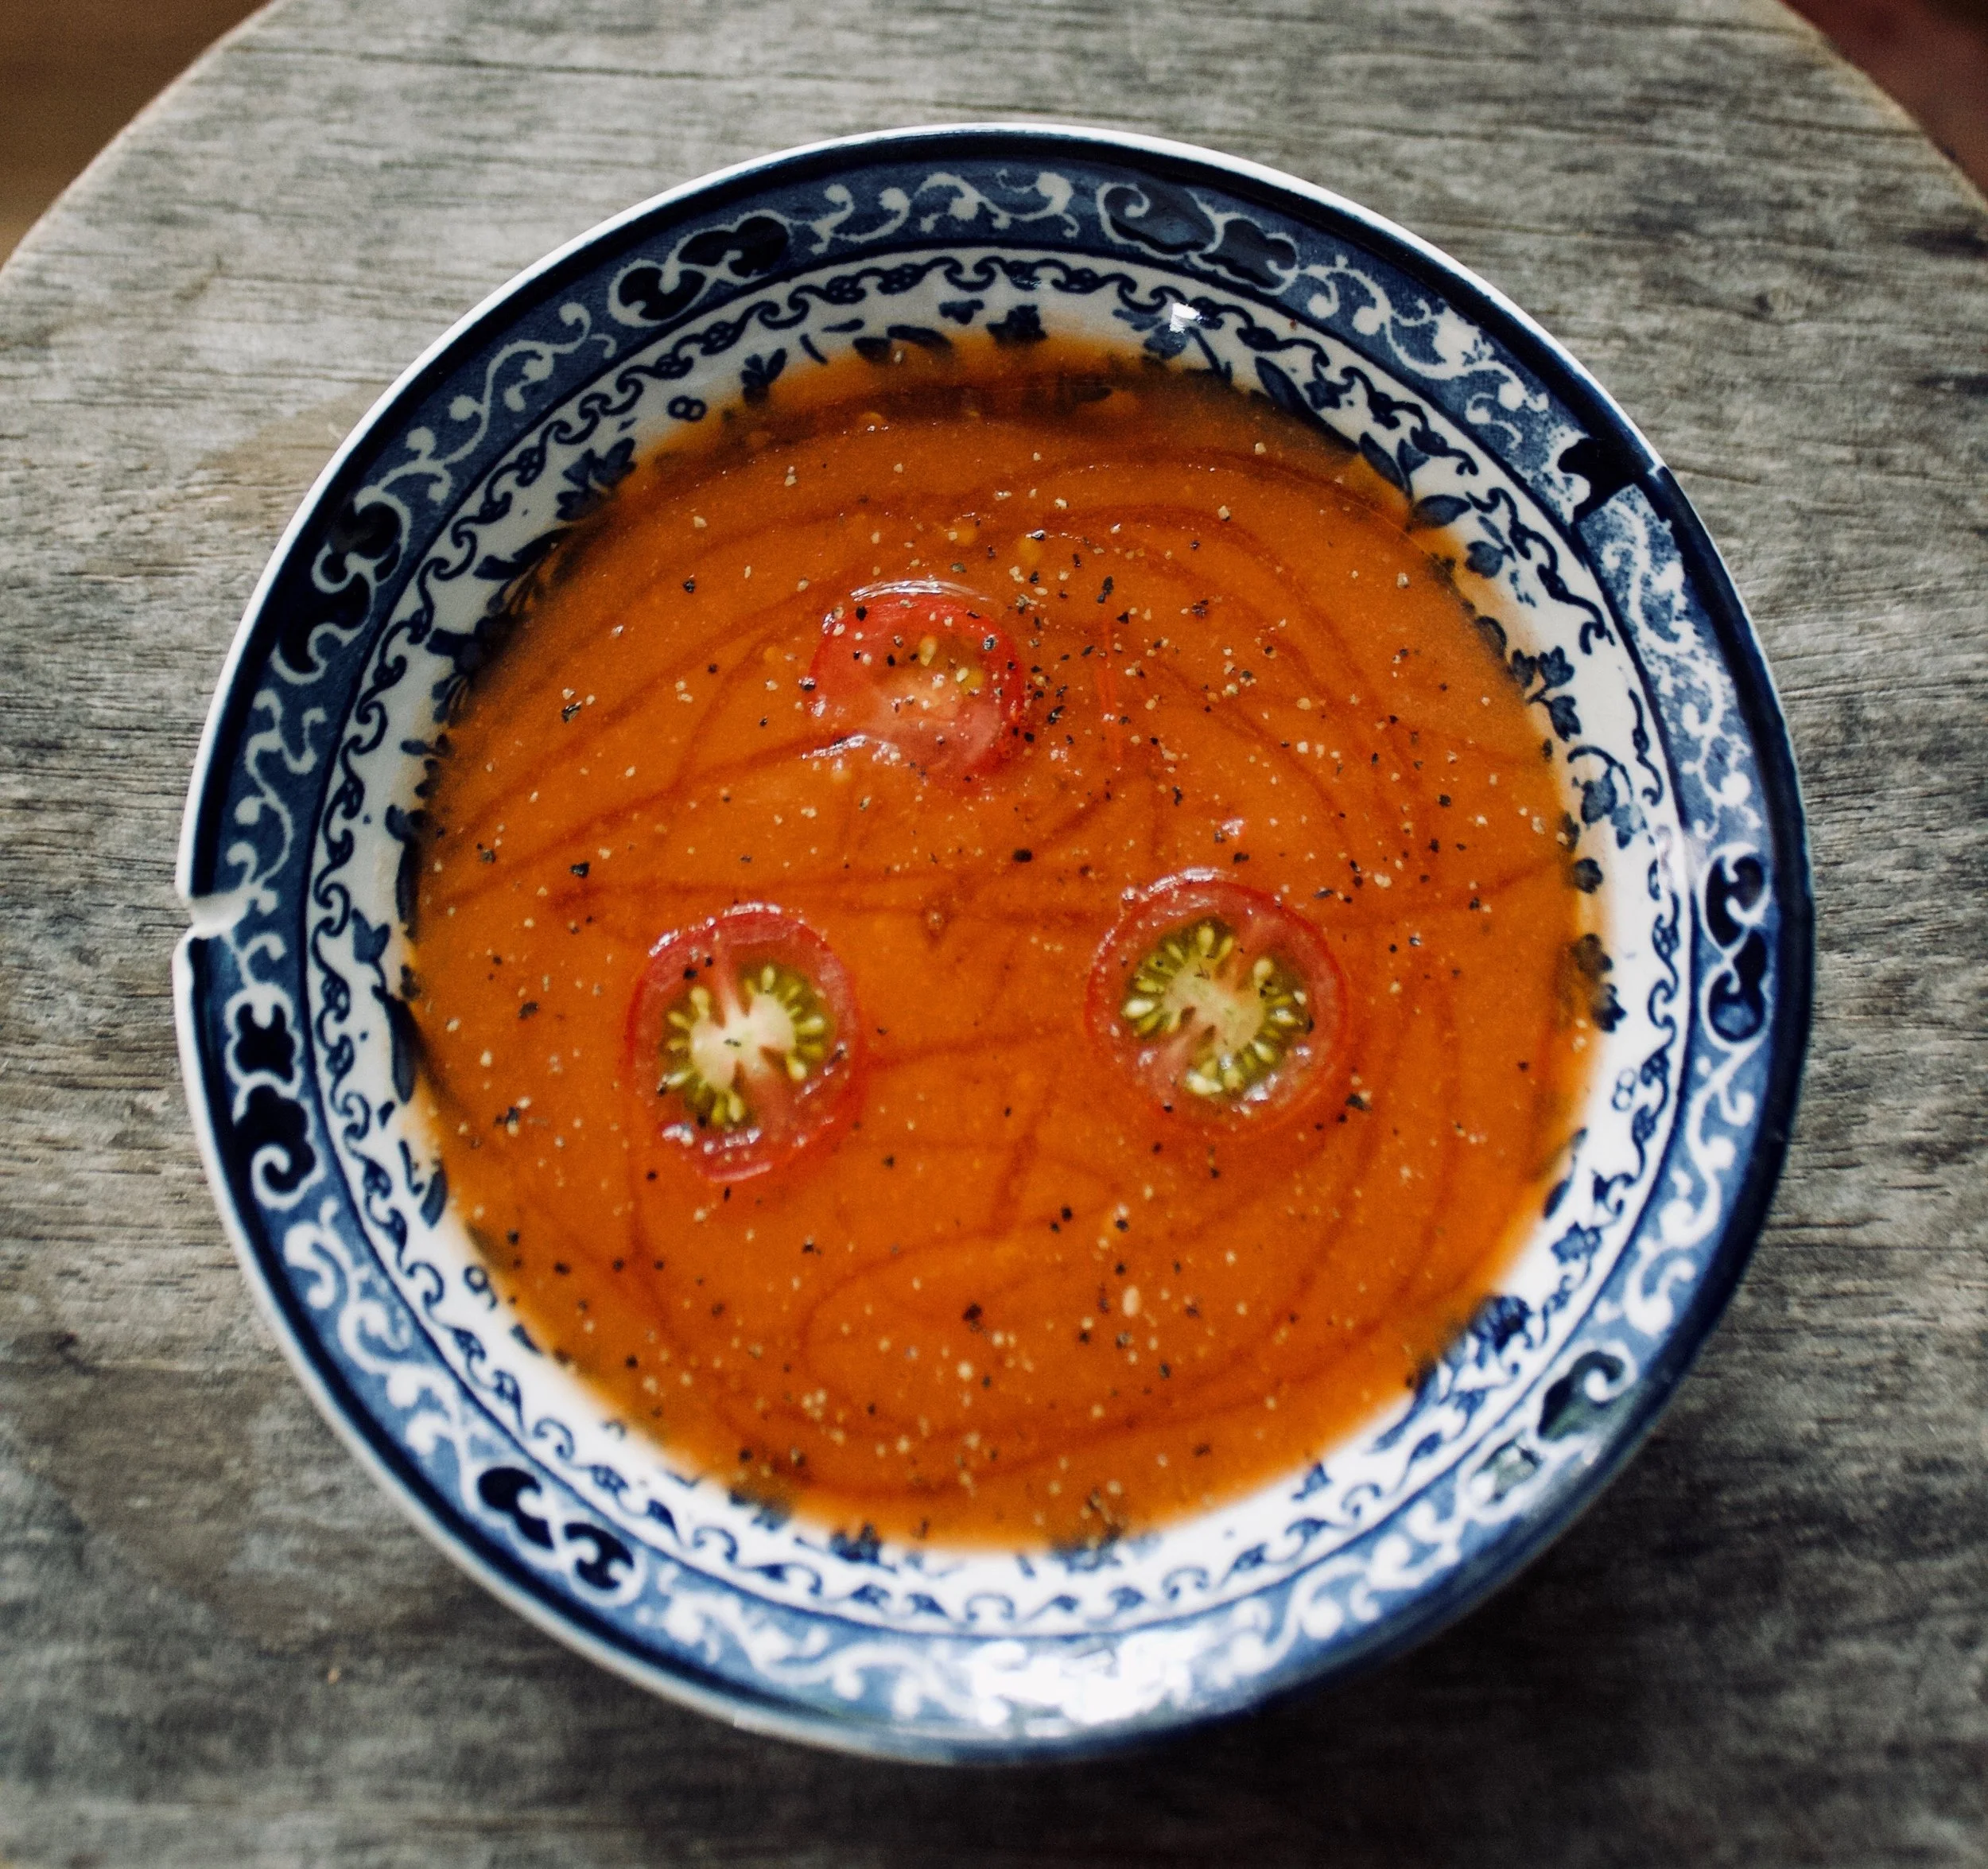
 I have never in my life seen, let alone received, a kohlrabi as big as the one I picked up from my farm share last week. It was, no joke, bigger then my head. (completely nuts) If I didn’t know the farm and the farmers of my CSA, I would have to question whether or not it was grown in radioactive sludge…(kind of like the dandelions in the Teenage Mutant Ninja Turtle movie from the 90’s)
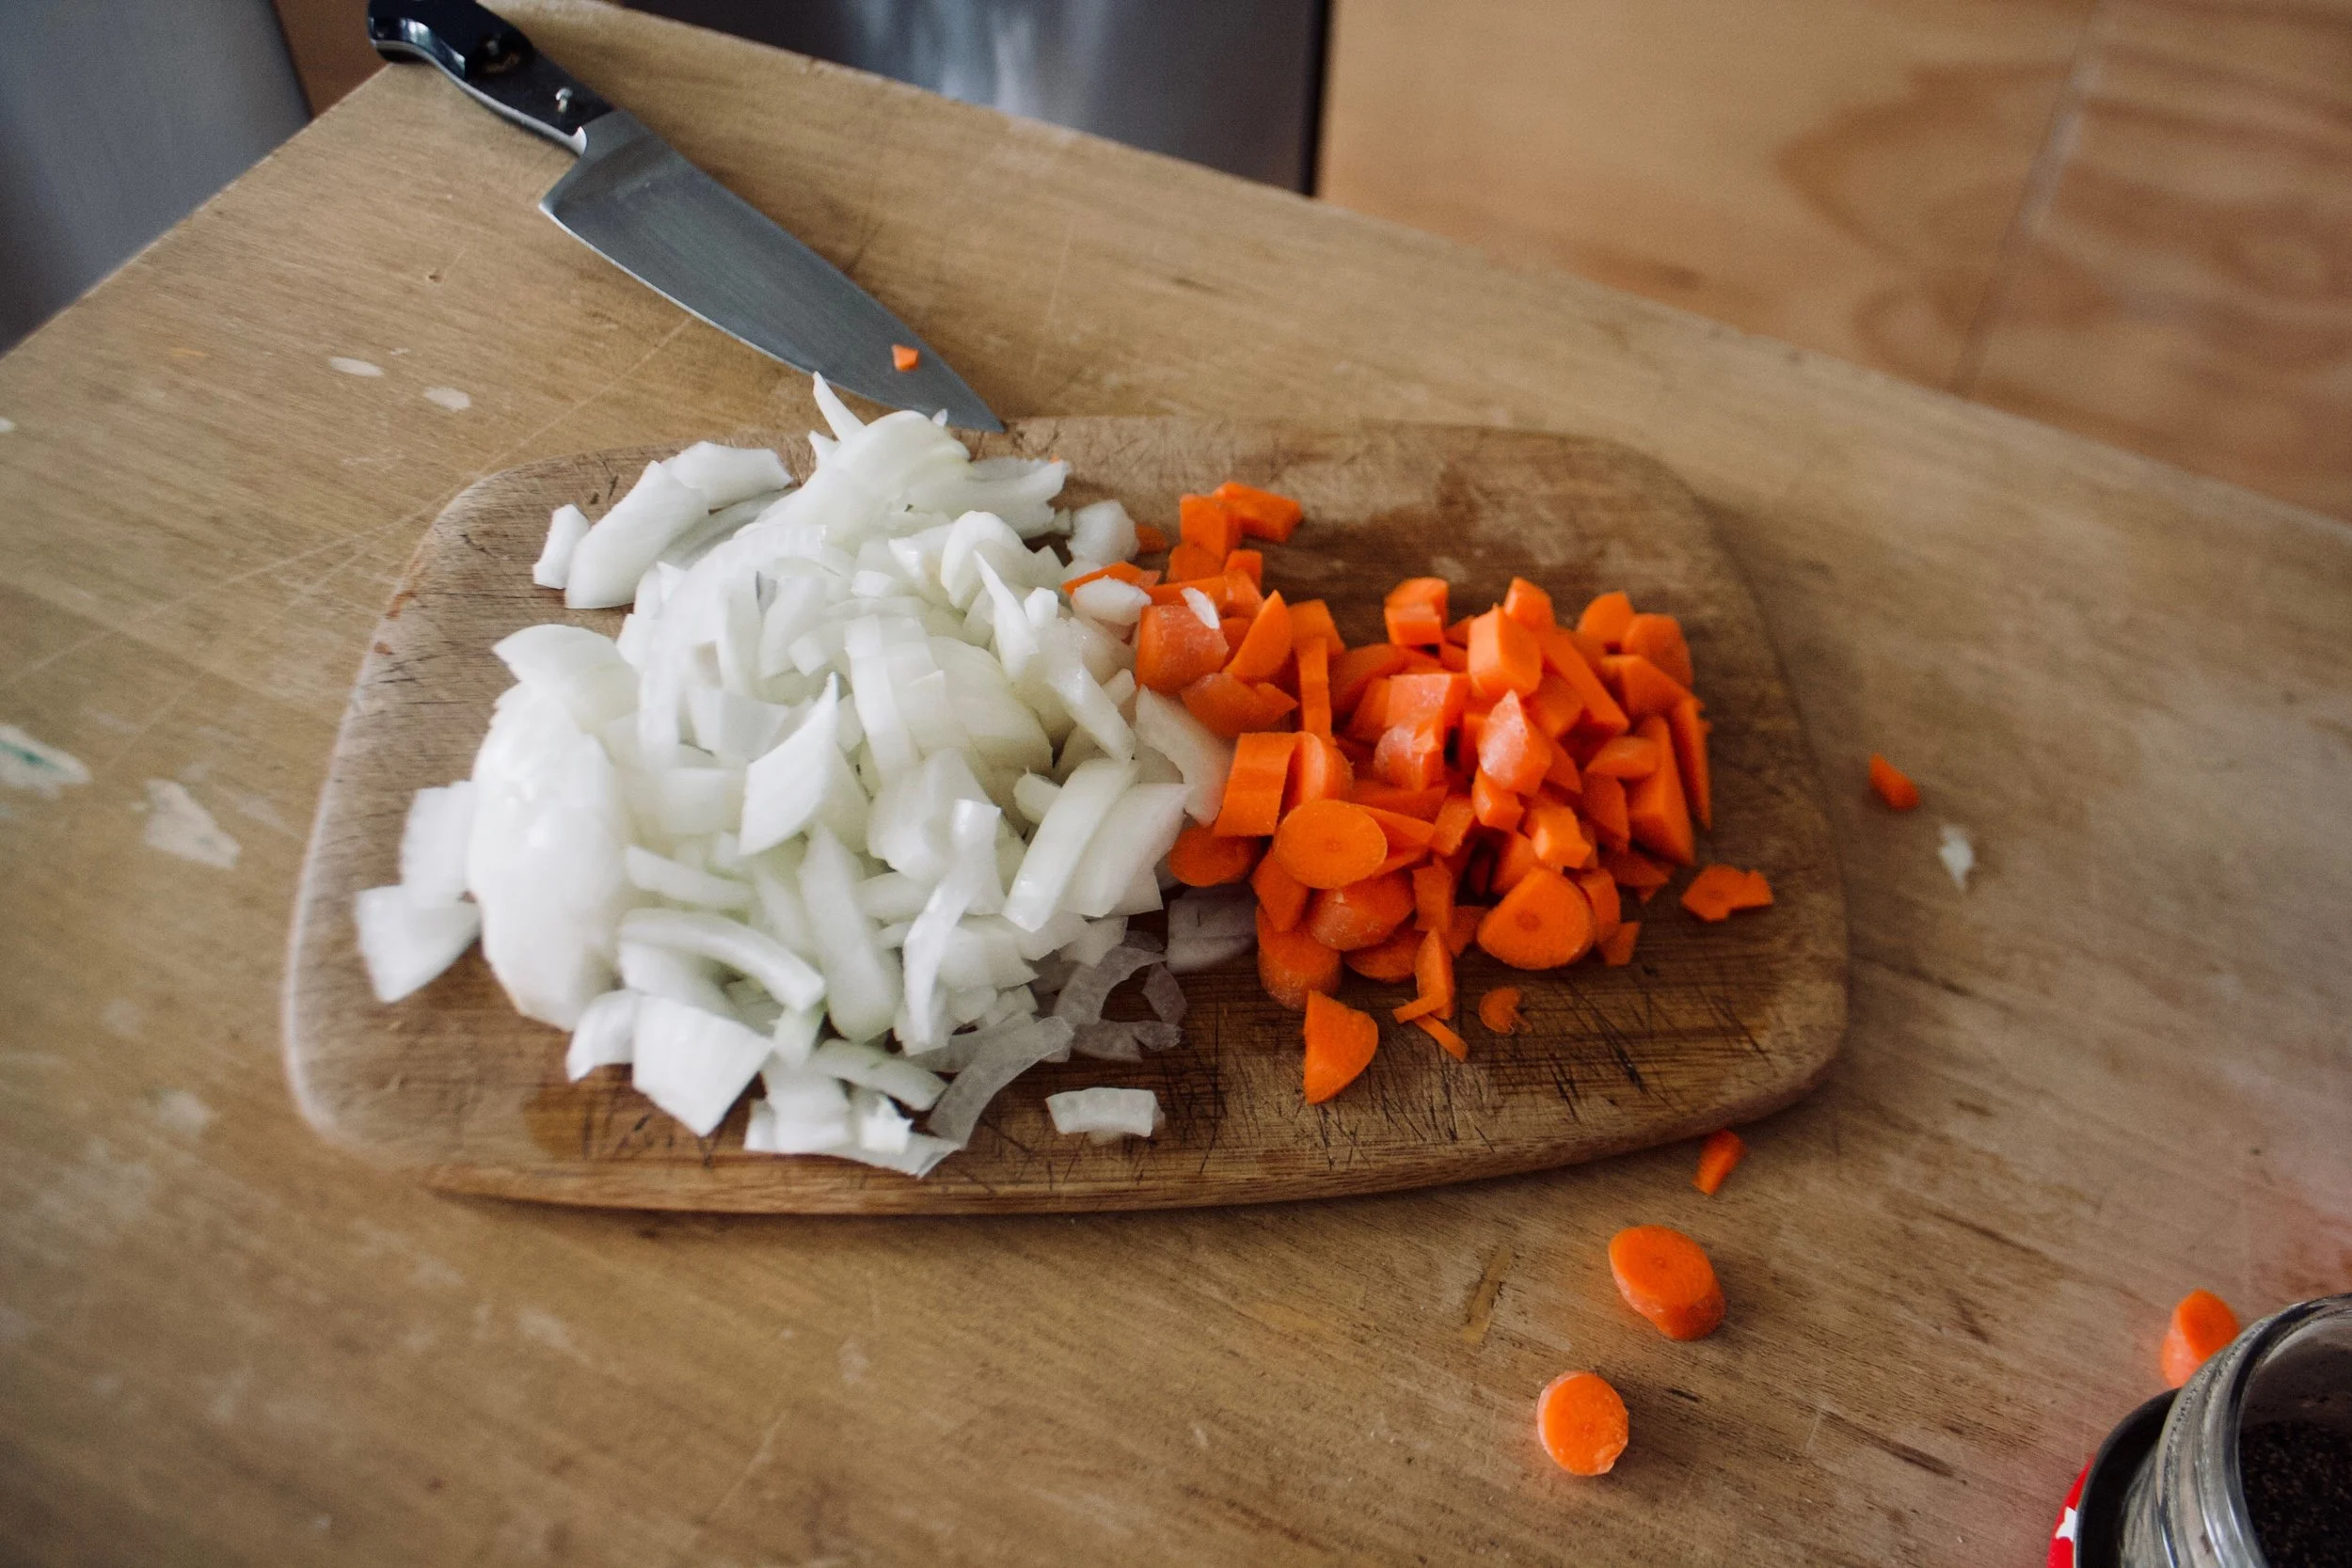
 A gigantic kohlrabi cut in half ( I only used one of the halts) A whole yellow onion and 2 large carrots. I also added in 4 cloves or garlic
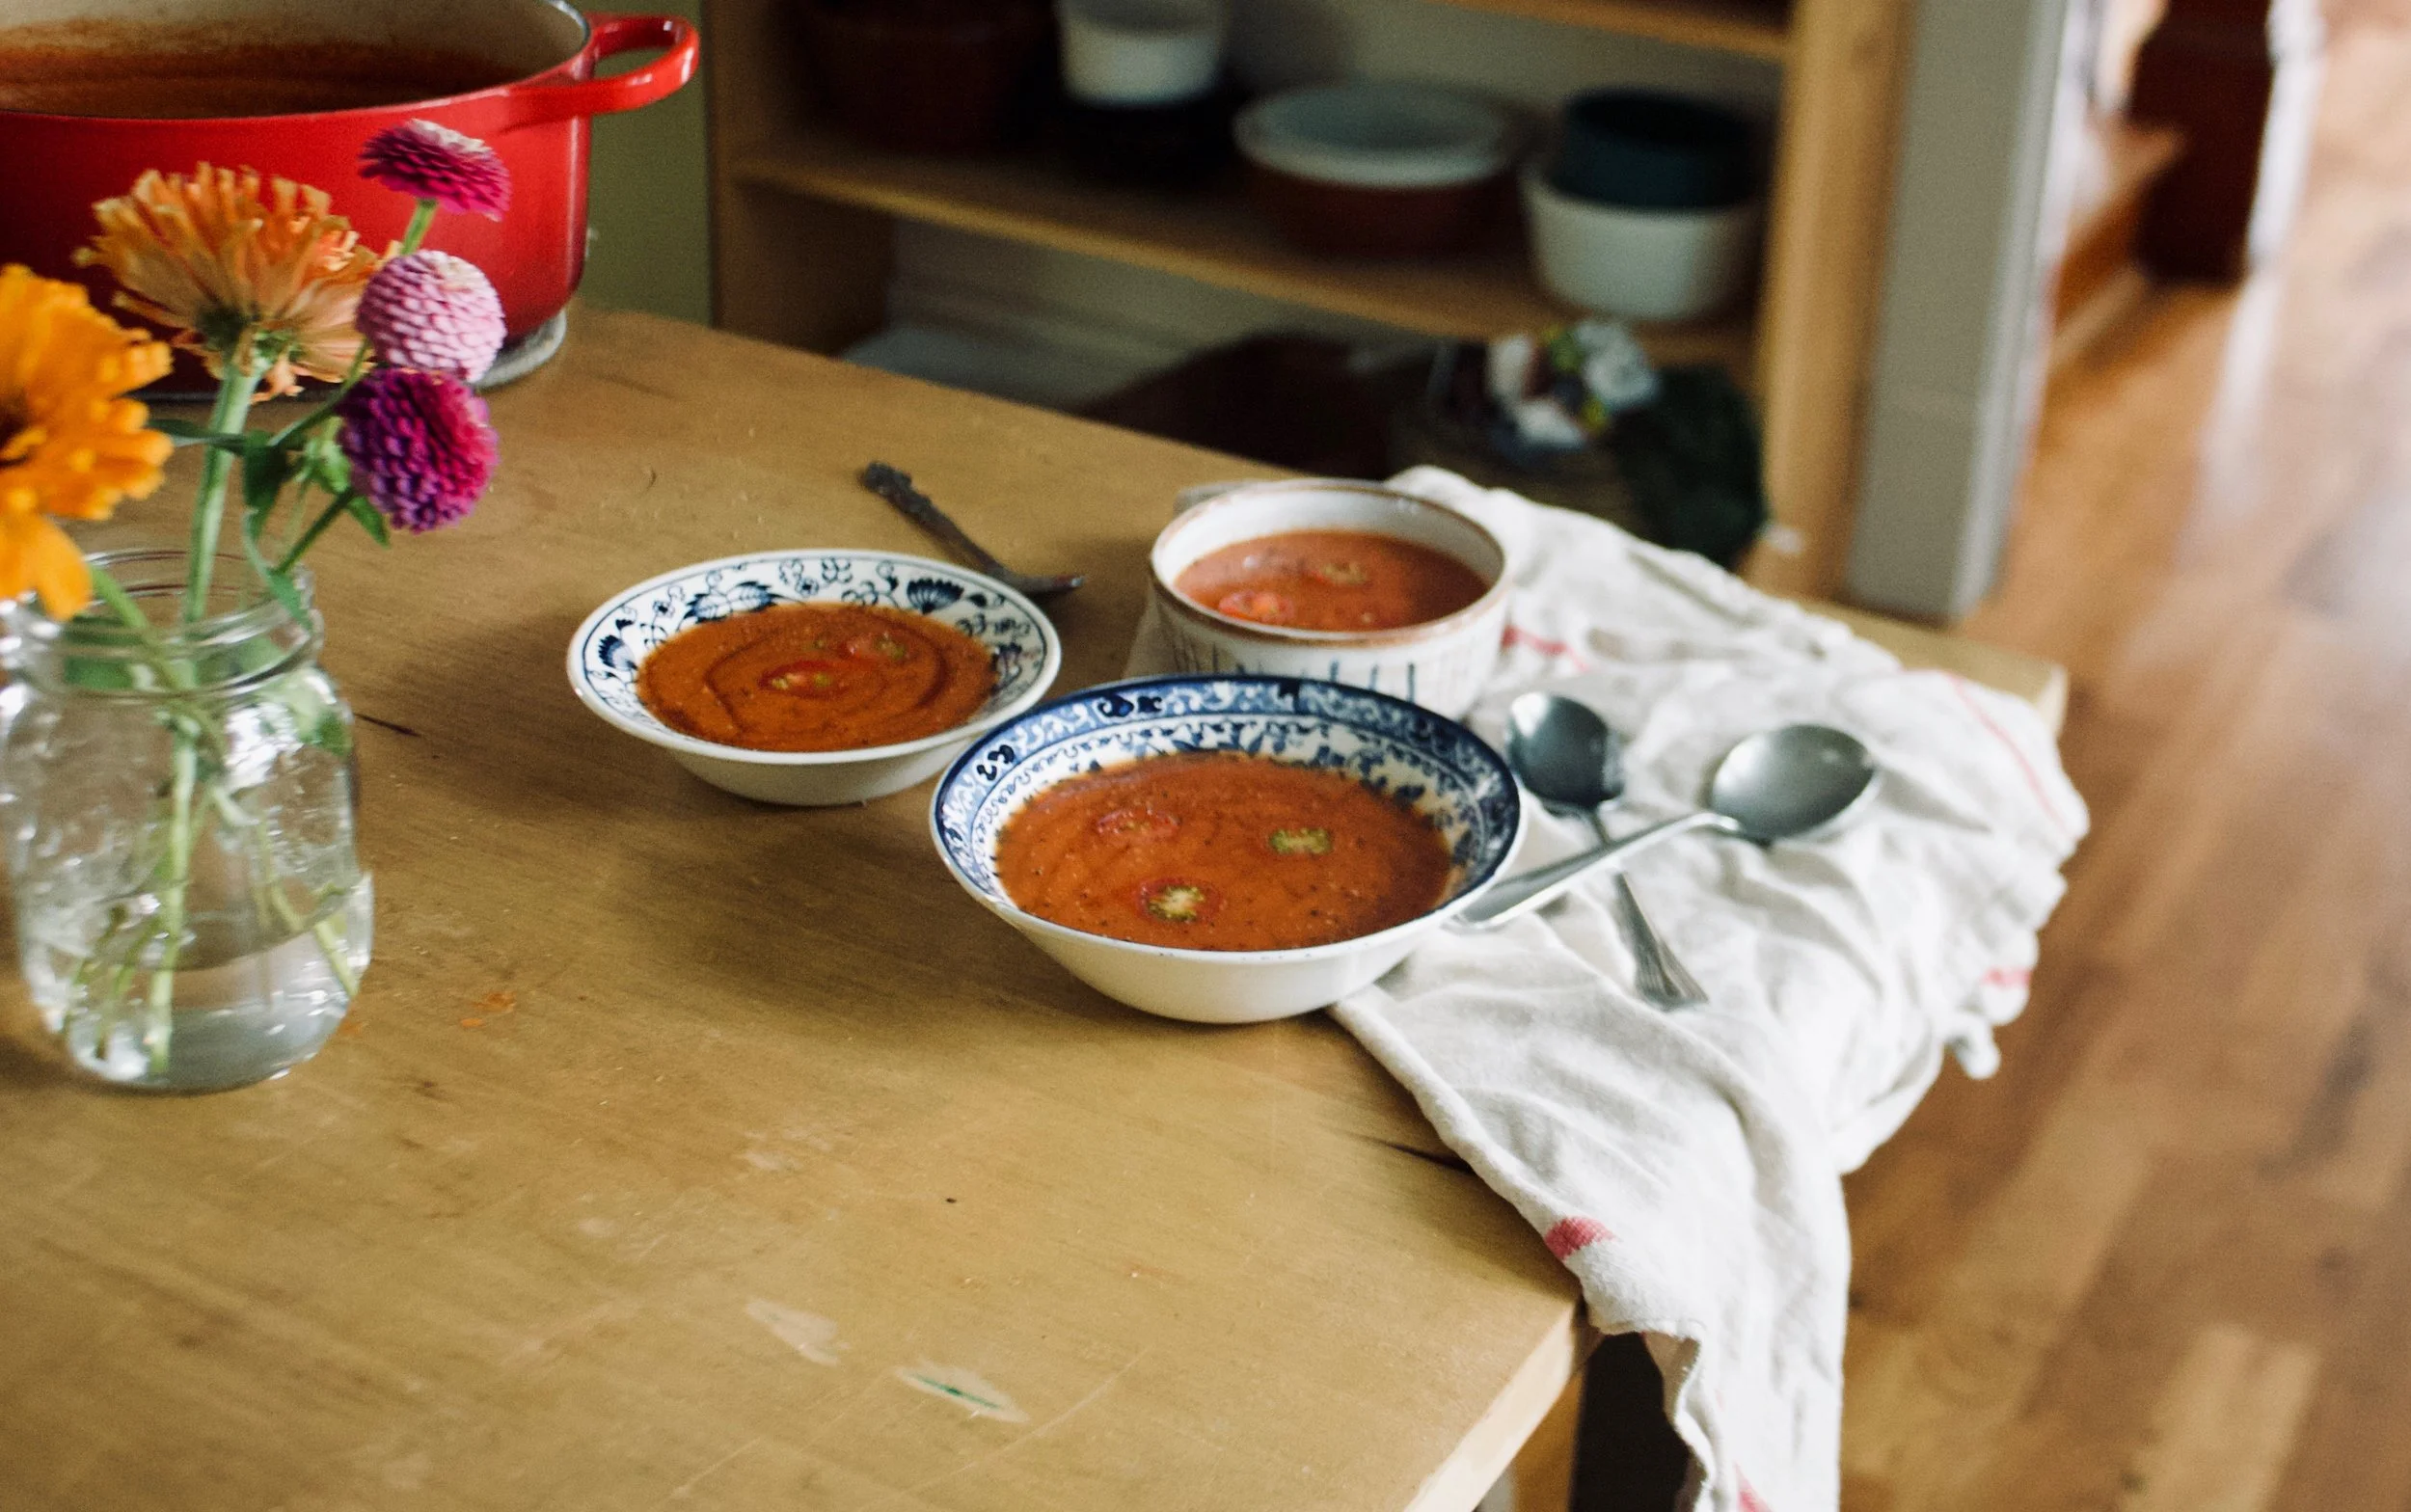
 All of those chopped veggies get thrown into a pot with two cups of water and a good sprinkle of salt and pepper. Cover and place on medium heat for about 20-25 minutes. (give a stir ever now and then) Keep cooking until the veggies are fork tender.
  Once the chunks are all cooked up, its time for the immersion blender. (or into a regular blender) Add in at least 3 cups of water, but more to thin out to your desired consistency and let it rip. Stop blending once the soup is nice and creamy. Taste and season with salt and pepper to taste. Leave on low heat to bring back to a good soup eating temperature.
 Now the soup is done.. and you can eat it just as it is, but you should really add in the asparagus. It is just so f*ing good. Just grab a few spears, dice them nice and small, and throw into the soup pot. Let it cook for another 5 minutes and wa la..
  Soup is done. Ladle into bowls and if you want a little fancy presentation, add a swirl of mustard (it’s so good) and a whole cooked asparagus spear.
 You ever have one of those days where its 9 am and your ready to call it a day? . Yesterday was one of those day for me. Its spring vacation around here (more like an arctic vacation) and I had volunteered my day to babysitting/ hanging out with 2 of my nephews, ages 11 and 13. (I know, I am the greatest sister). I had all of these great ideas and plans of things to do, but when it came down to it, they wanted to do nothing but play video games and not really listen to anything I said. I basically had to drag them outside to go for a walk we me and that’s all I could get them to do My great little nephews, I love them so much, but yesterday they had their minds set on being little monsters.
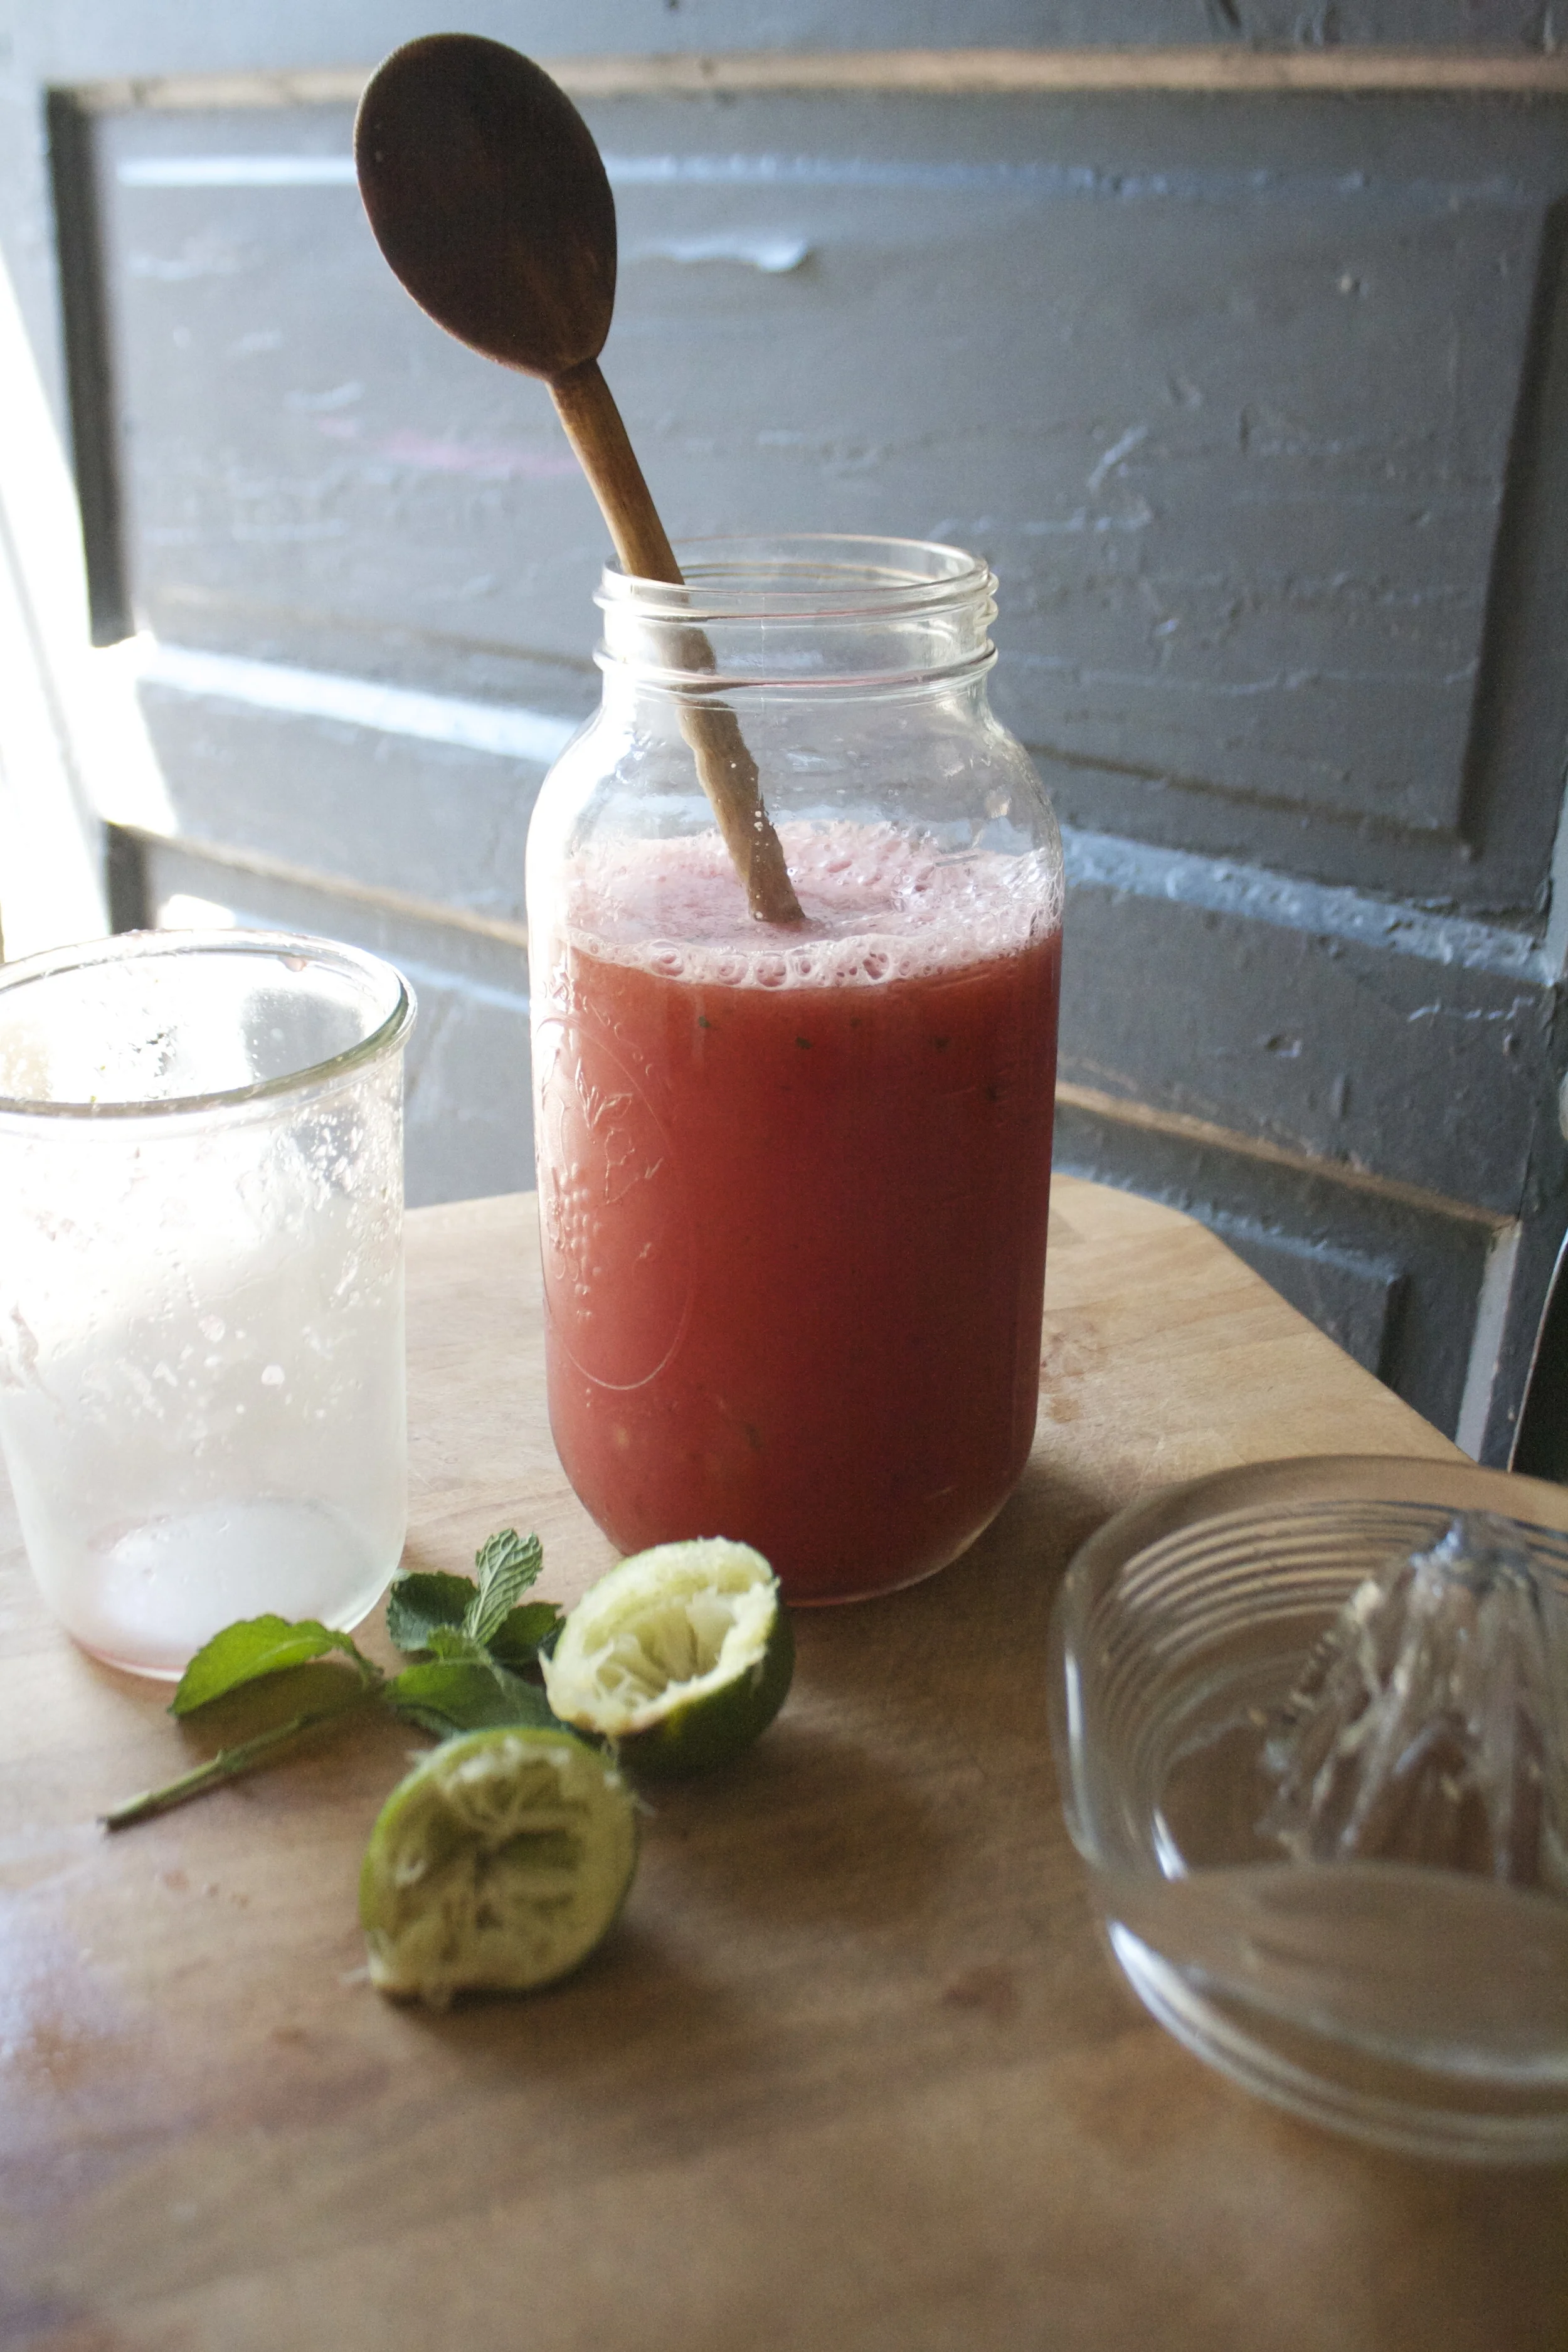
 What we have going here…… Chopped up onion, celery, and carrot in a pot. Stick that pot on the stove for a few minutes on medium heat to start the cooking process. While that happening get the other stuff ready. A big can of diced tomatoes, hot sauce, worcestershire sauce*, prepared horseradish*, celery salt, garlic powder, salt and pepper And last but not least a good squirt of yellow mustard. Now add it all to the pot and bring to a boil. Turn down to low and stick a lid on it.
 After about 20 minutes the veggies should be soft and the flavors should all have melded together. Taste soup as it is cooking and add any more spice that you want.
 I stopped when I got to a smooth consistency with the littlest bit of texture.
 And there it is…served with a stock of celery and a wedge of lemon (I forgot to add them to the pictures!) A bloody Mary to take the edge off any drag of a cold weather day. And best part.. left over soup is great served chilled with a shot of vodka to loosen this Mary up!
 Happy Friday!
 The Stuff. A medium sized butternut squash, seeded and diced (no need to peel, but go for it if you want) About a pound of broccoli, (fresh or frozen) and a few shallots. Salt, pepper and a few cups of water.
 The chopped squash and broccoli go into a big pot with about 2-3 cups of water. Add about a tablespoon of salt and pepper. Lid up the pot and place on medium low heat for about a half hour, or unitl squash and broccoli is fork tender. Now blend together with either a emulsion stick blender or place in a blender for 3-5 minutes until completely smooth. Add enough water to keep things moving. Add more water if you want a thinner soup, less for a thicker soup. Season with more salt and pepper to taste. Once blended, place back in pot on simmer until ready to serve.
  Finish off with a drizzle of balsamic vinegar and top with the sautéed shallots.

 Before we get to the fries, I just want to mention that yesterday was one of those fantastic winter days that reminds me why I love living in Vermont. Pretty white snow everywhere, the sun was out, and 20 degrees without a gust of wind. The trash dog an I were even able to go for a little hike. It was so nice and soooo sooo needed! Anyways, the other day as me, my sister and the mister where putting together one more piece of Ikea furniture, (I am the master at Ikea assembling!) a little runs into the room and presents the mister with a Dominos pizza. Yup, a whole pizza just for him. Why you might ask? Well I guess my sister was delivered the wrong pizza and the place didn’t want it back and she didn’t want it, so she gave it to him.
 The carrots and the parsnips are all sliced up into big matchsticks and ready to be baked to crispy browned perfection. I added the oil to the pan to toss the fries in and then sprinkled with a fair amount of salt and pepper. If you don’t have and or want to use a cast iron pan, a baking sheet works just the same.
 Oh saucy sauce stuff. Tomato puree, sriracha, and yellow mustard. Add a little bit of honey to lighten it up (can use brown sugar if keeping it vegan), a splash of apple cider vinegar and a couple minced cloves of garlic. Topped off with the smokey delightful spice of cumin. I cold eat this on everything…and I kind of did.
  Fries are done, Sauce is ready. Served in super cute tea cups.(from now on I want to serve everything in tea cups.) A perfect side dish, snack, or even a light meal. It lead the mister to ask the question…What pizza?
  WOO WHOA!! MARDI GRAS! I wish I was down in New Orleans today celebrating… and soaking up some warmth and sunshine, catching beads, maybe even taking my shirt off(?!!?)

 Beans are in a pot filled with water unit beans are completely sumerged. Add in the onion, jalapeño, tomato paste and cajun seasoning. Bring to a boil then cover with a lid and simmer for about 45 minutes….. After about a half hour, start up the rice. Water in pot with rice, bring to a boil, cover and simmer for 15-20 minutes.
  The rice is done and fluffed with at fork. The beans are cooked with just the tiniest bit of bite, bathing in a thick spicy tomatoey sauce. The chunks of onion and jalapeño have broken down and are hiding in every bite…. Oh so good!
 Bringing a little spice and nice to this crazy cold winter day or any fun festivities you may have planned.


 I don’t think I need to tell anyone about how weird the past few weeks of weather have been, so I will just leave it alone because we don’t need to keep thinking about how stupid cold it is outside or that the next week is only suppose to get worse. Booooo, but oh well. More time for cooking, reading, and trolling the internet (I have spent a little more time then usual getting sucked into the world-wide web.) Beacause I have been spending a little more time interneting, I have added an addition to %u00a0my usual happy bits, %u00a0a%u00a0few links that I have stumbled upon that I think are cool and of things that I want or want to make%u2026 Cool internet stuff%u2026..a bit of internet happy.%u00a0
 I got to%u00a0hang out with my little sister for the first time in like a month%u2026 She is just so busy being busy. I guess high school,play practices and boys and friends can fill up ones time at 15%u2026 but I miss her so much! I was very excited that she was able to hang out with me this week. %u00a0What did we do? Well we spent most of out time together taking pictures of her in my glasses, making food and then taking pictures of her eating food. %u00a0(She is eating whipped carob moose%u2026 like one should eat it) A fantastic day of silliness.%u00a0
 I have been feeling like I might be fighting off an illness so I have been eating this Turmeric Ginger Garlic Carrot soup%u00a0which I have been adding cabbage and topping with these pickled heart beet, all week long. So tasty and full of so much good.
 %u00a0Oh yeah. Me, the mister, my sister, and her lovely little little went to Ikea this week. (the littles first international trip!!! Over the border and into Montreal) And of course at the end of any good shopping trip there is some type of food%u2026. She %u00a0was so excited for the hot dog and frozen yogurt cone at check out. Champion food eater this one is.
 And what’s not to love about pretty flowers (primrose)%u2026..Sadly this is not a current picture. I need to get me some color today.%u00a0


 Is it really for real April? Where has all the time gone and where the hell is the warm weather? It’s not funny anymore. I%u00a0am officially OVER winter!%u00a0 Ok, so now that I got that off my chest%u2026..
 The Stuff. Cornmeal, water, navy beans and parmesan for the polenta. Crushed tomatoes, garlic, dried basil, onion, carrot, zucchini, and summer squash for the sauce. Salt, pepper, and olive oil all around.
 Cornmeal and water go into a cast iron skillet (or any oven safe dish) with a pinch of salt and pepper. Give it a little mix and stick it into the oven at 400 degrees .
 Once the polenta is in%u00a0the oven, make the sauce. Chop up all the veggies and stick into a dutch oven or sauce pot with a pinch of salt, the basil and a good drizzle of olive oil. Stick on medium heat and let veggies cook down a bit. %u00a0When the veggies are tender, add in minced garlic, crushed tomatoes and another drizzle or oil. %u00a0Turn burner to lowest setting and simmer (giving it a stir every now and then) for about 45 minutes or until the polenta is done.%u00a0
 After about 30 minutes when the water had pretty much all cooked down, take the polenta out of the oven and stir in the beans, the parmesan, a tablespoon or two of olive oil and salt and pepper. Smooth top out and sprinkle with more pepper, parmesan and drizzle with a bit more oil. Stick back into oven for another 1/2 or until polenta %u00a0has formed a crust and no longer giggles when you wiggle the pan.
 Pull polntna from the oven and let sit for at least 1o minutes.


 %u00a0Happy Cinco de Mayo! And what better day to share my version of %u00a0my oh so fantastic pico de gallo, or as I call it, super freshy salsa.
 The stuff. Chopped Roma tomatoes, chopped red onion, a diced jalape%u00f1o, lemon, a bunch of cilantro, and salt.
 And thats it. Now eat%u2026 with something or without.
 I was cleaning my spice shelf (I feel like I do this like once a week) and found some poppy seeds hiding behind some jars. Accidental spice findings happened more often the then one might think in my house.. I like to buy tiny baggies of spices with good intentions of using them, but because of their tiny size, I often lose them or forget about them due to that %u00a0tininess. But I usually find those tiny little bags, and when I find them, I try to use them right away..(I don’t like having old spices around and no, I will not toss it)%u00a0And it just so happened that I has a lemon in need of using.. and it was getting close to dinner time. I could wait and make lemon poppy seed cake or muffins, or just start dinner. %u00a0 Then I was like, ” I’ll %u00a0just make lemon poppy seed pasta.” And so I did. And of course it needed to have lots of garlic and some kind of vegetable to round out the dish, (I know tomatoes are fruit but you know what I mean) %u00a0
 Start by tuning oven on to 400 degrees. Chopped tomatoes %u00a0and sprinkle in oil and salt and stick in the oven. Do this first because the rest of the meal only takes about 10 minutes..So fast!!!
 The sauce is pretty much a basic roux%u2026
 Once your pasta is cooked (cook however it says to on package), reserve about a 1/4 cup of pasta water and drain the rest. Add the pasta water and pasta the sauce. (the pasta water helps the sauce and noodles canooddle together)
 And its all mixed up just waiting to be served%u2026and the roasted tomatoes!
 Scooped into a bowl with a scoop of the roasted tomatoes and some chopped chives, %u00a0served with a couple wedges of lemon..just because.
THE LOVELY CRAZY
October 15, 2019 by maximios • Blog
Salad season is here. Green salads, fruit salads, potato salads, and grain salads. All the salads and we are not mad about it.
This is a good grain salad using millet, which I am sightly surprised to hear that a lot of people have never had. Millet is kind of like quinoa, but not. I cooks fluffy and looks kind of the same, and is gluten free like quinoa. I think the biggest difference is that millet is slightly softer and tastes a bit more nutty. It also is really good at absorbing liquid flavors.
But who are we to compare. The main thing is that it is nutritious and delicious so we will eat it.
Back to the salad. This is one of those grain salads that is good cooked and served warm but only gets better with a little age (like an hour or a day) in the fridge. Served hot or cold or room tempature, and is hearty enough to be meal like but is also a fantastic addition as a side to any of you meal plans. Like maybe a BBQ? Whatever the occasion, or non occasion, this is just a really good grain salad situation and I think you will be pleased, smiling all smiles while eating it.
To the millet salad.
The stuff. Millet, a couple handful of greens, a few mushrooms, an onion, dijon mustard, a little maple syrup, red wine vinegar, a lemon, a couple cloves or garlic, some toasted sunflower seeds, and salt and pepper.
Start by giving the millet a little toast, just enough to really up the nutty flavor and make it that much more yummy. It only takes a few minutes in a skillet on medium heat. Not an entirely necessary step, but you should do it.
Toasted millet goes into pot with water. Bring pot to a boil and then turn to the lowest simmer and cover.
While millet is cooking, get to the mushrooms and onions. Chop the onion thin and small and the mushrooms thin and small as well. Place them into the skillet with a drizzle of oil and place on medium heat. Mix around every now and then and cook until the mushrooms and onions are soft and a nice golden brown.
And make the vinaigrette. Minced garlic, mustard, vinegar, the juice of the lemon, and maple syrup get put into one place.
Mixed and now all is one.
Millet. Cooked and fluffed and ready to go.
Cooked mushrooms and onions go into the pot, along with the greens, the sunflower seed, and the vinaigrette. This step can be right away or you can wait a little while for things to cool as to not wilt the greens. Up tp you.
Mixed with love and hunger.
Even if you are making it ahead of time, just do yourself a favor. Grab a bowl, grab a fork, and get down on it.
-C
Seves 4-6
3/4 cup uncooked millet
2 cups water
1 sweet onion
3-4 big button mushrooms
Large handful or two of bitter greens like arugula, spinach or a mixture.
2 tablespoon brown or dijon mustard
2 tablespoon red wine vinegar
1 teaspoon maple syrup
2 cloves garlic
salt and pepper
handful toasted sunflower seeds
To start, toast millet. Dump the uncooked millet into a pan and place on a medium heat tt for about 5 minutes or until you start hearing the millet crackle.This gives the millet a slightly more nutty flavor but you can skip this step if you don%u2019t care.
Dump millet and water into medium pot. Place on high heat until water starts to boil then tun heat down to simmer and over. After about 15 or 20 minutes, when most of the water is gone, turn pot completely off. Let sit, covered for another 10ish minutes then take a fork and fluff it.
While the millet is cooking, cook the veggies. Grab the onion and slice it up into thin pieces. Clean off the mushrooms and chop them into small thin pieces too. Place the chopped stuff into the skillet with a drizzle of olive oil and a pinch of salt and place on a medium heat. Stir occasionally and cook for about 15 minutes or until the onion and mushroom are a nice dark, golden brown.
And make the mustard vinaigrette. Mince garlic and place into a jar or bowl with the vinegar, the mustard, the maple, and the juice of the lemon. Mix and set aside.
Once the millet is cooked, the mushrooms and onions are cooked, and the vinaigrette is made, all you have left to do is mix everything together. You can do this while things are slightly warm which will wilt the greens a bit, o let them cool so the greens stay fresh. Up to you. (I like the greens fresh)
Finally, dump cooked mushrooms and onions into pot with cooked millet. Add in the greens and sunflower seeds and drizzle the vinegertte all over. Toss around until fully mixed. Sprinkle with lots of fresh cracked pepper.
Then eat. Or place in a container to bring to the BBQ.
It is getting oh so much nicer out yeah? Springing and such, well kind of. Still a wee bit chillier then it should be around here but still, it is spring and I am taking it.
And with the spring, I feel the itch, the itch to spend all of my free time outside. Out doing things that are not inside because I spent the last 7 long months inside way too much. I needed to be outside as much as possible and as it gets even nicer and warmer and garden temperature-able, I am basically going to be living outside.
Bring in sesame noodles. Super fast, super easy, super duper in every way. Make a big old batch and eat now, eat later, eat hot or eat cold. Everyone loves them, they love you, etc. etc%u2026 A perfect meal to have in rotation when you know that you are not going to have or want to spend much time cooking in the kitchen because you will be outside playing in the dirt and soaking up the sun. And think about all the picnics and BBQ%u2019s to come. These suckers are fantastic to have at any outdoor eating event. They are even peanut free so you can safely bring them to potlucks and such and don%u2019t have to worry about accidentally kill a peanut allergy person. And you can make them gluten free as well if you sub in your favorite gluten free pasta. These noodles, I am telling you. They are a winner in every way.
So with out further ado, the noodles!
The stuff. Spaghetti noodles, tahini, a few cloves of garlic, some toasted sesame oil, soy sauce, red wine vinegar, honey (used whatever sweetener you like), red pepper flakes, tasted sesame seeds some cabbage, half a red onion and a carrot.
Get pasta cooking. Boil water, drop noodles in, you know the drill. Cook as long as the the noodles need cooking, just make sure to not over cook them cause soggy noodles are nasty.
Chop, shred and julienne the cabage, onion and carrot. Nice and thin.
Mince the heck out of the garlic. Or use a garlic press if you want.
Now make the sauce. Add the minced garlic, along with the soy, sesame oil, vinegar, sweetener, and chili flakes to the bowl with the tahini. Mix, mix, mix until it is all incorporated and not lumpy. And that is that.
Noodles should be done by now so strain them out.
Add the prepared veggies to a big bowl.
Add in the cooked noodles
Cover with sauce and toss all around until all the noodles are coated and delicious. Sprinkle with sesame seeds and a pinch or so more of pepper flakes.
And then it is time. Eating time.
Happy spring!
-C
serves 3-6
3/4 lb (3/4 of a package) of your favorite spaghetti noodles (or linguine or similar noodle)
2 tablespoons toasted sesame oil
1/4 cup soy (low sodium if you have it and gluten free tamari if needed)
3 tablespoons red wine vinegar
3 tablespoons tahini
2-4 teaspoons red chili flakes
1-2 teaspoons sweetener of choice (maple, honey, or brown sugar)
4-5 cloves garlic
1-2 tablespoons toasted sesame seeds
about a 1/4 head of cabbage
a carrot
small red onion
Bring a pot of water to a boiling cook the noodles as directed on package. You want them al dente, cooked all the way, but barely. No soggy noodles. (unless you like them soggy)
In the mean time, shred the cabbage, julienne the carrot (or shred it) and slice the onion so very thinly. Place into a large bowl. Now mince garlic and place into a bowl along with the soy, sweetener, vinegar, tahini, sesame oil and a teaspoon or two (more for spicier) of chili flakes and whisk until completely incorporated. Taste and adjust if needed. Add more tahini for more body, more sweetener if needed or more hot pepper flakes for more spice.
Once noodles are cooked, drain and place into large bowl along with the shredded and julienned veggies. Pour in the sauce and toss it all around until all the noodles are covered. Sprinkle in the toasted sesame seeds and a small pinch more of the red pepper flakes.
Eat. Eat warm, room temp, or cold. They are delicious any way.
Any left overs just stick in fridge. Can be reheated or not. Also, you can make the sauce and the noodles a few day ahead of time of when you want to have the dish Just mix the sauce with the noodles when you are about to serve them%u2026 So simple!
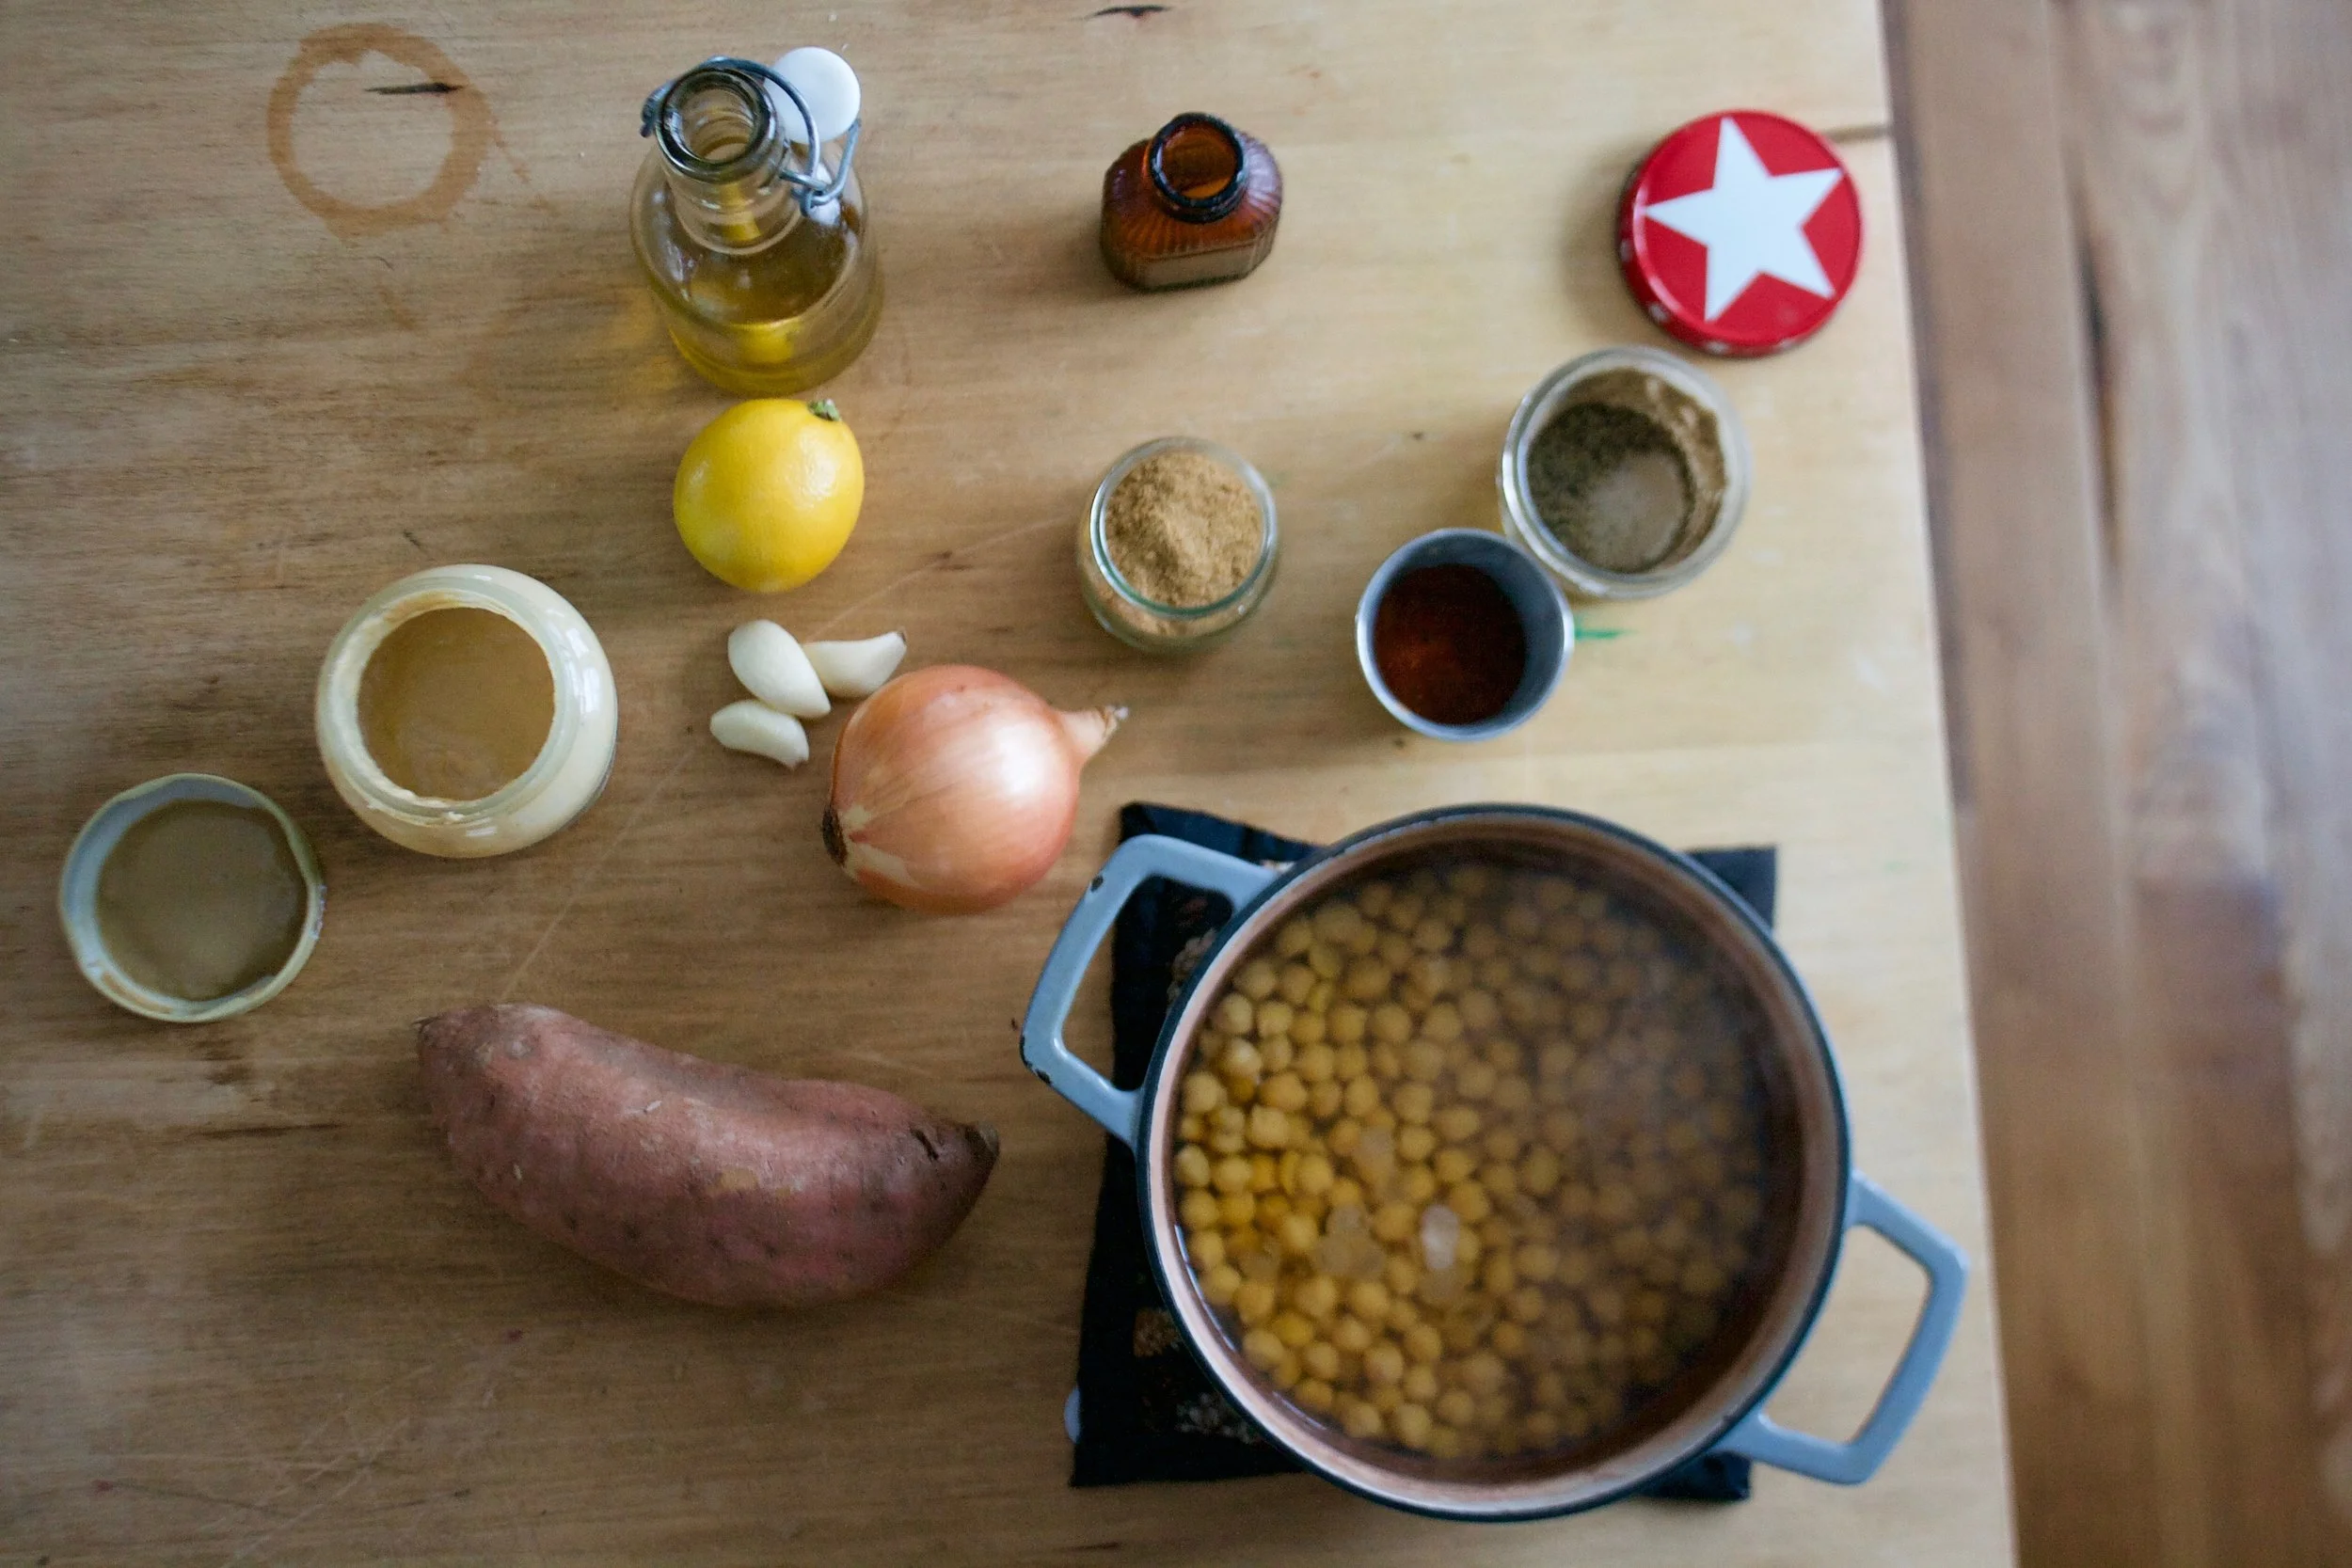
I am one of those people that hangs out for far to long in the grocery store, mostly in the bulk section, looking al all the types of rice, and grains, and beans, and seeds, admiring the variety and colors and also wishing I was one of those people that had an extra $25 to drop on a pound of pistachios.%u00a0%u00a0(Them were some pricey pistachios fo sho.) I take my time, peruse the bins, maybe take a little taste or two, %u00a0and go for what I need. And maybe if something is on sale, get a little of that too. Things that usually make the list are spices,%u00a0oats, beans, maybe rice or quinoa, flours, and seeds. Pumpkin seeds were on sale so those were the seeds of choice and I also got some barely because when I was starting at all the grains,%u00a0it dawned on me that I don’t know many people that eat barley, or even care about it, which is a shame because it is awesome. It might not be trendy like farro or freekeh, but it is just as good, and damn if it is not a hell of a lot cheaper.%u00a0
With the barley and pumpkins seed in hand, I had the start of a salad. So I grabbed some oats, a few spices, some beans and ran away from the builk section, past the nuts before things got bad and I either a) got kicked out for eating my weight in cashews and almonds,%u00a0pretending to just need a taste, or b) paid the $25 for a pound of pistachios that I might not eat because I would need to save them for something really special because they cost $25 a pound. Then I grabbed veggies, walked around the wellness section for good measure, did another lap around the store just in case I forgot something, then finally made my way out of the store only to realize when I got home that I forgot something. (I always forget something)%u00a0
But I had all I needed for a barley salad situation so things went well. This is a fantastic salad. It’s quick and easy and tasty and good. Barley, tahini, veggies and pumpkin seeds… It’s all you need for a just right dinner, or a fantastic side to any meal. Or as a snack at anytime. Bring it to a BBQ, a graduation party, or a pot luck. it will get eaten, and if by chance you end up with a little left over, bring it on home and eat it for breakfast. It will still be just as good.%u00a0%u00a0
The stuff. Pearled barley, tahini, pumpkin seeds and garlic. And some red wine vinegar, salt and pepper, kale, a carrot, some cauliflower, a lemon, a red onion, and a cucumber. (you are not going to need the full amount of all these veggies)%u00a0
First off, cook the barley. The barley and water go into a pot, brought to a boil, then left on low %u00a0to cook until tender. Once cooked, strain away excess water
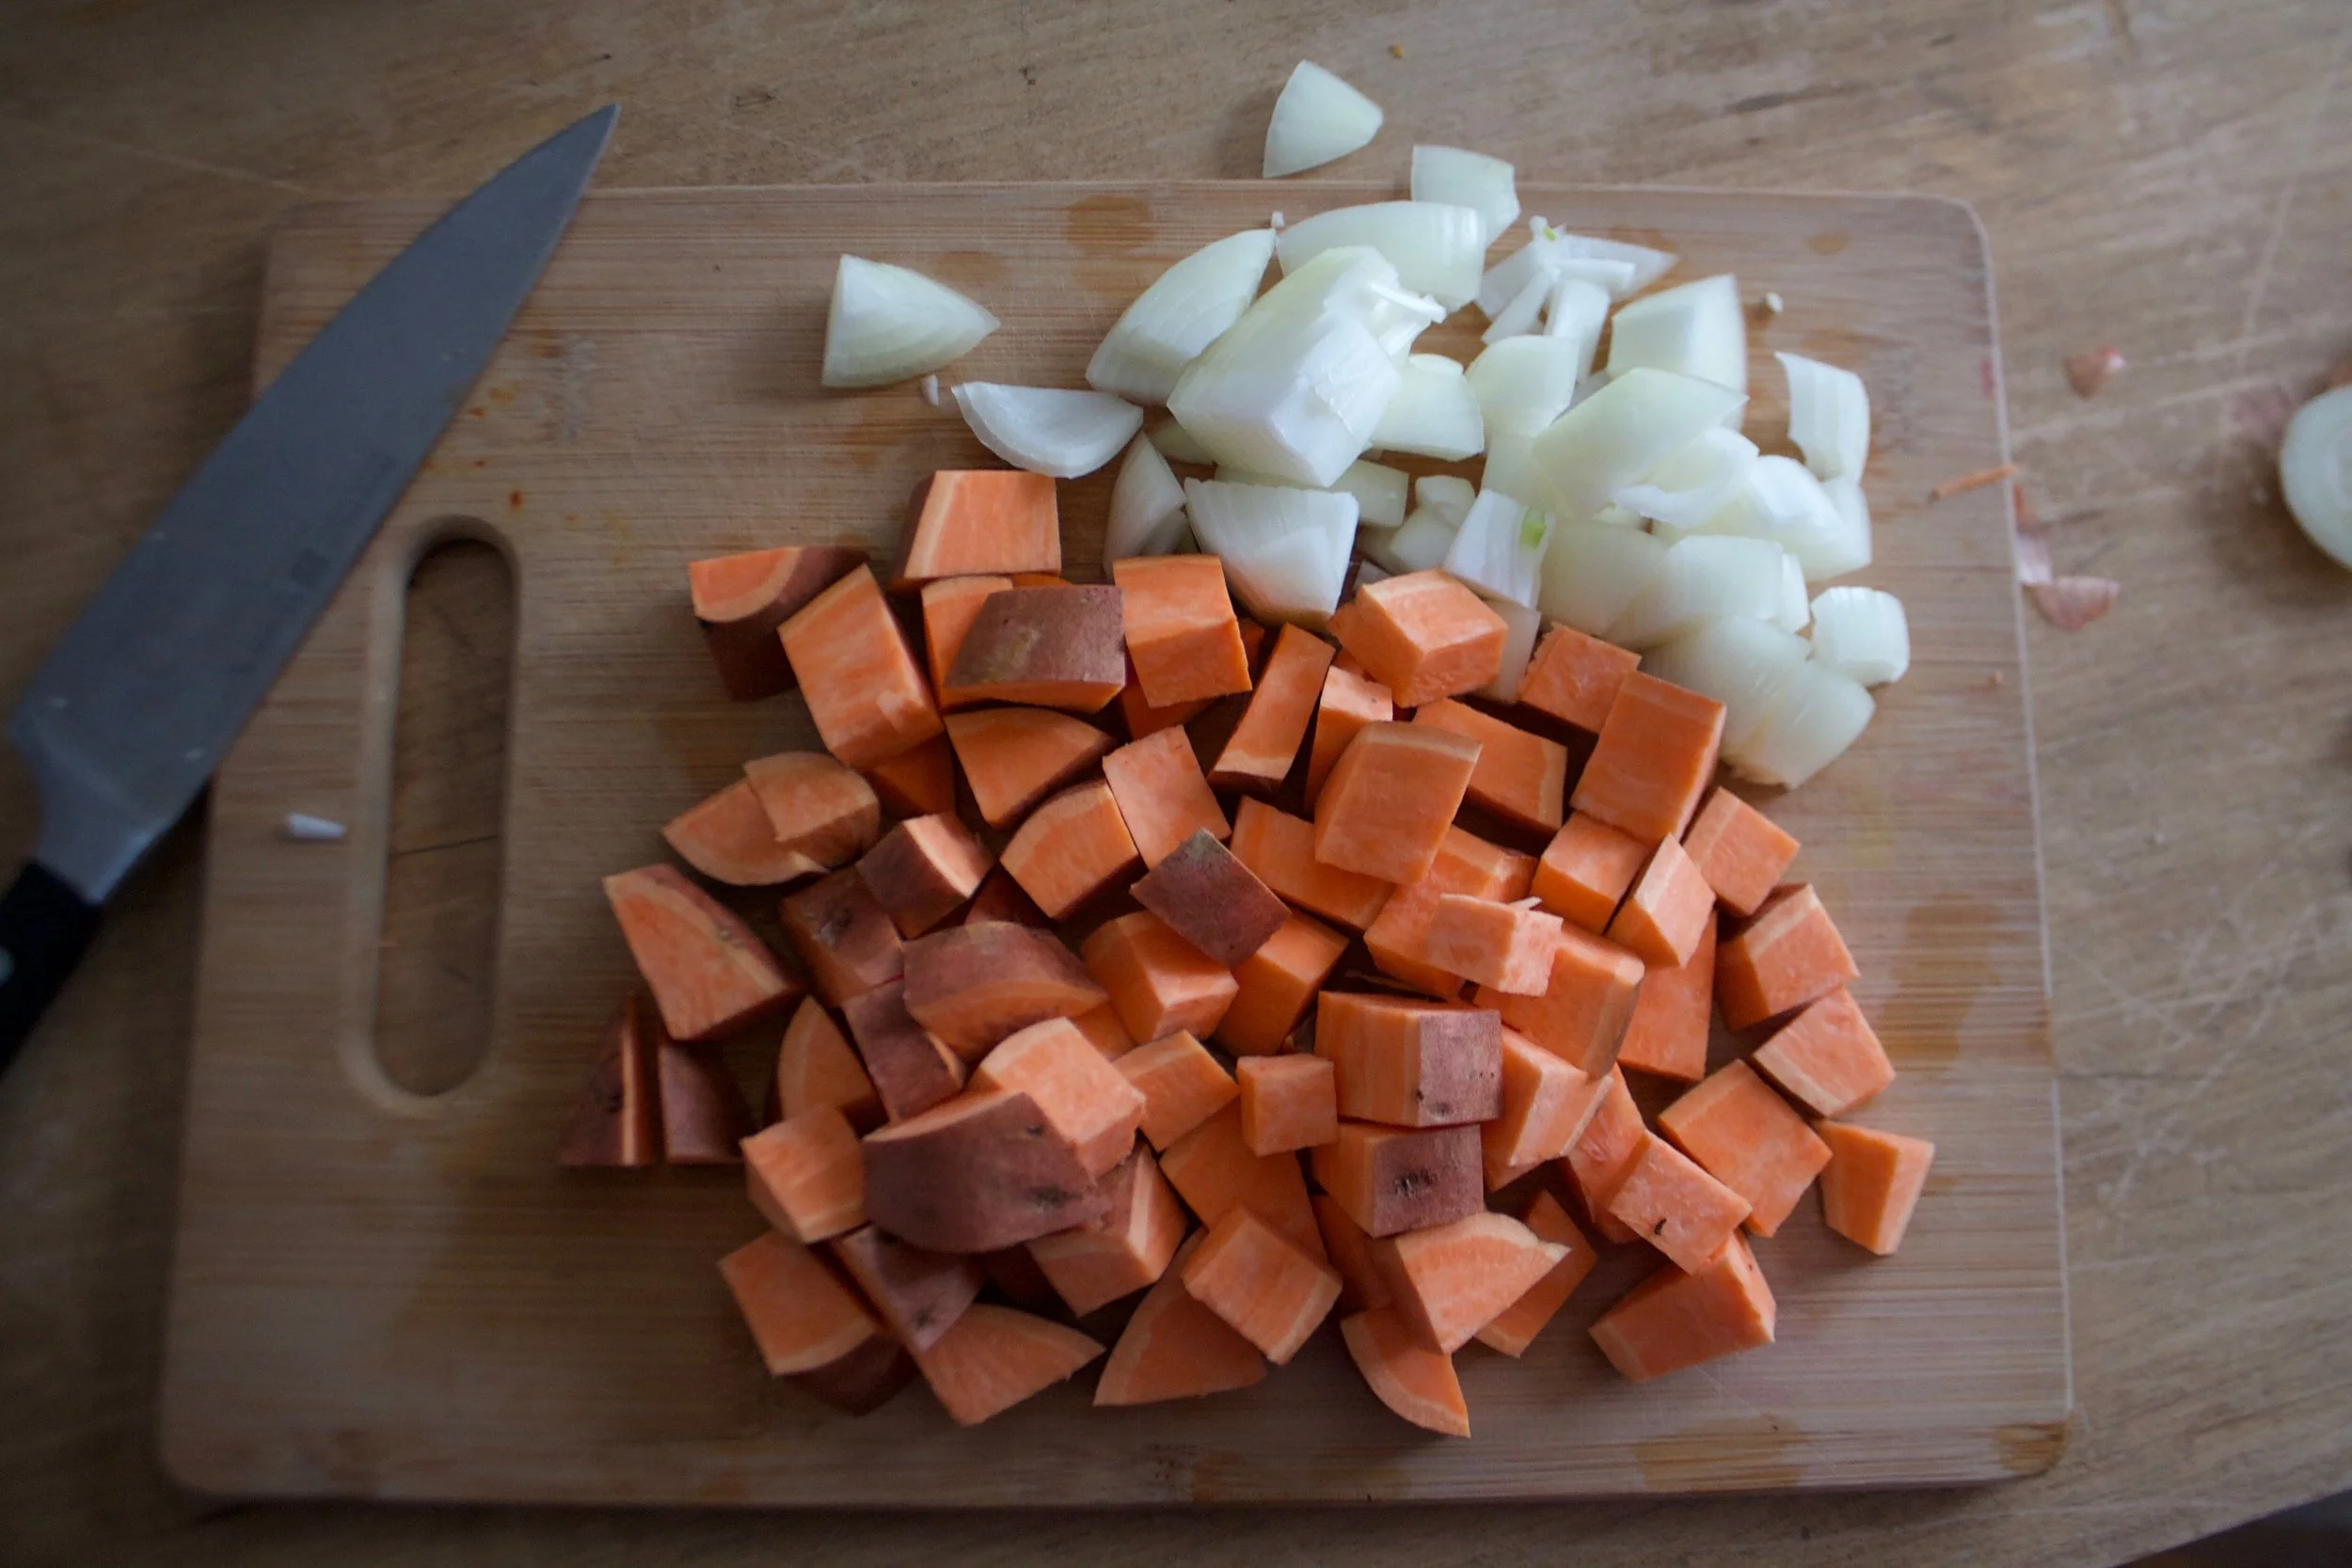
While barley is cooking (or is cooked) chop up the veggies into mouth sized pieces. I used half the cucumber, half the onion, some of the cauliflower, all the kale, and all the carrot. It’s not an exact measurement, you just want a good amount to toss into the salad.%u00a0
Barley in bowl, topped with the veggies and pumpkin seeds…. The pretty before the mix. You don’t need to add it like this, I just did it cause it looks good.
And the tahini sauce. Mince garlic and add to a jar or bowl with the juice of the lemon, vinegar, a pinch of salt and pepper and give it a really good mix.
Creamy, zippy, oh so good.%u00a0
Drizzle and toss the dressing with the barley and veggies.
And that’s that. Now you are ready for eating.%u00a0
Enjoy wherever this salad takes you.%u00a0
-C
If eaten as a meal, serves 2-3. As a side dish, serves 6-8
Note. The vegetable amount and type is more of a preference. You could use all cucumber and onion or add %u00a0broccoli and pepper, just make sure to have a least 3 good cups of some chopped up color.%u00a0
Place barley and water into a pot and bring to a boil. Turn heat down to low and continue to cook until barley is tender, but not mushy, which should take about 45 minutes. Once cooked, strain excess water.
While the barley is cooking, chop all the veggies into small mouth sized pieces.%u00a0%u00a0And make the tahini sauce. Mince garlic and place in a bowl or jar. Add in tahini, the juice of the lemon, and the vinegar. Mix well until smooth then season with salt and pepper to taste. %u00a0
When barley is cooked and drained, let cool for a few minutes then place in a big bowl. Add in all the veggies and the toasted pumpkin seeds, then drizzle with the tahini sauce and toss all around. Season with salt and pepper to taste..%u00a0
Now eat still warm, or later at room renature, or place in fridge for it to get cold. It can be a filling meal or a great side dish.%u00a0It’s good all ways, any way.
Another note. This salad is great for parties and BBQ’s and can be made a day or two ahead. If you do make ahead, hold off on mixing the pumpkin seeds and the tahini sauce with the rest of the salad until you are about to serve it.%u00a0
I love watermelon, I mean, who doesn’t, but i don’t often buy them for myself for one main reason. They are so freaking big and once you cut open a melon, the rest of what is not eaten needs to be refrigerated which would be fine but I have a very tiny fridge and sticking a watermelon in there takes up about half the space. And sure, I could maybe eat a whole melon all to may face in one sitting, but then I would explode. And yes, I know you can buy smaller wedges of melon at the store, but I refuse. Those wedges just seem gross and expensive and wrong to me.%u00a0 When I buy watermelon I take my chances and buy the whole thing and just eat the crap out of it until I make room for other food in the fridge.
It has been so hot out (too hot) and I really just needed a watermelon, so I bought a watermelon (the biggest one I could find because of course). I waited for a day until the fridge was near empty and cut the beast up. Half went into the fridge right away (I had just eaten the last of the greens to make room) and the other half, well only a 1/4 was eaten. I could have kept going and eaten the rest or I figured I would just make a nice tea drink with the rest. And that what I did and that’s this drink I show you here. Smooth, bright, and earthy iced green tea with fresh sweet watermelon, it’s all summertime up in you mouth. And pureeing up watermelon into a liquid definitely takes up way less space in the fridge. I am a genius.
The stuff. Some watermelon, a few green tea bags, a lime( or a lemon), a spring or two of mint, and some water.
Start off with making the tea. Hot water to tea bags, steep for 5 or so minutes then remove bags. Stick tea in fridge to cool.
Now for the watermelon. Remove the rind from the fruit , and cut it up into chunks. Toss in a few mint leaves and…..
So you have cooled tea, pureed watermelon and the juice of a lime.
Pour it all together and mix it all up.
And there you have it. Fresh watermelon green ice tea, ready for your drinking.
All you need now are glasses full of ice and little wedges of melon.
All the summertime, all the watermelon.
Hope you are all staying cool.
-C
make 6 1/2 cups
Bring water to an almost boil (I let my tea pot whistle, turn it off and sit for a minute or two) and pour hot water over tea bags. Let steep for about 5 minutes, then remove bags and refrigerate tea until cold.
When the tea has cooled, take you melon, remove the rind, and puree the fruit along with the mint, with a blending device of you choice. Squeeze in the juice of the lime and give it all a good stir.
Pour tea over ice, garnish with a sprig of mint and a slice of watermelon if you want some fancy.
What a week, what a week. I have barely had time to think, let alone cook food.%u00a0
I had the rhubarb that was in need of cooking, the corn is all over the place all super fresh, and I had me a few minutes in between running around to make some food.
%u00a0I made this (what I now realize is succotash, which is such a fantastic word for food) a few weeks back, fell in love with it so I wanted to make it again. I also wanted to see if the mr would like it this time (he didn’t so much the last time) Says he is not a corn fan. But I don’t know, I still think he loves corn and just wants to be a pain in my ass and tell me he doesn’t. I figured that this time I made it, he would finally declare his love of corn, I mean, there is butt load of rhubarb in it too. And big creamy lima beans and nice sweet onion, and tomatoes. Yes it has a lot of corn, but it has so much more.
Well, he didn’t declare his love of corn.%u00a0 He did have a big scoop on his dinner plate, ate a bite or two then, picked out all the lima beans and chunks of rhubarb then told me that corn love wasn’t going to happen. He also aid that I should stop messing with the rhubarb and just make another pie.
What a butt face.
Whatever, more for me! And if you are awesome and you like sweet corn, tart rhubarb (corn and rhubarb together is the best) ,and are in need of a great summer side for any and all of your summertime food time needs, this is a winner.%u00a0 Super fast and easy to make, eaten warm or cold, and keeps well. It screams BBQ time. (Or 10 o’clock at night, standing in front of the fridge, eaten with a big spoon) It’s good whenever.
The stuff. Rhubarb, fresh corn, and some cooked lima beans. Also need a tomato, a sweet onion, red wine vinegar, salt ans pepper, a little olive oil and water (not pictured) and a few sprigs of fresh parsley.
The onion and rhubarb gets chopped up and tossed into a big skillet with a tiny bit of olive oil and a few splashes of water and place on the stove to cook a bit.
Corn needs to come off the cob. Do it the way you like, but I find holding corn vertical in a big bowl and cutting it down works best.
Slightly soft rhubarb and onions, ready for the other stuff.
Dump the corn, the tomato (chop it up first) the lima beans(drained) and a few splashes of vinegar into the skillet. Stir it all up and keep on heat for a few more minutes until the corn is just barely cooked and all the flavors have had a few minutes to meld.
Toss in some fresh chopped up parsley and season with salt and pepper…..
Into a pretty bowl for eating now or eating later.
This big ass bowl is all for me!!!!
Have the greatest weekend!
-C
Chop the onion into small pieces then chop the rhubarb into smallish chunks. Toss the rhubarb and onion into a skillet with just a tiny bit of olive oil and a few splashes water. Place on the stove on medium heat and cook until the onion and rhubarb are slightly tender, but not to soft.%u00a0 If you need to, add a bit more water to the skillet to keep the stuff from browning or burning.
While the rhubarb is cooking, remove the corn from the cob and chop up the tomato into small chunks.%u00a0 Toss the corn, the tomato, the lima beans (drained) into the skillet with the rhubarb and onion. Pour in about 2-3 tablespoons of vinegar and season with salt and pepper. Mix and cook for another few minutes just until the corn get slightly cooked and all the flavors have had a few minutes to meld.
Remove from heat and dump into a bowl. Chop up a handful of fresh parsley and sprinkle all over
Serve right away warm or stick in the fridge and serve cold later.
I know what you are thinking, you are thinking “It’s Memorial Day weekend. Unofficial start of summer. Lots of BBQ’s now I have to make a potato salad!” (it’s a law right?) and “I want a pickle, dill to be specific”. Ok, maybe you weren’t thinking that, but I was. (I often think about pickles…)
Pickles. And potato salad. It only made sense to make a pickled potato salad. So make it I did. And oh boy oh boy, there is nothing better then a rich and creamy salad consisting of potatoes other then a rich and creamy and pickle tart salad of potatoes. I hit the nail right on the head with this one. The mr and I ate the entire salad all to ourselves and way to fast. Now it is gone and I didn’t get a chance to share with anyone. But it’s ok, cause this is definitely going into the summertime potato salad rotation.
Now you are thinking “creamy dill pickle potato salad.. this girl is a genius!” and to that, I say yes. I would have to agree with you on that. (hehe)
And to all who may not be a pickle fan, or need to make 2 potato salads, (it is always good to have a variety of potato dishes at any BBQ ) try this guacamole potato salad, another favorite.
The stuff. Potatoes of course and half a sweet onion, a cup or so of navy beans in the aquafaba ( bean water), left over pickle juice, fresh dill, dried dill, garlic, olive oil ,salt and a pepper.%u00a0
Yes there is a lemon pictured, but I was actually using that to squeeze into my water so yeah, not needed in the potato salad but you should grab a lemon and a big tall glass of water and drink it. Keep yourself hydrated.
Get the potatoes going. Chop them up into small piece and place into a big pot. Cover with cold water and add in a good bit of salt. Stick the pot on the stove and boil those taters.
While potatoes are boiling, strain the aquafaba (bean water) from the beans.
And chop the onion into little pieces and stick into a big bowl along with the strained (and now rinsed) beans.%u00a0 Pour in half the pickle juice and give it a good toss then set aside and let the pickle juice do it’s thing.
Now it’s the sauce time. Blend up aquafaba, garlic,%u00a0 dried dill, a little pickle juice and pinch of salt. As your blending, pour in olive oil until the sauce becomes rich and creamy dill sauce (vegan mayo my friends)
The potatoes are boiled until fork tender and drained..
Toss the strained potatoes back into the pot and add in the bean/ onion mix and the rest of the pickle juice. Give it all a good toss and stick the pot into the fridge for about an hour until the potatoes are cool.
And now we assemble. The cooled off pickle juice infused potatoes, beans, and onions are stuck into a bowl (or just leave in the pot if you want) and slathered with the creamy dill sauce and mixed with as much fresh dill as you want and lots of freshly cracked pepper
And a pickle. If you have one, I highly, HIGHLY, recommend chopping one up and adding it… I mean it is a pickled potato salad after all.
So now you have a great,%u00a0 fantastic, knock your socks off, salad to make for any of your weekend BBQ needs.
Your welcome.
Now have a great, extra long weekend!
-C
Serve 4-6
Chop up the potatoes into mouth little chunks ans place into a pot . Rinse them and them cover about with about an extra inch of cold water, Ad d in a a good sprnkle of salt (like a tablespoon) and stick on the stove. Bring the pot to a rapid boil then turn heat down a bit to a low boil and cook until the potatoes are fork tender.
While potatoes are boils, strain you beans away from the aquafaba, and keeping about 3-4 tablespoons of the liquid. Rinse the beans and place into a big bowl. Chop the onion into little pieces and add that in with the beans and about 1/2 of the pickle juice. Set aside
Now grab the strained bean juice, about a tablespoon of pickle juice, the garlic, and the dried dill,%u00a0 Either with a hand blender or regular blender, start blending all that together while slowly pouring in olive oil (about 1/2 a cup ) until the sauce is thick and creamy. Season with salt and pepper to taste and place in fridge to hang until you need it.
And once the potatoes are cooked, strain them then add them back to the pot along with the bean/onion mixture and the rest of the pickle juice. Toss around to coat evenly and place into the fridge to cool. After about a half hour its a good idea to give it a toss to make sure the juice is getting to all the potatoes.
Once potatoes are cooled, dump into a serving bowl. (or just keep in pot) It’s ok if there is a little remaining liquid.. it will get sucked up by the potatoes. Get the sauce from the fridge and pour it and toss it around to evenly coat all those yummy potatoes. Chop up fresh dill and toss that in too (as much fresh dill as you like.. more is better!) And lately, if you have a spare pickle or two, chop it up and add it on in (or place in a bowl on the side for people add in themselves)
I added the pickle. You should add the pickle. It is so good with the pickle
Like any potato salad, serve with your favorite foods and keep in the fridge when not being eaten.