Spicy, crispy cauliflower… um yes please. I really like cauliflower. The mister loves it, or at least likes it better than any other vegetable. So when he asked for spicy cauliflower, well yea I am going to make it because I am so nice and really, could I say no to a veggie request? (I might have said no if it involved deep frying) Also, I found fresh cauliflower on sale! ($2.25) I don’t usually cook fresh cauliflower, but I figured at that price, it wouldn’t be bad to cook a head. (If I am cooking cauliflower, which I do a lot, I just use frozen….casue it be waaaay cheaper)
Fresh, cheap and requested veggies….those are must makes. And the mister was happy with I handed him the plate of oh so lovely looking crispy crunchy loveliness. (I kind of like to make him happy…sometimes)
The stuff. Cauliflower, chopped and broken into pieces. Corn meal mixed with salt, pepper, onion and garlic powder, and because I made this for the mister, parmesan cheese. And in the green bowl, srirsachi and a little oil. The cauliflower gets a coat of the hot sauce and then tossed around in the corn meal mixture. Handling as little as possible, place coated pieces on a lightly oiled baking sheet and stick those suckers in the oven for about a half hour, taking them out and flipping half way.And take them out of the oven when pieces tuned golden brown, stik them on a plate, and serve immediately.
A bit of spice, a bit of crispy , a lot a yum. Serve with some crunchy veggies, maybe a squeeze of lemon and definitely some type of avocado situation.
A beer would be lovely too!
Have a fantastic weekend!
-C
Spicy Crispy baked Cauliflower
1 head cauliflower, chopped or broken into florets
1/2 cup corn meal
3-4 tablespoon sriracha or your favorite hot sauce
1 tablespoon olive or coconut oil
salt and pepper
Any seasonings you might like (garlic or onion powder, parmesan cheese, national yeast…. whatever floats your boat)
Preheat oven to 400 degrees
In a bowl, mix together sriracha and oil. In a separate bowl, mix salt, pepper, any seasonings you might like, and corn meal. Take cauliflower and toss in sauce to coat. Remove from sauce and toss around in cornmeal mixture till fully coated, but try not to hand too much so the coating doesn’t come off. Place pieces on a lightly oiled baking sheet and stick into oven. Bake for about 15 minutes, remove and flip pieces. Back into the oven for another 15-20 minutes (depending on you crispy preference) Remove when golden brown (or darker if you like) and serve immediately.
Cucumber, celery, and carrots are great accompaniments.. also a little mashed avocado or guacamole is much appreciated.
First day of Spring!! Well kind of I guess. I think it actually starts at like 6:20 tonight, when the temperature is going to dip back done to 10.(Spring my ass) I don’t know about you people out there but here in Vermont, we are really hanging on to winter. I have to keep telling myself…” It will be warmer soon and you’ll be looking forward to this weather in a few months.. so stop bitching!” I give myself good pep talks.
Anyway, last week at the farm share pick up, there was a nice little surprise. We got a few pounds of some sweet locally grown and milled whole wheat flour. There was a little sign with the information about the wheat and where it came from, but in my haste of gathering all of my other veggies, I failed to take notes and forgot the name of the farm that it came from. But I do know that my farm traded some celeriac for the wheat. I was really excited because I am really into the idea of using locally grown grains and I don’t know, it just made me really happy, especially because it was a trade. Food framing and local sharing is stuff that makes me happy.
I wanted to make something to kind of showcase the hearty, nutty flavor of the wheat and I also wanted to make something that my mister would eat for breakfast. Well what better way to do that then with muffins! Banana coconut whole wheat (that just happen to be vegan) Hearty, fruity, and smells like the word lovely and the color yellow. A few to eat and a few to share. Hanging at home, running away or getting ready for a day of spring cleaning….This is a great weekend to make muffins!
The stuff… Light, nutty local whole wheat flour, ripe oh ripe bananas and coconut flakes are the stars in this muffin… But we need the other stuff too. Brown sugar, vanilla, coconut oil and a chia egg. Baking powder, baking soda, and last but not least, salt.
Yup, that sounds about right The salt, baking soda, and baking powder are whisked together. The banana and all the rest of the stuff are mixed up… Then mix the wet mixture into the dry. Stir until combined and then add in the coconut flakes,Scoop mixture into 12 lined muffin cups… A scoop like mine works very nicely. Don’t have one, well I recommend you get yourself one. Until then, use a spoon. Something I always do when baking any muffin is sprinkle the tops of each muffin with a bit of sugar or brown sugar. It melts and caramelizes and adds a sweet little crunch to the tops.
Now stick the muffins into the oven. Remove from oven when they look like this, nice and golden brown. Also good idea to check with a tester stuck into the middle. When it comes out clean, they are done.12 happy little muffins cooling on a rack, waiting to be eaten with you mouth.
Doesn’t the sight of pretty food make you happy, like sing a song happy? Muffins, whoa yah!! Friday yah yah!! Spring…What, Yah!! Yah…Yah Yah!!!
Terrible I know, but at least you were spared hearing my actual voice.
Have a great weekend. Do lots of springy stuff!
-C
2 Cups Whole Wheat Flour
4 Ripe bananas
1 Teaspoon Baking Soda
1/2 Teaspoon Baking Powder
1 teaspoon Salt
1 teaspoon Vanilla Extract
3/4 Cup Brown Sugar
1/3 cup melted Coconut Oil
1 Tablespoon Chia Seeds + 3 Tablespoons warm water
1/2 Cup Unsweetened Coconut Flakes
Preheat oven to 350
In a small bowl, mix 3 tablespoons warm water to the chia seeds and let sit for at least 5 minutes (10 is better) In a large bowl, peel and mash the bananas until they turn into a kind of chunky soupy puree. Add in brown sugar, chia seed mixture, vanilla extract, and the melted coconut oil (make sure it’s melted or it won’t incorporate into the mixture) Mix together. In another bowl, whisk together the flour, baking soda, baking powder and salt. Mix the wet mixture with the dry until combined then mix in the coconut flakes.
Line a 12 cup muffin tin and fill each cup about 3/4 the way up with batter. Sprinkle each muffin with brown sugar and place in oven on center rack. Bake for 25-30 minutes or until the tops 0f the muffins are golden brown and a tester inserted into the middle comes out clean.
Remove muffins from tin and let cool.
Serve as is or maybe with a smudge of coconut butter, or anything you want really.
No need for fork, just use you mouth.
I swear I didn’t plan this, but today is officially Pi Day! Pi being the mathematical constant of the ratio of the circumference of a circle to its dimeter (did I say that right?) 3.1415…… And today’s date is 3.14.15. Whoa…I guess that means that this pie was meant to be.
But the real reason I made this pie was for a surprise treat for the mister. He left for a couple of days and me being the super assume lady love of his, thought it would be nice for him to come home to his favorite dessert.. plain old rhubarb pie.( I know, I be the best) And it didn’t hurt that when I went to the grocery store, there was a big old pile of fresh, gorgeous rhubarb staring me right in the face, and on sale to boot.
The funniest thing. Me and the mister have been together for a very long time (12+ years….we started dating in high school, so I am not that old!) and I have known that his favorite dessert is plain rhubarb pie for ever. Every time we have one of our food discussions about our favorite foods, (which happens more than it should and usually consists of me running my mouth and him grunting or nodding once in a while) rhubarb pie always comes up. He even talks about the old lady who used to make him rhubarb pie for mowing her lawn. And guess what… I have never once made him a plain rhubarb pie. Why? Honestly, I have no idea. Maybe I secretly think I was going to screw up his one favorite dessert, or maybe I never quit had enough rhubarb for a pie, or maybe I am really just an awful lady. But for whatever reason, it doesn’t matter anymore because I finally made him a plain rhubarb pie.
The stuff for the makings of pie… One single pie crust, flour, sugar and rhubarb. I mean, come on, this might be one of the simplest pies ever.
Note…The first thing the mister said to me when he saw the pie was. “Where is the top crust? My response what “Screw you ass face” but then chuckled. This pie would be great with a top crust, but I was thinking how pretty it would be without it. And honestly, I only made a single crust. What I am saying is.. make a double crust if you want a top.
The chilled pie crust gets rolled out, placed into a pie plate, trimmed and made all pretty. The bottom is sprinkled with a 1/4 cup of sugar and stuck back into the fridge while the oven preheats to 350. Now is a good time to dice the rhubarb into inchish chunks. Once the oven is preheated, remove crust from fridge and add in the diced rhubarb.
The remaining sugar and flour get mixed together in a bowl and dump on top of the rhubarb. Give it a tiny toss with you fingers just to get some of the mixture to sink down a little. (Don’t worry, the filling will be perfect when you do it like this) I also cut up the pie crust trimmings and placed on top… not necessary, but looks pretty and is a good use of the scraps.
Now cover the entire pie with tinfoil. Cut and x through the middle and fold foil back to expose the filling but keep the crust covered. (so much easier than trying to squish strips of foil together..you know what I am talking about)
And then the pie is ready to be baked.
In the oven for 5o minutes with the foil, then 10 or so minutes without to finish.And then you take it from the oven and marvel at the beauty.
I am now truly the best super awesome lady love. I should get a freaking crown but would settle for a stand mixer or blender as a reward instead.
Important…..Let the pie cool completely (or just about) before cutting.The filling needs a bit of time to set.
Happy Saturday, Happy Weekend, Happy PI Pie Day!!!
-C
Rhubarb Pie
Single Pie Crust.. Recipe here
4-5 large Rhubarb Stocks (4 cups chopped)
1 1/4 cups white sugar
a hefty 1/3 cup flour
Make you pie crust.. and make sure it’s chilled!
Roll our pie crust and place in pie plate. Trim and make edge all nice and pretty. Add 1/4 cup of sugar to the bottom and stick back in the fridge to relax while you get the other stuff together.
Preheat oven to 350
Wash and dice rhubarb into inchish chunks. In a bowl, mix together 1 cup of sugar and the flour. Once the oven is preheated, remove crust from fridge and fill crust with the chopped up rhubarb. Now dump the sugar, flour mixture on top, slightly tossing it around with your fingers. Cover entire pie with tin foil and with a knife, cut an x through the middle of the foil. Fold foil back to expose the center of the pie, but keep the crust covered. Stick into oven. Bake for about an hour, removing the tin foil after about 50 minutes. Pie is done when the crust is golden brown and a fork or knife stuck into the middle of pie comes out with a thick jam like sauciness.
Let pie cool and set for a bit.
Slice. Serve on a plate with an eating utensil and maybe a scoop of vanilla bean ice cream. Lick plate clean.
How awesome will you be when you bring the most freaking amazing tortilla chips to the party this weekend? You will be like..”what, it ain’t no thang.. I am just good like that” Yes, yes you are.
And yes, I am assuming that you will be making these awesome chippers to share at a Super Bowl part this weekend. I say this because even as I sit here writing this (with the TV on) there has been nothing but football talk…deflated balls, hot wings, half time shows and commercials. It’s almost as big as Christmas. Got to get the decorations, the special game day food and your football jerseys. It’s crazy and all over the place. So that’s why I am assuming you are making these for the game. But if you not going to be participating in any football parties.. by all means, make these chips for yourself anyways. Celebrate you day! Have a non football watching party. Or just make these whenever. Jalapeño Lime chips for everyday!
Note: You can make these chips without the jalaeno and or the lime if you need or want to. You can also stop after the first step and have some dank corn totillas for tacos ands stuff..But definitely make the chips… worth it for sure!
All the stuff.. Masa harina, hot water, salt, a lime and a jalapeño. Zest lime and place half the zest into a glass bowl with oil and either sit on warm oven or microwave for 30 seconds to infuse. Puree the jalapeño with a cup of hot water and add the puree and half the zest of a lime, plus salt, to the masa harina. Mix it all up with another 1/2 cup of water or enough to make the dough resemble play dough… You can add more water or masa if you dough is to wet or dry.
Knead dough a few times just to make sure it’s completely uniformed and divide into 12-14 equal pieces. Place balls on a plate and cover with a wet paper towl to keep from drying out.
I do not own a tortilla press so I used what I had… wax paper, a wooded cutting board and brunt force. I took each ball and place it between the two pieces of the waxed paper, placed the cutting board on top, and with all my might and body weight, pressed down to smoosh. It works like a charm.
My cast iron skillet is big enough to cook 2 -3 at a time, but doing one at a time is cool too. Preheat the skillet to medium heat. Cook each tortilla for about 2-3 minutes ( or until starting to brown) on each side. Half way there to chips!!!
With my fingers ( you can using a basting brush for sure), I rubbed a little of the lime oil all over both sides of each tortilla. Stacked a few high, then sliced those tortillas into triangle shapes. If you want to go crazy, you could cut them into strips or even use a cookie cutter and do some fun shapes… but triangle are easy, classic, and practical. A good shape for dipping!
Placed all nice and cozy on a baking sheet. trying not to overlap. Into a 400 degree oven for about 20 minutes to complete the chip making process.. After about 15 minutes, check for doneness. When nice a crispy, remove from oven, squeeze lime juice all over and sprinkle with salt. I then stuck them back in the oven for a few more minutes just to dry the lime..
After cooling down, take those chips and stick them in a bowl.
Eat a few, but wait and save them for the party. Or better yet, make a few batches. Bring a batch, eat a batch. (Its ok, you are allowed)
Eat with some salsa, maybe some of this guacamole, or just as they are…Anyway is the right way as long as you are eating!
Have fun making these and have fun getting read for the party this weekend (Super Bowl or not!)
-C
Jalapeño Lime Tortilla Chips
Makes 12-14 tortillas.. then made into a medium bowl of tortilla chips.
Ingredients
2 cups masa harina
1 1/2 to 1 3/4 cups hot water
1 teaspoon salt
1 lime (juice and zest)
1 large or 2 small jalapeños
2 tablespoons olive oil
salt
To start, zest lime and add 1/2 of the zest to bowl with the oil. Place oil on warm spot on stove to let the oil infuse the limeness.
Take jalapeno and puree with 1 cup of hot water. In a large bowl, add puree and remaining lime zest to the masa harina and mix, adding an additional 1/2 to 1 cup of hot water until the dough resembles play dough, not to soft, but not to dry and completely incorporated
Divide dough into 12-14 balls and place on a plate under a wet paper towel to keep dough from drying out.
One at a time, take a dough ball and place between two pieces of wax or parchment paper. Place either a plate or cutting board on top and press down as hard as you can (you could even stand on it). Remove flatten tortilla from paper and place in medium hot skillet. Cook each tortilla for 2-3 minutes on each side.
When all tortillas have been made, lightly rub lime oil on all over both sides. Stack a few on top of each other and cut into triangles. Place pieces on a baking sheets (I used 2) and bake at 400 for 15- 20 minutes or until lightly browned and crunchy. When chips are done, remove from oven, squeeze or sprinkle lime juice on chips and sprinkle with salt. Stick back into oven for another 2 or so minutes to re-crisp from the lime juice.
Remove and let cool completely, then dump into a bowl
Enjoy!
So the mister wants to know…”Why would anyone ever buy those crappy english muffins from the store when they could be eating these?”
Good question…And we will all answer….”Never again! Because I now make the sickest E.M.s around.!”(E.M.s is the cool short way to say english muffins and now that you are going to make your own….man, your so cool!)
These E.M.s are perfect. Easy to make, not overly fussy, and you end up with a super yummy, extremely versatile, individually portion super sweet little disk of bread. And the best part is..nooks and crannies! I think that is why I decided to make these E.M.s, so Nick and I can talk the about nooks and crannies…(Sometimes we need light conversation)
We start with flour and salt whisked together in a bowl. The honey, yeast and warm water are getting on proofing in a jar. An egg waiting to be cracked, some milk, and 2 tablespoons of butter. All this good stuff equals…nooks and crannies!
Oh you like my nifty dough whisk….me too, I use it all the time. Maybe I should have a dough whisk give away ……maybe…..
Everything all mixed together, dumped onto a floured surface and kneaded for 10 minutes by hand…..If you have a stand mixer, you can use it if you want, but you are missing out on the fun of doing it by hand….
When the dough has been sufficiently kneaded, gather dough into a nice ball, coat with a little oil and place back into bowl. Cover with a towel and stick in a warm place to rise for about an hour or until it has doubled in size.
When dough has doubled, punch down and plop out onto floured surface. Dust the bottom of a griddle or in my case, two cast iron pans, with corn meal. Divide dough into 8-10 equal balls and smash into 2 inch thick disks.
Place on griddle or pans and sprinkle more corn meal on top of each E.M. Cover and let rise for another 15 minute.
Now the E.M.s have rested, turn the griddle (or pans) on to low heat. Once your griddle (or pans) gets hot, continue to cook that side for another 7-10 minutes, or until golden brown. Flip and cook other side for 10-12 minutes or until golden brown. Once browned, check for doneness with a thermometer. The inside should reach 200 degrees.( if you don’t have a thermometer, fork split one open and check…. you are going to eat it anyway) If the outside cooked faster then the inside, no worries, just pop them into the oven at 350 for 8-10 minutes. I had to pop mine into the oven for to cook completely.
Remove form griddle, let cool a bit, and ……Fresh, fluffy fat, fantastic….Everything and more that a real english muffin should be. Split open with a fork and……. the nooks and crannies! So spot on. Serve with anything your heart desires…I served these with whipped honey butter…. and eat the only kind of E.M. you will ever again eat. Grocery store english muffins be damned!
Enjoy and Happy Tuesday!
-C
English Muffins
Ingredients
2 1/2 cups unbleached all-purpose flour
2 teaspoons honey
1 teaspoon salt
2 tablespoon butter at room temperature
1 1/4 teaspoons active dry yeast
1/4 cup warm water
3/4 cup milk
1 egg
cornmeal for pan
Combine warm water, honey and yeast in a bowl to active..about 5-10 minutes or until yeast is foamy.
In a separate bowl, whisk together flour and salt. Mix in butter(I use my fingers) When yeast mixture is done proofing, whisk together mixture with the egg and milk. Add wet to dry and mix until just incorporated Dump out onto floured surface and knead dough for 8 minutes, adding a bit of flour whenever dough starts to get too sticky. Roll into a ball, coat with oil and place back into bowl and cover with a towel. Let rise for 60 minutes or until sought has doubled in size.
Once the first rise is done, deflate dough and divide into 8 equal pieces(10 for a slightly smaller muffin). Smoosh each ball into a flat disk, about 2 inches thick) and place on a cold cornmeal dusted cast iron griddle. (I used 2 cast iron pans) Sprinkle tops of muffins with more corn meal and let dough rest for another 15 minted. Turn burners on low heat. Let griddle get hot and continue to cook the muffins for another 10 minutes or until golden brown. Flip and cook opposite side until gold brown and remove from griddle. To make sure the muffins are cooked completely, stick an instant read thermometer into the center…it should read 200 degrees. (if you don’t have a thermometer, split one open… the tester E.M.) If the E.M.s are not completely cook, just stick in the oven on 350 for 5-10 minutes or until cooked throughout.
Remove and let cool. To serve, split open with a fork and give a light toast. Spread with butter, jam, peanuts butter, anything you want…maybe make E.M pizzas!
I usually base my meals on what I know I have for food in the house and what I know needs to be eaten. I was a little surprised when muling around in the freezer to find a block of extra firm tofu. (I don’t remember buying). Maybe a tofu fairy left it in there for me, or maybe it has been in there for years and I just am now stumbling upon it. Either way, I found it and it had to be eaten. So I cooked it up, and I cooked it up nice and good. Tofu is a pretty vertical food, being that its basically a flavorless block of protein. It can go sweet or savory, mashed, chopped or blended. Add fresh garlic, any type of sauce or even peanut butter. (the possibilities are quite endless) I was going for a dinner dish so I decided on a simple cubed tofu with lots of ginger and garlic (so good to ward of those winter sicko bugs out there) and baked it up nice and crispy with fresh bright green broccoli and soba noodle. Quick, easy, tasty and healthy.. I did it again. Thanks tofu fairy!
This noodle dish is super easy to make and take only about a half hour. We start with extra firm tofu, a package of buckwheat soba noodle, a nice big broccoli crown, honey, fresh ginger, garlic and soy sauce. oil for pan and lime for a finish. Nothing fancy. Dice the tofu into small cubes and place onto a clean dish towel and pat dry…It really helps the tofu suck in more flavor and become nice a and crispy.
Tofu get moved into a lightly oiled skillet, ready to go into a hot oven. Why baked instead of sautéed on the stove? I find that the tofu keeps it shape and crisps up better when baked. But do whatever you want….. But just bake it.
While the tofu is baking, make up the sauce. Grate about 2 tablespoons of fresh ginger and4 large cloves of garlic into a bowl. Whisk together with 2 tablespoons honey, 1/3 cup soy ( tamari or brags aminos works too) and 1/3 cup of warm water. Taste it, and if you think it needs more anything, add it. I actually used 6 cloves of garlic, but I really wanted a garlic packed sauce.
Oh and start a pot of water to boil noodles in.
After 15 ish minutes, give tofu a flip, then after about 25 minutes, the tofu should be nearly done. Remove from the oven and toss in the chopped broccoli and 1/3 cup of the sauce. Its a little watery but thats what you want, it will cook down in the oven. Now stick the skillet goes back into the oven and boil the soba noodle.
Another 10 minutes in the oven and the sauce starts to caramelize and the broccoli is cooked but still nice and crisp. Remove skillets from oven and toss in the cooked noodles and the rest of the dressing. Toss and toss and place on a plate, or a bowl, or if your into it, just eat out of the pan. (it happens)
I added a small handful of fresh shopped cabbage to add a bit more crunchy bite. I also added a squeeze of lime juice on top for a nice acidic finish. Lemon works and even a slash of vinegar would be nice, but plain is good too. What ever you do, just EAT!
A quicky yummy, noodley dinner! And leave a little extra for left overs because these noodles are fantastic cold… think lunch, or a later that night fridge snack.
keep it in the reals!
-C
Ginger Soy Tofu and Broccoli Soba Noodles
Ingredients
1 package of extra firm tofu
1 package Soba noodle
1 large crown of fresh Broccoli
2 tablespoons grated fresh ginger
3-4 cloves garlic
1/3 cup low sodium soy sauce
1/3 cup water
2 tablespoons honey (or brown sugar for vegan)
Lime wedges(Optional)
Chopped cabbage(optional)
coconut or oil for skillet
Preheat oven to 425
Remove tofu from package, cut into cubes and lay on a clean dish towel and pat dry.
Tofu goes into a oiled skillet and placed in oven for 25 minutes. Give tofu a flip after about 15 minutes. While tofu is baking, make the dressing, chop the broccoli and boil water for soba noodles.
For dressing, grate fresh ginger and garlic into a bowl. Whisk together with soy, water and honey (or brown sugar).
When water is at a boil, add soba noodle and cook until done ( about 6-8 minutes..Follow instructions of package)
When tofu has baked for 20 minutes, remove skillet, toss in chopped broccoli and 1/2 cup of soy ginger dressing Return skillet to oven for another 10 minutes or until dressing just starts to caramelize. Remove for oven and toss in cooked soba noodles and the rest of dressing. If you want a little more veggie bit, add in some fresh chopped cabbage. Plate and serve with a wedge of lime or lemon or even a sprinkle of red wine vinegar.
Now EAT!
Nothing to fancy….. just a little warmth and spice to fancy up a quick snack. Word!
Sliced apples sprinkled with cinnamon and stuck in oven at 425 for 5-8 minutes. Easy Peasy. Topped with a squeezey….of lemon. (Yes..I am a dork)

THE LOVELY CRAZY
September 19, 2015 by maximios • Blog
Fresh, cheap and requested veggies….those are must makes. And the mister was happy with I handed him the plate of oh so lovely looking crispy crunchy loveliness. (I kind of like to make him happy…sometimes)
A bit of spice, a bit of crispy , a lot a yum. Serve with some crunchy veggies, maybe a squeeze of lemon and definitely some type of avocado situation.
A beer would be lovely too!
Have a fantastic weekend!
-C
Spicy Crispy baked Cauliflower
Preheat oven to 400 degrees
In a bowl, mix together sriracha and oil. In a separate bowl, mix salt, pepper, any seasonings you might like, and corn meal. Take cauliflower and toss in sauce to coat. Remove from sauce and toss around in cornmeal mixture till fully coated, but try not to hand too much so the coating doesn’t come off. Place pieces on a lightly oiled baking sheet and stick into oven. Bake for about 15 minutes, remove and flip pieces. Back into the oven for another 15-20 minutes (depending on you crispy preference) Remove when golden brown (or darker if you like) and serve immediately.
Cucumber, celery, and carrots are great accompaniments.. also a little mashed avocado or guacamole is much appreciated.
First day of Spring!! Well kind of I guess. I think it actually starts at like 6:20 tonight, when the temperature is going to dip back done to 10.(Spring my ass) I don’t know about you people out there but here in Vermont, we are really hanging on to winter. I have to keep telling myself…” It will be warmer soon and you’ll be looking forward to this weather in a few months.. so stop bitching!” I give myself good pep talks.
Anyway, last week at the farm share pick up, there was a nice little surprise. We got a few pounds of some sweet locally grown and milled whole wheat flour. There was a little sign with the information about the wheat and where it came from, but in my haste of gathering all of my other veggies, I failed to take notes and forgot the name of the farm that it came from. But I do know that my farm traded some celeriac for the wheat. I was really excited because I am really into the idea of using locally grown grains and I don’t know, it just made me really happy, especially because it was a trade. Food framing and local sharing is stuff that makes me happy.
I wanted to make something to kind of showcase the hearty, nutty flavor of the wheat and I also wanted to make something that my mister would eat for breakfast. Well what better way to do that then with muffins! Banana coconut whole wheat (that just happen to be vegan) Hearty, fruity, and smells like the word lovely and the color yellow. A few to eat and a few to share. Hanging at home, running away or getting ready for a day of spring cleaning….This is a great weekend to make muffins!
The stuff… Light, nutty local whole wheat flour, ripe oh ripe bananas and coconut flakes are the stars in this muffin… But we need the other stuff too. Brown sugar, vanilla, coconut oil and a chia egg. Baking powder, baking soda, and last but not least, salt.
Yup, that sounds about right The salt, baking soda, and baking powder are whisked together. The banana and all the rest of the stuff are mixed up… Then mix the wet mixture into the dry. Stir until combined and then add in the coconut flakes,Scoop mixture into 12 lined muffin cups… A scoop like mine works very nicely. Don’t have one, well I recommend you get yourself one. Until then, use a spoon. Something I always do when baking any muffin is sprinkle the tops of each muffin with a bit of sugar or brown sugar. It melts and caramelizes and adds a sweet little crunch to the tops.
Now stick the muffins into the oven. Remove from oven when they look like this, nice and golden brown. Also good idea to check with a tester stuck into the middle. When it comes out clean, they are done.12 happy little muffins cooling on a rack, waiting to be eaten with you mouth.
Doesn’t the sight of pretty food make you happy, like sing a song happy? Muffins, whoa yah!! Friday yah yah!! Spring…What, Yah!! Yah…Yah Yah!!!
Terrible I know, but at least you were spared hearing my actual voice.
Have a great weekend. Do lots of springy stuff!
-C
Preheat oven to 350
In a small bowl, mix 3 tablespoons warm water to the chia seeds and let sit for at least 5 minutes (10 is better) In a large bowl, peel and mash the bananas until they turn into a kind of chunky soupy puree. Add in brown sugar, chia seed mixture, vanilla extract, and the melted coconut oil (make sure it’s melted or it won’t incorporate into the mixture) Mix together. In another bowl, whisk together the flour, baking soda, baking powder and salt. Mix the wet mixture with the dry until combined then mix in the coconut flakes.
Line a 12 cup muffin tin and fill each cup about 3/4 the way up with batter. Sprinkle each muffin with brown sugar and place in oven on center rack. Bake for 25-30 minutes or until the tops 0f the muffins are golden brown and a tester inserted into the middle comes out clean.
Remove muffins from tin and let cool.
Serve as is or maybe with a smudge of coconut butter, or anything you want really.
No need for fork, just use you mouth.
But the real reason I made this pie was for a surprise treat for the mister. He left for a couple of days and me being the super assume lady love of his, thought it would be nice for him to come home to his favorite dessert.. plain old rhubarb pie.( I know, I be the best) And it didn’t hurt that when I went to the grocery store, there was a big old pile of fresh, gorgeous rhubarb staring me right in the face, and on sale to boot.
The funniest thing. Me and the mister have been together for a very long time (12+ years….we started dating in high school, so I am not that old!) and I have known that his favorite dessert is plain rhubarb pie for ever. Every time we have one of our food discussions about our favorite foods, (which happens more than it should and usually consists of me running my mouth and him grunting or nodding once in a while) rhubarb pie always comes up. He even talks about the old lady who used to make him rhubarb pie for mowing her lawn. And guess what… I have never once made him a plain rhubarb pie. Why? Honestly, I have no idea. Maybe I secretly think I was going to screw up his one favorite dessert, or maybe I never quit had enough rhubarb for a pie, or maybe I am really just an awful lady. But for whatever reason, it doesn’t matter anymore because I finally made him a plain rhubarb pie.
Note…The first thing the mister said to me when he saw the pie was. “Where is the top crust? My response what “Screw you ass face” but then chuckled. This pie would be great with a top crust, but I was thinking how pretty it would be without it. And honestly, I only made a single crust. What I am saying is.. make a double crust if you want a top.
Now cover the entire pie with tinfoil. Cut and x through the middle and fold foil back to expose the filling but keep the crust covered. (so much easier than trying to squish strips of foil together..you know what I am talking about)
And then the pie is ready to be baked.
In the oven for 5o minutes with the foil, then 10 or so minutes without to finish.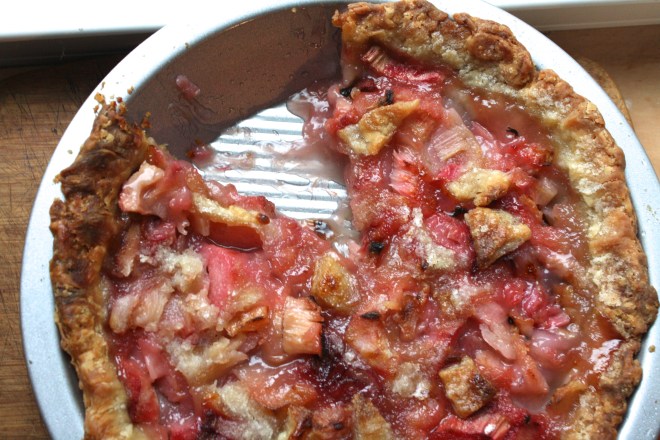 And then you take it from the oven and marvel at the beauty.
I am now truly the best super awesome lady love. I should get a freaking crown but would settle for a stand mixer or blender as a reward instead.
Important…..Let the pie cool completely (or just about) before cutting.The filling needs a bit of time to set.
Happy Saturday, Happy Weekend, Happy PI Pie Day!!!
-C
Rhubarb Pie
Make you pie crust.. and make sure it’s chilled!
Roll our pie crust and place in pie plate. Trim and make edge all nice and pretty. Add 1/4 cup of sugar to the bottom and stick back in the fridge to relax while you get the other stuff together.
Preheat oven to 350
Wash and dice rhubarb into inchish chunks. In a bowl, mix together 1 cup of sugar and the flour. Once the oven is preheated, remove crust from fridge and fill crust with the chopped up rhubarb. Now dump the sugar, flour mixture on top, slightly tossing it around with your fingers. Cover entire pie with tin foil and with a knife, cut an x through the middle of the foil. Fold foil back to expose the center of the pie, but keep the crust covered. Stick into oven. Bake for about an hour, removing the tin foil after about 50 minutes. Pie is done when the crust is golden brown and a fork or knife stuck into the middle of pie comes out with a thick jam like sauciness.
Let pie cool and set for a bit.
Slice. Serve on a plate with an eating utensil and maybe a scoop of vanilla bean ice cream. Lick plate clean.
And yes, I am assuming that you will be making these awesome chippers to share at a Super Bowl part this weekend. I say this because even as I sit here writing this (with the TV on) there has been nothing but football talk…deflated balls, hot wings, half time shows and commercials. It’s almost as big as Christmas. Got to get the decorations, the special game day food and your football jerseys. It’s crazy and all over the place. So that’s why I am assuming you are making these for the game. But if you not going to be participating in any football parties.. by all means, make these chips for yourself anyways. Celebrate you day! Have a non football watching party. Or just make these whenever. Jalapeño Lime chips for everyday!
Note: You can make these chips without the jalaeno and or the lime if you need or want to. You can also stop after the first step and have some dank corn totillas for tacos ands stuff..But definitely make the chips… worth it for sure!
All the stuff.. Masa harina, hot water, salt, a lime and a jalapeño. Zest lime and place half the zest into a glass bowl with oil and either sit on warm oven or microwave for 30 seconds to infuse. Puree the jalapeño with a cup of hot water and add the puree and half the zest of a lime, plus salt, to the masa harina. Mix it all up with another 1/2 cup of water or enough to make the dough resemble play dough… You can add more water or masa if you dough is to wet or dry.
I do not own a tortilla press so I used what I had… wax paper, a wooded cutting board and brunt force. I took each ball and place it between the two pieces of the waxed paper, placed the cutting board on top, and with all my might and body weight, pressed down to smoosh. It works like a charm.
With my fingers ( you can using a basting brush for sure), I rubbed a little of the lime oil all over both sides of each tortilla. Stacked a few high, then sliced those tortillas into triangle shapes. If you want to go crazy, you could cut them into strips or even use a cookie cutter and do some fun shapes… but triangle are easy, classic, and practical. A good shape for dipping!
Eat a few, but wait and save them for the party. Or better yet, make a few batches. Bring a batch, eat a batch. (Its ok, you are allowed)
Eat with some salsa, maybe some of this guacamole, or just as they are…Anyway is the right way as long as you are eating!
Have fun making these and have fun getting read for the party this weekend (Super Bowl or not!)
-C
Jalapeño Lime Tortilla Chips
Makes 12-14 tortillas.. then made into a medium bowl of tortilla chips.
Ingredients
To start, zest lime and add 1/2 of the zest to bowl with the oil. Place oil on warm spot on stove to let the oil infuse the limeness.
Take jalapeno and puree with 1 cup of hot water. In a large bowl, add puree and remaining lime zest to the masa harina and mix, adding an additional 1/2 to 1 cup of hot water until the dough resembles play dough, not to soft, but not to dry and completely incorporated
Divide dough into 12-14 balls and place on a plate under a wet paper towel to keep dough from drying out.
One at a time, take a dough ball and place between two pieces of wax or parchment paper. Place either a plate or cutting board on top and press down as hard as you can (you could even stand on it). Remove flatten tortilla from paper and place in medium hot skillet. Cook each tortilla for 2-3 minutes on each side.
When all tortillas have been made, lightly rub lime oil on all over both sides. Stack a few on top of each other and cut into triangles. Place pieces on a baking sheets (I used 2) and bake at 400 for 15- 20 minutes or until lightly browned and crunchy. When chips are done, remove from oven, squeeze or sprinkle lime juice on chips and sprinkle with salt. Stick back into oven for another 2 or so minutes to re-crisp from the lime juice.
Remove and let cool completely, then dump into a bowl
Enjoy!
Good question…And we will all answer….”Never again! Because I now make the sickest E.M.s around.!”(E.M.s is the cool short way to say english muffins and now that you are going to make your own….man, your so cool!)
These E.M.s are perfect. Easy to make, not overly fussy, and you end up with a super yummy, extremely versatile, individually portion super sweet little disk of bread. And the best part is..nooks and crannies! I think that is why I decided to make these E.M.s, so Nick and I can talk the about nooks and crannies…(Sometimes we need light conversation)
We start with flour and salt whisked together in a bowl. The honey, yeast and warm water are getting on proofing in a jar. An egg waiting to be cracked, some milk, and 2 tablespoons of butter. All this good stuff equals…nooks and crannies!
Oh you like my nifty dough whisk….me too, I use it all the time. Maybe I should have a dough whisk give away ……maybe…..
When the dough has been sufficiently kneaded, gather dough into a nice ball, coat with a little oil and place back into bowl. Cover with a towel and stick in a warm place to rise for about an hour or until it has doubled in size.
Enjoy and Happy Tuesday!
-C
English Muffins
Ingredients
Combine warm water, honey and yeast in a bowl to active..about 5-10 minutes or until yeast is foamy.
In a separate bowl, whisk together flour and salt. Mix in butter(I use my fingers) When yeast mixture is done proofing, whisk together mixture with the egg and milk. Add wet to dry and mix until just incorporated Dump out onto floured surface and knead dough for 8 minutes, adding a bit of flour whenever dough starts to get too sticky. Roll into a ball, coat with oil and place back into bowl and cover with a towel. Let rise for 60 minutes or until sought has doubled in size.
Once the first rise is done, deflate dough and divide into 8 equal pieces(10 for a slightly smaller muffin). Smoosh each ball into a flat disk, about 2 inches thick) and place on a cold cornmeal dusted cast iron griddle. (I used 2 cast iron pans) Sprinkle tops of muffins with more corn meal and let dough rest for another 15 minted. Turn burners on low heat. Let griddle get hot and continue to cook the muffins for another 10 minutes or until golden brown. Flip and cook opposite side until gold brown and remove from griddle. To make sure the muffins are cooked completely, stick an instant read thermometer into the center…it should read 200 degrees. (if you don’t have a thermometer, split one open… the tester E.M.) If the E.M.s are not completely cook, just stick in the oven on 350 for 5-10 minutes or until cooked throughout.
Remove and let cool. To serve, split open with a fork and give a light toast. Spread with butter, jam, peanuts butter, anything you want…maybe make E.M pizzas!
Oh and start a pot of water to boil noodles in.
I added a small handful of fresh shopped cabbage to add a bit more crunchy bite. I also added a squeeze of lime juice on top for a nice acidic finish. Lemon works and even a slash of vinegar would be nice, but plain is good too. What ever you do, just EAT!
A quicky yummy, noodley dinner! And leave a little extra for left overs because these noodles are fantastic cold… think lunch, or a later that night fridge snack.
keep it in the reals!
-C
Ginger Soy Tofu and Broccoli Soba Noodles
Ingredients
Preheat oven to 425
Remove tofu from package, cut into cubes and lay on a clean dish towel and pat dry.
Tofu goes into a oiled skillet and placed in oven for 25 minutes. Give tofu a flip after about 15 minutes. While tofu is baking, make the dressing, chop the broccoli and boil water for soba noodles.
For dressing, grate fresh ginger and garlic into a bowl. Whisk together with soy, water and honey (or brown sugar).
When water is at a boil, add soba noodle and cook until done ( about 6-8 minutes..Follow instructions of package)
When tofu has baked for 20 minutes, remove skillet, toss in chopped broccoli and 1/2 cup of soy ginger dressing Return skillet to oven for another 10 minutes or until dressing just starts to caramelize. Remove for oven and toss in cooked soba noodles and the rest of dressing. If you want a little more veggie bit, add in some fresh chopped cabbage. Plate and serve with a wedge of lime or lemon or even a sprinkle of red wine vinegar.
Now EAT!
Sliced apples sprinkled with cinnamon and stuck in oven at 425 for 5-8 minutes. Easy Peasy. Topped with a squeezey….of lemon. (Yes..I am a dork)
Happy Friday!
-C