It%u2019s not too late to get in a little end of the year baking. It is actually the perfect time to bake. All the holiday hub bub is still going on so there is usually still people all around still willing and able to eat your offerings (if you were so inclined to share), the days just feel more slow and of need of warmth and lovely smells. Plus we need something to do while while waiting for New Years, because we are just all sitting around waiting for that ball to drop, right? HAHAHA. No.
Anyway, I have been wanting to make some version of a boiled clementine cake for a while now. I love that fact the the whole clementine goes into the cake, that there is no peeling or zesting or juicing. It is just boil the clems for a little while to get the bitterness out and you are good to go. And it doesn%u2019t hurt that right now is citrus season so I have a humngo bowl of clementines, plus a shit load of other oranges and other citrus to go through so the thought of tossing a good few clementines into a cake, well it was just what needed to be done.
And the family is coming over to eat and trash my house so I needed another dessert besides the half eaten ice cream cake left in the freezer from Camereon%u2019s birthday/Christmas. So I baked that they will eat. And there we go. Win win.
Now to the clementine cake.
The stuff. Flour, baking powder and soda, salt, sugar, oil, cinnamon, vinegar, clementines, and powdered sugar.
First you need to boil the clementines. Big pot, fill with water, place clems inside, bring to a boil, then simmer for 2 hours. Seems like a long time but just do it while you are making and drinking coffee or doing laundry or whatever. You don%u2019t need to keep an eye on them, other then to check that the water hasn%u2019t evaporated, and it smells so nice.
After the 2 hours are up, remove clementines from water and let cool enough to handle. Cut in half. If there are giant seeds, remove them.
Place the clementines into blender and blend until silky smooth.
Now the other stuff. Flour, sugar, salt, baking powder and soda, and cinnamon. All into big bowl.
Whisk together until incorporated then add in the clementine puree, the oil, and the vinegar. Whisk together until it becomes a uniform batter.
Scoop batter into a very well greased bundt cake pan and bake, 50-60 minutes, until tester comes out clean.
The big revel%u2026. And it went perfect! Now time to let this sucker cool a bit on a wire rack.
While the cake is cooling, make a simple glaze. Just powdered sugar and fresh (not boiled) clementine juice. Mixed unit glaze consistency.
Once the cake is pretty much cooled, pour on the glaze.
And now it is cake time.
-C
Makes one bundt cake
2 1/4 cups all pupose flour
1 cup white sugar
1/2 teaspoon salt
1 teaspoon baking powder
1 teaspoon baking soda
1 tablespoon vinegar
1/2 cup any neutral oil
1 teaspoon cinnamon
6 clementines (you need 2 cups pureed)
For the glaze
1 cup powdered sugar
1 clementine
To start, place 6 clementines into large pot and fill with water. Place on stove and bring water to a rapid boil then reduce heat and continue to simmer clementines for about 2 hours.
Once clementines are cooked, cut in half and check and discard any large seeds. Place the clementines into a blended and blend until smooth. Should have about 2 cups puree. If you are short on volume, add water to make up the difference.
Preheat oven to 350
Grab a large bowl. Dump the flour, baking powder and soda, salt, cinnamon, and sugar and whisk together until completely incorporated. Now add in the clementine puree along with the oil and the vinegar. Mix until completely incorporated. Scoop batter into a well greased burnt pan (at least 10 cup capacity) then place into oven on middle rack and bake for 50-60 minutes until a tester (or a fork) stuck in to the deepest part of the cake comes out clean.
Once baked, remove cake from oven and allow to cool for a few minutes in pan, then flip the cake out of pan, gently of course, and hope you greased it well enough for it to just pop out. Once removed from pan, allow to cool on a wire rack.
While cake is cooling, make the glaze. Powered sugar into a bowl along with the juice of a clementine. Mix together. If the glaze is to thick, add more juice (or water), to thin, a little more powdered sugar until you reach your desired consistency (pourable but not runny is good) and once cake is cooled, pour glaze all over.
And then eat cake.
These are definitely my favorite shaped cutout cookies I have ever made. I mean seriously, carrot shaped carrot cookies, what could possibly ever be better? Nothing, and that%u2019s truth for you.
Not only are they carrot shaped, they are also carrot flavored. Yup, Carrot shaped, carrot flavored, awesomeness. A little cinnamon added to the cookie for little extra boost of flavor and an orange glaze because it works and orange is good and fresh and springing. All good stuff.
You might be thinking, huh, carrot puree in a cookie, well that doesn%u2019t sound right. But it is, it is right. And you know how I know that these cookies are awesome? Well I packed them up, (2 dozen of them) and took them over to the littles house for an after school treat. When I got there, the two older ones had friends over. I asked them if they wanted a carrot which earned me that look that said %u201care you serious%u201d but them showed them the cookies. Of course the wanted a carrot so I gave them each one. They ate their cookies then proceeded to beat the shit out of the mr. Then they asked for another cookies and beat the shit out of the mr some more. This when on and on for about a 1/2 hour until all the cookies were gone and the mr was crouched in the corner with a broom trying to defend himself against 4 rulely kids who where slashing at him with light sabers and spraying him in he face with kitchen cleaner. It%u2019s because they wanted more cookies. (and yes, the littles are getting crazy). So yeah, the cookies are good. Ass kicking good.
Anyway, a cookie with some goodness mix into it, shaped into a great shape, that will make everyone smile and happy. You could make them by yourself, make them with your friends, make them with some kids, with some old people. They are the perfect cookie to leave out for the easter bunny(do you leave carrots out for the easter bunny?) or to serve up at any easter party, spring party, or any garden party you might be attending. This cookie is pretty much perfect for any and every occasion that required a cookie. Or a carrot because carrots are always welcome.
To the carrots! I mean, the cookies!
The stuff. Flour, baking soda, salt, sugar, vegan butter, carrot puree, cinnamon, an orange, some powdered sugar, and food coloring.
Into a big bowl the sugar, vegan butter, and carrot puree go.
Beat for a minute or two until completely incorporated.
Add in all the rest of the dry stuff and mix by hand until it turns to dough.
This is the dough it turned into.
Gather the dough and wrap it or place in a plastic bag and stick it Into the fridge for a few hours or overnight. The dough NEEDS to chill.
After you let the dough be, remove from fridge, liberally dust counter, and roll out dough about 1/4 inch thick.
And then it%u2019s time to cut the cookies out. I unfortunately do not have a cookie cutter so I improvised and make 2 carrot cutouts from paper and hand cut each cookie. That worked but took forever so I got crafty and used a fat Christmas tree cookie cutter then just did a little trim and pinch to make it into a cookie. (I am a genius for that). Any way works, and you can also do other shapes too, the cookies don%u2019t change taste in different shapes. (but that would be so cool if they did)
Carefully place cut out cookies onto a baking sheet, giving them a little space because they do spread a tiny bit.
And into the oven to bake they go.
Out in 10 minutes looking all carrot like.
Carrots waiting to cool so they can be glazed.
The glaze. Pretty straight forward. Just zest orange into powdered sugar and juice the orange into the sugar and mix.
Divide glaze and dye one orange and one green
And glaze away. I recommend doing it over a rack and baking sheet to minimize mess because they do drip a bit.
Now just you look at that, carrot shaped carrot sugar cookies .What a sight!
And of course, carrots come in bunches. HA
Enjoy some carrots!
-C
makes about 2 and a half dozen (depending on size)
2 1/4 cups all purpose flour plus more for dusting
1 teaspoon baking soda
1/2 teaspoon salt
1 teaspoon cinnamon
1/2 cup vegan butter
3/4 cup granulated sugar
1/2 cup carrot puree ( see note about how to make puree)
For the glaze
2 to 3 cups powdered sugar
on orange
orange and green food coloring
Note. To make carrot puree, steam a couple carrots until completely soft them blend until smooth.
Place sugar, vegan butter, and carrot puree into a big bowl. Beat with a beater until light and fluffy. Add in the flour, baking soda, salt, and cinnamon and mix by hand until completely incorporated and mixture tunes into dough. Gather dough into a disk and wrap in plastic or place in a plastic bag and refrigerate for at least 2 hours or up to overnight.
Once dough has chilled enough and you are ready to go, preheat the oven to 350.
Place dough on a flour dusted counter and roll out about 1/4 inch thick. Cut out the cookies with a cutter or by hand and place on a baking sheet. Bake cookies for 10-11 minutes or until just starting to turn slightly brown around the edges. Remove from oven and place on a wire rack to cool.
Once cookies are all baked and cooling, make the glaze. Place powered sugar into a big bowl, zest in the orange then add in the juice od half the orange. Mix completely and check consistency. You want it to be slightly running but not liquid, but also not to stiff. Add more juice or more sugar to get it right. Once it is the right consistency, separate into 2 bowls. Dye one green and one orange. Now glaze you cookies. A knife or small spatula works best and yes, the glaze drips a little so do it over a baking sheet, but after about 10 minutes the glaze hardens.
And then you have carrot cookies and all is good. Now go eat a carrot cookie!
Store uneaten cookies in an airtight container for up to 5 days. They can be frozen too.
Do you realize that Christmas is just a handful and a half of days away? I knew it, but like didn’t really register it. And now I am like, fa la la la fuck! We have been so busy and distracted that I haven’t really focused to much on the holiday, but at least we decorate the tree. And if I am remembering correctly, there were a few years, long ago, that the mr and I wouldn’t even start celebrating or get our tree until a few days before Christmas so if I am judging us on my past selves, well we are golden. And now we let the celebrating begin!
One of our Christmas traditions is to string popcorn while watching elf for the tree. This is a big deal night because I won’t let myself watch it until that night, but after that, I can watch it as many times that I want. (once a day) We got our tree like two weeks ago, and finally late last week we did the popcorn, watched some elf, and a few days after that we decorated, kinda.%u00a0 It was much lacking in ornaments. We had the lights, the popcorn garland, the paper chain (we made it a few years back), and the carved wooden carrots, but the bulbs we usually stick on it, I just wasn’t feeling. The tree was looking pretty good but was still lacking something. That’s when I went to my fruit bowl and grabbed an orange, a clementine and the dehydrator out of the basement over at the loft and went to work. I turned on the Christmas music (A very special Christmas, the red cover) sliced the citrus, stuck it in the dehydrator, and then, well, then I waited a good few hours. During those hours, the music was going, the house smelled up like citrus and lovely, and I felt that slight holiday tingle.
I think these orange slices are going to be a new holiday tree decorating tradition. I will probably tweak it next year ans spend the 6 hours waiting for the fruit to dry baking cookies and not pouring concrete, but maybe not.
And if you are thinking its too late to make any more holiday stuff, well you are wrong. And honestly, I might just make a sting of these slices to hang up all year long.
To make the orange slice ornaments..
All you need is..
oranges or whatever citrus you want to use
a sharp knife
needle and thread or ornament hangers
a dehydrator or a baking sheet.
The dirty work. Slice the orange about a 1/4 inch thick. Try to make all the slices the same thickness.
I am using my dehydrator so the slices go single layer onto a rack. If you are using the oven, line a baking sheet with parchment and single layer the slices. Pop those suckers into the oven at the lowest possible setting you got. Either way you do it, the slices are going to take anywhere between 5-8 hours to completely dehydrate. It all depends on how juicy your oranges are. Just keep an eye on them after the first few hours. You want them to dehydrate, not burn into crisp.
They are done when they look like so, all dried and crispy and delicate. They should feel dry to the touch.
%u00a0Once the slices have cooled off a bit, they are ready to be handled and hung. I used thread to hang my orange slices, but feel free to use whatever you want.(I was going to use ornament hangers but didn’t have any and I was not about to go buy some)
Slices of orange so pretty. They look so good with the wooden carrots, the popcorn garland, and the glittery acorns on the tree.
I definitely will be making more.
Enjoy!
-C
My little twin brothers birthday was yesterday, and when I say little, I mean younger, cause these dudes are not small and 18 isn’t little. But really, all I can think is “What the F**K. When did that happen?”%u00a0 It seems like just yesterday that I was baby sitting these kids, watching Rugrats and Toy Story on loop. Playing with mr. lemon head, blowing bubbles and drawing with sidewalk chalk. All the boxes of mac ans cheese, cups of chocolate with a little milk and the fruitthat needed to be cut up in order for them to eat it. They were so cute and sweet and they loved their big sister (me) so much Now when I see them, if they decided to come out of their rooms,%u00a0 they talk about which colleges they want to go to, their jobs, girls (if I pry) and things that I have no need to listen to (sports, video games, stuff boys walk about). And because they are bigger then me, I usually get roughed up a little when ever I see them.(I kind of deserve it cause when they were babied I dropped them each at least once) They are pretty much all grown up, although they still drink too much chocolate milk, still like their fruit pre-cut, and I think that they still secretly watch Toy Story on loop.
Never to old for Toy Story.
The cookies were made for their birthday. I was going to make a cake, but my mom was on that with 2 ice cream cakes and another regular one(just in case two was not enough) and I was not about to do a cake to compete with boxed ice cream cakes from the grocery store. I know my family, they liked their carnival ice cream cakes.%u00a0 But one of the twins asked me to make him a special dessert, something with lemon. So I made him these here lemon cookies and I added strawberry jam because I wanted to and it felt right. Look at me being the best sister.
But just because it’s not your birthday you can still have these cookies. It’s citrus season so everything should be citrusy and bright and it’s just the right amount of time between Christmas cookies and now so you can make these cookies no problem. Just don’t eat them all at once.
The stuff. Flour, baking powder and soda, and a little salt. Then earth balance, a chia egg, vanilla, turbinado sugar, a lemon and some strawberry jam.
Sugar, earth balance, vanilla, and the chia egg go into the bowl.
And cream it all together.
Then the dry ingredients get mix together into a bowl with the zest of the lemon then dumped into the wet with the juice of the lemon.
Mix together until a stiff, but soft dough forms.
Roll dough into little balls and with an object of your choosing (I used a chop stick) squish the cookies down a bit in a starburst like pattern then push the center of each cookie in a bit to create a little well for the jam to go.
Place the cookies on a baking sheet and fill the centers with jam and into the oven they go!
And after a good few minutes in the oven, remove from baking sheet and set to cool for a least a minute (never eat super hot jam.. you will be sorry)
And there you have it, Happy Birthday Cookies! Or just cookies, but happy cookies non the less!
Have a great weekend!
-C
Makes about 24 cookies
2 cups all purpose flour
1/2 teaspoon baking powder
1/2 teaspoon baking soda
1/2 teaspoon salt
1 cup turbinado sugar
1/2 cup from temperature earth balance
1 large lemon (zest and about 3 tablespoons of juice)
about a 1/3 cup of strawberry jam (or any flavor you want)
In a large bowl, cream together the earth balance, sugar, vanilla and chia egg. In another bowl whisk together the flour, baking soda and powder, salt and the zest of the lemon. Dump the dry into wet and mix together along with about 3 tablespoons of lemon juice until a dough forms.
preheat oven to 350
Roll dough into little palm sized balls then give them a little squish to slightly flatten them. With a chop stick or fork, press lines around the center of the cookie then take your finger and push in the center a little to create a small well.%u00a0 Place cookies on a baking sheet and fill each well with about 1/2 teaspoon jam. Place in oven and bake for about 10until the cookies have puffed up a little and the jam has spread. Remove one from sheet ans if the bottom is golden brown, then they are done. (The tops do not brown much) They may seem a little under baked, but once they cool, they will be perfect.%u00a0 Remove the rest from baking sheet and let cool on a wire rack.
Eat cookies.
Last week pineapples were on sale everywhere%u2026%u2026So I bought 5. Don’t judge%u00a0
And I bet I am not the only one that got overly excited at $1.50 pineapple and bough themselves a few. We will just call ourselves opportunists. %u00a0Now we have plenty of pineapples and don’t have to pay %u00a0the $4 a piece prices. (Justification) %u00a0
But if you don’t have a pineapple laying around, you must go get one. (Maybe if your lucky, there might still be some sales going on) because you must make this salad. I am on a mission to make everyone I know eat it because, for lake of a better way to say it%u2026%u2026.It will rock your world.
Dill and pineapple are a serious match made in heaven. Pineapple, with its sweet, tangy, citrusness %u00a0and dill with it’s super fresh earthiness. Mixed together with a few other helpers to create a fresh, clean, chunky, tangy, over the top, flavor. I could stop right there, but toss in a handful of lentils, some creamy avocado and a bed of kale%u2026It’s like the best spring time, celebration on you tongue, happiness in you tummy, kind of salad.
A salad that will make you smile. (and maybe buy %u00a05 pineapples)%u00a0
%u00a0Stuff for the goodness. We got the kale, some avocado because all salads should have avocado and some cooked lentils because, well, all salads should have lentils (or beans or nuts.. so you could totally something else) Then a few sprigs of fresh dill, a clove of garlic, red wine vinegar, salt and a bowl of chunked up pineapple.%u00a0The pineapple, dill, garlic, red wine vinegar, a splash of water and a pinch of salt get blended in a blender or whatever blending device you use. Go as smooth or chunky as you like, I recommend going smooth, but leaving a little chunk, like half blended.
The prep is done, now compile. %u00a0Kale in bowl, top with lentils,. Toss on avocado chunks, and, last but not least, the blended pineapple dill mixture.So good%u2026%u2026So so good.
Happy Friday!!
-C
So Good Pineapple Dill Kale Salad
Serves Two
3 cups washed and chopped Kale
1/2 a avocado, diced
1 cup fresh pineapple chunks
1-2 springs fresh dill
1 tablespoon Red Wine Vinegar
Salt%u00a0
1/2 cup cooked lentils%u00a0(or any bean or nut will do)
Note. No fresh dill? You can use dried, just sub in 1 teaspoon for the fresh and after blending with the pineapple, let sit a little longer to really let the flavors meld together.%u00a0
Place pineapple, dill, pinch of salt, vinegar and garlic into a blender or whatever you own that blends and blend stuff together, leaving it a little chunky. Let sit for 5-10 minutes.
Kale goes into a bowl and add the lentils and diced avocado. Pour the blended pineapple on. Toss around.%u00a0
Now eat.
%u00a0 %u00a0%u00a0%u00a0%u00a0 TGIF!!!! For reals, because Monday-Thurday were monster days. And now that its friday, I can dig a hole and hide in it until it’s at least 30 degrees with some sunshine. (I might never get to come out.)
A few things I will bring in my hole:
food (lots of food and coffee, lots of coffee)
a soft blanket and pillow
a few books, preferably with pictures, on farming and gardening (think spring!)
the entire series of the Fresh Prince of Bel-air and a device to watch it on
toothpaste (I can use my finger to brush my teeth)
But before I leave for my hole in the ground, I made these little cake bites to get my people through the weekend. Sweet little lemony bites of rich dense cake dipped into bittersweet chocolate. (I am just so nice) %u00a0They have all the pleasure or cake without the need of a fork and are much easier to give away then a big slice of cake. Plus, they are fun to make. My little sister helped and did most of the chocolate dipping. Then she and another little used their mouths to clean up the chocolate mess. It was an afternoon of chocolate all over the kitchen fun day.%u00a0
So make some bites to have and to share. Or if you, like me, are digging a hole to hide in, make a batch of bites to bring with you. That’s the beauty of cake covered in a harden chocolate shell, they travel really well.Simple lemon cake stuff. Flour, baking powder and salt whisked together, Sugar and soft butter in a bowl. An egg, some vanilla, milk, and of course, the lemon.%u00a0
To make the batter, cream the soften butter with the sugar until light and fluffy. Zest lemon(1 big or 2 small) into bowl with the juice of the lemon(s), the vanilla and the egg. Beat until combined. Now beat in the dry and then the milk. Keep beating for another minute until all mixed. Batter should be light and fluffy.
Batter goes into a greased and floured %u00a09x13 baking sheet and stuck into a 375 degree oven for about 30 minutes (You can use a 9×9 baking pan. Just bake fir another 10 minutes and you will end up with thicker bites). Remove from oven and let cool for a few minutes and flip to remove cake from baking sheet. Cut cake into small pieces (I cut 4×6%u00a0 %u00a0to get 24 bites) and place bake into sheet and into freezer (I stuck mine outside, it was -2 degrees ) for at least 2 hours.%u00a0
Frozen bites ready for the chocolate coating%u2026 Bittersweet chocolate chips and a little bit of coconut oil. Melted together all nice and shiny smooth.Now dip and slather those bites in the melted chocolate.%u00a0
Oh what a lovely sister I have.. Look at her dunk%u2026.. like a boss!Fully coated and placed on a rack for the chocolate to harden. I %u00a0ended up sticking the rack in the freezer for 10 minutes%u2026They harder really fast in there.
And now you have some it, bites of cake covered in chocolate.%u00a01 bite, 2 bites%u20265 bites. Eat however many you want because its Friday and because there small little bites and just because you can.
Now if you need me, I’ll be in my hole.%u00a0
-C
Chocolate Lemon Cake Bite
1 1/2 cups all purpose flour
1 teaspoon baking powder
1 teaspoons salt
1 cup %u00a0white sugar
1/2 cup (1 stick) soft butter
1 egg
1 teaspoon vanilla
1 cup milk
1 large or 2 small lemons
2 cups bittersweet chocolate chips
2 tablespoons coconut oil
Add butter %u00a0and sugar to a large bowl and beat on medium unit light and fluffy. Ass in vanilla egg, the zest of the lemon and the juice of the lemon. Beat to incorporate. Now beat in the dry and lastly the milk.
Grease and flour either a 9×9 pan or a 9×13 baking sheet. dump batter in and smooth out. %u00a0Stick in oven and bake for about 3o minutes or until a toothpick stuck into the middle comes out clean. Remove and let cool %u00a0for a few minutes on a %u00a0wire rack. Flip cake to remove from pan. Cut cake into bit sized pieces, 4×6 is a good size, and place back on baking sheet and stick into freezer for at least 2 hours.
When cake bites are as good as frozen, get the chocolate ready. Take the chocolate and the coconut oil and either melt in a double boiler or the microwave. Mix until smooth and make sure to full incorporate the oil. Now remove the cake bites from the freezer and dip each bite into chocolate, trying to full coat all sides. Stick onto a wire rack or a parchment lined pan to harden. They can be stuck back into the freezer to harden faster.
Once chocolate has harden, your good to go!
%u00a0 %u00a0 %u00a0
First off.. Happy Saturday %u00a0and Happy Valantines Day!
Once again, it is so F-ing cold out and I don’t want to leave my house! And because of the cold we%u00a0decided to forgoing the traditional V day hike(kinda sad) but instead are going to just hang at home and watch movies. (which is actually kind of nice because now I get to stay all frumpy and warm , hanging out in my baggy old sweats and oversized sweater (so sexy right?) %u00a0
Anyways.. %u00a0being all cozy usually entails something warm and yummy to drink. Neither of us are really big on hot chocolate, (plus we don’t have the stuff to make it) and sure we could crack open the fancy bottle of wine we bought for dinner (4.99 Trader Joes Special!!!!) or we can save that and I can whip up something a little spicy sweet.
Warm winter lemonade!! We are both big on lemon in everything and I just bought a bunch of sweet meyers lemons, so I think it’s meant to be.
Sweet, a little spicy, and warning%u2026.Perfect for a day of cuddling on the couch or for something to warm you after being outside. Great for anyone who wants a little something tasty that isn’t chocolate or booze, even good for those that might be feeling a little under the weather. %u00a0Kids and adults alike%u2026. this winter lemonade works for it all. %u00a0
So whip some up and stay warm!
And have a fantastic day!!!
-C
Warm Winter %u00a0Lemonade %u00a0
Serves 2
1 Meyer lemon (can use regular lemon too)
3 cups water
2 tablespoon of honey (use sweetener of choice if vegan)
A few sprinkles of cinnamon(optional but recommended!)
Slice lemon and place into a pot with water, cover, and bring to a boil. Once boiling, remove from heat and let sit for a minute or two. Transfer to a blender (or use a emulsifier) and blend until frothy. %u00a0Place a tablespoon of the honey or whatever sweeter into each cup. (add more if you like) Strain lemon mixture in equal amounts into mugs. Stir and sprinkle with cinnamon.
If you don’t want to use the blender method, you can juice 1 lemon, split into two mugs , add sweetener and top with hot water.. Don’t forget the cinnamon!%u00a0
%u00a0 Whenever me and the mister get invited / show up for dinner at someone’s house, I like to bring at least one thing to contribute to the meal. First, because I am nice like that. Secondly, because I get to make food for other people besides Nick and get new feedback on recipes. (Sometimes I think he tells me things taste amazing when they might not) And thirdly, its nice to mess up someone else’s kitchen besides my own. So last night we went to my sisters and %u00a0I made a salad. %u00a0A very easy and virtually mess free salad%u2026%u2026.I still made a mess (I cleaned it up myself!)
%u00a0The salad I made was a light, crisp, and citrusy%u00a0thing of beauty. Not exactly what one would think to eat on a freezing my face off cold day, but hey, you can’t help what the body craves. Plus, if you %u00a0make it for. lets say, a sister that is making french fries and hamburgers for dinner..then a light and citusy salad is just what you need. Feedback from the mouths that ate it%u2026.Fanstastic combo! Best Salad ever! Never going to eat anything else! Ok, not so dramatic, but this was a winner. And for real,%u00a0this salad takes about five seconds to compile and all the ingredients are really accessible right now so really, why not?%u00a0
%u00a0%u00a0
%u00a0Nice crisp %u00a0kale. Thinly slices red onion for a nice bite. Orange for that sweet citrusy%u00a0and juicy smack and avocado to add a perfect creamy finish. Lime to make it perfect.%u00a0%u00a0Start with the%u00a0%u00a0base layer of kale%u2026 then first goes the sliced onion. (Make sure it’s thinly sliced or else it will be to overpowering)%u00a0%u00a0Add thinly sliced oranges%u2026oh boy, your half way there!!!
Top with thinly sliced avocado, a sprinkle of salt and drizzle with lime juice. I also served with an extra wedge of lime, there is never too much lime.
Now you can stand back, take a picture, send to all your friends and make them jealous of you fantastically pretty and oh so delicious salad. They will ask, “What is that amazing looking dish you are eating?” Your response will be..”Check out the blog..the lovely crazy%u2026and make it yourself! ” (yes, I am shamelessly plugging myself here)%u00a0
Anyway, enjoy the day and try to keep warm!
-C
Citrus Avocado Salad (Makes 2)
Ingredients
A few good handfuls of kale leaves
1 orange
1 avocado
1 lime
1/2 a red onion
Remove tough stems from kale and chop leaves into small month sized pieces. Thinly slice %u00a0onion, peel and thinly slice orange and cut avocado into%u2026yup you got it, thin slices.%u00a0
Kale into bowls, top with %u00a0onion, orange and avocado. Top with the juice of half a lime%u2026Add a sprinkle of salt.%u00a0

THE LOVELY CRAZY
December 29, 2019 by maximios • Blog
It%u2019s not too late to get in a little end of the year baking. It is actually the perfect time to bake. All the holiday hub bub is still going on so there is usually still people all around still willing and able to eat your offerings (if you were so inclined to share), the days just feel more slow and of need of warmth and lovely smells. Plus we need something to do while while waiting for New Years, because we are just all sitting around waiting for that ball to drop, right? HAHAHA. No.
Anyway, I have been wanting to make some version of a boiled clementine cake for a while now. I love that fact the the whole clementine goes into the cake, that there is no peeling or zesting or juicing. It is just boil the clems for a little while to get the bitterness out and you are good to go. And it doesn%u2019t hurt that right now is citrus season so I have a humngo bowl of clementines, plus a shit load of other oranges and other citrus to go through so the thought of tossing a good few clementines into a cake, well it was just what needed to be done.
And the family is coming over to eat and trash my house so I needed another dessert besides the half eaten ice cream cake left in the freezer from Camereon%u2019s birthday/Christmas. So I baked that they will eat. And there we go. Win win.
Now to the clementine cake.
The stuff. Flour, baking powder and soda, salt, sugar, oil, cinnamon, vinegar, clementines, and powdered sugar.
First you need to boil the clementines. Big pot, fill with water, place clems inside, bring to a boil, then simmer for 2 hours. Seems like a long time but just do it while you are making and drinking coffee or doing laundry or whatever. You don%u2019t need to keep an eye on them, other then to check that the water hasn%u2019t evaporated, and it smells so nice.
After the 2 hours are up, remove clementines from water and let cool enough to handle. Cut in half. If there are giant seeds, remove them.
Place the clementines into blender and blend until silky smooth.
Now the other stuff. Flour, sugar, salt, baking powder and soda, and cinnamon. All into big bowl.
Whisk together until incorporated then add in the clementine puree, the oil, and the vinegar. Whisk together until it becomes a uniform batter.
Scoop batter into a very well greased bundt cake pan and bake, 50-60 minutes, until tester comes out clean.
The big revel%u2026. And it went perfect! Now time to let this sucker cool a bit on a wire rack.
While the cake is cooling, make a simple glaze. Just powdered sugar and fresh (not boiled) clementine juice. Mixed unit glaze consistency.
Once the cake is pretty much cooled, pour on the glaze.
And now it is cake time.
-C
Makes one bundt cake
2 1/4 cups all pupose flour
1 cup white sugar
1/2 teaspoon salt
1 teaspoon baking powder
1 teaspoon baking soda
1 tablespoon vinegar
1/2 cup any neutral oil
1 teaspoon cinnamon
6 clementines (you need 2 cups pureed)
For the glaze
1 cup powdered sugar
1 clementine
To start, place 6 clementines into large pot and fill with water. Place on stove and bring water to a rapid boil then reduce heat and continue to simmer clementines for about 2 hours.
Once clementines are cooked, cut in half and check and discard any large seeds. Place the clementines into a blended and blend until smooth. Should have about 2 cups puree. If you are short on volume, add water to make up the difference.
Preheat oven to 350
Grab a large bowl. Dump the flour, baking powder and soda, salt, cinnamon, and sugar and whisk together until completely incorporated. Now add in the clementine puree along with the oil and the vinegar. Mix until completely incorporated. Scoop batter into a well greased burnt pan (at least 10 cup capacity) then place into oven on middle rack and bake for 50-60 minutes until a tester (or a fork) stuck in to the deepest part of the cake comes out clean.
Once baked, remove cake from oven and allow to cool for a few minutes in pan, then flip the cake out of pan, gently of course, and hope you greased it well enough for it to just pop out. Once removed from pan, allow to cool on a wire rack.
While cake is cooling, make the glaze. Powered sugar into a bowl along with the juice of a clementine. Mix together. If the glaze is to thick, add more juice (or water), to thin, a little more powdered sugar until you reach your desired consistency (pourable but not runny is good) and once cake is cooled, pour glaze all over.
And then eat cake.
These are definitely my favorite shaped cutout cookies I have ever made. I mean seriously, carrot shaped carrot cookies, what could possibly ever be better? Nothing, and that%u2019s truth for you.
Not only are they carrot shaped, they are also carrot flavored. Yup, Carrot shaped, carrot flavored, awesomeness. A little cinnamon added to the cookie for little extra boost of flavor and an orange glaze because it works and orange is good and fresh and springing. All good stuff.
You might be thinking, huh, carrot puree in a cookie, well that doesn%u2019t sound right. But it is, it is right. And you know how I know that these cookies are awesome? Well I packed them up, (2 dozen of them) and took them over to the littles house for an after school treat. When I got there, the two older ones had friends over. I asked them if they wanted a carrot which earned me that look that said %u201care you serious%u201d but them showed them the cookies. Of course the wanted a carrot so I gave them each one. They ate their cookies then proceeded to beat the shit out of the mr. Then they asked for another cookies and beat the shit out of the mr some more. This when on and on for about a 1/2 hour until all the cookies were gone and the mr was crouched in the corner with a broom trying to defend himself against 4 rulely kids who where slashing at him with light sabers and spraying him in he face with kitchen cleaner. It%u2019s because they wanted more cookies. (and yes, the littles are getting crazy). So yeah, the cookies are good. Ass kicking good.
Anyway, a cookie with some goodness mix into it, shaped into a great shape, that will make everyone smile and happy. You could make them by yourself, make them with your friends, make them with some kids, with some old people. They are the perfect cookie to leave out for the easter bunny(do you leave carrots out for the easter bunny?) or to serve up at any easter party, spring party, or any garden party you might be attending. This cookie is pretty much perfect for any and every occasion that required a cookie. Or a carrot because carrots are always welcome.
To the carrots! I mean, the cookies!
The stuff. Flour, baking soda, salt, sugar, vegan butter, carrot puree, cinnamon, an orange, some powdered sugar, and food coloring.
Into a big bowl the sugar, vegan butter, and carrot puree go.
Beat for a minute or two until completely incorporated.
Add in all the rest of the dry stuff and mix by hand until it turns to dough.
This is the dough it turned into.
Gather the dough and wrap it or place in a plastic bag and stick it Into the fridge for a few hours or overnight. The dough NEEDS to chill.
After you let the dough be, remove from fridge, liberally dust counter, and roll out dough about 1/4 inch thick.
And then it%u2019s time to cut the cookies out. I unfortunately do not have a cookie cutter so I improvised and make 2 carrot cutouts from paper and hand cut each cookie. That worked but took forever so I got crafty and used a fat Christmas tree cookie cutter then just did a little trim and pinch to make it into a cookie. (I am a genius for that). Any way works, and you can also do other shapes too, the cookies don%u2019t change taste in different shapes. (but that would be so cool if they did)
Carefully place cut out cookies onto a baking sheet, giving them a little space because they do spread a tiny bit.
And into the oven to bake they go.
Out in 10 minutes looking all carrot like.
Carrots waiting to cool so they can be glazed.
The glaze. Pretty straight forward. Just zest orange into powdered sugar and juice the orange into the sugar and mix.
Divide glaze and dye one orange and one green
And glaze away. I recommend doing it over a rack and baking sheet to minimize mess because they do drip a bit.
Now just you look at that, carrot shaped carrot sugar cookies .What a sight!
And of course, carrots come in bunches. HA
Enjoy some carrots!
-C
makes about 2 and a half dozen (depending on size)
2 1/4 cups all purpose flour plus more for dusting
1 teaspoon baking soda
1/2 teaspoon salt
1 teaspoon cinnamon
1/2 cup vegan butter
3/4 cup granulated sugar
1/2 cup carrot puree ( see note about how to make puree)
For the glaze
2 to 3 cups powdered sugar
on orange
orange and green food coloring
Note. To make carrot puree, steam a couple carrots until completely soft them blend until smooth.
Place sugar, vegan butter, and carrot puree into a big bowl. Beat with a beater until light and fluffy. Add in the flour, baking soda, salt, and cinnamon and mix by hand until completely incorporated and mixture tunes into dough. Gather dough into a disk and wrap in plastic or place in a plastic bag and refrigerate for at least 2 hours or up to overnight.
Once dough has chilled enough and you are ready to go, preheat the oven to 350.
Place dough on a flour dusted counter and roll out about 1/4 inch thick. Cut out the cookies with a cutter or by hand and place on a baking sheet. Bake cookies for 10-11 minutes or until just starting to turn slightly brown around the edges. Remove from oven and place on a wire rack to cool.
Once cookies are all baked and cooling, make the glaze. Place powered sugar into a big bowl, zest in the orange then add in the juice od half the orange. Mix completely and check consistency. You want it to be slightly running but not liquid, but also not to stiff. Add more juice or more sugar to get it right. Once it is the right consistency, separate into 2 bowls. Dye one green and one orange. Now glaze you cookies. A knife or small spatula works best and yes, the glaze drips a little so do it over a baking sheet, but after about 10 minutes the glaze hardens.
And then you have carrot cookies and all is good. Now go eat a carrot cookie!
Store uneaten cookies in an airtight container for up to 5 days. They can be frozen too.
Do you realize that Christmas is just a handful and a half of days away? I knew it, but like didn’t really register it. And now I am like, fa la la la fuck! We have been so busy and distracted that I haven’t really focused to much on the holiday, but at least we decorate the tree. And if I am remembering correctly, there were a few years, long ago, that the mr and I wouldn’t even start celebrating or get our tree until a few days before Christmas so if I am judging us on my past selves, well we are golden. And now we let the celebrating begin!
One of our Christmas traditions is to string popcorn while watching elf for the tree. This is a big deal night because I won’t let myself watch it until that night, but after that, I can watch it as many times that I want. (once a day) We got our tree like two weeks ago, and finally late last week we did the popcorn, watched some elf, and a few days after that we decorated, kinda.%u00a0 It was much lacking in ornaments. We had the lights, the popcorn garland, the paper chain (we made it a few years back), and the carved wooden carrots, but the bulbs we usually stick on it, I just wasn’t feeling. The tree was looking pretty good but was still lacking something. That’s when I went to my fruit bowl and grabbed an orange, a clementine and the dehydrator out of the basement over at the loft and went to work. I turned on the Christmas music (A very special Christmas, the red cover) sliced the citrus, stuck it in the dehydrator, and then, well, then I waited a good few hours. During those hours, the music was going, the house smelled up like citrus and lovely, and I felt that slight holiday tingle.
I think these orange slices are going to be a new holiday tree decorating tradition. I will probably tweak it next year ans spend the 6 hours waiting for the fruit to dry baking cookies and not pouring concrete, but maybe not.
And if you are thinking its too late to make any more holiday stuff, well you are wrong. And honestly, I might just make a sting of these slices to hang up all year long.
To make the orange slice ornaments..
All you need is..
The dirty work. Slice the orange about a 1/4 inch thick. Try to make all the slices the same thickness.
I am using my dehydrator so the slices go single layer onto a rack. If you are using the oven, line a baking sheet with parchment and single layer the slices. Pop those suckers into the oven at the lowest possible setting you got. Either way you do it, the slices are going to take anywhere between 5-8 hours to completely dehydrate. It all depends on how juicy your oranges are. Just keep an eye on them after the first few hours. You want them to dehydrate, not burn into crisp.
They are done when they look like so, all dried and crispy and delicate. They should feel dry to the touch.
%u00a0Once the slices have cooled off a bit, they are ready to be handled and hung. I used thread to hang my orange slices, but feel free to use whatever you want.(I was going to use ornament hangers but didn’t have any and I was not about to go buy some)
Slices of orange so pretty. They look so good with the wooden carrots, the popcorn garland, and the glittery acorns on the tree.
I definitely will be making more.
Enjoy!
-C
My little twin brothers birthday was yesterday, and when I say little, I mean younger, cause these dudes are not small and 18 isn’t little. But really, all I can think is “What the F**K. When did that happen?”%u00a0 It seems like just yesterday that I was baby sitting these kids, watching Rugrats and Toy Story on loop. Playing with mr. lemon head, blowing bubbles and drawing with sidewalk chalk. All the boxes of mac ans cheese, cups of chocolate with a little milk and the fruitthat needed to be cut up in order for them to eat it. They were so cute and sweet and they loved their big sister (me) so much Now when I see them, if they decided to come out of their rooms,%u00a0 they talk about which colleges they want to go to, their jobs, girls (if I pry) and things that I have no need to listen to (sports, video games, stuff boys walk about). And because they are bigger then me, I usually get roughed up a little when ever I see them.(I kind of deserve it cause when they were babied I dropped them each at least once) They are pretty much all grown up, although they still drink too much chocolate milk, still like their fruit pre-cut, and I think that they still secretly watch Toy Story on loop.
Never to old for Toy Story.
The cookies were made for their birthday. I was going to make a cake, but my mom was on that with 2 ice cream cakes and another regular one(just in case two was not enough) and I was not about to do a cake to compete with boxed ice cream cakes from the grocery store. I know my family, they liked their carnival ice cream cakes.%u00a0 But one of the twins asked me to make him a special dessert, something with lemon. So I made him these here lemon cookies and I added strawberry jam because I wanted to and it felt right. Look at me being the best sister.
But just because it’s not your birthday you can still have these cookies. It’s citrus season so everything should be citrusy and bright and it’s just the right amount of time between Christmas cookies and now so you can make these cookies no problem. Just don’t eat them all at once.
The stuff. Flour, baking powder and soda, and a little salt. Then earth balance, a chia egg, vanilla, turbinado sugar, a lemon and some strawberry jam.
Sugar, earth balance, vanilla, and the chia egg go into the bowl.
And cream it all together.
Then the dry ingredients get mix together into a bowl with the zest of the lemon then dumped into the wet with the juice of the lemon.
Mix together until a stiff, but soft dough forms.
Roll dough into little balls and with an object of your choosing (I used a chop stick) squish the cookies down a bit in a starburst like pattern then push the center of each cookie in a bit to create a little well for the jam to go.
Place the cookies on a baking sheet and fill the centers with jam and into the oven they go!
And after a good few minutes in the oven, remove from baking sheet and set to cool for a least a minute (never eat super hot jam.. you will be sorry)
And there you have it, Happy Birthday Cookies! Or just cookies, but happy cookies non the less!
Have a great weekend!
-C
Makes about 24 cookies
In a large bowl, cream together the earth balance, sugar, vanilla and chia egg. In another bowl whisk together the flour, baking soda and powder, salt and the zest of the lemon. Dump the dry into wet and mix together along with about 3 tablespoons of lemon juice until a dough forms.
preheat oven to 350
Roll dough into little palm sized balls then give them a little squish to slightly flatten them. With a chop stick or fork, press lines around the center of the cookie then take your finger and push in the center a little to create a small well.%u00a0 Place cookies on a baking sheet and fill each well with about 1/2 teaspoon jam. Place in oven and bake for about 10until the cookies have puffed up a little and the jam has spread. Remove one from sheet ans if the bottom is golden brown, then they are done. (The tops do not brown much) They may seem a little under baked, but once they cool, they will be perfect.%u00a0 Remove the rest from baking sheet and let cool on a wire rack.
Eat cookies.
And I bet I am not the only one that got overly excited at $1.50 pineapple and bough themselves a few. We will just call ourselves opportunists. %u00a0Now we have plenty of pineapples and don’t have to pay %u00a0the $4 a piece prices. (Justification) %u00a0
But if you don’t have a pineapple laying around, you must go get one. (Maybe if your lucky, there might still be some sales going on) because you must make this salad. I am on a mission to make everyone I know eat it because, for lake of a better way to say it%u2026%u2026.It will rock your world.
Dill and pineapple are a serious match made in heaven. Pineapple, with its sweet, tangy, citrusness %u00a0and dill with it’s super fresh earthiness. Mixed together with a few other helpers to create a fresh, clean, chunky, tangy, over the top, flavor. I could stop right there, but toss in a handful of lentils, some creamy avocado and a bed of kale%u2026It’s like the best spring time, celebration on you tongue, happiness in you tummy, kind of salad.
A salad that will make you smile. (and maybe buy %u00a05 pineapples)%u00a0
The prep is done, now compile. %u00a0Kale in bowl, top with lentils,. Toss on avocado chunks, and, last but not least, the blended pineapple dill mixture. So good%u2026%u2026So so good.
Happy Friday!!
-C
So Good Pineapple Dill Kale Salad
Serves Two
Note. No fresh dill? You can use dried, just sub in 1 teaspoon for the fresh and after blending with the pineapple, let sit a little longer to really let the flavors meld together.%u00a0
Place pineapple, dill, pinch of salt, vinegar and garlic into a blender or whatever you own that blends and blend stuff together, leaving it a little chunky. Let sit for 5-10 minutes.
Kale goes into a bowl and add the lentils and diced avocado. Pour the blended pineapple on. Toss around.%u00a0
Now eat.
A few things I will bring in my hole:
But before I leave for my hole in the ground, I made these little cake bites to get my people through the weekend. Sweet little lemony bites of rich dense cake dipped into bittersweet chocolate. (I am just so nice) %u00a0They have all the pleasure or cake without the need of a fork and are much easier to give away then a big slice of cake. Plus, they are fun to make. My little sister helped and did most of the chocolate dipping. Then she and another little used their mouths to clean up the chocolate mess. It was an afternoon of chocolate all over the kitchen fun day.%u00a0
So make some bites to have and to share. Or if you, like me, are digging a hole to hide in, make a batch of bites to bring with you. That’s the beauty of cake covered in a harden chocolate shell, they travel really well.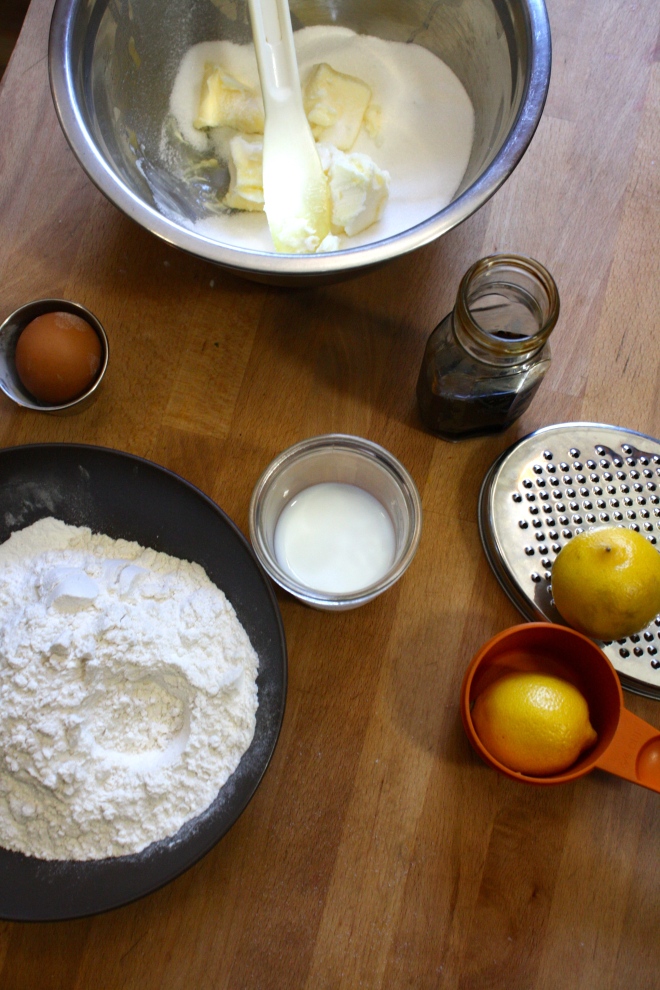 Simple lemon cake stuff. Flour, baking powder and salt whisked together, Sugar and soft butter in a bowl. An egg, some vanilla, milk, and of course, the lemon.%u00a0
To make the batter, cream the soften butter with the sugar until light and fluffy. Zest lemon(1 big or 2 small) into bowl with the juice of the lemon(s), the vanilla and the egg. Beat until combined. Now beat in the dry and then the milk. Keep beating for another minute until all mixed. Batter should be light and fluffy.
Batter goes into a greased and floured %u00a09x13 baking sheet and stuck into a 375 degree oven for about 30 minutes (You can use a 9×9 baking pan. Just bake fir another 10 minutes and you will end up with thicker bites). Remove from oven and let cool for a few minutes and flip to remove cake from baking sheet. Cut cake into small pieces (I cut 4×6%u00a0 %u00a0to get 24 bites) and place bake into sheet and into freezer (I stuck mine outside, it was -2 degrees ) for at least 2 hours.%u00a0
Oh what a lovely sister I have.. Look at her dunk%u2026.. like a boss! Fully coated and placed on a rack for the chocolate to harden. I %u00a0ended up sticking the rack in the freezer for 10 minutes%u2026They harder really fast in there.
And now you have some it, bites of cake covered in chocolate.%u00a01 bite, 2 bites%u20265 bites. Eat however many you want because its Friday and because there small little bites and just because you can.
Now if you need me, I’ll be in my hole.%u00a0
-C
Chocolate Lemon Cake Bite
Add butter %u00a0and sugar to a large bowl and beat on medium unit light and fluffy. Ass in vanilla egg, the zest of the lemon and the juice of the lemon. Beat to incorporate. Now beat in the dry and lastly the milk.
Grease and flour either a 9×9 pan or a 9×13 baking sheet. dump batter in and smooth out. %u00a0Stick in oven and bake for about 3o minutes or until a toothpick stuck into the middle comes out clean. Remove and let cool %u00a0for a few minutes on a %u00a0wire rack. Flip cake to remove from pan. Cut cake into bit sized pieces, 4×6 is a good size, and place back on baking sheet and stick into freezer for at least 2 hours.
When cake bites are as good as frozen, get the chocolate ready. Take the chocolate and the coconut oil and either melt in a double boiler or the microwave. Mix until smooth and make sure to full incorporate the oil. Now remove the cake bites from the freezer and dip each bite into chocolate, trying to full coat all sides. Stick onto a wire rack or a parchment lined pan to harden. They can be stuck back into the freezer to harden faster.
Once chocolate has harden, your good to go!
First off.. Happy Saturday %u00a0and Happy Valantines Day!
Once again, it is so F-ing cold out and I don’t want to leave my house! And because of the cold we%u00a0decided to forgoing the traditional V day hike(kinda sad) but instead are going to just hang at home and watch movies. (which is actually kind of nice because now I get to stay all frumpy and warm , hanging out in my baggy old sweats and oversized sweater (so sexy right?) %u00a0
Anyways.. %u00a0being all cozy usually entails something warm and yummy to drink. Neither of us are really big on hot chocolate, (plus we don’t have the stuff to make it) and sure we could crack open the fancy bottle of wine we bought for dinner (4.99 Trader Joes Special!!!!) or we can save that and I can whip up something a little spicy sweet.
Warm winter lemonade!! We are both big on lemon in everything and I just bought a bunch of sweet meyers lemons, so I think it’s meant to be.
Sweet, a little spicy, and warning%u2026.Perfect for a day of cuddling on the couch or for something to warm you after being outside. Great for anyone who wants a little something tasty that isn’t chocolate or booze, even good for those that might be feeling a little under the weather. %u00a0Kids and adults alike%u2026. this winter lemonade works for it all. %u00a0
So whip some up and stay warm!
And have a fantastic day!!!
-C
Warm Winter %u00a0Lemonade %u00a0
Serves 2
Slice lemon and place into a pot with water, cover, and bring to a boil. Once boiling, remove from heat and let sit for a minute or two. Transfer to a blender (or use a emulsifier) and blend until frothy. %u00a0Place a tablespoon of the honey or whatever sweeter into each cup. (add more if you like) Strain lemon mixture in equal amounts into mugs. Stir and sprinkle with cinnamon.
If you don’t want to use the blender method, you can juice 1 lemon, split into two mugs , add sweetener and top with hot water.. Don’t forget the cinnamon!%u00a0
%u00a0 Whenever me and the mister get invited / show up for dinner at someone’s house, I like to bring at least one thing to contribute to the meal. First, because I am nice like that. Secondly, because I get to make food for other people besides Nick and get new feedback on recipes. (Sometimes I think he tells me things taste amazing when they might not) And thirdly, its nice to mess up someone else’s kitchen besides my own. So last night we went to my sisters and %u00a0I made a salad. %u00a0A very easy and virtually mess free salad%u2026%u2026.I still made a mess (I cleaned it up myself!)
%u00a0The salad I made was a light, crisp, and citrusy%u00a0thing of beauty. Not exactly what one would think to eat on a freezing my face off cold day, but hey, you can’t help what the body craves. Plus, if you %u00a0make it for. lets say, a sister that is making french fries and hamburgers for dinner..then a light and citusy salad is just what you need. Feedback from the mouths that ate it%u2026.Fanstastic combo! Best Salad ever! Never going to eat anything else! Ok, not so dramatic, but this was a winner. And for real,%u00a0this salad takes about five seconds to compile and all the ingredients are really accessible right now so really, why not?%u00a0
%u00a0Nice crisp %u00a0kale. Thinly slices red onion for a nice bite. Orange for that sweet citrusy%u00a0and juicy smack and avocado to add a perfect creamy finish. Lime to make it perfect.%u00a0 %u00a0Start with the%u00a0%u00a0base layer of kale%u2026 then first goes the sliced onion. (Make sure it’s thinly sliced or else it will be to overpowering)
 %u00a0%u00a0Add thinly sliced oranges%u2026oh boy, your half way there!!!
Now you can stand back, take a picture, send to all your friends and make them jealous of you fantastically pretty and oh so delicious salad. They will ask, “What is that amazing looking dish you are eating?” Your response will be..”Check out the blog..the lovely crazy%u2026and make it yourself! ” (yes, I am shamelessly plugging myself here)%u00a0
Anyway, enjoy the day and try to keep warm!
-C
Citrus Avocado Salad (Makes 2)
Ingredients
Remove tough stems from kale and chop leaves into small month sized pieces. Thinly slice %u00a0onion, peel and thinly slice orange and cut avocado into%u2026yup you got it, thin slices.%u00a0
Kale into bowls, top with %u00a0onion, orange and avocado. Top with the juice of half a lime%u2026Add a sprinkle of salt.%u00a0