Guess what guys ….I got myself a sick vintage waffle/ griddle iron. I couldn’t be more thrilled!!! I found this thing at the local recycled goods store the other day, along with a very beautiful old white pyrex mixing bowl. It was one of my best thrift store scores! (Checking out the inventory and the condition of all the old things that day, I would say an old lady had just died and all her perfectly keep, mint condition kitchen stuff had just been donated. But it’s cool, cause I get the feeling that she was at least 90, with a big loving family, and was happy until the day she died. And I am sure she would be pleased that I have taken over the waffle maker. Thanks old lady!)
And now I am pretty sure that everything I make for the next week will be cooked on said waffle/griddle. I am serious, I already have a list of things to try and cook on it; cookies, biscuits, granola bars, potatoes, fruit, some type of pasta situations…. the list of possibilities is endless and I bet that at least 1/2 of these things will be totally awesome and amazing.
But first thing first. I need to make dinner.
So waffles for dinner!!
Note. These waffles are completely 100% fantastic for any meal you want to make them for. They consist of nothing more then beans, a shit ton of veggies, and just a bit of cornmeal. But don’t let that fool you because they are super packed full of so much flavor, have a really soft tender inside, with a nice crispy outside and are so super pretty. They are wonderful! The stuff. First, we got a big old pile of shredded up veggies which include; carrot, beet, sweet potato, onion, parsnip, celeriac, and a little bit of kale. A we got a bowl of rinsed and strained white beans, a little bit of cornmeal and salt, pepper, and garlic powder.
The makings of something amazing!Before you do anything. get your waffle iron out and preheat it.
While thats going on, take you beans, add 3/4 cup water and puree until smooth with whatever blending device want to like to use. (I used my hand blender…less to clean)Now collect all the shredded veggies and dump into a big bowl with the bean puree, the spices and the cornmeal. Mix until combined. The batter should be thick, but not dry. If its seems to wet, add more corn meal, or too dry, add a little more water.
Note how my batter turned a magical pink… I love beets, they make everything pretty! And check out that bowl!When your waffle iron is preheated, oil it if needed (if your not sure, add a little oil just to really make sure your waffles don’t stick) and take appropriate size spoonfuls of the batter and stick on iron. Close it and wait…..My iron has a little light that turns on when the waffles are done cooking, so I waited patiently (ok iI did open it a few time) until light tuned on and removed the perfectly cooked waffles.
Did I mention how awesome my new/old vintage iron is?
SO AWESOME!!
I made a little gaucamole and gave the mister and little bowl of plain Greek yogurt with lemon juice, but feel free to top, drizzle, or dump whatever you want onto these beauties…
Happy waffle Wednesday!!!
-C
Veggie Bean Wonder Waffles
Makes 8-10 waffles (in my iron) feeds 2-3 peeps
1 small carrot shredded
1 small parsnip shredded
1/2 a small celeriac root
1 small beet shredded
2 kale leaves chopped into tiny bits
1/2 an onion, shredded
1/2 a small sweet potato shredded
1/2 cup cornmeal
2 cups(or 1 can) cooked, rinsed and strained white beans
2 teaspoons garlic powder
teaspoon each salt and pepper
oil for iron(if needed)
Note on veggies… I used what I had in the fridge and shredded, it came to about 3 cups. If you don’t have these specific veggies or only want to use a few.. go for it. Just make sure to have 3 cups of whatever veggies you use.
Take you beans and blend them up with whatever device you would like to use. Once creamy, add to a bowl with the rest of the ingredients. Stir until combined.
Once the waffle iron is preheated, oil it( if needed) and place the recommended amount of batter right on it there. Close and cook until golden brown and waffly.
Serve on a plate with topping of your choice, A few suggestions.. Guacamole, salsa, hummus, mustard, greek yogurt… anything that tastes good to you.
Eat as breakfast, lunch or dinner…
Fork into face
I figured now is a good time to get this recipe out there before we get to far into spring and summer recipes because there is going to be a lot of banana ice cream filled recipe coming and I figured its a good idea to have the basic banana ice cream recipe ready for people to refer too. And because I made so much fantastic naner ice cream, I also made a cookies and cream naner ice cream for my sisters and the mister.
Comments that I got from my sisters and the mister when I made them this ice cream
-Sister one.”I give this my sister seal of approval.. It’s so good. The first dessert you have made that I liked! (not including all the other desserts that you have made that I liked)”
-Sister two- “Wow.. it looks like ice cream and feels like ice cream and tastes like ice cream.. You should make me this ice cream!” (I was confused too because I was pretty sure I just made her some)
-The mister- “I am so excited for my new fly fishing pole!”
Ok, so the naner ice cream isn’t new to the mister and he IS very much excited for his new fly fish pole. So excited that he forgot to tell me how amazing that I am and to thank me for making him a big bowl of yumminess. (It’s ok, I forgive him)
And yes, this is probably one of the easiest, most delicious, healthy and amazing frozen dessert that you will ever eat. You will probably find yourself buying mass amounts of bananas and stocking the freezer until things just start falling out. (which is also ok because it’s only bananas and you can’t have too many frozen bananas)
The stuff you need for this ice cream…. Nice and ripe bananas, peeled and then frozen* That’s it.
To make it, place frozen bananas into food processor and hit the on button. Process the crap out of the namers until nice and silky smooth.
*Note, the smaller the frozen chunks are , the faster and maybe a little easier for the blender to blend the naners into ice cream. So if you think of it, chop bananas into pieces before freezing or even after.
After all blended and smooth, either eat right away or scoop ice cream into a freezer safe container and stick in freezer. That’s the banana ice cream… And it is amazing and so so so so so addictive. I make a batch, think I am only going to eat a scoop, then find myself eating half of what I have made, but it’s ok cause it’s only bananas.
Now for the cookies and cream banana ice cream..One batch of banana ice cream, either freshly made, still in food processor or made ahead and placed in a food processor and given a good pulse to smooth it up.
Add cookies in, crushing a bit beforehand and pulse till combined. Now you have cookies and cream naner ice cream…. and everybody is happy.
Scoop into a cup, a bowl, a freezer safe container, or directly into your mouth. Be careful…. You can still get brain freeze from eating naner ice cream too fast!
Keep it real hump day drum bum!
-C
Basic Banana Ice Cream
Makes one batch. Good for 3-4 servings
4-5 ripe bananas peeled and frozen
Peel bananas and stick in a freezer bag or container and freeze. When bananas are completely frozen, break into pieces and stick into a food processor or blender and puree until silky smooth.
Eat right away or scoop into a freezer safe container for later.
Cookies and Cream Banana Ice Cream
1 batch banana ice cream
5-10 (depending on your cookie need) cream filled cookies like oreos or Trader Joe’s Joe Joe’s (These are gluten free)
In a food processor, blend banana ice cream with cookies.
Eat right away, with a utensil of choice in a container of choice.
Bowl licking is acceptable.
Before we left for the weekend, I was was trying my hardest to empty the fridge out of all food with the intention of leaning it empty so I could leave it open to defrost while were were gone. Unfortunately I was not able to make it happen. What I did make happen was emptying it almost completely so that when we got home, we had pretty much no food in the house, except for a few things that probably should be eaten. Plus one of the last things that I want to do after sitting in a car for 6 hours is go to the grocery store, or anywhere for that matter, so I was determined to make with what wet had in the fridge:
Carrots
half of a gigantic kohlrabi
soy milk
iced tea
bananas that needed to be frozen
strawberries
Perfect! A few carrots and half of a gigantic kohlrabi.. plus at the hotel we were staying at, there were fruit bowls in he lobby full apples. Every time I went past the apples (which was a lot) I grab one or two, so I have a few apples (I actually have a lot of apples now). All the things I need for a super awesome salad slaw. Apples with their nice sweet crispiness and kohlrabi with its cabbagey, crunchy earthiness, tossed together with some vinegar, some toasted walnuts and some carrots, I mean, so freaking good. And to make it a bit more of a meal, I made some lentils to go with it. But the best part was there was no need to leave the house!!
The stuff… A huge hunk of a bigger then my head kohlrabi (or 2 normal bulbs). A carrot, an apple, toasted walnuts, red wine vinegar, and some salt.
Pretty simple stuff going on here. Just peel and julienne the kohlrabi, carrot and apple. (no need to peel the carrot or apple unless you want too) and stick it all into a bowl. I used my mandolin, which is one of my favorite kitchen tools ever, but if you don’t have one, a box grater works too.Sprinkle with salt and a good glug glug of red wine vinegar. Chop up the walnuts (some big chunks and some very small pieces makes for good eating), toss it all together and, well that’s it. But wait…. let it sit for a few minutes before serving to really let the flavors draw out.And there we have it. Super fast, full of flavors and crunchy texture. A salad slaw after my own heart.
Serve it as it or add to a bed of greens, rice, or lentils… and make sure to save at least as little… cause its an awesome little pre-bed snack.
Happy Week!!
-C
Kohlrabi Apple Walnut Slaw
2 medium sized Kohlrabis
1 medium apple
1 small carrot
1/2 cup toasted walnuts
red wine vinegar
salt
In a large bowl, julienne kohlrabi (after peeled) apple and carrot. Sprinkle with salt, add in vinegar. Rough chop walnuts and toss the whole bit together. Let sit for at least 10 minutes, if not longer before serving. (A great salad to make ahead of time)
Eat as is, or toss onto a bed of greens, plate of rice or a bowl of lentils.
Any left overs only end up tasting better the next day.
Last night I had my sister and her kiddos come over for dinner. Nothing fancy, nothing to complicated, just something fast and something that I knew the littles would eat. Spaghetti and meatballs, except replace meatballs were bean balls So they came, we played, did a little drawing and had a bit of first grad gossip. Then came dinner time when I was told by one little that she was not going to eat.. She had pasta for lunch. Well I made her sit anyway and she mainly just ate carrots (I was ok with that) Then the other little was all into his pasta and bean balls, 1 down, 3 more to go, when the mister let slip that the meatballs were not really meat. He ate around the remaining balls, said he didn’t want them anymore. And my sister, well she doesn’t eat anything that is not pizza.
Good thing a neighbor stopped by while we were eating. He had a few of the balls and told me that they were amazing. I needed someone to tell me that.
So yeah, the littles were not overly enthused with the ball, but the Mister the Neighbor, and I thought that they were awesome and delicious. Maybe next time I will make sure that pasta was not lunch and tell Nick to keep his mouth shut and stop talking about balls at the dinner table.
I feel like I don’t need to tell you how to boil pasta or heat up the sauce, so I left that portion of the recipe out. I have faith that you are capable in doing that part without my instruction.
The bean ball stuff. Chickpeas (soaked and cooked or canned), sweet potato, carrot, onion, and some chick pea flour. Dried garlic, basil and oregano. Salt and pepper and a little bit of olive oil. Small chop all the veggies and toss them and the dry spices into a skillet with a drizzle or two of olive oil. Stick on medium heat and add about 1/4 cup of water to pan. Top with slid and let veggies cook down until soft and fragrant.
Add the cooked veggies to a food processor or blender with the rinsed and drained chickpeas. The mixture gets pulsed until combined, keeping a little bit of chunkiness. Now go warhead and taste the mixture. Add another pinch or two of salt , pepper or any of the spices that you think it need. Dump the mixture into a bowl and mix in the chickpea flour than stink the mixture into the fridge for a least a 1/2 hour. Cooling to off is really important to forming the balls. If you don’t, it’s much harder to keep mixture from falling apart and sticking to your hands.
After the mixture has had time to cool and set, start rolling the mixture into balls roughly the size of ping pong balls. In a shallow bowl, add a few tablespoons of the chickpea flour with a pinch of salt, pepper and garlic powder. Take each ball and roll in flour and place each ball on a well oiled baking sheet. When the balls are all rolled, stick into the oven and bake away for about 30-40 minutes, flipping balls after about 20. After you flip the balls, get the pasta ready so its finished about the same time the balls are done.You pasta and sauce is cooked and the balls are all crispy and oh so nice.
Serve balls over pasta with sauce and eat with a fork.
Your day is now complete.. balls and all.
Happy Weekend!
-C
Spaghetti and Bean Balls
makes about 20 balls
4 Cups (or 2 cans) Cooked, Rinsed and Drained ChickPeas
1 Small Sweet Potato
1 Small Onion
1 Carrot
1/4 Cup Chickpea Flour plus extra to roll balls in
1 Heaping Teaspoon Basil
1 Heaping Teaspoon Oregano
1 Heaping Teaspoon Garlic Powder
Olive or Vegetable Oil
Salt and Pepper
Your choice of Spaghetti (Use Vegan and or Gluten Free if needed) Prepared as package recommends
Marinara or Pasta Sauce of your choice
Preheat Oven to 425 degrees
Small dice the carrot, onion and sweet potato and toss into a skillet on medium high heat with a splash of oil. Add in the dry spices and add in about a quarter cup of water. stir and cover the skillet with a lid and let the veggies cook down until the water has evaporated and the veggies are tender.
Add rinsed and drained chickpeas to a food processor with the cooked veggie mixture. Pulse together until the mixture is combined and slightly smooth, but still with a little bit of texture left.Place bean mixture in a bowl and mix in the 1/4 cup of chickpea flour. and stick in the fridge for a least a 1/2 hour to cool. (Mixture can be made a day ahead if you want)
Once the mixture has time to cool and set up , remove from fridge and with a light head, roll mixture into ping-pong sized balls. In a separate shallow dish add a bit of chickpea flour with a pinch of salt and pepper. Roll each ball in the flour mixture and place balls on a well oiled baking sheet. Once balls ae made, stick into the oven and bake for about 30-40 minutes, flipping after about 20 minutes. The balls are done when the outsides are once and golden brown and crispy. After about 30 minutes, get to cooking your pasta and mariana sauce.
Once the pasta and sauce is done, plate it and toss on some of those awesome bean balls!
Bean balls also make fantastic bean ball sandwiches or bean balls on a toothpick.
TGIF!!!! For reals, because Monday-Thurday were monster days. And now that its friday, I can dig a hole and hide in it until it’s at least 30 degrees with some sunshine. (I might never get to come out.)
A few things I will bring in my hole:
food (lots of food and coffee, lots of coffee)
a soft blanket and pillow
a few books, preferably with pictures, on farming and gardening (think spring!)
the entire series of the Fresh Prince of Bel-air and a device to watch it on
toothpaste (I can use my finger to brush my teeth)
But before I leave for my hole in the ground, I made these little cake bites to get my people through the weekend. Sweet little lemony bites of rich dense cake dipped into bittersweet chocolate. (I am just so nice) They have all the pleasure or cake without the need of a fork and are much easier to give away then a big slice of cake. Plus, they are fun to make. My little sister helped and did most of the chocolate dipping. Then she and another little used their mouths to clean up the chocolate mess. It was an afternoon of chocolate all over the kitchen fun day.
So make some bites to have and to share. Or if you, like me, are digging a hole to hide in, make a batch of bites to bring with you. That’s the beauty of cake covered in a harden chocolate shell, they travel really well.Simple lemon cake stuff. Flour, baking powder and salt whisked together, Sugar and soft butter in a bowl. An egg, some vanilla, milk, and of course, the lemon.
To make the batter, cream the soften butter with the sugar until light and fluffy. Zest lemon(1 big or 2 small) into bowl with the juice of the lemon(s), the vanilla and the egg. Beat until combined. Now beat in the dry and then the milk. Keep beating for another minute until all mixed. Batter should be light and fluffy.
Batter goes into a greased and floured 9×13 baking sheet and stuck into a 375 degree oven for about 30 minutes (You can use a 9×9 baking pan. Just bake fir another 10 minutes and you will end up with thicker bites). Remove from oven and let cool for a few minutes and flip to remove cake from baking sheet. Cut cake into small pieces (I cut 4×6 to get 24 bites) and place bake into sheet and into freezer (I stuck mine outside, it was -2 degrees ) for at least 2 hours.
Frozen bites ready for the chocolate coating… Bittersweet chocolate chips and a little bit of coconut oil. Melted together all nice and shiny smooth.Now dip and slather those bites in the melted chocolate.
Oh what a lovely sister I have.. Look at her dunk….. like a boss!Fully coated and placed on a rack for the chocolate to harden. I ended up sticking the rack in the freezer for 10 minutes…They harder really fast in there.
And now you have some it, bites of cake covered in chocolate. 1 bite, 2 bites…5 bites. Eat however many you want because its Friday and because there small little bites and just because you can.
Now if you need me, I’ll be in my hole.
-C
Chocolate Lemon Cake Bite
1 1/2 cups all purpose flour
1 teaspoon baking powder
1 teaspoons salt
1 cup white sugar
1/2 cup (1 stick) soft butter
1 egg
1 teaspoon vanilla
1 cup milk
1 large or 2 small lemons
2 cups bittersweet chocolate chips
2 tablespoons coconut oil
Add butter and sugar to a large bowl and beat on medium unit light and fluffy. Ass in vanilla egg, the zest of the lemon and the juice of the lemon. Beat to incorporate. Now beat in the dry and lastly the milk.
Grease and flour either a 9×9 pan or a 9×13 baking sheet. dump batter in and smooth out. Stick in oven and bake for about 3o minutes or until a toothpick stuck into the middle comes out clean. Remove and let cool for a few minutes on a wire rack. Flip cake to remove from pan. Cut cake into bit sized pieces, 4×6 is a good size, and place back on baking sheet and stick into freezer for at least 2 hours.
When cake bites are as good as frozen, get the chocolate ready. Take the chocolate and the coconut oil and either melt in a double boiler or the microwave. Mix until smooth and make sure to full incorporate the oil. Now remove the cake bites from the freezer and dip each bite into chocolate, trying to full coat all sides. Stick onto a wire rack or a parchment lined pan to harden. They can be stuck back into the freezer to harden faster.
Once chocolate has harden, your good to go!
This weekend I made a stand of paper hearts that live all around the house. An early Valentines for my mister. We don’t do fancy dinners, store bought cards or gifts….. Handmade and pretty is what we do.
These hearts hang from the ceiling and toss pretty heart shadows on the walls…..and make both of us smile.
The making of stringed paper hearts is so very simple. What you need is..
One or more different colors of card stock paper
scissors
A sewing machine with thread..(can be hand sewn for sure)
To start, cut out a bunch of hearts, as many as you want. You can free form cut them (that’s what I did) or you can either make a template and rouse a cookie cutter or something and trace, if you want perfect uniform hearts.
Decide on a color pattern (I did red, pink, white, brown, repeat) or random is nice too.
Start sewing the hearts. (I used a scrap to get started..and use the scrap piece for tacking to the ceiling). You can either sew hearts close together or leave an inch or two in between each. One trick I have learned when sewing strands of paper is to give a little tension to the strand as you are sewing…it helps keep the machine from jamming up.
You are done when all the hearts are sewn… And hang them up or, if you want to save them for a surprise for Valentines day, wrap strand around a piece of cardboard. Leave up for a day, for a week, or like us, all year long.
Hearts everywhere…so simple, so pretty, so much love!
-C
I was informed yesterday that if I was going to make tortilla chips, that I better make some sweet ass dips to go with them. I kind of agree… tortilla chips need dip… or better yet, two dips. Queso and guacamole. It’s what needed to be done, and so I did it.
Guacamole is amazing… anything avocado is amazing…this guacamole is amazing. White bean guacamole is amazing. And not that we really care, but this guac is half the fat then straight up guacamole. Plus it’s packed full of protein making it a kind of super duper, must eat all of it, kind of dip. And sweet potato anything will make me happy. Making queso dip with sweet potato and cauliflower is probably one of my best food combos so far. (after eating a butt load, I felt like I was a genius and made an amazing discovery) Again, not that we need it to be, but this is also a fat-free, vegan, gluten-free, super healthy, packed full of B12, fiber and nutrients, dip for all kind of dip.…. just another reason why you cannot feel bad when you finish off half a batch before you get a chance to stick it in a serving bowl. (I might have done that)
Here is what you need for a good time:
−These tortilla chips ….Check.
−Some Chopped Veggies (I want the veggies)…..Check
−Cauliflower Sweet Potato Queso.…Check.
−White Bean Guacamole…Check.
You are now ready for it. It being this party, that party, the Super Bowl, or a Wednesday afternoon.
To the left we have the makings for the cauliflower sweet potato queso.. Steamed cauliflower, a baked sweet potato, nutritional yeast, garlic, and chopped up red onion, red bell pepper and jalapeño. To make all you need to do it take the chopped peppers, onion, and garlic and sauté for a few minutes just to slightly soften and bring out flavors. While that’s going on, take the steamed cauliflower and sweet potato(skin off..but eat it, or save it for soup or feed it to the dog) and puree together with a blender or food processor. Add in nutritional yeast, about a tablespoon or two of hot water and, salt and pepper to taste. Blend for about 5 minutes until super creamy smooth. Add in sautéed stuff and pulse just enough to incorporated the veggies but not complete blend in. Stick in a bowl.
To the right we have white bean guacamole stuff. Two cups (or one can) rinsed white beans, one ripe avocado, a lime, a few cloves of garlic,(I also added a bit of garlic powered…I like my garlic) and some chopped up red onion and tomato. Place beans, garlic, avocado and lime juice in a blender or food processor and blend until smooth. Add salt to taste and toss in the chopped tomato and onion. Blend for sec to mix that in…Stick in a bowl
Perfect…
To think that both of these dips took about 10 minutes total to make. (I had pre baked the cauliflower and sweet potato) And for real, I would spend much more time if I had too because both of these dips are so freaking good, I definitely will be making these on the regular.
So there , dips for those sweet ass chips or whatever you want to dip or them spread them on.
And he guys…It’s FRIDAY! Have a fantastic day!
-C
White Bean Guacamole
2 cups white beans (or 1 can) rinsed and drained
1 ripe avocado
3 cloves garlic
1 lime
1/4 small red onion
1 small tomato
1-2 teaspoons salt
Finley chop onion and tomato. Set aside. Place the beans, avocado, garlic, garlic powder, 1 teaspoon salt and the juice from one lime into a blender or food processor and blend until smooth. Add a splash of water if needed to help keep things moving. Taste and add more salt if needed. When smooth, add the onion and tomato and pulse a few times to mix in. Scoop into a serving dish and finish with a squeeze of lime and a bit of chopped onion and tomato.
Cauliflower Sweet Potato Queso
1 1/2 cups pre cooked steamed or roasted cauliflower
1 medium pre baked sweet potato
1/2 cup nutritional yeast
1-2 tablespoons hot water
1/2 a small red pepper
1/4 small red onion
1 jalapeño
3 cloves garlic
salt and pepper
Finely dice the red pepper, jalapeño, onion and garlic and sauté in a skillet for a few minutes until slightly soften and fragrant. Take the pre-cooked cauliflower, sweet potato (skin removed), and nutritional yeast and place in a blender or food processor. Blend for about 5 minutes until creamy and smooth. Add in a tablespoon of water to keep things moving. When completely smooth, add in sautéed veggies and pulse a few times to combine. Scoop into a serving dish. If your feeling it, top with scallions and cracked pepper.
Serve dips with chips, veggies or anything you want. Also make great spreads for sandwiches and crackers too!
Yes Please. Thank you very much. Sweet Potato custard (I don’t know what else to call it) topped with coconut. My taste buds have found themselves in heaven. I have found myself sticking my butt out of the fridge with spoon in hand. Hey there, like what you see?
Now that thanksgiving is over you might be thinking.. oh we can’t or, no we shouldn’t or, that it’s too much work. Well you can, you should, and it’s not. This custardy crustless pie is nothing short of awesome and is super easy to make. All you really have to do is puree and mix a few ingredients together and bake it. The obstacle here is trying not eat it all in one sitting, But you know what. that would be ok..You eat this and it tastes so good and you feel like you have used your days worth of guilt on dessert but guess what, you didn’t. This pie is actually pretty darn healthy, even maybe good for you. There is no sugar, no gluten, no dairy, no crap. Hardy sweet potatoes and sweet little dates with so many vitamins, chai and coconut for protein and health fat and cinnamon, which is good for everything. I mean, AMAZING Now you can have dessert and save your guilt for say, buying a new sweater when you really don’t need it or for canceling your dentist appointment because, let’s be honest, you really just don’t feel like going( Its ok, I rescheduled for next week). See, you must make this. Pie, sweater and no dentist…It’s a winner.
Custard ingredients. A whole lot of not much. Sweet potatoes are the star here. A few dates, chia seeds, and a bit of cinnamon spice. That’s it. Oh yes, this desert is 100% way acceptable for breakfast and comes with absolutely 0% quilt. Its magic.
If you have left over sweet potato, this is your chance to use them up, but if not, 3 sweet potatoes, stuck in the oven at 400 degrees for about 45 minutes or until they are fork tender.
While the potatoes are baking, chia seeds go into water to soak.. I remember the first time I used chia seeds and they turned into gel, I thought something was very wrong. They are suppose to turn gloppy, so if your concerned, don’t be. Now take your dates..MAKE SURE TO REMOVE PIT!!!..and stick in some warm water, just enough to cover. If you are familiar with dates and use them often, you might already have date paste on hand…just use that. otherwise. we are going to turn these dates into a paste by simply letting them sit in a bit of water to soften and then pureeing.. It’s a really simple process that you can do every time you use date paste in a recipe, but my suggestion is to make a big batch and save the rest. It will turn into a new thing for you. You will want to eat it by the spoon full and then some. It’s that good..
The potatoes are done and cooling… now is a good time to puree dates. The consistency doesn’t have to be silky smooth, but it doesn’t hurt to get close. Once the potatoes are cool enough to handle, remove skin( eat the skin) and stick into either a large bowl if you’re using a handle blender or emulsifier, or into the food processor. Puree those sweet roots of deliciousness, adding a splash of water or two if they need help whipping up. Add the chia seeds, the date paste, and spices….mix and POW!!. Go ahead, you must eat a bite….or two. Satisfied for now? Stick it into the fridge. Refrigerating for a bit to even over night makes the custard set up a smidge better, but you really don’t need to refrigerate. To be honest,, you don’t need to bake this either, just eat it like pudding(which is what I have been doing too) But you really want to bake it. Just stick the bowl in the fridge.
Now to make this custard even more awesome, we are going to add a little coconut topping. Here we have coconut flour, unsweetened coconut flakes, a little scoop of the custard filling and a little coconut oil
Mixed together for a bit of a crumble… and yea.
The custard is make.. The topping is ready. Take a pie plate and light oil with the coconut oil and dust with a bit of coconut flour. Transfer the sweet potato puree into plate and top with coconut topping. Move to oven and bake at 375 degrees for about half hour to 40 minutes…checking every now and then to make sure that coconut isn’t burning. Remove when top is golden brown
And one more thing, add a scoop of whipped coconut cream which I forget to photograph. All I did was whip a can of cold coconut cream with a tiny bit of vanilla. SOOOOOO GOOOOOD!!
There you have it, the best, easiest, healthy, crustless custardy pie that ever was or will be.
Sweet Potato Coconut Crustless Pie
Ingredients
Custard
3 medium sweet potatoes
3-4 dates pureed. Raserve a teapoon for topping
2 tablespoons chia seeds
6 tablespoons water
3 teaspoons Vietnamese cinnamon or pumpkin pie spice
1/2 teaspoon allspice
sprinkle of salt
Coconut topping
1/4 cup of coconut flour
2 tablespoons coconut oil
1 tablespoon prepared custard filling
1/4 cup of unsweetened coconut flakes
Whipped coconut cream… I bought a can of Trader Joes coconut cream, stuck in fridge for the day, and just opened the can, scooped the hardened cream into a bowl and whipped it up. I did add a tiny splash of vanilla, but that’s it…And oh man it is sooooo sooooo good.
Place sweet potatoes in oven at 400 degrees and bake for 40 minutes or until fork tender.
While the potatoes are baking, place chia seeds in 6 tablespoons of water to soak. Place dates into just enough warm water to cover. REMOVE THE PIT! Let chia seeds and date soak while potatoes are cooking. When the potatoes are out of the oven cooling, take dates and either place in food processor or emulsify until smooth.
After potatoes are cooked and cool enough to handle, remove skin and place flesh in bowl or food processor and puree, adding a small amount of water if needed to keep it moving. Mix in date paste, chia seeds and spices. Refrigerate for 1 hour to overnight.
For coconut topping, place all ingredients into a bowl and crumble together.
Grease a 9 inch pie plate with coconut oil and dust with coconut flour. Scoop custard into plate and coat with coconut topping. Place in oven at 375 degrees for half hut to 40 minutes or until topping is golden brown.
Remove and let cool. Top with coconut whipped cream and eat all to your face.. Maybe saving a little for breakfast or even sharing with someone you love.

THE LOVELY CRAZY
September 19, 2015 by maximios • Blog
Guess what guys ….I got myself a sick vintage waffle/ griddle iron. I couldn’t be more thrilled!!! I found this thing at the local recycled goods store the other day, along with a very beautiful old white pyrex mixing bowl. It was one of my best thrift store scores! (Checking out the inventory and the condition of all the old things that day, I would say an old lady had just died and all her perfectly keep, mint condition kitchen stuff had just been donated. But it’s cool, cause I get the feeling that she was at least 90, with a big loving family, and was happy until the day she died. And I am sure she would be pleased that I have taken over the waffle maker. Thanks old lady!)
And now I am pretty sure that everything I make for the next week will be cooked on said waffle/griddle. I am serious, I already have a list of things to try and cook on it; cookies, biscuits, granola bars, potatoes, fruit, some type of pasta situations…. the list of possibilities is endless and I bet that at least 1/2 of these things will be totally awesome and amazing.
But first thing first. I need to make dinner.
So waffles for dinner!!
Note. These waffles are completely 100% fantastic for any meal you want to make them for. They consist of nothing more then beans, a shit ton of veggies, and just a bit of cornmeal. But don’t let that fool you because they are super packed full of so much flavor, have a really soft tender inside, with a nice crispy outside and are so super pretty. They are wonderful! The stuff. First, we got a big old pile of shredded up veggies which include; carrot, beet, sweet potato, onion, parsnip, celeriac, and a little bit of kale. A we got a bowl of rinsed and strained white beans, a little bit of cornmeal and salt, pepper, and garlic powder.
The makings of something amazing!Before you do anything. get your waffle iron out and preheat it.
While thats going on, take you beans, add 3/4 cup water and puree until smooth with whatever blending device want to like to use. (I used my hand blender…less to clean)Now collect all the shredded veggies and dump into a big bowl with the bean puree, the spices and the cornmeal. Mix until combined. The batter should be thick, but not dry. If its seems to wet, add more corn meal, or too dry, add a little more water.
Note how my batter turned a magical pink… I love beets, they make everything pretty! And check out that bowl!When your waffle iron is preheated, oil it if needed (if your not sure, add a little oil just to really make sure your waffles don’t stick) and take appropriate size spoonfuls of the batter and stick on iron. Close it and wait…..My iron has a little light that turns on when the waffles are done cooking, so I waited patiently (ok iI did open it a few time) until light tuned on and removed the perfectly cooked waffles.
Did I mention how awesome my new/old vintage iron is?
SO AWESOME!!
I made a little gaucamole and gave the mister and little bowl of plain Greek yogurt with lemon juice, but feel free to top, drizzle, or dump whatever you want onto these beauties…
Happy waffle Wednesday!!!
-C
Veggie Bean Wonder Waffles
Makes 8-10 waffles (in my iron) feeds 2-3 peeps
Note on veggies… I used what I had in the fridge and shredded, it came to about 3 cups. If you don’t have these specific veggies or only want to use a few.. go for it. Just make sure to have 3 cups of whatever veggies you use.
Take you beans and blend them up with whatever device you would like to use. Once creamy, add to a bowl with the rest of the ingredients. Stir until combined.
Once the waffle iron is preheated, oil it( if needed) and place the recommended amount of batter right on it there. Close and cook until golden brown and waffly.
Serve on a plate with topping of your choice, A few suggestions.. Guacamole, salsa, hummus, mustard, greek yogurt… anything that tastes good to you.
Eat as breakfast, lunch or dinner…
Fork into face
Comments that I got from my sisters and the mister when I made them this ice cream
-Sister one.”I give this my sister seal of approval.. It’s so good. The first dessert you have made that I liked! (not including all the other desserts that you have made that I liked)”
-Sister two- “Wow.. it looks like ice cream and feels like ice cream and tastes like ice cream.. You should make me this ice cream!” (I was confused too because I was pretty sure I just made her some)
-The mister- “I am so excited for my new fly fishing pole!”
Ok, so the naner ice cream isn’t new to the mister and he IS very much excited for his new fly fish pole. So excited that he forgot to tell me how amazing that I am and to thank me for making him a big bowl of yumminess. (It’s ok, I forgive him)
And yes, this is probably one of the easiest, most delicious, healthy and amazing frozen dessert that you will ever eat. You will probably find yourself buying mass amounts of bananas and stocking the freezer until things just start falling out. (which is also ok because it’s only bananas and you can’t have too many frozen bananas)
To make it, place frozen bananas into food processor and hit the on button. Process the crap out of the namers until nice and silky smooth.
*Note, the smaller the frozen chunks are , the faster and maybe a little easier for the blender to blend the naners into ice cream. So if you think of it, chop bananas into pieces before freezing or even after.
Now for the cookies and cream banana ice cream.. One batch of banana ice cream, either freshly made, still in food processor or made ahead and placed in a food processor and given a good pulse to smooth it up.
Add cookies in, crushing a bit beforehand and pulse till combined. Now you have cookies and cream naner ice cream…. and everybody is happy.
Scoop into a cup, a bowl, a freezer safe container, or directly into your mouth. Be careful…. You can still get brain freeze from eating naner ice cream too fast!
Keep it real hump day drum bum!
-C
Basic Banana Ice Cream
Makes one batch. Good for 3-4 servings
Peel bananas and stick in a freezer bag or container and freeze. When bananas are completely frozen, break into pieces and stick into a food processor or blender and puree until silky smooth.
Eat right away or scoop into a freezer safe container for later.
Cookies and Cream Banana Ice Cream
In a food processor, blend banana ice cream with cookies.
Eat right away, with a utensil of choice in a container of choice.
Bowl licking is acceptable.
Perfect! A few carrots and half of a gigantic kohlrabi.. plus at the hotel we were staying at, there were fruit bowls in he lobby full apples. Every time I went past the apples (which was a lot) I grab one or two, so I have a few apples (I actually have a lot of apples now). All the things I need for a super awesome salad slaw. Apples with their nice sweet crispiness and kohlrabi with its cabbagey, crunchy earthiness, tossed together with some vinegar, some toasted walnuts and some carrots, I mean, so freaking good. And to make it a bit more of a meal, I made some lentils to go with it. But the best part was there was no need to leave the house!!
Pretty simple stuff going on here. Just peel and julienne the kohlrabi, carrot and apple. (no need to peel the carrot or apple unless you want too) and stick it all into a bowl. I used my mandolin, which is one of my favorite kitchen tools ever, but if you don’t have one, a box grater works too.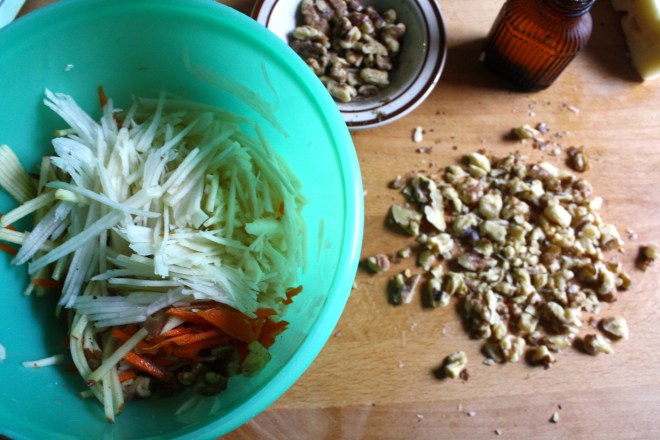 Sprinkle with salt and a good glug glug of red wine vinegar. Chop up the walnuts (some big chunks and some very small pieces makes for good eating), toss it all together and, well that’s it. But wait…. let it sit for a few minutes before serving to really let the flavors draw out.
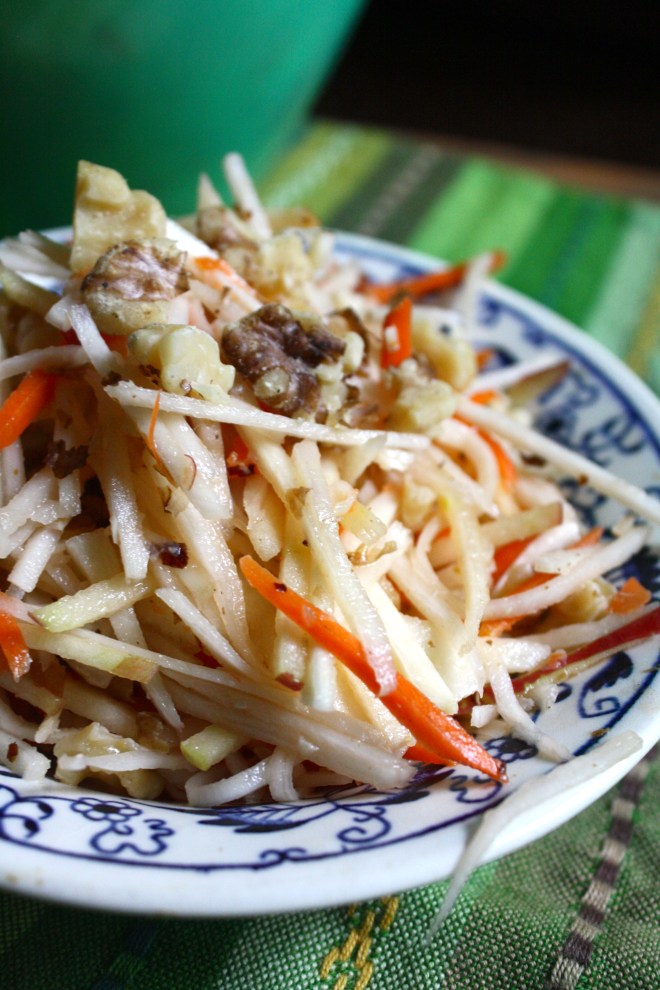 And there we have it. Super fast, full of flavors and crunchy texture. A salad slaw after my own heart.
Serve it as it or add to a bed of greens, rice, or lentils… and make sure to save at least as little… cause its an awesome little pre-bed snack.
Happy Week!!
-C
Kohlrabi Apple Walnut Slaw
In a large bowl, julienne kohlrabi (after peeled) apple and carrot. Sprinkle with salt, add in vinegar. Rough chop walnuts and toss the whole bit together. Let sit for at least 10 minutes, if not longer before serving. (A great salad to make ahead of time)
Eat as is, or toss onto a bed of greens, plate of rice or a bowl of lentils.
Any left overs only end up tasting better the next day.
Good thing a neighbor stopped by while we were eating. He had a few of the balls and told me that they were amazing. I needed someone to tell me that.
So yeah, the littles were not overly enthused with the ball, but the Mister the Neighbor, and I thought that they were awesome and delicious. Maybe next time I will make sure that pasta was not lunch and tell Nick to keep his mouth shut and stop talking about balls at the dinner table.
The bean ball stuff. Chickpeas (soaked and cooked or canned), sweet potato, carrot, onion, and some chick pea flour. Dried garlic, basil and oregano. Salt and pepper and a little bit of olive oil.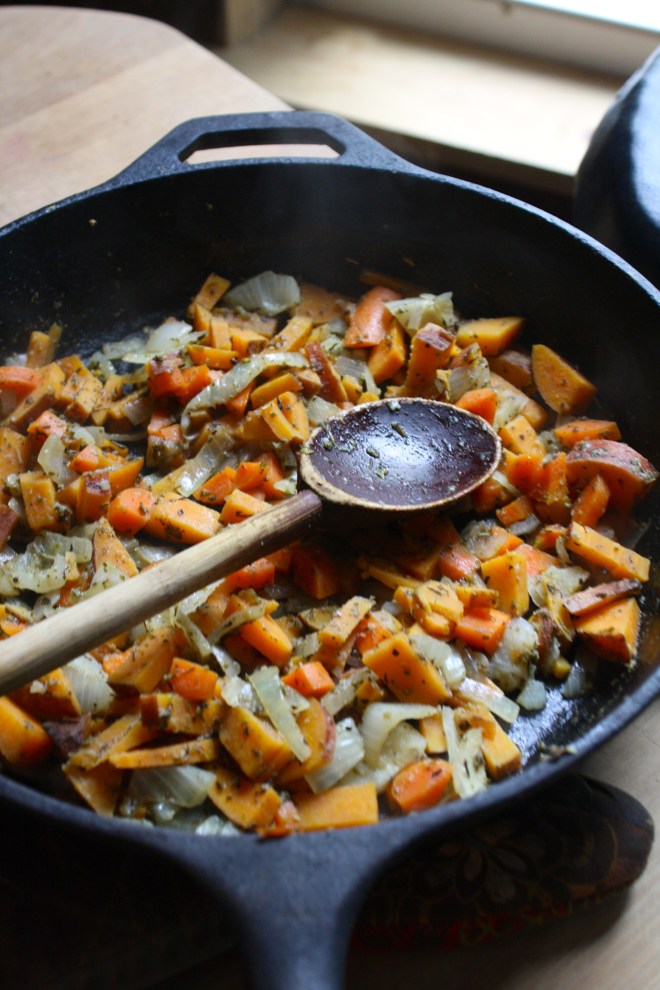 Small chop all the veggies and toss them and the dry spices into a skillet with a drizzle or two of olive oil. Stick on medium heat and add about 1/4 cup of water to pan. Top with slid and let veggies cook down until soft and fragrant.
Serve balls over pasta with sauce and eat with a fork.
Your day is now complete.. balls and all.
Happy Weekend!
-C
Spaghetti and Bean Balls
makes about 20 balls
Preheat Oven to 425 degrees
Small dice the carrot, onion and sweet potato and toss into a skillet on medium high heat with a splash of oil. Add in the dry spices and add in about a quarter cup of water. stir and cover the skillet with a lid and let the veggies cook down until the water has evaporated and the veggies are tender.
Add rinsed and drained chickpeas to a food processor with the cooked veggie mixture. Pulse together until the mixture is combined and slightly smooth, but still with a little bit of texture left.Place bean mixture in a bowl and mix in the 1/4 cup of chickpea flour. and stick in the fridge for a least a 1/2 hour to cool. (Mixture can be made a day ahead if you want)
Once the mixture has time to cool and set up , remove from fridge and with a light head, roll mixture into ping-pong sized balls. In a separate shallow dish add a bit of chickpea flour with a pinch of salt and pepper. Roll each ball in the flour mixture and place balls on a well oiled baking sheet. Once balls ae made, stick into the oven and bake for about 30-40 minutes, flipping after about 20 minutes. The balls are done when the outsides are once and golden brown and crispy. After about 30 minutes, get to cooking your pasta and mariana sauce.
Once the pasta and sauce is done, plate it and toss on some of those awesome bean balls!
Bean balls also make fantastic bean ball sandwiches or bean balls on a toothpick.
A few things I will bring in my hole:
But before I leave for my hole in the ground, I made these little cake bites to get my people through the weekend. Sweet little lemony bites of rich dense cake dipped into bittersweet chocolate. (I am just so nice) They have all the pleasure or cake without the need of a fork and are much easier to give away then a big slice of cake. Plus, they are fun to make. My little sister helped and did most of the chocolate dipping. Then she and another little used their mouths to clean up the chocolate mess. It was an afternoon of chocolate all over the kitchen fun day.
So make some bites to have and to share. Or if you, like me, are digging a hole to hide in, make a batch of bites to bring with you. That’s the beauty of cake covered in a harden chocolate shell, they travel really well. Simple lemon cake stuff. Flour, baking powder and salt whisked together, Sugar and soft butter in a bowl. An egg, some vanilla, milk, and of course, the lemon.
To make the batter, cream the soften butter with the sugar until light and fluffy. Zest lemon(1 big or 2 small) into bowl with the juice of the lemon(s), the vanilla and the egg. Beat until combined. Now beat in the dry and then the milk. Keep beating for another minute until all mixed. Batter should be light and fluffy.
Batter goes into a greased and floured 9×13 baking sheet and stuck into a 375 degree oven for about 30 minutes (You can use a 9×9 baking pan. Just bake fir another 10 minutes and you will end up with thicker bites). Remove from oven and let cool for a few minutes and flip to remove cake from baking sheet. Cut cake into small pieces (I cut 4×6 to get 24 bites) and place bake into sheet and into freezer (I stuck mine outside, it was -2 degrees ) for at least 2 hours.
Oh what a lovely sister I have.. Look at her dunk….. like a boss! Fully coated and placed on a rack for the chocolate to harden. I ended up sticking the rack in the freezer for 10 minutes…They harder really fast in there.
And now you have some it, bites of cake covered in chocolate. 1 bite, 2 bites…5 bites. Eat however many you want because its Friday and because there small little bites and just because you can.
Now if you need me, I’ll be in my hole.
-C
Chocolate Lemon Cake Bite
Add butter and sugar to a large bowl and beat on medium unit light and fluffy. Ass in vanilla egg, the zest of the lemon and the juice of the lemon. Beat to incorporate. Now beat in the dry and lastly the milk.
Grease and flour either a 9×9 pan or a 9×13 baking sheet. dump batter in and smooth out. Stick in oven and bake for about 3o minutes or until a toothpick stuck into the middle comes out clean. Remove and let cool for a few minutes on a wire rack. Flip cake to remove from pan. Cut cake into bit sized pieces, 4×6 is a good size, and place back on baking sheet and stick into freezer for at least 2 hours.
When cake bites are as good as frozen, get the chocolate ready. Take the chocolate and the coconut oil and either melt in a double boiler or the microwave. Mix until smooth and make sure to full incorporate the oil. Now remove the cake bites from the freezer and dip each bite into chocolate, trying to full coat all sides. Stick onto a wire rack or a parchment lined pan to harden. They can be stuck back into the freezer to harden faster.
Once chocolate has harden, your good to go!
This weekend I made a stand of paper hearts that live all around the house. An early Valentines for my mister. We don’t do fancy dinners, store bought cards or gifts….. Handmade and pretty is what we do.
These hearts hang from the ceiling and toss pretty heart shadows on the walls…..and make both of us smile.
The making of stringed paper hearts is so very simple. What you need is..
To start, cut out a bunch of hearts, as many as you want. You can free form cut them (that’s what I did) or you can either make a template and rouse a cookie cutter or something and trace, if you want perfect uniform hearts.
Decide on a color pattern (I did red, pink, white, brown, repeat) or random is nice too.
Start sewing the hearts. (I used a scrap to get started..and use the scrap piece for tacking to the ceiling). You can either sew hearts close together or leave an inch or two in between each. One trick I have learned when sewing strands of paper is to give a little tension to the strand as you are sewing…it helps keep the machine from jamming up.
You are done when all the hearts are sewn… And hang them up or, if you want to save them for a surprise for Valentines day, wrap strand around a piece of cardboard. Leave up for a day, for a week, or like us, all year long.
Hearts everywhere…so simple, so pretty, so much love!
-C
Guacamole is amazing… anything avocado is amazing…this guacamole is amazing. White bean guacamole is amazing. And not that we really care, but this guac is half the fat then straight up guacamole. Plus it’s packed full of protein making it a kind of super duper, must eat all of it, kind of dip. And sweet potato anything will make me happy. Making queso dip with sweet potato and cauliflower is probably one of my best food combos so far. (after eating a butt load, I felt like I was a genius and made an amazing discovery) Again, not that we need it to be, but this is also a fat-free, vegan, gluten-free, super healthy, packed full of B12, fiber and nutrients, dip for all kind of dip.…. just another reason why you cannot feel bad when you finish off half a batch before you get a chance to stick it in a serving bowl. (I might have done that)
Here is what you need for a good time:
−These tortilla chips ….Check.
−Some Chopped Veggies (I want the veggies)…..Check
−Cauliflower Sweet Potato Queso.…Check.
−White Bean Guacamole…Check.
You are now ready for it. It being this party, that party, the Super Bowl, or a Wednesday afternoon.
To the left we have the makings for the cauliflower sweet potato queso.. Steamed cauliflower, a baked sweet potato, nutritional yeast, garlic, and chopped up red onion, red bell pepper and jalapeño. To make all you need to do it take the chopped peppers, onion, and garlic and sauté for a few minutes just to slightly soften and bring out flavors. While that’s going on, take the steamed cauliflower and sweet potato(skin off..but eat it, or save it for soup or feed it to the dog) and puree together with a blender or food processor. Add in nutritional yeast, about a tablespoon or two of hot water and, salt and pepper to taste. Blend for about 5 minutes until super creamy smooth. Add in sautéed stuff and pulse just enough to incorporated the veggies but not complete blend in. Stick in a bowl.
To the right we have white bean guacamole stuff. Two cups (or one can) rinsed white beans, one ripe avocado, a lime, a few cloves of garlic,(I also added a bit of garlic powered…I like my garlic) and some chopped up red onion and tomato. Place beans, garlic, avocado and lime juice in a blender or food processor and blend until smooth. Add salt to taste and toss in the chopped tomato and onion. Blend for sec to mix that in…Stick in a bowl
So there , dips for those sweet ass chips or whatever you want to dip or them spread them on.
And he guys…It’s FRIDAY! Have a fantastic day!
-C
White Bean Guacamole
Finley chop onion and tomato. Set aside. Place the beans, avocado, garlic, garlic powder, 1 teaspoon salt and the juice from one lime into a blender or food processor and blend until smooth. Add a splash of water if needed to help keep things moving. Taste and add more salt if needed. When smooth, add the onion and tomato and pulse a few times to mix in. Scoop into a serving dish and finish with a squeeze of lime and a bit of chopped onion and tomato.
Cauliflower Sweet Potato Queso
Finely dice the red pepper, jalapeño, onion and garlic and sauté in a skillet for a few minutes until slightly soften and fragrant. Take the pre-cooked cauliflower, sweet potato (skin removed), and nutritional yeast and place in a blender or food processor. Blend for about 5 minutes until creamy and smooth. Add in a tablespoon of water to keep things moving. When completely smooth, add in sautéed veggies and pulse a few times to combine. Scoop into a serving dish. If your feeling it, top with scallions and cracked pepper.
Serve dips with chips, veggies or anything you want. Also make great spreads for sandwiches and crackers too!
Now that thanksgiving is over you might be thinking.. oh we can’t or, no we shouldn’t or, that it’s too much work. Well you can, you should, and it’s not. This custardy crustless pie is nothing short of awesome and is super easy to make. All you really have to do is puree and mix a few ingredients together and bake it. The obstacle here is trying not eat it all in one sitting, But you know what. that would be ok..You eat this and it tastes so good and you feel like you have used your days worth of guilt on dessert but guess what, you didn’t. This pie is actually pretty darn healthy, even maybe good for you. There is no sugar, no gluten, no dairy, no crap. Hardy sweet potatoes and sweet little dates with so many vitamins, chai and coconut for protein and health fat and cinnamon, which is good for everything. I mean, AMAZING Now you can have dessert and save your guilt for say, buying a new sweater when you really don’t need it or for canceling your dentist appointment because, let’s be honest, you really just don’t feel like going( Its ok, I rescheduled for next week). See, you must make this. Pie, sweater and no dentist…It’s a winner.
Mixed together for a bit of a crumble… and yea.
The custard is make.. The topping is ready. Take a pie plate and light oil with the coconut oil and dust with a bit of coconut flour. Transfer the sweet potato puree into plate and top with coconut topping. Move to oven and bake at 375 degrees for about half hour to 40 minutes…checking every now and then to make sure that coconut isn’t burning. Remove when top is golden brown
And one more thing, add a scoop of whipped coconut cream which I forget to photograph. All I did was whip a can of cold coconut cream with a tiny bit of vanilla. SOOOOOO GOOOOOD!!
There you have it, the best, easiest, healthy, crustless custardy pie that ever was or will be.
Sweet Potato Coconut Crustless Pie
Ingredients
Custard
Coconut topping
Place sweet potatoes in oven at 400 degrees and bake for 40 minutes or until fork tender.
While the potatoes are baking, place chia seeds in 6 tablespoons of water to soak. Place dates into just enough warm water to cover. REMOVE THE PIT! Let chia seeds and date soak while potatoes are cooking. When the potatoes are out of the oven cooling, take dates and either place in food processor or emulsify until smooth.
After potatoes are cooked and cool enough to handle, remove skin and place flesh in bowl or food processor and puree, adding a small amount of water if needed to keep it moving. Mix in date paste, chia seeds and spices. Refrigerate for 1 hour to overnight.
For coconut topping, place all ingredients into a bowl and crumble together.
Grease a 9 inch pie plate with coconut oil and dust with coconut flour. Scoop custard into plate and coat with coconut topping. Place in oven at 375 degrees for half hut to 40 minutes or until topping is golden brown.
Remove and let cool. Top with coconut whipped cream and eat all to your face.. Maybe saving a little for breakfast or even sharing with someone you love.