Me well, I need to can, pickle and eat as much zucchini as I can. And it’s not just zucchini anymore… we are getting into cucumbers too…AAAHHH I know I have said this a few times in the past weeks, but man, I have so manning freaking zucchinis.. and the more I eat, the more I end up with… It’s getting pretty crazy here!
So anyway, yesterday my dad came back to VT, WOO HOO! and I was his first stop on his rotating dinner schedule. (cause I am his favorite child. I think..maybe) I made zucchini noodles for dinner (I have made them every night for the past week) and I wanted to make him dessert, I have all sorts of pretty fruit that I wanted to make and prepare, but I also had little time and honestly, little desire to move all that much (it was so f ing hot!) I already had out the shredder and a bowl, and the zucchini was just sitting there, in the basket taunting me with it’s gigantic green whaleness. So I figured I’d just make a zucchini cake, or better yet, cause my dad really likes chocolate, a chocolate zucchini cake.
This cake is tender and moist, almost like a cakey brownie, so it does not require any frosting which is nice when your dead tired and it’s so hot that any frosting would probably just melt off anyway. (although you could totally frost it up) It makes a great dessert, but I would not hesitate to serve this for breakfast either because, 1. It has a lot of zucchini in it which automatically justifies eating it whenever, 2. also made with whole wheat, and 3. it’s totally ok to eat chocolate cake for breakfast. I mean people eat donuts for breakfast and that shit is usually fried.
Yeah, this is for sure a dessert/breakfast cake.
The stuff for cake…. Regular all purpose flour, white whole wheat flour, and cocoa powder. Some sugar, salt, baking soda and oil. A little vanilla extact and a splash of coffee. And of course, shredded zucchinn
Dump the sugar, salt and baking soda into flour, whisk together, then mix in the oil, vanilla and the coffee. Now add in the shredded zucchini, but right before adding it in, give it a squeeze to remove a little bit of the liquid.
Mix until combined.
And pour batter into a well oiled pan
Feeling fancy? I was so I peeled the green skin from a zucchini and make a little starburst on top
And into the oven to bake…
And it comes out looking so fancy. Let cake cool for a few minutes and carefully flip from pan.
Note. It might not be the best idea to test your cake with a blunt chop stick.. I did and it made the middle sink in a little. No big deal, but next time I will use a fork.
Cooled and removed from pan. Now all you need to do now is eat cake.. I think that’s something you can handle.
Happy Friday!!!!
-C
1 cup white whole wheat (can use regular whole wheat or all all purpose)
1 cup all purpose flour
1 cup sugar
1/2 cup cocoa powder
2 teaspoons vanilla extract
1/2 cup oil (veggie, canola, sufflower)
1 teaspoons baking soda
1 teaspoon salt
2 cups of shredded zucchini
2 tablespoons of coffee
Preheat oven to 350
In a large bowl, whisk together the flours, salt, baking soda, cocoa powder, salt and sugar. Then add in the oil, vanilla and coffee. Add in the zucchini, but right before, give it a squeeze to remove some of the liquid. (don’t got crazy, just get a little liquid out). Mix until incorporated.
Oil a 9 inch cake pan and pour in the batter. If you want, use zucchini skin to make a pretty design on top (completely optional), and place into preheated oven.
Bake for about 45-50 minutes, or until a tester stabbed in the middle comes out clean.
Remove from oven and let cool in pan for at least 5 minutes the gently invert pan to remove cake and place on a rack to cool.
Serve as soon as you want..
Place in mouth, chew, and swallow…..Smile!!!
First day of Spring!! Well kind of I guess. I think it actually starts at like 6:20 tonight, when the temperature is going to dip back done to 10.(Spring my ass) I don’t know about you people out there but here in Vermont, we are really hanging on to winter. I have to keep telling myself…” It will be warmer soon and you’ll be looking forward to this weather in a few months.. so stop bitching!” I give myself good pep talks.
Anyway, last week at the farm share pick up, there was a nice little surprise. We got a few pounds of some sweet locally grown and milled whole wheat flour. There was a little sign with the information about the wheat and where it came from, but in my haste of gathering all of my other veggies, I failed to take notes and forgot the name of the farm that it came from. But I do know that my farm traded some celeriac for the wheat. I was really excited because I am really into the idea of using locally grown grains and I don’t know, it just made me really happy, especially because it was a trade. Food framing and local sharing is stuff that makes me happy.
I wanted to make something to kind of showcase the hearty, nutty flavor of the wheat and I also wanted to make something that my mister would eat for breakfast. Well what better way to do that then with muffins! Banana coconut whole wheat (that just happen to be vegan) Hearty, fruity, and smells like the word lovely and the color yellow. A few to eat and a few to share. Hanging at home, running away or getting ready for a day of spring cleaning….This is a great weekend to make muffins!
The stuff… Light, nutty local whole wheat flour, ripe oh ripe bananas and coconut flakes are the stars in this muffin… But we need the other stuff too. Brown sugar, vanilla, coconut oil and a chia egg. Baking powder, baking soda, and last but not least, salt.
Yup, that sounds about right The salt, baking soda, and baking powder are whisked together. The banana and all the rest of the stuff are mixed up… Then mix the wet mixture into the dry. Stir until combined and then add in the coconut flakes,Scoop mixture into 12 lined muffin cups… A scoop like mine works very nicely. Don’t have one, well I recommend you get yourself one. Until then, use a spoon. Something I always do when baking any muffin is sprinkle the tops of each muffin with a bit of sugar or brown sugar. It melts and caramelizes and adds a sweet little crunch to the tops.
Now stick the muffins into the oven. Remove from oven when they look like this, nice and golden brown. Also good idea to check with a tester stuck into the middle. When it comes out clean, they are done.12 happy little muffins cooling on a rack, waiting to be eaten with you mouth.
Doesn’t the sight of pretty food make you happy, like sing a song happy? Muffins, whoa yah!! Friday yah yah!! Spring…What, Yah!! Yah…Yah Yah!!!
Terrible I know, but at least you were spared hearing my actual voice.
Have a great weekend. Do lots of springy stuff!
-C
2 Cups Whole Wheat Flour
4 Ripe bananas
1 Teaspoon Baking Soda
1/2 Teaspoon Baking Powder
1 teaspoon Salt
1 teaspoon Vanilla Extract
3/4 Cup Brown Sugar
1/3 cup melted Coconut Oil
1 Tablespoon Chia Seeds + 3 Tablespoons warm water
1/2 Cup Unsweetened Coconut Flakes
Preheat oven to 350
In a small bowl, mix 3 tablespoons warm water to the chia seeds and let sit for at least 5 minutes (10 is better) In a large bowl, peel and mash the bananas until they turn into a kind of chunky soupy puree. Add in brown sugar, chia seed mixture, vanilla extract, and the melted coconut oil (make sure it’s melted or it won’t incorporate into the mixture) Mix together. In another bowl, whisk together the flour, baking soda, baking powder and salt. Mix the wet mixture with the dry until combined then mix in the coconut flakes.
Line a 12 cup muffin tin and fill each cup about 3/4 the way up with batter. Sprinkle each muffin with brown sugar and place in oven on center rack. Bake for 25-30 minutes or until the tops 0f the muffins are golden brown and a tester inserted into the middle comes out clean.
Remove muffins from tin and let cool.
Serve as is or maybe with a smudge of coconut butter, or anything you want really.
No need for fork, just use you mouth.
There is irish soda bread in your future. I can see it. A nice hardy hunk slathered in butter and honey, crumbs all over the place. So all you have to do know is make it.
I remember reading somewhere (I wish I could remember where) that irish soda bread is just four ingredients, flour, sea salt, baking soda and buttermilk and adding anything else would make it a cake. So when I decided to make irish soda bread, thats all I used. ( I made it with some wheat flour) What you end up with is a highly dense, super fragrant, soft, chewy bread with a crunchy crust. Definitely not a cake.
Note….You can for sure add in a bit of sweetener or even little fat to make it richer and softer, but then it wouldn’t be bread (or so that’s what I read) There are tons of other recipes out there that have other stuff in them. This is just a really simple basic recipe.
White whole wheat flour and all purpose flour mixed together. Salt baking soda and buttermilk. That’s it.All the dry whisked together and in goes the buttermilk. Mix together until dough starts to form then dump onto a floured surface. Handling dough as little as possible, knead into ball.
Place on a baking sheet and dust with flour. Take a sharp knife and cut an X through the top about 1/2 inch deep.
Stick in into the oven for 50 ish minutes, or unit la tester stuck into the middle comes out clean and there is kind of a hollow thunk when tapped on.
And now you have a very pretty, dense hunk of irish soda bread.
Cut and serve with butter and honey (thats how the mister likes it) or whatever you want to eat it with.
-C
Irish Soda Bread
1 cup all purpose flour
1 cup white whole wheat flour (or you can use all purpose)
1 teaspoon baking soda
1 teaspoon salt
1 cup buttermilk (or your choice if milk plus a tablespoon lemon juice)
Preheat oven to 375
In a large bowl, whisk together flours, baking soda and salt. Mix in buttermilk until the dough starts to come together. If the dough seems to dry, add another splash or two of milk. Dump out dough onto a floured surface and shape into a ball. transfer onto a baking sheet, dust with flour and cut a x about 1/2 inch into the top. Stick into oven for 50 minutes until a toothpick comes out clean and the bread makes a hollow sound when tapped.
Let cool enough to handle.
Cut into and serve with a smear of whatever you want
Best eaten within a day or two
HORRAY, its Saturday!!! I don’t care that I have a bunch of laundry and house work to do, bills to pay, a mangy dog to groom… I get to do it all at home with the music blasting,(maybe some holiday tunes) a lot of coffee, in my comfy sweats and the oven on. Weekends are always a mixed bag of crazy for me but I can usually count on being at home for a chunk of the morning or afternoons and that’s when I jump at the chance to make me some yeasted bread. Give me a couple of hours, my list of chores and watch me go.. I can mix and knead,, set aside to rise and hit up cleaning that toilet. Go back and knead, divided and rise again, then go fold all the laundry. Stick the bread in the oven and watch out, I am mopping the floors. I am nothing if not a fantastic multitasked, much like these rolls. You can serve them as a side for dinner , use them as a sandwich roll, or eat them as the star with a dab of butter and a drizzle of honey. The possibilities are endless. This particular recipe is fantastic for may reasons…. Its pretty simple, not to many ingredients and is made with whole wheat flour. If you don’t want 16 rolls, you can make the dough, bake half and freeze the rest. You could even bake into loaves of bread instead.Yeah, sounds good right? Go ahead, you know you want to. Just do it!I always gather the ingredients.. I have learned over the years that if I have all my stuff out and measured in front of me, I will almost never forget something and that I make less of a mess. It also helps that I find it pretty. So, flours and salt are whisked together. The yeast and honey in a bowl waiting to be proofed. The butter in need of more melting and an egg.. Pretty. Honey and yeast mixed with a cup of warm water. BE CAREFUL with the temperature of the water.. If its to hot, the yeast will kill the yeast and you will have to start over again, but I trust you won’t do that.Now that the yeast is active, mix in melted butter and egg. (Make sure the butter is not hot, warm is ok) Add wet ingredients to the dry and mix.
I have a super awesome dough mixer , it helps to mix and not completely stick like it does to a wooden spoon. Dont have one? Use a wooden spoon, it works the same with a little more stickiness..You have a stand mixer? Well fancy you. No I am not jealous,(maybe a little). I like using my hands when making bread, but you? Go ahead, use your mixer, its cool with me. So mix you dough, you want the dough wet and sticky but still able to roll into a ball. If you need to, add a pinch more of flour, just enough to help form a ball. When ball is formed, drizzle oil and rub all over and place in bowl with a damp towel. Let sit somplace warm to rise for about an 45 minutes or unit dough has doubled in size. A good warm spot..Try the top of the fridge, thats my rising spot.
Once it has doubled, roll out onto a nicely floured surface and..my favorite part, punch it down and knead for a few minutes…. This dough doesn’t need a lot of kneading, just enough to reform ball and get some air out. Now divide and place into well buttered pans. I used two 9 inch cake pans, but a 13 X 9 pan or baking dish would work or loaf pans if you want loaves. Just make sure to really butter the pans.
Little ball of dough turned into big balls of dough. (Yeast is so cool!).Into the oven they go. Right before I baked them I gave the tops a little milk wash, just for color. Do it if you want, you could even do an egg wash, but it’s really not necessary. Oh boy… Fresh from the oven…Take a bit of butter and melt over the top….So lovely! Who wouldn’t want to just tear these beauties apart?
Now eat.. Eat with jam, eat with cheese, eat with peanut butter or with a bit of honey. Or, eat as is…..Just eat it and enjoy you labor of love and the satisfaction that you just made those delicious rolls that you are eating.
Honey Wheat Pull-apart Rolls.
Ingredients
1 cup all-purpose flour
1 3/4 white whole wheat flour
2 tablespoons honey
4 tablespoons melted butter
teaspoon salt
2 1/4 teaspoon yeast
1 egg
1 cup warm water
2 tablespoons butter(to rub over baked rolls)
Makes 16 good-sized rolls
In a large bowl whisk together both flours and salt.
In a smaller bowl add warm water, yeast and honey. Stir and let sit for 5 – 10 minutes or until the yeast has grown and is foamy. Meanwhile, melt butter and let sit for 5 minutes. When the yeast has proofed, whisk together with butter and egg. Add to dry ingredients.
With a dough spoon , wooden spoon, stand mixer or your fist, mix (or knead) until the dough comes together and begins to form into a ball. You want the dough to be wet and sticky but add a pinch or two of flour if its to wet and not forming a ball.
Coat dough with a little oil and place back into large bowl. Cover with a towel and place in a warm place(The top of the fridge is great) Let rise for 45 minutes or until the dough has doubled in size.
When dough has doubled, dump dough onto a well floured surface, flour up you hand and punch down the dough and knead for a few minutes. Divided dough 16 even balls. Now is a good time to preheat oven to 400 degrees.
Place in greased pans ( 8 in each) and cove with plastic and let rise for another 20-30 minutes or until dough has doubled and filling out the pans. When the second rise is done, place in oven and bake for 25 minutes or until a nice light brown. If you want a darker crust, right before baking, lightly brush the tops of rolls with butter. As soon as the rolls are removed from the oven take the remaining 2 tablespoons of butter( one tablespoon for each pan) and melt over top of rolls
Note..If you want to freeze any rolls, place in a pan after fist rise and stick in freezer until frozen Transfer to a airtight bag. When you want to use, simply pop out of freezer and let sit for about and hour. Bake as directed above.

THE LOVELY CRAZY
September 19, 2015 by maximios • Blog
What are your weekend plans?
Me well, I need to can, pickle and eat as much zucchini as I can. And it’s not just zucchini anymore… we are getting into cucumbers too…AAAHHH I know I have said this a few times in the past weeks, but man, I have so manning freaking zucchinis.. and the more I eat, the more I end up with… It’s getting pretty crazy here!
So anyway, yesterday my dad came back to VT, WOO HOO! and I was his first stop on his rotating dinner schedule. (cause I am his favorite child. I think..maybe) I made zucchini noodles for dinner (I have made them every night for the past week) and I wanted to make him dessert, I have all sorts of pretty fruit that I wanted to make and prepare, but I also had little time and honestly, little desire to move all that much (it was so f ing hot!) I already had out the shredder and a bowl, and the zucchini was just sitting there, in the basket taunting me with it’s gigantic green whaleness. So I figured I’d just make a zucchini cake, or better yet, cause my dad really likes chocolate, a chocolate zucchini cake.
This cake is tender and moist, almost like a cakey brownie, so it does not require any frosting which is nice when your dead tired and it’s so hot that any frosting would probably just melt off anyway. (although you could totally frost it up) It makes a great dessert, but I would not hesitate to serve this for breakfast either because, 1. It has a lot of zucchini in it which automatically justifies eating it whenever, 2. also made with whole wheat, and 3. it’s totally ok to eat chocolate cake for breakfast. I mean people eat donuts for breakfast and that shit is usually fried.
Yeah, this is for sure a dessert/breakfast cake.
The stuff for cake…. Regular all purpose flour, white whole wheat flour, and cocoa powder. Some sugar, salt, baking soda and oil. A little vanilla extact and a splash of coffee. And of course, shredded zucchinn
Dump the sugar, salt and baking soda into flour, whisk together, then mix in the oil, vanilla and the coffee. Now add in the shredded zucchini, but right before adding it in, give it a squeeze to remove a little bit of the liquid.
Mix until combined.
And pour batter into a well oiled pan
Feeling fancy? I was so I peeled the green skin from a zucchini and make a little starburst on top
And into the oven to bake…
And it comes out looking so fancy. Let cake cool for a few minutes and carefully flip from pan.
Note. It might not be the best idea to test your cake with a blunt chop stick.. I did and it made the middle sink in a little. No big deal, but next time I will use a fork.
Cooled and removed from pan. Now all you need to do now is eat cake.. I think that’s something you can handle.
Happy Friday!!!!
-C
Preheat oven to 350
In a large bowl, whisk together the flours, salt, baking soda, cocoa powder, salt and sugar. Then add in the oil, vanilla and coffee. Add in the zucchini, but right before, give it a squeeze to remove some of the liquid. (don’t got crazy, just get a little liquid out). Mix until incorporated.
Oil a 9 inch cake pan and pour in the batter. If you want, use zucchini skin to make a pretty design on top (completely optional), and place into preheated oven.
Bake for about 45-50 minutes, or until a tester stabbed in the middle comes out clean.
Remove from oven and let cool in pan for at least 5 minutes the gently invert pan to remove cake and place on a rack to cool.
Serve as soon as you want..
Place in mouth, chew, and swallow…..Smile!!!
First day of Spring!! Well kind of I guess. I think it actually starts at like 6:20 tonight, when the temperature is going to dip back done to 10.(Spring my ass) I don’t know about you people out there but here in Vermont, we are really hanging on to winter. I have to keep telling myself…” It will be warmer soon and you’ll be looking forward to this weather in a few months.. so stop bitching!” I give myself good pep talks.
Anyway, last week at the farm share pick up, there was a nice little surprise. We got a few pounds of some sweet locally grown and milled whole wheat flour. There was a little sign with the information about the wheat and where it came from, but in my haste of gathering all of my other veggies, I failed to take notes and forgot the name of the farm that it came from. But I do know that my farm traded some celeriac for the wheat. I was really excited because I am really into the idea of using locally grown grains and I don’t know, it just made me really happy, especially because it was a trade. Food framing and local sharing is stuff that makes me happy.
I wanted to make something to kind of showcase the hearty, nutty flavor of the wheat and I also wanted to make something that my mister would eat for breakfast. Well what better way to do that then with muffins! Banana coconut whole wheat (that just happen to be vegan) Hearty, fruity, and smells like the word lovely and the color yellow. A few to eat and a few to share. Hanging at home, running away or getting ready for a day of spring cleaning….This is a great weekend to make muffins!
The stuff… Light, nutty local whole wheat flour, ripe oh ripe bananas and coconut flakes are the stars in this muffin… But we need the other stuff too. Brown sugar, vanilla, coconut oil and a chia egg. Baking powder, baking soda, and last but not least, salt.
Yup, that sounds about right The salt, baking soda, and baking powder are whisked together. The banana and all the rest of the stuff are mixed up… Then mix the wet mixture into the dry. Stir until combined and then add in the coconut flakes,Scoop mixture into 12 lined muffin cups… A scoop like mine works very nicely. Don’t have one, well I recommend you get yourself one. Until then, use a spoon. Something I always do when baking any muffin is sprinkle the tops of each muffin with a bit of sugar or brown sugar. It melts and caramelizes and adds a sweet little crunch to the tops.
Now stick the muffins into the oven. Remove from oven when they look like this, nice and golden brown. Also good idea to check with a tester stuck into the middle. When it comes out clean, they are done.12 happy little muffins cooling on a rack, waiting to be eaten with you mouth.
Doesn’t the sight of pretty food make you happy, like sing a song happy? Muffins, whoa yah!! Friday yah yah!! Spring…What, Yah!! Yah…Yah Yah!!!
Terrible I know, but at least you were spared hearing my actual voice.
Have a great weekend. Do lots of springy stuff!
-C
Preheat oven to 350
In a small bowl, mix 3 tablespoons warm water to the chia seeds and let sit for at least 5 minutes (10 is better) In a large bowl, peel and mash the bananas until they turn into a kind of chunky soupy puree. Add in brown sugar, chia seed mixture, vanilla extract, and the melted coconut oil (make sure it’s melted or it won’t incorporate into the mixture) Mix together. In another bowl, whisk together the flour, baking soda, baking powder and salt. Mix the wet mixture with the dry until combined then mix in the coconut flakes.
Line a 12 cup muffin tin and fill each cup about 3/4 the way up with batter. Sprinkle each muffin with brown sugar and place in oven on center rack. Bake for 25-30 minutes or until the tops 0f the muffins are golden brown and a tester inserted into the middle comes out clean.
Remove muffins from tin and let cool.
Serve as is or maybe with a smudge of coconut butter, or anything you want really.
No need for fork, just use you mouth.
I remember reading somewhere (I wish I could remember where) that irish soda bread is just four ingredients, flour, sea salt, baking soda and buttermilk and adding anything else would make it a cake. So when I decided to make irish soda bread, thats all I used. ( I made it with some wheat flour) What you end up with is a highly dense, super fragrant, soft, chewy bread with a crunchy crust. Definitely not a cake.
Note….You can for sure add in a bit of sweetener or even little fat to make it richer and softer, but then it wouldn’t be bread (or so that’s what I read) There are tons of other recipes out there that have other stuff in them. This is just a really simple basic recipe.
Stick in into the oven for 50 ish minutes, or unit la tester stuck into the middle comes out clean and there is kind of a hollow thunk when tapped on.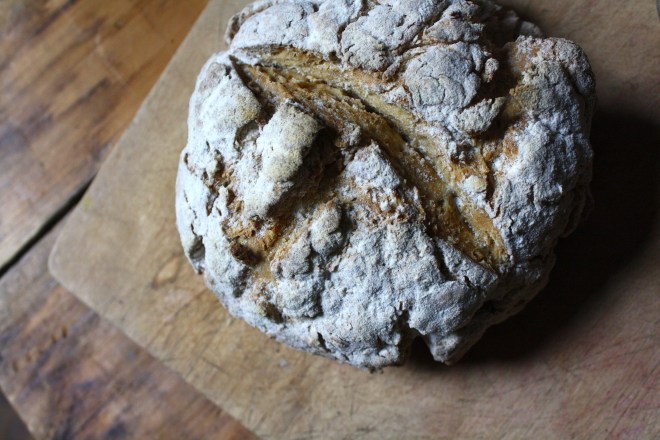
And now you have a very pretty, dense hunk of irish soda bread.
Cut and serve with butter and honey (thats how the mister likes it) or whatever you want to eat it with.
-C
Irish Soda Bread
Preheat oven to 375
In a large bowl, whisk together flours, baking soda and salt. Mix in buttermilk until the dough starts to come together. If the dough seems to dry, add another splash or two of milk. Dump out dough onto a floured surface and shape into a ball. transfer onto a baking sheet, dust with flour and cut a x about 1/2 inch into the top. Stick into oven for 50 minutes until a toothpick comes out clean and the bread makes a hollow sound when tapped.
Let cool enough to handle.
Cut into and serve with a smear of whatever you want
Best eaten within a day or two
I have a super awesome dough mixer , it helps to mix and not completely stick like it does to a wooden spoon. Dont have one? Use a wooden spoon, it works the same with a little more stickiness..You have a stand mixer? Well fancy you. No I am not jealous,(maybe a little). I like using my hands when making bread, but you? Go ahead, use your mixer, its cool with me. So mix you dough, you want the dough wet and sticky but still able to roll into a ball. If you need to, add a pinch more of flour, just enough to help form a ball. When ball is formed, drizzle oil and rub all over and place in bowl with a damp towel. Let sit somplace warm to rise for about an 45 minutes or unit dough has doubled in size. A good warm spot..Try the top of the fridge, thats my rising spot.
Once it has doubled, roll out onto a nicely floured surface and..my favorite part, punch it down and knead for a few minutes…. This dough doesn’t need a lot of kneading, just enough to reform ball and get some air out. Now divide and place into well buttered pans. I used two 9 inch cake pans, but a 13 X 9 pan or baking dish would work or loaf pans if you want loaves. Just make sure to really butter the pans.
Now eat.. Eat with jam, eat with cheese, eat with peanut butter or with a bit of honey. Or, eat as is…..Just eat it and enjoy you labor of love and the satisfaction that you just made those delicious rolls that you are eating.
Honey Wheat Pull-apart Rolls.
Ingredients
Makes 16 good-sized rolls
In a large bowl whisk together both flours and salt.
In a smaller bowl add warm water, yeast and honey. Stir and let sit for 5 – 10 minutes or until the yeast has grown and is foamy. Meanwhile, melt butter and let sit for 5 minutes. When the yeast has proofed, whisk together with butter and egg. Add to dry ingredients.
With a dough spoon , wooden spoon, stand mixer or your fist, mix (or knead) until the dough comes together and begins to form into a ball. You want the dough to be wet and sticky but add a pinch or two of flour if its to wet and not forming a ball.
Coat dough with a little oil and place back into large bowl. Cover with a towel and place in a warm place(The top of the fridge is great) Let rise for 45 minutes or until the dough has doubled in size.
When dough has doubled, dump dough onto a well floured surface, flour up you hand and punch down the dough and knead for a few minutes. Divided dough 16 even balls. Now is a good time to preheat oven to 400 degrees.
Place in greased pans ( 8 in each) and cove with plastic and let rise for another 20-30 minutes or until dough has doubled and filling out the pans. When the second rise is done, place in oven and bake for 25 minutes or until a nice light brown. If you want a darker crust, right before baking, lightly brush the tops of rolls with butter. As soon as the rolls are removed from the oven take the remaining 2 tablespoons of butter( one tablespoon for each pan) and melt over top of rolls
Note..If you want to freeze any rolls, place in a pan after fist rise and stick in freezer until frozen Transfer to a airtight bag. When you want to use, simply pop out of freezer and let sit for about and hour. Bake as directed above.