What is better for a bake sale then Oreo cookies? Oreo cookies made from scratch!.
So when my sister called and asked me to make something for my nephews bake sale to raise money for his basketball team, I couldn’t say no. (or I didn’t want to say no cause any good excuse to bake right!) Plus I had just found this awesome recipe on one of my favorite blogs, my name is yeh, for home made Oreos that I have been super excited to try, so it kind of worked out. But before I committed to the Oreo, I wanted to just double check with my nephew and see what he might want me to make because it was his bake sale.
This is the conversation we had. And yes, it was through text.
Me- “Hey bud, what do you want me to make for your bake sale? Cupcakes, cookies, donuts, or brownies”
Jack- ” Yea!”
Me- “Yea what?”
Jack- “Make that.”
Me- “Make what?….Hello!! What do you want me to make? Should I make Oreos?”
Jack- I WANT OREOS!”
Ok.. So it took a little while, but we got there. And after the the basketball game and the super successful bake sale..
ME-“Did you see the Oreos?”
Jack- “What do you mean?”
Me- “The Oreos I made for the bake sale…the ones you wanted me to make”
Jack- “There was a bake sale? I want Oreos”
Yup, that’s the attention span of my 13 year old nephew. Little shit head. But for real, I had so much fun making these cookies and I am definitely going to be making them again. Plus they were a super hit at the sale.
I am the best aunt! (and sister!)
Cookie Time! Whats going on here is brown sugar and butter have be beaten together until nice and fluffy Then a good big splash of vanilla and another 2 big splashes of coffee are added to that.(I sacrificed my last few sips of my coffee for these cookies) The dry stuff, flour, salt and cocoa powder, are whisked together, waiting to be added to the wet. Mix the dry ingredients into the wet and mix. I ended up just using my hand and kind of squish mixing everything together until in tuned into a nice lovely uniformed dough. Form the dough into 2 balls and give each a few kneads to get any air bubbles out. Place dough back into bowl and stick in the fridge to sit for 10-15 minutes( it makes the dough a little easier to work with)
Once the dough has had a little time to rest and cool, remove from fridge, one ball at a time. Place on a lightly cocoa or powdered sugar dusted surface and roll out the dough. Grab any size circle (or other shape) cookie cutter and get to shaping the cookies. Notice the tin can in the bowl? I could’t find my biscuit cutters anywhere but the can was the perfect size, and it worked really well. Keep a little bowl of either powered sugar of cocoa to dip the cutter in in between making the cookies. It really helps the dough from sticking and breaking.
When you have cut out your cookies, use a spatial and place them on a baking sheet. You can try to transfer with you hands, but you end up messing up the shape and most of them will break anyway.
Stick the cookies in the oven for about 15 minutes a batch and continute to roll and cut out the cookies until you have no dough left.
While the cookies are getting their cool on, make the cream filling. All you need is a stick of butter, about 4 cups of powdered sugar, some vanilla and a few splashes of heavy cream. Beat that all up until nice and creamy thick and spoon it into a pastry bag (I used a big old ziplock bag) to be piped on the cookies. Filling the cookies is for sure the best part. Separate the cookies into pairs and pipe a big blob of filling onto one of the two cookies. Take the names cookie and place on top, giving it a little smooth to the disperse the cream. Keep doing that until the cookies are all filled.
Stacks of cookies… Sold to the highest bidder! I was told that they sold out within the first half hour at $1.50 a pop….Should have charged $5…. for a good cause right?
And yes, even though he was being a space head and didn’t even care that I just made him like 50 bucks for his team, I still saved the kid one.He just had to give me either a hug or 5 bucks for it.
I got a hug. (I really wanted the 5 dollars)
-C
From Scratch Oreo Cookies
Adapted by Molly Yeh from My Name is Yeh!
The cookie (makes about 18 3 inch Oreos)
2 cups all purpose flour
1 cup cocoa powder
3/4 cup brown sugar
1 cup or 2 sticks soften butter (use earth balance for vegan)
1 teaspoon salt
1 teaspoon vanilla extract
2 tablespoons brewed coffee
The filling
1 stick soft butter (us earth balance for vegan)
2 tablespoons heavy or whipping cream (use a nut or soy milk for vegan)
4 cups powdered sugar
2 teaspoons vanilla extract
Cookies- In a large bowl cream together sugar and butter until light and fluffy. Add in vanilla and coffee and mix together. In another bowl, whisk together the flour, salt and cocoa powder. Add dry to wet and mix together unit a uniform dough forms. Dump out onto a lightly cocoa or powdered sugared surface and knead dough a few times. Split ball into two balls, place in bowl, and stick in the fridge for 15 or so minutes.
Preheat oven t0 325 degrees
When dough is chilled, remove one ball at a time, and roll dough out on a cocoa or powdered sugar dusted counter until its about 1/4 inch thick. With a round (any shape would work) cookie cutter, cut out as many cookies as you can. In between sits, dip cutter in a sugar and cocoa to keep the cookie from sticking. Transfer cut out cookies onto a baking sheet with a spatula. Take scraps, roll into a ball, and roll out again. Keep doing that until you can’t cut out any more. (You can either bake a weird shape cookie or just eat the dough)
Bake cookies for about 15 minutes or until the cookie has risen a bit and the tops have lost their glossiness and look cooked. Remove from oven and let cookies dry on a wire rack.
Make the filling
Filling- Beat together butter, sugar, vanilla, and cream until completely mixed and is at your optimal consistency. Add a drizzle more cream if you want to thin out or add more sugar for a thicker cream.
Stick the filling into a piping bag or ziplock bag an snip the end. With cookies in pairs, pipe a big dollop of filling onto one of the two cookies. Place the naked cookie onto the filled cookie and give a smooth to distribute the filling.
lick your fingers and eat a cookie.
If selling at a bake sale, charge $3 a cookie…. If it’s for a good cause.
I am so happy its Friday, but like whoa, this week has flown by so fast. I think I need to make a pie to slow things down a bit.. What Kind of pie am I making? We will get to that, but first we must make a killer pie crust, one to hold of the goodness to come.
Crusty Stuff. Flour, a stick of frozen butter (or a stick of frozen Earth Balance, which I have used and it turns out much the same) a bit of sugar, some salt, ice water, and apple cider vinegar*.
Whats with the vinegar you ask? Well first off, don’t worry about tasting it, you won’t. Secondly, I add it because it helps keep gluten from forming in the flour, which in turns makes the pie crust more flakey and less doughy. If the though of vinegar really bothers you, you can use lemon juice or even leave it out.
The flour, salt, ans sugar are mixed together into a bowl. Then with a box grater or hand grater with big hole, grate the frozen butter directly into the flour, stopping every few tablespoons to toss around in the flour. (DO this or you will end up with a big pile of shredded butter that is starting to melt back together) Also, hold the butter with the wrapper to keep from warming the butter with your hand.
Once the whole stick is shredded, take a fork and just toss the chunks around a bit more just to evenly distribute. Now add in vinegar and water. Toss with fork until the mixture starts to come together. If you think that dough seems way to dry, add in one more tablespoon of ice water.Dump the dough onto a lightly flour surface and kind of squish, smoosh dough into a pile. The dough is all clumpy and weird looking, Well thats what it is support to look like, so your good. Once the dough is gathered into a ball, place onto a piece of wax paper and wrap. Now is the most satisfying part..Smoosh the wrapped dough into a disk but applying pressure. Aaahh, kind of looked like pie crust. Now Stick it in the fridge for a least a hour (Don’t skip this or your crust will be blah)
Out of the fridge and awaiting a roll and a filling.
Weekend plans for a pie are set!
Have lots of good times!
-C
Pie Crust
Notes… You can for sure make this pie crust vegan by replacing the butter for a stick of Earth Balance. Also, this is the stuff for a single pie crust but I usually habra bit left over to make a few little cutouts for the top of the pie or pie scrap cookies.
To make this a double pie crust, just double everything up.
1 1/4 cups all-purpose flour
1 tablespoons granulated sugar
1/2 teaspoon salt
1/2 cup unsalted butter (or Earth Balace), cold or frozen
1/4 cup ice water
1 tablespoon apple cider vinegar
In a large bow, whisk together the flour, salt, and sugar. Place grater in bowl and with the biggest grate hole, grate the frozen or cold butter directly into the flour mixture, stopping ever few tablespoons to toss around in the flour so you don’t end up with a big pile of grated butter. With a fork, toss around a bit until the butter is evenly disrupted in the flour being careful NOT to work the butter into the flour. Add in the vinegar and water and mix as little as possible with a fork until the mixture starts to come together. The mixture will seem kind of dry and almost like it is falling apart, but thats what you want. If dough is really too dry, add in another tablespoon of ice water. Dump mixture onto a lightly floured surface and squish together to form a ball, handling as little as possible. Place on a piece of wax paper and wrap. Give it a good squish to flatten out a bit and place back into fridgerater for a least one hour, if not longer.
And then you have crust
Crust can be frozen.. just wrap in plastic wrap and place into a freezer bag.
TGIF!!!! For reals, because Monday-Thurday were monster days. And now that its friday, I can dig a hole and hide in it until it’s at least 30 degrees with some sunshine. (I might never get to come out.)
A few things I will bring in my hole:
food (lots of food and coffee, lots of coffee)
a soft blanket and pillow
a few books, preferably with pictures, on farming and gardening (think spring!)
the entire series of the Fresh Prince of Bel-air and a device to watch it on
toothpaste (I can use my finger to brush my teeth)
But before I leave for my hole in the ground, I made these little cake bites to get my people through the weekend. Sweet little lemony bites of rich dense cake dipped into bittersweet chocolate. (I am just so nice) They have all the pleasure or cake without the need of a fork and are much easier to give away then a big slice of cake. Plus, they are fun to make. My little sister helped and did most of the chocolate dipping. Then she and another little used their mouths to clean up the chocolate mess. It was an afternoon of chocolate all over the kitchen fun day.
So make some bites to have and to share. Or if you, like me, are digging a hole to hide in, make a batch of bites to bring with you. That’s the beauty of cake covered in a harden chocolate shell, they travel really well.Simple lemon cake stuff. Flour, baking powder and salt whisked together, Sugar and soft butter in a bowl. An egg, some vanilla, milk, and of course, the lemon.
To make the batter, cream the soften butter with the sugar until light and fluffy. Zest lemon(1 big or 2 small) into bowl with the juice of the lemon(s), the vanilla and the egg. Beat until combined. Now beat in the dry and then the milk. Keep beating for another minute until all mixed. Batter should be light and fluffy.
Batter goes into a greased and floured 9×13 baking sheet and stuck into a 375 degree oven for about 30 minutes (You can use a 9×9 baking pan. Just bake fir another 10 minutes and you will end up with thicker bites). Remove from oven and let cool for a few minutes and flip to remove cake from baking sheet. Cut cake into small pieces (I cut 4×6 to get 24 bites) and place bake into sheet and into freezer (I stuck mine outside, it was -2 degrees ) for at least 2 hours.
Frozen bites ready for the chocolate coating… Bittersweet chocolate chips and a little bit of coconut oil. Melted together all nice and shiny smooth.Now dip and slather those bites in the melted chocolate.
Oh what a lovely sister I have.. Look at her dunk….. like a boss!Fully coated and placed on a rack for the chocolate to harden. I ended up sticking the rack in the freezer for 10 minutes…They harder really fast in there.
And now you have some it, bites of cake covered in chocolate. 1 bite, 2 bites…5 bites. Eat however many you want because its Friday and because there small little bites and just because you can.
Now if you need me, I’ll be in my hole.
-C
Chocolate Lemon Cake Bite
1 1/2 cups all purpose flour
1 teaspoon baking powder
1 teaspoons salt
1 cup white sugar
1/2 cup (1 stick) soft butter
1 egg
1 teaspoon vanilla
1 cup milk
1 large or 2 small lemons
2 cups bittersweet chocolate chips
2 tablespoons coconut oil
Add butter and sugar to a large bowl and beat on medium unit light and fluffy. Ass in vanilla egg, the zest of the lemon and the juice of the lemon. Beat to incorporate. Now beat in the dry and lastly the milk.
Grease and flour either a 9×9 pan or a 9×13 baking sheet. dump batter in and smooth out. Stick in oven and bake for about 3o minutes or until a toothpick stuck into the middle comes out clean. Remove and let cool for a few minutes on a wire rack. Flip cake to remove from pan. Cut cake into bit sized pieces, 4×6 is a good size, and place back on baking sheet and stick into freezer for at least 2 hours.
When cake bites are as good as frozen, get the chocolate ready. Take the chocolate and the coconut oil and either melt in a double boiler or the microwave. Mix until smooth and make sure to full incorporate the oil. Now remove the cake bites from the freezer and dip each bite into chocolate, trying to full coat all sides. Stick onto a wire rack or a parchment lined pan to harden. They can be stuck back into the freezer to harden faster.
Once chocolate has harden, your good to go!
So the mister wants to know…”Why would anyone ever buy those crappy english muffins from the store when they could be eating these?”
Good question…And we will all answer….”Never again! Because I now make the sickest E.M.s around.!”(E.M.s is the cool short way to say english muffins and now that you are going to make your own….man, your so cool!)
These E.M.s are perfect. Easy to make, not overly fussy, and you end up with a super yummy, extremely versatile, individually portion super sweet little disk of bread. And the best part is..nooks and crannies! I think that is why I decided to make these E.M.s, so Nick and I can talk the about nooks and crannies…(Sometimes we need light conversation)
We start with flour and salt whisked together in a bowl. The honey, yeast and warm water are getting on proofing in a jar. An egg waiting to be cracked, some milk, and 2 tablespoons of butter. All this good stuff equals…nooks and crannies!
Oh you like my nifty dough whisk….me too, I use it all the time. Maybe I should have a dough whisk give away ……maybe…..
Everything all mixed together, dumped onto a floured surface and kneaded for 10 minutes by hand…..If you have a stand mixer, you can use it if you want, but you are missing out on the fun of doing it by hand….
When the dough has been sufficiently kneaded, gather dough into a nice ball, coat with a little oil and place back into bowl. Cover with a towel and stick in a warm place to rise for about an hour or until it has doubled in size.
When dough has doubled, punch down and plop out onto floured surface. Dust the bottom of a griddle or in my case, two cast iron pans, with corn meal. Divide dough into 8-10 equal balls and smash into 2 inch thick disks.
Place on griddle or pans and sprinkle more corn meal on top of each E.M. Cover and let rise for another 15 minute.
Now the E.M.s have rested, turn the griddle (or pans) on to low heat. Once your griddle (or pans) gets hot, continue to cook that side for another 7-10 minutes, or until golden brown. Flip and cook other side for 10-12 minutes or until golden brown. Once browned, check for doneness with a thermometer. The inside should reach 200 degrees.( if you don’t have a thermometer, fork split one open and check…. you are going to eat it anyway) If the outside cooked faster then the inside, no worries, just pop them into the oven at 350 for 8-10 minutes. I had to pop mine into the oven for to cook completely.
Remove form griddle, let cool a bit, and ……Fresh, fluffy fat, fantastic….Everything and more that a real english muffin should be. Split open with a fork and……. the nooks and crannies! So spot on. Serve with anything your heart desires…I served these with whipped honey butter…. and eat the only kind of E.M. you will ever again eat. Grocery store english muffins be damned!
Enjoy and Happy Tuesday!
-C
English Muffins
Ingredients
2 1/2 cups unbleached all-purpose flour
2 teaspoons honey
1 teaspoon salt
2 tablespoon butter at room temperature
1 1/4 teaspoons active dry yeast
1/4 cup warm water
3/4 cup milk
1 egg
cornmeal for pan
Combine warm water, honey and yeast in a bowl to active..about 5-10 minutes or until yeast is foamy.
In a separate bowl, whisk together flour and salt. Mix in butter(I use my fingers) When yeast mixture is done proofing, whisk together mixture with the egg and milk. Add wet to dry and mix until just incorporated Dump out onto floured surface and knead dough for 8 minutes, adding a bit of flour whenever dough starts to get too sticky. Roll into a ball, coat with oil and place back into bowl and cover with a towel. Let rise for 60 minutes or until sought has doubled in size.
Once the first rise is done, deflate dough and divide into 8 equal pieces(10 for a slightly smaller muffin). Smoosh each ball into a flat disk, about 2 inches thick) and place on a cold cornmeal dusted cast iron griddle. (I used 2 cast iron pans) Sprinkle tops of muffins with more corn meal and let dough rest for another 15 minted. Turn burners on low heat. Let griddle get hot and continue to cook the muffins for another 10 minutes or until golden brown. Flip and cook opposite side until gold brown and remove from griddle. To make sure the muffins are cooked completely, stick an instant read thermometer into the center…it should read 200 degrees. (if you don’t have a thermometer, split one open… the tester E.M.) If the E.M.s are not completely cook, just stick in the oven on 350 for 5-10 minutes or until cooked throughout.
Remove and let cool. To serve, split open with a fork and give a light toast. Spread with butter, jam, peanuts butter, anything you want…maybe make E.M pizzas!
Those are some for real chocolate chip cookies…….for real.
This is probably one of the first recipes that I ever really knew by heart. Some recipes I can bring up in my head, but if I haven’t used it in a while, I usually have to check to make sure I got it right… Not these… Chocolate chip cookie are forever imprinted in my brain.
Chocolate chip may seem like a simple cookie, but trust me, its more complex then one may think. There are so many little factors that really affect the over all cookie: The baking temperature, the exact perfect time to pull the cookies out of the oven. Weather the butter is hand mixed or beaten, softened or melted. The color of the baking sheet and how long you leave the cookie on the sheet before placing on the coloring rack…….This cookie is as much about method as it is about ingredients. ….But don’t let that scare you..you got this. Just don’t think that these are a mindless act of baking. You have to be committed, keeping on the oven the whole time these cookies are baking………….. It’s so worth it.
Full disclosure here…I have been making these cookies the same way for so long so I am not exactly sure, but this might actually be the same recipe as toll house. I haven’t looked….Either way…I have tried out other chocolate chip recipes and this one has always come out on top.
As usual, I forgot an ingredient in the line up…the chocolate chips, oh and the pinch of salt.. But rest assure, even though not pictured, there are indeed chocolate chips in these cookies!
Pre heat the oven to 375.
Room temperature butter creamed with both the white and brown sugar. Before you add the butter to the sugar, smash any of the big chunks of brown sugar. The key to my recipe is not melting butter or using an electric beater, it’s all hand mixin, no electric mixing(you could use a kitchen aid, but I don’t have one so I think you should use a wooden spoon too), plus it’s a good arm work out. Mix mix mix. I find smearing on the side of the bowl helps too. Mix/smear until both sugar and butter is a unified color and consistency, Once that happens, add the two room temperature eggs, the vanilla and mix a little more,
When everything is mixed, add the dry ingredients and mix that until fully incorpaerterd….
Take a minute here and sniff……I love the smell of cookie dough, it’s a happy smell.Now for the chocolate chips. I use only 1 1/2 cups of chocolate chips… You want just enough in each cookie, but don’t want to overwhelm it with too much chocolate. The cookie is as much of the star as the chocolate. See how may cookie sheet is nice and silver and clean? For a long time I used a very dirty and dark baking sheet. I would make cookies and they always seem to come out slightly burnt. Got myself a new baking sheet and……perfect cookies. If your baking sheet is dark, I would recommend using parchment paper.
Your ready to scoop and bake….my suggestion. Make 2-4 cookies for your first batch, or what I call the tester batch. I swear, there is some law of the universe that says the first batch always is overcooked. I have excepted that and learned to only make a couple for the first batch Scoop mounds of your preferable size(I do a spoonful) and place on sheet with each mound having good amount of spreading space. Place in preheated oven..
Now here is the really important part!!!!Baking time is essential to how your cookie turns out. If you want a more soft and chewy cookie, bake for about 7-9 minutes or until the cookies are just barely turning brown…just barely. They might seem a little undercooked, but the cookies will cook a bit more once pulled from the oven Trust…I know what I am talking about. .Let them cool for about a minute on sheet before transferring them to rack. If you like more crunchy milk dipping cookie..bake for 9-11 minutes or until they are golden brown.
Lovely right…
Now you have gone and done it…Made fantastic cookies!!! Maybe you are going to share? No pressure, but it is the holiday season. For real, you can’t go wrong with a chocolate chip cookie, every loves it. and then will in turn love you too.
Get people to like you with Cookies!!!! hahahaha… but you know its true!
Perfect Chocolate Chip Cookie
2 1/4 cups all-purpose flour
1 teaspoon baking soda
1 teaspoon salt
3/4 cup brown sugar
3/4 white sugar
1 cup (two sticks) unsalted butter at room temperature
2 eggs
teaspoon vanilla
1 1/2 cups chocolate chips
Preheat oven to 375.
In a bowl, whisk together flour, salt and baking soda
In a large bowl with a wooden spoon, cream together the brown and white sugar with the room temperature butter. Add eggs and vanilla and stir. Now add the dry ingredients and….. then the chocolate chips.
On a light-colored baking sheet to a parchment line sheet, use a spoon and drop a constant size mound of dough, leaving room for expansion. Place in oven for 7-9 minus until cookie is barely turning brown. Remove and let sit on sheet for another minute before transferring to cooling rack. Keep doing this until all of you dough is gone…
COOKIES!!!!
I don’t know what got into my head today, but I was hell bent on making blondes. I was already committed to make cupcakes with the help of a little little, but, not going to lie, the cake was coming from a box. It wasn’t going to satisfy my baking itch. You see, it’s the misters birthday this week and tonight was the family B-day dinner. My family consists of a whole lot of people, and half of them are 13 and under. So instead of busting my butt baking an amazing 4 tiered strawberry chocolate cream cheese cake for kids who won’t even try it(that was last week, the cake came out fantastic and everyone but the birthday girl ate it. But maybe a 2 year old doesn’t need to like strawberry cake) I decided that I was going boxed and low and behold, they loved Hey, sometimes you gots to make the people happy. But I really wanted to do something else, something a little more special, something for the more mature pallet……..banana brown butter blondes…..Oh yea, I did and I did.
Not a heck of a lot of ingredients. Flour, sugar, banana, butter, egg and vanilla. I always forget something in my ingredient line up pics. Today it was the cinnamon, but thats ok, its optional anyway.
Start with browning the butter… lots of lovely little bits. Smells super nutty.. You want to do it first so it can cool a little before using.Cooled butter mixed with the brown sugar.(I might have jumped the gun a bit and hit was still slightly warm) Make sure when you add the butter you add all the little flavor bits. Mix or beat it up. then add the vanilla and egg.Now mash up and mix in the nanaers. Swirl it in, just like that. Now is a good time to add a little cinnamon… but don’t add it if your don’t want too. I don’t know how I ended up using like five different mixing instruments for this little batch of brownies, but I did, and I definitely trashed the kitchen. First off, I was at my sisters and I don’t know where she puts all of stuff.(She doesn’t either) Secondly, I was also making cupcakes and garlic bread, pasta, and salad at the same time…so maybe that all made me a little more messy than usual…..Whatever. its ok, I cleaned it up. Anyway, above you see me using an electrical beater to mix in flour. I used the beater for the cupcakes and then started used it in the brownies..It was fine, I used low speed for just a sec but I would recommend to just stir in the flour..Try not to overwork the batter.
Ready for the pan…..Its a bit thick, which is good. Your going to have to scoop it more than pout it. Make sure to spread it evenly in pan and not just plop it in and stick it into the oven. Aaaahhh, so darn pretty.And cut into little squares..I love the casserole dish in this picture.… my sister might not ever get it back. To add a little something something, I went and added a small smear of Nutella on half the batch……I think it was a good idea.
Banana Brown Butter Blondies
1/2 cup (1 stick)unsalted butter
1 cup brown sugar
1 cup all purpose flour
1 egg
1 teaspoon vanilla
1 teaspoon cinnamon(optional)
1 medium mashed banana
Preheat oven to 350
Place butter in a small pot or pan over medium heat. Stir frequently until the butter is completely melted and starting to foam. It will start to smell nutty and turn brown within a few minutes…when its a medium brown, take of heat and let cool.( I stick my in the freezer in a shallow pan to help cool faster.)
Once butter has cooled a bit, cream together with the brown sugar. In a small bowl, mash banana. Add egg, vanilla and banana. mix together, then mix in flour until just incorporated. Scoop batter into a grease 8×8 pan and spread evenly. Place in oven for about 20 minutes or until golden brown..It should be cooked all the way through but still a little gooey, moist and brownie like
Let cool and remove from pan….cut and do what you need to do! For a little more decadence..add a drizzle of chocolate or a bit of peanut butter. or do what I did, a smear of Nutella…and serve with the recommendation of a cold glass of milk.
I know your all curious about the cupcake so I’ll show you…I actually made cupcake and a two layered 4 inch cake for the birthday boy. I know, I know…. and the bright pink frosting. It’s actually pretty amazing. That kind of color doesn’t excises in nature.
HAPPY ALMOST BIRTHDAY LOVE!!!!!!!!!!
HORRAY, its Saturday!!! I don’t care that I have a bunch of laundry and house work to do, bills to pay, a mangy dog to groom… I get to do it all at home with the music blasting,(maybe some holiday tunes) a lot of coffee, in my comfy sweats and the oven on. Weekends are always a mixed bag of crazy for me but I can usually count on being at home for a chunk of the morning or afternoons and that’s when I jump at the chance to make me some yeasted bread. Give me a couple of hours, my list of chores and watch me go.. I can mix and knead,, set aside to rise and hit up cleaning that toilet. Go back and knead, divided and rise again, then go fold all the laundry. Stick the bread in the oven and watch out, I am mopping the floors. I am nothing if not a fantastic multitasked, much like these rolls. You can serve them as a side for dinner , use them as a sandwich roll, or eat them as the star with a dab of butter and a drizzle of honey. The possibilities are endless. This particular recipe is fantastic for may reasons…. Its pretty simple, not to many ingredients and is made with whole wheat flour. If you don’t want 16 rolls, you can make the dough, bake half and freeze the rest. You could even bake into loaves of bread instead.Yeah, sounds good right? Go ahead, you know you want to. Just do it!I always gather the ingredients.. I have learned over the years that if I have all my stuff out and measured in front of me, I will almost never forget something and that I make less of a mess. It also helps that I find it pretty. So, flours and salt are whisked together. The yeast and honey in a bowl waiting to be proofed. The butter in need of more melting and an egg.. Pretty. Honey and yeast mixed with a cup of warm water. BE CAREFUL with the temperature of the water.. If its to hot, the yeast will kill the yeast and you will have to start over again, but I trust you won’t do that.Now that the yeast is active, mix in melted butter and egg. (Make sure the butter is not hot, warm is ok) Add wet ingredients to the dry and mix.
I have a super awesome dough mixer , it helps to mix and not completely stick like it does to a wooden spoon. Dont have one? Use a wooden spoon, it works the same with a little more stickiness..You have a stand mixer? Well fancy you. No I am not jealous,(maybe a little). I like using my hands when making bread, but you? Go ahead, use your mixer, its cool with me. So mix you dough, you want the dough wet and sticky but still able to roll into a ball. If you need to, add a pinch more of flour, just enough to help form a ball. When ball is formed, drizzle oil and rub all over and place in bowl with a damp towel. Let sit somplace warm to rise for about an 45 minutes or unit dough has doubled in size. A good warm spot..Try the top of the fridge, thats my rising spot.
Once it has doubled, roll out onto a nicely floured surface and..my favorite part, punch it down and knead for a few minutes…. This dough doesn’t need a lot of kneading, just enough to reform ball and get some air out. Now divide and place into well buttered pans. I used two 9 inch cake pans, but a 13 X 9 pan or baking dish would work or loaf pans if you want loaves. Just make sure to really butter the pans.
Little ball of dough turned into big balls of dough. (Yeast is so cool!).Into the oven they go. Right before I baked them I gave the tops a little milk wash, just for color. Do it if you want, you could even do an egg wash, but it’s really not necessary. Oh boy… Fresh from the oven…Take a bit of butter and melt over the top….So lovely! Who wouldn’t want to just tear these beauties apart?
Now eat.. Eat with jam, eat with cheese, eat with peanut butter or with a bit of honey. Or, eat as is…..Just eat it and enjoy you labor of love and the satisfaction that you just made those delicious rolls that you are eating.
Honey Wheat Pull-apart Rolls.
Ingredients
1 cup all-purpose flour
1 3/4 white whole wheat flour
2 tablespoons honey
4 tablespoons melted butter
teaspoon salt
2 1/4 teaspoon yeast
1 egg
1 cup warm water
2 tablespoons butter(to rub over baked rolls)
Makes 16 good-sized rolls
In a large bowl whisk together both flours and salt.
In a smaller bowl add warm water, yeast and honey. Stir and let sit for 5 – 10 minutes or until the yeast has grown and is foamy. Meanwhile, melt butter and let sit for 5 minutes. When the yeast has proofed, whisk together with butter and egg. Add to dry ingredients.
With a dough spoon , wooden spoon, stand mixer or your fist, mix (or knead) until the dough comes together and begins to form into a ball. You want the dough to be wet and sticky but add a pinch or two of flour if its to wet and not forming a ball.
Coat dough with a little oil and place back into large bowl. Cover with a towel and place in a warm place(The top of the fridge is great) Let rise for 45 minutes or until the dough has doubled in size.
When dough has doubled, dump dough onto a well floured surface, flour up you hand and punch down the dough and knead for a few minutes. Divided dough 16 even balls. Now is a good time to preheat oven to 400 degrees.
Place in greased pans ( 8 in each) and cove with plastic and let rise for another 20-30 minutes or until dough has doubled and filling out the pans. When the second rise is done, place in oven and bake for 25 minutes or until a nice light brown. If you want a darker crust, right before baking, lightly brush the tops of rolls with butter. As soon as the rolls are removed from the oven take the remaining 2 tablespoons of butter( one tablespoon for each pan) and melt over top of rolls
Note..If you want to freeze any rolls, place in a pan after fist rise and stick in freezer until frozen Transfer to a airtight bag. When you want to use, simply pop out of freezer and let sit for about and hour. Bake as directed above.

THE LOVELY CRAZY
September 19, 2015 by maximios • Blog
So when my sister called and asked me to make something for my nephews bake sale to raise money for his basketball team, I couldn’t say no. (or I didn’t want to say no cause any good excuse to bake right!) Plus I had just found this awesome recipe on one of my favorite blogs, my name is yeh, for home made Oreos that I have been super excited to try, so it kind of worked out. But before I committed to the Oreo, I wanted to just double check with my nephew and see what he might want me to make because it was his bake sale.
This is the conversation we had. And yes, it was through text.
Me- “Hey bud, what do you want me to make for your bake sale? Cupcakes, cookies, donuts, or brownies”
Jack- ” Yea!”
Me- “Yea what?”
Jack- “Make that.”
Me- “Make what?….Hello!! What do you want me to make? Should I make Oreos?”
Jack- I WANT OREOS!”
Ok.. So it took a little while, but we got there. And after the the basketball game and the super successful bake sale..
ME-“Did you see the Oreos?”
Jack- “What do you mean?”
Me- “The Oreos I made for the bake sale…the ones you wanted me to make”
Jack- “There was a bake sale? I want Oreos”
Yup, that’s the attention span of my 13 year old nephew. Little shit head. But for real, I had so much fun making these cookies and I am definitely going to be making them again. Plus they were a super hit at the sale.
I am the best aunt! (and sister!)
When you have cut out your cookies, use a spatial and place them on a baking sheet. You can try to transfer with you hands, but you end up messing up the shape and most of them will break anyway.
Stick the cookies in the oven for about 15 minutes a batch and continute to roll and cut out the cookies until you have no dough left.
Stacks of cookies… Sold to the highest bidder! I was told that they sold out within the first half hour at $1.50 a pop….Should have charged $5…. for a good cause right?
And yes, even though he was being a space head and didn’t even care that I just made him like 50 bucks for his team, I still saved the kid one.He just had to give me either a hug or 5 bucks for it.
I got a hug. (I really wanted the 5 dollars)
-C
From Scratch Oreo Cookies
Adapted by Molly Yeh from My Name is Yeh!
The cookie (makes about 18 3 inch Oreos)
The filling
Cookies- In a large bowl cream together sugar and butter until light and fluffy. Add in vanilla and coffee and mix together. In another bowl, whisk together the flour, salt and cocoa powder. Add dry to wet and mix together unit a uniform dough forms. Dump out onto a lightly cocoa or powdered sugared surface and knead dough a few times. Split ball into two balls, place in bowl, and stick in the fridge for 15 or so minutes.
Preheat oven t0 325 degrees
When dough is chilled, remove one ball at a time, and roll dough out on a cocoa or powdered sugar dusted counter until its about 1/4 inch thick. With a round (any shape would work) cookie cutter, cut out as many cookies as you can. In between sits, dip cutter in a sugar and cocoa to keep the cookie from sticking. Transfer cut out cookies onto a baking sheet with a spatula. Take scraps, roll into a ball, and roll out again. Keep doing that until you can’t cut out any more. (You can either bake a weird shape cookie or just eat the dough)
Bake cookies for about 15 minutes or until the cookie has risen a bit and the tops have lost their glossiness and look cooked. Remove from oven and let cookies dry on a wire rack.
Make the filling
Filling- Beat together butter, sugar, vanilla, and cream until completely mixed and is at your optimal consistency. Add a drizzle more cream if you want to thin out or add more sugar for a thicker cream.
Stick the filling into a piping bag or ziplock bag an snip the end. With cookies in pairs, pipe a big dollop of filling onto one of the two cookies. Place the naked cookie onto the filled cookie and give a smooth to distribute the filling.
lick your fingers and eat a cookie.
If selling at a bake sale, charge $3 a cookie…. If it’s for a good cause.
Whats with the vinegar you ask? Well first off, don’t worry about tasting it, you won’t. Secondly, I add it because it helps keep gluten from forming in the flour, which in turns makes the pie crust more flakey and less doughy. If the though of vinegar really bothers you, you can use lemon juice or even leave it out.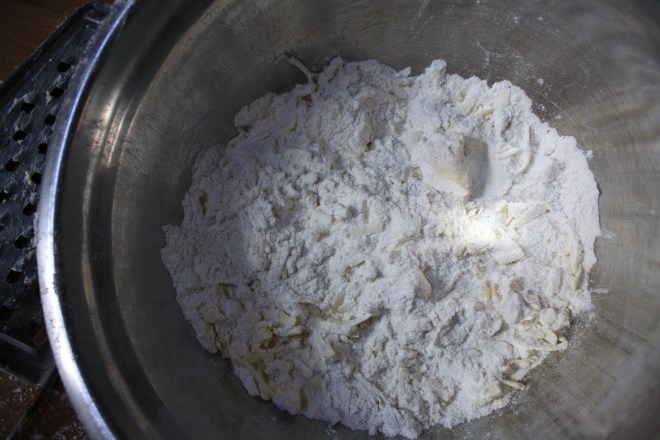
The flour, salt, ans sugar are mixed together into a bowl. Then with a box grater or hand grater with big hole, grate the frozen butter directly into the flour, stopping every few tablespoons to toss around in the flour. (DO this or you will end up with a big pile of shredded butter that is starting to melt back together) Also, hold the butter with the wrapper to keep from warming the butter with your hand.
Once the whole stick is shredded, take a fork and just toss the chunks around a bit more just to evenly distribute. Now add in vinegar and water. Toss with fork until the mixture starts to come together. If you think that dough seems way to dry, add in one more tablespoon of ice water.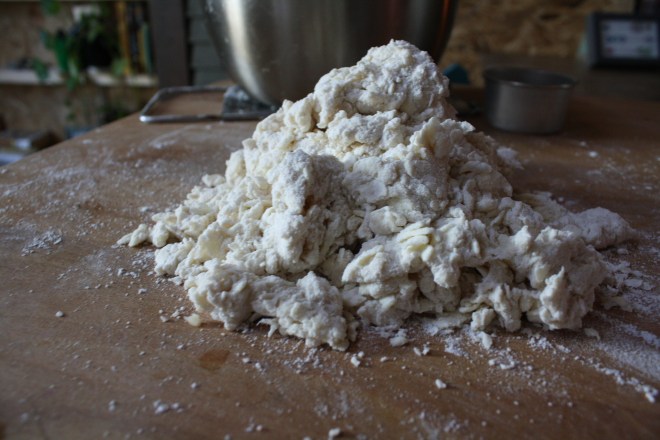 Dump the dough onto a lightly flour surface and kind of squish, smoosh dough into a pile. The dough is all clumpy and weird looking, Well thats what it is support to look like, so your good.
 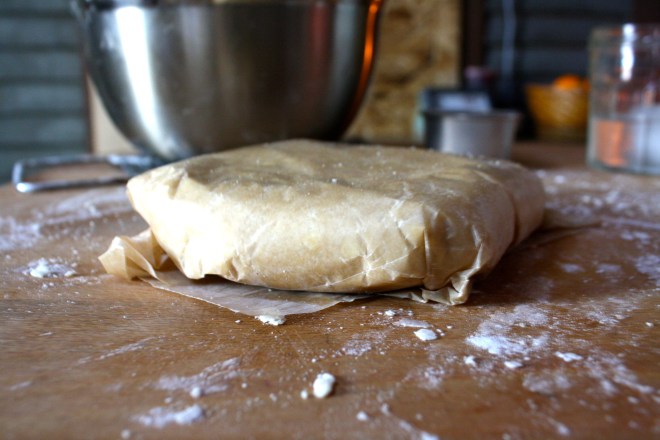 Once the dough is gathered into a ball, place onto a piece of wax paper and wrap. Now is the most satisfying part..Smoosh the wrapped dough into a disk but applying pressure. Aaahh, kind of looked like pie crust. Now Stick it in the fridge for a least a hour (Don’t skip this or your crust will be blah)
Out of the fridge and awaiting a roll and a filling.
Weekend plans for a pie are set!
Have lots of good times!
-C
Pie Crust
Notes… You can for sure make this pie crust vegan by replacing the butter for a stick of Earth Balance. Also, this is the stuff for a single pie crust but I usually habra bit left over to make a few little cutouts for the top of the pie or pie scrap cookies.
To make this a double pie crust, just double everything up.
In a large bow, whisk together the flour, salt, and sugar. Place grater in bowl and with the biggest grate hole, grate the frozen or cold butter directly into the flour mixture, stopping ever few tablespoons to toss around in the flour so you don’t end up with a big pile of grated butter. With a fork, toss around a bit until the butter is evenly disrupted in the flour being careful NOT to work the butter into the flour. Add in the vinegar and water and mix as little as possible with a fork until the mixture starts to come together. The mixture will seem kind of dry and almost like it is falling apart, but thats what you want. If dough is really too dry, add in another tablespoon of ice water. Dump mixture onto a lightly floured surface and squish together to form a ball, handling as little as possible. Place on a piece of wax paper and wrap. Give it a good squish to flatten out a bit and place back into fridgerater for a least one hour, if not longer.
And then you have crust
Crust can be frozen.. just wrap in plastic wrap and place into a freezer bag.
A few things I will bring in my hole:
But before I leave for my hole in the ground, I made these little cake bites to get my people through the weekend. Sweet little lemony bites of rich dense cake dipped into bittersweet chocolate. (I am just so nice) They have all the pleasure or cake without the need of a fork and are much easier to give away then a big slice of cake. Plus, they are fun to make. My little sister helped and did most of the chocolate dipping. Then she and another little used their mouths to clean up the chocolate mess. It was an afternoon of chocolate all over the kitchen fun day.
So make some bites to have and to share. Or if you, like me, are digging a hole to hide in, make a batch of bites to bring with you. That’s the beauty of cake covered in a harden chocolate shell, they travel really well. Simple lemon cake stuff. Flour, baking powder and salt whisked together, Sugar and soft butter in a bowl. An egg, some vanilla, milk, and of course, the lemon.
To make the batter, cream the soften butter with the sugar until light and fluffy. Zest lemon(1 big or 2 small) into bowl with the juice of the lemon(s), the vanilla and the egg. Beat until combined. Now beat in the dry and then the milk. Keep beating for another minute until all mixed. Batter should be light and fluffy.
Batter goes into a greased and floured 9×13 baking sheet and stuck into a 375 degree oven for about 30 minutes (You can use a 9×9 baking pan. Just bake fir another 10 minutes and you will end up with thicker bites). Remove from oven and let cool for a few minutes and flip to remove cake from baking sheet. Cut cake into small pieces (I cut 4×6 to get 24 bites) and place bake into sheet and into freezer (I stuck mine outside, it was -2 degrees ) for at least 2 hours.
Oh what a lovely sister I have.. Look at her dunk….. like a boss! Fully coated and placed on a rack for the chocolate to harden. I ended up sticking the rack in the freezer for 10 minutes…They harder really fast in there.
And now you have some it, bites of cake covered in chocolate. 1 bite, 2 bites…5 bites. Eat however many you want because its Friday and because there small little bites and just because you can.
Now if you need me, I’ll be in my hole.
-C
Chocolate Lemon Cake Bite
Add butter and sugar to a large bowl and beat on medium unit light and fluffy. Ass in vanilla egg, the zest of the lemon and the juice of the lemon. Beat to incorporate. Now beat in the dry and lastly the milk.
Grease and flour either a 9×9 pan or a 9×13 baking sheet. dump batter in and smooth out. Stick in oven and bake for about 3o minutes or until a toothpick stuck into the middle comes out clean. Remove and let cool for a few minutes on a wire rack. Flip cake to remove from pan. Cut cake into bit sized pieces, 4×6 is a good size, and place back on baking sheet and stick into freezer for at least 2 hours.
When cake bites are as good as frozen, get the chocolate ready. Take the chocolate and the coconut oil and either melt in a double boiler or the microwave. Mix until smooth and make sure to full incorporate the oil. Now remove the cake bites from the freezer and dip each bite into chocolate, trying to full coat all sides. Stick onto a wire rack or a parchment lined pan to harden. They can be stuck back into the freezer to harden faster.
Once chocolate has harden, your good to go!
Good question…And we will all answer….”Never again! Because I now make the sickest E.M.s around.!”(E.M.s is the cool short way to say english muffins and now that you are going to make your own….man, your so cool!)
These E.M.s are perfect. Easy to make, not overly fussy, and you end up with a super yummy, extremely versatile, individually portion super sweet little disk of bread. And the best part is..nooks and crannies! I think that is why I decided to make these E.M.s, so Nick and I can talk the about nooks and crannies…(Sometimes we need light conversation)
We start with flour and salt whisked together in a bowl. The honey, yeast and warm water are getting on proofing in a jar. An egg waiting to be cracked, some milk, and 2 tablespoons of butter. All this good stuff equals…nooks and crannies!
Oh you like my nifty dough whisk….me too, I use it all the time. Maybe I should have a dough whisk give away ……maybe…..
When the dough has been sufficiently kneaded, gather dough into a nice ball, coat with a little oil and place back into bowl. Cover with a towel and stick in a warm place to rise for about an hour or until it has doubled in size.
Enjoy and Happy Tuesday!
-C
English Muffins
Ingredients
Combine warm water, honey and yeast in a bowl to active..about 5-10 minutes or until yeast is foamy.
In a separate bowl, whisk together flour and salt. Mix in butter(I use my fingers) When yeast mixture is done proofing, whisk together mixture with the egg and milk. Add wet to dry and mix until just incorporated Dump out onto floured surface and knead dough for 8 minutes, adding a bit of flour whenever dough starts to get too sticky. Roll into a ball, coat with oil and place back into bowl and cover with a towel. Let rise for 60 minutes or until sought has doubled in size.
Once the first rise is done, deflate dough and divide into 8 equal pieces(10 for a slightly smaller muffin). Smoosh each ball into a flat disk, about 2 inches thick) and place on a cold cornmeal dusted cast iron griddle. (I used 2 cast iron pans) Sprinkle tops of muffins with more corn meal and let dough rest for another 15 minted. Turn burners on low heat. Let griddle get hot and continue to cook the muffins for another 10 minutes or until golden brown. Flip and cook opposite side until gold brown and remove from griddle. To make sure the muffins are cooked completely, stick an instant read thermometer into the center…it should read 200 degrees. (if you don’t have a thermometer, split one open… the tester E.M.) If the E.M.s are not completely cook, just stick in the oven on 350 for 5-10 minutes or until cooked throughout.
Remove and let cool. To serve, split open with a fork and give a light toast. Spread with butter, jam, peanuts butter, anything you want…maybe make E.M pizzas!
This is probably one of the first recipes that I ever really knew by heart. Some recipes I can bring up in my head, but if I haven’t used it in a while, I usually have to check to make sure I got it right… Not these… Chocolate chip cookie are forever imprinted in my brain.
Chocolate chip may seem like a simple cookie, but trust me, its more complex then one may think. There are so many little factors that really affect the over all cookie: The baking temperature, the exact perfect time to pull the cookies out of the oven. Weather the butter is hand mixed or beaten, softened or melted. The color of the baking sheet and how long you leave the cookie on the sheet before placing on the coloring rack…….This cookie is as much about method as it is about ingredients. ….But don’t let that scare you..you got this. Just don’t think that these are a mindless act of baking. You have to be committed, keeping on the oven the whole time these cookies are baking………….. It’s so worth it.
Full disclosure here…I have been making these cookies the same way for so long so I am not exactly sure, but this might actually be the same recipe as toll house. I haven’t looked….Either way…I have tried out other chocolate chip recipes and this one has always come out on top.
Pre heat the oven to 375.
Room temperature butter creamed with both the white and brown sugar. Before you add the butter to the sugar, smash any of the big chunks of brown sugar. The key to my recipe is not melting butter or using an electric beater, it’s all hand mixin, no electric mixing(you could use a kitchen aid, but I don’t have one so I think you should use a wooden spoon too), plus it’s a good arm work out. Mix mix mix. I find smearing on the side of the bowl helps too. Mix/smear until both sugar and butter is a unified color and consistency, Once that happens, add the two room temperature eggs, the vanilla and mix a little more,
Take a minute here and sniff……I love the smell of cookie dough, it’s a happy smell. Now for the chocolate chips. I use only 1 1/2 cups of chocolate chips… You want just enough in each cookie, but don’t want to overwhelm it with too much chocolate. The cookie is as much of the star as the chocolate.
  See how may cookie sheet is nice and silver and clean? For a long time I used a very dirty and dark baking sheet. I would make cookies and they always seem to come out slightly burnt. Got myself a new baking sheet and……perfect cookies. If your baking sheet is dark, I would recommend using parchment paper.
Your ready to scoop and bake….my suggestion. Make 2-4 cookies for your first batch, or what I call the tester batch. I swear, there is some law of the universe that says the first batch always is overcooked. I have excepted that and learned to only make a couple for the first batch Scoop mounds of your preferable size(I do a spoonful) and place on sheet with each mound having good amount of spreading space. Place in preheated oven..
Now here is the really important part!!!!Baking time is essential to how your cookie turns out. If you want a more soft and chewy cookie, bake for about 7-9 minutes or until the cookies are just barely turning brown…just barely. They might seem a little undercooked, but the cookies will cook a bit more once pulled from the oven Trust…I know what I am talking about. .Let them cool for about a minute on sheet before transferring them to rack. If you like more crunchy milk dipping cookie..bake for 9-11 minutes or until they are golden brown.
Now you have gone and done it…Made fantastic cookies!!! Maybe you are going to share? No pressure, but it is the holiday season. For real, you can’t go wrong with a chocolate chip cookie, every loves it. and then will in turn love you too.
Get people to like you with Cookies!!!! hahahaha… but you know its true!
Perfect Chocolate Chip Cookie
Preheat oven to 375.
In a bowl, whisk together flour, salt and baking soda
In a large bowl with a wooden spoon, cream together the brown and white sugar with the room temperature butter. Add eggs and vanilla and stir. Now add the dry ingredients and….. then the chocolate chips.
On a light-colored baking sheet to a parchment line sheet, use a spoon and drop a constant size mound of dough, leaving room for expansion. Place in oven for 7-9 minus until cookie is barely turning brown. Remove and let sit on sheet for another minute before transferring to cooling rack. Keep doing this until all of you dough is gone…
COOKIES!!!!
Banana Brown Butter Blondies
Preheat oven to 350
Place butter in a small pot or pan over medium heat. Stir frequently until the butter is completely melted and starting to foam. It will start to smell nutty and turn brown within a few minutes…when its a medium brown, take of heat and let cool.( I stick my in the freezer in a shallow pan to help cool faster.)
Once butter has cooled a bit, cream together with the brown sugar. In a small bowl, mash banana. Add egg, vanilla and banana. mix together, then mix in flour until just incorporated. Scoop batter into a grease 8×8 pan and spread evenly. Place in oven for about 20 minutes or until golden brown..It should be cooked all the way through but still a little gooey, moist and brownie like
Let cool and remove from pan….cut and do what you need to do! For a little more decadence..add a drizzle of chocolate or a bit of peanut butter. or do what I did, a smear of Nutella…and serve with the recommendation of a cold glass of milk.
I know your all curious about the cupcake so I’ll show you…I actually made cupcake and a two layered 4 inch cake for the birthday boy. I know, I know…. and the bright pink frosting. It’s actually pretty amazing. That kind of color doesn’t excises in nature.
HAPPY ALMOST BIRTHDAY LOVE!!!!!!!!!!
I have a super awesome dough mixer , it helps to mix and not completely stick like it does to a wooden spoon. Dont have one? Use a wooden spoon, it works the same with a little more stickiness..You have a stand mixer? Well fancy you. No I am not jealous,(maybe a little). I like using my hands when making bread, but you? Go ahead, use your mixer, its cool with me. So mix you dough, you want the dough wet and sticky but still able to roll into a ball. If you need to, add a pinch more of flour, just enough to help form a ball. When ball is formed, drizzle oil and rub all over and place in bowl with a damp towel. Let sit somplace warm to rise for about an 45 minutes or unit dough has doubled in size. A good warm spot..Try the top of the fridge, thats my rising spot.
Once it has doubled, roll out onto a nicely floured surface and..my favorite part, punch it down and knead for a few minutes…. This dough doesn’t need a lot of kneading, just enough to reform ball and get some air out. Now divide and place into well buttered pans. I used two 9 inch cake pans, but a 13 X 9 pan or baking dish would work or loaf pans if you want loaves. Just make sure to really butter the pans.
Now eat.. Eat with jam, eat with cheese, eat with peanut butter or with a bit of honey. Or, eat as is…..Just eat it and enjoy you labor of love and the satisfaction that you just made those delicious rolls that you are eating.
Honey Wheat Pull-apart Rolls.
Ingredients
Makes 16 good-sized rolls
In a large bowl whisk together both flours and salt.
In a smaller bowl add warm water, yeast and honey. Stir and let sit for 5 – 10 minutes or until the yeast has grown and is foamy. Meanwhile, melt butter and let sit for 5 minutes. When the yeast has proofed, whisk together with butter and egg. Add to dry ingredients.
With a dough spoon , wooden spoon, stand mixer or your fist, mix (or knead) until the dough comes together and begins to form into a ball. You want the dough to be wet and sticky but add a pinch or two of flour if its to wet and not forming a ball.
Coat dough with a little oil and place back into large bowl. Cover with a towel and place in a warm place(The top of the fridge is great) Let rise for 45 minutes or until the dough has doubled in size.
When dough has doubled, dump dough onto a well floured surface, flour up you hand and punch down the dough and knead for a few minutes. Divided dough 16 even balls. Now is a good time to preheat oven to 400 degrees.
Place in greased pans ( 8 in each) and cove with plastic and let rise for another 20-30 minutes or until dough has doubled and filling out the pans. When the second rise is done, place in oven and bake for 25 minutes or until a nice light brown. If you want a darker crust, right before baking, lightly brush the tops of rolls with butter. As soon as the rolls are removed from the oven take the remaining 2 tablespoons of butter( one tablespoon for each pan) and melt over top of rolls
Note..If you want to freeze any rolls, place in a pan after fist rise and stick in freezer until frozen Transfer to a airtight bag. When you want to use, simply pop out of freezer and let sit for about and hour. Bake as directed above.