A couple of days ago, during a grocery store porous, I stumbles upon a produce item that I have not seen sold in stores before, Broccoli leaf. And I was kind of surprised to see that they were selling bunches of the leaf, organic, at 2 bucks a bunch. I was very excited ! But wait.. You can eat broccoli leaves? Heck yes you can! Broccoli leaves are fantastic. They taste kind of like broccoli, have a hearty texture like a collard, and can be used raw or cooked just like any other green. Its just one more super yummy green to add to your repertoire. So when I bring home something that I find to be a good score, like a bunch of broccoli leaves, I feel like I have to share it with the mister. (I am so nice) And this dish was how I shared them…. Tossed into a bowl of garlic raging pasta. The stuff…. A bunch of broccoli leaves, lots of garlic, pasta, olive oil, salt and a lemon. Pretty simple right? Fist off, get your water boiling for the pasta. Once its ready, drop a pinch of salt into the water and stick pasta in for the amount of time recommend by pasta box people. While the pasta is boiling, mince up the garlic (I used my garlic press) into a skillet and add in the oil. Stick on a burner on medium for a few minutes, stirring around to make sure the garlic doesn’t stick and burn. Once you start to smell the garlic, turn heat onto low, chop up the broccoli leaves (stems and all) and stir around until wilted and add in the juice of half a the lemon.When the pasta is cooked, remove a few tablespoons of starchy water and strain the noodles. Add water and pasta right into the skillet with the other stuff. Toss around, taste, season with salt and pepper. Go ahead and add some chopped tomato and or parmesan cheese if you want. And serve your amazingly amazing pasta. And make sure that you are ok with really smelly garlic breath…Casue it’s going to happen. Keep it good! -C
2 servings of your favorite pasta (spaghetti, penne, vegan, gluten free…..)
8 or so fresh garlic cloves
1/4 cup olive oil
salt and pepper
lemon (optional)
parmesan cheese (optional)
Start by bringing a pot of water to a boil with a pinch of salt. Add in pasta and cook per instructions on box. While pasta is cooking, mined garlic and add to a skillet with the oil. Place on a burner on medium heat and cook and stir until the garlic becomes fragrant. Chop the broccoli leaves (stems and all) into bit sized pieces and add to the garlic oil and toss around to wilt the leaves. Squeeze in some lemon juice. Once the pasta is done cooking, remove a few tablespoons of the starchy water and strain the pasta. Add the water and the noodles to the skillet, toss to evenly coat the pasta and call it down. Serve in a bowl or on a plate, topped with freshly chopped tomatoes and parmesan cheese if you so shall please and another little squeeze of lemon juice if you like. Watch your mouth.. it will be breathing out garlic like whoa.
FA LA LA LA LA….. LA LA LA LA….Happy eve of Christmas! What better way to celebrate the holidays than with the sweet and spicy flavor of ginger…in donut form! There is nothing better.
This donut is ideal for Christmas morning(or any other morning)..Warm and sweet, bright and tangy….The perfect balance to make everyone happy! It’s really fast and easy, so you can make a batch while the coffee is brewing, or you can even make them tonight and maybe leave a donut out for santa. Have guests over for the holidays…Dazzle them with a homemade donut. Hanging out at home by yourself…make some donuts…..traveling….well you are kind of screwed at the moment… but think about making donuts when you get where your going.
It all started a few Christmases back when the mister gifted me with a wonderful addition to my kitchen bakeware….a donut pan…. and it was a game changer. If you do not have a donut pan I suggest that you immediately go buy one.. No joke, it’s so worth it. The pan elevates a simple cake recipe to something more… A round of frosted soft cakeness. Circles with holes…..happiness. Hopefully you already have a donut pan, but if not, I trust you will soon.(you can still make this recipe without the pan, just bake it in a 9×9 pan. Yes, it will still taste amazing, but it’s that much better as a donut!)
I am really excited to finally share a donut recipe with you all. I haven’t made a batch yet that hasn’t won a round of applause or at least a super double thumbs up. If you haven’t made donuts yet, bookmark this recipe and make it priority for your next baking adventure
.What I started with….flour, baking soda, baking powder and salt whisked together. A little bowl of fresh ginger, powdered ginger and cinnamon. Molasses, brown sugar, vanilla, and egg, melted butter and milk. Not a bad line up
The spiced mixed in to the dry….I used fresh and powered ginger but if you don’t have any fresh.. just add more powdered…but fresh adds that extra bit of gingery spiciness.
The wet ingredients all mix together. Molasses first, then the butter, vanilla, and the brown sugar, mix that then add the egg and the milk last.(avoid adding egg and melted butter together so it doesnt scramble) Mix wet mixture with the dry until fully incorporated and smooth.
A beautiful donut batter….Scoop small spoonfuls of batter into very well greased donut pan …smooth tops with a spoon or spatial….I may have added just a little too much batter the first round, , which is totally cool, it’s just the donuts came our with a bit of a spare tire around the bottom…a little more to eat I say.Out of the oven and turned onto a cooling rack…This beauties smell so very nice.
While the donuts are cooling, prepare the icing. Mix 1/4 cup of cream cheese with 1/2 cup of sifted powdered sugar. Half of a lemons worth of juice with a teaspoon of lemon zest and mix… add a splash or two of milk to get the desired consistency(this is a cream cheese glaze, it won’t harden like a sugar glaze)When the donuts are full cooled, dip into glaze….
Flip and let drip……and admire. I had to beat a few hands away while taking these pictures..I am telling you, people will do crazy things for a donut…..CRAZY THINGS…Just look at these. And for real, they really don’t take much time. You could totally whip these up in less than 30 minutes.. just make sure to have someone else do all the dishes!!!
Gingerbread Donuts with Lemon Cream Cheese Glaze
Ingredients……Makes about 8
1 cup all purpose flour
1 teaspoon baking powder
1/2 teaspoon baking soda
1/2 teaspoon salt
1 teaspoon cinnamon
1 teaspoon powdered ginger
1 teaspoon fresh grated ginger
1/2 cup brown sugar
1 egg
2 tablespoons molasses
1/2 cup milk
1/2 teaspoon vanilla extract
3 tablespoon melted butter
Lemon Cream Cheese Glaze
1/2 cup powdered sugar
1/4 cup cream cheese
1 teaspoon lemon zest
half a lemon worth of lemon juice
a splash or two of milk
Instructions Preheat oven 350
Grease donut pan In a large bowl, whisk together flour, baking powder, baking soda, cinnamon, salt, powdered and fresh ginger. In a small bow mix molasses, vanilla, brown sugar and melted butter. Stir and add milk and egg last.
Mix the wet with dry ingredients and until just combined. Scoop small amounts of batter to each donut mold… fill to about 2/3 full. and level out with a spoon if spatula. Stick in oven and bake for 10 minutes or until edges just start to turn golden brown and a cake test comes out clean.
While donuts are cooling, stir together cream cheese, sugar, lemon juice and zest. Add small splashes of milk until you reach the desired consistency(not to runny, think dish soap) Dip baked side of donuts into glaze, flip and return to wire rack.
And then you open your mouth…..EAT DONUT……..EAT!!!
Chomp Chomp Chomp… The sound I make as I eat this freaking fantastic crunchy granola. You know it’s good when the person sitting next to you is annoyed by the sound of you face while eating. I eat a lot of crunchy stuff. And I am pretty sure I annoy the mister a lot.
Oh well, he will live, and he eats his fair share of annoying stuff too so we can just call it even.
So granola. I love it. I make a batch every few weeks or so, and I usually make it just for me. (I almost never make things just for me) I like to keep it simple but flavorful. A tad sweet, but not really, and crunchy, without the oily fried taste. I also like a variety of sizes, some big clusters and some small pieces.
This granola fits the bill perfectly. Made with 5 ingredients, no oil, and the perfect sweetness level. It’s one of my favorite flavors yet. And I know I said I made it just for me, but the mister really liked it too. (I can’t help sharing)
The simplest of stuff. 1 smashed banana, a cup of pureed butternut squash, Vietnamese cinnamon*, honey, and old fashion oats. (and a dash of salt, not shown)
*Note. I only ever use Vietnamese cinnamon because once I start using it, regular old cinnamon just won’t cut it anymore. It is a bit sweeter and a lot more spicy. If you don’t have it or don’t want to use it, use regular cinnamon and add in 1/2 a teaspoon of all spice.Toss the cinnamon and salt with the oats. Mix together the banana, squash and the sweetener and combine with the oats until full incorporated.
Another note. Because I made this granola for me and no body else, I actually omitted the honey (I think that banana abs squash make it sweet enough) But if I was making this for lets say, the mister, or a friend, I would use add a bit. The sweetness level and sweetener of choice is up to you, but 2-3 teaspoons of honey or maple syrup is usually sweet enough for people.
Dump the mixture on a parchment lined baking sheet and give it a little pat, you know, to settle all the bit and pieces together, all cozy and evenly spread out. Now stick into a preheated oven and after about 20 minutes, take out of oven and give the granola a toss, breaking apart any super big chunks or overly wet pieces. Put back into oven for another 20 minutes. (I like my granola super crispy crunchy so I cook it a little longer, like 30 more minutes)And when you are happy with the crunchiness of you granola, remove from oven and let cool, trying not to eat all of it while it sit’s on the counter looking all pretty and smelling like happiness.
Grab a bowl, stick the rest into a jar with a lid, hide it from others, and chomp chomp chomp away!
-C
Banana Butternut Granola
3 cups old fashion oats (use gluten free oats if needed)
1 ripe banana, mashed
1 cup butternut squash puree (can use canned)
2 tablespoons Vietnamese cinnamon (or 2 tablespoons regular cinnamon and 1/2 teaspoon of allspice)
1-3 tablespoon honey or sweetener of choice (use greater amount for sweeter)
dash of salt
Preheat oven to 375
In a large bowl, mix together oats, cinnamon and salt. Mix the mashed banana, squash, and sweetener of choice together and combine with the oats. If the mixture seems really dry, add in a very small splash of water to loosen just enough to mix.
Dump mixture onto a parchment lined baking sheet and evenly disperse the mixture. Give it a kind of smoosh to compact the oats and to make sure all its all the same thickness on the pan.
Stick into oven for 20 minutes. Remove and give granola a little toss, maybe breaking apart any really big chunks (unless you like really big chunks) and put back into oven for another 20 minutes. (30 for a crunchier granola) Remove from oven and let cool on baking sheet before storing in an air tight container. If you find that it is not as crunchy as you would like or is a few days old and lost some of its crunchiness, just stick it back into the oven for a few minutes to re crunch.
Eat as is, as a cold cereal, dip in peanut butter, add to popcorn or whatever way you want to eat it. No utensil required.
Wowzers…Is it for real Memorial day weekend? Where has all the time gone? Let’s talk about a week gone by fast. My brain is on complete overdrive and I am having a hard time keeping it from exploding…SO MUCH TO DO! (Not bad stuff, just a lot of stuff) But lo, that’s life right? There is always a lots of “stuff” to do, but today I am going to try and let that stuff chill and maybe give myself a few hours of coffee, (so much coffee) reading a book in the sunshine, gardening, and just some overall chillin.
Hopefully.
And hopefully you party people out there will be able to do a little of the same, or at least the chillin part. It is a 3 day weekend after all (not for us, but whatever)
Some internet fun finds.
-Sleeping in a loft that I have to crawl to get to the bed… this Gallery of Gorgeous Attic Bedrooms makes me so jealous..
-This new startup wants to sell you ugly fruit and veggies. I still don’t get it, it’s not ugly, its awesome.
-So cool and reminds me of my late brother in law. Wet Fold Origami Technique Gives Wavy Personality to Paper Animals by Artist Hoang Tien Quyet
-Could this be my new home? And I love a good plant lady. BURSTING WITH PLANTS, A 1910 PORTLAND FOURSQUARE FOR A FLORIST AND BARISTA
-Its so weird how try this is. Going, Going, Gone: 30+ Items That Are Disappearing from Our Homes
-We are doing this is the humongus pot hole in front of our house(we want to anyway) Treats in the Streets: Artist Jim Bachor Fills Potholes with Ice Cream Mosaics
-Holy shit is this the mister. 5 Conditions That Afflict the Reluctant Dishwasher. (1 and 2 really hit the nail)
A few photos from the weekGoodbye fiddleheads…. Hello ferns
On our way to a geo catch…. And note clothing options for 2 in the afternoon. I am much fond of that little guy wearing a rain jacket without a shirt in when its sunny and 80 degrees. And a pink poke dot bath robe.. I mean, it’s so the cool thing to do.
We didn’t find the geo, but we found this gigantic mushroom. Just as cool, maybe even cooler.
I love brick and there is one street in all of burlington (that I know of) that has brick sidewalks. I like to walk down it a lot.
Nurse lady making food… I compare this to a big foot sighting. I have heard stories that she cooks,but have never actually witnessed it myself. (Just kidding….kinda)
Happy long weekend! (if you are lucky to have one!)
Before we get to the fries, I just want to mention that yesterday was one of those fantastic winter days that reminds me why I love living in Vermont. Pretty white snow everywhere, the sun was out, and 20 degrees without a gust of wind. The trash dog an I were even able to go for a little hike. It was so nice and soooo sooo needed! Anyways, the other day as me, my sister and the mister where putting together one more piece of Ikea furniture, (I am the master at Ikea assembling!) a little runs into the room and presents the mister with a Dominos pizza. Yup, a whole pizza just for him. Why you might ask? Well I guess my sister was delivered the wrong pizza and the place didn’t want it back and she didn’t want it, so she gave it to him.
A whole pizza to himself. I didn’t mind too much..he was just going to be eating it for lunch and dinner until it was out of the fridge. But for dinner I did want him to eat something of the vegetable matter that didn’t come out of a box. I was going to make him a big salad, but then realized that would mean sharing the last of the greens that I had for MY dinner and I was not about to do that, so I made him parsnip and carrot fries instead. No biggy, just some slicing, a little tossing and a bit of time in the old oven. And I figured I might as well make a nice sauce for those fries because I be so very nice.
The biggest problem that I ran into when I made these fries was that I didn’t make enough, so you should probably make twice as many as you think you will eat. If you end up not eating them all (which you probably will), well then you now have a great start for a soup or a nice addition to a salad. Either way, you will eat them because they are amazing and addicting… and as healthy as can be!
The carrots and the parsnips are all sliced up into big matchsticks and ready to be baked to crispy browned perfection. I added the oil to the pan to toss the fries in and then sprinkled with a fair amount of salt and pepper. If you don’t have and or want to use a cast iron pan, a baking sheet works just the same.
Oh saucy sauce stuff. Tomato puree, sriracha, and yellow mustard. Add a little bit of honey to lighten it up (can use brown sugar if keeping it vegan), a splash of apple cider vinegar and a couple minced cloves of garlic. Topped off with the smokey delightful spice of cumin. I cold eat this on everything…and I kind of did.
All mixed up in an oven safe dish, I stuck it into the oven for a about 8 minutes until it got a little bubbly, just to let all the flavors fuse together…
Fries are done, Sauce is ready. Served in super cute tea cups.(from now on I want to serve everything in tea cups.) A perfect side dish, snack, or even a light meal. It lead the mister to ask the question…What pizza?
Happy Day!
-C
Parsnip and Carrot Fries with Smokey Sriracha Sauce
Wash and trim carrots and parsnips and cut into large matchsticks (any shape is good, just make them all uniform) Toss with oil and sprinkle with salt and pepper. Place on cast iron pan or baking sheet and stick in oven for 30 or so minutes, and rotating after about 20. The fries are done when crispy and brown.
For the sauce. Mince garlic and add to all the sauce ingredients in an oven safe bowl. stick into oven for about 8 minutes until slightly bubbly and hot.
Dip fries in sauce
Happy Hanukkah!!! Today is the first day of the festival of lights and I wanted to send a little love towards those who celebrate it.
I am not going to lie, I don’t know much about Hanukkah but I do know that its customary to eat fried foods during the holiday. The oil represents the miracle of the oil that burned for eight days ands.nights when it should have lasted for only one night. That’s a cool reason to celebrate.. So a lot of food eaten during the holiday is fried, therefore I must fry, and what better than potato latkes.
I don’t usually fry anything. But again, I don’t think I used as much oil with these as I could have..just enough to cook and not stick. Hey, it’s the holidays and this oil had meaning so it’s completely a ok to eat a little fried, just make sure to eat lots of good healthy stuff too!
I didn’t actually use all the potatoes in the picture, but I wish I did. There was the perfect amount for dinner for two people, but I wanted to make a few extra for left overs….there were none. Oh well. I did a matchstick dice for the apples.. I didn’t want the apples to be to chunky and I didn’t want them to turn into sauce so the match stick worked well. After I diced the apples, I squeezed a little lemon over the top to keep the apple from turning brown.
I start grating the potatoes and onion, and whoa! Imagine my surprise when one of the potatoes was purple… I got pretty excited.The color is so beautiful. and made the latkes look so nice…It was meant to be.Super squeeze the juices out of the grated potato and onion. If you don’t get most of the liquid out, the potato won’t crisp up and will fall apart and be and it will be gross. So SQUEEZE! Add in the egg, cornstarch, salt and pepper and mix it on up. Did I mention that I was making these for the mister and the GF sister..No flour, just cornstarch. I think they might have come out even better without the flour…so yeah, these babies are gluten-free.
Your mixture is going to start to get a little watery again. Its cool, just squeeze it out with your hands and smash into patties.Enough oil to cover the bottom of the pan on medium heat. Test the oil to make sure its hot enough before sticking the latke n the pan. To test, sprinkle water in pan, if it sizzles, its ready.Working in batches, fry each latke on each side for around 5 minutes..you don’t want to cook to fast or the inside of the latkes will be raw. I always do a tester and feed it to nick. He’s my guinea pig….He said they were awesome.. With every batch made, stick on a wire rack and keep in the oven to stay warm. The rack keeps the bottom from getting soggy on the pan… so use it. Roasted apples are the BOMB!!! Its like eating apple sauce sticks or little bites of heaven(A bit dramatic, but these are so good) I roasted mine for 20 minutes, until they were nice and soft but not completely failing apart. If you are into it, add a touch of cinnamon…I did’t this time, but you bet I am going to be making myself a big ol bowl of roasted apples this week, and yes, I will top with cinnamon. A bowl of apple slaw, sour cream and lemon wedges….I put the latkes on a nice little pile of greens. A very good idea. A dinner worth celebrating! I also served the latkes with roasted chickpeas and cailflower…for more of a meal…( Mini recipe… Cauilfower and chick peas drizzled in olive oil, tossed in salt pepper and garlic, roasted 30 minutes and topped with lemon) A little added veggie and protein….I am looking out for you people.
There we have it…my variation on a traditional food. Enjoy your fried pancakes of potato and onion, they are a food worth a celebration.
HAPPY HANUKKAH!
Potato Latkes with Roasted Apple Slaw
Ingredients
3 medium potatoes
half of a small onion
2 eggs
2 tablespoons corn starch
vegetable oil
salt and pepper
2 medium apples
sour cream(optional)
Wash and cut apples into match sticks… Place on a parchment lined baking sheet and stick in oven. Let roast for 15-20 minutes or until the apple is nice and soft. Remove and set aside.
In a large bowl, grate the potatoes and the onion. Transfer the mixture into a clean towel and squeeze the crap out of it to remove as much liquid as possible. Return to bowl and add the two eggs, corn starch and salt and pepper. In a large skillet on medium heat, drizzle enough oil to completely cover the bottom..Work in batches and after each batch, add a bit more oil to cover the pan. Once the oil is hot place squashed latkes into oil. Fry each side until crispy and brown, about 3-5 minutes. When fully cooked, place on a wire rack in the oven to stay warm and crisp. When ready to serve, top with roasted apples and a dollop of sour cream. You can serve the latkes on top a bed of greens..Its a good way to make the pancakes more meal like.
Enjoy
Sometimes, no matter whats going on with the week, Monday seems like, well, like a Monday. I drag a little on Mondays. I think it stems from the Monday through Friday school week that was beaten into me for 16 plus years. Hate Mondays, Love Fridays.. Yup, I blame the public educational system(I have to blame someone) I want my day back. I don’t want to feel the drag today. I am going to have a fantastic day. I’m getting excited, pumped up and ready for the week. I am turning my Mondays into fun days. Funday Monday…Yes, yes I did just say that. . See, don’t we all feel better already?
On this Funday, I don’t want to worry all day what I am going to make for dinner, I just want something tasty and easy. .Whats better than a plate of fries?……. a plate of roasted rutabaga fries! Yes! See, we are already having a great day. A plate of fries, easy, delicious and nutritious. Not a bad start to the week. You can eat them with just about anything, a grilled cheese tomato and avocado sandwich, a bowl of curried lentil soup..or just straight up eat a big old pile of these roasted rutafries (That a word, I swear) Just have fun with it. Its funday Monday after all.
One large rutabaga… This one fed 2 as a side… but if your eating just the fries, eat a whole one to your face. It’s totally cool.Chop the rutabaga into fries and toss with a smidge of oil, salt, pepper and ground up rosemary. Don’t like the rosemary… don’t use it. Maybe try something else like sage or garlic and onion powder or curry powder. Just use whatever you like. Throw into a 425 degree oven for 20 minutes, give them a flip and back in for another 15, Simple. Easy.
Remove from oven when crisped to your liking and eat.
Yes, this was a dinner of rutafries and brussel sprouts, is that a problem? I don’t think so .A suggestion, .dip in mustard….its fantastic, but go the ketchup route if that s your fancy.
Alright people..Have a great day and remember to not let today be a drag of a Monday, make it fun, looking forward to a plate of rutafries for dinner and think of how great the rest of the week is going to be!( I might have been a motivational speaker in a past life)
I had to share the last of the 5 pineapples cause if I didn’t, that would mean I ate 5 pineapples by myself. (I ate 4 pineapples by myself) So donuts were made and delivered to my sisters house where I proceeded to make her and her kids and another sister dinner. (hand made pizza on a weekday!) I then whipped out these pretty little upside down pineapple donuts for dessert, right after I cleaned up and made whipped cream. The kids were swallowing them hole and trying to steal just one more and my sister and the mister, well they had to eat their donuts all elegant like with forks. (weirdos)
I know I have said it before but just in case you forgot
I am the best sister/aunt ever!
The stuff. Flour, salt, and the baking soda whisked together into a bowl. Fresh pureed pineapple, milk, egg, melted butter, and white sugar. Than there is more melted butter, brown sugar and fresh pineapple for the upside down. This batter is pretty simple, just make sure to whisk all the dry really well. Dump all the wet stuff into the dry and mix until combined. Don’t over mix!Grease the donut pan really well and mix the brown sugar with the remaining melted butter
Drizzle the bottom of each donut round with the butter/ sugar mix then layer thinly sliced pieces of pineapple around the hole maker. (not as perfect as a pineapple ring, but still pretty)
Scoop donut batter on into the pan and stick into the oven preheated at 350 degrees. When donuts are all nice and golden brown, remove from oven and let sit and cool for about 5 minutes to give the donuts time to cool and the brown sugar to thicken. Dump donuts out onto a wires rackAnd serve them all upside down like. Maybe with a scoop of whipped cream or ice cream or nothing.
Donut Smiles!
-C
Pineapple Upside Down Donuts
Makes 12 donuts
1 cup flour
1 teaspoon baking soda
1 teaspoon salt
1/2 cup white sugar
6 tablespoons melted butter ( 1/2 s for batter 1/2 for sugar mixture)
1 egg
1/2 cup milk
1/2 cup pinapple puree (about 1 cup fresh pineapple chunks blended)
1/2 cup brown sugar
1 cup sliced pineapple
Note. I used fresh pineapple, but you could use canned. I think you would need a of rings (cut in half) and a an of chunks, blended up)
Preheat the oven to 350 and grease the donut pan(s)
In a large bowl, whisk together the flour, salt, sugar and baking soda. Melt 3 tablespoons of butter and mix that with into the flour mixture along with the pineapple puree, milk, and lastly the egg. Mix until combined.
Melt the remaining 3 tablespoons of butter and mix into the brown sugar. Drizzle (crumble) about a teaspoon of the mixture into the bottoms if each donut mold. Layer thinly sliced pineapple on top of that then scoop donut batter on top of that. Stick into the oven for about 10 minutes, or until donuts are gold brown and a tester comes out clean. Remove from oven and let cool for 5 or so minutes on a wire rack before turning out of pan.
If working with one pan, make sure to really clean the pan and re-grease before baking the second batch!
Serve donuts with a scoop of whipped cream and eat with your face.
I never use to eat breakfast. Or I would drink a pot of coffee and call that my breakfast. (which still happens every now and then) But as I get older I have realized the importance of a eating a healthy morning meal.. If I eat breakfast I have more energy throughout the day. I go to the gym in the mornings and find that if I eat before or right after that I feel so much better and stronger and am less likely to have a major energy crash.. I also made breakfast a routine, where I read while I eat, which is one of my favorite parts of the day. This bowl of greatness has made me wake up hungry, to the point that sometime I go to bed excited to wake up and eat, and i’ll be honest, to drink coffee.(that’s totally not weird)
And I know, this might seem like a strange combination to some, that lentils should not be a breakfast food. But really think about it. Why not? I am a firm believe that anything healthy that provides a great amount of nourishment is good breakfast food.
This breakfast bowl is full of everything that I love. It’s backed full of proteins and all sorts of other hearhtly vitamins, minerals and antioxidants (I am not going to list everything) and is the optimal form of nourishment…. The perfect breakfast.
Still skeptical…Well don’t be because I am telling you, this is oh so tasty. Just trust.
The stuff*…. Cooked and cooled lentils, a carrot, a couple strawberries and a small apple, all chopped up. And cinnamon. Don’t forget the cinnamon.
*Note.. I always start with the lentils and carrots but will change uo the mix ins. I like peaches, blueberries, cherries, pears, roasted sweet potatoes. I’ll use pretty much whatever I have for fruit in the house. So what I am saying is use whatever you like.
Take you stuff, and pile into a bowl all nice and pretty.
Sprinkle on a spoonful of cinnamon..
This is for real, the best breakfast ever!
Start your morning right and have a great day!
-C
Between 1/2- 1 cup cooked and cooled lentils
About a cup of mix ins. (use whatever you like.. apple, pears, any type of berry, roasted sweet potato, cherries, peaches, nuts, carrots, mango)
Cinnamon
Place lentils and mix in’s into a bowl. Sprinkle on desired amount of cinnamon. Mix together and eat.
Can be made the night before so it is all ready for the morning.
Use a spoon or your fingers, Always chew with mouth.
It used to be that if I got hungry after dinner I would cut up a piece of fruit and a carrot for a snack, but when the mister started to eat my snack, I figured I should just cut up a few pieces to share.
Then it turned into a thing.
Now just about every night I make us (us sometimes includes a few littles) a after dinner smorgasbord of fruits and veggies that I stick on the coffee table for us to pick at while we are chillin out for the night. It’s fantastic…. I mean, who wouldn’t love a big plate of cut up apple, pear, broccoli, strawberries, and carrots. I use whatever fruit and veggies that I have in the house and usually whatever is in season. (Woo Ha for watermelon season!) And not only is it a super fresh, guilt free, no pressure snack, it also keeps us from eating a bunch of crap throughout the night.
And the little love it too. They have now come to request a smorgasbord whenever I am around (and now ask their mom for smorgasbords now too) Maybe it’s the fact that it’s a big plate of food that they grab at without someone nagging them to eat, or maybe they just like to say the word smorgasbord. Whatever it is, the littles are eating a good portion of fruits and veggies….. and loving it.
Look at me instilling good habits into the littles…Finally My sisters can stop blaming me for the bad stuff (no I did not teach them to say that) but blame me for this.
I am so good!
-C
Pick at least 2 fruits, anything from apples, kiwi, and oranges to bananas, cantaloupe and strawberries. (the more variety the better)
Pick at least one veggie (carrots are the best, sweet peppers, cucumbers, broccoli and cauliflower florets are great too)
a little bowl of cinnamon for dipping (optional)
Wash and cut up your selection and stick on a plate. Place where everyone can reach. Much and crunch until gone or stick any left overs in fridge for breakfast.
Today I am going to spend the day hiding inside (it’s suppose rain all day) binge watching Top Chef, while baking as many cakes and cookies as I can. For I stumbled upon the amazing world of aquagfaba (bean water, which when whipped, act almost exactly like egg white). It’s freaking amazing and I now I must devote my life to it. (no, not really).
Other then the bean juice, this week had been good. Lots of amazing clouds in the sky, more super fresh summer veggies, bke rides, gardening, summertime fun. We really wanted to go camping this weekend, but sadly our plans fell through, which is probably a good because I really don’t think my body can survive any more bug bites. I think I might have contracted west nile from the 100 trillion bug bites that I got while strawberry picking. I also might have gotten a little poison ivy (can’t tell if its just more bug bites). Either way, my skin is destroyed and I am ready to tear it all off. Oh well, we did get to spend a day on a river where the mr fished and I played with rocks. Good times.
So today, baking with aquafaba, a little T.V, some watercolor painting, and maybe a little of that stinky pink lotion on my legs. And coffee. Lots and lots of coffee. Sounds like a pretty good day to me. Hope that you out there are going to do the same (maybe not play with bean water, but have a relaxing day)
Some fun and awesome internet stuff to peruse if you are hanging around the old computer.
– This is such a great design… I want one. Tiny Footprint: A Prefab Home for Two, in 183 Square Feet by Michelle Slatalla
– How To Make Slime…. My life is now complete.
-2015’s Crime Stories Are Riddled With Hangry People . My headline would be ..”Vegan girl reverts to cannibalism. Eats boyfriends arm off while stuck in traffic on the way to the farmers market”… HAHAHA
-Are You Flossing Or Just Lying About Flossing? The Dentist Knows. Just so you know.
– J.K. Rowling Announces ‘Harry Potter and the Cursed Child’ Will Hit London Stage. And of course it’s all the way in London. What about me?
– Really need to get me one of these. Camp in the Air: New Suspended Treehouse Tents and Hammocks
-Andrés Jaque’s giant water purifier unveiled in MoMA PS1 courtyard
– I am so going to be making this as soon as the chard is ready in the garden .A Genius Trick for Lighter, Smoother Hummus
I never use to eat breakfast. Or I would drink a pot of coffee and call that my breakfast. (which still happens every now and then) But as I get older I have realized the importance of a eating a healthy morning meal.. If I eat breakfast I have more energy throughout the day. I go to the gym in the mornings and find that if I eat before or right after that I feel so much better and stronger and am less likely to have a major energy crash.. I also made breakfast a routine, where I read while I eat, which is one of my favorite parts of the day. This bowl of greatness has made me wake up hungry, to the point that sometime I go to bed excited to wake up and eat, and i’ll be honest, to drink coffee.(that’s totally not weird)
And I know, this might seem like a strange combination to some, that lentils should not be a breakfast food. But really think about it. Why not? I am a firm believe that anything healthy that provides a great amount of nourishment is good breakfast food.
This breakfast bowl is full of everything that I love. It’s backed full of proteins and all sorts of other hearhtly vitamins, minerals and antioxidants (I am not going to list everything) and is the optimal form of nourishment…. The perfect breakfast.
Still skeptical…Well don’t be because I am telling you, this is oh so tasty. Just trust.
The stuff*…. Cooked and cooled lentils, a carrot, a couple strawberries and a small apple, all chopped up. And cinnamon. Don’t forget the cinnamon.
*Note.. I always start with the lentils and carrots but will change uo the mix ins. I like peaches, blueberries, cherries, pears, roasted sweet potatoes. I’ll use pretty much whatever I have for fruit in the house. So what I am saying is use whatever you like.
Take you stuff, and pile into a bowl all nice and pretty.
Sprinkle on a spoonful of cinnamon..
This is for real, the best breakfast ever!
Start your morning right and have a great day!
-C
Between 1/2- 1 cup cooked and cooled lentils
About a cup of mix ins. (use whatever you like.. apple, pears, any type of berry, roasted sweet potato, cherries, peaches, nuts, carrots, mango)
Cinnamon
Place lentils and mix in’s into a bowl. Sprinkle on desired amount of cinnamon. Mix together and eat.
Can be made the night before so it is all ready for the morning.
Use a spoon or your fingers, Always chew with mouth.

 FA LA LA LA LA….. LA LA LA LA….Happy eve of Christmas! What better way to celebrate the holidays than with the sweet and spicy flavor of ginger…in donut form! There is nothing better.
 I am really excited to finally share a donut recipe with you all. I haven’t made a batch yet that hasn’t won a round of applause or at least a super double thumbs up. If you haven’t made donuts yet, bookmark this recipe and make it priority for your next baking adventure
 The spiced mixed in to the dry….I used fresh and powered ginger but if you don’t have any fresh.. just add more powdered…but fresh adds that extra bit of gingery spiciness.
 The wet ingredients all mix together. Molasses first, then the butter, vanilla, and the brown sugar, mix that then add the egg and the milk last.(avoid adding egg and melted butter together so it doesnt scramble) Mix wet mixture with the dry until fully incorporated and smooth.
 Out of the oven and turned onto a cooling rack…This beauties smell so very nice.
 While the donuts are cooling, prepare the icing. Mix 1/4 cup of cream cheese with 1/2 cup of sifted powdered sugar. Half of a lemons worth of juice with a teaspoon of lemon zest and mix… add a splash or two of milk to get the desired consistency(this is a cream cheese glaze, it won’t harden like a sugar glaze)
 When the donuts are full cooled, dip into glaze….
 Just look at these. And for real, they really don’t take much time. You could totally whip these up in less than 30 minutes.. just make sure to have someone else do all the dishes!!!
 Chomp Chomp Chomp… The sound I make as I eat this freaking fantastic crunchy granola. You know it’s good when the person sitting next to you is annoyed by the sound of you face while eating. I eat a lot of crunchy stuff. And I am pretty sure I annoy the mister a lot.
  The simplest of stuff. 1 smashed banana, a cup of pureed butternut squash, Vietnamese cinnamon*, honey, and old fashion oats. (and a dash of salt, not shown)
 Toss the cinnamon and salt with the oats. Mix together the banana, squash and the sweetener and combine with the oats until full incorporated.
  Dump the mixture on a parchment lined baking sheet and give it a little pat, you know, to settle all the bit and pieces together, all cozy and evenly spread out. Now stick into a preheated oven and after about 20 minutes, take out of oven and give the granola a toss, breaking apart any super big chunks or overly wet pieces. Put back into oven for another 20 minutes. (I like my granola super crispy crunchy so I cook it a little longer, like 30 more minutes)
 And when you are happy with the crunchiness of you granola, remove from oven and let cool, trying not to eat all of it while it sit’s on the counter looking all pretty and smelling like happiness.
  Wowzers…Is it for real Memorial day weekend? Where has all the time gone? Let’s talk about a week gone by fast. My brain is on complete overdrive and I am having a hard time keeping it from exploding…SO MUCH TO DO! (Not bad stuff, just a lot of stuff) But lo, that’s life right? There is always a lots of “stuff” to do, but today I am going to try and let that stuff chill and maybe give myself a few hours of coffee, (so much coffee) reading a book in the sunshine, gardening, and just some overall chillin.
  Goodbye fiddleheads…. Hello ferns
  On our way to a geo catch…. And note clothing options for 2 in the afternoon. I am much fond of that little guy wearing a rain jacket without a shirt in when its sunny and 80 degrees. And a pink poke dot bath robe.. I mean, it’s so the cool thing to do.
  We didn’t find the geo, but we found this gigantic mushroom. Just as cool, maybe even cooler.
 I love brick and there is one street in all of burlington (that I know of) that has brick sidewalks. I like to walk down it a lot.
  Nurse lady making food… I compare this to a big foot sighting. I have heard stories that she cooks,but have never actually witnessed it myself. (Just kidding….kinda)
 Before we get to the fries, I just want to mention that yesterday was one of those fantastic winter days that reminds me why I love living in Vermont. Pretty white snow everywhere, the sun was out, and 20 degrees without a gust of wind. The trash dog an I were even able to go for a little hike. It was so nice and soooo sooo needed! Anyways, the other day as me, my sister and the mister where putting together one more piece of Ikea furniture, (I am the master at Ikea assembling!) a little runs into the room and presents the mister with a Dominos pizza. Yup, a whole pizza just for him. Why you might ask? Well I guess my sister was delivered the wrong pizza and the place didn’t want it back and she didn’t want it, so she gave it to him.
 The carrots and the parsnips are all sliced up into big matchsticks and ready to be baked to crispy browned perfection. I added the oil to the pan to toss the fries in and then sprinkled with a fair amount of salt and pepper. If you don’t have and or want to use a cast iron pan, a baking sheet works just the same.
 Oh saucy sauce stuff. Tomato puree, sriracha, and yellow mustard. Add a little bit of honey to lighten it up (can use brown sugar if keeping it vegan), a splash of apple cider vinegar and a couple minced cloves of garlic. Topped off with the smokey delightful spice of cumin. I cold eat this on everything…and I kind of did.
  Fries are done, Sauce is ready. Served in super cute tea cups.(from now on I want to serve everything in tea cups.) A perfect side dish, snack, or even a light meal. It lead the mister to ask the question…What pizza?
  Happy Hanukkah!!! Today is the first day of the festival of lights and I wanted to send a little love towards those who celebrate it.
 I didn’t actually use all the potatoes in the picture, but I wish I did. There was the perfect amount for dinner for two people, but I wanted to make a few extra for left overs….there were none. Oh well.
 I did a matchstick dice for the apples.. I didn’t want the apples to be to chunky and I didn’t want them to turn into sauce so the match stick worked well. After I diced the apples, I squeezed a little lemon over the top to keep the apple from turning brown.
 I start grating the potatoes and onion, and whoa! Imagine my surprise when one of the potatoes was purple… I got pretty excited.The color is so beautiful. and made the latkes look so nice…It was meant to be.
 Super squeeze the juices out of the grated potato and onion. If you don’t get most of the liquid out, the potato won’t crisp up and will fall apart and be and it will be gross. So SQUEEZE!
 Add in the egg, cornstarch, salt and pepper and mix it on up. Did I mention that I was making these for the mister and the GF sister..No flour, just cornstarch. I think they might have come out even better without the flour…so yeah, these babies are gluten-free.
 Your mixture is going to start to get a little watery again. Its cool, just squeeze it out with your hands and smash into patties.
 Enough oil to cover the bottom of the pan on medium heat. Test the oil to make sure its hot enough before sticking the latke n the pan. To test, sprinkle water in pan, if it sizzles, its ready.Working in batches, fry each latke on each side for around 5 minutes..you don’t want to cook to fast or the inside of the latkes will be raw. I always do a tester and feed it to nick. He’s my guinea pig….He said they were awesome..
 With every batch made, stick on a wire rack and keep in the oven to stay warm. The rack keeps the bottom from getting soggy on the pan… so use it.
  Roasted apples are the BOMB!!! Its like eating apple sauce sticks or little bites of heaven(A bit dramatic, but these are so good) I roasted mine for 20 minutes, until they were nice and soft but not completely failing apart. If you are into it, add a touch of cinnamon…I did’t this time, but you bet I am going to be making myself a big ol bowl of roasted apples this week, and yes, I will top with cinnamon.
  A bowl of apple slaw, sour cream and lemon wedges….I put the latkes on a nice little pile of greens. A very good idea. A dinner worth celebrating!
  I also served the latkes with roasted chickpeas and cailflower…for more of a meal…( Mini recipe… Cauilfower and chick peas drizzled in olive oil, tossed in salt pepper and garlic, roasted 30 minutes and topped with lemon) A little added veggie and protein….I am looking out for you people.
 There we have it…my variation on a traditional food. Enjoy your fried pancakes of potato and onion, they are a food worth a celebration.
 Sometimes, no matter whats going on with the week, Monday seems like, well, like a Monday. I drag a little on Mondays. I think it stems from the Monday through Friday school week that was beaten into me for 16 plus years. Hate Mondays, Love Fridays.. Yup, I blame the public educational system(I have to blame someone) I want my day back. I don’t want to feel the drag today. I am going to have a fantastic day. I’m getting excited, pumped up and ready for the week. I am turning my Mondays into fun days. Funday Monday…Yes, yes I did just say that. . See, don’t we all feel better already?
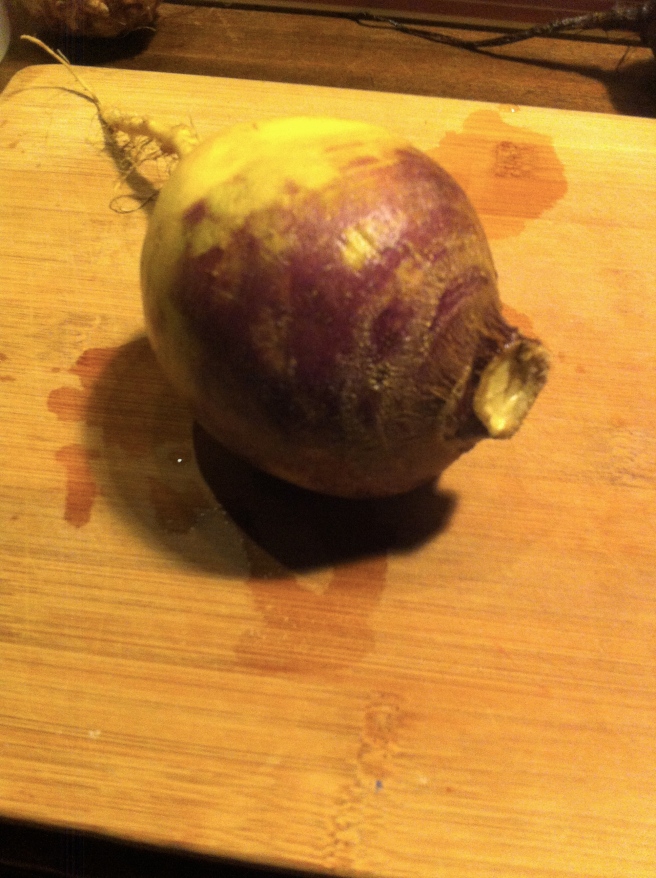 One large rutabaga… This one fed 2 as a side… but if your eating just the fries, eat a whole one to your face. It’s totally cool.
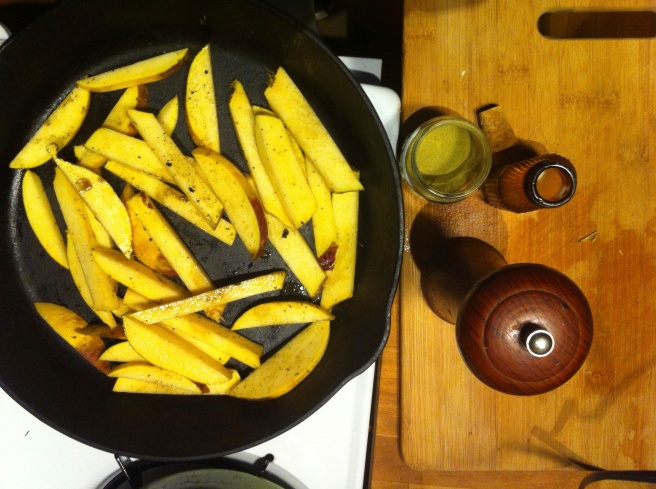 Chop the rutabaga into fries and toss with a smidge of oil, salt, pepper and ground up rosemary. Don’t like the rosemary… don’t use it. Maybe try something else like sage or garlic and onion powder or curry powder. Just use whatever you like. Throw into a 425 degree oven for 20 minutes, give them a flip and back in for another 15, Simple. Easy.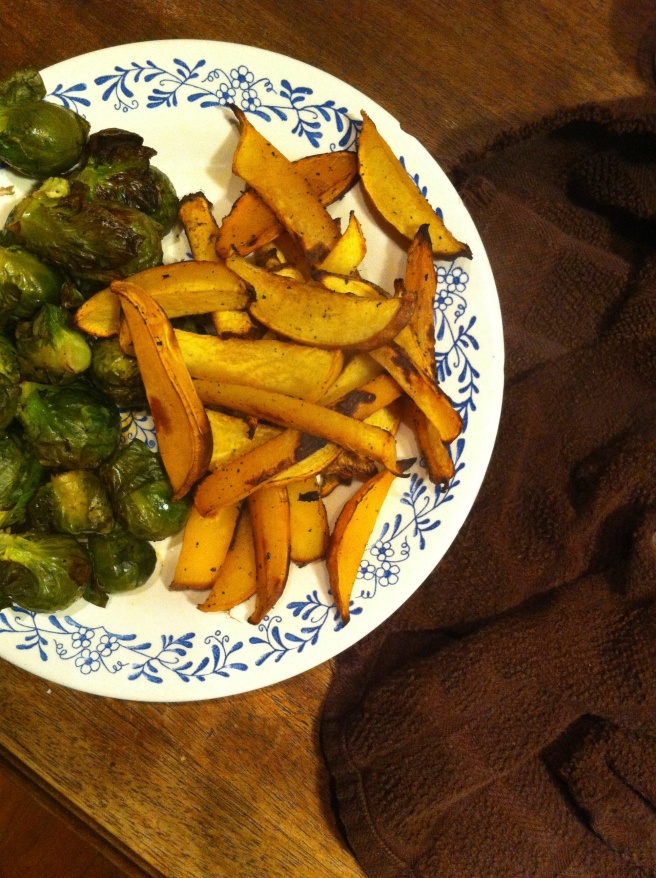
 I had to share the last of the 5 pineapples cause if I didn’t, that would mean I ate 5 pineapples by myself. (I ate 4 pineapples by myself) So donuts were made and delivered to my sisters house where I proceeded to make her and her kids and another sister dinner. (hand made pizza on a weekday!) I then whipped out these pretty little upside down pineapple donuts for dessert, right after I cleaned up and made whipped cream. The kids were swallowing them hole and trying to steal just one more and my sister and the mister, well they had to eat their donuts all elegant like with forks. (weirdos)
 The stuff. Flour, salt, and the baking soda whisked together into a bowl. Fresh pureed pineapple, milk, egg, melted butter, and white sugar. Than there is more melted butter, brown sugar and fresh pineapple for the upside down.
  This batter is pretty simple, just make sure to whisk all the dry really well. Dump all the wet stuff into the dry and mix until combined. Don’t over mix!
 Grease the donut pan really well and mix the brown sugar with the remaining melted butter
 Drizzle the bottom of each donut round with the butter/ sugar mix then layer thinly sliced pieces of pineapple around the hole maker. (not as perfect as a pineapple ring, but still pretty)
 When donuts are all nice and golden brown, remove from oven and let sit and cool for about 5 minutes to give the donuts time to cool and the brown sugar to thicken. Dump donuts out onto a wires rack
 And serve them all upside down like. Maybe with a scoop of whipped cream or ice cream or nothing.

THE LOVELY CRAZY
September 19, 2015 by maximios • Blog
Broccoli Leaf and Garlic Noodles
Start by bringing a pot of water to a boil with a pinch of salt. Add in pasta and cook per instructions on box. While pasta is cooking, mined garlic and add to a skillet with the oil. Place on a burner on medium heat and cook and stir until the garlic becomes fragrant. Chop the broccoli leaves (stems and all) into bit sized pieces and add to the garlic oil and toss around to wilt the leaves. Squeeze in some lemon juice. Once the pasta is done cooking, remove a few tablespoons of the starchy water and strain the pasta. Add the water and the noodles to the skillet, toss to evenly coat the pasta and call it down. Serve in a bowl or on a plate, topped with freshly chopped tomatoes and parmesan cheese if you so shall please and another little squeeze of lemon juice if you like. Watch your mouth.. it will be breathing out garlic like whoa.