What a week. Was it summer where you are this week as well? I mean jeez, talk about one extreme to another. Oh well, at least the world has turned green, the winter stuff is completely out of sight and I found the box that contained all of my shorts and summery clothes (pants and long sleeves in 90 degrees is just gross) And honestly, it’s been great. In between work, chores and just plan old being busy, we have manage to get a few bike rides and long walks in. Plus all the veggie starts are doing great, the flowers are coming up everywhere and life just has a little bit more of a relaxed feeling. So what if my allergies are turning my face into big red puff or that the past few night have been so hot that the act of sitting has caused me to break a sweat. I’ll take it.
Oh and I can’t forget….
Happy Mother’s Day ladies!!!!
Here I give you a few thing from the internet this week …
– I didn’t believe they were paintings at first. Hyper-realistic Cactus Paintings that Bristle with Detail by Kwang-Ho Lee
-I’ll take any one of these The 5 Fanciest French Press Coffeemakers We Could Find
-Love love the floors in This house.
-Spending a bit of time making summer camping plans here…Vermont State Parks. I can’t wait to get the tent out!
-I think this should be happening everywhere. Recycled Drinking Water: Getting Past the Yuck Factor
– And there is this. ABC Brings Muppets Back To Prime Time As News Emerges About Fall Shows
And that, here are a few pictures from the week.
My boys. I long socks and sneakers… these guys know cool. Took the super cutie cuties out for an ice cream cone.Our first bike ride picnic down on the waterfront. I love bike ride picnics!So many succulents. I didn’t actually buy any because I need to stop being a plant whore.I have made a batch of this stuff evey day this week. I can’t stop eating it, it’s like eating summer. So good
Have a wonderful day and to all that it applies to…
Happy Moms Day!
-C
It’s been a long, packed, but very fantastic week. Everyday has been full of work, chores, family, and trying to get in a least one good bike ride or walk in. I made a list of a few important points to mention from the past week.
Spring is real, not an imagined season in my head. (HOORAY!!!!).
Banana ice cream is everyones favorite snack
Planting things from seed and watching them grow is magic
Riding a bike with kinda flat tires really sucks
The little people in my family are the best most fantastic humans
Don’t tell a 2 year that ants will bite her or you will end up caring that child around everywhere because she is afraid to walk outside (Anyone know good therapist for a 2 year old?)
Anyways, I am hoping to take it easy today, catch up on my coffee consumption, do a bit of gardening, reading, bike riding, all without pressure or expectations. Everyone should have a day for no expectations.
Some fun internet stuff from the week.
-I need an RV or camper. THE BRAVE // vintage rv renovation inspiration
-Who cares if not everyone is pleased, I would be if my lunch bags looked like this. These Parents Make Lovely Lunch Bag Art. Not Everyone Is Pleased
-So lovely. Urban Jewelry: New Lace Street Art by NeSpoon
-Alternative energy Woo Hoo! Tesla’s Powerwall Home Battery Wants to Make Fossil Fuels Obsolete
-I am really excited to make this… I have a feeling that I will be incorporating it into many of my recipes. ChefSteps’ Genius Roasted Onion Cream
-Another house that I could get down with.
And a few pictures….
The mister and the worlds biggest crayon, which is made of scraps of blue crayons from all over the world. I could totally use a big ass crayon like this.The coolest most badass 95 year old lady that I know (I know a few), Grammy Stem. And the little, getting a lift. (I could have used a lift too!)Brothers. The guy in the green is my Dad.Aftre dinner ice cream break.The sky has been on point all week longAnd made myself some veggie chips. The colors alone are delicious.
Yesterday The mister and I went for a walk, a long walk. I was wearing a sweater, a light jacket and I left the mittens and hat at home. There was sunshine, huge puddles and mud. Birds were chirping. It was amazing.
After our nice long walk, we got home and I needed to start dinner. It was a little later than I usually so I wanted fast and easy I usually always have pesto in my fridge (I had to make some, but it only takes 5 minutes) because when it’s in there, I can whip up a big awesome meal in the time it takes to boil some pasta or quinoa or smear on toast or toss with potatoes. It really can be used on everything and can be made out of just about anything. Kale and walnuts are just one of so many fantastic combos. And frozen ravioli is always in the freezer too. I used just plain cheese, but use whatever kind you like.
Together, pesto and ravioli, well that’s a quick, easy, and tasty meal, perfect for a spring evening, And yea, there will be left over pesto from this recipe… just stick it in the fridge or freezer….you will be glad you have it.
Pesto stuff. Kale, walnuts, parmesan cheese(nutritional yeast to keep it vegan), garlic, lemon, olive oil, and salt and pepper.
A few little pre steps before the blending.. Toast the walnuts. Just toss onto a dry skillet and stick on medium heat for about 5 minutes or until they start to become née and fragrant. Remove from skillet and add in a bit of water. Add in chopped or ripped kale and cover to let the kale tenderize, but only for about 2 minutes. (you want the kale to still be crispy and fresh tasting) Drain water and add kale, garlic, toasted walnuts, cheese and the juice of the lemon into a food processor. Turn on and slowly add in olive oil until you get to a nice paste, adding more oil to get to your desired consistency. Oh and don’t forget to salt and pepper to taste!
Straight up frozen ravioli goes onto an oiled baking sheet.(make sure that non are overlapping) Place into an oven at 400 degrees for about 15-18 minutes, flipping after 10. If you want to add mushroom and a few more walnuts, just toss them onto the ravioli when you are flipping over the ravioli.
When the ravioli is nice and brown and crispy, remove from oven and dump the ravioli and the mushrooms into a bowl. Add a big old scoop of the freshly made pesto and toss around.
Look at this… fresh, crunchy, light and happy. Kinda like a spring day.
I am the best lady, making the mister a pretty yummy dinner.
Have a great Tuesday!
-C
Kale Pesto and Baked Ravioli
4-5 cups chopped Kale
1/2 cup Parmesan Cheese ( Nutritional Yeast to make it vegan)
1/2 cup Walnuts
1/4-1/2 cup Olive Oil
4-5 Cloves Garlic
1 Lemon
Salt and Pepper
1 bag of frozen ravioli(use vegan or gluten-free if you want)
3-4 mushrooms
Note..There will be plenty of left over pesto… Just fridge or freeze it
Place walnuts in a skillet and toast on medium heat for about 3-5 minutes or until the nuts become fragrant. In the same skillet, add enough water to cover bottom and add in all the kale. Place a lid on it and let kale wilt on medium heat for about a minutes or 2, Take off heat. Add walnuts. garlic, cheese, salt and pepper, and juice of lemon to a food processor. Blend. Now add in the kale and blend, slowly adding olive oil until a thick paste forms. You can add as much oil as you want to make it as thick or thin as you like.
Preheat oven to 400
Place frozen ravioli on an oiled baking sheet, making sure none are overlapping. Place into oven for about 15-18 minutes, removing after 8 minutes to flip. When you take the ravioli out to flip, slice up the mushrooms and grab a few more walnuts and toss onto baking sheet with the ravioli. When the ravioli’s are nicely browned and toasty, remove (mushrooms and walnuts too) and place into bowl. Add a big scoop of pesto and toss to mix.
Serve and eat.. fork is optional.
Note..Add a thin layer to the top of any left over pesto to keep it fresh and from turning black
Me well, I need to can, pickle and eat as much zucchini as I can. And it’s not just zucchini anymore… we are getting into cucumbers too…AAAHHH I know I have said this a few times in the past weeks, but man, I have so manning freaking zucchinis.. and the more I eat, the more I end up with… It’s getting pretty crazy here!
So anyway, yesterday my dad came back to VT, WOO HOO! and I was his first stop on his rotating dinner schedule. (cause I am his favorite child. I think..maybe) I made zucchini noodles for dinner (I have made them every night for the past week) and I wanted to make him dessert, I have all sorts of pretty fruit that I wanted to make and prepare, but I also had little time and honestly, little desire to move all that much (it was so f ing hot!) I already had out the shredder and a bowl, and the zucchini was just sitting there, in the basket taunting me with it’s gigantic green whaleness. So I figured I’d just make a zucchini cake, or better yet, cause my dad really likes chocolate, a chocolate zucchini cake.
This cake is tender and moist, almost like a cakey brownie, so it does not require any frosting which is nice when your dead tired and it’s so hot that any frosting would probably just melt off anyway. (although you could totally frost it up) It makes a great dessert, but I would not hesitate to serve this for breakfast either because, 1. It has a lot of zucchini in it which automatically justifies eating it whenever, 2. also made with whole wheat, and 3. it’s totally ok to eat chocolate cake for breakfast. I mean people eat donuts for breakfast and that shit is usually fried.
Yeah, this is for sure a dessert/breakfast cake.
The stuff for cake…. Regular all purpose flour, white whole wheat flour, and cocoa powder. Some sugar, salt, baking soda and oil. A little vanilla extact and a splash of coffee. And of course, shredded zucchinn
Dump the sugar, salt and baking soda into flour, whisk together, then mix in the oil, vanilla and the coffee. Now add in the shredded zucchini, but right before adding it in, give it a squeeze to remove a little bit of the liquid.
Mix until combined.
And pour batter into a well oiled pan
Feeling fancy? I was so I peeled the green skin from a zucchini and make a little starburst on top
And into the oven to bake…
And it comes out looking so fancy. Let cake cool for a few minutes and carefully flip from pan.
Note. It might not be the best idea to test your cake with a blunt chop stick.. I did and it made the middle sink in a little. No big deal, but next time I will use a fork.
Cooled and removed from pan. Now all you need to do now is eat cake.. I think that’s something you can handle.
Happy Friday!!!!
-C
1 cup white whole wheat (can use regular whole wheat or all all purpose)
1 cup all purpose flour
1 cup sugar
1/2 cup cocoa powder
2 teaspoons vanilla extract
1/2 cup oil (veggie, canola, sufflower)
1 teaspoons baking soda
1 teaspoon salt
2 cups of shredded zucchini
2 tablespoons of coffee
Preheat oven to 350
In a large bowl, whisk together the flours, salt, baking soda, cocoa powder, salt and sugar. Then add in the oil, vanilla and coffee. Add in the zucchini, but right before, give it a squeeze to remove some of the liquid. (don’t got crazy, just get a little liquid out). Mix until incorporated.
Oil a 9 inch cake pan and pour in the batter. If you want, use zucchini skin to make a pretty design on top (completely optional), and place into preheated oven.
Bake for about 45-50 minutes, or until a tester stabbed in the middle comes out clean.
Remove from oven and let cool in pan for at least 5 minutes the gently invert pan to remove cake and place on a rack to cool.
Happy St Patricks Day!!!! As a kid, St Patricks day always meant green milk, green eggs, and those nasty gold foil covered chocolate coins. (you know, from the pot of gold) Not to mention all the leprechaun hunting and pinching. In my family, if you were unlucky enough to forget to wear green, you ended up as a walking target. It all started out nice an innocent, a pinch here or there, but by the end of the day, someone would end up pinching a little to hard or maybe just one too many times and the game would go from pinches to punches.
Ahh, memories.
Now as an adult (kinda adult) St Patricks is celebrated a little differently. The little ones in the family still get their green milk (which they are told is leprechaun pee) and those nasty gold coins, but I think the pinching has stopped.( a great tradition lost) I myself don’t have any littles at home so no little leprechaun games or gross dyed food for me. Nope, in my house we celebrate with a few beers and a more traditional irish dish, Colcannon. Mashed up potatoes with cabbage and kale… I mean, can it get much better? It can when you use red potatoes and red cabbage. Not only is it so tasty tasty, but it is so pretty pretty. No need for green milk or nasty candy.
But I still make sure to wear green and you might find me doling out a pinch or two.
The stuff…. Super pretty red potatoes, red cabbage, shallots, kale, salt and pepper, and olive oil.
Note. If you do not have or want to use red potatoes, russet or white will work, it just won’t be as pretty.
Dice up the pretty potatoes and stick them into a pot and fill up with water and add in a good tablespoon of salt. Stick on high heat and bring to a boil, then turn the heat down to medium and cook those taters until super fork tender. (bring them to the edge of falling apart)
While the potatoes are boiling, chop up the cabbage, shallots, and the kale and stick into a big skillet with a good drizzle of olive oil. Sauté on medium heat until soft and tender.
Once the potatoes are super tender, drain the water and dump them into the pan with the sautéed veggies. With a potato masher or a fork, mash up the potatoes and mix in the veggies, adding a drizzle or more of olive oil as you go. (Start with a drizzle and work your way up until it tastes good to you) Salt and pepper to taste.
The most pretty pan of smashed up potatoes that I have ever seen. Eat as a side dish or even a light main dish. Fork is a good utensil to use, but I found that my fingers worked just as well.
Have a great happy day full of green, potatoes, and pinches. Maybe even a leprechaun or two!
-C
Red Potato Colcannon
5-10 Red potatoes Red Potatoes depending on the size (about 3 1/2 – 4 chops chopped)
1 Cup Chopped Red or Green Cabbage
1 Cup Chopped Kale
1-2 Shallots
Olive Oil
Salt and Pepper
Rinse and dice potatoes and place into big pot. Cover potatoes with water and add about a tablespoon of salt. Place on high high heat and bring to a boil. Turn heat to medium low and let potatoes cook until super fork tender. While potatoes are boiling, chop up cabbage, shallots and kale and sauté in a large cast iron skillet (or any skillet) with a good drizzle of olive oil. Once the potatoes are done, drain water and add potatoes to the skillet with the sautéed veggies. With a potato masher or fork, mash the potatoes and mix with the veggies, adding a drizzle or two (depending on your taste) of olive oil as you go. Salt and pepper to taste.
Serve from skillet or dump into a fancy dish with a big spoon.
Eat as a main dish or as a side….Good hot, warm and cold.
Before we left for the weekend, I was was trying my hardest to empty the fridge out of all food with the intention of leaning it empty so I could leave it open to defrost while were were gone. Unfortunately I was not able to make it happen. What I did make happen was emptying it almost completely so that when we got home, we had pretty much no food in the house, except for a few things that probably should be eaten. Plus one of the last things that I want to do after sitting in a car for 6 hours is go to the grocery store, or anywhere for that matter, so I was determined to make with what wet had in the fridge:
Carrots
half of a gigantic kohlrabi
soy milk
iced tea
bananas that needed to be frozen
strawberries
Perfect! A few carrots and half of a gigantic kohlrabi.. plus at the hotel we were staying at, there were fruit bowls in he lobby full apples. Every time I went past the apples (which was a lot) I grab one or two, so I have a few apples (I actually have a lot of apples now). All the things I need for a super awesome salad slaw. Apples with their nice sweet crispiness and kohlrabi with its cabbagey, crunchy earthiness, tossed together with some vinegar, some toasted walnuts and some carrots, I mean, so freaking good. And to make it a bit more of a meal, I made some lentils to go with it. But the best part was there was no need to leave the house!!
The stuff… A huge hunk of a bigger then my head kohlrabi (or 2 normal bulbs). A carrot, an apple, toasted walnuts, red wine vinegar, and some salt.
Pretty simple stuff going on here. Just peel and julienne the kohlrabi, carrot and apple. (no need to peel the carrot or apple unless you want too) and stick it all into a bowl. I used my mandolin, which is one of my favorite kitchen tools ever, but if you don’t have one, a box grater works too.Sprinkle with salt and a good glug glug of red wine vinegar. Chop up the walnuts (some big chunks and some very small pieces makes for good eating), toss it all together and, well that’s it. But wait…. let it sit for a few minutes before serving to really let the flavors draw out.And there we have it. Super fast, full of flavors and crunchy texture. A salad slaw after my own heart.
Serve it as it or add to a bed of greens, rice, or lentils… and make sure to save at least as little… cause its an awesome little pre-bed snack.
Happy Week!!
-C
2 medium sized Kohlrabis
1 medium apple
1 small carrot
1/2 cup toasted walnuts
red wine vinegar
salt
In a large bowl, julienne kohlrabi (after peeled) apple and carrot. Sprinkle with salt, add in vinegar. Rough chop walnuts and toss the whole bit together. Let sit for at least 10 minutes, if not longer before serving. (A great salad to make ahead of time)
Eat as is, or toss onto a bed of greens, plate of rice or a bowl of lentils.
Any left overs only end up tasting better the next day.
What a way to start the day, with a mouth full of c words…….Caraway, cauliflower, chick peas and cabbage…What did you think I meant?
This week has been nippy, no, its been chilly…..nah, it’s been freaking freezing! Yeah, freezing cold. When I woke up this morning to walk the pup, it was 5 degrees. So needless to say, when it gets this cold, I like to keep inside. Tying not to be a complete lazy bones, I went to town on my spices… refilling jars with all the little baggies scattering the kitchen, screwing on lids, and wiping down the shelves. Not a bad accomplishment for a day. While cleaning I came upon a little bag or caraway seeds, Not enough to warrant a jar on the wall, but defiantly enough for one dish.
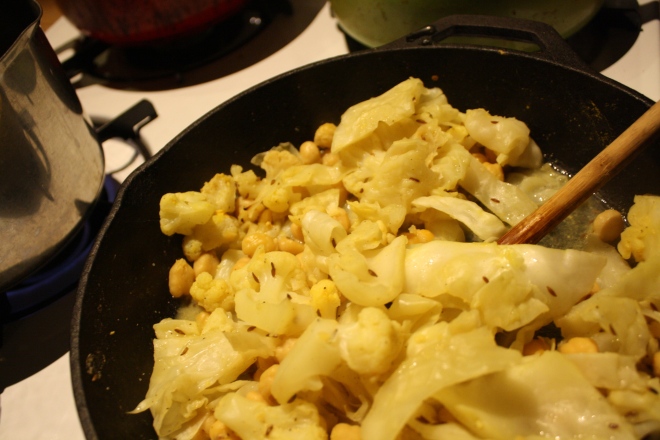
When I think of the bright, somewhat sweet and peppery caraway, I think cabbage.(anything cabbage and I am sold) A big pan cabbage, added cauliflower for the mister,(his favorite) creamy chick peas because we need protein and they be tasty, and of course mustard, because everything tastes better with mustard.(I’ll let you in on a little secret.I eat a lot of mustard, I am kind of obsessed. Mustards of all kind; grainy, homemade, dijon…but usually just plan old yellow. And I eat it on everything.. but my go to is French’s yellow mustard and carrots…don’t judge) A warm, bright and filling dish, perfect for a freezing cold evening stuck inside. You can eat it as main dish or add a pile of quinoa or wild rice, or even a big plate of greens. What ever say you eat it, you and your stomach will be happy.(If your worries about cabbage bloat..don’t be. Cooking cabbage helps breaks down the enzymes that create gas, plus caraway has anti bloating properties…WIN!)
Cabbage, cauliflower,(fresh of frozen….I used frozen in this recipe) pre-cooked or canned chick peas, caraway seeds, yellow mustard, and salt..(I added pepper too)
Chop the cabbage and toss into a lightly oiled pan with the rest of the stuff. Heat pan with everything but water for a couple of minutes.. to warm the caraway and give everything a cooking head start, then add the water. Stick a lid on it and let simmer. After about 15 minutes, give it a stir or two and do a taste test. At this point, it’s up to you…how cooked you want the veggies? I kept mine cooking for another 10 minutes. I also added another 1/2 cup of water. Not enough water and the pan will burn, a little extra water is good, it creates a yummy broth.
When you are happy with the flavor and doneness, eat it. I made myself a bowl with a heap of pickled beets(holy yes!). I am sorry if you don’t have any pickled beets, but the dish is still amazing without them. Fresh ground pepper really does the trick too!
So there you go, make it tonight, it will make you warm,smart and happy
-C
serves 2-3
1/2 small head of green cabbage(about 2 cups chopped)
2 cups cauliflower(fresh or frozen)
1 cup cooked chick peas
1 1/2 -2 cups water
1 tablespoon caraway seed
2 tablespoons yellow mustard
salt and pepper to taste
Lightly oil a medium sized skillet and add all ingredients except water. Heat for a few minutes to warm up veggie and caraway seeds then add a 1 1/2 cups of water. Keep on medium heat with a lid and stir on occasion If water evaporates completely out, add another 1/2 cup. Dish is done when veggies are tender.. about 20 minutes….but whenever tastes best to you!
Lets kick the weekend off right, with a nice warm and hardy salad. Not a frilly little salad, but a salad that fills you up and leaves you feeling warm and cozy. A salad with a lot of squash! So here’s the thing, I eat a lot of winter squash, maybe 4 plus a week. Because I eat so many, I store a good amount in a cold storage area outside of the little warm living space we call home. Last week we had a drastic temperature change and a good few of the my butternut and spaghetti squash froze.. then started to de-thaw. Not good. That was the second bad food experience of the day….. Earlier that day I had bought about 2 dozen super ripe bananas that I had been planing on freezing and what not. There were four bunches and each bunch was wrapped in plastic and were in a bag that I left near the back door. The thought crossed my mind, but I hastily brushed it away. Washer won’t eat those….. Well guess what? The shit ate half of my freaking bananas…plastic and all. Needless to say, I was kind of pissed already so finding my squash on the way out really set me off. I was not about to let more food go to waste.(or be eaten by the dog) I went into rescue mode..Chop chop and dice…boil, roast and steam…and eat eat eat…. and eat. I have been eating butternut for breakfast, lunch and dinner for the past week and that’s ok with me cause man it does taste oh so tasty. But for some people in my life, eating mashed squash out of a jar all day long does not hold the same appeal so I have been sneaking it in where ere I can.
So some of that diced squash tuned into this lovely warm salad. Even the mister liked it and he is not a fan of warm salads(he says he is not, but I think he actually is, as long as I don’t call them “salads”) Any who…This salad hits all the marks…. Fantastically filling, super delicious, fast and healthy. Check, check, and check! I am so good.
Easy peasy….
Diced butternut squash, half a vilalia onion, prepared lentils and a bunch of kale… Nothin else.(salt and pepper, but they don’t count)
Diced butternut and a mediumly sliced onion..(mediumly is a new cooking term) Spritz a bit of oil in a pan and toss the squash and onion in there and sprinkle with salt and pepper. Shove into the hot oven and roast until squash and onion are tender and tasty.
Remove the pan from the oven and toss in finely chopped kale and a big scoop of lentil… Mix it up and let the sit in hot pan for a few minutes…it will make the kale get soft and warm.
Plate it and eat eat… I drizzled a little balsamic vinegar on mine…Nick like his straight up. Do what you will cause either way, it’s going to be awesome!!!!
Hooray for Friday and for winter squash!!!!
-C
Warm Winter Salad
Ingredients (This made one good sized salad…and exact measurements were not used so feel free to add greater or lesser amounts of any of the ingredients)
1 1/2 cup Diced Butternut squash
1/2 Vidalia Onion(or any variety you like)
3-4 large Kale leaves
1/2 cup Precooked Lentils
salt and pepper to taste
Balsamic Vinegar
drizzle of oil for pan
In a 425 degree oven, place diced squash and sliced onions in a slightly oiled pan, sprinkle with salt and pepper, and roast for about 20 minutes until tender. Remove pan from oven and toss in chopped kale and lentils and let sit in hot pan for a few minutes… Plate and drizzle with balsamic vinegar.
What we got here is an easy one pan meal for the beginning of a hectic(but fun) holiday week . But I am sure that you have your wits about you, that you are not feeling like a stretch Armstrong doll. No, you are all calm and collected… Well that’s nice because I feel like my head going to explode. So what I need this week is easy, fast food with lots of healthy good stuff and maybe to get rid of the meatballs that are in the freezer….. Mission accomplished with this dish. It’s basically a hug pan of veggies with a few left over meatballs from Nicks bday dinner and a little cottage cheese. Nothing fancy… hearty and warm..Nick likes it so it’s a winner.
The spaghetti squash is the main component in this dish so if you want to use other veggies, go for it. You can make this vegan and leave out the cheese and use fake balls or no balls at all (hehe) You can even toss in some beans, lentils, or tofu. I make variations of this dish often… and lentils are a really good addition..
Besides the squash and the meatballs, I used mushroom, onion, kale, tomato and garlic plus about a half cup of cottage cheese, cause that was what I had in the fridge.
First thing first, cook the squash. Just stick it in the oven for half hour at 425.. Once you can stick a fork into it, pull it out and let it cool enough to handle.. While thats cooling off, cook down the veggies. Started with a little oil in a cast iron skillet on medium heat, toss the onion and mushrooms ands frozen meatballs*(or whatever you want to use) and heat until meatballs are cook through and the onion and mushroom are browned. Now add the garlic, kale and tomato, Turn heat off. When the squash is cooled enough to handle,. slice open, scoop out the seeds and scoop the flash out. Spaghetti squash and cottage cheese into the skillet and toss.. Sprinkled a bit of mozzarella or parmesan cheese on top. Lots of crushed black pepper and into the oven for about 15 minutes. or until the cheese is nice and melty and you are hungry and want to eat.
*Note. If you want to make meatballs fresh, my recommendation would be to make them in the skillet first and then just toss all the veggies into that pan to cook down… No need to make more dishes.
Pulled straight from the oven….Served nice and hot, placed right onto my wooded counter. I need to stop placing hot pans on the wood, I am leaving burn marks. There is actually a lot of thing that I need to stop doing in the kitchen, like setting towels on fire, burning myself at least once a day, slicing my fingers,.breaking dishes…….So maybe place skillet on a trivet of some kind and serve it up!
So easy and fast.. Served with a piece of crusty bread… Man, I wish everything this week could be this fast sans easy….. but I am not complaining.
Have a good Monday!
Spaghetti Squash and Meatballs
1 small Spaghetti Squash
5-7 pre cooked meatballs
Small red onion
2 -3 big mushrooms
1 small tomato
a few kale leaves
3-5 cloves garlic(or as many as you like)
half a cup of cottage cheese
a handful of shredded parmesan or mozzarella
salt and pepper
oil (for pan)
Preheat oven to 425
Place spaghetti squash in oven. Let bake for about a half hour or until fork tender. Remove and let cool enough to handle.
While that’s happening, chop the veggies into any size you want.. Drizzle olive oil in medium skillet and place diced sliced mushrooms, onion, and pre made meatball to brown. Once meatballs are warmed through, add the kale, garlic, tomato, and cottage cheese. Take the cooked spaghetti squash and remove seeds and scoop flesh into the skillet. Toss everything together, sprinkle with salt pepper, top with shredded cheese and place in oven for 15 minutes
Take it out of the oven and let cool. for a minutes and……
This week started with the notion that I was going to make a big dish of potato salad. I boiled the potatoes so that they would be ready when I needed them and stuck them in a bowl in fridge. That was Sunday. Monday was super busy and I didn’t get a chance to get to the potaoes, but that was ok, I figured I would just make it the for Tuesday. (which has officially been dubbed family dinner night). But for the first time, my sister declined potatoes and said she was already making goulash, which turned out that no one really wanted to eat. (I bet they would have eaten the potato salad) And Wednesday we were in Montreal so no go there.
So last night (now Thursday) when I opened the fridge to contemplate the dinner options, I knew that whatever I was going to make, the potatoes had to be used. I could have made the potato salad that I had been planning on making all week, but the potaotes were a little on the weird side, not bad, just not the best. They needed to be cooked. Plus, I had eaten the avocados and tomatoes that I had planned on using for the potatoes so I think it just wasn’t meant to be. I was tired, so nothing to elaborate was going to happen. I wasn’t feeling like spending too much time in the kitchen cause I really wanted to bike to the garden. I already had my giant dinner salad made and the mr. was pretty hungry, so split decision.
Cheesey nacho potatoes
That mr.. he has got it made with me.
The stuff. Sliced up cold boiled potatoes, cheese, garlic and onion powder, salt and pepper. and a little bit of oil. And we need guacamole, salsa, something spicy in the form of jalapeño jam (I use it on everything!) and a bunch of fresh cilantro.
Spread the sliced potatoes on a lightly oiled baking sheet and drizzle with a tad bit more oil. Sprinkle with the spices and salt and pepper and pop those suckers into the oven.
Once the poatoes turn a golden brown and are all crispy, remove from the oven and sprinkle on the shredded cheese. Toss on a few spoonfuls of salsa, and add on the jalapeños. Pop back into the oven for another minutes or two until the cheese is all melty.
And cover the potatoes with lots of freshly chopped cilantro.
Serve with extra salsa, guacamole and if you have it, more jalapeño jam.
I was thinking that I would totally make these for my dad this Sunday, if he didn’t live all the way in Michigan. (I think it’s time to move back!!!)
Happy Friday..Have an excellent weekend!
-C
4-5 boiled potatoes the size of lemons (or 2 big ones)
1/2 to 3/4 cups shredded cheese (I used cheddar and can easily be made with vegan cheese)
heaping teaspoon garlic powder
heaping teaspoon onion powder
salt and pepper
olive oil
salsa
fresh cilantro (or if you hate it, some kind of fresh herb)*
guacamole*
jalapeños (or something spicy)*
*note.. These last three ingredients are optional, but you should definitely use them all.
Turn the oven on to 425 degrees
Thinly slice potatoes and place on a lightly oiled baking sheet. Drizzle with a bit more oil and sprinkle with the garlic and onion powder, salt and pepper. Stick into oven until potatoes are brown and crispy. Remove from the oven, sprinkle on the cheese, toss on the jalapeños and some globs of salsa. Place back into oven for a minutes or two or until the cheese is all melty.
Remove from oven and cover with a handful of freshly chopped cilantro.
Serve with more salsa, guacamole, and more jalapeños.
If eating all yourself, eat directly from baking sheet or if sharing, transfer onto a plates. (or eat from the baking sheet..less dishes, more conversation) Forks and fingers work equally.
Now that halloween is over, its time to eat the pumpkins!
I make pumpkin puree on the reg… and it is so super easy, it makes you look like an ass for buying the can stuff. (I have a few cans on hand)
First thing first is to choose you pumpkin. I am a squash hoarder so I check my stock and make sure there isn’t a squash with any mold or soft spots. Then its all about using the ugliest one, or the prettiest, depending on how you look at it.
Stick whole washed pumpkin in oven on 400 degrees .After about 30 minutes, flip that mother upside down and keep on baking. After another 20ish minutes it should be fork tender. If not, keep in oven until it is. When its ready, take out of oven and let sit and cool a bit.
After a rest, pull of the stem, cut in half and scoop out the seeds. Set seeds aside for roasting.
Place pumpkin flesh and skin in a blender or a vessel to emulsify. You can remove the skin if you want… but why? seriously, why? Let it Rip
And there you have it….Pumpkin Puree.
Now what you may ask am I planning on doing with this …. Oh man. So many things. I’ll let the suspense build for a little while. Until then, try not to eat it all standing in front of the fridge in your pjs cause thats not what I do. So good….so good.
CHILI MONDAY!Well it is, but I am talking about making some super duper, yes I’ll have seconds, tummy filling, bone warming, pumpkin chili.. And heathy oh so healthy to boot. Reals, it’s the best.
This pumpkin chili recipe had evolved over the years. The first time I made pumpkin chili was for my very first dinner party that I threw back in college. Instead of cutting the pumpkin and adding it into the chili, I chopped the little pumpkins in half, roasted them, and used the halves as bowls..A good idea except no one at the pumpkin and I was left with a bunch of slobbered on roasted pumpkin halves. ( I probably should have said something, but being a few drinks in, I didn’t think to say anything about the edible bowls and I don’t think I noticed the abandoned pumpkins until the next morning). After that somewhat failed attempt, I started adding the pumpkin to the chili and left the drinking tip after the food is served. ( I learned so much in college)
But yeah, this recipe has traveled a few years with me and every time I make it, I always think, jeez, why don’t I make this every weekend. Well maybe now I will.
Don’t let this spread scare you.. it’s just veggies from the fridge, a chopped up pie pumpkin and pre soaked beans. Oh and some canned tomato and spices. It took about 10 minutes of hands on time and one big pot. No big mess to clean up and you can get rid of those veggies in the fridge that are on the way out. WIN WIN WIN!
All the chopped veggies, the chopped pumpkin go into the pot with salt. pepper , and spices.( I added a fresh jalapeno and about 5 cloves of garlic to this mixture) Let the mixture sweat for about 5 minutes, giving it a quick stir or two.
Now toss in the beans and the tomatoes… Add a cans worth of water as well. Bring to a boil, then turn to low heat and cover.
A last minute addition.. I added a few chopped up kale leaves. I wanted a little more bright color and adding kale to anything is a good idea.
I added a little sliced avocado to one of the bowls (I only had enough for one) and cut up some lime wedges to squeeze on top. (I did, Nick didn’t)
Best chili I have made in a long time…and yes, there is a bunch of left over which is fantastic because now I have lunch for the next couple days…
HOORAY FOR FOOD!!!
Have a good Monday!
-C
small sugar pie pumpkin
2 cups dried beans..I used a 1 1/2 cups black and 1/2 cup kidney or 2 cans of beans
28 oz can of crushed or diced tomatoes
1 small onion
1 small
1 carrot
1 /4 head of cabbage
a small broccoli crown
1/4 head of cauliflower
a few kale leaves
1 jalapeño
5 cloves garlic
2 tablespoons chili powder
2 tablespoons cumin
1 tablespoon coriander
salt and pepper
Either the night before or morning of, presoak dried beans..(beans in pot with about 4 cups water and a sprinkle of salt)
Take pumpkin and slice in half, de-seed and chop flesh into little chunks. (You can peel it if you want, but really, there is no reason to) Rough chop all the veggies (minus the kale) and stick into a large pot with the pumpkin. Pot on medium heat.. let the veggies sweat for about five minutes. Now add the garlic and the spices and let cook for a few more minutes.
When the mixture starts to become fragrant… drain, rinse and add presoaked (or canned) beans. Then the tomatoes, and 1 1/2 cans worth of water.
Bring chili to a boil then cover and reduce heat to low. Let cook for about an hour, giving it a stir every now and then………
Add in chopped kale a few minutes before serving
Serve in a bowl and top with sliced lime, avocado, a sprinkle of cheese….Whatever you want.
This week started with the notion that I was going to make a big dish of potato salad. I boiled the potatoes so that they would be ready when I needed them and stuck them in a bowl in fridge. That was Sunday. Monday was super busy and I didn’t get a chance to get to the potaoes, but that was ok, I figured I would just make it the for Tuesday. (which has officially been dubbed family dinner night). But for the first time, my sister declined potatoes and said she was already making goulash, which turned out that no one really wanted to eat. (I bet they would have eaten the potato salad) And Wednesday we were in Montreal so no go there.
So last night (now Thursday) when I opened the fridge to contemplate the dinner options, I knew that whatever I was going to make, the potatoes had to be used. I could have made the potato salad that I had been planning on making all week, but the potaotes were a little on the weird side, not bad, just not the best. They needed to be cooked. Plus, I had eaten the avocados and tomatoes that I had planned on using for the potatoes so I think it just wasn’t meant to be. I was tired, so nothing to elaborate was going to happen. I wasn’t feeling like spending too much time in the kitchen cause I really wanted to bike to the garden. I already had my giant dinner salad made and the mr. was pretty hungry, so split decision.
Cheesey nacho potatoes
That mr.. he has got it made with me.
The stuff. Sliced up cold boiled potatoes, cheese, garlic and onion powder, salt and pepper. and a little bit of oil. And we need guacamole, salsa, something spicy in the form of jalapeño jam (I use it on everything!) and a bunch of fresh cilantro.
Spread the sliced potatoes on a lightly oiled baking sheet and drizzle with a tad bit more oil. Sprinkle with the spices and salt and pepper and pop those suckers into the oven.
Once the poatoes turn a golden brown and are all crispy, remove from the oven and sprinkle on the shredded cheese. Toss on a few spoonfuls of salsa, and add on the jalapeños. Pop back into the oven for another minutes or two until the cheese is all melty.
And cover the potatoes with lots of freshly chopped cilantro.
Serve with extra salsa, guacamole and if you have it, more jalapeño jam.
I was thinking that I would totally make these for my dad this Sunday, if he didn’t live all the way in Michigan. (I think it’s time to move back!!!)
Happy Friday..Have an excellent weekend!
-C
4-5 boiled potatoes the size of lemons (or 2 big ones)
1/2 to 3/4 cups shredded cheese (I used cheddar and can easily be made with vegan cheese)
heaping teaspoon garlic powder
heaping teaspoon onion powder
salt and pepper
olive oil
salsa
fresh cilantro (or if you hate it, some kind of fresh herb)*
guacamole*
jalapeños (or something spicy)*
*note.. These last three ingredients are optional, but you should definitely use them all.
Turn the oven on to 425 degrees
Thinly slice potatoes and place on a lightly oiled baking sheet. Drizzle with a bit more oil and sprinkle with the garlic and onion powder, salt and pepper. Stick into oven until potatoes are brown and crispy. Remove from the oven, sprinkle on the cheese, toss on the jalapeños and some globs of salsa. Place back into oven for a minutes or two or until the cheese is all melty.
Remove from oven and cover with a handful of freshly chopped cilantro.
Serve with more salsa, guacamole, and more jalapeños.
If eating all yourself, eat directly from baking sheet or if sharing, transfer onto a plates. (or eat from the baking sheet..less dishes, more conversation) Forks and fingers work equally.

 HOORAY FOR SPRING!!!!!!!
 Pesto stuff. Kale, walnuts, parmesan cheese(nutritional yeast to keep it vegan), garlic, lemon, olive oil, and salt and pepper.
 Straight up frozen ravioli goes onto an oiled baking sheet.(make sure that non are overlapping) Place into an oven at 400 degrees for about 15-18 minutes, flipping after 10. If you want to add mushroom and a few more walnuts, just toss them onto the ravioli when you are flipping over the ravioli.
  Look at this… fresh, crunchy, light and happy. Kinda like a spring day.
 Happy St Patricks Day!!!! As a kid, St Patricks day always meant green milk, green eggs, and those nasty gold foil covered chocolate coins. (you know, from the pot of gold) Not to mention all the leprechaun hunting and pinching. In my family, if you were unlucky enough to forget to wear green, you ended up as a walking target. It all started out nice an innocent, a pinch here or there, but by the end of the day, someone would end up pinching a little to hard or maybe just one too many times and the game would go from pinches to punches.
  The stuff…. Super pretty red potatoes, red cabbage, shallots, kale, salt and pepper, and olive oil.
 Dice up the pretty potatoes and stick them into a pot and fill up with water and add in a good tablespoon of salt. Stick on high heat and bring to a boil, then turn the heat down to medium and cook those taters until super fork tender. (bring them to the edge of falling apart)
 Once the potatoes are super tender, drain the water and dump them into the pan with the sautéed veggies. With a potato masher or a fork, mash up the potatoes and mix in the veggies, adding a drizzle or more of olive oil as you go. (Start with a drizzle and work your way up until it tastes good to you) Salt and pepper to taste.
  The most pretty pan of smashed up potatoes that I have ever seen. Eat as a side dish or even a light main dish. Fork is a good utensil to use, but I found that my fingers worked just as well.
 Before we left for the weekend, I was was trying my hardest to empty the fridge out of all food with the intention of leaning it empty so I could leave it open to defrost while were were gone. Unfortunately I was not able to make it happen. What I did make happen was emptying it almost completely so that when we got home, we had pretty much no food in the house, except for a few things that probably should be eaten. Plus one of the last things that I want to do after sitting in a car for 6 hours is go to the grocery store, or anywhere for that matter, so I was determined to make with what wet had in the fridge:
 The stuff… A huge hunk of a bigger then my head kohlrabi (or 2 normal bulbs). A carrot, an apple, toasted walnuts, red wine vinegar, and some salt.
 Sprinkle with salt and a good glug glug of red wine vinegar. Chop up the walnuts (some big chunks and some very small pieces makes for good eating), toss it all together and, well that’s it. But wait…. let it sit for a few minutes before serving to really let the flavors draw out.
 And there we have it. Super fast, full of flavors and crunchy texture. A salad slaw after my own heart.




 Lets kick the weekend off right, with a nice warm and hardy salad. Not a frilly little salad, but a salad that fills you up and leaves you feeling warm and cozy. A salad with a lot of squash! So here’s the thing, I eat a lot of winter squash, maybe 4 plus a week. Because I eat so many, I store a good amount in a cold storage area outside of the little warm living space we call home. Last week we had a drastic temperature change and a good few of the my butternut and spaghetti squash froze.. then started to de-thaw. Not good. That was the second bad food experience of the day….. Earlier that day I had bought about 2 dozen super ripe bananas that I had been planing on freezing and what not. There were four bunches and each bunch was wrapped in plastic and were in a bag that I left near the back door. The thought crossed my mind, but I hastily brushed it away. Washer won’t eat those….. Well guess what? The shit ate half of my freaking bananas…plastic and all. Needless to say, I was kind of pissed already so finding my squash on the way out really set me off. I was not about to let more food go to waste.(or be eaten by the dog) I went into rescue mode..Chop chop and dice…boil, roast and steam…and eat eat eat…. and eat. I have been eating butternut for breakfast, lunch and dinner for the past week and that’s ok with me cause man it does taste oh so tasty. But for some people in my life, eating mashed squash out of a jar all day long does not hold the same appeal so I have been sneaking it in where ere I can.
  Easy peasy….
 Diced butternut and a mediumly sliced onion..(mediumly is a new cooking term) Spritz a bit of oil in a pan and toss the squash and onion in there and sprinkle with salt and pepper. Shove into the hot oven and roast until squash and onion are tender and tasty.

 Plate it and eat eat… I drizzled a little balsamic vinegar on mine…Nick like his straight up. Do what you will cause either way, it’s going to be awesome!!!!
 What we got here is an easy one pan meal for the beginning of a hectic(but fun) holiday week . But I am sure that you have your wits about you, that you are not feeling like a stretch Armstrong doll. No, you are all calm and collected… Well that’s nice because I feel like my head going to explode. So what I need this week is easy, fast food with lots of healthy good stuff and maybe to get rid of the meatballs that are in the freezer….. Mission accomplished with this dish. It’s basically a hug pan of veggies with a few left over meatballs from Nicks bday dinner and a little cottage cheese. Nothing fancy… hearty and warm..Nick likes it so it’s a winner.
  The spaghetti squash is the main component in this dish so if you want to use other veggies, go for it. You can make this vegan and leave out the cheese and use fake balls or no balls at all (hehe) You can even toss in some beans, lentils, or tofu. I make variations of this dish often… and lentils are a really good addition..
 Pulled straight from the oven….Served nice and hot, placed right onto my wooded counter. I need to stop placing hot pans on the wood, I am leaving burn marks. There is actually a lot of thing that I need to stop doing in the kitchen, like setting towels on fire, burning myself at least once a day, slicing my fingers,.breaking dishes…….So maybe place skillet on a trivet of some kind and serve it up!


THE LOVELY CRAZY
September 19, 2015 by maximios • Blog
Oh and I can’t forget….
Happy Mother’s Day ladies!!!!
Here I give you a few thing from the internet this week …
– I didn’t believe they were paintings at first. Hyper-realistic Cactus Paintings that Bristle with Detail by Kwang-Ho Lee
-I’ll take any one of these The 5 Fanciest French Press Coffeemakers We Could Find
-Love love the floors in This house.
-Spending a bit of time making summer camping plans here…Vermont State Parks. I can’t wait to get the tent out!
-I think this should be happening everywhere. Recycled Drinking Water: Getting Past the Yuck Factor
– And there is this. ABC Brings Muppets Back To Prime Time As News Emerges About Fall Shows
And that, here are a few pictures from the week.
Have a wonderful day and to all that it applies to…
Happy Moms Day!
-C
Anyways, I am hoping to take it easy today, catch up on my coffee consumption, do a bit of gardening, reading, bike riding, all without pressure or expectations. Everyone should have a day for no expectations.
Some fun internet stuff from the week.
-I need an RV or camper. THE BRAVE // vintage rv renovation inspiration
-Who cares if not everyone is pleased, I would be if my lunch bags looked like this. These Parents Make Lovely Lunch Bag Art. Not Everyone Is Pleased
-So lovely. Urban Jewelry: New Lace Street Art by NeSpoon
-Alternative energy Woo Hoo! Tesla’s Powerwall Home Battery Wants to Make Fossil Fuels Obsolete
-I am really excited to make this… I have a feeling that I will be incorporating it into many of my recipes. ChefSteps’ Genius Roasted Onion Cream
-Another house that I could get down with.
And a few pictures….
Have a great day!
-C.