Can you believe it? We are already getting toward the end of June. This is just crazy to me. I feel like I should have gotten more summer stuff done already. Aaaaaaaaah! Pulling my hair out! Whatever, it’s all cool. I’ll get there (where? not exactly sure) but I think this week was a good start. We did a little road trip to Montreal, a few good bike rides, hung out with some littles that are officially on summer vacation (again. AAAAAHHHHH), a drive to the country to collect wildflowers…. I mean, I did a good amount of awesome stuff this week. I also did a fair amount of not so much fun crap, but we don’t need to go there. All this summer talk got me thinking.. What do I want to do this summer? So I made a list
SUMMER BUCKET LIST
Hike Camels Hump (and some other mountains)
Start knitting a sweater so it will be ready for fall
Fly a kite
A kayaking Day Trip
At least one EPIC bike ride
repot all my house plants
spend a n entire day in bed (or at least at home)
Make popsicles at least once a week
Fly somewhere
go swimming in a river
Clean out the barn
A few good camping trips (can combine with #1,2,3,4,6, and 9)
Road Trip!!! (another one)
Shave my legs and get a hair cut
Every kind of berry picking
I could add a few more, but this is a good start. Do you have a summer bucket list? If so, something you got that I am missing? I am open to suggestions,
Anyway, here is what this week in internet had for me…
– I am in love and inspired by this. STUDIO TOUR: KIKI SLAUGHTER
– A Gallery of Beautifully Eclectic Living Rooms
–Yes, Coffee Can Actually Improve The Power Of Your Power Naps
-Nick and I were just listening to this TED talk. Very interesting. Shifting Time
– I love a good Horseshoe.
-This hotel room, I could live in. AN APARTMENT-LIKE HOTEL ROOM FOR THE TRAVELING PROFESSIONAL
-Your Inner-Child Will Love This Playground Decor I think I want the side.
And some pictures from the week.
The gardens looking good, no?
Sticks and farting noises make the best of times.
Weekly CSA…..so AMAZING!!!
I rode the mr’s bike for a few days after my tire popped. I liked having a basket, I felt like the wicked witch of the west.
I figured now is a good time to get this recipe out there before we get to far into spring and summer recipes because there is going to be a lot of banana ice cream filled recipe coming and I figured its a good idea to have the basic banana ice cream recipe ready for people to refer too. And because I made so much fantastic naner ice cream, I also made a cookies and cream naner ice cream for my sisters and the mister.
Comments that I got from my sisters and the mister when I made them this ice cream
-Sister one.”I give this my sister seal of approval.. It’s so good. The first dessert you have made that I liked! (not including all the other desserts that you have made that I liked)”
-Sister two- “Wow.. it looks like ice cream and feels like ice cream and tastes like ice cream.. You should make me this ice cream!” (I was confused too because I was pretty sure I just made her some)
-The mister- “I am so excited for my new fly fishing pole!”
Ok, so the naner ice cream isn’t new to the mister and he IS very much excited for his new fly fish pole. So excited that he forgot to tell me how amazing that I am and to thank me for making him a big bowl of yumminess. (It’s ok, I forgive him)
And yes, this is probably one of the easiest, most delicious, healthy and amazing frozen dessert that you will ever eat. You will probably find yourself buying mass amounts of bananas and stocking the freezer until things just start falling out. (which is also ok because it’s only bananas and you can’t have too many frozen bananas)
The stuff you need for this ice cream…. Nice and ripe bananas, peeled and then frozen* That’s it.
To make it, place frozen bananas into food processor and hit the on button. Process the crap out of the namers until nice and silky smooth.
*Note, the smaller the frozen chunks are , the faster and maybe a little easier for the blender to blend the naners into ice cream. So if you think of it, chop bananas into pieces before freezing or even after.
After all blended and smooth, either eat right away or scoop ice cream into a freezer safe container and stick in freezer. That’s the banana ice cream… And it is amazing and so so so so so addictive. I make a batch, think I am only going to eat a scoop, then find myself eating half of what I have made, but it’s ok cause it’s only bananas.
Now for the cookies and cream banana ice cream..One batch of banana ice cream, either freshly made, still in food processor or made ahead and placed in a food processor and given a good pulse to smooth it up.
Add cookies in, crushing a bit beforehand and pulse till combined. Now you have cookies and cream naner ice cream…. and everybody is happy.
Scoop into a cup, a bowl, a freezer safe container, or directly into your mouth. Be careful…. You can still get brain freeze from eating naner ice cream too fast!
Keep it real hump day drum bum!
-C
Basic Banana Ice Cream
Makes one batch. Good for 3-4 servings
4-5 ripe bananas peeled and frozen
Peel bananas and stick in a freezer bag or container and freeze. When bananas are completely frozen, break into pieces and stick into a food processor or blender and puree until silky smooth.
Eat right away or scoop into a freezer safe container for later.
Cookies and Cream Banana Ice Cream
1 batch banana ice cream
5-10 (depending on your cookie need) cream filled cookies like oreos or Trader Joe’s Joe Joe’s (These are gluten free)
In a food processor, blend banana ice cream with cookies.
Eat right away, with a utensil of choice in a container of choice.
I don’t think I need to tell anyone about how weird the past few weeks of weather have been, so I will just leave it alone because we don’t need to keep thinking about how stupid cold it is outside or that the next week is only suppose to get worse. Booooo, but oh well. More time for cooking, reading, and trolling the internet (I have spent a little more time then usual getting sucked into the world-wide web.) Beacause I have been spending a little more time interneting, I have added an addition to my usual happy bits, a few links that I have stumbled upon that I think are cool and of things that I want or want to make… Cool internet stuff…..a bit of internet happy.
So I recently discovered that I can waste a good amount of time on pintrest, especially looking at interiors and architecture and clothes (which I found really weird, but with one pin, an open can of worms…Dangerous stuff). I have a long way to go before I have nearly as many pins as other folk, but I am getting a good a start. Check out my boards…
I smiled so much when I read this article. So sweet and are some of the coolest tattoos ever.
The original nomad. I am not a hot tub person (it makes me feel like I am being cooked..) But I might be able to get into one of these when doing some camping.
I practically started salivating when I saw this falafel. I am so going to make it for a special mister and me dinner!
I don’t have any big kitchen utensils… like a kitchen aid or a panini grill, and for now, I am ok with that, but I really want this waffle iron. I could so use the crap out of it.
So that’s some internet stuff and here are a few life moments…..
I got to hang out with my little sister for the first time in like a month… She is just so busy being busy. I guess high school,play practices and boys and friends can fill up ones time at 15… but I miss her so much! I was very excited that she was able to hang out with me this week. What did we do? Well we spent most of out time together taking pictures of her in my glasses, making food and then taking pictures of her eating food. (She is eating whipped carob moose… like one should eat it) A fantastic day of silliness.
I have been feeling like I might be fighting off an illness so I have been eating this Turmeric Ginger Garlic Carrot soup which I have been adding cabbage and topping with these pickled heart beet, all week long. So tasty and full of so much good.
Oh yeah. Me, the mister, my sister, and her lovely little little went to Ikea this week. (the littles first international trip!!! Over the border and into Montreal) And of course at the end of any good shopping trip there is some type of food…. She was so excited for the hot dog and frozen yogurt cone at check out. Champion food eater this one is.
And what’s not to love about pretty flowers (primrose)…..Sadly this is not a current picture. I need to get me some color today.
Which leaves me with my goals for the day..
Get 2 new library books (and return the huge stack by the door)
Make something tasty good for dinner and prep food for the week
clean bathroom and change sheets
buy flowers
Take a nap
Hope you all have a great day and the most splendid week!
Chomp Chomp Chomp… The sound I make as I eat this freaking fantastic crunchy granola. You know it’s good when the person sitting next to you is annoyed by the sound of you face while eating. I eat a lot of crunchy stuff. And I am pretty sure I annoy the mister a lot.
Oh well, he will live, and he eats his fair share of annoying stuff too so we can just call it even.
So granola. I love it. I make a batch every few weeks or so, and I usually make it just for me. (I almost never make things just for me) I like to keep it simple but flavorful. A tad sweet, but not really, and crunchy, without the oily fried taste. I also like a variety of sizes, some big clusters and some small pieces.
This granola fits the bill perfectly. Made with 5 ingredients, no oil, and the perfect sweetness level. It’s one of my favorite flavors yet. And I know I said I made it just for me, but the mister really liked it too. (I can’t help sharing)
The simplest of stuff. 1 smashed banana, a cup of pureed butternut squash, Vietnamese cinnamon*, honey, and old fashion oats. (and a dash of salt, not shown)
*Note. I only ever use Vietnamese cinnamon because once I start using it, regular old cinnamon just won’t cut it anymore. It is a bit sweeter and a lot more spicy. If you don’t have it or don’t want to use it, use regular cinnamon and add in 1/2 a teaspoon of all spice.Toss the cinnamon and salt with the oats. Mix together the banana, squash and the sweetener and combine with the oats until full incorporated.
Another note. Because I made this granola for me and no body else, I actually omitted the honey (I think that banana abs squash make it sweet enough) But if I was making this for lets say, the mister, or a friend, I would use add a bit. The sweetness level and sweetener of choice is up to you, but 2-3 teaspoons of honey or maple syrup is usually sweet enough for people.
Dump the mixture on a parchment lined baking sheet and give it a little pat, you know, to settle all the bit and pieces together, all cozy and evenly spread out. Now stick into a preheated oven and after about 20 minutes, take out of oven and give the granola a toss, breaking apart any super big chunks or overly wet pieces. Put back into oven for another 20 minutes. (I like my granola super crispy crunchy so I cook it a little longer, like 30 more minutes)And when you are happy with the crunchiness of you granola, remove from oven and let cool, trying not to eat all of it while it sit’s on the counter looking all pretty and smelling like happiness.
Grab a bowl, stick the rest into a jar with a lid, hide it from others, and chomp chomp chomp away!
-C
Banana Butternut Granola
3 cups old fashion oats (use gluten free oats if needed)
1 ripe banana, mashed
1 cup butternut squash puree (can use canned)
2 tablespoons Vietnamese cinnamon (or 2 tablespoons regular cinnamon and 1/2 teaspoon of allspice)
1-3 tablespoon honey or sweetener of choice (use greater amount for sweeter)
dash of salt
Preheat oven to 375
In a large bowl, mix together oats, cinnamon and salt. Mix the mashed banana, squash, and sweetener of choice together and combine with the oats. If the mixture seems really dry, add in a very small splash of water to loosen just enough to mix.
Dump mixture onto a parchment lined baking sheet and evenly disperse the mixture. Give it a kind of smoosh to compact the oats and to make sure all its all the same thickness on the pan.
Stick into oven for 20 minutes. Remove and give granola a little toss, maybe breaking apart any really big chunks (unless you like really big chunks) and put back into oven for another 20 minutes. (30 for a crunchier granola) Remove from oven and let cool on baking sheet before storing in an air tight container. If you find that it is not as crunchy as you would like or is a few days old and lost some of its crunchiness, just stick it back into the oven for a few minutes to re crunch.
Eat as is, as a cold cereal, dip in peanut butter, add to popcorn or whatever way you want to eat it. No utensil required.
I love mustard, and when I say love, I mean LOVE. I eat it on anything and everything. And not just small quaintites, I buy jumbo sized containers of the stuff because I go through it so fast. Over the past few years I even started taking down others with my mustard eating obsession. Sisters, brothers, even some of the littles are now mustard eating feens. One of my little nieces is now just as bad as me. I don’t think I have seen her eat a single meal without a side of mustard. Her favorite snack, clementines and mustard, although sometimes she skips the clementines and just goes in with her fingers. Oh so good. I think that child could possible be mine. And yes, it’s mostly the yellow grocery store variety of mustard being consumed, but yellow mustard is just the tip of the ice berg. There is a whole world of flavors, textures and colors when it comes to the humble mustard seed. Whole grain mustard, to me, is one of the best and easiest to adapt to any persons specific taste. You can make it plan or add in just about any spice, vinegar, even a little sweetness that you might like. One of my favorite variations of this mustard is to skip the vinegar and use picked jalapeño juice. Aah, my mouth is watering just thinking about it.
So if you are anything of a mustard connoisseur, you really must, at least once, make your own batch.(It’s so easy!) And you will love it and share it with all your friends and they will think you are a bad ass for making your own mustard and your life will just be so great. All because you are now a mustard maker. Yes.
Yellow mustard seeds, brown mustard seeds, apple cider vinegar and salt. The most basic ingredients.
Note- If you want, add in a pinch of any spice that you want.. Chili flakes, granulated garlic, turmeric…. And you can use the vinegar of your choice. I like apple cider because its mellow with a slight sweetness but white or sherry or any vinegar would be great. Even left over picked juice is fantastic too.
In a large jar, combine the mustard seed , twice as much vinegar and a pinch of salt. Cover and let sit for on the counter overnight until the seeds have soften and look almost like caviar.
Now blend those seeds. You might want to add another splash or two of vinegar to help blend and to thin out a bit. Chose how creamy or seeded you like you mustard. I like to make it creamy but seedy so I blend it half way to creamy.
Taste and add another pinch of salt if its needed and……..
You have got mustard! Make sure you have a good snack ready to eat with it.. My go to is carrots. I could eat this all day long.
Enjoy and have a great Tuesday full of mustard and stuff!
-C
Whole Grain Mustard
1/4 Cup Brown Mustard Seeds
1/4 Cup Brown Mustard Seeds
1 Cup Apple Cider Vinegar
1 Teaspoon Salt
Optional..A pinch of Garlic Graduals, Red Pepper Flakes, Curry Powder (Anything you want)
Combine all ingredients into a large jar that has at least a few extras inches for the seed to expand. Leave on counter for 8-12 hours.
Once seeds are nice and soft and have expanded, either eat as is (Mustard seed caviar) or blend the seeds to desired consistency (I like it half smooth, half seedy) Add a pinch more or salt and another splash or two of vinegar to help blend.
Refrigerate and use on anything and everytihng.
There is irish soda bread in your future. I can see it. A nice hardy hunk slathered in butter and honey, crumbs all over the place. So all you have to do know is make it.
I remember reading somewhere (I wish I could remember where) that irish soda bread is just four ingredients, flour, sea salt, baking soda and buttermilk and adding anything else would make it a cake. So when I decided to make irish soda bread, thats all I used. ( I made it with some wheat flour) What you end up with is a highly dense, super fragrant, soft, chewy bread with a crunchy crust. Definitely not a cake.
Note….You can for sure add in a bit of sweetener or even little fat to make it richer and softer, but then it wouldn’t be bread (or so that’s what I read) There are tons of other recipes out there that have other stuff in them. This is just a really simple basic recipe.
White whole wheat flour and all purpose flour mixed together. Salt baking soda and buttermilk. That’s it.All the dry whisked together and in goes the buttermilk. Mix together until dough starts to form then dump onto a floured surface. Handling dough as little as possible, knead into ball.
Place on a baking sheet and dust with flour. Take a sharp knife and cut an X through the top about 1/2 inch deep.
Stick in into the oven for 50 ish minutes, or unit la tester stuck into the middle comes out clean and there is kind of a hollow thunk when tapped on.
And now you have a very pretty, dense hunk of irish soda bread.
Cut and serve with butter and honey (thats how the mister likes it) or whatever you want to eat it with.
-C
Irish Soda Bread
1 cup all purpose flour
1 cup white whole wheat flour (or you can use all purpose)
1 teaspoon baking soda
1 teaspoon salt
1 cup buttermilk (or your choice if milk plus a tablespoon lemon juice)
Preheat oven to 375
In a large bowl, whisk together flours, baking soda and salt. Mix in buttermilk until the dough starts to come together. If the dough seems to dry, add another splash or two of milk. Dump out dough onto a floured surface and shape into a ball. transfer onto a baking sheet, dust with flour and cut a x about 1/2 inch into the top. Stick into oven for 50 minutes until a toothpick comes out clean and the bread makes a hollow sound when tapped.
Let cool enough to handle.
Cut into and serve with a smear of whatever you want
Best eaten within a day or two
Happy Friday!
A simple post for the simplest of soups. Minimal ingredients, no fuss, fast to make but can be left all day to simmer……. And oh so very very good.
This has been one of my go to soups this winter. Warming, hardy, comforting….every kind of soft cozy feeling that I need when I can’t leave my house because it’s so cold out that all I want to do is sit on the couch wrapped up in a blanket, with a book, and eat hot soup. (That’s the my plan for the weekend) But it’s also good for any type of weekend activities you might have… it’t kind of the perfect soup.
The Stuff. A medium sized butternut squash, seeded and diced (no need to peel, but go for it if you want) About a pound of broccoli, (fresh or frozen) and a few shallots. Salt, pepper and a few cups of water.
Note.. I didn’t add any spices to this batch because I really love the flavor without anything. With that being said, I have made this same soup with sage, rosemary, turmeric, even curry. Almost any flavor works in this soup.
The chopped squash and broccoli go into a big pot with about 2-3 cups of water. Add about a tablespoon of salt and pepper. Lid up the pot and place on medium low heat for about a half hour, or unitl squash and broccoli is fork tender. Now blend together with either a emulsion stick blender or place in a blender for 3-5 minutes until completely smooth. Add enough water to keep things moving. Add more water if you want a thinner soup, less for a thicker soup. Season with more salt and pepper to taste. Once blended, place back in pot on simmer until ready to serve.
When the soup is simmering, thinly slice the shallots and toss into a pan. Sauté until soft and fragrant.
Finish off with a drizzle of balsamic vinegar and top with the sautéed shallots.
Soup and a spoon. So simple, so good.
Have a great weekend…..Try and stay warm!
-C
Butternut Broccoli Soup
The Stuff
1 medium butternut squash
1 pound of broccoli (crown and stem and can use frozen)
4 shallots
Balsamic Vinegar
salt and pepper
Split squash in half, remove seeds, and dice into chunks. Place in big pot. Chop up broccoli and add to pot. (or just add frozen chopped broccoli) Add water until stuff is about half way summered. Place a lid on the pot and cook on medium low heat for about 30 minutes or until squash and broccoli are fork tender. Blend together with either a stick blender or place in a blender. Add enough water to keep things moving. Add more water if you want a thinner soup, less for a thicker soup. Add more salt and pepper to taste. Once blended, place back in pot on simmer until ready to serve.
When the soup is on simmer, thinly slice the shallots and place in a pan to sautee until soft and fragrant.
To serve, ladle soup into bowl, drizzle with balsamic vinegar, and top with sautéed shallot.
Eat with a spoon
Before we get to the fries, I just want to mention that yesterday was one of those fantastic winter days that reminds me why I love living in Vermont. Pretty white snow everywhere, the sun was out, and 20 degrees without a gust of wind. The trash dog an I were even able to go for a little hike. It was so nice and soooo sooo needed! Anyways, the other day as me, my sister and the mister where putting together one more piece of Ikea furniture, (I am the master at Ikea assembling!) a little runs into the room and presents the mister with a Dominos pizza. Yup, a whole pizza just for him. Why you might ask? Well I guess my sister was delivered the wrong pizza and the place didn’t want it back and she didn’t want it, so she gave it to him.
A whole pizza to himself. I didn’t mind too much..he was just going to be eating it for lunch and dinner until it was out of the fridge. But for dinner I did want him to eat something of the vegetable matter that didn’t come out of a box. I was going to make him a big salad, but then realized that would mean sharing the last of the greens that I had for MY dinner and I was not about to do that, so I made him parsnip and carrot fries instead. No biggy, just some slicing, a little tossing and a bit of time in the old oven. And I figured I might as well make a nice sauce for those fries because I be so very nice.
The biggest problem that I ran into when I made these fries was that I didn’t make enough, so you should probably make twice as many as you think you will eat. If you end up not eating them all (which you probably will), well then you now have a great start for a soup or a nice addition to a salad. Either way, you will eat them because they are amazing and addicting… and as healthy as can be!
The carrots and the parsnips are all sliced up into big matchsticks and ready to be baked to crispy browned perfection. I added the oil to the pan to toss the fries in and then sprinkled with a fair amount of salt and pepper. If you don’t have and or want to use a cast iron pan, a baking sheet works just the same.
Oh saucy sauce stuff. Tomato puree, sriracha, and yellow mustard. Add a little bit of honey to lighten it up (can use brown sugar if keeping it vegan), a splash of apple cider vinegar and a couple minced cloves of garlic. Topped off with the smokey delightful spice of cumin. I cold eat this on everything…and I kind of did.
All mixed up in an oven safe dish, I stuck it into the oven for a about 8 minutes until it got a little bubbly, just to let all the flavors fuse together…
Fries are done, Sauce is ready. Served in super cute tea cups.(from now on I want to serve everything in tea cups.) A perfect side dish, snack, or even a light meal. It lead the mister to ask the question…What pizza?
Happy Day!
-C
Parsnip and Carrot Fries with Smokey Sriracha Sauce
Wash and trim carrots and parsnips and cut into large matchsticks (any shape is good, just make them all uniform) Toss with oil and sprinkle with salt and pepper. Place on cast iron pan or baking sheet and stick in oven for 30 or so minutes, and rotating after about 20. The fries are done when crispy and brown.
For the sauce. Mince garlic and add to all the sauce ingredients in an oven safe bowl. stick into oven for about 8 minutes until slightly bubbly and hot.
Dip fries in sauce
One of the best things about winter is that I can have something in the oven at any time and not worry about how hot the house is going to get. I get to spend my free time (or my in between free minutes) baking up all the thing that I would not dare bake in the summer. (lots of bread and cakes) Yeah, I might complain a little about how cold it is outside (to my defense, -20 is kind of a bitch) but then I think of the super hot humid days that come during the summer and cringe. At least when its cold out I am able to get warm, (que oven) but when its super hot and humid, I just turn into something that border lines a wet towel and the rabbit animal… Not so pleasant. I much prefer cooler weather. So no big surprise….I made bread.. or focaccia to be exact. And now you should too because first off, you want to eat it, and secondly, you can probably whip this up faster then it would take to get all of you winter warmies on and leave the house. Don’t leave, just turn the oven on. The stuff, which isn’t a whole lot… Flour and salt. A mixture of honey, water, and yeast. And olive oil. Its pretty much my pizza dough recipe, tweaked with the addition of oil, less flour and no kneading. Mix together the wet and dry…I used my nifty dough whisk, but a wooden spoon or even your hand works. Mix mix mix. The dough should be really slack and sticky. And guess what.. no need to knead! Just make sure the dough is uniformly incorporated…hehe.. uniformly incorporated… sounds weird. Drizzle the dough (don’t worry about making it into a ball, a blob is good) with a little oil and place in a nice warm place topped with a towel to rise for about an hour or until dough has doubled in size. Once is has fully risen, drizzle 2 tablespoons oil in two 9 inch cake pans. Divide dough in half, and kind of smoosh dough into pans. Cover and let rise for another 20 minutes or so. When dough has finished its second rise, drizzle each with another tablespoon of oil and with your fingers, fill out the pan and indent the dough, kind of like playing a piano or tickling a puppy(?)….Then layer your toppings (if you want any) Start with any herbs, then the veggies. Then last, any cheese you got. I used thyme, cracked black pepper, tomato, onion, topped with parmesan cheese. And the other one is just plain old salt. Pulled from the oven when nice and golden brown..set on a wire rack to cool for a few minute and removed from the pans. The mister was practically salivating waiting for a slice… and he was so not disappointed. Crispy outside with soft airy insides… Everything a perfect focaccia should be. The one with the toppings was the favorite for the first night, but for a peanut butter and cheese panini for lunch the next day…plain is the way to go.. My suggestion, do what I did, jazz one up and leave one plain. And then make more if you need too because the forecast call for another week of below zero!!! Oh the things that I’ll get to make! (me being positive) Stay warm! -C
Focaccia with out without stuff
3 cups all-purpose flour
1 tablespoon salt plus 2 teaspoons for topping (can use more or less if you want)
2 teaspoons active yeast (or one package)
1 1/2 cups warm water
1 tablespoon honey (or sugar if vegan)
6 tablespoons olive oil
Optional toppings
Fresh cracked pepper
Thyme or any other spices
Thinly sliced tomato
Thinly sliced onion
Parmesan Cheese
Anything you want!
In a bowl or jar, mix honey (or sugar), yeast and warm water together and let sit for about 5 minutes or until yeast is activated and starts to foam In a large bowl, whisk together flour and 1 tablespoon of salt. With either a wooden spoon, dough whisk, or if you have one, a stand mixer with a dough hook, mix the yeast mixture with the flour. The dough is going to be really sticky so mixing might get a little gloppy, but keep at it until everything is full incorporated.. for about 3-5 minutes and don’t be afraid to use your hand… you can wash it off. Once mixed drizzle with oil and cover with a towel. Let rise for about an hour or until dough has dubbed in size. When dough has double, coat two 8 or 9 inch cake pans each with 2 tablespoons olive oil. Dump dough onto floured surface and cut in half. Take each half a place in pan. cover and let rise again for another 20ish minutes. preheat over to 400 degrees After second rise, lightly take your fingers and push down dough, making little indents all over the surface. Drizzle each with another tablespoon of olive oil and sprinkle each with a teaspoon of salt. If using spices or any other toppings, nows the time to layer them on. And do any cheese last! Place in oven and bake for about 30 minutes or until the tops are golden brown. When done, place on a wire rack and let cool a bit before removing from pans. Done!! To store, place in a paper bag.. best eaten within a few days!
How awesome will you be when you bring the most freaking amazing tortilla chips to the party this weekend? You will be like..”what, it ain’t no thang.. I am just good like that” Yes, yes you are.
And yes, I am assuming that you will be making these awesome chippers to share at a Super Bowl part this weekend. I say this because even as I sit here writing this (with the TV on) there has been nothing but football talk…deflated balls, hot wings, half time shows and commercials. It’s almost as big as Christmas. Got to get the decorations, the special game day food and your football jerseys. It’s crazy and all over the place. So that’s why I am assuming you are making these for the game. But if you not going to be participating in any football parties.. by all means, make these chips for yourself anyways. Celebrate you day! Have a non football watching party. Or just make these whenever. Jalapeño Lime chips for everyday!
Note: You can make these chips without the jalaeno and or the lime if you need or want to. You can also stop after the first step and have some dank corn totillas for tacos ands stuff..But definitely make the chips… worth it for sure!
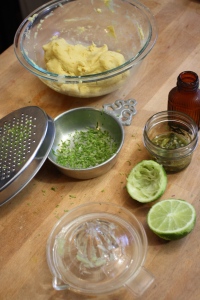
All the stuff.. Masa harina, hot water, salt, a lime and a jalapeño. Zest lime and place half the zest into a glass bowl with oil and either sit on warm oven or microwave for 30 seconds to infuse. Puree the jalapeño with a cup of hot water and add the puree and half the zest of a lime, plus salt, to the masa harina. Mix it all up with another 1/2 cup of water or enough to make the dough resemble play dough… You can add more water or masa if you dough is to wet or dry.
Knead dough a few times just to make sure it’s completely uniformed and divide into 12-14 equal pieces. Place balls on a plate and cover with a wet paper towl to keep from drying out.
I do not own a tortilla press so I used what I had… wax paper, a wooded cutting board and brunt force. I took each ball and place it between the two pieces of the waxed paper, placed the cutting board on top, and with all my might and body weight, pressed down to smoosh. It works like a charm.
My cast iron skillet is big enough to cook 2 -3 at a time, but doing one at a time is cool too. Preheat the skillet to medium heat. Cook each tortilla for about 2-3 minutes ( or until starting to brown) on each side. Half way there to chips!!!
With my fingers ( you can using a basting brush for sure), I rubbed a little of the lime oil all over both sides of each tortilla. Stacked a few high, then sliced those tortillas into triangle shapes. If you want to go crazy, you could cut them into strips or even use a cookie cutter and do some fun shapes… but triangle are easy, classic, and practical. A good shape for dipping!
Placed all nice and cozy on a baking sheet. trying not to overlap. Into a 400 degree oven for about 20 minutes to complete the chip making process.. After about 15 minutes, check for doneness. When nice a crispy, remove from oven, squeeze lime juice all over and sprinkle with salt. I then stuck them back in the oven for a few more minutes just to dry the lime..
After cooling down, take those chips and stick them in a bowl.
Eat a few, but wait and save them for the party. Or better yet, make a few batches. Bring a batch, eat a batch. (Its ok, you are allowed)
Eat with some salsa, maybe some of this guacamole, or just as they are…Anyway is the right way as long as you are eating!
Have fun making these and have fun getting read for the party this weekend (Super Bowl or not!)
-C
Jalapeño Lime Tortilla Chips
Makes 12-14 tortillas.. then made into a medium bowl of tortilla chips.
Ingredients
2 cups masa harina
1 1/2 to 1 3/4 cups hot water
1 teaspoon salt
1 lime (juice and zest)
1 large or 2 small jalapeños
2 tablespoons olive oil
salt
To start, zest lime and add 1/2 of the zest to bowl with the oil. Place oil on warm spot on stove to let the oil infuse the limeness.
Take jalapeno and puree with 1 cup of hot water. In a large bowl, add puree and remaining lime zest to the masa harina and mix, adding an additional 1/2 to 1 cup of hot water until the dough resembles play dough, not to soft, but not to dry and completely incorporated
Divide dough into 12-14 balls and place on a plate under a wet paper towel to keep dough from drying out.
One at a time, take a dough ball and place between two pieces of wax or parchment paper. Place either a plate or cutting board on top and press down as hard as you can (you could even stand on it). Remove flatten tortilla from paper and place in medium hot skillet. Cook each tortilla for 2-3 minutes on each side.
When all tortillas have been made, lightly rub lime oil on all over both sides. Stack a few on top of each other and cut into triangles. Place pieces on a baking sheets (I used 2) and bake at 400 for 15- 20 minutes or until lightly browned and crunchy. When chips are done, remove from oven, squeeze or sprinkle lime juice on chips and sprinkle with salt. Stick back into oven for another 2 or so minutes to re-crisp from the lime juice.
Remove and let cool completely, then dump into a bowl
Enjoy!
What a way to start the day, with a mouth full of c words…….Caraway, cauliflower, chick peas and cabbage…What did you think I meant?
This week has been nippy, no, its been chilly…..nah, it’s been freaking freezing! Yeah, freezing cold. When I woke up this morning to walk the pup, it was 5 degrees. So needless to say, when it gets this cold, I like to keep inside. Tying not to be a complete lazy bones, I went to town on my spices… refilling jars with all the little baggies scattering the kitchen, screwing on lids, and wiping down the shelves. Not a bad accomplishment for a day. While cleaning I came upon a little bag or caraway seeds, Not enough to warrant a jar on the wall, but defiantly enough for one dish.
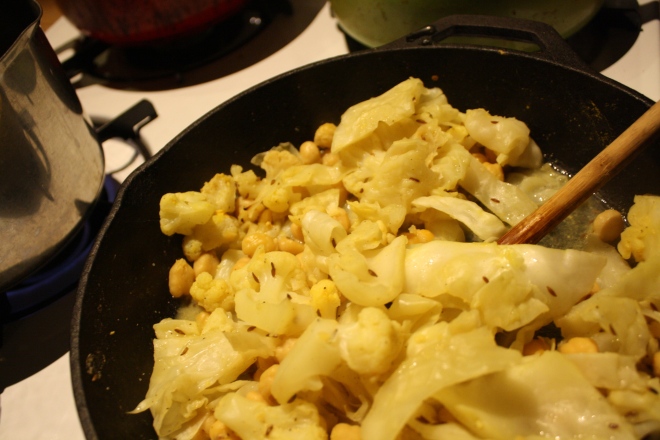
When I think of the bright, somewhat sweet and peppery caraway, I think cabbage.(anything cabbage and I am sold) A big pan cabbage, added cauliflower for the mister,(his favorite) creamy chick peas because we need protein and they be tasty, and of course mustard, because everything tastes better with mustard.(I’ll let you in on a little secret.I eat a lot of mustard, I am kind of obsessed. Mustards of all kind; grainy, homemade, dijon…but usually just plan old yellow. And I eat it on everything.. but my go to is French’s yellow mustard and carrots…don’t judge) A warm, bright and filling dish, perfect for a freezing cold evening stuck inside. You can eat it as main dish or add a pile of quinoa or wild rice, or even a big plate of greens. What ever say you eat it, you and your stomach will be happy.(If your worries about cabbage bloat..don’t be. Cooking cabbage helps breaks down the enzymes that create gas, plus caraway has anti bloating properties…WIN!)
Cabbage, cauliflower,(fresh of frozen….I used frozen in this recipe) pre-cooked or canned chick peas, caraway seeds, yellow mustard, and salt..(I added pepper too)
Chop the cabbage and toss into a lightly oiled pan with the rest of the stuff. Heat pan with everything but water for a couple of minutes.. to warm the caraway and give everything a cooking head start, then add the water. Stick a lid on it and let simmer. After about 15 minutes, give it a stir or two and do a taste test. At this point, it’s up to you…how cooked you want the veggies? I kept mine cooking for another 10 minutes. I also added another 1/2 cup of water. Not enough water and the pan will burn, a little extra water is good, it creates a yummy broth.
When you are happy with the flavor and doneness, eat it. I made myself a bowl with a heap of pickled beets(holy yes!). I am sorry if you don’t have any pickled beets, but the dish is still amazing without them. Fresh ground pepper really does the trick too!
So there you go, make it tonight, it will make you warm,smart and happy
-C
serves 2-3
1/2 small head of green cabbage(about 2 cups chopped)
2 cups cauliflower(fresh or frozen)
1 cup cooked chick peas
1 1/2 -2 cups water
1 tablespoon caraway seed
2 tablespoons yellow mustard
salt and pepper to taste
Lightly oil a medium sized skillet and add all ingredients except water. Heat for a few minutes to warm up veggie and caraway seeds then add a 1 1/2 cups of water. Keep on medium heat with a lid and stir on occasion If water evaporates completely out, add another 1/2 cup. Dish is done when veggies are tender.. about 20 minutes….but whenever tastes best to you!
Weird week. I feel like I have been so busy, but can’t quite figure out with what. I guess winter can do that to you, you know, when leaving the house kind of feels like a chore. Yup, it’s mid February when its cold, windy, snowy, and kind of mah. But it’s cool cause I feel like it’s all down hill from now. Soon we will be looking at an extra hour of daylight and hopefully some above freezing temps! (I think we have had a record amount of days below freezing here in VT) No, I am not complaining, just looking forward to getting out of hibernation.
Anyway, here is some internet stuff I have found fun and interesting this week
And some life stuff from the week…It was farm share week and yes, that’s a kohlrabi bulb. And no, I have never in my life seen a kohlrabi as big as this one. It is for real bigger then my head. If I didn’t know my farm was organic, I would think that they were growing these in toxic sludge. Wondering what I am going to do with it? Come back this week and see.
Oh my love… A few days ago I had my super comfy warm rag wool mittens stolen from me at the gym. I know, I was so pissed, but hopefully whom ever stole them is getting good use out of them. Anyway, to my Valentines Day surprise, the mister got me a new pair and sewed a heart into the palm of one. So freaking cute right!
I like to take a look back at old pictures when I am feeling the crazy.. This one makes me think of summer and our honey bees. (That’s the mister digging into the top bar hive)
The blue sky! And oh man am I craving some traveling. I think this was taken somewhere is Colorado. I want to go back.
Well that’s about it. Hopefully where ever you are, you are warm and staying out of crazy. Just wait, a few more weeks we will have more daylight and I bet even some above freezing temperatures because it has to happen, right?
And that’s how I know that this is a winner. As an awesome aunt, when I have any of my nieces or nephews, I feel the need to make something special for dinner, something that the kiddos might not get very often, but also keep it on he healthy side. I have 2 littles for the night which gives me the perfect opportunity for a trash food recipe. You know trash food, things like boxed mac and cheese, beefaroni in a can, or, in this case, sloppy joes.
Sloppy yes, trashy, not so much. These are made with beans and bulgur. No meat.
And I figured it is nice enough out that I can make the kiddos some messy food and then just bring them out back and hose them off… I mean, why not right?
The stuff… We start with onion and green pepper, chopped into pieces. Black beans, bulgur, can crushed tomatoes. Chili powder, garlic powder, a bit o apple cider vinegar (which I forgot to picture) ,and some salt and pepper. Oh and cheese if you want… Plus a bun of some sort is necessary. Toss the chopped onion and peppers into a deep skillet or pot with a drizzle of oil. Cook on medium heat until tender and toss in the spices. Give a stir. Add in the beans, bulgur, and tomato, a splash of vinegar. Stir it all up, cover, and let simmer for about 15 minutes, or until the bulgur has absorbed the liquid and is nice and tender.
If you are a bun toaster… toast while waiting. If not, just get the buns ready And Then dump a good heaping pile right onto a bun. Add some cheese, or not..and eat with wild abandonment, making sure to get as much on your face as you get in you mouth.
Fantastic Friday!! Live it up.
-C
Black Bean and Bulgur Sloppy Joes
2 cups or 1 can cooked black beans
1 16 oz can crushed tomatoes
1/2 cup bulgur
1/2 cup water
1 small onion
1 green pepper
1 teaspoon garlic powder
1 teaspoon chili powder
salt and pepper
a splash of apple cider vinegar
olive oil
4-6 burger or bulky buns
cheese (optional)
Dice the onion and the pepper and toss with a drizzle of olive oil into a large skillet. Sauté on medium heat until veggies become tender. Add in the spices, stir in and let cook for a minutes, then add in the beans, the tomato,water and the bugler. Cover skillet and let simmer until bugler becomes soft.
When the slop is ready, either toasted or not, scoop a generous portions onto buns. If so inclined, add some cheese.
Sometimes, no matter whats going on with the week, Monday seems like, well, like a Monday. I drag a little on Mondays. I think it stems from the Monday through Friday school week that was beaten into me for 16 plus years. Hate Mondays, Love Fridays.. Yup, I blame the public educational system(I have to blame someone) I want my day back. I don’t want to feel the drag today. I am going to have a fantastic day. I’m getting excited, pumped up and ready for the week. I am turning my Mondays into fun days. Funday Monday…Yes, yes I did just say that. . See, don’t we all feel better already?
On this Funday, I don’t want to worry all day what I am going to make for dinner, I just want something tasty and easy. .Whats better than a plate of fries?……. a plate of roasted rutabaga fries! Yes! See, we are already having a great day. A plate of fries, easy, delicious and nutritious. Not a bad start to the week. You can eat them with just about anything, a grilled cheese tomato and avocado sandwich, a bowl of curried lentil soup..or just straight up eat a big old pile of these roasted rutafries (That a word, I swear) Just have fun with it. Its funday Monday after all.
One large rutabaga… This one fed 2 as a side… but if your eating just the fries, eat a whole one to your face. It’s totally cool.Chop the rutabaga into fries and toss with a smidge of oil, salt, pepper and ground up rosemary. Don’t like the rosemary… don’t use it. Maybe try something else like sage or garlic and onion powder or curry powder. Just use whatever you like. Throw into a 425 degree oven for 20 minutes, give them a flip and back in for another 15, Simple. Easy.
Remove from oven when crisped to your liking and eat.
Yes, this was a dinner of rutafries and brussel sprouts, is that a problem? I don’t think so .A suggestion, .dip in mustard….its fantastic, but go the ketchup route if that s your fancy.
Alright people..Have a great day and remember to not let today be a drag of a Monday, make it fun, looking forward to a plate of rutafries for dinner and think of how great the rest of the week is going to be!( I might have been a motivational speaker in a past life)
IF you like potatoes and guacamole (probably even if you think you don’t like potatoes or guacamole) then oh boy, do I have a treat for you.
Guacamole Potato Salad.. Only the best potatoes salad you will ever put in your mouth.
I tried to make this a few weeks back and ended up not getting to my potatoes in time to use, so I had to put the salad on hold. But this weekend I was ready. The grill was prepped, the corn was husked, and the poatoes were boiled. Then it happened, I made the best potato salad ever. It changed the way I feel about potato salad. (I have never really been a huge fan) Sure, I love potatoes, but in the past I have experiences to many overly dressed, really heavy, and overall, some pretty crappy paotao salads. This salad, well it is the exact opposite. This salad is all summer. Bright and light, so full of flavor, but not overly heavy and gross. I mean, its potatoes covered in guacamole… How can that not be amazing. I am now a potato salad fan (for life!).
So my suggestion for you. Have a cook out, invite your friends, grill up some veggies or whatever and make a humongous batch (you will need a humongous batch) of this potato salad. Sit back and watch (while you are eating) and see peoples faces light up with joy and happiness. You will be number one. The hostess with thte mostest. People will fall at your feet…
or not. (But probably)
So here, take a look, and make.. Your day, week, life will be better for this.
The stuff; Potatoes, avocados, mini onions, and tomatoes. Pickled Jalapeños (with juice) garlic, and the juice from a lemon And lastly,a big bunch of cilantro, and salt.
First things first, boil the potatoes. Stick in a pot of cold water with a palmful of salt. Bring to a boil then turn down to a medium heat and stick a lid on the pot. Cook until fork pierces easily through then strain from water and let cool. When cooled, but still slightly warm, dice them up into mouth sized pieced. Place potatoes back into pot and drizzle a few glugs of the pickled jalapeño juice over them. Place in fridge to complete cool.
While the potatoes are cooling down, mix up the quad dressing. In a large bowl, take the avoado fruit and mash and smoosh until relatively smooth and mix in minced garlic , lemon juice, and a sprinkle of salt.
Dice up the onion, jalapeños, tomatoes and add to the mashed avocado and mix that all up…and try not to eat it all before the potatoes get in.
add in lots of chopped up cilantro
Nothing compares..
Have a great day and get to planning you next cookout!
Later!
-C
3 lb. of potatoes of a small waxy variety (like red or new potatoes)
1 1/2- 2 whole avocados
2 small Roma tomatoes or q large
2 mini onions with greens or 1 regular white onion
handful (or more) of pickled jalapeños and the juice
juice of 1 lemon
a bunch of fresh cilantro
3 cloves garlic
salt and pepper
Wash potatoes and stick in a big pot with cold water and a good palmful of salt. Bring to a boil then turn heat downy to a a medium heat, stick a lid on it and cook potatoes until a fork can pierce through. Strain from water and let cool enough to handle. Once cooled, cut potatoes into mouth sized pieces, place back into bowl, and drizzle with a few teaspoons of pickled jalapeño juice. Stick the potatoes in the fridge and let completely cool.
While those are getting cold, make the guacamole dressing. In a big bowl, place the avocados (pits and rind removed of course) and smash and smoosh until a smooth constancy. Add in a pinch of salt, mince the garlic and toss that in, and add the juice of the lemon. Now dice up the garlic, onion, tomatoes and jalapenos and gentile fold it all in to the avocado mash.
Once the potatoes are cool, roughly chop the cilantro and add that and the potatoes into the guacamole and mix around until everthig is all coated. Top with some more cilantro.
Eat as a side, a meal, a snack, or dessert
a fork pierced nicely but a large wooden spoon works too.
Before we left for the weekend, I was was trying my hardest to empty the fridge out of all food with the intention of leaning it empty so I could leave it open to defrost while were were gone. Unfortunately I was not able to make it happen. What I did make happen was emptying it almost completely so that when we got home, we had pretty much no food in the house, except for a few things that probably should be eaten. Plus one of the last things that I want to do after sitting in a car for 6 hours is go to the grocery store, or anywhere for that matter, so I was determined to make with what wet had in the fridge:
Carrots
half of a gigantic kohlrabi
soy milk
iced tea
bananas that needed to be frozen
strawberries
Perfect! A few carrots and half of a gigantic kohlrabi.. plus at the hotel we were staying at, there were fruit bowls in he lobby full apples. Every time I went past the apples (which was a lot) I grab one or two, so I have a few apples (I actually have a lot of apples now). All the things I need for a super awesome salad slaw. Apples with their nice sweet crispiness and kohlrabi with its cabbagey, crunchy earthiness, tossed together with some vinegar, some toasted walnuts and some carrots, I mean, so freaking good. And to make it a bit more of a meal, I made some lentils to go with it. But the best part was there was no need to leave the house!!
The stuff… A huge hunk of a bigger then my head kohlrabi (or 2 normal bulbs). A carrot, an apple, toasted walnuts, red wine vinegar, and some salt.
Pretty simple stuff going on here. Just peel and julienne the kohlrabi, carrot and apple. (no need to peel the carrot or apple unless you want too) and stick it all into a bowl. I used my mandolin, which is one of my favorite kitchen tools ever, but if you don’t have one, a box grater works too.Sprinkle with salt and a good glug glug of red wine vinegar. Chop up the walnuts (some big chunks and some very small pieces makes for good eating), toss it all together and, well that’s it. But wait…. let it sit for a few minutes before serving to really let the flavors draw out.And there we have it. Super fast, full of flavors and crunchy texture. A salad slaw after my own heart.
Serve it as it or add to a bed of greens, rice, or lentils… and make sure to save at least as little… cause its an awesome little pre-bed snack.
Happy Week!!
-C
2 medium sized Kohlrabis
1 medium apple
1 small carrot
1/2 cup toasted walnuts
red wine vinegar
salt
In a large bowl, julienne kohlrabi (after peeled) apple and carrot. Sprinkle with salt, add in vinegar. Rough chop walnuts and toss the whole bit together. Let sit for at least 10 minutes, if not longer before serving. (A great salad to make ahead of time)
Eat as is, or toss onto a bed of greens, plate of rice or a bowl of lentils.
Any left overs only end up tasting better the next day.


 I figured now is a good time to get this recipe out there before we get to far into spring and summer recipes because there is going to be a lot of banana ice cream filled recipe coming and I figured its a good idea to have the basic banana ice cream recipe ready for people to refer too. And because I made so much fantastic naner ice cream, I also made a cookies and cream naner ice cream for my sisters and the mister.
 The stuff you need for this ice cream…. Nice and ripe bananas, peeled and then frozen* That’s it.
 After all blended and smooth, either eat right away or scoop ice cream into a freezer safe container and stick in freezer. That’s the banana ice cream… And it is amazing and so so so so so addictive. I make a batch, think I am only going to eat a scoop, then find myself eating half of what I have made, but it’s ok cause it’s only bananas.
  One batch of banana ice cream, either freshly made, still in food processor or made ahead and placed in a food processor and given a good pulse to smooth it up.
 Now you have cookies and cream naner ice cream…. and everybody is happy.
 I don’t think I need to tell anyone about how weird the past few weeks of weather have been, so I will just leave it alone because we don’t need to keep thinking about how stupid cold it is outside or that the next week is only suppose to get worse. Booooo, but oh well. More time for cooking, reading, and trolling the internet (I have spent a little more time then usual getting sucked into the world-wide web.) Beacause I have been spending a little more time interneting, I have added an addition to my usual happy bits, a few links that I have stumbled upon that I think are cool and of things that I want or want to make… Cool internet stuff…..a bit of internet happy.
  I got to hang out with my little sister for the first time in like a month… She is just so busy being busy. I guess high school,play practices and boys and friends can fill up ones time at 15… but I miss her so much! I was very excited that she was able to hang out with me this week. What did we do? Well we spent most of out time together taking pictures of her in my glasses, making food and then taking pictures of her eating food. (She is eating whipped carob moose… like one should eat it) A fantastic day of silliness.
  I have been feeling like I might be fighting off an illness so I have been eating this Turmeric Ginger Garlic Carrot soup which I have been adding cabbage and topping with these pickled heart beet, all week long. So tasty and full of so much good.
 Oh yeah. Me, the mister, my sister, and her lovely little little went to Ikea this week. (the littles first international trip!!! Over the border and into Montreal) And of course at the end of any good shopping trip there is some type of food…. She was so excited for the hot dog and frozen yogurt cone at check out. Champion food eater this one is.
 And what’s not to love about pretty flowers (primrose)…..Sadly this is not a current picture. I need to get me some color today.
  Chomp Chomp Chomp… The sound I make as I eat this freaking fantastic crunchy granola. You know it’s good when the person sitting next to you is annoyed by the sound of you face while eating. I eat a lot of crunchy stuff. And I am pretty sure I annoy the mister a lot.
  The simplest of stuff. 1 smashed banana, a cup of pureed butternut squash, Vietnamese cinnamon*, honey, and old fashion oats. (and a dash of salt, not shown)
 Toss the cinnamon and salt with the oats. Mix together the banana, squash and the sweetener and combine with the oats until full incorporated.
  Dump the mixture on a parchment lined baking sheet and give it a little pat, you know, to settle all the bit and pieces together, all cozy and evenly spread out. Now stick into a preheated oven and after about 20 minutes, take out of oven and give the granola a toss, breaking apart any super big chunks or overly wet pieces. Put back into oven for another 20 minutes. (I like my granola super crispy crunchy so I cook it a little longer, like 30 more minutes)
 And when you are happy with the crunchiness of you granola, remove from oven and let cool, trying not to eat all of it while it sit’s on the counter looking all pretty and smelling like happiness.
 I love mustard, and when I say love, I mean LOVE. I eat it on anything and everything. And not just small quaintites, I buy jumbo sized containers of the stuff because I go through it so fast. Over the past few years I even started taking down others with my mustard eating obsession. Sisters, brothers, even some of the littles are now mustard eating feens. One of my little nieces is now just as bad as me. I don’t think I have seen her eat a single meal without a side of mustard. Her favorite snack, clementines and mustard, although sometimes she skips the clementines and just goes in with her fingers. Oh so good. I think that child could possible be mine. And yes, it’s mostly the yellow grocery store variety of mustard being consumed, but yellow mustard is just the tip of the ice berg. There is a whole world of flavors, textures and colors when it comes to the humble mustard seed. Whole grain mustard, to me, is one of the best and easiest to adapt to any persons specific taste. You can make it plan or add in just about any spice, vinegar, even a little sweetness that you might like. One of my favorite variations of this mustard is to skip the vinegar and use picked jalapeño juice. Aah, my mouth is watering just thinking about it.
 Yellow mustard seeds, brown mustard seeds, apple cider vinegar and salt. The most basic ingredients.
 In a large jar, combine the mustard seed , twice as much vinegar and a pinch of salt. Cover and let sit for on the counter overnight until the seeds have soften and look almost like caviar.
  Now blend those seeds. You might want to add another splash or two of vinegar to help blend and to thin out a bit. Chose how creamy or seeded you like you mustard. I like to make it creamy but seedy so I blend it half way to creamy.
 You have got mustard! Make sure you have a good snack ready to eat with it.. My go to is carrots. I could eat this all day long.
  There is irish soda bread in your future. I can see it. A nice hardy hunk slathered in butter and honey, crumbs all over the place. So all you have to do know is make it.
  White whole wheat flour and all purpose flour mixed together. Salt baking soda and buttermilk. That’s it.
 All the dry whisked together and in goes the buttermilk. Mix together until dough starts to form then dump onto a floured surface. Handling dough as little as possible, knead into ball.
 Place on a baking sheet and dust with flour. Take a sharp knife and cut an X through the top about 1/2 inch deep.
 Happy Friday!
 The Stuff. A medium sized butternut squash, seeded and diced (no need to peel, but go for it if you want) About a pound of broccoli, (fresh or frozen) and a few shallots. Salt, pepper and a few cups of water.
 The chopped squash and broccoli go into a big pot with about 2-3 cups of water. Add about a tablespoon of salt and pepper. Lid up the pot and place on medium low heat for about a half hour, or unitl squash and broccoli is fork tender. Now blend together with either a emulsion stick blender or place in a blender for 3-5 minutes until completely smooth. Add enough water to keep things moving. Add more water if you want a thinner soup, less for a thicker soup. Season with more salt and pepper to taste. Once blended, place back in pot on simmer until ready to serve.
  Finish off with a drizzle of balsamic vinegar and top with the sautéed shallots.

 Before we get to the fries, I just want to mention that yesterday was one of those fantastic winter days that reminds me why I love living in Vermont. Pretty white snow everywhere, the sun was out, and 20 degrees without a gust of wind. The trash dog an I were even able to go for a little hike. It was so nice and soooo sooo needed! Anyways, the other day as me, my sister and the mister where putting together one more piece of Ikea furniture, (I am the master at Ikea assembling!) a little runs into the room and presents the mister with a Dominos pizza. Yup, a whole pizza just for him. Why you might ask? Well I guess my sister was delivered the wrong pizza and the place didn’t want it back and she didn’t want it, so she gave it to him.
 The carrots and the parsnips are all sliced up into big matchsticks and ready to be baked to crispy browned perfection. I added the oil to the pan to toss the fries in and then sprinkled with a fair amount of salt and pepper. If you don’t have and or want to use a cast iron pan, a baking sheet works just the same.
 Oh saucy sauce stuff. Tomato puree, sriracha, and yellow mustard. Add a little bit of honey to lighten it up (can use brown sugar if keeping it vegan), a splash of apple cider vinegar and a couple minced cloves of garlic. Topped off with the smokey delightful spice of cumin. I cold eat this on everything…and I kind of did.
  Fries are done, Sauce is ready. Served in super cute tea cups.(from now on I want to serve everything in tea cups.) A perfect side dish, snack, or even a light meal. It lead the mister to ask the question…What pizza?
  One of the best things about winter is that I can have something in the oven at any time and not worry about how hot the house is going to get. I get to spend my free time (or my in between free minutes) baking up all the thing that I would not dare bake in the summer. (lots of bread and cakes) Yeah, I might complain a little about how cold it is outside (to my defense, -20 is kind of a bitch) but then I think of the super hot humid days that come during the summer and cringe. At least when its cold out I am able to get warm, (que oven) but when its super hot and humid, I just turn into something that border lines a wet towel and the rabbit animal… Not so pleasant. I much prefer cooler weather. So no big surprise….I made bread.. or focaccia to be exact. And now you should too because first off, you want to eat it, and secondly, you can probably whip this up faster then it would take to get all of you winter warmies on and leave the house. Don’t leave, just turn the oven on.
  The stuff, which isn’t a whole lot… Flour and salt. A mixture of honey, water, and yeast. And olive oil. Its pretty much my pizza dough recipe, tweaked with the addition of oil, less flour and no kneading.
  Mix together the wet and dry…I used my nifty dough whisk, but a wooden spoon or even your hand works. Mix mix mix. The dough should be really slack and sticky. And guess what.. no need to knead! Just make sure the dough is uniformly incorporated…hehe.. uniformly incorporated… sounds weird.
 Drizzle the dough (don’t worry about making it into a ball, a blob is good) with a little oil and place in a nice warm place topped with a towel to rise for about an hour or until dough has doubled in size. Once is has fully risen, drizzle 2 tablespoons oil in two 9 inch cake pans. Divide dough in half, and kind of smoosh dough into pans. Cover and let rise for another 20 minutes or so.
  When dough has finished its second rise, drizzle each with another tablespoon of oil and with your fingers, fill out the pan and indent the dough, kind of like playing a piano or tickling a puppy(?)….Then layer your toppings (if you want any) Start with any herbs, then the veggies. Then last, any cheese you got. I used thyme, cracked black pepper, tomato, onion, topped with parmesan cheese. And the other one is just plain old salt.
  Pulled from the oven when nice and golden brown..set on a wire rack to cool for a few minute and removed from the pans.
  The mister was practically salivating waiting for a slice… and he was so not disappointed. Crispy outside with soft airy insides… Everything a perfect focaccia should be. The one with the toppings was the favorite for the first night, but for a peanut butter and cheese panini for lunch the next day…plain is the way to go.. My suggestion, do what I did, jazz one up and leave one plain. And then make more if you need too because the forecast call for another week of below zero!!! Oh the things that I’ll get to make! (me being positive) Stay warm! -C
 How awesome will you be when you bring the most freaking amazing tortilla chips to the party this weekend? You will be like..”what, it ain’t no thang.. I am just good like that” Yes, yes you are.
 Knead dough a few times just to make sure it’s completely uniformed and divide into 12-14 equal pieces. Place balls on a plate and cover with a wet paper towl to keep from drying out.
 My cast iron skillet is big enough to cook 2 -3 at a time, but doing one at a time is cool too. Preheat the skillet to medium heat. Cook each tortilla for about 2-3 minutes ( or until starting to brown) on each side.
  Half way there to chips!!!
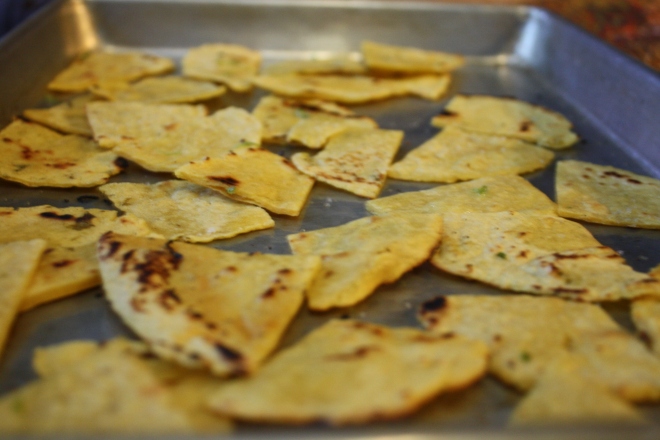 Placed all nice and cozy on a baking sheet. trying not to overlap. Into a 400 degree oven for about 20 minutes to complete the chip making process.. After about 15 minutes, check for doneness. When nice a crispy, remove from oven, squeeze lime juice all over and sprinkle with salt. I then stuck them back in the oven for a few more minutes just to dry the lime..
 After cooling down, take those chips and stick them in a bowl.




 Weird week. I feel like I have been so busy, but can’t quite figure out with what. I guess winter can do that to you, you know, when leaving the house kind of feels like a chore. Yup, it’s mid February when its cold, windy, snowy, and kind of mah. But it’s cool cause I feel like it’s all down hill from now. Soon we will be looking at an extra hour of daylight and hopefully some above freezing temps! (I think we have had a record amount of days below freezing here in VT) No, I am not complaining, just looking forward to getting out of hibernation.
 It was farm share week and yes, that’s a kohlrabi bulb. And no, I have never in my life seen a kohlrabi as big as this one. It is for real bigger then my head. If I didn’t know my farm was organic, I would think that they were growing these in toxic sludge. Wondering what I am going to do with it? Come back this week and see.
 Oh my love… A few days ago I had my super comfy warm rag wool mittens stolen from me at the gym. I know, I was so pissed, but hopefully whom ever stole them is getting good use out of them. Anyway, to my Valentines Day surprise, the mister got me a new pair and sewed a heart into the palm of one. So freaking cute right!
 I like to take a look back at old pictures when I am feeling the crazy.. This one makes me think of summer and our honey bees. (That’s the mister digging into the top bar hive)
 The blue sky! And oh man am I craving some traveling. I think this was taken somewhere is Colorado. I want to go back.
 And that’s how I know that this is a winner.
  As an awesome aunt, when I have any of my nieces or nephews, I feel the need to make something special for dinner, something that the kiddos might not get very often, but also keep it on he healthy side. I have 2 littles for the night which gives me the perfect opportunity for a trash food recipe. You know trash food, things like boxed mac and cheese, beefaroni in a can, or, in this case, sloppy joes.
 The stuff… We start with onion and green pepper, chopped into pieces. Black beans, bulgur, can crushed tomatoes. Chili powder, garlic powder, a bit o apple cider vinegar (which I forgot to picture) ,and some salt and pepper. Oh and cheese if you want… Plus a bun of some sort is necessary.
 Toss the chopped onion and peppers into a deep skillet or pot with a drizzle of oil. Cook on medium heat until tender and toss in the spices. Give a stir. Add in the beans, bulgur, and tomato, a splash of vinegar. Stir it all up, cover, and let simmer for about 15 minutes, or until the bulgur has absorbed the liquid and is nice and tender.
 And Then dump a good heaping pile right onto a bun. Add some cheese, or not..and eat with wild abandonment, making sure to get as much on your face as you get in you mouth.
  Sometimes, no matter whats going on with the week, Monday seems like, well, like a Monday. I drag a little on Mondays. I think it stems from the Monday through Friday school week that was beaten into me for 16 plus years. Hate Mondays, Love Fridays.. Yup, I blame the public educational system(I have to blame someone) I want my day back. I don’t want to feel the drag today. I am going to have a fantastic day. I’m getting excited, pumped up and ready for the week. I am turning my Mondays into fun days. Funday Monday…Yes, yes I did just say that. . See, don’t we all feel better already?
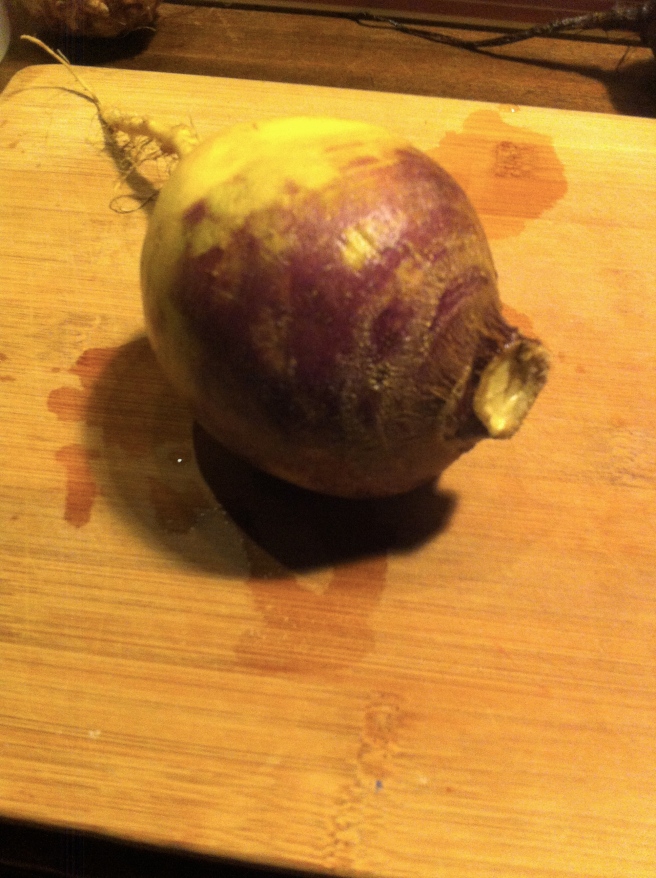 One large rutabaga… This one fed 2 as a side… but if your eating just the fries, eat a whole one to your face. It’s totally cool.
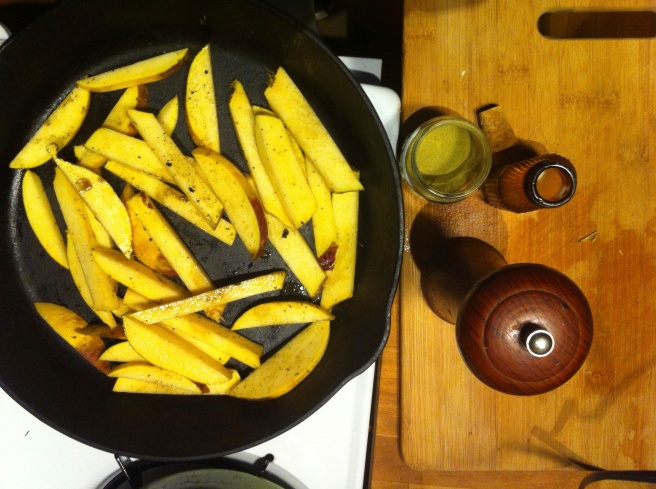 Chop the rutabaga into fries and toss with a smidge of oil, salt, pepper and ground up rosemary. Don’t like the rosemary… don’t use it. Maybe try something else like sage or garlic and onion powder or curry powder. Just use whatever you like. Throw into a 425 degree oven for 20 minutes, give them a flip and back in for another 15, Simple. Easy.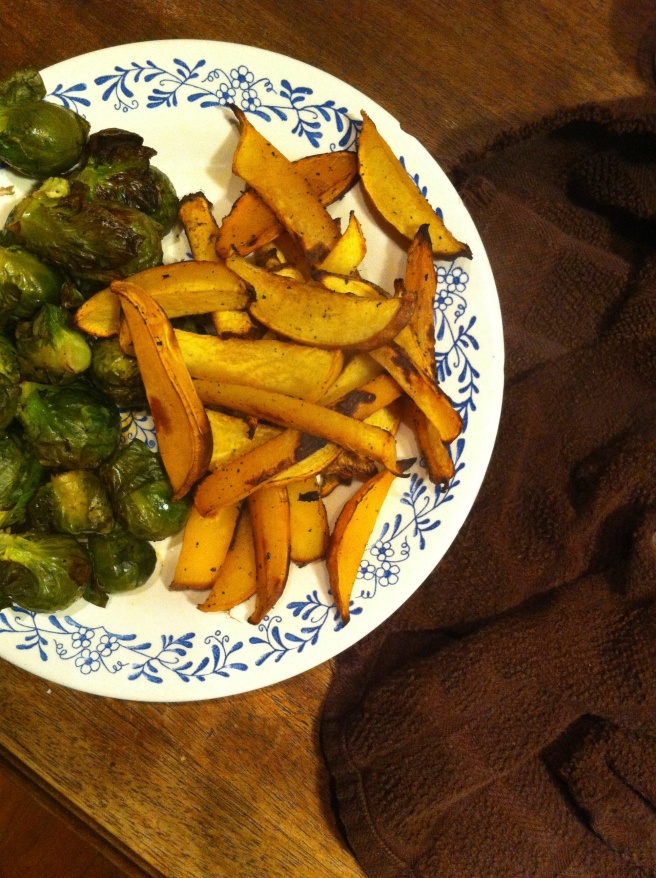
 Before we left for the weekend, I was was trying my hardest to empty the fridge out of all food with the intention of leaning it empty so I could leave it open to defrost while were were gone. Unfortunately I was not able to make it happen. What I did make happen was emptying it almost completely so that when we got home, we had pretty much no food in the house, except for a few things that probably should be eaten. Plus one of the last things that I want to do after sitting in a car for 6 hours is go to the grocery store, or anywhere for that matter, so I was determined to make with what wet had in the fridge:
 The stuff… A huge hunk of a bigger then my head kohlrabi (or 2 normal bulbs). A carrot, an apple, toasted walnuts, red wine vinegar, and some salt.
 Sprinkle with salt and a good glug glug of red wine vinegar. Chop up the walnuts (some big chunks and some very small pieces makes for good eating), toss it all together and, well that’s it. But wait…. let it sit for a few minutes before serving to really let the flavors draw out.
 And there we have it. Super fast, full of flavors and crunchy texture. A salad slaw after my own heart.
THE LOVELY CRAZY
September 19, 2015 by maximios • Blog
Happy summer!! Happy Fathers Day!! Happy happy!!
Can you believe it? We are already getting toward the end of June. This is just crazy to me. I feel like I should have gotten more summer stuff done already. Aaaaaaaaah! Pulling my hair out! Whatever, it’s all cool. I’ll get there (where? not exactly sure) but I think this week was a good start. We did a little road trip to Montreal, a few good bike rides, hung out with some littles that are officially on summer vacation (again. AAAAAHHHHH), a drive to the country to collect wildflowers…. I mean, I did a good amount of awesome stuff this week. I also did a fair amount of not so much fun crap, but we don’t need to go there. All this summer talk got me thinking.. What do I want to do this summer? So I made a list
SUMMER BUCKET LIST
I could add a few more, but this is a good start. Do you have a summer bucket list? If so, something you got that I am missing? I am open to suggestions,
Anyway, here is what this week in internet had for me…
– I am in love and inspired by this. STUDIO TOUR: KIKI SLAUGHTER
– A Gallery of Beautifully Eclectic Living Rooms
–Yes, Coffee Can Actually Improve The Power Of Your Power Naps
-Nick and I were just listening to this TED talk. Very interesting. Shifting Time
– I love a good Horseshoe.
-This hotel room, I could live in. AN APARTMENT-LIKE HOTEL ROOM FOR THE TRAVELING PROFESSIONAL
-Your Inner-Child Will Love This Playground Decor I think I want the side.
And some pictures from the week.
The gardens looking good, no?
Sticks and farting noises make the best of times.
Weekly CSA…..so AMAZING!!!
I rode the mr’s bike for a few days after my tire popped. I liked having a basket, I felt like the wicked witch of the west.