Not to much is going on here, just trying to enjoy the last bits of summer, while secretly saying to myself that I am ok for the hot weather to be gone, for summer to pitter out and let the cooler weather roll in. Bring on the sweaters, apples, and root veggies (and maybe a little more couch cuddling and a new tv show to sink my teeth into while knitting). And I have already noticed a few trees giving away some colorful leave. Foliage season… the best time of year (minus all the annoying leaf peepers) But before we get to ahead of ourselves, we have the other time of the year coming up.. Back to school!! I myself am not really effected by this,other then all the littles in my life are going back, which means less babysitting (happy!/Sad) And let’s not mention all the back to school supplies I am drooling over. Trapper keepers, watercolors and cool new backpacks. The kiddos are all getting ready with their new sneakers, crisp, empty notebooks, and a fancy new sweater. Me, I am just being jealous, hoping maybe one of them will give me one of their extra cool new pencils with the removable eraser. Maybe once everything ends up on clearance, I’ll buy myself a new composition notebook. You know, the ones where you can color all the white parts in with a bright pink neon marker. A customized badass notebook Those are my favorite.
So besides all that, here are some eventful things from the my life this week in list form.
got some husk cherries to make something special. and ate them all. Need to get more (more to eat, and more to make something with to share..maybe)
Starting knitting the mr his annual new winter hat (going with a grey watch cap)
Painted a ceiling gold
scratched my face on a raspberry bush
went to my family reunion, came home and found 2 white hairs on the top of my head (no joke)
Had two other awesome websites mention my recipes this week!!! (Food52 and feedfeed)
made a few jars of pickles
Discovered Reading Rainbow is now on Netflix.(my childhood right there)
Yeah, that’s about sums it up.
But here, have some internet stuff to check out.
-I think I need this entire bed set to be happy.
-And I want to do this to a set of sheet too!
-Totally into this house, especially the toilet on the door.
Not sure if this is for real, but it’t pretty freaking funny. Lady Gaga Threatening Legal Action Over Breast Milk Ice Cream Flavor ‘Royal Baby Gaga’
– I think I should get me some goats. Goats May Be Unwelcome In Zimbabwe’s Capital, But D.C. Loves Them
-The Duo Coffee Steeper. This might be fantastic.. Someone buy one and let me know how it works.
–Soothing Spaces… I like
-Watch This Hilarious Parody of Artisanal Food Makers
-I love The Purl Bee. Another project that I have to make.
And some photos from the week.
Another cold and blustery week… but it’s the middle of January in Vermont so its to be expected.( I just wish I could walk outside for more than 5 minutes without my nose ruining and having the snot freeze to my face) Yup, cold and busy. My Dad has come back to Vermont for a long visit (he moved to Michigan a few years ago… jerk) So while he is here I have been trying to put in as much time as possible with him all the while trying to do 8 million other things, I figured I owe him a little bit of my time (and lots of food) for helping to raise me…I am such a good daughter. (2 thumbs pointed at me with a big smirk..)
Let me take you through a few little happy highlights of my week.
The father and I went for a little hike with the pup on one of the milder temperature days… I drove to the trail, locked the car doors and off we went. After getting cold enough where I couldn’t feel my hands-feet-face… we made our way back to the car. And I reached for the keys…and shuffled around in my pockets….and felt around in all my pockets again…. and again. Finally, I had to admit it, I dropped the keys. I got a little panicky (I was so cold and the car key is like 300 bucks to replace) but we did the only thing we could do. I stuff everything back in my pockets and off we went in search of the key. We got lucky, my dad found the key only a few minutes into the trail!!! Hooray! A happy hike with a happy ending.
Me and this little made some donuts, but screw the donuts(sweet potato with chocolate frosting).. look at the overalls! I decided a long time ago that when I have kids, they will be wearing nothing but overalls. Osh Gosh FOREVER!
FARM SHARE PICK UP!!! I was starting to go through veggie withdrawals.
Shadow hearts for Valentines Day! I love Valentines Day..… or maybe I just love hearts and pink. Either way, I am getting ready for some V-day recipes! This one is a definite go….
And beet dyed coconut sprinkles…I mean, talk about happy.
A late Christmas gift from Nicks mom. Every year she gives us s few of her hand thrown pieces….. love!!
And I gave the mister a haircut!!! He has been asking me for about 2 months now to cut it, but for some reason we just haven’t gotten around to it. So finally this week it happened, and I can see his lovely face again!
How can you not be happy when your piece of ginger looks like a little man. (right after I took this picture I cut his legs off)
Flowers from our garden last summer….. Sunflowers are my favorite (these are teddy bear sunflowers)…. I love looking back at old picture, especially ones from opposite seasons, like flowers in winter or pictures of snow in summer. There like little glimpses of whats to come. I can not say it enough, I am so lucky to live in VT..we have excellent seasons so there is always something to look forward too!
What a week. Was it summer where you are this week as well? I mean jeez, talk about one extreme to another. Oh well, at least the world has turned green, the winter stuff is completely out of sight and I found the box that contained all of my shorts and summery clothes (pants and long sleeves in 90 degrees is just gross) And honestly, it’s been great. In between work, chores and just plan old being busy, we have manage to get a few bike rides and long walks in. Plus all the veggie starts are doing great, the flowers are coming up everywhere and life just has a little bit more of a relaxed feeling. So what if my allergies are turning my face into big red puff or that the past few night have been so hot that the act of sitting has caused me to break a sweat. I’ll take it.
Oh and I can’t forget….
Happy Mother’s Day ladies!!!!
Here I give you a few thing from the internet this week …
– I didn’t believe they were paintings at first. Hyper-realistic Cactus Paintings that Bristle with Detail by Kwang-Ho Lee
-I’ll take any one of these The 5 Fanciest French Press Coffeemakers We Could Find
-Love love the floors in This house.
-Spending a bit of time making summer camping plans here…Vermont State Parks. I can’t wait to get the tent out!
-I think this should be happening everywhere. Recycled Drinking Water: Getting Past the Yuck Factor
– And there is this. ABC Brings Muppets Back To Prime Time As News Emerges About Fall Shows
And that, here are a few pictures from the week.
My boys. I long socks and sneakers… these guys know cool. Took the super cutie cuties out for an ice cream cone.Our first bike ride picnic down on the waterfront. I love bike ride picnics!So many succulents. I didn’t actually buy any because I need to stop being a plant whore.I have made a batch of this stuff evey day this week. I can’t stop eating it, it’s like eating summer. So good
Have a wonderful day and to all that it applies to…
Happy Moms Day!
-C
And I am home. The mister and I woke up at 2:15 am Friday morning to drive to Easton PA and spend the weekend with family, going to the Crayola crayon factory, wondering a grave yard, and hearing some fantastic stories about my family from the mouth of my 95 year old grandmother. (I’ll show some pictures and tell you some stuff later this week) Than we drove back late last night… I don’t know how I am even awake right now…I am sooooo much tired! But that’s how I work I guess. The coffee is almost ready, calling my name, telling me its totally cool to drink it all.
I’ll leave you with a few little internet things I liked this week..
– I just love looking at other peoples homes. Treehouse in the city
– These puppies make me think of my little nephew., he is in love with bulldogs. 20+ Beautiful Bulldog Puppies That Will Melt Your Heart
-Holy Shit YES!!!! ‘Full House’ Reunion on Netflix Is Officially Happening
-How cool would to find one of these? New Urban Geodes on the Streets of L.A. by Paige Smith
-I don’t know if I would want to stick stuff on these shelves.These Wall Shelves are Dollhouses for Adults
– And if you need a push…On Your Mark, Get Set, Grow: A Guide To Speedy Vegetables
A few pictures from earlier in the week..
My forsythia bush in from of one of my houses… Always the first one to bloom. This is how washer sleeps in the warmer months.. All feet in the air. I ate it all and it was good. Two pretty ladiesVeggies Plants!!!!
So yeah, I am tired and happy and in need of a day to processing, lounge and drink tons of coffee.
Hope your weekend was fantastic and today brings all the whatever you want and more.
-C
Ah Sunday…Monday-Saturday would suck without you. The past week has been glorious with all the warm sunny days. I have even managed to give myself a slight sunburn on my face (time to whip out the real sunscreen!!) I am really looking forward to today because honesty, I need a down day. Not complaining, but when the weather is nice, I try to do my life and spend as much time as possible being and playing outside, so I have burned myself out a bit. So today I have very little planned except a bike ride to the library to return and retrieve a few books that will keep me occupied for the rest of the day and maybe I’ll get to the baskets of dirty laundry and mop the floors… maybe. All I know for sure is that I have a least one pot of coffee coming my way. Much excitement!!!!!
Some Internet things to check out.
-I have the seeds and the plot, just waiting a little longer for the weather to hold!!!! .7 Secrets For A High-Yield Vegetable Garden
-Washed Up: Alejandro Duran’s Site-Specific Found Plastic and Trash Installations…. Sad about trash but so awesome and pretty.
-Why Asparagus make you pee smell funny…… So now you can tell everyone.
-The Space Station Gets A Coffee Bar. I know I would for sure not go to space unless there I could have coffee.
-I am looking forward to this cook book. Honey & Jam: Seasonal Baking from My Kitchen in the Mountains.
– I still don’t have one, but its good to know. How Microwaves Heat Your Food.
A few shots from the week
The sky has had the most amazing clouds all week.A walk leading to a free rain barrel. Love free stuff! (and everyone pictured)We took the car through a car wash… My first time, it was thrilling. Only and his yearly bath. Wet cats look so pathetic, but he was a champ. Neither nick or I suffered any wounds.So much asparagus… I can’t get enough! (and my pee doesn’t smell)
And I’ll just leave you with that.
Hope your day is full of coffee refills and leisurely outdoor activities!
It’s been a long, packed, but very fantastic week. Everyday has been full of work, chores, family, and trying to get in a least one good bike ride or walk in. I made a list of a few important points to mention from the past week.
Spring is real, not an imagined season in my head. (HOORAY!!!!).
Banana ice cream is everyones favorite snack
Planting things from seed and watching them grow is magic
Riding a bike with kinda flat tires really sucks
The little people in my family are the best most fantastic humans
Don’t tell a 2 year that ants will bite her or you will end up caring that child around everywhere because she is afraid to walk outside (Anyone know good therapist for a 2 year old?)
Anyways, I am hoping to take it easy today, catch up on my coffee consumption, do a bit of gardening, reading, bike riding, all without pressure or expectations. Everyone should have a day for no expectations.
Some fun internet stuff from the week.
-I need an RV or camper. THE BRAVE // vintage rv renovation inspiration
-Who cares if not everyone is pleased, I would be if my lunch bags looked like this. These Parents Make Lovely Lunch Bag Art. Not Everyone Is Pleased
-So lovely. Urban Jewelry: New Lace Street Art by NeSpoon
-Alternative energy Woo Hoo! Tesla’s Powerwall Home Battery Wants to Make Fossil Fuels Obsolete
-I am really excited to make this… I have a feeling that I will be incorporating it into many of my recipes. ChefSteps’ Genius Roasted Onion Cream
-Another house that I could get down with.
And a few pictures….
The mister and the worlds biggest crayon, which is made of scraps of blue crayons from all over the world. I could totally use a big ass crayon like this.The coolest most badass 95 year old lady that I know (I know a few), Grammy Stem. And the little, getting a lift. (I could have used a lift too!)Brothers. The guy in the green is my Dad.Aftre dinner ice cream break.The sky has been on point all week longAnd made myself some veggie chips. The colors alone are delicious.
My winter farm share is coming to an end this week. One more pick and then a three week stretch until the summer share starts… WHAT AM I GOING TO DO!!! Stock up as much as I can is what.
I have been strategic about the roots and veggies that I have chosen to bring home the past few weeks.(My farm lets you pick what you want) I know what I can buy at the store, things like carrots and potatoes, so I have been passing those up, but the roots like beets and celeriac… I have been bringing home baskets of those and hoarding them in the fridge and basement in preparation for the laps in farm fresh food and knowing that if I want to by these at the store it s going to coast me a million dollars a pound. (a for real million dollars)
Yup, lots of roots around here, especially celeriac root which is fantastic. I am kind of obsessed with celeriac, with its fibrous, knobby exterior, soft but almost meaty texture inside, and a flavor that is close to celery but so much better. I don’t know why it has taken me so long to do a posting featuring this amazing root vegetable (I eat it almost every day)
So here, an amazingly tasty, hearty but not heavy, celeriac recipe. Perfect for spring and the change into summer…. Mustard roasted celeriac with an fanatic split peas gravy that will have you licking you bowl clean.
The stuff….For the split pea gravy we have a carrot, a parsnip and a large onion chopped into small chunks. Salt, thyme, a bay leaf and of course the split peas. Then there is the celeriac root* sliced into 1/2 inch thick rounds and some plain old yellow mustard .
*Note. I don’t peel my celeriac root. I really enjoy the fibrous exterior but realize that some don’t(The mister does not like it) so peel it if you want.
Toss the chopped parsnip, carrot, onion and the spices into a pot on medium heat and let veggies sweat a few minutes until tender. Add in the split peas and enough water to cover everything. Turn pot on high and bring to a boil, then cover and turn to low. Make sure to give the pot a good stir ever few minutes and add more water if needed
While the gravy is cooking, take the celeriac rounds and brush each side with yellow mustard, sprinkle with pepper, and place on a baking sheet. Stick into the oven to roast for about 25 minutes, flipping the rounds after about 10 minutes.
Once the peas have soften, remove the bay leaf and puree until smooth and oh so creamy. Taste and add more salt and pepper if needed. If you find that the gravy seems to thick, just add in more water until it’s the consistency that you want. The gravy is made, the celeriac is roasted… now we are ready to eat!! Stick the celeriac on a plate and dump good amount of that gravy right on top. Feel free to add a bed of spinach, or a grain or anything you want, because why not, and also some chopped tomatoes for a little acid and prettiness.
Serve with the fanciest knife and fork you can find. Extra yellow mustard and sriracha sauce are great condiments to have close by.
Happy Tuesday!
-C
Mustard Roasted Celeriac with Split Pea Gravy
2 medium celeriac roots
6 tablespoons mustard
1 large carrot
1 medium parsnip
1 large yellow onion
2/3 cup split peas
2-3 cups water
1 bay leaf
2 teaspoons thyme or italian spice mix
salt and pepper
spinach (optional)
diced tomatoes(optional)
Preheat oven to 400 degrees
Small dice the carrot, parsnip and onion and throw into a large pot. Spinkle with salt and pepper, add in the thyme and bay leaf and add a splash of water. Stick on stove on medium heat and stir. Let cook until the veggies become soft and fragrant. Now add in the split peas and 2 cups of water. Bring to a boil then cover and turn heat down to medium low. Let cook until the split peas become tender (about 25 minutes) string on occasion and adding more water if the peas are not completely summered while cooking.
Once the peas are tender, let cool for a few minutes, remove bay leaf, and either dump into a blender or blend with an immersion blender until nice and creamy. If gravy seems to thick, add in more water.
Scrub or peel celeriac roots and slice them into 1/2 inch think rounds. Place on a baking sheet and brush mustard on both sides and spindle with pepper. Stick into oven for about 10 minutes, flip, then back into the oven for another 15 or so minutes, or unit the celeriac is tender.
When the celeriac is done remove from oven and stick a few rounds on a bed of spinach (or not, or any kind of grain or green you like) Top with a hearty helping of the gravy and toss on some chopped up tomatoes.
Eat with at knife and fork like a fancy person.
I love mustard, and when I say love, I mean LOVE. I eat it on anything and everything. And not just small quaintites, I buy jumbo sized containers of the stuff because I go through it so fast. Over the past few years I even started taking down others with my mustard eating obsession. Sisters, brothers, even some of the littles are now mustard eating feens. One of my little nieces is now just as bad as me. I don’t think I have seen her eat a single meal without a side of mustard. Her favorite snack, clementines and mustard, although sometimes she skips the clementines and just goes in with her fingers. Oh so good. I think that child could possible be mine. And yes, it’s mostly the yellow grocery store variety of mustard being consumed, but yellow mustard is just the tip of the ice berg. There is a whole world of flavors, textures and colors when it comes to the humble mustard seed. Whole grain mustard, to me, is one of the best and easiest to adapt to any persons specific taste. You can make it plan or add in just about any spice, vinegar, even a little sweetness that you might like. One of my favorite variations of this mustard is to skip the vinegar and use picked jalapeño juice. Aah, my mouth is watering just thinking about it.
So if you are anything of a mustard connoisseur, you really must, at least once, make your own batch.(It’s so easy!) And you will love it and share it with all your friends and they will think you are a bad ass for making your own mustard and your life will just be so great. All because you are now a mustard maker. Yes.
Yellow mustard seeds, brown mustard seeds, apple cider vinegar and salt. The most basic ingredients.
Note- If you want, add in a pinch of any spice that you want.. Chili flakes, granulated garlic, turmeric…. And you can use the vinegar of your choice. I like apple cider because its mellow with a slight sweetness but white or sherry or any vinegar would be great. Even left over picked juice is fantastic too.
In a large jar, combine the mustard seed , twice as much vinegar and a pinch of salt. Cover and let sit for on the counter overnight until the seeds have soften and look almost like caviar.
Now blend those seeds. You might want to add another splash or two of vinegar to help blend and to thin out a bit. Chose how creamy or seeded you like you mustard. I like to make it creamy but seedy so I blend it half way to creamy.
Taste and add another pinch of salt if its needed and……..
You have got mustard! Make sure you have a good snack ready to eat with it.. My go to is carrots. I could eat this all day long.
Enjoy and have a great Tuesday full of mustard and stuff!
-C
Whole Grain Mustard
1/4 Cup Brown Mustard Seeds
1/4 Cup Brown Mustard Seeds
1 Cup Apple Cider Vinegar
1 Teaspoon Salt
Optional..A pinch of Garlic Graduals, Red Pepper Flakes, Curry Powder (Anything you want)
Combine all ingredients into a large jar that has at least a few extras inches for the seed to expand. Leave on counter for 8-12 hours.
Once seeds are nice and soft and have expanded, either eat as is (Mustard seed caviar) or blend the seeds to desired consistency (I like it half smooth, half seedy) Add a pinch more or salt and another splash or two of vinegar to help blend.
Refrigerate and use on anything and everytihng.
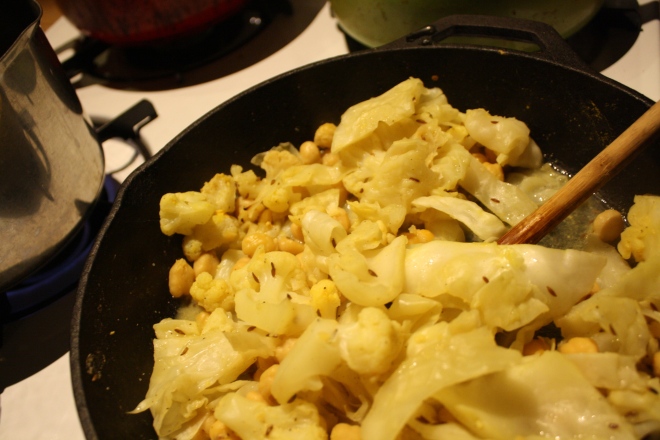
What a way to start the day, with a mouth full of c words…….Caraway, cauliflower, chick peas and cabbage…What did you think I meant?
This week has been nippy, no, its been chilly…..nah, it’s been freaking freezing! Yeah, freezing cold. When I woke up this morning to walk the pup, it was 5 degrees. So needless to say, when it gets this cold, I like to keep inside. Tying not to be a complete lazy bones, I went to town on my spices… refilling jars with all the little baggies scattering the kitchen, screwing on lids, and wiping down the shelves. Not a bad accomplishment for a day. While cleaning I came upon a little bag or caraway seeds, Not enough to warrant a jar on the wall, but defiantly enough for one dish.
When I think of the bright, somewhat sweet and peppery caraway, I think cabbage.(anything cabbage and I am sold) A big pan cabbage, added cauliflower for the mister,(his favorite) creamy chick peas because we need protein and they be tasty, and of course mustard, because everything tastes better with mustard.(I’ll let you in on a little secret.I eat a lot of mustard, I am kind of obsessed. Mustards of all kind; grainy, homemade, dijon…but usually just plan old yellow. And I eat it on everything.. but my go to is French’s yellow mustard and carrots…don’t judge) A warm, bright and filling dish, perfect for a freezing cold evening stuck inside. You can eat it as main dish or add a pile of quinoa or wild rice, or even a big plate of greens. What ever say you eat it, you and your stomach will be happy.(If your worries about cabbage bloat..don’t be. Cooking cabbage helps breaks down the enzymes that create gas, plus caraway has anti bloating properties…WIN!)
Cabbage, cauliflower,(fresh of frozen….I used frozen in this recipe) pre-cooked or canned chick peas, caraway seeds, yellow mustard, and salt..(I added pepper too)
Chop the cabbage and toss into a lightly oiled pan with the rest of the stuff. Heat pan with everything but water for a couple of minutes.. to warm the caraway and give everything a cooking head start, then add the water. Stick a lid on it and let simmer. After about 15 minutes, give it a stir or two and do a taste test. At this point, it’s up to you…how cooked you want the veggies? I kept mine cooking for another 10 minutes. I also added another 1/2 cup of water. Not enough water and the pan will burn, a little extra water is good, it creates a yummy broth.
When you are happy with the flavor and doneness, eat it. I made myself a bowl with a heap of pickled beets(holy yes!). I am sorry if you don’t have any pickled beets, but the dish is still amazing without them. Fresh ground pepper really does the trick too!
So there you go, make it tonight, it will make you warm,smart and happy
-C
serves 2-3
1/2 small head of green cabbage(about 2 cups chopped)
2 cups cauliflower(fresh or frozen)
1 cup cooked chick peas
1 1/2 -2 cups water
1 tablespoon caraway seed
2 tablespoons yellow mustard
salt and pepper to taste
Lightly oil a medium sized skillet and add all ingredients except water. Heat for a few minutes to warm up veggie and caraway seeds then add a 1 1/2 cups of water. Keep on medium heat with a lid and stir on occasion If water evaporates completely out, add another 1/2 cup. Dish is done when veggies are tender.. about 20 minutes….but whenever tastes best to you!
We had ourselves a very full past week. Dinners with the misters family, dinners with mine. Lots of running around for last minutes projects, papers and bills. Mailed in the taxes in (barf) and washed the Washer dog (now he smells like a wet dog with a faint lavender scent… not much better) Then it happened, the most amazing spring day. I spent half the day on Friday trying to remember what it’s like to function in warm weather. I was getting hot and forgot that I could take of my sweater. But it was back to the sweater, hat, and mittens the next day which made me kind of cranky. It actually worked out ok because I didn’t feel bad about hanging inside listening to music , drawing and painting. Oh, and can’t forget to mention the cleaning… lots and lots of cleaning.. and there is still more to be done. All in all, not a bad week.
Some internet bits from the week
-I love this house and all the funky touches. Roger & Chris’ Bold, Eclectic & Vivacious 160-Year-Old Victorian
-A LIGHT THAT COULD EASE SEASONAL AFFECTIVE DISORDER. Not sure if it would really work, but it is a really cool light.
-Where do Babies Come From? A volcano sounds right to me.
-I love everything about this. Michelle Obama’s ‘Evolution Of Mom Dancing’ Is Back With Part 2
-Brilliant! Kids should know how to clean up after themselves. Without Janitors, Students Are In Charge Of Keeping School Shipshape
-I am waiting for this book to come in at the library. FUDS: A Complete Encyclofoodia from Tickling Shrimp to Not Dying in a Restaurant.
And a few real life pictures.
The collection of snow shovels has finally moved to the barn!!!
Sure you can dye eggs, or like me, just melt a bunch of crayon.
I have never seen it before, but all these leaves were melting into the ice. Very weird and very beautiful.Speaking of weird and beautiful… And yes.. I pulled out my sandals for the one day of spring we had this week. It was glorious and amazing. I had forgotten what warm weather felt like.
Hope all you people had a great and lovely week as well.
It’s been a long, packed, but very fantastic week. Everyday has been full of work, chores, family, and trying to get in a least one good bike ride or walk in. I made a list of a few important points to mention from the past week.
Spring is real, not an imagined season in my head. (HOORAY!!!!).
Banana ice cream is everyones favorite snack
Planting things from seed and watching them grow is magic
Riding a bike with kinda flat tires really sucks
The little people in my family are the best most fantastic humans
Don’t tell a 2 year that ants will bite her or you will end up caring that child around everywhere because she is afraid to walk outside (Anyone know good therapist for a 2 year old?)
Anyways, I am hoping to take it easy today, catch up on my coffee consumption, do a bit of gardening, reading, bike riding, all without pressure or expectations. Everyone should have a day for no expectations.
Some fun internet stuff from the week.
-I need an RV or camper. THE BRAVE // vintage rv renovation inspiration
-Who cares if not everyone is pleased, I would be if my lunch bags looked like this. These Parents Make Lovely Lunch Bag Art. Not Everyone Is Pleased
-So lovely. Urban Jewelry: New Lace Street Art by NeSpoon
-Alternative energy Woo Hoo! Tesla’s Powerwall Home Battery Wants to Make Fossil Fuels Obsolete
-I am really excited to make this… I have a feeling that I will be incorporating it into many of my recipes. ChefSteps’ Genius Roasted Onion Cream
-Another house that I could get down with.
And a few pictures….
The mister and the worlds biggest crayon, which is made of scraps of blue crayons from all over the world. I could totally use a big ass crayon like this.The coolest most badass 95 year old lady that I know (I know a few), Grammy Stem. And the little, getting a lift. (I could have used a lift too!)Brothers. The guy in the green is my Dad.Aftre dinner ice cream break.The sky has been on point all week longAnd made myself some veggie chips. The colors alone are delicious.
Hey there party people…It’s Sunday! Hopefully you all have some good plans for the day. Me, well I have a peanut butter and jelly lunch date at the park with some littles, a butt load of plants to stick into the ground, and hopefully drinking much to much coffee while basking in the glow of the very lovely world. (which has been on point all week with warm weather, sunny days, splashed with the perfect moments of rain) Everything is so green and lush and freshy, it’s hard to not to be full of happy and the feeling that anything is possible. It’s fantastical! Oh, and I got to give a shout out to my big sister for graduating from nursing school this week…Whoa HOO!!!!! (Does she realize she is from a family of hypochondriacs? Texting nurse Shannon……she is screwed.)
Summer here we come…It’s GO TIME!
Internet links from the week……
-Going to be making myself one of these this weekRail Road Totes.
-I could see doing somethinglike thiswith my family… If I didn’t kill them first.
-Interesting….What If Americans Ate Like South Africans And Vice Versa?
-I have felt like popping a few balls in my time.The Good Listener: Can I Deflate The Beach Balls At Concerts?
-My next project/living arrangement? (Hey, if we can live in a tiny room now, we can live in a tiny room on wheels)… The Vintage Nugget
-I can’ t believe this show was canceled, but thank the tv gods for Hulu….Hulu Saves The Mindy Project
-I am into all of these interiors atFrenchyfancy…..I wish I knew how to read french and wish I was that fancy.
A few pictures from the week….
The prettiest tree. LILACS!!!!!My yard these days..A wheel barrel full of strawberry plants. Pretty in purple
The mister and I harvested a frame of honey…So pretty
I don’t think I need to tell anyone about how weird the past few weeks of weather have been, so I will just leave it alone because we don’t need to keep thinking about how stupid cold it is outside or that the next week is only suppose to get worse. Booooo, but oh well. More time for cooking, reading, and trolling the internet (I have spent a little more time then usual getting sucked into the world-wide web.) Beacause I have been spending a little more time interneting, I have added an addition to my usual happy bits, a few links that I have stumbled upon that I think are cool and of things that I want or want to make… Cool internet stuff…..a bit of internet happy.
So I recently discovered that I can waste a good amount of time on pintrest, especially looking at interiors and architecture and clothes (which I found really weird, but with one pin, an open can of worms…Dangerous stuff). I have a long way to go before I have nearly as many pins as other folk, but I am getting a good a start. Check out my boards…
I smiled so much when I read this article. So sweet and are some of the coolest tattoos ever.
The original nomad. I am not a hot tub person (it makes me feel like I am being cooked..) But I might be able to get into one of these when doing some camping.
I practically started salivating when I saw this falafel. I am so going to make it for a special mister and me dinner!
I don’t have any big kitchen utensils… like a kitchen aid or a panini grill, and for now, I am ok with that, but I really want this waffle iron. I could so use the crap out of it.
So that’s some internet stuff and here are a few life moments…..
I got to hang out with my little sister for the first time in like a month… She is just so busy being busy. I guess high school,play practices and boys and friends can fill up ones time at 15… but I miss her so much! I was very excited that she was able to hang out with me this week. What did we do? Well we spent most of out time together taking pictures of her in my glasses, making food and then taking pictures of her eating food. (She is eating whipped carob moose… like one should eat it) A fantastic day of silliness.
I have been feeling like I might be fighting off an illness so I have been eating this Turmeric Ginger Garlic Carrot soup which I have been adding cabbage and topping with these pickled heart beet, all week long. So tasty and full of so much good.
Oh yeah. Me, the mister, my sister, and her lovely little little went to Ikea this week. (the littles first international trip!!! Over the border and into Montreal) And of course at the end of any good shopping trip there is some type of food…. She was so excited for the hot dog and frozen yogurt cone at check out. Champion food eater this one is.
And what’s not to love about pretty flowers (primrose)…..Sadly this is not a current picture. I need to get me some color today.
Which leaves me with my goals for the day..
Get 2 new library books (and return the huge stack by the door)
Make something tasty good for dinner and prep food for the week
clean bathroom and change sheets
buy flowers
Take a nap
Hope you all have a great day and the most splendid week!
And that’s how I know that this is a winner. As an awesome aunt, when I have any of my nieces or nephews, I feel the need to make something special for dinner, something that the kiddos might not get very often, but also keep it on he healthy side. I have 2 littles for the night which gives me the perfect opportunity for a trash food recipe. You know trash food, things like boxed mac and cheese, beefaroni in a can, or, in this case, sloppy joes.
Sloppy yes, trashy, not so much. These are made with beans and bulgur. No meat.
And I figured it is nice enough out that I can make the kiddos some messy food and then just bring them out back and hose them off… I mean, why not right?
The stuff… We start with onion and green pepper, chopped into pieces. Black beans, bulgur, can crushed tomatoes. Chili powder, garlic powder, a bit o apple cider vinegar (which I forgot to picture) ,and some salt and pepper. Oh and cheese if you want… Plus a bun of some sort is necessary. Toss the chopped onion and peppers into a deep skillet or pot with a drizzle of oil. Cook on medium heat until tender and toss in the spices. Give a stir. Add in the beans, bulgur, and tomato, a splash of vinegar. Stir it all up, cover, and let simmer for about 15 minutes, or until the bulgur has absorbed the liquid and is nice and tender.
If you are a bun toaster… toast while waiting. If not, just get the buns ready And Then dump a good heaping pile right onto a bun. Add some cheese, or not..and eat with wild abandonment, making sure to get as much on your face as you get in you mouth.
Fantastic Friday!! Live it up.
-C
Black Bean and Bulgur Sloppy Joes
2 cups or 1 can cooked black beans
1 16 oz can crushed tomatoes
1/2 cup bulgur
1/2 cup water
1 small onion
1 green pepper
1 teaspoon garlic powder
1 teaspoon chili powder
salt and pepper
a splash of apple cider vinegar
olive oil
4-6 burger or bulky buns
cheese (optional)
Dice the onion and the pepper and toss with a drizzle of olive oil into a large skillet. Sauté on medium heat until veggies become tender. Add in the spices, stir in and let cook for a minutes, then add in the beans, the tomato,water and the bugler. Cover skillet and let simmer until bugler becomes soft.
When the slop is ready, either toasted or not, scoop a generous portions onto buns. If so inclined, add some cheese.
What a week. It was my birthday, which if you know me, is not usually something I like to talk about. I’m not sure exactly why, but I am not really big on celebrating my own birthday. Or its more like I hide away from everyone around my birthday. ( I am not good with attention) But this year I tried. I had a couple little dinners with family, went on a few good hikes, gave the dog a bath (had to mention it because it was so needed and I was so happy to have a cleaner, less smelly dog..which lasted all of about 12 hours) and tried to relax and enjoy myself. The mister and I also did a bunch of little house repair projects that have been needed to be done (Birthday wish list). All and all, I had a good week. And now the birthday week is over and we can get back to normal, not bugging me, hectic, crazy, life. That makes me happy. Here are a few of my happy bits from the big week.
A birthday bouquet of veggies. My lover knows me oh so well.
I went to get myself a new skien if yarn and stumbled upon this wall display of sprinkles.. It took a lot to not buy a bunch.
Every year I buy myself some special food for my birthday week. This is the bulk section at the local coop. They got in a bunch of new local dried beans!!!! Local birthday week beans. ( yes, beans make me happy)
This hike was pretty treacherous, the whole trail was covered in this ice…. but look how cool it is.
Huggable mountains
Birthday hike with big trees and a happy dog.
Split peas with tons of purple cabbage and purple onions plus chunks or bright orange carrots.. So freaking pretty and so freaking tasty!
And last but not least..a throw back that made me smile…Moving day last summer. Our truck full of my house plants. I love my plants.
So now we go onto the last week of January! (holy crap, where has the time go?)

 What a week. Was it summer where you are this week as well? I mean jeez, talk about one extreme to another. Oh well, at least the world has turned green, the winter stuff is completely out of sight and I found the box that contained all of my shorts and summery clothes (pants and long sleeves in 90 degrees is just gross) And honestly, it’s been great. In between work, chores and just plan old being busy, we have manage to get a few bike rides and long walks in. Plus all the veggie starts are doing great, the flowers are coming up everywhere and life just has a little bit more of a relaxed feeling. So what if my allergies are turning my face into big red puff or that the past few night have been so hot that the act of sitting has caused me to break a sweat. I’ll take it.
 My boys. I long socks and sneakers… these guys know cool.
  Took the super cutie cuties out for an ice cream cone.
 Our first bike ride picnic down on the waterfront. I love bike ride picnics!
 So many succulents. I didn’t actually buy any because I need to stop being a plant whore.
 I have made a batch of this stuff evey day this week. I can’t stop eating it, it’s like eating summer. So good
 And I am home. The mister and I woke up at 2:15 am Friday morning to drive to Easton PA and spend the weekend with family, going to the Crayola crayon factory, wondering a grave yard, and hearing some fantastic stories about my family from the mouth of my 95 year old grandmother. (I’ll show some pictures and tell you some stuff later this week) Than we drove back late last night… I don’t know how I am even awake right now…I am sooooo much tired! But that’s how I work I guess. The coffee is almost ready, calling my name, telling me its totally cool to drink it all.
 My forsythia bush in from of one of my houses… Always the first one to bloom.
  This is how washer sleeps in the warmer months.. All feet in the air.
  I ate it all and it was good.
 Two pretty ladies
 Veggies Plants!!!!
  Ah Sunday…Monday-Saturday would suck without you. The past week has been glorious with all the warm sunny days. I have even managed to give myself a slight sunburn on my face (time to whip out the real sunscreen!!) I am really looking forward to today because honesty, I need a down day. Not complaining, but when the weather is nice, I try to do my life and spend as much time as possible being and playing outside, so I have burned myself out a bit. So today I have very little planned except a bike ride to the library to return and retrieve a few books that will keep me occupied for the rest of the day and maybe I’ll get to the baskets of dirty laundry and mop the floors… maybe. All I know for sure is that I have a least one pot of coffee coming my way. Much excitement!!!!!
 The sky has had the most amazing clouds all week.
 A walk leading to a free rain barrel. Love free stuff! (and everyone pictured)
 We took the car through a car wash… My first time, it was thrilling.
  Only and his yearly bath. Wet cats look so pathetic, but he was a champ. Neither nick or I suffered any wounds.
 So much asparagus… I can’t get enough! (and my pee doesn’t smell)
 It’s been a long, packed, but very fantastic week. Everyday has been full of work, chores, family, and trying to get in a least one good bike ride or walk in. I made a list of a few important points to mention from the past week.
 The mister and the worlds biggest crayon, which is made of scraps of blue crayons from all over the world. I could totally use a big ass crayon like this.
 The coolest most badass 95 year old lady that I know (I know a few), Grammy Stem. And the little, getting a lift. (I could have used a lift too!)
 Brothers. The guy in the green is my Dad.
 Aftre dinner ice cream break.
 The sky has been on point all week long
 And made myself some veggie chips. The colors alone are delicious.
 My winter farm share is coming to an end this week. One more pick and then a three week stretch until the summer share starts… WHAT AM I GOING TO DO!!! Stock up as much as I can is what.
 The stuff….For the split pea gravy we have a carrot, a parsnip and a large onion chopped into small chunks. Salt, thyme, a bay leaf and of course the split peas. Then there is the celeriac root* sliced into 1/2 inch thick rounds and some plain old yellow mustard .
 Toss the chopped parsnip, carrot, onion and the spices into a pot on medium heat and let veggies sweat a few minutes until tender. Add in the split peas and enough water to cover everything. Turn pot on high and bring to a boil, then cover and turn to low. Make sure to give the pot a good stir ever few minutes and add more water if needed
  Once the peas have soften, remove the bay leaf and puree until smooth and oh so creamy. Taste and add more salt and pepper if needed. If you find that the gravy seems to thick, just add in more water until it’s the consistency that you want.
  The gravy is made, the celeriac is roasted… now we are ready to eat!!
  Stick the celeriac on a plate and dump good amount of that gravy right on top. Feel free to add a bed of spinach, or a grain or anything you want, because why not, and also some chopped tomatoes for a little acid and prettiness.
 I love mustard, and when I say love, I mean LOVE. I eat it on anything and everything. And not just small quaintites, I buy jumbo sized containers of the stuff because I go through it so fast. Over the past few years I even started taking down others with my mustard eating obsession. Sisters, brothers, even some of the littles are now mustard eating feens. One of my little nieces is now just as bad as me. I don’t think I have seen her eat a single meal without a side of mustard. Her favorite snack, clementines and mustard, although sometimes she skips the clementines and just goes in with her fingers. Oh so good. I think that child could possible be mine. And yes, it’s mostly the yellow grocery store variety of mustard being consumed, but yellow mustard is just the tip of the ice berg. There is a whole world of flavors, textures and colors when it comes to the humble mustard seed. Whole grain mustard, to me, is one of the best and easiest to adapt to any persons specific taste. You can make it plan or add in just about any spice, vinegar, even a little sweetness that you might like. One of my favorite variations of this mustard is to skip the vinegar and use picked jalapeño juice. Aah, my mouth is watering just thinking about it.
 Yellow mustard seeds, brown mustard seeds, apple cider vinegar and salt. The most basic ingredients.
 In a large jar, combine the mustard seed , twice as much vinegar and a pinch of salt. Cover and let sit for on the counter overnight until the seeds have soften and look almost like caviar.
  Now blend those seeds. You might want to add another splash or two of vinegar to help blend and to thin out a bit. Chose how creamy or seeded you like you mustard. I like to make it creamy but seedy so I blend it half way to creamy.
 You have got mustard! Make sure you have a good snack ready to eat with it.. My go to is carrots. I could eat this all day long.




 We had ourselves a very full past week. Dinners with the misters family, dinners with mine. Lots of running around for last minutes projects, papers and bills. Mailed in the taxes in (barf) and washed the Washer dog (now he smells like a wet dog with a faint lavender scent… not much better) Then it happened, the most amazing spring day. I spent half the day on Friday trying to remember what it’s like to function in warm weather. I was getting hot and forgot that I could take of my sweater. But it was back to the sweater, hat, and mittens the next day which made me kind of cranky. It actually worked out ok because I didn’t feel bad about hanging inside listening to music , drawing and painting. Oh, and can’t forget to mention the cleaning… lots and lots of cleaning.. and there is still more to be done. All in all, not a bad week.
 The collection of snow shovels has finally moved to the barn!!!
 Sure you can dye eggs, or like me, just melt a bunch of crayon.
 I have never seen it before, but all these leaves were melting into the ice. Very weird and very beautiful.
 Speaking of weird and beautiful…
  And yes.. I pulled out my sandals for the one day of spring we had this week. It was glorious and amazing. I had forgotten what warm weather felt like.


 I don’t think I need to tell anyone about how weird the past few weeks of weather have been, so I will just leave it alone because we don’t need to keep thinking about how stupid cold it is outside or that the next week is only suppose to get worse. Booooo, but oh well. More time for cooking, reading, and trolling the internet (I have spent a little more time then usual getting sucked into the world-wide web.) Beacause I have been spending a little more time interneting, I have added an addition to my usual happy bits, a few links that I have stumbled upon that I think are cool and of things that I want or want to make… Cool internet stuff…..a bit of internet happy.
  I got to hang out with my little sister for the first time in like a month… She is just so busy being busy. I guess high school,play practices and boys and friends can fill up ones time at 15… but I miss her so much! I was very excited that she was able to hang out with me this week. What did we do? Well we spent most of out time together taking pictures of her in my glasses, making food and then taking pictures of her eating food. (She is eating whipped carob moose… like one should eat it) A fantastic day of silliness.
  I have been feeling like I might be fighting off an illness so I have been eating this Turmeric Ginger Garlic Carrot soup which I have been adding cabbage and topping with these pickled heart beet, all week long. So tasty and full of so much good.
 Oh yeah. Me, the mister, my sister, and her lovely little little went to Ikea this week. (the littles first international trip!!! Over the border and into Montreal) And of course at the end of any good shopping trip there is some type of food…. She was so excited for the hot dog and frozen yogurt cone at check out. Champion food eater this one is.
 And what’s not to love about pretty flowers (primrose)…..Sadly this is not a current picture. I need to get me some color today.
  And that’s how I know that this is a winner.
  As an awesome aunt, when I have any of my nieces or nephews, I feel the need to make something special for dinner, something that the kiddos might not get very often, but also keep it on he healthy side. I have 2 littles for the night which gives me the perfect opportunity for a trash food recipe. You know trash food, things like boxed mac and cheese, beefaroni in a can, or, in this case, sloppy joes.
 The stuff… We start with onion and green pepper, chopped into pieces. Black beans, bulgur, can crushed tomatoes. Chili powder, garlic powder, a bit o apple cider vinegar (which I forgot to picture) ,and some salt and pepper. Oh and cheese if you want… Plus a bun of some sort is necessary.
 Toss the chopped onion and peppers into a deep skillet or pot with a drizzle of oil. Cook on medium heat until tender and toss in the spices. Give a stir. Add in the beans, bulgur, and tomato, a splash of vinegar. Stir it all up, cover, and let simmer for about 15 minutes, or until the bulgur has absorbed the liquid and is nice and tender.
 And Then dump a good heaping pile right onto a bun. Add some cheese, or not..and eat with wild abandonment, making sure to get as much on your face as you get in you mouth.
  A birthday bouquet of veggies. My lover knows me oh so well.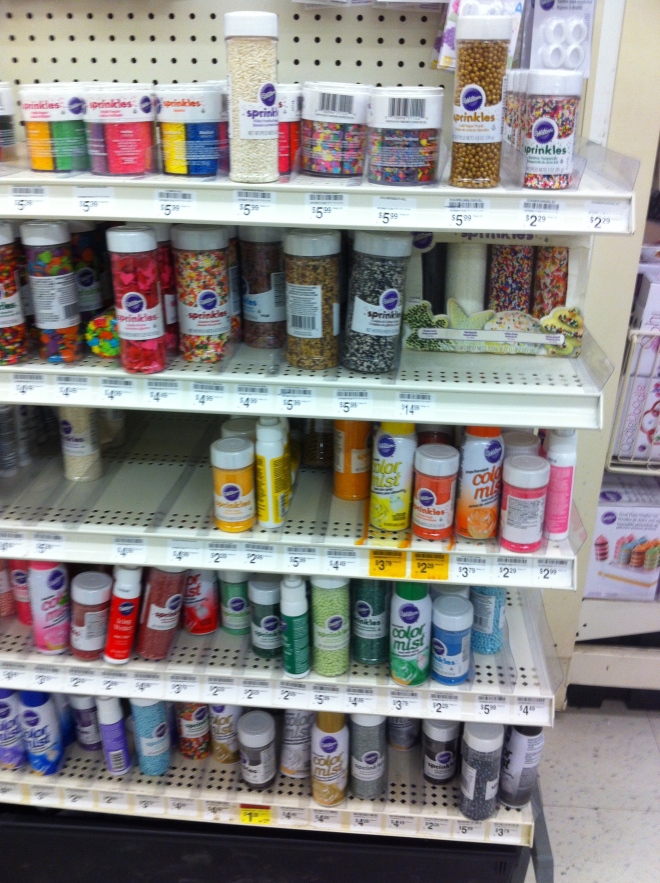
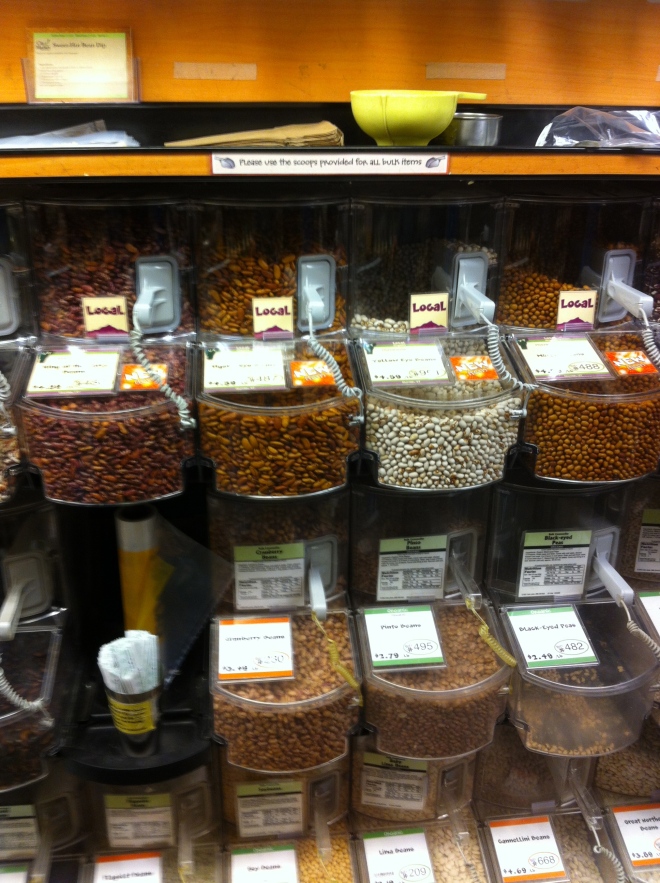 Every year I buy myself some special food for my birthday week. This is the bulk section at the local coop. They got in a bunch of new local dried beans!!!! Local birthday week beans. ( yes, beans make me happy)
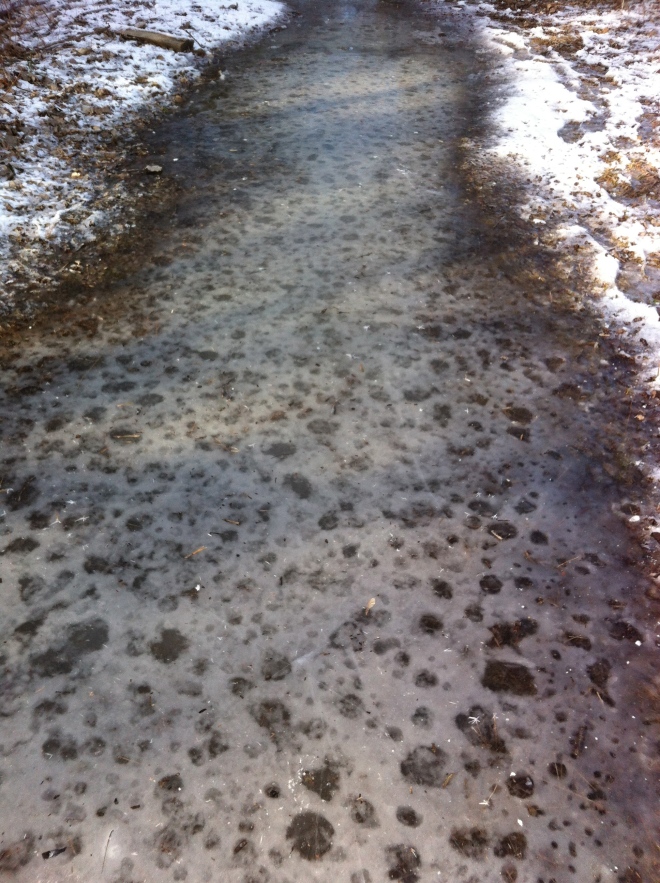 This hike was pretty treacherous, the whole trail was covered in this ice…. but look how cool it is.
  Huggable mountains
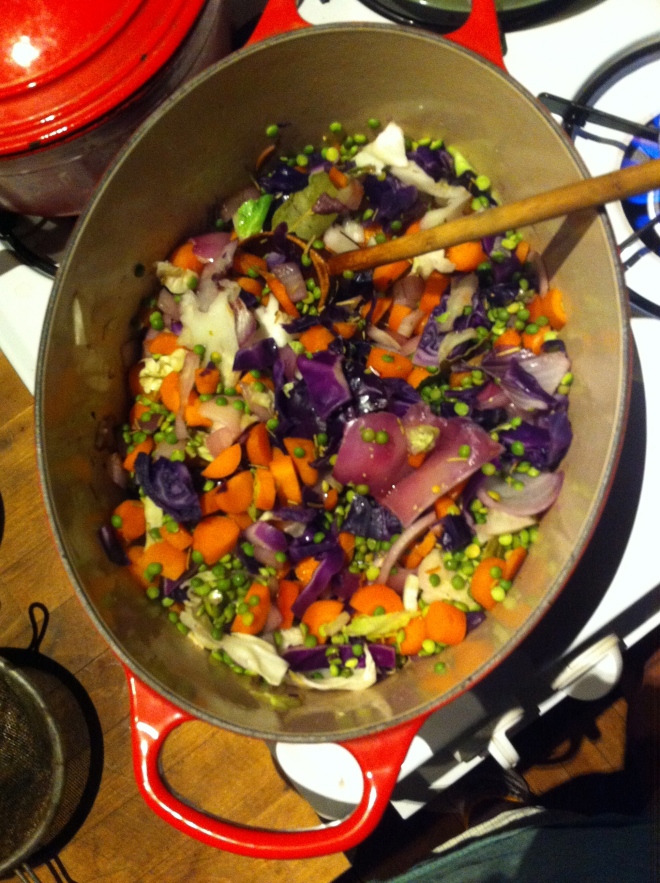 Split peas with tons of purple cabbage and purple onions plus chunks or bright orange carrots.. So freaking pretty and so freaking tasty!
 And last but not least..a throw back that made me smile…Moving day last summer. Our truck full of my house plants. I love my plants.
THE LOVELY CRAZY
September 19, 2015 by maximios • Blog
Not to much is going on here, just trying to enjoy the last bits of summer, while secretly saying to myself that I am ok for the hot weather to be gone, for summer to pitter out and let the cooler weather roll in. Bring on the sweaters, apples, and root veggies (and maybe a little more couch cuddling and a new tv show to sink my teeth into while knitting). And I have already noticed a few trees giving away some colorful leave. Foliage season… the best time of year (minus all the annoying leaf peepers) But before we get to ahead of ourselves, we have the other time of the year coming up.. Back to school!! I myself am not really effected by this,other then all the littles in my life are going back, which means less babysitting (happy!/Sad) And let’s not mention all the back to school supplies I am drooling over. Trapper keepers, watercolors and cool new backpacks. The kiddos are all getting ready with their new sneakers, crisp, empty notebooks, and a fancy new sweater. Me, I am just being jealous, hoping maybe one of them will give me one of their extra cool new pencils with the removable eraser. Maybe once everything ends up on clearance, I’ll buy myself a new composition notebook. You know, the ones where you can color all the white parts in with a bright pink neon marker. A customized badass notebook Those are my favorite.
So besides all that, here are some eventful things from the my life this week in list form.
Yeah, that’s about sums it up.
But here, have some internet stuff to check out.
-I think I need this entire bed set to be happy.
-And I want to do this to a set of sheet too!
-Totally into this house, especially the toilet on the door.
Not sure if this is for real, but it’t pretty freaking funny. Lady Gaga Threatening Legal Action Over Breast Milk Ice Cream Flavor ‘Royal Baby Gaga’
– I think I should get me some goats. Goats May Be Unwelcome In Zimbabwe’s Capital, But D.C. Loves Them
-The Duo Coffee Steeper. This might be fantastic.. Someone buy one and let me know how it works.
–Soothing Spaces… I like
-Watch This Hilarious Parody of Artisanal Food Makers
-I love The Purl Bee. Another project that I have to make.
And some photos from the week.
Another cold and blustery week… but it’s the middle of January in Vermont so its to be expected.( I just wish I could walk outside for more than 5 minutes without my nose ruining and having the snot freeze to my face) Yup, cold and busy. My Dad has come back to Vermont for a long visit (he moved to Michigan a few years ago… jerk) So while he is here I have been trying to put in as much time as possible with him all the while trying to do 8 million other things, I figured I owe him a little bit of my time (and lots of food) for helping to raise me…I am such a good daughter. (2 thumbs pointed at me with a big smirk..)
Let me take you through a few little happy highlights of my week.
The father and I went for a little hike with the pup on one of the milder temperature days… I drove to the trail, locked the car doors and off we went. After getting cold enough where I couldn’t feel my hands-feet-face… we made our way back to the car. And I reached for the keys…and shuffled around in my pockets….and felt around in all my pockets again…. and again. Finally, I had to admit it, I dropped the keys. I got a little panicky (I was so cold and the car key is like 300 bucks to replace) but we did the only thing we could do. I stuff everything back in my pockets and off we went in search of the key. We got lucky, my dad found the key only a few minutes into the trail!!! Hooray! A happy hike with a happy ending.
So yeah, a few little happy happys…..
Hope you all have some happy happys too!
-C