I probabaly have already told you, but August is for sure my favorite month of the year (well,one of my favorites)
There is bounties of bounties of fresh, sweet and colorful, oh so juicy, crispy crisp, just so f ing amazing, produce exploding all over the place. I have probably gained like 75 thousand pounds in the past month due to all of the fruits and veggies that I have been consuming. I am starting to consider it a full time job just to keep up with the eating.
Another reason why I love August so much is becauuse the days are still nice and warm, but the nights are starting to cool which means I get to make so much soup!!!!!.
This soup is the freshest freshy soup yet. Everything is from the farm and or the garden (except the salt pepper, vinegar and oil), some picked within hours of me making this.
. I am a lucky/spolied veggie brat.
Anyways. This soup. The fresh tomato base gives it a sweet, slightly acidic kick. So super creamy due to the lovely earthy stocks of the chard. Slightly spicy and earthy from the arugula* and chard green green. This soup… it just tastes so fresh and clean, yet hearty and satisfying. A perfect soup for a mid August night, eating outside, watching the sun slide behind the mountains and the temperature dropping just enough that you might want a light sweater. Or you can just eat it from the pot in the kitchen while watching TV. It’s good eating anyway you want.
*Here in America, it’s called arugula. Else where , it’s called rocket. I wish we all called it rocket, although I do like the name arugula, but for like my first born child or maybe a pet goldfish. Anyway, rocket is arugula, or vice versa.
Soup time!.
The stuff. Some big fresh tomatoes, a few stalks of chard, and a few handfuls of arugaula (aka rocket). A couple carrots, an onion, some garlic, salt and pepper and a bit of olive oil.. Oh, and I added some balsamic vinegar, which for some reason didn’t make it into the picture (sorry vinegar)
Start by removing the chard leaves from the stalks. Set aside leave with the arugula. Chop up the carrot, chard stems, onion and garlic and toss into a big pot with a drizzle of olive oil, a splash of water, and a sprinkle of salt and pepper. Stir around and stick o nthe stove on medium heat for about 10 minutes until the veggies start to soften up.
Now chop up the tomatoes into chunks and toss those right into the pot with the other stuff. Add in a few cups water and a few glugs of balazmic vinegar. Bring everything to a boil and then turn heat to medium low and place a lid on pot and let cook at medium heat for another 20 ish minutes, or until the tomatoes are falling apart.
Now that everything is all cooked up, blend it up.
And now take the chard leaves and the aruglula and chop into little pieces….into the pot they go.
Mix it all up.. and take the blender to the soup again….if you want a smaller sized bite.
Soup Into bowls..Then into mouth.
Happy August!!
And hey hey hey.. Have the best weekend!
-C
4-5 large fresh tomatoes
4 large stalks of rainbow chard
2-3 big handfuls of arugula
1 medium onion
1 large or 2 small carrots
4-5 garlic cloves
2-3glugs (about 2 tablespoons) balsamic vinegar
3 cups water
olive oil
salt and pepper
To start, remove stalks of chard from leaves and chop stalks, onion, carrot and garlic into chunks and place int a big pot with a drizzle of olive oil, a splash or water, and spinkle of salt and pepper. Place on stove on medium low heat sand cooke the veggies down until starting to soften and garlic is becoming fragrant. While that cooking, remove core from tomatoes and dice them up. Toss into pot with the cooked down veggies with the vinegar and water. Place a lid on the pot and let cook for about 20-25 minutes or until the tomatoes are falling apart.
When cooked, using with a hand blender or a normal blender, blend the soup until smooth. (if using blender, pour back into pot)
Now take the arugula and chard leaves and chop them into wee little picese and mix into soup. If you want to, blend the greens into the soup.. but not until smooth, unless thats what you want. Cook for another 5 minutes. Taste and season with more salt and pepper to taste.
Ladle into bowl and serve with lots of fresh cracked pepper, maybe a little balsamic drizzle or even some mustard (I at left overs with mustard and it rocked my world)
The Mr. and I went and took ourselves on a rainy day nature adventure. He did some fly fishing (worst day ever for fishing) and I did some wondering. It was fantastic. And the Mr, only lost one fly and I managed only about a dozen mosquito bites! Nature days are the best!
And then as we were leaving, the clouds broke and the sun came out. It was kind of perfect.
All day, everyday, there is something new and delicious to pick and eat. I have my CSA with the Interval Community Farm, which is in full swing, so I am picking up thousands of pounds of fresh produce every week. (maybe not quite that much, but so so much) Plus our lovely garden is starting to reward up with the prettiest veggies as well. I have so much fresh produce that I find myself mindless eating just to make more room in the fridge.(not to mention that my counters are also covered and I have a laundry basket full of yellow squash and zucchini on the table). I guess its getting about time to do a little canning and pickling… but until then, I will just have to solider on and keep on eating!
So this salad is completely inspired by the ever exploding contents of my fridge (and table, and counters). Fresh zucchini, corn,and peaches roasted and tossed together with fresh tomato, creamy avocado, and herbs into one big bowl.. It’s like eating summer… And it fantastic.
The stuff. Zucchini, corn, tomato, peach, and avocado. A lemon (not shown..it rolled under the couch and I couldn’t find it for a little while) and salt and pepper. Also not shown is the bunch of fresh cilantro that I added at the last minute
I initially wanted to grill this stuff, but I didn’t feel like starting the charcoal and getting that all situated, so I just used the oven. So if you want, use the grill.
Cut zucchini into long wedges and cut the peaches into a few large slices. Place on a lightly oiled pan or baking sheet, sprinkle with a little salt and pepper and stick into the oven at 425 degrees. Toss you corn into the oven too.. but I just stuck that on the oven rack.
While the stuff is roasting in the oven, chop the tomato into mouth sized chunks, and mash the avocado with the juice of the lemon( I finally found it) and a pitch or more of salt. Add enough water to make it slightly runny.
Afer about 15 minutes, the stuff in the oven should be done. You want the corn slightly charred and the peach and zucchini to be soft, but not mushy. Remove from oven and stick everything on a plate or baking sheet and let cool for a few minutes, or until cool enough to handle it.
And now cut the corn from the cob and dice the zucchini and peaches into chunks.
Toss it all into a bowl, give it a mix and smother with the avocado dressing.
And lastly, dice up and add a big ass handful of some freshly chopped herb.. (Cilantro is great, but basil is also just as nice) and toss that on top too!
So much color, so much tasty. This is all summer!
Happy Friday
BYE!
-C
Makes a meal for 1 or a side for 2
1 ripe peaches
1 medium zucchini
1 ear of corn
l medium tomato
1 avocado
juice of 1 lemon
salt and pepper
bunch of fresh cilantro or basil
Note..If i had the time to light up the charcoal to grill, I would have. So Feel free to cook the corn, zucchini and peach on the grill if you so do please.
Slice peach into 4 equal chunks and zucchini into 4-5 wedges. Place in a lightly oiled skillet and sprinkle with salt and pepper. Stick the pan and the corn, husk removed, into oven at 425 degrees for about 10-15 minutes, or until the corn is charred and the zucchini and peach is browning and slightly tender. While this is going on, dice up the tomato into chunks and smash the avocadoin a jar until smoothish with the juice of the lemon, salt and pepper, and enough water to thin it out so that its kind of pasty. (make it any consistency you like)
When veggies are done cooking, remove from oven and place on the counter or a plate and let sit until its cool enough to handle. When cooled off, dice the peach and zucchini into chunks and remove corn from the cob. Toss together with the tomato, sprinkle with a little salt and pepper, dump the mixed lemony avocado all over and top wit a heavy handful of some freshly chopped herb.
Serve warm or cold. Can be eaten with a fork or spoon.
TGIF!!!! For reals, because Monday-Thurday were monster days. And now that its friday, I can dig a hole and hide in it until it’s at least 30 degrees with some sunshine. (I might never get to come out.)
A few things I will bring in my hole:
food (lots of food and coffee, lots of coffee)
a soft blanket and pillow
a few books, preferably with pictures, on farming and gardening (think spring!)
the entire series of the Fresh Prince of Bel-air and a device to watch it on
toothpaste (I can use my finger to brush my teeth)
But before I leave for my hole in the ground, I made these little cake bites to get my people through the weekend. Sweet little lemony bites of rich dense cake dipped into bittersweet chocolate. (I am just so nice) They have all the pleasure or cake without the need of a fork and are much easier to give away then a big slice of cake. Plus, they are fun to make. My little sister helped and did most of the chocolate dipping. Then she and another little used their mouths to clean up the chocolate mess. It was an afternoon of chocolate all over the kitchen fun day.
So make some bites to have and to share. Or if you, like me, are digging a hole to hide in, make a batch of bites to bring with you. That’s the beauty of cake covered in a harden chocolate shell, they travel really well.Simple lemon cake stuff. Flour, baking powder and salt whisked together, Sugar and soft butter in a bowl. An egg, some vanilla, milk, and of course, the lemon.
To make the batter, cream the soften butter with the sugar until light and fluffy. Zest lemon(1 big or 2 small) into bowl with the juice of the lemon(s), the vanilla and the egg. Beat until combined. Now beat in the dry and then the milk. Keep beating for another minute until all mixed. Batter should be light and fluffy.
Batter goes into a greased and floured 9×13 baking sheet and stuck into a 375 degree oven for about 30 minutes (You can use a 9×9 baking pan. Just bake fir another 10 minutes and you will end up with thicker bites). Remove from oven and let cool for a few minutes and flip to remove cake from baking sheet. Cut cake into small pieces (I cut 4×6 to get 24 bites) and place bake into sheet and into freezer (I stuck mine outside, it was -2 degrees ) for at least 2 hours.
Frozen bites ready for the chocolate coating… Bittersweet chocolate chips and a little bit of coconut oil. Melted together all nice and shiny smooth.Now dip and slather those bites in the melted chocolate.
Oh what a lovely sister I have.. Look at her dunk….. like a boss!Fully coated and placed on a rack for the chocolate to harden. I ended up sticking the rack in the freezer for 10 minutes…They harder really fast in there.
And now you have some it, bites of cake covered in chocolate. 1 bite, 2 bites…5 bites. Eat however many you want because its Friday and because there small little bites and just because you can.
Now if you need me, I’ll be in my hole.
-C
Chocolate Lemon Cake Bite
1 1/2 cups all purpose flour
1 teaspoon baking powder
1 teaspoons salt
1 cup white sugar
1/2 cup (1 stick) soft butter
1 egg
1 teaspoon vanilla
1 cup milk
1 large or 2 small lemons
2 cups bittersweet chocolate chips
2 tablespoons coconut oil
Add butter and sugar to a large bowl and beat on medium unit light and fluffy. Ass in vanilla egg, the zest of the lemon and the juice of the lemon. Beat to incorporate. Now beat in the dry and lastly the milk.
Grease and flour either a 9×9 pan or a 9×13 baking sheet. dump batter in and smooth out. Stick in oven and bake for about 3o minutes or until a toothpick stuck into the middle comes out clean. Remove and let cool for a few minutes on a wire rack. Flip cake to remove from pan. Cut cake into bit sized pieces, 4×6 is a good size, and place back on baking sheet and stick into freezer for at least 2 hours.
When cake bites are as good as frozen, get the chocolate ready. Take the chocolate and the coconut oil and either melt in a double boiler or the microwave. Mix until smooth and make sure to full incorporate the oil. Now remove the cake bites from the freezer and dip each bite into chocolate, trying to full coat all sides. Stick onto a wire rack or a parchment lined pan to harden. They can be stuck back into the freezer to harden faster.
It’s Mother’s Day weekend which means that you and I and everyone out there should feel the slightest bit obligated to at least do a little something nice for your mom for the mere fact that you were borned. And really what better way to celebrate mom than with food… It really is the least that you can do. (I think mom’s also like flowers and cards and handmade pasta necklaces) My mom is defiantly about the food. (she has had her fair share or pasta necklaces) A many years back on Mother’s day, this sweet little girl (me) made her mother a special breakfast treat…blueberry scones. And ever since that day, for every freaking holiday, birthday, whatever day, my mother requests (demands) a batch of those scones. She is always saying that these are her favorite treat and that no one has ever made them as good as I do. (I guess that just reiterates that I am her number 1 child)
And for the last few months my mom has been up my butt, trying to get me to make her some. Not going to lie, I have been saying I’ll get her a batch, but for some reason, I haven’t gotten around to making them. So two birds here.. Make the scones and she gets off my back for a least a little while (a month.. maybe 2) and I give her a fantastic Mothers day gift that I know she will love.
So here they are , oh mother of mine. Blueberry scones!
The stuff. Flour, baking soda, baking powder and salt. A bit of sugar, vanilla, buttermilk, and butter (use vegan butter and nut milk if you want to make them vegan) And of course we need the blueberries which can be fresh or frozen. I usually use fresh, but the store I stopped at only had really big containers of fresh that were like $1000 dollars a piece and the organic frozen happen to be on super sale. So you know, the cheap in me won that battle. So into the bowl goes all the dry stuff; flour, baking powder and soda, salt, and the sugar. Give it a good whisk.
Now for my special trick for a perfectly distributed cold butter in a pastry. Freeze your butter and grate it!
With a large wholed grater, grate the frozen butter directly into the bowl with the dry, stoping a few times to toss the butter chunks around so you don’t end up with a huge pile of grated butter. When it’s all grated, gently toss around so the butter is evenly distributed. Now dump the blueberries into the flour mixture. Toss them around to give them a coat of flour. Add in the buttermilk and vanilla and give a little mix until liquid is absorbed. We are trying to handle the dough as little as possible.Turn mixture onto counter. It’s very loose, but thats what it should look like. Very gently and with as little handling as possible, gather dough up, knead a few times till everything just comes together. Press dough into a disk that is roughly an inch thick…. and it doesn’t need to be perfect. Cut the disk into even sized pieces. Do 6 big, 8 normal, maybe even 10 smaller. Whatever size you like. (I did 8) Place the scones onto a baking sheet, using a spatula to transfer, and sprinkle the tops with a little bit of sugar. Into a preheated oven for about 20 minutes.And when the scones look all nice and browned and a tester comes out clean. remove and either serve right away warm, preferably with huge cup of coffee or tea, or stick on a rack to cool before storing in air tight container.
Perfect to serve as a breakfast pastry, at brunch, or even as a dessert. A nice little treat for a special lady. (dudes can eat them too)
Happy Mothers Day Mom! Thanks for having me!
And Happy Weekend!!!
-C
Blueberry Scones
2 cups all purpose flour
1/3 cup sugar plus 2 tablespoons to sprinkle on top
1 teaspoon baking powder
1 teaspoon baking soda
1/2 teaspoon salt
1/2 cup (1 stick) unsalted butter frozen or really cold (use non dairy butter like Earth Balance for vegan)
1 cup blueberries (fresh or frozen)
1 teaspoon vanilla
3/4 cup buttermilk (use non dairy milk for vegan)
Preheat oven t0 400 degrees
In a large bowl, whisk together flour, baking soda, baking powder, sugar, and salt. Take the frozen butter and grate directly into flour mixture, tossing around to evenly disrupted. Add in blueberries and toss around till coated with flour, then lastly, add vanilla to buttermilk and mix into mixture until just barely coming together. Turn mixture out onto counter and with your hands, knead mixture a few times until it forms a solid dough. Shape into a disk and smoosh down until about an inch thick. Cut into 6-10 triangles and place on a non greases baking sheet and sprinkle tops with remaining sugar. Stick into oven and bake for 20 minutes or until tops start turning a golden brown and a tester in the middle of a scone comes out clean.
Remove from baking sheet and serve warm or let cool on a rack.
Mom gets first dibs, and if she is willing to share, eat one yourself with your face.
Spicy, crispy cauliflower… um yes please. I really like cauliflower. The mister loves it, or at least likes it better than any other vegetable. So when he asked for spicy cauliflower, well yea I am going to make it because I am so nice and really, could I say no to a veggie request? (I might have said no if it involved deep frying) Also, I found fresh cauliflower on sale! ($2.25) I don’t usually cook fresh cauliflower, but I figured at that price, it wouldn’t be bad to cook a head. (If I am cooking cauliflower, which I do a lot, I just use frozen….casue it be waaaay cheaper)
Fresh, cheap and requested veggies….those are must makes. And the mister was happy with I handed him the plate of oh so lovely looking crispy crunchy loveliness. (I kind of like to make him happy…sometimes)
The stuff. Cauliflower, chopped and broken into pieces. Corn meal mixed with salt, pepper, onion and garlic powder, and because I made this for the mister, parmesan cheese. And in the green bowl, srirsachi and a little oil. The cauliflower gets a coat of the hot sauce and then tossed around in the corn meal mixture. Handling as little as possible, place coated pieces on a lightly oiled baking sheet and stick those suckers in the oven for about a half hour, taking them out and flipping half way.And take them out of the oven when pieces tuned golden brown, stik them on a plate, and serve immediately.
A bit of spice, a bit of crispy , a lot a yum. Serve with some crunchy veggies, maybe a squeeze of lemon and definitely some type of avocado situation.
A beer would be lovely too!
Have a fantastic weekend!
-C
Spicy Crispy baked Cauliflower
1 head cauliflower, chopped or broken into florets
1/2 cup corn meal
3-4 tablespoon sriracha or your favorite hot sauce
1 tablespoon olive or coconut oil
salt and pepper
Any seasonings you might like (garlic or onion powder, parmesan cheese, national yeast…. whatever floats your boat)
Preheat oven to 400 degrees
In a bowl, mix together sriracha and oil. In a separate bowl, mix salt, pepper, any seasonings you might like, and corn meal. Take cauliflower and toss in sauce to coat. Remove from sauce and toss around in cornmeal mixture till fully coated, but try not to hand too much so the coating doesn’t come off. Place pieces on a lightly oiled baking sheet and stick into oven. Bake for about 15 minutes, remove and flip pieces. Back into the oven for another 15-20 minutes (depending on you crispy preference) Remove when golden brown (or darker if you like) and serve immediately.
Cucumber, celery, and carrots are great accompaniments.. also a little mashed avocado or guacamole is much appreciated.
I have been meaning to make this jam for a while now. I’ll buy a bunch of jalapeños, then slowly, before I get to cooking them down, end up eating them all. But not today, and the rewards are great, Fresh jalapeño jam. So much potential for the greatest of things (I am thinking mango jalapeño sorbet… no, I am making jalapeño mango sorbet) And if you, like me are a jalapeño fan, this is going to make your life amazing. You will find yourself jamming up everything, or maybe just eating it with a spoon.
Whatever you want to do with it, just make it.
Honey and jalapeños.. All you need, well a little salt and water too, but that’s it.
What you need to do is remove the stems,, most of the ribs and half of the seeds removed. (You could remove all or none of the seeds depending on you heat preference) Chop the peppers into small chunks, toss into a pot, sprinkle with a bit of salt, add in a splash of water. Place the pot on medium heat. Top it with a lid, and give the peppers a good stir every few minutes. While the peppers are cooking, you want to make sure the bottom isn’t sticking and buringin. If that starts to happen, just turn the heat down a bit and add in a little splash more of water.
After about 20 minutes, the peppers are fully cooked and falling apart. The liquid is cooked down and the peppers are starting to caramelize on the bottom of the pan. When that happened, remove the pot from heat.
Now you can either blend the peppers, mash the peppers with a fork, or leave it chunky. Thats a choice Ill leave to you. ( I like to blend, but keep some chunks)
And drizzle in a bit o honey. As little or as much as you like.
And scoop into a jar. Eat the jam on anything you want. (I found myself eating it with a spoon)
Keep it Real!
-C
Makes about 1 1/2 cups of jam
10 large jalapeño peppers
a pinch of salt
About 1 tablespoon of honey, but add more if you like (And if you want to keep it vegan, use agave or sugar)
Wash, remove ribs and most seeds (the more seeds you leave the hotter it will be) and dice jalapenos into small chunks. Place in a pot with a few splashes of water and a sprinkle of salt. Turn on medium heat and cover, stirring every few minutes. If the peppers seem to be sticking o the pot and burning, turn heat down and add another splash of water. After about 20 minutes, the peppers should be really tender and falling apart. The liquid should be completely cooked out and the peppers will start to caramelized at the bottom of the pot. When that starts to happen, remove from heat. Now either mash with a fork, blend with a hand blender, or leave superr chunky. Drizzle in honey (or sweetener) and stir.
Eat right away or stick in a jar and store in the fridge for up to a week (It won’t last that long)
It’s Mother’s Day weekend which means that you and I and everyone out there should feel the slightest bit obligated to at least do a little something nice for your mom for the mere fact that you were borned. And really what better way to celebrate mom than with food… It really is the least that you can do. (I think mom’s also like flowers and cards and handmade pasta necklaces) My mom is defiantly about the food. (she has had her fair share or pasta necklaces) A many years back on Mother’s day, this sweet little girl (me) made her mother a special breakfast treat…blueberry scones. And ever since that day, for every freaking holiday, birthday, whatever day, my mother requests (demands) a batch of those scones. She is always saying that these are her favorite treat and that no one has ever made them as good as I do. (I guess that just reiterates that I am her number 1 child)
And for the last few months my mom has been up my butt, trying to get me to make her some. Not going to lie, I have been saying I’ll get her a batch, but for some reason, I haven’t gotten around to making them. So two birds here.. Make the scones and she gets off my back for a least a little while (a month.. maybe 2) and I give her a fantastic Mothers day gift that I know she will love.
So here they are , oh mother of mine. Blueberry scones!
The stuff. Flour, baking soda, baking powder and salt. A bit of sugar, vanilla, buttermilk, and butter (use vegan butter and nut milk if you want to make them vegan) And of course we need the blueberries which can be fresh or frozen. I usually use fresh, but the store I stopped at only had really big containers of fresh that were like $1000 dollars a piece and the organic frozen happen to be on super sale. So you know, the cheap in me won that battle. So into the bowl goes all the dry stuff; flour, baking powder and soda, salt, and the sugar. Give it a good whisk.
Now for my special trick for a perfectly distributed cold butter in a pastry. Freeze your butter and grate it!
With a large wholed grater, grate the frozen butter directly into the bowl with the dry, stoping a few times to toss the butter chunks around so you don’t end up with a huge pile of grated butter. When it’s all grated, gently toss around so the butter is evenly distributed. Now dump the blueberries into the flour mixture. Toss them around to give them a coat of flour. Add in the buttermilk and vanilla and give a little mix until liquid is absorbed. We are trying to handle the dough as little as possible.Turn mixture onto counter. It’s very loose, but thats what it should look like. Very gently and with as little handling as possible, gather dough up, knead a few times till everything just comes together. Press dough into a disk that is roughly an inch thick…. and it doesn’t need to be perfect. Cut the disk into even sized pieces. Do 6 big, 8 normal, maybe even 10 smaller. Whatever size you like. (I did 8) Place the scones onto a baking sheet, using a spatula to transfer, and sprinkle the tops with a little bit of sugar. Into a preheated oven for about 20 minutes.And when the scones look all nice and browned and a tester comes out clean. remove and either serve right away warm, preferably with huge cup of coffee or tea, or stick on a rack to cool before storing in air tight container.
Perfect to serve as a breakfast pastry, at brunch, or even as a dessert. A nice little treat for a special lady. (dudes can eat them too)
Happy Mothers Day Mom! Thanks for having me!
And Happy Weekend!!!
-C
Blueberry Scones
2 cups all purpose flour
1/3 cup sugar plus 2 tablespoons to sprinkle on top
1 teaspoon baking powder
1 teaspoon baking soda
1/2 teaspoon salt
1/2 cup (1 stick) unsalted butter frozen or really cold (use non dairy butter like Earth Balance for vegan)
1 cup blueberries (fresh or frozen)
1 teaspoon vanilla
3/4 cup buttermilk (use non dairy milk for vegan)
Preheat oven t0 400 degrees
In a large bowl, whisk together flour, baking soda, baking powder, sugar, and salt. Take the frozen butter and grate directly into flour mixture, tossing around to evenly disrupted. Add in blueberries and toss around till coated with flour, then lastly, add vanilla to buttermilk and mix into mixture until just barely coming together. Turn mixture out onto counter and with your hands, knead mixture a few times until it forms a solid dough. Shape into a disk and smoosh down until about an inch thick. Cut into 6-10 triangles and place on a non greases baking sheet and sprinkle tops with remaining sugar. Stick into oven and bake for 20 minutes or until tops start turning a golden brown and a tester in the middle of a scone comes out clean.
Remove from baking sheet and serve warm or let cool on a rack.
Mom gets first dibs, and if she is willing to share, eat one yourself with your face.
This time of year, there are so many reasons for popsicles, but I think that main reason is that I don’t want to willingly turn on the oven for any amount of time. It’s just to f-ing hot.
Lately, it’s been hot. And humid. And gross. Just way too hot to make anything in the oven. So when I grabbed the rhubarb out of the fridge, knowing that if I didn’t use it soon it would go bad, I immediately thought to make pie. Then I was like,” hell no, not going to happen. I need to freeze this shit”. And freeze it I did..into the greatest, slightly sweet, slightly tart, bright pink popsicles of happiness. They are really the perfect little frozen treat. Not overly sweet and sticky, have a lot a fresh clean flavor, and takes the edge off of the super summer heat and humidity, even if only for a few minutes.
I love popsicles.
But sadly this is probably the last rhubarb for the season (Or maybe the second to last..I think I saw some for sale at the coop a few days ago)
So get it while you can and make these popsicles!
The stuff. Rhubarb, a lime and a little bit of honey (or any sweetener you like). Plus you are going to need some water, but I bet you have some of that on hand.
Chop the rhubarb into inch chunks and toss into a big pot with the water. Stick on the stove and bring to a boil then turn heat to low and let simmer.
Once the rhubarb is so soft that it falls apart, remove from heat and let cool for a few minutes.
With a fine mesh stainer, strain juice into a large jar or bowl.
Now you have the juice for the popsicles and the left over rhubarb stuff is the rhubarb butter.
Place the rhubarb butter into a jar, adding a little honey(or whatever) if you want and eat with anything and everything ( I’ve been adding it to the mr’s yogurt and just eating it with a spoon)
And now add the juice of the lime to the rhubarb juice and add a little honey or whatever sweetness to taste.
And add the rhubarb juice to your popsicle molds and stick in the freezer with sticks tops or wait two hours and add wooden sticks.
When frozen, run the mold under a little hot water and pop those suckers out.
A two for one deal here. And timed perfectly. You have the rhubarb butter to eat while you wait for the popsicles to freeze. So smart
Happy Tuesday.. Keep it cool!
-C
makes 6 4oz popsicles and about a cup of jam
3 cups chopped rhubarb
2 1/2 cups water
1 lime
Anywhere from 4 tablespoons honey (2 for popsicles and 2 for jam)
Chop the rhubarb into inch ish chunks and stick into a big pot with water. Turn on high heat and bring to a boil. Once boiling, turn heat to low and simmer until the rhubarb is so soft its falling apart. Remove from heat and let cool for a few minutes. Take a big jug or bowl with a fine mesh strainer,strain the liquid from the solids. You can use a wooden spoon to stir around to help get the juice flowing. Place remaining solids into a jar and add as little or as much or as little honey (any sweetener you like) and give it a stir. Thats your jam
Now for the popsicles. Add the juice of the lime and a tablespoon or two of honey (or whatever sweeteners you like) and mix around. Pour into popsicle molds and stick into freezer.Know your mold.. if you need to insert a stick, do so after about 2 hours.
When pops are frozen, remove from mold and eat your heart out.
Nothing. Well, not completely nothing. I did wake up and go to the gym, but then came home and fell asleep on the floor for more then an hour and woke up in a puddle of drool. I also continued my binge watching of the Mindy Project so I can be up to speed when season 4 started tonight on hulu!!!!!. And I cut up a cantaoplue. That’s a good amount of stuff for one day, right?
Anyway. even when I am gone from home for just a few day, I never really quite feel right when I get back until I cook something inn my kitchen.. So after my floor nap, I got up with a hankering for some of the juicy cantaloupe that I got from last weeks farm share (and forgot to stick in the fridge before we left so I came home to very ripe cantaloupe) Cut it into chunked, tossed with slightly toasted caraway seeds and then caramelized a bit more. Super fresh and clean and a very almost fall like way to eat the melon. And even though it took me about 4 minutes to do, it’s all I needed to make me feel normal again.
Ah, home and food and Mindy.. Nothing better, Now to back doing stuff all day.
The stuff. Some cantaloupe and some caraway seeds.
Place caraway seeds into a dry skillet and place on the stove on high heat. While the seeds are toasting, remove seeds and rind of the cantaloupe and cut into mouth sized chunks and place into a bowl.
Once you hear the fist pop from the seeds, dump them in the bowl with the cantaloupe and toss around. Then dump the seed covered chunks back into the hot skillet.
Sear each side until browned.
And scoop it back into the bowl.
Eat right away. IF you want to get down with a scoop of yogurt on top or maybe a bed of some green, I think you should.
Enjoy you Tuesday my friends.
-C
1/4 of a cantaploupe
2-3 teaspoons caraway seeds
Toss caraway seeds into a dry skillet and turn heat onto high. Toast seeds for about a minutes or so or until you hear the first seed pop. Dump seeds onto cantaloup chunks and toss around then dump the cantaloupe into hot skillet. Let chunks sear for 2-3 minutes on each side, or until they are starting to caramelize. Remove from pan when you are happy with doneness.
Eat right away.
Holy shit is it hot out. My brain is all fizzy, my hair is all frizzy, and my over all being is just blah. I am not a fan of super hot weather (as some of you may know) and am getting more pissy as the days go by and I continue to be a sweaty mess. I don’t want to feel like a big wet slob, I want to feel fresh and clean and wear clothes that are not drenched in sweat. I know, bitch, bitch, bitch, but seriously. Even the world around me is wilting, and in the nice, colorful fall foliage kind of way. It’s all crispy and brown. The garden is barely holding on, the flowers are shriveling in the ground, and a few plants are just plan dead. It’s just too hot.
I think that only plus side of this past week of hot crap weather are these popsicles that I made. They were actually suppose to be a treat for the littles, but guess what, me and the mr ate them and didn’t share, and no, I feel zero bad about it. They were so good, so refreshing, so cold(if only for a minute) and just so needed. A few minute reprieve from being miserably hot. And bonus, a great use of all the watermelon and tomatoes that I have taking over the countertops (I have so much watermelon and tomatoes)
And really, these probably (better freaking be) the last batch of popsicles for the summer so I think I am going to make another batch today, eat them, savor the flavors of summer, and move on from there.
. Maybe I’ll even share them this time.
The stuff. Some watermelon*, a tomato, a handful of basil, and a lime.
*My watermelon had seeds, but you can use seedless. I also removed the green skin, but kept on as much rind as I could, although this particulate melon had very little white rind.
Dump the melon, tomato (cut in a few pieces, the juice of the lime and the basil into a blender. If your melon has seed, don’t worry about removing them.
The stuff all blended up.
. This step is more necessary if you melon is seeded, straining the mixture pretty much caught most of the seed chunks. You can skip this if your melon is seedless.
Now pour the juice into your molds and stick into freezer to freeze.
After about 2 ish hours, remove and stick the sticks into the semi harder pops.
And a few more hours later……Frozen goodness.
And pop one of those suckers out of the mold and savor every frozen delicious bite.
Happy Tuesday… DON’T MELT!
-C
Make six 3.5 oz popsicles
1 ish cup watermelon (green skin removed.. rind is good)
1 large ripe tomato (about a cups worth)
a few sprigs of basil
Juice of 1 lime
Place all ingredients into blender and blend until smooth. Strain mixture through a fine strainer into a bowl or jar and pour into popsicle molds.
Place in freezer for a few hours. About 2-3 hours in the freezer, take them out and stick in sticks (or fallow you popsicle molds instructions) Place back into freezer
Once completely frozen, remove from molds and eat with your mouth.
What are your weekend plans?
Me well, I need to can, pickle and eat as much zucchini as I can. And it’s not just zucchini anymore… we are getting into cucumbers too…AAAHHH I know I have said this a few times in the past weeks, but man, I have so manning freaking zucchinis.. and the more I eat, the more I end up with… It’s getting pretty crazy here!
So anyway, yesterday my dad came back to VT, WOO HOO! and I was his first stop on his rotating dinner schedule. (cause I am his favorite child. I think..maybe) I made zucchini noodles for dinner (I have made them every night for the past week) and I wanted to make him dessert, I have all sorts of pretty fruit that I wanted to make and prepare, but I also had little time and honestly, little desire to move all that much (it was so f ing hot!) I already had out the shredder and a bowl, and the zucchini was just sitting there, in the basket taunting me with it’s gigantic green whaleness. So I figured I’d just make a zucchini cake, or better yet, cause my dad really likes chocolate, a chocolate zucchini cake.
This cake is tender and moist, almost like a cakey brownie, so it does not require any frosting which is nice when your dead tired and it’s so hot that any frosting would probably just melt off anyway. (although you could totally frost it up) It makes a great dessert, but I would not hesitate to serve this for breakfast either because, 1. It has a lot of zucchini in it which automatically justifies eating it whenever, 2. also made with whole wheat, and 3. it’s totally ok to eat chocolate cake for breakfast. I mean people eat donuts for breakfast and that shit is usually fried.
Yeah, this is for sure a dessert/breakfast cake.
The stuff for cake…. Regular all purpose flour, white whole wheat flour, and cocoa powder. Some sugar, salt, baking soda and oil. A little vanilla extact and a splash of coffee. And of course, shredded zucchinn
Dump the sugar, salt and baking soda into flour, whisk together, then mix in the oil, vanilla and the coffee. Now add in the shredded zucchini, but right before adding it in, give it a squeeze to remove a little bit of the liquid.
Mix until combined.
And pour batter into a well oiled pan
Feeling fancy? I was so I peeled the green skin from a zucchini and make a little starburst on top
And into the oven to bake…
And it comes out looking so fancy. Let cake cool for a few minutes and carefully flip from pan.
Note. It might not be the best idea to test your cake with a blunt chop stick.. I did and it made the middle sink in a little. No big deal, but next time I will use a fork.
Cooled and removed from pan. Now all you need to do now is eat cake.. I think that’s something you can handle.
Happy Friday!!!!
-C
1 cup white whole wheat (can use regular whole wheat or all all purpose)
1 cup all purpose flour
1 cup sugar
1/2 cup cocoa powder
2 teaspoons vanilla extract
1/2 cup oil (veggie, canola, sufflower)
1 teaspoons baking soda
1 teaspoon salt
2 cups of shredded zucchini
2 tablespoons of coffee
Preheat oven to 350
In a large bowl, whisk together the flours, salt, baking soda, cocoa powder, salt and sugar. Then add in the oil, vanilla and coffee. Add in the zucchini, but right before, give it a squeeze to remove some of the liquid. (don’t got crazy, just get a little liquid out). Mix until incorporated.
Oil a 9 inch cake pan and pour in the batter. If you want, use zucchini skin to make a pretty design on top (completely optional), and place into preheated oven.
Bake for about 45-50 minutes, or until a tester stabbed in the middle comes out clean.
Remove from oven and let cool in pan for at least 5 minutes the gently invert pan to remove cake and place on a rack to cool.
Serve as soon as you want..
Place in mouth, chew, and swallow…..Smile!!!
This time of year, there are so many reasons for popsicles, but I think that main reason is that I don’t want to willingly turn on the oven for any amount of time. It’s just to f-ing hot.
Lately, it’s been hot. And humid. And gross. Just way too hot to make anything in the oven. So when I grabbed the rhubarb out of the fridge, knowing that if I didn’t use it soon it would go bad, I immediately thought to make pie. Then I was like,” hell no, not going to happen. I need to freeze this shit”. And freeze it I did..into the greatest, slightly sweet, slightly tart, bright pink popsicles of happiness. They are really the perfect little frozen treat. Not overly sweet and sticky, have a lot a fresh clean flavor, and takes the edge off of the super summer heat and humidity, even if only for a few minutes.
I love popsicles.
But sadly this is probably the last rhubarb for the season (Or maybe the second to last..I think I saw some for sale at the coop a few days ago)
So get it while you can and make these popsicles!
The stuff. Rhubarb, a lime and a little bit of honey (or any sweetener you like). Plus you are going to need some water, but I bet you have some of that on hand.
Chop the rhubarb into inch chunks and toss into a big pot with the water. Stick on the stove and bring to a boil then turn heat to low and let simmer.
Once the rhubarb is so soft that it falls apart, remove from heat and let cool for a few minutes.
With a fine mesh stainer, strain juice into a large jar or bowl.
Now you have the juice for the popsicles and the left over rhubarb stuff is the rhubarb butter.
Place the rhubarb butter into a jar, adding a little honey(or whatever) if you want and eat with anything and everything ( I’ve been adding it to the mr’s yogurt and just eating it with a spoon)
And now add the juice of the lime to the rhubarb juice and add a little honey or whatever sweetness to taste.
And add the rhubarb juice to your popsicle molds and stick in the freezer with sticks tops or wait two hours and add wooden sticks.
When frozen, run the mold under a little hot water and pop those suckers out.
A two for one deal here. And timed perfectly. You have the rhubarb butter to eat while you wait for the popsicles to freeze. So smart
Happy Tuesday.. Keep it cool!
-C
makes 6 4oz popsicles and about a cup of jam
3 cups chopped rhubarb
2 1/2 cups water
1 lime
Anywhere from 4 tablespoons honey (2 for popsicles and 2 for jam)
Chop the rhubarb into inch ish chunks and stick into a big pot with water. Turn on high heat and bring to a boil. Once boiling, turn heat to low and simmer until the rhubarb is so soft its falling apart. Remove from heat and let cool for a few minutes. Take a big jug or bowl with a fine mesh strainer,strain the liquid from the solids. You can use a wooden spoon to stir around to help get the juice flowing. Place remaining solids into a jar and add as little or as much or as little honey (any sweetener you like) and give it a stir. Thats your jam
Now for the popsicles. Add the juice of the lime and a tablespoon or two of honey (or whatever sweeteners you like) and mix around. Pour into popsicle molds and stick into freezer.Know your mold.. if you need to insert a stick, do so after about 2 hours.
When pops are frozen, remove from mold and eat your heart out.
Last night had we had a couple littles (and my little sister who is not so little anymore) over for a cookout and watercolor evening.
It was fantastic. We set them up outside with paint, paper, and brushes and let them have at it. And while they were painting the mr took charge of the grill: cooking up potatoes, corn, and the tofu dogs.
I was cutting up fruit and making a special snack treat of popcorn (who doesn’t love popcorn?) consisting of almond butter, coconut, and chocolate….Almond Joy popcorn.
Addictive like crack. But still safe for children
The littles were more or less indifferent to it ( they are not big coconut fans..I know, but i am making it a mission to make them like it), but the sister and the mr… Lets just say I had to pull out my outdoor voice on them a few times (STOP EATING IT ALL!!!!!)
I think we have a winner here!
The stuff. A large quantity of air popped popcorn, almond butter, chocolate chip, coconut flakes and coconut oil. We also have some extra chocolate chips and a big handful of roasted almonds.
Licking your lips yet?
Start by dumpling your popcorn into the larges baking sheet to pan that you have.. the more surface area the better. Now heat up the almond butter. You can do this on the stove or in the microwave. The trick here is to heat it slowly so you don’t burn it. If doing on the stove, put in a sauce pot and with a fork, constantly stir until a drizzable consistency. If in microwave, stick it in there for 10 second intervals.
Note. I know from experience that there are many different types and consistency of almond butters out there. If your butter seems really stiff and thick, add a teaspoon of coconut oil.
As soon as your almond butter is melted, drizzle all over the popcorn.
With the same pot (no need to clean) place teaspoon of coconut oil in it. Heat oil until hot. Remove from heat and stir in the chocolate chips. Kepp string until the chips are melted.
And drizzle that all over
Then toss on the coconut chips, chopped almond bits, and the chocolate chip.
With your (clean) hands, give the popcorn a good toss, mixing everything all around.
And now place either in a big bowl or individual cups (great for littles) I happened to have some pink(beet juice stained) shredded coconut on hand, which made for a nice touch of pretty (totally not necessary,but it kinda was). Next time maybe some sprinkles would look nice……
Anyway, be ready to lick you fingers!
And I am giving you ample amount of time to get the ingredients needed for this. Makes the perfect snack for a cookout, a party, or movie night(or Netflix binge)
Happy Day!!!
-C
6-7 cups air poppped popcorn
1/3 cup smooth almond butter
1/2 cup unsweetened coconut flakes
1/2 cup chocolate chips plus a handful (use vegan chocolate chip if needed)
1 -2 teaspoon coconut oil
handful of toasted almonds, chopped into pieces
Feel free to play with proportion. You can adjust the amount and ratios of all the ingredients to your taste preference.
Take popcorn and dump on the biggest baking sheet or pan that you have and level it out. Either on the stove or in the microwave, heat almond butter until a melty a runny consistency. If doing so on the stove, make sure to consantly stir while heating* If in microwave, check ever 10 seconds. (burnt almond butter tastes like crap )
*Note. I find that all almond butters are not the same. IF you feel that yours is not melty and drizzable enough, add in a teaspoon of coconut oil.With a spoon or spatula, drizzle all over popcorn. .
Now take the coconut oil and melt on stove or in microwave until hot. Remove from heat, add in chocolate chips and mix around until fully melted. Drizzle all over popcorn .
And last but not least, take the coconut flakes, almond pieces, and the extra handful of chocolate chips and toss those in too. With clean hands, give everything a good mix Dump into a big bowl or individual container.
Eat with hands..lick your fingers clean..
Word of caution…Once you start, you will not be able to stop eating this.
Chomp Chomp Chomp… The sound I make as I eat this freaking fantastic crunchy granola. You know it’s good when the person sitting next to you is annoyed by the sound of you face while eating. I eat a lot of crunchy stuff. And I am pretty sure I annoy the mister a lot.
Oh well, he will live, and he eats his fair share of annoying stuff too so we can just call it even.
So granola. I love it. I make a batch every few weeks or so, and I usually make it just for me. (I almost never make things just for me) I like to keep it simple but flavorful. A tad sweet, but not really, and crunchy, without the oily fried taste. I also like a variety of sizes, some big clusters and some small pieces.
This granola fits the bill perfectly. Made with 5 ingredients, no oil, and the perfect sweetness level. It’s one of my favorite flavors yet. And I know I said I made it just for me, but the mister really liked it too. (I can’t help sharing)
The simplest of stuff. 1 smashed banana, a cup of pureed butternut squash, Vietnamese cinnamon*, honey, and old fashion oats. (and a dash of salt, not shown)
*Note. I only ever use Vietnamese cinnamon because once I start using it, regular old cinnamon just won’t cut it anymore. It is a bit sweeter and a lot more spicy. If you don’t have it or don’t want to use it, use regular cinnamon and add in 1/2 a teaspoon of all spice.Toss the cinnamon and salt with the oats. Mix together the banana, squash and the sweetener and combine with the oats until full incorporated.
Another note. Because I made this granola for me and no body else, I actually omitted the honey (I think that banana abs squash make it sweet enough) But if I was making this for lets say, the mister, or a friend, I would use add a bit. The sweetness level and sweetener of choice is up to you, but 2-3 teaspoons of honey or maple syrup is usually sweet enough for people.
Dump the mixture on a parchment lined baking sheet and give it a little pat, you know, to settle all the bit and pieces together, all cozy and evenly spread out. Now stick into a preheated oven and after about 20 minutes, take out of oven and give the granola a toss, breaking apart any super big chunks or overly wet pieces. Put back into oven for another 20 minutes. (I like my granola super crispy crunchy so I cook it a little longer, like 30 more minutes)And when you are happy with the crunchiness of you granola, remove from oven and let cool, trying not to eat all of it while it sit’s on the counter looking all pretty and smelling like happiness.
Grab a bowl, stick the rest into a jar with a lid, hide it from others, and chomp chomp chomp away!
-C
Banana Butternut Granola
3 cups old fashion oats (use gluten free oats if needed)
1 ripe banana, mashed
1 cup butternut squash puree (can use canned)
2 tablespoons Vietnamese cinnamon (or 2 tablespoons regular cinnamon and 1/2 teaspoon of allspice)
1-3 tablespoon honey or sweetener of choice (use greater amount for sweeter)
dash of salt
Preheat oven to 375
In a large bowl, mix together oats, cinnamon and salt. Mix the mashed banana, squash, and sweetener of choice together and combine with the oats. If the mixture seems really dry, add in a very small splash of water to loosen just enough to mix.
Dump mixture onto a parchment lined baking sheet and evenly disperse the mixture. Give it a kind of smoosh to compact the oats and to make sure all its all the same thickness on the pan.
Stick into oven for 20 minutes. Remove and give granola a little toss, maybe breaking apart any really big chunks (unless you like really big chunks) and put back into oven for another 20 minutes. (30 for a crunchier granola) Remove from oven and let cool on baking sheet before storing in an air tight container. If you find that it is not as crunchy as you would like or is a few days old and lost some of its crunchiness, just stick it back into the oven for a few minutes to re crunch.
Eat as is, as a cold cereal, dip in peanut butter, add to popcorn or whatever way you want to eat it. No utensil required.
I know that it it spring, but I still have a winter farm share for another month and will be cooking and eating roots and squash until the summer share starts in early June. And I am good with that cause I love me some root veggies and butternut squash. But, yes, it is spring and my body isn’t craving the super hearty, rich foods that it was just a few short weeks ago (more like last week) When the temperatures first start to go up, I usually want my food to not feel as heavy or my spices to be quite at warming (I am still all over curries and hot hot hot sauces in the summer). It’s like I have said before, I tend to change up my spices with the seasons.
So to give a lighter feel to a heartier squash, I busted out one of my favorite spices, the oh so lovely tarragon. It has a sweet, light, fruity and floral taste that pairs beautifully with the squash and onions. It give the dish a nice spring like flavor that will leave you feeling satisfied without wanting to move directly onto the couch and hide under a blanket. This is a eat and ride you bike kind of dish ( you don’t actually have to go for a bike ride if you don’t want to)
Note. If I had a grill, I would definitely cook this dish on it. As of now, I don’t own one so I am left to cook on the stove. But by all means, if you have a grill, do it up!
Half of a medium sized butternut squash (or use a whole one.. I had a half in the fridge that was waiting to be cooked) and one whole onion (two if you use a whole squash) Apple cider vinegar, olive oil, salt , pepper, garlic powder, and, last but not least, the oh so fragrant and tasty, tarragon.
Chop the onion and the squash into big chunks. If you don’t like the skin of the squash, you can peel it, but I like it so I don’t peel. Drizzle olive oil in a pan or a baking sheet, toss the veggies in and add the garlic powder, tarragon, salt and pepper and a few splashes of apple cider vinegar. Toss around. Stick into oven at 425 degrees for about 30-40 minutes. When the squash is tender and the onions are cooked, remove from oven.
I am pretty sure you can figure out the rest.
Happy day!
-C
Tarragon Butternut and Onions
Half of Medium Butternut Squash
1 Large Onion
1 Tablespoon Dried Tarragon (use fresh if you have it.. 2 tablespoons)
2 Tablespoons Apple Cider Vinegar
1 Teaspoon Garlic Powder
Salt ans Pepper
Olive Oil
Chop squash and onions into similar size pieces. Toss in a skillet or on a oiled baking sheet and add the rest of the ingredients. Toss around and place into a 425 degree oven for about 30-40 minutes or until squash is fork tender.
Remove from oven and eat.
Make as a side dish or add to a salad. Eat as a light lunch, or a midnight snack… eat it however you want.
I can’t stop eating these. They are like little balls of crack and I am an addict.
Frozen peanut butter grapes… I mean, I just can’t stop.
So you say you have never frozen your grapes? Well you should. It’s the only way I like to eat them anymore. I was never a huge grape fan, but one day long ago, I discovered the wonder that is the frozen grape and it is amazing, Now whenever grapes are on sale at the grocery store, I buy way to many and end up filling our tiny little freezer with jars and bowls of grapes. Then whenever the mister goes to grab the bag of frozen peas for his sore back or knees, there is almost always a frozen grape avalanche. Why I don’t put a lid on those containers is even a mystery to me. Oh, now I remember.. I want easy access.Oopen the freezer, grab a few grapes, and go on my way… not having a lid to take off makes the process a little easier.
Then one day, the frozen grape game turned into something else, something a little more decadent and even more addicting. Where it came from, I do not know. Maybe it’s some subconscious throwback to a childhood full of peanut butter and grape jelly sandwiches, or maybe it’s just that fact that I think peanut butter can pretty much go with anything. But no matter why, I started dipping those frozen grapes into peanut butter and never looked back. And now when I have grapes, it’s all I want to eat.
I am warning you now, once you start making these, watch out, because before you know it, you will develop a frozen grape addiction too. And littles.. they are as easily addicted to these as well. I have seen kids that hate grapes go totally bonkers for these. Just so you know.
The stuff you will need. Washed and drained fresh grapes (green or red. I usually use red but the green were half the price and the red ones didn’t taste very grapie*) Creamy peanut butter, skewers, and a little bit of cinnamon or cocoa powder (optional)
*Note. When you are the store, try before you buy. You know what I mean, eat a few while shopping aground. I say this because not all grape are created equal. Some taste way better than others. I have bought grapes before that didn’t taste like anything or that have really tough skins, and those just piss me off, so eating a few will guarantee that your money is being well spent and that the grapes won’t disappoint you.
Ok, so now let’s make these bad boys.
Simple simple. Two grapes per skewer (or toothpick) Lay on a wax paper covered dish or pan and stick them in the freezer until frozen. When the grapes are frozen, melt peanut butter. Take a big glob and stick in a tall skinny cup or bowl and stick in the microwave or heat in a sauce pan and then transfer to a tall skinny vessel. Take frozen skewed grapes and, one skewer at a time, dip in the peanut butter. Cover with as much or as little of the peanut butter as you want and place on wax paper. If you are feeling feisty, add a sprinkle or cinnamon or even a dash of cocoa powder. Or, this may seem a little crazy, but garlic powder is so F*ing good.(it’s worth at least giving it a try) When all grapes are dipped, place back into freezer for another 10 minutes or so to let the peanut butter set up a bit.
Whenever your ready… Eat. And be so happy. And always keep a back stock of frozen grapes in the freezer. They are the best.
Keep it realz.
-C
Peanut Butter Freezer Grapes
the quantity is up to you, but I recommend making a shit ton!
Creamy Peanut butter (I use organic creamy from Trader Joes, or natural skippy)
Green or Red Grapes
Cinnamon and or cocoa powder (Optional)
Toothpicks or skewers
Wash grapes and skewer 2 grapes onto a stick. Place on a flat surface and stick into the freezer until frozen, which usually takes about an hour.
Once grapes are frozen, stick a big glob of peanut butter into a tall skinny vessel (Like a juice cup or a 4 oz ball jar) and warm to a liquid constancy in the microwave (about 30-45 seconds) or if you don’t have a microwave, stick in a sauce pan, warm on stove, and pour into a glass (what I do)
Remove frozen grapes from freezer and dip into melted peanut butter. Place on a wax paper line tray or pan and sprinkle with cinnamon and or cocoa powder, or not, or a few (whatever you want) and stick back into freezer for another 10 minutes.
Eat as many as you want… Make so many because you will become addicted!


 TGIF!!!! For reals, because Monday-Thurday were monster days. And now that its friday, I can dig a hole and hide in it until it’s at least 30 degrees with some sunshine. (I might never get to come out.)
 Simple lemon cake stuff. Flour, baking powder and salt whisked together, Sugar and soft butter in a bowl. An egg, some vanilla, milk, and of course, the lemon.
  Frozen bites ready for the chocolate coating… Bittersweet chocolate chips and a little bit of coconut oil. Melted together all nice and shiny smooth.
 Now dip and slather those bites in the melted chocolate.
  Fully coated and placed on a rack for the chocolate to harden. I ended up sticking the rack in the freezer for 10 minutes…They harder really fast in there.
 It’s Mother’s Day weekend which means that you and I and everyone out there should feel the slightest bit obligated to at least do a little something nice for your mom for the mere fact that you were borned. And really what better way to celebrate mom than with food… It really is the least that you can do. (I think mom’s also like flowers and cards and handmade pasta necklaces) My mom is defiantly about the food. (she has had her fair share or pasta necklaces) A many years back on Mother’s day, this sweet little girl (me) made her mother a special breakfast treat…blueberry scones. And ever since that day, for every freaking holiday, birthday, whatever day, my mother requests (demands) a batch of those scones. She is always saying that these are her favorite treat and that no one has ever made them as good as I do. (I guess that just reiterates that I am her number 1 child)
 The stuff. Flour, baking soda, baking powder and salt. A bit of sugar, vanilla, buttermilk, and butter (use vegan butter and nut milk if you want to make them vegan) And of course we need the blueberries which can be fresh or frozen. I usually use fresh, but the store I stopped at only had really big containers of fresh that were like $1000 dollars a piece and the organic frozen happen to be on super sale. So you know, the cheap in me won that battle.
  So into the bowl goes all the dry stuff; flour, baking powder and soda, salt, and the sugar. Give it a good whisk.
 Now dump the blueberries into the flour mixture. Toss them around to give them a coat of flour. Add in the buttermilk and vanilla and give a little mix until liquid is absorbed. We are trying to handle the dough as little as possible.
 Turn mixture onto counter. It’s very loose, but thats what it should look like.
  Very gently and with as little handling as possible, gather dough up, knead a few times till everything just comes together. Press dough into a disk that is roughly an inch thick…. and it doesn’t need to be perfect.
  Cut the disk into even sized pieces. Do 6 big, 8 normal, maybe even 10 smaller. Whatever size you like. (I did 8) Place the scones onto a baking sheet, using a spatula to transfer, and sprinkle the tops with a little bit of sugar. Into a preheated oven for about 20 minutes.
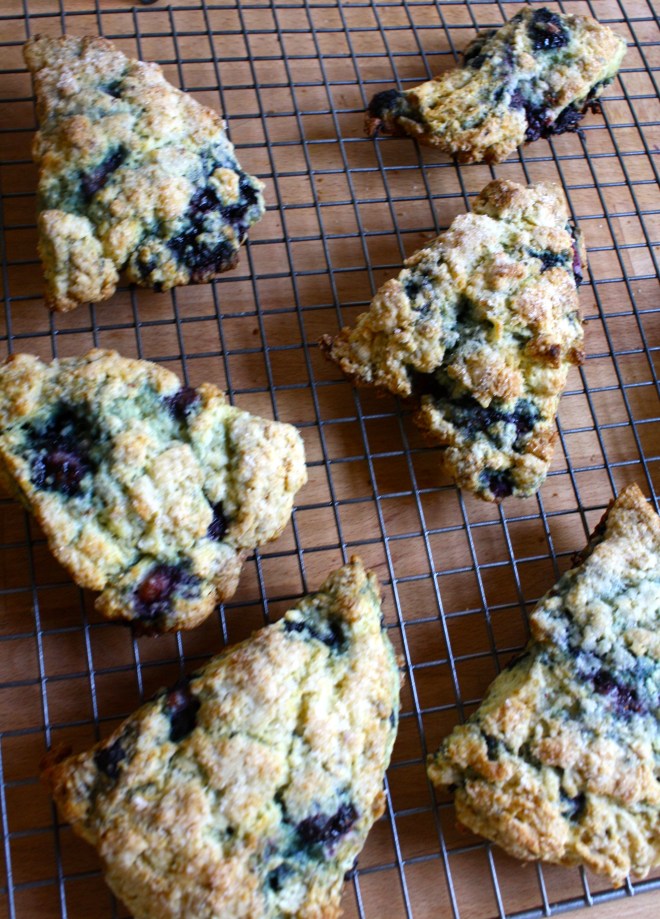 And when the scones look all nice and browned and a tester comes out clean. remove and either serve right away warm, preferably with huge cup of coffee or tea, or stick on a rack to cool before storing in air tight container.
 Spicy, crispy cauliflower… um yes please. I really like cauliflower. The mister loves it, or at least likes it better than any other vegetable. So when he asked for spicy cauliflower, well yea I am going to make it because I am so nice and really, could I say no to a veggie request? (I might have said no if it involved deep frying) Also, I found fresh cauliflower on sale! ($2.25) I don’t usually cook fresh cauliflower, but I figured at that price, it wouldn’t be bad to cook a head. (If I am cooking cauliflower, which I do a lot, I just use frozen….casue it be waaaay cheaper)
  The stuff. Cauliflower, chopped and broken into pieces. Corn meal mixed with salt, pepper, onion and garlic powder, and because I made this for the mister, parmesan cheese. And in the green bowl, srirsachi and a little oil.
  The cauliflower gets a coat of the hot sauce and then tossed around in the corn meal mixture. Handling as little as possible, place coated pieces on a lightly oiled baking sheet and stick those suckers in the oven for about a half hour, taking them out and flipping half way.
 And take them out of the oven when pieces tuned golden brown, stik them on a plate, and serve immediately.

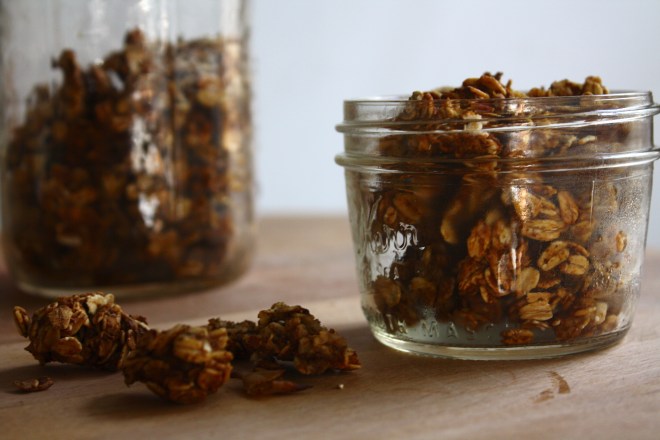 Chomp Chomp Chomp… The sound I make as I eat this freaking fantastic crunchy granola. You know it’s good when the person sitting next to you is annoyed by the sound of you face while eating. I eat a lot of crunchy stuff. And I am pretty sure I annoy the mister a lot.
 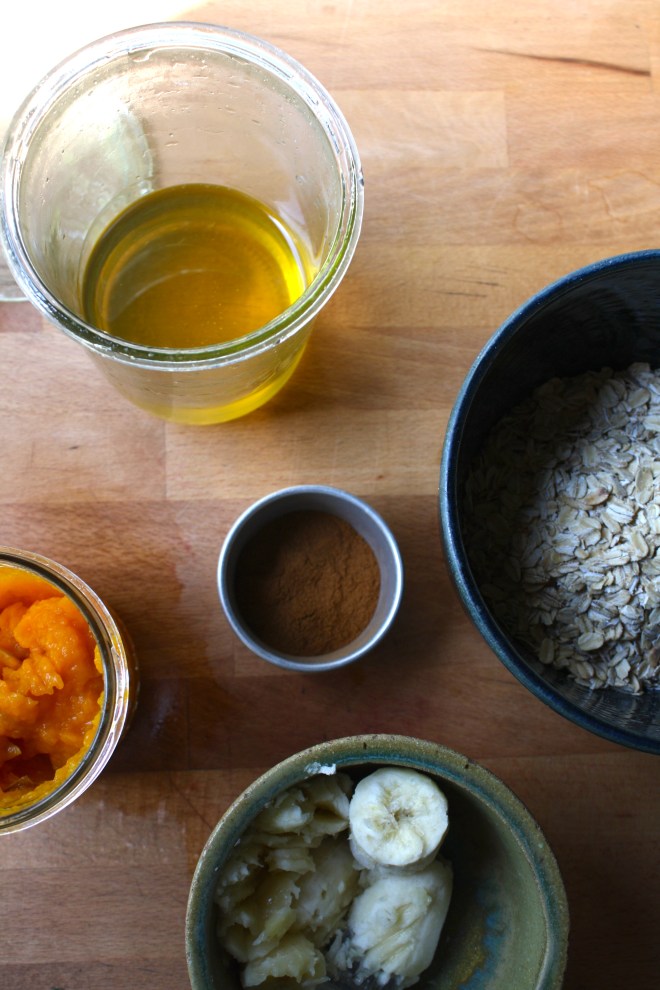 The simplest of stuff. 1 smashed banana, a cup of pureed butternut squash, Vietnamese cinnamon*, honey, and old fashion oats. (and a dash of salt, not shown)
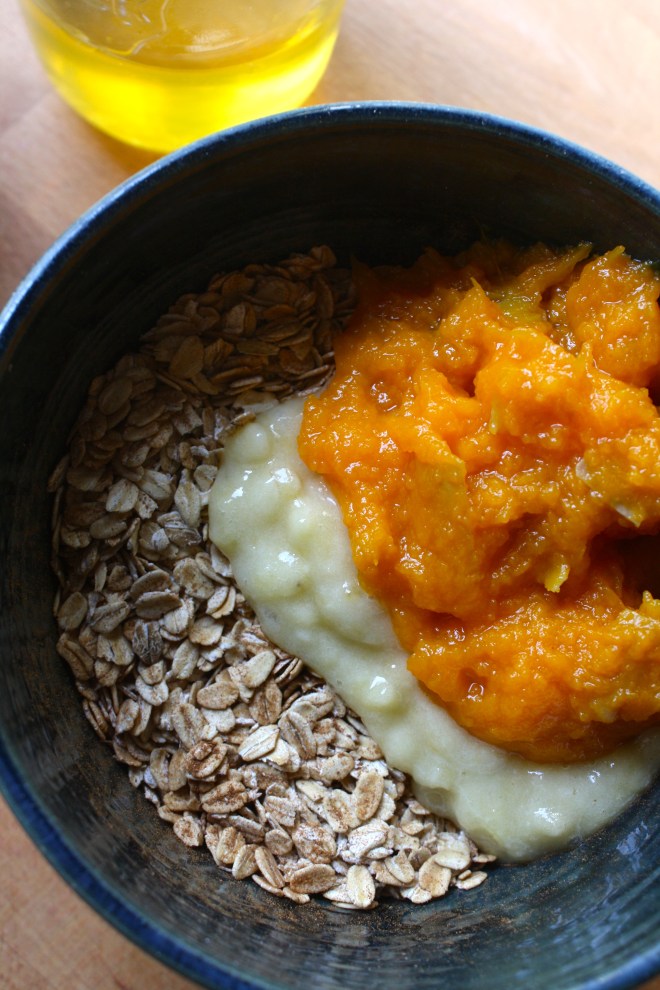 Toss the cinnamon and salt with the oats. Mix together the banana, squash and the sweetener and combine with the oats until full incorporated.
 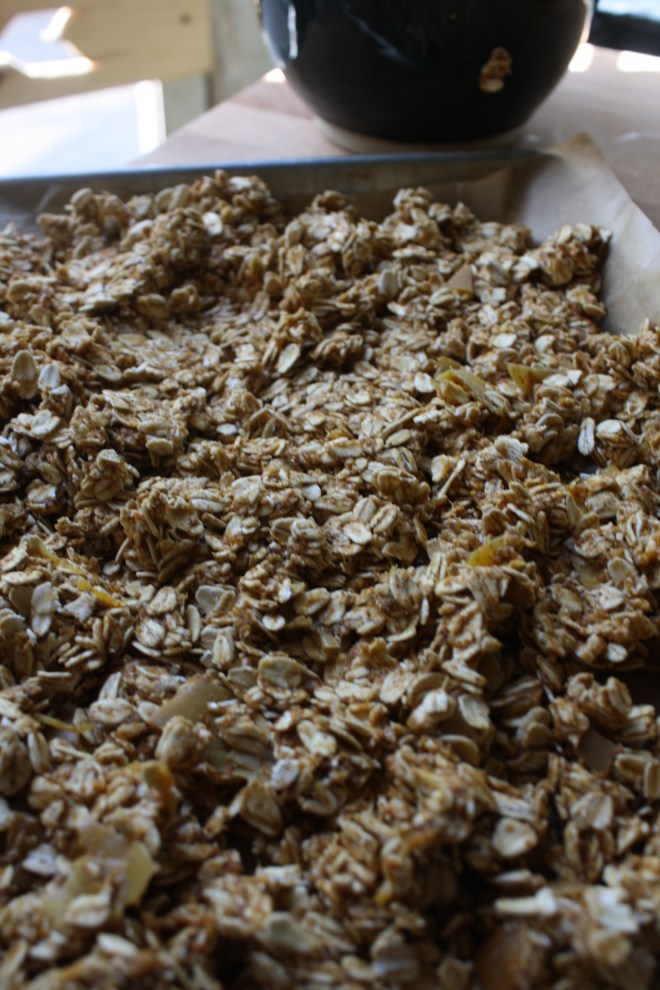 Dump the mixture on a parchment lined baking sheet and give it a little pat, you know, to settle all the bit and pieces together, all cozy and evenly spread out. Now stick into a preheated oven and after about 20 minutes, take out of oven and give the granola a toss, breaking apart any super big chunks or overly wet pieces. Put back into oven for another 20 minutes. (I like my granola super crispy crunchy so I cook it a little longer, like 30 more minutes)
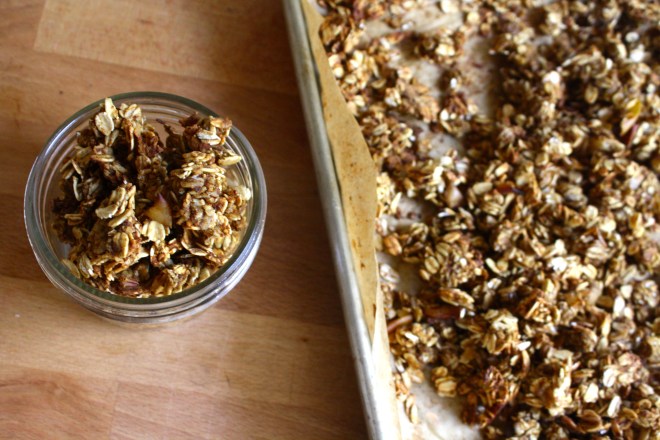 And when you are happy with the crunchiness of you granola, remove from oven and let cool, trying not to eat all of it while it sit’s on the counter looking all pretty and smelling like happiness.
  I know that it it spring, but I still have a winter farm share for another month and will be cooking and eating roots and squash until the summer share starts in early June. And I am good with that cause I love me some root veggies and butternut squash. But, yes, it is spring and my body isn’t craving the super hearty, rich foods that it was just a few short weeks ago (more like last week) When the temperatures first start to go up, I usually want my food to not feel as heavy or my spices to be quite at warming (I am still all over curries and hot hot hot sauces in the summer). It’s like I have said before, I tend to change up my spices with the seasons.
  Half of a medium sized butternut squash (or use a whole one.. I had a half in the fridge that was waiting to be cooked) and one whole onion (two if you use a whole squash) Apple cider vinegar, olive oil, salt , pepper, garlic powder, and, last but not least, the oh so fragrant and tasty, tarragon.
  Chop the onion and the squash into big chunks. If you don’t like the skin of the squash, you can peel it, but I like it so I don’t peel. Drizzle olive oil in a pan or a baking sheet, toss the veggies in and add the garlic powder, tarragon, salt and pepper and a few splashes of apple cider vinegar. Toss around. Stick into oven at 425 degrees for about 30-40 minutes.
  When the squash is tender and the onions are cooked, remove from oven.
 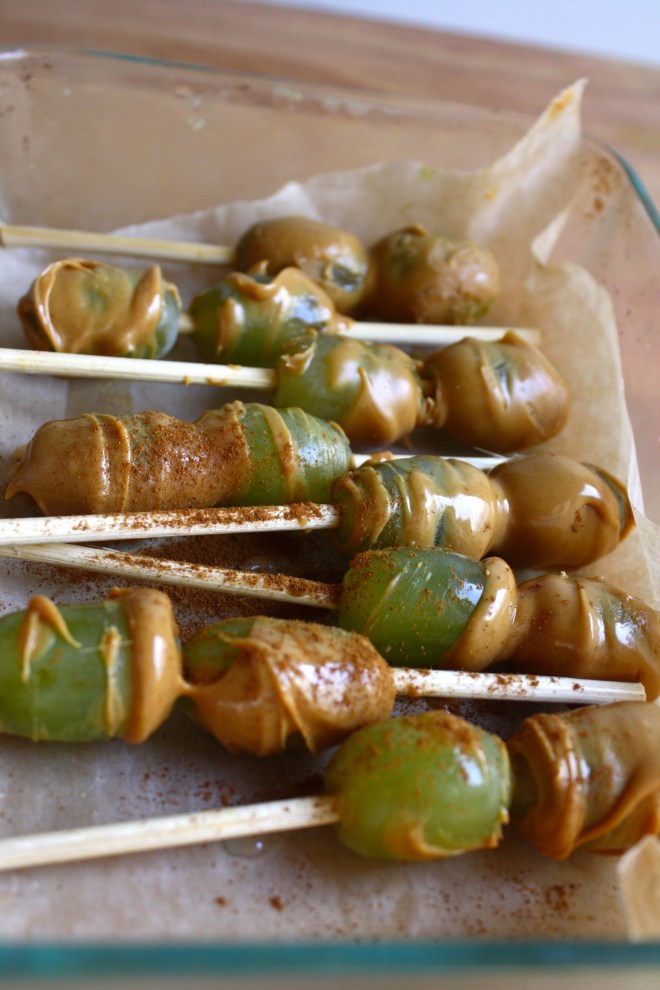 I can’t stop eating these. They are like little balls of crack and I am an addict.
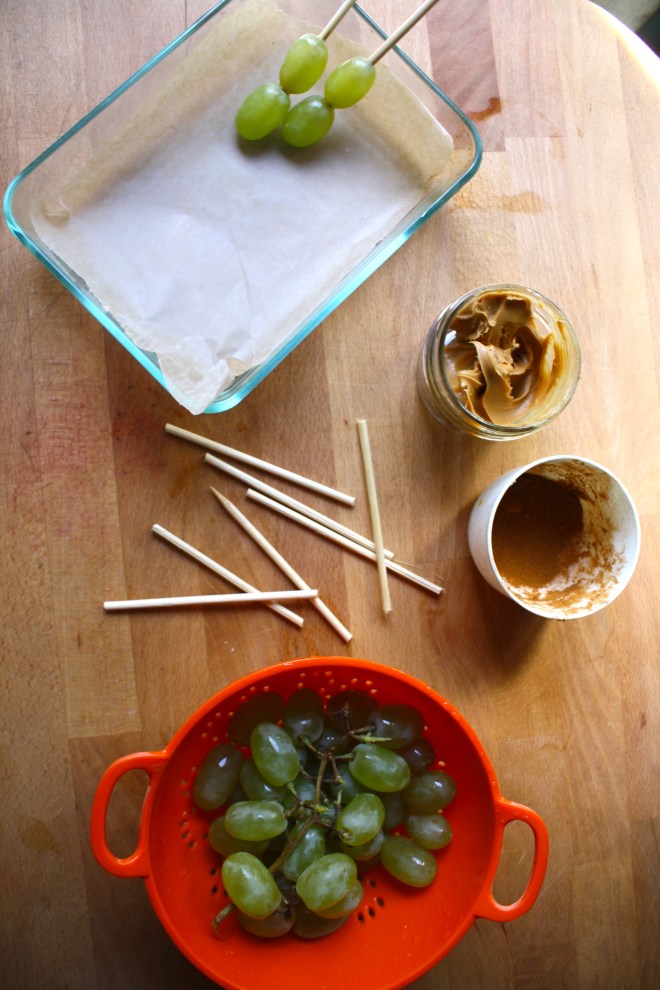 The stuff you will need. Washed and drained fresh grapes (green or red. I usually use red but the green were half the price and the red ones didn’t taste very grapie*) Creamy peanut butter, skewers, and a little bit of cinnamon or cocoa powder (optional)
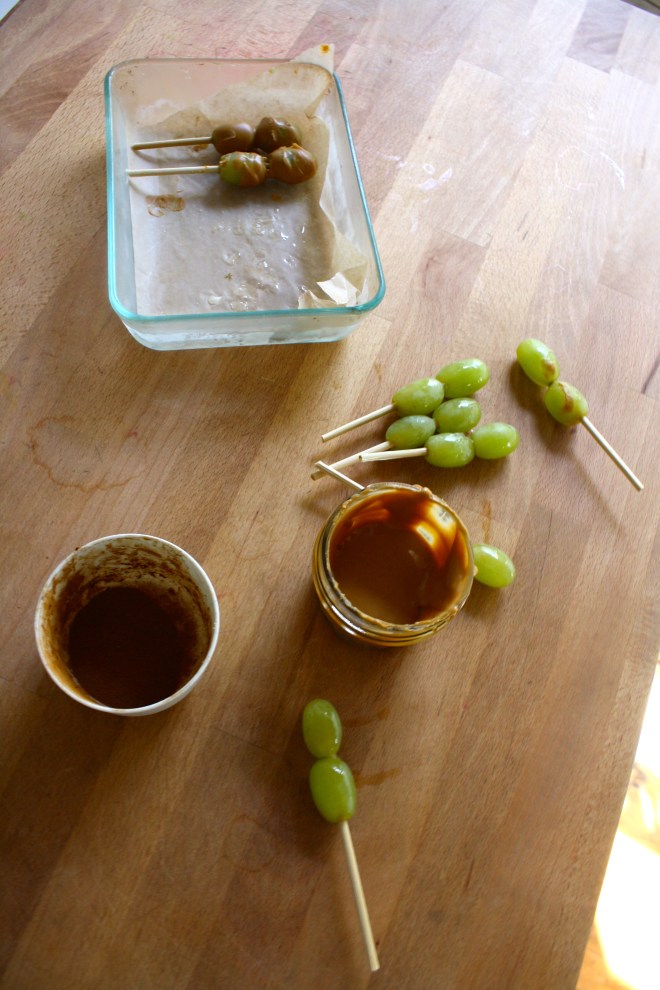 When the grapes are frozen, melt peanut butter. Take a big glob and stick in a tall skinny cup or bowl and stick in the microwave or heat in a sauce pan and then transfer to a tall skinny vessel. Take frozen skewed grapes and, one skewer at a time, dip in the peanut butter. Cover with as much or as little of the peanut butter as you want and place on wax paper. If you are feeling feisty, add a sprinkle or cinnamon or even a dash of cocoa powder. Or, this may seem a little crazy, but garlic powder is so F*ing good.(it’s worth at least giving it a try) When all grapes are dipped, place back into freezer for another 10 minutes or so to let the peanut butter set up a bit.
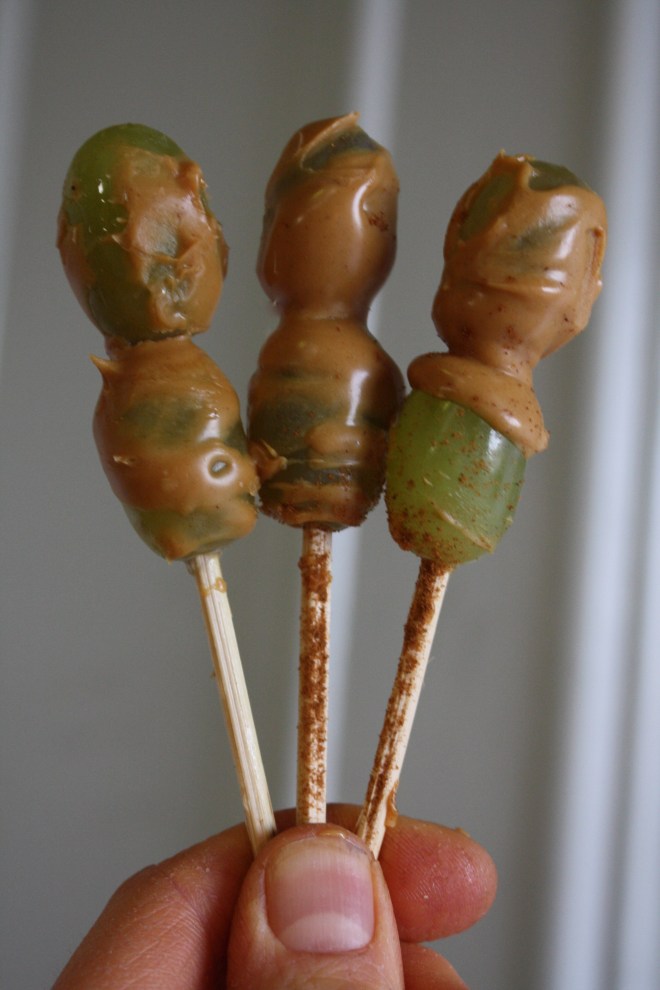 Whenever your ready… Eat. And be so happy. And always keep a back stock of frozen grapes in the freezer. They are the best.
THE LOVELY CRAZY
September 19, 2015 by maximios • Blog
I probabaly have already told you, but August is for sure my favorite month of the year (well,one of my favorites)
There is bounties of bounties of fresh, sweet and colorful, oh so juicy, crispy crisp, just so f ing amazing, produce exploding all over the place. I have probably gained like 75 thousand pounds in the past month due to all of the fruits and veggies that I have been consuming. I am starting to consider it a full time job just to keep up with the eating.
Another reason why I love August so much is becauuse the days are still nice and warm, but the nights are starting to cool which means I get to make so much soup!!!!!.
This soup is the freshest freshy soup yet. Everything is from the farm and or the garden (except the salt pepper, vinegar and oil), some picked within hours of me making this.
. I am a lucky/spolied veggie brat.
Anyways. This soup. The fresh tomato base gives it a sweet, slightly acidic kick. So super creamy due to the lovely earthy stocks of the chard. Slightly spicy and earthy from the arugula* and chard green green. This soup… it just tastes so fresh and clean, yet hearty and satisfying. A perfect soup for a mid August night, eating outside, watching the sun slide behind the mountains and the temperature dropping just enough that you might want a light sweater. Or you can just eat it from the pot in the kitchen while watching TV. It’s good eating anyway you want.
*Here in America, it’s called arugula. Else where , it’s called rocket. I wish we all called it rocket, although I do like the name arugula, but for like my first born child or maybe a pet goldfish. Anyway, rocket is arugula, or vice versa.
Soup time!.
The stuff. Some big fresh tomatoes, a few stalks of chard, and a few handfuls of arugaula (aka rocket). A couple carrots, an onion, some garlic, salt and pepper and a bit of olive oil.. Oh, and I added some balsamic vinegar, which for some reason didn’t make it into the picture (sorry vinegar)
Start by removing the chard leaves from the stalks. Set aside leave with the arugula. Chop up the carrot, chard stems, onion and garlic and toss into a big pot with a drizzle of olive oil, a splash of water, and a sprinkle of salt and pepper. Stir around and stick o nthe stove on medium heat for about 10 minutes until the veggies start to soften up.
Now chop up the tomatoes into chunks and toss those right into the pot with the other stuff. Add in a few cups water and a few glugs of balazmic vinegar. Bring everything to a boil and then turn heat to medium low and place a lid on pot and let cook at medium heat for another 20 ish minutes, or until the tomatoes are falling apart.
Now that everything is all cooked up, blend it up.
And now take the chard leaves and the aruglula and chop into little pieces….into the pot they go.
Mix it all up.. and take the blender to the soup again….if you want a smaller sized bite.
Soup Into bowls..Then into mouth.
Happy August!!
And hey hey hey.. Have the best weekend!
-C
To start, remove stalks of chard from leaves and chop stalks, onion, carrot and garlic into chunks and place int a big pot with a drizzle of olive oil, a splash or water, and spinkle of salt and pepper. Place on stove on medium low heat sand cooke the veggies down until starting to soften and garlic is becoming fragrant. While that cooking, remove core from tomatoes and dice them up. Toss into pot with the cooked down veggies with the vinegar and water. Place a lid on the pot and let cook for about 20-25 minutes or until the tomatoes are falling apart.
When cooked, using with a hand blender or a normal blender, blend the soup until smooth. (if using blender, pour back into pot)
Now take the arugula and chard leaves and chop them into wee little picese and mix into soup. If you want to, blend the greens into the soup.. but not until smooth, unless thats what you want. Cook for another 5 minutes. Taste and season with more salt and pepper to taste.
Ladle into bowl and serve with lots of fresh cracked pepper, maybe a little balsamic drizzle or even some mustard (I at left overs with mustard and it rocked my world)
spoons work eel las eating utencils.