I was informed yesterday that if I was going to make tortilla chips, that I better make some sweet ass dips to go with them. I kind of agree… tortilla chips need dip… or better yet, two dips. Queso and guacamole. It’s what needed to be done, and so I did it.
Guacamole is amazing… anything avocado is amazing…this guacamole is amazing. White bean guacamole is amazing. And not that we really care, but this guac is half the fat then straight up guacamole. Plus it’s packed full of protein making it a kind of super duper, must eat all of it, kind of dip. And sweet potato anything will make me happy. Making queso dip with sweet potato and cauliflower is probably one of my best food combos so far. (after eating a butt load, I felt like I was a genius and made an amazing discovery) Again, not that we need it to be, but this is also a fat-free, vegan, gluten-free, super healthy, packed full of B12, fiber and nutrients, dip for all kind of dip.…. just another reason why you cannot feel bad when you finish off half a batch before you get a chance to stick it in a serving bowl. (I might have done that)
Here is what you need for a good time:
−These tortilla chips ….Check.
−Some Chopped Veggies (I want the veggies)…..Check
−Cauliflower Sweet Potato Queso.…Check.
−White Bean Guacamole…Check.
You are now ready for it. It being this party, that party, the Super Bowl, or a Wednesday afternoon.
To the left we have the makings for the cauliflower sweet potato queso.. Steamed cauliflower, a baked sweet potato, nutritional yeast, garlic, and chopped up red onion, red bell pepper and jalapeño. To make all you need to do it take the chopped peppers, onion, and garlic and sauté for a few minutes just to slightly soften and bring out flavors. While that’s going on, take the steamed cauliflower and sweet potato(skin off..but eat it, or save it for soup or feed it to the dog) and puree together with a blender or food processor. Add in nutritional yeast, about a tablespoon or two of hot water and, salt and pepper to taste. Blend for about 5 minutes until super creamy smooth. Add in sautéed stuff and pulse just enough to incorporated the veggies but not complete blend in. Stick in a bowl.
To the right we have white bean guacamole stuff. Two cups (or one can) rinsed white beans, one ripe avocado, a lime, a few cloves of garlic,(I also added a bit of garlic powered…I like my garlic) and some chopped up red onion and tomato. Place beans, garlic, avocado and lime juice in a blender or food processor and blend until smooth. Add salt to taste and toss in the chopped tomato and onion. Blend for sec to mix that in…Stick in a bowl
Perfect…
To think that both of these dips took about 10 minutes total to make. (I had pre baked the cauliflower and sweet potato) And for real, I would spend much more time if I had too because both of these dips are so freaking good, I definitely will be making these on the regular.
So there , dips for those sweet ass chips or whatever you want to dip or them spread them on.
And he guys…It’s FRIDAY! Have a fantastic day!
-C
White Bean Guacamole
2 cups white beans (or 1 can) rinsed and drained
1 ripe avocado
3 cloves garlic
1 lime
1/4 small red onion
1 small tomato
1-2 teaspoons salt
Finley chop onion and tomato. Set aside. Place the beans, avocado, garlic, garlic powder, 1 teaspoon salt and the juice from one lime into a blender or food processor and blend until smooth. Add a splash of water if needed to help keep things moving. Taste and add more salt if needed. When smooth, add the onion and tomato and pulse a few times to mix in. Scoop into a serving dish and finish with a squeeze of lime and a bit of chopped onion and tomato.
Cauliflower Sweet Potato Queso
1 1/2 cups pre cooked steamed or roasted cauliflower
1 medium pre baked sweet potato
1/2 cup nutritional yeast
1-2 tablespoons hot water
1/2 a small red pepper
1/4 small red onion
1 jalapeño
3 cloves garlic
salt and pepper
Finely dice the red pepper, jalapeño, onion and garlic and sauté in a skillet for a few minutes until slightly soften and fragrant. Take the pre-cooked cauliflower, sweet potato (skin removed), and nutritional yeast and place in a blender or food processor. Blend for about 5 minutes until creamy and smooth. Add in a tablespoon of water to keep things moving. When completely smooth, add in sautéed veggies and pulse a few times to combine. Scoop into a serving dish. If your feeling it, top with scallions and cracked pepper.
Serve dips with chips, veggies or anything you want. Also make great spreads for sandwiches and crackers too!
Maybe you, like me, went a did a little strawberry picking this past weekend. And maybe you, like me, pick so so many that now you have an overload of the most perfect, if not slightly too ripe strawberries staring at you, waiting to be eaten or, at the very least, cooked into some magical cake, pie, cookie, or whatever. But lets face it, its Monday and maybe we do not exactly feel the need (or have the time) to make a cake, pie, cookie or whatever tonight. So that leaves us with a crap load of strawberries that need to be dealt with.
And sure, we can freeze them, but maybe you, like me, already have a freezer full of other stuff. And just because we don’t want to bake a cake, pie, cookies, or whatever tonight, doesn’t mean we don’t want something amazingly tasty and fantastic.
So that brings us to this super easy, oh so pretty, and ever so tasty way to move those strawberries….. Stick them in the oven and roast them. So simple and really truly amazing. When strawberries are roasted, they turn so tender and fall apart and release all of their juices that turn into a sweet syrup. They become almost jam like, but the flavors are way better, more complex. And there is no need for added sugar or any other stuff because the flavors and natural sweetness of the roasted strawberries stand on their own.
A few ways to which you might want to use roasted strawberries that will make your life better: Dump onto ice cream, yogurt, or make a strawberry shortcake or a strawberry fool. Scoop onto a green salad, mix into a bowl of quinoa, marinate some tofu, or add to roasted veggies. You can mix into muffin batter, into oatmeal, or add to a layer cake. They make a fantastic PB and J and the syrup in seltzer is a tasty drink. You can pretty much use them for anything. But MY favorite way to consume these…a bowl, a little spoon, and my mouth. Nothing else needed.
And if you didn’t happen to go strawberry picking this weekend. It’s cool, just pick some up from the closest farm stand near you. You can tell all your anyone thats asks that you picked them yourself. (not a lie, just a stretch cause you did, in fact, pick them up yourself)
Yea for Monday and for roasted strawberries! (Or at least yea for strawberries.)
All you need…A big (or small) bowl of strawberries.
Rinse those pretties and place them on a parchment lines baking sheet. (don’t skip parchment… these suckers get super thick and juicy.)
Here is the thing. These strawberries are picked from the lovely farm I get my CSA from.(How badass is it that we have a PYO part of the share). They are not like super market berries that are extra firm with dirty unappealing green tops. These little organic lovelys have tender little green tops…. I eat them. If you do not wish to eat the greens, just top the berry off before roasting.
So the berries, stick them in the oven at 450 degrees and roast them for about 35-45 minutes (depending on the size of your berries)
Pull them out when they start to get dark and slightly charred and the juice is thick and bubbly.
And scrap the berries, juice and all, right into a jar.
Eat with anything, everything and with nothing at all.
Happy Monday
-C
strawberries of any quantity
Place strawberries, with or without tops (your preference) on a parchment lined baking sheet. Place in a 450 degree oven and roasted foe about 45 minutes or until the berries are soft, mushy, starting to charr and have lots of bubbly juice, . When done, remove from oven and let cooll for for about 5 minutes. Transfer berries, juice and all, into jar.
Eat right away or stick in fridge. Juices thicken up when cooled.
Keeps about a week in fridge, but I highly doubt it will last the night.
And for your Friday, I made these awesome little raw/ vegan/ gluten free cookies.
Now wait a minute. Don’t let all the labels of what is not in these cookies scare you away. Just focus on all the stuff that these cookies are made of. Almonds, Cashews, Coconut, Cocoa, Oatmeal. They are cookies made with lots of good yummy stuff that just happened to be enjoyed by those with specific food diets as well as those who eat anything. A cookie for all! See, don’t they sound excellent? Yes, yes they do. And they are good. So, so, good. Even the mr. is into them. And he is far from being raw/vegan/ gluten free.
And because these cookies are made with all sorts of good for you stuff (lots of proteins, good healthy fats, and complex carbs) you can pretty much feel zero percent guilt eating them. They a are a no joke, healthy, energy packed cookies of goodness. A fantastic way to start the morning, eat with lunch, as dessert, post work out, or eat as a late night snack. (Just don’t eat them all at once)
Now go for it!
The raw stuff. A cup of old fashion rolled oat that have been soaking in water for about an hour. Almonds(which I spent 20 minutes deshelling) cashews, dehydrated coconut flakes, some cocoa powder and a few medjool date. If your nuts are unsalted, add a pinch of salt too.
Dump everything into a food processor. BUT WAIT! Make sure to remove the pits from the dates)I have broken a blade in the past form a date pit)
Blend unit combined and a kind of rough dough is formed. It will be a little sticky. If it;s to sticky to handle, place into the fridge for a few minutes to set up.
Now take blobs of mixture and roll into balls
And you could totally leave them as balls… you can even play with your balls….
But I think they look nicer squished flat and topped with pieces of nuts and coconut. They look almost fancy, if I do say so myself.
Now have yourself a cookie, and place the rest in the fridge (they get harder and, if you can imagine, taste even better after a few hours of cold)
Freak Yeah FRIDAY! Do fu stuff!
-C
Makes 15 normal sized cookies (you can make more or less, depending on the ball size)
1 cups oat fashion oats soaked in 1 cup water for at least an hour (use gluten free oats if needed)
1/2 cup raw almonds
1/2 cup raw cashews
5-6 medjool dates
1/2 cup dehydrated flaked coconut
1/4 cup cocoa powder
a pinch of salt (if your nuts are unsalted)
Add all the ingredients into a food processer and blend until the mixer forms a cohesive dough. It;s going to be a tad sticky, but if it seems to sticky to handle, refrigerate for a little bit so it’s easier to handle. (I have no problem handling right away)
Scoop and roll into balls and either leave them as is or squish them flat. Sprinkle with chopped nuts and coconut
Eat one or two right away, then stick the rest in fridge.
A ok to eat as breakfast, with lunch, at dinner, as as snack, a post workout protein, or when sitting on the couch and watching TV.
This week started with the notion that I was going to make a big dish of potato salad. I boiled the potatoes so that they would be ready when I needed them and stuck them in a bowl in fridge. That was Sunday. Monday was super busy and I didn’t get a chance to get to the potaoes, but that was ok, I figured I would just make it the for Tuesday. (which has officially been dubbed family dinner night). But for the first time, my sister declined potatoes and said she was already making goulash, which turned out that no one really wanted to eat. (I bet they would have eaten the potato salad) And Wednesday we were in Montreal so no go there.
So last night (now Thursday) when I opened the fridge to contemplate the dinner options, I knew that whatever I was going to make, the potatoes had to be used. I could have made the potato salad that I had been planning on making all week, but the potaotes were a little on the weird side, not bad, just not the best. They needed to be cooked. Plus, I had eaten the avocados and tomatoes that I had planned on using for the potatoes so I think it just wasn’t meant to be. I was tired, so nothing to elaborate was going to happen. I wasn’t feeling like spending too much time in the kitchen cause I really wanted to bike to the garden. I already had my giant dinner salad made and the mr. was pretty hungry, so split decision.
Cheesey nacho potatoes
That mr.. he has got it made with me.
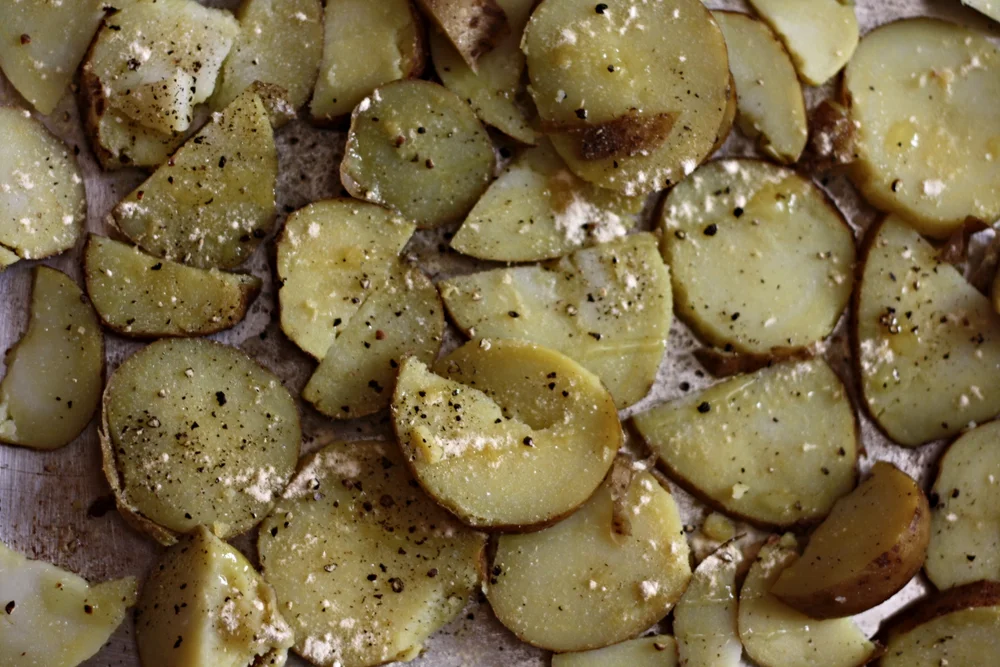
The stuff. Sliced up cold boiled potatoes, cheese, garlic and onion powder, salt and pepper. and a little bit of oil. And we need guacamole, salsa, something spicy in the form of jalapeño jam (I use it on everything!) and a bunch of fresh cilantro.
Spread the sliced potatoes on a lightly oiled baking sheet and drizzle with a tad bit more oil. Sprinkle with the spices and salt and pepper and pop those suckers into the oven.
Once the poatoes turn a golden brown and are all crispy, remove from the oven and sprinkle on the shredded cheese. Toss on a few spoonfuls of salsa, and add on the jalapeños. Pop back into the oven for another minutes or two until the cheese is all melty.
And cover the potatoes with lots of freshly chopped cilantro.
Serve with extra salsa, guacamole and if you have it, more jalapeño jam.
I was thinking that I would totally make these for my dad this Sunday, if he didn’t live all the way in Michigan. (I think it’s time to move back!!!)
Happy Friday..Have an excellent weekend!
-C
4-5 boiled potatoes the size of lemons (or 2 big ones)
1/2 to 3/4 cups shredded cheese (I used cheddar and can easily be made with vegan cheese)
heaping teaspoon garlic powder
heaping teaspoon onion powder
salt and pepper
olive oil
salsa
fresh cilantro (or if you hate it, some kind of fresh herb)*
guacamole*
jalapeños (or something spicy)*
*note.. These last three ingredients are optional, but you should definitely use them all.
Turn the oven on to 425 degrees
Thinly slice potatoes and place on a lightly oiled baking sheet. Drizzle with a bit more oil and sprinkle with the garlic and onion powder, salt and pepper. Stick into oven until potatoes are brown and crispy. Remove from the oven, sprinkle on the cheese, toss on the jalapeños and some globs of salsa. Place back into oven for a minutes or two or until the cheese is all melty.
Remove from oven and cover with a handful of freshly chopped cilantro.
Serve with more salsa, guacamole, and more jalapeños.
If eating all yourself, eat directly from baking sheet or if sharing, transfer onto a plates. (or eat from the baking sheet..less dishes, more conversation) Forks and fingers work equally.
Last week I bought this nice hunk of locally made tofu to bring to my sisters for dinner. I was planning on making T.A.L.T.’s, but when I told her what I planned on making, she turned it down. She asked, ” is there bacon with that? If not, I don’t really feel like tofu”. And I was like, “No there is not F**king bacon….. when did I mention bacon?”
We still went over for dinner, Just me,her,and the Mr. I brought myself a big salad. The other two ended up eating a frozen pizza and blue cheese dressing (I think they might have eaten dressing with a little bit of pizza…barf) But whatever, her lose, cause I made the T.A.L.T.’s a few days later. They were amazing (the tofu was soo good!) and I am pretty sure she would have loved them. Oh well, now she will just have to make them for herself if she ever decided to she wants one.
So here.. To everyone and to Shannon….. How to make a T.A.L.T. .. There is NO BACON!
The stuff… Some nice firm tofu, half a ripe avocado,lettuce (I used baby greens), and some sliced up fresh and tasty tomato. To spice up the tofu, we use galic powder, salt pepper, and a nice smokey paprika. Oh.. and a big hunk of a soft and crusty baguette to stick it all in.
To get this TALT going, thinly slice up as about a 1/3 of a block of tofu. (for one sandwich) Or slice up the whole thing to make more sandwiches.
On a plate or in a bowl, mix together the garlic powder, paprika and a little salt and pepper. Gently dredge both sides of each piece in the mixute.
Paprika is so bright and pretty.
Place the tofu in a lightly oiled and preheated skillet on medium heat. Cook each side until crispy and golden brown.
Slice you bread open and toast if you want. Scoop avocado onto the bread( a little on both sides). Add the tomato and the seasoned tofu and last but not least, pile on the greens.
TA DA! A Sandwich… a damn good one at that .
-C
Makes on 6-8 inch sandwich
1/3 block of extra firm tofu*
1/2 of a ripe avocado
1 small tomato thinly slices
a handful of baby greens or a few lettuce leaves
A 6-8inch hunk of a soft and crusty baguette (use a gluten free bread of choice if needed)
1 tablespoon SMOKEY paprika*
1 tablespoon garlic powder*
salt and pepper.*
*Note.. This is enough for one sandwich. If making more then one, use the whole block, or even if you not, you might as well cook the whole thing for and have some extra for later use. If you do cook it all, just add another tablespoon or so of the paprika and the garlic powder.
Remove tofu from package and stick between a clean dish towel. Press as much liquid out as you can without smooshing it. Cut tofu into 1/4 inch thick slabs. Mix the spices with a pinch of salt and pepper in a shall bowl or plate and dredge both side of the tofu in the mixture. Lightly oil and preheat a skillet to medium heat. When the tofu is seasoned, stick onto skillet and cook each side until crispy and brown. Remove from heat and let cool for a minute. (If you like you tofu a little more on the crunchy and dried out side you can stick the tofu in the oven for a few minutes)
To assemble. Slice bread, toast if you want. Place equal amounts of avocado on each side of bread. Layer on the sliced tomatoes, the cooked tofu and add on the greens. Close up sandwich and place on a plate.
Bite, chew, swallow.
Smile
You ever make dish, completely on the fly, just to use something up (I have a lot of ripe tomatoes) with no real expectation, just because… Then have it be one of the best freaking things that you have ever made? This salad is one of those things.. maybe not the best thing I have ever made, but definitely the best salad I have ever made…. this week.
A salad compiled of all things amazing, taking just a few minutes to make and is the perfect balance of uber fresh with baby spinach, raw kale, and crunchy quick pickled onions. Then adding a touch of warmth with the sweet and juicy seared tomatoes and big chunks of creamy avocado.
I mean, for reals. ……Best Salad Ever !!!! (this week)
Now let’s do this.
The Stuff. A big bowl of baby spinach and chopped up kale, a few sliced up roma tomatoes, some super thinly sliced red onion, half an avocado, red wine vinegar and salt and pepper. Before you do anything, place the sliced onions into bowl, sprinkle with a pinch of salt and add a few glugs of the red wine vinegar. You want the onions to sit in the vinegar for at least 5 minutes on the counter cause the longer they sit the more crispy pickly they get. (after eating onions like this, you will never want to eat them any other way) Lightly oil a skillet and preheat to a medium heat. Once the skillet is hot, sprinkle the tomato slices with salt and pepper and place tomatoes right on in, snugly, but not overlapping. Let cook for about 3-4 minutes, or until the bottoms start to brown. Flip and cook other side for another few minutes.Once the tomatoes are seared on both sides, remove them gently from skillet and toss them on top of the bowl of greens.
Take the pickled onions and toss those right on top, with any of the residual vinegar, add dice and scoop the half of avocado and toss that on in as well.And now eat the best salad ever (this week).
Make the day good!
-C
Skillet Seared Tomato and Quick Pickled Onion Salad
Serves 2 as a side, 1 for a hungry eater
2 large or 3 smaller roma tomatoes
1/2 of a red onion
2-3 tablespoons red wine vinegar
1 1/2 cups baby spinach
1 1/2 cups chopped kale
salt pepper
1/2 a ripe avocado
olive oil (to grease pan)
Thinly slice red onion and place in a bowl. Add vinegar into a and sprinkle with salt. Let sit on counter for at least 5 minutes, if not longer,
Slice tomatoes into 1/2 inch thick rounds and sprinkle with a pitch or salt and pepper. Lightly oil a skillet and preheat it on medium heat. Once the skillet is preheated, stick the tomatoes on it (watch out for splattering tomato juice) Cook first side for about 3 minutes or until the bottom has browned, then flip and do the same for other side.
One tomatoes are seared, place directly onto the greens. Now dump the pickled onions and residual vinegar on top. And dice up avocado and add that on top too.
Now eat your salad, fork or fingers…
And I know, ba-daaaamn. So good.
A couple of days ago, during a grocery store porous, I stumbles upon a produce item that I have not seen sold in stores before, Broccoli leaf. And I was kind of surprised to see that they were selling bunches of the leaf, organic, at 2 bucks a bunch. I was very excited ! But wait.. You can eat broccoli leaves? Heck yes you can! Broccoli leaves are fantastic. They taste kind of like broccoli, have a hearty texture like a collard, and can be used raw or cooked just like any other green. Its just one more super yummy green to add to your repertoire. So when I bring home something that I find to be a good score, like a bunch of broccoli leaves, I feel like I have to share it with the mister. (I am so nice) And this dish was how I shared them…. Tossed into a bowl of garlic raging pasta. The stuff…. A bunch of broccoli leaves, lots of garlic, pasta, olive oil, salt and a lemon. Pretty simple right? Fist off, get your water boiling for the pasta. Once its ready, drop a pinch of salt into the water and stick pasta in for the amount of time recommend by pasta box people. While the pasta is boiling, mince up the garlic (I used my garlic press) into a skillet and add in the oil. Stick on a burner on medium for a few minutes, stirring around to make sure the garlic doesn’t stick and burn. Once you start to smell the garlic, turn heat onto low, chop up the broccoli leaves (stems and all) and stir around until wilted and add in the juice of half a the lemon.When the pasta is cooked, remove a few tablespoons of starchy water and strain the noodles. Add water and pasta right into the skillet with the other stuff. Toss around, taste, season with salt and pepper. Go ahead and add some chopped tomato and or parmesan cheese if you want. And serve your amazingly amazing pasta. And make sure that you are ok with really smelly garlic breath…Casue it’s going to happen. Keep it good! -C
2 servings of your favorite pasta (spaghetti, penne, vegan, gluten free…..)
8 or so fresh garlic cloves
1/4 cup olive oil
salt and pepper
lemon (optional)
parmesan cheese (optional)
Start by bringing a pot of water to a boil with a pinch of salt. Add in pasta and cook per instructions on box. While pasta is cooking, mined garlic and add to a skillet with the oil. Place on a burner on medium heat and cook and stir until the garlic becomes fragrant. Chop the broccoli leaves (stems and all) into bit sized pieces and add to the garlic oil and toss around to wilt the leaves. Squeeze in some lemon juice. Once the pasta is done cooking, remove a few tablespoons of the starchy water and strain the pasta. Add the water and the noodles to the skillet, toss to evenly coat the pasta and call it down. Serve in a bowl or on a plate, topped with freshly chopped tomatoes and parmesan cheese if you so shall please and another little squeeze of lemon juice if you like. Watch your mouth.. it will be breathing out garlic like whoa.
My contribution to last nights dinner at my sisters…. Freshy fresh veggies spring rolls.I had about 30 minutes between work and getting over to my sisters house to throw something together so it needed to be something fast, easy, and something I could make without going to the store. She was making the main course (some teriyaki situation and rice) so I was doing up the veggies.
I had just bought a package of spring roll wrappers…. Bingo! The perfect and logical choice. I grab the wrappers, a variety of veggies and after spending 12 of my 30 minutes trying to scrub the oil based paint off of my face and hands, I still managed to completely prepare, construct, and take pictures of these lovely tasty spring rolls. and get over to my sisters in time for dinner.
Impressed?
Damn right!
The stuff. Carrot, beet, asparagus, red cabbage, and kohlrabi, which all (except asparagus, which I just cut into thirds) got cut into matchstick sized pieces with my mandoiln. Then there are the rice spring roll wrappers that we need to make the veggies into rolls. Also a bit of red wine vinegar to drizzle onto the veggies for a little extra zing. And lastly, soy, fresh ginger, and a couple cloves of garlic for a spicy salty dipping sauce.Start by having everything set out and ready to assemble. Fill a large shallow dish or baking sheet with really warm water. Working with one at a time,place a rice wrapper into water and let sit for about 10 seconds or until the paper starts to soften. Remove from water and place on a damp surface (just splash a little water on the counter) Take a little bit of everything and and place on the lower middle part of the paper. Fold in the sides first, then tuck and roll the wrapper as tightly as you can without ripping the wrapper.
Repeat until you have used up all you veggies.For the dipping sauce. Finely grate ginger and garlic and add to soy sauce. Stir… and it’s done.Freshy, pretty and fantastically delicious. And for real, took about 8 minutes to make. (I even had enough time to wash the dishes before we left!)
I am so awesome!
Hump Day Pow!!!!!
-C
Fresh Veggies Spring Rolls
Makes 8-10 but can easily be increased or decreased to desired amount
8-1o rice spring roll papers
Splash of Red wine or rice vinegar
1/4 cup soy or tamari sauce
2 cloves of garlic
teaspoon freshly grated ginger
1 medium carrot
1 medium beet
1/4 head of purple cabbage
10 thin fresh asparagus
1 small kohlrabi
Note… I used the veggies that I had in the fridge at the moment. If you have a bunch of veggies but not these particular ones, use what you have. Pretty much all veggies taste good inside a spring roll!
Gather your veggies and prep by either using a mandolin, a grater, or some sick knife skills, and julienne, shred, or slice you veggies into thin match sticks. Once all the veggies are prepared, sprinkle a little vinegar over the top.
For the rolls…Grab a large shallow vessel (a rimmed baking sheet works great) and add in warm water. Working one at a time, place the wrapper into the water for about 10 seconds or until the wrapper starts to soften. Remove and spread onto a clean, damp work surface. Gather a bit of each veggie that you are adding and place towards the bottom middle of the wrapper. Now fold the sides in over the pile of veggies. Then with the side closest to you, tuck and roll wrapper away from you, trying to keep it tight, but not to tight that it rips.. (Hopefully that makes since.) Place finished rolls onto a damp surface to keep from sticking and if not serving right away, drape with a damp towel or paper towel to keep from drying out.
For the soy ginger dipping sauce. Add grated ginger, minced garlic, and soy into a bowl and mix together. Serve with spring rolls.
Eat one, two, or a plateful. It’s nice to share but not a necessity.

My winter farm share is coming to an end this week. One more pick and then a three week stretch until the summer share starts… WHAT AM I GOING TO DO!!! Stock up as much as I can is what.
I have been strategic about the roots and veggies that I have chosen to bring home the past few weeks.(My farm lets you pick what you want) I know what I can buy at the store, things like carrots and potatoes, so I have been passing those up, but the roots like beets and celeriac… I have been bringing home baskets of those and hoarding them in the fridge and basement in preparation for the laps in farm fresh food and knowing that if I want to by these at the store it s going to coast me a million dollars a pound. (a for real million dollars)
Yup, lots of roots around here, especially celeriac root which is fantastic. I am kind of obsessed with celeriac, with its fibrous, knobby exterior, soft but almost meaty texture inside, and a flavor that is close to celery but so much better. I don’t know why it has taken me so long to do a posting featuring this amazing root vegetable (I eat it almost every day)
So here, an amazingly tasty, hearty but not heavy, celeriac recipe. Perfect for spring and the change into summer…. Mustard roasted celeriac with an fanatic split peas gravy that will have you licking you bowl clean.
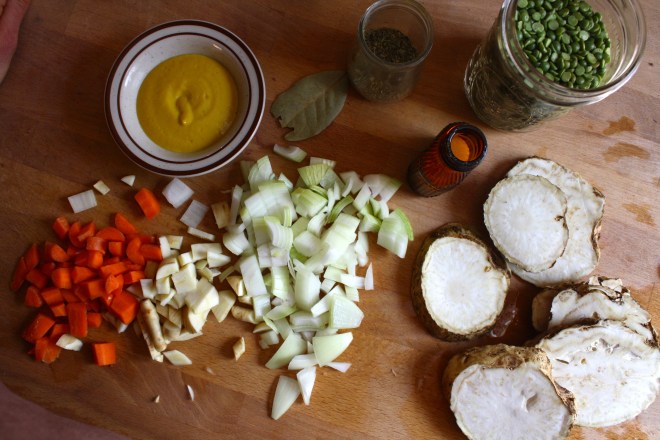
The stuff….For the split pea gravy we have a carrot, a parsnip and a large onion chopped into small chunks. Salt, thyme, a bay leaf and of course the split peas. Then there is the celeriac root* sliced into 1/2 inch thick rounds and some plain old yellow mustard .
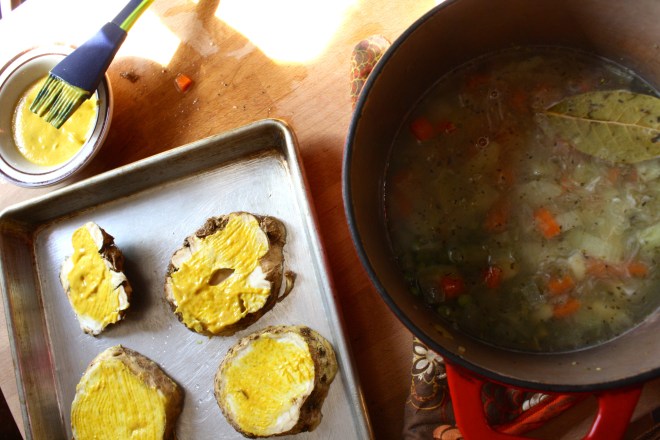
*Note. I don’t peel my celeriac root. I really enjoy the fibrous exterior but realize that some don’t(The mister does not like it) so peel it if you want.
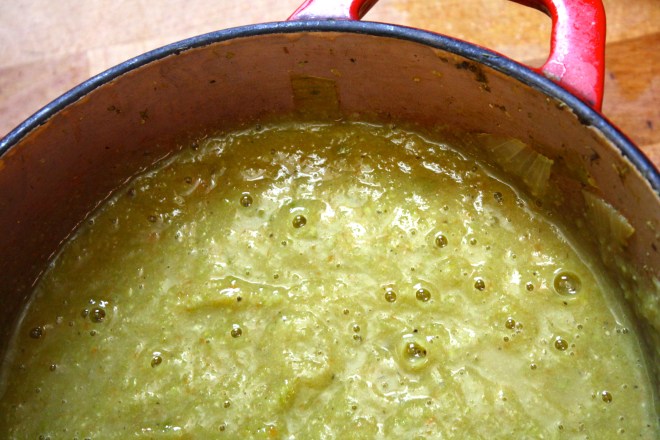
Toss the chopped parsnip, carrot, onion and the spices into a pot on medium heat and let veggies sweat a few minutes until tender. Add in the split peas and enough water to cover everything. Turn pot on high and bring to a boil, then cover and turn to low. Make sure to give the pot a good stir ever few minutes and add more water if needed
While the gravy is cooking, take the celeriac rounds and brush each side with yellow mustard, sprinkle with pepper, and place on a baking sheet. Stick into the oven to roast for about 25 minutes, flipping the rounds after about 10 minutes.
Once the peas have soften, remove the bay leaf and puree until smooth and oh so creamy. Taste and add more salt and pepper if needed. If you find that the gravy seems to thick, just add in more water until it’s the consistency that you want. The gravy is made, the celeriac is roasted… now we are ready to eat!! Stick the celeriac on a plate and dump good amount of that gravy right on top. Feel free to add a bed of spinach, or a grain or anything you want, because why not, and also some chopped tomatoes for a little acid and prettiness.
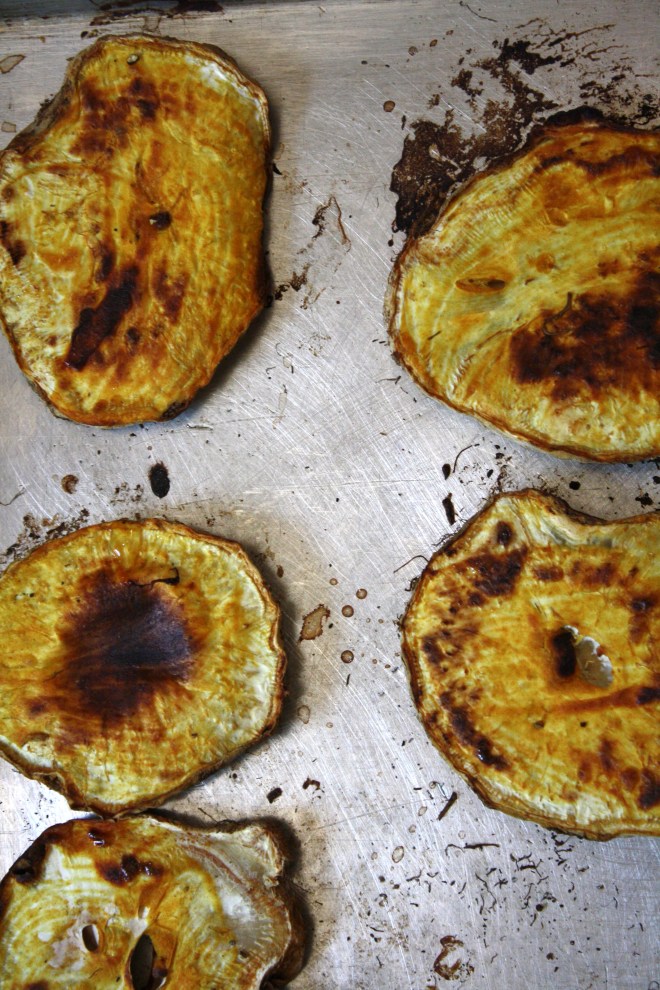
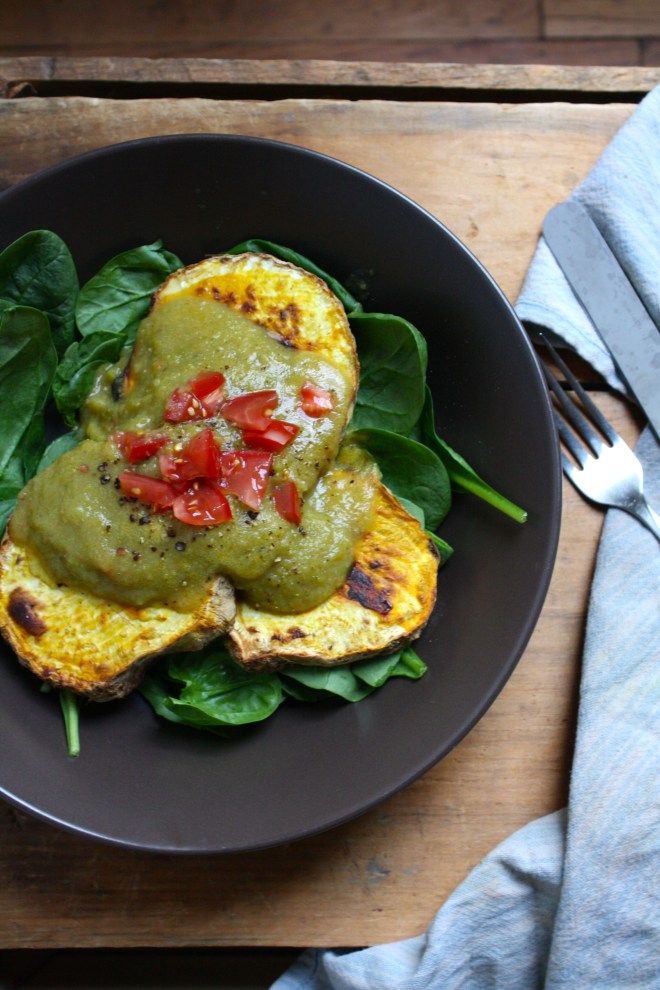
Serve with the fanciest knife and fork you can find. Extra yellow mustard and sriracha sauce are great condiments to have close by.
Happy Tuesday!
-C
Mustard Roasted Celeriac with Split Pea Gravy
2 medium celeriac roots
6 tablespoons mustard
1 large carrot
1 medium parsnip
1 large yellow onion
2/3 cup split peas
2-3 cups water
1 bay leaf
2 teaspoons thyme or italian spice mix
salt and pepper
spinach (optional)
diced tomatoes(optional)
Preheat oven to 400 degrees
Small dice the carrot, parsnip and onion and throw into a large pot. Spinkle with salt and pepper, add in the thyme and bay leaf and add a splash of water. Stick on stove on medium heat and stir. Let cook until the veggies become soft and fragrant. Now add in the split peas and 2 cups of water. Bring to a boil then cover and turn heat down to medium low. Let cook until the split peas become tender (about 25 minutes) string on occasion and adding more water if the peas are not completely summered while cooking.
Once the peas are tender, let cool for a few minutes, remove bay leaf, and either dump into a blender or blend with an immersion blender until nice and creamy. If gravy seems to thick, add in more water.
Scrub or peel celeriac roots and slice them into 1/2 inch think rounds. Place on a baking sheet and brush mustard on both sides and spindle with pepper. Stick into oven for about 10 minutes, flip, then back into the oven for another 15 or so minutes, or unit the celeriac is tender.
When the celeriac is done remove from oven and stick a few rounds on a bed of spinach (or not, or any kind of grain or green you like) Top with a hearty helping of the gravy and toss on some chopped up tomatoes.
Eat with at knife and fork like a fancy person.
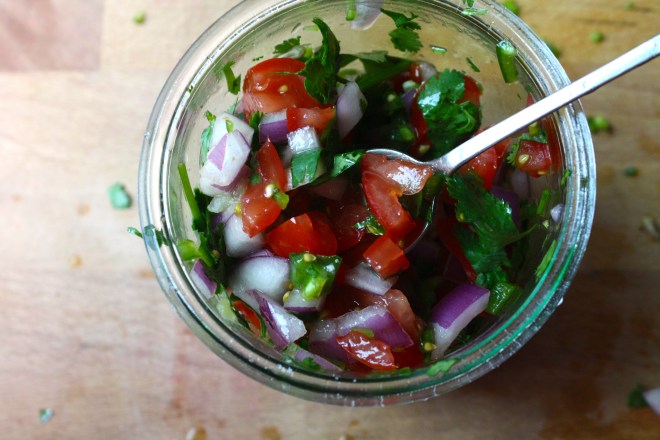
Happy Cinco de Mayo! And what better day to share my version of my oh so fantastic pico de gallo, or as I call it, super freshy salsa.
I love me some freshy salsa, It makes me oh so happy.
I make this stuff all the time, especially during the warmer months and tomato season. I usually make a batch right before a meal, just enough to eat right away, but sometimes I ‘ll make a big batched of it, thinking I’ll save some for the next day. It never makes it past the second day in the fridge because it’s just one of those things that when you see it, you want to eat it. Weird but true. And it’s totally ok to do so cause it’s basically eating a big bowl of healthy goodness, so eat on!
It takes no time to prepare, tastes super refreshing, goes on everything, and it’s just so freaking tasty. You can eat it with tacos and chips (the mister) or like me, I like to add it to everything; salads, popcorn, or directly in my mouth.
Make one batch, make 4, it doesn’t matter cause you will eat it all, and need to make more.
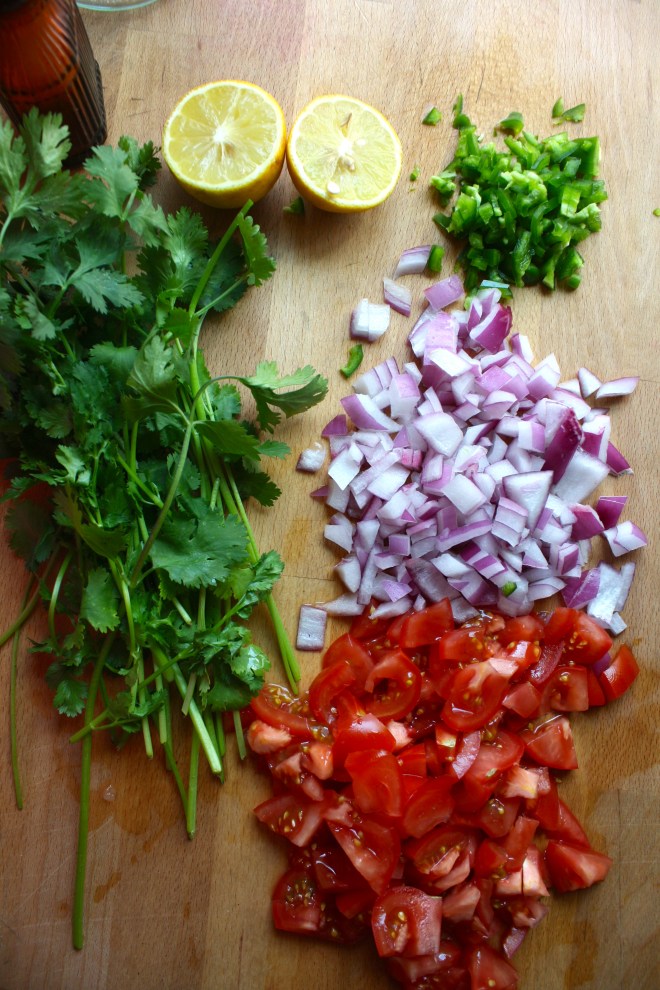
The stuff. Chopped Roma tomatoes, chopped red onion, a diced jalapeño, lemon, a bunch of cilantro, and salt.
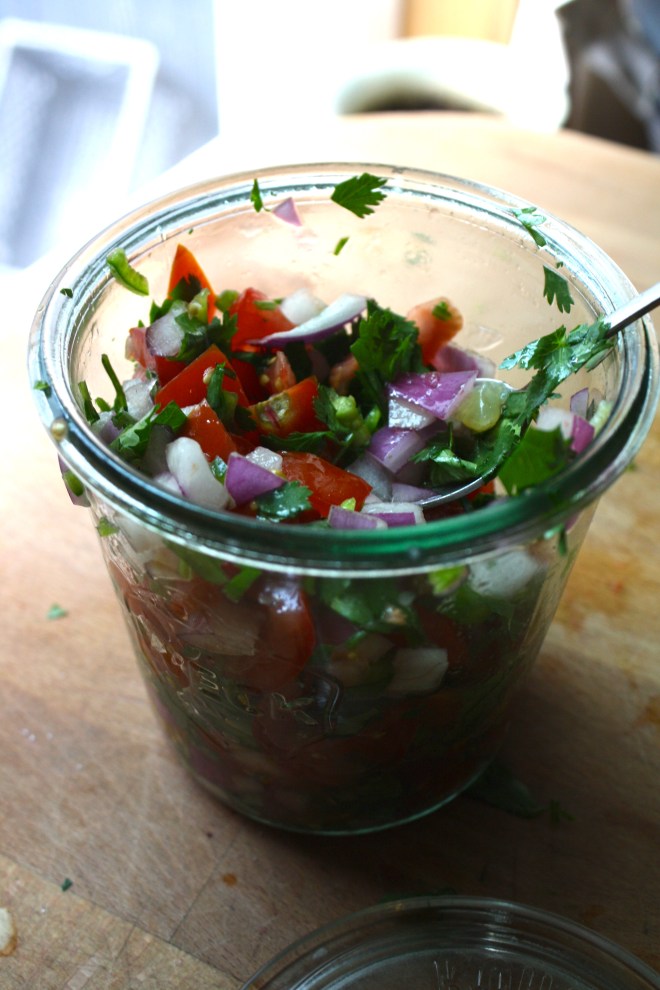
Stick all the chopped stuff into a jar and add in the juice of the lemon. Roughly chop the cilantro and add that on in with a sprinkle of salt.
Mix it up….And thats it. Now eat… with something or without.
A spoon out of the jar is one of my favorite ways to go at it.
Happy Cinco de Mayo, Happy Tuesday!
-C
Pico de Gallo… Freshy Salsa
4-5 Roma Tomatoes
1 small red onion
1-2 jalapeños (Depending on heat preference)
1 lemon or lime
salt
1 bunch of cilantro (don’t use it if you don’t like it)
Chop tomatoes and onion and toss into a bowl or jar. Cut seeds from jalapeño(s) and dice up into little bitty pieces and add that to the tomato and onion. Roughly chop the cilantro and toss that in as well with the juice of the lemon or lime. Sprinkle with salt. Stir, let sit for a minutes, taste and then add more salt if needed.
Eat right away or make ahead and store in the fridge until ready to use.
Goes great with corn chips, tacos, toss onto salads or eat as is standing in front of the fridge. If someone is judging you, they are stupid.
Every time I open the fridge, at least one (if not a few) come falling out from all the places that I have managed to squeeze them in. (the egg tray in the door is not a safe place for cucumbers) This is a slight problem, but a problem that I kind of like having.
This past weekend I had planned on doing a bunch of pickling and canning. Like a whole day of music blasting, dancing around the kitchen in a cute little apron with wooden spoon in hand, (pretending its a microphone) canning all sorts of fruits and veggies that a piling up in massive amounts for the winter months.
That didn’t happen, and I still have a million cucumbers and not a whole heck of a lot of time this week to inact my canning day day dream.
My simple solution. Cut um up, stick in a bowl with a some fresh dill, a lithe vinegar and leave them on the counter….. And watch as they disappear. It’s crazy. I find if you leave a bowl of cut up anything on the counter, anyone that walks by will stop and eat a few pieces (if not the whole bowl) It’s a scientific fact (no not really, but maybe)
As for my blissful canning day. It will be happening soon. But until then, this is the way to go with those all those cucks. (this works fantastic will zucchinis too!)
The stuff. Cucumbers, onion, fresh dill, salt, pepper, and red wine vinegar.
Slice up the cucumber and onion and toss into a bowl. Spinkle with salt, pepper, and lots of fresh chopped up dill. Splash in the vinegar and toss it all around.
Let it sit on the counter for at least 2 minutes, but the longer they sit, the more pickley they taste.
And eat. Leave on the counter until they are all gone..which won’t take too long.
Enjoy the Tuesday!
-C
2-3 medium to large cucumbers
1 medium sweet onion
a bunch of fresh dill
salt and pepper (fresh cracked is best)
red wine vinegar
Slice cucumber and onion into thin slices. and stick in a big bowl. Sprinkle with salt. pepper, chopped up dill. Pour on a few glugs of vinegar. Toss around, taste and adjust seasoning if needed and let sit on the counter for a few minute… or as long as you want*.
Eat all day long or until they are gone.
IF there are still cucumbers left over after 2 hours and you are worried about leaving food out all day (I don’t worry, but that’s me), stick in the fridge until you ar ready to eat them.
You ever make dish, completely on the fly, just to use something up (I have a lot of ripe tomatoes) with no real expectation, just because… Then have it be one of the best freaking things that you have ever made? This salad is one of those things.. maybe not the best thing I have ever made, but definitely the best salad I have ever made…. this week.
A salad compiled of all things amazing, taking just a few minutes to make and is the perfect balance of uber fresh with baby spinach, raw kale, and crunchy quick pickled onions. Then adding a touch of warmth with the sweet and juicy seared tomatoes and big chunks of creamy avocado.
I mean, for reals. ……Best Salad Ever !!!! (this week)
Now let’s do this.
The Stuff. A big bowl of baby spinach and chopped up kale, a few sliced up roma tomatoes, some super thinly sliced red onion, half an avocado, red wine vinegar and salt and pepper. Before you do anything, place the sliced onions into bowl, sprinkle with a pinch of salt and add a few glugs of the red wine vinegar. You want the onions to sit in the vinegar for at least 5 minutes on the counter cause the longer they sit the more crispy pickly they get. (after eating onions like this, you will never want to eat them any other way) Lightly oil a skillet and preheat to a medium heat. Once the skillet is hot, sprinkle the tomato slices with salt and pepper and place tomatoes right on in, snugly, but not overlapping. Let cook for about 3-4 minutes, or until the bottoms start to brown. Flip and cook other side for another few minutes.Once the tomatoes are seared on both sides, remove them gently from skillet and toss them on top of the bowl of greens.
Take the pickled onions and toss those right on top, with any of the residual vinegar, add dice and scoop the half of avocado and toss that on in as well.And now eat the best salad ever (this week).
Make the day good!
-C
Skillet Seared Tomato and Quick Pickled Onion Salad
Serves 2 as a side, 1 for a hungry eater
2 large or 3 smaller roma tomatoes
1/2 of a red onion
2-3 tablespoons red wine vinegar
1 1/2 cups baby spinach
1 1/2 cups chopped kale
salt pepper
1/2 a ripe avocado
olive oil (to grease pan)
Thinly slice red onion and place in a bowl. Add vinegar into a and sprinkle with salt. Let sit on counter for at least 5 minutes, if not longer,
Slice tomatoes into 1/2 inch thick rounds and sprinkle with a pitch or salt and pepper. Lightly oil a skillet and preheat it on medium heat. Once the skillet is preheated, stick the tomatoes on it (watch out for splattering tomato juice) Cook first side for about 3 minutes or until the bottom has browned, then flip and do the same for other side.
One tomatoes are seared, place directly onto the greens. Now dump the pickled onions and residual vinegar on top. And dice up avocado and add that on top too.
Now eat your salad, fork or fingers…
And I know, ba-daaaamn. So good.
As the weather gets warmer and the days get longer, my food brain turns to fresh colorful simple spring food. (which is totally a thing). Spring food is a combination of the last of the winters hardy root veggies combined with the springs bounty of fresh greens and early growers. Spring food is the best!
This lovely. oh so gorgeous salad has been on repeat in my meal repertoire. It’s so yummy and so simple. Beets and carrots roasted and sliced, tossed onto a bed of tender spinach and topped with a creamy, lemony avocado dressing. Fresh, fast, light, and filling. Everything a perfect spring salad needs. Not to mention it takes no time at all to make because with all this nice weather , we want to spend as much time basking in the warmth and glow of the sun. I might even take my spring salad outside today. Maybe.
Dressing stuff. A nice and ripe avocado, the juice of a juicy lemon, a bit of garlic powder (raw garlic is nice too, but grate it super fine) and salt. Simple simple and sometimes simple can be the best.All stuff get mashed super mashed until smooth and scooped into a jar with a lid. Add about 1/4- 1/2 cup water (depending on how thick you like it) and shake that jar all around.
That’s it. You now have super creamy avocado lemon dressing. Drizzle on anything and everything… especially this roasted carrot and beet salad..
A roasted beet and carrot, all sliced upTossed onto a bed of tender baby spinachAnd topped with creamy avocado dressing. Fantastic, so pretty, and makes the day super springy!
A salad suggestion…. Add some roasted chickpeas toasted nuts, or sunflower seeds to this or any salad. Adds a little proteins and the crispy crunch is a nice addition.
Enjoy the day..Smile lots
-C
Roasted Carrot Beet Salad and Avocado Lemon Dressing
Salad
2-3 cups Baby Spinach
1 large carrot
1 medium beet
Toasted nuts, beans, or seeds (Optional)
You can roast the veggies a few ways.. Slice the carrot and beet, place on a baking sheet and stick into the oven at 425 degrees until tender. Or you can just toss a the carrot and beet onto a baking sheet whole and roast.( What I usually do)
Once the veggies are roasted and cooled, thinly slice and toss onto the bed of baby spinach. Top with Avocado Lemon Dressing (recipe below) and some toasted crunchy thing.
Dressing
1 Ripe Avocado
1 lemon
1 teaspoon garlic powder
1 teaspoon salt
1/4- 1/2 cup water
Scoop avocado fruit into a bowl and mash with a fork until a paste is formed. Scoop mashed avocado into a jar and add remaining ingredients. Stick lid on jar and shake tip combined. Use on anything.
Dressing lasts a few days in the fridge. Should stay green, but add a layer of lemon juice to top to keep from browning.
When something goes on sale at the grocery store, I tend to buy it. Being that it is Valentines Day this week, all the stores are having specials on all sorts of sexy things… and strawberries are one of them. Now I am not a huge fan of buying produce that is terribly out of season, but I can’t help myself…a good deal is a good deal and the strawberries were a super good deal. I was just going to make some sweet ass strawberry jam or maybe a lovely strawberry cake with them (and I probably still will), but these strawberries are actually super juicy and full of flavor, and it’s always nice to eat some full flavor freshy strawberries… especially soaked in balsamic vinegar. And yeah, I think that this salad is pretty sexy, so it makes for a perfect Valentines day dish.
A handful of ingredients and 5 minutes will get you to a fantastic salad experience.
A bowl of baby spinach, a few chopped up strawberries*, half a sliced avocado and a small handful of toasted almonds.. Oh, and don’t forget the balsamic vinegar….
*Note.. Strawberries are kind of heart shaped already so if you want, reserve a few slices to fancy up you salad presentation, but chop up the rest into smaller pieces.
Pour the vinegar on the strawberries and let sit for at least 5 minutes. (the longer the strawberries can sit with the vinegar, the better)
Pile it on.. thinly slice avocado.. rough chopped toasted almonds… It’s pretty much as easy as it can get.And last but not least, toss on the balsamic soaked strawberries and drizzle the remaining vinegar. (if you made hearts, place on top to make pretty) Sprinkle with a pitch of salt and pepper and pow! Fancy, sexy, delicious salad.
Not to shabby for 5 minutes and a handful of ingredients. Anyone (don’t feed to a person with nut allergies) would be so syked to be fed a salad like this… You yourself should be pretty excited to eat a salad like this. Heck, I am excited to eat a salad like this!
A love salad for everyone and everyday!
YAY for Thursday and Happy meal planning!!!!
-C
♥ Balsamic Strawberries on Spinach Almond Avocado Salad ♥
Ingredients for 1 large or 2 small salads
3-4 ripe strawberries
handful of roasted almonds (slivers or whole)
1/2 avocado
2 tablespoons Balsamic Vinegar
3 cups baby spinach
Pinch of salt and pepper
Dice strawberries into small pieces (reserve a few whole slices for heart shapes if you want) and toss in a small bowl with the balsamic vinegar. Let sit for at least 5 minutes. Rinse and dry spinach. Place in a bowl(s) and top with thinly sliced avocado, chopped almonds and balsamic soaked strawberries. Drizzle the residual vinegar on top and sprinkle with a pinch of salt and pepper.
Eat with a fork
I am such a sucker for the reduced price produce at the grocery store. I save at least half of the original price for stuff that might look a little weird or have a brown spot or something. Sometimes I can’t believe what ends up on in the bin, stuff that I wouldn’t consider reduced bin material, but hey, if they want to stick it in there, then I will be more than happy to buy it. A couple days ago I found some good looking roma tomatoes in that said reduced produce bin..the skins the tiniest bit wrinkled (like I could care less), least hen 50 cents a pound. Um, yea, I bought those and put them to good use.
Tomatoes roasted until they fell apart with a few other chunks of stuff, then piled onto a base of spinach and couscous. This meal cost me pennies and was stupid easy and fast to make. And pretty to boot. Perfect for a quick healthy meal on a busy day or maybe for those people looking for a tasty, not too completed dinner to make for a special someone for Valentines day? Or make just for yourself…its pretty much the perfectly dish. Anyone can get into it. And if you don’t happen to have a grocery store with a reduced produce bin full of tomatoes…it’s cool, you’ll just have to pay full price for the perfect ones.
So simple. A little olive oil in pan. Chunk the tomatoes and throw in pan with the chopped onion, carrot, cauliflower, garlic and chick peas. Drizzle a bit more oil and top with salt and pepper. Give it all a toss and stick into oven. That’s that. Just leave it in there until everything is so nice and soft and falling apart.
One of the best things about couscous is that you don’t even need to dirty a pot or a bowl to make it, just add dried couscous to the bowl you are going to eat out of with a cup of boiling water and a pinch of salt. (I added the spinach with the water too) After about 8 minutes, the couscous absorbs all the water and you just fluff it up with a fork. Easy, freaking Peasy!!! Out of the oven and piled on…..
I mean, if this isn’t one classy looking meal, then I don’t know what is.
Sprinkle with a little parmesan or nutritional yeast if you want and step back and admire. And now eat it to you face.
And barely any dishes to wash. No big mess to clean up. I could get used to that.
-C
Chunky Tomato and Stuff Couscous
Ingredients
Serves 2
3/4 cup Couscous
1 cup boiling water
Handful of chopped spinach
4-5 roma tomatoes chopped
1 medium carrot diced
Half of an onion diced
Cup or so of cauliflower (fresh or frozen)
Cup of prepared chick peas
4 or 5 cloves garlic minced
Olive oil to drizzle
Salt and pepper
Preheat oven to 400
Place onion, carrot, cauliflower,tomatoes, chick peas and garlic into a large skillet. Drizzle with olive oil, sprinkle with salt and pepper, and give everything a light toss. Stick into oven for 35-40 minutes until tomatoes are falling apart and everything is nice and roasted.
In a medium bowl, (or serving bowl) add cup of boiling water to dry couscous and spinach. Sprinkle with salt and cover. Let sit for at about 8 minutes, or until the couscous had fully absorbed all the water. Fluff with a fork and top with roasted tomato stuff.
Top with parmesan or nutritional yeast if you are into it.
You ever make dish, completely on the fly, just to use something up (I have a lot of ripe tomatoes) with no real expectation, just because… Then have it be one of the best freaking things that you have ever made? This salad is one of those things.. maybe not the best thing I have ever made, but definitely the best salad I have ever made…. this week.
A salad compiled of all things amazing, taking just a few minutes to make and is the perfect balance of uber fresh with baby spinach, raw kale, and crunchy quick pickled onions. Then adding a touch of warmth with the sweet and juicy seared tomatoes and big chunks of creamy avocado.
I mean, for reals. ……Best Salad Ever !!!! (this week)
Now let’s do this.
The Stuff. A big bowl of baby spinach and chopped up kale, a few sliced up roma tomatoes, some super thinly sliced red onion, half an avocado, red wine vinegar and salt and pepper. Before you do anything, place the sliced onions into bowl, sprinkle with a pinch of salt and add a few glugs of the red wine vinegar. You want the onions to sit in the vinegar for at least 5 minutes on the counter cause the longer they sit the more crispy pickly they get. (after eating onions like this, you will never want to eat them any other way) Lightly oil a skillet and preheat to a medium heat. Once the skillet is hot, sprinkle the tomato slices with salt and pepper and place tomatoes right on in, snugly, but not overlapping. Let cook for about 3-4 minutes, or until the bottoms start to brown. Flip and cook other side for another few minutes.Once the tomatoes are seared on both sides, remove them gently from skillet and toss them on top of the bowl of greens.
Take the pickled onions and toss those right on top, with any of the residual vinegar, add dice and scoop the half of avocado and toss that on in as well.And now eat the best salad ever (this week).
Make the day good!
-C
Skillet Seared Tomato and Quick Pickled Onion Salad
Serves 2 as a side, 1 for a hungry eater
2 large or 3 smaller roma tomatoes
1/2 of a red onion
2-3 tablespoons red wine vinegar
1 1/2 cups baby spinach
1 1/2 cups chopped kale
salt pepper
1/2 a ripe avocado
olive oil (to grease pan)
Thinly slice red onion and place in a bowl. Add vinegar into a and sprinkle with salt. Let sit on counter for at least 5 minutes, if not longer,
Slice tomatoes into 1/2 inch thick rounds and sprinkle with a pitch or salt and pepper. Lightly oil a skillet and preheat it on medium heat. Once the skillet is preheated, stick the tomatoes on it (watch out for splattering tomato juice) Cook first side for about 3 minutes or until the bottom has browned, then flip and do the same for other side.
One tomatoes are seared, place directly onto the greens. Now dump the pickled onions and residual vinegar on top. And dice up avocado and add that on top too.
Now eat your salad, fork or fingers…
And I know, ba-daaaamn. So good.
Being that it was St. Patricks day this week and lots of folks buy up a good amount of cabbage, I figured that this is a good time to get people to try one of my most favorite of favorite meals…..Beet bean and cabbage steaks. I love to play around with food, how to pair textures and colors plus tastes while trying to make whatever I am making healthy and balanced. This is one of my fav creations. And sure, this may seem like a somewhat weird combo, maybe a little like a extremely hippy dippy vegan fake meat thing, and you might be kind of right, but screw if it doesn’t taste like A-mazing. First off, notice how freaking dang pretty this thing is. The roasted beets bring a earthy hearty flavor but also pack a huge punch of color, especially when blended together with the ever so sweet white bean, which brings a nice mellow taste and a great serving of protein. (Beets and beans are meant for each other). Spread that brightly colored, tasty mixture onto of a huge slab of one of my favorites, roasted cabbage with all its crunch and cabbagy flavor and you got yourself a hearty healthy meal of deliciousness.
So maybe this might seem a little out of your normal food routine, but why not try it? Trust me….you will love it and everyone you make it for will think you are a number 1 badass too.
Cabbage, white beans, and beets. There is a lemon involved, but it didn’t make it into the picture.
Notes…. I used white beans, but I have also done this with chick peas and lentils. All are fantastic. Also, I did not peel my beets because I never do.(I do not peel anything the skin is full of goodness and I love the taste) If you don’t want to eat the skin, then peel them. Cabbage is cut into inch thick slabs… I like to us the inter most part of a cabbage head cause I like the core. But use any cut that you want. 2 beets are chopped into chunkers and both the cabbage and the beets are placed on a lightly oiled baking sheets, seasoned with salt and pepper, and stuck into the oven for 20-25 minutes at 400 degrees.
Once the beets are tender and the cabbage is cooked to a nice withered golden pretty, take out of the oven, but leave the oven on. Leave the cabbage on the pan but throw the beets into a blender or a big bowl if using a hand blender with the white beans
Beans and beets get pureed together. Add the juice of 1/2 a lemon (or the whole lemon, depending on your taste) and a pinch of salt and pepper. With a big spoon or spatula, scoop equal amounts of the bean/beet mixture on top of the cabbage steaks and spread around. Sprinkle with cracked pepper and place back into oven for another 5-10 minutes. (You could totally skip the second bake, but I like my cabbage well done and crispy)
Oh ho boy… And with a good squirt of mustard to finish off… I could eat this all day, everyday
And now I am #1
Happy Wednesday… Keep it good!
-C
Beet and Bean Cabbage Steaks
Makes 2 Thick Cut Steaks
1/2 head of cabbage (green or red)
2 cups or 1 can of cooked white beans
2 medium beets
1 lemon
salt and pepper
Mustard (Optional)
Preheat Oven to 4oo degrees
Cut two 1 ish inch thick rounds of cabbage from the widest part of the head. Place on a lightly oiled baking sheet. Chop beets into chunks and toss on same baking sheet.(Peel if you want) Sprinkle everything with salt and pepper. Stick into oven for 20-25 minutes or until the beets and cabbage are tender. Remove veggies from oven and place roasted beets into a blender (or bowl if using a hand blender) but leave the cabbage on the baking sheet. Add the white beans, the juice of half a lemon, and salt and pepper to the beets and puree until smooth. Scoop equal amounts of the mixture to each cabbage steak, sprinkle with pepper and place back into oven for another 5-10 minutes to give the beans and beets a nice crunchy crust (You can skip this step if you don’t want to be crusty)
Remove from oven, stick on a plate and drizzle with mustard….Fork and knife are good ways to eat it, but eating it with you fingers makes less dirty dishes.
I have never in my life seen, let alone received, a kohlrabi as big as the one I picked up from my farm share last week. It was, no joke, bigger then my head. (completely nuts) If I didn’t know the farm and the farmers of my CSA, I would have to question whether or not it was grown in radioactive sludge…(kind of like the dandelions in the Teenage Mutant Ninja Turtle movie from the 90’s)
What is a kohlrabi you ask? It’s kind of a cross between a turnip and a cabbage that is usually the size of a baseball. It can be eaten raw (I like chunks dipped in mustard) or cooked. (roasted chunks dipped in mustard) It pairs well with sweet stuff like apples and honey, or in any savory stuff. Its one of my favorite vegetables (I say that about them all!)
So now that you know about kohlrabi (if you didn’t already) its time to get yourself some and make this soup. Because for real, I am not kidding when I say that this is one of the best soups that I have ever made. You really must try it. And do it soon because hopefully in the next few weeks the soup weather will turn into fresh pea weather and we might not want soup as much (I eat soup all year long)
A gigantic kohlrabi cut in half ( I only used one of the halts) A whole yellow onion and 2 large carrots. I also added in 4 cloves or garlic
Peel the kohlrabis tough skin off and chop up into chunks. Chop the carrot, garlic and onion as well .
All of those chopped veggies get thrown into a pot with two cups of water and a good sprinkle of salt and pepper. Cover and place on medium heat for about 20-25 minutes. (give a stir ever now and then) Keep cooking until the veggies are fork tender.
Once the chunks are all cooked up, its time for the immersion blender. (or into a regular blender) Add in at least 3 cups of water, but more to thin out to your desired consistency and let it rip. Stop blending once the soup is nice and creamy. Taste and season with salt and pepper to taste. Leave on low heat to bring back to a good soup eating temperature.
Now the soup is done.. and you can eat it just as it is, but you should really add in the asparagus. It is just so f*ing good. Just grab a few spears, dice them nice and small, and throw into the soup pot. Let it cook for another 5 minutes and wa la.. Soup is done. Ladle into bowls and if you want a little fancy presentation, add a swirl of mustard (it’s so good) and a whole cooked asparagus spear.
And eat one of the greatest soups ever!
Happy Day Wednesday!
-C
Creamy Kohlrabi Soup with Asparagus
3-4 kohlrabi (or 4 cups chopped Kohlrabi)
2 large carrots
1 large onion
4 or more cloves of garlic
Salt and Pepper
4-6 spears of Asparagus (extra if you want to garnish)
Yellow Mustard (optional)
Peel outer layer of kohlrabis. Roughly chop the onion, carrot, kohlrabi and garlic and stick it all into large dutch oven or stock pot. Add water until veggies are half submerged . Add a good sprinkle of salt and pepper and place on burner on medium heat and cover. Check ever 5 or so minutes and give the pot a good stir. After about 25 minutes, all the veggies should be very tender and almost fall apart when stuck with a fork. With an immersion blender or regular blender, blend till smooth, adding water until soup is at your desired constancy. Return soup to medium heat. Small dice asparagus and add to pot. (I added 2 extra whole pieces and fished them put once cooked for garnish.) Keep on heat for another 5-10 minutes until asparagus is cooked.
Scoop into bowl and squirt top with yellow mustard and top with a spear of cooked asparagus.
Eat with a spoon and lick bowl clean.
When something goes on sale at the grocery store, I tend to buy it. Being that it is Valentines Day this week, all the stores are having specials on all sorts of sexy things… and strawberries are one of them. Now I am not a huge fan of buying produce that is terribly out of season, but I can’t help myself…a good deal is a good deal and the strawberries were a super good deal. I was just going to make some sweet ass strawberry jam or maybe a lovely strawberry cake with them (and I probably still will), but these strawberries are actually super juicy and full of flavor, and it’s always nice to eat some full flavor freshy strawberries… especially soaked in balsamic vinegar. And yeah, I think that this salad is pretty sexy, so it makes for a perfect Valentines day dish.
A handful of ingredients and 5 minutes will get you to a fantastic salad experience.
A bowl of baby spinach, a few chopped up strawberries*, half a sliced avocado and a small handful of toasted almonds.. Oh, and don’t forget the balsamic vinegar….
*Note.. Strawberries are kind of heart shaped already so if you want, reserve a few slices to fancy up you salad presentation, but chop up the rest into smaller pieces.
Pour the vinegar on the strawberries and let sit for at least 5 minutes. (the longer the strawberries can sit with the vinegar, the better)
Pile it on.. thinly slice avocado.. rough chopped toasted almonds… It’s pretty much as easy as it can get.And last but not least, toss on the balsamic soaked strawberries and drizzle the remaining vinegar. (if you made hearts, place on top to make pretty) Sprinkle with a pitch of salt and pepper and pow! Fancy, sexy, delicious salad.
Not to shabby for 5 minutes and a handful of ingredients. Anyone (don’t feed to a person with nut allergies) would be so syked to be fed a salad like this… You yourself should be pretty excited to eat a salad like this. Heck, I am excited to eat a salad like this!
A love salad for everyone and everyday!
YAY for Thursday and Happy meal planning!!!!
-C
♥ Balsamic Strawberries on Spinach Almond Avocado Salad ♥
Ingredients for 1 large or 2 small salads
3-4 ripe strawberries
handful of roasted almonds (slivers or whole)
1/2 avocado
2 tablespoons Balsamic Vinegar
3 cups baby spinach
Pinch of salt and pepper
Dice strawberries into small pieces (reserve a few whole slices for heart shapes if you want) and toss in a small bowl with the balsamic vinegar. Let sit for at least 5 minutes. Rinse and dry spinach. Place in a bowl(s) and top with thinly sliced avocado, chopped almonds and balsamic soaked strawberries. Drizzle the residual vinegar on top and sprinkle with a pinch of salt and pepper.
Eat with a fork
There is a joke about Vermonters, that all we talk about is the weather. Well, it’s kind of true. But to our defense, we get a lot of weather, and it’s always changing and intense and both lovely and crazy and all over. So yeah, we talk. A lot, about the weather. And on that topic, I am trying so hard not to complain, but honestly, I am getting a little sick, both physically and mentally from all of these super, to freaking cold temperatures. Yesterday the high was 0 ( which was at like 2 in the morning) and factor in the windchill, the temp stayed at like 25 below. It f**king sucks. I can’t stay outside for too long or else I will probably die. The dog is having a hard time making it around the block before he gets ice paws, and the mister, well he even started wearing gloves (he wears a sweater all winter and never gets cold…..he is officially cold)
And not only is the cold keeping us all indoors, but its making us all borderline sick. We both have been fighting something for the past few week. The headaches, stuffy nose, chest congestions. The puppy is getting super dry skin and gave himself a hot spot. BLAh!! Ok, enough! No more complaining
Because I do really love the winter and all the pretty snow!!!!
But we are feeling kind of sick so to make us feel oh so much better, a fantastic, super tasty, healing, good for me, good for you, soup. Turmeric ginger carrot… oh man. Made with lots of ginger, turmeric and garlic and finished with a drizzle of raw honey. This soup is exactly what we need. All ingredients scream.. FEEL GOOD, BE WARM AND COZY! Almost everything in it has antibacterial and anti inflammatory properties. The veggies are hearty and heathy and just eating soup helps to keep hydrated. And the best part..it tastes so freaking amazing.
So whether you are feeling a little mah, or just a little hungry.…this soup is where it’s at!
Lots of chopped up carrots, a small onion, a little bit of cauliflower I had left over and a small beet. If you don’t have the cauliflower and or a beet, just use ares pepper or another 2 carrots.. no biggy.
Then we have the fresh ginger ( you can use powdered) turmeric and garlic. All the good healthy spicy and yummy stuff.
I accidentally spilled the turmeric on the counter..but it kind of looks like I might have done it on purpose… yeah, let’s go with that. Chop the garlic and he ginger into chunksAnd toss into the pot to warm and activate. Just a little toasty toast.
And the veggies are roasted and tender and smell so good. It took a lot of will power to not eat the whole pan right there.
I added the roasted veggies and 3 cups water straight into my pot with the spices because I used an emulsion blender. If you are using normal blender, add the veggies, the toasted spices and the water to the blender and blend until smooth. Then transfer to a pot.
Pretty much all blended together….(I left a few big chunks in there to snack on while I was waiting to eat serve…I was really hungry) and let to simmer for a little longer…
And now ladle into a bowl and get ready for a fantastic finish… drizzle a spoonful of raw honey into soup…….so so good. You could add the honey before serving, but heating it kills all the good antibacterial stuff so that’s why we wait. Then I sprinkle some chopped kale and chives. (do it if you want, but not necessary)
Now enjoy. Let the warmth wash over you and feel all those good spices helping to fight the good fight to keep you well and all the yummy to satisfy your hunger.
And lets hope for some warm (above 0!!) weather!
-C
Turmeric Ginger Carrot Soup
Ingredients
5 large carrots
1 small onion
1 small beet*
quarter head cabbage ( or a cup of frozen)*
2-3 teaspoons turmeric
2-3 tablespoons fresh ginger (1/2 teaspoon if using powdered)
4-6 cloves garlic
salt pepper
raw honey (omit if vegan)
* If you don’t have or want to use beet and or the cauliflower, you can use a red pepper, a small sweet potato, or just use a few more carrots.
Chop all veggies into similar sized chunks and toss into a lightly oiled pan or on a baking sheet and sprinkle with salt. Stick in oven at 425 for about 30 minutes or until all veggies are fork tender.
In a large soup pot or dutch oven, toss chopped garlic, ginger and the turmeric and place on medium heat for a few minutes to activate the spices. Add the roasted veggies and 3 cups water to pot (if using emulsion blender) and blend until smooth. If using a blender, add the toasted spices, roasted veggie and 3 cups water and blend until smooth then transfer to a large pot or dutch oven. Add salt and pepper to taste. Turn heat down to simmer and let cook for an addition 10 minutes.
When ready to serve, ladle soup into bowl and drizzle a spoonful of raw honey into soup. Garnish with fresh chopped kale, chives, cabbage or whatever you want. (or nothing is good too)
It’s official, all of the littles started school yesterday……HOORAY! (I say hooray cause school is cool and the start of school means it’s going to be fall so soon!. Also I like hanging out with the littles more when they are in school. There is more to talk about and any time away from school is cool time so they like to do more stuff and not just be summer bums)
One of the littles had his very first ever day of school. So me, being the bestest most awesomest aunt ever, made that little a celebration, hooray for school, banana ice cream cake.
This little has been bugging me for a while now to make him an ice cream cake. It all started a few months ago when I gave him a bowl of banana ice cream and told him that when he sleeps over he can have ice cream for breakfast That blew his little mind. We then proceeded to have a converastawtion about healthy food and what was ok to eat for breakfast. (He is very interested in being healthy) I then told him that whenever he sleeps over I would make a banana ice cream cake for breakfast cause bananas are healthy. But every time he is over, I never seems to have enough bananas.
Well I had the bananas and there is no better excuse then the first day of kindergarten to make a cake.. A very delicious peanut butter banana ice cream cake! And no, it wasn’t for breakfast, but the left overs can be! (there were no left overs here)
The stuff… Crispy rice cereal, peanut butter (I have some chiunky stuff at the moment, but any nut butter is good) and 4 frozen chopped up bananas.
Rice ceareal goes into a food processor with the peanut butter. Pulse until everything is all combined and starts to come togerter.
And ump the mixture into a spring for pan. If you do not have a spring form pan, a pie plate will work just as well.
Such a nice looking crust if I do say so myself. Now stick it in the freezer while you make your ice cream.
Frozen bananas go into the processor, get blended for a few mounters, and come out as ice cream…. freaking magic!
Now dump the magic ice cream into the crust.
And smooth it all nice like..and into the freezer it goes until its frozen.
After a few hours, you take it out of the freezer, remove from the pan (or leave it in the pan)
And gather your toppings. A handful of the rice cereal, some melted peanut butter, and a little melted nutella. (use whatever you want.. fruit would be great, some nuts, graham crackers, sprinkles. You get the idea)
Now, Wait for it….
Go crazy! Toppings all over!
And serve up, and watch out.. I almost got my hand eaten for kids going for seconds..
Have a fantastic day and happy back to school. to littles and parents alike!
-C
Makes a 6 inch cake
For the cake
4-5 frozen bananas
2 1/2 cups crispy rice cereal
4 tablespoon peanut butter
To garnish (use any, all or none of what you would like… and maybe not the super sugary ones if a breakfast cake)
melted peanut butter
melted chocolate
Nutella
handful of rice cereal
fresh fruit
jam
coconut flakes
sprinkles
anything else you would like!
Place cereal and peanut butter into a food processor and pulse until crumbly and combined and starts to come away from bowl.
Dump mixture into a 6 in spring form pan (or if you not have one, a pie plate works too) and press it down evenly on the bottom. Stick into freezer
Take bananas out of freezer and place into food processor. Blend until smooth. If needed, you can drizzle a tiny amount of water into it if you think it needs a little help to blend.
Once smooth, take crust from freezer and dump the nanaer ice cream on top and carefully smooth it out. Stick back into freezer (a pier of plastic over to prevent ice crystals )for at least 2 hours, or until the ice cream has completely frozen.
When it’s time to serve, remove cake from spring form (or leave it in the pie plate).and drizzle the top with melted peanut butter, melted, chocolate and another handful of crispy cereal. Or leave it bare. Or add sprinkles… the toppings are all unto you!
Eat like a camp, for breakfast or dessert.. Or eat some for dessert and then some for breakfast.
HEY Hey Hey… It’s Taco TUESDAY, which means that you are obligated as consumer of food to eat some tacos today!
So ok, I am not going to lie, these tacos were not actually made on a Tuesday (GASP) but were made in lu of pizza Friday (another GASP!!)
But guess what? No one died. People were happy. Food was fantastic, and there was no mention of the pizza that was not. So sure, taco tuesday is totally a thing around here, but you know how “Nobady puts baby in a corner”.. well nobody buts tacos in a corner. We don’t let the day of the week depict when tacos are eaten cause we think tacos are for everyday!
And these tacos, well, I got down with these. Made with lentils, cause lentils are the best, and topped with a hearty scoop of super fresh, chunky veggie salsa…. Not much is better then that. Easy and fast with lots of pretty in every bite, these tacos are a great addition to any taco dinner rotation!
Now lets get taco-ing!!!
The stuff. First off, you are going to need some type of taco shell.. soft or hard or both , that is entirely up to you.( I made taco shells a little early in the day, but store bought is totally cool.) Also need lentils, water to cook the lentils, a jalapeño (optional), taco seasoning (pre blended or your own blend) and onion. Also needed is a gigantic tomato, some red cabbage, a few kale leaves, a lime, and salt and pepper.
To get this party started, chop up half the onion, the tomato, cabbage ,and kale and toss into a big bowl. Oh, and chop up the cilantro and toss that in as well.
Sprinkle with salt and add the juice of the lime. Mix oh mix and set aside to let all the flavors meld.
Now that the salsa is doing it’s thing, chop up the jalapeño and the other half of onion and toss into a big skillet and place on medium heat.
And when the bits start to brown like so…
Dump the lentils in to the pan with water.Bring it all to a boil then turn heat down to low.. Add in the taco seasoning and sprinkle of salt and pepper and place some type of lid on ithe pan.
And simmered until cooked.
Note. Check the lentils every few minutes while they are cooking. If you think they seems to dry, add in another 1/2 cup of water.
Now it’s ssembly time! Lentils in shell, topped with a generous amount of salsa. That’s it! Maybe some guacamole would be nice (I had an avocado saved for guac, but it was rotten on the inside.. I was super pissed) But with or without, these are some freak yeah yummy tacos! I served my next to a bed of some jasmine rice which was nice, but do what you want my friends.
Happy Taco Tuesday! (or any taco day!)
-C
Makes about 8 -10 tacos
For the Lentil Filling
1 cup dried lentils
2 1/2 -3 cups water
2 tablespoons taco seasoning*
1/2 of an onion
1 jalapeño
Fot the Garden Veggie Salsa
2 big tomatoes (or one gigantic tomato)
1/4 head of red(or green) cabbage (about 2 cups shredded)
1/2 of an onion
4-5 kale leaves
1 juicy lime (2 if they are not very juicy)
a bunch of cilantro
salt and pepper
And don’t forget the taco shells!
*Note. You can use any type of taco seasoning that you like, store bought or home made. I make my own with cumin, chili powder, onion powder, garlic powder, and a little coriander.
Dice the tomato and 1/2 the onion into small chunks and toss into a big bowl. Finely chop the cabbage an the kale into small shreds and toss that into the bowl. And chop up as much cilantro as you would like and that goes into the bowl as well. Spinkle with some salt and add in the juice of the lime. Mix everything all around and set aside.
Once the salsa is made and sitting, chop the jalapeño and other half of onion and toss into a large skillet. Place on medium heat for a few minutes until the pepper and onion start to brown. Now dump in dried lentils and 2 1/2 cups of water. Turn heat to high and bring to a boil, them back down to low. Seaosn with salt, add in the taco seasoning, and stick a lid (or cover with something), and let simmer for about 20- 25 minutes or until the lentils have absorbed all the water and are nice and soft. If you find the lentils are still hard and there is no liquid, , add in another 1/2 cup of water.
Once the lentils are cooked to your liking, remove from heat and get assemble tacos.
Scoops some lentil mixture into shells. Add on a big scoop of the fresh veggie salsa and eat with you face.
Guacamole, cheese, sour cream, or whatever are optional topping that you may consider adding but are definitely not necessary. .
Ugh. It has been so nasty gross out. A four day heat wave, and no, not just hot hot days, but those gross, hot hot with all the humidity in the world, kind of days. My body has rebelled and turned into a slug and my hair… well let’s not talk about my hair.
Yup, it’s been way to freaking hot to do anything, especially cook. And eating food is’t even especially appealing either (living off raw kale and, yes, lots of tomatoes at the moment) . What we all want is to drink something nice and cold and refreshing (and boozy). And what do I do when I want this, and have a lot of that? I turn that into this. That being tomatoes, and this, being a cold drink. Did that confuse you?
What I am trying to say is that I have a butt load of cherry tomatoes to eat but what I really want is a cold drink. So I took the tomatoes and make them into a lemonade. And it is amazing. It hits all the end of summer, super gross heatwave, I don’t want to move, spots that needed to be hit. And just in time for the weekend sow e get to add a little splash or two of something hard, cause we all know that after this past week, we all deserve it.
Think that combination sounds weird? Well don’t cause lemons and tomatoes are perfectly paired together. Tart and tangy, but still with a bit of sweetness from the tomatoes ( especially if using a sweeter variety like the sun-gold). It really is a great, refreshing drink, with or without the booze. A perfect match!
Tomato lemonade here we go!
The stuff. Tomatoes ( I used sun-gold cherry cause I have a buttload, but you can sure use whatever tomato you have to many of), lemons, water, and if your into it vodka.
Note. The mr. and I are not big on sweet drinks, so I didn’t add any sweetener, the tomatoes being sweet enough. But feel free to add a little sugar or honey to yours.
Start by dumping tomatoes into a pot with water. Stick on high heat and bring to boil, then turn heat to medium low,stick a lid on pot, and let tomatoes simmer for a little while.
About 30 ish minutes later, the tomatoes have reduced to about 1/3 of what you started with and have turned into a a chunky like syrup.
Strain the juice from the solids into a big pitcher.
Tomato juice! and it’s so pretty bright gold. Now let it cool far a little bit.
And while juice is cooling, juice your lemons
When the tomato juice is cooled off, add the lemon juice to the tomato.
Add water and stir
Taste, and if you think it need sweetener, by all means, add a drizzle or two of some honey or spoonful of sugar.
A couple of glasses of ice, and if you shall,, a shot of vodka (add the shot to the glass, not the pitcher)
Me being so fancy added a garnish/snack. Basil leaf and cherry tomato skewer looks so nice.
And sit back, put your feet up. and take it all in.
Weekend here we come!
-C
2 cups cherry tomatoes (can use 2 cups of any tomato)
1 cup fresh lemon juice (4-5 lemons)
1 cup water plus 3 1/2 -4 cups water
a few basil leaves and extra tomatoes for garnish (optional)
Note. I did not add any sweetener to my lemonade but you could totally add in a few tablespoons honey or sugar. Do what floats your boat.
Dump tomatoes into a pot with 1 cup of water. Bring to boil then cover and turn heat to a medium low heat. Cook tomatoes down for about 30 minutes or until the tomatoes have reduced about 1/3 and is almost sauce like.
Using a fine mesh strainer, strain the tomato mixture into pitcher or jug that you can serve your drinks from. Use a wood spoon or spatula to scrap the tomato around strainer to really make sure you get all the juicy goodness. Let tomato juice cool.
While cooling, juice lemons until you get a cup of fresh lemon juice. Add lemon juice to cool tomato juice along with 3 1/2 cups water. Mix and taste. If you think it needs a little sweetener, add a little in. If you think it tastes to strong, add in more water.
Good stir, ice in cups, a 2-3oz shot of vodka per 8-12oz cup of lemonade (the ratio is up to you my friend)… and your sitting pretty. Feeling a little fancy, take a basil leaf and wrap around a cherry tomato. Stab it with a tooth pick and garnish your drink. It ames for anise snack too.
Sit back, sip and enjoy.
I am not complaining at the least bit, but man, so,so,so many tomatoes. Everyday more and more are ripe and ready for the picking, some even starting to fall off the plants.
If you were to come to my house, you will notice that I have bowls and baskets all over the place, just full of not just cherry tomatoes, but big baskets of the most beautiful heirloom tomatoes this girl has ever seen. It’s actually causing me a little anxiety. I cannot bare to think of one single tomato going bad. I and am on a mission to eat as many of the heirloom ones as I can ever day. But that still leaves all the sweet little cherry tomatoes, which I do still snack on, (and try and make the mr snack on too) but am having a had time keeping up with eating all of those on top of the other kinds. But again, not a complaint, cause one can never really have too many tomatoes.
So instead of just continuing to make sauces and soups, (I have yet to do a tomato canning day, which is in need of happing asap) I figured I would give the mr a break and make him something a little different. A big tomato slab tart. And a tart needs some type of cream, so fresh corn and avocado cream happened as well.
Lovely looking, yummy, and pretty easy to make. Uses a good amount of tomatoes (I was fooled.. I used two pints for this tart, went to garden afterword, got 4 more pints) and is perfect for a lunch situation or a light dinner. Add some greens, maybe some cheese (the mr and his cheese) and you are sitting pretty and ready to go.
Lets get tarting!
The stuff… For the tart we have flour, slat, a little vinegar, icy cold water, frozen olive oil* and a big bowl of cherry tomatoes. For the avocado and corn cream, well we gots an avocado, a cooked cob of corn,a few cloves of garlic (I forgot in the picture) and a lemon. Salt and pepper for everything.
*Note. I recently read on the food 52 website that freezing the olive oil for crust makes the oil distribute more like butter and makes the dough super flaky and crispy, which it indeed did. I will forever freeze oil for oil crusts, Thanks food 52 for being so smart.
Start by making the dough. Whisk together the flour and salt, then dump in the frozen olive oil. Using a fork or a pastry cutter and working as quick as you can, cut the oil into the dough.
When the mixture resembles a course crumb, add in vinegar and mix with fork, then add in water, one tablespoon at a time, until the dough starts to comes together. Dump mixture out onto a floured surface and form into ball. Wrap in plastic and stick in the fridge for at least an hour or even over night.
Chilled dough placed on a lightly floured surface, ready to roll.
You know what to do here.. roll it out and stick it in a baking sheet or, if you don’t have a small baking sheet, use a large casserole dish. You could use a pie plate, but you might have a little extra dough (pie dough cookies?)
And dump in the tomatoes. Don’t forget to remove the little green tops if they have them. Drizzle with a little olive oil, season with salt and pepper. and into the oven it goes.
While the tart is baking, make the cream. Scoop fruit of avocado, the corn off the cob, a clove or two of garlic, juice of lemon, and salt to taste, into a blender (or bowl if using a immersion blender) and blend until smooth. Taste and ass more swooning if needed. and if you want the cream a little thinner, add in a slash of water.
Cream oh creamy goodness. (So great on tart, but also makes a great dip, toast spread, salad topper, or eaten straight with a spoon.)
The tart has been baking and after about an 45 minutes, it should be done. Remove from oven when the tomatoes have all bursted and are starting to caramelize and the crust is cooked through and golden brown,
Let cool for a few minutes. I
You got you tart, the cream, and if you are in into it, a nice serving of some freshy greens to some extra heft and color…SOmething on the more bitter side like kale or young chard pairs very well with the sweetness of the tomatoes.
A big slab on greens with cream on slab.
The mr added a little cheese to his… if your a cheese person.(he sure likes his cheese)
Pretty food.. Food so good!
Happy Humpty hump!
-C
For the Tart
2 pints of any variety cherry tomatoes. A variety look nice
1 3/4 cups all purpose flour
1/2 cup olive oil (frozen ahead of time)
1 teaspoon salt for crust
1 tablespoon apple cider vinegar
3-4 tablespoons ice water
salt and pepper
9×11 baking pan*
For the Corn Avocado Cream
1 cooked and cooled cob of corn
1 avocado
1 lemon
salt
2 cloves of garlic
*Note. I used a 9×11 baking sheet, but if you don’t have one, you can use a big glass casserole dish. Or you could even use a pie plate, but you will end up with a little extra dough and you might not need all the tomatoes.
Start by making your dough. Whisk together the flour and salt. Cut in the frozen olive oil into flour with either a pastry cutter or a big fork until it has a crumbly texture. Add in the apple cider vinegar and a tablespoon of water at a time until dough starts to come together.(about 3-4)
Dump out onto a surface and fomr into a disk. Wrap with plastic and stick in the fridge for at least an hour or overnight.
Preheat oven to 375
Get your chilled dough and, on a lightly floured surface,roll out into a rectangle roughly the size of your baking sheet. Place in sheet pan and make it look pretty. You can use your fingers to lightly press the dough into pan Dump in your cherry tomatoes. If you want, once the tomatoes are in, slightly fold the edges towards the tomatoes and away form the side of the pan. Sprinkle with salt and pepper and the finest drizzle of olive oil. Stick into the oven for about 45-55 minutes. The Pie is done when the tomatoes have popped and starting to brown and caramelize and the crust is golden brown.
While the pie is baking, remove corn from cob. Add to a blender with the avocado, garlic and and the juice of the lemon. Puree until smooth. Season with salt and pepper to taste.
To serve, slice big slabs of tart and spoon on big globs of the avocado corn cream. If your into it, a bed of fresh greens is very much nice.
Shovel into face.
Every year, the second weekend in August, the Stem family , siblings, cousins, even my 94 year old grandmother makes the trip from Easton PA, come together at, what we call, “the cabin.” (It’s more a house, but it started out as a cabin) . Its a little crazy, but such a good fun time.
This cabin, oh this place is magic. The air, the tree’s the streams, the mountains, and of course the people. It’s all the things that I love about life. Some of my earliest memories are from this place. Hanging out with my siblings, running around the meadow or through the woods. Playing in the swinging holes. My grandfather pulling taffy or making orange juice box houses with my grandmother. The giant rocking chair that my uncle made and all of us kids used to play on. So many camp fires and s mores. There are just so many memories because it’s been a part of my life, my whole life. It’s one of my favorite places in the world.
A little background on the place (what I can remember) Sometime in the late 70’s, my uncle and my grandparents bought a big chunk of land on the side of a mountain in the middle of nowhere Vt. After doing some clearing of trees, they went to building a cabin. (my aunt, grandmother, and dad helped a bit too). It was amazing, but quaint. A 2 story situation with a kitchen living area and one door to get in and out. At some point my grandparent ended up selling their share to my uncle and he took over the entry of the place. Over the years my uncle, (who is a carpenter, furniture designer,design professor, and all out crazy amazing person), continured to work on the place. He has added on a kitchen, a second floor bathroom, new this, and that, but never has it once felt like a patchworker pieced together place. And now the place is more like a amazing craftsman home, with just the right touches of cabin, but with two running toilets, a beautiful kitchen, electricity and running water ( There is even internet access, which sucks, but still).It is a little gem nestled on a side of a tiny mountain in one the most beautiful places.
So an awesome cabin in the woods with a bunch of crazy, but awesome people= Stem family reunion.
Here are some pictures of the shenanigans..
Not to much is going on here, just trying to enjoy the last bits of summer, while secretly saying to myself that I am ok for the hot weather to be gone, for summer to pitter out and let the cooler weather roll in. Bring on the sweaters, apples, and root veggies (and maybe a little more couch cuddling and a new tv show to sink my teeth into while knitting). And I have already noticed a few trees giving away some colorful leave. Foliage season… the best time of year (minus all the annoying leaf peepers) But before we get to ahead of ourselves, we have the other time of the year coming up.. Back to school!! I myself am not really effected by this,other then all the littles in my life are going back, which means less babysitting (happy!/Sad) And let’s not mention all the back to school supplies I am drooling over. Trapper keepers, watercolors and cool new backpacks. The kiddos are all getting ready with their new sneakers, crisp, empty notebooks, and a fancy new sweater. Me, I am just being jealous, hoping maybe one of them will give me one of their extra cool new pencils with the removable eraser. Maybe once everything ends up on clearance, I’ll buy myself a new composition notebook. You know, the ones where you can color all the white parts in with a bright pink neon marker. A customized badass notebook Those are my favorite.
So besides all that, here are some eventful things from the my life this week in list form.
got some husk cherries to make something special. and ate them all. Need to get more (more to eat, and more to make something with to share..maybe)
Starting knitting the mr his annual new winter hat (going with a grey watch cap)
Painted a ceiling gold
scratched my face on a raspberry bush
went to my family reunion, came home and found 2 white hairs on the top of my head (no joke)
Had two other awesome websites mention my recipes this week!!! (Food52 and feedfeed)
made a few jars of pickles
Discovered Reading Rainbow is now on Netflix.(my childhood right there)
Yeah, that’s about sums it up.
But here, have some internet stuff to check out.
-I think I need this entire bed set to be happy.
-And I want to do this to a set of sheet too!
-Totally into this house, especially the toilet on the door.
Not sure if this is for real, but it’t pretty freaking funny. Lady Gaga Threatening Legal Action Over Breast Milk Ice Cream Flavor ‘Royal Baby Gaga’
– I think I should get me some goats. Goats May Be Unwelcome In Zimbabwe’s Capital, But D.C. Loves Them
-The Duo Coffee Steeper. This might be fantastic.. Someone buy one and let me know how it works.
–Soothing Spaces… I like
-Watch This Hilarious Parody of Artisanal Food Makers
-I love The Purl Bee. Another project that I have to make.
And some photos from the week.
I probabaly have already told you, but August is for sure my favorite month of the year (well,one of my favorites)
There is bounties of bounties of fresh, sweet and colorful, oh so juicy, crispy crisp, just so f ing amazing, produce exploding all over the place. I have probably gained like 75 thousand pounds in the past month due to all of the fruits and veggies that I have been consuming. I am starting to consider it a full time job just to keep up with the eating.
Another reason why I love August so much is becauuse the days are still nice and warm, but the nights are starting to cool which means I get to make so much soup!!!!!.
This soup is the freshest freshy soup yet. Everything is from the farm and or the garden (except the salt pepper, vinegar and oil), some picked within hours of me making this.
. I am a lucky/spolied veggie brat.
Anyways. This soup. The fresh tomato base gives it a sweet, slightly acidic kick. So super creamy due to the lovely earthy stocks of the chard. Slightly spicy and earthy from the arugula* and chard green green. This soup… it just tastes so fresh and clean, yet hearty and satisfying. A perfect soup for a mid August night, eating outside, watching the sun slide behind the mountains and the temperature dropping just enough that you might want a light sweater. Or you can just eat it from the pot in the kitchen while watching TV. It’s good eating anyway you want.
*Here in America, it’s called arugula. Else where , it’s called rocket. I wish we all called it rocket, although I do like the name arugula, but for like my first born child or maybe a pet goldfish. Anyway, rocket is arugula, or vice versa.
Soup time!.
The stuff. Some big fresh tomatoes, a few stalks of chard, and a few handfuls of arugaula (aka rocket). A couple carrots, an onion, some garlic, salt and pepper and a bit of olive oil.. Oh, and I added some balsamic vinegar, which for some reason didn’t make it into the picture (sorry vinegar)
Start by removing the chard leaves from the stalks. Set aside leave with the arugula. Chop up the carrot, chard stems, onion and garlic and toss into a big pot with a drizzle of olive oil, a splash of water, and a sprinkle of salt and pepper. Stir around and stick o nthe stove on medium heat for about 10 minutes until the veggies start to soften up.
Now chop up the tomatoes into chunks and toss those right into the pot with the other stuff. Add in a few cups water and a few glugs of balazmic vinegar. Bring everything to a boil and then turn heat to medium low and place a lid on pot and let cook at medium heat for another 20 ish minutes, or until the tomatoes are falling apart.
Now that everything is all cooked up, blend it up.
And now take the chard leaves and the aruglula and chop into little pieces….into the pot they go.
Mix it all up.. and take the blender to the soup again….if you want a smaller sized bite.
Soup Into bowls..Then into mouth.
Happy August!!
And hey hey hey.. Have the best weekend!
-C
4-5 large fresh tomatoes
4 large stalks of rainbow chard
2-3 big handfuls of arugula
1 medium onion
1 large or 2 small carrots
4-5 garlic cloves
2-3glugs (about 2 tablespoons) balsamic vinegar
3 cups water
olive oil
salt and pepper
To start, remove stalks of chard from leaves and chop stalks, onion, carrot and garlic into chunks and place int a big pot with a drizzle of olive oil, a splash or water, and spinkle of salt and pepper. Place on stove on medium low heat sand cooke the veggies down until starting to soften and garlic is becoming fragrant. While that cooking, remove core from tomatoes and dice them up. Toss into pot with the cooked down veggies with the vinegar and water. Place a lid on the pot and let cook for about 20-25 minutes or until the tomatoes are falling apart.
When cooked, using with a hand blender or a normal blender, blend the soup until smooth. (if using blender, pour back into pot)
Now take the arugula and chard leaves and chop them into wee little picese and mix into soup. If you want to, blend the greens into the soup.. but not until smooth, unless thats what you want. Cook for another 5 minutes. Taste and season with more salt and pepper to taste.
Ladle into bowl and serve with lots of fresh cracked pepper, maybe a little balsamic drizzle or even some mustard (I at left overs with mustard and it rocked my world)
spoons work eel las eating utencils.
This past weekend was the annual Stem family reunion and I had signed up to bring a dessert to the circus, (circus being an event with lots of my family) I went out of my way to get the nieces, sweetest, most delicoius peaches and was planning on making them into some type of epic peachy peach cake, but being that the weekend turned into a shit storm, I didn’t get a chance to make that epic peach cake. So come Sunday morning, a few hours before we were suppose to leave for the reunion, I was deesertless.
So I did what anyone that has a bunch of the fruit, little time, and doesn’t want to make a big mess should do. I made a crisp.
And it was good. Gooey sweet and cardamon spiced peaches under a slightly sweet, oatie topping. A perfect dessert for a late summer afternoon. Served warm or at room tepature, add a little whipped cream or ice cream and a cup of coffee. Dessert time is perfect. And any left over makes for a fantastic breakfast treat….or just make it for breakfast, it’s totally a breakfast food too.
I am almost glad that I didn’t get a chance to make that cake.(although I really wanted to make a cake, just for shits and giggles) I’ll just make one later. But until then.
To the crisp!
The Stuff. Peaches of course and some old fashion rolled oats and a pinch of salt mixed with gluten free flour*. Some earth balance*, honey*, cardamon and cinnamon and a tiny bit or arrowroot powder
Notes.. You can totally use regular all purpose flour in place of gluten free. Also can sub regular butter for the earth balance and use maple syrup instead of honey..
In a bowl, mix/mush together the oats, flour, honey, half the cardamon and cinnamon, and earth balance. The mixture is going to be a little gloppy and wet, but that’s how you want it to be.
Toss the other half of the spices into the peaches with a bit of arrowroot powder or corn starch and mix all around.
If you peaches are not super yummy sweet, you can always drizzle in a little extra honey or maple here too.
Now place the peaches in a well greased oven safe skillet.
Distribute the topping all over.
And into the oven it goes..
After about 45 minutes, check for doneness. When top is all golden brown and nice… you are there!
. Ooey gooey peaches underneath all that golden crispy goodness….
Nailed it!
Have great day you guys! Crisp away!
-C
For the filling
4-5 Large ripe, but firm peaches
1 tablespoon corn or arrowroot starch
1 teaspoon cardamon
1/2 teaspoon cinnamon
tablespoon honey or maple (optional if peaches are not really sweet)
For the topping
1/3 earth balance or butter plus 1 tablespoon
1 1/2 cup old fashion rolled oats
1/2 cup gluten free flour or all purpose flour
1 teaspoon cardomon
1/2 teaspoon cinnamon
1/2 cup honey or maple
dash of salt
Preheat oven to 350
Slice peaches in half, remove pits, and cut into pieces and toss into a bowl with the cinnamon, cardamon and starch, In a large oven save skillet, smear or melt 1 tablespoon earth balance and cover bottom and sides of skillet. Add in the peach mixture. In a large mixing bowl, (using your hands if you don’t mind), mix together oats, flour, salt, spices, earth balance and honey. until a combined. Evenly disptuipt to the top of the peaches. Now place skillet into oven to bake. When the top golden brown and all crispy, remove from oven. Let cool for a few minutes and serve.
Some type of creamy situation like ice cream or whipped coconut cream would be extra nice here…but not necessary .
There is corn everywhere!!
This past weekend, the mr and I were out and about in the sticks of Vermont and got an eyeful of this very familiar sight of corn fields forever. It’s just part of the landscape.. Blue sky, big lush mountains, little rives and big fields of corn. It is ever so lovely… and so telling. Tall high corn fields just means two things. 1.We will be eating lots of corn, and, 2. the summer is winding down. So soon we will be talking apples and root veggies, but until then, we will just eat the corn and revel in what I consider one of the best and most beautiful times of the year here in Vermont.
And after seeing all the corn (and we have been getting a bunch in the farmshare) I realized that I need to step up my corn game.
What better why to fancy up some corn then to fancy up the stuff people like to smother on it…. butter.
Whenever I think about butter, I think about my sister, the one that, as a little kid, used sneak to the kitchen and eat whole sticks of butter. This (to me) just seemed like a pretty gross option for a snack, but you know, whatever floats your boat I guess.
Bur after making making this coconut butter, I can see the draw, for I would sure love to eat the entire contents of a jar of this butter. (I have been eating a spoonful here and there)
Lime cilantro coconut butter.. Its my new thing…corn or not.
The stuff. We have some lovely, super fresh from the farm, corn on the cob. Then for the coconut butter we have , unsweetended coconut flakes, a lime, som ecilantro and salt.
Dump coconut flakes into a food processor. Turn to on and let it go.
After about 7 minutes… you coconut will start to clump together and look like this. And maybe you are like, “this shit isn’t going to happen”.. well be patent. Scrap the coconut off the sides and keep the processor going.. scraping down the sides whenever you need to.
And eventually, after another 8-10 minutes, it will turn into this.. a nice creamy buttery butter.
Now add in the zest of the lime, the lime juice, a pinch of salt, and cilantro into the butter. Turn processor back on until combined.
And you got yourself some freak yeah cilantro lime coconut butter… ready to smother your corn with.
This amount is good for 6-8 corn cobs… Any extra is excitlent on any veggies, bread, cake, or spoon.
And stick that butter in a jar.
I dare you not to eat a spoonful right now. (I licked the bowl down clean)
So I hope I am not being presumptuous when I think that you know how to cook corn. Or maybe you have a specific way you like to cook your corn. But just in case, husk corn and stick either in a pot and boil until cooked,(about 8-10 minutes) or like me, char on the grill, or under the broiler.
So cook some corn….And smother it with the butter.
And there you have it, some freak yeah amazing lime cilantro coconut butter smothered on some corn.
So good…..so good.
Have a great day!
-C
1 1/2 cups dried unsweetened coconut flakes
1 lime
1/2 bunch of fresh cilantro (about a 1/4 cup chopped)
salt
1 tablespoon coconut oil (optional)
freshly cooked corn on the cob
Note. Any extra butter is good on anything and everyhitng!!!
Place coconut into a food prosser and turn to on. Prosse until coconut start to stick to sides. Stop, scrap down bowl, then conuitne to process. Repet this until the coconut has turned into a creamy buttery goodness.
Add the juice, the zest, a pinch of salt, and the cilantro to the butter. Pulse until combined. If you want to add in a little coconut oil here to make it a little smoother, go for it.
Scoop into a jar. When your corn is hot and ready, smother butter all over.
And eat. There swill be stuff stuck in your teeth..Don’t worry about it. Think of it as a snack for later.
This past week my dad has been in town to spend some time with the family. Besides going about my normal life, every day I have been with at least one, if not a bunch of my siblings and or father (Aaaaaaahhhhh!!!). Spending as much time as I have with them this week has made me realize how much I love them, and how crazy they are. I am happy to have spent all this time with everybody, but am very much excited to have a day to myself, because again, they are all f ing crazy.
But today is not a reclusive day.
Today is our annual Stem family reunion. We all get together, immediate and extended, at my uncles cabin, up in the sticks of Vermont and gossip, hike around, eat, and try not to drive our 94 year old grams completely cray. It’s one of the highlights of my summer.
So now, before heading out, I am trying to figure out what exactly I have for ingredients to throw together some type of peach situation… so I gots to get to that. And of course the coffee. I need the coffee, and lots of it.
Hope you folks are living up the end of summer!!!
Here is some internet fun stuff.
-This is so great I want to draw on my walls now
-The world we live in. Could Sexting Help Your Relationship?
– I love these cabins, the pictures are beautiful
-Another place I could totally live in
– Why is the world so beautiful.A theoretical physicist searches for the design behind nature’s beauty.
–These or these I can’t decide
-I love maps. Lithuanian Artist Makes Incredibly Detailed Paper Cuts Of City Maps
-Only in VT. One Vermont Ballet Group Is Mixing Dance With Cows In ‘Farm To Ballet’
The official, unofficial, last weekend of summer. A little sad, but not really, cause I am super pumped for fall. I have my sweaters unpacked, my knitting started, and am looking forward to eating nothing but apples and pumpkins for a while. I am ready.
Now to get through the next few days of close to 90 degree weather. (Globaly warming… you suck!)
This past week of summer has been great. We have managed to get a lot of work crap done, but also had time to do a little river hopping, have a sleep over with a few littles, and go to a family gathering. The mr, being the most bestest guy, even hand mowed out little yard so we can actually sit outside without being surrounded by 3 ft tall weeds and hay. He is so nice. We did get a chance to pick a few apples from our community garden (not sure of the variety, but they are so good!) and we played on one of the coolest,most dangerous, playgrounds around here. All in all, not a bad way to leave the summer behind.
And now it’s Sunday and I am feeling good. Going to sit around and read, knit, garden, and drink so much coffee. And best part? Tomorrow is Labor Day! Three day WEEKEND!!! so I will probably make tonight a party night and stay up past 9:30 (yes, I am an old lady) and binge watch the rest of season 1 of Playing House (fucking fantastic show) before it goes away and I don’t get a chance.
Lofty goals, but I think I can manage.
So how about you? Is this a three day weekend for you as well? Hopefully so and hopefully you are spending it doing you, and having fun, relaxing and remembering not to labor or at least not labor to hard.
Some internet stuff for you to peruse if you want.
–Another dream home/studio/camper. Why don’t I live here?
-Because I am support to live here! (This is the pretty much perfect in every way)
-Got 230K? If you do, you can buy a whole Spanish Village
-An oh so lovely home
–Writing in trees looks cool, but not something I would want to of by hand.
-Inspiration from 5 Super Organized Garages… If only
-Are you a stinky farter? Check these out! (hahaha)
-Which Hogwarts House Do You Belong In? Your Cooking Style Will Tell. I am a Ravenclaw
-So I don’t have a baby or one on the way, but when/if I ever do, I want this for baby.
-Why Are We Drawn To Heirloom Fruits And Veggies?
-A carrot cake that tastes like carrot. Because it should.
And some pictures from the past week.
Happy Weekend.. Hope your able to enjoy a long one!
-C
The past few weeks, whenever the mr and I have a free couple of hours, we have been hitting the countryside, in such of the best rivers (for me to play in and for him to fly fish)
We have been to many, but this one is my new favorite. There is shade to sit in, sun to bath in, and hiking trails to hike. There are little wading pools, deep spots that are great for fishing, and lost and lots of the most amazing rock formations. And bonus, the was not a mere person in site, only a few cute little frogs.
No matter that I think I broke the bottom of my foot walking barefoot in the water and jumping hard onto a rock, or that the mr came back with a touch of poison ivy (poison something). We still both love it and are looking forward to our next trip back with shoes and long sleeves!
You got any plans this weekend? If not, I am recommending that you hit a river. Bring a book, bring a picnic, and bring a little bucket for your river treasures. Soak up the last bits of the summer, take a break from the crazy, and just go. Trust, you will be happy you did.
Today I am going to spend the day hiding inside (it’s suppose rain all day) binge watching Top Chef, while baking as many cakes and cookies as I can. For I stumbled upon the amazing world of aquagfaba (bean water, which when whipped, act almost exactly like egg white). It’s freaking amazing and I now I must devote my life to it. (no, not really).
Other then the bean juice, this week had been good. Lots of amazing clouds in the sky, more super fresh summer veggies, bke rides, gardening, summertime fun. We really wanted to go camping this weekend, but sadly our plans fell through, which is probably a good because I really don’t think my body can survive any more bug bites. I think I might have contracted west nile from the 100 trillion bug bites that I got while strawberry picking. I also might have gotten a little poison ivy (can’t tell if its just more bug bites). Either way, my skin is destroyed and I am ready to tear it all off. Oh well, we did get to spend a day on a river where the mr fished and I played with rocks. Good times.
So today, baking with aquafaba, a little T.V, some watercolor painting, and maybe a little of that stinky pink lotion on my legs. And coffee. Lots and lots of coffee. Sounds like a pretty good day to me. Hope that you out there are going to do the same (maybe not play with bean water, but have a relaxing day)
Some fun and awesome internet stuff to peruse if you are hanging around the old computer.
– This is such a great design… I want one. Tiny Footprint: A Prefab Home for Two, in 183 Square Feet by Michelle Slatalla
– How To Make Slime…. My life is now complete.
-2015’s Crime Stories Are Riddled With Hangry People . My headline would be ..”Vegan girl reverts to cannibalism. Eats boyfriends arm off while stuck in traffic on the way to the farmers market”… HAHAHA
-Are You Flossing Or Just Lying About Flossing? The Dentist Knows. Just so you know.
– J.K. Rowling Announces ‘Harry Potter and the Cursed Child’ Will Hit London Stage. And of course it’s all the way in London. What about me?
– Really need to get me one of these. Camp in the Air: New Suspended Treehouse Tents and Hammocks
-Andrés Jaque’s giant water purifier unveiled in MoMA PS1 courtyard
– I am so going to be making this as soon as the chard is ready in the garden .A Genius Trick for Lighter, Smoother Hummus
THE LOVELY CRAZY
September 19, 2015 by maximios • Blog
Guacamole is amazing… anything avocado is amazing…this guacamole is amazing. White bean guacamole is amazing. And not that we really care, but this guac is half the fat then straight up guacamole. Plus it’s packed full of protein making it a kind of super duper, must eat all of it, kind of dip. And sweet potato anything will make me happy. Making queso dip with sweet potato and cauliflower is probably one of my best food combos so far. (after eating a butt load, I felt like I was a genius and made an amazing discovery) Again, not that we need it to be, but this is also a fat-free, vegan, gluten-free, super healthy, packed full of B12, fiber and nutrients, dip for all kind of dip.…. just another reason why you cannot feel bad when you finish off half a batch before you get a chance to stick it in a serving bowl. (I might have done that)
Here is what you need for a good time:
−These tortilla chips ….Check.
−Some Chopped Veggies (I want the veggies)…..Check
−Cauliflower Sweet Potato Queso.…Check.
−White Bean Guacamole…Check.
You are now ready for it. It being this party, that party, the Super Bowl, or a Wednesday afternoon.
To the left we have the makings for the cauliflower sweet potato queso.. Steamed cauliflower, a baked sweet potato, nutritional yeast, garlic, and chopped up red onion, red bell pepper and jalapeño. To make all you need to do it take the chopped peppers, onion, and garlic and sauté for a few minutes just to slightly soften and bring out flavors. While that’s going on, take the steamed cauliflower and sweet potato(skin off..but eat it, or save it for soup or feed it to the dog) and puree together with a blender or food processor. Add in nutritional yeast, about a tablespoon or two of hot water and, salt and pepper to taste. Blend for about 5 minutes until super creamy smooth. Add in sautéed stuff and pulse just enough to incorporated the veggies but not complete blend in. Stick in a bowl.
To the right we have white bean guacamole stuff. Two cups (or one can) rinsed white beans, one ripe avocado, a lime, a few cloves of garlic,(I also added a bit of garlic powered…I like my garlic) and some chopped up red onion and tomato. Place beans, garlic, avocado and lime juice in a blender or food processor and blend until smooth. Add salt to taste and toss in the chopped tomato and onion. Blend for sec to mix that in…Stick in a bowl
So there , dips for those sweet ass chips or whatever you want to dip or them spread them on.
And he guys…It’s FRIDAY! Have a fantastic day!
-C
White Bean Guacamole
Finley chop onion and tomato. Set aside. Place the beans, avocado, garlic, garlic powder, 1 teaspoon salt and the juice from one lime into a blender or food processor and blend until smooth. Add a splash of water if needed to help keep things moving. Taste and add more salt if needed. When smooth, add the onion and tomato and pulse a few times to mix in. Scoop into a serving dish and finish with a squeeze of lime and a bit of chopped onion and tomato.
Cauliflower Sweet Potato Queso
Finely dice the red pepper, jalapeño, onion and garlic and sauté in a skillet for a few minutes until slightly soften and fragrant. Take the pre-cooked cauliflower, sweet potato (skin removed), and nutritional yeast and place in a blender or food processor. Blend for about 5 minutes until creamy and smooth. Add in a tablespoon of water to keep things moving. When completely smooth, add in sautéed veggies and pulse a few times to combine. Scoop into a serving dish. If your feeling it, top with scallions and cracked pepper.
Serve dips with chips, veggies or anything you want. Also make great spreads for sandwiches and crackers too!