And for your Friday, I made these awesome little raw/ vegan/ gluten free cookies.
Now wait a minute. Don’t let all the labels of what is not in these cookies scare you away. Just focus on all the stuff that these cookies are made of. Almonds, Cashews, Coconut, Cocoa, Oatmeal. They are cookies made with lots of good yummy stuff that just happened to be enjoyed by those with specific food diets as well as those who eat anything. A cookie for all! See, don’t they sound excellent? Yes, yes they do. And they are good. So, so, good. Even the mr. is into them. And he is far from being raw/vegan/ gluten free.
And because these cookies are made with all sorts of good for you stuff (lots of proteins, good healthy fats, and complex carbs) you can pretty much feel zero percent guilt eating them. They a are a no joke, healthy, energy packed cookies of goodness. A fantastic way to start the morning, eat with lunch, as dessert, post work out, or eat as a late night snack. (Just don’t eat them all at once)
Now go for it!
The raw stuff. A cup of old fashion rolled oat that have been soaking in water for about an hour. Almonds(which I spent 20 minutes deshelling) cashews, dehydrated coconut flakes, some cocoa powder and a few medjool date. If your nuts are unsalted, add a pinch of salt too.
Dump everything into a food processor. BUT WAIT! Make sure to remove the pits from the dates)I have broken a blade in the past form a date pit)
Blend unit combined and a kind of rough dough is formed. It will be a little sticky. If it;s to sticky to handle, place into the fridge for a few minutes to set up.
Now take blobs of mixture and roll into balls
And you could totally leave them as balls… you can even play with your balls….
But I think they look nicer squished flat and topped with pieces of nuts and coconut. They look almost fancy, if I do say so myself.
Now have yourself a cookie, and place the rest in the fridge (they get harder and, if you can imagine, taste even better after a few hours of cold)
Freak Yeah FRIDAY! Do fu stuff!
-C
Makes 15 normal sized cookies (you can make more or less, depending on the ball size)
1 cups oat fashion oats soaked in 1 cup water for at least an hour (use gluten free oats if needed)
1/2 cup raw almonds
1/2 cup raw cashews
5-6 medjool dates
1/2 cup dehydrated flaked coconut
1/4 cup cocoa powder
a pinch of salt (if your nuts are unsalted)
Add all the ingredients into a food processer and blend until the mixer forms a cohesive dough. It;s going to be a tad sticky, but if it seems to sticky to handle, refrigerate for a little bit so it’s easier to handle. (I have no problem handling right away)
Scoop and roll into balls and either leave them as is or squish them flat. Sprinkle with chopped nuts and coconut
Eat one or two right away, then stick the rest in fridge.
A ok to eat as breakfast, with lunch, at dinner, as as snack, a post workout protein, or when sitting on the couch and watching TV.
This week started with the notion that I was going to make a big dish of potato salad. I boiled the potatoes so that they would be ready when I needed them and stuck them in a bowl in fridge. That was Sunday. Monday was super busy and I didn’t get a chance to get to the potaoes, but that was ok, I figured I would just make it the for Tuesday. (which has officially been dubbed family dinner night). But for the first time, my sister declined potatoes and said she was already making goulash, which turned out that no one really wanted to eat. (I bet they would have eaten the potato salad) And Wednesday we were in Montreal so no go there.
So last night (now Thursday) when I opened the fridge to contemplate the dinner options, I knew that whatever I was going to make, the potatoes had to be used. I could have made the potato salad that I had been planning on making all week, but the potaotes were a little on the weird side, not bad, just not the best. They needed to be cooked. Plus, I had eaten the avocados and tomatoes that I had planned on using for the potatoes so I think it just wasn’t meant to be. I was tired, so nothing to elaborate was going to happen. I wasn’t feeling like spending too much time in the kitchen cause I really wanted to bike to the garden. I already had my giant dinner salad made and the mr. was pretty hungry, so split decision.
Cheesey nacho potatoes
That mr.. he has got it made with me.
The stuff. Sliced up cold boiled potatoes, cheese, garlic and onion powder, salt and pepper. and a little bit of oil. And we need guacamole, salsa, something spicy in the form of jalapeño jam (I use it on everything!) and a bunch of fresh cilantro.
Spread the sliced potatoes on a lightly oiled baking sheet and drizzle with a tad bit more oil. Sprinkle with the spices and salt and pepper and pop those suckers into the oven.
Once the poatoes turn a golden brown and are all crispy, remove from the oven and sprinkle on the shredded cheese. Toss on a few spoonfuls of salsa, and add on the jalapeños. Pop back into the oven for another minutes or two until the cheese is all melty.
And cover the potatoes with lots of freshly chopped cilantro.
Serve with extra salsa, guacamole and if you have it, more jalapeño jam.
I was thinking that I would totally make these for my dad this Sunday, if he didn’t live all the way in Michigan. (I think it’s time to move back!!!)
Happy Friday..Have an excellent weekend!
-C
4-5 boiled potatoes the size of lemons (or 2 big ones)
1/2 to 3/4 cups shredded cheese (I used cheddar and can easily be made with vegan cheese)
heaping teaspoon garlic powder
heaping teaspoon onion powder
salt and pepper
olive oil
salsa
fresh cilantro (or if you hate it, some kind of fresh herb)*
guacamole*
jalapeños (or something spicy)*
*note.. These last three ingredients are optional, but you should definitely use them all.
Turn the oven on to 425 degrees
Thinly slice potatoes and place on a lightly oiled baking sheet. Drizzle with a bit more oil and sprinkle with the garlic and onion powder, salt and pepper. Stick into oven until potatoes are brown and crispy. Remove from the oven, sprinkle on the cheese, toss on the jalapeños and some globs of salsa. Place back into oven for a minutes or two or until the cheese is all melty.
Remove from oven and cover with a handful of freshly chopped cilantro.
Serve with more salsa, guacamole, and more jalapeños.
If eating all yourself, eat directly from baking sheet or if sharing, transfer onto a plates. (or eat from the baking sheet..less dishes, more conversation) Forks and fingers work equally.
Last week I bought this nice hunk of locally made tofu to bring to my sisters for dinner. I was planning on making T.A.L.T.’s, but when I told her what I planned on making, she turned it down. She asked, ” is there bacon with that? If not, I don’t really feel like tofu”. And I was like, “No there is not F**king bacon….. when did I mention bacon?”
We still went over for dinner, Just me,her,and the Mr. I brought myself a big salad. The other two ended up eating a frozen pizza and blue cheese dressing (I think they might have eaten dressing with a little bit of pizza…barf) But whatever, her lose, cause I made the T.A.L.T.’s a few days later. They were amazing (the tofu was soo good!) and I am pretty sure she would have loved them. Oh well, now she will just have to make them for herself if she ever decided to she wants one.
So here.. To everyone and to Shannon….. How to make a T.A.L.T. .. There is NO BACON!
The stuff… Some nice firm tofu, half a ripe avocado,lettuce (I used baby greens), and some sliced up fresh and tasty tomato. To spice up the tofu, we use galic powder, salt pepper, and a nice smokey paprika. Oh.. and a big hunk of a soft and crusty baguette to stick it all in.
To get this TALT going, thinly slice up as about a 1/3 of a block of tofu. (for one sandwich) Or slice up the whole thing to make more sandwiches.
On a plate or in a bowl, mix together the garlic powder, paprika and a little salt and pepper. Gently dredge both sides of each piece in the mixute.
Paprika is so bright and pretty.
Place the tofu in a lightly oiled and preheated skillet on medium heat. Cook each side until crispy and golden brown.
Slice you bread open and toast if you want. Scoop avocado onto the bread( a little on both sides). Add the tomato and the seasoned tofu and last but not least, pile on the greens.
TA DA! A Sandwich… a damn good one at that .
-C
Makes on 6-8 inch sandwich
1/3 block of extra firm tofu*
1/2 of a ripe avocado
1 small tomato thinly slices
a handful of baby greens or a few lettuce leaves
A 6-8inch hunk of a soft and crusty baguette (use a gluten free bread of choice if needed)
1 tablespoon SMOKEY paprika*
1 tablespoon garlic powder*
salt and pepper.*
*Note.. This is enough for one sandwich. If making more then one, use the whole block, or even if you not, you might as well cook the whole thing for and have some extra for later use. If you do cook it all, just add another tablespoon or so of the paprika and the garlic powder.
Remove tofu from package and stick between a clean dish towel. Press as much liquid out as you can without smooshing it. Cut tofu into 1/4 inch thick slabs. Mix the spices with a pinch of salt and pepper in a shall bowl or plate and dredge both side of the tofu in the mixture. Lightly oil and preheat a skillet to medium heat. When the tofu is seasoned, stick onto skillet and cook each side until crispy and brown. Remove from heat and let cool for a minute. (If you like you tofu a little more on the crunchy and dried out side you can stick the tofu in the oven for a few minutes)
To assemble. Slice bread, toast if you want. Place equal amounts of avocado on each side of bread. Layer on the sliced tomatoes, the cooked tofu and add on the greens. Close up sandwich and place on a plate.
Bite, chew, swallow.
Smile
You ever make dish, completely on the fly, just to use something up (I have a lot of ripe tomatoes) with no real expectation, just because… Then have it be one of the best freaking things that you have ever made? This salad is one of those things.. maybe not the best thing I have ever made, but definitely the best salad I have ever made…. this week.
A salad compiled of all things amazing, taking just a few minutes to make and is the perfect balance of uber fresh with baby spinach, raw kale, and crunchy quick pickled onions. Then adding a touch of warmth with the sweet and juicy seared tomatoes and big chunks of creamy avocado.
I mean, for reals. ……Best Salad Ever !!!! (this week)
Now let’s do this.
The Stuff. A big bowl of baby spinach and chopped up kale, a few sliced up roma tomatoes, some super thinly sliced red onion, half an avocado, red wine vinegar and salt and pepper. Before you do anything, place the sliced onions into bowl, sprinkle with a pinch of salt and add a few glugs of the red wine vinegar. You want the onions to sit in the vinegar for at least 5 minutes on the counter cause the longer they sit the more crispy pickly they get. (after eating onions like this, you will never want to eat them any other way) Lightly oil a skillet and preheat to a medium heat. Once the skillet is hot, sprinkle the tomato slices with salt and pepper and place tomatoes right on in, snugly, but not overlapping. Let cook for about 3-4 minutes, or until the bottoms start to brown. Flip and cook other side for another few minutes.Once the tomatoes are seared on both sides, remove them gently from skillet and toss them on top of the bowl of greens.
Take the pickled onions and toss those right on top, with any of the residual vinegar, add dice and scoop the half of avocado and toss that on in as well.And now eat the best salad ever (this week).
Make the day good!
-C
Skillet Seared Tomato and Quick Pickled Onion Salad
Serves 2 as a side, 1 for a hungry eater
2 large or 3 smaller roma tomatoes
1/2 of a red onion
2-3 tablespoons red wine vinegar
1 1/2 cups baby spinach
1 1/2 cups chopped kale
salt pepper
1/2 a ripe avocado
olive oil (to grease pan)
Thinly slice red onion and place in a bowl. Add vinegar into a and sprinkle with salt. Let sit on counter for at least 5 minutes, if not longer,
Slice tomatoes into 1/2 inch thick rounds and sprinkle with a pitch or salt and pepper. Lightly oil a skillet and preheat it on medium heat. Once the skillet is preheated, stick the tomatoes on it (watch out for splattering tomato juice) Cook first side for about 3 minutes or until the bottom has browned, then flip and do the same for other side.
One tomatoes are seared, place directly onto the greens. Now dump the pickled onions and residual vinegar on top. And dice up avocado and add that on top too.
Now eat your salad, fork or fingers…
And I know, ba-daaaamn. So good.
A couple of days ago, during a grocery store porous, I stumbles upon a produce item that I have not seen sold in stores before, Broccoli leaf. And I was kind of surprised to see that they were selling bunches of the leaf, organic, at 2 bucks a bunch. I was very excited ! But wait.. You can eat broccoli leaves? Heck yes you can! Broccoli leaves are fantastic. They taste kind of like broccoli, have a hearty texture like a collard, and can be used raw or cooked just like any other green. Its just one more super yummy green to add to your repertoire. So when I bring home something that I find to be a good score, like a bunch of broccoli leaves, I feel like I have to share it with the mister. (I am so nice) And this dish was how I shared them…. Tossed into a bowl of garlic raging pasta. The stuff…. A bunch of broccoli leaves, lots of garlic, pasta, olive oil, salt and a lemon. Pretty simple right? Fist off, get your water boiling for the pasta. Once its ready, drop a pinch of salt into the water and stick pasta in for the amount of time recommend by pasta box people. While the pasta is boiling, mince up the garlic (I used my garlic press) into a skillet and add in the oil. Stick on a burner on medium for a few minutes, stirring around to make sure the garlic doesn’t stick and burn. Once you start to smell the garlic, turn heat onto low, chop up the broccoli leaves (stems and all) and stir around until wilted and add in the juice of half a the lemon.When the pasta is cooked, remove a few tablespoons of starchy water and strain the noodles. Add water and pasta right into the skillet with the other stuff. Toss around, taste, season with salt and pepper. Go ahead and add some chopped tomato and or parmesan cheese if you want. And serve your amazingly amazing pasta. And make sure that you are ok with really smelly garlic breath…Casue it’s going to happen. Keep it good! -C
2 servings of your favorite pasta (spaghetti, penne, vegan, gluten free…..)
8 or so fresh garlic cloves
1/4 cup olive oil
salt and pepper
lemon (optional)
parmesan cheese (optional)
Start by bringing a pot of water to a boil with a pinch of salt. Add in pasta and cook per instructions on box. While pasta is cooking, mined garlic and add to a skillet with the oil. Place on a burner on medium heat and cook and stir until the garlic becomes fragrant. Chop the broccoli leaves (stems and all) into bit sized pieces and add to the garlic oil and toss around to wilt the leaves. Squeeze in some lemon juice. Once the pasta is done cooking, remove a few tablespoons of the starchy water and strain the pasta. Add the water and the noodles to the skillet, toss to evenly coat the pasta and call it down. Serve in a bowl or on a plate, topped with freshly chopped tomatoes and parmesan cheese if you so shall please and another little squeeze of lemon juice if you like. Watch your mouth.. it will be breathing out garlic like whoa.
My contribution to last nights dinner at my sisters…. Freshy fresh veggies spring rolls.I had about 30 minutes between work and getting over to my sisters house to throw something together so it needed to be something fast, easy, and something I could make without going to the store. She was making the main course (some teriyaki situation and rice) so I was doing up the veggies.
I had just bought a package of spring roll wrappers…. Bingo! The perfect and logical choice. I grab the wrappers, a variety of veggies and after spending 12 of my 30 minutes trying to scrub the oil based paint off of my face and hands, I still managed to completely prepare, construct, and take pictures of these lovely tasty spring rolls. and get over to my sisters in time for dinner.
Impressed?
Damn right!
The stuff. Carrot, beet, asparagus, red cabbage, and kohlrabi, which all (except asparagus, which I just cut into thirds) got cut into matchstick sized pieces with my mandoiln. Then there are the rice spring roll wrappers that we need to make the veggies into rolls. Also a bit of red wine vinegar to drizzle onto the veggies for a little extra zing. And lastly, soy, fresh ginger, and a couple cloves of garlic for a spicy salty dipping sauce.Start by having everything set out and ready to assemble. Fill a large shallow dish or baking sheet with really warm water. Working with one at a time,place a rice wrapper into water and let sit for about 10 seconds or until the paper starts to soften. Remove from water and place on a damp surface (just splash a little water on the counter) Take a little bit of everything and and place on the lower middle part of the paper. Fold in the sides first, then tuck and roll the wrapper as tightly as you can without ripping the wrapper.
Repeat until you have used up all you veggies.For the dipping sauce. Finely grate ginger and garlic and add to soy sauce. Stir… and it’s done.Freshy, pretty and fantastically delicious. And for real, took about 8 minutes to make. (I even had enough time to wash the dishes before we left!)
I am so awesome!
Hump Day Pow!!!!!
-C
Fresh Veggies Spring Rolls
Makes 8-10 but can easily be increased or decreased to desired amount
8-1o rice spring roll papers
Splash of Red wine or rice vinegar
1/4 cup soy or tamari sauce
2 cloves of garlic
teaspoon freshly grated ginger
1 medium carrot
1 medium beet
1/4 head of purple cabbage
10 thin fresh asparagus
1 small kohlrabi
Note… I used the veggies that I had in the fridge at the moment. If you have a bunch of veggies but not these particular ones, use what you have. Pretty much all veggies taste good inside a spring roll!
Gather your veggies and prep by either using a mandolin, a grater, or some sick knife skills, and julienne, shred, or slice you veggies into thin match sticks. Once all the veggies are prepared, sprinkle a little vinegar over the top.
For the rolls…Grab a large shallow vessel (a rimmed baking sheet works great) and add in warm water. Working one at a time, place the wrapper into the water for about 10 seconds or until the wrapper starts to soften. Remove and spread onto a clean, damp work surface. Gather a bit of each veggie that you are adding and place towards the bottom middle of the wrapper. Now fold the sides in over the pile of veggies. Then with the side closest to you, tuck and roll wrapper away from you, trying to keep it tight, but not to tight that it rips.. (Hopefully that makes since.) Place finished rolls onto a damp surface to keep from sticking and if not serving right away, drape with a damp towel or paper towel to keep from drying out.
For the soy ginger dipping sauce. Add grated ginger, minced garlic, and soy into a bowl and mix together. Serve with spring rolls.
Eat one, two, or a plateful. It’s nice to share but not a necessity.
My winter farm share is coming to an end this week. One more pick and then a three week stretch until the summer share starts… WHAT AM I GOING TO DO!!! Stock up as much as I can is what.
I have been strategic about the roots and veggies that I have chosen to bring home the past few weeks.(My farm lets you pick what you want) I know what I can buy at the store, things like carrots and potatoes, so I have been passing those up, but the roots like beets and celeriac… I have been bringing home baskets of those and hoarding them in the fridge and basement in preparation for the laps in farm fresh food and knowing that if I want to by these at the store it s going to coast me a million dollars a pound. (a for real million dollars)
Yup, lots of roots around here, especially celeriac root which is fantastic. I am kind of obsessed with celeriac, with its fibrous, knobby exterior, soft but almost meaty texture inside, and a flavor that is close to celery but so much better. I don’t know why it has taken me so long to do a posting featuring this amazing root vegetable (I eat it almost every day)
So here, an amazingly tasty, hearty but not heavy, celeriac recipe. Perfect for spring and the change into summer…. Mustard roasted celeriac with an fanatic split peas gravy that will have you licking you bowl clean.
The stuff….For the split pea gravy we have a carrot, a parsnip and a large onion chopped into small chunks. Salt, thyme, a bay leaf and of course the split peas. Then there is the celeriac root* sliced into 1/2 inch thick rounds and some plain old yellow mustard .
*Note. I don’t peel my celeriac root. I really enjoy the fibrous exterior but realize that some don’t(The mister does not like it) so peel it if you want.
Toss the chopped parsnip, carrot, onion and the spices into a pot on medium heat and let veggies sweat a few minutes until tender. Add in the split peas and enough water to cover everything. Turn pot on high and bring to a boil, then cover and turn to low. Make sure to give the pot a good stir ever few minutes and add more water if needed
While the gravy is cooking, take the celeriac rounds and brush each side with yellow mustard, sprinkle with pepper, and place on a baking sheet. Stick into the oven to roast for about 25 minutes, flipping the rounds after about 10 minutes.
Once the peas have soften, remove the bay leaf and puree until smooth and oh so creamy. Taste and add more salt and pepper if needed. If you find that the gravy seems to thick, just add in more water until it’s the consistency that you want. The gravy is made, the celeriac is roasted… now we are ready to eat!! Stick the celeriac on a plate and dump good amount of that gravy right on top. Feel free to add a bed of spinach, or a grain or anything you want, because why not, and also some chopped tomatoes for a little acid and prettiness.
Serve with the fanciest knife and fork you can find. Extra yellow mustard and sriracha sauce are great condiments to have close by.
Happy Tuesday!
-C
Mustard Roasted Celeriac with Split Pea Gravy
2 medium celeriac roots
6 tablespoons mustard
1 large carrot
1 medium parsnip
1 large yellow onion
2/3 cup split peas
2-3 cups water
1 bay leaf
2 teaspoons thyme or italian spice mix
salt and pepper
spinach (optional)
diced tomatoes(optional)
Preheat oven to 400 degrees
Small dice the carrot, parsnip and onion and throw into a large pot. Spinkle with salt and pepper, add in the thyme and bay leaf and add a splash of water. Stick on stove on medium heat and stir. Let cook until the veggies become soft and fragrant. Now add in the split peas and 2 cups of water. Bring to a boil then cover and turn heat down to medium low. Let cook until the split peas become tender (about 25 minutes) string on occasion and adding more water if the peas are not completely summered while cooking.
Once the peas are tender, let cool for a few minutes, remove bay leaf, and either dump into a blender or blend with an immersion blender until nice and creamy. If gravy seems to thick, add in more water.
Scrub or peel celeriac roots and slice them into 1/2 inch think rounds. Place on a baking sheet and brush mustard on both sides and spindle with pepper. Stick into oven for about 10 minutes, flip, then back into the oven for another 15 or so minutes, or unit the celeriac is tender.
When the celeriac is done remove from oven and stick a few rounds on a bed of spinach (or not, or any kind of grain or green you like) Top with a hearty helping of the gravy and toss on some chopped up tomatoes.
Eat with at knife and fork like a fancy person.
Happy Cinco de Mayo! And what better day to share my version of my oh so fantastic pico de gallo, or as I call it, super freshy salsa.
I love me some freshy salsa, It makes me oh so happy.
I make this stuff all the time, especially during the warmer months and tomato season. I usually make a batch right before a meal, just enough to eat right away, but sometimes I ‘ll make a big batched of it, thinking I’ll save some for the next day. It never makes it past the second day in the fridge because it’s just one of those things that when you see it, you want to eat it. Weird but true. And it’s totally ok to do so cause it’s basically eating a big bowl of healthy goodness, so eat on!
It takes no time to prepare, tastes super refreshing, goes on everything, and it’s just so freaking tasty. You can eat it with tacos and chips (the mister) or like me, I like to add it to everything; salads, popcorn, or directly in my mouth.
Make one batch, make 4, it doesn’t matter cause you will eat it all, and need to make more.
The stuff. Chopped Roma tomatoes, chopped red onion, a diced jalapeño, lemon, a bunch of cilantro, and salt.
Stick all the chopped stuff into a jar and add in the juice of the lemon. Roughly chop the cilantro and add that on in with a sprinkle of salt.
Mix it up….And thats it. Now eat… with something or without.
A spoon out of the jar is one of my favorite ways to go at it.
Happy Cinco de Mayo, Happy Tuesday!
-C
Pico de Gallo… Freshy Salsa
4-5 Roma Tomatoes
1 small red onion
1-2 jalapeños (Depending on heat preference)
1 lemon or lime
salt
1 bunch of cilantro (don’t use it if you don’t like it)
Chop tomatoes and onion and toss into a bowl or jar. Cut seeds from jalapeño(s) and dice up into little bitty pieces and add that to the tomato and onion. Roughly chop the cilantro and toss that in as well with the juice of the lemon or lime. Sprinkle with salt. Stir, let sit for a minutes, taste and then add more salt if needed.
Eat right away or make ahead and store in the fridge until ready to use.
Goes great with corn chips, tacos, toss onto salads or eat as is standing in front of the fridge. If someone is judging you, they are stupid.

THE LOVELY CRAZY
September 19, 2015 by maximios • Blog
FRIDAY YEAH YEAH!!!!
And for your Friday, I made these awesome little raw/ vegan/ gluten free cookies.
Now wait a minute. Don’t let all the labels of what is not in these cookies scare you away. Just focus on all the stuff that these cookies are made of. Almonds, Cashews, Coconut, Cocoa, Oatmeal. They are cookies made with lots of good yummy stuff that just happened to be enjoyed by those with specific food diets as well as those who eat anything. A cookie for all! See, don’t they sound excellent? Yes, yes they do. And they are good. So, so, good. Even the mr. is into them. And he is far from being raw/vegan/ gluten free.
And because these cookies are made with all sorts of good for you stuff (lots of proteins, good healthy fats, and complex carbs) you can pretty much feel zero percent guilt eating them. They a are a no joke, healthy, energy packed cookies of goodness. A fantastic way to start the morning, eat with lunch, as dessert, post work out, or eat as a late night snack. (Just don’t eat them all at once)
Now go for it!
The raw stuff. A cup of old fashion rolled oat that have been soaking in water for about an hour. Almonds(which I spent 20 minutes deshelling) cashews, dehydrated coconut flakes, some cocoa powder and a few medjool date. If your nuts are unsalted, add a pinch of salt too.
Dump everything into a food processor. BUT WAIT! Make sure to remove the pits from the dates)I have broken a blade in the past form a date pit)
Blend unit combined and a kind of rough dough is formed. It will be a little sticky. If it;s to sticky to handle, place into the fridge for a few minutes to set up.
Now take blobs of mixture and roll into balls
And you could totally leave them as balls… you can even play with your balls….
But I think they look nicer squished flat and topped with pieces of nuts and coconut. They look almost fancy, if I do say so myself.
Now have yourself a cookie, and place the rest in the fridge (they get harder and, if you can imagine, taste even better after a few hours of cold)
Freak Yeah FRIDAY! Do fu stuff!
-C
Makes 15 normal sized cookies (you can make more or less, depending on the ball size)
Add all the ingredients into a food processer and blend until the mixer forms a cohesive dough. It;s going to be a tad sticky, but if it seems to sticky to handle, refrigerate for a little bit so it’s easier to handle. (I have no problem handling right away)
Scoop and roll into balls and either leave them as is or squish them flat. Sprinkle with chopped nuts and coconut
Eat one or two right away, then stick the rest in fridge.
A ok to eat as breakfast, with lunch, at dinner, as as snack, a post workout protein, or when sitting on the couch and watching TV.
This week started with the notion that I was going to make a big dish of potato salad. I boiled the potatoes so that they would be ready when I needed them and stuck them in a bowl in fridge. That was Sunday. Monday was super busy and I didn’t get a chance to get to the potaoes, but that was ok, I figured I would just make it the for Tuesday. (which has officially been dubbed family dinner night). But for the first time, my sister declined potatoes and said she was already making goulash, which turned out that no one really wanted to eat. (I bet they would have eaten the potato salad) And Wednesday we were in Montreal so no go there.
So last night (now Thursday) when I opened the fridge to contemplate the dinner options, I knew that whatever I was going to make, the potatoes had to be used. I could have made the potato salad that I had been planning on making all week, but the potaotes were a little on the weird side, not bad, just not the best. They needed to be cooked. Plus, I had eaten the avocados and tomatoes that I had planned on using for the potatoes so I think it just wasn’t meant to be. I was tired, so nothing to elaborate was going to happen. I wasn’t feeling like spending too much time in the kitchen cause I really wanted to bike to the garden. I already had my giant dinner salad made and the mr. was pretty hungry, so split decision.
Cheesey nacho potatoes
That mr.. he has got it made with me.
The stuff. Sliced up cold boiled potatoes, cheese, garlic and onion powder, salt and pepper. and a little bit of oil. And we need guacamole, salsa, something spicy in the form of jalapeño jam (I use it on everything!) and a bunch of fresh cilantro.
Spread the sliced potatoes on a lightly oiled baking sheet and drizzle with a tad bit more oil. Sprinkle with the spices and salt and pepper and pop those suckers into the oven.
Once the poatoes turn a golden brown and are all crispy, remove from the oven and sprinkle on the shredded cheese. Toss on a few spoonfuls of salsa, and add on the jalapeños. Pop back into the oven for another minutes or two until the cheese is all melty.
And cover the potatoes with lots of freshly chopped cilantro.
Serve with extra salsa, guacamole and if you have it, more jalapeño jam.
I was thinking that I would totally make these for my dad this Sunday, if he didn’t live all the way in Michigan. (I think it’s time to move back!!!)
Happy Friday..Have an excellent weekend!
-C
*note.. These last three ingredients are optional, but you should definitely use them all.
Turn the oven on to 425 degrees
Thinly slice potatoes and place on a lightly oiled baking sheet. Drizzle with a bit more oil and sprinkle with the garlic and onion powder, salt and pepper. Stick into oven until potatoes are brown and crispy. Remove from the oven, sprinkle on the cheese, toss on the jalapeños and some globs of salsa. Place back into oven for a minutes or two or until the cheese is all melty.
Remove from oven and cover with a handful of freshly chopped cilantro.
Serve with more salsa, guacamole, and more jalapeños.
If eating all yourself, eat directly from baking sheet or if sharing, transfer onto a plates. (or eat from the baking sheet..less dishes, more conversation) Forks and fingers work equally.
Last week I bought this nice hunk of locally made tofu to bring to my sisters for dinner. I was planning on making T.A.L.T.’s, but when I told her what I planned on making, she turned it down. She asked, ” is there bacon with that? If not, I don’t really feel like tofu”. And I was like, “No there is not F**king bacon….. when did I mention bacon?”
We still went over for dinner, Just me,her,and the Mr. I brought myself a big salad. The other two ended up eating a frozen pizza and blue cheese dressing (I think they might have eaten dressing with a little bit of pizza…barf) But whatever, her lose, cause I made the T.A.L.T.’s a few days later. They were amazing (the tofu was soo good!) and I am pretty sure she would have loved them. Oh well, now she will just have to make them for herself if she ever decided to she wants one.
So here.. To everyone and to Shannon….. How to make a T.A.L.T. .. There is NO BACON!
The stuff… Some nice firm tofu, half a ripe avocado,lettuce (I used baby greens), and some sliced up fresh and tasty tomato. To spice up the tofu, we use galic powder, salt pepper, and a nice smokey paprika. Oh.. and a big hunk of a soft and crusty baguette to stick it all in.
To get this TALT going, thinly slice up as about a 1/3 of a block of tofu. (for one sandwich) Or slice up the whole thing to make more sandwiches.
On a plate or in a bowl, mix together the garlic powder, paprika and a little salt and pepper. Gently dredge both sides of each piece in the mixute.
Paprika is so bright and pretty.
Place the tofu in a lightly oiled and preheated skillet on medium heat. Cook each side until crispy and golden brown.
Slice you bread open and toast if you want. Scoop avocado onto the bread( a little on both sides). Add the tomato and the seasoned tofu and last but not least, pile on the greens.
TA DA! A Sandwich… a damn good one at that .
-C
Makes on 6-8 inch sandwich
*Note.. This is enough for one sandwich. If making more then one, use the whole block, or even if you not, you might as well cook the whole thing for and have some extra for later use. If you do cook it all, just add another tablespoon or so of the paprika and the garlic powder.
Remove tofu from package and stick between a clean dish towel. Press as much liquid out as you can without smooshing it. Cut tofu into 1/4 inch thick slabs. Mix the spices with a pinch of salt and pepper in a shall bowl or plate and dredge both side of the tofu in the mixture. Lightly oil and preheat a skillet to medium heat. When the tofu is seasoned, stick onto skillet and cook each side until crispy and brown. Remove from heat and let cool for a minute. (If you like you tofu a little more on the crunchy and dried out side you can stick the tofu in the oven for a few minutes)
To assemble. Slice bread, toast if you want. Place equal amounts of avocado on each side of bread. Layer on the sliced tomatoes, the cooked tofu and add on the greens. Close up sandwich and place on a plate.
Bite, chew, swallow.
Smile
You ever make dish, completely on the fly, just to use something up (I have a lot of ripe tomatoes) with no real expectation, just because… Then have it be one of the best freaking things that you have ever made? This salad is one of those things.. maybe not the best thing I have ever made, but definitely the best salad I have ever made…. this week.
A salad compiled of all things amazing, taking just a few minutes to make and is the perfect balance of uber fresh with baby spinach, raw kale, and crunchy quick pickled onions. Then adding a touch of warmth with the sweet and juicy seared tomatoes and big chunks of creamy avocado.
I mean, for reals. ……Best Salad Ever !!!! (this week)
Now let’s do this.
The Stuff. A big bowl of baby spinach and chopped up kale, a few sliced up roma tomatoes, some super thinly sliced red onion, half an avocado, red wine vinegar and salt and pepper. Before you do anything, place the sliced onions into bowl, sprinkle with a pinch of salt and add a few glugs of the red wine vinegar. You want the onions to sit in the vinegar for at least 5 minutes on the counter cause the longer they sit the more crispy pickly they get. (after eating onions like this, you will never want to eat them any other way) Lightly oil a skillet and preheat to a medium heat. Once the skillet is hot, sprinkle the tomato slices with salt and pepper and place tomatoes right on in, snugly, but not overlapping. Let cook for about 3-4 minutes, or until the bottoms start to brown. Flip and cook other side for another few minutes.Once the tomatoes are seared on both sides, remove them gently from skillet and toss them on top of the bowl of greens.
Take the pickled onions and toss those right on top, with any of the residual vinegar, add dice and scoop the half of avocado and toss that on in as well.And now eat the best salad ever (this week).
Make the day good!
-C
Skillet Seared Tomato and Quick Pickled Onion Salad
Serves 2 as a side, 1 for a hungry eater
Thinly slice red onion and place in a bowl. Add vinegar into a and sprinkle with salt. Let sit on counter for at least 5 minutes, if not longer,
Slice tomatoes into 1/2 inch thick rounds and sprinkle with a pitch or salt and pepper. Lightly oil a skillet and preheat it on medium heat. Once the skillet is preheated, stick the tomatoes on it (watch out for splattering tomato juice) Cook first side for about 3 minutes or until the bottom has browned, then flip and do the same for other side.
One tomatoes are seared, place directly onto the greens. Now dump the pickled onions and residual vinegar on top. And dice up avocado and add that on top too.
Now eat your salad, fork or fingers…
And I know, ba-daaaamn. So good.
Broccoli Leaf and Garlic Noodles
Start by bringing a pot of water to a boil with a pinch of salt. Add in pasta and cook per instructions on box. While pasta is cooking, mined garlic and add to a skillet with the oil. Place on a burner on medium heat and cook and stir until the garlic becomes fragrant. Chop the broccoli leaves (stems and all) into bit sized pieces and add to the garlic oil and toss around to wilt the leaves. Squeeze in some lemon juice. Once the pasta is done cooking, remove a few tablespoons of the starchy water and strain the pasta. Add the water and the noodles to the skillet, toss to evenly coat the pasta and call it down. Serve in a bowl or on a plate, topped with freshly chopped tomatoes and parmesan cheese if you so shall please and another little squeeze of lemon juice if you like. Watch your mouth.. it will be breathing out garlic like whoa.
My contribution to last nights dinner at my sisters…. Freshy fresh veggies spring rolls.I had about 30 minutes between work and getting over to my sisters house to throw something together so it needed to be something fast, easy, and something I could make without going to the store. She was making the main course (some teriyaki situation and rice) so I was doing up the veggies.
I had just bought a package of spring roll wrappers…. Bingo! The perfect and logical choice. I grab the wrappers, a variety of veggies and after spending 12 of my 30 minutes trying to scrub the oil based paint off of my face and hands, I still managed to completely prepare, construct, and take pictures of these lovely tasty spring rolls. and get over to my sisters in time for dinner.
Impressed?
Damn right!
The stuff. Carrot, beet, asparagus, red cabbage, and kohlrabi, which all (except asparagus, which I just cut into thirds) got cut into matchstick sized pieces with my mandoiln. Then there are the rice spring roll wrappers that we need to make the veggies into rolls. Also a bit of red wine vinegar to drizzle onto the veggies for a little extra zing. And lastly, soy, fresh ginger, and a couple cloves of garlic for a spicy salty dipping sauce.Start by having everything set out and ready to assemble. Fill a large shallow dish or baking sheet with really warm water. Working with one at a time,place a rice wrapper into water and let sit for about 10 seconds or until the paper starts to soften. Remove from water and place on a damp surface (just splash a little water on the counter) Take a little bit of everything and and place on the lower middle part of the paper. Fold in the sides first, then tuck and roll the wrapper as tightly as you can without ripping the wrapper.
Repeat until you have used up all you veggies.For the dipping sauce. Finely grate ginger and garlic and add to soy sauce. Stir… and it’s done.Freshy, pretty and fantastically delicious. And for real, took about 8 minutes to make. (I even had enough time to wash the dishes before we left!)
I am so awesome!
Hump Day Pow!!!!!
-C
Fresh Veggies Spring Rolls
Makes 8-10 but can easily be increased or decreased to desired amount
Note… I used the veggies that I had in the fridge at the moment. If you have a bunch of veggies but not these particular ones, use what you have. Pretty much all veggies taste good inside a spring roll!
Gather your veggies and prep by either using a mandolin, a grater, or some sick knife skills, and julienne, shred, or slice you veggies into thin match sticks. Once all the veggies are prepared, sprinkle a little vinegar over the top.
For the rolls…Grab a large shallow vessel (a rimmed baking sheet works great) and add in warm water. Working one at a time, place the wrapper into the water for about 10 seconds or until the wrapper starts to soften. Remove and spread onto a clean, damp work surface. Gather a bit of each veggie that you are adding and place towards the bottom middle of the wrapper. Now fold the sides in over the pile of veggies. Then with the side closest to you, tuck and roll wrapper away from you, trying to keep it tight, but not to tight that it rips.. (Hopefully that makes since.) Place finished rolls onto a damp surface to keep from sticking and if not serving right away, drape with a damp towel or paper towel to keep from drying out.
For the soy ginger dipping sauce. Add grated ginger, minced garlic, and soy into a bowl and mix together. Serve with spring rolls.
Eat one, two, or a plateful. It’s nice to share but not a necessity.
I have been strategic about the roots and veggies that I have chosen to bring home the past few weeks.(My farm lets you pick what you want) I know what I can buy at the store, things like carrots and potatoes, so I have been passing those up, but the roots like beets and celeriac… I have been bringing home baskets of those and hoarding them in the fridge and basement in preparation for the laps in farm fresh food and knowing that if I want to by these at the store it s going to coast me a million dollars a pound. (a for real million dollars)
Yup, lots of roots around here, especially celeriac root which is fantastic. I am kind of obsessed with celeriac, with its fibrous, knobby exterior, soft but almost meaty texture inside, and a flavor that is close to celery but so much better. I don’t know why it has taken me so long to do a posting featuring this amazing root vegetable (I eat it almost every day)
So here, an amazingly tasty, hearty but not heavy, celeriac recipe. Perfect for spring and the change into summer…. Mustard roasted celeriac with an fanatic split peas gravy that will have you licking you bowl clean.
*Note. I don’t peel my celeriac root. I really enjoy the fibrous exterior but realize that some don’t(The mister does not like it) so peel it if you want.
While the gravy is cooking, take the celeriac rounds and brush each side with yellow mustard, sprinkle with pepper, and place on a baking sheet. Stick into the oven to roast for about 25 minutes, flipping the rounds after about 10 minutes.
Serve with the fanciest knife and fork you can find. Extra yellow mustard and sriracha sauce are great condiments to have close by.
Happy Tuesday!
-C
Mustard Roasted Celeriac with Split Pea Gravy
Preheat oven to 400 degrees
Small dice the carrot, parsnip and onion and throw into a large pot. Spinkle with salt and pepper, add in the thyme and bay leaf and add a splash of water. Stick on stove on medium heat and stir. Let cook until the veggies become soft and fragrant. Now add in the split peas and 2 cups of water. Bring to a boil then cover and turn heat down to medium low. Let cook until the split peas become tender (about 25 minutes) string on occasion and adding more water if the peas are not completely summered while cooking.
Once the peas are tender, let cool for a few minutes, remove bay leaf, and either dump into a blender or blend with an immersion blender until nice and creamy. If gravy seems to thick, add in more water.
Scrub or peel celeriac roots and slice them into 1/2 inch think rounds. Place on a baking sheet and brush mustard on both sides and spindle with pepper. Stick into oven for about 10 minutes, flip, then back into the oven for another 15 or so minutes, or unit the celeriac is tender.
When the celeriac is done remove from oven and stick a few rounds on a bed of spinach (or not, or any kind of grain or green you like) Top with a hearty helping of the gravy and toss on some chopped up tomatoes.
Eat with at knife and fork like a fancy person.
I love me some freshy salsa, It makes me oh so happy.
I make this stuff all the time, especially during the warmer months and tomato season. I usually make a batch right before a meal, just enough to eat right away, but sometimes I ‘ll make a big batched of it, thinking I’ll save some for the next day. It never makes it past the second day in the fridge because it’s just one of those things that when you see it, you want to eat it. Weird but true. And it’s totally ok to do so cause it’s basically eating a big bowl of healthy goodness, so eat on!
It takes no time to prepare, tastes super refreshing, goes on everything, and it’s just so freaking tasty. You can eat it with tacos and chips (the mister) or like me, I like to add it to everything; salads, popcorn, or directly in my mouth.
Make one batch, make 4, it doesn’t matter cause you will eat it all, and need to make more.
Stick all the chopped stuff into a jar and add in the juice of the lemon. Roughly chop the cilantro and add that on in with a sprinkle of salt.
Mix it up….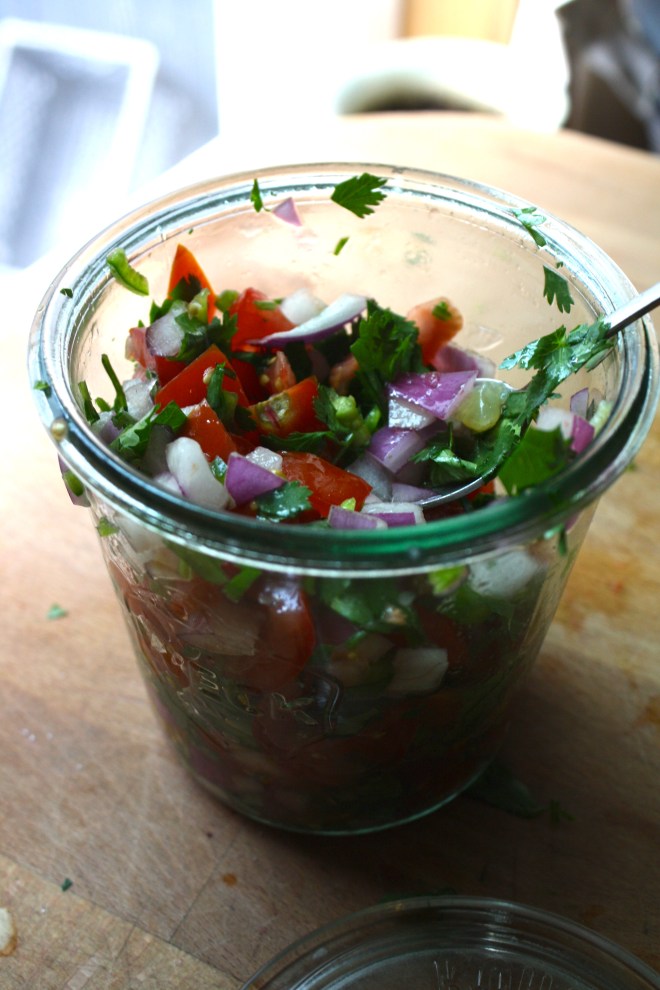 And thats it. Now eat… with something or without.
A spoon out of the jar is one of my favorite ways to go at it.
Happy Cinco de Mayo, Happy Tuesday!
-C
Pico de Gallo… Freshy Salsa
Chop tomatoes and onion and toss into a bowl or jar. Cut seeds from jalapeño(s) and dice up into little bitty pieces and add that to the tomato and onion. Roughly chop the cilantro and toss that in as well with the juice of the lemon or lime. Sprinkle with salt. Stir, let sit for a minutes, taste and then add more salt if needed.
Eat right away or make ahead and store in the fridge until ready to use.
Goes great with corn chips, tacos, toss onto salads or eat as is standing in front of the fridge. If someone is judging you, they are stupid.