I found another bag of frozen rhubarb in the chest freezer which is never a bad thing, but my rhubarb patch outside is growing strong and I will have all the fresh rhubarb I could possible eat within the next few weeks. So found rhubarb just means I need to eat it right fast before the fresh stuff comes in. (I haven%u2019t had a problem with that. it%u2019s almost gone already). Plus the other day while I was digging up and transplanting raspberry bushes to the back yard, my neighbor came over and gave me a gallon of frozen raspberries, harvested from said bushes that I was currently planting in my yard. Score for me! Free bushes and berries%u2026I have such nice neighbors.
So the logical thing to do with my new found and giving bounty was of course to hurry up and bake something. Cobbler. Why cobbler? Well, why not? I figured the mr would really like it and eat it and I also didn%u2019t want to make anything to fussy because I was just to dang busy spending all of my extra time outside doing outside things. And cobbler, it%u2019s not fussy because it is basically biscuits and jam baked up all together. Not a lot to think about and comes out looking all homey and sweet and smelling all nice and cozy. Doesn%u2019t that sound nice? And not a pain in the ass?
And best part. A made cobbler works as dessert or breakfasts or just a snack. Just asked the mr. He ate it for all the reasons. With a dollop of yogurt or cream of course because he is fancy like that.
And yeah the fruit I used was frozen, but fresh works just the same here too.
Now, lets get to that cobbler.
The stuff. Raspberries (frozen), rhubarb (frozen), sugar, flour, salt, baking power, cinnamon ,almond milk, apple cider vinegar, cornstarch, and oil.
Raspberries, rhubarb, sugar, cinnamon, cornstarch. Its all there in the bowl. Just needs to be mixed. So mix it.
Dump fruit mixture into well greased 8 inch pan and pop it into a hot oven to get a head start on baking.
While the fruits in the oven, make the biscuit dough. Mix the dry together then mix in the wet until just incorporated and a sticky dough forms.
Pulled from the oven, the fruit is starting to cook down and whoa, it just smells so good!
Drop on the biscuits dough on top of the fruit (careful of the hot pan). Evenly if possible, but don%u2019t work to hard to make it look perfect. Imperfection makes it look perfect, you know?
Once biscuits are on, lightly brush the tops with a little milk and sprinkle with more sugar then pop it back into the oven for another 25-30 minutes or until the biscuits are baked.
Pulled from the oven with a bubbly filling and a golden brown biscuity top. Things are looking good here.
And now it%u2019s time.
Dig on in my friend. Sever with something creamy like whipped coconut cream or some type of yogurt or ice cream situation of your choice. And again, this can be your breakfast.
Happy spring people!
-C
make a a 8 inch round which serves 5-6
For the Filling
2 cups raspberries (fresh or frozen)
2 cups rhubarb chopped into 1/2 inch to inch long pieces (fresh or frozen)
1 1/2 tablespoons corn starch
3/4 -1 cup sugar (lesser amount if you like a little more tartness. I used lesser amount)
1 teaspoon cinnamon
For the dough
1 cups all purpose flour
1 1/2 teaspoon baking powder
1/2 teaspoon salt
3 tablespoons sugar
3 tablespoons neutral flavored oil
1/2 cup plant based milk
1 teaspoon apple cider vinegar
Preheat oven to 350.
In a large bowl mix together the rhubarb and raspberries with the corn starch, sugar, and cinnamon. Grease a 8 inch round pan the is at least 2 inches deep (can use a slightly large pan or a square) and dump in fruit mixture. Place into oven to bake for about 15 minutes or the fruit starts to break down.
While fruit is baking, mix up biscuit dough. Flour, salt, 2 tablespoons sugar, and baking powder go in a large bowl and mixed until combined. Add in the oil, the milk, and the vinegar. Mix until just incorporated and a dough has formed.
Remove the fruit cooking from the oven. Turn heat up to 375.
Carefully drop spoonfuls of biscuit batter on top of fruit. Brush the top of the biscuits with a little milk and sprinkle with remaining tablespoon sugar. Place the pan back into the oven and bake for another 25-30 minutes or until the biscuits are all nice and golden brown on top.
Remove from oven and let cool for a few minutes before serving. Serve warm with a scoop or dollop of soothing creamy (coconut cream, yogurt, ice cream%u2026..whatever floats your boat.)
Left overs can be stored in pan, just cover it with something and place in fridge. Can be eaten cold to or reheated in microwave or oven.
It%u2019s a smoothie. And no, we have never really been smoothie people in this house, but what can I say, sometimes smoothies happen, especially when you have about 20 ripe bananas in the fruit bowl with no room in the freezer and no need for 7 loafs of banana bread.
So I smoothied. And I like it (a lot).
This is a smoothie of simplicity. Nothing fancy. Simplest of simple. Straight to the point. And all sorts of good.
You might think, does this simple smoothie you speak of taste very good? Yes, yes indeed it does. It is all sorts of fantastic. Basically if you like creamy, nutty, oaty, bananery things, you will like this. And it%u2019s a perfect breakfast, snack, dessert, or just wanting a little treat like thing that is not garbage food. A smoothie of all smoothies with the most basic ingredients. And takes about 15 seconds to whip up. Can%u2019t complain about that.
To the smoothie goodness!
The stuff. A ripe banana, some old fashion rolled oats, a pinch of salt, water, and a smidge of maple syrup if you want it.
Everything goes into blender.
And blended until smooth. Hence the word smoothie.
Pour it into a cup (or if you are feeling primal, drink it straight from the blender%u2026 it%u2019s totally cool)
And done.
A banana oat smoothie.
Let the good time roll!
-C
makes 1 smoothie
1 very ripe banana
1/3 cup raw old fashion oats
1 1/2 cups water
pinch of salt
a tablespoon or two of any sweetener you like (optional)
a pinch of cinnamon (optional)
Place everything into a blender and blend until smooth. Pour into a cup, sprinkle with cinnamon if you wish, and drink right away.
I am sadly at my last few bags of frozen garden foods from last season. As of now I have a bag of tomatoes, a couple bags of shredded zucchini, and a bag of rhubarb. Well, had a bag of rhubarb. I think I have eaten almost all of it already. My rhubarb patch better get up and producing stalks soon. And as for the rest of the veggies that I will require. Guess I am going to be surviving mostly on roots from farm share (we are getting a lot more greens though!!!!) and probably doing a bit more grocery shopping then I care too. A few more months. I can do it.
Anyway, enough about my freezer and lack of fresh produce problems.
Here in Vermont maple season is well on it%u2019s way making it a perfect time for anything maple. And rhubarb. Yeah I am using my frozen rhubarb from last year, but any time now (after the snow melts) there will be plenty of stalks for the taking. There will be so much maple and so much fresh rhubarb which are the perfect taste combination. Exciting times! And when added to oatmeal, things just get more gooder. (I know gooder is not a word but I think it should be) Oatmeal, especially baked, is the stuff where all gooder things start.
Have you had baked oatmeal yet? It truly is fantastic. Not at all gummy and gloopy like stove topped cooked oatmeal (but I like it like that too). It still has a good bite to it while still being soft and creamy and boy oh boy is it just the bees knees. With the addition of some crunchy almond friends, well even better. Trust me. If you are a oatmeal eater, you must try it baked. Best part is that it can be eaten as breakfast but also I have been serving it to the mr for dessert with a healthy drizzle of more maple. It%u2019s that good friends. From breakfast to dessert. Everyone is happy.
To the baked oatmeal.
The stuff. Old fashion oats, cinnamon, salt, baking powder, rhubarb (fresh or frozen), REAL maple syrup, some plant milk, a few flax eggs, a bit of tahini, and some almonds.
To start. Oats, cinnamon. salt, baking powder and almonds get a quick toss together in a big bowl.
If you rhubarb is not already chopped up into inch long pieces, do that. I already did before freezing it so yea me. Once its chopped, layer almost all of it (reserve a few small needful to toss on top) into a lightly greased 9×9 inch baking dish then cover evenly with the oat mixture.
In now empty bowl mix together the milk, the flax eggs, the tahini, and the maple until evenly incorporated.
Pour the wet mixture all over the oats and let it absorb.
Once the liquid is all absorbed , top with any left over almonds and the left over rhubarb. For good looks.
Pop into a hot oven to bake.
Golden brown with crispy edges. Rhubarb and maple baked oatmeal for all your maple, oaty and rhubarbie needs.
Fresh from the oven scooped warm into bowls. Top with extra maple if thats what you should want do.
Enjoy and happy maple season!
-C
Make a 9×9 pan of oatmeal
2 1/2 cups old fashion oats (make sure gluten free if need be)
2 1/2 cups fresh or frozen rhubarb chopped into inch long pieces
1 1/2 cup plant milk (water works but it won%u2019t be as creamy)
1/2 cup chopped almonds (optional)
Preheat oven to 375
Lightly grease a 9×9 inch baking pan (I used metal because it makes for crisper edges but glass works too) and dump 2 cups of the rhubarb in and evenly distribute on the bottom. In a large bowl mis the oats, the baking powder, salt, and cinnamon together. Mix in chopped nuts if you are using. Evenly cover rhubarb with oat mixture. In now empty bowl mix together the milk, flax eggs, maple syrup, and tahini until evenly incorporated. Pour mixture over oats. Let the mixture sit for a few minutes until the oats have abosbed all the liquid. Toss the rest of the diced rhubarb and a few more chop nuts to the top and pop into the oven to bake.
Bake for 30-40 minutes (shorter time for a wetter oatmeal, longer for a denser crispier oatmeal)
Once baked to your likeness, remove from oven and let cool for a few minutes just so it is not super hot. Scoop into bowls and serve warm with extra maple and milk or whatever you might want to serve with it.
Left overs last great in fridge for 3-4 days or individual portions can be frozen for a month or two. Just pop into microwave for a couple minutes to warm up.
I have very strong feelings for heart shaped baked goods. I think that everything, all year round, should be heart shaped. How lovely would that be? It would be ever so lovely, or I would think so anyway. And yes, ok, I was thinking about Valentines Day when I made these cupcakes but don%u2019t let that be the only reason you make a cupcake, cake, or any other baked good into the shape of a heart or pink for that matter.. Hearts are just so sweet and cute and dare I say cuddly? (Can you cuddle baked goods? Let me know if you have and do. We should talk about that). And pink is just a fantastic color, especially when it is the color of the flavor. Purple-y pink equals a taste like berry so all just makes sense.
Anyways. Cupcakes. Made with nutty almond meal to taste all nutty, frosted with blackberry and clementine frosting which is a pairing that all party and non party people will love. A down right deeelightful combination that will, no matter your circumstance in life, make you smile. Because lets get this clear, these cupcakes might look all lovey dovey and Valentines Day-e and are very much a perfect Valentines Day treat, but also can be an everyday, run of the milll, straight up any day, all day cupcakes. Valentines Day does not own the heart or pink.
These cupcakes are for you to love and you don%u2019t need to worry if they love you back. That would be weird.
Slightly off topic thought. How awesome would it be if someone made a cute little teddy bear that when you squeezed it it would scream %u201cWHAT THE HELL! GET OFF ME!%u201d Hahahaha. That would be amazing.
To the cupcakes!
The stuff. Flour, almond meal, baking soda, baking powder, salt, sugar, soy milk, oil, vanilla extract, and apple cider vinegar. Also some blackberry jam, powdered sugar, some vegan butter, and a clementine.
In a big bowl, whisk together the granulated sugar, flour, almond meal, salt, baking powder, and baking soda.
Add in the oil, vanilla, milk, and apple cider vinegar. Mix until fully incorporated.
And that is some mixed batter.
Scoop the batter into well greased muffin tins. I used to different shapes and sizes because I wanted too. You can do the same, just be aware different sizes will cook at different times.
And into the hot oven they go.
Baked, popped out of the tins, and cooling to cool.
Frosting time. Butter, clementine zest, and jam mixed together makes for the prettiest color.
Add in the powdered sugar and juice of the clementine and beat with a beater.
Pretty pink frosting. All natural.
And now that the cupcakes are cooled (you must wait until they are completely cooled) get them frosted.
And of course, adding sprinkles will only make them that much better.
And now you got the cupcakes which makes it cupcake time.
Look at that smile. Thats a smile just for cupcakes, not at all because I told him too.
Happy happy.
-C
Makes 12-16 cupcakes (depending on size)
1 1/2 cups all purpose flour
1/2 cup almond meal
1/3 cup neutral oil
1 1/4 cup almond milk
3/4 cup white sugar
1 teaspoon baking soda
1 teaspoon baking powder
1 tablespoon apple cider vinegar
1/2 teaspoon salt
1 teaspoon vanilla or almond extract
For the frosting
3 tablespoons blackberry jam or preserves with or without seeds
2- 2 1/2 cups powdered sugar
4 tablespoon vegan butter
1 clementine (zest and some juice)
Preheat oven to 350.
In a large bowl whisk together the flours, salt, baking soda and powder and sugar until fully combines. In a separate bowl mix together the oil, milk, vinegar, and vanilla. Pour into the dry and mix, by hand, until full incorporated. Scoop batter into well greased muffin tins (heart or other shape up to you) and place into oven for 13-18 minutes (shorter time for smaller cupcakes, longer for larger sized) or until lightly browned and a tester stuck into a cake comes out clean. Pull from oven when done and pop from tin. Place on a wire rack to cool.
While cakes are cooling, make frosting. Beat together the butter, zest of the clementine, and jam. Add in the sugar and the juice and beat until fully incorporated. If the consistency is to thin, add a little more sugar, to thick, more clementine juice or if out of juice, a splash of milk.
Once cupcakes are full cooled, frost, add sprinkle if you would like, and then the only thing left to do is eat them.
Eat cupcakes, store left overs in an air tight container in the fridge for up to a week.
I love pomegranates but barely ever buy them because they are usually really expensive. A few weeks ago I was pleasantly surprised to find that that the grocery store was selling them at a reasonable price so I bought one. Duh. Anyway, that was a few weeks ago and I have had the pomegranate chillin in the fridge, just waiting for the perfect time to bust open and retrieve all the bright pink jewel like seeds. But I also kind of forgot about it. It was hiding behind a giant rutabaga. When I finally grabbed the rutabaga for some soup, the pomegranate reviled itself again. It was time, it needed to be eaten. And me being me, I can%u2019t not share right? So I asked the mr what he wanted me to bake. He said muffins, and that is how I came to pomegranate orange and poppyseed muffins. Look at me, poster child for sharing good things. I should get a gold star!.
Anyway, these muffins came out awesome. First, they smell so good because anything baked smells good but the orange really shines and the smell is still lingering in my hair. Secondly, people really were into them. The mr said they were amazing when I finally let him eat one (two actually because I made them mini) and when I brought them over to Megans house for dinner, my Dad at one, then two, then three.. ..He stopped at 5, and this was after dinner. When a guy eats 5 muffins and is not a muffin man, you take it as a good sign.
Do yourself a solid this cold ass weekend and bake something. These muffins are a good place to start.
To the muffins!
The stuff. Flour, baking soda and powder, and salt in a bowl. Poppy seeds, an orange, a pomegranate, sugar, oil, vanilla extract, and a little apple cider vinegar.
First, remove arils from the pomegranate. Cut the fruit in half, hold the cut side face down in your hand and place over a large bowl. Take a wooden spoon and wack the outside of the fruit and the seeds will just fall out. And yes , the juice stains so watch out.
Next, whisk together all the dry ingredients and add in the sugar, poppyseeds and the zest of the orange. Whisk again to combine.
And then add in the oil, milk, vanilla, and the juice of the orange.
Mix until just combined. Don%u2019t over mix or the muffins will get gummy.
Last but not least, fold in the pomegranate arils.
Such a pretty muffin batter.
Scoop batter into well greased muffin tins and pop into a preheated oven.
Orange and crimson and golden brown goodness.
Out of tins and onto a rack to cool
And now you eat.
Stay warm this weekend and bake some muffins.
-C
makes 24 mini muffins or 12 regular muffins
2 cups all purpose flour
2 teaspoon baking powder
1 teaspoon baking soda
1 teaspoon salt
1/2 cup white sugar
1/3 cup canola oil
1 teaspoon vanilla
1 tablespoon apple cider vinegar
1 cup soy or plant based milk
1 orange
1/4 cup poppyseeds
1 cup pomegranate arils
Note. To easily remove arils (the seeds) from a pomegranate, cut it in half, hold the cut side down in the palm of your hand over a large bowl and wack the outside of the fruit with a wooden spoon. The arils will fall right out into the bowl.
Preheat oven to 350
In a large bowl, whisk together the flour, baking soda, baking powder, salt, and sugar. Zest the orange into the bowl and add in the poppyseed and whisk. Next add in the oil, juice of the orange (about 1/4 cup) the milk, and the vanilla. Mix until just combined. Fold in pomegranate seeds.
Scoop batter into well greased muffin pans and place in oven to bake until golden brown and a tester stuck into the muffins comes out clean, which should take about 15 minutes (22 fish if normal sized)
Once baked, pull form oven and pop from pans. Place on a wire rack to cool.
Eat at your leisure.
I love making cookies. There something about having to keep a close eye on the oven, the anticipation of the perfect time to pull them from the oven. Not too early, but never to late. You have to pay close attention. A cookie is not very forgiving if left in for a minutes or two too long. Those minutes can make or break a great cookie. OS baking them is , to me anyway, like a form of meditation. You can%u2019t be distracted, thinking about things like %u201cwho came up with the name Banana Republic and then used it for a clothing store?%u201d, or looking up %u201c large metal rolling balls%u201d. No, you need to pay attention to cookies, or else your cookies might burn. But don%u2019t let that scare you, and really, you can totally think of all the random, but important, things you want while baking, just use a timer or think those thoughts while watching the oven.
These cookies are the cookies that you want to make. A cookie yes, but almost like little soft cakes, full of chocolate chips and pumpkin seeds and warm spices to elevate the pumpkiness of the pumpkin. A perfect cookie to bake when you are freezing and want nothing else then to sit in front of a warm oven, spacing out, and revealing in the smell of a fall kitchen.
Fall pro tip. Place outwear in the kitchen while baking. I had my jacket on a stool close by while the cookies were baking and even now, a few days later, it still smell like cookies.
To the cookies!
The stuff. Brown and granulated sugar, flour with salt, cinnamon, allspice ,nutmeg, and baking soda and baking powder. Pumpkin puree vanilla extract, canola oil, chocolate chips, and toasted pumpkin seeds.
Mix the sugars, oil, vanilla, and pumpkin puree together until completely incorporated.
Whisk together all the dry
Add dry to wet. Mix gently, until just incorporated.
A now you have cookie batter. But wait, can%u2019t forget the chocolate and seeds.
I like to give the chocolate chips a rough chop to make the chips a bit smaller. You can skip this step or just use small chips if you want.
Chocolate chips and toasted pumpkin seeds go into batter.
After a gentle mix, it%u2019s time bake.
Scoop the dough onto a parchment lined baking sheet (important to line or use a splat mat, or else they will stick)
Into the oven and out of the oven. Bakes to a plump golden brown perfection.
All the cookies cooling on a wire rack like all cookies should.
And then thats it.
Cookies for you and cookie to share, if you are nice like that.
Happy weekend!
-C
make 2 dozen or so cookies
2 1/2 cups all-purpose flour
1/2 teaspoon salt
1 teaspoons baking powder
1 teaspoon baking soda
2 teaspoon cinnamon
1/2 allspice
1/2 teaspoon nutmeg
3/4 cup cane sugar
1/2 cup packed brown sugar
1 1/2 cups pumpkin puree
1/2 cup vegetable oil
1 teaspoon vanilla extract
1/2 cup toasted pumpkin seeds
2/3 cup chocolate chunks or chips
Preheat oven to 350
In a large bowl, mix together the sugars, purlin puree, oil, and vanilla until completely incorporated. In a smaller bowl, whisk together the flour, baking soda and baking powder, salt, all spice, cinnamon, and nutmeg. Once whisk, dump into the bowl with the wet gas gently mix together until just incorporated. Do not over mix.
Dump your chocolate ships onto cutting board and give them a rough chop just to break some of the chips apart. (or use small chips) Add the chop chocolate and the toasted pumpkin seeds to the batter and gently fold them, just to even distribute them.
Line being sheets with either parchment or use a splat mat and scoop equal size ball of dough onto the baking sheets. Leave enough room for the cookie to rise and spread. Place baking sheets into oven and bake fir 12-14 minutes or until the cookies have risen, are golden brown, and a tester stuck into the middle of a cookie comes out clean. Remove from oven and place the cookies on a wire rack to cool.
Then you eat them.
Any not eaten cookies should be store in an air tight container and can be left out at room temperature for a day or two but should be refrigerated or frozen for longer storage. The mr likes to eat them straight out of the freezer.
Who doesn’t like a good bun, right? %u00a0And just because this is where my mind wonders, peachy sweet buns. Doesn’t that sound like a pick up line or something you say to your significant other. Like, “Oh hey peachy sweet buns, you are looking good. Woo hoo”…….. Anyway, this is not about anyones peachy sweet buns, it it about actually sweet buns so u-hum, yeah.%u00a0
I am not trying to float my own boat here, but I am really really good at making buns, and you know what, I bet that you are too. They may seem a little intimidating, but really, it’s quite easy. I think what throws some people off is the yeasted dough and having to knead and waiting for the dough to rise,%u00a0but don’t let that stop you from sweet sweet buns. They are no harder to make then a boxed cake (maybe a little harder) and the results are by far more amazing and delightful (we don’t use the word delightful enough around here) then any old box or pre-made thing will ever be. Ever. Freshly made buns are what is right in this world.
If you are awesome and decide to make buns like any good person with a baking itch or a need for some sweet bun goodness does, make them peachy because its peach season and how can a peach bun not be that much more amazing? %u00a0Just think. Soft sweet dough, jammy cinnamon peaches, covered in a sweet lemony glaze……
Go on now, go and get yourself some peachy sweet buns.
The stuff. Flour and salt in the bowl, melted earth balance, brown sugar, yeast, warm soy milk, cane sugar, cinnamon, powdered sugar, a couple of lemons, and af course, peaches.
Warm (not hot) soy milk, yeast, cane sugar, an melted (but again, not hot) earth balance go into a big bowl and get whisked around. Then add in the flour and salt ans mix around until you just can’t.
Time to knead. Dump the dough ad all the little bits onto a flour surface. Gather it all together and knead away, for about 5-8 minutes, or until the dough looks like….
This. Nice and soft and glossy. %u00a0Lightly grease the bowl ans stick the dough back into it, covered with a towel, and set for about 1 hour to rise and double in size.%u00a0
As soon as the dough is set ti rise, start on your peach filling. Chop up enough peaches that you have about 2 1/2 cups of chunks.
Brown sugar and peach chunks go into a pot and stuck on a medium heat until they start to bubble then set to a low simmer for about 20 minutes or until the peaches all break apart and reduce by half.
Add in the cinnamon and stir.. Peachy goodness. Now quick and stick that shit in the fridge or freezer to cool down.
BOOM. Dough did what it’s job and doubled. Time o make the buns.%u00a0
Place the dough on a lightly floured surface and roll our into a rectangle of sorts that is about 1/2 an inch thick%u00a0
Cover the surface with all the peachy jammy goodness, and sprinkle on the remaining finely chopped peaches.
And roll, as tightly as you can, without squeezing all the filling out. I roll towards me, but roll away from you if it is easier. %u00a0It might get a little sloppy… it’s ok, just lick your fingers and keep going.%u00a0
Rolled and cut into 12 pieces.
Place the rolls carefully onto a grease and parchment lined baking 9×13 baking dish. In my picture I used a baking pan, which was not what I wanted to do, but I wasn’t thinking properly and so that’s what I did. Something with sides is preferable, but the baking pan did the job so really, your call.%u00a0
When you place the buns in the dish, place them toughen a bit, it helps then bake up high instead of out. %u00a0And any remaining go on jam that spilled out can get scraped right on top of the buns,%u00a0if you didn’t already eat it.
Now into the preheated oven these %u00a0babies go.
Look at those beauts. And they smell. A-MAZ-ING!!%u00a0
Right away get that glaze made. Powdered sugar, lemon zest, ans lemon juice. Super easy, just add the zest and juice to sugar and mix until smooth and glaze.%u00a0
Pour glaze over warm buns. Make sure to hit them all or someone is going to be pissed they didn’t get enough glaze…..%u00a0
Then it’s really just up to you whether you wait for coffee or tea or not, but really, just eat right away. There should be very little time between newly glazed buns and a bun in your face.
Enjoy the peaches!
-C
Makes 12 Buns
For the Dough%u00a0
3 1/2 cups all purposes flour
1/4 %u00a0cup cane sugar
1 cup warm soy milk
2 teaspoon or 1 packet yeast
4 tablespoons melted vegan butter%u00a0
1 teaspoon salt
For the Filling%u00a0
3-4 good sized ripe peaches (about 3 cups chopped peaches)
3/4 cup brown sugar
1 tablespoon cinnamon
Juice of half a lemon
For the Glaze
1 lemons
1 1/2 cup powered sugar
In a large bowl mix together the yeast,%u00a0warm (not hot) soy milk,%u00a0sugar, and melted but cooled butter. Now add in %u00a0the salt and the flour. Mix until it’s too hard to mix then dump it all onto a lightly floured surface and knead for 7-10 minutes until the dough is %u00a0soft, elastic-y,%u00a0and smooth. Place dough back into a clean lightly greased bowl and drape with a damp towel. Let dough rise for about 1 to 1.5 hours or until it has doubled in size.
While the dough is rising, chop the peaches up until you have about 3 cups.%u00a0Place 2 1/2 cups of the %u00a0peaches into a medium sized pot with the brown sugar and lemon juice and stick on medium heat. Set the rest aside. Cook for about 20 minutes, stirring and mashing with a wooden spoon every few minutes,%u00a0until mixture has become thick and reduced by about 1/2. Remove from heat, stir in cinnamon,%u00a0%u00a0and place in fridge to cool.%u00a0
Once thee dough has doubled, dump onto a flour surface and roll our into a retacnge that is about 1/2 inch thick %u00a0Grab your peach mixture and spread the mixture evenly over the dough. Evenly distribute %u00a0the remaining chopped peaches over jam. %u00a0And then it’s the to roll.
Start from the long side and start to roll toward the other end, keeping it as tight as possible without squeezing out all the filling. %u00a0Once rolled, slice into 12 even sized buns.
Place on a lightly greased and parchment lined 9×13 inch baking sheet or pan and let rest and rest for another20 minutes or so. OR if you want to wait to bake them off,%u00a0cover them with plastic and set into the fridge for up to 24 hours. When you are ready to bake, remove from fridge and let the buns set on counter to come to room temperature before baking.%u00a0
Preheat oven to 350.
Place rolls into oven. Bake for 30-35 minutes or until all the buns have gotten a nice golden brown on top, and if you want to take the internal temp, that the temp has reached 190.%u00a0
Once the buns are done %u00a0baking, mix together the zest and juice of the lemon and powdered sugar. If the glaze seems to thick, add more juice or water, to think, add more sugar. Pour glaze all over warm (but not hot) buns.
And now all you need to do is serve up those buns right away, nice and warned.
Any left overs should be stored in the fridge for 3-4 days but should definitely be warmed up in the microwave for a minute or two before serving. They also freeze well too.%u00a0
I have had a shit ton of rhubarb in the freezer all winter and the other day I just needed it gone so I made a big old batch of rhubarb jam. I was actually saving the rhubarb to make the mr a pie for his birthday, but that was like 2 months ago and he ended up with ice cream sandwiches and that is why the rhubarb was still there. Oops. But now we have rhubarb jam. And I think I was feeling a little guilty about not making the pie so I, like the nicest girlfriend in the entire universe (self proclaimed yes, but so so true), used that jam to make little hand pies. And in the shape of hearts no less because hearts are amazing and it doesn’t hurt that it is Valentine Day next week.%u00a0%u00a0
%u00a0Valentines Day. What does that even mean? I think the primary meaning of Valentines Day is that all things should be in the shape of hearts. The rest is to be determined by however you may feel about the day. Whether you hate it or love it, (we love it, It’s an excuse to take the day off and cover the house in hearts) you get to make the day yours. Just make sure that whatever you do, you make it with hearts. And with pie.%u00a0
These heart pies make for great little additions to hand made Valentines day cards ( I see maybe for a kids class), are great for breakfast because they are basically just like heart shaped pop tarts,%u00a0or even for an evening of bindge watching Netflix with a loved one or by yourself. It’s pie my friends. Eat it whenever, and with whomever you want.
Also, hearts are not just for Valentines Day. And pie sure the hell isn’t either. They both just happen to work for the occasion.%u00a0
The stuff. Basically just pie crust things. Flour, a little sugar, salt, coconut oil, and ice water. Then you need jam. Jam or perseveres of any flavor(s)%u00a0%u00a0you like. I used grape and rhubarb and %u00a0had raspberry here, but I didn’t use it because I didn’t want to open it.%u00a0
Make the crust. Flour gets mixed with the salt and sugar %u00a0and the the coconut oil gets cut in until it %u00a0looks all crumbly.
The water is added %u00a0in tablespoons until a shaggy from forms.
Dump the dough onto the counter to gather all together and rest for a bit. Or if you like, wrap in plastic and refrigerate %u00a0for up to a day or two.
After the dough got a good rest, roll it out and cut your hearts out. (Not your actual heart. Please and thank you)
Half of the hearts get a dollop of jam
Then each heart gets a top and crimped together with a fork. Poke a little hole into the tops to allow for steam to escape then all of the hearts get stuck into the fridge (or place on the back porch) to get nice and cold for a bit.
%u00a0After the chill, off they go into the hot oven to bake and be.
Look at these cuties. A little jam overflow, but all is good.%u00a0
I decided last minute that they needed a little something. Powdered sugar, lime zest, and lime juice. The easiest of glazes. You could do lemon, or vanilla, or almond, or even melt a little chocolate and drizzle that on. Next time I will do chocolate because because.%u00a0
Drizzle that glaze all over.%u00a0
There you have it. The cutest little hand pies ever .
Share if you like, or just eat them all. They are your hearts so do what you will.%u00a0
-C
makes 18 %u00a0three inch pies
2 1/4 cup flour
1 teaspoon salr
1 tablespoon sugar
8 tablespoons ice water
3/4 cup solid coconut oil
about 1 1/4 cups of some sweet ass jam (any kind you have)
1 cup powdered sugar
1 lemon or lime%u00a0
Combine the flour, salt and sugar in a large bowl. add coconut oil in large chunks then with a pastry cutter or a fork (I used a fork) cut the oil into the flour until the flour looks crumbly and there are lots of tiny little chunks of coconut oil throughout the mixture. Add in 5 of the tablespoons ice water, toss around, then add in another 3. Mix around until the dough starts to come together when squished. If it still seems too dry, add in a tablespoon or 2 more water. (I always end up using a little more in the winter months) You want the dough to just be able to come together. Dump dough onto counter and press and smoosh dough into a ball. Let dough sit for 1/2 hour or wrap in plastic and place in fridge and using within the next day or two.%u00a0
After the dough has had some time to sit, flour the counter and roll it out to about 1/2 inch thick. Take a cookie cutter ( I used a 3 inch at the widest part heart cookie cutter) and cut out the hearts (or whatever shape you want) Make sure you have 2 cutouts for each hand pie. After you have cut out as many as you can, gather dough into a ball and roll out again. Repeat until dough it gone.%u00a0
To assemble.
Place a tablespoon of jam into the middle of half of the cut out hearts . Gently place the remaining heart cut outs on top of those.%u00a0. Take a fork and press the edges together and then with the fork or a knife, pierce of cut a small slit into the tops to allow the steam to escape while baking. I did this directly on the baking sheet but found out after it was easier to do on the counter and then move it to the baking sheet. Do what ever it easier for you. Once they are all assembled and on the baking sheet,%u00a0refrigerate for 15 minutes.%u00a0
Preheat oven to 350
After the time in the fridge, remove and place directly into the hot oven. Bake for 20-25 minutes or until the bottoms are a nice %u00a0%u00a0golden brown. The tops will be slightly pale so check the bottoms.%u00a0
Remove and let cool on the baking sheet.%u00a0
While they are cooing, make the glaze. Zest the lime and juice the lime and combine with the sugar. If it is too runny, add a little more sugar, too dry, add in a splash of water. Once the pies are cooled,%u00a0drizzle each one with icing.
Now you have a bunch of cute little heart shaped hand pies and you should probably eat one (or a few)
If you want to get ahold of me for a non stupid reason, shoot me an email. I like questions, comments, suggestions, and even a simple hello. Just please no nuddies… I’m not like that.
You want to be a sponsor or partner with this…. Lets talk….
I am open to anyone in want or need of recipe development. I can help with that.
Let%u2019s talk about how soup is the perfect food. It can be light and fresh, hearty and deep, chunky or smooth. You can eat it with a spoon, or somtime a fork if warranted, or just drink it from a mug. It%u2019s usually a one pot meal, a small pot for one, a big pot for many. Make a pot of soup and eat some now and save some for later. It freezes amazingly well. Got a few extra sad carrots and wilted greens? Toss them into a pot with whatever you have on hand, maybe those veggies scraps and you got yourself a meal. Want something more filling, just add in some grains. Feeling sick, warm soup will make it all better. Feeling fresh and springy, well soup is there for you too. Seriously soup, you can do anything. If I could, I would marry you. %u2665%ufe0f
This soup is one of this velvety smooth, light but rich, delicious beyond delicious soups. A fresh spring time soup. Not to hearty or heavily spiced. Super rich and creamy and flavorful. Bright ass green which makes it amazing in itself, but then with a nice tangy sumac tahini swirl on top, well it is just about the most perfect soup. I made to share, which I did, (and everyone licked their bowls clean) but then hoarded the little bit left over and ate it cold for a late afternoon snack. That is another thing about soup, you can eat is cold and it is still amazing.
Tasty and delicious, and nutritious. This soup does it all.
To the soup!
The stuff. Peas, chopped broccoli, and chopped cauliflower which are all frozen and slightly thawed. You can totally use fresh here too, but I just so happen to have it frozen so you might as well save the fresh stuff for fresh eating. Also have a big yellow onion, a few cloves garlic, some tahini, a lemon, sumac, and salt and pepper. You need water which I did not picture here.
A pot, some water and a roughly chopped onion and the garlic start off this soup. Bring the pot to a boil, then turn to medium and let the onion and garlic cook until very tender. I have been making a lot of soups starting with this step lately. Boiling the onion and garlic until tender and fragrant really make for a super flavorful and clean soup base. Or soup in itself.
Now add in the broccoli and cauliflower to the pot and cook until tender.
Mid soup cooking time is a good time to make the sumac tahini sauce for the swirl. Basics here, just mix the tahini, the sumac, a pinch of salt and pepper, the juice of the lemon and a tablespoon of warm water together until smooth.
Last but not least, the peas. Add them in and they just need a few minutes to cook through.
And then it all gets blended to become this green creamy goodness.
Ladle into bowls, grab the sumac tahini sauce and swirl it on in. A tablespoon or so is good. And don%u2019t forget a little more pepper and another pinch of sumac for good measure.
Just appreciate for a moment. That is one good looking bowl of soup. And it taste even better then it looks.
-C
Makes about 4 serving
1 1/2 cups fresh or frozen peas
1 1/2 cup chopped fresh or frozen cauliflower
1 1/2 cup chopped fresh or frozen broccoli
1 large onion
3-4 cloves garlic
4-5 cups water
Salt and pepper
1 teaspoon sumac
2 tablespoons tahini
2-4 tablespoons warm water
Start by removing the papery skin from the onion and chop into a few big chunks. Remove the skin from garlic too. Place into pot with 4 cups water. Turn heat on high and bring to a boil then turn heat to medium and let onion are garlic cook until tender which should take about 15-20 minutes
Once the onion is cooked, add in the broccoli and cauliflower. Turn heat back to high and bring to a boil again then turn back down to medium heat. Keep cooking until tender (another 15 minutes or so) then add in the peas. Keep on heat until peas are cooked through then remove the pot from heat and either transfer to a blender or use a immusrian blender to blend the soup until smooth. Add a little more water if needed to get to the right consistency to blend right. Or if you want a thinner soup.
For the tahini sumac swirl just mix the tahini and sumac together along with the juice of the lemon, two tablespoon warm water and a pinch of salt. Mix together until smooth. If the mixture is to thick, add another tablespoon of water.
To serve. Ladle or pour soup into bowls and drizzle and swirl the tahini sumac on top. Sprinkle with pepper and a pinch more sumac and you are good to go.
I am obsessed. For real. That might seem like a strong statement for a feeling about a food, but right now, it is truth. I spend more time then I want to admit thinking and drooling over Socca, which is, to those who do not know, the most basic chickpea flour pancake-y bread thing. Chickpea flour, water and salt. Cooked fast under the broiler in a screaming hot skillet. That is it. And it is amazing. Depending on how you make it, it can be creamy and soft or more cracker like with some crisp crunch to it. Either way, it is just so freaking good. Of course, what I am dreaming about regarding it is not just plan basic socca (which I have made 3 times in the past 3 days) but different flavored soccas (I have experimented with lot of seasoning, and they are all A+) with all sorts of different topping and using it in all sorts of different ways. But for now, I wanted to keep basic so we all know how good simplicity is. We will go from here.
There is no stopping me. There is no stopping the socca.
Now to my new favorite food, the socca.
Chickpea flour, salt and water. That is it. Mix it all up.
Batter all smooth and now in need of a rest. Half an hour or up to a day of rest is good.
Now to cook the socca. You need to use something oven safe like cast iron. The trick here is to preheat the skillet while you are preheating the oven. Crank oven to 450 with the skillet in oven and once the oven reaches temp, turn oven over to a high broil. Let the skillet get really hot for another minute or two then remove skillet from oven (carefully!!!) and give it a splash of oil. Don%u2019t preheat the skillet with oil in it or else it will start to smoke and get gross.
Now that you got a nice hot and oiled skillet, grab the rested batter and pour half of it in. Tilt skillet around to coat bottom then stick skillet back into oven under broiler and cook for 4-8minutes. ( It depends on your broilers strength and your preference for blisters)
Out from the broiler. Cooked and slightly blistered. I went easy on this one. The next one got a few more blisters.
2 soccas, one a little thicker then the other. One a little more blistered then the other. Both in my belly.
So many Soccas to come.
So. many. Soccas.
-C
makes two 10 inch soccas
1 cup chickpea flour
1 cup room temperature water
1/2 teaspoon salt
olive oil for pan
Mix chickpea flour, salt and water together into a bowl until smooth. Let mixture rest for at least half an hour or up to a day.
When ready to make the socca, preheat oven to 450 with a 10 inch oven safe skillet (I used cast iron but any oven safe dish would work) in oven.
Once oven reaches temp, turn oven over to broil and place skillet under it for a minute to really heat the skillet. Carefully, with oven mitts, remove hot skillet from oven and brush or pour a smidge of oil into the hot skillet to coat bottom. Pour in half the batter and tilt around until bottom is coated then place skillet back into oven under broiler and cook for 4 -8 minutes or until the socca starts to blister. (it kind of depends on your broiler so keep a close eye on it) Remove from oven and slip socca onto cutting board. Sprinkle with salt and pepper. Drizzle with olive oil if you like. Then all you do is cut and eat.
Left over socca can be stored in fridge and reheated in oven or toaster.
Note. IF you want a slightly thicker socca, use a 8 inch skillet. For a thiner, more cracker like socca, pour in 1/3 of the batter at a time (you will end up with 3 instead of 2)
It is spring yes? I know it is officially spring but around here it has been more or less still winter which is to be expected but is, at this point, no longer welcomed. I, as well as everyone else I talk to, are over it. Enough snow. enough of the hats and jackets. Just enough.
But the bright side of the chilly, cold weather is that we can and still want to turn the oven on and cook things. And because I turned the heat off a little prematurely, I am cold so I really want the oven on.
One skillet, a little chop action, a stir, some good time in the oven and there you go, food for your belly. Not a ton of dishes to do, steps to fallow, thoughts to think (other then eating thoughts). A good old, hearty, simple to toss together, spicy, delicious skillet of goodness. Prepare it fast, pop into warm oven, sit in kitchen drawing up plans for the spring veggie garden, and then eat yourself warm. What more can we ask for?
We can ask for spring weather because seriously. But other then that.
To the goodness of cajun lentils and rice!
The stuff. Lentils, brown rice, cajun seasoning, some crushed tomatoes, an onion, a carrot, a few cloves garlic, some cauliflower, water, oil, and salt and pepper.
First off, mince garlic and chop up the cauliflower, carrot, and onion into small pieces.
Toss it all into a good sized oven safe skillet with a splash of oil. Mix in the cajun seasoning too and stick o nth stove on medium heat for a few minutes.
Cook until fragrant and slightly tender. Taste it, it is good.
Dump in the lentils and rice. Then dump I the tomatoes and the water. Give it all a mix.
And after. All done. Now dinner.
Grab some green thing to chop and toss on for some color.
Now grab some bowls, a few forks, and get to eating.
-C
Serves 4-6
3/4 cup uncooked brown or white rice
3/4 cup dried green lentils
2 cups crushed tomatoes (preferably not salted)
2 1/4 cups water
3 tablespoons cajun seasoning (see note)
1 large carrot
1/4 head of cauliflower (about 2 cups chopped)
1 large yellow onion
2-3 cloves garlic
1 tablespoon olive oil
salt and pepper
Note. Store bought cajun seasoning usually contains salt and pepper so when seasoning, be aware of the amount of salt (if any) you choose to use.
Preheat oven to 350
Start by chopping the carrot, onion, and cauliflower into small pieces. Mince the garlic and toss it all into the skillet with the olive oil. Stir in the cajun seasoning and sprinkle in salt and pepper if it needs it. Place skillet on medium high heat and cook veggies until fragrant and slightly tender which should take about 5 minutes then remove from heat. Dump in the lentils, rice, water and tomatoes. Stir until mixed then either place a lid or foil over the top. Place into preheated oven for about an hour, removing the lid or foil after 40ish minutes and giving it a stir when you do. The bake is done when the rice and lentils are fully cooked, but if you are into a crispy top and crunchy sides, by all means, cook a little longer.
Remove from oven when fully cooked and you are happy with crispness. Let cool for a few minutes, toss on some chopped green something or another if you want, and serve it up.
Left overs store great in the fridge for a few day and freeze well too.
It%u2019s a smoothie. And no, we have never really been smoothie people in this house, but what can I say, sometimes smoothies happen, especially when you have about 20 ripe bananas in the fruit bowl with no room in the freezer and no need for 7 loafs of banana bread.
So I smoothied. And I like it (a lot).
This is a smoothie of simplicity. Nothing fancy. Simplest of simple. Straight to the point. And all sorts of good.
You might think, does this simple smoothie you speak of taste very good? Yes, yes indeed it does. It is all sorts of fantastic. Basically if you like creamy, nutty, oaty, bananery things, you will like this. And it%u2019s a perfect breakfast, snack, dessert, or just wanting a little treat like thing that is not garbage food. A smoothie of all smoothies with the most basic ingredients. And takes about 15 seconds to whip up. Can%u2019t complain about that.
To the smoothie goodness!
The stuff. A ripe banana, some old fashion rolled oats, a pinch of salt, water, and a smidge of maple syrup if you want it.
Everything goes into blender.
And blended until smooth. Hence the word smoothie.
Pour it into a cup (or if you are feeling primal, drink it straight from the blender%u2026 it%u2019s totally cool)
And done.
A banana oat smoothie.
Let the good time roll!
-C
makes 1 smoothie
1 very ripe banana
1/3 cup raw old fashion oats
1 1/2 cups water
pinch of salt
a tablespoon or two of any sweetener you like (optional)
a pinch of cinnamon (optional)
Place everything into a blender and blend until smooth. Pour into a cup, sprinkle with cinnamon if you wish, and drink right away.
It is getting oh so much nicer out yeah? Springing and such, well kind of. Still a wee bit chillier then it should be around here but still, it is spring and I am taking it.
And with the spring, I feel the itch, the itch to spend all of my free time outside. Out doing things that are not inside because I spent the last 7 long months inside way too much. I needed to be outside as much as possible and as it gets even nicer and warmer and garden temperature-able, I am basically going to be living outside.
Bring in sesame noodles. Super fast, super easy, super duper in every way. Make a big old batch and eat now, eat later, eat hot or eat cold. Everyone loves them, they love you, etc. etc%u2026 A perfect meal to have in rotation when you know that you are not going to have or want to spend much time cooking in the kitchen because you will be outside playing in the dirt and soaking up the sun. And think about all the picnics and BBQ%u2019s to come. These suckers are fantastic to have at any outdoor eating event. They are even peanut free so you can safely bring them to potlucks and such and don%u2019t have to worry about accidentally kill a peanut allergy person. And you can make them gluten free as well if you sub in your favorite gluten free pasta. These noodles, I am telling you. They are a winner in every way.
So with out further ado, the noodles!
The stuff. Spaghetti noodles, tahini, a few cloves of garlic, some toasted sesame oil, soy sauce, red wine vinegar, honey (used whatever sweetener you like), red pepper flakes, tasted sesame seeds some cabbage, half a red onion and a carrot.
Get pasta cooking. Boil water, drop noodles in, you know the drill. Cook as long as the the noodles need cooking, just make sure to not over cook them cause soggy noodles are nasty.
Chop, shred and julienne the cabage, onion and carrot. Nice and thin.
Mince the heck out of the garlic. Or use a garlic press if you want.
Now make the sauce. Add the minced garlic, along with the soy, sesame oil, vinegar, sweetener, and chili flakes to the bowl with the tahini. Mix, mix, mix until it is all incorporated and not lumpy. And that is that.
Noodles should be done by now so strain them out.
Add the prepared veggies to a big bowl.
Add in the cooked noodles
Cover with sauce and toss all around until all the noodles are coated and delicious. Sprinkle with sesame seeds and a pinch or so more of pepper flakes.
And then it is time. Eating time.
Happy spring!
-C
serves 3-6
3/4 lb (3/4 of a package) of your favorite spaghetti noodles (or linguine or similar noodle)
2 tablespoons toasted sesame oil
1/4 cup soy (low sodium if you have it and gluten free tamari if needed)
3 tablespoons red wine vinegar
3 tablespoons tahini
2-4 teaspoons red chili flakes
1-2 teaspoons sweetener of choice (maple, honey, or brown sugar)
4-5 cloves garlic
1-2 tablespoons toasted sesame seeds
about a 1/4 head of cabbage
a carrot
small red onion
Bring a pot of water to a boiling cook the noodles as directed on package. You want them al dente, cooked all the way, but barely. No soggy noodles. (unless you like them soggy)
In the mean time, shred the cabbage, julienne the carrot (or shred it) and slice the onion so very thinly. Place into a large bowl. Now mince garlic and place into a bowl along with the soy, sweetener, vinegar, tahini, sesame oil and a teaspoon or two (more for spicier) of chili flakes and whisk until completely incorporated. Taste and adjust if needed. Add more tahini for more body, more sweetener if needed or more hot pepper flakes for more spice.
Once noodles are cooked, drain and place into large bowl along with the shredded and julienned veggies. Pour in the sauce and toss it all around until all the noodles are covered. Sprinkle in the toasted sesame seeds and a small pinch more of the red pepper flakes.
Eat. Eat warm, room temp, or cold. They are delicious any way.
Any left overs just stick in fridge. Can be reheated or not. Also, you can make the sauce and the noodles a few day ahead of time of when you want to have the dish Just mix the sauce with the noodles when you are about to serve them%u2026 So simple!
I am sadly at my last few bags of frozen garden foods from last season. As of now I have a bag of tomatoes, a couple bags of shredded zucchini, and a bag of rhubarb. Well, had a bag of rhubarb. I think I have eaten almost all of it already. My rhubarb patch better get up and producing stalks soon. And as for the rest of the veggies that I will require. Guess I am going to be surviving mostly on roots from farm share (we are getting a lot more greens though!!!!) and probably doing a bit more grocery shopping then I care too. A few more months. I can do it.
Anyway, enough about my freezer and lack of fresh produce problems.
Here in Vermont maple season is well on it%u2019s way making it a perfect time for anything maple. And rhubarb. Yeah I am using my frozen rhubarb from last year, but any time now (after the snow melts) there will be plenty of stalks for the taking. There will be so much maple and so much fresh rhubarb which are the perfect taste combination. Exciting times! And when added to oatmeal, things just get more gooder. (I know gooder is not a word but I think it should be) Oatmeal, especially baked, is the stuff where all gooder things start.
Have you had baked oatmeal yet? It truly is fantastic. Not at all gummy and gloopy like stove topped cooked oatmeal (but I like it like that too). It still has a good bite to it while still being soft and creamy and boy oh boy is it just the bees knees. With the addition of some crunchy almond friends, well even better. Trust me. If you are a oatmeal eater, you must try it baked. Best part is that it can be eaten as breakfast but also I have been serving it to the mr for dessert with a healthy drizzle of more maple. It%u2019s that good friends. From breakfast to dessert. Everyone is happy.
To the baked oatmeal.
The stuff. Old fashion oats, cinnamon, salt, baking powder, rhubarb (fresh or frozen), REAL maple syrup, some plant milk, a few flax eggs, a bit of tahini, and some almonds.
To start. Oats, cinnamon. salt, baking powder and almonds get a quick toss together in a big bowl.
If you rhubarb is not already chopped up into inch long pieces, do that. I already did before freezing it so yea me. Once its chopped, layer almost all of it (reserve a few small needful to toss on top) into a lightly greased 9×9 inch baking dish then cover evenly with the oat mixture.
In now empty bowl mix together the milk, the flax eggs, the tahini, and the maple until evenly incorporated.
Pour the wet mixture all over the oats and let it absorb.
Once the liquid is all absorbed , top with any left over almonds and the left over rhubarb. For good looks.
Pop into a hot oven to bake.
Golden brown with crispy edges. Rhubarb and maple baked oatmeal for all your maple, oaty and rhubarbie needs.
Fresh from the oven scooped warm into bowls. Top with extra maple if thats what you should want do.
Enjoy and happy maple season!
-C
Make a 9×9 pan of oatmeal
2 1/2 cups old fashion oats (make sure gluten free if need be)
2 1/2 cups fresh or frozen rhubarb chopped into inch long pieces
1 1/2 cup plant milk (water works but it won%u2019t be as creamy)
1/2 cup chopped almonds (optional)
Preheat oven to 375
Lightly grease a 9×9 inch baking pan (I used metal because it makes for crisper edges but glass works too) and dump 2 cups of the rhubarb in and evenly distribute on the bottom. In a large bowl mis the oats, the baking powder, salt, and cinnamon together. Mix in chopped nuts if you are using. Evenly cover rhubarb with oat mixture. In now empty bowl mix together the milk, flax eggs, maple syrup, and tahini until evenly incorporated. Pour mixture over oats. Let the mixture sit for a few minutes until the oats have abosbed all the liquid. Toss the rest of the diced rhubarb and a few more chop nuts to the top and pop into the oven to bake.
Bake for 30-40 minutes (shorter time for a wetter oatmeal, longer for a denser crispier oatmeal)
Once baked to your likeness, remove from oven and let cool for a few minutes just so it is not super hot. Scoop into bowls and serve warm with extra maple and milk or whatever you might want to serve with it.
Left overs last great in fridge for 3-4 days or individual portions can be frozen for a month or two. Just pop into microwave for a couple minutes to warm up.
Do you ever wake up first thing in the morning with a craving, a maybe somewhat strange food craving? Lately I have been waking up and within an hour of being up, I start to think about olives. My mouth starts to water and it%u2019s like I can almost taste the salty, briny, fattiness in my mouth, which in itself is kind of weird, but for me is really really weird because up until very recently I completely hated olives. Now, well now I just want to eat them all. And first thing in the morning.
I don%u2019t pretend to understand such things. My brain is going to do what it%u2019s going do. Tell me I like olives, well all right then.
Another thing I am desperately craving is freshy fresh greens which makes complete since because I always crave greens. I am still pretty deep in root veggies and cooked things because winter and Vermont and all, but all I really really really want to eat are buckets of greens. Any kind will do, but the sweet tender baby ones%u2026. So good.
And so I combined my two cravings, greens and olives and hit those craving like POW! BAM! POOF? A salad so simple yet so amazing and mouth watering. I outdid myself here.
To the bestest, most amazingly perfect salad yet!
The stuff. A big ol%u2019 bowl of greens. Black pitted olives, half an avocado, a lemon, toasted almonds, a chunk of red onion, a couple cloves garlic, and pepper.
Almond crumbs. Exactly what it sounds like. Place almonds into a clean food prosessor and pulse until they are crumbs.
Dump the almonds into a bowl. Don%u2019t bother cleaning it out, you are about to use it again. Olives, avocado, garlic, and all the juice of the lemon now get a go in the food processor. Pulsed together into a creamy, kinda of chunky but mostly smooth, mixture of amazing. Add a few tablespoons of cold water if the mixture seems really thick, but other then that, you be done.
Very thinly slice up red onion and slice up a few extra olives.
All here, all ready to go. Just got to toss it together now.
Greens, some slices olives and onion tossed all together in a good amount of the olive avocado goodness then topped with a hardy helping of almond crumbs. Fresh pepper to finish it off.
I was barely able to stop myself from eating it all before snapping a few pictures.
All of my cravings come true%u2026
It%u2019s salad time!
-C
Makes enough dressing and crumbs to feed 2-4 people
1/2 of a ripe avocado
1 cup pitted black olives
1 lemon
2-3 tablespoons cold water
1-2 cloves garlic
1/4 cup toasted almonds
2-4 large handfuls of fresh greens (I used a mixture of baby spinach, baby chard, and baby kale. Spring mix or even chopped leaf lettuce would be grand as well)
about 1/2 a small red onion
pepper to taste
Place almonds in food processor and pulse until they are crumbly. Not to fine, a few big chunks are good.. Remove and set aside
Roughly chop the garlic and place in the food processor (no need to clean it out after the almonds). Add in the avocado and most of the olives (leave few behind to slice up). Add in the juice of the lemon. Pulse until mixture is combined but with little specks of olive left.or completely smooth if you wanted too. Scoop out into a container. You want it to be slightly loos so it will mix well with the greens. If the mixture seems really thick, add in a a few tablespoons of cold water to thin out.
Grab the onion and remaining olives and thinly slice.
Now to assemble salad. Place a handful of clean greens into a bowl. Toss a some onions and extra sliced olives into greens. Add as little or as much olive avocado dressing as desired then sprinkle as much or as little of the almond crumbs all over that. Top with freshly find pepper
Then eat it.
Nothing here but a mere craving, the fact that I had a fresh head of cauliflower, and I really wanted tahini. TA DA. I made exactly what I wanted and it was so so sooooo good. Maple Cumin is one of those super A+++ taste pairings and anything roasted cover in tahini is basically going to be a win so I had no fear when making this dish that it was going to be anything but fanatic.
And of course I was right. It was so freaking good, like now I am going to make it again and again because I don%u2019t want make cauliflower any other way ever or at least until I get sick of it or of roasted vegetables. But that probably won%u2019t happen for a while.
So if you like cauliflower and tahini and amazingness, here, make this.
To the cauliflower
The stuff. A head of cauliflower, tahini, maple syrup, cumin powder, red wine vinegar, salt and pepper, and olive oil.
Break or cu the head of cauliflower up into florets and toss with a little oil, the maple and cumin, and a little salt and pepper.
Scatter on a baking sheet and stuff it into a hot oven.
Meanwhile mix tahini with vinegar, salt and pepper, and enough warm water to thin out.
Roasted all nice and crisp and delightful.
And now you gather up all that cauliflower and cover with all the tahini you want. Grab a bowl, or just eat off baking sheet, and get to it.
And there is no shame in eating a whole head of cauliflower because hey, its cauliflower.
-C
Makes a meal for one or a side for a few
a head of cauliflower
3 teaspoons cumin
2 tablespoons maple syrup
olive oil
3 tablespoons tahini
2 tablespoons red wine vinegar
2-3 tablespoons warm water
salt and pepper
Preheat oven to 450
Break or cut the cauliflower into medium sized florets. Place in a bowl and drizzle with a teaspoon or so olive oil and toss around. Drizzle in maple, add in the cumin, and a pinch of salt and pepper. Toss until coated then dump the cauliflower onto a baking sheet. Place in hot oven for 25-30 minutes or until roasted to your liking.
While that%u2019s roasting, mix up the tahini, vinegar, and a pinch of salt and pepper. Add in warm water until the mixture is a drizzlable consistency.
Once cauliflower is out of oven, cover with tahini.
Now eat.
There will be no left overs so don%u2019t worry about it.
It happens every year. SO MANY TOMATOES! This is not a complaint, just a fun fact. And so for the forseeable future, besides canning and freezing tomatoes at a rapid pace, I will also be sticking them into everything. Enter here a tomato cracker. But who wants just a tomato cracker? I( bet some would love just a tomato cracker) But a tomato basil cracker, well that is something people will want. And yes, I have a buttload of basil at he moment too.. I cook with what I got!
Tomato basil crackers. First off, I needed to make a road snack for the mr and cut up chunks of raw tomatoes would not have gone down well with him, so I figured what better way to use up some tomatoes then a cracker situation because why the hell not. I was a little hesitant to use fresh tomatoes and not cook them or roast the in anyway before using them in the crackers, but I glad I didn’t. The tomato flavor really shines through, pairs beautifully with the basil, and you get to skip having to deal with cooking down the tomatoes, which makes them all the more easy to make.
So I made the crackers and gave a baggie to the mr to eat, which he did right then and there (with some sweet ass baba ganoush because yes) then packed a big bag for the road trip. Not only was the mr chowing down, but my sisters were gobbling them up too, even the one who is gluten free. That is good cracker validation.
If you have never made your own crackers and you are a cracker person, now is the time to start doing it. I don’t eat crackers personally, but the mr and every one around me really seem to be cracker people so a while back I started to make them at home, and once you make a homemade cracker, the store bought ones will just not be acceptable anymore. But they really are super easy so you really should be making them at home anyway.. No pressure though.
The stuff. Flour, olive oil, tomatoes, fresh basil, and sea salt.
Chunks of fresh tomato go into blender and get blended up all nice and smooth. Add in basil and oil and pulse until basil turns to little specks.
Pour the blended mixture into the flour.
Mix with a spoon until you can’t mix anymore then dump onto the counter.
Keeping the counter nice and floured, knead dough for a minute until it all comes together into nice ball.
Working with half of the dough at a time, roll out one of the pieces about 1/4-1/8 inch thick. (really flour counter and rolling pin)
And cut into crackers.. Shapes are up to you, but inch to 2 inch squares are easies to cut.
Place crackers onto backing sheet. Before oven time and after oven time. They shrink and puff up a little bit in the oven. That is what a cracker is suppose to do. (but if you don’t like that you can prevent it by piercing the crackers with a fork before they go into the oven)
And that’s it. Simple, and delicious.
Crackers are looking all pretty like I am about to have party or something. I even made baba ganoush to serve with them. Lucky mr, he got to have this cracker party all to himself. Ha (He did not eat all of these crackers at once, that would be crazy)
-C
makes between 100 -125 crackers
3 cups flour
2 large tomatoes ( equal to 1 1/4 cup of tomato puree )
1/3 cup fresh basil leaves
4 tablespoons olive oil
About 2 tablespoons sea salt
Remove core from tomatoes and place into food processor or blender. Blend until smooth and measure out 1 1/4 cups of the puree. Any left overs rs can be used as food later on. Dump measured puree back into blender and add in the basil and oil and pulse until the basil is in little pieces but not completely blended in. Add flour to a big bowl then pour in tomato mixture and mix until a dough forms. Dump out onto counter and knead for a minute or two until dough is uniform in texture.
Preheat oven to 400 degrees
On a floured surface, divide dough in half as to make rolling it easier, and roll dough into a rectangle that is 1/4- 1/8 inch thick. It is important to make sure the rolling pin and counter are well floured to avoid the dough from sticking. Once rolled out, sprinkle with sea salt and lightly roll the dough once more to kind of press the salt in then cut with either pizza cutter or a cracker cutter, or a knife, into 1 1/2 inch squares. The edges are going to be wonky shaped and you can either except them as they are or re roll and recut. (Note. IF you want your crackers to late flat and not puff up while baking, stab the crackers with a fork before they go into oven to create air vents. But honestly, most people really like the puffed up cracker) Place cut crackers onto a baking sheet and stick into oven. Bake for 15 minutes, checking after 10, until the crackers are golden brown. Don’t forget to roll and bake off the other half of the dough!
Once crackers look good, remove from oven and place onto cooling rack. They will get crisper as they cool.
Eat as many as you want. Store extra crackers in a airtight container or bag.
I have fond memories of young me skipping school and sitting in front of the tv with peanut butter, a package of graham crackers, and a glass of milk to dunk the peanut butter cover crackers in, watching myself some Martha Stewart. I also have some fond memories of the days in college I would skip class (obviously to finish a paper or something), and sit around eating graham crackers covered in peanut butter and nutella, dipped in beer? Wait no, it was coffee. (although….beer? Could be something there.) Apparently I liked to skip class and eat peanut butter graham crackers. But don’t blame the cracker for the bad behavior, blame the eater. And I didn’t do it all the time, only once in a while. (A girl needed to watch her some Martha or write a 20 page paper.)
We had a BBQ this week and for some reason I though people want to eat s’mores at a BBQ. (I guess I got that confused with camping.) I figured even though the days of skipping life and eating graham crackers has passed me by, that I needed to make the graham crackers for others to enjoy. And then I wondered why the heck no one ever makes graham crackers. They are by far the underrated crispy cookie (lets just call it what it is ) of the snack world. I think I might make it my new thing. I’ll make graham crackers for ever cookie swap situation, every event that requires a dessert, every time a snack is need, until people realize what they are missing. I’ll bring the graham cracker into all it’s glory.
These graham crackers were raved over by people who like graham crackers and were absolutely perfect for s’mores. A few of the littles that don’t like graham crackers did not care for them, but I guess you can’t make everyone happy. Tthey just wanted to eat the marshmallows.) They are crispy and crackery, tiny bit smokey and sweet but not to sweet, and perfect for all your graham cracker needs.
The stuff. In one bowl there is graham flour, all purpose flour, baking soda and salt. The other bowl has brown sugar, honey and molasses. Also going to need vegan butter, vanilla, and a little bit of plant milk.
The big bowl of sweet stuff get beaten together with the butter and vanilla until smooth, then the dry mixture and milk go in an beaten until just combined.
. This is what graham cracker dough looks like. Course and chunky, but done. Don’t beat it anymore, just use your hands to gather it tighter.
Gather the dough into a ball then wrap in plastic (or stick in a plastic bag)and smoosh flat and rectangular. Place in the fridge for at least 2 hours, if not overnight. IT needs the time firm up.
After the dough has firmed up, its time to roll it out. Cut the dough in half (place the other half back in fridge until you are ready for it) and roll out on a very floured surface. The dough is sticky and not super strong so go slow and make sure to keep the surface and the rolling pin floured so it doesn’t stick .
When it’s all rolled out, trim the sides even the cut into into squares or rectangular (or any shape you want). I was going to measure and make them all the same size and then I was like, yeah, no. I just eyed it and made them kind of the same size. I don’t live in a world where I need perfect graham crackers.
Gently transfer the crackers ( I used the bench scrapper to list them, but a spatula would be good too) on a parchment lined baking sheet. Run a line the doesn’t cut all the way through in the middle of each cracker and then poke 6 (or how many you want) hole on each side. You can use a toothpick or a wooden skewer. I used a size 8 kitting needle.
Get all your crackers made and sprinkle the tops with a little graduated sugar. Pop into the preheated oven to bake for 15-20 minutes, rotated around 10 to keep an even bake.
Done. Golden brown graham cracker success.
Cool the crackers on a wire rack.
And now you have yourself graham crackers for all your graham cracker needs.
May I suggest a smear of peanut butter, maybe a glass of milk or coffee and some Martha Stewart on the tv?
-C
Makes between 20-30 crackers depending on size
1 1/2 cups graham flour (unbolted whole wheat flour with the germ and bran)
1 1/4 cup all purpose flour
1 teaspoon salt
1 teaspoon baking soda
1/2 cup light brown sugar
1/4 cup honey (can sub in golden syrup or brown rice syrup)
2 tablespoons molasses (not black strap)
1/2 cup vegan butter
1 teaspoon vanilla
1 tablespoon plant milk
1 tablespoon white sugar
Stick the butter, brown sugar, honey, molasses , and vanilla into a large bowl and beat with an electric beater until smooth, In a smaller bowl, whisk together the flours, salt, and baking soda. Dump the dry into the wet, add in the milk and beat on low until mixture just starts to come together,then use your hand and smoosh and knead the dough into a ball. Either wrap or place dough ball in a plastic airtight bag, smoosh into a flat rectangular shape, and refrigerate for at least 2 hours, if not over night.
When you are ready to bake the crackers, preheat oven to 325 and line 2 large baking sheets with parchment paper.
Cut dough in half and place one half back in fridge while working with the other half. Flour a surface and the rolling pin and roll dough our into a retangle about 1/8 inch thick. Trim sides ( a pizza cutter or dough scraper works really well here) to make a sides straight (straight enough) and then cut into equal sizes pieces that are the size of your liking. (What it did was cut in half, then each half into thirds vertically then the whole thing in thirds hortiztally. I ended up with 18 pieces)
Place the crackers on prepared baking sheet and take you cutting instruments and run a line along the middle of each cracker without cutting all the way through (if you cut all the way through, it should fuse back together in baking) Take a wooden skewer and poke 6 holes into each side. Sprinkle with white sugar. Now grab the second half of the dough and do the same thing. And don’t forget to gather all the trimming and either roll into more crackers or just make one weird shaped blob cracker for taste testing.
Once all the crackers are prepared, stick into the oven to bake for 15- 20 minutes (15 for a softer cracker, 20 for a more crispy cracker) , rotating after 10 minutes to insure even baking. Once the crackers are a nice golden brown, remove and place on a wire rack to cool.
Eat the way you do.
Store uneaten crackers in a airtight container for a up to a week. Crackers can be frozen for later use.
No matter what is going on in my day, seeing a blue sky like this puts a smile on my face….To bad that smile turned to ice and my face froze in place. Because for some reason, winter around here now means below zero all the time. I mean, I love winter, but I am not going to lie… I wouldn’t mind if the wind would stop blowing and we had a couple of days of above zero weather.. and maybe a good foot of snow. I guess I’ll just have to be patient, cause its bound to happen. I mean, we live in Vermont, and if nothing else, we get weather.
Anyways.. another week full of stuff that fills. I am a little taken aback that its already February… when was it January? Time just keeps going by fast and faster, (especially when I get cabin fever) and I think, “What have I done in the past year?” Well, I have done a lot. I was just looking through pictures from a year ago and found some of our tiny home in working progress. Not to many people can remodel a five unit house and a meat locker to live in, within a year.. by ourselves. (ourselves being Nick and I)..So yeah, that made me feel pretty freaking awesome and accomplished. (I needed to remember that because I haven’t been feeling it) But now I am feeling inspired and am looking forward to some new projects and fun things to come! (hopefully getting my pottery studio up and running, maybe another house remodel and lots of traveling!!…. take that winter blues!)
Anyway.. here are a few little bits from my week that made me happy.
The mister called these snow mounds goosebumps… I think that is exactly what they are
The only warm day this week. (20..woo whoo!) Took the little out for a sled ride. She spent the entire time dragging her hands in the fresh snow.
And oh how I cannot handle how freaking cute she is!! Plus, a shout out to my brother in law….MADLOVE!
Fresh snow..Even though it was -15, I had to stop and take this picture. The colors were amazing
Cabbage at the farm share pick up! Love ICF!!!
89 cents a pound for fresh organic cranberries. Score!! Made these Oatmeal fresh cranberry coconut chocolate chip cookies with them. Big hit.
This picture was taken exactly a year ago…..The mister and I were finally putting in the bathroom of our tiny little home…. And look at that awesome sink! (another amazing salvage yard find) If you ever need or want to remodel a bathroom, I suggest using a old cast iron utility sink. So practical, so functional, so pretty.….it makes me happy everyday!
Happy Sunday!
Happy February!
And if you are into it….
Happy Football Super bowl Game and or party! ( If you need any awesome fast party recipes, I have bunch, just check out the recipes page!)
-C
Don’t let the fact that these rich, fudgy, soft, oh so yummy brownies that have beans in them scare you away, it just means that you can eat more, you know, like half a pan, and not think twice about it. (I think that is perfectly acceptable) And the carob. Well one of the things I always do for my birthday is to buy a new ingredient of some sort that I wouldn’t normally buy because it’s either too expensive or is hard to find. Carob is neither too expensive or hard to find, but I couldn’t find the really expensive stuff that I was looking for so I grabbed a bag of carob powder. If you have never tried carob, it’s a must. It’s kind of like chocolate, but more fruity, sweet, not bitter, and caffeine free, while still containing all the good health benefits as chocolate. It’s really good…..you will like it. (You can use cocoa instead, but then you are going to miss out on the awesomeness of carob and be left with a plain old normal black bean brownie)
I was also thinking that these would make for a fantastic Super Bowl party snack, you know, brownies and protein.. Sounds like a football type of food right. ( I know nothing of football, but I do know about food parties….brownies are good for food parties)
Anyways, super fast, super simple, super easy. Make these and feel awesome. And maybe don’t tell people that you made them with beans, they don’t need to know, all they will think is that they are eating something good.
One bowl. Beans, oil, oats, baking powder carob and vanilla. I used an emulsion blender but a blender or a food processor does the same…..blend together until fully incorporated, smooth and creamy with little speckles of oats. It’s so simple and barely a mess to be made.
Into a greases pan and into the oven for 25- 30 minutes…. Out of the oven when a toothpick comes out clean
Let cool for at least 10 minutes (ok, maybe 5) and cut into squares of any size you like.
Stacked on parchment….oh so pretty
Ready to go….. To share or to hoard.
Excellent for so many reasons. They are tasty, gluten-free, vegan, full of proteins and when consumed, make people happy. My little nephew who is so so picky and doesn’t like anything even really liked these so right there I knew this recipes was a winner.
Enjoy your brownies!
-C
2 cups cooked black beans (1 can)
3/4 carob powder
1/2 cup sugar
3/4 cup gluten-free quick oats or rolled oats
1/2 cup coconut oil
1 teaspoon vanilla
1 teaspoon baking power
Preheat oven to 375
Place all ingredients in either a food processor, blender, or a large bowl for a hand blender and blend together until stuff is fully incorporated and smooth. Transfer into a well greases 9×9 baking pan and stick in over for 25-30 minutes or until a toothpick stuck in the middle comes out clean.
Let cool for some minutes, cut into squares and serve!
I have very strong feelings for heart shaped baked goods. I think that everything, all year round, should be heart shaped. How lovely would that be? It would be ever so lovely, or I would think so anyway. And yes, ok, I was thinking about Valentines Day when I made these cupcakes but don’t let that be the only reason you make a cupcake, cake, or any other baked good into the shape of a heart or pink for that matter.. Hearts are just so sweet and cute and dare I say cuddly? (Can you cuddle baked goods? Let me know if you have and do. We should talk about that). And pink is just a fantastic color, especially when it is the color of the flavor. Purple-y pink equals a taste like berry so all just makes sense.
Anyways. Cupcakes. Made with nutty almond meal to taste all nutty, frosted with blackberry and clementine frosting which is a pairing that all party and non party people will love. A down right deeelightful combination that will, no matter your circumstance in life, make you smile. Because lets get this clear, these cupcakes might look all lovey dovey and Valentines Day-e and are very much a perfect Valentines Day treat, but also can be an everyday, run of the milll, straight up any day, all day cupcakes. Valentines Day does not own the heart or pink.
These cupcakes are for you to love and you don’t need to worry if they love you back. That would be weird.
Slightly off topic thought. How awesome would it be if someone made a cute little teddy bear that when you squeezed it it would scream “WHAT THE HELL! GET OFF ME!” Hahahaha. That would be amazing.
To the cupcakes!
The stuff. Flour, almond meal, baking soda, baking powder, salt, sugar, soy milk, oil, vanilla extract, and apple cider vinegar. Also some blackberry jam, powdered sugar, some vegan butter, and a clementine.
In a big bowl, whisk together the granulated sugar, flour, almond meal, salt, baking powder, and baking soda.
Add in the oil, vanilla, milk, and apple cider vinegar. Mix until fully incorporated.
And that is some mixed batter.
Scoop the batter into well greased muffin tins. I used to different shapes and sizes because I wanted too. You can do the same, just be aware different sizes will cook at different times.
And into the hot oven they go.
Baked, popped out of the tins, and cooling to cool.
Frosting time. Butter, clementine zest, and jam mixed together makes for the prettiest color.
Add in the powdered sugar and juice of the clementine and beat with a beater.
Pretty pink frosting. All natural.
And now that the cupcakes are cooled (you must wait until they are completely cooled) get them frosted.
And of course, adding sprinkles will only make them that much better.
And now you got the cupcakes which makes it cupcake time.
Look at that smile. Thats a smile just for cupcakes, not at all because I told him too.
Happy happy.
-C
Makes 12-16 cupcakes (depending on size)
1 1/2 cups all purpose flour
1/2 cup almond meal
1/3 cup neutral oil
1 1/4 cup almond milk
3/4 cup white sugar
1 teaspoon baking soda
1 teaspoon baking powder
1 tablespoon apple cider vinegar
1/2 teaspoon salt
1 teaspoon vanilla or almond extract
For the frosting
3 tablespoons blackberry jam or preserves with or without seeds
2- 2 1/2 cups powdered sugar
4 tablespoon vegan butter
1 clementine (zest and some juice)
Preheat oven to 350.
In a large bowl whisk together the flours, salt, baking soda and powder and sugar until fully combines. In a separate bowl mix together the oil, milk, vinegar, and vanilla. Pour into the dry and mix, by hand, until full incorporated. Scoop batter into well greased muffin tins (heart or other shape up to you) and place into oven for 13-18 minutes (shorter time for smaller cupcakes, longer for larger sized) or until lightly browned and a tester stuck into a cake comes out clean. Pull from oven when done and pop from tin. Place on a wire rack to cool.
While cakes are cooling, make frosting. Beat together the butter, zest of the clementine, and jam. Add in the sugar and the juice and beat until fully incorporated. If the consistency is to thin, add a little more sugar, to thick, more clementine juice or if out of juice, a splash of milk.
Once cupcakes are full cooled, frost, add sprinkle if you would like, and then the only thing left to do is eat them.
Eat cupcakes, store left overs in an air tight container in the fridge for up to a week.
Mid January and I love it. Yes I know it is coldest part of the winter and still dark early and people are still crashing over the holidays, but this time of year always makes me feel like the world is all for me. Even the cold, the super cold that is scaring most people inside, well I love that too. Crisp and clean and oh so beautiful. I’ll take this freezing cold any day over being hot. I am a winter lady here through and through.
This past week had been busy busy. Mark and Paul turned 21(Happy Birthday BROS!) and had a little birthday party, alcohol free, but with 2 cakes. Drove out to the North East Kingdom in a freaking snow storm to see some of the mr’s family. We went and made dinner with the littles then watched Miley play her saxaphone in the sixth grade band concert. I finally got to pick up farm share. (I went through more then half my stock of frozen garden veggies over the past week which is sad because I have been rationing them and hoped the chest freezer of veggies would last a little longer..Oh well) The mr spent half a day creating ice sculptured on the porch. We did some work and dealt with annoying things. All this while I have barely been able to move my neck. I think the drive to Rhode Island last weekend started off a tweak in my neck the has turned into a pinch nerve or something and I have been spending more then too much time in pain with either a ice pack or hot water bottle propped up on my neck. It has sucked and still really does. I can’t wait for the day when it doesn’t hurt. It’s gonna be amazing.
Jeff Dad came into town for a long postponed weekend. We did dinner at Megans, I made soup and so much bread. Then yesterday the whole family came over for the postponed Christmas with Dad. Sure I had no tree, and there was no Christmas music or anything, but it was super fun. The kids were all behaving and being nice to each other, probably because they were not all cracked out on sugar. I fixed a bunch of food and it was all eaten. We all exchanged presents. Jackson stuffed his shirt with my squash. Good time. And my house got trashed which was a-ok because it was cleaning day anyways.
And to is Sunday again already. In a few hours the mr and I are zipping, if that is what a 4 hour drive is called, down to Rhode Island again for the afternoon and then zipping that 4 hours back. Excited to see family, not excited to sit in the car for 8 hours. My brain and neck already hurt thinking about the drive.
And then I am taking tomorrow off and doing nothing, or as close to nothing as possible.
Interenting from the internet.
-Have you watched and started to “tidy” your life? My life is pretty tidy so I am good on that but it seems eveywhere I go I am hearing people talking about it. Marie Kondo and the fantasy of a tidy life, explained
-Who knew those little demons were actually helping to grow the rainforest. How termites help rainforests survive climate change
-I never use measuring devices when cooking and even sometimes when I bake (as long as I am not writing a recipe) It really is a lot less dishes and hassle to use the old eyeballs. Your Life Will Change When You Learn to Eyeball Measurements
-I have thought about this on multiple occasions and the song always changes. What’s the last song you want to hear beforeyou die?
–ISLAND: A Cast of Colorful Creatures Pop, Quiver, and Hiccup in a Charming Stop Motion Animation. Only watch if you want to smile.
–How Much Junk Am I Consuming Online Every Day?. People average 12 hours a day…That shit is crazy! I feel pretty good about my 1ish hour of digital anything a day. If you want to stop, read. How to go on a low-information diet
-Good time of year to get all the shut eye you need. Why do people need to sleep?
-Why Costco? 27-Pound Bucket of Macaroni and Cheese and Costco’s Giant Tubs of Nutella
–Don’t Reply to Your Emails. Ok. I won’t.
-I didn’t know I wanted a net in my house until now. 10 Homes With Nets to Make You Feel Like a Kid Again
Pictures from the week.
What a week. What a year. So much has happened and is happening and is about happen. I guess that is the nature of life and time and all that good stuff.
The week started off fantastic. On Sunday the mr and I grabbed Judah, Emerson, and Barb, piled into the car, and went for a light drive. We walked around a light filled park, drove some more, then ended up at, of all places in this world, Burger King. And they loved it (I packed my own dinner because I do not, will not, eat at almost any place that the littles prefer) Funny, I don’t know if I have ever been inside of a Burger King before, and if I have, it was long before I had a choice in what I ate. Again, they loved it, even though it was trash food, they got their crowns. Coco cheered just about every French Fry that went into his mouth, and the mr got to use Burger King coupons that he had hiding in his pocket (that is basically why we ended up there) It was a fantastic evening and is now going to be a Christmas Eve eve tradition. Light drive with dinner (never Burger King again thank you very much)
After we dropped them off at home, we went home and that is when the mr succumbed to it. IT being the stomach flu. That was fun.
Christmas Eve the mr was an ill man so I forged it alone. With the help of all the Christmas music I could handle, I baked a bunch, prepared the house for the next day when the family came over. I cut up all the fruits and veggies, wrapped the few little presents I had, did bills and a bunch laundry, ran to the grocery store. My mom stopped by and brought me a lemon tree because just because. I just was so freaking productive. And best part, it SNOWED, like a good amount. What I thought was going to be a completely snow free Christmas turned into the most magical snow ever. Christmas Eve afternoon, Big fat fluffy flakes covering the world. I bundled myself up and walked around the neighborhood just taking it all in. It truly was the best Christmas Eve snow ever. And after a full on day of resting , the mr was feeling a bit better so that was good. And then both to bed by 7 because thats our life these days.
Christmas morning had all the right stuff. Woke up and watched the sun rise while drinking a butload of coffee. The house was all clean and glittery and the ltree lights were on and the ground glittered with the fresh snow. After the mr woke up and was feeling a little worse for ware but ok, we bundled up and went for a little stroll on the beach. We usually go for a hike but I was not trying to push the mr too hard. The beach, oh man, was that amazing. The water was still, the snow was like diamonds, and the air was crisp and clean. Not a sound to be heard other then the lapping of water. It was so good. We left before I decided to stay forever and because the mr thought he could walk on ice and ended up with a his foot in a foot of water so we headed on home to meet the hoard of family. Just about everyone came (minus Ryan and the girls and Anthony.. we missed them all) ate food, did a little gift exchange thing (I got some sweet new house plants), plastered Jackson with a very nice shade of lipstick that might have been called whore red, and had a Happy Birthday celebration for Cameron because it’s was Christmas, but it really was his birthday.
Then for the saddest part. We got the news that our uncle had passed away.
Oh Uncle Seth. He had been sick for a while now with Parkinson’s disease, but the past month or so it got so bad. His death was not unexpected but never the less it was not any less painful. My only uncle, the guy who gave me my first car, the man who built a cabin from nothing in the woods and turned it into a place that you could only imagine (or see in a design magazine) A man who taught (he was as professor at RISD), loved the world, loved to travel, loved his work, was so fierce in emotion. SO many little qualities that I saw in him, I see in me. ( I feel like I get a lot of who I am from my dad and my uncle and aunt) The world lost a great man, I lost a great uncle. He is and will always be loved and I know I was just lucky to have been able to have him as an uncle. It is still hard, I don’t think I have fully processed it still, It is kind of a not quite real feeling. Just an overall heaviness that has settled in on my mind and heart. It is so hard to loose any family, but especially hard when they were so full of life and had so much to give to the world. Agh. The words are not even close to adequate here, the full measure of him as a person not explained. To put it simply, he was an amazing, loving and generous person. I am so going to miss him, his creativity, his lust for life. And what I am going to miss most is his hugs and smiles and overall presences in my life. RIP Seth. You really were a fucking awesome uncle.
We got word of the funeral on Wednesday (which was also Anthonys 17th birthday….So old! I stopped by to see him and give him a big hug. Didn’t want a party or cake this year so I owe him granola bars.) and were in the car driving down to RI by Thursday morning. Shannon, Megan, the mr, and me, all packed into the car and off we went. A small family funeral which was very beautiful and full of love, then food with the family. Not a long stay, but we are all going back down next weekend for Seths memorial celebration bash.
We got home and it hit hard. I started to feel kind of crappy (sick wise) and have been feeling blue ever since. Driving to RI really kicked the mr down again. He was so good, no complaining about anything, not the cranked up car heat or driving straight while us ladies spent the entire time talking of childhood memories. He didn’t even put on the music. And by the time we came back home, the guy was sick again, or maybe never was not sick, but he has been down for the count ever since.
So yesterday we did a few morning chores together like got rid of the recycling and retuned amazon stuff to UPS, but by afternoon the mr was out. So I cleaned house, made another ice cream cake for Judah, and did more and more laundry. Another one of those feeling super productive days. Weird, but I am starting to see a pattern here. When the mr is really sick, I get a lot done. I think it’s mainly because. a) I want to stay away from him as to not get sick too. b) I am afraid that if I do get sick none of what needs to be done will get done so I need to do it fast. And c) I don’t have to worry about what he needs to do, it’s all me. Ha.
Today is Judah’s birthday. Nine years old! What an age to be. So basically I am going to the gym then coming home to do a few things and finish making his cake, then heading over to his house for a birthday dinner celebration. I told him and his sister I would go over early and give them haircuts (the boys hair is so long it covers his eyes, He looks cool, but if you can’t see, well looking cool isn’t gonna get you anywhere). It’s gonna be fun.
Goodness, is that it. The end of another year. Hard to wrap my head around so I am just going to ease on in to 2019. Low key and cool. Just like me. Ha.
Happy New Years Friends! Be safe. Be happy. Be good. Be kind.
Interent links from the week
–Just Admit It, You’re in a Bad Mood. All the lead up to Christmas then BAM, its over. Gets me every time.
-I am defintially one of those people who likes to bake when I am feeling anxious. The Rise of Anxiety Baking. Cookies are my favorite to bake too.
-Speakig of cookies. When ‘Cookiers’ Take Holiday Cookie Decorating To A Whole New Level. I had no idea there was a cookie cutter factory in Vt. I must see this place!
-Who doesn’t love a good tree picture? Black and White Photographs Capture the Striking Appearance of Bare Trees Against Snow-Filled Landscapes
–Explorer completes historic Antarctic trek. Some people do crazy things that make me jealous. Not that I want to ski Antarctica, but something crazy would be cool.
-How did I not know until now that there was a monthly round up of trucks spilling shit. We all need this information. This month in overturned trucks: Cash, Christmas trees, cooking oil
–How A Little Science And A Lot Of Shady Advertising Boosted Yeast’s Popularity. I have never eaten a yeast cake, but I eat a shit load of nutritional yeast. MY favorite is a spoonful in the mouth where it gets stuck in my teeth and the roof of my mouth. For real.
-I am going to get a scale sometime soon. I just need to find the right one for the right price (free or very cheap at the thrift store) Until then, this is handy. Weight Conversions for Flour, Sugar, and Other Common Baking Ingredients
-This is something that I have wondered about. I am really happy that it doesn’t get wasted. We Finally Know What Happens to the Leftover Cake on the Great British Bake Off
–The year vegan junk food went mainstream. Yup. Just cause it’s vegan doesn’t mean it is good for you.
And pictures from the week.
Currently it is like 50 degrees outside and raining buckets of cats and frogs and what not. I live in Vt for a few reasons, and one of them is winter, so the warm rain is just not nice. Apparently these cookies are the closest thing to snowflakes I will be seeing for a little while…(sad face inserted here) But I am hoping that juuuust maybe it will turn, and all of a sudden it will be snow coming down and not rain. And that it snows and snows and snows, like a foot or 2 of it. I want so much snow that I am stuck in my house for a least a solid 24 hours (of course with the power still on and all the necessities I would need) and the only way out being by foot or sled. And you know what I would do if I was snowed in? Lounge around in my pj’s all day (or at least until like 10 am), have a never emptying cup of hot coffee in hand, play around outside and make a snow fort, and definitely make cookies. Doesn’t that just sound so nice?
But I am not snowed in, and wasn’t snowed in and probably will not be snowed in for the foreseeable future. But I can still, and did make cookies so there is that. Chocolate cut out snowflakes with orange glaze to be exact. A good all around chocolate cookie jazzed up with a citrus kick. Simple, elegant and perfect for all of your holiday cookie needs. Plus it is just a really pretty cookie. I just might make a few more batches and liter the front yard with them. I’ll make my own freaking snow, even if it is out of cookies. Then I really wouldn’t be able to leave my house due to the crazy fat squirrels attacking the lawn. That would be something. HA.
To the snowflake cookies! (They can be any shape really, but snowflakes are so nice)
The stuff. Sugar, vegan butter, flour, cocoa powder, baking powder, salt, canola oil, brewed coffee, grind chia seeds, vanilla extract, an orange, and some powdered sugar.
First, mix the ground chia seeds with the coffee for caffeinated chia eggs.
Beat the butter with the sugar to give it a good fluff, then add in the oil, vanilla, and chia eggs to the mix.
Place all the dry into a bowl and whisk together until fully incorporated.
Dump the mixed dry into the were and grab a wooden spoon. Start mixing.
Cookie dough is a-formin.
Collect the dough in some plastic and smash into a disk. Place in fridge to rest for at least a few hours, but a day is good too.
Chilled dough, flour, a cookie cutter, and a rolling pin. I think you know what to do. Just really make sure to keep the counter and rolling pin floured or else the dough will stick and that is just so annoying.
Yes this dough is a little delicate, but not in a bad way. It might tear or slightly crumble but you just smoosh it back in there and you are all set. Anyway, after rolling dough out to about 1/2 inch thick, cut cookies out with a well floured cutter.
Cookies on the baking sheet ready for the oven.
Cookies on a baking sheet right out of the oven.
Now those cookies got to cool so get them on a rack.
While cookies are cooling, fix yourself some glaze. The powdered sugar, zest of orange and juice of orange will do the trick.
A good looking glaze. Thick put drizzable consistency.
And to finish. Drizzle the cookies with glaze, dunk the tops in the glaze, or do a little of both (I say both). The glaze does harden after a few minutes so these are very much stackable cookies.
And then what you do with the finished cookies is up to you. I let the mr eat a good few, saved a few for Christmas and dropped some off to some peps. They were well received for sure.
Hope you are enjoying the weekend and are able to get in on some cookie making.
-C
makes about 3 dozen cookies
2 1/2 cups flour
1/2 cup cocoa powder
1 teaspoon baking powder
1/2 teaspoon salt
1/3 cup vegan butter
1/2 cup oil
1 cup white sugar
1 teaspoon vanilla
2 tablespoons ground chia seeds
6 tablespoon coffee or water (coffee brings out the chocolate flavor more)
1 orange
1 cup powdered sugar
In a large bowl, cream together the white sugar and butter until light and fluffy. Add in the oil, vanilla, and coffee chia eggs. Mix until incorporated. In a separate bowl mix together the flour, cocoa. salt. and baking powder. Dump dry into wet and mix until a dough forms. Gather dough into a ball and place in plastic and flatten into a disk. Place in fridge for at least an hour or overnight.
When you are ready to bake, preheat oven to 350
Take dough from fridge and unwrap. Place on a well floured surface and roll until it is about 1/4 inch thick. The dough is delicate and a little crumbly, but don’t worry to much, just squish it back together and keep rolling it out. With a floured cookie cutter, cut your shapes and gently place them on a cookie sheet. Gather remnants of dough back into a ball and re-roll out and cut more cookies until you have used up all the dough. Place cookies into oven and bake for 11-12 minutes or until the cookies have puffed up a bit and the bottoms are slightly browned. Once cookies are cooked, let cool on a wire rack.
While cookies are cooling make the glaze. Mix about a tablespoon of the zest of the orange with the powdered sugar and add in a few tablespoons of the juice of the orange until the glaze is slightly runny. Once cookies are cooled either dip the tops in the glaze or drizzle the glaze on top of cookies (or do some of both). Then eat. If you wait a little while, the glaze will harden and then you can stack them and then if you want, maybe wrap on a few in little packages to give to someone you like. Either way, place uneaten cookies in a airtight container. Should last about a week, but can you not eat them for that long?
What is any good holiday season without some sort of gingerbread? Am I right, or am I right? I am right. The smell alone smacks a smile on my face. Spicy and sweet and all sorts of comforting. If smells could be objects, the smell of gingerbread would be a warm soft blanket that you can curl up next to a fire, with hot beverages and a good book. Yup, that is exactly what gingerbread smells like.
Gingerbread cookies were an option for all the gingerbread goodness but right now there is a heavy influx of people making cookies of the gingerbread variety so I figured I should do something a little different and honestly, a heck of a lot easier and faster. Plus scones are a way more expectable breakfast food then cookies (who am I kidding, cookies are a completely expectable for breakfast) and I was looking for a good breakfast treat to feed the mr this week because its his birthday week and I wanted a little something special for him for breakfast. I know, I am just so great.
Anyway, these scones fit the holiday gingerbread bill. I mixed them up, added the chocolate chips for a little extra something, then tossed them into the oven and bathed in the smell as they were baking. Pulled them from the oven, poured some coffee, and set out a delightful afternoon snack for the mr, right after he was finished laying on the freezing ground trying to fix the tire on the truck. I think he really appreciated the smell of a warm blanket. And he really enjoyed the scones too. All birthday week long.
So what are you doing this weekend? I think probably making scones. Yeah, do that.
Here we go.
The stuff. In the bowl there is flour, old fashion oats, baking soda and baking powder, and salt. Also need the spices of ginger, cinnamon, clove, and black pepper. Molasses, brown sugar, vegan butter, soy milk, and chocolate chips finish of the list.
In the bowl add in all the spices and the brownl sugar. Mix until completely combined and there are no brown sugar lumps. Drop in the cold butter and cut it in with a fork. You don’t want it blended, you want the butter in little bits.
You want it to look like this. Crumbly.
Toss in the chocolate chip.
Dump the molasses into the milk and mix until combined. Doing this helps minimize the amount of mixing you do which will help make sure your scones are not tuff. So don’t not do this.
Pour the molasses milk into the mixture
With a fork, lightly fold and mix batter until it just starts to come together.
Dump dough out onto a lightly flour surface and gather together with your hands.
Flatten into a big disk and cut into 8 equal wedges. Or as equal as you want to make them… you could even make a few more wedges if you want more. You do you.
Place the scones onto a baking sheet. Brush a little milk on each then sprinkle the tops with a little brown sugar and some oats.
Pop them into preheated oven and let bake.
Gold brown and ready for the world.
After letting them cool for a bit on a wire rack, stack onto a plate and feed them to your people. And yourself of course.
Chocolate chip oatmeal gingerbread scone and a cup of coffee. A perfection in all the ways.
Enjoy the weekend. It will be great, especially if you make some of these scones.
-C
Makes 8 scones
2 cups all purpose flour
1/2 cup old fashion oats plus 1/4 cup to sprinkle on top
1 1/2 teaspoons baking powder
1/2 teaspoon baking soda
1 teaspoon salt
2 teaspoons ground ginger
2 teaspoon cinnamon
1/2 teaspoon fresh ground pepper
1/4 teaspoon cloves
1/3 cup packed light brown sugar plus 2 tablespoons more to sprinkle on top
2 tablespoons molasses
1/2 cup cold vegan butter
2/3 cup soy or your favorite plant milk
2/3 cup semi sweet chocolate chips
Preheat oven to 375
In a large bowl, whisk together the flour, oats, baking powder and soda, salt, all the spices, and the brown sugar. Make sure there are no big lumps of brown sugar in the mixture. Once dry mixture is all mixed up, cut in (do not blend in) the cold vegan butter until the mixture looks crumbly. Toss in the chocolate chips.
Grab your measure out milk and mix in the molasses until completely mixed together. Dump the mixture into the bowl of dry and lightly mix with a fork until a dough forms. Dump out the dough onto a lightly floured surface and bring it all together with your hands .Flatten dough out into a circle about and inch thick them with a knife or dough scraper, cut into 8 even sized wedges. Place scones onto a baking sheet and lightly brush a little milk onto the tops.. Mix together the extra oats and brown sugar and sprinkle on the tops. Place into preheated oven and bake for 25-28 minutes, or until nice and golden brown. Once baked, remove and place on a wire rack to cool.
Eat. Store left over scones in an airtight container at room temperature for 3-4 days. Individual scones freeze well.
Soup is all about comfort and I needed comfort this week. What with being all sad and slightly stressed with a little touch of the holiday blues. And I needed something to warm me up because is has been freaking chilly cold. I needed soup. But I wanted something slightly special, not the everyday, but also not anything fussy or finicky. A soup that I could make really fast or let sit on the stove all day. A soup that would bring a little brightness without being overly rich. A soup to take away the chill and make me happy.
Is that asking to much of a soup? I think not.
This soup, it did it all. But also take into account, this soup is not for the people that do not like squash. Or for the people that do not like apples or cranberries. Or for people that do not like thick creamy soups. But if you are not one of this people (you are a person that likes squash, apples and cranberries, and creamy soup) then this soup is for you. It is for us. Creamy, flavorful, slightly sweet and spicy with a little tang and just so dang delicious. It is like a warm blanket of soup. Comfortable and lovely. I have basically eaten an entire pot all to myself in the past two days.
It has been just what I needed.
Join me.
The stuff. A butternut squash, a couple apples, and some cranberries. Also a carrot, an onion, some fresh ginger, a few cloves garlic, cumin and chili powder, salt and pepper, apple cider vinegar, and a little olive oil.
Start by chopping up the carrot and the onion. Small pieces just because they cook a little faster.
Peel and grate or mince some fresh ginger too.
Toss that all into a big pot with a splash of olive oil and a splash of water and cook on a medium heat until tender and fragrant.
While the veggies cook, chop the squash into small cubes. Remove the seeds, but no need to peel.
And chop up the apple too, but set aside a half of one for the apple cranberry relish.
Now toss all that into the pot along with the cranberries.
Add the spices, salt and pepper, a few splashed of apple cider vinegar, and water to cover it all. Then place it on stove, bring to a boil, then turn heat to medium and let cook.
While the soup is cooking, make the relish. Mince the half apple along with about 1/2 cup of cranberries.
Place in a bowl with a pinch of salt and a few splashed of apple cider vinegar. Then just let it sit and meld.
Soup is looking good. Everything is soft and falling apart and ready to go.
Blend it all until smooth.
Thick and creamy goodness right here. If it is to thick, add more water, too thin, cook it down a little longer. The consistency is up to you.
Now all you need to do is ladle soup into bowls and top with a couple spoonfuls of the relish.
This is comfort. This is good.
Have a great, comfy weekend.
-C
makes 6-8 servings
1 small butternut squash (about 5 cups cubed)
1 large onion
1 carrot
2 macon or mac apples
2 cups fresh cranberries (you can use frozen too)
2 tablespoon cumin
2 tablespoons chili power
2-3 cloves garlic
2 tablespoon fresh minced or grated ginger
4-5 tablespoon apple cider vinegar
olive oil
salt and pepper
6 cups water
Start by chopping the onion and carrot into small pieces. Place into large heavy bottom pot with a splash of water and a tiny splash of olive oil. Mince the garlic and peel and mince ginger. Toss into the pot as well and place it on a medium heat to cook until the veggies are tender and fragrant.
While the veggies are cooking, dice up the butternut squash. Remove any seeds but there is no need to peel. Also dice up the apples, reserving 1/2 of one for the relish. Place the chopped squash and apples into the pot with the cooking veggies along with 1 1/2 cups of cranberries , the chili powder and cumin, 2-3 tablespoons apple cider vinegar, and the water. Place the pot back on the stove, bring it to a boil, then reduce heat to medium and let cook.
Once soup is on the stove, take reserved half apple and the other 1/2 cup of cranberries and dice into very small pieces. Place into a bowl with a little pinch of salt and 2 tablespoons apple cider vinegar. Toss around and set aside.
And back to soup. Once the squash is tender and starting to fall apart, it is time. Remove from heat and either with a immersion blender, or a regular blender, blend the soup until smooth. After its blended and creamy smooth, check for thickness. If you think it is too thick, add more water. Too thin, place back on stove and cook down until it thickens up a bit more.
When you are ready to serve and eat, ladle soup into a bowl and top with more pepper and a spoonful or two of the apple cranberry relish.
Then eat and feel cozy.
Right now it is all about the holiday cookies. There are the chocolate ones, the filled ones, the nutty ones and all at the other ones, but really, what is the holiday without a good basic sugar cookie covered in way to much icing and sprinkles? Not right it what it is.
So to kick off holiday cookie baking I had a cookie decorating and pizza party with the littles and big littles. Cookies, icing and frosting, and so many sprinkles. I went the smart route with preparation and precut all the cookies before the party. I was thinking that I would have everyone cut there own cookies out but then I was thinking a bunch of little and hot pans and more likely then not burnt cookies. I just didn’t want to deal with it and it was a good choice on my part. I am so smart.
These cookies are kind of your basic sugar cookies with a little lemon twist. The lemon adds that extra something, a little zip behind the sweetness, especially after all the glaze. And they can be baked to be slightly soft or to have a nice crisp edge. A good, tasty, all around cookie, perfect for any holiday cookie party.
And just a warning about cookie parties. There will be madness and states of being that only an emense amount of sugar can produce.
The stuff. Flour, baking powder sugar, and salt. Squash puree, earth balance, vanilla, and some lemons.
Sugar, butter, puree, lemon zest, lemon juice and the vanilla get cozy into big bowl and then mixed together.
Some people prefer to do this step with an electric beater but I like to use a wooden spoon because arm powder. Either way, make sure the mixtures is completely mixed and that there are no huge chunks of butter.
Now add in the dry and mix mix mix until if forms a dough.
Don’t be afraid to use your hands here.. I started out with the spoon and finish with my hands. It is much easier.
The dough needs a little time in the fridge so wrap it in plastic (or a large plastic bag) and stick in the fridge for a least and hour or up to a day.
When your ready for cookie cutting time, remove dough and let sit on counter for a few minutes to warm up. Then place on a lightly floured surface and roll out about 1/4 inch thick (you can go a little thinner if you like)
And keep gathering and rolling ou the dough until all the dough is a cookie.
Bake the cookies for anywhere between 10-13 minutes. This is dependent on if you like a softer cookie or one with more of a crunch.
And you are probably going to want to make some glaze, which is super simple. Powedred sugar, water, corn syrup, and vanilla extract.
You of course need to get crafty with colors so color the icing to your liking.
Then it’s all about decorating. The mr and I did a few cookies ourselves before the cookie party began. We figured we wouldn’t really get a chance to once all the littles showed up. We were right.
Also I bought brand new synthetic paint brushes (important that they are new) to use to paint on the glaze. It was a very good idea. We loved it and so did all the little.
Our cookie masterpieces. Who doesn’t love a rapper snowman?
Let the party begin. I ended up making 3 batches of cookies because the more cookies the better. And again, so smart to have the cookies all precut and ready. I couldn’t imagine having to deal with cutting cookies with everyone. There would have been tears (most likely mine)
Christmas music on, happy little littles, it started out so wholesome and good. Glaze, frosting, so many sprinkles. I could smell the sugar in the air. I also said that there was to be no cookie eating until after dinner so naturally I think that each little ate about 5 cookies before dinner. It would have been worse if I had they could eat any at all.
And then we ate dinner and more cookies and they all went freaking crazy. Like running around screaming, stoping once in a while to maybe think they might throw up, then kept on running and screaming. Sugar can do crazy things.
Just a few of the creations from the night. There were snowmen, 3D trees and reindeer, and stars. I guess I don’t have a snowflake which bummed me out but stars made do. And yes, that is indeed a target employee cookie.. so awesome.
All in all, the party was a success. The cookies came out great. The decorations were on point. The littles and big littles had fun and were all in a sugar coma by the end of the night. Annnd my house is covered in a light film of stickiness.
Enjoy your weekend and make lots of cookies because that is what you are suppose to do.
-C
makes 20-25 cookies (all depending on you shapes ands sizes of cutters)
Cookie
2 1/4 cups flour
1/2 teaspoon salt
1 teaspoon baking powder
1/4 cup squash puree
3/4 cup white sugar
1 teaspoon vanilla
1/2 cup room temp vegan butter
1 tablespoons lemon juice
2 teaspoons lemon zest
Icing
2 tablespoons corn syrup
2 cups powdered sugar
2 tablespoons plant milk or water
1 teaspoon extract (vanilla, almond, or lemon)
food coloring (optional)
preheat oven to 350
In a large bowl beat together butter, sugar, vanilla, squash, lemon zest and lemon juice until fully incorporated. Add in flour, salt, and baling powder and mix until it all comes together. When dough gets a little hard to mix with a spoon, use your hands and compress the dough into a ball. Take dough and wrap in plastic wrap or place in a zip lock pulled to dough tight and place in the fridge for at least 1 hour or up to a day.
After the dough has had time in the fridge, remove and let sit for a few minutes.. Lightly flour the counter and roll dough out to about a quart inch thick. Grab your cookie cutter and cut away at rolled out dough. Place cut cookies on a baking sheet, gather up remaining dough and roll out all over again. Repeat process until all the dough has been used. Place cookies in oven and bake for 10 minutes or until cookies are just barely turning golden brown. If you like a crispier cookies, cook for 2-3 minutes longer. Remove and place on a cooling rack to cool.
Prepare your icing.
Mix all the ingerdients together until full incorporated. Color to your liking.
And once the cookies are cool its time to start you decorating! You can dip, pour, paint, or pip icing onto cookies. Embellish with sprinkles and candies.
Eat your cookies
Happy New Year! Hope you are all waking up to sunshine in your strut, happiness in you mouth, and kindness in your soul.
So much has happened in the past few weeks. Holidays full of family, friends, birthdays (Happy to Cam, Anthony, and Judah) and all around craziness. My phone got run over by a car(still works!!!),we finally changed the summer tires to snows (thanks Justin!) and Only has now officially moved in behind the couch and is enjoying the life of an indoor cat. We are getting so close with house, so so close. I know a few weeks ago I told you we about the counter top and how excited I was to un-mold it. Well what I don’t think I told you was that we un-molded it and it was fantastic. Then, trying to remove the sink mold from the middle with a hammer, I cracked it! AAAGGGHHHH. That was suck a bitch if a day. But we took it it stride and just made another one. And that one, that one is even better and amazing and is all nice and perfectly perfect. Once we did that we threw up a tile wall, hood vent, light fixtures and all sorts of little things that I can’t remember. Last night we slid the stove into place and fired it up for the first time! It was really stinky and great and I made the mr a pizza for all of his excellent work bringing me fire. It was so freaking satisfying to use an oven and feel slightly normal again. Now all we need to do is finish the cabinets, find a faucet that doesn’t suck, hook up the sink, and a bunch of other stuff and we will be all set. But the oven works so the coming weeks are going to be full of so much oven food so watch out! (i can’t wait to start posting more recipes!!!!)
On top of all the life stuff, I have been sicko all week, and so has the mr. Actually, he has been sick for two weeks and then lovingly gave me his ick. And it sucks. I am tired and snotty and sore and cranks. I have been eating large quantities of raw garlic, swiging apple cider vinegar, and drinking turmeric tea all day. (so I don’t smell the greatest) I bought elderberries to make some syrup a little while back but left them at the loft and we let my dad stay there this week so I didn’t want to go ransack the place looking for them. He is gone now so I’ll go find them and make us a wellness potion. We will be tops soon!
So 2017. You got any resolutions or plans? Me, no resolutions, just to keep on living with intention, kindness and love and to continue to pursue my goals. We have plans for some travels (cross country awesomeness part 2), plans for some life stuff, so we got things. But basically I am just looking forward to making this year good, and to be better with where I place my camera. (I can never seem to find it when I want to take pictures)
Sunday. With today, I am going to relax and recoup. Drink my fluids (tea and coffee) take my naps, and wash the sheets (everyone should start a new year with clean sheets!)
Internet links to click if you like.
-Happiness vs meaning…How about some of both. In 2017, Pursue Meaning Instead of Happiness.
–15 of Carrie Fisher’s Best, Most Honest Feminist Quotes.
-I already charge my cellphone on the machines at the gym, but it it floated , well that would be swell. Floating Gym In Paris Uses Human Energy To Sail Down The Seine River
–A Short Catalog of Foods Discontinued in 2016
-Life is bigger then all of us. As A Rough Year Ends, We Turn To The Cosmos For Some Perspective
–Cross stitching awesomeness
– Maybe 2017 will be the year that I wear pretty things. I really like this dress.
–The Best Things We Read and Ate This Year
-I really want to go back to Iceland.(maybe we will this summer?!) 15+ Iceland Photos You Won’t Believe Are From This Planet
-There is sugar in everything. How Much Sugar Can You Avoid Today?
As I was sitting at the table making this simple little ode to spring salad, it started to snow outside. “Look away”, I told myself. “Pretend you didn’t see it.” Well, I saw it then, saw it before bed, and when I woke up this morning , there was (and still is) a few inches of fresh white covering up my hopes of a warm spring day. I have to admit that it is really very pretty, but what the hell.
This salad is all spring. Fresh spinach from the farm, asparagus in abundance every store I go to. Simple, crisp, refreshing. A nice change from a winter heavy with roasted roots and thick stews. I don’t know about you, but this is the time of year that all I want to eat are fist fulls of fresh green stuff. (I could insert a picture here of me sitting on the couch munching away from a bag of baby kale, but I won’t. You don’t need to see that)
Now if it would just stop snowing and be spring for real, that would be great.
The stuff. Fresh spinach. tender asparagus, a lemon, and salt and pepper..
Snap off the woody ends of the asparagus then dice up the rest.
Toss the chopped up asparagus in a bowl with spinach. Squeeze the juice of the lemon all up in that and sprinkle with salt and pepper. That is it.
Fresh, green, springtime goodness in a bowl.
-C
2 large handfuls of fresh spinach
10 ish spears of fresh asparagus
1 lemon
salt and pepper
Wash and dry spinach ans place in bowl. Snap off woody end of asparagus (I save this bits for soup) and chop up the rest into mouth sized pieces. Toss the chopped asparagus into bowl with spinach. Squeeze on the juice of the lemon and sprinkle with salt and pepper to taste.
Eat.
Winter squash season is in full swing. I have already started to hoard them in all the nooks and crannies around the house. There are sugar pumpkins on the stairs, buttercups on the floor and delicatas all over the counter. Ever meal, breakfast, lunch or dinner needs to have some squash. House rule.
This hear spaghetti squash has been sitting on a stool for about a week, looming in it’s size and just waiting for me to bake it off. The spaghetti squash at farm share have been bigger then a small child so I have been a little hesitant to bake it until the mr was down with eating it with me too.
What I love about this dish is that it is really simple and easy to make.We have been working later these past few days so when we get home, we really just want to eat and go to bed (not really….kinda really) The initial baking of the squash takes a little time, but its zero hands on and can be done ahead of time. And the rest, take like 8 minutes tops. Also a lot of time people forget that you can eat a spaghetti squash with things other then tomato sauce. (although that’s good too) But really, the sky is the limit. Squash goes with everything.
So dinner. I had the squash and went with what I had in the fridge. Beans are great, fresh pico is amazing, all atop a big pile of some warm spaghetti squash. Well that is just what we call a winner. A winner dinner!!!
The stuff. A spaghetti squash (maybe go for a smaller sized one if you don’t want a lot of left overs) precooked or canned black beans, a red pepper, and some red onion. Also need garlic, cumin (crushed or seeds) salt and pepper, olive oil, and fresh cilantro. And lastly some home made or store bought pico de gallo or any of your favorite salsa.
You don’t see it here, but the squash went into the oven about an hour ago to cook. I did nothing to it besides stab it once andjust stuck the entire thing right on in and cranked up the heat. Simple, easy.
Ok, so when the squash has been baking for a while, start getting the rest of thestuff ready. Small dice up the red pepper and the onion and toss it into a lightly oiled hot skillet to sweat down a bit.
Once the pepper and onion are nice and soft, toss in the cumin and minced garlic. Cook a little longer until the seeds and garlic are fragrant and cooked.
Add in the beans and mix it all around. Taste, add a little salt and pepper if it needs it, and set aside.
Spaghetti-ing the squash. I took it out of the oven when it was fork tender, sliced it in half on a baking sheet and let it cool off for just a minute. Scooped the seed out then scraped the cooked squash with a fork. Fun times, just watch you your hands, the squash is hot.
And your ready for food. Squash in a bowl, topped with some black bean mixture and a hearty amount of fresh pico. Serve it with lots (or none if you don’t like it) cilantro and a wedge of lemon(or lime)
This is some good stuff friends, some really good stuff.
Alright, now I have to get ready. We are taking a handful of the little pumpkin picking….A few more pumpkins to add to the stash.
-C
Serves 2-3
1 medium spaghetti squash
2-3 cups cooked black beans (or a can)
1 teaspoon cumin seeds (or crushed cumin)
a red pepper
a small red onion
2-3 cloves garlic
olive oil
1 cup fresh Pico de gallo or any of your fav salsa.
salt and pepper
a lemon or lime
fresh cilantro (optional)
To cook the squash. Preheat oven to 400. Grab squash a stab a small hole in it so when its baking it does bot explode (this has happened to me a few times) then stick the whole squash into the oven. Let bake for 45 minutes to an hour (depending on size) It is done when it is soft and fork tender. Once done, pull squash from oven, cut in half and let cool for a minutes. Once cool enough to handle, scoop out the seeds then start scraping the flesh with a fork to create spaghetti like strands.
For the beans. Small chop up the red pepper ans onion and toss into a hot skillet with a little splash of olive oil. Sweat the pepper and onion on medium heat and when they are close to done, mince up the garlic and toss that in along with the cumin seeds and a pinch of salt ans pepper (if needed) Keep cooking until the garlic is cooked and the cumin if fragrant.
To assemble. Grab a bowl and fill with a good amount of the cooked squash, top it with a big scoop of the black bean mixture and you desired amount of fresh pico or salsa. Add lots of extra cilantro and serve with a lemon or lime wedge to squeeze on top.
Now eat it.
Note….Any left overs make a fantastic cold salad or wrapped in a tortilla.
Do you have a gazillion tomatoes, like so many that they are practically coming out of your ears? Me too…. Me too. This year the tomatoes have been gang busters, a explosion of the sweetest and most delicious fruit and now I have tomatoes littered everywhere, tucked into all the corners and baskets all over the house. It’s getting kinda tomato crazy over here.
I can only eat so many tomatoes a day before all I have eaten are tomatoes and I start to feel slightly sick. Same with the mr, he has been a tomato eating champ as well but I think he was getting a little bored with all the tomato salads that I have been making. So I thought I would try something new and make a tomato cake. I figured why the heck not, tomatoes are technically a fruit and fruit and cake are great together and yeah. So tomato cake is going to be fantastic. I also wanted to make something that the mr would eat for breakfast. I have been doing this new thing in the mornings for the mr. I have coffee ready, some breakfast food (its been zucchini bread for a while), and a little vase of fresh flowers that I pick on my morning walk, all set out on the counter for when he wakes up. I know, I am so great right. Really I do it cause I want him to eat something before working all morning and plus if I am all sweet in the morning, he can’t be an old man cranky pants (at least he tries not to be). Now for the next few days the tomato cake is breakfast cake and all is good.
Anyway, the cake come out great. Bright reddish orange, dense but fluffy and most, and smells so good. The mr tells me it’s amazingand I shared a chunk with some of my family and everyone (minus a little) where fans. I am for sure going to be making this again soon, although I have been toying with the idea of eggplant sweet bread (too far??) but I’ll get to that later.
Now for the tomato cake!
The stuff. Flour, baking soda, baking powder and salt (all in the bowl). Brown sugar, oil, vanilla, apple cider vinegar and a few nice and juicy tomatoes.
First off, remove the core from tomatoes and cut into some chunks. Stick the chunks into a blender and blend.
Fresh and smooth tomato puree.
Now just dump the rest of the liquid stuff into the blender now and give it a whirl to mix it all up.
And pour the blended wet into the dry and mix until incorporated.
Pretty pink batter goes in a well greases bundt pan. I had got brown sugar everywhere while I was measuring it out and decided to just toss it on the cake as not to waste it…doesn’t hurt.
And now the batter goes into a preheated oven to bake .
A bit of time later you have yourself a cake.
The scary part. Flip the pan and hope all that grease does it’s job and the cake pops out. Lucky me this one popped out like a champ.
One de-panned, let the cake cool for a bit before cutting into it.
And now all you have left to do it eat it, so eat it.
Have a great weekend. Eat lots of tomatoes and make lots of cake.
-C
Makes one bundt cake
2 -1/3 cup all purpose flour
1 teaspoon baking soda
1 -1/2 teaspoon powder
1/2 teaspoon salt
2-3 large tomatoes (2 -1/2 cups after blended)
1/2 cup brown sugar (for a tad sweeter, add another 1/4 cup)
1/2 cup of any neutral flavored oil
1 teaspoon vanilla
1 tablespoon apple cider vinegar
Preheat oven to 350
Start by whisking together all the dry ingredients into a big bowl. Take tomatoes, remove core, chop into chunks, and place into a blender. Blend tomatoes until a smooth and frothy puree. Now add in the sugar, oil, vanilla, and apple cider vinegar and blend until incorporated. Pour wet mixture into dry and stir until combined.
Pour the cake batter into a greased (and floured if you want. I find it helps to make sure all the nooks are greases) and stick into preheated oven. Bake for 45-50 minutes until it’s a dark reddish golden brown and a tester (I use a fork) comes out clean when stabbed.
Remove from oven and let cool for a minute or two then invert cake, give the pan a few tap taps and hope that it comes out all nice and clean. (don’t worry if a piece gets stuck, you can just dust the top with some powdered sugar)
Let cake cool and when ready, cut a slice and eat it up. I was told no glaze, but I was going to make a simple lemon glaze (lemon juice and powdered sugar) for the top. The mr said it was perfect, but glaze would have been pretty. So glaze it up if you want.
My rhubarb patch has turned into a rhubarb jungle and I couldn’t be happier. At the beginning of the spring I moved like 10 of the plants to the new patch location and was wondering if I would even get a small crop this year. Guess my soil is premo cause those plants be ginormous.
And now I am harvesting the stalks from that jungle and I have rhubarb coming out of my ears. (I will be eating rhubarb all summer long) It’s not really a problem per say, but there is so much, so it’s time to get a little crafty with the tangy sour veggie stalk.(rhubarb sword fight anyone?) One of the first things I made with some of it was a salad that consisted of roasted and slightly charred zucchini, onions, corn and rhubarb. I made it for the mr thinking that he was going to love it because he loves rhubarb so much. Well he didn’t love it because of all the corn. (Such a weird egg that boy) But me,I loved it, like ate it all and then some. Corn and rhubarb are such a good combination and if the mr wasn’t being such a weirdo, he should have liked that salad too. But it gave me the inspiration for the cake . A cornbread cake ( he loves cornbread) sweetened just the right amount with maple. Not exactly a rhubarb corn salad, but you get the idea. And this cake is totally multi purpose. Made as dessert and would go extremely well with a scoop of your favorite vanilla ice cream but would work equally as well served with a bowl of baked beans. I mean, can cake for dinner get any better?
The stuff. A bowl with cornmeal, flour, baking soda, baking powder, along with a little salt. Also need some maple syrup, soy milk, earth balance and apple cider vinegar.And of course we have a few rhubarb stocks,
Start with melting the earth balance and maple syrup together on the stove and letting it thicken up a bit. While it’s thickening, think about the shape of you skillet and haw you want to layer you rhubarb, like the design of it.
Then when the maple is thickened and you know how you want to layer it, chop up your rhubarb and start placing in into the bottom of the skillet. Any way you do it, just make sure that the bottom is pretty much covered in rhubarb and that its only on stalk deep.
Now for the batter. Easy easy. Just whisk together the dry and combine all of the wet into a bowl.
Wet and dried mixed together.
Pour the batter gently onto the rhubarb and smooth the batter out.
And into the oven it goes.
Pulled from the oven when the cornbread is golden brown and a tester stuck into it comes out clean. Let it cool just as it is for about 10 minutes… (give the maple time to cool and set up so it doesn’t just get sucked into the cake) then flip in. I flipped mine onto a piece of parchment and a cutting board . You could try to go directly onto a cake stand or plate, but It might get a little messy. I like to play it safe when flipping things and just use a big cutting board. Now get ready to cross your fingers…..
Ta da!. Ain’t it a beaut? And don’t worry if a little piece or two get stuck in the pan. Either scrape it out and place it back on the cake or consider it a little snack.
There you have it. A cake good to go for all your meal eating needs.
Go rhubarb GO!
-C
1 1/4 cup flour
1 1/4 cup cornmeal
1 teaspoon baking soda
1 tablespoon baking powder
1 teaspoon salt
1/3 cup melted earth balance + 2 tablespoons
1/3 cup maple syrup + 2-3 tablespoons
1 1/2 cups soy milk (or any plant based milk)
1 tablespoon apple cider vinegar
2-3 stalks rhubarb (enough to cover bottom of skillet)
Note. I baked this in a 10 inch cast iron skillet. If you don’t have one, a 9 inch circle or square pan will do the trick, you are just going to have to simmer the maple in a pot ans pour in into the pan you are using…and maker sure to grease it!
Preheat oven to 350.
Place the 2 tablespoons of earth balance and the 1/3 cup of maple into a 10 inch skillet and place on medium heat. Stir around until earth balance is melted and the maple starts to thicken. Remove from heat. Now grab rhubarb cut into pieces and layer it any way you see fit, making sure to cover the bottom of the skillet but not layering it in to thick.
In a large bowl mix together the flour corn meal, salt, baking soda and powder. Then In a separate bowl, mix together the apple cider vinegar, soy, melted and cooled earth balance and the remaining maple. Pour wet into dry ans mix until even;y incorporated.
Pour batter gently on top of rhubarb, leveling out if need be, then slide it on into the oven to bake for 25-30 minutes or until the cake is golden brown and a tester stuck into the middle come out clean.
Remove cake ans let cool for for about 10 minutes. This is really important,because flipping to soon and all the rhubarb maple will just absorb and soggy up the cake and if you wait to long, all that goodness willl harden up and get stuck. SO 10 minutes.
Now when your ready yo flip, think about size. I used a big cutting board that , but a plate would work to, just make sure it;s slightly bigger then the skillet. Then just do it flip and lift the skillet away. Any pieces that might have gotten stuck can be scraped off and placed back where they belong.
Now your cake is ready and waiting for you to eat. Sweet enough for dessert, not to sweet that you couldn’t serve it with dinner. Multi purpose cake.. the best kind!
I know what you are thinking, you are thinking “It’s Memorial Day weekend. Unofficial start of summer. Lots of BBQ’s now I have to make a potato salad!” (it’s a law right?) and “I want a pickle, dill to be specific”. Ok, maybe you weren’t thinking that, but I was. (I often think about pickles…)
Pickles. And potato salad. It only made sense to make a pickled potato salad. So make it I did. And oh boy oh boy, there is nothing better then a rich and creamy salad consisting of potatoes other then a rich and creamy and pickle tart salad of potatoes. I hit the nail right on the head with this one. The mr and I ate the entire salad all to ourselves and way to fast. Now it is gone and I didn’t get a chance to share with anyone. But it’s ok, cause this is definitely going into the summertime potato salad rotation.
Now you are thinking “creamy dill pickle potato salad.. this girl is a genius!” and to that, I say yes. I would have to agree with you on that. (hehe)
And to all who may not be a pickle fan, or need to make 2 potato salads, (it is always good to have a variety of potato dishes at any BBQ ) try this guacamole potato salad, another favorite.
The stuff. Potatoes of course and half a sweet onion, a cup or so of navy beans in the aquafaba ( bean water), left over pickle juice, fresh dill, dried dill, garlic, olive oil ,salt and a pepper.
Yes there is a lemon pictured, but I was actually using that to squeeze into my water so yeah, not needed in the potato salad but you should grab a lemon and a big tall glass of water and drink it. Keep yourself hydrated.
Get the potatoes going. Chop them up into small piece and place into a big pot. Cover with cold water and add in a good bit of salt. Stick the pot on the stove and boil those taters.
While potatoes are boiling, strain the aquafaba (bean water) from the beans.
And chop the onion into little pieces and stick into a big bowl along with the strained (and now rinsed) beans. Pour in half the pickle juice and give it a good toss then set aside and let the pickle juice do it’s thing.
Now it’s the sauce time. Blend up aquafaba, garlic, dried dill, a little pickle juice and pinch of salt. As your blending, pour in olive oil until the sauce becomes rich and creamy dill sauce (vegan mayo my friends)
The potatoes are boiled until fork tender and drained..
Toss the strained potatoes back into the pot and add in the bean/ onion mix and the rest of the pickle juice. Give it all a good toss and stick the pot into the fridge for about an hour until the potatoes are cool.
And now we assemble. The cooled off pickle juice infused potatoes, beans, and onions are stuck into a bowl (or just leave in the pot if you want) and slathered with the creamy dill sauce and mixed with as much fresh dill as you want and lots of freshly cracked pepper
And a pickle. If you have one, I highly, HIGHLY, recommend chopping one up and adding it… I mean it is a pickled potato salad after all.
So now you have a great, fantastic, knock your socks off, salad to make for any of your weekend BBQ needs.
Your welcome.
Now have a great, extra long weekend!
-C
Serve 4-6
5-6 red potatoes
1 cup pickle juice (use a good pickle juice that you like the taste of)
A small sweet yellow onion (or half a big one)
1 cup navy beans
3-4 tablespoons aquafaba (bean water)
1/2 cup olive oil
2-3 cloves garlic
1 tablespoon dried dill
a handful of fresh dill
salt and pepper
pickles (optional)
Chop up the potatoes into mouth little chunks ans place into a pot . Rinse them and them cover about with about an extra inch of cold water, Ad d in a a good sprnkle of salt (like a tablespoon) and stick on the stove. Bring the pot to a rapid boil then turn heat down a bit to a low boil and cook until the potatoes are fork tender.
While potatoes are boils, strain you beans away from the aquafaba, and keeping about 3-4 tablespoons of the liquid. Rinse the beans and place into a big bowl. Chop the onion into little pieces and add that in with the beans and about 1/2 of the pickle juice. Set aside
Now grab the strained bean juice, about a tablespoon of pickle juice, the garlic, and the dried dill, Either with a hand blender or regular blender, start blending all that together while slowly pouring in olive oil (about 1/2 a cup ) until the sauce is thick and creamy. Season with salt and pepper to taste and place in fridge to hang until you need it.
And once the potatoes are cooked, strain them then add them back to the pot along with the bean/onion mixture and the rest of the pickle juice. Toss around to coat evenly and place into the fridge to cool. After about a half hour its a good idea to give it a toss to make sure the juice is getting to all the potatoes.
Once potatoes are cooled, dump into a serving bowl. (or just keep in pot) It’s ok if there is a little remaining liquid.. it will get sucked up by the potatoes. Get the sauce from the fridge and pour it and toss it around to evenly coat all those yummy potatoes. Chop up fresh dill and toss that in too (as much fresh dill as you like.. more is better!) And lately, if you have a spare pickle or two, chop it up and add it on in (or place in a bowl on the side for people add in themselves)
I added the pickle. You should add the pickle. It is so good with the pickle
Like any potato salad, serve with your favorite foods and keep in the fridge when not being eaten.
Yesterday we had a few pieces of really log ass metal roofing delivered to the new house so we can finish the little side parts of the roof off. The funny thing is we ended up with way more wood then metal. The roofing is super light and flexible so it has to be strapped to a super long wooden structure. And it was perfect. The mr and I have pretty much finished the fence except for the gate from the driveway which sucks because we still can’t bring Washer over to play without it ans we pretty much fenced the yard in for him. But the long ass wooded palette things.. IT was perfect. Well a perfect for now solution. A Already constructed tall and long (too long, we had to cut it down) wooded wall that is now our temporary gate.What a score! And now the pup can spend all day long laying around outside and not getting into any neighborhood fights with the other dogs. And look at us making use of all the scraps. We are so awesome.
Ok, so besides our awesomeness and the new temp gate, let talk about this greenest freaking soup that there ever was. It is probably the best green soup that I have ever tasted. (I know, I have habit of proclaiming all of my soups as the best soup ever, mostly because they are.) It’s one of those soups that is super fast and so simple to make and is perfect for all the spring and summer time eating that will be going on. Eaten hot or cold and out of a bowl or a drank out of a glass. A soup for any time, any place. The mr even liked it and he says he doesn’t like peas. (but he so does). Who doesn’t like the best soup ever?
Now here is how to make it.
The stuff. A big bowl of fresh spinach and a bowl of peas (fresh or frozen.. mine were frozen) Also need an onion, a carrot, a few cloves or garlic, water, olive oil, and salt and pepper.
First thing first. Get the onion and carrot all nice and chopped up and tossed into a big pot with a drizzle of olive oil, a little splash of water,and salt and pepper. Stick that pot on the stove on medium high heat and start to cook cook.
Soften and yummy carrots and onion. I am not exactly sure if my carrots turned the onion orange or if my pot because it is so stained with turmeric that it turns everything yellow. Keep the pot on low heat and mince and stir in the garlic.
And for magic. The pot is sill on low and you are going to pile all the fresh spinach right on in to the pot. Add a few splashes of water and a lid and let it cook for a few minutes. And when you go back and remove the lid..Ca bang ! All the spinach is gone (not really, it just wilted).
It’s time for the peas and water to be added.The blender comes out and the soup gets blended until super smooth.
So green, so good.. This soup is all ready to go. But here is the thing, you can eat it at any temperature and it will be amazing so if you want to heat it up a little more, go for it. Cold soup shooters, just stick it in the fridge for a while and wait until its chilled. Or both. I ate a bowl warm then had cold soup for dessert.
And to finish, you must serve with fresh lemon and if you have it, a pretty little mint plant. I love the flavor of a little fresh mint added, but not all do. So mint if you like( it really is so good) but lemon in a must!
Enjoy all the green things!
-C
serves 3-4
2 cup peas (fresh or frozen.. I used frozen)
3 packed cups fresh spinach
a few sprigs of fresh mint (optional)
3 cups water
1 small onion
a carrot
3 cloves garlic
1 lemon
olive oil
salt and pepper
Small chop onion and carrot and toss into a big heavy bottom pot with a drizzle of olive oil and salt and pepper. Stick on stove on medium heat and cook until it becomes soft and fragrant. Now mince garlic and add that it too. Stir and cook for another minute or two then add in all the spinach and a splash of water. Place o lid on pot and let until cook until spinach is all wilted. (give it a stir to get it all cooked down). Once wilted, add the peas and the water. Stir all together and let simmer for a few minutes then remove from heat. Now blend the crap out of it until silky smooth.(use your blending device of choice).
And it’s done. You can either serve right away as a hot soup or sick it in the fridge and serve cold! Just remember that you need to serve it with cracked pepper, a squeeze of fresh lemon and some chopped up fresh mint(mint it optional but so good)
Eat with a spoon or forget the spoon and slurp out a a cup like the cool kids.
I eat a lot of hummus. Like a lot. Every day, all day long. (seriously, I am always snacking on veggies dipped in hummus) So I am sorry to all around me that my breath always smells.. (I blame all the garlic in the hummus.)
Recently, during a particularly browsey grocery shop, I ended up in the hummus case (I always end up there) and found a new hummus flavor. Pineapple jalapeno, WHAT. I grabbed it right then and there, convinced that hummus gods were rewarding me for all of my hummus eating and have made me my very own flavor.
Got home, tossed all the groceries into the fridge and busted open the new hummus, a bag of carrots, and went at it. Oh man, it was good.(to often the store bought hummus flavors are not so great) The flavors were all there, sweet and spicy, and creamy. It was fantastic, I ate almost all of it and I knew I had to make my own.
And I did and you know what, it was even freaking better! (Fresh it the best!)
So If you are a hummus person of any kind, this is a fantastic exciting flavor that will make you all sorts of happy.
The stuff for the hummus: chickpeas, tahini, olive oil, garlic, and salt and pepper. And for flavor add ins, fresh pineapple and a jalapeno pepper.
Chickpeas (rinsed and drained) go into the food processor with some tahini, the juice of the lemon and salt and pepper.. The garlic I actually pulsed in the processor first (to avoid big raw hunks) and some olive oil are also going in on this.
Blended until a smooth, creamy perfection.
Now for the fun stuff. Dice up the pineapple and remove seeds (or not) from the jalapeno and dice that up too
Toss it all (minus a few little pieces of garnish if you want) into that creamy dreamy hummus.
Pulse pulse pulse until the chunks of stuff are all incorporated . Make it super chunky or super smooth, up to you. I like mine kinda chunky, but not too chunky, if you know what I mean.
Into a big bowl, topped with a few little diced up pieces of jalapeno and pineapple, you know, for prettiness. And lots of cracked pepper.. Lots.
Now eat. With whatever ( I like veggies or just give me a spoon, Ican eat hummus all by itself)
Hummus for life!
-C
Makes about 2 1/2cups
2 1/2 cups cooked chickpeas (one can)
2-3 cloves garlic
2 tablespoons tahini
1 lemon
2 tablespoons olive oil
3/4 cup fresh pineapple
1-2 jalapenos
salt and pepper
Rinsed and drain chickpeas. Add garlic and a little olive oil to the food processor and pulse until the garlic is a little minced. Add in the drained chickpeas, tahini, a sprinkle of salt ans pepper, the juice of the lemon and another tablespoon of olive oil and blend until smooth.
Dice up pineapple into smaller chunks and remove seeds (if you want) from the jalapeno and chop that into smaller pieces . Add to the hummus and pulse until combined. You can leave it chunky or blend until smooth. Just stop blending when you reach you desired consistency . Garnish with more chopped pineapple and jalapeno and lots of freshly ground pepper.
Serve with whatever you eat your hummus with.
Store left over (there probably won’t be any) in a container in the fridge.
Every year I play this game with myself.. Is it allergies or am I sick. The past few days I have been feeling kinda crappy, waking up with itchy, gunky eyes. My throat hurts, my head is like a balloon, and I am just feeling beat..
I think it’s that I am sick (because I don’t want to have allergies) but whatever it is, it sucks, but usually goes away after a week (like every year because its really allergies). Blah.
But enough about my balloon head, lets talk these maple banana walnut oat squares. These yummy gems of the oat square world are just what you need in your life. Healthy, protein packed, nutty, and a touch sweet. No junk, just good stuff all made with little to no effort. If you like banana bread, you will be all into them. I was inspired to make these by the extremely ripe bananas that need to be eaten asap and the mr’s lack of eating a healthy breakfast (I want him to eat, and I want it be oatmeal). I know him well enough that if I make a snack like thing and leave it out to eat, that he will eat it. For breakfast.
So weather or not you are looking for a good way to get in some good stuff into your tummy or just want some good tasting stuff in your mouth, this is the breakfast/dessert for you.
The stuff. A couple of ripe bananas, a bunch of rolled oats, some yummy walnuts, real maple syrup, cinnamon, baking soda and a wee bit of water.
Start with the walnuts in a food processor. Turn it on and process until….
You got this walnut butter. Do not eat it, it’s for the squares (it is so good).
Add in the oats, cinnamon and baking soda and turn the processor back on until you get a nice unified crumbly mixture.
Now in goes the bananas and the maple syrup. And you guessed it, blend some more. While you are blending, if the mixture seems to dry, add in a splash of water, to wet, just toss in another handful of oat. The mixture should be like a muffin batter consistency.
And that’s it. If you want some nut chunks, add in a handful more of walnuts (do it) and pulse just to get them mixed into batter.
Then pourthe mixture into a well greased 9×9 baking pan and spread out evenly. Toss those suckers into the oven to bake.
Oh so good bananas give off the best smell when baking. After about a 1/2hour, these bars are nice and golden brown and a fork stuck in the center comes out clean, which means, they are done.
Cut into square , eat one or two, and save the rest. Eat for breakfast, as a snack, or for dessert. And a smear of peanut butter on top is aces too!
Later dudes.
-C
3 cups old fashion rolled oats (gluten free ones to keep in GF)
1 cup plus a a small handful walnuts
1/2 cup maple syrup
2 rip bananas
1 /2 teaspoon baking soda
1 teaspoon cinnamon (optional)
Place 1 cup of walnuts into a food processor and blend until it turns into walnut butter.. about 3 minutes. Add in the oats and blend together until it becomes a crumbly mixture. Add in the maple, baking soda, cinnamon and the bananas (break into chunks) and blend until incorporated. If the mixture seems lie its too dry, add in a splash of water, and if to wet, add in another handful of oats. The batter should resemble a muffin batter. Once blended, mix in the remaining walnuts and pulse just to mix them in.
Pour mixture into a well greased 9×9 baking pan and stick into the fridge for 10ish minutes and preheat oven 350
And after the time in the fridge, remove the pan and slide them into the oven. Bake until golden brown and a tester stuck into te middle comes out clean. (about 30 minutes)
Remove and let cool. Pop out of pan, cut into square, and eat to you face.
Squares will last 3-4 days in a airtight container or freeze them and they will last until you eat them.
Roasted veggies of any kind can get this girl in trouble. Place a sheet pan meant for many full of roasted veggies and watch out, I will probably eat them all. I can’t stop, won’t stop and you know what, I am not sorry, especially if its roasted brussel sprouts and squash.l I am grabbing at every last bit, especially all the really crispy, almost burnt pieces. Burnt food is one of my favorite flavors.
This dish is pretty basic, but also not. A slightly overlooked grain, spelt, makes for a hearty backdrop to the magic of roasted sprouts and squash, covered with a sunflower butter sauce which is a nice spin on a traditional peanut sauce. It’s pretty easy to make and pretty to look at as well. A nice hearty and warming meal for all of those cold winter nights. And it’s not going to make you feel heavy or gross, like if you sat and ate an entire lasagna. No, you will feel full and fantastic and ready for a cookie (it is the holidays after all).
The ingredients in this dish are mainly inspired by the half eaten jar of sunflower butter a friend of mine gave me at the gym, plus the fact that I have been getting a few stocks of brussel sprouts each week at farm share so we are eating them at ever meal, (plus I LOVE brussel sprouts) and me trying to use up all of the grains and such in the pantry before restocking anything more or new. A dish of convenience sure, but also a damn delicious one at that. With this being said, if you had a different grain you wanted to use, or an abundance of some other veggies that you have or prefer, well go ahead and use them. You do you my friend.
And really, I was thinking of you when I made this dish. Sometimes at this time of year people tend to forget to eat, or tend to eat on the not so healthy side. This grain bowl situation is just what your body is in need of. Simple delicious nourishment.
The stuff. Spelt that has been soaking in water for a while, half a butternut squash, brussel sprouts, a red onion. Also sunflower butter, a few cloves garlic, a lime, soy sauce, a touch of maple, salt and pepper, and olive oil.
The spelt will probably take the longest so get it on the stove. Strain away the soaking water and place into with fresh water. Bring to boil then reduce heat to a simmer. Place a lid on pot ans let it go.
Next, get to the veggies. Halve the big sprouts (small ones can stay whole) chop onion into chunks and cube the squash.
A drizzle of oil, a sprinkle of salt and pepper, and a good toss around and it ready for the oven.
Meanwhile, make the sunflower butter sauce. Its pretty basic. The sunflower butter, minced garlic, soy, maple, and juice of the lime all into a vessel that can hold it. Add a couple tablespoons of warm water to thin it out and done. Sunflower butter sauce. Easy Peasy.
After about an hour, your slept should be cooked (that sounds aggressive to me) Tender and chewy and just right.
The veggies should be roasted and done too. Crisp as you like ( I actually like mine even darker, but the mr does not so I went a light roast this time)
And it’s all ready for you to eat.
Roasted butternut squash and brussel sprouts on a warm bed of spelt covered in sunflower butter sauce. Living the good life here.
Take care of yourself this week, and always for that matter. Eat some good food. Your body will be happy for it.
Bye.
-C
Serves 2-3
1 cup spelt berries (soaked in water overnight if you remember)
3 cups water
about 1/2 of a butternut squash
about a pound of Brussel sprouts
a medium red onion
1/4 cup sunflower seed butter (unsalted and unsweetened)
2 tablespoons liquid amionos or soy
1 teaspoon maple or honey
1 lime
2 cloves garlic
salt and pepper
olive oil
Preheat oven to 425
Place soaked spelt berries in a pot with water and a pinch of salt. Bring a boil then reduce heat, place a lid on pot and simmer for 45 minutes to an hour or until spelt berries are tender and all the water has been absorbed.
While spelt is cooking, cut sprouts in half (unless they are very small), cube the butternut into pieces about an inch big, and chop the onion up into chunks. Place all that you just chopped onto a baking sheet, drizzle with a teaspoon or two of olive oil and toss around. Sprinkle the veggies with a pinch or so of salt and pepper and pop into the hot oven. Roast for 40-45 minutes or until roasted to your desired doneness. (I like things a lot darker then the mr so I would leave my veggies in for closer to an hour)
For the sunflower butter sauce. Mince garlic and place into bowl or cup with the sunflower butter. Add in the maple, soy, and the juice of the lime. Mix together and add in a 2 tablespoons of warm water to thin out. Add more water if needed to get to a thick but pourable consistency.
Once the spelt is cooked, the veggies are roasted and the sauce is made, well you can assemble and eat. Spelt in a bowl, toss on some roasted veggies, and cover in the sauce. And then you eat it.
I made baked beans last week for a side to dinner with the mr and Barb. They ate them all. I didn’t get more then a spoonful. I was sad for me, but also was like “Shit, if I had known you guys were bean fiends, I would be making baked beans like all the time.”
And maybe not all the time, but I made them again this week. And again, they ate a lot, but I got me some this time, and I will probably make them again next week too because they will be perfect for Thanksgiving. See, homemade baked beans are a thing of beauty. Sure you can buy them in a can and be just fine, but these baked beans, well these are waaaayyyy way better. These baked beans are soft (not canned bean soft) and tomatoey and a little spicy with a tang. Not sickly sweet, (not sugar added) and not too salty.. They are just about perfect. You can eat them on their own, toss them into salads or wraps, stick on some toast, serve as as side, or just eat them cold straight from a jar from the fridge right before bed. (your loved one will thank you for that). Plus they are baked in the oven and I love me a good warm oven on a cold day. And the obvious, but all the protein and all around goodness. A great dish to serve if ever you need to feed people like me who don’t eat meat. It’s a win win win win.
Baked beans in all their glory. No cans in sight.
The stuff. White beans that were soaked overnight, strained then added back to a pot with 6 cups of water. Also have crushed tomatoes. an onion, a few cloves of garlic, chili powder, mustard powder, apple cider vinegar, and some salt and pepper.
First step is to start boiling you beans. But while that is happening, mince garlic and chop the onion into really small pieces.
Toss the onion and garlic in a pan and cook on medium low until soften and fragrant.
Cooked beans. All you need to do to cook them is place the pot with soaked beans and water on high, bring to a boil, then turn heat to a medium. Let beans cook until tender. It should take about an hour and a half.
Beans are cooked and the garlic and onion are soften so now all you do is combine everything together. Don’t drain the beans, just toss in the tomatoes, the vinegar, the spices, and a few pinches of pepper and a pinch of salt. Stir in all together,
Looks like soup right? This is right before you stick it into the oven.
Now look at that, oven baked beans. The best part… The crispy sides. ALL MINE!
Not much left to do but eat them. Straight up with a hunk of bread. That is a good way to start anyway.
Enjoy your beans!
-C
Makes a big pot of beans
1 pound (2 cups) white beans soaked in water for at least 8 hours (I used great northern but navy would be good too)
6 cups water or veggie stock
3 cups (or a 28 oz can) crushed tomatoes
1 onion
3 cloves garlic
1 1/2 tablespoons chili pepper
1 tablespoon mustard powder
1/3 cup apple cider vinegar
salt and pepper
Strain soaked beans and place them into large oven safe dutch oven almond with the water and stick on the stove. Bring the beans to a boil then reduce heat to medium and cook util the beans are tender. Should take about 1 1/2 hours.
Sometime while the beans are cooking, mince garlic and chop the onion into very small pieces. Place in a skillet and cook on medium until the onion and garlic are soften and fragrant. Remove from heat and set aside until beans are cooked
Preheat oven to 425
One beans are tender, dump in the cooked garlic and onion, the tomatoes, the spices, the vinegar, and a good pinch of salt and pepper. Stir it all together and place into the oven. Bake for about 2 hours, staring about ever 30 minutes, until the bean sauce is nice and thick. If at any point you think they have gotten to dry, just add more water. Pull the beans out of oven once you are happy with the sauce consistency. Taste and season with more salt and pepper if needed.
And then eat them. As a meal, as a side, or as a snack. Beans are good anytime.
Any leftovers should be stored in the fridge. Beans can be reheated very easily on the stove top. Just place the pot back on stove, stir in a little water and cook til hot.
Beans are also fantastic eaten cold from the fridge.
The thing with having an abundance of squash in the house, and having the abundance keep growing (we get a lot of squashes at farm share) is that I need to cook just about every meal with said abundance, which I am totally on happy to do. I welcome all the squash. I am excited about all the squash. I could eat al the squash all day, everyday. And I do. But that is me. The mr and the others the I sometimes cook for, they are not as squash crazy as me and get sick of plain old roasted squash so I am trying to change it up and make new and interesting things out of the squash so no one gets bored with it.
Yes, I know stuffing an acorn squash is hardly a new idea, but this squash is not stuffed with the usual rice and stuff, it stuffed with lots of black beans and cumin and chili powder spiced cauliflower (and a few other things). The combination of all the flavors with the acorn squash really hit all the right spots for a tasty, not boring squash meal. It is a brilliant combination of flavors that even the not so keen on squash person will love.
That is my opinion of course but it will be your opinion too after you make and eat these. We will brilliant together.
To the stuffed squash.
The stuff. An acorn squash, some cauliflower, cooked black beans, an onion, and a few kale leaves. Also need some cumin, chili powder, salt and pepper. salsa, and olive oil.
Start by cutting the squash in half and scooping out all the seeds.
Place the squash open side down on a baking sheet or in a skillet lightly oiled and then stick into a hot oven to roast.
After the squash goes in, dice up the onion and cauliflower into small little pieces.
Place the chopped stuff onto a baking sheet. Drizzle with olive oil and toss with the cumin, chili powder, salt, and pepper. Get that into the oven too.
Roasted, and ready. Stop, do not eat it all, but you might want too, it is so freaking good.
And once this guy in fork tender, its ready as well.
Scoop out a bit of the cooked squash from each side making the well bigger. More room to stuff.
Get everything together. Chop the kale, grab a bowl.
The black beans, salsa, scooped out cooked squash go into bowl. Add in the roasted cauliflower and onion and the chopped kale and mix.
Now stuff each side. Get as much in as you can, mound it as high as you can and place back into oven to bake for a little bit longer.
Cooked and slightly crispy in all the right ways.
These stuffed suckers are everything we all wanted and didn’t know we needed. Fantastic, and all the more when serves with extra salsa, sliced avocado, and a wedge of lime.
Go get at it.
Bye!
-C
Makes 2 stuffed halves. This recipe is very easy to fiddle with and can easily be double or tripled.
1 medium sized acorn squash
1 1/2 cups cooked black beans
1/4 head of cauliflower (about 2 cups chopped before roasting)
a small onion
a few kale leaves
1/4 cup thick and chunky salsa
2 teaspoons cumin
1 teaspoon chili pepper
salt and pepper
olive oil
Avocado, lime, extra salsa (optional)
Preheat oven to 400
Slice acorn squash in half and scoop out all the seeds. (seeds can be roasted). Place both halves cut side down on a lightly oiled baking sheet or oven safe skillet and place in oven to roast for about 30-35 minutes or until the squash is fork tender.
Once squash is in oven, dice the onion and cauliflower into small pieces and place on a baking sheet. Drizzle with olive oil and toss together with the cumin, chili powder, salt, and pepper. Place into oven along with the squash. Roast for 15-20 minutes or until the cauliflower is lightly browned and tender.
When the cauliflower is roasted and squash is cooked, get all the rest of the ingredients ready. Dice up the kale . Take each side of squash and scoop out about an inch more of cooked squash, leaving a good sized well. Place cooked squash into a bowl and kind of mash it up. Add in the beans, the salsa, the kale, and the roasted cauliflower and onions. Season with salt and pepper and mix it all up. Take filling and fill the squashes, stuffing as much as you can in and mounding it on top. Place the halves back onto baking sheet or skillet and place back into oven for 10-15 minutes until nice and browned and slightly crispy on top. Pull from oven and serve. Although not necessary, extra salsa, avocado, a lime are much appreciated.
A lot of times I make food that I don’t nessasrily care to eat because well, I love to make for other people. Take all the cakes, I love to make cake, it makes me so happy to make a cake, but I don’t eat cake. I never eat cake.
This is not one of those times. I basically made these cabbage rolls all for me. Sure I shared them with the mr because it was dinner but honestly, he was’t the biggest fan (he hate celery). And to be honest, I was glad he didn’t really like them because these things were bonkers amazing to me whichh means I got to eat them all myself. In fact I thought they were so good that I made them twice this week. And not just because I have a shit load of cabbage right now, (I stocked up on cabbage and have like 15 heads in the pantry and stuffed in the fridge), although it helped that I do.
I ♥️ cabbage.
And now I ♥️ these cabbage rolls.
To the rolls!
The stuff. A head of cabbage, a can of butter beans (cooked from dried beans or canned), crushed tomato (also home made or canned), a couple stocks of celery, a carrot, an onion, some garlic, Italian seasoning, salt and pepper, and a little olive oil.
Start by getting the cabbage leaves to roll the filling in. You are basically just going to dunk the whole head of cabbage, with the core removed, into a big pot of boiling water until the outer leaves are tender enough to peel away. You are going to want to 12-14 nice leaves so peel away using tongs. Once you have all the leaves, remove the rest of the cabbage ans place the leaves back into the pot to cook until completely tender and soft. Remove then from the water and place them into a bowl and let them cool.
Meanwhile the filling. Take roughly half of the remaining cabbage and rough chop it up along with the celery, carrot, onion and garlic.
Place it all into food processor and pulse until its a small chunky chunk consistancy.
Add a splash of olive oil to a pan then dump the veggies on in. Sprinkle with salt and pepper and the Italian seasoning then set on a medium heat on the stove to start to cook the veggies a bit.
One the veggies are out and cooking, pulse up the butter beans in the food processor until not quite smooth. Some chunk is good.
Dump the veggies back into the food processor with the beans, along with a little of the crushed tomato. Pulse a few times.
That is the filling. Time to roll.
Pat each leave dry and lay flat on counter. If your cabbage leaves have thick ribs you can slice them down the middle, just not to far up into the leaf. Add about 1/3 of a cup of the filling (add less for smaller leaves) and then roll as tightly as you can like a burrito without the filling coming out. Repeat until all the filling is gone.
Place all of the rolls nice and cozy into a oven safe pan, preferably the pan you have been using to cook the veggies in (you want them to fit close together, it helps then from opening up during cooking ) and cover then all up with crushed tomato.
Now all you need to do is stick the whole thing in the oven.
If you got it, spinkled with some green scallions and parsley for color and flavor and the all you need to do it eat. Eat one or eat them all because they are freaking fantastic!
P.S. Left overs are just as good, if not better cold.
YAY CABBAGE!
Stay cool.
-C
A medium sized head of cabbage
2 cups (or 1 can) cooked butter beans
an onion
1 large carrots
2 stalks of celery
3 cloves garlic
3 1/2 cups crushed tomatoes (or a 28 oz can)
1 tablespoon Italian seasoning
olive oil
salt and pepper
First thing, bring a large pot of water to a boil. Remove the core from the head of cabbage and place the cabbage head into the boiling water. Gently peal away 12-14 of the outer leaves from the head then remove the head. Place the leaves back into the boiling water until they are soft and plyable. Remove from water and place in a large bowl.
Preheat oven to 400
Rough chop about half of the remaining cabbage head (like a little more then a cup) the carrot, celery, onion, and the garlic and place into a food processor. Pulse until its a small chunk consistency. Add a drizzle of olive oil to a skillet (if you can, use a oven safe skillet the can also be used to bake the rolls in) and dump the veggies in. Sprinkle with the Italian seasoning, salt and pepper, and place on a medium heat to cook for a few minutes. While the veggies are cooking, drain the beans and dump them into the food processsor. Pulse until not quite smooth. After the veggies have started to become fragrant and are not completely raw, dump those veggies back into the food processor with the beans. Add about 1/3 cup of the crushed tomato and pulse until combined.
To assemble the rolls. Pat the leaves dry and lay flat. If a leaf has a really thick rib, cut it down the middle, but not to far up the leaf.. Place about 1/3 cup of filling into each leaf (less if the leaves are small) and roll each one up like a burrito, as tight as you can without ripping the cabbage. Place rolls into oven safe skillet, bumped up against each other if they can. Once all the rolls are assembled and in skillet, pour the crushed tomatoes all over, getting the sauce in between each of the rolls.
And then place the rolls into oven to bake for an hour.
Once the rolls looked cooked and maybe a little crisp on an edge or two, remove and let cool a few minutes before serving.
Chopped parsley and scallions are nice to sprinkle on top if you got it.
Eat, and eat some more. Any left over should be placed into the fridge and eaten just a short few hours later cold, while standing in from of the fridge because these cold are almost better then hot. So good!
Are you as excited about pumpkin season as I am. And not because of pumpkin spice this or that, I am talking about real squash pumpkin. I am so excited, and have started a stash. I have about 10 sugar pumpkins all through the house. Equal parts fall decor and dinner. Being able to eat your decorations is key to a successful life. I am 100 percent sure about that.
So now that we have established that it’s time to eat pumpkin, we also have to realized that there are more ways to eat pumpkin then in baked goods. Savory pumpkin is just as good, if not better then sweet pumpkin. I mean, it’s a squash and don’t we all love a good ssavory squash situation? If you don’t, well you are in the wrong place my friend.
This dish here pretty much sums up all that I ever want to eat again. Roasted pumpkin with cumin is one of the best things ever. No joke. Swiss chard is definitely my favorite green, besides spinach, (and I love kale, but chard is better then kale too!) and red lentils are my favorite kind of lentils. All I all, this small list of ingredients makes for one heck of a dish. I was pre making this for dinner for Barb and the mr. and ended up making something else for dinner so I could eat and save it all for myself. I did not share one bit of this and feel zero bad about it. I mean, I made it so it is mine. They had chili, I secretly ate this.
It’s come to that. I am hiding my pumpkin and lentil dish. What is wrong with me? Ha!
Now to the best pumpkin dish ever!
The stuff. A sugar pumpkin, some swiss chard, an onion, red lentils, a few cloves of garlic. cumin, salt and pepper, and olive oil.
Cut the pumpkin in half, scoop the seeds out (save for roasting later), and chop into mouth sized chunks. Dice the onion up, and remove the stalk and thicker part of the rib from the chard leaves and dice up the stalk. Stick the leaves to the side.
Place all the chopped up stuff onto a baking sheet, drizzle with a little bit of oil, dump on some cumin and sprinkle with salt and pepper then toss it all around.
A fall roast ready for the oven.
Once veggies are in oven roasting, make the lentils. Water and lentil in a pot, bring to a boil, turn on low and let cook until lentils are done. Once cooked, sprinkle in a pinch of salt.
Also mince up the garlic and rough chop up the chard leaves.
Fall veggies are looking nice and roasted and tasting all so good. Toss in the minced garlic and chopped chard leaves and pop the baking sheet back into the oven for a little longer just until the garlic and leaves are cooked too.
Now you have your lentils and the cumin roasted pan of goodness. If you have a lime, cut that up too because it will make this all just perfect. Perfect I tell you.
Here it is. A bowl of red lentils, piled high with cumin roasted pumpkin and chard with a fresh squeeze of lime. Once you aat a few bites, tell me. Best fall dish ever, right!?!
Have a fantastic fall weekend.
-C
serve 2-3
1 pie pumpkin
1 bunch of Swiss chard (between 5-6 large stalks, more if the stalks are small)
1 yellow onion
2-3 cloves garlic
1 cup died red lentils
3 cups water
2 tablespoons cumin
A lime (optional)
salt and pepper
olive oil
Preheat oven to 400
Start by cutting pumpkin in half and removing seeds, (place seeds aside for later to roast), then cut the pumpkin into inch or so cubes. Grab the chard, remove the stalks and ribs from the leaves, place leaves to the side, and dice the stalks up. Dice onion into medium sized chunks and place all of what you have just chopped on a baking sheet. Drizzle a teaspoon or two of oil all over. Spinkle on the cumin and a pinch of salt and pepper and toss around. Evenly distribute the veggies on the pan and stick into the oven to roast, for about 25 minutes, or until the pumpkin and chard stalks are fork tender. In the meantime rough chop the leaves and mince the garlic. When the pumpkin and chard are just about done, remove pan from oven and toss in the garlic and leaves. Place pan back into oven for another 8-10 minutes or until the leaves have cooked. Remove from oven.
While the veggies are roasting, make the lentils. Place the water and lentils into a medium sized pot and bring to a boil. Once boiling, turn down to low, giving it a stir ever few minutes until lentils are soft.Once cooked, remove from heat and season with pinch of salt salt.
When the lentils are cooked and the veggies are roasted, it’s time to eat. Spoon lentils into a bowl and top with roasted veggies. Season with more salt and pepper if needed and cut up lime (optional) and squeeze juice all over. Eat right away and save any for later.
Dinner for when you have maybe too many (although I never think I have too many… just sometime I end up with a lot at once and that it can get a little chaotic) squash and tomatoes, which may be bound to happen this time of year.
Nothing fancy, and is quick and easy, filling, and full of all those summertime things that need to be eaten before they are gone and we are back to eating beets and potatoes for months at a time.
Savor all of the good stuff the summer is giving us.
The stuff. A couple of squashed ( I used a crookneck and a patty pan), cherry tomatoes, an onion, some spaghetti, salt and pepper, and olive oil.
Preheat the oven and chop up your squash and onion. Not tiny pieces, but not really bug chinches either.
Toss all that chopped stuff into a skillet along with the cherry tomatoes. Drizzle it all with olive oil, sprinkle with salt and pepper, then stick it into the hot oven.
While the stuff is roasting, cook up the pasta, but cook it a little al dente, it will cook a bit more once mixed with the veggies.
Roasted and ready for noodles.
Add the cooked spaghetti to the skillet, along along with about 1/2 of cup of the pasta water (it helps bind the flavors all together). Toss it all around and then let it chill in the hot skillet for a minute or two then taste it. So good right? And if you need to, season with more salt and pepper, and drizzle with more oil if needed.
That is all you need to do, besides you know, sticking it into a bowl, getting all the good big chunks, and eating it.
-C
2 small summer squash (I used a crook neck and a patty pan… but whatever kind you have on hand works)
1 mild onion (vidalia or walla walls)
1 pint cherry tomatoes
2-3 tablespoons olive oil
salt and pepper
1/2 pound spaghetti and water to boil it in
Preheat the oven to 425.
Chop up squashes into inch-ish sized chunks then chop the onion into medium sized slices and toss into a large oven safe skillet. Add in the tomatoes and drizzle the whole lot with olive oil and sprinkle with salt and pepper and toss around to make sure everything is evenly coasted. Place in oven and roast for 30-40 minutes or until the squash and tomatoes are nice and soft and ready to eat.
While the stuff is roasting, boil the pasta per the instructions on the box, but cook it a little al dente (still with a bite to it). Drain the pasta when done, reserving a cup full of the starchy pasta water.
When the pasta is done and the veggies are roasted, dump the pasta into the skillet along with 1/2 a cup of the starchy pasta water. Mix around and let sit for a minute or two. Sprinkle with more salt and pepper and drizzle a tiny more olive oil on top (optional).
Serve and eat.
Basil goes extremely well with this dish, if you just so happen to have some.
I love me some spring time fresh greens, especially arugula. The last farm share pick up there was arugula for the first time since late fall and as soon as I saw it my mouth started to water for the fresh springy, peppery taste of fresh spring time greens. As I bagged my greens, I shoved a fist full into my mouth. Ah, nothing better then a mouth full of fresh greens after a long long winter. Am I right or am I right?
I ate a lot of those greens fresh, but did you know that arugula makes for a nice accompaniment to walnuts and chickpeas? And if you mashed all that together with a few other things and shaped the mixture into patties and you get yourself some dank ass burgers? Well now you know. And now you can make them for yourself and experience the greatness of spring fresh arugula. Just make sure you have enough fresh to shove a handful into your mouth. It is spring time refreshing.
The stuff. Chickpeas, arugula, walnuts, and big onion, and some radishes. Also a couple carrots, some oats, a few cloves of garlic, a Leon, salt and pepper, red wine vinegar, and a little olive oil.
To start, halve the onion. Thinly slice one half and thinly slice the radishes
Scoop it all into a bowl, sprinkle with salt and toss in vinegar. Set aside on the counter to do it’s thing.
Chop the rest of the onion, the carrots, and the garlic into small chunks.
Carrot, onion, garlic, and oats go into the food processor and pulsed until a medium crumble.
Walnuts and arugula next.
Pulsed until combined then add in the juice of the lemon a good pinch of salt and pepper, and the drained chicken peas.
Pulse until just combined. Some big chunks are good, you just want the mixture to be able to hold together.
Dump the mixture into a bowl and place in the fridge for at least and hour and up to a day.
After the time in the fridge, divide the mixture into 6 equal parts and form each into a patty about an inch think. Take a clean cloth and pat each applies dry on both sides.
Grab a skillet, lightly oil it, and place on a medium heat. Sear each side of each burger until browedthen place on a lightly Ould baking sheet.
Place the burgers into a preheated oven to finished cooking. 40 minutes, flipped after 20.
After the burgers are cooked, it time to assemble. Bread or buns of some kind(I used sourdough rolls) the pickled radish and onion mixture, some mustard( I used honey mustard) and more fresh arugula.
Do it up, do it right. Serve with some fries or chips and eat while knowing that spring is here, even if as you are eating, it is snowing. Damn snow.
At least we have arugula.
-C
makes 6 burgers
1 can or 2 cups cooked chick peas drained
2 large handfuls arugula (about 2 packed cups)
1 large sweet onion
2 small carrot
1 cup old fashion oats
1/3 cups walnuts
2-3 cloves garlic
A lemon
salt and pepper
2 tablespoon red wine vinegar
handful of radishes (5-7 of them)
salt and pepper
olive oil
To assemble burgers
Burger buns or baguettes
Maple or honey mustard
fresh arugula
Start by cutting half of the onion as thinly as you can. Do the same with the radishes and place the onions and radishes in a bowl with a sprinkle of salt and drizzle the vinegar all over Toss around and set the bowl aside.
Grab the food processor and dump the oats in. Roughly chop the other half of onion, the carrots, and the garlicand toss those into the processor too. Pulse until a medium crumble. Add in the arugula, the juice of the lemon, the walnuts, the chickpeas, and a good pinch each of salt and pepper. Pulse again until just combined and the mixture has come together. Taste and make sure the salt and pepper are good for you then dump the mixture into bowl and set in fridge for at least a half hour or as long as a day.
Preheat oven to 400.
When ready for burgers, take mixture out of the fridge. Place a lightly oiled skillet on the stove on medium heat.
Divide the mixture into 6 equal balls and pat into inch think patties. Take a clean cloth and pat eat patties dry. Place each burger on hot skillet and cook each side for 4-6 minutes or until each side is nicely browed. Transfer burgers onto a lightly greased baking sheet then place them all into the oven to finish cooking for 40 minutes, flipping them after 20 minutes.
Once burgers are cooked, remove from the oven. They will be slightly fragile, but will firm up if you let them set for 5-10 minutes.
Assemble the burgers. Grab a bun or bread of some kind (if you want), top with a good fork or two full of the pickled radish onion mixture, drizzle with some mustard and top with more fresh arugula.
Get on to eating it.
If you don’t eat all the burger at one time, the freeze really well. I almost prefer them after they have been frozen.
Pineapples have been on sale all week long. I think it’s because Easter and I guess people need pineapples for Easter for some reason. Does Pineapple have anything to do with bunnies or Jesus? I think not. Pretty sure it has something to do with cake or ham or some shit, but I honestly don’t care because I just like the fact that I can buy a few (like 3) pineapples without breaking the bank. (I think I am going to buy 3 more for the dehydrator) Plus it is always good to have a pineapple or 3 on the counter at home. You never know when you are going to need one. So lets give a shout out to the Easter bunny and Jesus. Thanks for the cheap pineapples. HA!
So now you are have those pineapples, you are going want to eat them. And maybe you don’t want to eat them with cake or ham or some shit. You are going to want to eat it the best way…In a stir fry.
This is by far one of my favorite stir fry combinations. Pineapple does amazing things when cooked a bit, especially with soy, broccoli, and tofu. This dish definitely let’s pineapple reach it’s full pineapple potential. It is so good that tI think I might even prefer my pineapple cooked along with savory stuff. It is just so right and seriously so freaking good. The mr even get excited for it and he is not the excitable kind of guy. Plus it’s fast (especially if you have already cut up your pineapple) and easy because stir fry and that’s what stir fries are. Fast and easy, just like……….(insert your favorite fast and easy person and then chuckle)
And don’t try to use canned pineapple because no. Just get the fresh one,even if it’s not on sale. It’s a must.
The stuff. A pineapple (you are only going to need 1/3 of this, but you can never have too much fresh pineapple on hand), a big head of broccoli, a little cabbage, and some firm tofu. Also need some soy, a few cloves of garlic, a little fresh ginger, a bit of oil, and pepper.
Dice up the tofu into cubes and place on a clean dish towel to absorb some moisture.
Grab the fresh pineapple. Cut it up the way you do, but the easiest way for me is to cut in half the cut that half into fourths then cut the skin away. You are going to have a lot of extra pineapple so snack as you need too. I always eat like half of what I am cutting up and end up with pineapple gut. SO maybe watch yourself.
Pour some soy into a cup and mince the garlic and ginger.
Garlic, ginger, soy. Looking good.
Cut up about 2ish (or more if you want) pineapple into small mouth sized pieces. Break Broccoli head into small florets and shredded the cabbage.
Tofu into a lightly oiled hot skillet with a splash of soy, cooked until a nice crisp brown on all sides. Once it is cooked, remove from pan and set aside.
It’s the broccolis turn. Add in the florets and a splash of water to start cooking down for a few minutes, it need the head start.
Once the broccoli turns bright green and is slightly less raw, add in the pineapple and cook until the broccoli is slightly tender and the pineapple starts to caramalize which will take about 5-7 minutes.
Add the tofu back in along with the shredded cabbage and dump the soy ginger garlic mixture all over.. Keep cooking and stirring around until everything is hot and the liquid has mostly been absorbed.
That’s some stir fry ladies and gentlemen.
You might want some rice to accompany your stir fry so think about it and have it ready. Other then that, it’s food to face time.
Enjoy the best stir fry ever.
Bye.
-C
serves 2
1/3 of a fresh pineapple (about 2 cups cubed)
1/2 block firm tofu
a large head of broccoli (about 2 1/2-3 cups of florets)
1/4 head of red or green cabbage (about a cup shredded)
2-3 cloves garlic
3 tablespoons soy or tamari
1 tablespoon freshly grated ginger
pepper
Cooked rice to serve with (Optional)
Cube tofu into 1 inch pieces and either place on a dry towel to absorb the moisture or place the tofu into the microwave and heat for 2 minutes. When you take it out of the microwave there will be a lot of liquid…pour it off and pat the tofu dry.
Cube fresh pineapple into similar sized pieces and break broccoli into small florets. Shred cabbage.
Mince garlic and add to a bowl or jar with the grated ginger and soy sauce.
Place a large skillet on the stove an medium heat. Drizzle in a little olive oil. Once oil is hot, place the tofu in with a splash of soy, cooking until all sides are a nice dark browned. Remove the tofu from pan and add the in the broccoli. Add a splash of water and cook for 5 minutes. Then add in the pineapple and cook for another 5-7 minutes or until the pineapple starts to caramelize and the broccoli os no longer raw. Add the tofu back in along with the shredded cabbage and pour the soy garlic ginger mixture all over. Sprinkle with pepper to taste. Cook for another 5 minutes or until the liquid has cooked down.
Serve with rice or quinoa and extra soy if needed.
Roasted veggies of any kind can get this girl in trouble. Place a sheet pan meant for many full of roasted veggies and watch out, I will probably eat them all. I can’t stop, won’t stop and you know what, I am not sorry, especially if its roasted brussel sprouts and squash.l I am grabbing at every last bit, especially all the really crispy, almost burnt pieces. Burnt food is one of my favorite flavors.
This dish is pretty basic, but also not. A slightly overlooked grain, spelt, makes for a hearty backdrop to the magic of roasted sprouts and squash, covered with a sunflower butter sauce which is a nice spin on a traditional peanut sauce. It’s pretty easy to make and pretty to look at as well. A nice hearty and warming meal for all of those cold winter nights. And it’s not going to make you feel heavy or gross, like if you sat and ate an entire lasagna. No, you will feel full and fantastic and ready for a cookie (it is the holidays after all).
The ingredients in this dish are mainly inspired by the half eaten jar of sunflower butter a friend of mine gave me at the gym, plus the fact that I have been getting a few stocks of brussel sprouts each week at farm share so we are eating them at ever meal, (plus I LOVE brussel sprouts) and me trying to use up all of the grains and such in the pantry before restocking anything more or new. A dish of convenience sure, but also a damn delicious one at that. With this being said, if you had a different grain you wanted to use, or an abundance of some other veggies that you have or prefer, well go ahead and use them. You do you my friend.
And really, I was thinking of you when I made this dish. Sometimes at this time of year people tend to forget to eat, or tend to eat on the not so healthy side. This grain bowl situation is just what your body is in need of. Simple delicious nourishment.
The stuff. Spelt that has been soaking in water for a while, half a butternut squash, brussel sprouts, a red onion. Also sunflower butter, a few cloves garlic, a lime, soy sauce, a touch of maple, salt and pepper, and olive oil.
The spelt will probably take the longest so get it on the stove. Strain away the soaking water and place into with fresh water. Bring to boil then reduce heat to a simmer. Place a lid on pot ans let it go.
Next, get to the veggies. Halve the big sprouts (small ones can stay whole) chop onion into chunks and cube the squash.
A drizzle of oil, a sprinkle of salt and pepper, and a good toss around and it ready for the oven.
Meanwhile, make the sunflower butter sauce. Its pretty basic. The sunflower butter, minced garlic, soy, maple, and juice of the lime all into a vessel that can hold it. Add a couple tablespoons of warm water to thin it out and done. Sunflower butter sauce. Easy Peasy.
After about an hour, your slept should be cooked (that sounds aggressive to me) Tender and chewy and just right.
The veggies should be roasted and done too. Crisp as you like ( I actually like mine even darker, but the mr does not so I went a light roast this time)
And it’s all ready for you to eat.
Roasted butternut squash and brussel sprouts on a warm bed of spelt covered in sunflower butter sauce. Living the good life here.
Take care of yourself this week, and always for that matter. Eat some good food. Your body will be happy for it.
Bye.
-C
Serves 2-3
1 cup spelt berries (soaked in water overnight if you remember)
3 cups water
about 1/2 of a butternut squash
about a pound of Brussel sprouts
a medium red onion
1/4 cup sunflower seed butter (unsalted and unsweetened)
2 tablespoons liquid amionos or soy
1 teaspoon maple or honey
1 lime
2 cloves garlic
salt and pepper
olive oil
Preheat oven to 425
Place soaked spelt berries in a pot with water and a pinch of salt. Bring a boil then reduce heat, place a lid on pot and simmer for 45 minutes to an hour or until spelt berries are tender and all the water has been absorbed.
While spelt is cooking, cut sprouts in half (unless they are very small), cube the butternut into pieces about an inch big, and chop the onion up into chunks. Place all that you just chopped onto a baking sheet, drizzle with a teaspoon or two of olive oil and toss around. Sprinkle the veggies with a pinch or so of salt and pepper and pop into the hot oven. Roast for 40-45 minutes or until roasted to your desired doneness. (I like things a lot darker then the mr so I would leave my veggies in for closer to an hour)
For the sunflower butter sauce. Mince garlic and place into bowl or cup with the sunflower butter. Add in the maple, soy, and the juice of the lime. Mix together and add in a 2 tablespoons of warm water to thin out. Add more water if needed to get to a thick but pourable consistency.
Once the spelt is cooked, the veggies are roasted and the sauce is made, well you can assemble and eat. Spelt in a bowl, toss on some roasted veggies, and cover in the sauce. And then you eat it.
I made baked beans last week for a side to dinner with the mr and Barb. They ate them all. I didn’t get more then a spoonful. I was sad for me, but also was like “Shit, if I had known you guys were bean fiends, I would be making baked beans like all the time.”
And maybe not all the time, but I made them again this week. And again, they ate a lot, but I got me some this time, and I will probably make them again next week too because they will be perfect for Thanksgiving. See, homemade baked beans are a thing of beauty. Sure you can buy them in a can and be just fine, but these baked beans, well these are waaaayyyy way better. These baked beans are soft (not canned bean soft) and tomatoey and a little spicy with a tang. Not sickly sweet, (not sugar added) and not too salty.. They are just about perfect. You can eat them on their own, toss them into salads or wraps, stick on some toast, serve as as side, or just eat them cold straight from a jar from the fridge right before bed. (your loved one will thank you for that). Plus they are baked in the oven and I love me a good warm oven on a cold day. And the obvious, but all the protein and all around goodness. A great dish to serve if ever you need to feed people like me who don’t eat meat. It’s a win win win win.
Baked beans in all their glory. No cans in sight.
The stuff. White beans that were soaked overnight, strained then added back to a pot with 6 cups of water. Also have crushed tomatoes. an onion, a few cloves of garlic, chili powder, mustard powder, apple cider vinegar, and some salt and pepper.
First step is to start boiling you beans. But while that is happening, mince garlic and chop the onion into really small pieces.
Toss the onion and garlic in a pan and cook on medium low until soften and fragrant.
Cooked beans. All you need to do to cook them is place the pot with soaked beans and water on high, bring to a boil, then turn heat to a medium. Let beans cook until tender. It should take about an hour and a half.
Beans are cooked and the garlic and onion are soften so now all you do is combine everything together. Don’t drain the beans, just toss in the tomatoes, the vinegar, the spices, and a few pinches of pepper and a pinch of salt. Stir in all together,
Looks like soup right? This is right before you stick it into the oven.
Now look at that, oven baked beans. The best part… The crispy sides. ALL MINE!
Not much left to do but eat them. Straight up with a hunk of bread. That is a good way to start anyway.
Enjoy your beans!
-C
Makes a big pot of beans
1 pound (2 cups) white beans soaked in water for at least 8 hours (I used great northern but navy would be good too)
6 cups water or veggie stock
3 cups (or a 28 oz can) crushed tomatoes
1 onion
3 cloves garlic
1 1/2 tablespoons chili pepper
1 tablespoon mustard powder
1/3 cup apple cider vinegar
salt and pepper
Strain soaked beans and place them into large oven safe dutch oven almond with the water and stick on the stove. Bring the beans to a boil then reduce heat to medium and cook util the beans are tender. Should take about 1 1/2 hours.
Sometime while the beans are cooking, mince garlic and chop the onion into very small pieces. Place in a skillet and cook on medium until the onion and garlic are soften and fragrant. Remove from heat and set aside until beans are cooked
Preheat oven to 425
One beans are tender, dump in the cooked garlic and onion, the tomatoes, the spices, the vinegar, and a good pinch of salt and pepper. Stir it all together and place into the oven. Bake for about 2 hours, staring about ever 30 minutes, until the bean sauce is nice and thick. If at any point you think they have gotten to dry, just add more water. Pull the beans out of oven once you are happy with the sauce consistency. Taste and season with more salt and pepper if needed.
And then eat them. As a meal, as a side, or as a snack. Beans are good anytime.
Any leftovers should be stored in the fridge. Beans can be reheated very easily on the stove top. Just place the pot back on stove, stir in a little water and cook til hot.
Beans are also fantastic eaten cold from the fridge.
The thing with having an abundance of squash in the house, and having the abundance keep growing (we get a lot of squashes at farm share) is that I need to cook just about every meal with said abundance, which I am totally on happy to do. I welcome all the squash. I am excited about all the squash. I could eat al the squash all day, everyday. And I do. But that is me. The mr and the others the I sometimes cook for, they are not as squash crazy as me and get sick of plain old roasted squash so I am trying to change it up and make new and interesting things out of the squash so no one gets bored with it.
Yes, I know stuffing an acorn squash is hardly a new idea, but this squash is not stuffed with the usual rice and stuff, it stuffed with lots of black beans and cumin and chili powder spiced cauliflower (and a few other things). The combination of all the flavors with the acorn squash really hit all the right spots for a tasty, not boring squash meal. It is a brilliant combination of flavors that even the not so keen on squash person will love.
That is my opinion of course but it will be your opinion too after you make and eat these. We will brilliant together.
To the stuffed squash.
The stuff. An acorn squash, some cauliflower, cooked black beans, an onion, and a few kale leaves. Also need some cumin, chili powder, salt and pepper. salsa, and olive oil.
Start by cutting the squash in half and scooping out all the seeds.
Place the squash open side down on a baking sheet or in a skillet lightly oiled and then stick into a hot oven to roast.
After the squash goes in, dice up the onion and cauliflower into small little pieces.
Place the chopped stuff onto a baking sheet. Drizzle with olive oil and toss with the cumin, chili powder, salt, and pepper. Get that into the oven too.
Roasted, and ready. Stop, do not eat it all, but you might want too, it is so freaking good.
And once this guy in fork tender, its ready as well.
Scoop out a bit of the cooked squash from each side making the well bigger. More room to stuff.
Get everything together. Chop the kale, grab a bowl.
The black beans, salsa, scooped out cooked squash go into bowl. Add in the roasted cauliflower and onion and the chopped kale and mix.
Now stuff each side. Get as much in as you can, mound it as high as you can and place back into oven to bake for a little bit longer.
Cooked and slightly crispy in all the right ways.
These stuffed suckers are everything we all wanted and didn’t know we needed. Fantastic, and all the more when serves with extra salsa, sliced avocado, and a wedge of lime.
Go get at it.
Bye!
-C
Makes 2 stuffed halves. This recipe is very easy to fiddle with and can easily be double or tripled.
1 medium sized acorn squash
1 1/2 cups cooked black beans
1/4 head of cauliflower (about 2 cups chopped before roasting)
a small onion
a few kale leaves
1/4 cup thick and chunky salsa
2 teaspoons cumin
1 teaspoon chili pepper
salt and pepper
olive oil
Avocado, lime, extra salsa (optional)
Preheat oven to 400
Slice acorn squash in half and scoop out all the seeds. (seeds can be roasted). Place both halves cut side down on a lightly oiled baking sheet or oven safe skillet and place in oven to roast for about 30-35 minutes or until the squash is fork tender.
Once squash is in oven, dice the onion and cauliflower into small pieces and place on a baking sheet. Drizzle with olive oil and toss together with the cumin, chili powder, salt, and pepper. Place into oven along with the squash. Roast for 15-20 minutes or until the cauliflower is lightly browned and tender.
When the cauliflower is roasted and squash is cooked, get all the rest of the ingredients ready. Dice up the kale . Take each side of squash and scoop out about an inch more of cooked squash, leaving a good sized well. Place cooked squash into a bowl and kind of mash it up. Add in the beans, the salsa, the kale, and the roasted cauliflower and onions. Season with salt and pepper and mix it all up. Take filling and fill the squashes, stuffing as much as you can in and mounding it on top. Place the halves back onto baking sheet or skillet and place back into oven for 10-15 minutes until nice and browned and slightly crispy on top. Pull from oven and serve. Although not necessary, extra salsa, avocado, a lime are much appreciated.
Are you as excited about pumpkin season as I am. And not because of pumpkin spice this or that, I am talking about real squash pumpkin. I am so excited, and have started a stash. I have about 10 sugar pumpkins all through the house. Equal parts fall decor and dinner. Being able to eat your decorations is key to a successful life. I am 100 percent sure about that.
So now that we have established that it’s time to eat pumpkin, we also have to realized that there are more ways to eat pumpkin then in baked goods. Savory pumpkin is just as good, if not better then sweet pumpkin. I mean, it’s a squash and don’t we all love a good ssavory squash situation? If you don’t, well you are in the wrong place my friend.
This dish here pretty much sums up all that I ever want to eat again. Roasted pumpkin with cumin is one of the best things ever. No joke. Swiss chard is definitely my favorite green, besides spinach, (and I love kale, but chard is better then kale too!) and red lentils are my favorite kind of lentils. All I all, this small list of ingredients makes for one heck of a dish. I was pre making this for dinner for Barb and the mr. and ended up making something else for dinner so I could eat and save it all for myself. I did not share one bit of this and feel zero bad about it. I mean, I made it so it is mine. They had chili, I secretly ate this.
It’s come to that. I am hiding my pumpkin and lentil dish. What is wrong with me? Ha!
Now to the best pumpkin dish ever!
The stuff. A sugar pumpkin, some swiss chard, an onion, red lentils, a few cloves of garlic. cumin, salt and pepper, and olive oil.
Cut the pumpkin in half, scoop the seeds out (save for roasting later), and chop into mouth sized chunks. Dice the onion up, and remove the stalk and thicker part of the rib from the chard leaves and dice up the stalk. Stick the leaves to the side.
Place all the chopped up stuff onto a baking sheet, drizzle with a little bit of oil, dump on some cumin and sprinkle with salt and pepper then toss it all around.
A fall roast ready for the oven.
Once veggies are in oven roasting, make the lentils. Water and lentil in a pot, bring to a boil, turn on low and let cook until lentils are done. Once cooked, sprinkle in a pinch of salt.
Also mince up the garlic and rough chop up the chard leaves.
Fall veggies are looking nice and roasted and tasting all so good. Toss in the minced garlic and chopped chard leaves and pop the baking sheet back into the oven for a little longer just until the garlic and leaves are cooked too.
Now you have your lentils and the cumin roasted pan of goodness. If you have a lime, cut that up too because it will make this all just perfect. Perfect I tell you.
Here it is. A bowl of red lentils, piled high with cumin roasted pumpkin and chard with a fresh squeeze of lime. Once you aat a few bites, tell me. Best fall dish ever, right!?!
Have a fantastic fall weekend.
-C
serve 2-3
1 pie pumpkin
1 bunch of Swiss chard (between 5-6 large stalks, more if the stalks are small)
1 yellow onion
2-3 cloves garlic
1 cup died red lentils
3 cups water
2 tablespoons cumin
A lime (optional)
salt and pepper
olive oil
Preheat oven to 400
Start by cutting pumpkin in half and removing seeds, (place seeds aside for later to roast), then cut the pumpkin into inch or so cubes. Grab the chard, remove the stalks and ribs from the leaves, place leaves to the side, and dice the stalks up. Dice onion into medium sized chunks and place all of what you have just chopped on a baking sheet. Drizzle a teaspoon or two of oil all over. Spinkle on the cumin and a pinch of salt and pepper and toss around. Evenly distribute the veggies on the pan and stick into the oven to roast, for about 25 minutes, or until the pumpkin and chard stalks are fork tender. In the meantime rough chop the leaves and mince the garlic. When the pumpkin and chard are just about done, remove pan from oven and toss in the garlic and leaves. Place pan back into oven for another 8-10 minutes or until the leaves have cooked. Remove from oven.
While the veggies are roasting, make the lentils. Place the water and lentils into a medium sized pot and bring to a boil. Once boiling, turn down to low, giving it a stir ever few minutes until lentils are soft.Once cooked, remove from heat and season with pinch of salt salt.
When the lentils are cooked and the veggies are roasted, it’s time to eat. Spoon lentils into a bowl and top with roasted veggies. Season with more salt and pepper if needed and cut up lime (optional) and squeeze juice all over. Eat right away and save any for later.
I feel like this salad is kind of a summery salad, or better yet, a salad that highlights all the best of what summer has to bring. All the fresh tender dill that is still growing (but not for long) , all the brightly colored and amazing veggies that are being harvested and are nearing the end (bye fresh cucumbers.) This salad might just be my little last hurrah of summer cooking before it is all root veggies and dried herbs and hot and hearty food. And not going to lie and say that I am sad to see summer go because I am so so ready for it to be over, but I will miss all the fresh fresh produce. And I will especially miss all the fresh dill because fresh dill is seriously the best.
Eat up what is left of summer now before it’s too late!
The stuff. Quinoa, a bunch of dill, a cucumber, a pepper, an onion, and some cherry tomatoes. Also a clove of garlic, some salt and pepper, and red wine vinegar.
Mince the garlic, chop the onion, mince the pepper and the cucumber, half the tomatoes, and last but noblest, rough chop the dill.
All that goodness goes into. big bow, along with a sprinkle of salt and pepper, and the vinegar Tossed around and left to meld.
Uncooked quinoa with water turns to cooked quinoa
Quinoa meets the bowl of veggies
And after a good mix, viola!
You got yourself a yummers fresh dill and veggie quinoa salad.
-C
serves 3-5 as a side or 2 as a meal
1 cup uncooked quinoa
2 cups water
I bunch fresh dill (like a 1/3 cup chopped… But use as much as you want)
1/2 a small red onion
1 clove garlic
1 small Persian cucumer
1/2 of a sweet red or yellow pepper
handful or two of cherry tomatoes
4 tablespoons red wine vinegar
salt and pepper to taste
Start by cooking the quinoa. Place the water and the uncooked quinoa into a medium sized pot. Place on high heat until sorts to boil, then reduce heat to a simmer and place lid on the pot. Let cook for about 15 minutes, checking at 10 minutes, to see if all the water has absorbed. When it has, remove from heat and let sit for a few more minutes then fluff with a fork.
While the quinoa id cooking, mince the garlic and chop all the veggies into small little pieces. Place into a big bowl. Chop up the fresh dill and toss into bowl too, along with the vinegar and a good sprinkle of salt and pepper. Mix it all around and let sit on the counter for a little so the veggies get nice and vinegary. Once quinoa is cooked and fluffed, dump into the bowl and mix around. Season with more salt and pepper if needed. Eat warm or refrigerate and eat cold. It’s defiantly one of those salads that taste great right away but tastes even better the next day.
Dinner for when you have maybe too many (although I never think I have too many… just sometime I end up with a lot at once and that it can get a little chaotic) squash and tomatoes, which may be bound to happen this time of year.
Nothing fancy, and is quick and easy, filling, and full of all those summertime things that need to be eaten before they are gone and we are back to eating beets and potatoes for months at a time.
Savor all of the good stuff the summer is giving us.
The stuff. A couple of squashed ( I used a crookneck and a patty pan), cherry tomatoes, an onion, some spaghetti, salt and pepper, and olive oil.
Preheat the oven and chop up your squash and onion. Not tiny pieces, but not really bug chinches either.
Toss all that chopped stuff into a skillet along with the cherry tomatoes. Drizzle it all with olive oil, sprinkle with salt and pepper, then stick it into the hot oven.
While the stuff is roasting, cook up the pasta, but cook it a little al dente, it will cook a bit more once mixed with the veggies.
Roasted and ready for noodles.
Add the cooked spaghetti to the skillet, along along with about 1/2 of cup of the pasta water (it helps bind the flavors all together). Toss it all around and then let it chill in the hot skillet for a minute or two then taste it. So good right? And if you need to, season with more salt and pepper, and drizzle with more oil if needed.
That is all you need to do, besides you know, sticking it into a bowl, getting all the good big chunks, and eating it.
-C
2 small summer squash (I used a crook neck and a patty pan… but whatever kind you have on hand works)
1 mild onion (vidalia or walla walls)
1 pint cherry tomatoes
2-3 tablespoons olive oil
salt and pepper
1/2 pound spaghetti and water to boil it in
Preheat the oven to 425.
Chop up squashes into inch-ish sized chunks then chop the onion into medium sized slices and toss into a large oven safe skillet. Add in the tomatoes and drizzle the whole lot with olive oil and sprinkle with salt and pepper and toss around to make sure everything is evenly coasted. Place in oven and roast for 30-40 minutes or until the squash and tomatoes are nice and soft and ready to eat.
While the stuff is roasting, boil the pasta per the instructions on the box, but cook it a little al dente (still with a bite to it). Drain the pasta when done, reserving a cup full of the starchy pasta water.
When the pasta is done and the veggies are roasted, dump the pasta into the skillet along with 1/2 a cup of the starchy pasta water. Mix around and let sit for a minute or two. Sprinkle with more salt and pepper and drizzle a tiny more olive oil on top (optional).
Serve and eat.
Basil goes extremely well with this dish, if you just so happen to have some.
Whatever you do, do not turn on your oven this weekend! But I guess if you have air conditioning and don’t mind cranking it… well then go for it. And can I come stay with you?
But for the rest of us doing this weekend without the old A.C., we need to feed ourselves, feed ourselves without any fire because 100 degrees is no joke and any added heat from anything will likey tip us over the edge. I am already so close to that edge and it’s a long way down..(Just ask the mr, he could tell you a thing or two about heat and me.. not good)
Enter hummus and veggies.
You can’t really go wrong with a good hummus and veggies meal situation and sometimes it’s all that can be right. I for one could eat bowls and bowls of hummus, and sometime do, so this is not a stretch for me. Especially this hummus. I knew I would like it, but man, was (was because I ate it all) it freaking delicious. The sunflower seeds really did it for me, gave it a little something extra, like a freshness that is still creamy and earthy, but is not quite, I don’t know, dark as tahini? It’s kind of hard to explain without having you taste it (so make it and you tell me) Don’t get me wrong, I love tahini, but sometimes you just got to mix it up. (Plus sunflowers seeds are dirt cheap. Tahini is not nearly as cheap so bonus there too.) Maybe its because the sunflower seeds bring the sunshine to your mouth. A sun filled mouth of pureed seeds and beans. Yup, that’s what it is.
So here ya go, a no heat meal (or snack or spread). We got this.
The stuff. Cooked chickpeas (no need to cook your own, canned is a okay), sunflower seeds, a lemon, a few cloves of garlic, salt, pepper, a little water, and some herby green like parsley or cilantro.
Hummus is pretty basic, it’s just stuff blended up, but because we are starting with raw sunflower seeds, we need to really bend the shit out of them until they turn into a paste, so do that, which is going to a take about 8-10 minutes. Then once its pasty, add in the garlic and the juice of the lemon and blend until its all smooth.
Could almost stop here at this point. Sunflower seed goodness all emulsified. Taste it, it is so good.
Now add in the chickpeas and a pinch of salt and pepper.
Blended until smooth with a little drizzle of water to give just the right consistency. And that’s it.
Pile a bowl full enough that you can call it dinner them top with a good amount of fresh herbs. Serve with chopped up fresh veggies or whatever you like and we are good to go.
Creamy, dreamy sunflower hummus, no heat required!
Stay not melted!
-C
Makes about 2 3/4 cups
2 1/2 cups cooked chickpeas (or one can) drained
3/4 cup raw (can use toasted)unshelled sunflower seeds
l juicy lemon
2-3 cloves garlic
1-2 tablespoons ice water
salt and pepper
handful fresh herbs like parsley,cilantro and or dill (optional)
Place the sunflower seeds in food processor and turn on until seeds turn into a paste, which will take about 8-10 minutes. After every few minutes, scrap the sides down to make sure it all gets blended. Once the seeds reach paste consistency, add in the juice of the lemon and the garlic. Blend until smooth. Last off, add in the chickpeas and a pinch or salt and pepper and blend until smooth, adding in a tablespoon or two of water to get the hummus to the consistency of your liking. Once blended taste and check for seasoning (add more salt and or pepper if needed)
When the hummus is done, scrape into bowl(s), and top with lots of fresh herbs and a sprinkle more of sunflower seeds. Now eat it. Eat with veggies, with bread, with pretzels, or with a spoon (or finger). Do what you need to do.
Any left over, if there is any, can be store in the fridge for 2-3 days.
I am one of those people that hangs out for far to long in the grocery store, mostly in the bulk section, looking al all the types of rice, and grains, and beans, and seeds, admiring the variety and colors and also wishing I was one of those people that had an extra $25 to drop on a pound of pistachios. (Them were some pricey pistachios fo sho.) I take my time, peruse the bins, maybe take a little taste or two, and go for what I need. And maybe if something is on sale, get a little of that too. Things that usually make the list are spices, oats, beans, maybe rice or quinoa, flours, and seeds. Pumpkin seeds were on sale so those were the seeds of choice and I also got some barely because when I was starting at all the grains, it dawned on me that I don’t know many people that eat barley, or even care about it, which is a shame because it is awesome. It might not be trendy like farro or freekeh, but it is just as good, and damn if it is not a hell of a lot cheaper.
With the barley and pumpkins seed in hand, I had the start of a salad. So I grabbed some oats, a few spices, some beans and ran away from the builk section, past the nuts before things got bad and I either a) got kicked out for eating my weight in cashews and almonds, pretending to just need a taste, or b) paid the $25 for a pound of pistachios that I might not eat because I would need to save them for something really special because they cost $25 a pound. Then I grabbed veggies, walked around the wellness section for good measure, did another lap around the store just in case I forgot something, then finally made my way out of the store only to realize when I got home that I forgot something. (I always forget something)
But I had all I needed for a barley salad situation so things went well. This is a fantastic salad. It’s quick and easy and tasty and good. Barley, tahini, veggies and pumpkin seeds… It’s all you need for a just right dinner, or a fantastic side to any meal. Or as a snack at anytime. Bring it to a BBQ, a graduation party, or a pot luck. it will get eaten, and if by chance you end up with a little left over, bring it on home and eat it for breakfast. It will still be just as good.
The stuff. Pearled barley, tahini, pumpkin seeds and garlic. And some red wine vinegar, salt and pepper, kale, a carrot, some cauliflower, a lemon, a red onion, and a cucumber. (you are not going to need the full amount of all these veggies)
First off, cook the barley. The barley and water go into a pot, brought to a boil, then left on low to cook until tender. Once cooked, strain away excess water
While barley is cooking (or is cooked) chop up the veggies into mouth sized pieces. I used half the cucumber, half the onion, some of the cauliflower, all the kale, and all the carrot. It’s not an exact measurement, you just want a good amount to toss into the salad.
Barley in bowl, topped with the veggies and pumpkin seeds…. The pretty before the mix. You don’t need to add it like this, I just did it cause it looks good.
And the tahini sauce. Mince garlic and add to a jar or bowl with the juice of the lemon, vinegar, a pinch of salt and pepper and give it a really good mix.
Creamy, zippy, oh so good.
Drizzle and toss the dressing with the barley and veggies.
And that’s that. Now you are ready for eating.
Enjoy wherever this salad takes you.
-C
If eaten as a meal, serves 2-3. As a side dish, serves 6-8
1 cup pearl barley
3 cups water
1/4 cup tahini
1 large lemon
3 tablespoons red wine vinegar
2 cloves garlic
salt and pepper
1/2 of a cucumber
1 small carrot
2 large kale leaves
1/2 of a red onion
1 cup of cauliflower florets
1/4 cup toasted pumpkin seeds
Note. The vegetable amount and type is more of a preference. You could use all cucumber and onion or add broccoli and pepper, just make sure to have a least 3 good cups of some chopped up color.
Place barley and water into a pot and bring to a boil. Turn heat down to low and continue to cook until barley is tender, but not mushy, which should take about 45 minutes. Once cooked, strain excess water.
While the barley is cooking, chop all the veggies into small mouth sized pieces. And make the tahini sauce. Mince garlic and place in a bowl or jar. Add in tahini, the juice of the lemon, and the vinegar. Mix well until smooth then season with salt and pepper to taste.
When barley is cooked and drained, let cool for a few minutes then place in a big bowl. Add in all the veggies and the toasted pumpkin seeds, then drizzle with the tahini sauce and toss all around. Season with salt and pepper to taste..
Now eat still warm, or later at room renature, or place in fridge for it to get cold. It can be a filling meal or a great side dish. It’s good all ways, any way.
Another note. This salad is great for parties and BBQ’s and can be made a day or two ahead. If you do make ahead, hold off on mixing the pumpkin seeds and the tahini sauce with the rest of the salad until you are about to serve it.
This past Saturday Nick and I had to let Only go. One of the hardest days of our lives. It was kidney failure that progressed so fast, we barely saw it coming. Needless to say, we have been kind of a wreck ever since.
13 years old, not terrible old for a cat, but he was still an old man. We adopted him from the humane society when he was a tiny baby kitten. We went to explore the options, to see if we really even wanted a cat that could be a animal sibling to Washer. We were only suppose to look, that’s it. I remember very clearly going into the cat room and playing with like 20 cats and kittens and Only (they were calling him sergeant pepper then) was the most crazy, energetic,lovable cat there was. It was instant love and the next day he was ours. We brought him home in a carrier and the very first thing he did when we let him out into his new home was to scratch a deep gash into Washers nose (he had a scar for the rest of his life). It was fitting. Only owned Washer. He would sneak attack his tail and bite at his face while they played all the time. It was the funniest shit to watch. a 75 lb dog getting his ass kicked by a 10 lb cat. Those were some of the best time ever. After we lost Washer, it was just the three of us.
When not inside being lazy, sitting in front of the window, or hiding behinding the couch, he was outside, where he was the happiest. He loved sitting on the neighbors porch sunbathing or in hiding in the bushes in the back yard. He didn’t stray to far, he liked to be close to home. He really was most happy being outside so we let him outside all summer but made him come inside for meals, and we made him come inside for the winter months. (Which I think he was ok with. I mean, he got to lay around on heated floors. Who wouldn’t like that?)
It’s funny, not a lot of people knew Only. He was scared of the kids and hid from anyone that came into the house. He didn’t like other cats and the only dog he ever could be around was Washer. He was pretty much exactly like us, a recluse that ran away from everyone. He only really spent time with us, and honestly, more Nick. He loved Nick more then anyone. Those two, they spent a lot of time sitting around together. He would crawl into Nicks lap whenever he was in the house. It was just where he wanted to be. Those two, they always made me smile.
There is so much, so many good memories. But I think what I am going to miss most is the unexpected love. I would be sitting out on the porch reading or doing something out in the back yard and all of a sudden, there he was, just wanting to say hi and to get some love. He had a nack for knowing when I wanted company and would just show up. He really was the best cat.
Ah fuck, I miss him so much.
So yeah, we are feeling pretty sad and shitty over here. The house feels so empty and so quite. We know that it’s going to take some time, that it is still fresh, but I still can’t wrap my head around it. I keep thinking he is outside and will come home to check in (and eat) anytime. But he won’t and we need to get used to this being our new normal.
Only. The one and only.
RIP kitty. Thank you for your life. Love you.
I made baked beans last week for a side to dinner with the mr and Barb. They ate them all. I didn’t get more then a spoonful. I was sad for me, but also was like “Shit, if I had known you guys were bean fiends, I would be making baked beans like all the time.”
And maybe not all the time, but I made them again this week. And again, they ate a lot, but I got me some this time, and I will probably make them again next week too because they will be perfect for Thanksgiving. See, homemade baked beans are a thing of beauty. Sure you can buy them in a can and be just fine, but these baked beans, well these are waaaayyyy way better. These baked beans are soft (not canned bean soft) and tomatoey and a little spicy with a tang. Not sickly sweet, (not sugar added) and not too salty.. They are just about perfect. You can eat them on their own, toss them into salads or wraps, stick on some toast, serve as as side, or just eat them cold straight from a jar from the fridge right before bed. (your loved one will thank you for that). Plus they are baked in the oven and I love me a good warm oven on a cold day. And the obvious, but all the protein and all around goodness. A great dish to serve if ever you need to feed people like me who don’t eat meat. It’s a win win win win.
Baked beans in all their glory. No cans in sight.
The stuff. White beans that were soaked overnight, strained then added back to a pot with 6 cups of water. Also have crushed tomatoes. an onion, a few cloves of garlic, chili powder, mustard powder, apple cider vinegar, and some salt and pepper.
First step is to start boiling you beans. But while that is happening, mince garlic and chop the onion into really small pieces.
Toss the onion and garlic in a pan and cook on medium low until soften and fragrant.
Cooked beans. All you need to do to cook them is place the pot with soaked beans and water on high, bring to a boil, then turn heat to a medium. Let beans cook until tender. It should take about an hour and a half.
Beans are cooked and the garlic and onion are soften so now all you do is combine everything together. Don’t drain the beans, just toss in the tomatoes, the vinegar, the spices, and a few pinches of pepper and a pinch of salt. Stir in all together,
Looks like soup right? This is right before you stick it into the oven.
Now look at that, oven baked beans. The best part… The crispy sides. ALL MINE!
Not much left to do but eat them. Straight up with a hunk of bread. That is a good way to start anyway.
Enjoy your beans!
-C
Makes a big pot of beans
1 pound (2 cups) white beans soaked in water for at least 8 hours (I used great northern but navy would be good too)
6 cups water or veggie stock
3 cups (or a 28 oz can) crushed tomatoes
1 onion
3 cloves garlic
1 1/2 tablespoons chili pepper
1 tablespoon mustard powder
1/3 cup apple cider vinegar
salt and pepper
Strain soaked beans and place them into large oven safe dutch oven almond with the water and stick on the stove. Bring the beans to a boil then reduce heat to medium and cook util the beans are tender. Should take about 1 1/2 hours.
Sometime while the beans are cooking, mince garlic and chop the onion into very small pieces. Place in a skillet and cook on medium until the onion and garlic are soften and fragrant. Remove from heat and set aside until beans are cooked
Preheat oven to 425
One beans are tender, dump in the cooked garlic and onion, the tomatoes, the spices, the vinegar, and a good pinch of salt and pepper. Stir it all together and place into the oven. Bake for about 2 hours, staring about ever 30 minutes, until the bean sauce is nice and thick. If at any point you think they have gotten to dry, just add more water. Pull the beans out of oven once you are happy with the sauce consistency. Taste and season with more salt and pepper if needed.
And then eat them. As a meal, as a side, or as a snack. Beans are good anytime.
Any leftovers should be stored in the fridge. Beans can be reheated very easily on the stove top. Just place the pot back on stove, stir in a little water and cook til hot.
Beans are also fantastic eaten cold from the fridge.
Are we all ready for it? Mid November and all. The holidays are creeping up fast and furious and I am starting to feel that bit of excitement and anxiety and over all buzz that one gets this time of year. I think seeing the neighbor putting their Christmas tree up in the window the other day (Which in my opinion is way to early. You need to wait until after Thanksgiving for the tree) really hit it home for me. So I located my boxes of decorations and pulled the box of glue and glitter for holiday arts and crafts. I restocked all my flours, sugars, and chocolate chips, and I already have a few of those cake orders in. It’s go time. Now all we need is a snow storm. Or all I need anyways.
The week has been slow. Daylight savings has did a little number on me. I have been waking up at like 415 but my ass is in bed by 830. I could probably get myself to adopt a later bedtime and maybe wake up a little later, but you know what? It works for me. I am nothing, if not an old lady.
Other then a little bit of work, nothing to exciting happened. The mr and walked in the rain to vote. We went for a nice mid week hike , then stopped at the new Harbor Freight store to play with axes. I spent some time throwing, loaded kilns at the studio, grocery shopped, and scraped ice off my car for the first time this season. The littles were over for food and play. Judah and I stating making turkey hand prints that we are going to finish this week. Coco just got snot everywhere and Miley just wanted to get our nightly walk over so I would giver her candy. Then Barb came over for baked beans (amazing baked beans), and Megan stopped by one day to hang with me for a while. It’s nice getting a little human interaction once in a while. HA.
The mr and I finally trapped Only in the house, gave him a bath and even tried to brush his ratty ass out. He is pretty much 100% an outdoor cat in the summer months, but I don’t like him out during the winter so he gots to stay inside. And he hates it. Meows all night long, try to sneak in between legs out the door. But I think it’s better for him and he will get used to sitting around all day on the heated floors again. The guy is to old to be hanging out there like a young cat.
And the leaves. So many leaves. The mr has been doing battle with the trees in the driveway. He spent a day raking and mowing, all pretty much in vain because the next day the driveway was just as bad, if not worse, covered in leaves. My suggestion was just to wait a few more days, let all the leaves fall, but he is a determined man. Plus he noted that the dents in leaves actually help the over all mission.
That was the week.
Today the mr and I are heading to the mountains. We (well I) want to see some snow and really, we just want to get out of town for a few hours. I am feeling a little crazy.
Hope today finds you happy and cozy. Doing you.
Interenting from the week.
-Antarctica scientist allegedly stabs colleague for spoiling the endings of books. I do not condone violence in any way but, I mean, I kind of get it.
–The best way to deal with fall leaves. The mr needs to read this.
-Take it from someone that burns herself on a daily bases. Be prepared in the kitchen. I keep burn cream (propolis calendula salve) right next to the knives. I use it all the time. How to Soothe a Kitchen Burn, STAT
–10 Things to Clean Now Before the Holiday Season Gets Going. Add to list…A good place to hide and a good alibi if needed.
-Interesting idea. A Meat Tax Sounds Nice to Me
-Knowing your flours is important. What’s the Difference Between Cake Flour, Pastry Flour, All-Purpose Flour, and Bread Flour
-I play sudoko when I am feeling worried or anxious. Can’t Stop Worrying? Try Tetris To Ease Your Mind
–Meet the Plantfluencers. I could totally be one, I have like 70 plants and counting. And if people are liking and then getting house plants, well heck yeah. Plants are the best.
-I don’t neeeeed , but I really, really want these sheets. They are amazing.
–Does stress eating actually make you less stressed? Whats your stress eating food? Mine is cabbage. I think there is something about peeling back cabbage leaves that I find soothing, and I a weirdo.
And pictures from the week.
You know when you eat something that you haven’t had or haven’t had in a long time and it’s all you want to eat?
I am having a moment with apples and onions. Roasted and raw, it’s on my mind every time I am making food. Weird? I don’t know, but it’s sweet and savory and all fall like and comforting. It’s a good moment.
So now I am passing on my moment in the form of cornbread. Why cornbread? Well I think cornbread is a fine fine vessel for things that could be perceived sweet of savory. This cornbread is in fact not sweet, but not not sweet. It is a little both and suits the the apple and onion moment quite well.
People ate it, at first somewhat suspect that it was not going to be good, but after a bite or two they too appreciated the apple onion combination. And the cornbread. Even got a lady that doesn’t even like cornbread to like this so that is something right?
Embrace the moments.. To the cornbread!
The stuff. A couple apples, an onion, cornmeal, flour, salt, and baking soda. Also soy milk, oil, apple cider vinegar, maple syrup, pepper, Sansa little earth balance.
Start by thinly slicing the onions. Toss them into a oven safe skillet with about a tablespoon of earth balance and place on a medium heat.
Once the onions are cooking, thinly slice the apples too.
Toss the apples in with the onions and stir around wait a few minutes and stir around some more until the stuff all looks like…
This. The apples ans onions are super tender sans soft and amazing and do not eat them all, but maybe have bite or two.
Scoop the mixture out of the skillet ans melt another tablespoon of earth balance into the skillet, trying to evenly coat the bottom.
Now to the cornbread. Mix together all of the dry ingredients.
Then add in all the wet and gently mix until completely incorporated.
Pour the batter into the greased skillet
Top with the apple union mixture then pop into the oven for about 40-45 minutes to bake.
Golden crisp and amazing smelling. Check for donees with a tester stuck in the middle and when its done, its done.
Now the hard part. Let it cool. You can go right at it, but it will crumble and fall apart. This bread really needs a little time to chill.
Then it’s time. Eat what you need. Careful, it might be all of it.
-C
makes a 10 inch round skillet of bread
1 1/2 cups cornmeal
1 cup all purpose flour
1 1/2 teaspoon baking soda
1 teaspoon salt
1 2/3 cups soy or other plant based milk
2 tablespoon apple cider vinegar
1/3 cup maple syrup
1/3 cup neutral oil like canola
1 large onion
2 apples (macon or mac)
2 tablespoon earth balance or vegan butter
Pepper
Note. This bread is baked in a cast iron skillet. If you don’t have one, you can use a 10 inch cake pan or a 9×9 square pan.
Preheat oven to 400
Start by cutting the onion in half length wise then slice the halves into very thing pieces. Grab a 8-10 inch oven safe skillet and place on medium heat with about a tablespoon of butter. Add in the onions, stir around, and let cook. Grab the apples, remove the cores and slice into thin pieces. Add the apples to the onions and stir. Keep cooking and stirring until the apples and onions are very tender and starting to brown. Place the mixture into a bowl then coat the bottom and sides of the skillet again with another tablespoon of butter. Set skillet aside for a minute.
For the cornbread, mix together the flour, cornmeal, salt, and baking soda in large bowl. Add in the soy milk, maple, oil, and vinegar and gently mix until completely incorporated and there are no big lumps. Pour batter into the greased skillet. Evenly top with the apple onion mixture, sprinkle with a little pepper, then pop the skillet into the preheated oven. Bake for about 40-45 minutes or until it’s a nice dark golden brown and a taster stuck in the middle comes out clean. Once cooked, remove from oven and let cool for at least a half hour. The cornbread needs the time to cool or else it will cut really crumbly.
Once cooled, eat. Left overs can be stored in airtight box at room temperature for a day, but any longer it should go into the fridge.
Did you wake up at 3:30 because your body is used to waking up at 4:30 but we add an extra hour and now you don’t even really know what time it is for real? Yeah, that would be me. I look at my phone, at my computer, but don’t trust all the self resetting clocks. I have to check the kitchen stove to see what time it was yesterday before I can figure out the time today and then check the technology clocks to see if they really know. But woo hoo, daylight savings. I am one of those people that really likes it. I like the light in the morning, I like the early as shit dark. It suits my life (early to bed, early to rise) and also gives off a feeling of coziness that I can’t quite describe. Plus I am a slight creeper and love walking around the neighborhood after dinner when it is dark and seeing inside peoples house. Not like too creepy where I go an actively peer in, just looking in if their windows are open, checking out their decor, seeing what they are watching on tv, or what they are eating for dinner. Don’t judge, you know you do the same thing too.
This week was a blur. On Sunday we spent way to much time walking around Ikea, checking out the Christmas stuff and choosing a new duvet cover. We had time to kill before Barbs plane landed from Italy (and it was late). So Ikea was the natural waiting place. It wasn’t bad, the mr got to try the new veggie dogs, said they were absolutely fantastic and we actually did buy a duvet cover. But as soon as the plane landed we jumped in the car a drove circles around the terminal until the ladies appeared with smiles and bottles of wine and olive oil, which I have still yet to receive. Then a drive back home to where we stopped for drinks, I opened the trunk of the car and smacked my head on the door so hard I think I broke my skull. Anyway, she made it back from Italy and I am pretty sure I gave myself a concussion. Good stuff.
The week started. I spent the first half doing paperwork and making all sorts of phone calls about things that I don’t know anything about trying to gather information to make said phone calls and blah blah blah.
And then it was Halloween and we didn’t do a damn thing. We were suppose to take, at the very least, Judah out, but Coco got super sick again and landed himself a bed up at the hospital. Things got confusing and crazy and he ended up going with a family friend and their kids. We were pretty bummed, and so was he. What a bust. And we had only enough candy tor give 3 little kids so we didn’t do that either. Another Halloween come and gone. Meh. But the next day we had the littles over for a school night sleep over. Not as fun as a weekend sleep over because there is bedtime, homework, the need to shower, and waking up early. But those guys championed, did all their homework, took their showers, and brushed their teeth without a single rebuke, and we had a grand old time. They even went to bed and woke up without giving me any shit. Then after a humorous breakfast of dried cereal, eggs, and toast, they got themselves ready and I dropped them off at school, again, with out any complaining. Those littles… So good. On the way to school I tried to explain why we do daylight savings. Things got off topic a bit and I might have blamed all the time changing on Voldemort and magic and yeah. Someone is going to need to sort that out with them someday. OR not.
After dropping them off I worked at the studio for the rest of the day. Megan came to visit me and bring me coffee. Which probably saved my life. Then I pugged clay for way to long and had to have the mr come to the studio and help me take the bolts out of the pug machine so I could take it apart to clean it, or more like I pugged, he took it apart and he cleaned it. My mr, he be so nice.
Yesterday was a burn out day. Might be getting a head cold (or it’s the concussion) and I could barely keep my head from falling off, SO much pressure, even my eyes looked bleak and blue. But I did some stuff. The mr and I took a research drive, I got the grocery shopping done, did laundry, cleaned he house. And then went to bed early.
And now I am awake and it’s early. My head is still pretty pressurized, but I think it might be starting to deflate a little which is good because today the mr and I have some outdoor plans. What exactly the plans are is still up in the air. It is suppose to be sunny and slightly warmer so we need to get to and get us some woods. I almost want to try and convince him that we should go camping and I totally would if I hadn’t packed away everything and we had fire wood and if I wasn’t afraid of the bears coming to eat me. One last meal before hibernation. Haha. No, its not the bears I worry about, our bears don’t eat people here, it is the hunters I am actually worried about. I don’t own any blaze orange and I move like a graceful doe in the woods. Yikes!
Some internet stuff I read this week.
-The mr sent me this link. He thinks I am crazy because I said that I want to live the next day without the extra hour yet and take my extra hour on Monday around 2, for like a nap time or something. I think I can do it, but only if I don’t look at my phone clock. If I lived in the city, this guy could make it happen for everyone. The Man Who Turns Back New York City’s Clocks, Hand by Hand. What a badass job.
-You Can Wrap All of Your Friends Christmas Gifts With Your Face This Year. Hahaha. I hate gift wrap, think it is a complete waste, but this is hilarious
-Another reason to get your shut eye. How Sleep Deprivation Messes With Creativity
-Do you love or loathe coffee? Your genes may be to blame. Both my parents drink pretty much nothing else but coffee so I think I am made up of like 25% coffee. Now I have a 99% tolerance to caffeine. The only thing that is does to me (that I notice) is that I get a major headache if I don’t have it. But I am one of those people that could drink a pot of coffee and sleep like a baby for 8 hours. Same as the parents. Got to be genetic.
-If I lived in a brownstone in a loft in Brooklyn, this would be the one I would want.
–How Do You Move A Bookstore? With A Human Chain, Book By Book. This is just so fantastic.
-Just because it is not summer anymore and we are no longer gardening does not mean that there is any less produce out there to eat. Your Ultimate Guide to Fall Produce
-About That Monstrous Black Hole We’re All Orbiting. Just in case you want to know. Life and black holes. What are you gonna do?
-Do any of yo have a septic system and grow ferns on top?. Something I have been thinking about fo septic system landscaping purposes. Anatomy of Ferns
–Thick Strokes of Paint Create Featureless Portraits in Abstracted Paintings by Joseph Lee
Pictures from the week. I didn’t take very many, but I did get Barb eating so there is that.
The thing with having an abundance of squash in the house, and having the abundance keep growing (we get a lot of squashes at farm share) is that I need to cook just about every meal with said abundance, which I am totally on happy to do. I welcome all the squash. I am excited about all the squash. I could eat al the squash all day, everyday. And I do. But that is me. The mr and the others the I sometimes cook for, they are not as squash crazy as me and get sick of plain old roasted squash so I am trying to change it up and make new and interesting things out of the squash so no one gets bored with it.
Yes, I know stuffing an acorn squash is hardly a new idea, but this squash is not stuffed with the usual rice and stuff, it stuffed with lots of black beans and cumin and chili powder spiced cauliflower (and a few other things). The combination of all the flavors with the acorn squash really hit all the right spots for a tasty, not boring squash meal. It is a brilliant combination of flavors that even the not so keen on squash person will love.
That is my opinion of course but it will be your opinion too after you make and eat these. We will brilliant together.
To the stuffed squash.
The stuff. An acorn squash, some cauliflower, cooked black beans, an onion, and a few kale leaves. Also need some cumin, chili powder, salt and pepper. salsa, and olive oil.
Start by cutting the squash in half and scooping out all the seeds.
Place the squash open side down on a baking sheet or in a skillet lightly oiled and then stick into a hot oven to roast.
After the squash goes in, dice up the onion and cauliflower into small little pieces.
Place the chopped stuff onto a baking sheet. Drizzle with olive oil and toss with the cumin, chili powder, salt, and pepper. Get that into the oven too.
Roasted, and ready. Stop, do not eat it all, but you might want too, it is so freaking good.
And once this guy in fork tender, its ready as well.
Scoop out a bit of the cooked squash from each side making the well bigger. More room to stuff.
Get everything together. Chop the kale, grab a bowl.
The black beans, salsa, scooped out cooked squash go into bowl. Add in the roasted cauliflower and onion and the chopped kale and mix.
Now stuff each side. Get as much in as you can, mound it as high as you can and place back into oven to bake for a little bit longer.
Cooked and slightly crispy in all the right ways.
These stuffed suckers are everything we all wanted and didn’t know we needed. Fantastic, and all the more when serves with extra salsa, sliced avocado, and a wedge of lime.
Go get at it.
Bye!
-C
Makes 2 stuffed halves. This recipe is very easy to fiddle with and can easily be double or tripled.
1 medium sized acorn squash
1 1/2 cups cooked black beans
1/4 head of cauliflower (about 2 cups chopped before roasting)
a small onion
a few kale leaves
1/4 cup thick and chunky salsa
2 teaspoons cumin
1 teaspoon chili pepper
salt and pepper
olive oil
Avocado, lime, extra salsa (optional)
Preheat oven to 400
Slice acorn squash in half and scoop out all the seeds. (seeds can be roasted). Place both halves cut side down on a lightly oiled baking sheet or oven safe skillet and place in oven to roast for about 30-35 minutes or until the squash is fork tender.
Once squash is in oven, dice the onion and cauliflower into small pieces and place on a baking sheet. Drizzle with olive oil and toss together with the cumin, chili powder, salt, and pepper. Place into oven along with the squash. Roast for 15-20 minutes or until the cauliflower is lightly browned and tender.
When the cauliflower is roasted and squash is cooked, get all the rest of the ingredients ready. Dice up the kale . Take each side of squash and scoop out about an inch more of cooked squash, leaving a good sized well. Place cooked squash into a bowl and kind of mash it up. Add in the beans, the salsa, the kale, and the roasted cauliflower and onions. Season with salt and pepper and mix it all up. Take filling and fill the squashes, stuffing as much as you can in and mounding it on top. Place the halves back onto baking sheet or skillet and place back into oven for 10-15 minutes until nice and browned and slightly crispy on top. Pull from oven and serve. Although not necessary, extra salsa, avocado, a lime are much appreciated.
Hello friends.
The past week is kind of a blur. There was some stressful times there where I was sure I was just going to have to stay in bed for the duration of the week and call it. But I didn’t. I was good. I got up, did what needed to be done and tried to keep my head from exploding. Nothing bad, just stressful. Life things, you know?
Besides from being a crazy person all week, I did accomplish a lot. I don’t know how, but I ended up doing like 5 loads of laundry which is like 4 more loads of laundry that I normally do a week. I unpacked all the winter stuff which we have actually needed because it has snowed a few time this week. Jackets, hates, mittens, shoes. And you would think that shoes would be needed right? Well the mr is still wearing his sandals but with socks of course , so you know. Me, I had to switch to real shoes a few weeks ago. After wearing Birkenstocks for 20 years straight, all year long, I have killed my feet and they can no longer handle any kind of cold. What else… I packed the camping stuff (one of those loads of laundry were our nasty, stinky, sleeping bags) which was kind of sad because it really means that we probably won’t be camping any more this year. I cleaned my studio space in the basement (then trashed it again). Picked up the last farm share for the summer (winter share starts in 2 weeks!) and the back porch got a good cleaning and organizing. All of my plants that were outside have been moved inside and now the house looks like a jungle. I forgot just how many plants I have. I think I am nearing 40 so just call me the crazy plant lady. Ha.
As for people, no Barb this week. She ditched me for Italy. So rude right? And all week, all month, I have been planning this pumpkin carving party. It was suppose to be me and the mr plus Barb and Miley, Judah, Coco, and Sophia. Well Barb was gone so one down. Then On Thursday I was informed that So had a Halloween party Friday night so wasn’t coming. And then on Friday I get a text saying that Miley wants to go to the school dance instead and that Coco is sick…. I was so bummed. I had all this pizza party stuff, all sorts of pumpkins, rented Hocus Pocus and made cookies. I was looking forward to this night for weeks. But you know what, Judah came and we had a blast. We carved pumpkin (well he and the mr did) His pumpkin came out amazing, gourd arms and seed teeth , and all. I made pizza, We went for a nighttime walk then came home and cuddled on the couch and watched Hocus Pocus. He ate cookies and half bag of chocolate chips, and then we all went to bed without any sibling fights. Woke up, made him Judah cakes (pancakes that spelled his name), went for a walk, ran some errands, then dropped him off at home. Sure I missed the other littles, but whatever, one cool kid was awesome and bonus, my house didn’t get completely trashed!
In a few hours the mr and I are going to head to Montreal, hit up IKEA, spend some time perusing stuff that I won’t buy then maybe take a nap in a sample bed. The mr will get some hot dogs (he is going to try the veggie dogs) and then we are picking up Barb’s ass up from the airport!!! I am really excited to see the lady and hear all about how much wine she was able to throw down while in Italy. Ha hahaha. But really, how much?
Anyways. Have yourself a very fantastic week. Halloween, November, the last week of daylight savings…. We are heading into the dark months! (I am so excited!!!!)
Stuff that doesn’t suck to read from the internet
–40 Tips For The Perfect A-Frame Cabin This is exactly where my brain is spending time this week. #LIFEGOALS
-We have a few Sears houses in our neighborhood and I love them. They should return to making awesome tiny home kit houses. People would love that. Sears Is Fading, But Memories Of Its Mail-Order Homes Endure
–Rethinking the $20 I Spend a Week on Almond Butter. Yeah. I love me some almond butter, but who the hell has 20 bucks a week to spend on it. No me, although I wish.
-Hells to the no, shoes are NOT ALLOWED in my house. I flip my shit if people don’t take their shoes off.And for those who say that I walk around barefoot all the time outside and then come inside, well that is different. Lawn dirt is way different from nasty shoe grim. DO YOU WEAR SHOES IN THE HOUSE? (AND THREE REASONS NOT TO!)
-Whatever your stance on candy corn is, don’t you think they should have stuck with the name, Chicken Feed? That would have been amazing. Actually, Candy Corn Is Great. (I don’t eat candy so I don’t even remember what it tastes like…)
–Comfort Baking: Why It’s Important & How We’re Practicing It. Baking always helps clear my head, it’s like my mediation.
-Did you know a rusty nail can be ink. An Urban Ink Forager Explains How To Paint With All The Colors Of The Alley
-Don’t Let Anyone Tell You How Many Muffin Tins You Need. I needed to hear this because sometimes I think I have way more then I need, but now I just might need to get me some more. Ha
-I want one of these rugs. Hand-Tufted Rugs Celebrate the Natural Beauty of Lichen and Mold
–Doctors in Scotland Are Literally Prescribing Nature to Their Patients. Those doctors are so smart. Nature is the best medicine.
And pictures from the week. Barb eating will be back next week. A big thanks to Judah for filling in this week, he also is a great eater.
I love making cookies. There something about having to keep a close eye on the oven, the anticipation of the perfect time to pull them from the oven. Not too early, but never to late. You have to pay close attention. A cookie is not very forgiving if left in for a minutes or two too long. Those minutes can make or break a great cookie. OS baking them is , to me anyway, like a form of meditation. You can’t be distracted, thinking about things like “who came up with the name Banana Republic and then used it for a clothing store?”, or looking up “ large metal rolling balls”. No, you need to pay attention to cookies, or else your cookies might burn. But don’t let that scare you, and really, you can totally think of all the random, but important, things you want while baking, just use a timer or think those thoughts while watching the oven.
These cookies are the cookies that you want to make. A cookie yes, but almost like little soft cakes, full of chocolate chips and pumpkin seeds and warm spices to elevate the pumpkiness of the pumpkin. A perfect cookie to bake when you are freezing and want nothing else then to sit in front of a warm oven, spacing out, and revealing in the smell of a fall kitchen.
Fall pro tip. Place outwear in the kitchen while baking. I had my jacket on a stool close by while the cookies were baking and even now, a few days later, it still smell like cookies.
To the cookies!
The stuff. Brown and granulated sugar, flour with salt, cinnamon, allspice ,nutmeg, and baking soda and baking powder. Pumpkin puree vanilla extract, canola oil, chocolate chips, and toasted pumpkin seeds.
Mix the sugars, oil, vanilla, and pumpkin puree together until completely incorporated.
Whisk together all the dry
Add dry to wet. Mix gently, until just incorporated.
A now you have cookie batter. But wait, can’t forget the chocolate and seeds.
I like to give the chocolate chips a rough chop to make the chips a bit smaller. You can skip this step or just use small chips if you want.
Chocolate chips and toasted pumpkin seeds go into batter.
After a gentle mix, it’s time bake.
Scoop the dough onto a parchment lined baking sheet (important to line or use a splat mat, or else they will stick)
Into the oven and out of the oven. Bakes to a plump golden brown perfection.
All the cookies cooling on a wire rack like all cookies should.
And then thats it.
Cookies for you and cookie to share, if you are nice like that.
Happy weekend!
-C
make 2 dozen or so cookies
2 1/2 cups all-purpose flour
1/2 teaspoon salt
1 teaspoons baking powder
1 teaspoon baking soda
2 teaspoon cinnamon
1/2 allspice
1/2 teaspoon nutmeg
3/4 cup cane sugar
1/2 cup packed brown sugar
1 1/2 cups pumpkin puree
1/2 cup vegetable oil
1 teaspoon vanilla extract
1/2 cup toasted pumpkin seeds
2/3 cup chocolate chunks or chips
Preheat oven to 350
In a large bowl, mix together the sugars, purlin puree, oil, and vanilla until completely incorporated. In a smaller bowl, whisk together the flour, baking soda and baking powder, salt, all spice, cinnamon, and nutmeg. Once whisk, dump into the bowl with the wet gas gently mix together until just incorporated. Do not over mix.
Dump your chocolate ships onto cutting board and give them a rough chop just to break some of the chips apart. (or use small chips) Add the chop chocolate and the toasted pumpkin seeds to the batter and gently fold them, just to even distribute them.
Line being sheets with either parchment or use a splat mat and scoop equal size ball of dough onto the baking sheets. Leave enough room for the cookie to rise and spread. Place baking sheets into oven and bake fir 12-14 minutes or until the cookies have risen, are golden brown, and a tester stuck into the middle of a cookie comes out clean. Remove from oven and place the cookies on a wire rack to cool.
Then you eat them.
Any not eaten cookies should be store in an air tight container and can be left out at room temperature for a day or two but should be refrigerated or frozen for longer storage. The mr likes to eat them straight out of the freezer.
Soup is all about comfort and I needed comfort this week. What with being all sad and slightly stressed with a little touch of the holiday blues. And I needed something to warm me up because is has been freaking chilly cold. I needed soup. But I wanted something slightly special, not the everyday, but also not anything fussy or finicky. A soup that I could make really fast or let sit on the stove all day. A soup that would bring a little brightness without being overly rich. A soup to take away the chill and make me happy.
Is that asking to much of a soup? I think not.
This soup, it did it all. But also take into account, this soup is not for the people that do not like squash. Or for the people that do not like apples or cranberries. Or for people that do not like thick creamy soups. But if you are not one of this people (you are a person that likes squash, apples and cranberries, and creamy soup) then this soup is for you. It is for us. Creamy, flavorful, slightly sweet and spicy with a little tang and just so dang delicious. It is like a warm blanket of soup. Comfortable and lovely. I have basically eaten an entire pot all to myself in the past two days.
It has been just what I needed.
Join me.
The stuff. A butternut squash, a couple apples, and some cranberries. Also a carrot, an onion, some fresh ginger, a few cloves garlic, cumin and chili powder, salt and pepper, apple cider vinegar, and a little olive oil.
Start by chopping up the carrot and the onion. Small pieces just because they cook a little faster.
Peel and grate or mince some fresh ginger too.
Toss that all into a big pot with a splash of olive oil and a splash of water and cook on a medium heat until tender and fragrant.
While the veggies cook, chop the squash into small cubes. Remove the seeds, but no need to peel.
And chop up the apple too, but set aside a half of one for the apple cranberry relish.
Now toss all that into the pot along with the cranberries.
Add the spices, salt and pepper, a few splashed of apple cider vinegar, and water to cover it all. Then place it on stove, bring to a boil, then turn heat to medium and let cook.
While the soup is cooking, make the relish. Mince the half apple along with about 1/2 cup of cranberries.
Place in a bowl with a pinch of salt and a few splashed of apple cider vinegar. Then just let it sit and meld.
Soup is looking good. Everything is soft and falling apart and ready to go.
Blend it all until smooth.
Thick and creamy goodness right here. If it is to thick, add more water, too thin, cook it down a little longer. The consistency is up to you.
Now all you need to do is ladle soup into bowls and top with a couple spoonfuls of the relish.
This is comfort. This is good.
Have a great, comfy weekend.
-C
makes 6-8 servings
1 small butternut squash (about 5 cups cubed)
1 large onion
1 carrot
2 macon or mac apples
2 cups fresh cranberries (you can use frozen too)
2 tablespoon cumin
2 tablespoons chili power
2-3 cloves garlic
2 tablespoon fresh minced or grated ginger
4-5 tablespoon apple cider vinegar
olive oil
salt and pepper
6 cups water
Start by chopping the onion and carrot into small pieces. Place into large heavy bottom pot with a splash of water and a tiny splash of olive oil. Mince the garlic and peel and mince ginger. Toss into the pot as well and place it on a medium heat to cook until the veggies are tender and fragrant.
While the veggies are cooking, dice up the butternut squash. Remove any seeds but there is no need to peel. Also dice up the apples, reserving 1/2 of one for the relish. Place the chopped squash and apples into the pot with the cooking veggies along with 1 1/2 cups of cranberries , the chili powder and cumin, 2-3 tablespoons apple cider vinegar, and the water. Place the pot back on the stove, bring it to a boil, then reduce heat to medium and let cook.
Once soup is on the stove, take reserved half apple and the other 1/2 cup of cranberries and dice into very small pieces. Place into a bowl with a little pinch of salt and 2 tablespoons apple cider vinegar. Toss around and set aside.
And back to soup. Once the squash is tender and starting to fall apart, it is time. Remove from heat and either with a immersion blender, or a regular blender, blend the soup until smooth. After its blended and creamy smooth, check for thickness. If you think it is too thick, add more water. Too thin, place back on stove and cook down until it thickens up a bit more.
When you are ready to serve and eat, ladle soup into a bowl and top with more pepper and a spoonful or two of the apple cranberry relish.
Then eat and feel cozy.
I made baked beans last week for a side to dinner with the mr and Barb. They ate them all. I didn’t get more then a spoonful. I was sad for me, but also was like “Shit, if I had known you guys were bean fiends, I would be making baked beans like all the time.”
And maybe not all the time, but I made them again this week. And again, they ate a lot, but I got me some this time, and I will probably make them again next week too because they will be perfect for Thanksgiving. See, homemade baked beans are a thing of beauty. Sure you can buy them in a can and be just fine, but these baked beans, well these are waaaayyyy way better. These baked beans are soft (not canned bean soft) and tomatoey and a little spicy with a tang. Not sickly sweet, (not sugar added) and not too salty.. They are just about perfect. You can eat them on their own, toss them into salads or wraps, stick on some toast, serve as as side, or just eat them cold straight from a jar from the fridge right before bed. (your loved one will thank you for that). Plus they are baked in the oven and I love me a good warm oven on a cold day. And the obvious, but all the protein and all around goodness. A great dish to serve if ever you need to feed people like me who don’t eat meat. It’s a win win win win.
Baked beans in all their glory. No cans in sight.
The stuff. White beans that were soaked overnight, strained then added back to a pot with 6 cups of water. Also have crushed tomatoes. an onion, a few cloves of garlic, chili powder, mustard powder, apple cider vinegar, and some salt and pepper.
First step is to start boiling you beans. But while that is happening, mince garlic and chop the onion into really small pieces.
Toss the onion and garlic in a pan and cook on medium low until soften and fragrant.
Cooked beans. All you need to do to cook them is place the pot with soaked beans and water on high, bring to a boil, then turn heat to a medium. Let beans cook until tender. It should take about an hour and a half.
Beans are cooked and the garlic and onion are soften so now all you do is combine everything together. Don’t drain the beans, just toss in the tomatoes, the vinegar, the spices, and a few pinches of pepper and a pinch of salt. Stir in all together,
Looks like soup right? This is right before you stick it into the oven.
Now look at that, oven baked beans. The best part… The crispy sides. ALL MINE!
Not much left to do but eat them. Straight up with a hunk of bread. That is a good way to start anyway.
Enjoy your beans!
-C
Makes a big pot of beans
1 pound (2 cups) white beans soaked in water for at least 8 hours (I used great northern but navy would be good too)
6 cups water or veggie stock
3 cups (or a 28 oz can) crushed tomatoes
1 onion
3 cloves garlic
1 1/2 tablespoons chili pepper
1 tablespoon mustard powder
1/3 cup apple cider vinegar
salt and pepper
Strain soaked beans and place them into large oven safe dutch oven almond with the water and stick on the stove. Bring the beans to a boil then reduce heat to medium and cook util the beans are tender. Should take about 1 1/2 hours.
Sometime while the beans are cooking, mince garlic and chop the onion into very small pieces. Place in a skillet and cook on medium until the onion and garlic are soften and fragrant. Remove from heat and set aside until beans are cooked
Preheat oven to 425
One beans are tender, dump in the cooked garlic and onion, the tomatoes, the spices, the vinegar, and a good pinch of salt and pepper. Stir it all together and place into the oven. Bake for about 2 hours, staring about ever 30 minutes, until the bean sauce is nice and thick. If at any point you think they have gotten to dry, just add more water. Pull the beans out of oven once you are happy with the sauce consistency. Taste and season with more salt and pepper if needed.
And then eat them. As a meal, as a side, or as a snack. Beans are good anytime.
Any leftovers should be stored in the fridge. Beans can be reheated very easily on the stove top. Just place the pot back on stove, stir in a little water and cook til hot.
Beans are also fantastic eaten cold from the fridge.
The thing with having an abundance of squash in the house, and having the abundance keep growing (we get a lot of squashes at farm share) is that I need to cook just about every meal with said abundance, which I am totally on happy to do. I welcome all the squash. I am excited about all the squash. I could eat al the squash all day, everyday. And I do. But that is me. The mr and the others the I sometimes cook for, they are not as squash crazy as me and get sick of plain old roasted squash so I am trying to change it up and make new and interesting things out of the squash so no one gets bored with it.
Yes, I know stuffing an acorn squash is hardly a new idea, but this squash is not stuffed with the usual rice and stuff, it stuffed with lots of black beans and cumin and chili powder spiced cauliflower (and a few other things). The combination of all the flavors with the acorn squash really hit all the right spots for a tasty, not boring squash meal. It is a brilliant combination of flavors that even the not so keen on squash person will love.
That is my opinion of course but it will be your opinion too after you make and eat these. We will brilliant together.
To the stuffed squash.
The stuff. An acorn squash, some cauliflower, cooked black beans, an onion, and a few kale leaves. Also need some cumin, chili powder, salt and pepper. salsa, and olive oil.
Start by cutting the squash in half and scooping out all the seeds.
Place the squash open side down on a baking sheet or in a skillet lightly oiled and then stick into a hot oven to roast.
After the squash goes in, dice up the onion and cauliflower into small little pieces.
Place the chopped stuff onto a baking sheet. Drizzle with olive oil and toss with the cumin, chili powder, salt, and pepper. Get that into the oven too.
Roasted, and ready. Stop, do not eat it all, but you might want too, it is so freaking good.
And once this guy in fork tender, its ready as well.
Scoop out a bit of the cooked squash from each side making the well bigger. More room to stuff.
Get everything together. Chop the kale, grab a bowl.
The black beans, salsa, scooped out cooked squash go into bowl. Add in the roasted cauliflower and onion and the chopped kale and mix.
Now stuff each side. Get as much in as you can, mound it as high as you can and place back into oven to bake for a little bit longer.
Cooked and slightly crispy in all the right ways.
These stuffed suckers are everything we all wanted and didn’t know we needed. Fantastic, and all the more when serves with extra salsa, sliced avocado, and a wedge of lime.
Go get at it.
Bye!
-C
Makes 2 stuffed halves. This recipe is very easy to fiddle with and can easily be double or tripled.
1 medium sized acorn squash
1 1/2 cups cooked black beans
1/4 head of cauliflower (about 2 cups chopped before roasting)
a small onion
a few kale leaves
1/4 cup thick and chunky salsa
2 teaspoons cumin
1 teaspoon chili pepper
salt and pepper
olive oil
Avocado, lime, extra salsa (optional)
Preheat oven to 400
Slice acorn squash in half and scoop out all the seeds. (seeds can be roasted). Place both halves cut side down on a lightly oiled baking sheet or oven safe skillet and place in oven to roast for about 30-35 minutes or until the squash is fork tender.
Once squash is in oven, dice the onion and cauliflower into small pieces and place on a baking sheet. Drizzle with olive oil and toss together with the cumin, chili powder, salt, and pepper. Place into oven along with the squash. Roast for 15-20 minutes or until the cauliflower is lightly browned and tender.
When the cauliflower is roasted and squash is cooked, get all the rest of the ingredients ready. Dice up the kale . Take each side of squash and scoop out about an inch more of cooked squash, leaving a good sized well. Place cooked squash into a bowl and kind of mash it up. Add in the beans, the salsa, the kale, and the roasted cauliflower and onions. Season with salt and pepper and mix it all up. Take filling and fill the squashes, stuffing as much as you can in and mounding it on top. Place the halves back onto baking sheet or skillet and place back into oven for 10-15 minutes until nice and browned and slightly crispy on top. Pull from oven and serve. Although not necessary, extra salsa, avocado, a lime are much appreciated.
A lot of times I make food that I don’t nessasrily care to eat because well, I love to make for other people. Take all the cakes, I love to make cake, it makes me so happy to make a cake, but I don’t eat cake. I never eat cake.
This is not one of those times. I basically made these cabbage rolls all for me. Sure I shared them with the mr because it was dinner but honestly, he was’t the biggest fan (he hate celery). And to be honest, I was glad he didn’t really like them because these things were bonkers amazing to me whichh means I got to eat them all myself. In fact I thought they were so good that I made them twice this week. And not just because I have a shit load of cabbage right now, (I stocked up on cabbage and have like 15 heads in the pantry and stuffed in the fridge), although it helped that I do.
I ♥️ cabbage.
And now I ♥️ these cabbage rolls.
To the rolls!
The stuff. A head of cabbage, a can of butter beans (cooked from dried beans or canned), crushed tomato (also home made or canned), a couple stocks of celery, a carrot, an onion, some garlic, Italian seasoning, salt and pepper, and a little olive oil.
Start by getting the cabbage leaves to roll the filling in. You are basically just going to dunk the whole head of cabbage, with the core removed, into a big pot of boiling water until the outer leaves are tender enough to peel away. You are going to want to 12-14 nice leaves so peel away using tongs. Once you have all the leaves, remove the rest of the cabbage ans place the leaves back into the pot to cook until completely tender and soft. Remove then from the water and place them into a bowl and let them cool.
Meanwhile the filling. Take roughly half of the remaining cabbage and rough chop it up along with the celery, carrot, onion and garlic.
Place it all into food processor and pulse until its a small chunky chunk consistancy.
Add a splash of olive oil to a pan then dump the veggies on in. Sprinkle with salt and pepper and the Italian seasoning then set on a medium heat on the stove to start to cook the veggies a bit.
One the veggies are out and cooking, pulse up the butter beans in the food processor until not quite smooth. Some chunk is good.
Dump the veggies back into the food processor with the beans, along with a little of the crushed tomato. Pulse a few times.
That is the filling. Time to roll.
Pat each leave dry and lay flat on counter. If your cabbage leaves have thick ribs you can slice them down the middle, just not to far up into the leaf. Add about 1/3 of a cup of the filling (add less for smaller leaves) and then roll as tightly as you can like a burrito without the filling coming out. Repeat until all the filling is gone.
Place all of the rolls nice and cozy into a oven safe pan, preferably the pan you have been using to cook the veggies in (you want them to fit close together, it helps then from opening up during cooking ) and cover then all up with crushed tomato.
Now all you need to do is stick the whole thing in the oven.
If you got it, spinkled with some green scallions and parsley for color and flavor and the all you need to do it eat. Eat one or eat them all because they are freaking fantastic!
P.S. Left overs are just as good, if not better cold.
YAY CABBAGE!
Stay cool.
-C
A medium sized head of cabbage
2 cups (or 1 can) cooked butter beans
an onion
1 large carrots
2 stalks of celery
3 cloves garlic
3 1/2 cups crushed tomatoes (or a 28 oz can)
1 tablespoon Italian seasoning
olive oil
salt and pepper
First thing, bring a large pot of water to a boil. Remove the core from the head of cabbage and place the cabbage head into the boiling water. Gently peal away 12-14 of the outer leaves from the head then remove the head. Place the leaves back into the boiling water until they are soft and plyable. Remove from water and place in a large bowl.
Preheat oven to 400
Rough chop about half of the remaining cabbage head (like a little more then a cup) the carrot, celery, onion, and the garlic and place into a food processor. Pulse until its a small chunk consistency. Add a drizzle of olive oil to a skillet (if you can, use a oven safe skillet the can also be used to bake the rolls in) and dump the veggies in. Sprinkle with the Italian seasoning, salt and pepper, and place on a medium heat to cook for a few minutes. While the veggies are cooking, drain the beans and dump them into the food processsor. Pulse until not quite smooth. After the veggies have started to become fragrant and are not completely raw, dump those veggies back into the food processor with the beans. Add about 1/3 cup of the crushed tomato and pulse until combined.
To assemble the rolls. Pat the leaves dry and lay flat. If a leaf has a really thick rib, cut it down the middle, but not to far up the leaf.. Place about 1/3 cup of filling into each leaf (less if the leaves are small) and roll each one up like a burrito, as tight as you can without ripping the cabbage. Place rolls into oven safe skillet, bumped up against each other if they can. Once all the rolls are assembled and in skillet, pour the crushed tomatoes all over, getting the sauce in between each of the rolls.
And then place the rolls into oven to bake for an hour.
Once the rolls looked cooked and maybe a little crisp on an edge or two, remove and let cool a few minutes before serving.
Chopped parsley and scallions are nice to sprinkle on top if you got it.
Eat, and eat some more. Any left over should be placed into the fridge and eaten just a short few hours later cold, while standing in from of the fridge because these cold are almost better then hot. So good!
Are you as excited about pumpkin season as I am. And not because of pumpkin spice this or that, I am talking about real squash pumpkin. I am so excited, and have started a stash. I have about 10 sugar pumpkins all through the house. Equal parts fall decor and dinner. Being able to eat your decorations is key to a successful life. I am 100 percent sure about that.
So now that we have established that it’s time to eat pumpkin, we also have to realized that there are more ways to eat pumpkin then in baked goods. Savory pumpkin is just as good, if not better then sweet pumpkin. I mean, it’s a squash and don’t we all love a good ssavory squash situation? If you don’t, well you are in the wrong place my friend.
This dish here pretty much sums up all that I ever want to eat again. Roasted pumpkin with cumin is one of the best things ever. No joke. Swiss chard is definitely my favorite green, besides spinach, (and I love kale, but chard is better then kale too!) and red lentils are my favorite kind of lentils. All I all, this small list of ingredients makes for one heck of a dish. I was pre making this for dinner for Barb and the mr. and ended up making something else for dinner so I could eat and save it all for myself. I did not share one bit of this and feel zero bad about it. I mean, I made it so it is mine. They had chili, I secretly ate this.
It’s come to that. I am hiding my pumpkin and lentil dish. What is wrong with me? Ha!
Now to the best pumpkin dish ever!
The stuff. A sugar pumpkin, some swiss chard, an onion, red lentils, a few cloves of garlic. cumin, salt and pepper, and olive oil.
Cut the pumpkin in half, scoop the seeds out (save for roasting later), and chop into mouth sized chunks. Dice the onion up, and remove the stalk and thicker part of the rib from the chard leaves and dice up the stalk. Stick the leaves to the side.
Place all the chopped up stuff onto a baking sheet, drizzle with a little bit of oil, dump on some cumin and sprinkle with salt and pepper then toss it all around.
A fall roast ready for the oven.
Once veggies are in oven roasting, make the lentils. Water and lentil in a pot, bring to a boil, turn on low and let cook until lentils are done. Once cooked, sprinkle in a pinch of salt.
Also mince up the garlic and rough chop up the chard leaves.
Fall veggies are looking nice and roasted and tasting all so good. Toss in the minced garlic and chopped chard leaves and pop the baking sheet back into the oven for a little longer just until the garlic and leaves are cooked too.
Now you have your lentils and the cumin roasted pan of goodness. If you have a lime, cut that up too because it will make this all just perfect. Perfect I tell you.
Here it is. A bowl of red lentils, piled high with cumin roasted pumpkin and chard with a fresh squeeze of lime. Once you aat a few bites, tell me. Best fall dish ever, right!?!
Have a fantastic fall weekend.
-C
serve 2-3
1 pie pumpkin
1 bunch of Swiss chard (between 5-6 large stalks, more if the stalks are small)
1 yellow onion
2-3 cloves garlic
1 cup died red lentils
3 cups water
2 tablespoons cumin
A lime (optional)
salt and pepper
olive oil
Preheat oven to 400
Start by cutting pumpkin in half and removing seeds, (place seeds aside for later to roast), then cut the pumpkin into inch or so cubes. Grab the chard, remove the stalks and ribs from the leaves, place leaves to the side, and dice the stalks up. Dice onion into medium sized chunks and place all of what you have just chopped on a baking sheet. Drizzle a teaspoon or two of oil all over. Spinkle on the cumin and a pinch of salt and pepper and toss around. Evenly distribute the veggies on the pan and stick into the oven to roast, for about 25 minutes, or until the pumpkin and chard stalks are fork tender. In the meantime rough chop the leaves and mince the garlic. When the pumpkin and chard are just about done, remove pan from oven and toss in the garlic and leaves. Place pan back into oven for another 8-10 minutes or until the leaves have cooked. Remove from oven.
While the veggies are roasting, make the lentils. Place the water and lentils into a medium sized pot and bring to a boil. Once boiling, turn down to low, giving it a stir ever few minutes until lentils are soft.Once cooked, remove from heat and season with pinch of salt salt.
When the lentils are cooked and the veggies are roasted, it’s time to eat. Spoon lentils into a bowl and top with roasted veggies. Season with more salt and pepper if needed and cut up lime (optional) and squeeze juice all over. Eat right away and save any for later.
I feel like this salad is kind of a summery salad, or better yet, a salad that highlights all the best of what summer has to bring. All the fresh tender dill that is still growing (but not for long) , all the brightly colored and amazing veggies that are being harvested and are nearing the end (bye fresh cucumbers.) This salad might just be my little last hurrah of summer cooking before it is all root veggies and dried herbs and hot and hearty food. And not going to lie and say that I am sad to see summer go because I am so so ready for it to be over, but I will miss all the fresh fresh produce. And I will especially miss all the fresh dill because fresh dill is seriously the best.
Eat up what is left of summer now before it’s too late!
The stuff. Quinoa, a bunch of dill, a cucumber, a pepper, an onion, and some cherry tomatoes. Also a clove of garlic, some salt and pepper, and red wine vinegar.
Mince the garlic, chop the onion, mince the pepper and the cucumber, half the tomatoes, and last but noblest, rough chop the dill.
All that goodness goes into. big bow, along with a sprinkle of salt and pepper, and the vinegar Tossed around and left to meld.
Uncooked quinoa with water turns to cooked quinoa
Quinoa meets the bowl of veggies
And after a good mix, viola!
You got yourself a yummers fresh dill and veggie quinoa salad.
-C
serves 3-5 as a side or 2 as a meal
1 cup uncooked quinoa
2 cups water
I bunch fresh dill (like a 1/3 cup chopped… But use as much as you want)
1/2 a small red onion
1 clove garlic
1 small Persian cucumer
1/2 of a sweet red or yellow pepper
handful or two of cherry tomatoes
4 tablespoons red wine vinegar
salt and pepper to taste
Start by cooking the quinoa. Place the water and the uncooked quinoa into a medium sized pot. Place on high heat until sorts to boil, then reduce heat to a simmer and place lid on the pot. Let cook for about 15 minutes, checking at 10 minutes, to see if all the water has absorbed. When it has, remove from heat and let sit for a few more minutes then fluff with a fork.
While the quinoa id cooking, mince the garlic and chop all the veggies into small little pieces. Place into a big bowl. Chop up the fresh dill and toss into bowl too, along with the vinegar and a good sprinkle of salt and pepper. Mix it all around and let sit on the counter for a little so the veggies get nice and vinegary. Once quinoa is cooked and fluffed, dump into the bowl and mix around. Season with more salt and pepper if needed. Eat warm or refrigerate and eat cold. It’s defiantly one of those salads that taste great right away but tastes even better the next day.
The rhubarb is ready and I am ready. There will be rhubarb in everything for weeks. But what to start with? I was debating if I should go classic and make a pie, or maybe savory and make a rhubarb tomato soup (going to make that soup later), or maybe just a big batch of jam to stick on and in everything.. Then I remembered that I had a cookie dream last fall, a dream that I had made almond rhubarb cookie. (that is the extent of my dream memory) And who am I to ignore a cookie dream? So I starting off rhubarb season with cookies.
These cookies are all sorts of good. They have oats, almonds, flax, and a vegetable (because we all know that rhubarb is technically a veggies right?) so right there is a good enough excuse to make them. And to eat whenever, including breakfast, because remember, all the good stuff. But don’t let that good stuff fool you. These cookies are just as good, if not better then any other cookie. Soft and chewy. So nutty, sweet but not too, and rhubarb all tart and fantastic cutting in to say hey hey hey. These are springtime, any time, cookie time cookies. Dream cookies that are now reality cookies.
Let the rhubarb begin!
The stuff. Almonds, oats and rhubarb. Brown sugar, vegan butter, a flax egg, cinnamon, baking powder, vanilla and salt.
First we need to turn the oats into flour so blend them in a food processor until that happens
Next up are the almonds. These you want to pulse for about 2-3 minutes they become more of an almond meal the flour. Don’t over blend or else you might end up with almond butter.
Next up. Sugar, vegan butter, cinnamon, vanilla, ans flax egg all go into a big bowl.
Mix well until all combined and incorporated.
Now add in the oat flour, almond meal, cinnamon, salt, and baking powder.
Stir it up and there you go.. but the rhubarb!
Remove the leave from rhubarb if you haven’t already. They will kill you!(or make you violently ill). Chop the rhubarb stalks into small pieces that are roughly the same size as chocolate chip. Some chunks can be a little bit bigger, but you don’t want the piece too big or else you will end up with soggy cookies.
Rhubarb goes into cookie batter Mix it all in.
Scoop out dough onto baking sheet and give them all a good pat to flatten them down a good bit. Place them into the oven for 17-22 minutes to bake. until nice deep golden brown.
Golden brown and baked all nice. Look at those rhubarb chunks. So pretty.
Cookies out on a wire rack to cool and firm up a bit.
So now you eat yourself a cookie. Or two.
-C
makes 18-22 cookies depending on size
1 1/2 cups raw almonds
1 1/2 cups old fashion oats (gluten free if needed)
1/3 cup vegan butter room temperature
1 flax or chia egg (1 tablespoon ground seed and 3 tablespoon water)
1 teaspoon baking soda
1 teaspoon salt
1 teaspoon vanilla extract
1 tablespoon cinnamon
2-3 stalks rhubarb (about 1 1/2 cups chopped)
Preheat oven to 350
Add oats to a food processor and blend until the oats turn into flour, which will take about 2 minutes. Dump the now flour into a bowl. Add almonds to the food processor and pulse for 2-3 minutes until the almonds turn into fine meal. Dump into the bowl with oats.
In a large bowl mix together the vegan butter, brown sugar, flax egg, and vanilla until fully incorporated. Add in the oat and almond flours, cinnamon, salt, and baking powder and mix until la dough forms.
Grab rhubarb and chop into little pieces that are roughly the size of a chocolate chip. Measure out 1 1/2 cups and dump into batter. Mix until incorporated.
Scoop out cookies onto a parchment lined baking sheet and flatten each cookie to aboutt 1/2 inch thick. Place into preheated oven. and bake for 17-22 minutes (rotate after 12) or until a nice golden brown on top and bottom. (Depending on your baking sheet and stove, it could take a few minutes longer, just keep your eyes on the cookies!) Once bakes, place on a wire rack to cool. These cookies are very fragile until they cool off so be careful handling them.
Let cool and eat. And yes, these are 100% exceptable to eat as a breakfast cookie.
Left over cookies should be stored in an airtight container at room tempature for 2-3 day, longer in the fridge, and can be frozen .
And eat yourself a cookie. Or two.
Cookie anecdote. I placed a cookie sheet full of cookies back into a cold oven to store while I was cleaning up the kitchen. And left them there and kind of forgot about they, And then I cranked the oven on to make dinner and a few minutes later smelled something burning. OH fuck… the cookies! I pulled them out just in time to see that I had completely burnt the bottoms. SO PISSED ( I might have raged cried a little). But you know what I did? I cut all the bunt bottoms off and placed the crumbles up un-burnt bits onto a bowl. The mr came home and ate the bowl of crumble and was happy as a clam. And lucky had left out half of the cookies l on the counter so not all were lost. But lessons learned. Cookies crumbles are just as good as whole cookies and always check the oven before turning it on. There might be cookies in there!!!
The mr has a soft spot for tortilla chips. He doesn’t get chips often, but when he does it is usually the super fried, super salty, in a plastic bag, tortilla chips. And I am ok with that because it is not often and the dude deserves chips when he wants them. But I hate how crappy they are for him, especially all the salt. So much salt that I can smell it in my mouth (yes, I said that right). So, as with everything else we eat in the house, I now make chips from scratch. (Slowly I have eliminated just about everything that is pre packaged and started making it myself. I think it’s pretty much just the dried pasta and the mr’s yogurt and cheese that I haven’t gotten to.Yet.) This way he can eat his chips and I don’t have to sit there tasting the smell and thinking about the crap that he is eating. I know I say this a lot, but lets just take a minute here and acknowledge how I really am the best girlfriend ever.
Ok, now about these chips. I have made plan tortilla chips a few times before and figured it was time for a twist. In come black beans. Why, because I was pretty sure beans were going to be awesome, and lo and behold, I was completely right. Adding the beans take little to no more effort then making the chips without, and bonus here, more fiber and protein and good stuff going into a chip. Then they are lightly oil, lightly salted, and eaten without any guilt because I made them and they are the best. Seriously, the mr thinks they are amazing and doesn’t miss those pre package ones a bit. And sure, they might take a little time and minimal effort, but really they are super easy and the time and effort to make them is probably no more then going into a store, waiting in line to pay, and driving home to eat your chips. You can have these chip made in that amount of time. So you might as well just make them.
To the chips.
The stuff. Masa harnia, black beans, water, salt, and a little oil. There should be a lemon or lime here too, but I forgot to stick it into the picture. Oops.
Pretty easy. Add the beans to a food processor and blend untill completely smooth. Add in the masa and pulse then gradually add in water until a dough forms. Stop and feel the dough. If it feels like play dough and comes together into ball easily, then you are good. If it is to wet, add a little more masa, to dry, more water.
Dump the dough onto the counter and form into a ball. Place the doguh into a bowl and cover with a damp closer for 15-30 minutes to let the dough rest.
After the rest, divide the dough into 12 pieces and roll into balls. Place the balls onto a damp cloth and cover while you are making the tortillas so they don’t dry out.
To flatten those balls into tortillas. After doing this a bunch of times, I have a system that works the best for me. I use a large ziplock bag (the plastic is a little thicker and easier to deal with, plus I don’t use plastic wrap), a cutting board, and a rolling pin. Place a dough ball into the center of the bag then take the cutting board and press directly on top, placing all your weight onto it. It gets flat, but not flat enough so take the rolling pin and flatten some more. Then press the rolled out dough with the cutting board one last time. Carefuly remove from bag and place direrely onto a hot dry skillet.
Cook each side 3-4 minutes or until it starts to get a few light brown spots. Once cooked, place on a plate or baking sheet. If I were just making tortillas, I would place then in between a kitchen towel to keep them warm, but because they are destined for chips and don’t care.
Black bean corn tortillas. Hey, you could stop here and make a taco or something if you need to. Feel free to use a tortilla or two before using the rest to make the into chips.
So chips. Grab baking sheets, oil, salt, a knife, and the tortillas. Take a few of the tortillas and oil them. (The easiest way I found to do this is to rub oil on with my hands then rub the oil onto the tortillas. ) Oil 3 at a time, stacked them on top of each other and cut into 8 triangles,
Get as many of the triangles onto a baking sheet as you can, without overlapping. Once all nice and tight, sprinkle the tops with salt and pop them into preheated oven.
Pull the chips out of the oven when they are crispy and done (about 10 minutes) then squeeze a little lemon juice all over the chips. Toss around and pop the pan back into the oven for another minute or two just so the juice doesn’t leave the chips soggy.
Dump cooked chips onto a wire rack to cool. Eat as you work, you deserve it.
Pile chips into a bowl, and serve with some salsa or guacamole or whatever you eat you chips with. They are your chips.
-C
Makes 98 chips, or like a good sized bag worth
2 cups masa harina
1 cup cooked black beans in bean juice
1- 1 1/4 cups warm water
couple teaspoons neutral oil (I used grape seed oil)
2-3 teaspoons salt
A lemon or lime
Beans go into a food processor and blended until completely smooth. Add in the masa and blend, slowly adding 3/4 cups water until a dough starts to forms. Stop and check dough. It should feel like play dough and come together easilty onto a ball. If it feel wet, add in a couple of tablespoons more of the masa. If it is still too dry and crumbly, add in more water until it’s to the right consistnacey. Dump dough onto counter and form in a ball. Place dough in a bowl and cover with a damp towel and let sit for abut 15-30 minutes.
Preheat a skillet on medium high heat on stove.
Once dough has rested, divide into 12 pieces and roll into balls. Place balls onto a damp towel and cover when not working with them. Grab a large ziplock bag, a cutting board, and a rolling pin. Take a dough ball and place in the center of the bag. Press down with the cutting board, placing all your weight on top. It got flat, but not flat enough. Continue to flatten out with the rolling pin until it is about 1/8 inch thick. Press again one last time with the cutting board. Gently remove from bag and place directly onto the hot skillet. Cook each side for 3-4 minutes or until it starts to get a few light brown spot. Place cooked tortilla on a baking sheet or in between a kitchen towel. Repeat until all 12 dough balls are cooked into tortillas.
Preheat oven to 375
Working in 3’s. dump a little oil onto your hand then lightly rub it all over the tortillas. Stack them on top of each other then cut into 8 wedged. Place wedges onto a baking sheet, get as many as you can onto sheet without any overlapping, then sprinkle with salt. to taste. If you have them, use multiple baking sheets. Place in oven for about 10-12 minutes or until the chips are crispy. Remove and sprinkle lemon juice all over the chips. Toss around and place back into oven for a minute or two just until lth lemon juice evaporates. Remove and dump chips onto a wire rack to cool.
Eat chips. Any left over can be placed into a airtight container or bag and will last about 3-4 days.


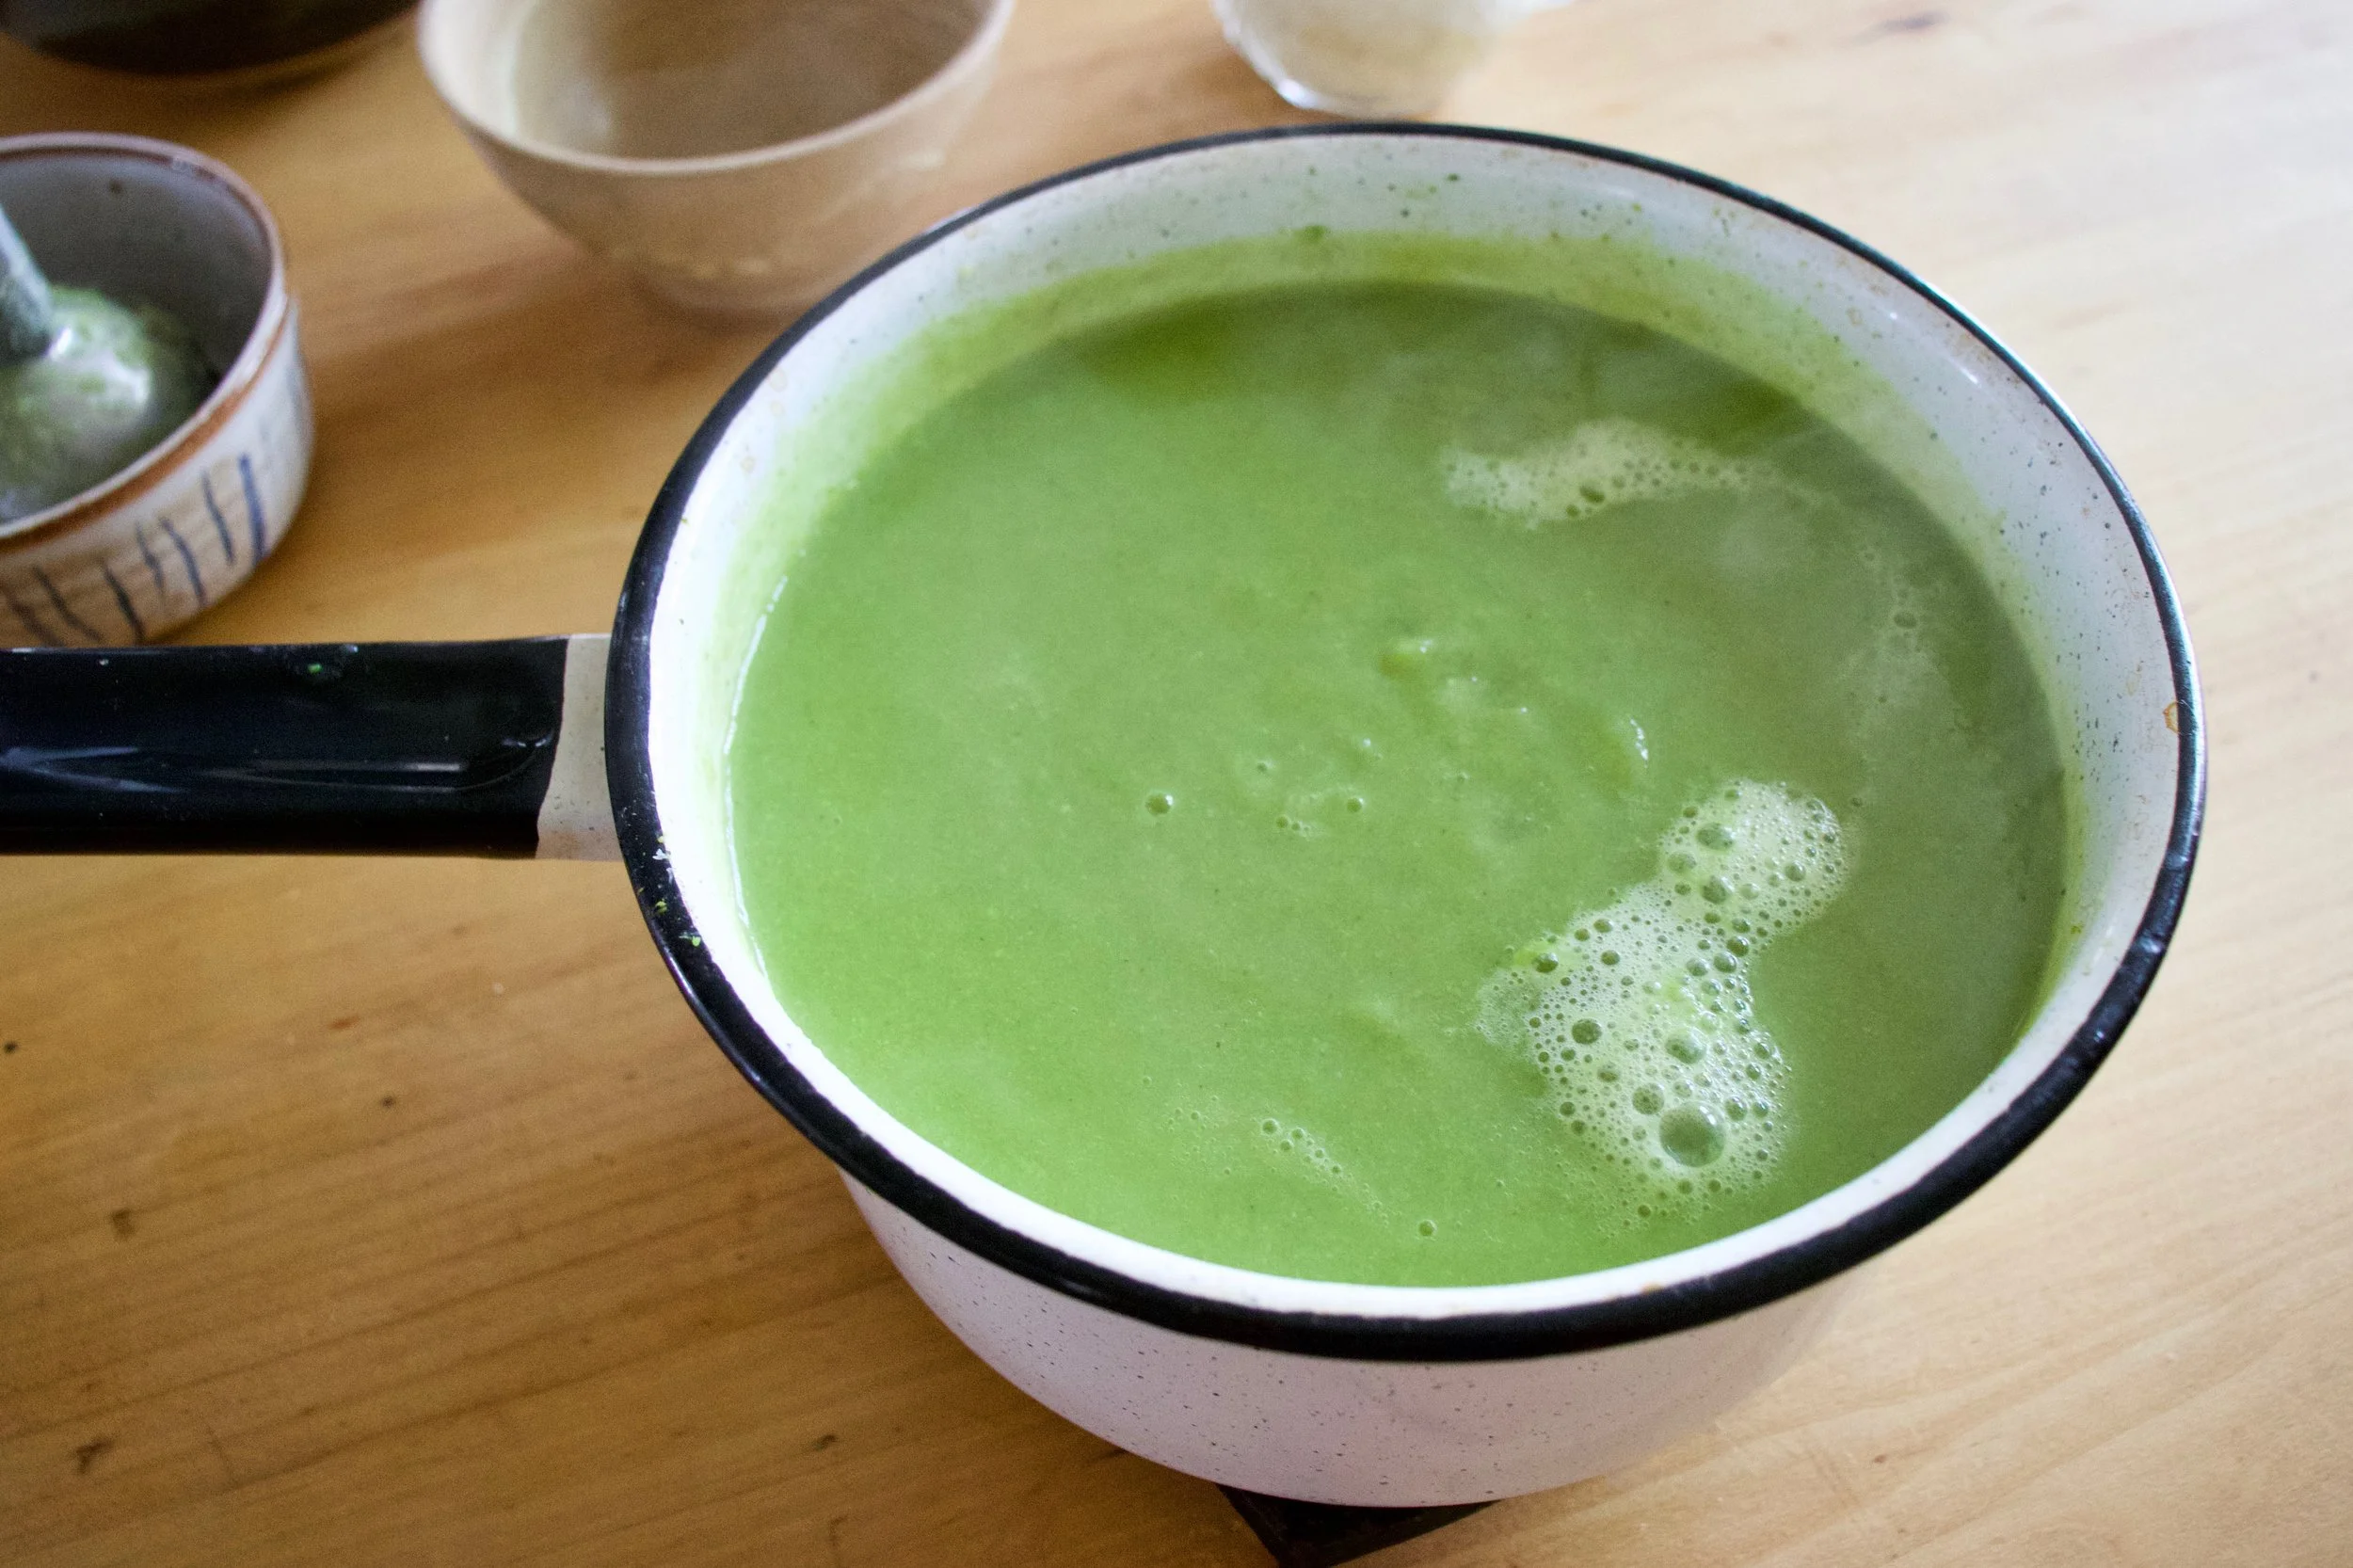
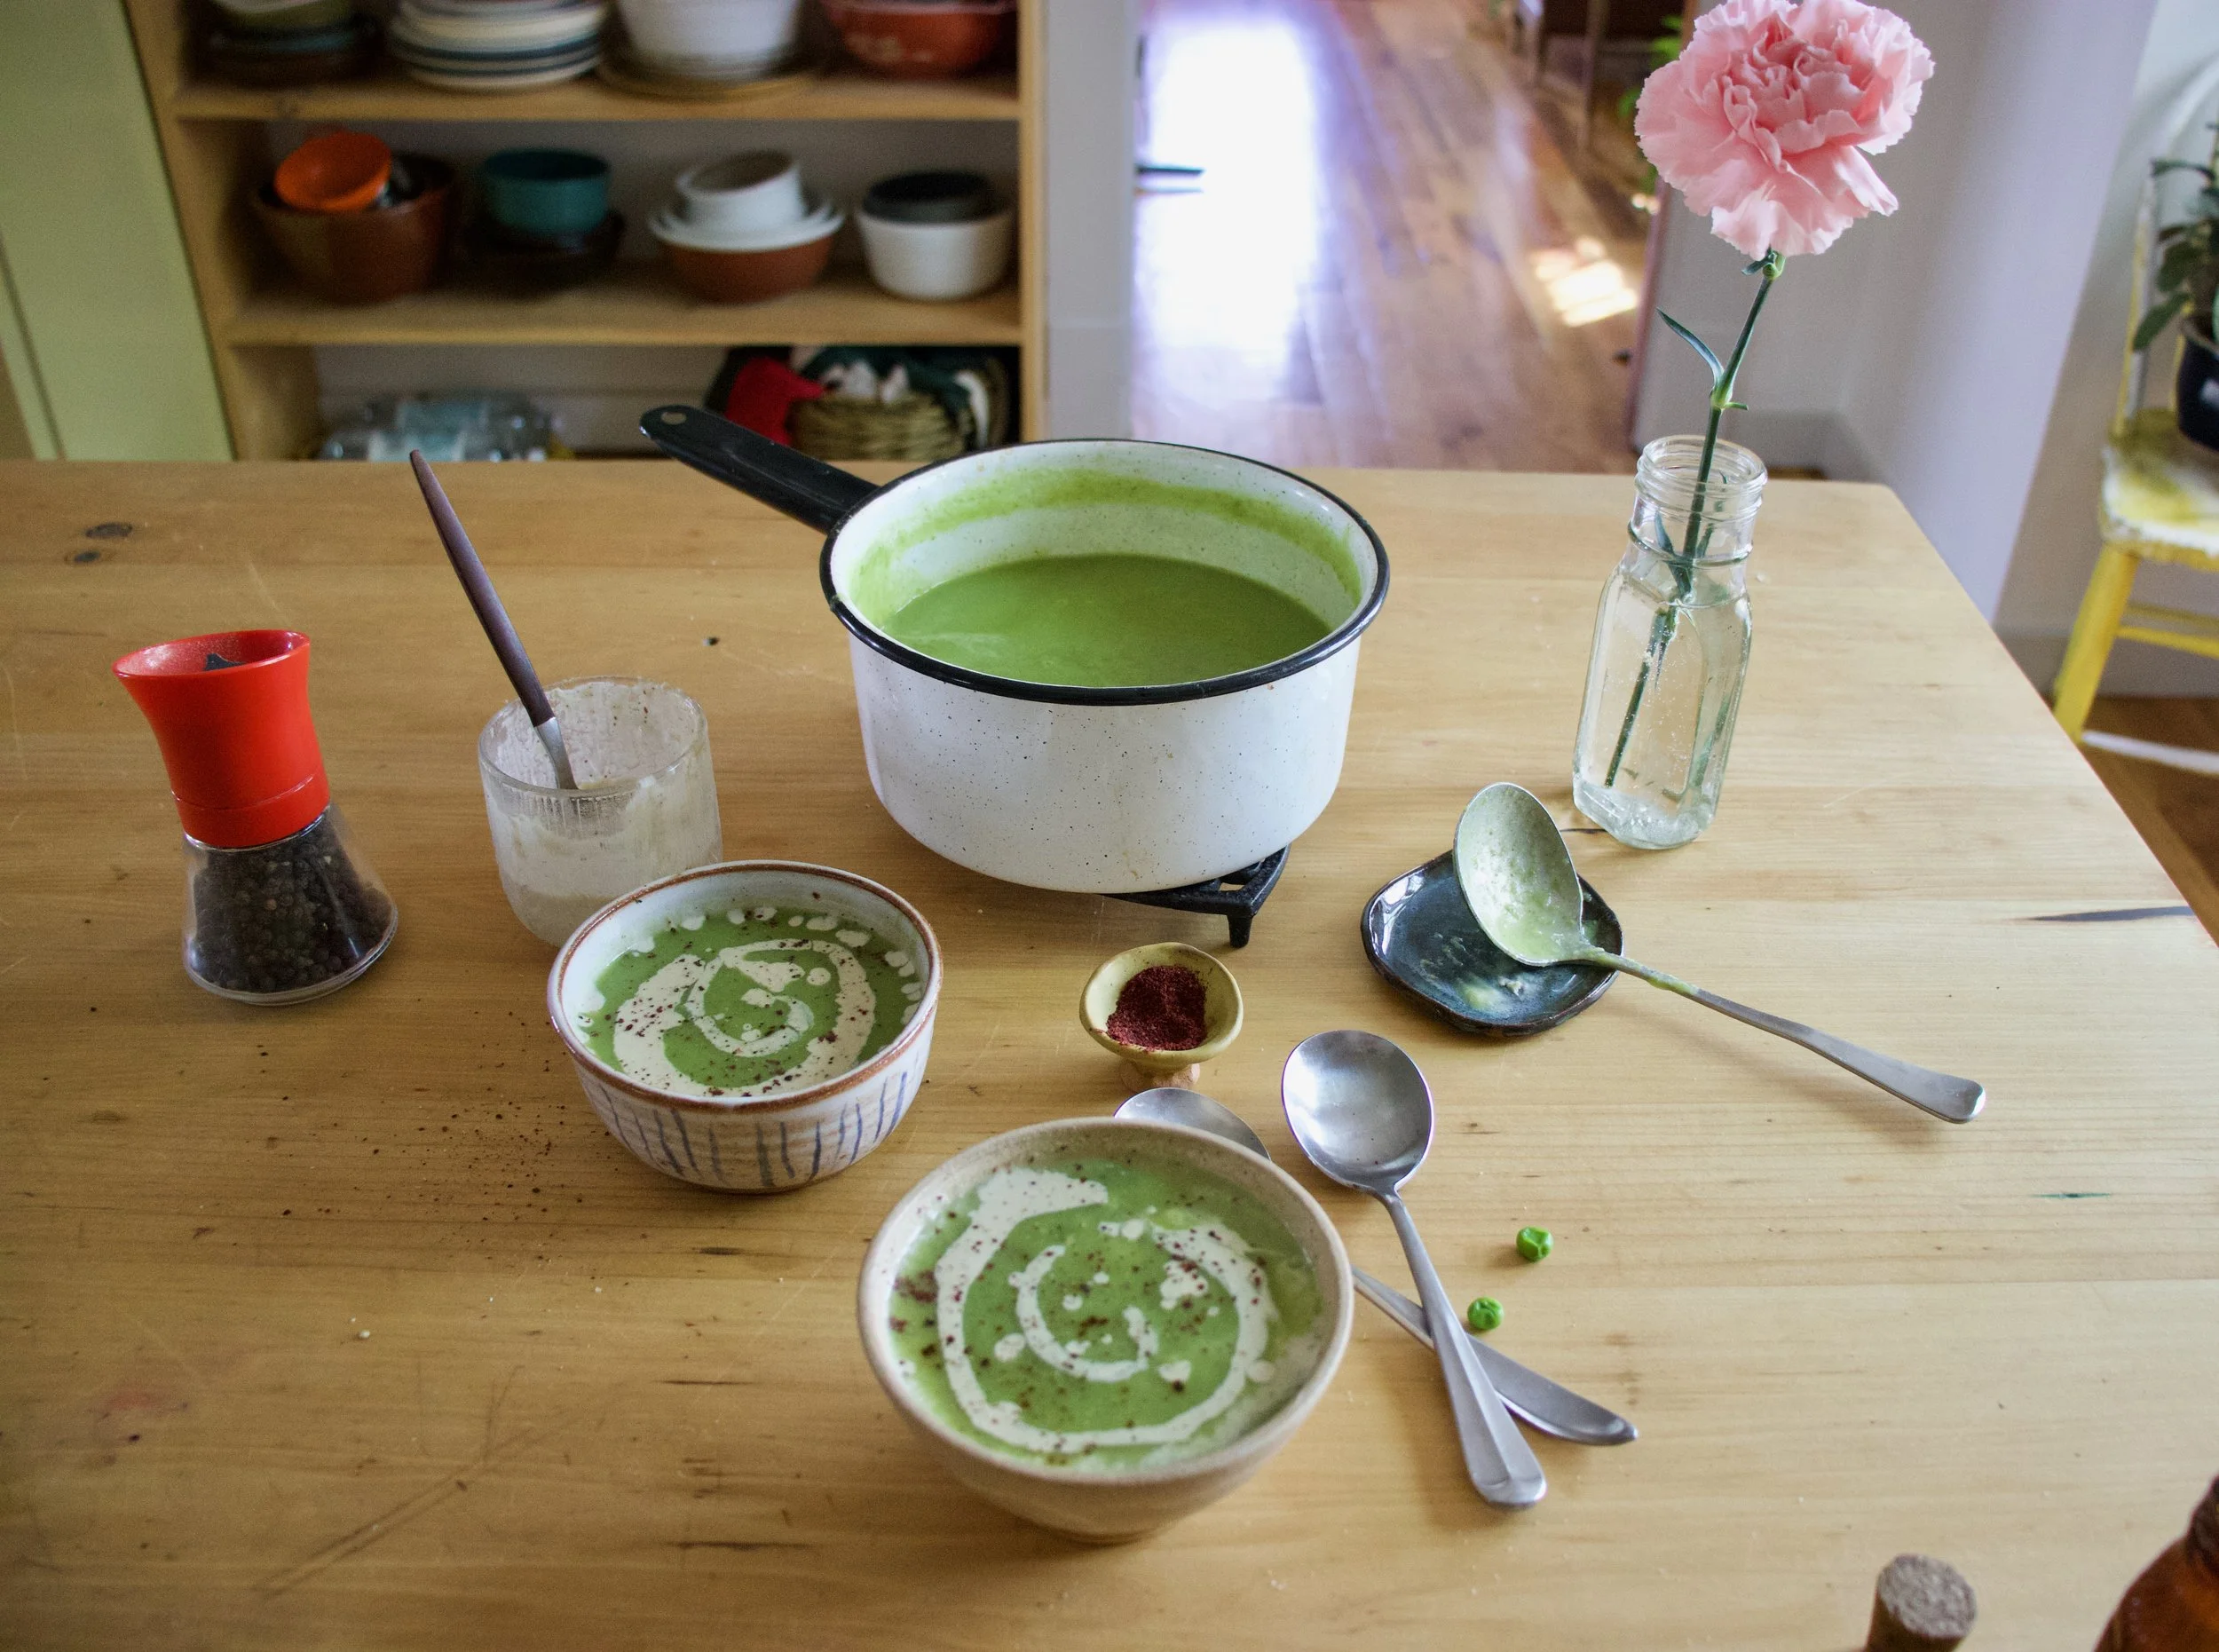
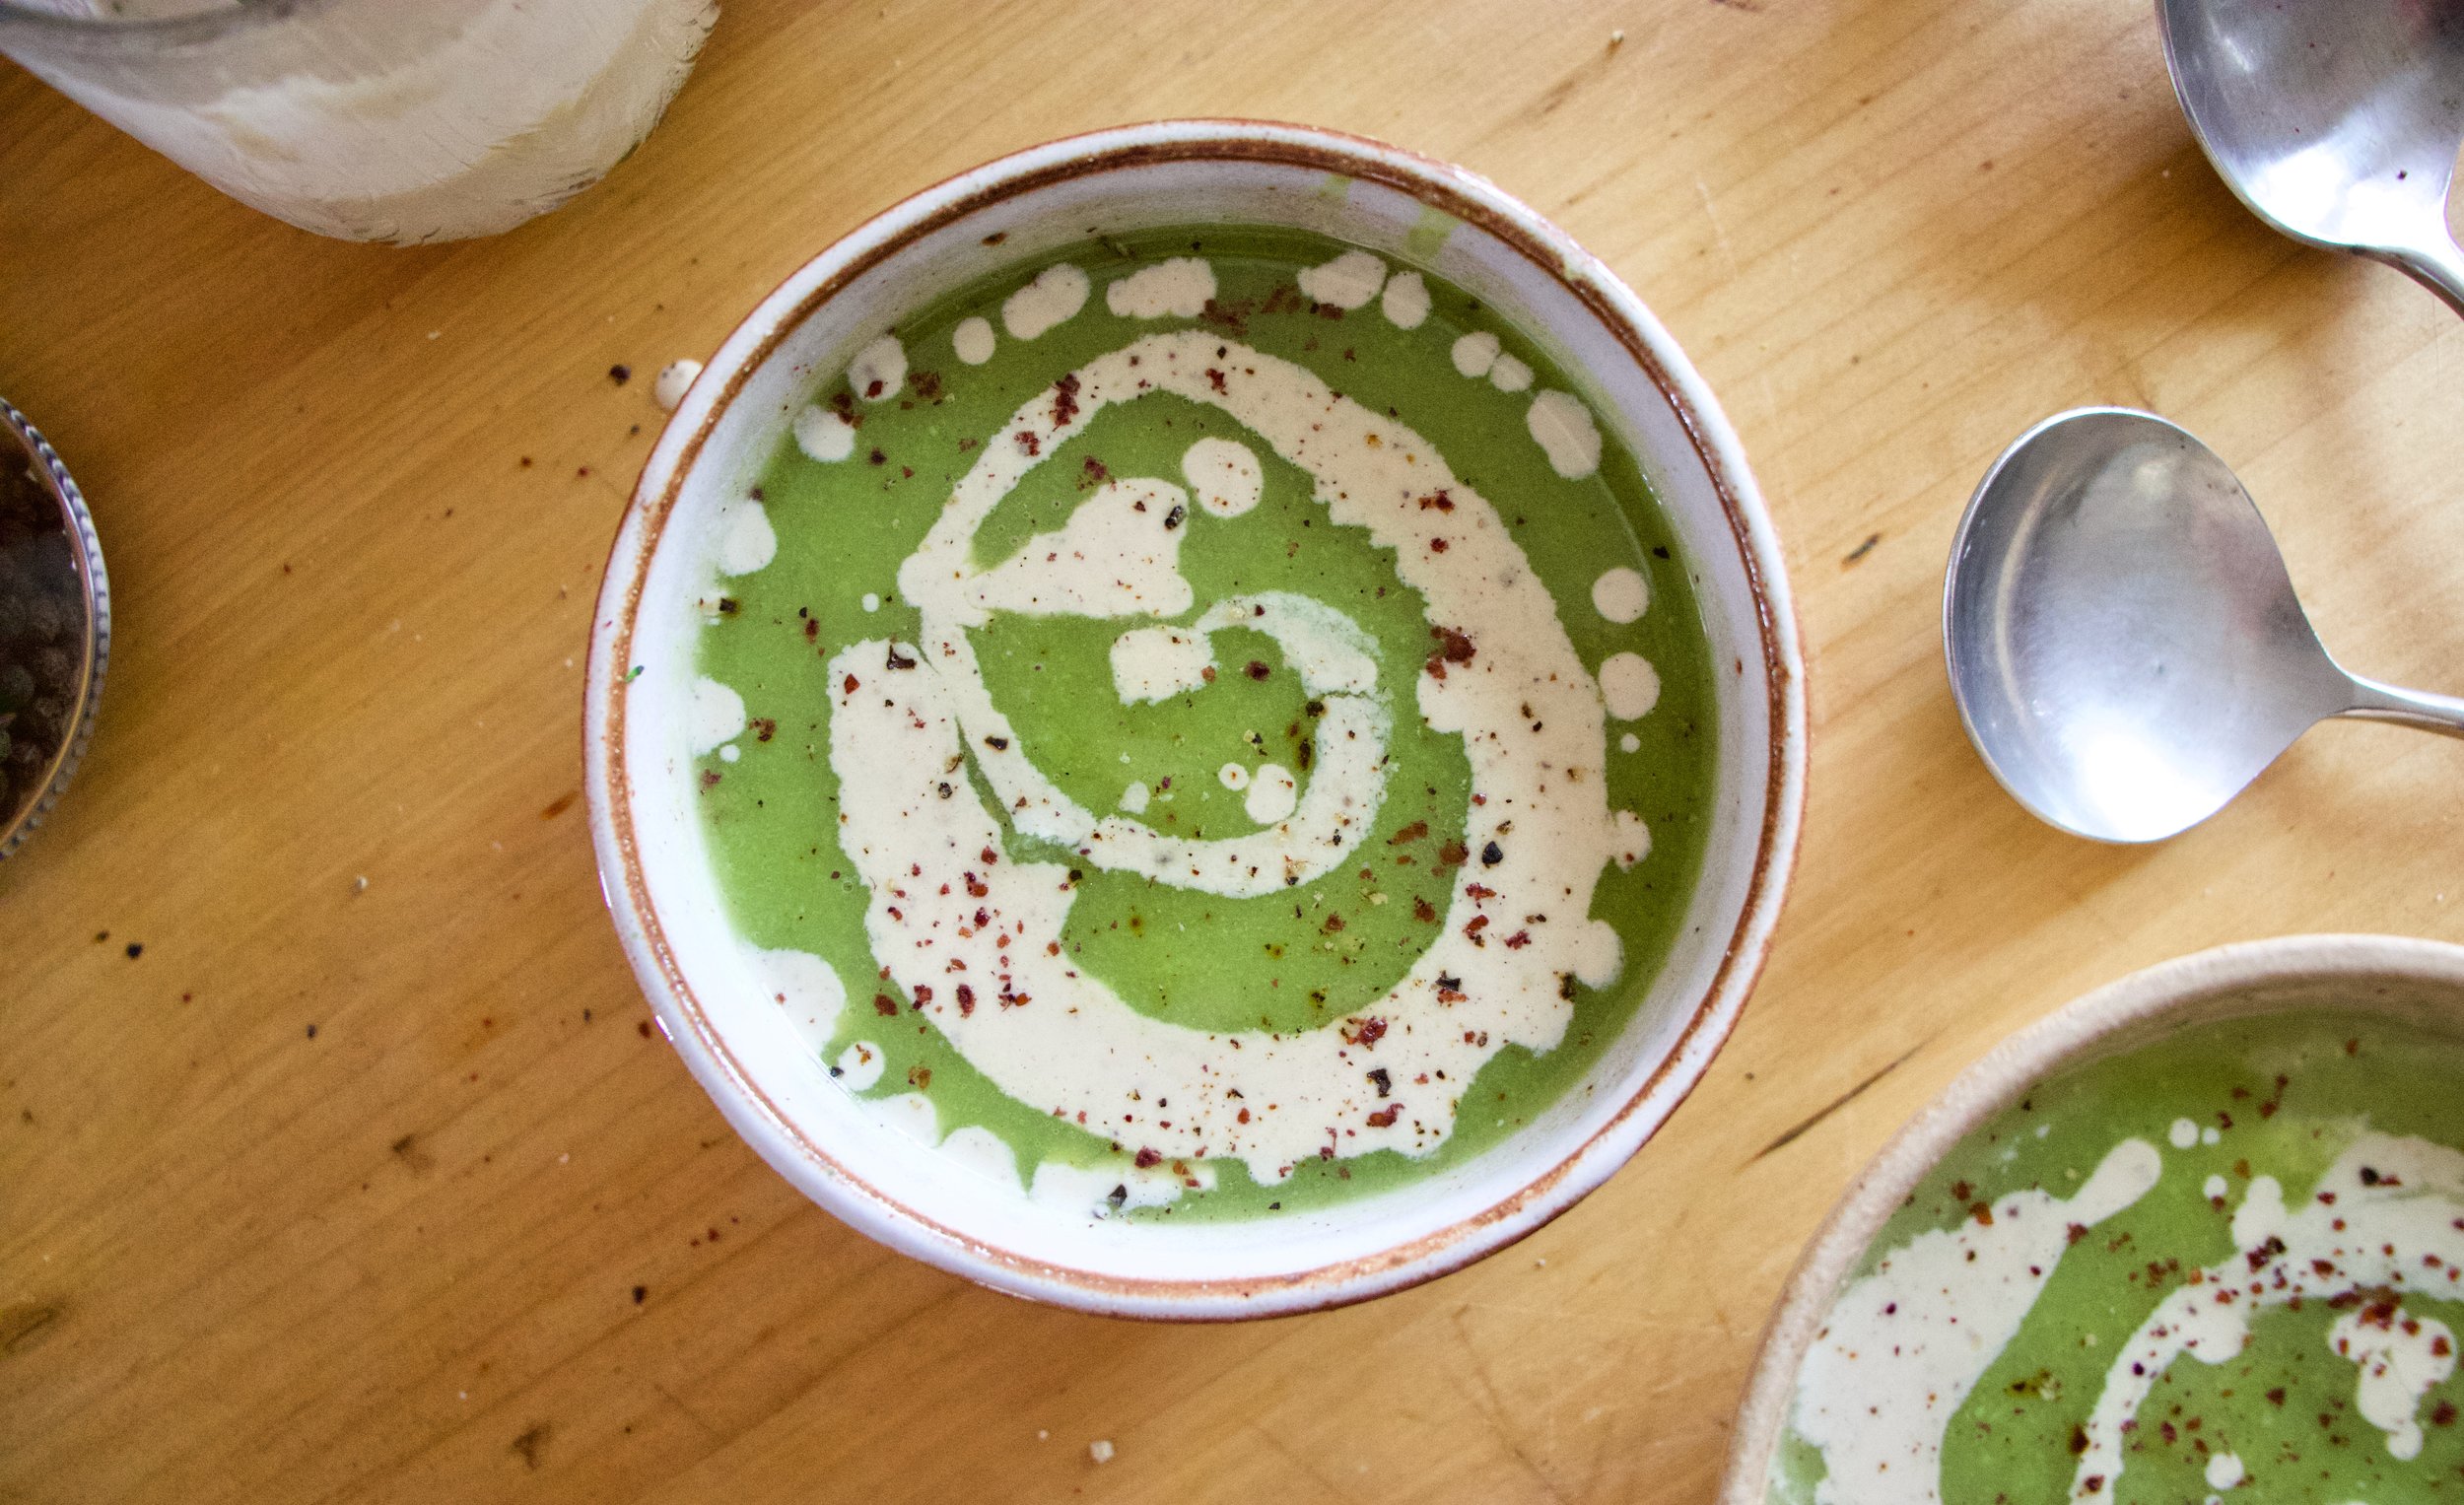
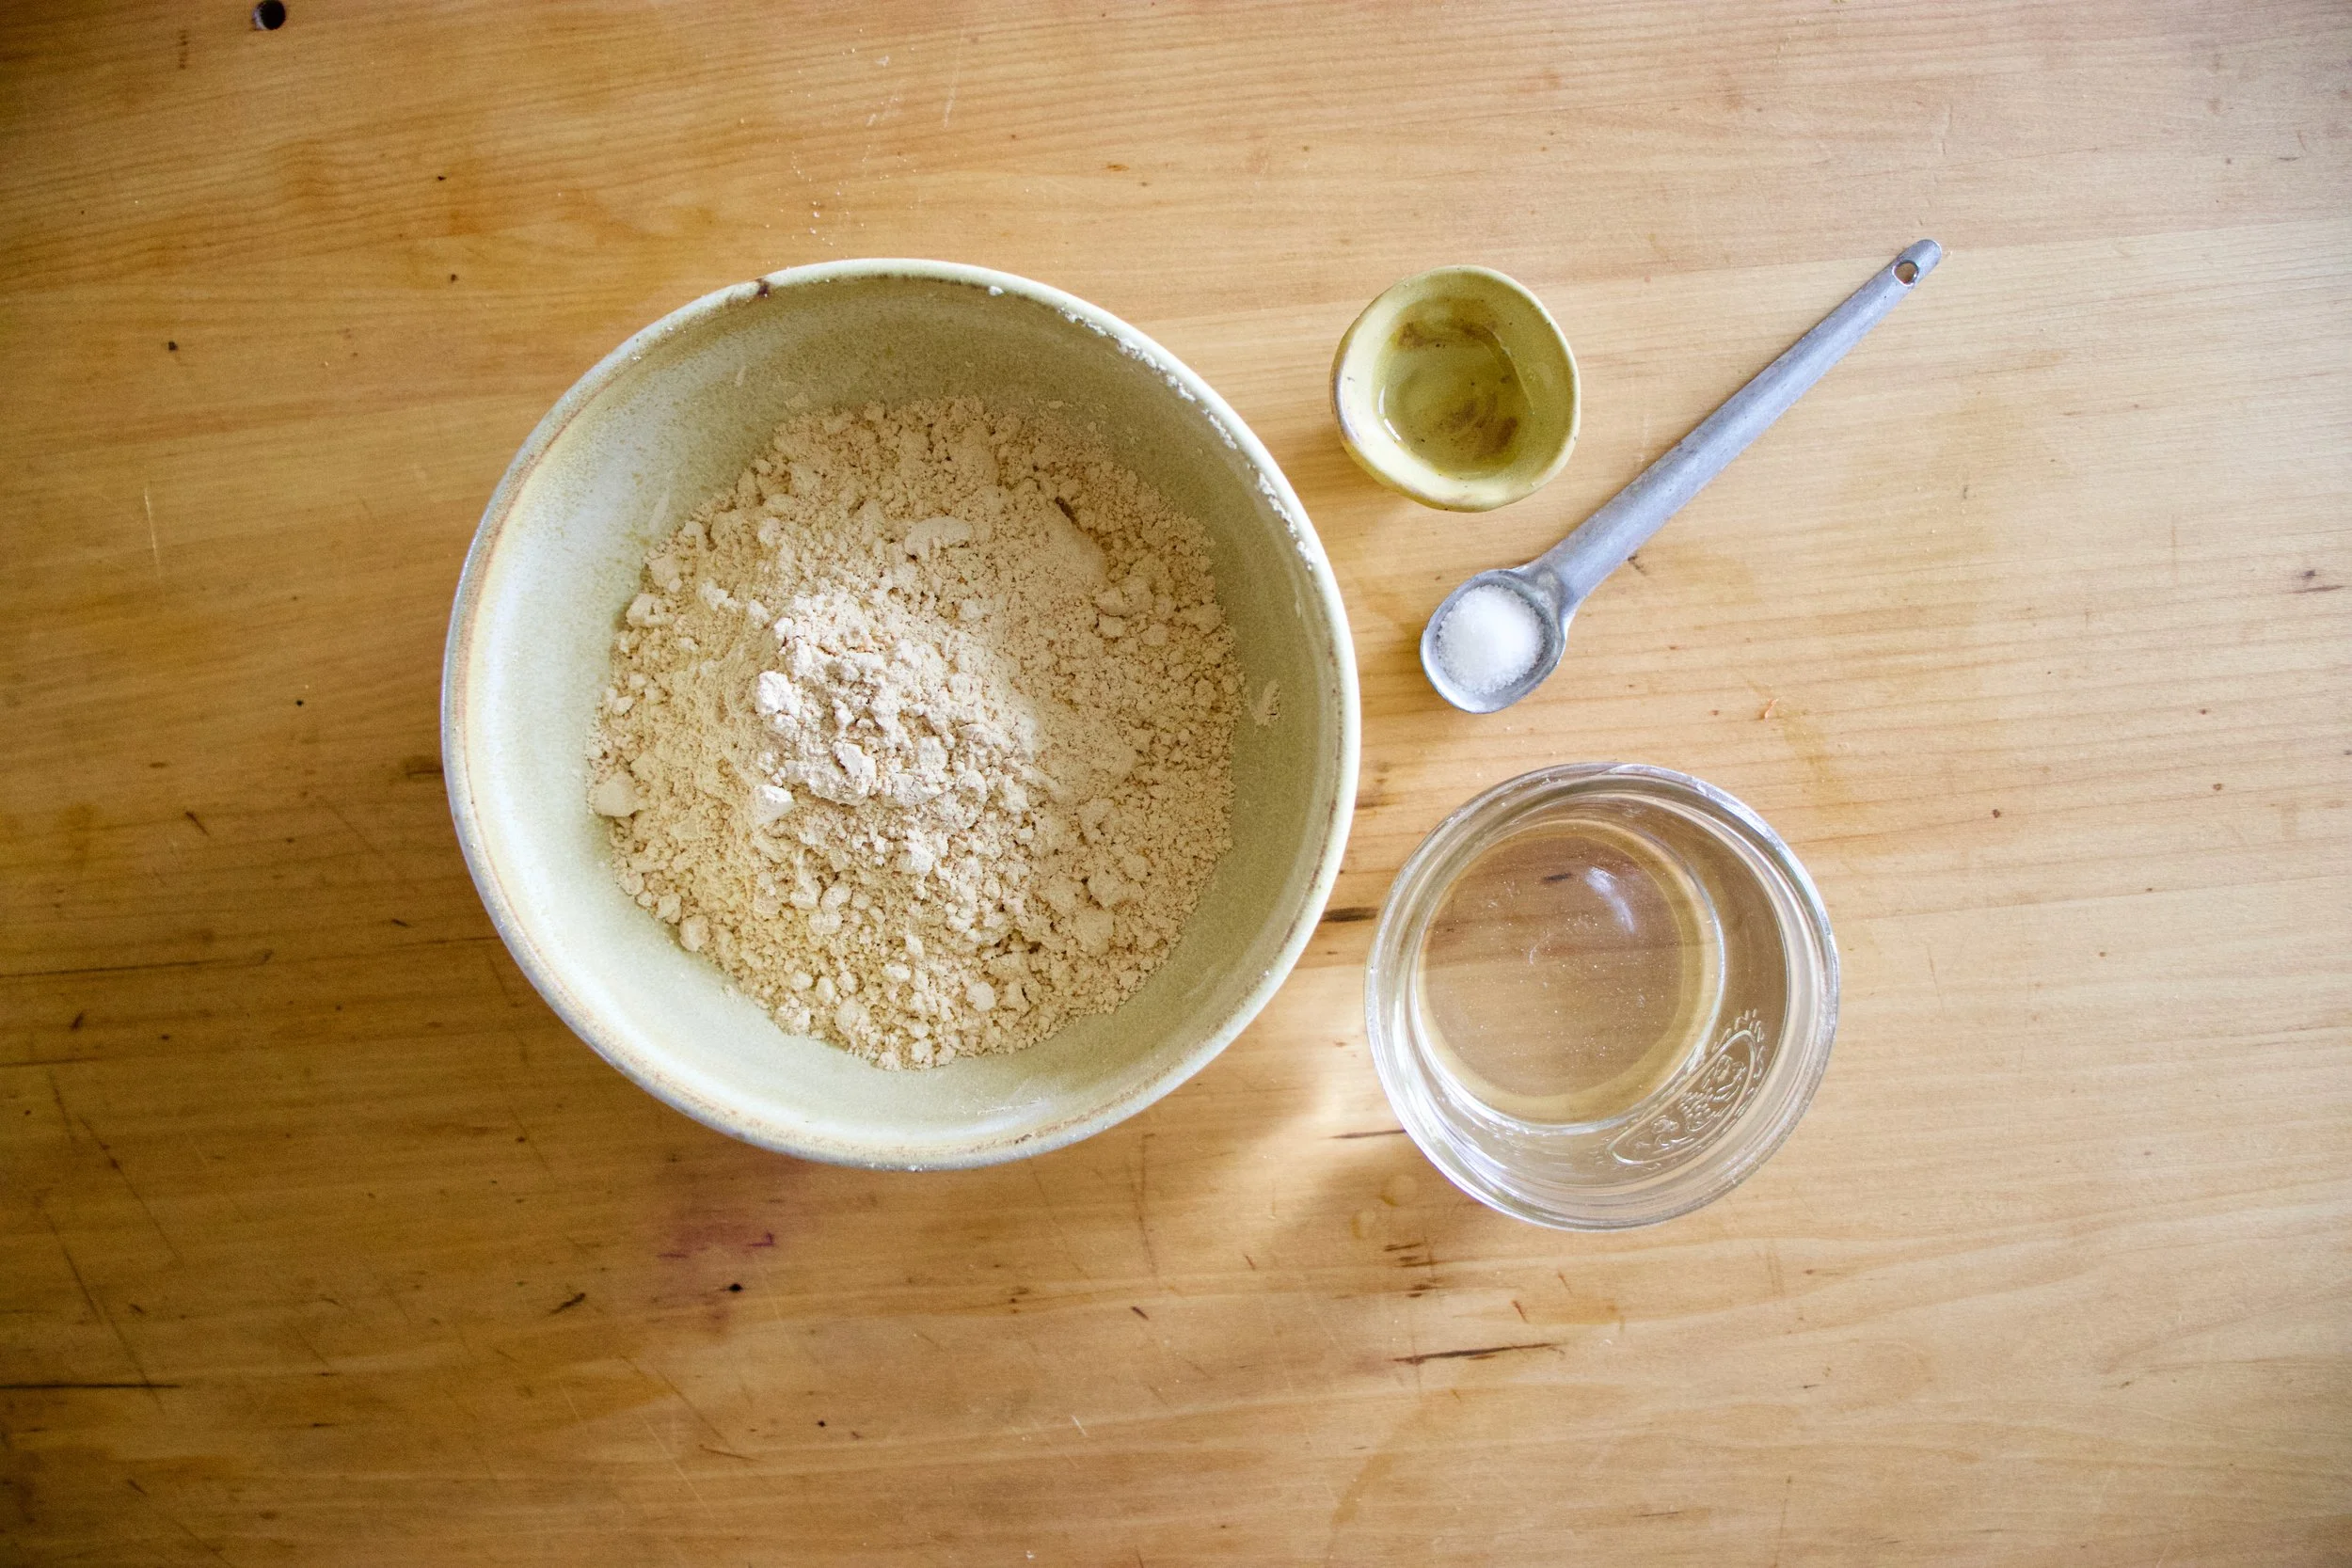

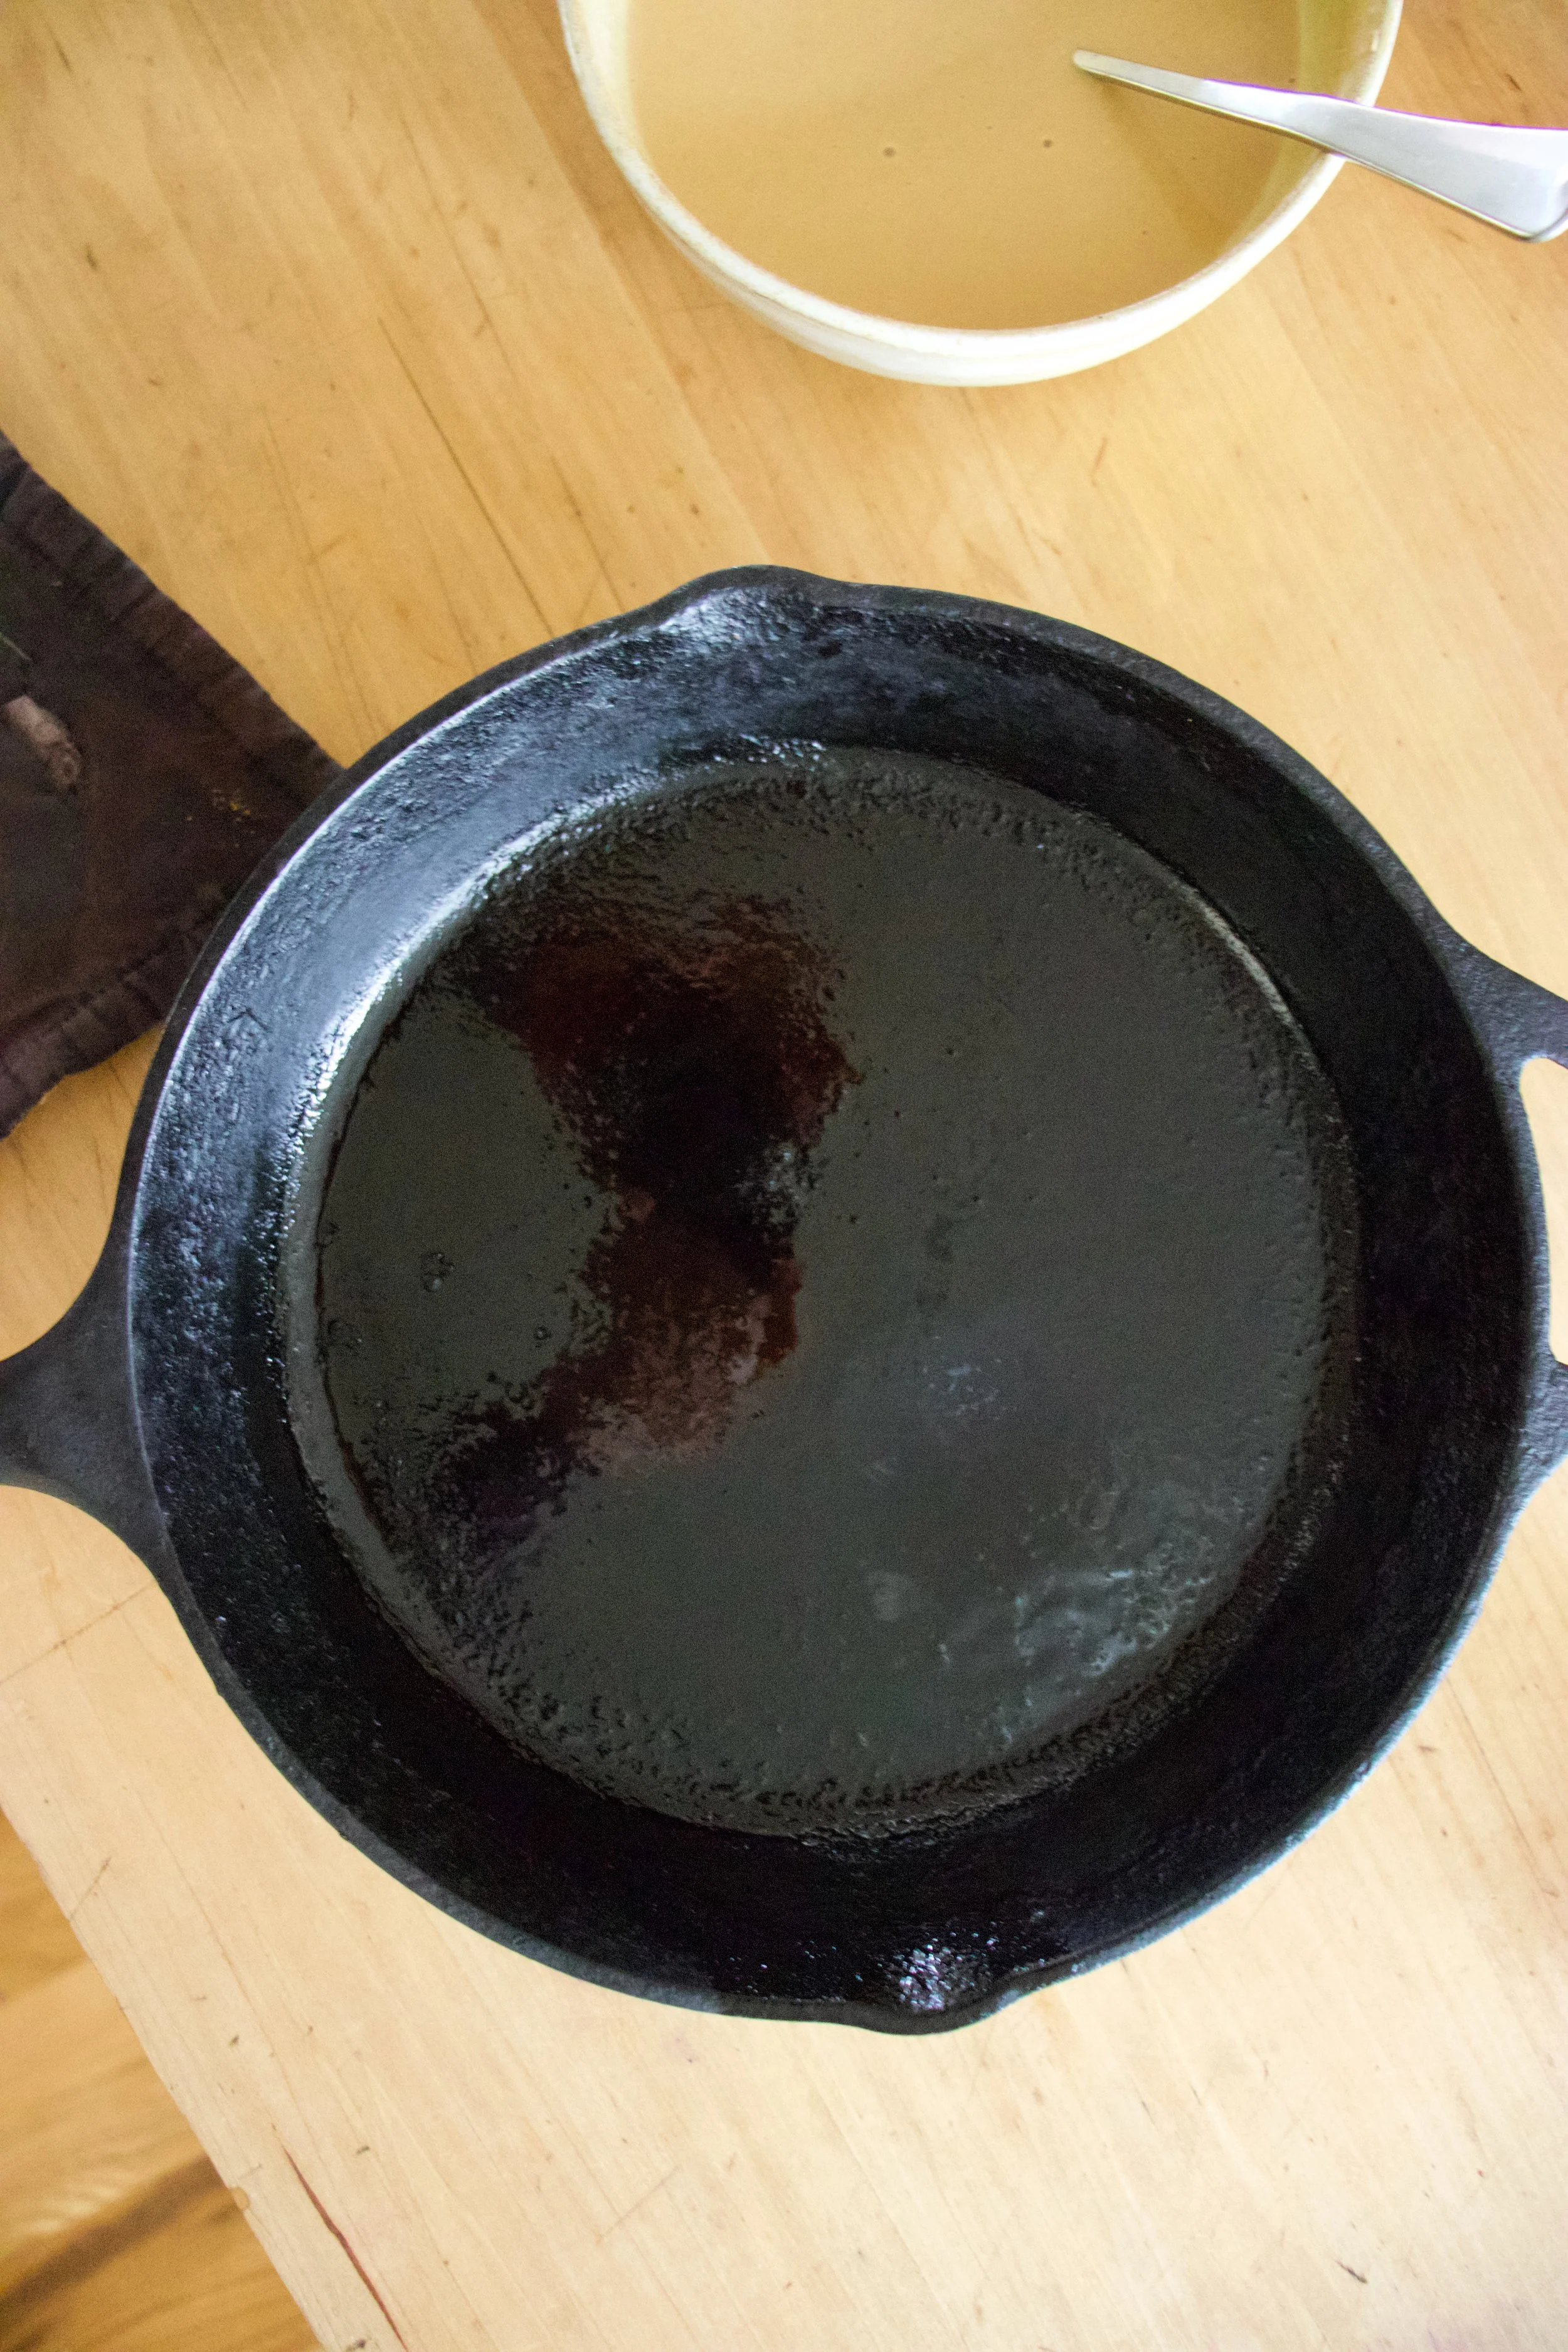
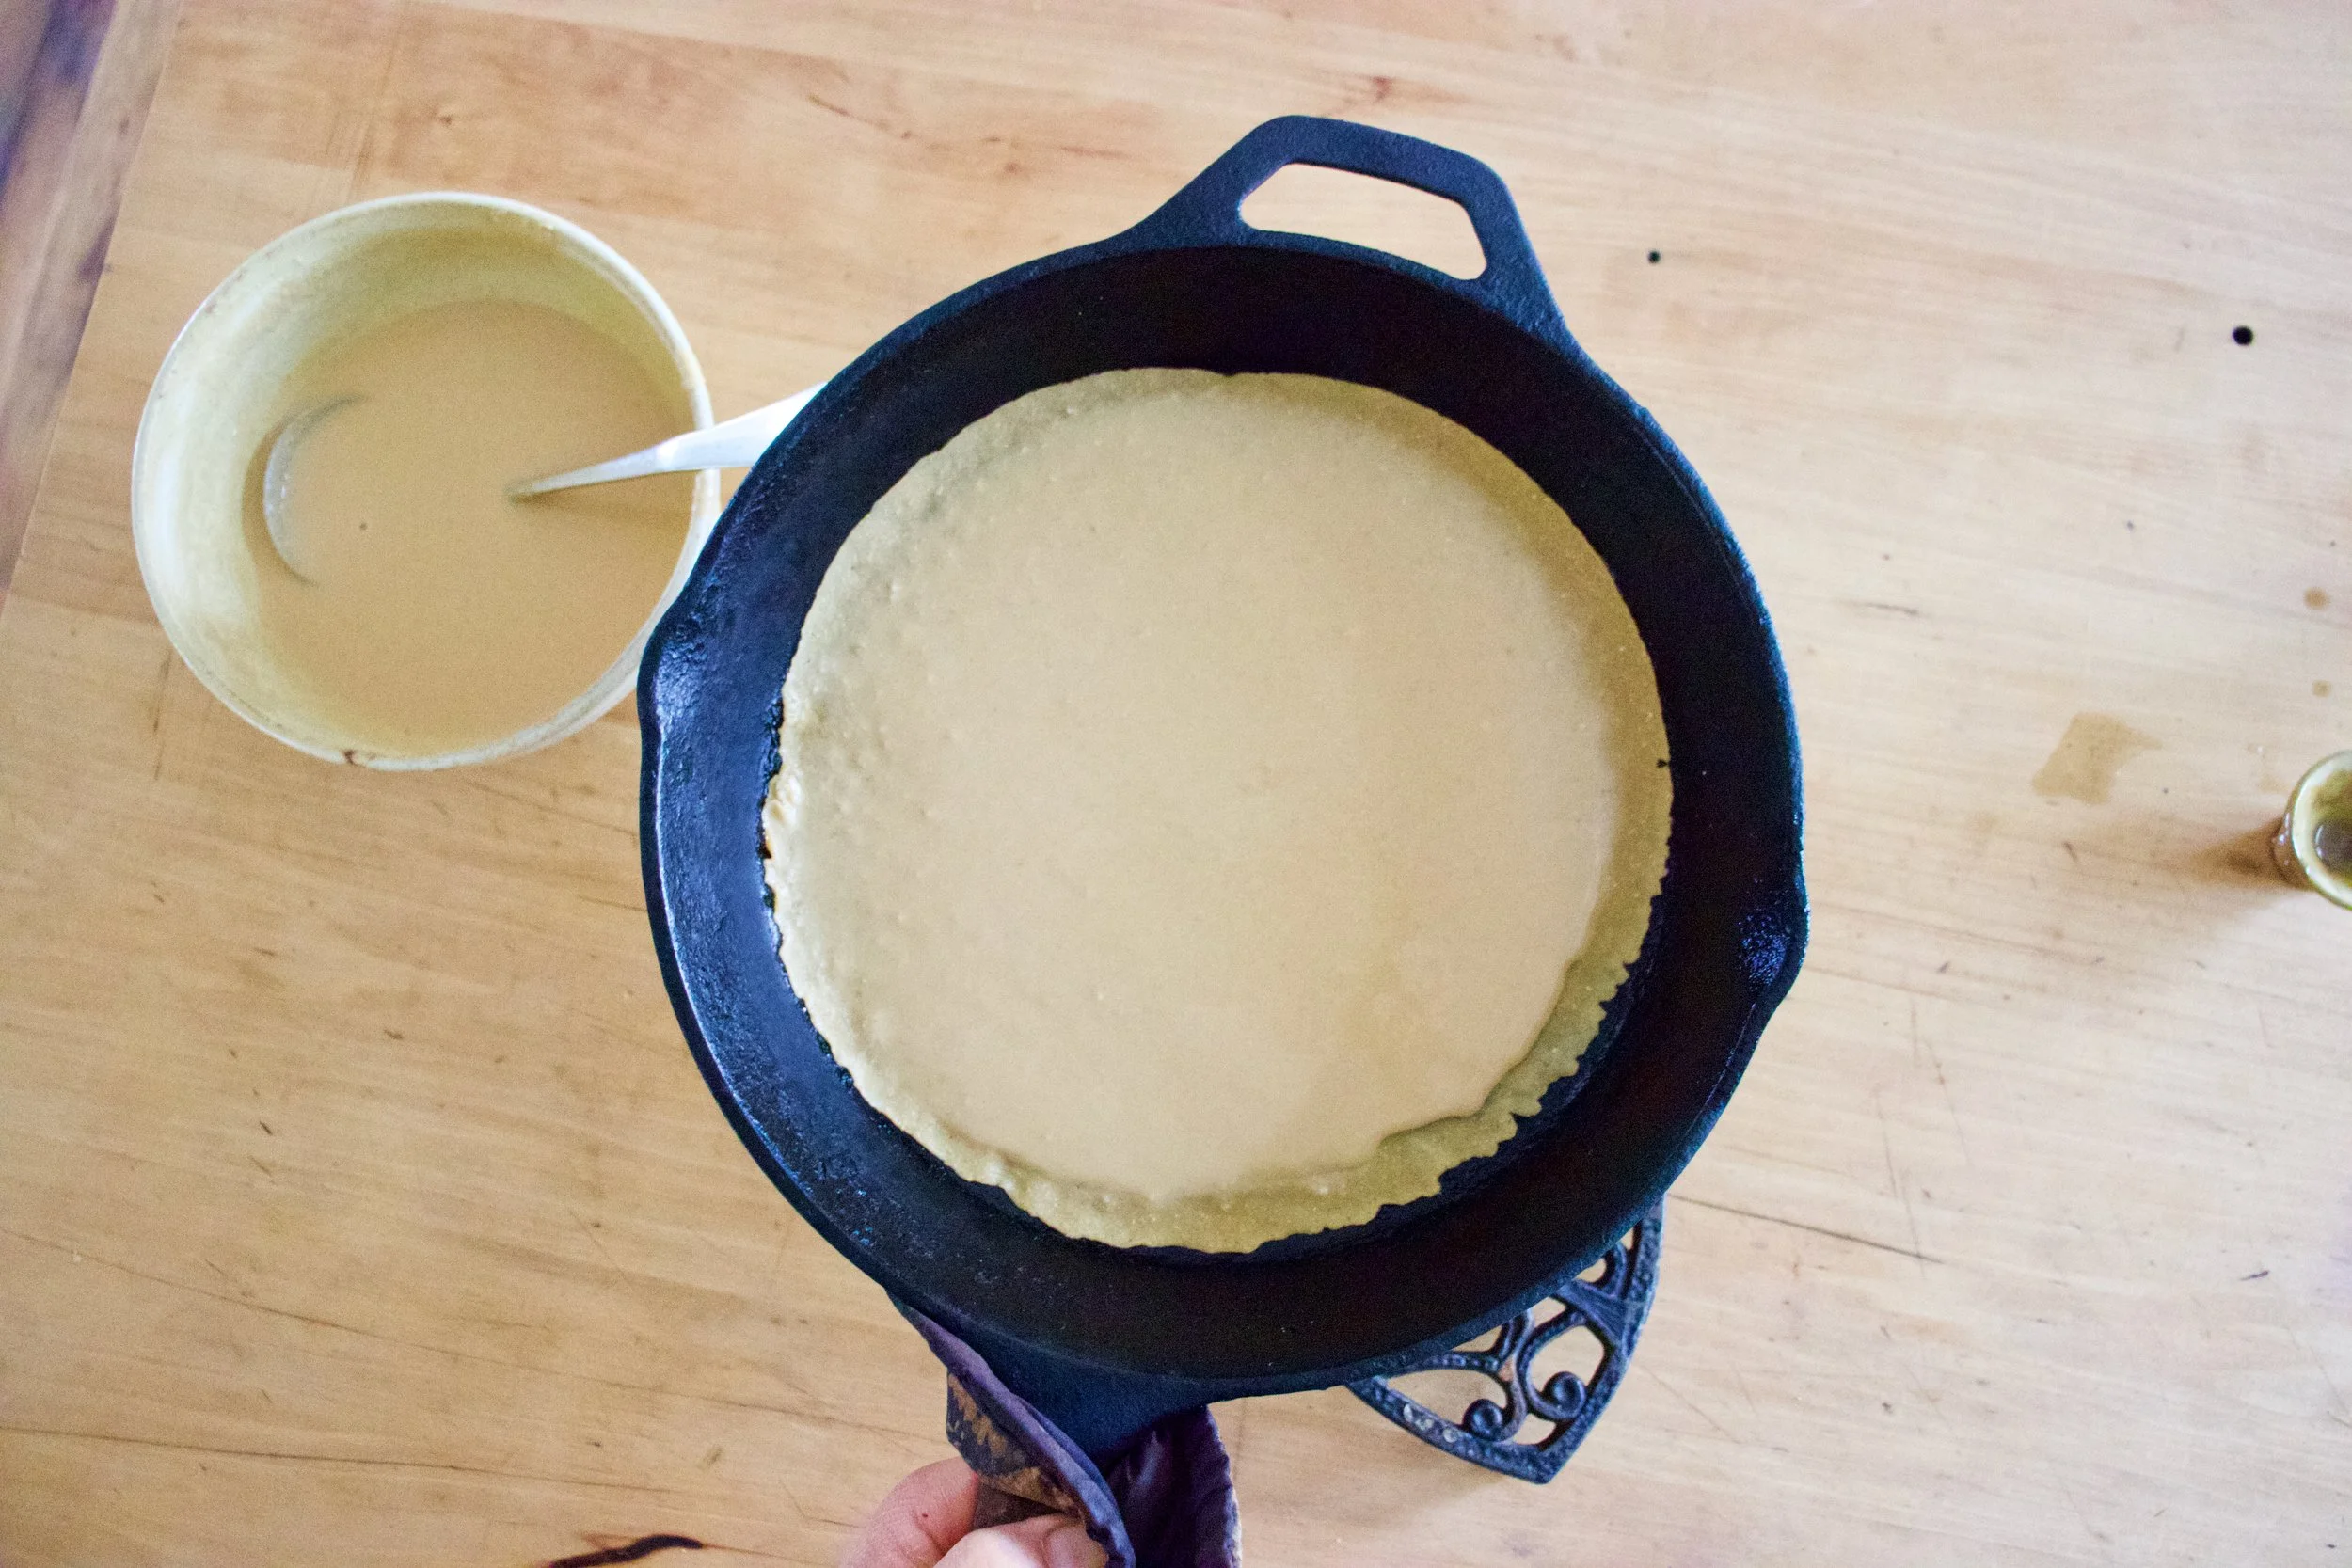
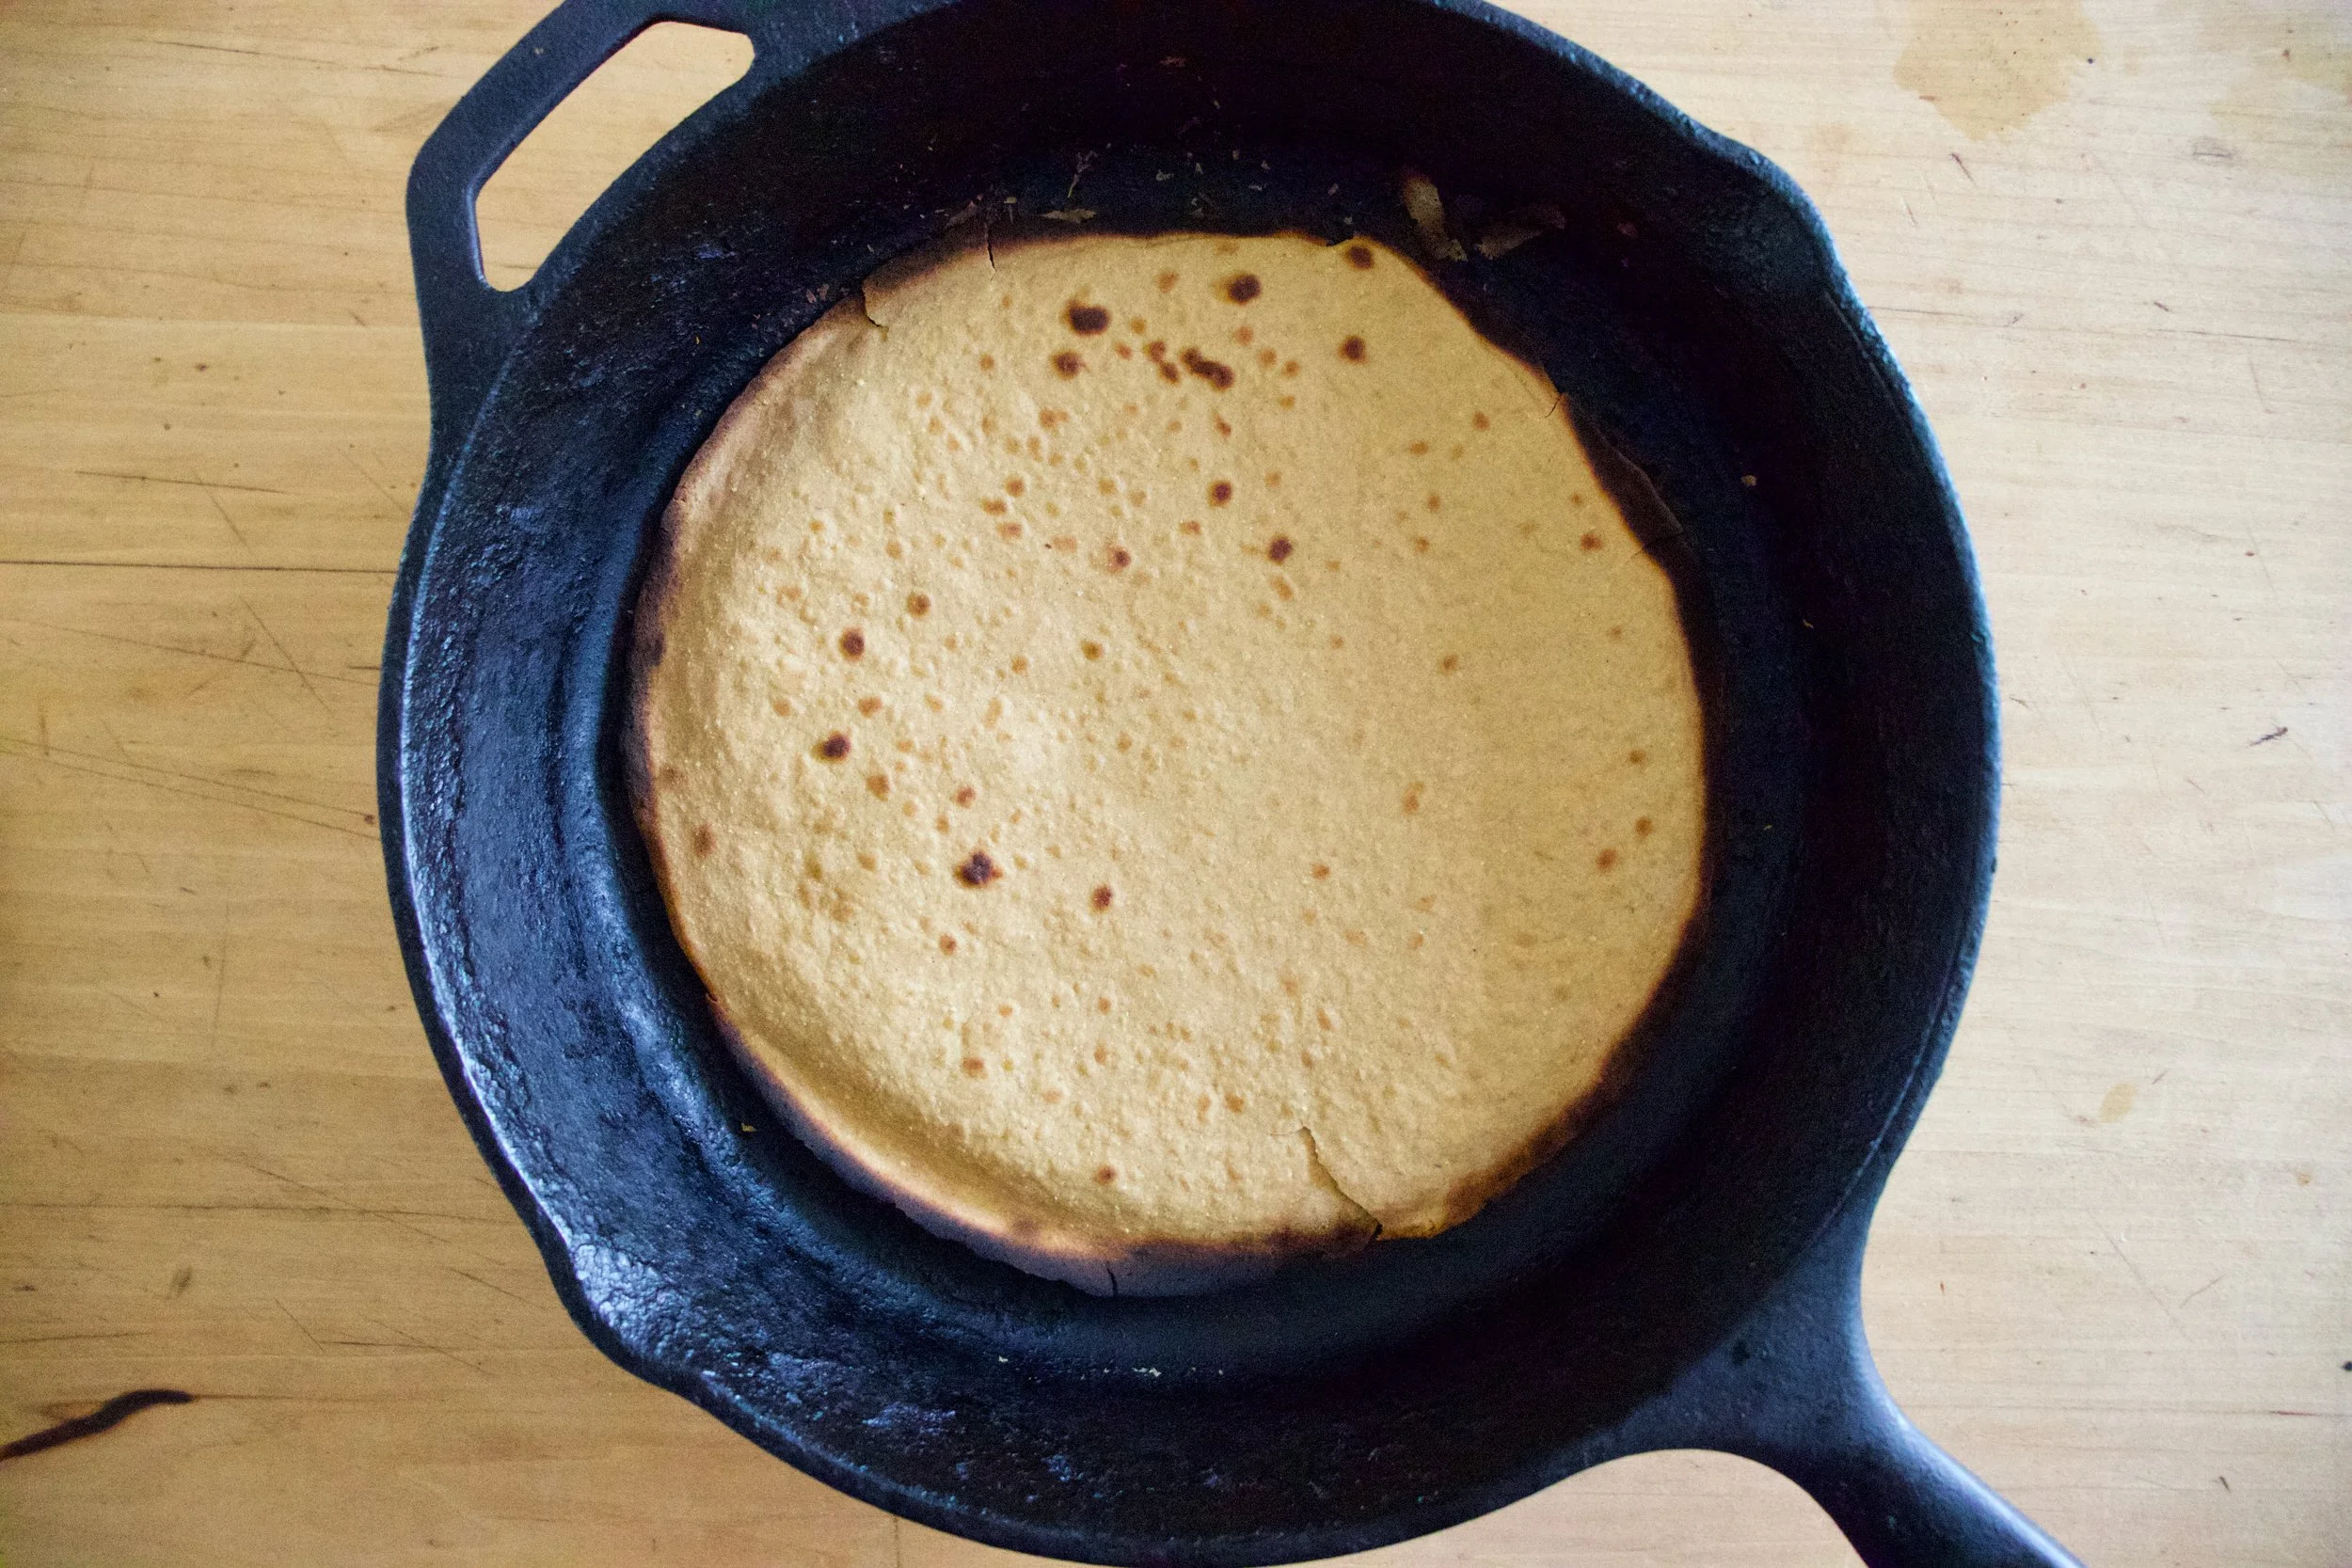
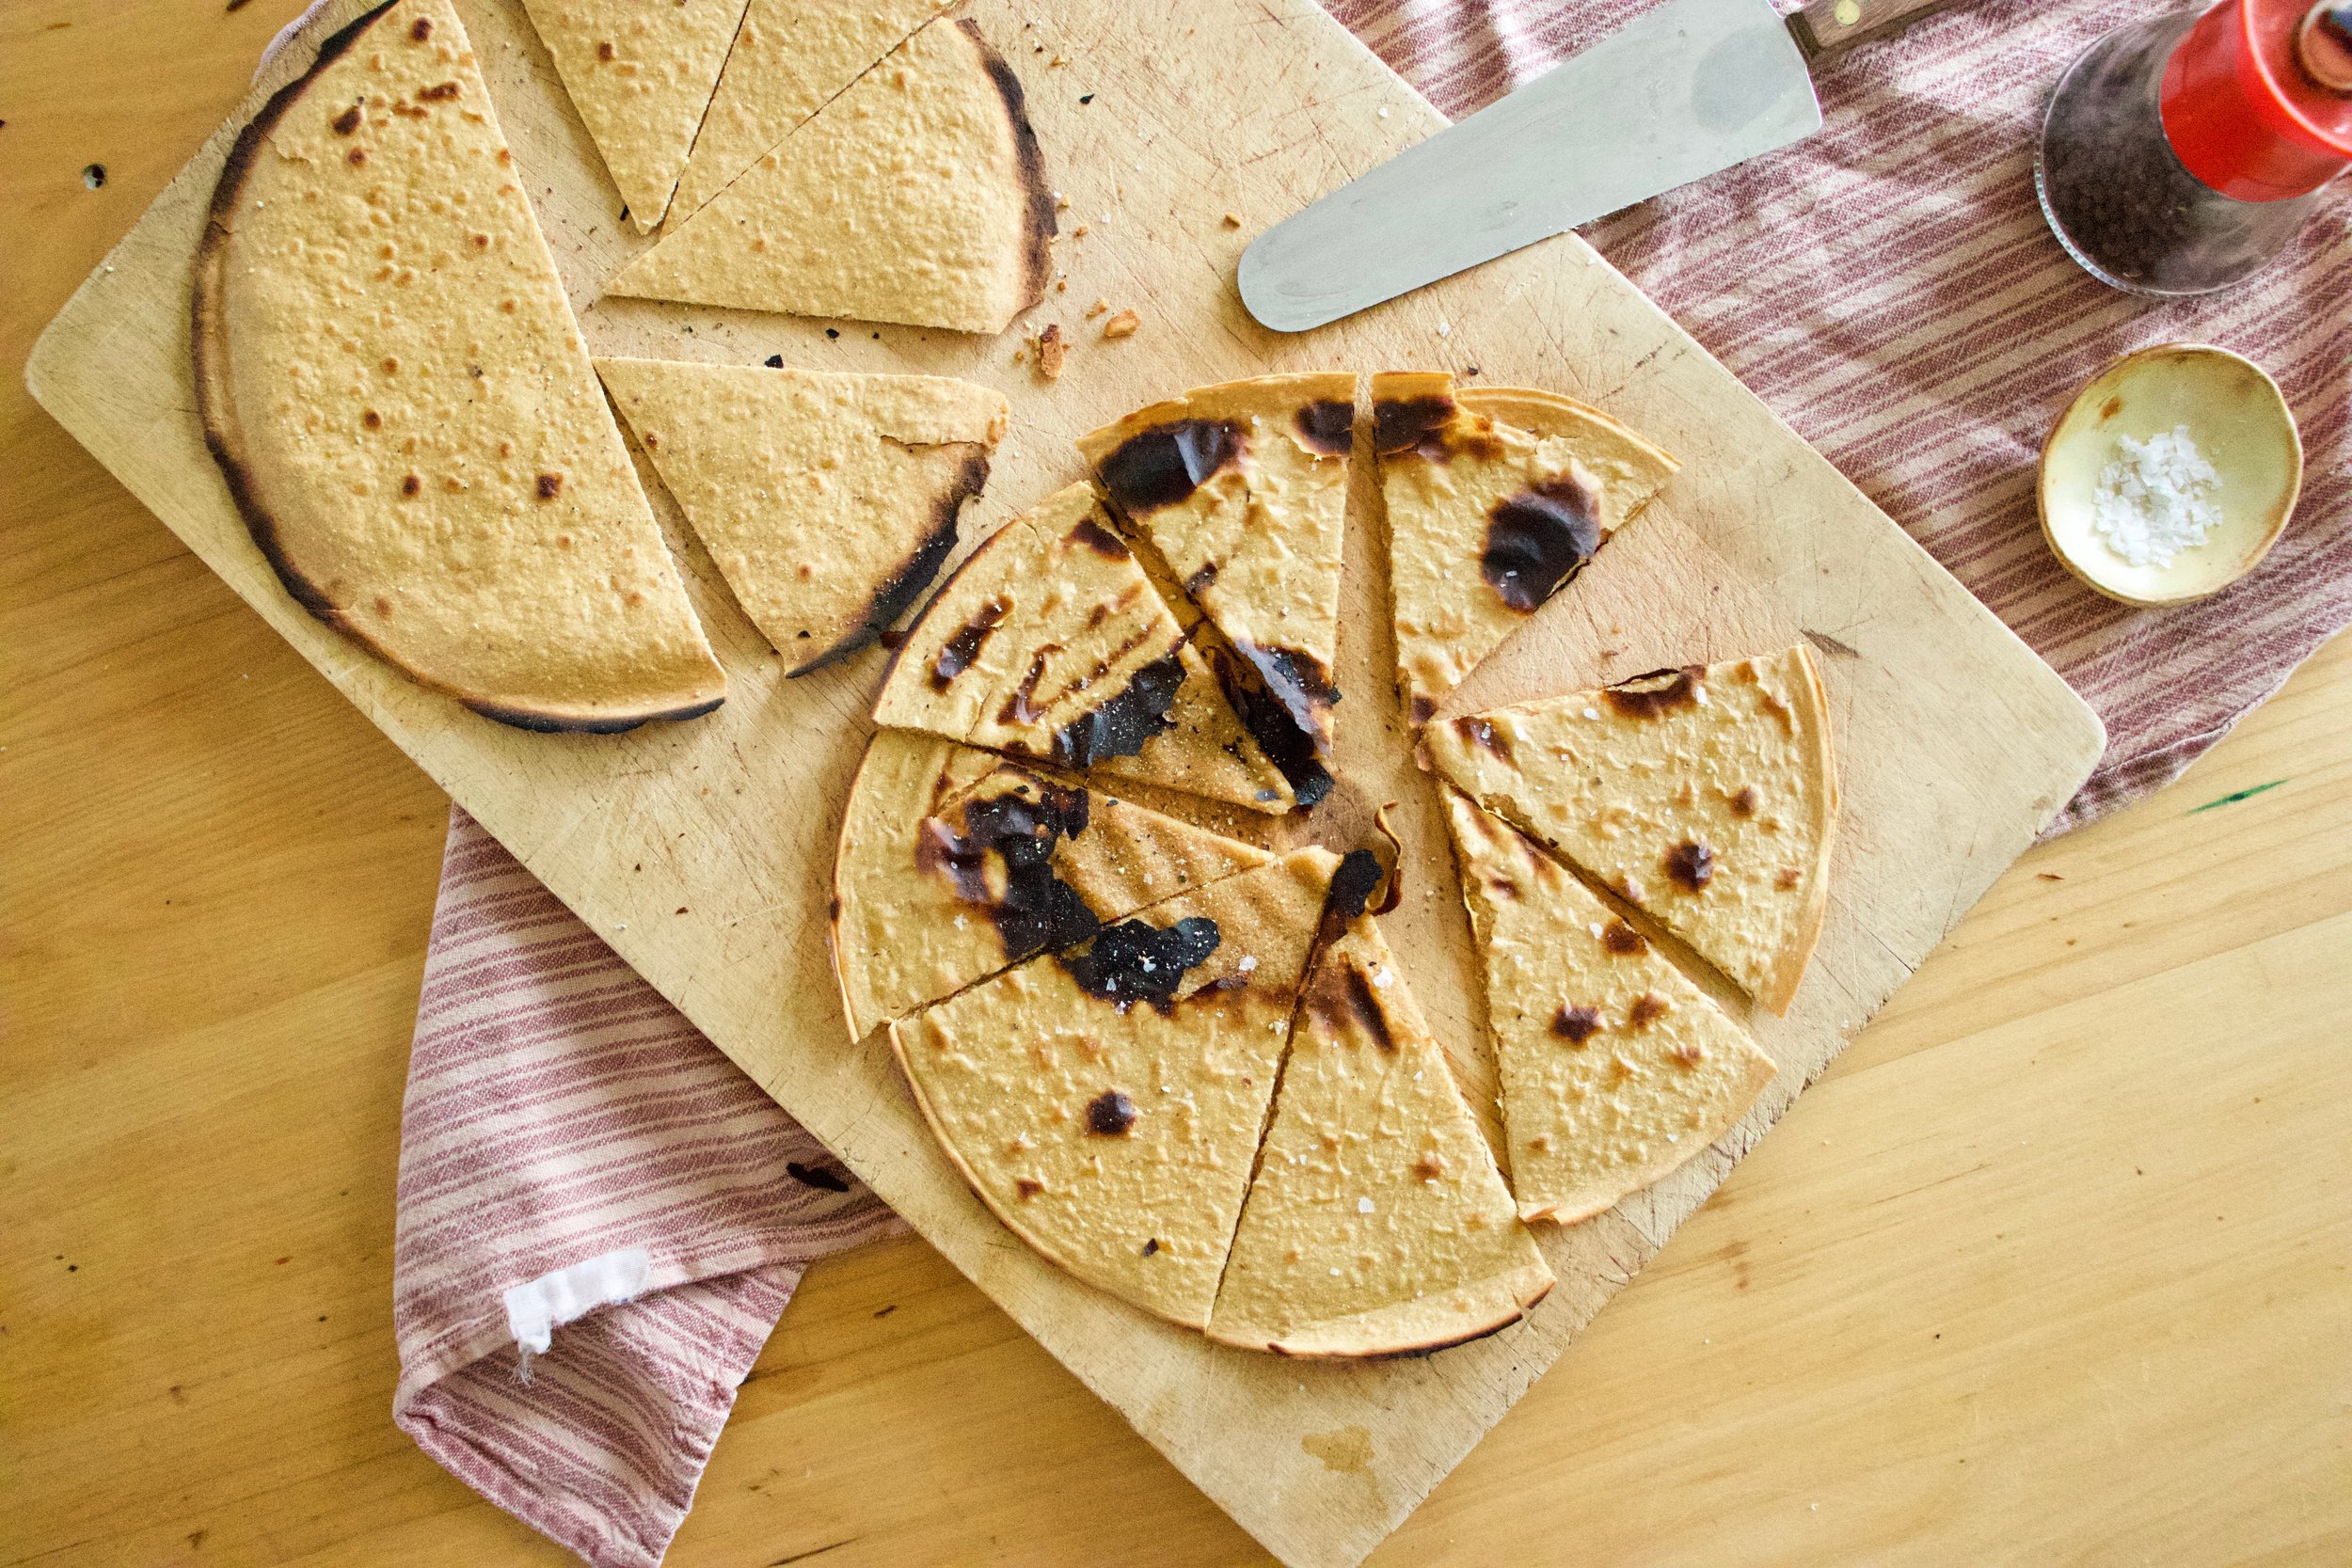
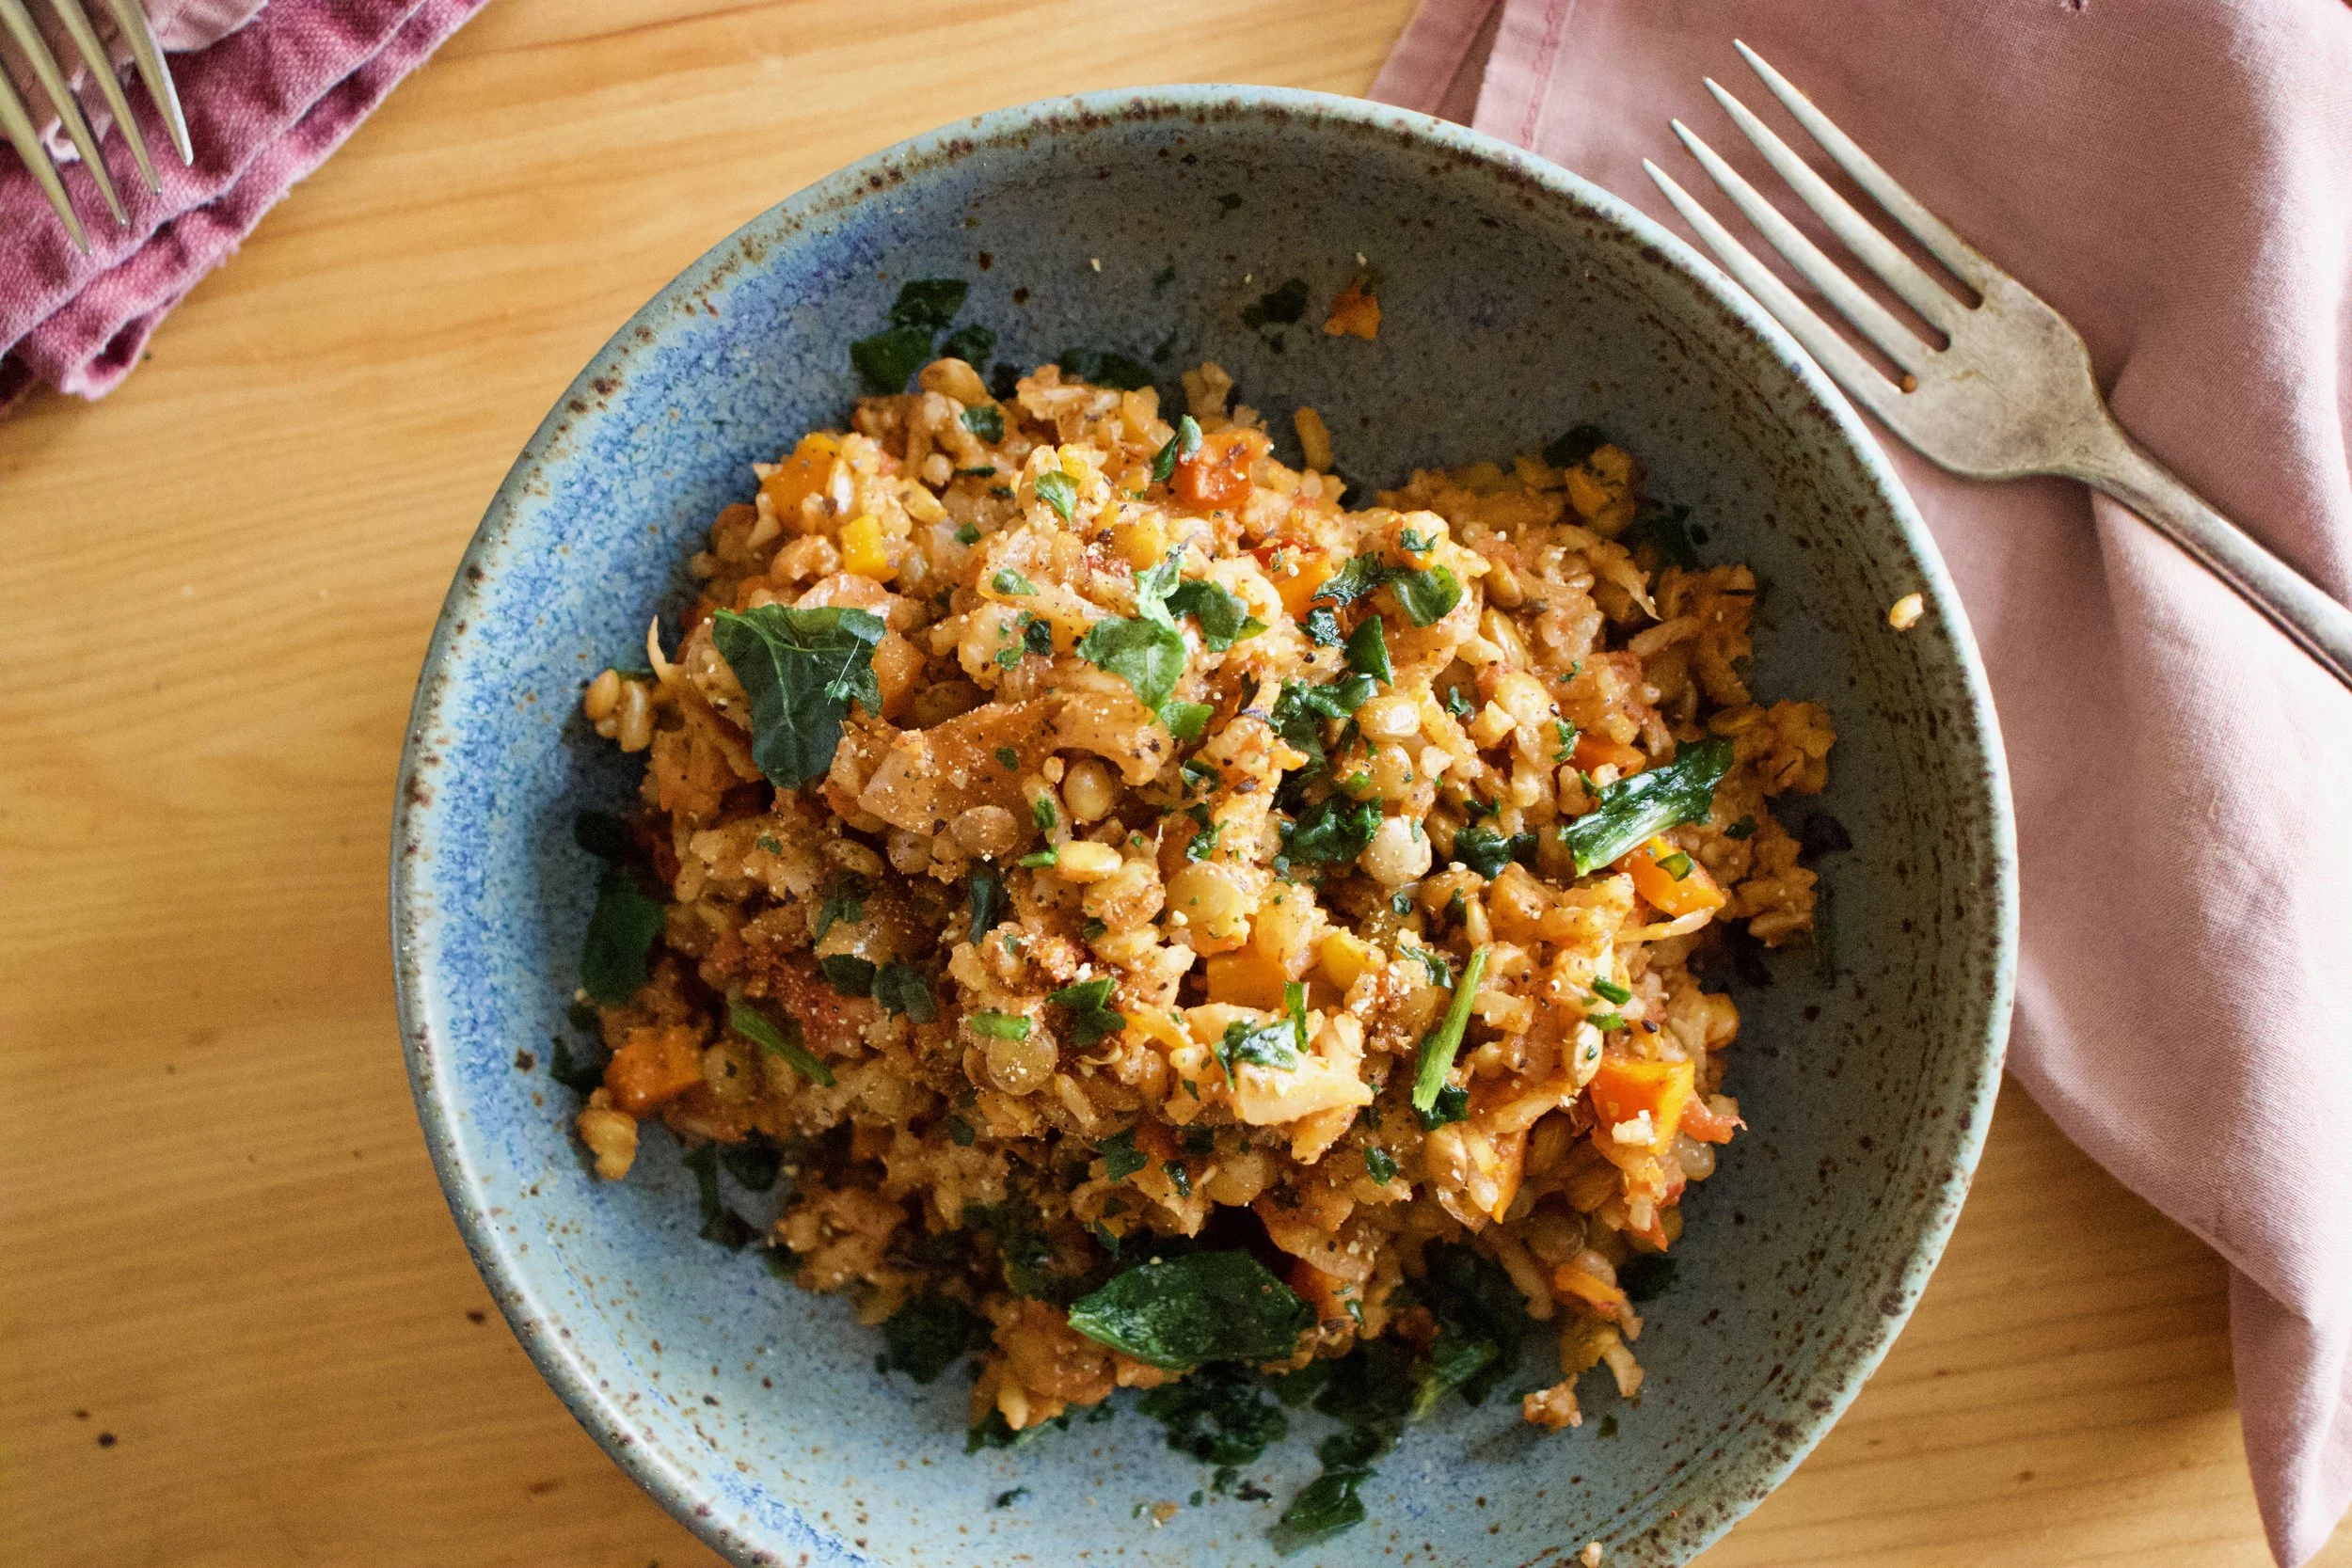


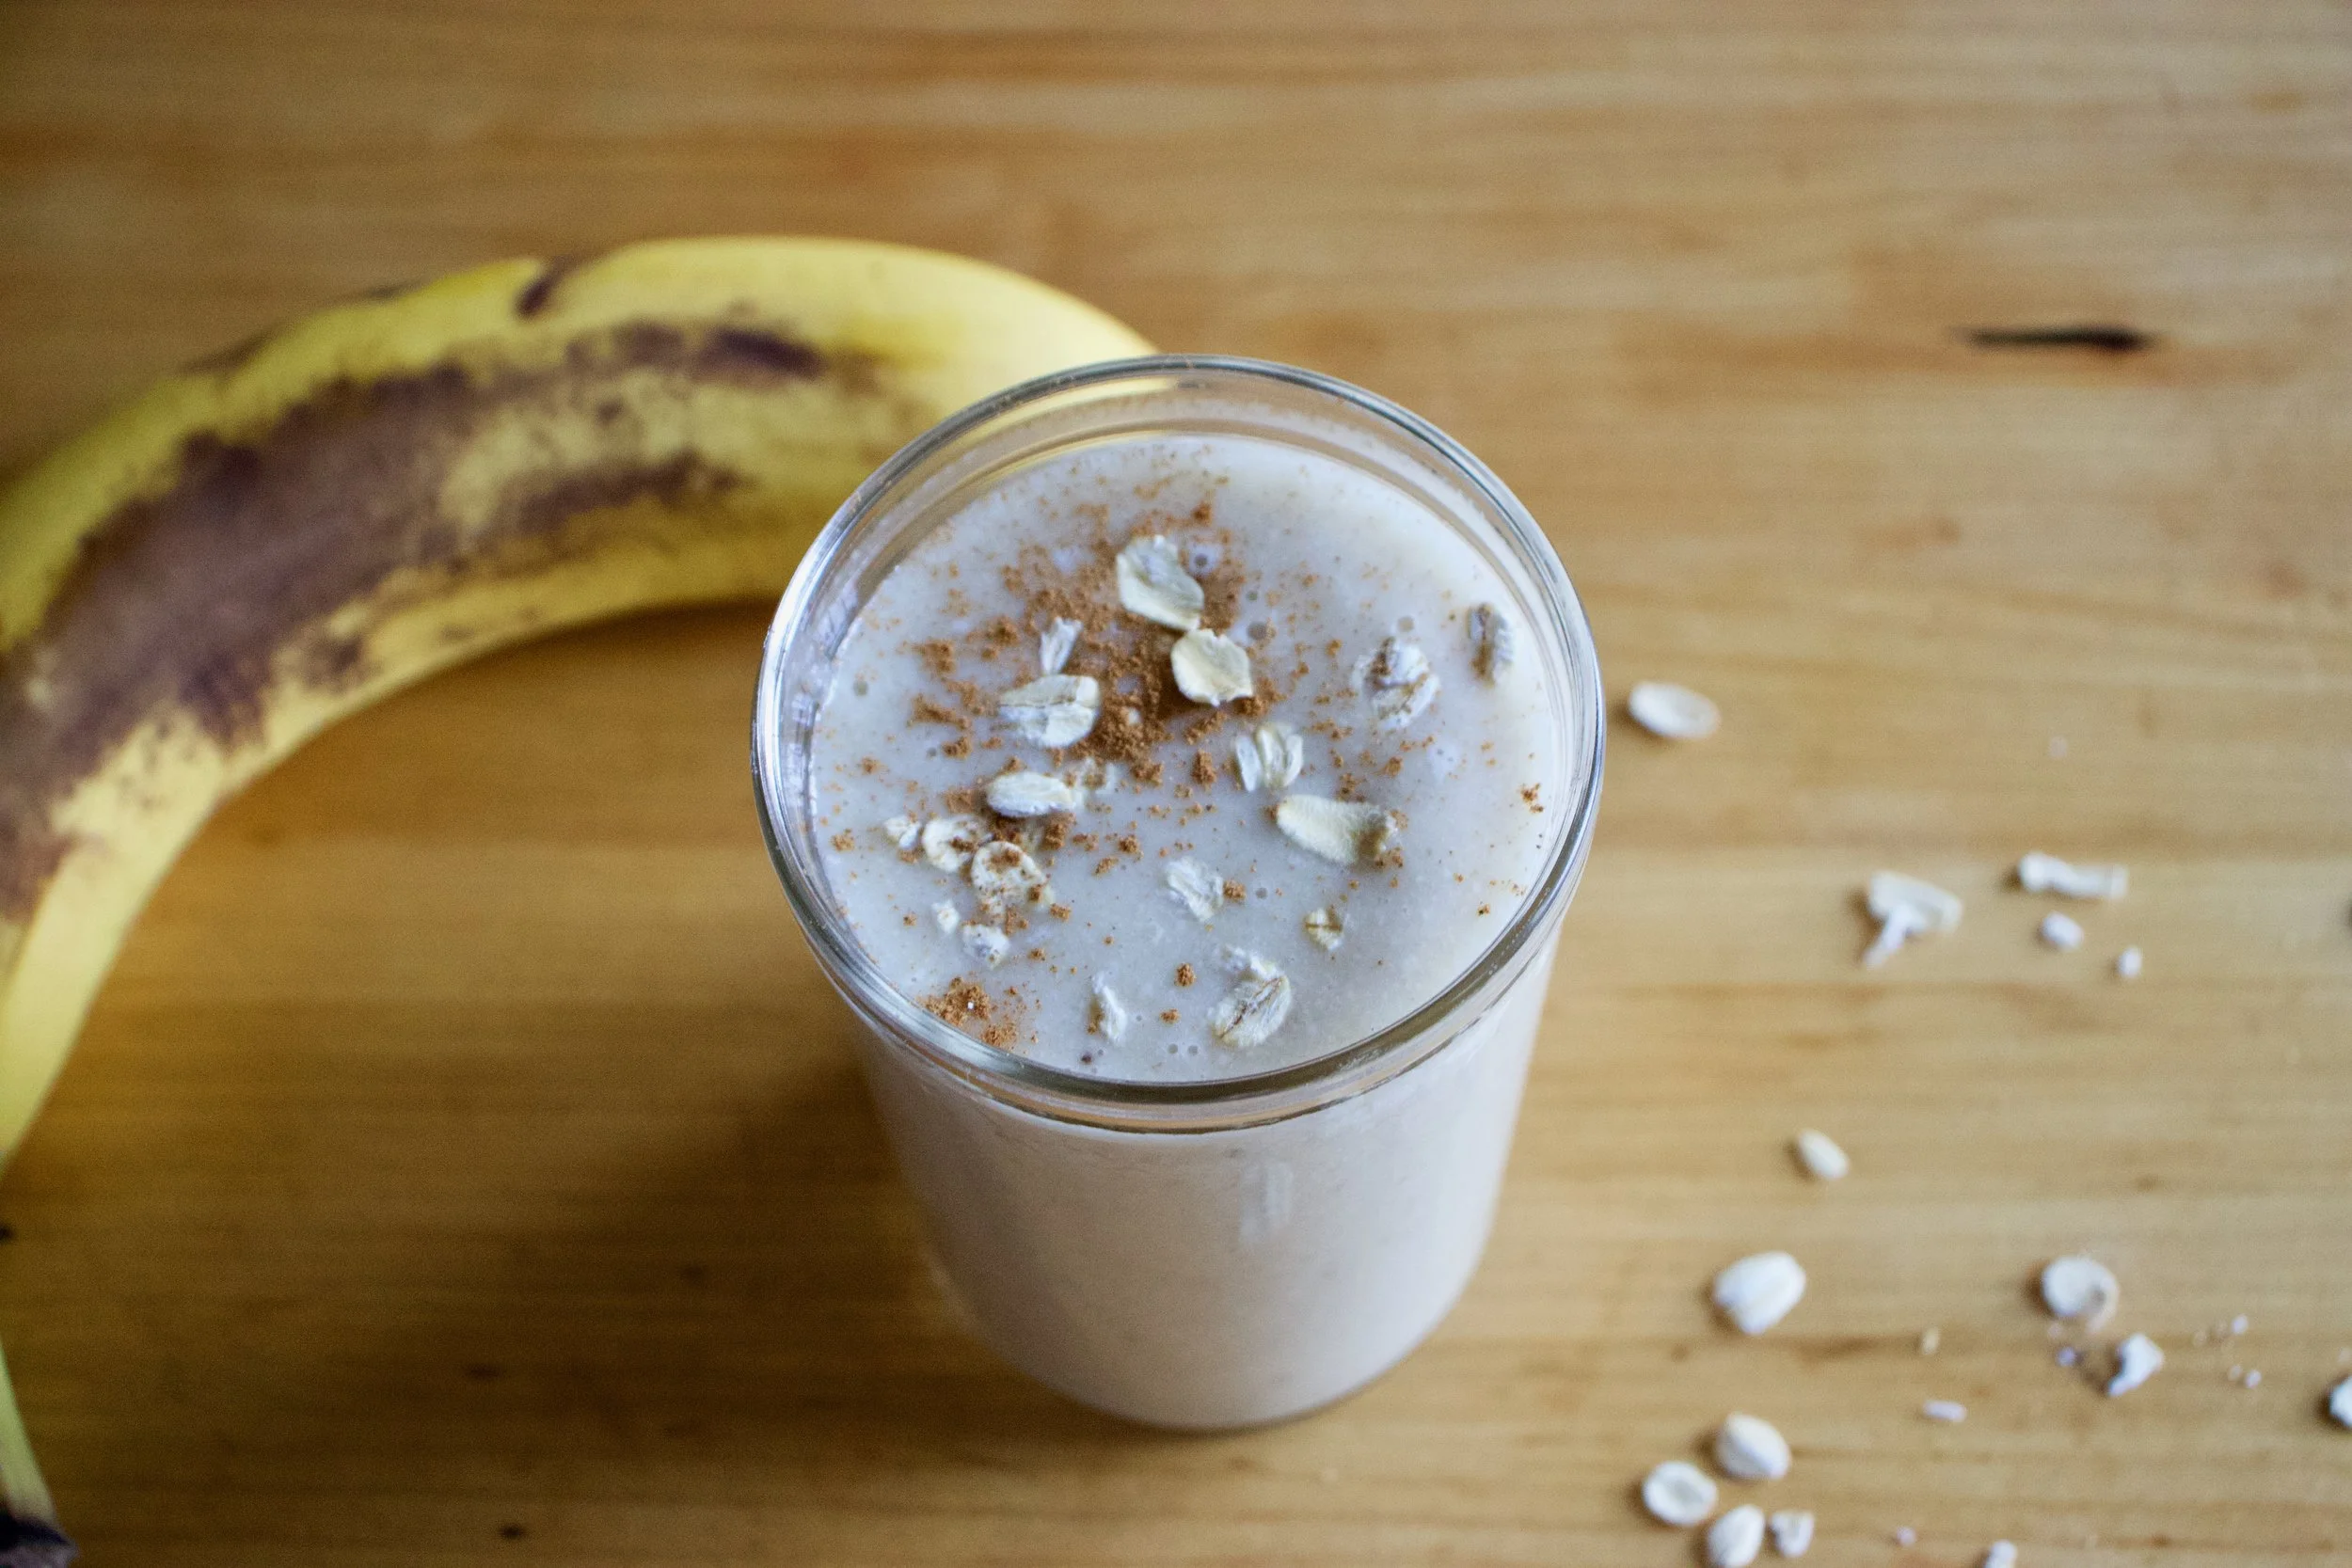

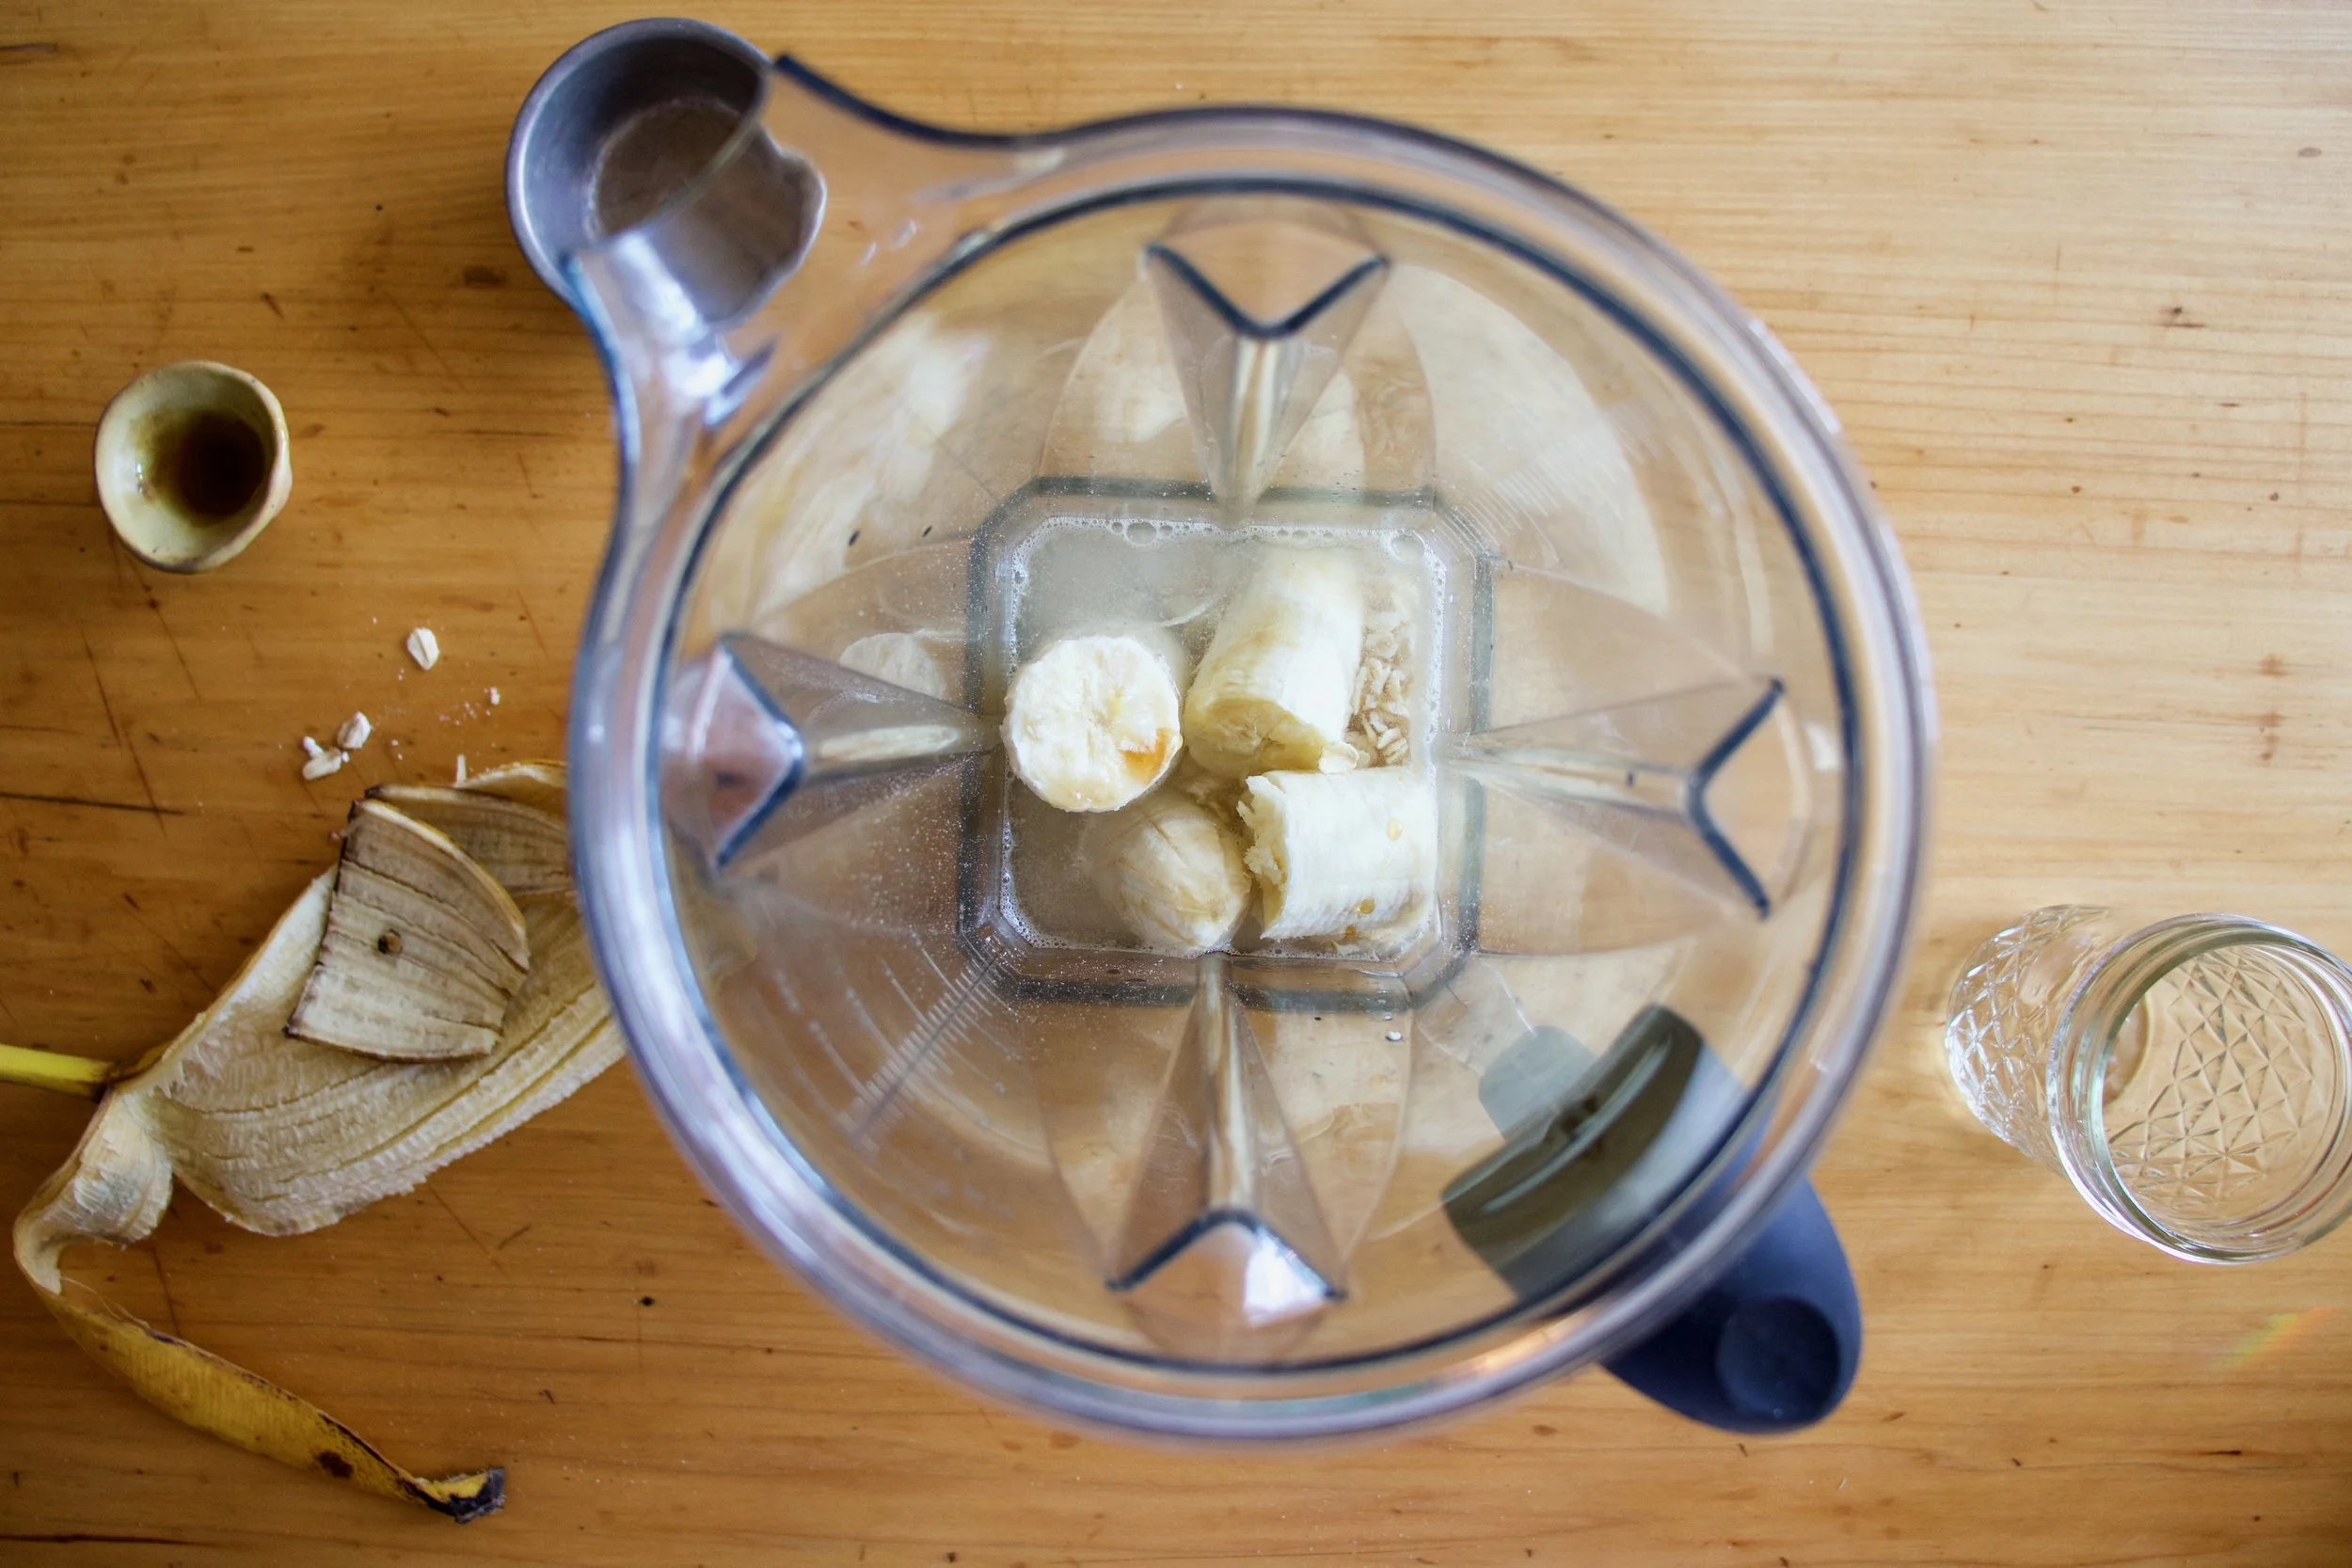

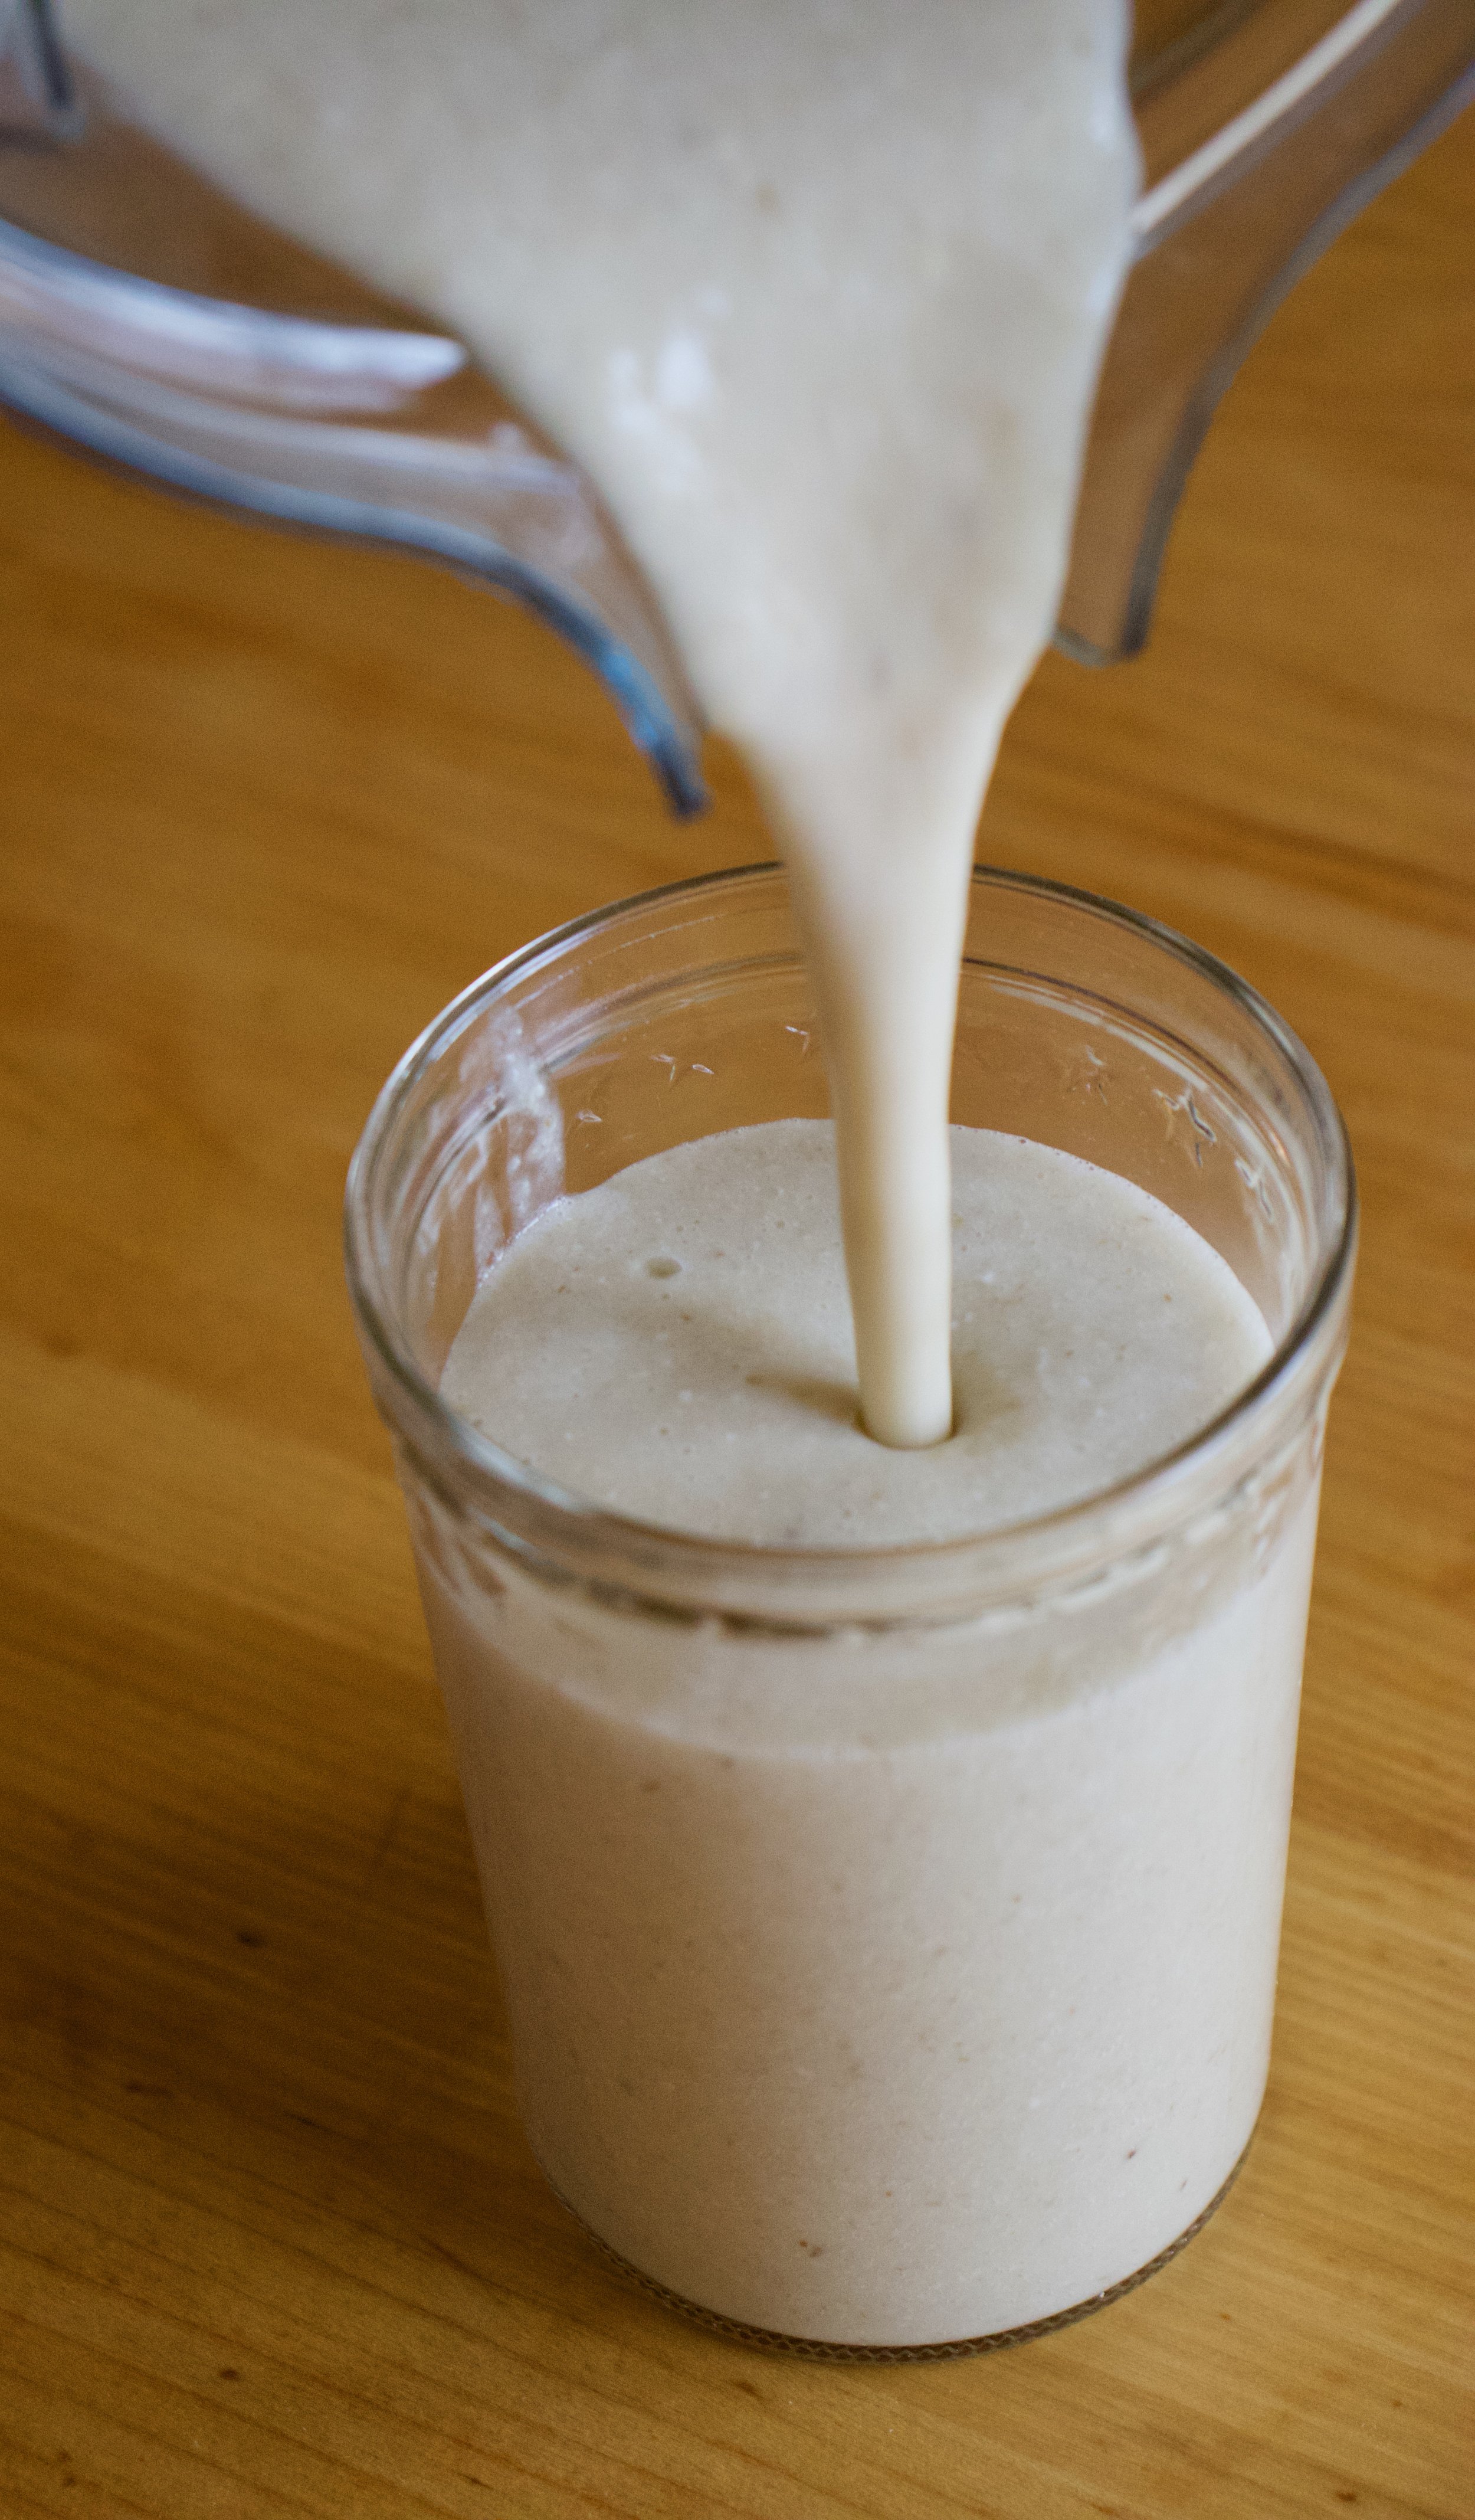


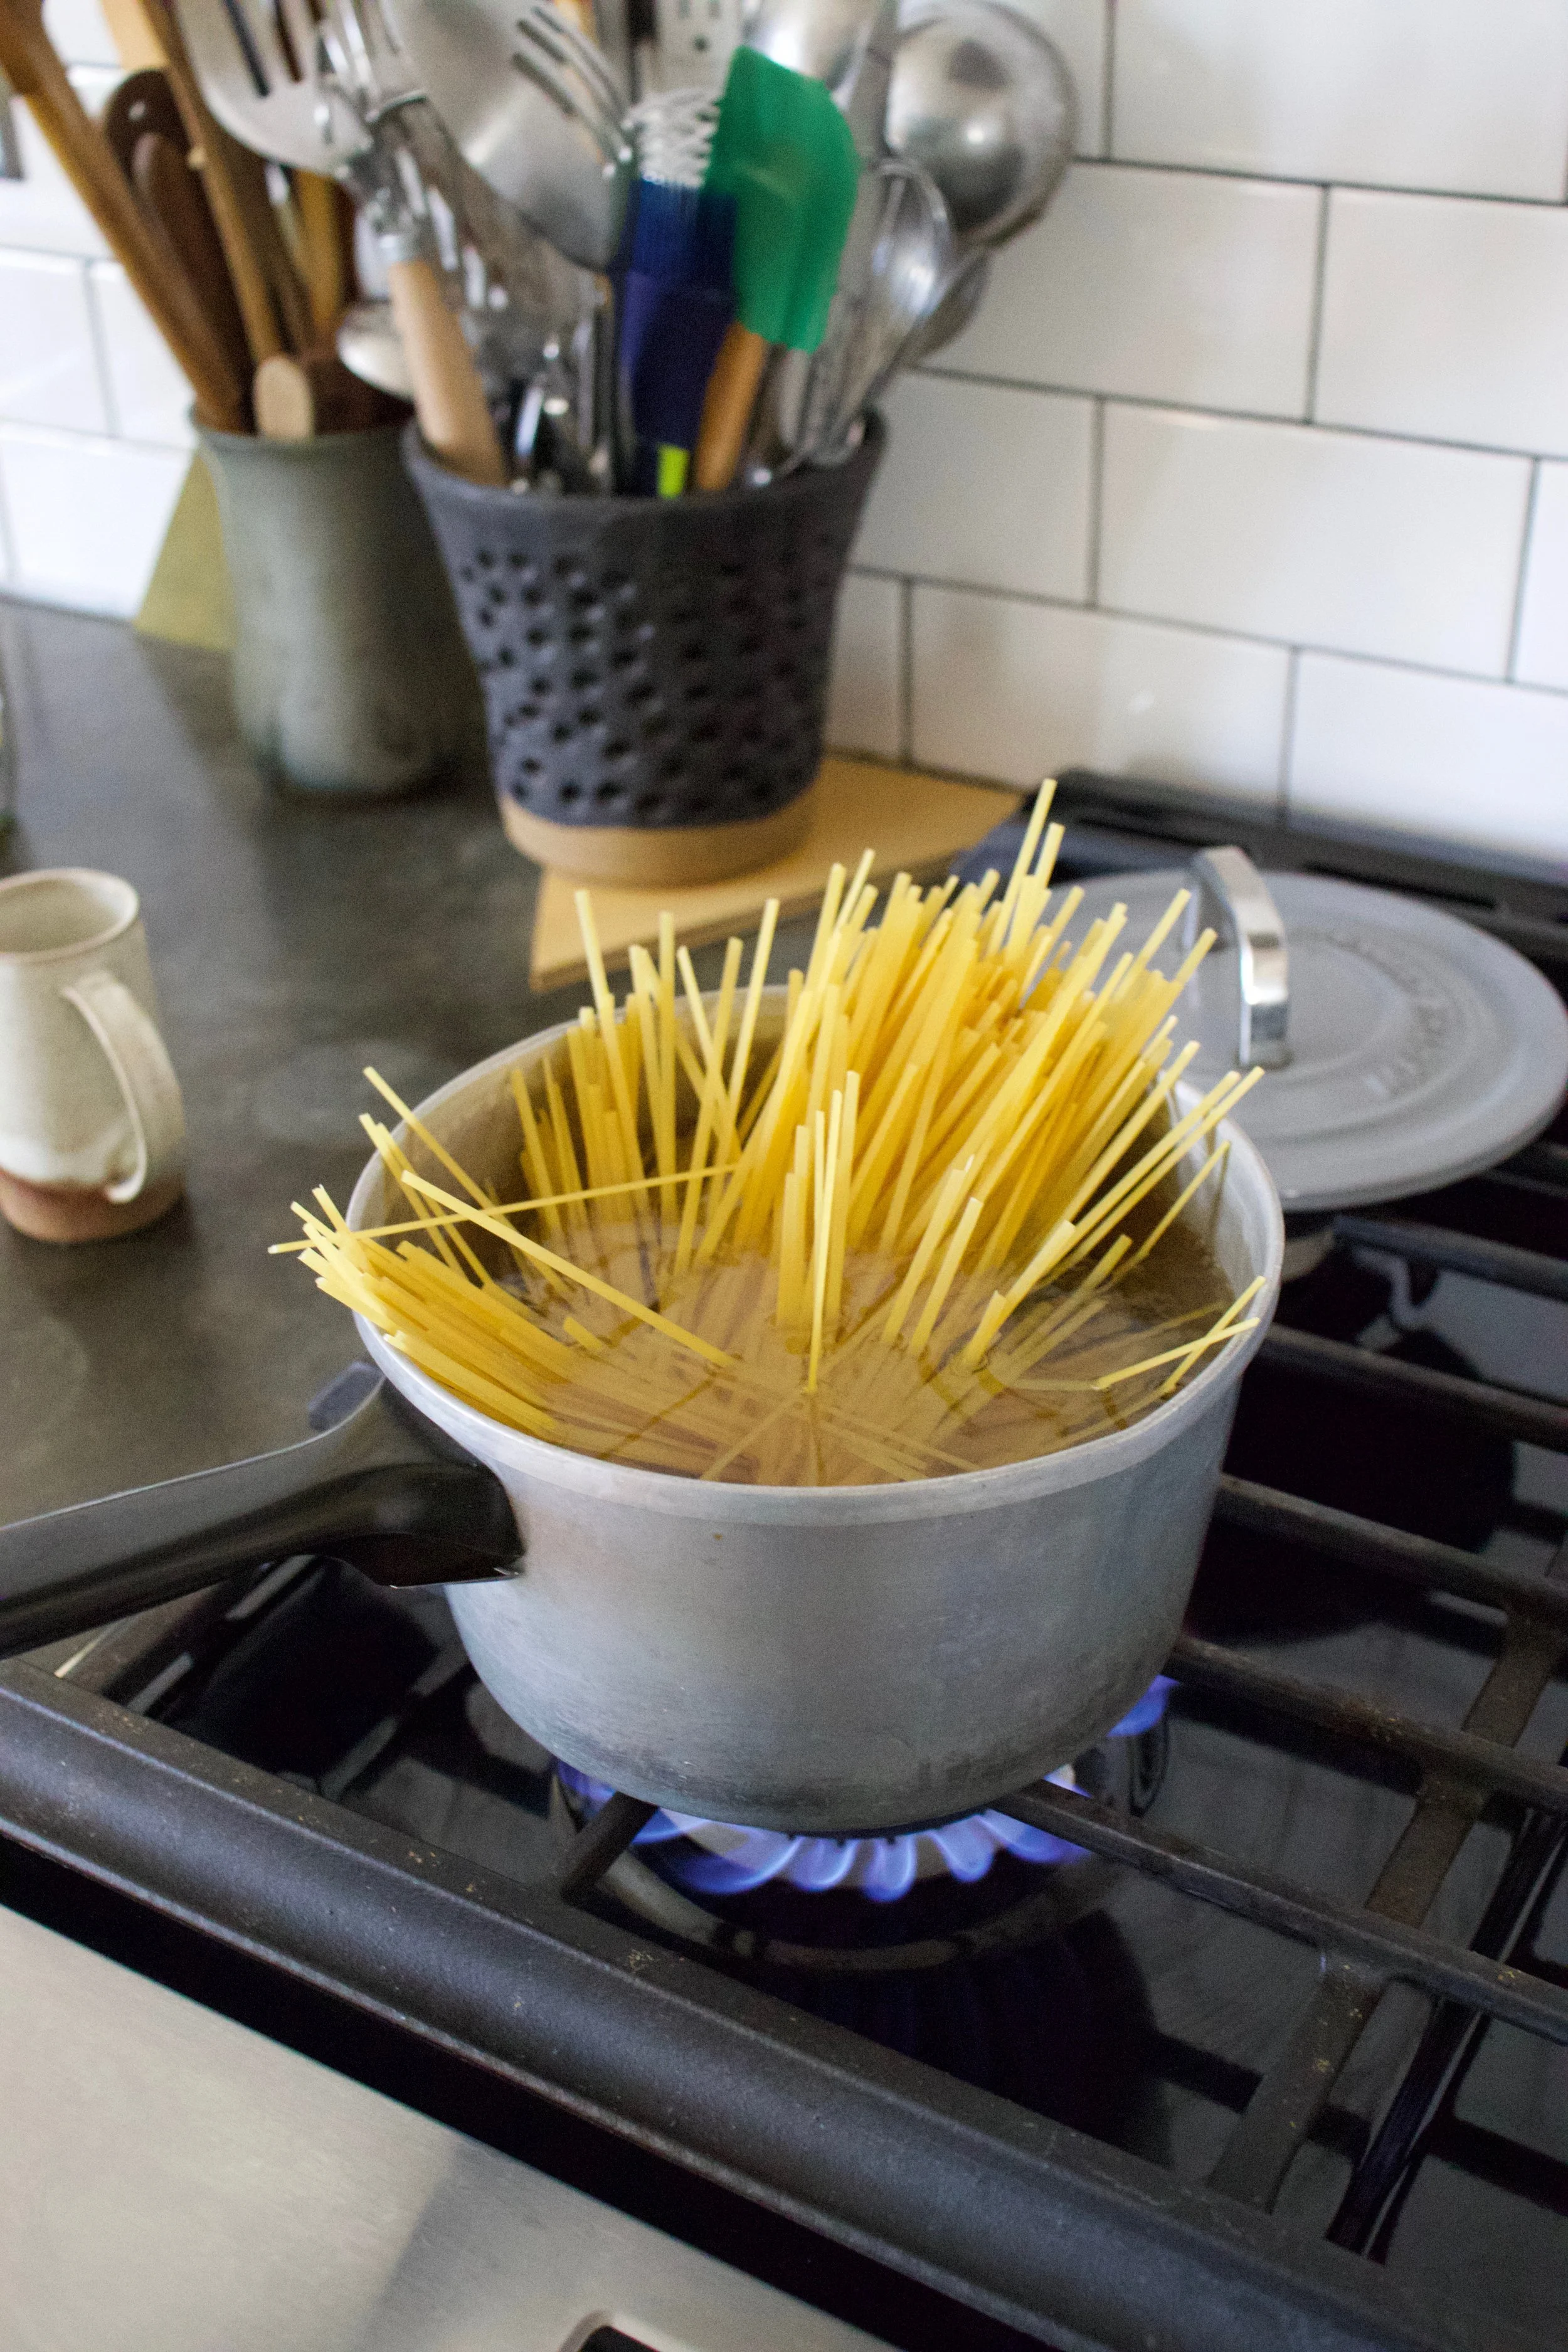
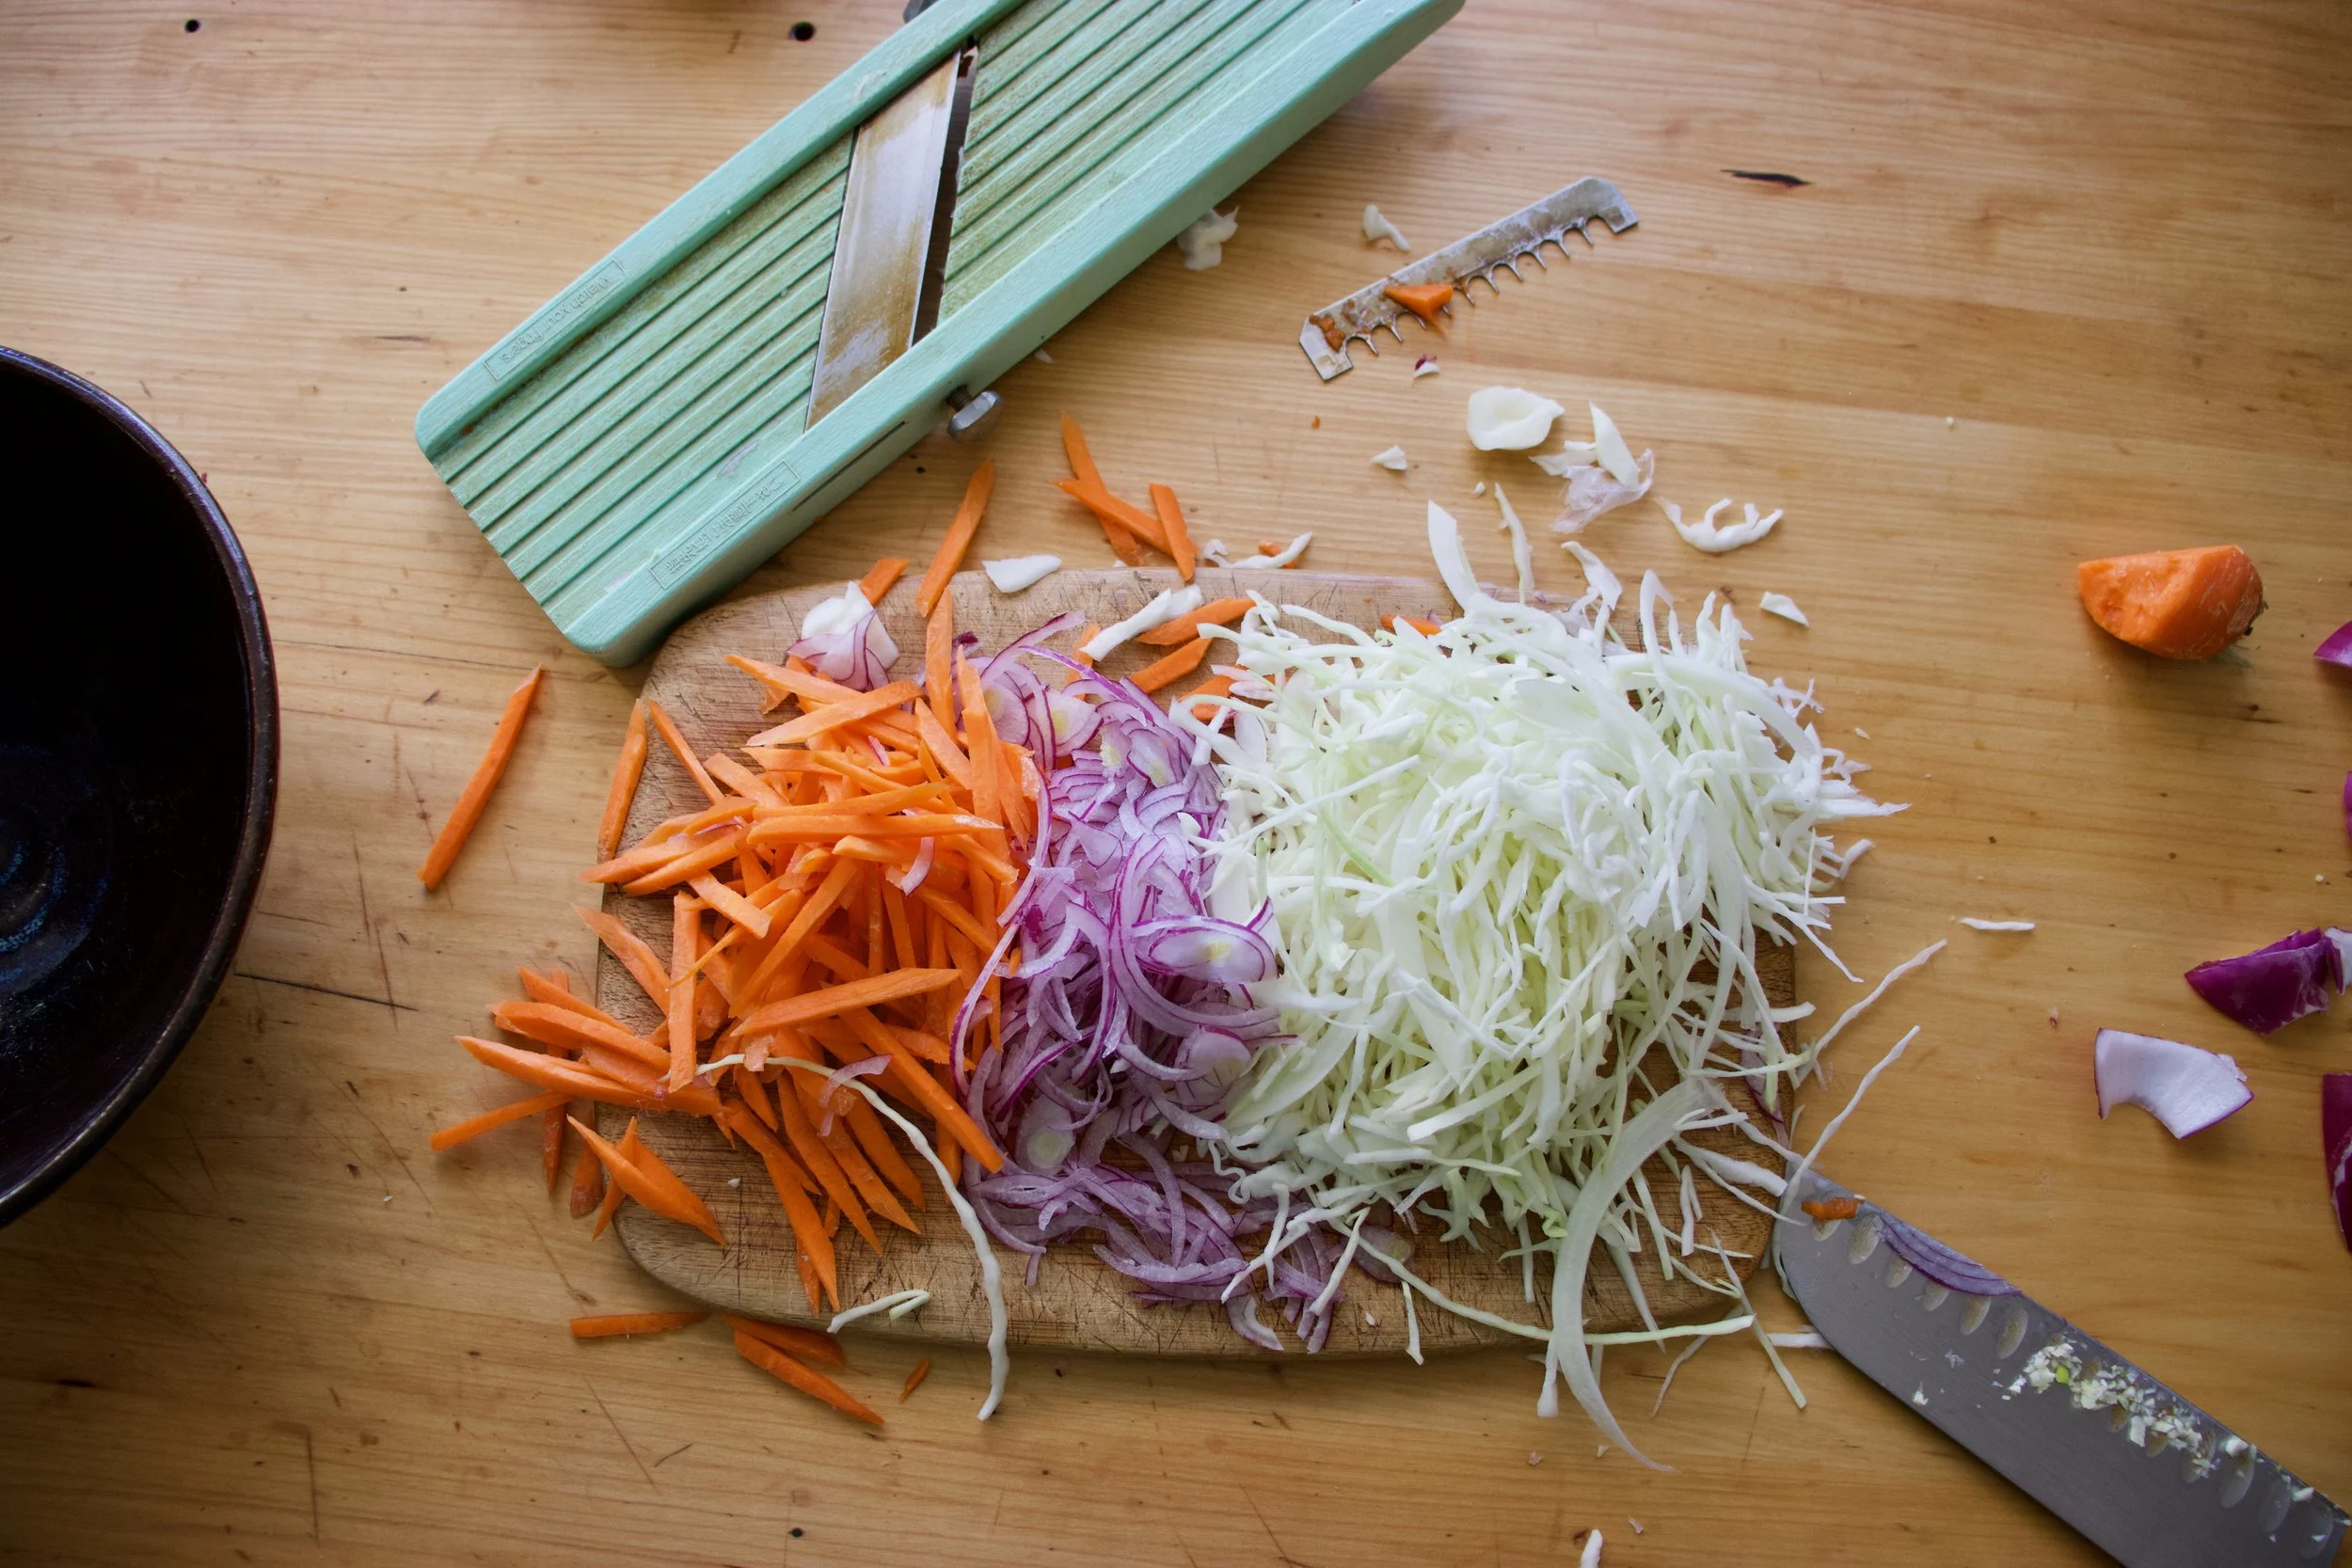


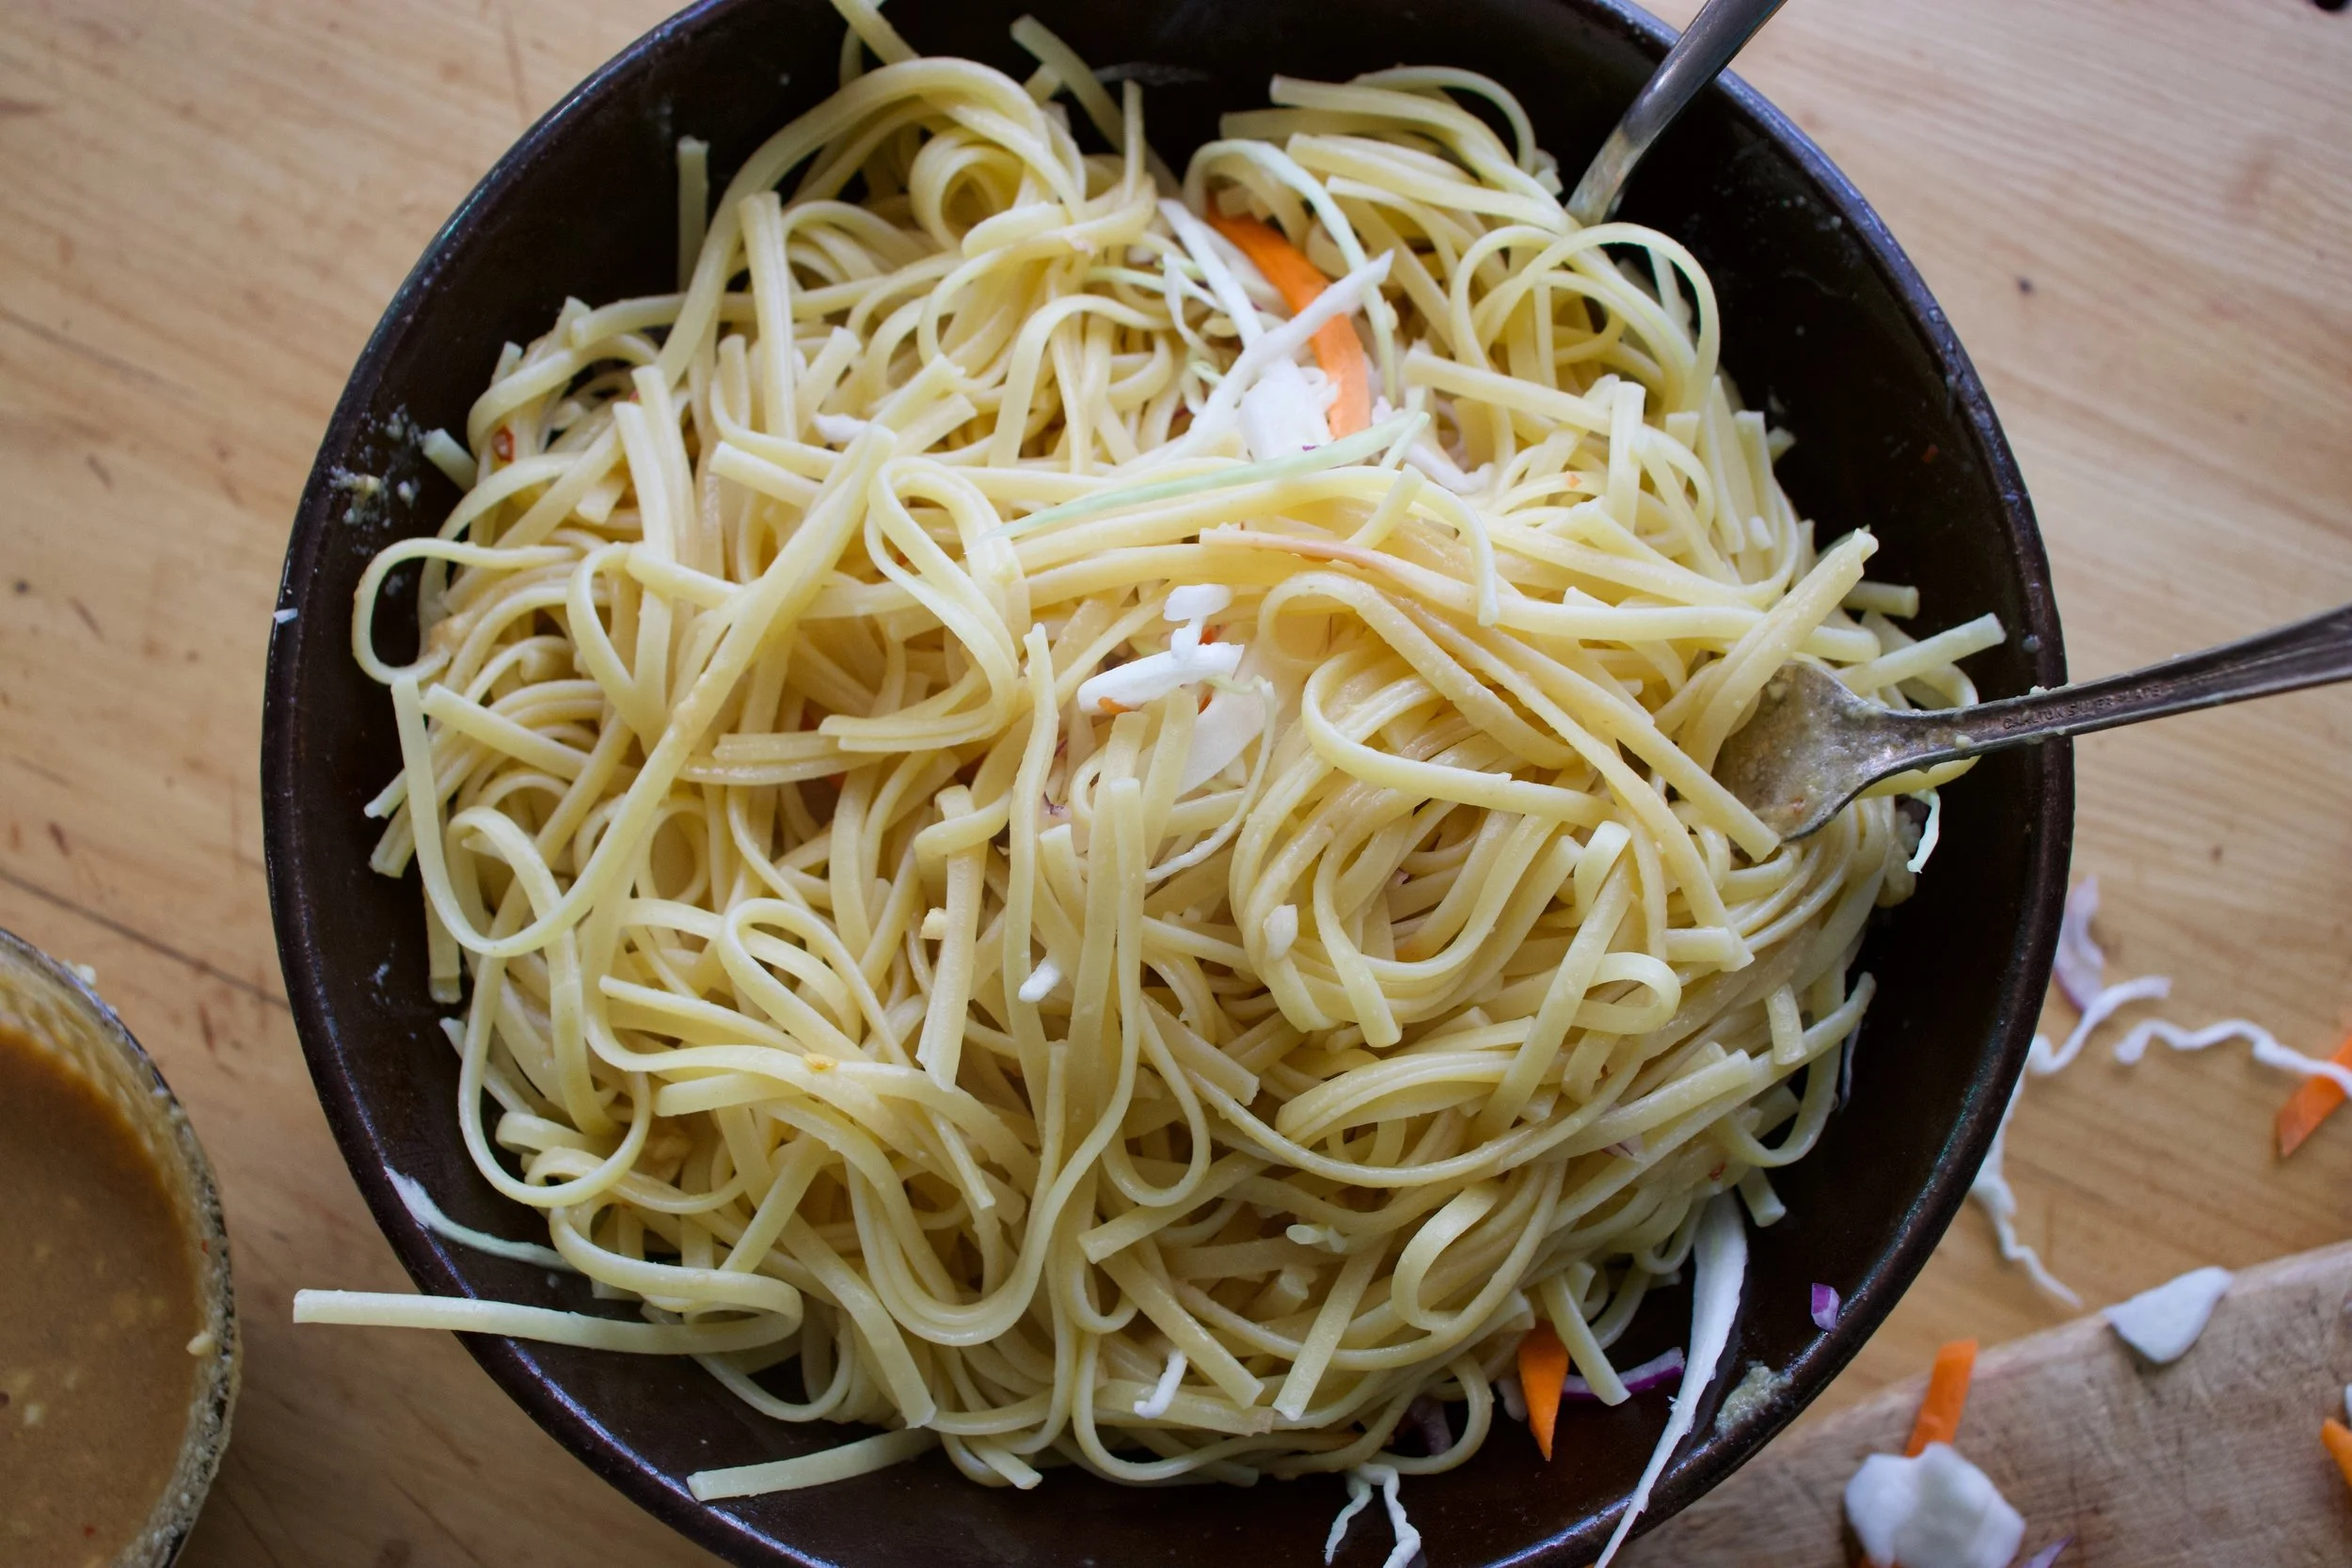
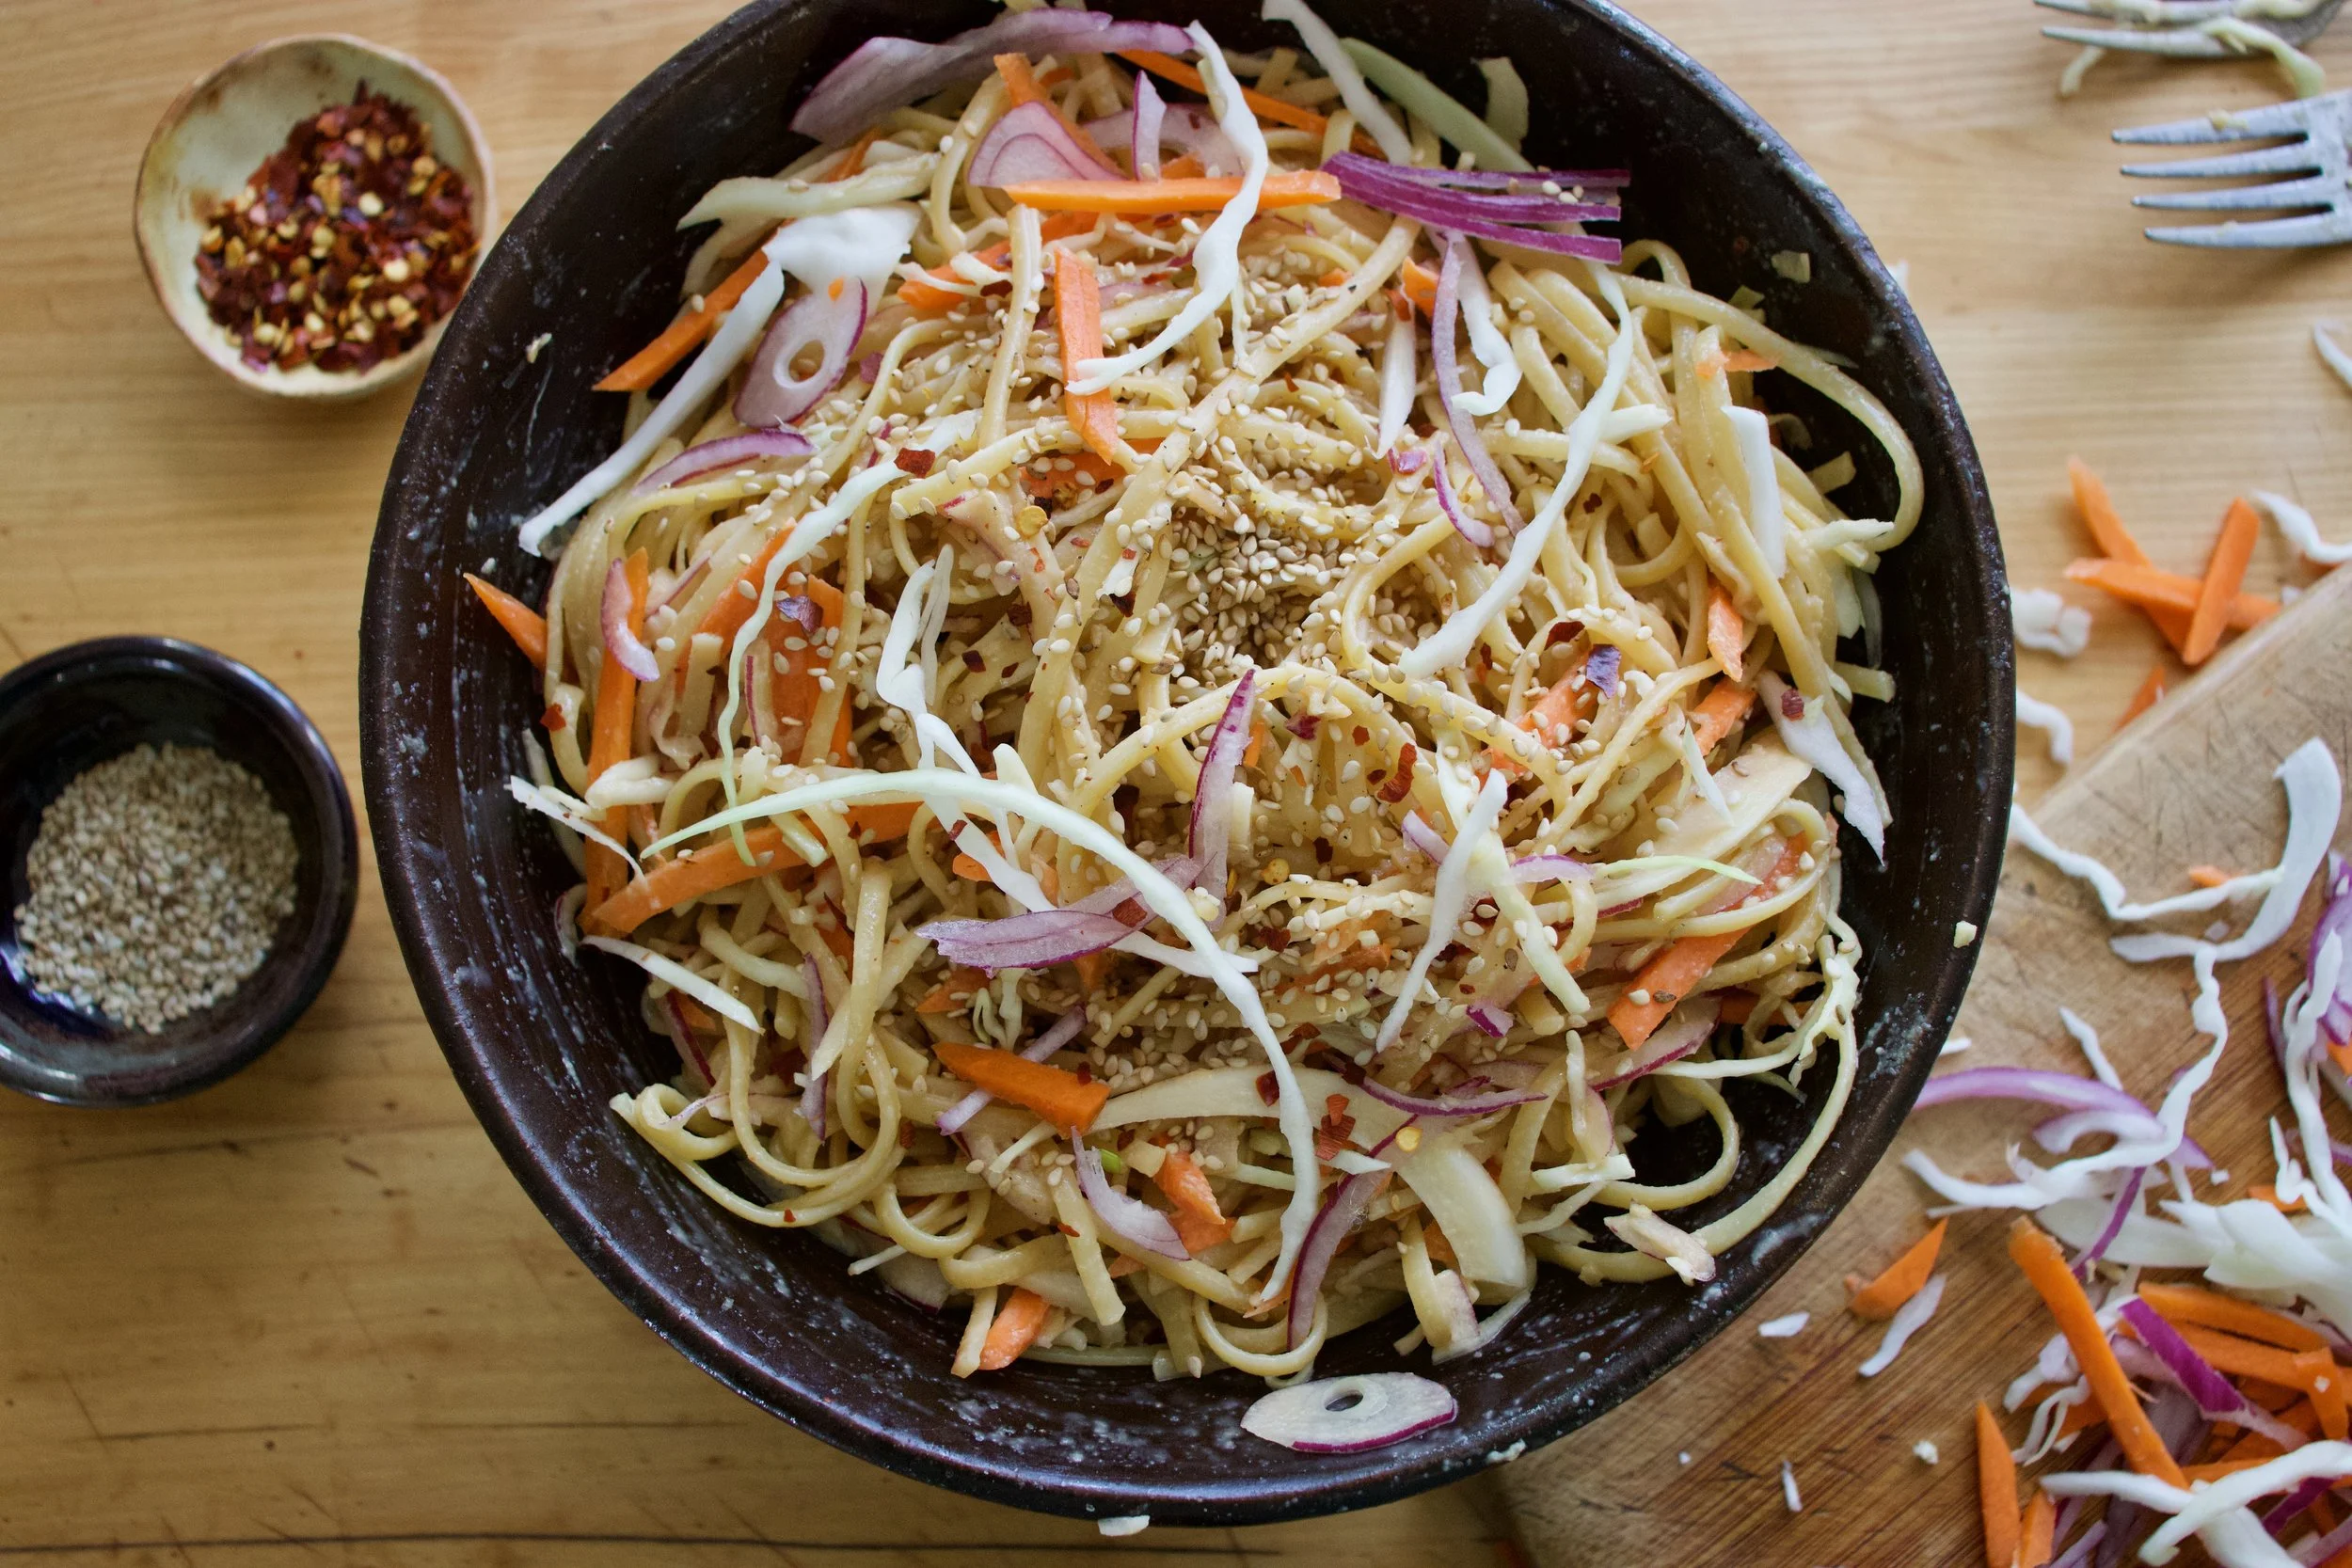


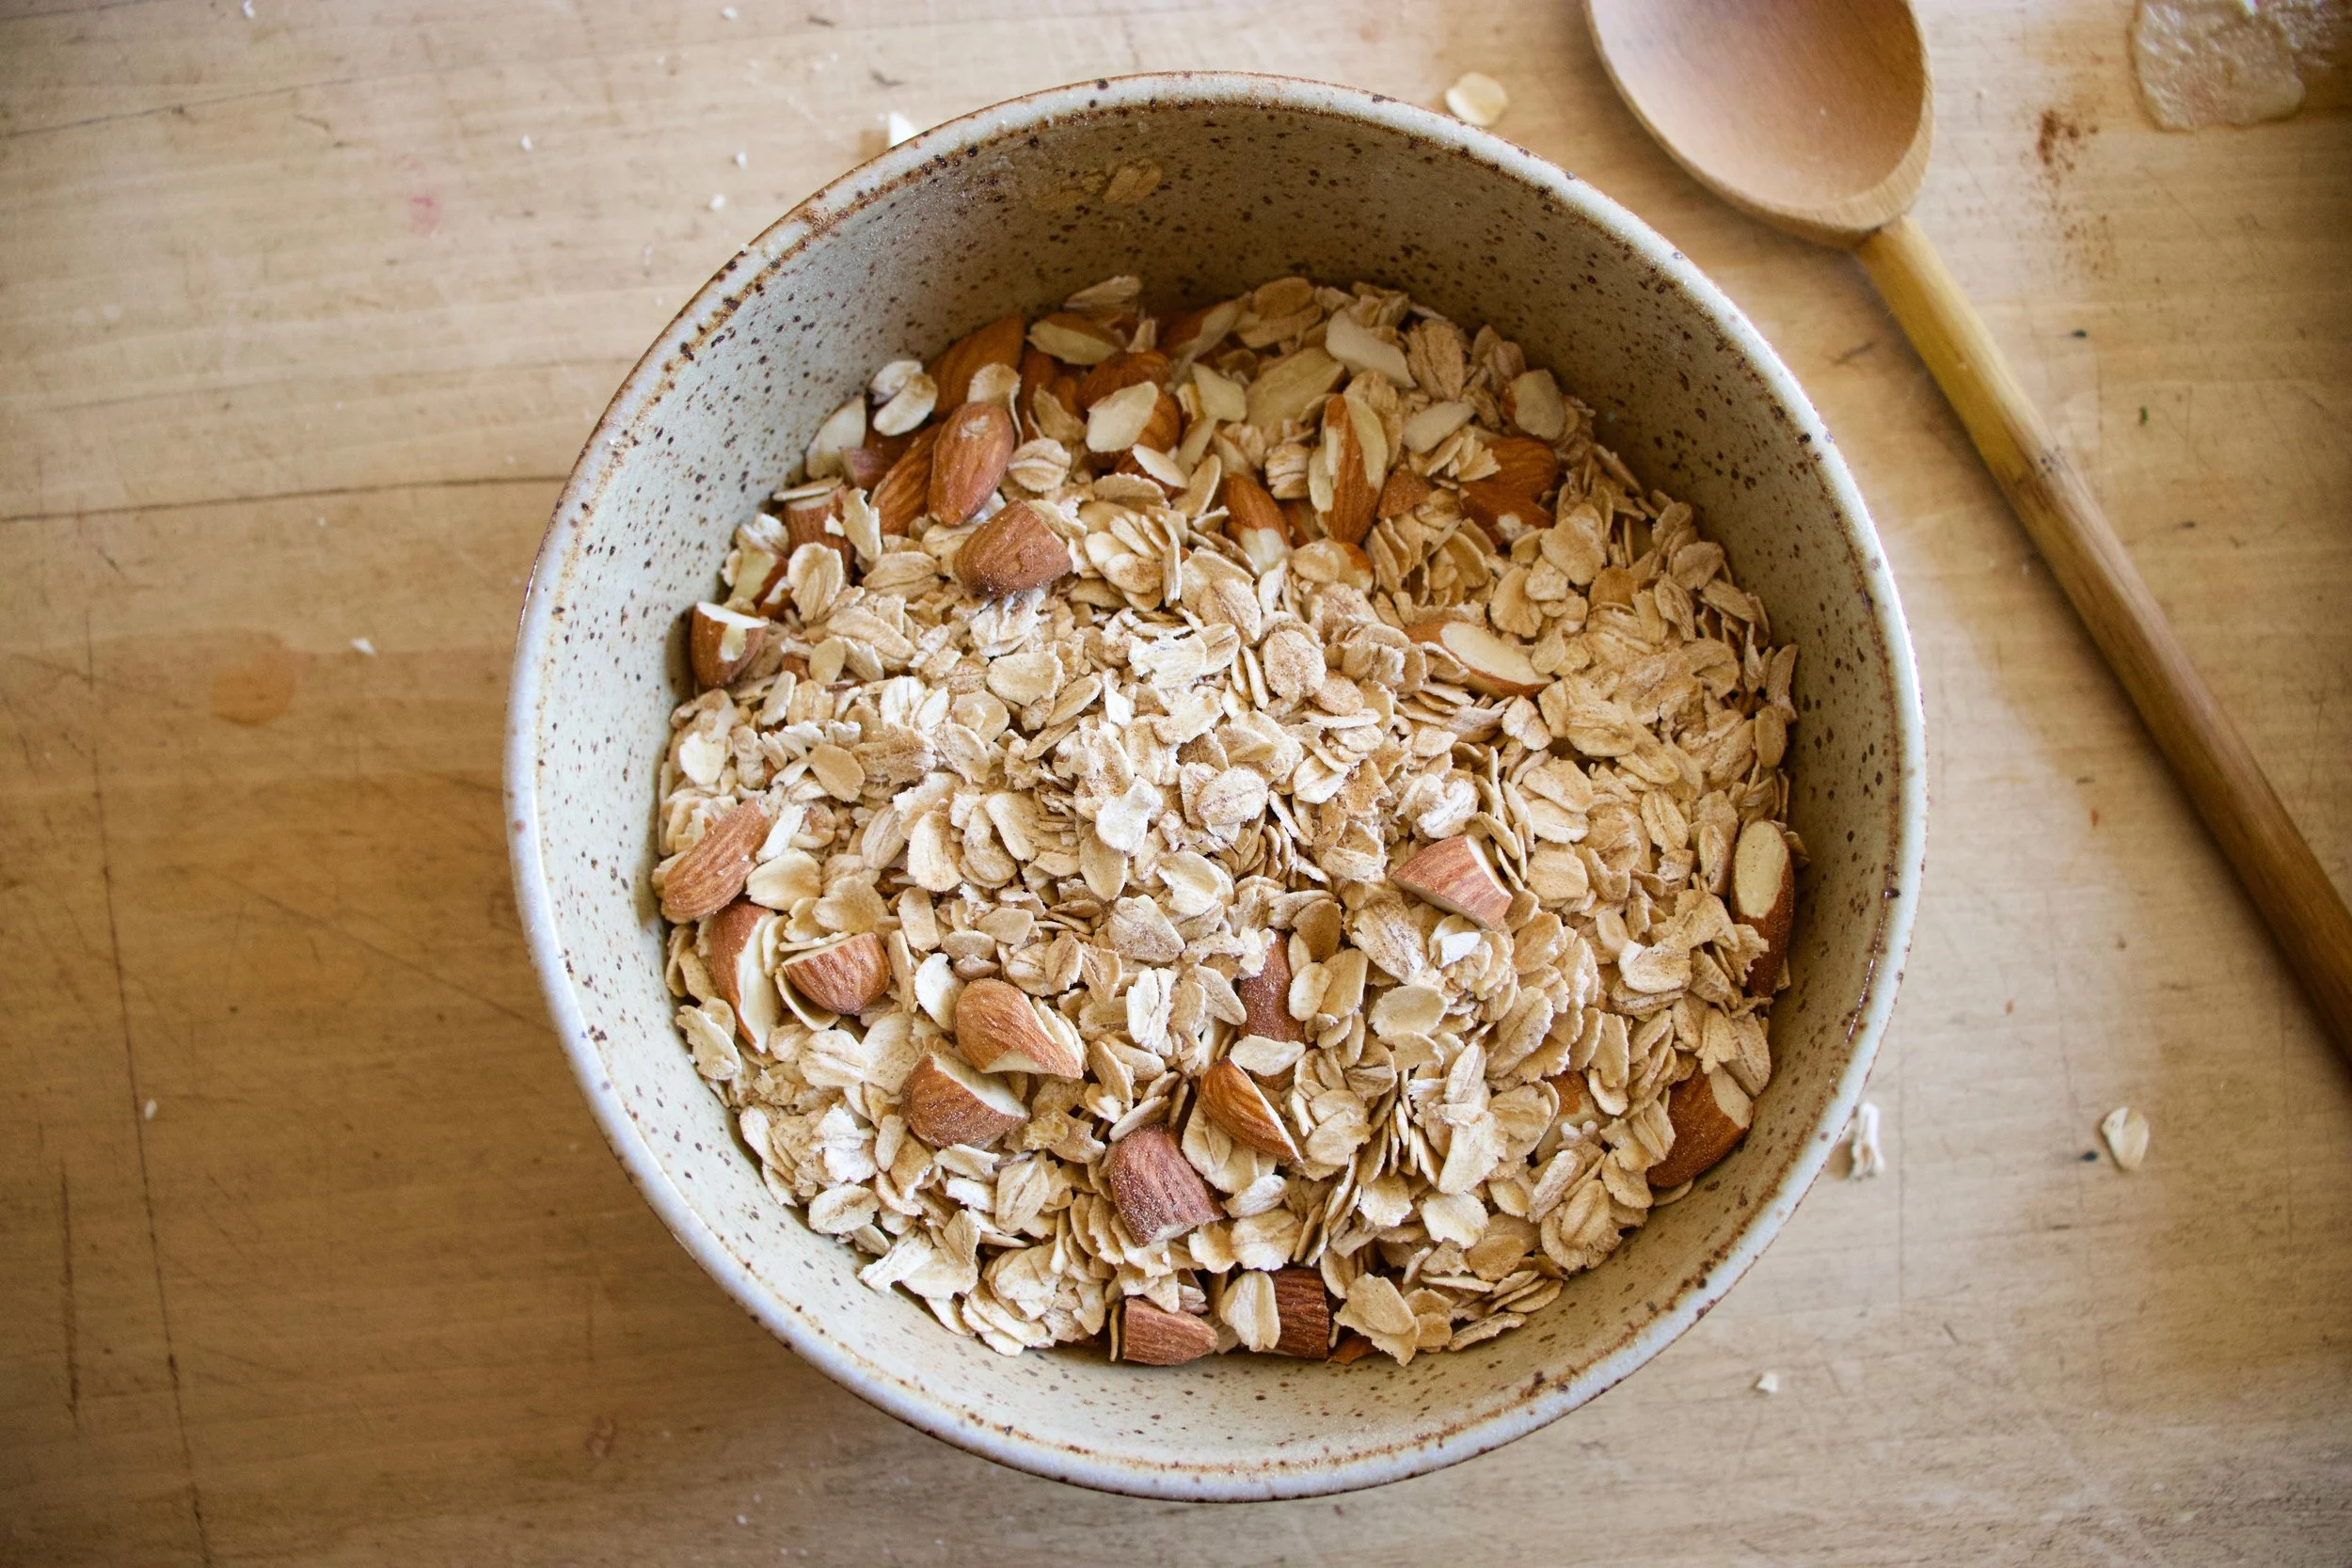


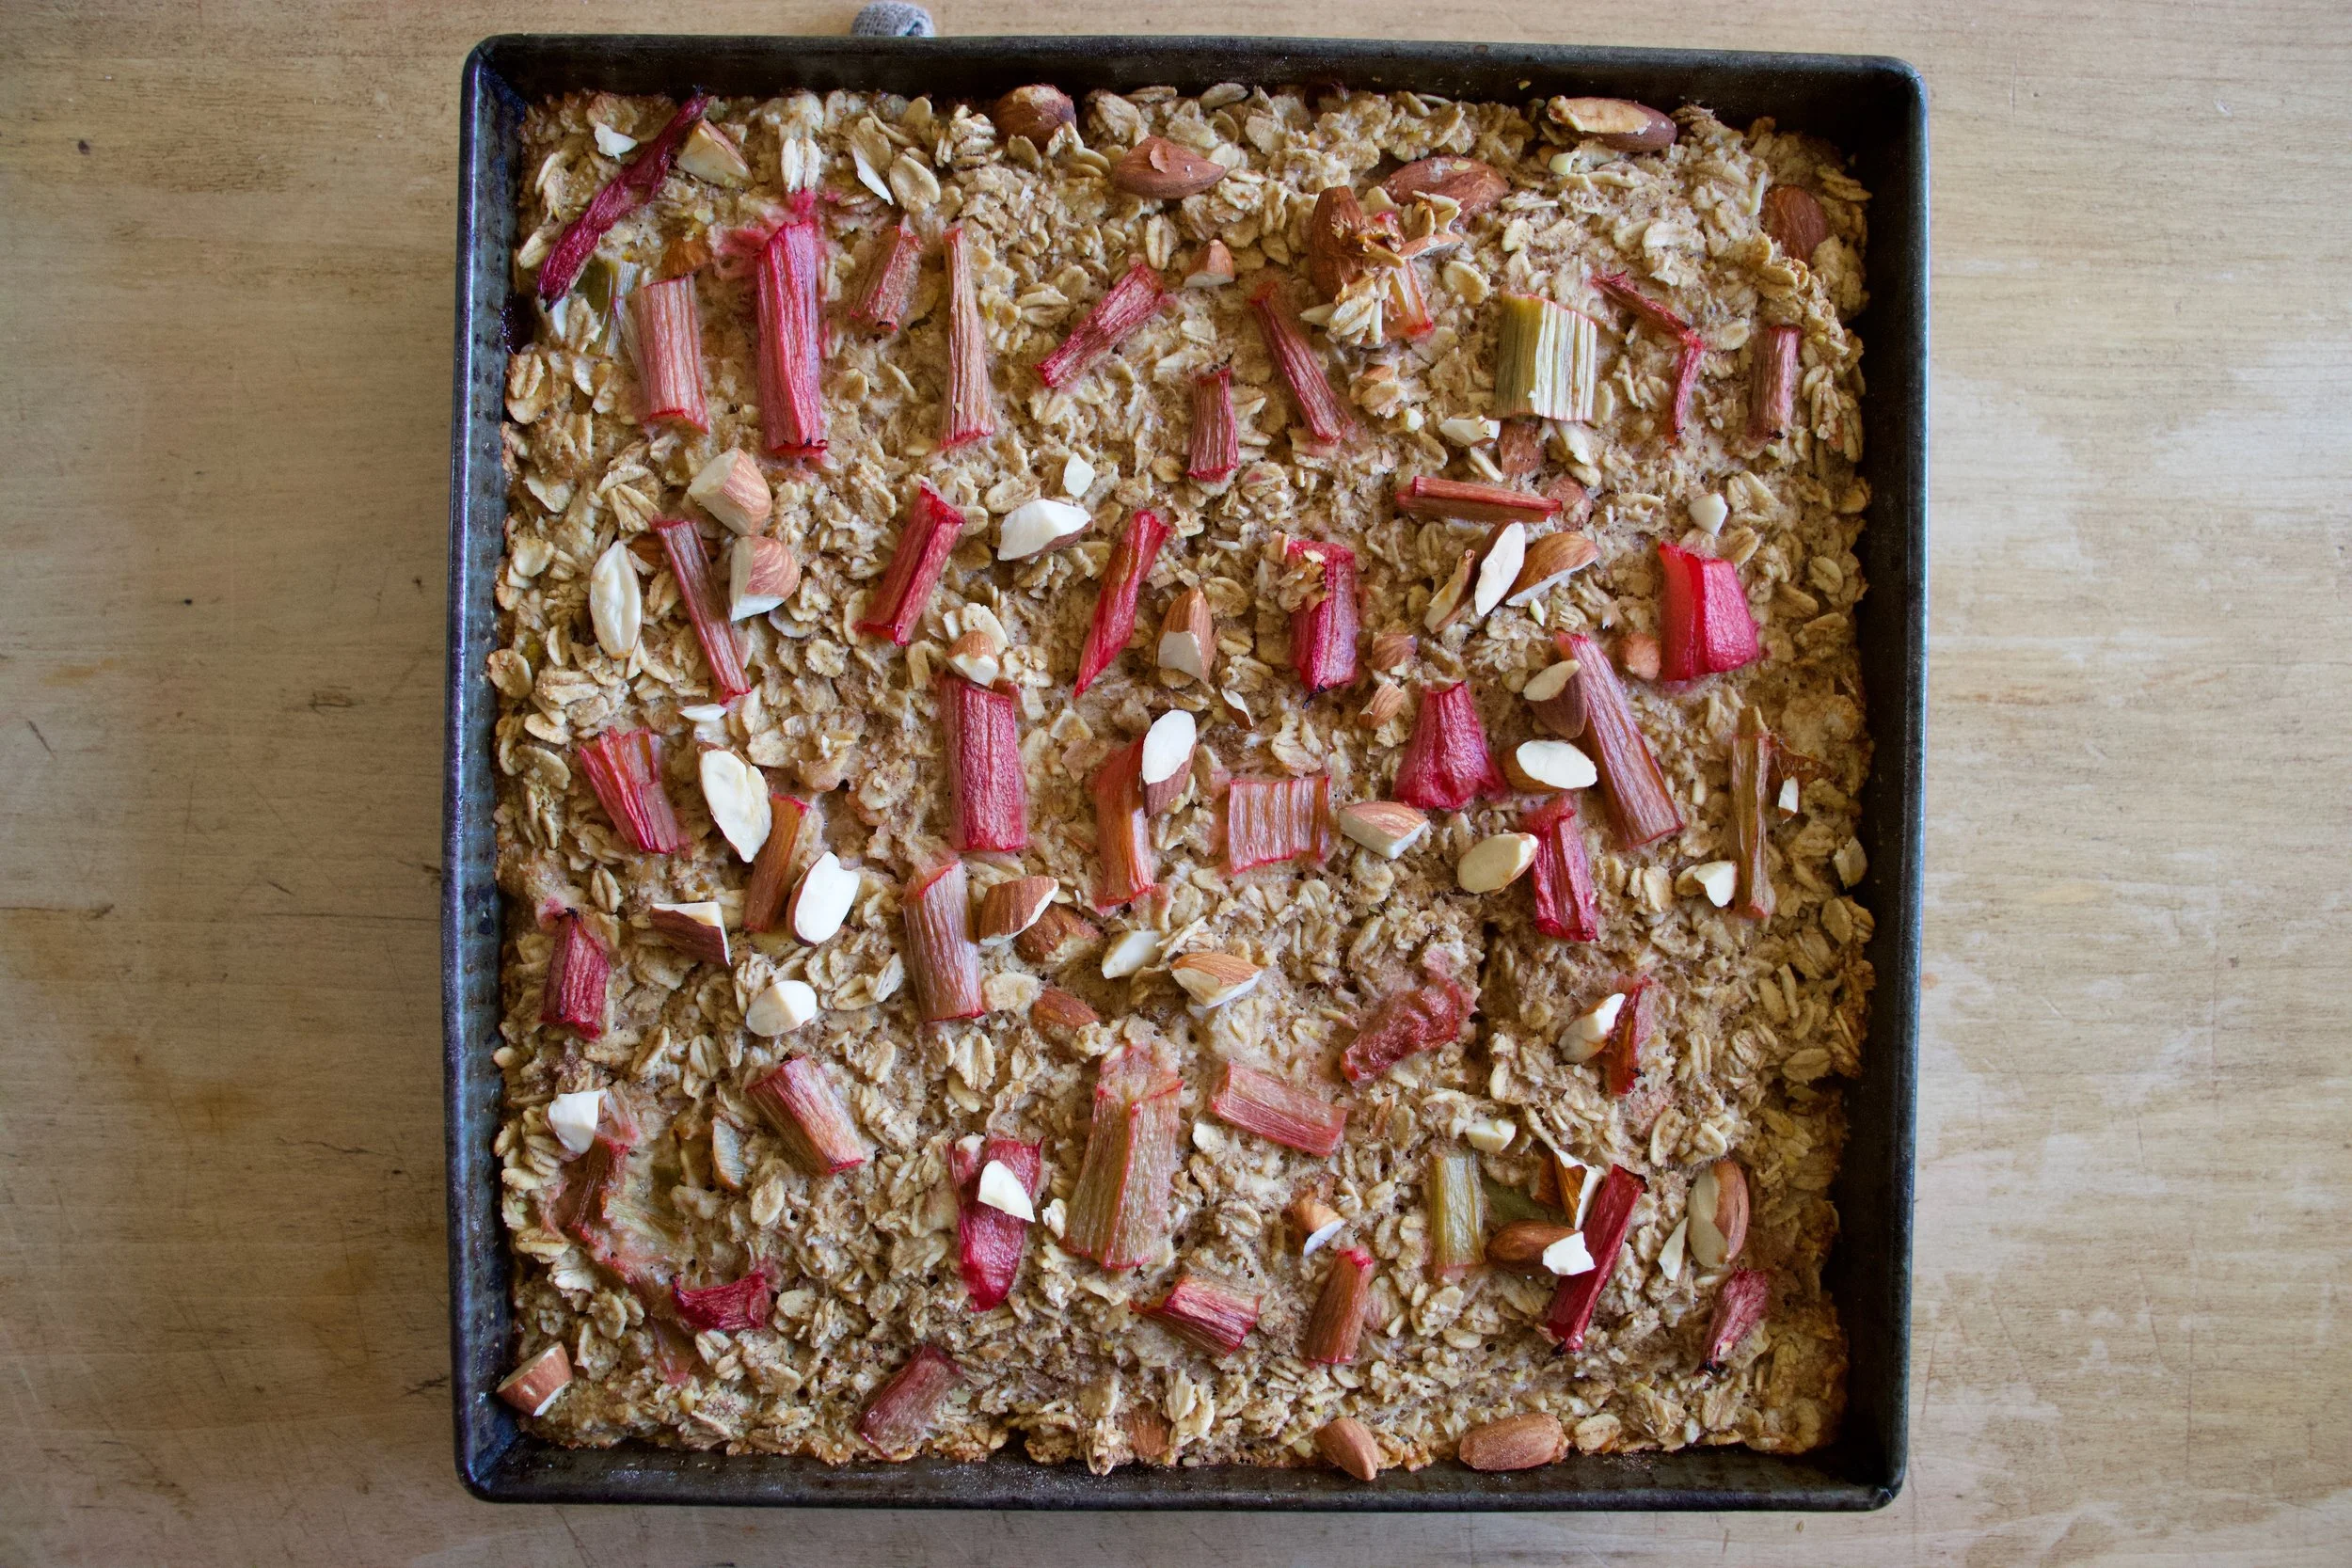
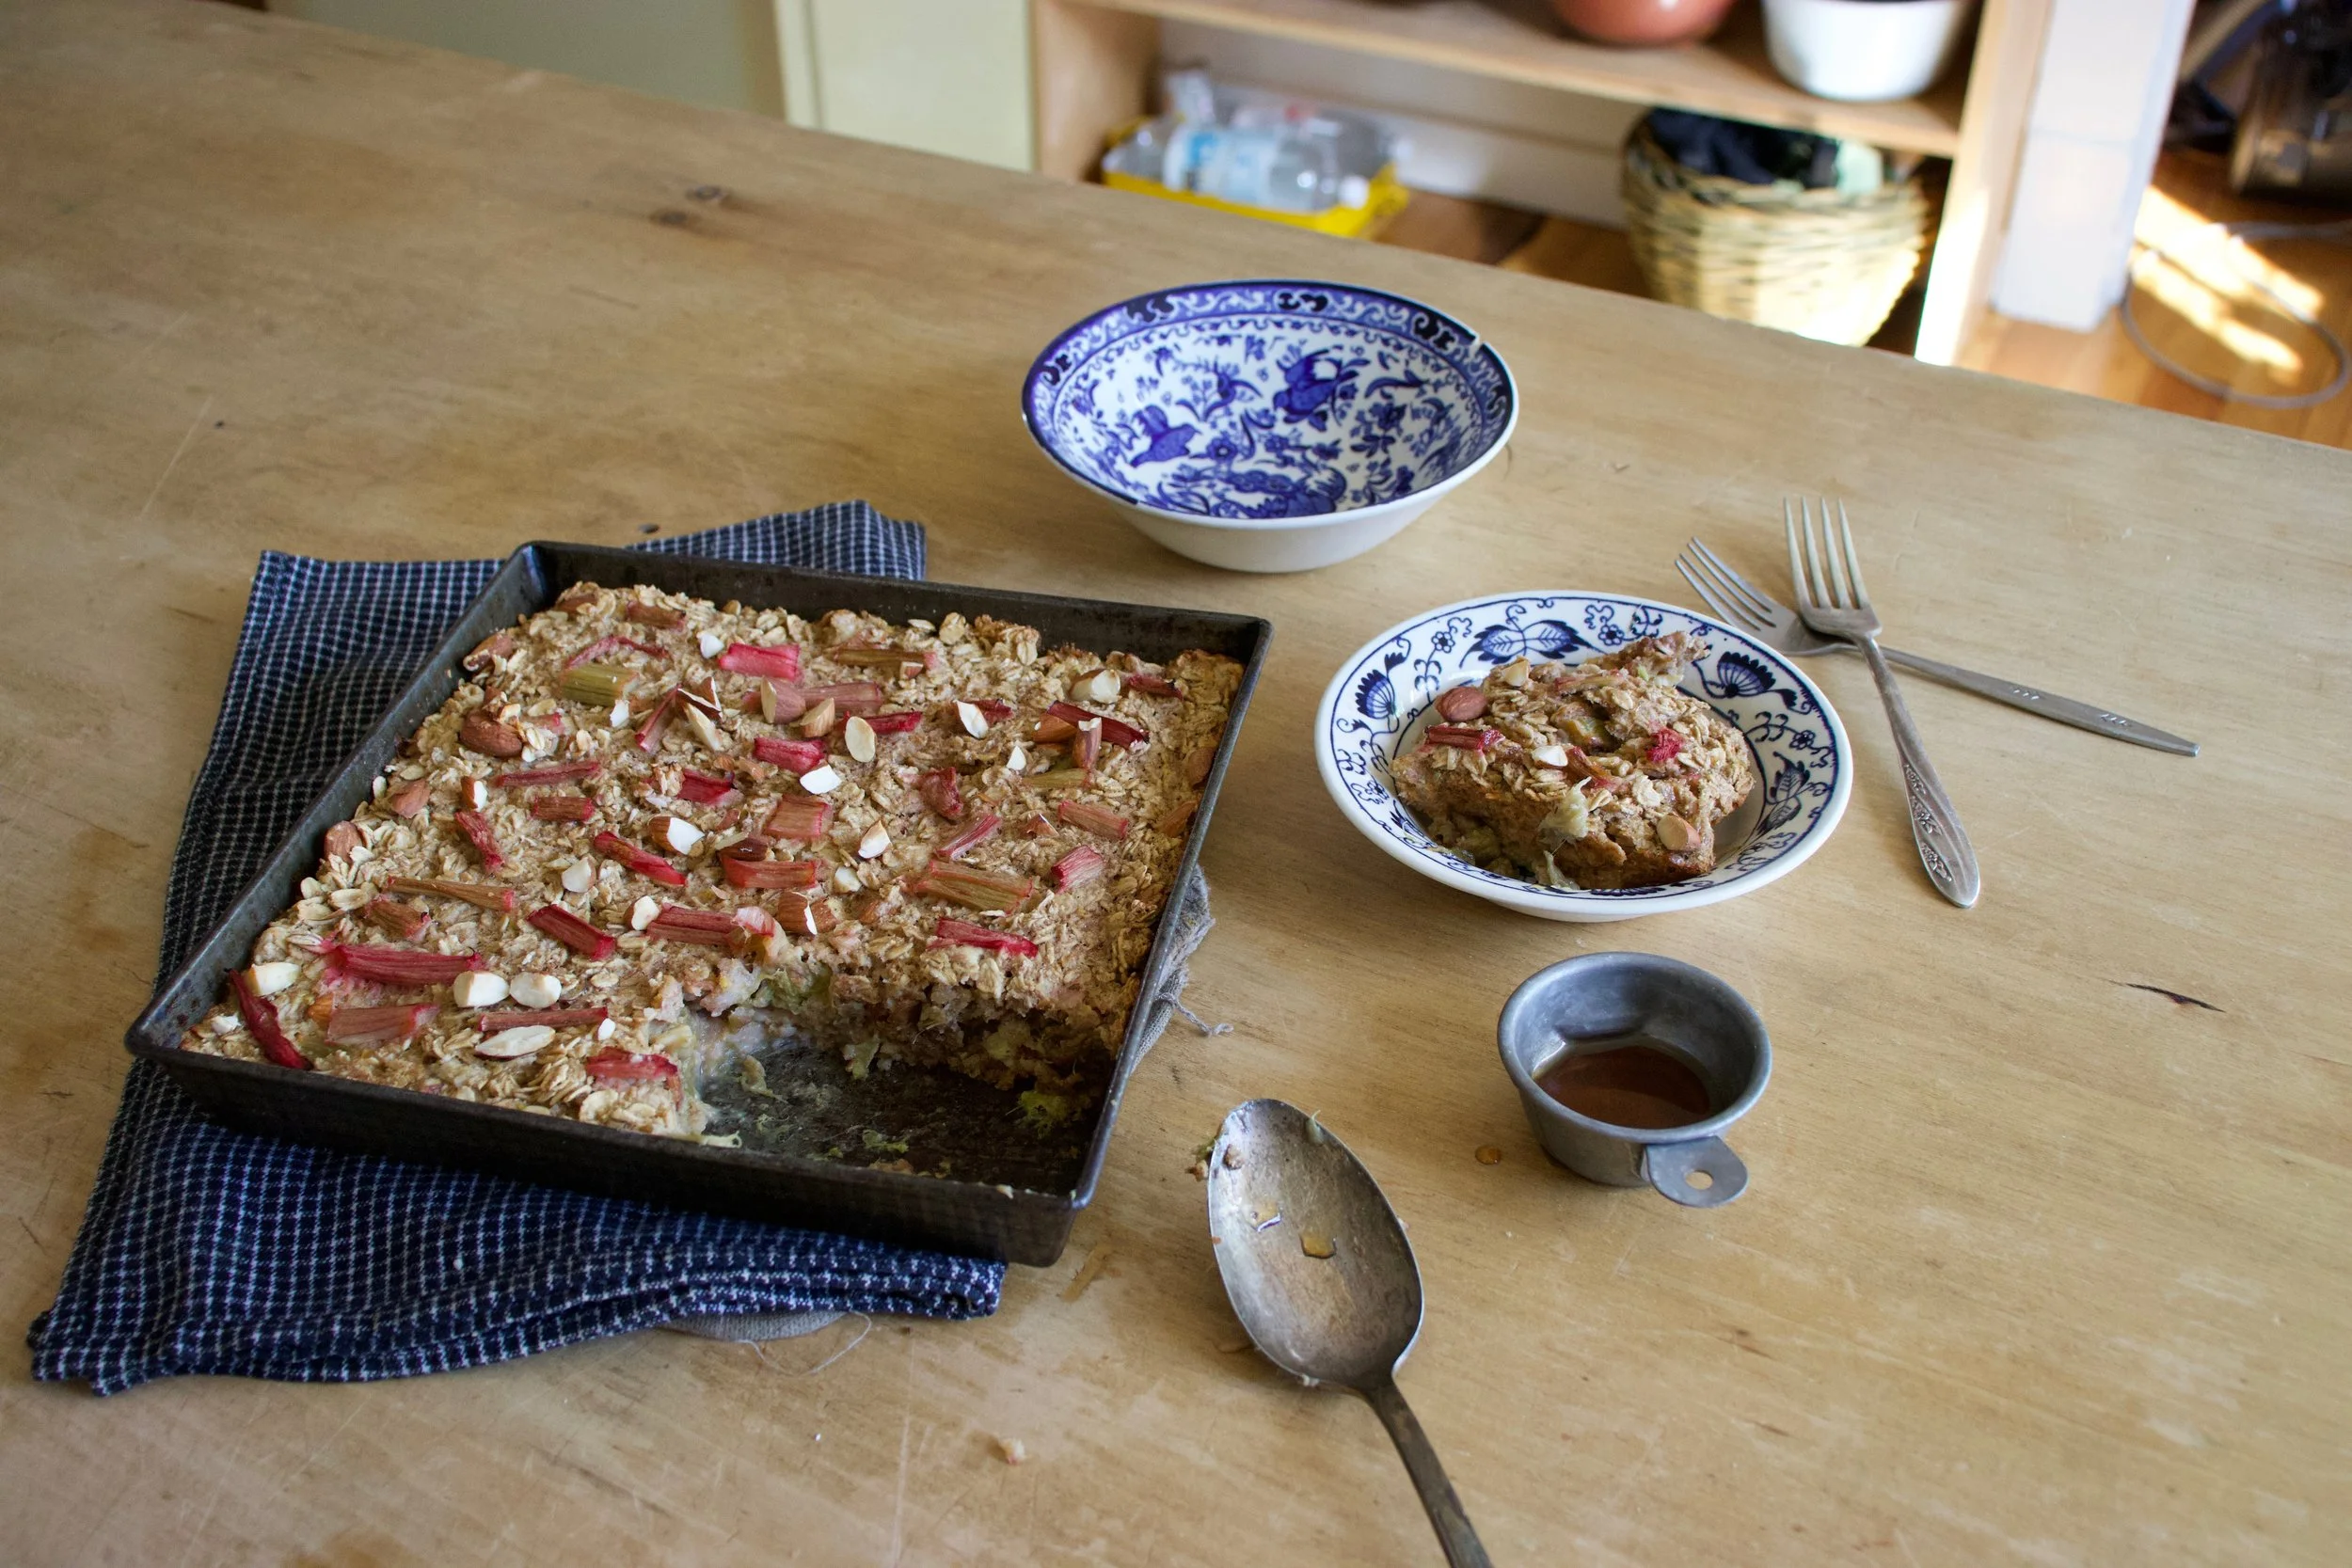


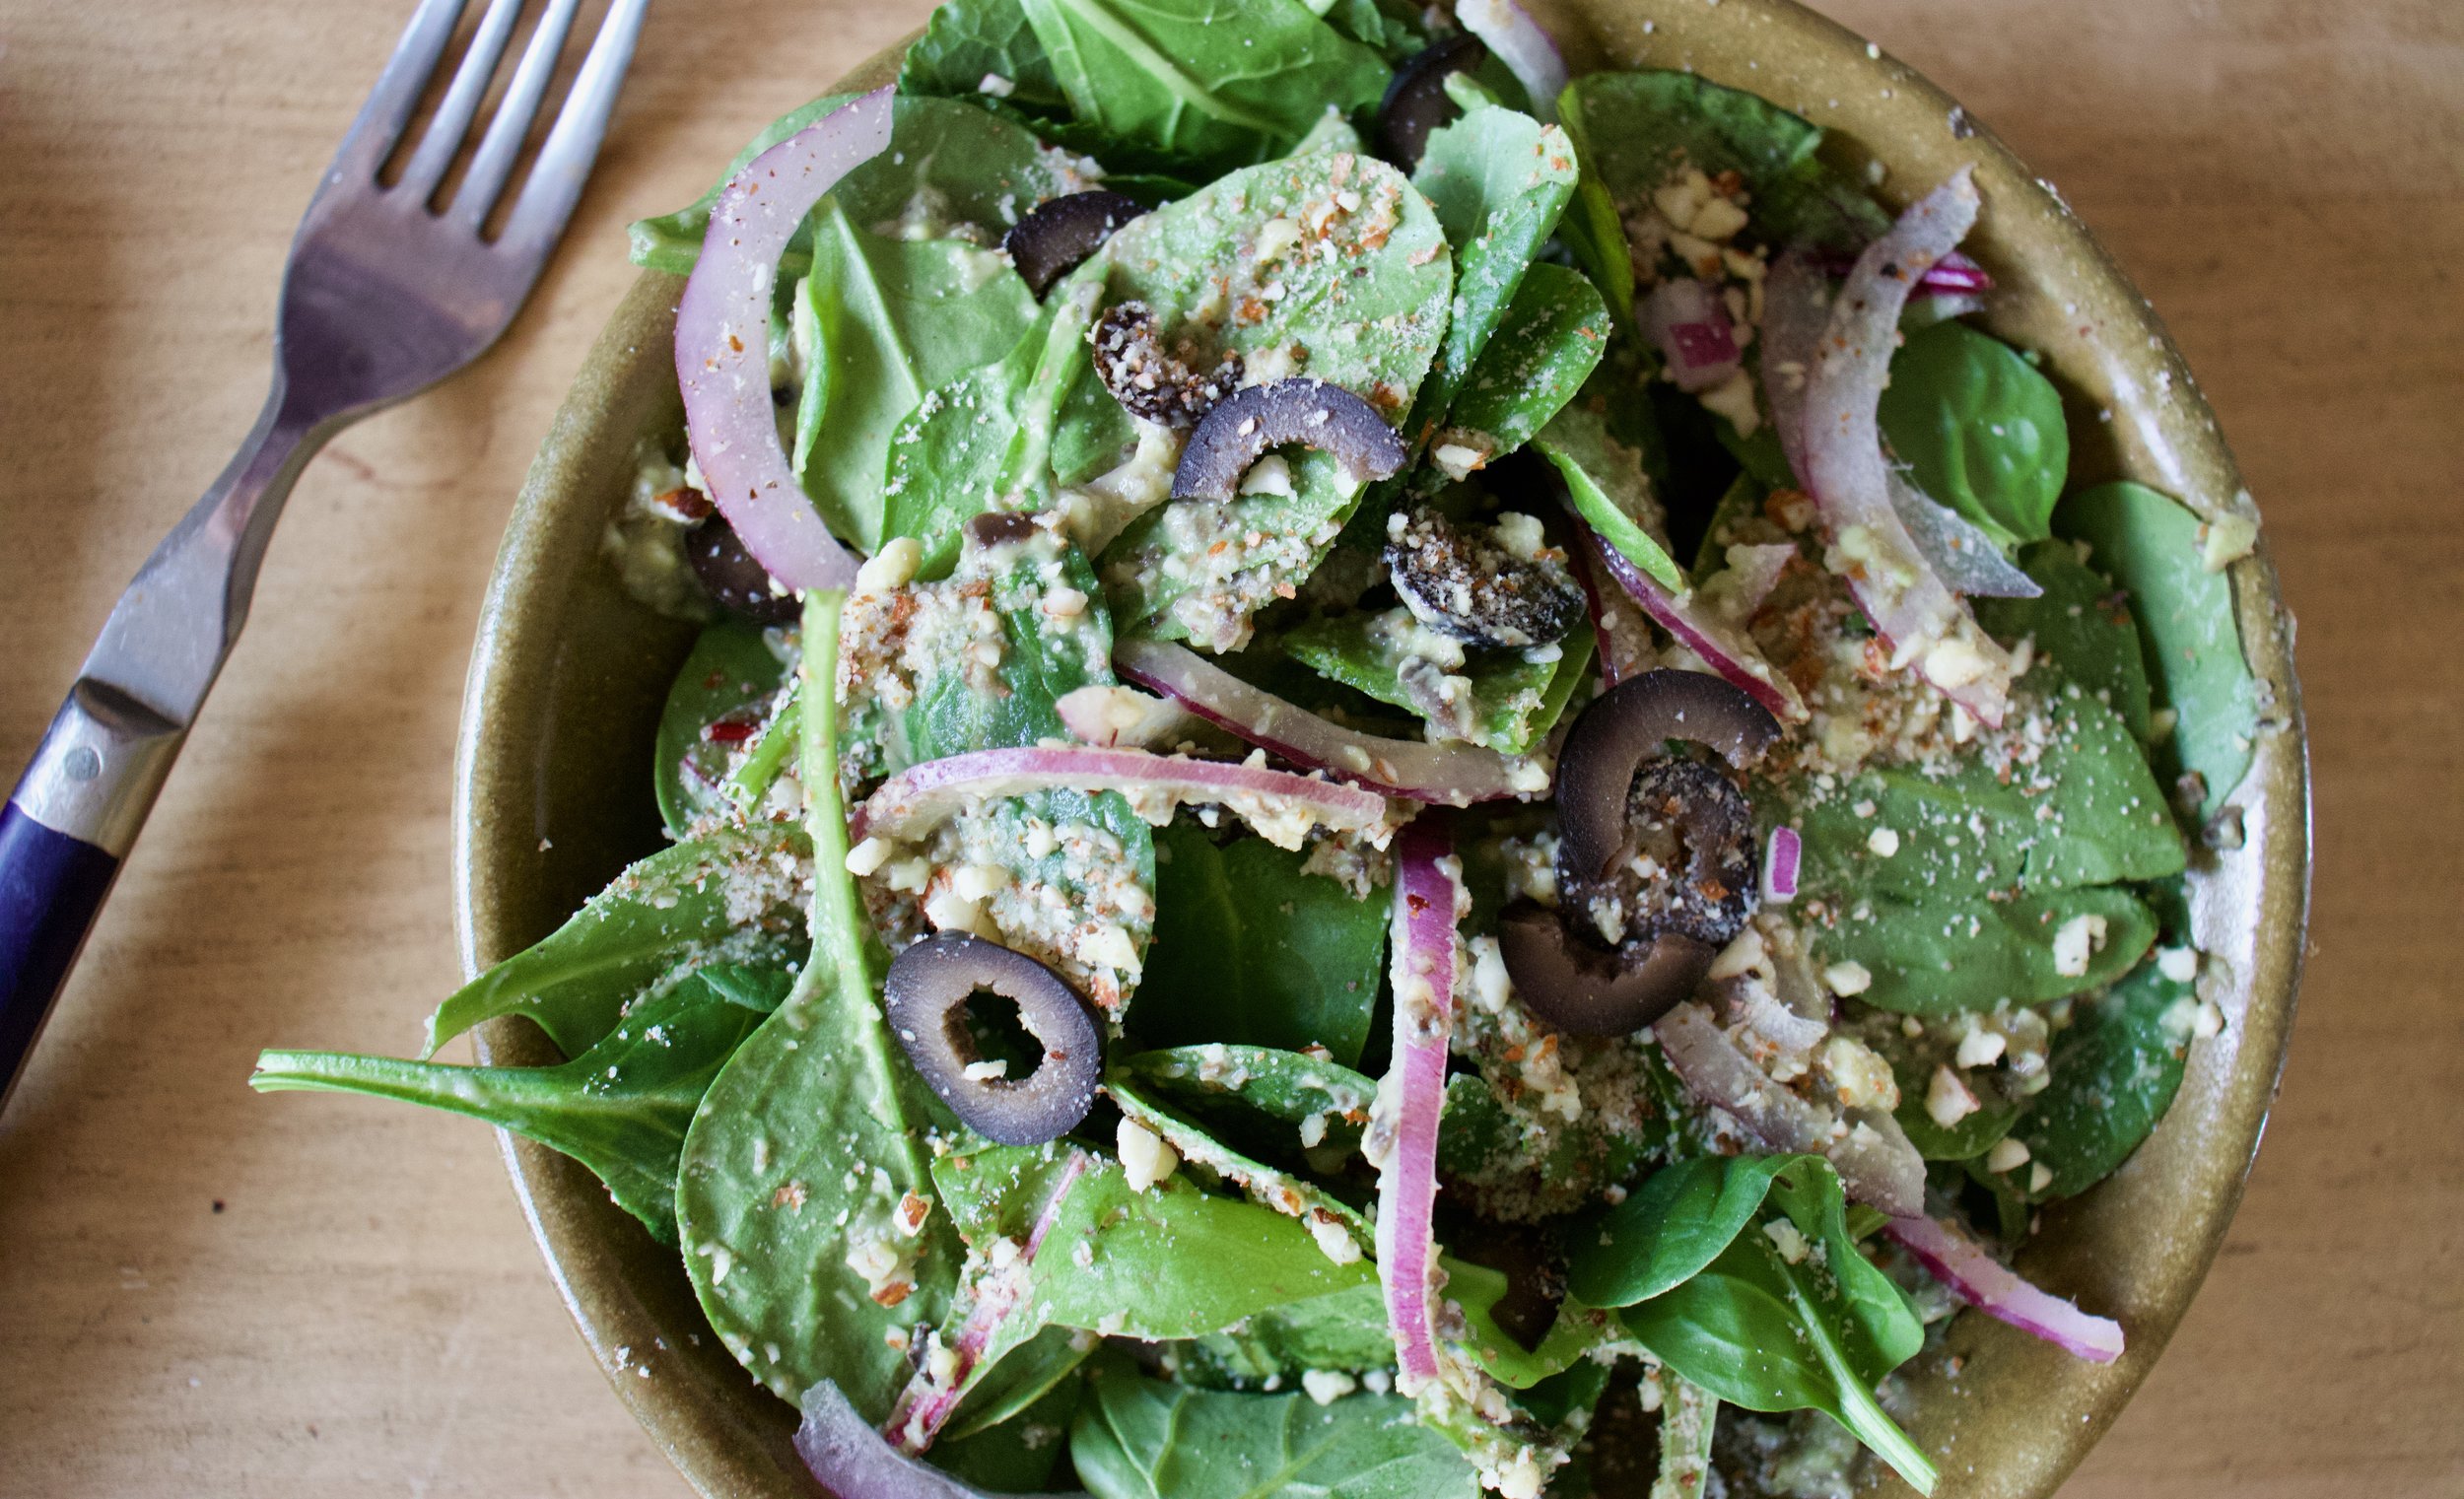
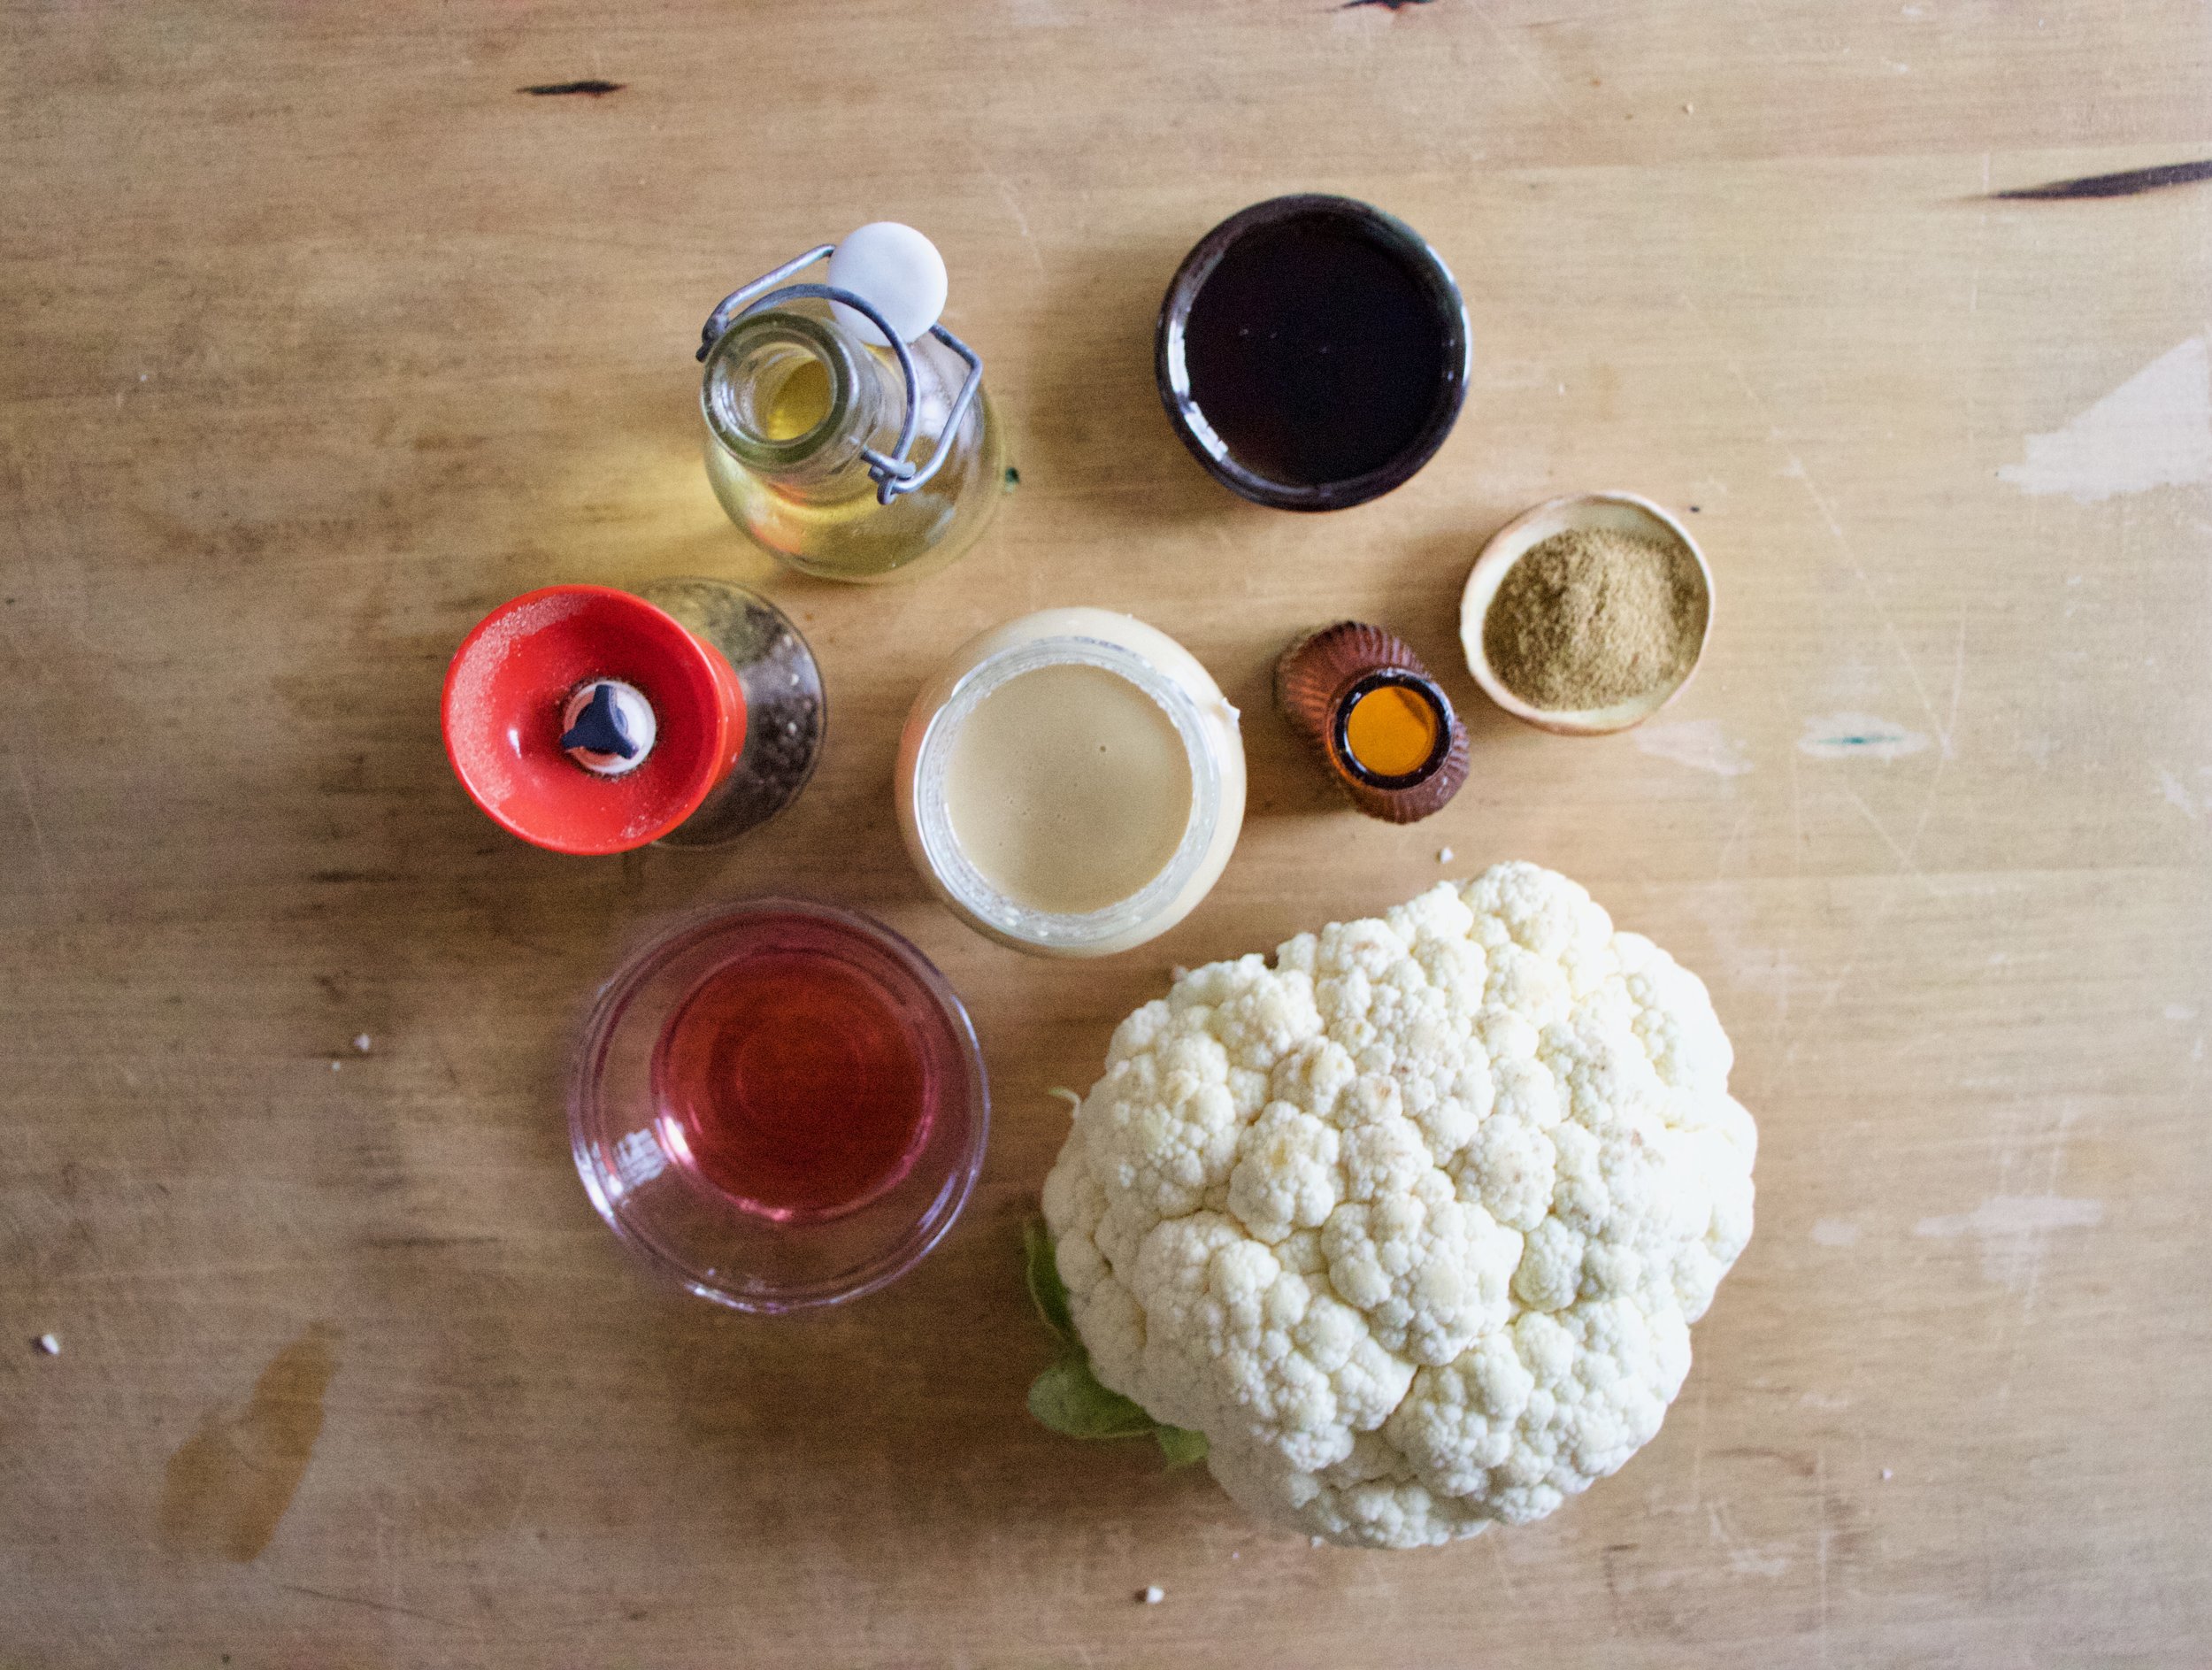


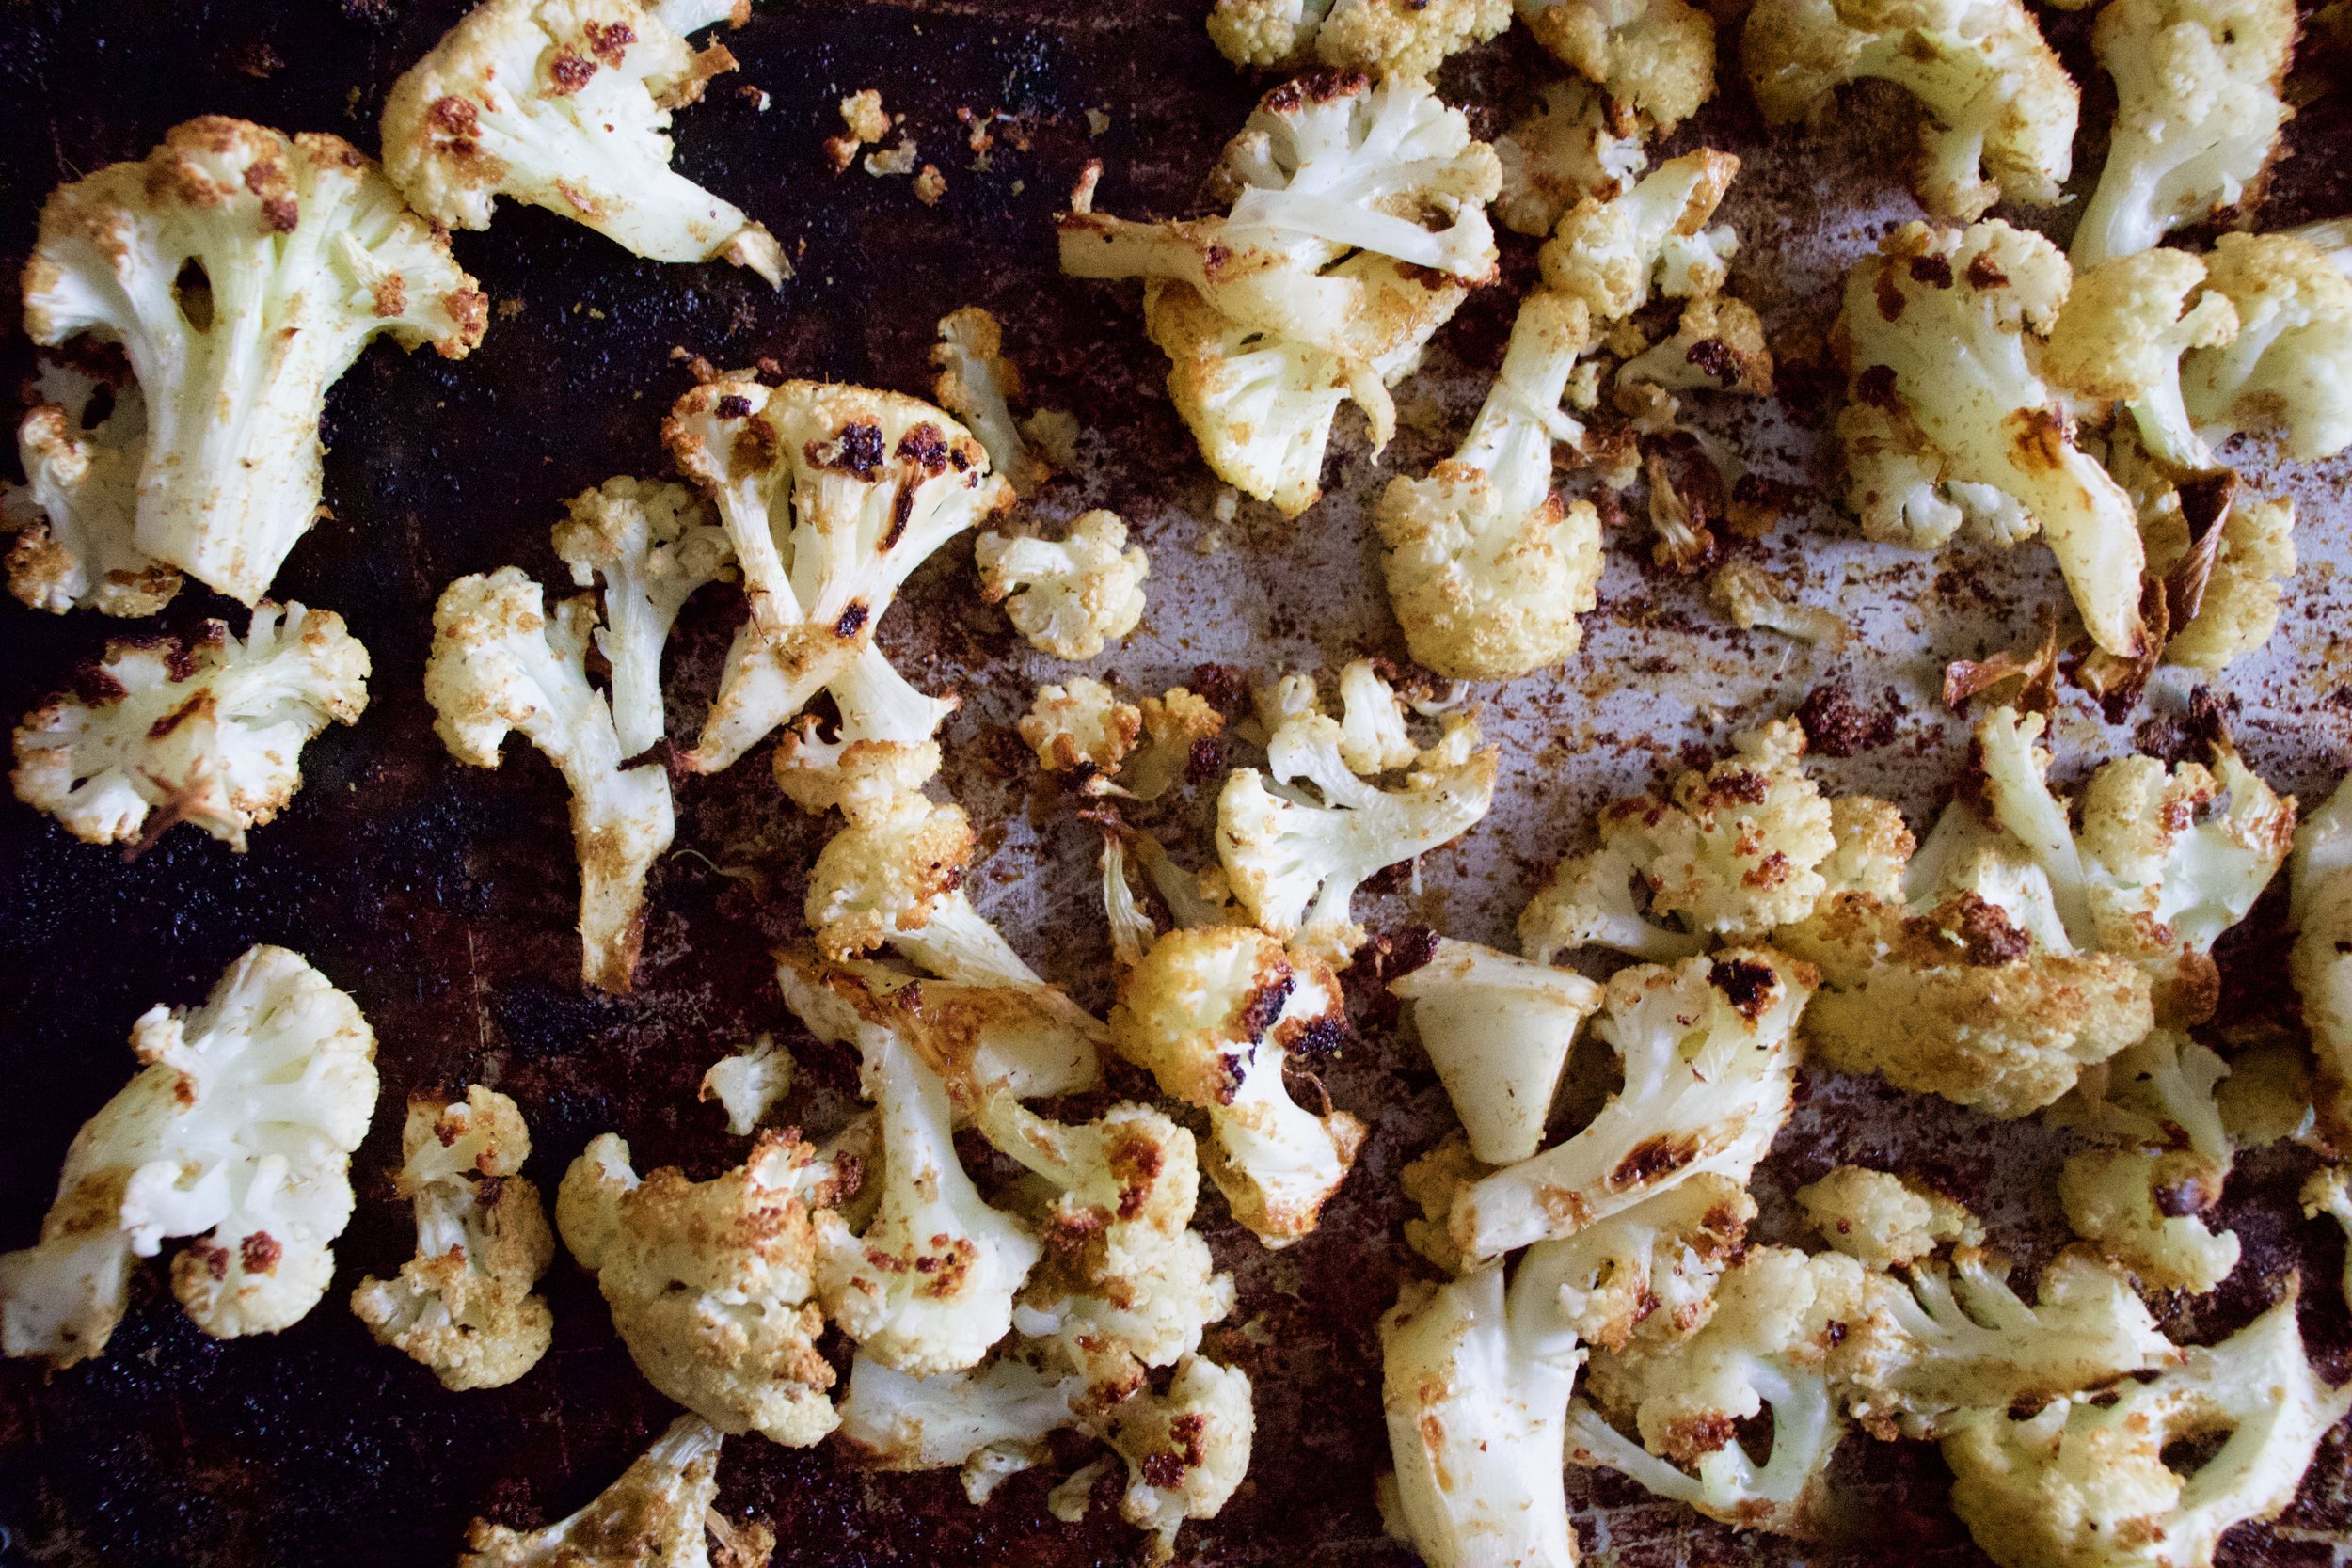


 No matter what is going on in my day, seeing a blue sky like this puts a smile on my face….To bad that smile turned to ice and my face froze in place. Because for some reason, winter around here now means below zero all the time. I mean, I love winter, but I am not going to lie… I wouldn’t mind if the wind would stop blowing and we had a couple of days of above zero weather.. and maybe a good foot of snow. I guess I’ll just have to be patient, cause its bound to happen. I mean, we live in Vermont, and if nothing else, we get weather.
  The mister called these snow mounds goosebumps… I think that is exactly what they are
 And oh how I cannot handle how freaking cute she is!! Plus, a shout out to my brother in law….MADLOVE!
 Fresh snow..Even though it was -15, I had to stop and take this picture. The colors were amazing
 Cabbage at the farm share pick up! Love ICF!!!
 89 cents a pound for fresh organic cranberries. Score!! Made these Oatmeal fresh cranberry coconut chocolate chip cookies with them. Big hit.
 This picture was taken exactly a year ago…..The mister and I were finally putting in the bathroom of our tiny little home…. And look at that awesome sink! (another amazing salvage yard find) If you ever need or want to remodel a bathroom, I suggest using a old cast iron utility sink. So practical, so functional, so pretty.….it makes me happy everyday!


THE LOVELY CRAZY
May 20, 2019 by maximios • Blog
I found another bag of frozen rhubarb in the chest freezer which is never a bad thing, but my rhubarb patch outside is growing strong and I will have all the fresh rhubarb I could possible eat within the next few weeks. So found rhubarb just means I need to eat it right fast before the fresh stuff comes in. (I haven%u2019t had a problem with that. it%u2019s almost gone already). Plus the other day while I was digging up and transplanting raspberry bushes to the back yard, my neighbor came over and gave me a gallon of frozen raspberries, harvested from said bushes that I was currently planting in my yard. Score for me! Free bushes and berries%u2026I have such nice neighbors.
So the logical thing to do with my new found and giving bounty was of course to hurry up and bake something. Cobbler. Why cobbler? Well, why not? I figured the mr would really like it and eat it and I also didn%u2019t want to make anything to fussy because I was just to dang busy spending all of my extra time outside doing outside things. And cobbler, it%u2019s not fussy because it is basically biscuits and jam baked up all together. Not a lot to think about and comes out looking all homey and sweet and smelling all nice and cozy. Doesn%u2019t that sound nice? And not a pain in the ass?
And best part. A made cobbler works as dessert or breakfasts or just a snack. Just asked the mr. He ate it for all the reasons. With a dollop of yogurt or cream of course because he is fancy like that.
And yeah the fruit I used was frozen, but fresh works just the same here too.
Now, lets get to that cobbler.
The stuff. Raspberries (frozen), rhubarb (frozen), sugar, flour, salt, baking power, cinnamon ,almond milk, apple cider vinegar, cornstarch, and oil.
Raspberries, rhubarb, sugar, cinnamon, cornstarch. Its all there in the bowl. Just needs to be mixed. So mix it.
Dump fruit mixture into well greased 8 inch pan and pop it into a hot oven to get a head start on baking.
While the fruits in the oven, make the biscuit dough. Mix the dry together then mix in the wet until just incorporated and a sticky dough forms.
Pulled from the oven, the fruit is starting to cook down and whoa, it just smells so good!
Drop on the biscuits dough on top of the fruit (careful of the hot pan). Evenly if possible, but don%u2019t work to hard to make it look perfect. Imperfection makes it look perfect, you know?
Once biscuits are on, lightly brush the tops with a little milk and sprinkle with more sugar then pop it back into the oven for another 25-30 minutes or until the biscuits are baked.
Pulled from the oven with a bubbly filling and a golden brown biscuity top. Things are looking good here.
And now it%u2019s time.
Dig on in my friend. Sever with something creamy like whipped coconut cream or some type of yogurt or ice cream situation of your choice. And again, this can be your breakfast.
Happy spring people!
-C
make a a 8 inch round which serves 5-6
For the Filling
2 cups raspberries (fresh or frozen)
2 cups rhubarb chopped into 1/2 inch to inch long pieces (fresh or frozen)
1 1/2 tablespoons corn starch
3/4 -1 cup sugar (lesser amount if you like a little more tartness. I used lesser amount)
1 teaspoon cinnamon
For the dough
1 cups all purpose flour
1 1/2 teaspoon baking powder
1/2 teaspoon salt
3 tablespoons sugar
3 tablespoons neutral flavored oil
1/2 cup plant based milk
1 teaspoon apple cider vinegar
Preheat oven to 350.
In a large bowl mix together the rhubarb and raspberries with the corn starch, sugar, and cinnamon. Grease a 8 inch round pan the is at least 2 inches deep (can use a slightly large pan or a square) and dump in fruit mixture. Place into oven to bake for about 15 minutes or the fruit starts to break down.
While fruit is baking, mix up biscuit dough. Flour, salt, 2 tablespoons sugar, and baking powder go in a large bowl and mixed until combined. Add in the oil, the milk, and the vinegar. Mix until just incorporated and a dough has formed.
Remove the fruit cooking from the oven. Turn heat up to 375.
Carefully drop spoonfuls of biscuit batter on top of fruit. Brush the top of the biscuits with a little milk and sprinkle with remaining tablespoon sugar. Place the pan back into the oven and bake for another 25-30 minutes or until the biscuits are all nice and golden brown on top.
Remove from oven and let cool for a few minutes before serving. Serve warm with a scoop or dollop of soothing creamy (coconut cream, yogurt, ice cream%u2026..whatever floats your boat.)
Left overs can be stored in pan, just cover it with something and place in fridge. Can be eaten cold to or reheated in microwave or oven.
It%u2019s a smoothie. And no, we have never really been smoothie people in this house, but what can I say, sometimes smoothies happen, especially when you have about 20 ripe bananas in the fruit bowl with no room in the freezer and no need for 7 loafs of banana bread.
So I smoothied. And I like it (a lot).
This is a smoothie of simplicity. Nothing fancy. Simplest of simple. Straight to the point. And all sorts of good.
You might think, does this simple smoothie you speak of taste very good? Yes, yes indeed it does. It is all sorts of fantastic. Basically if you like creamy, nutty, oaty, bananery things, you will like this. And it%u2019s a perfect breakfast, snack, dessert, or just wanting a little treat like thing that is not garbage food. A smoothie of all smoothies with the most basic ingredients. And takes about 15 seconds to whip up. Can%u2019t complain about that.
To the smoothie goodness!
The stuff. A ripe banana, some old fashion rolled oats, a pinch of salt, water, and a smidge of maple syrup if you want it.
Everything goes into blender.
And blended until smooth. Hence the word smoothie.
Pour it into a cup (or if you are feeling primal, drink it straight from the blender%u2026 it%u2019s totally cool)
And done.
A banana oat smoothie.
Let the good time roll!
-C
makes 1 smoothie
1 very ripe banana
1/3 cup raw old fashion oats
1 1/2 cups water
pinch of salt
a tablespoon or two of any sweetener you like (optional)
a pinch of cinnamon (optional)
Place everything into a blender and blend until smooth. Pour into a cup, sprinkle with cinnamon if you wish, and drink right away.
I am sadly at my last few bags of frozen garden foods from last season. As of now I have a bag of tomatoes, a couple bags of shredded zucchini, and a bag of rhubarb. Well, had a bag of rhubarb. I think I have eaten almost all of it already. My rhubarb patch better get up and producing stalks soon. And as for the rest of the veggies that I will require. Guess I am going to be surviving mostly on roots from farm share (we are getting a lot more greens though!!!!) and probably doing a bit more grocery shopping then I care too. A few more months. I can do it.
Anyway, enough about my freezer and lack of fresh produce problems.
Here in Vermont maple season is well on it%u2019s way making it a perfect time for anything maple. And rhubarb. Yeah I am using my frozen rhubarb from last year, but any time now (after the snow melts) there will be plenty of stalks for the taking. There will be so much maple and so much fresh rhubarb which are the perfect taste combination. Exciting times! And when added to oatmeal, things just get more gooder. (I know gooder is not a word but I think it should be) Oatmeal, especially baked, is the stuff where all gooder things start.
Have you had baked oatmeal yet? It truly is fantastic. Not at all gummy and gloopy like stove topped cooked oatmeal (but I like it like that too). It still has a good bite to it while still being soft and creamy and boy oh boy is it just the bees knees. With the addition of some crunchy almond friends, well even better. Trust me. If you are a oatmeal eater, you must try it baked. Best part is that it can be eaten as breakfast but also I have been serving it to the mr for dessert with a healthy drizzle of more maple. It%u2019s that good friends. From breakfast to dessert. Everyone is happy.
To the baked oatmeal.
The stuff. Old fashion oats, cinnamon, salt, baking powder, rhubarb (fresh or frozen), REAL maple syrup, some plant milk, a few flax eggs, a bit of tahini, and some almonds.
To start. Oats, cinnamon. salt, baking powder and almonds get a quick toss together in a big bowl.
If you rhubarb is not already chopped up into inch long pieces, do that. I already did before freezing it so yea me. Once its chopped, layer almost all of it (reserve a few small needful to toss on top) into a lightly greased 9×9 inch baking dish then cover evenly with the oat mixture.
In now empty bowl mix together the milk, the flax eggs, the tahini, and the maple until evenly incorporated.
Pour the wet mixture all over the oats and let it absorb.
Once the liquid is all absorbed , top with any left over almonds and the left over rhubarb. For good looks.
Pop into a hot oven to bake.
Golden brown with crispy edges. Rhubarb and maple baked oatmeal for all your maple, oaty and rhubarbie needs.
Fresh from the oven scooped warm into bowls. Top with extra maple if thats what you should want do.
Enjoy and happy maple season!
-C
Make a 9×9 pan of oatmeal
2 1/2 cups old fashion oats (make sure gluten free if need be)
1 teaspoon baking powder
1/2 teaspoon salt
2 teaspoon cinnamon
1/3 cup maple syrup plus more for serving
1 tablespoon tahini or any other nut butter
2 flax eggs (2 tablespoons ground flax seed with 6 tablespoons warm water)
2 1/2 cups fresh or frozen rhubarb chopped into inch long pieces
1 1/2 cup plant milk (water works but it won%u2019t be as creamy)
1/2 cup chopped almonds (optional)
Preheat oven to 375
Lightly grease a 9×9 inch baking pan (I used metal because it makes for crisper edges but glass works too) and dump 2 cups of the rhubarb in and evenly distribute on the bottom. In a large bowl mis the oats, the baking powder, salt, and cinnamon together. Mix in chopped nuts if you are using. Evenly cover rhubarb with oat mixture. In now empty bowl mix together the milk, flax eggs, maple syrup, and tahini until evenly incorporated. Pour mixture over oats. Let the mixture sit for a few minutes until the oats have abosbed all the liquid. Toss the rest of the diced rhubarb and a few more chop nuts to the top and pop into the oven to bake.
Bake for 30-40 minutes (shorter time for a wetter oatmeal, longer for a denser crispier oatmeal)
Once baked to your likeness, remove from oven and let cool for a few minutes just so it is not super hot. Scoop into bowls and serve warm with extra maple and milk or whatever you might want to serve with it.
Left overs last great in fridge for 3-4 days or individual portions can be frozen for a month or two. Just pop into microwave for a couple minutes to warm up.
I have very strong feelings for heart shaped baked goods. I think that everything, all year round, should be heart shaped. How lovely would that be? It would be ever so lovely, or I would think so anyway. And yes, ok, I was thinking about Valentines Day when I made these cupcakes but don%u2019t let that be the only reason you make a cupcake, cake, or any other baked good into the shape of a heart or pink for that matter.. Hearts are just so sweet and cute and dare I say cuddly? (Can you cuddle baked goods? Let me know if you have and do. We should talk about that). And pink is just a fantastic color, especially when it is the color of the flavor. Purple-y pink equals a taste like berry so all just makes sense.
Anyways. Cupcakes. Made with nutty almond meal to taste all nutty, frosted with blackberry and clementine frosting which is a pairing that all party and non party people will love. A down right deeelightful combination that will, no matter your circumstance in life, make you smile. Because lets get this clear, these cupcakes might look all lovey dovey and Valentines Day-e and are very much a perfect Valentines Day treat, but also can be an everyday, run of the milll, straight up any day, all day cupcakes. Valentines Day does not own the heart or pink.
These cupcakes are for you to love and you don%u2019t need to worry if they love you back. That would be weird.
Slightly off topic thought. How awesome would it be if someone made a cute little teddy bear that when you squeezed it it would scream %u201cWHAT THE HELL! GET OFF ME!%u201d Hahahaha. That would be amazing.
To the cupcakes!
The stuff. Flour, almond meal, baking soda, baking powder, salt, sugar, soy milk, oil, vanilla extract, and apple cider vinegar. Also some blackberry jam, powdered sugar, some vegan butter, and a clementine.
In a big bowl, whisk together the granulated sugar, flour, almond meal, salt, baking powder, and baking soda.
Add in the oil, vanilla, milk, and apple cider vinegar. Mix until fully incorporated.
And that is some mixed batter.
Scoop the batter into well greased muffin tins. I used to different shapes and sizes because I wanted too. You can do the same, just be aware different sizes will cook at different times.
And into the hot oven they go.
Baked, popped out of the tins, and cooling to cool.
Frosting time. Butter, clementine zest, and jam mixed together makes for the prettiest color.
Add in the powdered sugar and juice of the clementine and beat with a beater.
Pretty pink frosting. All natural.
And now that the cupcakes are cooled (you must wait until they are completely cooled) get them frosted.
And of course, adding sprinkles will only make them that much better.
And now you got the cupcakes which makes it cupcake time.
Look at that smile. Thats a smile just for cupcakes, not at all because I told him too.
Happy happy.
-C
Makes 12-16 cupcakes (depending on size)
1 1/2 cups all purpose flour
1/2 cup almond meal
1/3 cup neutral oil
1 1/4 cup almond milk
3/4 cup white sugar
1 teaspoon baking soda
1 teaspoon baking powder
1 tablespoon apple cider vinegar
1/2 teaspoon salt
1 teaspoon vanilla or almond extract
For the frosting
3 tablespoons blackberry jam or preserves with or without seeds
2- 2 1/2 cups powdered sugar
4 tablespoon vegan butter
1 clementine (zest and some juice)
Preheat oven to 350.
In a large bowl whisk together the flours, salt, baking soda and powder and sugar until fully combines. In a separate bowl mix together the oil, milk, vinegar, and vanilla. Pour into the dry and mix, by hand, until full incorporated. Scoop batter into well greased muffin tins (heart or other shape up to you) and place into oven for 13-18 minutes (shorter time for smaller cupcakes, longer for larger sized) or until lightly browned and a tester stuck into a cake comes out clean. Pull from oven when done and pop from tin. Place on a wire rack to cool.
While cakes are cooling, make frosting. Beat together the butter, zest of the clementine, and jam. Add in the sugar and the juice and beat until fully incorporated. If the consistency is to thin, add a little more sugar, to thick, more clementine juice or if out of juice, a splash of milk.
Once cupcakes are full cooled, frost, add sprinkle if you would like, and then the only thing left to do is eat them.
Eat cupcakes, store left overs in an air tight container in the fridge for up to a week.
I love pomegranates but barely ever buy them because they are usually really expensive. A few weeks ago I was pleasantly surprised to find that that the grocery store was selling them at a reasonable price so I bought one. Duh. Anyway, that was a few weeks ago and I have had the pomegranate chillin in the fridge, just waiting for the perfect time to bust open and retrieve all the bright pink jewel like seeds. But I also kind of forgot about it. It was hiding behind a giant rutabaga. When I finally grabbed the rutabaga for some soup, the pomegranate reviled itself again. It was time, it needed to be eaten. And me being me, I can%u2019t not share right? So I asked the mr what he wanted me to bake. He said muffins, and that is how I came to pomegranate orange and poppyseed muffins. Look at me, poster child for sharing good things. I should get a gold star!.
Anyway, these muffins came out awesome. First, they smell so good because anything baked smells good but the orange really shines and the smell is still lingering in my hair. Secondly, people really were into them. The mr said they were amazing when I finally let him eat one (two actually because I made them mini) and when I brought them over to Megans house for dinner, my Dad at one, then two, then three.. ..He stopped at 5, and this was after dinner. When a guy eats 5 muffins and is not a muffin man, you take it as a good sign.
Do yourself a solid this cold ass weekend and bake something. These muffins are a good place to start.
To the muffins!
The stuff. Flour, baking soda and powder, and salt in a bowl. Poppy seeds, an orange, a pomegranate, sugar, oil, vanilla extract, and a little apple cider vinegar.
First, remove arils from the pomegranate. Cut the fruit in half, hold the cut side face down in your hand and place over a large bowl. Take a wooden spoon and wack the outside of the fruit and the seeds will just fall out. And yes , the juice stains so watch out.
Next, whisk together all the dry ingredients and add in the sugar, poppyseeds and the zest of the orange. Whisk again to combine.
And then add in the oil, milk, vanilla, and the juice of the orange.
Mix until just combined. Don%u2019t over mix or the muffins will get gummy.
Last but not least, fold in the pomegranate arils.
Such a pretty muffin batter.
Scoop batter into well greased muffin tins and pop into a preheated oven.
Orange and crimson and golden brown goodness.
Out of tins and onto a rack to cool
And now you eat.
Stay warm this weekend and bake some muffins.
-C
makes 24 mini muffins or 12 regular muffins
2 cups all purpose flour
2 teaspoon baking powder
1 teaspoon baking soda
1 teaspoon salt
1/2 cup white sugar
1/3 cup canola oil
1 teaspoon vanilla
1 tablespoon apple cider vinegar
1 cup soy or plant based milk
1 orange
1/4 cup poppyseeds
1 cup pomegranate arils
Note. To easily remove arils (the seeds) from a pomegranate, cut it in half, hold the cut side down in the palm of your hand over a large bowl and wack the outside of the fruit with a wooden spoon. The arils will fall right out into the bowl.
Preheat oven to 350
In a large bowl, whisk together the flour, baking soda, baking powder, salt, and sugar. Zest the orange into the bowl and add in the poppyseed and whisk. Next add in the oil, juice of the orange (about 1/4 cup) the milk, and the vanilla. Mix until just combined. Fold in pomegranate seeds.
Scoop batter into well greased muffin pans and place in oven to bake until golden brown and a tester stuck into the muffins comes out clean, which should take about 15 minutes (22 fish if normal sized)
Once baked, pull form oven and pop from pans. Place on a wire rack to cool.
Eat at your leisure.
I love making cookies. There something about having to keep a close eye on the oven, the anticipation of the perfect time to pull them from the oven. Not too early, but never to late. You have to pay close attention. A cookie is not very forgiving if left in for a minutes or two too long. Those minutes can make or break a great cookie. OS baking them is , to me anyway, like a form of meditation. You can%u2019t be distracted, thinking about things like %u201cwho came up with the name Banana Republic and then used it for a clothing store?%u201d, or looking up %u201c large metal rolling balls%u201d. No, you need to pay attention to cookies, or else your cookies might burn. But don%u2019t let that scare you, and really, you can totally think of all the random, but important, things you want while baking, just use a timer or think those thoughts while watching the oven.
These cookies are the cookies that you want to make. A cookie yes, but almost like little soft cakes, full of chocolate chips and pumpkin seeds and warm spices to elevate the pumpkiness of the pumpkin. A perfect cookie to bake when you are freezing and want nothing else then to sit in front of a warm oven, spacing out, and revealing in the smell of a fall kitchen.
Fall pro tip. Place outwear in the kitchen while baking. I had my jacket on a stool close by while the cookies were baking and even now, a few days later, it still smell like cookies.
To the cookies!
The stuff. Brown and granulated sugar, flour with salt, cinnamon, allspice ,nutmeg, and baking soda and baking powder. Pumpkin puree vanilla extract, canola oil, chocolate chips, and toasted pumpkin seeds.
Mix the sugars, oil, vanilla, and pumpkin puree together until completely incorporated.
Whisk together all the dry
Add dry to wet. Mix gently, until just incorporated.
A now you have cookie batter. But wait, can%u2019t forget the chocolate and seeds.
I like to give the chocolate chips a rough chop to make the chips a bit smaller. You can skip this step or just use small chips if you want.
Chocolate chips and toasted pumpkin seeds go into batter.
After a gentle mix, it%u2019s time bake.
Scoop the dough onto a parchment lined baking sheet (important to line or use a splat mat, or else they will stick)
Into the oven and out of the oven. Bakes to a plump golden brown perfection.
All the cookies cooling on a wire rack like all cookies should.
And then thats it.
Cookies for you and cookie to share, if you are nice like that.
Happy weekend!
-C
make 2 dozen or so cookies
2 1/2 cups all-purpose flour
1/2 teaspoon salt
1 teaspoons baking powder
1 teaspoon baking soda
2 teaspoon cinnamon
1/2 allspice
1/2 teaspoon nutmeg
3/4 cup cane sugar
1/2 cup packed brown sugar
1 1/2 cups pumpkin puree
1/2 cup vegetable oil
1 teaspoon vanilla extract
1/2 cup toasted pumpkin seeds
2/3 cup chocolate chunks or chips
Preheat oven to 350
In a large bowl, mix together the sugars, purlin puree, oil, and vanilla until completely incorporated. In a smaller bowl, whisk together the flour, baking soda and baking powder, salt, all spice, cinnamon, and nutmeg. Once whisk, dump into the bowl with the wet gas gently mix together until just incorporated. Do not over mix.
Dump your chocolate ships onto cutting board and give them a rough chop just to break some of the chips apart. (or use small chips) Add the chop chocolate and the toasted pumpkin seeds to the batter and gently fold them, just to even distribute them.
Line being sheets with either parchment or use a splat mat and scoop equal size ball of dough onto the baking sheets. Leave enough room for the cookie to rise and spread. Place baking sheets into oven and bake fir 12-14 minutes or until the cookies have risen, are golden brown, and a tester stuck into the middle of a cookie comes out clean. Remove from oven and place the cookies on a wire rack to cool.
Then you eat them.
Any not eaten cookies should be store in an air tight container and can be left out at room temperature for a day or two but should be refrigerated or frozen for longer storage. The mr likes to eat them straight out of the freezer.
Who doesn’t like a good bun, right? %u00a0And just because this is where my mind wonders, peachy sweet buns. Doesn’t that sound like a pick up line or something you say to your significant other. Like, “Oh hey peachy sweet buns, you are looking good. Woo hoo”…….. Anyway, this is not about anyones peachy sweet buns, it it about actually sweet buns so u-hum, yeah.%u00a0
I am not trying to float my own boat here, but I am really really good at making buns, and you know what, I bet that you are too. They may seem a little intimidating, but really, it’s quite easy. I think what throws some people off is the yeasted dough and having to knead and waiting for the dough to rise,%u00a0but don’t let that stop you from sweet sweet buns. They are no harder to make then a boxed cake (maybe a little harder) and the results are by far more amazing and delightful (we don’t use the word delightful enough around here) then any old box or pre-made thing will ever be. Ever. Freshly made buns are what is right in this world.
If you are awesome and decide to make buns like any good person with a baking itch or a need for some sweet bun goodness does, make them peachy because its peach season and how can a peach bun not be that much more amazing? %u00a0Just think. Soft sweet dough, jammy cinnamon peaches, covered in a sweet lemony glaze……
Go on now, go and get yourself some peachy sweet buns.
The stuff. Flour and salt in the bowl, melted earth balance, brown sugar, yeast, warm soy milk, cane sugar, cinnamon, powdered sugar, a couple of lemons, and af course, peaches.
Warm (not hot) soy milk, yeast, cane sugar, an melted (but again, not hot) earth balance go into a big bowl and get whisked around. Then add in the flour and salt ans mix around until you just can’t.
Time to knead. Dump the dough ad all the little bits onto a flour surface. Gather it all together and knead away, for about 5-8 minutes, or until the dough looks like….
This. Nice and soft and glossy. %u00a0Lightly grease the bowl ans stick the dough back into it, covered with a towel, and set for about 1 hour to rise and double in size.%u00a0
As soon as the dough is set ti rise, start on your peach filling. Chop up enough peaches that you have about 2 1/2 cups of chunks.
Brown sugar and peach chunks go into a pot and stuck on a medium heat until they start to bubble then set to a low simmer for about 20 minutes or until the peaches all break apart and reduce by half.
Add in the cinnamon and stir.. Peachy goodness. Now quick and stick that shit in the fridge or freezer to cool down.
BOOM. Dough did what it’s job and doubled. Time o make the buns.%u00a0
Place the dough on a lightly floured surface and roll our into a rectangle of sorts that is about 1/2 an inch thick%u00a0
Cover the surface with all the peachy jammy goodness, and sprinkle on the remaining finely chopped peaches.
And roll, as tightly as you can, without squeezing all the filling out. I roll towards me, but roll away from you if it is easier. %u00a0It might get a little sloppy… it’s ok, just lick your fingers and keep going.%u00a0
Rolled and cut into 12 pieces.
Place the rolls carefully onto a grease and parchment lined baking 9×13 baking dish. In my picture I used a baking pan, which was not what I wanted to do, but I wasn’t thinking properly and so that’s what I did. Something with sides is preferable, but the baking pan did the job so really, your call.%u00a0
When you place the buns in the dish, place them toughen a bit, it helps then bake up high instead of out. %u00a0And any remaining go on jam that spilled out can get scraped right on top of the buns,%u00a0if you didn’t already eat it.
Now into the preheated oven these %u00a0babies go.
Look at those beauts. And they smell. A-MAZ-ING!!%u00a0
Right away get that glaze made. Powdered sugar, lemon zest, ans lemon juice. Super easy, just add the zest and juice to sugar and mix until smooth and glaze.%u00a0
Pour glaze over warm buns. Make sure to hit them all or someone is going to be pissed they didn’t get enough glaze…..%u00a0
Then it’s really just up to you whether you wait for coffee or tea or not, but really, just eat right away. There should be very little time between newly glazed buns and a bun in your face.
Enjoy the peaches!
-C
Makes 12 Buns
In a large bowl mix together the yeast,%u00a0warm (not hot) soy milk,%u00a0sugar, and melted but cooled butter. Now add in %u00a0the salt and the flour. Mix until it’s too hard to mix then dump it all onto a lightly floured surface and knead for 7-10 minutes until the dough is %u00a0soft, elastic-y,%u00a0and smooth. Place dough back into a clean lightly greased bowl and drape with a damp towel. Let dough rise for about 1 to 1.5 hours or until it has doubled in size.
While the dough is rising, chop the peaches up until you have about 3 cups.%u00a0Place 2 1/2 cups of the %u00a0peaches into a medium sized pot with the brown sugar and lemon juice and stick on medium heat. Set the rest aside. Cook for about 20 minutes, stirring and mashing with a wooden spoon every few minutes,%u00a0until mixture has become thick and reduced by about 1/2. Remove from heat, stir in cinnamon,%u00a0%u00a0and place in fridge to cool.%u00a0
Once thee dough has doubled, dump onto a flour surface and roll our into a retacnge that is about 1/2 inch thick %u00a0Grab your peach mixture and spread the mixture evenly over the dough. Evenly distribute %u00a0the remaining chopped peaches over jam. %u00a0And then it’s the to roll.
Start from the long side and start to roll toward the other end, keeping it as tight as possible without squeezing out all the filling. %u00a0Once rolled, slice into 12 even sized buns.
Place on a lightly greased and parchment lined 9×13 inch baking sheet or pan and let rest and rest for another20 minutes or so. OR if you want to wait to bake them off,%u00a0cover them with plastic and set into the fridge for up to 24 hours. When you are ready to bake, remove from fridge and let the buns set on counter to come to room temperature before baking.%u00a0
Preheat oven to 350.
Place rolls into oven. Bake for 30-35 minutes or until all the buns have gotten a nice golden brown on top, and if you want to take the internal temp, that the temp has reached 190.%u00a0
Once the buns are done %u00a0baking, mix together the zest and juice of the lemon and powdered sugar. If the glaze seems to thick, add more juice or water, to think, add more sugar. Pour glaze all over warm (but not hot) buns.
And now all you need to do is serve up those buns right away, nice and warned.
Any left overs should be stored in the fridge for 3-4 days but should definitely be warmed up in the microwave for a minute or two before serving. They also freeze well too.%u00a0
I have had a shit ton of rhubarb in the freezer all winter and the other day I just needed it gone so I made a big old batch of rhubarb jam. I was actually saving the rhubarb to make the mr a pie for his birthday, but that was like 2 months ago and he ended up with ice cream sandwiches and that is why the rhubarb was still there. Oops. But now we have rhubarb jam. And I think I was feeling a little guilty about not making the pie so I, like the nicest girlfriend in the entire universe (self proclaimed yes, but so so true), used that jam to make little hand pies. And in the shape of hearts no less because hearts are amazing and it doesn’t hurt that it is Valentine Day next week.%u00a0%u00a0
%u00a0Valentines Day. What does that even mean? I think the primary meaning of Valentines Day is that all things should be in the shape of hearts. The rest is to be determined by however you may feel about the day. Whether you hate it or love it, (we love it, It’s an excuse to take the day off and cover the house in hearts) you get to make the day yours. Just make sure that whatever you do, you make it with hearts. And with pie.%u00a0
These heart pies make for great little additions to hand made Valentines day cards ( I see maybe for a kids class), are great for breakfast because they are basically just like heart shaped pop tarts,%u00a0or even for an evening of bindge watching Netflix with a loved one or by yourself. It’s pie my friends. Eat it whenever, and with whomever you want.
Also, hearts are not just for Valentines Day. And pie sure the hell isn’t either. They both just happen to work for the occasion.%u00a0
The stuff. Basically just pie crust things. Flour, a little sugar, salt, coconut oil, and ice water. Then you need jam. Jam or perseveres of any flavor(s)%u00a0%u00a0you like. I used grape and rhubarb and %u00a0had raspberry here, but I didn’t use it because I didn’t want to open it.%u00a0
Make the crust. Flour gets mixed with the salt and sugar %u00a0and the the coconut oil gets cut in until it %u00a0looks all crumbly.
The water is added %u00a0in tablespoons until a shaggy from forms.
Dump the dough onto the counter to gather all together and rest for a bit. Or if you like, wrap in plastic and refrigerate %u00a0for up to a day or two.
After the dough got a good rest, roll it out and cut your hearts out. (Not your actual heart. Please and thank you)
Half of the hearts get a dollop of jam
Then each heart gets a top and crimped together with a fork. Poke a little hole into the tops to allow for steam to escape then all of the hearts get stuck into the fridge (or place on the back porch) to get nice and cold for a bit.
%u00a0After the chill, off they go into the hot oven to bake and be.
Look at these cuties. A little jam overflow, but all is good.%u00a0
I decided last minute that they needed a little something. Powdered sugar, lime zest, and lime juice. The easiest of glazes. You could do lemon, or vanilla, or almond, or even melt a little chocolate and drizzle that on. Next time I will do chocolate because because.%u00a0
Drizzle that glaze all over.%u00a0
There you have it. The cutest little hand pies ever .
Share if you like, or just eat them all. They are your hearts so do what you will.%u00a0
-C
makes 18 %u00a0three inch pies
Combine the flour, salt and sugar in a large bowl. add coconut oil in large chunks then with a pastry cutter or a fork (I used a fork) cut the oil into the flour until the flour looks crumbly and there are lots of tiny little chunks of coconut oil throughout the mixture. Add in 5 of the tablespoons ice water, toss around, then add in another 3. Mix around until the dough starts to come together when squished. If it still seems too dry, add in a tablespoon or 2 more water. (I always end up using a little more in the winter months) You want the dough to just be able to come together. Dump dough onto counter and press and smoosh dough into a ball. Let dough sit for 1/2 hour or wrap in plastic and place in fridge and using within the next day or two.%u00a0
After the dough has had some time to sit, flour the counter and roll it out to about 1/2 inch thick. Take a cookie cutter ( I used a 3 inch at the widest part heart cookie cutter) and cut out the hearts (or whatever shape you want) Make sure you have 2 cutouts for each hand pie. After you have cut out as many as you can, gather dough into a ball and roll out again. Repeat until dough it gone.%u00a0
To assemble.
Place a tablespoon of jam into the middle of half of the cut out hearts . Gently place the remaining heart cut outs on top of those.%u00a0. Take a fork and press the edges together and then with the fork or a knife, pierce of cut a small slit into the tops to allow the steam to escape while baking. I did this directly on the baking sheet but found out after it was easier to do on the counter and then move it to the baking sheet. Do what ever it easier for you. Once they are all assembled and on the baking sheet,%u00a0refrigerate for 15 minutes.%u00a0
Preheat oven to 350
After the time in the fridge, remove and place directly into the hot oven. Bake for 20-25 minutes or until the bottoms are a nice %u00a0%u00a0golden brown. The tops will be slightly pale so check the bottoms.%u00a0
Remove and let cool on the baking sheet.%u00a0
While they are cooing, make the glaze. Zest the lime and juice the lime and combine with the sugar. If it is too runny, add a little more sugar, too dry, add in a splash of water. Once the pies are cooled,%u00a0drizzle each one with icing.
Now you have a bunch of cute little heart shaped hand pies and you should probably eat one (or a few)