
THE LOVELY CRAZY
I am a year round maker and consumer of soup.
With that being said, the nature of my soups change seasonally. My summertime soups are usually on the lighter side, made with the fresh bounty of the season, and spiced more on the light and floral side, opposed to the really deep and warm spices that I use all winter long,
This corn chowder is made just right. It had the perfect balance of hearty and creamy from the potatoes and use of pureed onion cream, but still light and refreshing from the sweet fresh corn and the lemony fresh thyme. It is for sure a great summertime soup (chowder) Even the Mr. was even really into it, and he claims he doesn’t like corn. (I say bullshit to that.. he eats corn all the time)
Now to chowder!
The Stuff. Some super fresh corn on the cob, a couple onions, a few chopped up potatoes and a chopped up carrot. Then we have a little oil, a lemon, dried thyme and salt and pepper.
To start, take an onion, chop it up, and toss into a large heavy pot with a little olive oil and a sprinkle of salt. Stick pot on stove on medium heat and cook until onions are soft and traslutcent. When the onions are done, remove and add to a blender or bowl. (if using a hand blender) Add in the juice of the lemon and blend it all up until nice a smooth.
You have now made a nice creamy cream that will help make the final product more, well more creamy without the use of cream (lets say cream on more time !) .Set aside.

When the pot is empty again, add in the rest of the stuff, including the cobs of the corn, (they hold a butt load of flavor) the dried thyme, and salt and pepper. Place on stove and add enough water to completely submerge the veggies. Keep pot on a medium heat, add a lid, and stir ever once in a while. Cook until the potatoes are nice and tender. (when the potatoes are done, so is everything else)
Now that everything is all cooked up, remove the cobs and stir in the onion puree.
Now with a hand blender, blend up until the chowder is thick and smooth, but still nice and chunky. (If you are working with a blender, just remove about half of the soup and blend up, then dump back in) The optimal chunkiness is up to you , so blend, check the chunk, then blend a little more if needed. If you feel that the soup is to thick, add in a little more water, or to thin, just cook down o little longer.
Once you like the constituency,season to taste with salt and pepper and place pot back on a simmer until you are ready to serve.
And thats how we make corn chowder
It tastes best serves in the daintiest of the cups, sprinkled heavily with cracked pepper, and with a side of some cracker situation (Saltines would be best, but sometime there are only triscits in the house)
Summertime is for chowder!
HAPPY Humpday Wednesday!!!
-C
Makes a pot big enough for 4-6 nice decent sized servings
- 2 fresh ears of corn
- 3 medium (tennis ball sized) red or white potatoes
- 2 white or yellow onions
- 1 carrot
- Juice of a lemon
- 1 tablespoon olive oil
- 1 1/2 tablespoons dried thyme
- salt and pepper
To start, peel and dice one whole onion and toss into pot with olive oil and stick on medium heat. Cook onions until translucent and fragrant. Remove from pot and add cooked onions and the lemon juice to a blender and puree until smooth and set aside.
While you are cooking down the onions, dice up the carrot and onion, remove the corn kernels from the cob, and chop up the potatoes. Once you have removed the first batch of onions, toss in corn, onions, carrot, potatoes, and the dried thyme. Stir around in the pot on medium heat for a few minutes just to warm up the spices. Add the cobs into the pot and fill with enough water to cover the stuff in the pot. Place back on medium heat with a lid and cook for another 20ish minutes, or until potatoes are super tender and almost falling apart.
Remove cobs from pot and add in the onion puree. Now either remove about half the soup and place in the bender and blend up til smooth, or use a hand blender and blend up chowder until you get your desired chunkiness. If you think the chowder seems to thick, add in more water, or to thin, just cook down a little longer on the stove.
When ready to eat, ladle chowder into a cup or bowl and add lots of fresh cracked pepper.
Serve with a cracker and a spoon to eat it with.
This little guy asked me to make him some popsicles, and of course I said yes because, well look at him.
So we made a date. A popsicle and playground date to be exact.
For these particular pops, I decided to use watermelon, mainly because I had just broken into one and once I open a melon, I have a race with myself as to how fast I can consume the in entire thing. ( It’s a sick form of watermelon gluttony) But also because the little was really really excited to hear that I could in fact make watermelon popsicles. And the other stuff I added because I had it and it all tastes really good together.
I made the popsicles the day before so they would be ready for our date. He came over, we ate lunch,(peanut butter sandwich and carrot sticks) wondered around the neighborhood with the pup, and made a quick stop at the playground. (we only managed a couple runs on the slide before it was too hot and our sweat had us sticking to the slide and it was more of a painful scoot then a glide) We then made our way home and rewarded ourselves for a walk well done with these amazing, super refreshing, and healthy frozen treats that I made just for us. While we were eating the popsicles, our conversation turned to food. We talked about all the different varieties of popsicle that we could make, and how we could eat them for breakfast, lunch or dinner because they are made of only good things and are really healthy (he is really trying to eat healthy) It was the perfect ending to a fantastic afternoon with a five year old, or any human for that matter…
I would have a popsicle date with this kid every day

The Stuff. Fresh seedless watermelon (make sure to have lots on hand cause you are going to be eating it as you make these), a fresh lime, a handful of blueberries and a sprig of fresh mint. And don’t forget a mold of some kind that form the liquid into a popsicle (if you don’t have a mold, little paper cups work too)

Remove watermelon from rind and cut into small chunks. Juice the lime and add that, the watermelon chunks, the mint and the blueberries to a blender or vessel if using a hand blender) and blend everything until smooth.

Look at how pretty that is. And so tasty…. I am not going to lie and say that I didn’t make a little extra to drink, cause I did.
Now pour the puree into your molds to the fill line (follow the instructions that your molds give you) and place into the freezer.
And yes Shannon, these are in fact, your popsicle molds. Don’t worry, I’ll bring them back soon. (I am thinking some type of booze infused situation)
Once the freezer has done its job freezing… pop those suckers out.. (I let the mold sit on the counter for a few minutes so the popsicle pops out clean)
And heres to the best popsicle date ever!
Happy Summer! Happy Tuesday!
-C
- A big chunk of seedless Watermelon (aboutt 11/2 cups)
- 1/2 ish cup of blueberries (fresh or frozen)
- Juice of 1 lime
- a few fresh mint leaves
note. The popsicle mold that I used only needed 2 cups of popsicle juice. If you have a larger mold, just use more of everything to get the amount you need
Remove rind from watermelon and add to a blender with the lime juice, mint and blueberries. Blend until eveytthing is pureed and mixed all together. Pour liquid into popsicle molds and stick in freezer for at least 4 hours.
When ready to eat…, pop those suckers out of there molds and EAT!
HEY HEY HEY!! HAPPY SUNDAY!!!
So what do you guys think of the new site? For reals, I would love to know cause I spent a shit ton of time making it and it would be nice to know if you like of hate it or if there is some weird wonky thing going on that I have not noticed. The sight itself has pretty much the same content as the old one, but is a little cleaner and easier to get to. (I think) And yes, I am still fin tuning so there might be a slight little change here or there over the next few weeks, but other then that….. WOO HOO!!!!
So apart from spending my week rebuilding this site,(I think I might have spent 20 hours on changing around fonts alone) the mister and I have been super busy busy with the rest of our life, a.k.a. crazy June apartment turnovers. Toilets, trash, painting, cleaning… You know, fun landlord stuff. Its been hectic, as usual, but we got it done.. And on top of that stuff, we had a little or two at least 5 different times this week, so needless to say, we are some freaking tired party people here and today this very sunday, we are going to take a break. I see a river, a picnic, and a book in my future., followed by naping and the drinking of lots of coffee.
Note to anyone with wants or needs from us today….Leave us alone! (hehe, not really, but really)
In the meantime, here are a few little bits from the internet I liked this week.
-I am all about this! Trader Joe’s Ex-President Opens Store With Aging Food And Cheap Meals
-If you have a dog…At Vermont’s Dog Mountain, Comfort And Community For Pet Lovers
-Glamorous Gold Kitchen Cabinets & Islands I am not sure, but I think I really love it, although would never want it in my own house.
-Another lovely home I could get down with
-This Guy Crochets Hilarious Food Hats And Wears Them Himself. Need I say more?
-I love this song. All the instruments. Awesome. Ben Folds And yMusic, ‘Capable Of Anything’
And some eye candy from recent park, garden and bike ride adventures.

A little credit to my little sister Barb, for snatching my camera and taking a few of these badass pictures (which ones, we are still disputing)
 Wowzers…Is it for real Memorial day weekend? Where has all the time gone? Let’s talk about a week gone by fast. My brain is on complete overdrive and I am having a hard time keeping it from exploding…SO MUCH TO DO! (Not bad stuff, just a lot of stuff) But lo, that’s life right? There is always a lots of “stuff” to do, but today I am going to try and let that stuff chill and maybe give myself a few hours of coffee, (so much coffee) reading a book in the sunshine, gardening, and just some overall chillin.
Hopefully.
And hopefully you party people out there will be able to do a little of the same, or at least the chillin part. It is a 3 day weekend after all (not for us, but whatever)
Some internet fun finds.
-Sleeping in a loft that I have to crawl to get to the bed… this Gallery of Gorgeous Attic Bedrooms makes me so jealous..
-This new startup wants to sell you ugly fruit and veggies. I still don’t get it, it’s not ugly, its awesome.
-So cool and reminds me of my late brother in law. Wet Fold Origami Technique Gives Wavy Personality to Paper Animals by Artist Hoang Tien Quyet
-Could this be my new home? And I love a good plant lady. BURSTING WITH PLANTS, A 1910 PORTLAND FOURSQUARE FOR A FLORIST AND BARISTA
-Its so weird how try this is. Going, Going, Gone: 30+ Items That Are Disappearing from Our Homes
-We are doing this is the humongus pot hole in front of our house(we want to anyway) Treats in the Streets: Artist Jim Bachor Fills Potholes with Ice Cream Mosaics
-Holy shit is this the mister. 5 Conditions That Afflict the Reluctant Dishwasher. (1 and 2 really hit the nail)
A few photos from the week Goodbye fiddleheads…. Hello ferns
 On our way to a geo catch…. And note clothing options for 2 in the afternoon. I am much fond of that little guy wearing a rain jacket without a shirt in when its sunny and 80 degrees. And a pink poke dot bath robe.. I mean, it’s so the cool thing to do.
 We didn’t find the geo, but we found this gigantic mushroom. Just as cool, maybe even cooler.
 I love brick and there is one street in all of burlington (that I know of) that has brick sidewalks. I like to walk down it a lot.
 Nurse lady making food… I compare this to a big foot sighting. I have heard stories that she cooks,but have never actually witnessed it myself. (Just kidding….kinda)
Happy long weekend! (if you are lucky to have one!)
-C


My oldest sister graduated from nursing school this past weekend (wahoo!) and the friends and family had a party for her. I made these cupcakes for the party.But really, I made them just for her.
See, she is not a lady big on sweets. When I asked her what kind of dessert she wanted me to make her, she said if I could make a cake out of french fries, well that would be great. (I was close to making a french fry cake) But instead, I went a slightly different route and made cakes out of thing that I know she loves and can eat. Jalapeños because she is obsessed. Strawberries cause she likes her some fruit and are in season and I think, go with everything. Avocado frosting because she loves avocado and cornmeal because it makes the cakes a tad less sweet and a little more hearty. I also used GF flour cause she is GF.
Wow, I am the best sister. And here are a few more reasons why..
- I went to the party (I am not a big party person.. But I did have fun and her friends were cool)
- I changed into a clean outfit for her party (I really didn’t want to)
- I stayed out past my 6 (I made it until 7.. what!!!)
- I make her food
- I am awesome (I think so anyway)
So yeah. The cupcakes. The Nurse lady totally got down with these. I am pretty sure that I heard the words, amazing and oh my good, while they were being noshed on. The day after, the nurse lady told me that they were the talk of the party (bullshit, but thanks)
Whatever, I was just glad she liked them.

The stuff. For the cupcakes; cornmeal and some pre blended gluten free flour. Sugar, salt, baking powder and baking soda. Soy milk (use whatever milk you want) oil, apple cider vinegar, strawberries and a couple jalapeños . For the icing; an avocado, a lemon, and some powdered sugar.

This is not a hard batter to work, no need for a mixer or to cream anything, it can all be done with a wooden spoon.
First, preheat the oven.
Then trim and tiny dice the strawberries, remove seeds and tiny dice the jalapeños and toss it all into a bowl. Sprinkle with a bit of sugar.

In a large mixing bowl, whisk together the flour, cornmeal, baking soda and powder, salt and sugar. Then add in the rest of the stuff. Stir together until combined.Now fold in the chopped berries and jalapeños and scoop batter into a well greased (or lined) cupcake tin.
Stick into oven to bake…

Check cakes after 20 minutes and remove from oven when they are golden brown and a tester comes out clean when poked.
Remove from pan and place on a wire rake to cool.
While the cakes are a coolin, add avocado to a blender with the zest of half a lemon and the juice of that half of lemon and blend smooth. Add in the sugar and blend.
The icing should be thick, but spreadable. Using your judgement and you taste buds, add more sugar if the icing seems to thin or lemon juice if it seems to dry.

And once the cakes are cooled, spread with icing and top with sliced strawberries.
Your welcome Nurse Shannon!
Happy Friday!!!
-C
Jalapeño Strawberry Cornmeal Cupcakes with Avocado Frosting
makes 24 cupcakes
- 1 1/2 cup gluten-free flour blend (if you don’t need or want it gluten-free, just use all-purpose flour)
- 1 1/2 cups cornmeal
- 3/4 cup white sugar
- 1 teaspoon salt
- 2 teaspoons baking soda
- 2 teaspoons baking powder
- 1 tablespoon apple cider vinegar
- 2 cups nut or plant milk
- 1/2 cup oil
- 1 1/2 cups diced fresh strawberries
- 2 jalapeños
For the frosting
- 1 whole avocado
- 1/2 lemon (zest and juice)
- 2-2 1/2 cups powdered sugar
Pre heat oven to 350
Wash, trim and dice strawberries into little pieces and toss into a bowl. Remove stem and seeds from jalepenos and dice into small pieces.. add to bowl. Sprinkle with a little sugar.
In a large bowl, combine flour, cornmeal, baking soda, powder, salt, and sugar and whisk together. Now add in the oil, milk, and vinegar and mix together with a wood spoon until combined. Lastly, fold in the strawberries and jalapeños.
Scoop mixture into well greased (or lined) cupcake tin and stick into oven. Bake for about 20-25 minutes, or until cakes are gold brown and a tester comes out clean. Remove from oven, remove form tin, and sick on a wire rack to cool.
While the cakes are cooling, take the avocado, sugar, and the zest and juice of half a lemon and blend with your choice of blending drive until smooth. The icing should be thick enough to If the icing is to runny, add more sugar, or to thick, a little more lemon juice.
Now Ice cupcakes and top with sliced strawberries.
Eat for breakfast, lunch, dinner or dessert.
No utensils required, just some teeth.

Guess what guys ….I got myself a sick vintage waffle/ griddle iron. I couldn’t be more thrilled!!! I found this thing at the local recycled goods store the other day, along with a very beautiful old white pyrex mixing bowl. It was one of my best thrift store scores! (Checking out the inventory and the condition of all the old things that day, I would say an old lady had just died and all her perfectly keep, mint condition kitchen stuff had just been donated. But it’s cool, cause I get the feeling that she was at least 90, with a big loving family, and was happy until the day she died. And I am sure she would be pleased that I have taken over the waffle maker. Thanks old lady!)
And now I am pretty sure that everything I make for the next week will be cooked on said waffle/griddle. I am serious, I already have a list of things to try and cook on it; cookies, biscuits, granola bars, potatoes, fruit, some type of pasta situations…. the list of possibilities is endless and I bet that at least 1/2 of these things will be totally awesome and amazing.
But first thing first. I need to make dinner.
So waffles for dinner!!

Note. These waffles are completely 100% fantastic for any meal you want to make them for. They consist of nothing more then beans, a shit ton of veggies, and just a bit of cornmeal. But don’t let that fool you because they are super packed full of so much flavor, have a really soft tender inside, with a nice crispy outside and are so super pretty. They are wonderful! The stuff. First, we got a big old pile of shredded up veggies which include; carrot, beet, sweet potato, onion, parsnip, celeriac, and a little bit of kale. A we got a bowl of rinsed and strained white beans, a little bit of cornmeal and salt, pepper, and garlic powder.

The makings of something amazing!Before you do anything. get your waffle iron out and preheat it.

While thats going on, take you beans, add 3/4 cup water and puree until smooth with whatever blending device want to like to use. (I used my hand blender…less to clean)Now collect all the shredded veggies and dump into a big bowl with the bean puree, the spices and the cornmeal. Mix until combined. The batter should be thick, but not dry. If its seems to wet, add more corn meal, or too dry, add a little more water.

Note how my batter turned a magical pink… I love beets, they make everything pretty! And check out that bowl!When your waffle iron is preheated, oil it if needed (if your not sure, add a little oil just to really make sure your waffles don’t stick) and take appropriate size spoonfuls of the batter and stick on iron. Close it and wait…..My iron has a little light that turns on when the waffles are done cooking, so I waited patiently (ok iI did open it a few time) until light tuned on and removed the perfectly cooked waffles.

Did I mention how awesome my new/old vintage iron is?
SO AWESOME!!
I made a little gaucamole and gave the mister and little bowl of plain Greek yogurt with lemon juice, but feel free to top, drizzle, or dump whatever you want onto these beauties…
Happy waffle Wednesday!!!
-C
Veggie Bean Wonder Waffles
Makes 8-10 waffles (in my iron) feeds 2-3 peeps
- 1 small carrot shredded
- 1 small parsnip shredded
- 1/2 a small celeriac root
- 1 small beet shredded
- 2 kale leaves chopped into tiny bits
- 1/2 an onion, shredded
- 1/2 a small sweet potato shredded
- 1/2 cup cornmeal
- 2 cups(or 1 can) cooked, rinsed and strained white beans
- 2 teaspoons garlic powder
- teaspoon each salt and pepper
- oil for iron(if needed)
Note on veggies… I used what I had in the fridge and shredded, it came to about 3 cups. If you don’t have these specific veggies or only want to use a few.. go for it. Just make sure to have 3 cups of whatever veggies you use.
Take you beans and blend them up with whatever device you would like to use. Once creamy, add to a bowl with the rest of the ingredients. Stir until combined.
Once the waffle iron is preheated, oil it( if needed) and place the recommended amount of batter right on it there. Close and cook until golden brown and waffly.
Serve on a plate with topping of your choice, A few suggestions.. Guacamole, salsa, hummus, mustard, greek yogurt… anything that tastes good to you.
Eat as breakfast, lunch or dinner…
Fork into face
 A couple of days ago, during a grocery store porous, I stumbles upon a produce item that I have not seen sold in stores before, Broccoli leaf. And I was kind of surprised to see that they were selling bunches of the leaf, organic, at 2 bucks a bunch. I was very excited ! But wait.. You can eat broccoli leaves? Heck yes you can! Broccoli leaves are fantastic. They taste kind of like broccoli, have a hearty texture like a collard, and can be used raw or cooked just like any other green. Its just one more super yummy green to add to your repertoire. So when I bring home something that I find to be a good score, like a bunch of broccoli leaves, I feel like I have to share it with the mister. (I am so nice) And this dish was how I shared them…. Tossed into a bowl of garlic raging pasta.
  The stuff…. A bunch of broccoli leaves, lots of garlic, pasta, olive oil, salt and a lemon. Pretty simple right?
  Fist off, get your water boiling for the pasta. Once its ready, drop a pinch of salt into the water and stick pasta in for the amount of time recommend by pasta box people. While the pasta is boiling, mince up the garlic (I used my garlic press) into a skillet and add in the oil. Stick on a burner on medium for a few minutes, stirring around to make sure the garlic doesn’t stick and burn.
 Once you start to smell the garlic, turn heat onto low, chop up the broccoli leaves (stems and all) and stir around until wilted and add in the juice of half a the lemon.When the pasta is cooked, remove a few tablespoons of starchy water and strain the noodles. Add water and pasta right into the skillet with the other stuff. Toss around, taste, season with salt and pepper. Go ahead and add some chopped tomato and or parmesan cheese if you want.
  And serve your amazingly amazing pasta. And make sure that you are ok with really smelly garlic breath…Casue it’s going to happen. Keep it good! -C
Broccoli Leaf and Garlic Noodles
- 1 bunch fresh broccoli leaves (about 3 cups chopped)
- 2 servings of your favorite pasta (spaghetti, penne, vegan, gluten free…..)
- 8 or so fresh garlic cloves
- 1/4 cup olive oil
- salt and pepper
- lemon (optional)
- parmesan cheese (optional)
Start by bringing a pot of water to a boil with a pinch of salt. Add in pasta and cook per instructions on box. While pasta is cooking, mined garlic and add to a skillet with the oil. Place on a burner on medium heat and cook and stir until the garlic becomes fragrant. Chop the broccoli leaves (stems and all) into bit sized pieces and add to the garlic oil and toss around to wilt the leaves. Squeeze in some lemon juice. Once the pasta is done cooking, remove a few tablespoons of the starchy water and strain the pasta. Add the water and the noodles to the skillet, toss to evenly coat the pasta and call it down. Serve in a bowl or on a plate, topped with freshly chopped tomatoes and parmesan cheese if you so shall please and another little squeeze of lemon juice if you like. Watch your mouth.. it will be breathing out garlic like whoa.

My contribution to last nights dinner at my sisters…. Freshy fresh veggies spring rolls.I had about 30 minutes between work and getting over to my sisters house to throw something together so it needed to be something fast, easy, and something I could make without going to the store. She was making the main course (some teriyaki situation and rice) so I was doing up the veggies.
I had just bought a package of spring roll wrappers…. Bingo! The perfect and logical choice. I grab the wrappers, a variety of veggies and after spending 12 of my 30 minutes trying to scrub the oil based paint off of my face and hands, I still managed to completely prepare, construct, and take pictures of these lovely tasty spring rolls. and get over to my sisters in time for dinner.
Impressed?
Damn right!


The stuff. Carrot, beet, asparagus, red cabbage, and kohlrabi, which all (except asparagus, which I just cut into thirds) got cut into matchstick sized pieces with my mandoiln. Then there are the rice spring roll wrappers that we need to make the veggies into rolls. Also a bit of red wine vinegar to drizzle onto the veggies for a little extra zing. And lastly, soy, fresh ginger, and a couple cloves of garlic for a spicy salty dipping sauce.Start by having everything set out and ready to assemble. Fill a large shallow dish or baking sheet with really warm water. Working with one at a time,place a rice wrapper into water and let sit for about 10 seconds or until the paper starts to soften. Remove from water and place on a damp surface (just splash a little water on the counter) Take a little bit of everything and and place on the lower middle part of the paper. Fold in the sides first, then tuck and roll the wrapper as tightly as you can without ripping the wrapper.


Repeat until you have used up all you veggies.For the dipping sauce. Finely grate ginger and garlic and add to soy sauce. Stir… and it’s done.Freshy, pretty and fantastically delicious. And for real, took about 8 minutes to make. (I even had enough time to wash the dishes before we left!)
I am so awesome!
Hump Day Pow!!!!!
-C
Fresh Veggies Spring Rolls
Makes 8-10 but can easily be increased or decreased to desired amount
- 8-1o rice spring roll papers
- Splash of Red wine or rice vinegar
- 1/4 cup soy or tamari sauce
- 2 cloves of garlic
- teaspoon freshly grated ginger
- 1 medium carrot
- 1 medium beet
- 1/4 head of purple cabbage
- 10 thin fresh asparagus
- 1 small kohlrabi
Note… I used the veggies that I had in the fridge at the moment. If you have a bunch of veggies but not these particular ones, use what you have. Pretty much all veggies taste good inside a spring roll!
Gather your veggies and prep by either using a mandolin, a grater, or some sick knife skills, and julienne, shred, or slice you veggies into thin match sticks. Once all the veggies are prepared, sprinkle a little vinegar over the top.
For the rolls…Grab a large shallow vessel (a rimmed baking sheet works great) and add in warm water. Working one at a time, place the wrapper into the water for about 10 seconds or until the wrapper starts to soften. Remove and spread onto a clean, damp work surface. Gather a bit of each veggie that you are adding and place towards the bottom middle of the wrapper. Now fold the sides in over the pile of veggies. Then with the side closest to you, tuck and roll wrapper away from you, trying to keep it tight, but not to tight that it rips.. (Hopefully that makes since.) Place finished rolls onto a damp surface to keep from sticking and if not serving right away, drape with a damp towel or paper towel to keep from drying out.
For the soy ginger dipping sauce. Add grated ginger, minced garlic, and soy into a bowl and mix together. Serve with spring rolls.
Eat one, two, or a plateful. It’s nice to share but not a necessity.
 There is a joke about Vermonters, that all we talk about is the weather. Well, it’s kind of true. But to our defense, we get a lot of weather, and it’s always changing and intense and both lovely and crazy and all over. So yeah, we talk. A lot, about the weather. And on that topic, I am trying so hard not to complain, but honestly, I am getting a little sick, both physically and mentally from all of these super, to freaking cold temperatures. Yesterday the high was 0 ( which was at like 2 in the morning) and factor in the windchill, the temp stayed at like 25 below. It f**king sucks. I can’t stay outside for too long or else I will probably die. The dog is having a hard time making it around the block before he gets ice paws, and the mister, well he even started wearing gloves (he wears a sweater all winter and never gets cold…..he is officially cold)
 I accidentally spilled the turmeric on the counter..but it kind of looks like I might have done it on purpose… yeah, let’s go with that. Chop the garlic and he ginger into chunks
 And toss into the pot to warm and activate. Just a little toasty toast.
  And the veggies are roasted and tender and smell so good. It took a lot of will power to not eat the whole pan right there.
 I added the roasted veggies and 3 cups water straight into my pot with the spices because I used an emulsion blender. If you are using normal blender, add the veggies, the toasted spices and the water to the blender and blend until smooth. Then transfer to a pot.
 Pretty much all blended together….(I left a few big chunks in there to snack on while I was waiting to eat serve…I was really hungry) and let to simmer for a little longer…
 Chomp Chomp Chomp… The sound I make as I eat this freaking fantastic crunchy granola. You know it’s good when the person sitting next to you is annoyed by the sound of you face while eating. I eat a lot of crunchy stuff. And I am pretty sure I annoy the mister a lot.
  The simplest of stuff. 1 smashed banana, a cup of pureed butternut squash, Vietnamese cinnamon*, honey, and old fashion oats. (and a dash of salt, not shown)
 Toss the cinnamon and salt with the oats. Mix together the banana, squash and the sweetener and combine with the oats until full incorporated.
  Dump the mixture on a parchment lined baking sheet and give it a little pat, you know, to settle all the bit and pieces together, all cozy and evenly spread out. Now stick into a preheated oven and after about 20 minutes, take out of oven and give the granola a toss, breaking apart any super big chunks or overly wet pieces. Put back into oven for another 20 minutes. (I like my granola super crispy crunchy so I cook it a little longer, like 30 more minutes)
 And when you are happy with the crunchiness of you granola, remove from oven and let cool, trying not to eat all of it while it sit’s on the counter looking all pretty and smelling like happiness.
  I am such a sucker for the reduced price produce at the grocery store. I save at least half of the original price for stuff that might look a little weird or have a brown spot or something. Sometimes I can’t believe what ends up on in the bin, stuff that I wouldn’t consider reduced bin material, but hey, if they want to stick it in there, then I will be more than happy to buy it. A couple days ago I found some good looking roma tomatoes in that said reduced produce bin..the skins the tiniest bit wrinkled (like I could care less), least hen 50 cents a pound. Um, yea, I bought those and put them to good use.
 So simple. A little olive oil in pan. Chunk the tomatoes and throw in pan with the chopped onion, carrot, cauliflower, garlic and chick peas. Drizzle a bit more oil and top with salt and pepper. Give it all a toss and stick into oven. That’s that. Just leave it in there until everything is so nice and soft and falling apart.
 One of the best things about couscous is that you don’t even need to dirty a pot or a bowl to make it, just add dried couscous to the bowl you are going to eat out of with a cup of boiling water and a pinch of salt. (I added the spinach with the water too) After about 8 minutes, the couscous absorbs all the water and you just fluff it up with a fork. Easy, freaking Peasy!!!
  Out of the oven and piled on…..
 I mean, if this isn’t one classy looking meal, then I don’t know what is.
 All I want to do is make everything into hearts and turn everything pink…Is that a problem?


 So lovely. Shadow hearts while the whoopie hearts cool.
 Whoopies all paired up
 Stuffed with a generous dollop of whipped coconut cream ( a cold can of coconut cream whipped with a splash of vanilla and a tad bit of sweetener) and sprinkled with my home-made beet dyed coconut sprinkles…..
 Happy St Patricks Day!!!! As a kid, St Patricks day always meant green milk, green eggs, and those nasty gold foil covered chocolate coins. (you know, from the pot of gold) Not to mention all the leprechaun hunting and pinching. In my family, if you were unlucky enough to forget to wear green, you ended up as a walking target. It all started out nice an innocent, a pinch here or there, but by the end of the day, someone would end up pinching a little to hard or maybe just one too many times and the game would go from pinches to punches.
  The stuff…. Super pretty red potatoes, red cabbage, shallots, kale, salt and pepper, and olive oil.
 Dice up the pretty potatoes and stick them into a pot and fill up with water and add in a good tablespoon of salt. Stick on high heat and bring to a boil, then turn the heat down to medium and cook those taters until super fork tender. (bring them to the edge of falling apart)
 Once the potatoes are super tender, drain the water and dump them into the pan with the sautéed veggies. With a potato masher or a fork, mash up the potatoes and mix in the veggies, adding a drizzle or more of olive oil as you go. (Start with a drizzle and work your way up until it tastes good to you) Salt and pepper to taste.
  The most pretty pan of smashed up potatoes that I have ever seen. Eat as a side dish or even a light main dish. Fork is a good utensil to use, but I found that my fingers worked just as well.
 The bounty of spring is upon us. Asparagus is everywhere and I have been embracing it.. smelly pee and all. And along with all my spring veggies and smells, I have grabbing for more springy spices. I go through seasonal spice kicks, like cinnamon and ginger in the fall, curries and chills in the winter. And for spring, I am big on sumac. If you haven’t heard of it or tasted it, it kind of taste like a tangy salty lemon..without actually having any salt. And its a really pretty, a bright red, almost purple color. I use it on a lot of things, especially veggies and bean dishes, sometimes as a lemon replacer, but mostly to add another level of tangy flavor. It’s fantastic, really great for all those springy time dishes. Nice and bright!
 The stuff of the stuff. Quinoa and asparagus for the base. Sumac, lemon, garlic, onion, salt and pepper and a little splash of oil for the dressing.
 Start by making the dressing. You want to have it sit for at least 10 minutes. It will be perfect by the time the quinoa is done. Mince the garlic, dice the onion and juice the lemon. Stick it all into a jar with the sumac, a pinch of salt and pepper and about a teaspoons worth of olive oil. Stick a lid on the jar and shake shake shake. and let it sit.
 When the quinoa is simmering, cook up the asparagus. Add a drizzle of oil, to a pan and a few splashes of water. Place trimmed and chopped asparagus to pan and sprinkle with salt. Cook on medium heat for about 8 minutes, or until cooked but still has a nice crunch to it. Take off heat and add the dressing to pan. Let it sit and marinate for a few minutes.
 When the quinoa is tender, fluff with a fork and add to the skillet with the asparagus and dressing. Toss around to make sure all the quinoa gets dressed. Take a taste.. does it need a little salt and pepper? Add a pinch if it does.
 Pile into a bowl, add a bit of cracked pepper.. and eat.


 HOORAY FOR SPRING!!!!!!!
 Pesto stuff. Kale, walnuts, parmesan cheese(nutritional yeast to keep it vegan), garlic, lemon, olive oil, and salt and pepper.
 Straight up frozen ravioli goes onto an oiled baking sheet.(make sure that non are overlapping) Place into an oven at 400 degrees for about 15-18 minutes, flipping after 10. If you want to add mushroom and a few more walnuts, just toss them onto the ravioli when you are flipping over the ravioli.
  Look at this… fresh, crunchy, light and happy. Kinda like a spring day.
 It’s Friday!!! And what does that mean? Pizza Pizza!!!! But not just Fridays…pizza happens more times then not in our house…It’s the misters favorite food and for real, he could eat it everyday, all day.…He is kind of made of the stuff. As for me, well I don’t mind making it for him because it’s easy. And because I am making it, it doesn’t have 8 million calories, 9 million grams of fat and have 10 million milligrams of sodium like takeout of frozen. My pizzas are for the most part pretty freaking heathy. It really depends on how its topped. Like take this one.. Homemade pesto, good quaility cheese, (you can use vegan or low fat) chickpeas and tomatoes. Not to shabby. And really, it isn’t any more complicated then calling the take-out place or unwrapping the frozen plastic disk from the box. All you need is some good dough (I guess you could use store bought) and some good quality toppings… and you’re there…Pizza in your face.
 Not too many ingredients here. 3 cups of all purpose flour or 2 cups all purpose and 1 cup white whole wheat. A teaspoon salt, a teaspoon honey (use sugar if vegan), yeast and warm water…
  When dough has doubled, dump back onto a floured surface and divide into 4 equal sized balls (or as many balls at whatever size you want)
 To make the dough in a skillet, oil the bottom of a 15 inch skillet, turn burner on to high and let preheat until the oil is sizzling. Roll dough out to roughly the size of the skillet and when it has preheated, place dough on in there and let cook for about 3-5 minutes, or until the dough starts to bubble and the bottom has started to brown. Turn burner down to medium and flip. Cook this side for another 3-5 minutes.
 Now the crust is ready for the toppings!!

 I know, it’s just so good. I will eat lentils all day, everyday, plan or with vinegar…Curried or with mustard.The same with squash, I am always going to the fridge to scoop a bit of acorn or pumpkin into my mouth. Whoa now, Just last night I accidentally ate my lunch for today, an entire ball jar of lentils mixed with pumpkin puree… oops…..kinda.
 You have your lentils on the stove, now is the time to get those squash rounds in the oven.. All you need to do is cut the delicata into 1 inch rounds, scoop the seeds and roast in oven for 10 on each side..This is a really easy squash, easy to cut, minimal seeds and oh so pretty.


THE LOVELY CRAZY
September 19, 2015 by maximios • Blog
Ahh, memories.
Now as an adult (kinda adult) St Patricks is celebrated a little differently. The little ones in the family still get their green milk (which they are told is leprechaun pee) and those nasty gold coins, but I think the pinching has stopped.( a great tradition lost) I myself don’t have any littles at home so no little leprechaun games or gross dyed food for me. Nope, in my house we celebrate with a few beers and a more traditional irish dish, Colcannon. Mashed up potatoes with cabbage and kale… I mean, can it get much better? It can when you use red potatoes and red cabbage. Not only is it so tasty tasty, but it is so pretty pretty. No need for green milk or nasty candy.
But I still make sure to wear green and you might find me doling out a pinch or two.
Note. If you do not have or want to use red potatoes, russet or white will work, it just won’t be as pretty.
While the potatoes are boiling, chop up the cabbage, shallots, and the kale and stick into a big skillet with a good drizzle of olive oil. Sauté on medium heat until soft and tender.
Have a great happy day full of green, potatoes, and pinches. Maybe even a leprechaun or two!
-C
Red Potato Colcannon
Rinse and dice potatoes and place into big pot. Cover potatoes with water and add about a tablespoon of salt. Place on high high heat and bring to a boil. Turn heat to medium low and let potatoes cook until super fork tender. While potatoes are boiling, chop up cabbage, shallots and kale and sauté in a large cast iron skillet (or any skillet) with a good drizzle of olive oil. Once the potatoes are done, drain water and add potatoes to the skillet with the sautéed veggies. With a potato masher or fork, mash the potatoes and mix with the veggies, adding a drizzle or two (depending on your taste) of olive oil as you go. Salt and pepper to taste.
Serve from skillet or dump into a fancy dish with a big spoon.
Eat as a main dish or as a side….Good hot, warm and cold.
.
 Pretzels go into the food processor and pulsed until a mostly fine crumbly crumble. Now in goes the big ol scoop of peanut butter. Pulse until mixture comes together
 Go ahead and take a bite……so good right?..Start turning the mixtures into small balls..think grape sized.
That’s it…Imperfect little perfect candy nugget truffle thingys….I sprinkled the tops with colored sugar.. you know, for a little holiday fun.. 3 simple ingredients( oil doesn’t count).. and 10 minutes of hands on time…can’t get much better then that.
Peanut Butter Pretzel Truffles
Ingredients
Pretzels go into food processor and pulse until a fine mealy constancy.. Add peanut butter and pulse until combined and is easily handled. Add a bit more peanut butter if the mixture seems to dry or another pretzel if mixture is too loose.
Line a baking sheet with wax paper. Roll mixture into small grape sized balls. Pace in the fridge or freezer for 1/2 hour.
After the balls have chilled, place chocolate chips and coconut oil into a double boiler and heat until chocolate is fully melted. Place balls 2-3 at a time into melted chocolate, roll around to completely coat, then transfer back onto wax paper. Once all balls are chocolate coated, sprinkle with something( if you want) and place back in fridge to set up.
Share(if you feel like it) and Enjoy!!!
This donut is ideal for Christmas morning(or any other morning)..Warm and sweet, bright and tangy….The perfect balance to make everyone happy! It’s really fast and easy, so you can make a batch while the coffee is brewing, or you can even make them tonight and maybe leave a donut out for santa. Have guests over for the holidays…Dazzle them with a homemade donut. Hanging out at home by yourself…make some donuts…..traveling….well you are kind of screwed at the moment… but think about making donuts when you get where your going.
It all started a few Christmases back when the mister gifted me with a wonderful addition to my kitchen bakeware….a donut pan…. and it was a game changer. If you do not have a donut pan I suggest that you immediately go buy one.. No joke, it’s so worth it. The pan elevates a simple cake recipe to something more… A round of frosted soft cakeness. Circles with holes…..happiness. Hopefully you already have a donut pan, but if not, I trust you will soon.(you can still make this recipe without the pan, just bake it in a 9×9 pan. Yes, it will still taste amazing, but it’s that much better as a donut!)
.What I started with….flour, baking soda, baking powder and salt whisked together. A little bowl of fresh ginger, powdered ginger and cinnamon. Molasses, brown sugar, vanilla, and egg, melted butter and milk. Not a bad line up
A beautiful donut batter….Scoop small spoonfuls of batter into very well greased donut pan …smooth tops with a spoon or spatial….I may have added just a little too much batter the first round, , which is totally cool, it’s just the donuts came our with a bit of a spare tire around the bottom…a little more to eat I say. Out of the oven and turned onto a cooling rack…This beauties smell so very nice.
Flip and let drip……and admire. I had to beat a few hands away while taking these pictures..I am telling you, people will do crazy things for a donut…..CRAZY THINGS… Just look at these. And for real, they really don’t take much time. You could totally whip these up in less than 30 minutes.. just make sure to have someone else do all the dishes!!!
Gingerbread Donuts with Lemon Cream Cheese Glaze
Ingredients……Makes about 8
Lemon Cream Cheese Glaze
Instructions Preheat oven 350
Grease donut pan In a large bowl, whisk together flour, baking powder, baking soda, cinnamon, salt, powdered and fresh ginger. In a small bow mix molasses, vanilla, brown sugar and melted butter. Stir and add milk and egg last.
Mix the wet with dry ingredients and until just combined. Scoop small amounts of batter to each donut mold… fill to about 2/3 full. and level out with a spoon if spatula. Stick in oven and bake for 10 minutes or until edges just start to turn golden brown and a cake test comes out clean.
While donuts are cooling, stir together cream cheese, sugar, lemon juice and zest. Add small splashes of milk until you reach the desired consistency(not to runny, think dish soap) Dip baked side of donuts into glaze, flip and return to wire rack.
And then you open your mouth…..EAT DONUT……..EAT!!!
This is probably one of the first recipes that I ever really knew by heart. Some recipes I can bring up in my head, but if I haven’t used it in a while, I usually have to check to make sure I got it right… Not these… Chocolate chip cookie are forever imprinted in my brain.
Chocolate chip may seem like a simple cookie, but trust me, its more complex then one may think. There are so many little factors that really affect the over all cookie: The baking temperature, the exact perfect time to pull the cookies out of the oven. Weather the butter is hand mixed or beaten, softened or melted. The color of the baking sheet and how long you leave the cookie on the sheet before placing on the coloring rack…….This cookie is as much about method as it is about ingredients. ….But don’t let that scare you..you got this. Just don’t think that these are a mindless act of baking. You have to be committed, keeping on the oven the whole time these cookies are baking………….. It’s so worth it.
Full disclosure here…I have been making these cookies the same way for so long so I am not exactly sure, but this might actually be the same recipe as toll house. I haven’t looked….Either way…I have tried out other chocolate chip recipes and this one has always come out on top.
Pre heat the oven to 375.
Room temperature butter creamed with both the white and brown sugar. Before you add the butter to the sugar, smash any of the big chunks of brown sugar. The key to my recipe is not melting butter or using an electric beater, it’s all hand mixin, no electric mixing(you could use a kitchen aid, but I don’t have one so I think you should use a wooden spoon too), plus it’s a good arm work out. Mix mix mix. I find smearing on the side of the bowl helps too. Mix/smear until both sugar and butter is a unified color and consistency, Once that happens, add the two room temperature eggs, the vanilla and mix a little more,
Take a minute here and sniff……I love the smell of cookie dough, it’s a happy smell. Now for the chocolate chips. I use only 1 1/2 cups of chocolate chips… You want just enough in each cookie, but don’t want to overwhelm it with too much chocolate. The cookie is as much of the star as the chocolate.
  See how may cookie sheet is nice and silver and clean? For a long time I used a very dirty and dark baking sheet. I would make cookies and they always seem to come out slightly burnt. Got myself a new baking sheet and……perfect cookies. If your baking sheet is dark, I would recommend using parchment paper.
Your ready to scoop and bake….my suggestion. Make 2-4 cookies for your first batch, or what I call the tester batch. I swear, there is some law of the universe that says the first batch always is overcooked. I have excepted that and learned to only make a couple for the first batch Scoop mounds of your preferable size(I do a spoonful) and place on sheet with each mound having good amount of spreading space. Place in preheated oven..
Now here is the really important part!!!!Baking time is essential to how your cookie turns out. If you want a more soft and chewy cookie, bake for about 7-9 minutes or until the cookies are just barely turning brown…just barely. They might seem a little undercooked, but the cookies will cook a bit more once pulled from the oven Trust…I know what I am talking about. .Let them cool for about a minute on sheet before transferring them to rack. If you like more crunchy milk dipping cookie..bake for 9-11 minutes or until they are golden brown.
Now you have gone and done it…Made fantastic cookies!!! Maybe you are going to share? No pressure, but it is the holiday season. For real, you can’t go wrong with a chocolate chip cookie, every loves it. and then will in turn love you too.
Get people to like you with Cookies!!!! hahahaha… but you know its true!
Perfect Chocolate Chip Cookie
Preheat oven to 375.
In a bowl, whisk together flour, salt and baking soda
In a large bowl with a wooden spoon, cream together the brown and white sugar with the room temperature butter. Add eggs and vanilla and stir. Now add the dry ingredients and….. then the chocolate chips.
On a light-colored baking sheet to a parchment line sheet, use a spoon and drop a constant size mound of dough, leaving room for expansion. Place in oven for 7-9 minus until cookie is barely turning brown. Remove and let sit on sheet for another minute before transferring to cooling rack. Keep doing this until all of you dough is gone…
COOKIES!!!!
Oh, but how my mind never stops.. See, it’s not the cake that I wanted to make, it was more making a cake look like a piece of wood that was appealing to me. So I must try, or better yet, create my own version of a yule log……………
Problem solved. Peanut butter, fluff, nutella and a wrap. And oh what a piece of wood I made.(insert dirty joke here) A yule log,(or yule branch), but whatever. Its food that looks like a piece of wood. I am happy.
Looks good right…You can go ahead and stop here if you want to…Its pretty great, but one more minute and…
I used the other end of the spaghetti noodle dipped in the nutella to make the lines. I just free formed it and it really transformed the log into a LOG!!! Just to jazz it up I added a handful of crunchy rice with the extra glob of pb and fluff, mixed it up and made little piles of yule log landscape. Added a few dried cranberries and pistachios for color…. It like taking walk through the woods.
 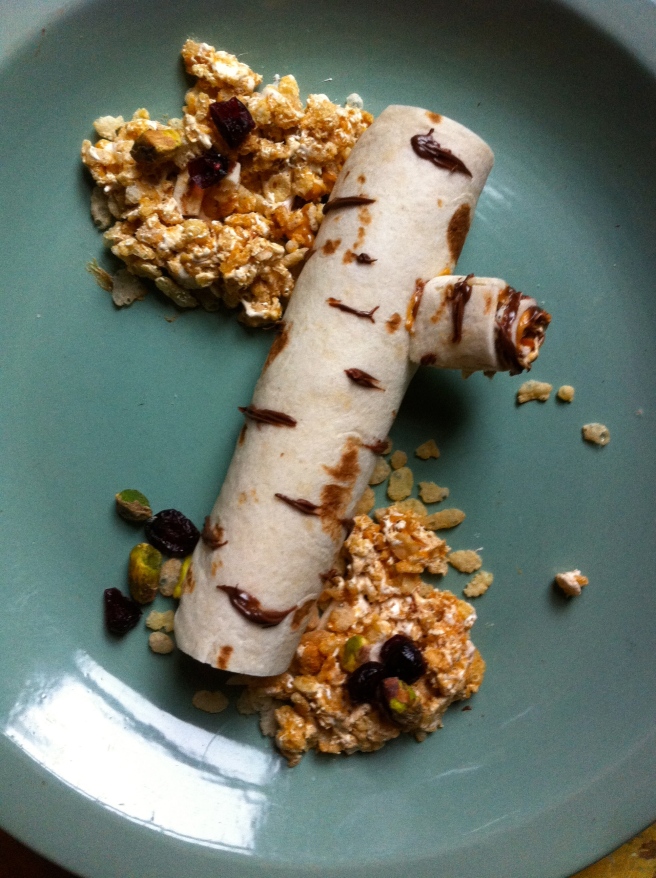 After the mister ate the crispy mounds, I sprinkled some flaked coconut around it and that looked pretty fantastic too.
Needless to say that if you make this, your day will be excellent.Make it for a friend, you will bring them joy. Its hard not to smile when looking at food that looks like wood. Happy.
These little logs would make fantastic party snacks. Fast and tasty … can’t get better than that. Think about walking into an office party, or better yet, a school party….All the other parents will think you are awesome and then probably start to hate you..Hey, it’s not your fault that you are cool enough to read my blog.(its ok, you can share the website) SO make them for friends, for family, for anyone.. Just don’t try to start a fire with the logs….It might not turn out so well.
Have fun splitting wood!!!
Yule Log
Each wrap makes one log
Note..Use these flavors or make up you own……PB and Jam…PB and Banana.. PB and Apples ….Cream cheese and Jam.. the possibilities are endless.
With a sharp knife, trip two opposite sides of a wrap and set trimming aside for later. Spread the peanut butter, fluff, and nutella(or whatever ingredients you want) all over wrap, up to the very edges. Sprinkle crispy rice all over.
Starting from one end, roll wrap leaving the seam on the bottom. With one of the wrap trimmings, spread more peanut butter fluff and nutella all over and wrap as well. Place a dollop of fluff on the bottom of the small nub and place on the roll where ever you see fit. For a better hold, snap small piece of spaghetti noodle and stick through nub into log.
For the tree markings, dip a toothpick or spaghetti noodle into nutella and lightly draw little lines on the log…..And you are done. If you want to jazz it up, sprinkle rice cereal or coconut or whatever you want to make the log look more nature like, do it. .
And now its time to eat your log…..
CRUNCH CRUNCH CRUNCH!!
I am not going to lie, I don’t know much about Hanukkah but I do know that its customary to eat fried foods during the holiday. The oil represents the miracle of the oil that burned for eight days ands.nights when it should have lasted for only one night. That’s a cool reason to celebrate.. So a lot of food eaten during the holiday is fried, therefore I must fry, and what better than potato latkes.
I don’t usually fry anything. But again, I don’t think I used as much oil with these as I could have..just enough to cook and not stick. Hey, it’s the holidays and this oil had meaning so it’s completely a ok to eat a little fried, just make sure to eat lots of good healthy stuff too!
HAPPY HANUKKAH!
Potato Latkes with Roasted Apple Slaw
Ingredients
Wash and cut apples into match sticks… Place on a parchment lined baking sheet and stick in oven. Let roast for 15-20 minutes or until the apple is nice and soft. Remove and set aside.
In a large bowl, grate the potatoes and the onion. Transfer the mixture into a clean towel and squeeze the crap out of it to remove as much liquid as possible. Return to bowl and add the two eggs, corn starch and salt and pepper. In a large skillet on medium heat, drizzle enough oil to completely cover the bottom..Work in batches and after each batch, add a bit more oil to cover the pan. Once the oil is hot place squashed latkes into oil. Fry each side until crispy and brown, about 3-5 minutes. When fully cooked, place on a wire rack in the oven to stay warm and crisp. When ready to serve, top with roasted apples and a dollop of sour cream. You can serve the latkes on top a bed of greens..Its a good way to make the pancakes more meal like.
Enjoy
Oh, it definitely was a long week. Did a lot of holiday stuff, watched a lot of littles( got peed on) got sick and lost my voice for a couple of days.(that was fun). All sorts of good stuff. But for real, I had a great week. Here are some bits.
 Persimmons.,,,,,,,,,,,. Do I need to say more?
Everything about getting our Christmas tree makes me happy. Every year, the mister, the dog, and I drive down to the rangers station,, get our tree tag , and hike into the Green Mountain National Forest to hunt for and cut down our Christmas tree. The tree is the thing for me. I don’t want presents, no shopping, take the food, just the tree and I will be happy. Its our most fantastical tradition. We make is a whole day event. A nice drive, lunch, listening to Christmas music, lots of hot coffee, a long hike in the most beautiful place in the world. The perfect day. Look at how happy this guy is. Its hunting season and we forgot his bright colors so we improvised. Yellow trash bag ribbons. His new nickname is now Trash dog. It fits him.
Hope you found some bits of happy this week, if not, your not doing it right.
HAPPY HAPPY HAPPY!!!