So its birthday season in my family.. Between September and April there is at least 3 birthdays a month to celebrate, and I usually make the cakes. What better way to share my beet booty then with a chocolatey beet cake. It helps that I went a little crazy at my last CSA pick up and brought home 8 lbs of beets. Yup, that is what I did and I don’t regret one single beet. So birthday+beets makes a happy birthday cake!
p.s. This cake is an ace for the holidays!
Suggestion for serving this super awesome cake, Do not tell anyone that they are eating a cake with beets in it until they are raving about how delicious it is. Over the years, I have learned that people tend to be wiry of veggies in there desert. You are not lying, just omitting unnecessary information for their own enjoyment. Let them eat cake!
I love a good fine grater. Just watch you fingers, blood and beet juice are hard to distinguish between. You might be tempted to eat all of the fine beet, but don’t. Just eat the left overs.
All the ingredients ready to go. I start with the wet the largest bowl cause that were I add my dry. I also whisk or sift together all my dry ingredients. Preheat the oven. I also grab the frosting ingredients.. Let the butter and cream cheese come to room temp.
Mixi the oil and sugar and vanilla. Then the best part, add those beets! Check out how bright that color is !
Add half of the dry. mix just until incorporated then add milk mixture. Mix that in and finish with the other half of dry. Dont over mix that batter
Pour that lovely batter into well greased and dusted cake pans. Taste or don’t taste your cake batter, thats completely up you but it is full of beets and there are no eggs so. Just lick the bowl clean, and the spoon.
Remove cakes from oven when an insert in the middle comes out clean, about 25 minutes. Dont let it over bake… it will dry out. Let cool in pans until you can handle then invert cakes onto wire rack and let cool completely
While the cake is cooling off, time to whip up that frosting.
Cream cheese and butter in the bowl at room temp. Beat it up on medium speed making sure it is fully mixed together.Sift in half the powdered sugar and mix slowly No Matter how hard I try, I always end up with sugar all over me. Add a bit of milk, then slowly sift in more sugar. Beat together and check you consistency. Add a splash more milk if you want a thinner frosting.
Once you get to the desired consistency, add the fun. Orange zest for flavor and color. Beets to really make this beauty pop. Isn’t it amazing? Now frost you cake! Just make sure it cool enough
Look at all those flavor specks! The orange really pops through the pink.
Hey, even dinosaurs like to eat cake
Happy BIrthday!
Chocolate Beet Cake with Orange Cream Cheese Frosting
Makes one 9-inch layer cake
Cake Ingredients
2 medium beets measuring about 1 cup shredded + 2 tablespoons shredded
1 cup minus 1 tsp milk or milk subsutie if you want to keep it vegan
1 tsp white or apple cider vinegar
1 cup granulated sugar
1/2 brown sugar
1/2 cup canola or coconut oil
1 tsp pure vanilla extract
2 cups unbleached all-purpose flour
2/3 cup unsweetened cocoa powder
1 tsp baking soda
1/2 tsp baking powder
pinch salt
Frosting Ingredients
1 stick unsalted butter, softened
4 ounces (1/2 brick) cream cheese, softened
3 to 4 cups powdered sugar, sifted
2 tablespoons finely grated beets
1 teaspoon pure vanilla extract
1-2 teaspoons milk
Tablespoon orange zest. More or less to taste
pinch of salt
To roast beets
Preheat oven 400 degrees
Wrap beets in a piece of foil and put on a baking sheet or in a casserole dish. The beets may drip a bit of juice. Roast until beets are easily pierced, about 1 hour. If you think of it, roast the beets ahead of time. The roasted beets will last a couple days in the fridge. Allow beets to cool enough to handle. Finely grate the roasted beets. Peeled or unpeeled is up to you. I never peel. Measure out 1 cup for cake and a tablespoon or two for frosting
To make Cake
Preheat oven 350
Mix milk and vinegar and set aside
MIx oil and sugars until fully incorporated, then mix in vanilla and beets
In a medium bowl, sift together flour, cocoa powder, baking soda, baking powder, and salt.
Slowly mix in half the dry ingencient them add the milk and vinegar mixture. Mix in the rest of the dry until the batter evenly mixed. The batter should be a bit thick you can mix in another splash of milk to thin it out a little.
Divide the batter between the two well greased and flour or cocoa dusted cake pans. Bake 25- 30 minutes or until toothpick stuck in middle comes out clean.. Cake is done when a skewer inserted in the center comes out clean. Remove cakes and let cool completely.
To make frosting
In a large bowl, beat cream cheese until smooth then beat in butter until combined making sure to scrap the sides of the bowl to get it all. Add the half the powdered sugar, vanilla extract, and a teaspoon of milk and salt. Beat on medium speed until mixed, add rest of sugar and mix until smooth. Add a splash more milk if you want to a thinner frosting. And last but not least, mix in the orange zest and beet. Beat until combined. Refrigerate the frosting for 30 minutes before using.
To frost cake place one layer on a cake stand or platter. Spread a good amount of frosting on first layer then place other layer on top. Scoop rest of frosting on top and evenly spread from top down the side.
I figured now is a good time to get this recipe out there before we get to far into spring and summer recipes because there is going to be a lot of banana ice cream filled recipe coming and I figured its a good idea to have the basic banana ice cream recipe ready for people to refer too. And because I made so much fantastic naner ice cream, I also made a cookies and cream naner ice cream for my sisters and the mister.
Comments that I got from my sisters and the mister when I made them this ice cream
-Sister one.”I give this my sister seal of approval.. It’s so good. The first dessert you have made that I liked! (not including all the other desserts that you have made that I liked)”
-Sister two- “Wow.. it looks like ice cream and feels like ice cream and tastes like ice cream.. You should make me this ice cream!” (I was confused too because I was pretty sure I just made her some)
-The mister- “I am so excited for my new fly fishing pole!”
Ok, so the naner ice cream isn’t new to the mister and he IS very much excited for his new fly fish pole. So excited that he forgot to tell me how amazing that I am and to thank me for making him a big bowl of yumminess. (It’s ok, I forgive him)
And yes, this is probably one of the easiest, most delicious, healthy and amazing frozen dessert that you will ever eat. You will probably find yourself buying mass amounts of bananas and stocking the freezer until things just start falling out. (which is also ok because it’s only bananas and you can’t have too many frozen bananas)
The stuff you need for this ice cream…. Nice and ripe bananas, peeled and then frozen* That’s it.
To make it, place frozen bananas into food processor and hit the on button. Process the crap out of the namers until nice and silky smooth.
*Note, the smaller the frozen chunks are , the faster and maybe a little easier for the blender to blend the naners into ice cream. So if you think of it, chop bananas into pieces before freezing or even after.
After all blended and smooth, either eat right away or scoop ice cream into a freezer safe container and stick in freezer. That’s the banana ice cream… And it is amazing and so so so so so addictive. I make a batch, think I am only going to eat a scoop, then find myself eating half of what I have made, but it’s ok cause it’s only bananas.
Now for the cookies and cream banana ice cream..One batch of banana ice cream, either freshly made, still in food processor or made ahead and placed in a food processor and given a good pulse to smooth it up.
Add cookies in, crushing a bit beforehand and pulse till combined. Now you have cookies and cream naner ice cream…. and everybody is happy.
Scoop into a cup, a bowl, a freezer safe container, or directly into your mouth. Be careful…. You can still get brain freeze from eating naner ice cream too fast!
Keep it real hump day drum bum!
-C
Basic Banana Ice Cream
Makes one batch. Good for 3-4 servings
4-5 ripe bananas peeled and frozen
Peel bananas and stick in a freezer bag or container and freeze. When bananas are completely frozen, break into pieces and stick into a food processor or blender and puree until silky smooth.
Eat right away or scoop into a freezer safe container for later.
Cookies and Cream Banana Ice Cream
1 batch banana ice cream
5-10 (depending on your cookie need) cream filled cookies like oreos or Trader Joe’s Joe Joe’s (These are gluten free)
In a food processor, blend banana ice cream with cookies.
Eat right away, with a utensil of choice in a container of choice.
My contribution to last nights dinner at my sisters…. Freshy fresh veggies spring rolls.I had about 30 minutes between work and getting over to my sisters house to throw something together so it needed to be something fast, easy, and something I could make without going to the store. She was making the main course (some teriyaki situation and rice) so I was doing up the veggies.
I had just bought a package of spring roll wrappers…. Bingo! The perfect and logical choice. I grab the wrappers, a variety of veggies and after spending 12 of my 30 minutes trying to scrub the oil based paint off of my face and hands, I still managed to completely prepare, construct, and take pictures of these lovely tasty spring rolls. and get over to my sisters in time for dinner.
Impressed?
Damn right!
The stuff. Carrot, beet, asparagus, red cabbage, and kohlrabi, which all (except asparagus, which I just cut into thirds) got cut into matchstick sized pieces with my mandoiln. Then there are the rice spring roll wrappers that we need to make the veggies into rolls. Also a bit of red wine vinegar to drizzle onto the veggies for a little extra zing. And lastly, soy, fresh ginger, and a couple cloves of garlic for a spicy salty dipping sauce.Start by having everything set out and ready to assemble. Fill a large shallow dish or baking sheet with really warm water. Working with one at a time,place a rice wrapper into water and let sit for about 10 seconds or until the paper starts to soften. Remove from water and place on a damp surface (just splash a little water on the counter) Take a little bit of everything and and place on the lower middle part of the paper. Fold in the sides first, then tuck and roll the wrapper as tightly as you can without ripping the wrapper.
Repeat until you have used up all you veggies.For the dipping sauce. Finely grate ginger and garlic and add to soy sauce. Stir… and it’s done.Freshy, pretty and fantastically delicious. And for real, took about 8 minutes to make. (I even had enough time to wash the dishes before we left!)
I am so awesome!
Hump Day Pow!!!!!
-C
Fresh Veggies Spring Rolls
Makes 8-10 but can easily be increased or decreased to desired amount
8-1o rice spring roll papers
Splash of Red wine or rice vinegar
1/4 cup soy or tamari sauce
2 cloves of garlic
teaspoon freshly grated ginger
1 medium carrot
1 medium beet
1/4 head of purple cabbage
10 thin fresh asparagus
1 small kohlrabi
Note… I used the veggies that I had in the fridge at the moment. If you have a bunch of veggies but not these particular ones, use what you have. Pretty much all veggies taste good inside a spring roll!
Gather your veggies and prep by either using a mandolin, a grater, or some sick knife skills, and julienne, shred, or slice you veggies into thin match sticks. Once all the veggies are prepared, sprinkle a little vinegar over the top.
For the rolls…Grab a large shallow vessel (a rimmed baking sheet works great) and add in warm water. Working one at a time, place the wrapper into the water for about 10 seconds or until the wrapper starts to soften. Remove and spread onto a clean, damp work surface. Gather a bit of each veggie that you are adding and place towards the bottom middle of the wrapper. Now fold the sides in over the pile of veggies. Then with the side closest to you, tuck and roll wrapper away from you, trying to keep it tight, but not to tight that it rips.. (Hopefully that makes since.) Place finished rolls onto a damp surface to keep from sticking and if not serving right away, drape with a damp towel or paper towel to keep from drying out.
For the soy ginger dipping sauce. Add grated ginger, minced garlic, and soy into a bowl and mix together. Serve with spring rolls.
Eat one, two, or a plateful. It’s nice to share but not a necessity.
I figured now is a good time to get this recipe out there before we get to far into spring and summer recipes because there is going to be a lot of banana ice cream filled recipe coming and I figured its a good idea to have the basic banana ice cream recipe ready for people to refer too. And because I made so much fantastic naner ice cream, I also made a cookies and cream naner ice cream for my sisters and the mister.
Comments that I got from my sisters and the mister when I made them this ice cream
-Sister one.”I give this my sister seal of approval.. It’s so good. The first dessert you have made that I liked! (not including all the other desserts that you have made that I liked)”
-Sister two- “Wow.. it looks like ice cream and feels like ice cream and tastes like ice cream.. You should make me this ice cream!” (I was confused too because I was pretty sure I just made her some)
-The mister- “I am so excited for my new fly fishing pole!”
Ok, so the naner ice cream isn’t new to the mister and he IS very much excited for his new fly fish pole. So excited that he forgot to tell me how amazing that I am and to thank me for making him a big bowl of yumminess. (It’s ok, I forgive him)
And yes, this is probably one of the easiest, most delicious, healthy and amazing frozen dessert that you will ever eat. You will probably find yourself buying mass amounts of bananas and stocking the freezer until things just start falling out. (which is also ok because it’s only bananas and you can’t have too many frozen bananas)
The stuff you need for this ice cream…. Nice and ripe bananas, peeled and then frozen* That’s it.
To make it, place frozen bananas into food processor and hit the on button. Process the crap out of the namers until nice and silky smooth.
*Note, the smaller the frozen chunks are , the faster and maybe a little easier for the blender to blend the naners into ice cream. So if you think of it, chop bananas into pieces before freezing or even after.
After all blended and smooth, either eat right away or scoop ice cream into a freezer safe container and stick in freezer. That’s the banana ice cream… And it is amazing and so so so so so addictive. I make a batch, think I am only going to eat a scoop, then find myself eating half of what I have made, but it’s ok cause it’s only bananas.
Now for the cookies and cream banana ice cream..One batch of banana ice cream, either freshly made, still in food processor or made ahead and placed in a food processor and given a good pulse to smooth it up.
Add cookies in, crushing a bit beforehand and pulse till combined. Now you have cookies and cream naner ice cream…. and everybody is happy.
Scoop into a cup, a bowl, a freezer safe container, or directly into your mouth. Be careful…. You can still get brain freeze from eating naner ice cream too fast!
Keep it real hump day drum bum!
-C
Basic Banana Ice Cream
Makes one batch. Good for 3-4 servings
4-5 ripe bananas peeled and frozen
Peel bananas and stick in a freezer bag or container and freeze. When bananas are completely frozen, break into pieces and stick into a food processor or blender and puree until silky smooth.
Eat right away or scoop into a freezer safe container for later.
Cookies and Cream Banana Ice Cream
1 batch banana ice cream
5-10 (depending on your cookie need) cream filled cookies like oreos or Trader Joe’s Joe Joe’s (These are gluten free)
In a food processor, blend banana ice cream with cookies.
Eat right away, with a utensil of choice in a container of choice.
HEY Hey Hey… It’s Taco TUESDAY, which means that you are obligated as consumer of food to eat some tacos today!
So ok, I am not going to lie, these tacos were not actually made on a Tuesday (GASP) but were made in lu of pizza Friday (another GASP!!)
But guess what? No one died. People were happy. Food was fantastic, and there was no mention of the pizza that was not. So sure, taco tuesday is totally a thing around here, but you know how “Nobady puts baby in a corner”.. well nobody buts tacos in a corner. We don’t let the day of the week depict when tacos are eaten cause we think tacos are for everyday!
And these tacos, well, I got down with these. Made with lentils, cause lentils are the best, and topped with a hearty scoop of super fresh, chunky veggie salsa…. Not much is better then that. Easy and fast with lots of pretty in every bite, these tacos are a great addition to any taco dinner rotation!
Now lets get taco-ing!!!
The stuff. First off, you are going to need some type of taco shell.. soft or hard or both , that is entirely up to you.( I made taco shells a little early in the day, but store bought is totally cool.) Also need lentils, water to cook the lentils, a jalapeño (optional), taco seasoning (pre blended or your own blend) and onion. Also needed is a gigantic tomato, some red cabbage, a few kale leaves, a lime, and salt and pepper.
To get this party started, chop up half the onion, the tomato, cabbage ,and kale and toss into a big bowl. Oh, and chop up the cilantro and toss that in as well.
Sprinkle with salt and add the juice of the lime. Mix oh mix and set aside to let all the flavors meld.
Now that the salsa is doing it’s thing, chop up the jalapeño and the other half of onion and toss into a big skillet and place on medium heat.
And when the bits start to brown like so…
Dump the lentils in to the pan with water.Bring it all to a boil then turn heat down to low.. Add in the taco seasoning and sprinkle of salt and pepper and place some type of lid on ithe pan.
And simmered until cooked.
Note. Check the lentils every few minutes while they are cooking. If you think they seems to dry, add in another 1/2 cup of water.
Now it’s ssembly time! Lentils in shell, topped with a generous amount of salsa. That’s it! Maybe some guacamole would be nice (I had an avocado saved for guac, but it was rotten on the inside.. I was super pissed) But with or without, these are some freak yeah yummy tacos! I served my next to a bed of some jasmine rice which was nice, but do what you want my friends.
Happy Taco Tuesday! (or any taco day!)
-C
Makes about 8 -10 tacos
For the Lentil Filling
1 cup dried lentils
2 1/2 -3 cups water
2 tablespoons taco seasoning*
1/2 of an onion
1 jalapeño
Fot the Garden Veggie Salsa
2 big tomatoes (or one gigantic tomato)
1/4 head of red(or green) cabbage (about 2 cups shredded)
1/2 of an onion
4-5 kale leaves
1 juicy lime (2 if they are not very juicy)
a bunch of cilantro
salt and pepper
And don’t forget the taco shells!
*Note. You can use any type of taco seasoning that you like, store bought or home made. I make my own with cumin, chili powder, onion powder, garlic powder, and a little coriander.
Dice the tomato and 1/2 the onion into small chunks and toss into a big bowl. Finely chop the cabbage an the kale into small shreds and toss that into the bowl. And chop up as much cilantro as you would like and that goes into the bowl as well. Spinkle with some salt and add in the juice of the lime. Mix everything all around and set aside.
Once the salsa is made and sitting, chop the jalapeño and other half of onion and toss into a large skillet. Place on medium heat for a few minutes until the pepper and onion start to brown. Now dump in dried lentils and 2 1/2 cups of water. Turn heat to high and bring to a boil, them back down to low. Seaosn with salt, add in the taco seasoning, and stick a lid (or cover with something), and let simmer for about 20- 25 minutes or until the lentils have absorbed all the water and are nice and soft. If you find the lentils are still hard and there is no liquid, , add in another 1/2 cup of water.
Once the lentils are cooked to your liking, remove from heat and get assemble tacos.
Scoops some lentil mixture into shells. Add on a big scoop of the fresh veggie salsa and eat with you face.
Guacamole, cheese, sour cream, or whatever are optional topping that you may consider adding but are definitely not necessary. .
This time of year, there are so many reasons for popsicles, but I think that main reason is that I don’t want to willingly turn on the oven for any amount of time. It’s just to f-ing hot.
Lately, it’s been hot. And humid. And gross. Just way too hot to make anything in the oven. So when I grabbed the rhubarb out of the fridge, knowing that if I didn’t use it soon it would go bad, I immediately thought to make pie. Then I was like,” hell no, not going to happen. I need to freeze this shit”. And freeze it I did..into the greatest, slightly sweet, slightly tart, bright pink popsicles of happiness. They are really the perfect little frozen treat. Not overly sweet and sticky, have a lot a fresh clean flavor, and takes the edge off of the super summer heat and humidity, even if only for a few minutes.
I love popsicles.
But sadly this is probably the last rhubarb for the season (Or maybe the second to last..I think I saw some for sale at the coop a few days ago)
So get it while you can and make these popsicles!
The stuff. Rhubarb, a lime and a little bit of honey (or any sweetener you like). Plus you are going to need some water, but I bet you have some of that on hand.
Chop the rhubarb into inch chunks and toss into a big pot with the water. Stick on the stove and bring to a boil then turn heat to low and let simmer.
Once the rhubarb is so soft that it falls apart, remove from heat and let cool for a few minutes.
With a fine mesh stainer, strain juice into a large jar or bowl.
Now you have the juice for the popsicles and the left over rhubarb stuff is the rhubarb butter.
Place the rhubarb butter into a jar, adding a little honey(or whatever) if you want and eat with anything and everything ( I’ve been adding it to the mr’s yogurt and just eating it with a spoon)
And now add the juice of the lime to the rhubarb juice and add a little honey or whatever sweetness to taste.
And add the rhubarb juice to your popsicle molds and stick in the freezer with sticks tops or wait two hours and add wooden sticks.
When frozen, run the mold under a little hot water and pop those suckers out.
A two for one deal here. And timed perfectly. You have the rhubarb butter to eat while you wait for the popsicles to freeze. So smart
Happy Tuesday.. Keep it cool!
-C
makes 6 4oz popsicles and about a cup of jam
3 cups chopped rhubarb
2 1/2 cups water
1 lime
Anywhere from 4 tablespoons honey (2 for popsicles and 2 for jam)
Chop the rhubarb into inch ish chunks and stick into a big pot with water. Turn on high heat and bring to a boil. Once boiling, turn heat to low and simmer until the rhubarb is so soft its falling apart. Remove from heat and let cool for a few minutes. Take a big jug or bowl with a fine mesh strainer,strain the liquid from the solids. You can use a wooden spoon to stir around to help get the juice flowing. Place remaining solids into a jar and add as little or as much or as little honey (any sweetener you like) and give it a stir. Thats your jam
Now for the popsicles. Add the juice of the lime and a tablespoon or two of honey (or whatever sweeteners you like) and mix around. Pour into popsicle molds and stick into freezer.Know your mold.. if you need to insert a stick, do so after about 2 hours.
When pops are frozen, remove from mold and eat your heart out.
Monday was kind of a suck until I made dinner. It was hot, I didn’t sleep well the night before, and I spent the morning calling the dentist over and over until someone picked up so I could get my butt in there to get my tooth fixed (sometime during eating on sunday I broke my back molar…. and that happened) . Whatever, I got the only appointment that they had available and was just happy that I was able to get in. So went about my morning, went to the gym, did my things then ran home, took a shower and headed to the appointment. When I got there, I checked in, sat down, and waited..Then waited some more, then was called in to the room and then did some more waiting. But finally, the doctor came in and took two minutes to check the tooth (the doctors said I was as badass… couldn’t believe that I don’t do novocain) and left the dental assistant lady to fix it. And ok, I know that people have to practice their craft to learn, but I am pretty sure that I was one of the first solo tooth fixings that this lady has ever done. And that’s cool, but I was hungry and just wanted to get the f out there.(did I mention that it was lunch time?) So taking her sweet time (at least she did a good job) she got it done. But then I had to wait some more, in the chair, for the doctor to come back and check. Holy hell I was there for way to long.
Then I got home and rushed out.. grabbing a carrot on the way. But I was still hungry.. And that just sent me to a dark place for the rest of the day.
So when I finally got home, I immediately went to the fridge to get dinner started. While aggressively riffling through bags of veggies and greens, I stubbled upon a big bag of mustard greens that I got last week at the farm….SCORE.., this made me happy.
Sure, I could have just eaten them right there, fresh and all spicy like, but I if I waited this long to eat, I could wait a little longer and I figured I would share.. and mabye do a little some thing fancy, like toss them with some cooked up onions and sweet potato and that left over quiona that was also in the fridge.
And thats what I did. And it was good. And the day didn’t seem so bad. (food always makes me better)
The stuff. Mustad greens oh lala. A small sweet potato and an onion (I used half of that big one). Cooked quinoa, garlic, salt and pepper, and a little olive oil.
Dice up the sweet potato into little chunks and toss into a big skillet with a drizzle of olive oil and a sprinkle of salt and pepper. Place skillet on medium heat and cook potato for a few minutes just to give it a little head start before adding the onions. When the potato starts to show a little browning, add in the onions and a splash or two of water. Stir around, stick a lid over it, and continue to cook until the onions are soft and the sweet potato is fork tender.
When the stuff is cooked, mince up the garlic and stir that in and cook for a little longer.
And now toss on the mustard greens. (Don’t worry if they are overflowing from the skillet, they will cook down really fast). Add another splash of water and place the lid back on. Cook for a couple minutes and mix everything together.
Place cooked quinoa (hot or cold) into a bowl.
And dump the stuff right on top. If your into it, drizzle with a bit of balsamic vinegar. (I highly recommend)
And eat to be happy.
Hears to a better day then yesterday!
-C
roughly 1/2 lb. of fresh mustard greens
1 small sweet onion or half a big onion
1 small sweet potato
3/4- 1 cup cooked quinoa*
few cloves of garlic
1-2 tablespoons balsamic vinegar(optional)
salt and pepper
olive oil
Note- To cook quinoa, use1 part quinoa- 2 parts water. Place quinoa in pot with water, bring to boil, place on a lid, then turn to simmer for 15 minutes. After 15, turn heat off and let sit of a few more minutes then fluff with fork. Also, i f you don’t have quinoa, just use rice or faro or nothing, the greens are good their own.
Dice up sweet potato into small picese and stick in a large, lightly oiled skillet on medium heat. Toss on some salt and pepper and cook potato for a few minutes until they start to slightly brown. Slice up onion and toss that into the skillet with the sweet potato. Add in a splash of water and place a lid on the skillet, giving it a stir ever now and then. (Watch the stuff carefully, it cooked pretty fast.) Cook until both the sweet potatoes and onion are browned and soft. Now mince garlic and mix that it and let cook for a few minutes..
Now everything is cooked, toss in the mustard greens. (It may seem like a lot, but its not) Hit with a splash of water, place a lid (it doesn’t have to be a snug fit) on top and cook for a few mites until greens are wilted. Toss everything around to mix together. Take your quinoa and place in a bowl. Top with cooked stuff and drizzle with balsamic vinegar.
Eat right away and maybe save a little for later cause it very much good cold too!
Is it really for real April? Where has all the time gone and where the hell is the warm weather? It’s not funny anymore. I am officially OVER winter! Ok, so now that I got that off my chest…..
Last night the misters Dad came over for a long awaited dinner accompanied by talk of life goals and what her referred to as “narratives” or the story of our lives. Some deep shit to be talking about at dinner, especially with zero alcohol to be had.
Me, being so super awesome, was all up in taking charge in making the food. Except that last night I didn’t have a bunch of time and honestly, much energy to be doing anything. And sure, I could have just made a pot of spaghetti, but that just felt like cheeping out. So Polenta it was. And because I just made a hug pot of navy bean, those were going into the polenta too.
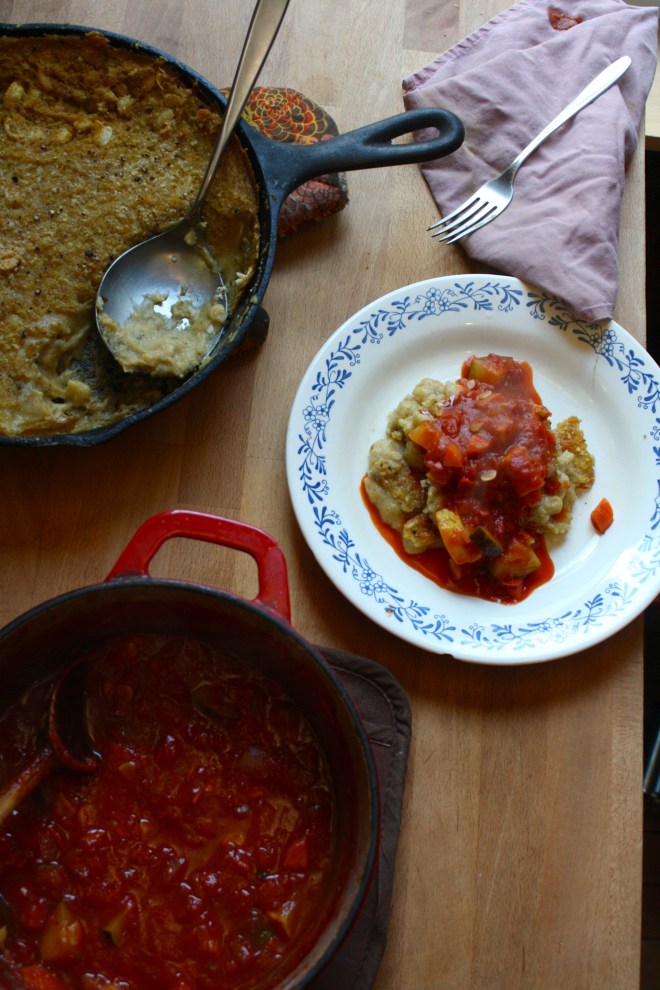
Beany polenta baked in the oven with a tomato sauce cooked on the stove. About 5 minutes of hands on time and an hour to cook it all. It’s the perfect meal to make when you have guests coming over. Fast prep, into the oven and on the stove, and then you have an hour to clean and make yourself presentable. See, I am a thinker. (I ended up skipping the making myself presentable part… I stayed in my gym clothes.. no need to impress family right?) Then after about and hour you end up with a hearty healthy pretty meal, all from scratch, that seems like you spent the afternoon cooking. When in fact you spent the past hour vacuuming and watching Gilmore Girls.
The Stuff. Cornmeal, water, navy beans and parmesan for the polenta. Crushed tomatoes, garlic, dried basil, onion, carrot, zucchini, and summer squash for the sauce. Salt, pepper, and olive oil all around.
Cornmeal and water go into a cast iron skillet (or any oven safe dish) with a pinch of salt and pepper. Give it a little mix and stick it into the oven at 400 degrees .
Once the polenta is in the oven, make the sauce. Chop up all the veggies and stick into a dutch oven or sauce pot with a pinch of salt, the basil and a good drizzle of olive oil. Stick on medium heat and let veggies cook down a bit. When the veggies are tender, add in minced garlic, crushed tomatoes and another drizzle or oil. Turn burner to lowest setting and simmer (giving it a stir every now and then) for about 45 minutes or until the polenta is done. After about 30 minutes when the water had pretty much all cooked down, take the polenta out of the oven and stir in the beans, the parmesan, a tablespoon or two of olive oil and salt and pepper. Smooth top out and sprinkle with more pepper, parmesan and drizzle with a bit more oil. Stick back into oven for another 1/2 or until polenta has formed a crust and no longer giggles when you wiggle the pan.
Pull polntna from the oven and let sit for at least 1o minutes.
Two big spoons and a pile of plates. Have the people serve themselves!
Have a Happy Day!
-C
Baked Navy Bean Polenta with Chunky Tomato Sauce
Serves 4 hungry people
For the Polenta
1 1/2 Cups Course Ground Corn Meal
4 Cups Water
3 Cups Prepared Navy Beans (Or just use to cans)
1/2 Cup Parmesan Cheese or Vegan Parmesan (Optional)
3 Tablespoons Olive Oil
Salt and Pepper
For the Sauce
One 28oz Can of Crushed Tomatoes
1 large Carrot
1 Small Onion
4 (or more ) Cloves Garlic
1 teaspoon Dried Basil
1 Small Zucchini
1 Small Summer Squash
Olive Oil
Salt and Pepper
Preheat oven to 400
In a large skillet, mix together the cornmeal and the water and add a good pinch of salt and pepper. Place into oven for about 30 minutes or until the polenta starts to congeal at the edge of the skillet nd most of the waster has cooked down.
Remove skillet from oven and with a whisk or wooden spoon, mix in the beans, the parmesan (if using) and 2-3 tablespoons of olive oil. Smooth out mixture, sprinkle with salt, pepper, parmesan and drizzle with olive oil. Stick back into oven for another 30 minutes or so. Polenta is done when it no longer wiggles when you giggle the skillet.
For the sauce
Small dice the carrot and the onion and stick into a medium dutch oven oor sauce pan with a drizzle of olive oil. Place on medium heat and cook until the veggies are tender. Add in tomato, minced up garlic and basil. stir and let simmer on stove top for about 45 minutes. When you place the polenta back into the oven for the second bake, dice up zucchini and squash and add to sauce. Stir and keep on simmer until ready to serve.
Once the polenta has completely cooked, remove from oven and let sit for at least 5 minutes…10 is better to solidify.
Spoon big piles of polenta on a plate or in a bowl, top with a big heap of tomato sauce. Sprinkle with a little more parm and maybe another dash of pepper .
Eat…..Spoon or fork is recommeded.
Happy Food!
Last night I had my sister and her kiddos come over for dinner. Nothing fancy, nothing to complicated, just something fast and something that I knew the littles would eat. Spaghetti and meatballs, except replace meatballs were bean balls So they came, we played, did a little drawing and had a bit of first grad gossip. Then came dinner time when I was told by one little that she was not going to eat.. She had pasta for lunch. Well I made her sit anyway and she mainly just ate carrots (I was ok with that) Then the other little was all into his pasta and bean balls, 1 down, 3 more to go, when the mister let slip that the meatballs were not really meat. He ate around the remaining balls, said he didn’t want them anymore. And my sister, well she doesn’t eat anything that is not pizza.
Good thing a neighbor stopped by while we were eating. He had a few of the balls and told me that they were amazing. I needed someone to tell me that.
So yeah, the littles were not overly enthused with the ball, but the Mister the Neighbor, and I thought that they were awesome and delicious. Maybe next time I will make sure that pasta was not lunch and tell Nick to keep his mouth shut and stop talking about balls at the dinner table.
I feel like I don’t need to tell you how to boil pasta or heat up the sauce, so I left that portion of the recipe out. I have faith that you are capable in doing that part without my instruction.
The bean ball stuff. Chickpeas (soaked and cooked or canned), sweet potato, carrot, onion, and some chick pea flour. Dried garlic, basil and oregano. Salt and pepper and a little bit of olive oil. Small chop all the veggies and toss them and the dry spices into a skillet with a drizzle or two of olive oil. Stick on medium heat and add about 1/4 cup of water to pan. Top with slid and let veggies cook down until soft and fragrant.
Add the cooked veggies to a food processor or blender with the rinsed and drained chickpeas. The mixture gets pulsed until combined, keeping a little bit of chunkiness. Now go warhead and taste the mixture. Add another pinch or two of salt , pepper or any of the spices that you think it need. Dump the mixture into a bowl and mix in the chickpea flour than stink the mixture into the fridge for a least a 1/2 hour. Cooling to off is really important to forming the balls. If you don’t, it’s much harder to keep mixture from falling apart and sticking to your hands.
After the mixture has had time to cool and set, start rolling the mixture into balls roughly the size of ping pong balls. In a shallow bowl, add a few tablespoons of the chickpea flour with a pinch of salt, pepper and garlic powder. Take each ball and roll in flour and place each ball on a well oiled baking sheet. When the balls are all rolled, stick into the oven and bake away for about 30-40 minutes, flipping balls after about 20. After you flip the balls, get the pasta ready so its finished about the same time the balls are done.You pasta and sauce is cooked and the balls are all crispy and oh so nice.
Serve balls over pasta with sauce and eat with a fork.
Your day is now complete.. balls and all.
Happy Weekend!
-C
Spaghetti and Bean Balls
makes about 20 balls
4 Cups (or 2 cans) Cooked, Rinsed and Drained ChickPeas
1 Small Sweet Potato
1 Small Onion
1 Carrot
1/4 Cup Chickpea Flour plus extra to roll balls in
1 Heaping Teaspoon Basil
1 Heaping Teaspoon Oregano
1 Heaping Teaspoon Garlic Powder
Olive or Vegetable Oil
Salt and Pepper
Your choice of Spaghetti (Use Vegan and or Gluten Free if needed) Prepared as package recommends
Marinara or Pasta Sauce of your choice
Preheat Oven to 425 degrees
Small dice the carrot, onion and sweet potato and toss into a skillet on medium high heat with a splash of oil. Add in the dry spices and add in about a quarter cup of water. stir and cover the skillet with a lid and let the veggies cook down until the water has evaporated and the veggies are tender.
Add rinsed and drained chickpeas to a food processor with the cooked veggie mixture. Pulse together until the mixture is combined and slightly smooth, but still with a little bit of texture left.Place bean mixture in a bowl and mix in the 1/4 cup of chickpea flour. and stick in the fridge for a least a 1/2 hour to cool. (Mixture can be made a day ahead if you want)
Once the mixture has time to cool and set up , remove from fridge and with a light head, roll mixture into ping-pong sized balls. In a separate shallow dish add a bit of chickpea flour with a pinch of salt and pepper. Roll each ball in the flour mixture and place balls on a well oiled baking sheet. Once balls ae made, stick into the oven and bake for about 30-40 minutes, flipping after about 20 minutes. The balls are done when the outsides are once and golden brown and crispy. After about 30 minutes, get to cooking your pasta and mariana sauce.
Once the pasta and sauce is done, plate it and toss on some of those awesome bean balls!
Bean balls also make fantastic bean ball sandwiches or bean balls on a toothpick.
Whenever my little sister comes over for dinner, I always end up making lentils in some form or another because she, like me, is awesome and loves a good lentil. It makes me so happy that she has such great taste in food and wants to eat what I make. It’s validation from a teenage girl which is the best kind of validation.
So last night when she came over after school for dinner and trash talk (she likes to verbally abuse Nick) we decided to make both of our favorites … Lentils AND sweet potatoes. How can you go wrong with that combo? Well I am telling you that you can’t. The rich creamy soft and slightly sweet sweet potato mixed up with the hearty, earthy, oh so fantastically tasty lentil. Add in a bit of kale and cheese if you wish and serve with salsa and guac… Whoa, it’s the best!!!
Such a great evening, I get to the cooking, the sister gets to the verbal abuse and the mister, begin the champ that he is, takes it and dishes it right back.
I am the greatest(coolest) sister.
Baked sweet potatoes, cooked lentils, chopped up kale and monetary jack cheese (Cheese is optional.. and make it vegan cheese if you want) And you don’t need then, but salsa and guacamole are the best toppings.. So you have them.
Cut the cooked potato in half lengthwise and scoop the flesh out into a bowl. With a fork, smooth the potato , sprinkle with salt and pepper and mix in lentils and kale.
Stuff the mixture back into the skins of the potato.
And add some cheese (The mister and the sister wanted lots of cheese, no cheese for me) and stick the potatoes into the oven and let bake for another 5 or so minutes or until the cheese is all melty or the top is nice and crispy.
Remove and plate… Serve with salsa and guacamole and maybe some corn chips.
I am the greatest sister
-C
Makes 2 serving
1 Large Sweet Potato
1 cup Prepared Lentils
1 cup Chopped Kale
1/2 cup Grated Monetary Jack Cheese (Vegan style or not)
Salsa (optional)
Guacamole(optional)
Place potato in oven at 400 degrees for 30-40 minutes or until soft a baked throughout.
While potato is baking, prepare lentils. 2 cups water to 1 cup lentils. Add water and lentil to pot, bring to a boil, add a sprinkle of salt, and reduce to simmer until lentils are tender.
When potato is cooked, remove potato and let cool for a few minutes. Cut in half lengthwise and scoop out most of the flesh out of the skins and place into a big bowl. WIth a fork, mash the potato a bit Add in the lentils and the kale, a sprinkle of salt and pepper, and mix to combine. Stuff the mixture back into the skins of the potatoes and top with cheese. (if using ) Place potatoes back into oven for 5-10 minutes until cheese is melty and bubbly or the top of the potato is a bit crispy. Remove from oven and serve on a plate with salsa and guacamole.
Eat and be happy.
Being that it was St. Patricks day this week and lots of folks buy up a good amount of cabbage, I figured that this is a good time to get people to try one of my most favorite of favorite meals…..Beet bean and cabbage steaks. I love to play around with food, how to pair textures and colors plus tastes while trying to make whatever I am making healthy and balanced. This is one of my fav creations. And sure, this may seem like a somewhat weird combo, maybe a little like a extremely hippy dippy vegan fake meat thing, and you might be kind of right, but screw if it doesn’t taste like A-mazing. First off, notice how freaking dang pretty this thing is. The roasted beets bring a earthy hearty flavor but also pack a huge punch of color, especially when blended together with the ever so sweet white bean, which brings a nice mellow taste and a great serving of protein. (Beets and beans are meant for each other). Spread that brightly colored, tasty mixture onto of a huge slab of one of my favorites, roasted cabbage with all its crunch and cabbagy flavor and you got yourself a hearty healthy meal of deliciousness.
So maybe this might seem a little out of your normal food routine, but why not try it? Trust me….you will love it and everyone you make it for will think you are a number 1 badass too.
Cabbage, white beans, and beets. There is a lemon involved, but it didn’t make it into the picture.
Notes…. I used white beans, but I have also done this with chick peas and lentils. All are fantastic. Also, I did not peel my beets because I never do.(I do not peel anything the skin is full of goodness and I love the taste) If you don’t want to eat the skin, then peel them. Cabbage is cut into inch thick slabs… I like to us the inter most part of a cabbage head cause I like the core. But use any cut that you want. 2 beets are chopped into chunkers and both the cabbage and the beets are placed on a lightly oiled baking sheets, seasoned with salt and pepper, and stuck into the oven for 20-25 minutes at 400 degrees.
Once the beets are tender and the cabbage is cooked to a nice withered golden pretty, take out of the oven, but leave the oven on. Leave the cabbage on the pan but throw the beets into a blender or a big bowl if using a hand blender with the white beans
Beans and beets get pureed together. Add the juice of 1/2 a lemon (or the whole lemon, depending on your taste) and a pinch of salt and pepper. With a big spoon or spatula, scoop equal amounts of the bean/beet mixture on top of the cabbage steaks and spread around. Sprinkle with cracked pepper and place back into oven for another 5-10 minutes. (You could totally skip the second bake, but I like my cabbage well done and crispy)
Oh ho boy… And with a good squirt of mustard to finish off… I could eat this all day, everyday
And now I am #1
Happy Wednesday… Keep it good!
-C
Beet and Bean Cabbage Steaks
Makes 2 Thick Cut Steaks
1/2 head of cabbage (green or red)
2 cups or 1 can of cooked white beans
2 medium beets
1 lemon
salt and pepper
Mustard (Optional)
Preheat Oven to 4oo degrees
Cut two 1 ish inch thick rounds of cabbage from the widest part of the head. Place on a lightly oiled baking sheet. Chop beets into chunks and toss on same baking sheet.(Peel if you want) Sprinkle everything with salt and pepper. Stick into oven for 20-25 minutes or until the beets and cabbage are tender. Remove veggies from oven and place roasted beets into a blender (or bowl if using a hand blender) but leave the cabbage on the baking sheet. Add the white beans, the juice of half a lemon, and salt and pepper to the beets and puree until smooth. Scoop equal amounts of the mixture to each cabbage steak, sprinkle with pepper and place back into oven for another 5-10 minutes to give the beans and beets a nice crunchy crust (You can skip this step if you don’t want to be crusty)
Remove from oven, stick on a plate and drizzle with mustard….Fork and knife are good ways to eat it, but eating it with you fingers makes less dirty dishes.
Yay Tuesday! Which means its lentil day in my house. Ok not really, because everyday is lentil day in my house. Why? Because they are pretty much the best. And with the addition of lots of garlic and lemon…..whoa nelly!!! Eat your heart out.But for serious, not only are these little bits of happy legumes oh so tasty, they also are a nutritional whomper. So much protein, iron and zinc, magnesium and a bunch of other good stuff. Low in calorie and fat. Shelf stable, cheap, and fast and easy to cook. They are fantastic in soups, sauces, casseroles and salads. Eat them warm, cold, plain or covered in mustard. There possibilities with these little guys are endless. If you do not have lentils in your pantry right now, you are crazy. Make it priority to get some. Do it today, and make these fantastically yummy lentils for dinner. Trust, you won’t be sorry.
Lentils, water (not shown but I think you know what it looks like) lemon, garlic, and some salt and pepper. Cabbage and kale to make it that much better.
Add a cup of lentils to a pot with minced or pressed garlic, the zest of the lemon and the juice of half the lemon. (save the other half to squeeze on top later) Add in 2 1/4 cups water , a sprinkle of salt and pepper, and bring to a boil. Place a lid on pot and turn heat down to low. Let cook for about 15 – 20 minutes or until lentils are just about done.
Now top the almost done lentils with the cabbage and the kale. Add a splash of water and a pinch of salt and replace lid. Keep pot on simmer for another 5-8 minutes until the veggies are wilted. This gives you a slightly cooked, but still nice and crisp veggie. If you like you veggies a bit more soft, just add them into the lentils a little earlier or don’t even cook them at all. It’s whatever you want.
After a few minutes take the lid off and…aahh. Smells like cozy lemony garlicy happiness.
A big steaming bowl of everything that is good. Serve with an extra wedge of lemon to squeeze on top!
Tuesday Ah HA!
Make your day AWESOME!!!
1 cup dry lentils
2 1/4 cups water
4-5 cloves garlic
1 lemon (juice and zest)
Salt and pepper
some shredded cabbage
a few kale leaves
Add water, lentils, the zest and juice of 1 lemon and about a teaspoon of salt and pepper to a pot. Mince garlic and add that in too. Bring to a boil then place a lid on it and turn down to simmer. After about 15 minutes, give lentils a stir. At this point the lentils should be a al denta, but just about done.( If you notice the lentils seem dry, just add a bit more water) Layer on the cabbage and kale, adding in a splashof water. Replace lid and let simmer of another 5-8 , or until lentils are cooked and the veggies are you cooked to your liking.
WOO WHOA!! MARDI GRAS! I wish I was down in New Orleans today celebrating… and soaking up some warmth and sunshine, catching beads, maybe even taking my shirt off(?!!?)
No, I keep my shirt on today because I am not like that, and also, I would die of hypothermia. Today I wear a shirt, underneath 5 other shirts ad sweaters. Because today is just another day of -20 below here in Vermont.
To keep me from going completely crazy, I am thinking of warm weather and I am thinking of New Orleans (love that place!) and the humongo celebration that’s been going on there for the past week. Everyone partying out in the streets. Big floats and beads all around. I might be feeling a little jealous, (more of the weather then the partying) but thats ok, I have TV to watch and a warm comforter to wrap myself up in. And maybe I should have done a post of fried donuts or of some type of alcohol party drink to celebrate the day, but I really just wanted to make something warm and spicy, so I went with some dank cajun beans. And also I wanted to sing…. “Beans Beans the musical fruit, the more you eat the more you toot!!” hehe
But for real, these beans are sooooo f-ing tasty and super versatile. You can serve the spicy beans with the rice or just eat just the beans. You could do the beans and add to a bed of kale (me) or add cheese, guacamole and a few corn tortillas to the mix (the mister). Simple to make, super tasty and full of flavor! And pretty freaking heathy to boot! This dish gets an A+!
This dish is so full of flavor but so simple to make. We start with presoaked black beans drained and rinsed. Cajun seasoning (which is basically 1 part onion powder, thyme, oregano, and 2 parts paprika, garlic powder, cayenne power, and salt and pepper) Sliced onion and jalapeno, and a few tablespoons of tomato paste. Oh, and the rice.
Beans are in a pot filled with water unit beans are completely sumerged. Add in the onion, jalapeño, tomato paste and cajun seasoning. Bring to a boil then cover with a lid and simmer for about 45 minutes….. After about a half hour, start up the rice. Water in pot with rice, bring to a boil, cover and simmer for 15-20 minutes.
The rice is done and fluffed with at fork. The beans are cooked with just the tiniest bit of bite, bathing in a thick spicy tomatoey sauce. The chunks of onion and jalapeño have broken down and are hiding in every bite…. Oh so good!
Now get ready for the bowl!!! Bringing a little spice and nice to this crazy cold winter day or any fun festivities you may have planned.
Have a Fantastic Day.. Stay Warm or if you already are.. lucky you!
-C
Cajun Black Beans and Rice
Ingredients
1 1/2 cups dried black beans* soaked for at least 4 hours or overnight..Rinse and strained
2 tablespoons tomato paste
2 tablespoons Cajun seasoning
salt and pepper
1 Jalapeño
1 small yellow onion
1 tomato (I used a large roma)
1 1/2 cup of dried rice plus 3 cups water
*If you want to use canned beans, go for it…Just sub in 2 cans rinsed and strained black beans and only add a cup of water to the beans. Pre sauté the onion and the jalapeño before adding to the beans and only simmer the beans for about 15 minutes.
Place you soaked beans into a pot and fill with water until the beans are completely summered. Slice the jalapeño and onion and add to the pot along with the tomato paste and the cajun seasoning. Bring to a boil then place a lid on it and turn heat down to low. Let simmer for about 45 minutes or until the beans are completely cooked.
When the beans are about half way done, add rice to water and bring to a boil. Once boiling, place a lid on pot and turn heat down to simmer and cook for about 15 minutes or until all water is absorbed and rice is tender. Fluff with a fork.
To sever. place a scoop of two of rice to a bowl and top with a scoop of two of beans.… Top with diced tomatoes and scallions… (The mister added shredded pepper jack to his and thought it was excellent)
Eat with a fork or spoon.
I was informed yesterday that if I was going to make tortilla chips, that I better make some sweet ass dips to go with them. I kind of agree… tortilla chips need dip… or better yet, two dips. Queso and guacamole. It’s what needed to be done, and so I did it.
Guacamole is amazing… anything avocado is amazing…this guacamole is amazing. White bean guacamole is amazing. And not that we really care, but this guac is half the fat then straight up guacamole. Plus it’s packed full of protein making it a kind of super duper, must eat all of it, kind of dip. And sweet potato anything will make me happy. Making queso dip with sweet potato and cauliflower is probably one of my best food combos so far. (after eating a butt load, I felt like I was a genius and made an amazing discovery) Again, not that we need it to be, but this is also a fat-free, vegan, gluten-free, super healthy, packed full of B12, fiber and nutrients, dip for all kind of dip.…. just another reason why you cannot feel bad when you finish off half a batch before you get a chance to stick it in a serving bowl. (I might have done that)
Here is what you need for a good time:
−These tortilla chips ….Check.
−Some Chopped Veggies (I want the veggies)…..Check
−Cauliflower Sweet Potato Queso.…Check.
−White Bean Guacamole…Check.
You are now ready for it. It being this party, that party, the Super Bowl, or a Wednesday afternoon.
To the left we have the makings for the cauliflower sweet potato queso.. Steamed cauliflower, a baked sweet potato, nutritional yeast, garlic, and chopped up red onion, red bell pepper and jalapeño. To make all you need to do it take the chopped peppers, onion, and garlic and sauté for a few minutes just to slightly soften and bring out flavors. While that’s going on, take the steamed cauliflower and sweet potato(skin off..but eat it, or save it for soup or feed it to the dog) and puree together with a blender or food processor. Add in nutritional yeast, about a tablespoon or two of hot water and, salt and pepper to taste. Blend for about 5 minutes until super creamy smooth. Add in sautéed stuff and pulse just enough to incorporated the veggies but not complete blend in. Stick in a bowl.
To the right we have white bean guacamole stuff. Two cups (or one can) rinsed white beans, one ripe avocado, a lime, a few cloves of garlic,(I also added a bit of garlic powered…I like my garlic) and some chopped up red onion and tomato. Place beans, garlic, avocado and lime juice in a blender or food processor and blend until smooth. Add salt to taste and toss in the chopped tomato and onion. Blend for sec to mix that in…Stick in a bowl
Perfect…
To think that both of these dips took about 10 minutes total to make. (I had pre baked the cauliflower and sweet potato) And for real, I would spend much more time if I had too because both of these dips are so freaking good, I definitely will be making these on the regular.
So there , dips for those sweet ass chips or whatever you want to dip or them spread them on.
And he guys…It’s FRIDAY! Have a fantastic day!
-C
White Bean Guacamole
2 cups white beans (or 1 can) rinsed and drained
1 ripe avocado
3 cloves garlic
1 lime
1/4 small red onion
1 small tomato
1-2 teaspoons salt
Finley chop onion and tomato. Set aside. Place the beans, avocado, garlic, garlic powder, 1 teaspoon salt and the juice from one lime into a blender or food processor and blend until smooth. Add a splash of water if needed to help keep things moving. Taste and add more salt if needed. When smooth, add the onion and tomato and pulse a few times to mix in. Scoop into a serving dish and finish with a squeeze of lime and a bit of chopped onion and tomato.
Cauliflower Sweet Potato Queso
1 1/2 cups pre cooked steamed or roasted cauliflower
1 medium pre baked sweet potato
1/2 cup nutritional yeast
1-2 tablespoons hot water
1/2 a small red pepper
1/4 small red onion
1 jalapeño
3 cloves garlic
salt and pepper
Finely dice the red pepper, jalapeño, onion and garlic and sauté in a skillet for a few minutes until slightly soften and fragrant. Take the pre-cooked cauliflower, sweet potato (skin removed), and nutritional yeast and place in a blender or food processor. Blend for about 5 minutes until creamy and smooth. Add in a tablespoon of water to keep things moving. When completely smooth, add in sautéed veggies and pulse a few times to combine. Scoop into a serving dish. If your feeling it, top with scallions and cracked pepper.
Serve dips with chips, veggies or anything you want. Also make great spreads for sandwiches and crackers too!
Don’t let the fact that these rich, fudgy, soft, oh so yummy brownies have beans in them scare you away, it just means that you can eat more, you know, like half a pan, and not think twice about it. (I think that is perfectly acceptable) And the carob. Well one of the things I always do for my birthday is to buy a new ingredient of some sort that I wouldn’t normally buy because it’s either too expensive or is hard to find. Carob is neither too expensive or hard to find, but I couldn’t find the really expensive stuff that I was looking for so I grabbed a bag of carob powder. If you have never tried carob, it’s a must. It’s kind of like chocolate, but more fruity, sweet, not bitter, and caffeine free, while still containing all the good health benefits as chocolate. It’s really good…..you will like it. (You can use cocoa instead, but then you are going to miss out on the awesomeness of carob and be left with a plain old normal black bean brownie)
I was also thinking that these would make for a fantastic Super Bowl party snack, you know, brownies and protein.. Sounds like a football type of food right. ( I know nothing of football, but I do know about food parties….brownies are good for food parties)
Anyways, super fast, super simple, super easy. Make these and feel awesome. And maybe don’t tell people that you made them with beans, they don’t need to know, all they will think is that they are eating something good.
One bowl. Beans, oil, oats, baking powder carob and vanilla. I used an emulsion blender but a blender or a food processor does the same…..blend together until fully incorporated, smooth and creamy with little speckles of oats. It’s so simple and barely a mess to be made.
Into a greases pan and into the oven for 25- 30 minutes…. Out of the oven when a toothpick comes out clean
Let cool for at least 10 minutes (ok, maybe 5) and cut into squares of any size you like.
Stacked on parchment….oh so pretty
Ready to go….. To share or to hoard.
Excellent for so many reasons; tasty, gluten-free, vegan, full of proteins and when consumed, make people happy. My little nephew who is so so picky and doesn’t like anything even really liked these so right there I knew this recipes was a winner.
Enjoy your brownies!
-C
Black Bean Carob Brownies
Ingredients
2 cups cooked black beans (1 can)
3/4 carob powder
3/4 cup gluten-free quick oats
1/2 cup coconut oil
1 teaspoon vanilla
1 teaspoon baking power
Place all ingredients in either a food processor, blender, or a large bowl for an emulsifier, and blend together until fully incorporated and smooth. Transfer into a well greases 9×9 baking pan and stick in over for 25-30 minutes or until a toothpick stuck in the middle comes out clean.
Let cool for 10 minutes, cut into squares and serve!
I probabaly have already told you, but August is for sure my favorite month of the year (well,one of my favorites)
There is bounties of bounties of fresh, sweet and colorful, oh so juicy, crispy crisp, just so f ing amazing, produce exploding all over the place. I have probably gained like 75 thousand pounds in the past month due to all of the fruits and veggies that I have been consuming. I am starting to consider it a full time job just to keep up with the eating.
Another reason why I love August so much is becauuse the days are still nice and warm, but the nights are starting to cool which means I get to make so much soup!!!!!.
This soup is the freshest freshy soup yet. Everything is from the farm and or the garden (except the salt pepper, vinegar and oil), some picked within hours of me making this.
. I am a lucky/spolied veggie brat.
Anyways. This soup. The fresh tomato base gives it a sweet, slightly acidic kick. So super creamy due to the lovely earthy stocks of the chard. Slightly spicy and earthy from the arugula* and chard green green. This soup… it just tastes so fresh and clean, yet hearty and satisfying. A perfect soup for a mid August night, eating outside, watching the sun slide behind the mountains and the temperature dropping just enough that you might want a light sweater. Or you can just eat it from the pot in the kitchen while watching TV. It’s good eating anyway you want.
*Here in America, it’s called arugula. Else where , it’s called rocket. I wish we all called it rocket, although I do like the name arugula, but for like my first born child or maybe a pet goldfish. Anyway, rocket is arugula, or vice versa.
Soup time!.
The stuff. Some big fresh tomatoes, a few stalks of chard, and a few handfuls of arugaula (aka rocket). A couple carrots, an onion, some garlic, salt and pepper and a bit of olive oil.. Oh, and I added some balsamic vinegar, which for some reason didn’t make it into the picture (sorry vinegar)
Start by removing the chard leaves from the stalks. Set aside leave with the arugula. Chop up the carrot, chard stems, onion and garlic and toss into a big pot with a drizzle of olive oil, a splash of water, and a sprinkle of salt and pepper. Stir around and stick o nthe stove on medium heat for about 10 minutes until the veggies start to soften up.
Now chop up the tomatoes into chunks and toss those right into the pot with the other stuff. Add in a few cups water and a few glugs of balazmic vinegar. Bring everything to a boil and then turn heat to medium low and place a lid on pot and let cook at medium heat for another 20 ish minutes, or until the tomatoes are falling apart.
Now that everything is all cooked up, blend it up.
And now take the chard leaves and the aruglula and chop into little pieces….into the pot they go.
Mix it all up.. and take the blender to the soup again….if you want a smaller sized bite.
Soup Into bowls..Then into mouth.
Happy August!!
And hey hey hey.. Have the best weekend!
-C
4-5 large fresh tomatoes
4 large stalks of rainbow chard
2-3 big handfuls of arugula
1 medium onion
1 large or 2 small carrots
4-5 garlic cloves
2-3glugs (about 2 tablespoons) balsamic vinegar
3 cups water
olive oil
salt and pepper
To start, remove stalks of chard from leaves and chop stalks, onion, carrot and garlic into chunks and place int a big pot with a drizzle of olive oil, a splash or water, and spinkle of salt and pepper. Place on stove on medium low heat sand cooke the veggies down until starting to soften and garlic is becoming fragrant. While that cooking, remove core from tomatoes and dice them up. Toss into pot with the cooked down veggies with the vinegar and water. Place a lid on the pot and let cook for about 20-25 minutes or until the tomatoes are falling apart.
When cooked, using with a hand blender or a normal blender, blend the soup until smooth. (if using blender, pour back into pot)
Now take the arugula and chard leaves and chop them into wee little picese and mix into soup. If you want to, blend the greens into the soup.. but not until smooth, unless thats what you want. Cook for another 5 minutes. Taste and season with more salt and pepper to taste.
Ladle into bowl and serve with lots of fresh cracked pepper, maybe a little balsamic drizzle or even some mustard (I at left overs with mustard and it rocked my world)
And for your Friday, I made these awesome little raw/ vegan/ gluten free cookies.
Now wait a minute. Don’t let all the labels of what is not in these cookies scare you away. Just focus on all the stuff that these cookies are made of. Almonds, Cashews, Coconut, Cocoa, Oatmeal. They are cookies made with lots of good yummy stuff that just happened to be enjoyed by those with specific food diets as well as those who eat anything. A cookie for all! See, don’t they sound excellent? Yes, yes they do. And they are good. So, so, good. Even the mr. is into them. And he is far from being raw/vegan/ gluten free.
And because these cookies are made with all sorts of good for you stuff (lots of proteins, good healthy fats, and complex carbs) you can pretty much feel zero percent guilt eating them. They a are a no joke, healthy, energy packed cookies of goodness. A fantastic way to start the morning, eat with lunch, as dessert, post work out, or eat as a late night snack. (Just don’t eat them all at once)
Now go for it!
The raw stuff. A cup of old fashion rolled oat that have been soaking in water for about an hour. Almonds(which I spent 20 minutes deshelling) cashews, dehydrated coconut flakes, some cocoa powder and a few medjool date. If your nuts are unsalted, add a pinch of salt too.
Dump everything into a food processor. BUT WAIT! Make sure to remove the pits from the dates)I have broken a blade in the past form a date pit)
Blend unit combined and a kind of rough dough is formed. It will be a little sticky. If it;s to sticky to handle, place into the fridge for a few minutes to set up.
Now take blobs of mixture and roll into balls
And you could totally leave them as balls… you can even play with your balls….
But I think they look nicer squished flat and topped with pieces of nuts and coconut. They look almost fancy, if I do say so myself.
Now have yourself a cookie, and place the rest in the fridge (they get harder and, if you can imagine, taste even better after a few hours of cold)
Freak Yeah FRIDAY! Do fu stuff!
-C
Makes 15 normal sized cookies (you can make more or less, depending on the ball size)
1 cups oat fashion oats soaked in 1 cup water for at least an hour (use gluten free oats if needed)
1/2 cup raw almonds
1/2 cup raw cashews
5-6 medjool dates
1/2 cup dehydrated flaked coconut
1/4 cup cocoa powder
a pinch of salt (if your nuts are unsalted)
Add all the ingredients into a food processer and blend until the mixer forms a cohesive dough. It;s going to be a tad sticky, but if it seems to sticky to handle, refrigerate for a little bit so it’s easier to handle. (I have no problem handling right away)
Scoop and roll into balls and either leave them as is or squish them flat. Sprinkle with chopped nuts and coconut
Eat one or two right away, then stick the rest in fridge.
A ok to eat as breakfast, with lunch, at dinner, as as snack, a post workout protein, or when sitting on the couch and watching TV.


 I figured now is a good time to get this recipe out there before we get to far into spring and summer recipes because there is going to be a lot of banana ice cream filled recipe coming and I figured its a good idea to have the basic banana ice cream recipe ready for people to refer too. And because I made so much fantastic naner ice cream, I also made a cookies and cream naner ice cream for my sisters and the mister.
 The stuff you need for this ice cream…. Nice and ripe bananas, peeled and then frozen* That’s it.
 After all blended and smooth, either eat right away or scoop ice cream into a freezer safe container and stick in freezer. That’s the banana ice cream… And it is amazing and so so so so so addictive. I make a batch, think I am only going to eat a scoop, then find myself eating half of what I have made, but it’s ok cause it’s only bananas.
  One batch of banana ice cream, either freshly made, still in food processor or made ahead and placed in a food processor and given a good pulse to smooth it up.
 Now you have cookies and cream naner ice cream…. and everybody is happy.


 Is it really for real April? Where has all the time gone and where the hell is the warm weather? It’s not funny anymore. I am officially OVER winter! Ok, so now that I got that off my chest…..
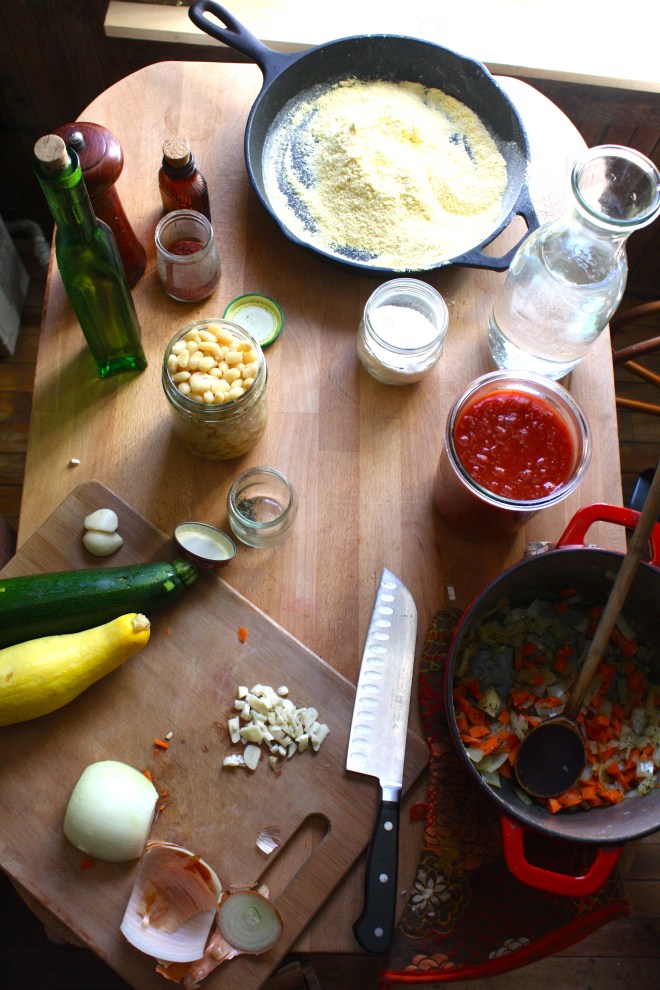 The Stuff. Cornmeal, water, navy beans and parmesan for the polenta. Crushed tomatoes, garlic, dried basil, onion, carrot, zucchini, and summer squash for the sauce. Salt, pepper, and olive oil all around.
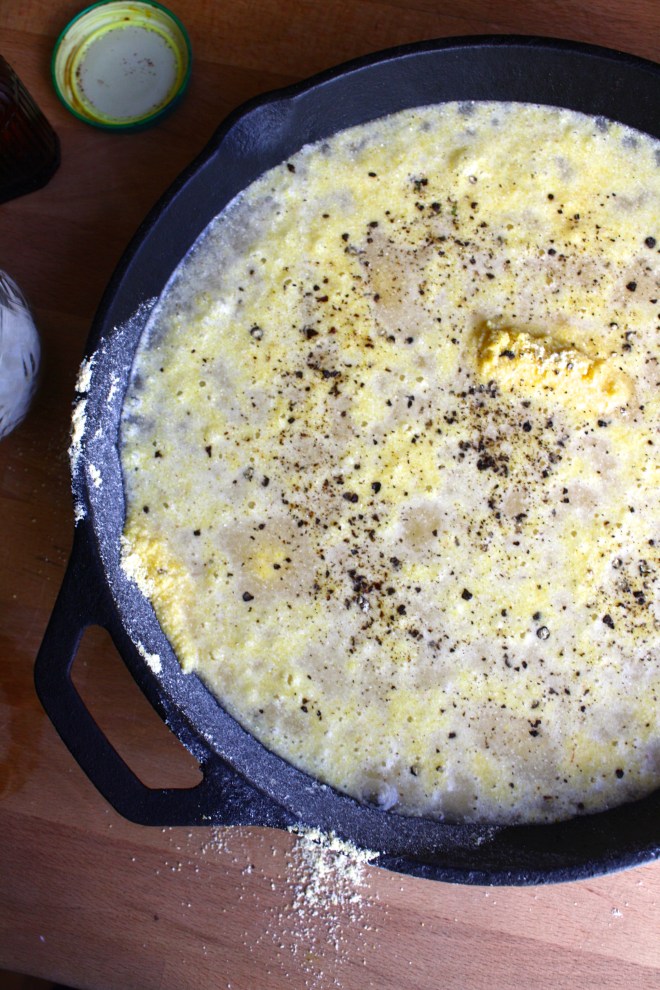 Cornmeal and water go into a cast iron skillet (or any oven safe dish) with a pinch of salt and pepper. Give it a little mix and stick it into the oven at 400 degrees .
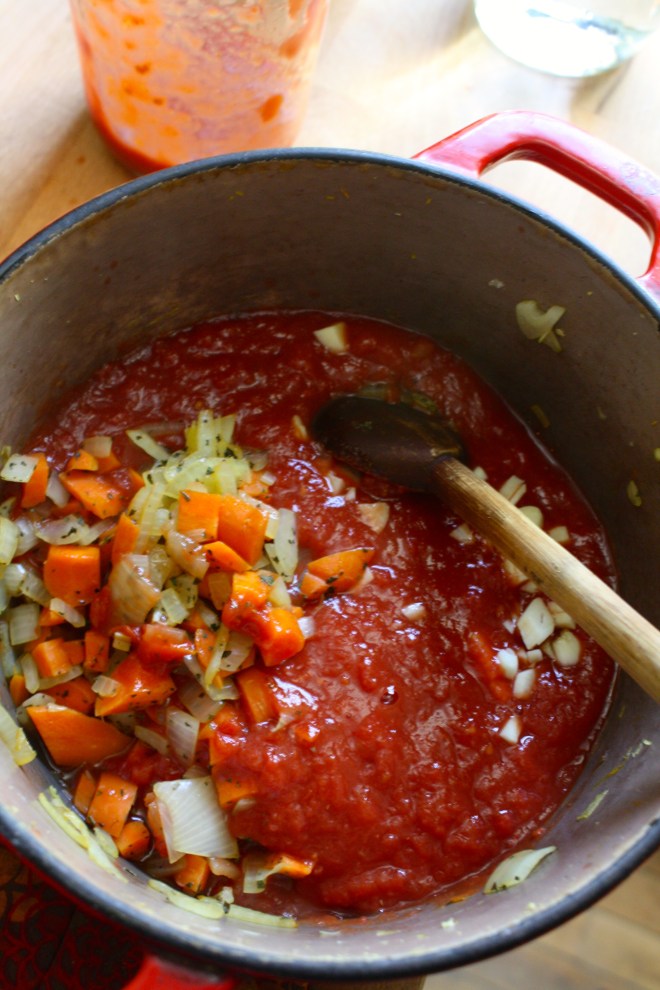 Once the polenta is in the oven, make the sauce. Chop up all the veggies and stick into a dutch oven or sauce pot with a pinch of salt, the basil and a good drizzle of olive oil. Stick on medium heat and let veggies cook down a bit. When the veggies are tender, add in minced garlic, crushed tomatoes and another drizzle or oil. Turn burner to lowest setting and simmer (giving it a stir every now and then) for about 45 minutes or until the polenta is done.
 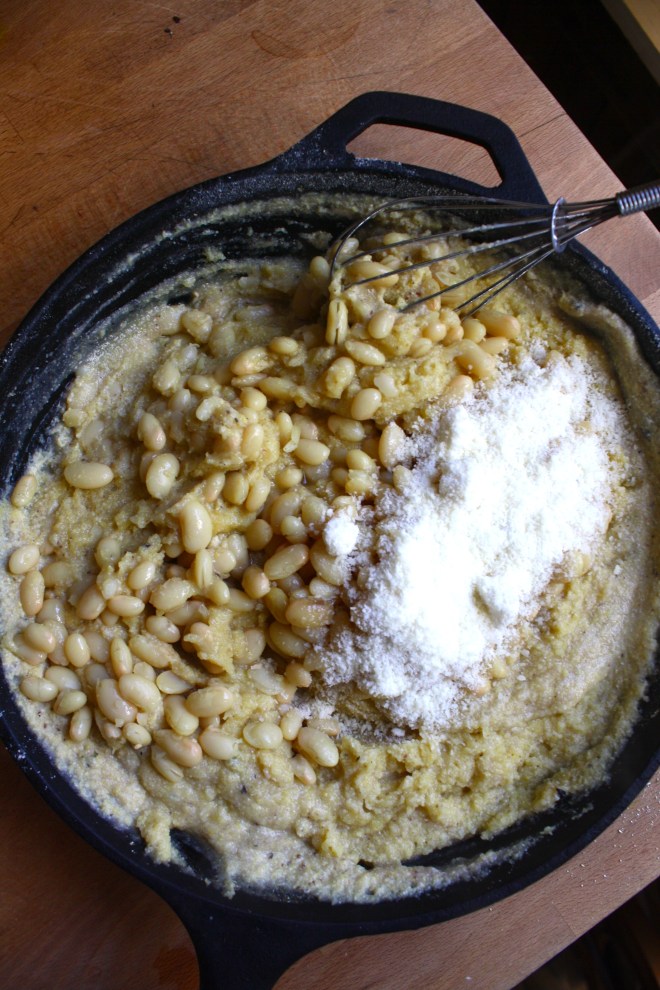 After about 30 minutes when the water had pretty much all cooked down, take the polenta out of the oven and stir in the beans, the parmesan, a tablespoon or two of olive oil and salt and pepper. Smooth top out and sprinkle with more pepper, parmesan and drizzle with a bit more oil. Stick back into oven for another 1/2 or until polenta has formed a crust and no longer giggles when you wiggle the pan.
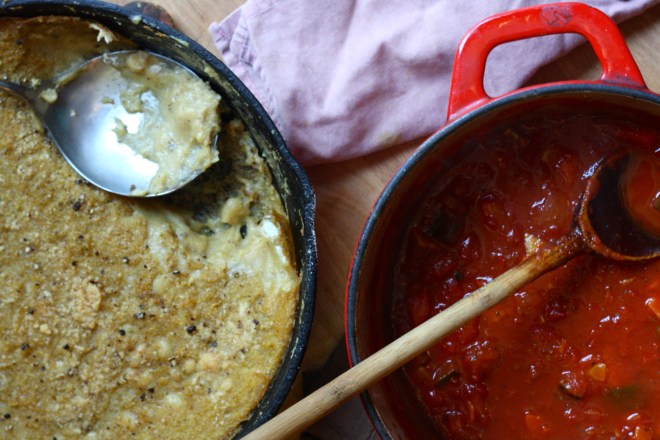 Pull polntna from the oven and let sit for at least 1o minutes.
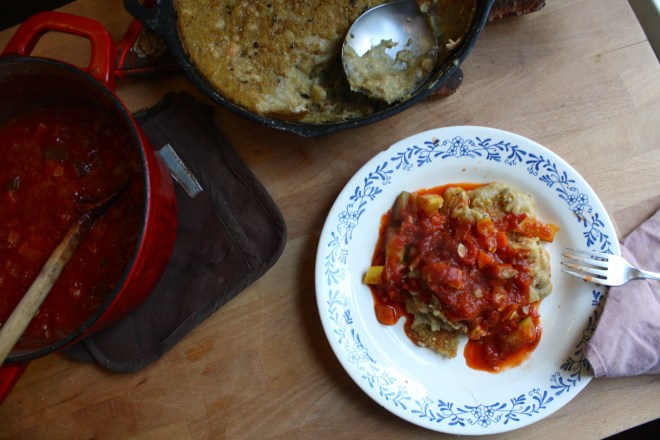
 Last night I had my sister and her kiddos come over for dinner. Nothing fancy, nothing to complicated, just something fast and something that I knew the littles would eat. Spaghetti and meatballs, except replace meatballs were bean balls So they came, we played, did a little drawing and had a bit of first grad gossip. Then came dinner time when I was told by one little that she was not going to eat.. She had pasta for lunch. Well I made her sit anyway and she mainly just ate carrots (I was ok with that) Then the other little was all into his pasta and bean balls, 1 down, 3 more to go, when the mister let slip that the meatballs were not really meat. He ate around the remaining balls, said he didn’t want them anymore. And my sister, well she doesn’t eat anything that is not pizza.
 I feel like I don’t need to tell you how to boil pasta or heat up the sauce, so I left that portion of the recipe out. I have faith that you are capable in doing that part without my instruction.
 Small chop all the veggies and toss them and the dry spices into a skillet with a drizzle or two of olive oil. Stick on medium heat and add about 1/4 cup of water to pan. Top with slid and let veggies cook down until soft and fragrant.
 Add the cooked veggies to a food processor or blender with the rinsed and drained chickpeas.
  The mixture gets pulsed until combined, keeping a little bit of chunkiness. Now go warhead and taste the mixture. Add another pinch or two of salt , pepper or any of the spices that you think it need. Dump the mixture into a bowl and mix in the chickpea flour than stink the mixture into the fridge for a least a 1/2 hour. Cooling to off is really important to forming the balls. If you don’t, it’s much harder to keep mixture from falling apart and sticking to your hands.
 After the mixture has had time to cool and set, start rolling the mixture into balls roughly the size of ping pong balls. In a shallow bowl, add a few tablespoons of the chickpea flour with a pinch of salt, pepper and garlic powder. Take each ball and roll in flour and place each ball on a well oiled baking sheet. When the balls are all rolled, stick into the oven and bake away for about 30-40 minutes, flipping balls after about 20. After you flip the balls, get the pasta ready so its finished about the same time the balls are done.
 You pasta and sauce is cooked and the balls are all crispy and oh so nice.


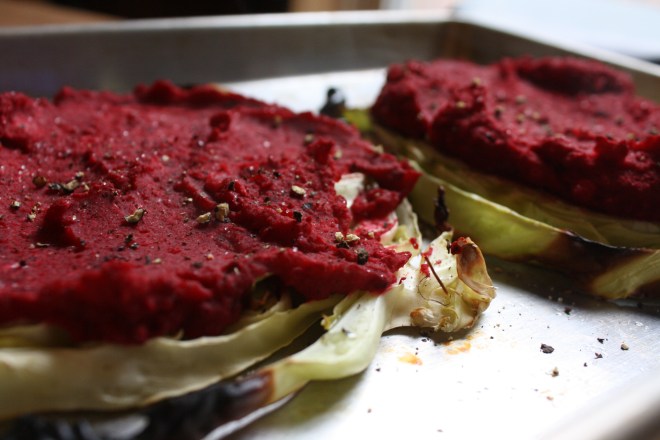 Being that it was St. Patricks day this week and lots of folks buy up a good amount of cabbage, I figured that this is a good time to get people to try one of my most favorite of favorite meals…..Beet bean and cabbage steaks. I love to play around with food, how to pair textures and colors plus tastes while trying to make whatever I am making healthy and balanced. This is one of my fav creations. And sure, this may seem like a somewhat weird combo, maybe a little like a extremely hippy dippy vegan fake meat thing, and you might be kind of right, but screw if it doesn’t taste like A-mazing. First off, notice how freaking dang pretty this thing is. The roasted beets bring a earthy hearty flavor but also pack a huge punch of color, especially when blended together with the ever so sweet white bean, which brings a nice mellow taste and a great serving of protein. (Beets and beans are meant for each other). Spread that brightly colored, tasty mixture onto of a huge slab of one of my favorites, roasted cabbage with all its crunch and cabbagy flavor and you got yourself a hearty healthy meal of deliciousness.
  Cabbage, white beans, and beets. There is a lemon involved, but it didn’t make it into the picture.
 Cabbage is cut into inch thick slabs… I like to us the inter most part of a cabbage head cause I like the core. But use any cut that you want. 2 beets are chopped into chunkers and both the cabbage and the beets are placed on a lightly oiled baking sheets, seasoned with salt and pepper, and stuck into the oven for 20-25 minutes at 400 degrees.
 Once the beets are tender and the cabbage is cooked to a nice withered golden pretty, take out of the oven, but leave the oven on. Leave the cabbage on the pan but throw the beets into a blender or a big bowl if using a hand blender with the white beans
 Beans and beets get pureed together. Add the juice of 1/2 a lemon (or the whole lemon, depending on your taste) and a pinch of salt and pepper. With a big spoon or spatula, scoop equal amounts of the bean/beet mixture on top of the cabbage steaks and spread around. Sprinkle with cracked pepper and place back into oven for another 5-10 minutes. (You could totally skip the second bake, but I like my cabbage well done and crispy)
 Oh ho boy… And with a good squirt of mustard to finish off… I could eat this all day, everyday


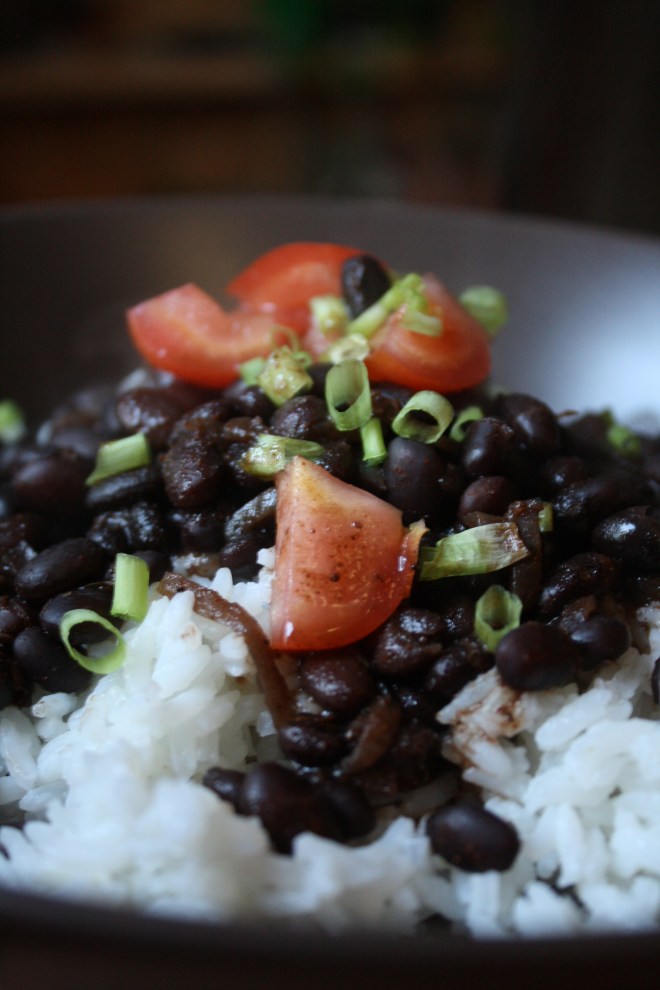 WOO WHOA!! MARDI GRAS! I wish I was down in New Orleans today celebrating… and soaking up some warmth and sunshine, catching beads, maybe even taking my shirt off(?!!?)
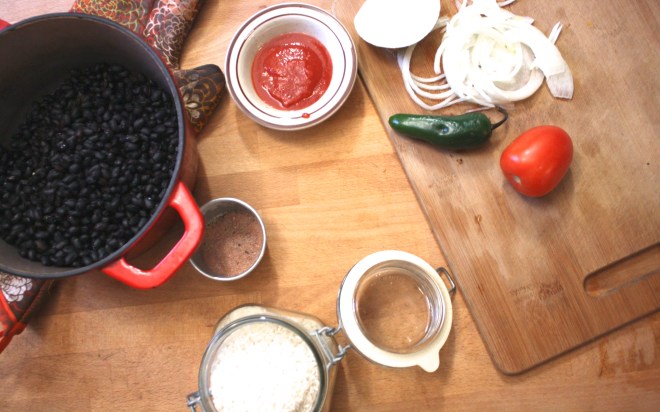
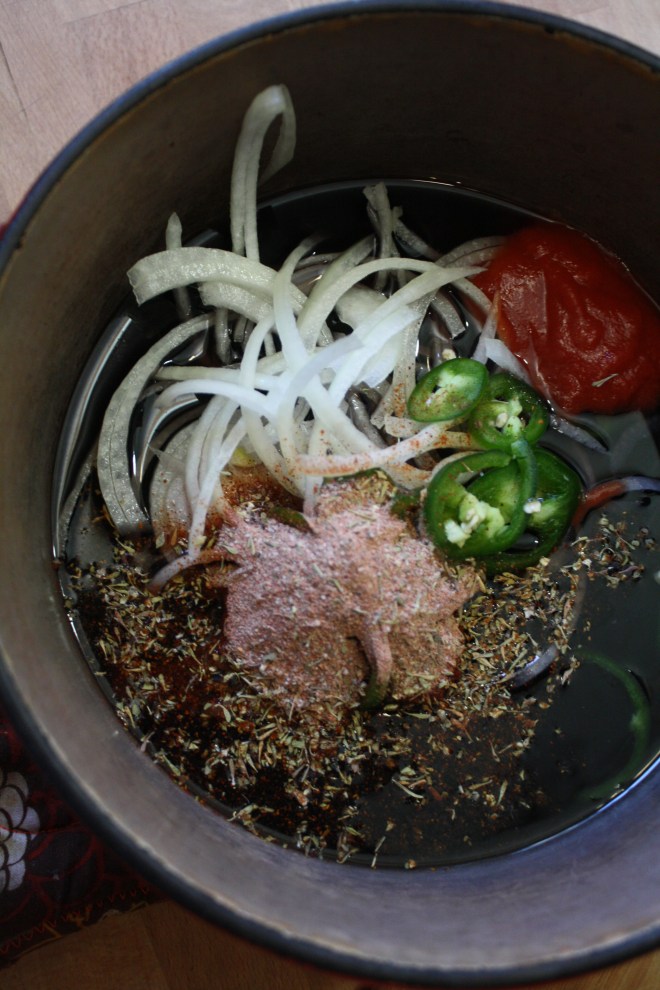
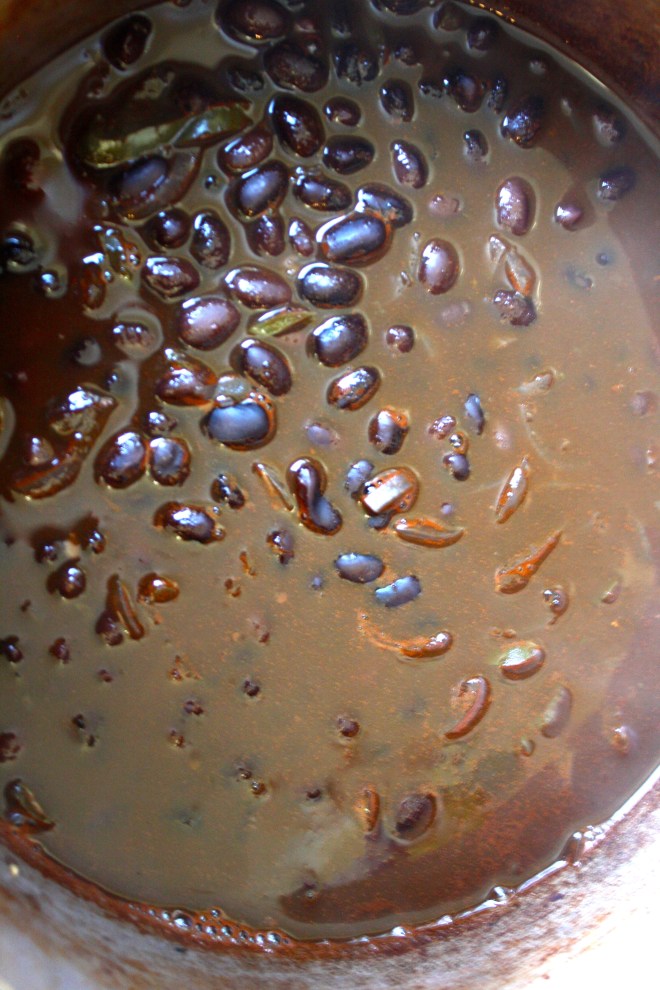 Beans are in a pot filled with water unit beans are completely sumerged. Add in the onion, jalapeño, tomato paste and cajun seasoning. Bring to a boil then cover with a lid and simmer for about 45 minutes….. After about a half hour, start up the rice. Water in pot with rice, bring to a boil, cover and simmer for 15-20 minutes.
  The rice is done and fluffed with at fork. The beans are cooked with just the tiniest bit of bite, bathing in a thick spicy tomatoey sauce. The chunks of onion and jalapeño have broken down and are hiding in every bite…. Oh so good!
 Bringing a little spice and nice to this crazy cold winter day or any fun festivities you may have planned.
  I was informed yesterday that if I was going to make tortilla chips, that I better make some sweet ass dips to go with them. I kind of agree… tortilla chips need dip… or better yet, two dips. Queso and guacamole. It’s what needed to be done, and so I did it.

 Perfect…
 To think that both of these dips took about 10 minutes total to make. (I had pre baked the cauliflower and sweet potato) And for real, I would spend much more time if I had too because both of these dips are so freaking good, I definitely will be making these on the regular.
 Don’t let the fact that these rich, fudgy, soft, oh so yummy brownies have beans in them scare you away, it just means that you can eat more, you know, like half a pan, and not think twice about it. (I think that is perfectly acceptable) And the carob. Well one of the things I always do for my birthday is to buy a new ingredient of some sort that I wouldn’t normally buy because it’s either too expensive or is hard to find. Carob is neither too expensive or hard to find, but I couldn’t find the really expensive stuff that I was looking for so I grabbed a bag of carob powder. If you have never tried carob, it’s a must. It’s kind of like chocolate, but more fruity, sweet, not bitter, and caffeine free, while still containing all the good health benefits as chocolate. It’s really good…..you will like it. (You can use cocoa instead, but then you are going to miss out on the awesomeness of carob and be left with a plain old normal black bean brownie)
 One bowl. Beans, oil, oats, baking powder carob and vanilla. I used an emulsion blender but a blender or a food processor does the same…..blend together until fully incorporated, smooth and creamy with little speckles of oats. It’s so simple and barely a mess to be made.
 Into a greases pan and into the oven for 25- 30 minutes…. Out of the oven when a toothpick comes out clean
 Let cool for at least 10 minutes (ok, maybe 5) and cut into squares of any size you like.
 Stacked on parchment….oh so pretty
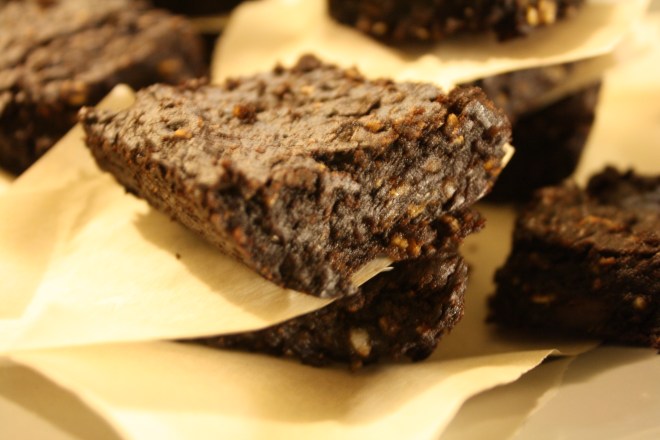
THE LOVELY CRAZY
September 19, 2015 by maximios • Blog
p.s. This cake is an ace for the holidays!
Suggestion for serving this super awesome cake, Do not tell anyone that they are eating a cake with beets in it until they are raving about how delicious it is. Over the years, I have learned that people tend to be wiry of veggies in there desert. You are not lying, just omitting unnecessary information for their own enjoyment. Let them eat cake!
I love a good fine grater. Just watch you fingers, blood and beet juice are hard to distinguish between. You might be tempted to eat all of the fine beet, but don’t. Just eat the left overs.
All the ingredients ready to go. I start with the wet the largest bowl cause that were I add my dry. I also whisk or sift together all my dry ingredients. Preheat the oven. I also grab the frosting ingredients.. Let the butter and cream cheese come to room temp.
Mixi the oil and sugar and vanilla. Then the best part, add those beets! Check out how bright that color is !
Add half of the dry. mix just until incorporated then add milk mixture. Mix that in and finish with the other half of dry. Dont over mix that batter
Pour that lovely batter into well greased and dusted cake pans. Taste or don’t taste your cake batter, thats completely up you but it is full of beets and there are no eggs so. Just lick the bowl clean, and the spoon.
Remove cakes from oven when an insert in the middle comes out clean, about 25 minutes. Dont let it over bake… it will dry out. Let cool in pans until you can handle then invert cakes onto wire rack and let cool completely
While the cake is cooling off, time to whip up that frosting.
Cream cheese and butter in the bowl at room temp. Beat it up on medium speed making sure it is fully mixed together.Sift in half the powdered sugar and mix slowly No Matter how hard I try, I always end up with sugar all over me. Add a bit of milk, then slowly sift in more sugar. Beat together and check you consistency. Add a splash more milk if you want a thinner frosting.
Once you get to the desired consistency, add the fun. Orange zest for flavor and color. Beets to really make this beauty pop. Isn’t it amazing? Now frost you cake! Just make sure it cool enough
Look at all those flavor specks! The orange really pops through the pink.
Hey, even dinosaurs like to eat cake
Happy BIrthday!
Chocolate Beet Cake with Orange Cream Cheese Frosting
Makes one 9-inch layer cake
Cake Ingredients
Frosting Ingredients
To roast beets
Preheat oven 400 degrees
Wrap beets in a piece of foil and put on a baking sheet or in a casserole dish. The beets may drip a bit of juice. Roast until beets are easily pierced, about 1 hour. If you think of it, roast the beets ahead of time. The roasted beets will last a couple days in the fridge. Allow beets to cool enough to handle. Finely grate the roasted beets. Peeled or unpeeled is up to you. I never peel. Measure out 1 cup for cake and a tablespoon or two for frosting
To make Cake
Preheat oven 350
Mix milk and vinegar and set aside
MIx oil and sugars until fully incorporated, then mix in vanilla and beets
In a medium bowl, sift together flour, cocoa powder, baking soda, baking powder, and salt.
Slowly mix in half the dry ingencient them add the milk and vinegar mixture. Mix in the rest of the dry until the batter evenly mixed. The batter should be a bit thick you can mix in another splash of milk to thin it out a little.
Divide the batter between the two well greased and flour or cocoa dusted cake pans. Bake 25- 30 minutes or until toothpick stuck in middle comes out clean.. Cake is done when a skewer inserted in the center comes out clean. Remove cakes and let cool completely.
To make frosting
In a large bowl, beat cream cheese until smooth then beat in butter until combined making sure to scrap the sides of the bowl to get it all. Add the half the powdered sugar, vanilla extract, and a teaspoon of milk and salt. Beat on medium speed until mixed, add rest of sugar and mix until smooth. Add a splash more milk if you want to a thinner frosting. And last but not least, mix in the orange zest and beet. Beat until combined. Refrigerate the frosting for 30 minutes before using.
To frost cake place one layer on a cake stand or platter. Spread a good amount of frosting on first layer then place other layer on top. Scoop rest of frosting on top and evenly spread from top down the side.