
Turmeric Ginger Carrot Soup — The Lovely Crazy
 There is a joke about Vermonters, that all we talk about is the weather. Well, it’s kind of true. But to our defense, we get a lot of weather, and it’s always changing and intense and both lovely and crazy and all over. So yeah, we talk. A lot, about the weather. And on that topic, I am trying so hard not to complain, but honestly, I am getting a little sick, both physically and mentally from all of these super, to freaking cold temperatures. Yesterday the high was 0 ( which was at like 2 in the morning) and factor in the windchill, the temp stayed at like 25 below. It f**king sucks. I can’t stay outside for too long or else I will probably die. The dog is having a hard time making it around the block before he gets ice paws, and the mister, well he even started wearing gloves (he wears a sweater all winter and never gets cold…..he is officially cold)
And not only is the cold keeping us all indoors, but its making us all borderline sick. We both have been fighting something for the past few week. The headaches, stuffy nose, chest congestions. The puppy is getting super dry skin and gave himself a hot spot. BLAh!! Ok, enough! No more complaining
Because I do really love the winter and all the pretty snow!!!!
But we are feeling kind of sick so to make us feel oh so much better, a fantastic, super tasty, healing, good for me, good for you, soup. Turmeric ginger carrot… oh man. Made with lots of ginger, turmeric and garlic and finished with a drizzle of raw honey. This soup is exactly what we need. All ingredients scream.. FEEL GOOD, BE WARM AND COZY! Almost everything in it has antibacterial and anti inflammatory properties. The veggies are hearty and heathy and just eating soup helps to keep hydrated. And the best part..it tastes so freaking amazing.
So whether you are feeling a little mah, or just a little hungry.…this soup is where it’s at!

Lots of chopped up carrots, a small onion, a little bit of cauliflower I had left over and a small beet. If you don’t have the cauliflower and or a beet, just use ares pepper or another 2 carrots.. no biggy.
Then we have the fresh ginger ( you can use powdered) turmeric and garlic. All the good healthy spicy and yummy stuff.
 I accidentally spilled the turmeric on the counter..but it kind of looks like I might have done it on purpose… yeah, let’s go with that. Chop the garlic and he ginger into chunks
 And toss into the pot to warm and activate. Just a little toasty toast.
 And the veggies are roasted and tender and smell so good. It took a lot of will power to not eat the whole pan right there.
 I added the roasted veggies and 3 cups water straight into my pot with the spices because I used an emulsion blender. If you are using normal blender, add the veggies, the toasted spices and the water to the blender and blend until smooth. Then transfer to a pot.
 Pretty much all blended together….(I left a few big chunks in there to snack on while I was waiting to eat serve…I was really hungry) and let to simmer for a little longer…

And now ladle into a bowl and get ready for a fantastic finish… drizzle a spoonful of raw honey into soup…….so so good. You could add the honey before serving, but heating it kills all the good antibacterial stuff so that’s why we wait. Then I sprinkle some chopped kale and chives. (do it if you want, but not necessary)
Now enjoy. Let the warmth wash over you and feel all those good spices helping to fight the good fight to keep you well and all the yummy to satisfy your hunger.
And lets hope for some warm (above 0!!) weather!
-C
Turmeric Ginger Carrot Soup
Ingredients
- 5 large carrots
- 1 small onion
- 1 small beet*
- quarter head cabbage ( or a cup of frozen)*
- 2-3 teaspoons turmeric
- 2-3 tablespoons fresh ginger (1/2 teaspoon if using powdered)
- 4-6 cloves garlic
- salt pepper
- raw honey (omit if vegan)
* If you don’t have or want to use beet and or the cauliflower, you can use a red pepper, a small sweet potato, or just use a few more carrots.
Chop all veggies into similar sized chunks and toss into a lightly oiled pan or on a baking sheet and sprinkle with salt. Stick in oven at 425 for about 30 minutes or until all veggies are fork tender.
In a large soup pot or dutch oven, toss chopped garlic, ginger and the turmeric and place on medium heat for a few minutes to activate the spices. Add the roasted veggies and 3 cups water to pot (if using emulsion blender) and blend until smooth. If using a blender, add the toasted spices, roasted veggie and 3 cups water and blend until smooth then transfer to a large pot or dutch oven. Add salt and pepper to taste. Turn heat down to simmer and let cook for an addition 10 minutes.
When ready to serve, ladle soup into bowl and drizzle a spoonful of raw honey into soup. Garnish with fresh chopped kale, chives, cabbage or whatever you want. (or nothing is good too)
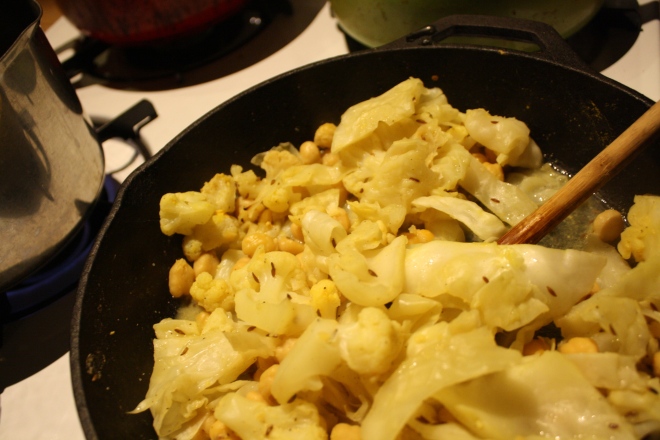
 I have the best winter CSA..(Intervale Community Farm) its an every other week pick up containing lots of roots, cabbage, winter squashes and fresh greens. Due to the holidays this past month, the farm hasn’t had a pick up in a since the middle of December. So the past few weeks I have been rationing out my stash of root veggies and winter squash, trying to make it all last until the next pick up. It was hard……There was the great freeze and thaw day where most of my winter squash froze had to be cooked and eaten. Then there was the holiday gatherings where I kindly shared some of my root loot with people, making lots of dishes to share. Plus its been really cold and all I want to do is cook and eat. It was close, but I got to the beginning of this week and relized I had nothing left..My stock was depleted. I had to buy beets this week. Tragic, I know.
 Salt, pepper, garlic. Kale, chopped up rutabaga, chopped up sweet potato, and yes, that is a gorgeous red potato, all chopped up. I also had chick peas in the fridge so those were going in too.
  Toss all the chopped roots and chick peas into an oiled skillet. Top with salt and pepper. Stick skillet in oven to roast for 30ssh minutes, or until the veggies are tender and brown. Look at how pretty it all is! I may never war a white potato again.
  When I took the skillet out, I tossed in a few cloves of grated garlic.. for a little extra bite. Served on a plate with a a fork to eat it with. (I am so smart)
 I need a good snack.. Something healthy, hardy, fast, and of course, something tasty.

 I have been meaning do a post on seltzer and syrups for a while now and this one is perfect… Everyone around me has been getting sick and I am trying my hardest to not get anything.


 So lovely…. so nice. I really got into these flavors. This drink has the ability to make you feel warm and cozy while being cold and fresh. It makes me happy.
 So the mister wants to know…”Why would anyone ever buy those crappy english muffins from the store when they could be eating these?”
 Everything all mixed together, dumped onto a floured surface and kneaded for 10 minutes by hand…..If you have a stand mixer, you can use it if you want, but you are missing out on the fun of doing it by hand….
 When dough has doubled, punch down and plop out onto floured surface. Dust the bottom of a griddle or in my case, two cast iron pans, with corn meal. Divide dough into 8-10 equal balls and smash into 2 inch thick disks.
  Place on griddle or pans and sprinkle more corn meal on top of each E.M. Cover and let rise for another 15 minute.
  Now the E.M.s have rested, turn the griddle (or pans) on to low heat. Once your griddle (or pans) gets hot, continue to cook that side for another 7-10 minutes, or until golden brown. Flip and cook other side for 10-12 minutes or until golden brown. Once browned, check for doneness with a thermometer. The inside should reach 200 degrees.( if you don’t have a thermometer, fork split one open and check…. you are going to eat it anyway) If the outside cooked faster then the inside, no worries, just pop them into the oven at 350 for 8-10 minutes. I had to pop mine into the oven for to cook completely.
 Remove form griddle, let cool a bit, and ……Fresh, fluffy fat, fantastic….Everything and more that a real english muffin should be. Split open with a fork and……. the nooks and crannies! So spot on. Serve with anything your heart desires…I served these with whipped honey butter…. and eat the only kind of E.M. you will ever again eat. Grocery store english muffins be damned!
 Soft huggable mountains…..happy all over!
 To start, take you main color of fleece and cut into a mountainy triangle shape. You can go tall and skinny or short and fat….. any shape you want. If you feel like you need to make a paper template and use that to cut, go for it, but I don’t think you really need to.
 Cut the piece for the peak in a jagged up and down pattern. Place right side up onto the base of the mountain and trim away excess fabric.
 Using the zig zag stitch on your machine, sew the jagged edges of the mountain peak right side up onto the right side of the mountain. Go slowly, but don’t worry about making it perfect, just make sure to sew over all the jagged edges.
  Now turn the two pieces right sides facing in on each other. Change the stitch on you machine to a straight stitch and sew around the perimeter of the mountain, leaving a small hole in the bottom.
 Fold it right side out and stuff it. I started with little bits of the stuffing in each of the corners, then filled in the middle, it makes it easier to fill.
 All I want to do is make everything into hearts and turn everything pink…Is that a problem?


 So lovely. Shadow hearts while the whoopie hearts cool.
 Whoopies all paired up
 Stuffed with a generous dollop of whipped coconut cream ( a cold can of coconut cream whipped with a splash of vanilla and a tad bit of sweetener) and sprinkled with my home-made beet dyed coconut sprinkles…..
 Whenever me and the mister get invited / show up for dinner at someone’s house, I like to bring at least one thing to contribute to the meal. First, because I am nice like that. Secondly, because I get to make food for other people besides Nick and get new feedback on recipes. (Sometimes I think he tells me things taste amazing when they might not) And thirdly, its nice to mess up someone else’s kitchen besides my own. So last night we went to my sisters and I made a salad. A very easy and virtually mess free salad…….I still made a mess (I cleaned it up myself!)
 Start with the base layer of kale… then first goes the sliced onion. (Make sure it’s thinly sliced or else it will be to overpowering)
 Add thinly sliced oranges…oh boy, your half way there!!!
 Top with thinly sliced avocado, a sprinkle of salt and drizzle with lime juice. I also served with an extra wedge of lime, there is never too much lime.


Oatmeal Fresh Cranberry Coconut Chocolate Chip Cookies — The Lovely Crazy
October 14, 2020 by maximios • Blog
It hasn’t stopped snowing, the temperature is dropping fast (it’s getting to the point the dog doesn’t even want to be outside) and the mister is busy hand shoveling three long driveways. So I figured that in between all the laundry folding, plant watering , and all around sitting on my butt that I am doing INSIDE, that I would be so super nice and crank the stove up and make my love some cookies.I love making cookies, especially when I have chores to do. I think part of it is that cookies are baked in batches which breaks up the chores and gives a sort of rhythm to things. Plus everything is nice when the house smells like cookies. I was going to make chocolate chocolate chocolate cookies, but realized that I didn’t have cocoa powder, so I went with fresh cranberries (I just scored a pound of organic cranberries for 89 cents!) coconut flakes and chocolate chips. Plus I wanted to make them oatmeal because the mister likes oatmeal and oatmeal makes the cookies a little more hardy. (We need hardy when the temperature dips below zero)The verdict….. chewy, soft, slightly sweet oatmeal, bittersweet chocolate, nutty floral coconut, and the zing and pop of the fresh cranberries. He told me to hide them… hide so he will stop eating them….. because they be amazing!
The base of this cookie….We are using regular old fashion oats and flour. Salt, baking soda and baking powder. Vanilla, chia seeds in hot water, coconut oil white and brown sugar…. You know, all the cookie stuff. Then all the goodness.. Chocolate chips, coconut flakes, and fresh cranberries. Goodness.Oh yeah, and they are vegan…if that matters to you.Warm the coconut oil and mix with the white and brown sugars. Then add the chia seeds soaked in hot water. Stir until nice and silky smooth.In goes some more stuff. I just dumped all the dry right on in that bowl and mixed it up nice and nice.Chopped the fresh cranberries into chunks… One at a time……Just kidding, I actually laid a cutting board on top of the cranberries, applied a little pressure and sliced through the cranberries.. Does that make sense? I hope so, because its is much easier and faster and the cranberries don’t all roll away.The chopped cranberries, coconut flakes and the chocolate chips go in to be mix all up. I used my hands to form the balls and gave each mound a little smoosh, but not completely flat. Then into a preheated 375 degree oven for about 13-15 minutes or until a nice golden brown.A cup of hot coffee and a plate of warm cookies… I am the nicest, right! (After his nice cookie rest I proceeded to do a little nagging, so the day evened out)So today is probably a great day for everyone to make cookies. It’s freezing out, its saturday and well, just cause. You might even be looking for a great recipe to make for that big party your going to.You should make these cookies. Have a Fantastic Weekend!!!-C
Oatmeal Fresh Cranberry Coconut Chocolate Chip Coookies
Ingredients
Preheat oven to 375To start, take the chia seed and soak them in the 4 tablespoon hot water for a few minutes. Then in a large bowl, mix together the white and brown sugar with warmed coconut oil. Add in the gelled chia seeds and vanilla and stir until silky and combined. (the warm chia seeds will help everything mix together nicely) Now mix in all the dry. I start with the oats, dump on flour, toss in the baking powder and soda and salt. Mix until fully combines. If the dough seems to dry, add in another tablespoon or two of hot water. Chop the fresh cranberries into halves or smaller and dump them, the coconut and chocolate chips into the bowl of dough and mix.Using a scoop, spoons, or your hands, make little balls and place on a cookie sheet, giving each ball a little smoosh. Into the oven for 13-15 minutes or until golden brown.Remove and cool on rack.Eat a few and hide the rest for later.