I forgot how amazing fall baking smells. The spiciness floating throughout the house, lingering on my clothes, in my hair, up the stairs and into the bedroom. It goes everywhere. Unfortunately it didn’t last very long this time around because the mr made popcorn and then the whole house ended up smelling like a freaking movie theater, but for a little while it was so nice. I want to bake everyday just to stink the house up all nice. I might just do that.%u00a0
Everyone eats the pumpkin bread or the pumpkin this or pumpkin that. But why does’t everyone harness the greatness of all the other winter squashes in baking? This I do not know. Don’t get me wrong, I love pumpkin but I also think that it’s very interchangeable in most baking applications. Like this quick %u00a0bread. I am sure that some people would notice that it is not pumpkin, but these same people would also enjoy the subtle difference in flavor. Acorn squash is a sweet and delicious squash and makes a fine fine bread my friends. And the acorn squash is cheaper then sugar pumpkins which is aways a plus. And the winter squash keeps longer the pumpkins so the are available longer. Acorn squash bread all winter long. (Yup, I am thinking winter already)
This bread lasted less then a day. The mr got a couple slices but some littles came over and ate almost the entire loaf. The didn’t ask what kind of squash I used, they just ate it vigorously and left heir little crumbs all over. So Bean with her mouth full of bread declared it A-MAZING. From the mouth of a 5 year old.
The stuff. The flour, baking soda and powder, salt, and cinnamon are in one bowl. The squash puree, oil, brown sugar, maple syrup, and apple cider vinegar in another .Also need a little plant milk a bit more cinnamon and sugar for topping.
Simple simple. Whisk together the dry then whisk together the wet.
Pour wet into dry and mix until incorporated.
And there you have it. %u00a0Acorn squash bread batter.%u00a0
Batter goes into a well greased bread pan and sprinkles all over with cinnamon sugar. Then into the oven (preheated of course) it goes.
All baked up and cooling. Like what I did there? %u00a0More circulation to the bottom %u00a0so it cools faster.. I am so smart.
The mr came home right when I was contemplating whether it was cool enough to cut. %u00a0It wasn’t but I cut it anyway.%u00a0
Have a great fall weekend!
-C %u00a0
makes 1 loaf
1 1/2 cups acorn squash puree*
1 1/2 cups all purpose flour
1/2 cup whole wheat flour
1 teaspoon baking soda
2 teaspoon baking powder
1 teaspoon salt
2 teaspoons cinnamon plus 1 teaspoon
1/2 cup brown sugar plus 1 tablespoon
1/2 cup maple syrup
1/2 cup oil%u00a0
1/3 cup plant based milk
1 tablespoon apple cider vinegar%u00a0
*To make acorn squash puree, stick an acorn squash into a oven at 400 for about 40 minutes or until until fork tender. Remove from oven,%u00a0cut in half, and let cool until you can handle it. Scoop out seeds (save for roasting) then scoop out flesh (eat skin as snack)%u00a0and puree in blender. Add a splash of water if needed to get a smooth puree.
preheat oven to 350
In a large bowl mix together the squash, oil, sugar, maple, milk, and apple cider vinegar. Mix until well combined. In a smaller bowl, whisk together the baking soda and powder, the tablespoon cinnamon, salt, and flour. Pour wet into the dry and mix until combined. %u00a0Pour into a well greased loaf pan. Combine the tablespoon brown sugar and teaspoon cinnamon and sprinkle on top. Pop into oven and bake for 60-65 minutes or until a tester poked into middle comes out clean.
Once cooked, remove from oven and let cool for a few minutes. Remove form loaf pan and let completely cool.%u00a0
Eat what you want and store the rest in an air tight container for a few days. Can be sliced and frozen too.
As a reward to ourselves for finishing the floor laying week (what a freaking week, I will share some pictures soon) I stayed home for a little while yesterday morning and made some donuts for the mr ( I got to bake and do a little knitting and he got donuts.) Initially I was gonna make a cake, had it on my agenda for a cake at some point this week, but last minutes I felt the need to use my unused donut pan. I think it was a good call. Donuts don’t require as much pumpkin puree.%u00a0 I roasted a pumpkin a few days ago for the purpose of baking a cake with it but have slowly eaten most of it (on accident) so that there was just enough left to make the donuts. I have no willpower when it comes to roasted squash, I can’t stop eating it.
Anyway,%u00a0 I had me a mighty fine morning of trashing the kitchen, using my pretty mixing bowls, basking in the glory of the residual heat coming from the oven, and making the house smell all nice and fall spicy. And now there are donuts in the house with lots of sprinkles and only the mr to eat them. He really really likes them, like a lot. (me “don’t eat all those f*ing donuts dude, save some for later!”)
Another reason donuts were a good call, they are easy to share. Maybe I should go drop off a few to a friend. Any takers?
The donut stuff. Flour, baking soda, baking powder, and salt are in that bowl. Then we have pumpkin puree(homemade or canned) soy milk(or any milk), brown sugar, cinnamon, oil, and apple cider vinegar
All the wet stuff gets mixed together and the dry stuff plus the cinnamon gets whisked together too.
Wet into dry and mixed until combined.
Scoop batter into well greased donut pan and don’t do what I did and overfill (I always forget not to overfill). My fist batch came out a little bit bigger the expected with holes. No biggie.
Once pan is filled,%u00a0 pan goes into preheated oven. Bake until golden perfection (about 15-18 minutes or until a tester comes out clean)
Slightly overflown donuts cooked to all the goodness and popped out of the pan to cool on a cooling rack.
Glaze stuff. Powdered sugar, cocoa powder, a pinch of salt, a splash of vanilla, and a bit of soy milk….Mix it all together and that’s that.
Completely cooled donuts (very important to be completely cooled) go heads down into the bowl of glaze.
All glazed and looking good but I think somethings missing…..
Pumpkin, chocolate, sprinkles. BOOM!!!
Happy Friday!!!!
makes 10 donuts
For donuts
1 1/4 cups all purpose flour
1 teaspoon baking powder
1 teaspoon baking soda
1/2 teaspoon salt
1 tablespoon cinnamon
1/2 cup pumpkin puree
1/2 cup brown sugar
1/2 cup soy milk (any milk works)
3 tablespoons neutral oil like canola
1 tablespoon apple cider vinegar
For the glaze
7 heaping tablespoons powdered sugar
2 tablespoons cocoa powder
2 tablespoons soy milk
splash vanilla
pinch of salt
sprinkles!!!!…optional
Preheat oven to 350
In a big bowl, mix together the flour, baking powder and baking soda, salt, and the cinnamon. In a separate bowl mix together the pumpkin puree, sugar, soy milk, oil and the apple cider vinegar. Dump the wet mixture into the dry and mix until combined.
Ready the donut pan by really making sure it is well grease. Fill each donut mold about a 3/4 way full. I use a spoon but you could transfer that batter to a piping bag if you want. Place pan into oven and bake for 15-18 minutes or until the donuts are golden brown and a fork stabbed into one comes out clean. Pop donuts out of mold and let cool completely on a cooling rack.
Note. I have one pan that does 6 at a time. I had to wash, dry and re-grease the panto bake all the donuts.
Once donuts are cooled, gather the glaze ingredients. In a shallow bowl whisk together the sugar, cocoa, and salt. Add in a splash of vanilla and then the soy. Mix together until a glossy not to thick but not to thin consistency . If its too thick, add in another splash of milk, to think, more powdered sugar.
To glaze, take each donut and place face down in glaze and give it a little twirl.%u00a0 Remove and place back on cooling rack (glaze size up) and cover with sprinkles. (optional)
Then eat the donuts
Any uneaten can be placed in airtight container for 2-3 days or can be stuck into freezer.
It’s Mother’s Day weekend which means that you and I and everyone out there should feel the slightest bit obligated to at least do a little something nice for your mom for the mere fact that you were borned. And really what better way to celebrate mom than with food%u2026 It really is the least that you can do. (I think mom’s also like flowers and cards and handmade pasta necklaces) My mom is defiantly about the food. (she has had her fair share or pasta necklaces) %u00a0A many years back on Mother’s day, this sweet little girl (me) made her mother a special %u00a0breakfast treat%u2026blueberry scones. And ever since that day, for every freaking holiday, birthday, whatever day, my mother requests (demands) a batch of those scones. She is always saying that these are her favorite treat and that no one has ever made them as good as I do. (I guess that just reiterates that I am her number 1 child)
And for the last few months my mom has been up my butt, trying to get me to make her some. Not going to lie, I have been saying I’ll get her a batch, but for some reason, I haven’t gotten around to making them. So two birds here.. Make the scones and she gets off my back for a least a little while (a month.. maybe 2) and I give her a fantastic Mothers day gift that I know she will love.
So here they are , oh mother of mine. Blueberry scones!
The stuff. Flour, baking soda, baking powder and salt. A bit of sugar, vanilla, buttermilk, and butter (use vegan butter and nut milk if you want to make them vegan) And of course we need the blueberries which can be fresh or frozen. I usually use fresh, but the store I stopped at only had really big containers of fresh that were like $1000 dollars a piece and the organic frozen happen to be on super sale. So you know, the cheap in me won that battle.%u00a0So into the bowl goes all the dry stuff; flour, baking powder and soda, salt, and the sugar. Give it a good whisk.
Now for my special trick for a perfectly distributed cold butter in a pastry. Freeze your butter and grate it!
With a large wholed grater, grate the frozen butter directly into the bowl with the dry, stoping a few times to toss the butter chunks around so you don’t end up with a huge pile of grated butter. When it’s all grated, gently toss around so the butter is evenly distributed.%u00a0Now dump the blueberries into the flour mixture. Toss them around to give them a coat of flour. Add in the buttermilk and vanilla and give a little mix until liquid is absorbed. We are trying to handle the dough as little as possible.Turn mixture onto counter. It’s very loose, but thats what it should look like. Very gently and with as little handling as possible, gather dough up, knead a few times till everything %u00a0just comes together. Press dough into a disk that is roughly an inch thick%u2026. and it doesn’t need to be perfect.%u00a0Cut the disk into even sized pieces. Do 6 big, 8 normal, maybe even 10 smaller. Whatever size you like. (I did 8) Place the scones onto a baking sheet, using a spatula to transfer, and sprinkle the tops with a little bit of sugar. Into a preheated oven for about 20 minutes.And when the scones look all nice and browned and a tester comes out clean. remove and either serve right away warm, preferably with huge cup of coffee or tea, or stick on a rack to cool before storing in %u00a0air tight container.
Perfect to serve as a breakfast pastry, at brunch, or even as a dessert. A nice little treat for a special lady. (dudes can eat them too)%u00a0
Happy Mothers Day Mom! Thanks for having me!
And Happy Weekend!!!
-C
Blueberry Scones%u00a0
2 cups all purpose flour
1/3 cup sugar plus%u00a02 tablespoons %u00a0to sprinkle on top
1 %u00a0teaspoon baking powder
1 teaspoon baking soda
1/2 teaspoon salt
1/2 cup (1 stick) unsalted %u00a0butter frozen or really cold (use non dairy butter like Earth Balance for vegan)
1 cup blueberries (fresh or frozen)
1 teaspoon %u00a0vanilla%u00a0
%u00a03/4 cup buttermilk (use non dairy milk for vegan)
Preheat oven t0 400 degrees
In a large bowl, whisk together flour, baking soda, baking powder, sugar, and salt. Take the frozen butter and grate directly into flour mixture, tossing around to evenly disrupted. Add in blueberries and toss around till coated with flour, then lastly, add vanilla to buttermilk and mix into mixture until just barely coming together. Turn mixture out onto counter and with your hands, knead mixture a few times until it forms a solid dough. Shape into a disk and smoosh down until about an inch thick. Cut into 6-10 triangles %u00a0and place on a non greases baking sheet and sprinkle tops with remaining sugar. Stick into oven and bake for 20 minutes or until tops start turning a golden brown and a tester in the middle of a scone comes out clean.%u00a0
Remove from baking sheet and serve warm or let cool on a rack.
Mom gets first dibs, and if she is willing to share, eat one yourself with%u00a0your face.%u00a0
I had to share the last of the 5 pineapples cause if I didn’t, that would mean %u00a0I ate 5 pineapples by myself. (I ate 4 pineapples by myself) So donuts were made and delivered to my sisters house where I proceeded to make her and her kids and another sister dinner. (hand made pizza on a weekday!) I then whipped out these pretty little upside down pineapple donuts for dessert, right after I cleaned up and made whipped cream. The kids were swallowing them hole and trying to steal just one more %u00a0and my sister and the mister, well they had to eat their donuts all elegant like with forks. (weirdos)
%u00a0I know I have said it before but just in case you forgot
I am the best sister/aunt ever! %u00a0
%u00a0The stuff. Flour, salt, and the baking soda whisked together into a bowl. Fresh pureed pineapple, milk, egg, melted butter, and white sugar. Than there is more melted butter, brown sugar and fresh pineapple for the upside down.%u00a0%u00a0This batter is pretty simple, just make sure to whisk all the dry really well. Dump all the wet stuff into the dry and mix until combined. Don’t over mix!Grease the donut pan really well and mix the brown sugar with the remaining melted butter
%u00a0 %u00a0 %u00a0 Drizzle the bottom of each donut round with the butter/ sugar mix %u00a0then layer thinly sliced pieces of pineapple around the hole maker. (not as perfect as a pineapple ring, but still pretty)
Scoop donut batter on into the pan and stick into the oven preheated at 350 degrees.%u00a0When donuts are all nice and golden brown, remove from oven and let sit and cool for about 5 minutes to give the donuts time to cool and the brown sugar to thicken. Dump donuts out onto a wires rackAnd serve them all upside down like. Maybe with a scoop of whipped cream or ice cream or nothing.%u00a0
Donut Smiles!
-C
Pineapple Upside Down Donuts
Makes 12 donuts
1 cup flour
1 teaspoon baking soda
1 teaspoon salt
1/2 cup white sugar
6 tablespoons melted butter ( 1/2 s for batter 1/2 for sugar mixture)
1 egg
1/2 cup milk
1/2 cup pinapple puree (about 1 cup fresh pineapple chunks blended)
1/2 cup brown sugar
1 cup sliced pineapple
Note. I used fresh pineapple, but you could use canned. I think you would need a of rings (cut in half) and a an of chunks, blended up)
Preheat the oven to 350 and grease the donut pan(s)
In a large bowl, whisk together the flour, salt, sugar and baking soda. %u00a0Melt 3 tablespoons of butter and mix that with into the flour mixture along with the pineapple puree, milk, and lastly the egg. Mix until combined.
Melt the remaining 3 tablespoons of butter and mix into the brown sugar. Drizzle (crumble) about a teaspoon of the mixture into the bottoms if each donut mold. Layer thinly sliced pineapple on top of that then scoop donut batter on top of that. Stick into the oven for about %u00a010 minutes, or until donuts are gold brown and a tester comes out clean. Remove from oven and let cool for 5 or so minutes on a wire rack before turning out of pan.%u00a0
If working with one pan, make sure to really clean the pan and re-grease before baking the second batch!
Serve donuts with a scoop of whipped cream and eat with your face.%u00a0
%u00a0 %u00a0 %u00a0 My Moms birthday was this past week, and naturally, I made the cake for our big family birthday gathering. (and I bought and made dinner and cleaned everything up, although the mister did do all the dinner dishes) Word to my sisters%u2026 You guys suck! (but I still love you)
Every year my mom asks for the same cake. Strawberry with Lemon frosting. Then a few years ago, other people in the family started asking for the same one. Now there is a weird strawberry cake thing going on between some of my family members. They have taken claim of the strawberry cake and don’t want me to make it for anyone else but them. They think that because I make them this awesome cake that they are somehow special. Well guess what people.. Your only special for one day, then you go back to being normal.
I have a family full of a bunch of weirdoes.
Anyways, My mom said she wanted the usual strawberry cake, but as cup cakes, or actually she asked me to make the little square cakes. I was kind of confused when she said square cakes because well, what the hell was she talking about? But then I remembered that a long time ago I use to have a square cupcake pan. (I lost in somehow) So no, I couldn’t make the cakes square, but I sure could make them cute. And cute as hell is what I did.
Cake Stuff. Flour, baking soda, baking powder, and salt whisked together in a bowl. Butter, a little oil, vanilla, eggs and buttermilk. Then of course we have strawberries cause it wouldn’t be a strawberry cake with out them.First things first. Wash, trim and dice up the strawberries. Stick them into a pot and sprinkle with a few tablespoons of sugar. Heat on low and let the strawberries cook for about 10 minutes, stirring frequently,%u00a0until they turn into a thick syrup. The sugar and the butter get beaten together until light and fluffy. Then goes in the oil, eggs, and vanilla. The milk is then added to the strawberry mixture. Add half the dry mixture to the wet, mix, then mix in half the strawberry mixture to that. Mix the rest of the dry in and finish off with the strawberry mixture.
Pour batter into well greased and parchment lined baking sheet (or pans). %u00a0Stick cake into preheated oven for about 35 minutes, rotating cakes after 15 minutes. Cake is done when it starts turning a light gold brown and a cake tester stuck in the middle comes out clean.%u00a0Cake gets pulled from the oven and set on a rack to cool.
I actually wrapped the cake when it was cool enough and stuck outside for a few hours. It didn’t completely freeze, but it was close. Frozen cake is easier to cut then soft non frozen cake. No necessary, but if you have the time%u2026.%u00a0
While the cake is cooling, make the frosting. %u00a0Powdered Sugar, a stick of butter, cream cheese, lemon zest, lemon juice, and vanilla get mixed together until it turns into a big bowl of thick lemony frosting.%u00a0Tomato can cutout. (I couldn’t find my biscuit cutters) %u00a0A biscuit or cookie cutter would probably work a little better.. The cakes kept getting stuck in the can. Frost the cake!! Place frosting into a piping bag or a big plastic zip lock with the tip cut off. %u00a02 rounds to a cake. A squeeze of frosting goes on one, topped with another and given a little smoosh. A nice big dollop of frosting on top then%u2026.%u00a0Sprinkles!!!! %u00a0Or sliced %u00a0strawberries (my mom doesn’t like sprinkles..I know)
So freaking cute. I don’t know if I can make a normal cake again.
Mom gets the bigger 3 tiered cake.. and a few more of the little ones.%u00a0
HAPPY BIRTHDAY MOM!
-C
Strawberry Cake with Lemon Cream Cheese Frosting
makes 16 two tiers cupcakes or can be made in three 8 inch cake pans
The Cake
3 Cups All Purpose Flour
1 Teaspoon Salt
1 Teaspoon Baking Soda
1 Teaspoon Baking Powder
1/2 Cup or %u00a0one Stick Soften Butter
1/3 Cup Vegetable Oil
3 Eggs
1 teaspoon Vanilla
1 Cup milk
1 Cup Sugar plus 2 Tablespoons
1 lb Fresh Strawberries (Can use Frozen, just let them thaw )
The Frosting
4 1/2 Cups Powdered Sugar
1 Stick Soften Butter
4 oz Cream Cheese (Half a block)
Zest of a Lemon
1-2 Tablespoons Lemon Juice
1 teaspoon Vanilla
pinch of salt
Preheat oven to 375
Grease a parchment lined %u00a013x18 high rimmed baking sheet and dust with flour. If you baking sheet isn’t as big as mine, use whatever size you have and make a few cupcakes on the side. Or make one , 3 tiered %u00a0cake with 8 inch cake pans. %u00a0I trust that you can find a way to bake all this cake batter.
Wash, trim and dice strawberries. Toss them in a medium sauce pan and sprinkle with 2 tablespoons of sugar. Place on low heat and cook for about 10 minutes %u00a0until %u00a0strawberries break down and turn into a thick syrup. Take of heat and let cool.
Combine flour, salt, baking powder and soda in a bowl and whisk together, In another large bowl, add butter and sugar together and beat on medium until light and fluffy. Add in oil, vanilla and eggs. Beat together. Now add the milk to the %u00a0strawberries and mix together. Beat in half the dry into the wet, add in half the strawberry mixture, then the rest of the dry, and finish off with the rest of the strawberry mixture.%u00a0
Pour batter into prepare baking sheet (or pans) and place in oven. Check cake after about 15 minutes and rotate to help insure an even bake. Bake for another 15- 20 minutes, or until cake %u00a0starts to turn golden brown and a tester (toothpick) comes out clean. %u00a0
Remove from oven and let completely cool. %u00a0(Not necessary, but once cake is cooled , wrap with plastic wrap and stick cake into the freezer of a little while before cutting the circles.. its makes it a little easier)
While cake is cooling, make the frosting. Place all ingredients in a big bowl and beat together until a nice soft but sturdy frosting forms. %u00a0If. you frosting seems to thick add in a %u00a0splash of milk. To thin.. add a little more sugar.%u00a0
When the cake is cooled, get to it. With you cookie or biscuit cuter dipped in powdered sugar, cut as many circles as you can.%u00a0
Fun Time!! Frost the cakes. Place frosting into a pastry bag, or like me, a large zip lock bag with the tip cut off. Partner up all the cake rounds and go through and give one of each of the pairs a good dollop of frosting. Top with the remaining cake, give it a lithe smooshto make sure they stick, and squeeze a nice dollop of frosting on top. Finish off with sliced strawberries and lots of sprinkles.
Sing Happy Birthday and eat!
%u00a0What is better for a bake sale then Oreo cookies?%u00a0 Oreo cookies made from scratch!.
So when my sister called and asked me to make something for my nephews bake sale to raise money for his basketball team, I couldn’t say no. (or I %u00a0didn’t want to say no cause any good excuse to bake right!) Plus I had just found this awesome recipe on one of my favorite blogs, my name is yeh, for home made Oreos that I have been super excited to try, so it kind of worked out. But before I committed to the Oreo, I wanted to just double check with my nephew and see what he might want me to make because it was his bake sale.%u00a0
This is the%u00a0conversation we had. And yes, it was through text.
Me- “Hey bud, what do you want me to make for your bake sale? Cupcakes, cookies, donuts, or brownies”
Jack- ” Yea!”
Me- “Yea what?”
Jack- “Make that.”
Me- “Make %u00a0what?%u2026.Hello!! What do you want me to make? Should I make Oreos?”
Jack- I WANT OREOS!”
Ok.. So it took a little while, but we got there. And after the %u00a0the basketball game and the super successful bake sale..
ME-“Did you see the Oreos?”
Jack- “What do you mean?”
Me- “The Oreos I made for the bake sale%u2026the ones you wanted me to make”
Jack- “There was a bake sale? I want Oreos”
Yup, that’s the attention span of my 13 year old nephew. Little shit head. But for real, I had so much fun making these cookies and I am definitely going to be making them again. Plus they were a super hit at the sale.
I am the best aunt! (and sister!)
Cookie Time!%u00a0Whats going on here is brown sugar and butter %u00a0have be beaten together until nice and fluffy Then a good big splash of vanilla and another 2 big splashes of coffee are added to that.(I sacrificed my last few sips of my coffee for these cookies) %u00a0The dry stuff, flour, salt and cocoa powder, are whisked together, waiting to be added to the wet. %u00a0Mix the dry ingredients into the wet and mix. I ended up just using my hand and kind of squish mixing everything together until in tuned into a nice lovely uniformed dough. %u00a0Form the dough into 2 balls and give each a few kneads to get any air bubbles out. Place dough back into bowl and stick in the fridge to sit for 10-15 minutes( it makes the dough a little easier to work with)
Once the dough has had a little time to rest and cool, remove from fridge, one ball at a time. Place on a lightly cocoa or powdered sugar dusted surface and roll out the dough. Grab any size circle (or other shape) cookie cutter and get to shaping the cookies. Notice the tin can in the bowl? I could’t find my biscuit cutters anywhere but the can was the perfect size, and it worked really well. Keep a little bowl of either powered sugar of cocoa to dip the cutter in in between making the cookies. It really helps the dough from sticking and breaking.%u00a0
When you have cut out your cookies, use a spatial and place them on a baking sheet. You can try to transfer with you hands, but you end up messing up the shape and most of them will break anyway.
Stick the cookies in the oven for about 15 minutes a batch and continute to roll and cut out the cookies until you have no dough left.%u00a0
%u00a0While the cookies are getting their cool on, make the cream filling. All you need is a stick of butter, about 4 cups of powdered sugar, some vanilla and a few splashes of heavy cream. Beat that all up until nice and creamy thick and spoon it into a pastry bag (I used a big old ziplock bag) to be piped on the cookies. Filling the cookies is for sure the best part. Separate the cookies into pairs and pipe a big blob of filling onto one of the two cookies. Take the names cookie and place on top, giving it a little smooth to the disperse the cream. Keep doing that until the cookies are all filled.
Stacks of cookies%u2026 Sold to the highest bidder! I was told that they sold out within the first half hour at $1.50 a pop%u2026.Should have charged $5%u2026. for a good cause right?
And yes, even though he was being a space head and didn’t even care that I just %u00a0made him like 50 bucks for his team, I still saved the kid one.He just had to give me either a hug or 5 bucks for it.
I got a hug. (I really wanted the 5 dollars)
-C
From Scratch Oreo Cookies%u00a0
Adapted by Molly Yeh from My Name is Yeh!
The cookie (makes about 18 3 inch Oreos)
2 cups all purpose flour
1 cup cocoa powder
3/4 cup brown sugar
1 cup or 2 sticks soften butter (use earth balance for vegan)
1 teaspoon salt
1 teaspoon vanilla extract
2 tablespoons brewed coffee
The filling
1 stick soft butter (us earth balance for vegan)
2 tablespoons heavy or whipping cream (use a nut or soy milk for vegan)
4 cups powdered sugar
2 teaspoons vanilla extract
Cookies- In a large bowl cream together sugar and butter until light and fluffy. Add in vanilla and coffee and mix together. In another bowl, whisk together the flour, salt and cocoa powder. Add dry to wet and mix together unit a uniform dough forms. Dump out onto a lightly cocoa or powdered sugared surface and knead dough a few times. Split ball into two balls, place in bowl, and stick in the fridge for 15 or so minutes.
Preheat oven t0 325 degrees
When dough is chilled, remove one ball at a time, and roll dough out on a cocoa or powdered sugar dusted counter until its about 1/4 inch thick. With a round (any shape would work) cookie cutter, cut out as many cookies as you can. In between sits, dip cutter in a sugar and cocoa to keep the cookie from sticking. Transfer cut out cookies onto a baking sheet with a spatula. %u00a0Take scraps, roll into a ball, and roll out again. Keep doing that until you can’t cut out any more. (You can either bake a weird shape cookie or just eat the dough)
Bake cookies for about 15 minutes or until the cookie has risen a bit and the tops have lost their glossiness and look cooked. %u00a0Remove from oven and let cookies dry on a wire rack.
Make the filling
Filling- Beat together butter, sugar, vanilla, and cream until completely mixed and is at your optimal consistency. Add a drizzle more cream if you want to thin out or add more sugar for a thicker cream.%u00a0
Stick the filling into a piping bag or ziplock bag an snip the end. With cookies in pairs, pipe a big dollop of filling onto one of the two cookies. Place the naked cookie onto the filled cookie and give a smooth to distribute the filling.
lick your fingers and eat a cookie.%u00a0
If selling at a bake sale, charge $3 a cookie%u2026. If it’s for a good cause.%u00a0
First day of Spring!! Well kind of I guess. I think it actually starts at like 6:20 tonight, when the temperature is going to dip back done to 10.(Spring my ass) I don’t know about you people out there but here in Vermont, we are really hanging on to winter. I have to keep telling myself%u2026″ It will be warmer soon and you’ll be looking forward to this weather in a few months.. so stop bitching!” %u00a0I give myself good pep talks.
Anyway, last week at the farm share pick up, there was a nice little surprise. We got a few pounds of some sweet locally grown and milled whole wheat flour. There was a little sign with the information about the wheat and where it came from, but in my haste of gathering all of my other veggies, I failed to take notes and forgot the name of the farm that it came from. But I do know that my farm traded some celeriac for the wheat. %u00a0I was really excited because I am really into the idea of using locally grown grains and I don’t know, it just made me really happy, especially because it was a trade. %u00a0Food framing and local sharing is stuff that makes me happy.
I wanted to make something to kind of showcase the hearty, nutty flavor of the wheat and I also wanted to make something that my mister would eat for breakfast. Well what better way to do that then with muffins!%u00a0Banana coconut whole wheat%u00a0(that just happen to be vegan) Hearty, fruity, and smells like the word lovely and the color yellow.%u00a0A few to eat and a few to share. Hanging at home, running away or %u00a0getting ready for a day of spring cleaning%u2026.This is a great weekend to make muffins!%u00a0
The stuff%u2026 Light, nutty local whole wheat flour, ripe oh ripe bananas and coconut flakes are the stars in this muffin%u2026 But we need the other stuff too. Brown sugar, vanilla, coconut oil and a chia egg. %u00a0Baking powder, baking soda, and last but not least, salt.
%u00a0Yup, that sounds about right%u00a0 %u00a0The salt, baking soda, and baking powder are whisked together. The banana and all the rest of the stuff are mixed up%u2026 Then mix the wet mixture into the dry. Stir until combined and then add in the coconut flakes,Scoop mixture %u00a0into 12 lined muffin cups%u2026 A scoop like mine works very nicely. Don’t have one, well I recommend you get yourself one. Until then, use a spoon. Something I always do when baking any muffin is sprinkle the tops of each muffin with a bit of %u00a0sugar or brown sugar. It melts and caramelizes and adds a sweet little crunch to the tops.%u00a0
Now stick the muffins into the oven.%u00a0Remove from oven when they look like this, nice and golden brown. Also good idea to check with a tester stuck into the middle. When it comes out clean, they are done.12 happy little muffins cooling on a rack, waiting to be eaten with you mouth.%u00a0
Doesn’t the sight of pretty food make you happy, like sing a song happy?%u00a0Muffins, whoa yah!! %u00a0Friday yah yah!! %u00a0Spring%u2026What, Yah!! %u00a0Yah%u2026Yah Yah!!!
Terrible I know, but at least you were spared hearing my actual voice.%u00a0
Have a great weekend. Do lots of springy stuff!
-C
2 Cups Whole Wheat Flour
4 Ripe bananas
1 Teaspoon Baking Soda
1/2 Teaspoon Baking Powder
1 teaspoon Salt
1 teaspoon Vanilla Extract
3/4 Cup Brown Sugar
1/3 cup melted Coconut Oil
1 Tablespoon Chia Seeds + 3 Tablespoons warm water
1/2 Cup Unsweetened Coconut Flakes
Preheat oven to 350
In a small bowl, mix 3 tablespoons warm water to the chia seeds and let sit for at least 5 minutes (10 is better) In a large bowl, peel and mash the bananas until they turn into a kind of chunky soupy puree. %u00a0Add in brown sugar, chia seed mixture, vanilla extract, and the melted coconut oil (make sure it’s melted or it won’t incorporate into the mixture) Mix together. In another bowl, whisk together the flour, baking soda, baking powder and salt. Mix the wet mixture with the dry until combined then mix in the coconut flakes.%u00a0
Line a 12 cup muffin tin and fill each cup about 3/4 the way up with batter. Sprinkle each muffin with brown sugar and place in oven on center rack. Bake for 25-30 minutes or until the tops 0f the muffins are golden brown and a tester inserted into the middle comes out clean.%u00a0
Remove muffins from tin and let cool.
Serve as is or maybe with a smudge of coconut butter, or anything you want really.
No need for fork, just use you mouth.
%u00a0 %u00a0%u00a0%u00a0%u00a0 TGIF!!!! For reals, because Monday-Thurday were monster days. And now that its friday, I can dig a hole and hide in it until it’s at least 30 degrees with some sunshine. (I might never get to come out.)
A few things I will bring in my hole:
food (lots of food and coffee, lots of coffee)
a soft blanket and pillow
a few books, preferably with pictures, on farming and gardening (think spring!)
the entire series of the Fresh Prince of Bel-air and a device to watch it on
toothpaste (I can use my finger to brush my teeth)
But before I leave for my hole in the ground, I made these little cake bites to get my people through the weekend. Sweet little lemony bites of rich dense cake dipped into bittersweet chocolate. (I am just so nice) %u00a0They have all the pleasure or cake without the need of a fork and are much easier to give away then a big slice of cake. Plus, they are fun to make. My little sister helped and did most of the chocolate dipping. Then she and another little used their mouths to clean up the chocolate mess. It was an afternoon of chocolate all over the kitchen fun day.%u00a0
So make some bites to have and to share. Or if you, like me, are digging a hole to hide in, make a batch of bites to bring with you. That’s the beauty of cake covered in a harden chocolate shell, they travel really well.Simple lemon cake stuff. Flour, baking powder and salt whisked together, Sugar and soft butter in a bowl. An egg, some vanilla, milk, and of course, the lemon.%u00a0
To make the batter, cream the soften butter with the sugar until light and fluffy. Zest lemon(1 big or 2 small) into bowl with the juice of the lemon(s), the vanilla and the egg. Beat until combined. Now beat in the dry and then the milk. Keep beating for another minute until all mixed. Batter should be light and fluffy.
Batter goes into a greased and floured %u00a09x13 baking sheet and stuck into a 375 degree oven for about 30 minutes (You can use a 9×9 baking pan. Just bake fir another 10 minutes and you will end up with thicker bites). Remove from oven and let cool for a few minutes and flip to remove cake from baking sheet. Cut cake into small pieces (I cut 4×6%u00a0 %u00a0to get 24 bites) and place bake into sheet and into freezer (I stuck mine outside, it was -2 degrees ) for at least 2 hours.%u00a0
Frozen bites ready for the chocolate coating%u2026 Bittersweet chocolate chips and a little bit of coconut oil. Melted together all nice and shiny smooth.Now dip and slather those bites in the melted chocolate.%u00a0
Oh what a lovely sister I have.. Look at her dunk%u2026.. like a boss!Fully coated and placed on a rack for the chocolate to harden. I %u00a0ended up sticking the rack in the freezer for 10 minutes%u2026They harder really fast in there.
And now you have some it, bites of cake covered in chocolate.%u00a01 bite, 2 bites%u20265 bites. Eat however many you want because its Friday and because there small little bites and just because you can.
Now if you need me, I’ll be in my hole.%u00a0
-C
Chocolate Lemon Cake Bite
1 1/2 cups all purpose flour
1 teaspoon baking powder
1 teaspoons salt
1 cup %u00a0white sugar
1/2 cup (1 stick) soft butter
1 egg
1 teaspoon vanilla
1 cup milk
1 large or 2 small lemons
2 cups bittersweet chocolate chips
2 tablespoons coconut oil
Add butter %u00a0and sugar to a large bowl and beat on medium unit light and fluffy. Ass in vanilla egg, the zest of the lemon and the juice of the lemon. Beat to incorporate. Now beat in the dry and lastly the milk.
Grease and flour either a 9×9 pan or a 9×13 baking sheet. dump batter in and smooth out. %u00a0Stick in oven and bake for about 3o minutes or until a toothpick stuck into the middle comes out clean. Remove and let cool %u00a0for a few minutes on a %u00a0wire rack. Flip cake to remove from pan. Cut cake into bit sized pieces, 4×6 is a good size, and place back on baking sheet and stick into freezer for at least 2 hours.
When cake bites are as good as frozen, get the chocolate ready. Take the chocolate and the coconut oil and either melt in a double boiler or the microwave. Mix until smooth and make sure to full incorporate the oil. Now remove the cake bites from the freezer and dip each bite into chocolate, trying to full coat all sides. Stick onto a wire rack or a parchment lined pan to harden. They can be stuck back into the freezer to harden faster.

THE LOVELY CRAZY
January 8, 2020 by maximios • Blog
I forgot how amazing fall baking smells. The spiciness floating throughout the house, lingering on my clothes, in my hair, up the stairs and into the bedroom. It goes everywhere. Unfortunately it didn’t last very long this time around because the mr made popcorn and then the whole house ended up smelling like a freaking movie theater, but for a little while it was so nice. I want to bake everyday just to stink the house up all nice. I might just do that.%u00a0
Everyone eats the pumpkin bread or the pumpkin this or pumpkin that. But why does’t everyone harness the greatness of all the other winter squashes in baking? This I do not know. Don’t get me wrong, I love pumpkin but I also think that it’s very interchangeable in most baking applications. Like this quick %u00a0bread. I am sure that some people would notice that it is not pumpkin, but these same people would also enjoy the subtle difference in flavor. Acorn squash is a sweet and delicious squash and makes a fine fine bread my friends. And the acorn squash is cheaper then sugar pumpkins which is aways a plus. And the winter squash keeps longer the pumpkins so the are available longer. Acorn squash bread all winter long. (Yup, I am thinking winter already)
This bread lasted less then a day. The mr got a couple slices but some littles came over and ate almost the entire loaf. The didn’t ask what kind of squash I used, they just ate it vigorously and left heir little crumbs all over. So Bean with her mouth full of bread declared it A-MAZING. From the mouth of a 5 year old.
The stuff. The flour, baking soda and powder, salt, and cinnamon are in one bowl. The squash puree, oil, brown sugar, maple syrup, and apple cider vinegar in another .Also need a little plant milk a bit more cinnamon and sugar for topping.
Simple simple. Whisk together the dry then whisk together the wet.
Pour wet into dry and mix until incorporated.
And there you have it. %u00a0Acorn squash bread batter.%u00a0
Batter goes into a well greased bread pan and sprinkles all over with cinnamon sugar. Then into the oven (preheated of course) it goes.
All baked up and cooling. Like what I did there? %u00a0More circulation to the bottom %u00a0so it cools faster.. I am so smart.
The mr came home right when I was contemplating whether it was cool enough to cut. %u00a0It wasn’t but I cut it anyway.%u00a0
Have a great fall weekend!
-C %u00a0
makes 1 loaf
*To make acorn squash puree, stick an acorn squash into a oven at 400 for about 40 minutes or until until fork tender. Remove from oven,%u00a0cut in half, and let cool until you can handle it. Scoop out seeds (save for roasting) then scoop out flesh (eat skin as snack)%u00a0and puree in blender. Add a splash of water if needed to get a smooth puree.
preheat oven to 350
In a large bowl mix together the squash, oil, sugar, maple, milk, and apple cider vinegar. Mix until well combined. In a smaller bowl, whisk together the baking soda and powder, the tablespoon cinnamon, salt, and flour. Pour wet into the dry and mix until combined. %u00a0Pour into a well greased loaf pan. Combine the tablespoon brown sugar and teaspoon cinnamon and sprinkle on top. Pop into oven and bake for 60-65 minutes or until a tester poked into middle comes out clean.
Once cooked, remove from oven and let cool for a few minutes. Remove form loaf pan and let completely cool.%u00a0
Eat what you want and store the rest in an air tight container for a few days. Can be sliced and frozen too.
As a reward to ourselves for finishing the floor laying week (what a freaking week, I will share some pictures soon) I stayed home for a little while yesterday morning and made some donuts for the mr ( I got to bake and do a little knitting and he got donuts.) Initially I was gonna make a cake, had it on my agenda for a cake at some point this week, but last minutes I felt the need to use my unused donut pan. I think it was a good call. Donuts don’t require as much pumpkin puree.%u00a0 I roasted a pumpkin a few days ago for the purpose of baking a cake with it but have slowly eaten most of it (on accident) so that there was just enough left to make the donuts. I have no willpower when it comes to roasted squash, I can’t stop eating it.
Anyway,%u00a0 I had me a mighty fine morning of trashing the kitchen, using my pretty mixing bowls, basking in the glory of the residual heat coming from the oven, and making the house smell all nice and fall spicy. And now there are donuts in the house with lots of sprinkles and only the mr to eat them. He really really likes them, like a lot. (me “don’t eat all those f*ing donuts dude, save some for later!”)
Another reason donuts were a good call, they are easy to share. Maybe I should go drop off a few to a friend. Any takers?
The donut stuff. Flour, baking soda, baking powder, and salt are in that bowl. Then we have pumpkin puree(homemade or canned) soy milk(or any milk), brown sugar, cinnamon, oil, and apple cider vinegar
All the wet stuff gets mixed together and the dry stuff plus the cinnamon gets whisked together too.
Wet into dry and mixed until combined.
Scoop batter into well greased donut pan and don’t do what I did and overfill (I always forget not to overfill). My fist batch came out a little bit bigger the expected with holes. No biggie.
Once pan is filled,%u00a0 pan goes into preheated oven. Bake until golden perfection (about 15-18 minutes or until a tester comes out clean)
Slightly overflown donuts cooked to all the goodness and popped out of the pan to cool on a cooling rack.
Glaze stuff. Powdered sugar, cocoa powder, a pinch of salt, a splash of vanilla, and a bit of soy milk….Mix it all together and that’s that.
Completely cooled donuts (very important to be completely cooled) go heads down into the bowl of glaze.
All glazed and looking good but I think somethings missing…..
Pumpkin, chocolate, sprinkles. BOOM!!!
Happy Friday!!!!
makes 10 donuts
For donuts
For the glaze
Preheat oven to 350
In a big bowl, mix together the flour, baking powder and baking soda, salt, and the cinnamon. In a separate bowl mix together the pumpkin puree, sugar, soy milk, oil and the apple cider vinegar. Dump the wet mixture into the dry and mix until combined.
Ready the donut pan by really making sure it is well grease. Fill each donut mold about a 3/4 way full. I use a spoon but you could transfer that batter to a piping bag if you want. Place pan into oven and bake for 15-18 minutes or until the donuts are golden brown and a fork stabbed into one comes out clean. Pop donuts out of mold and let cool completely on a cooling rack.
Note. I have one pan that does 6 at a time. I had to wash, dry and re-grease the panto bake all the donuts.
Once donuts are cooled, gather the glaze ingredients. In a shallow bowl whisk together the sugar, cocoa, and salt. Add in a splash of vanilla and then the soy. Mix together until a glossy not to thick but not to thin consistency . If its too thick, add in another splash of milk, to think, more powdered sugar.
To glaze, take each donut and place face down in glaze and give it a little twirl.%u00a0 Remove and place back on cooling rack (glaze size up) and cover with sprinkles. (optional)
Then eat the donuts
Any uneaten can be placed in airtight container for 2-3 days or can be stuck into freezer.
And for the last few months my mom has been up my butt, trying to get me to make her some. Not going to lie, I have been saying I’ll get her a batch, but for some reason, I haven’t gotten around to making them. So two birds here.. Make the scones and she gets off my back for a least a little while (a month.. maybe 2) and I give her a fantastic Mothers day gift that I know she will love.
So here they are , oh mother of mine. Blueberry scones!
Now for my special trick for a perfectly distributed cold butter in a pastry. Freeze your butter and grate it!
With a large wholed grater, grate the frozen butter directly into the bowl with the dry, stoping a few times to toss the butter chunks around so you don’t end up with a huge pile of grated butter. When it’s all grated, gently toss around so the butter is evenly distributed.%u00a0 Now dump the blueberries into the flour mixture. Toss them around to give them a coat of flour. Add in the buttermilk and vanilla and give a little mix until liquid is absorbed. We are trying to handle the dough as little as possible.
 Turn mixture onto counter. It’s very loose, but thats what it should look like.
  Very gently and with as little handling as possible, gather dough up, knead a few times till everything %u00a0just comes together. Press dough into a disk that is roughly an inch thick%u2026. and it doesn’t need to be perfect.%u00a0
 Cut the disk into even sized pieces. Do 6 big, 8 normal, maybe even 10 smaller. Whatever size you like. (I did 8) Place the scones onto a baking sheet, using a spatula to transfer, and sprinkle the tops with a little bit of sugar. Into a preheated oven for about 20 minutes.
 And when the scones look all nice and browned and a tester comes out clean. remove and either serve right away warm, preferably with huge cup of coffee or tea, or stick on a rack to cool before storing in %u00a0air tight container.
Perfect to serve as a breakfast pastry, at brunch, or even as a dessert. A nice little treat for a special lady. (dudes can eat them too)%u00a0
Happy Mothers Day Mom! Thanks for having me!
And Happy Weekend!!!
-C
Blueberry Scones%u00a0
Preheat oven t0 400 degrees
In a large bowl, whisk together flour, baking soda, baking powder, sugar, and salt. Take the frozen butter and grate directly into flour mixture, tossing around to evenly disrupted. Add in blueberries and toss around till coated with flour, then lastly, add vanilla to buttermilk and mix into mixture until just barely coming together. Turn mixture out onto counter and with your hands, knead mixture a few times until it forms a solid dough. Shape into a disk and smoosh down until about an inch thick. Cut into 6-10 triangles %u00a0and place on a non greases baking sheet and sprinkle tops with remaining sugar. Stick into oven and bake for 20 minutes or until tops start turning a golden brown and a tester in the middle of a scone comes out clean.%u00a0
Remove from baking sheet and serve warm or let cool on a rack.
Mom gets first dibs, and if she is willing to share, eat one yourself with%u00a0your face.%u00a0
%u00a0I know I have said it before but just in case you forgot
I am the best sister/aunt ever! %u00a0
Scoop donut batter on into the pan and stick into the oven preheated at 350 degrees. %u00a0When donuts are all nice and golden brown, remove from oven and let sit and cool for about 5 minutes to give the donuts time to cool and the brown sugar to thicken. Dump donuts out onto a wires rack
 And serve them all upside down like. Maybe with a scoop of whipped cream or ice cream or nothing.%u00a0
Donut Smiles!
-C
Pineapple Upside Down Donuts
Makes 12 donuts
Note. I used fresh pineapple, but you could use canned. I think you would need a of rings (cut in half) and a an of chunks, blended up)
Preheat the oven to 350 and grease the donut pan(s)
In a large bowl, whisk together the flour, salt, sugar and baking soda. %u00a0Melt 3 tablespoons of butter and mix that with into the flour mixture along with the pineapple puree, milk, and lastly the egg. Mix until combined.
Melt the remaining 3 tablespoons of butter and mix into the brown sugar. Drizzle (crumble) about a teaspoon of the mixture into the bottoms if each donut mold. Layer thinly sliced pineapple on top of that then scoop donut batter on top of that. Stick into the oven for about %u00a010 minutes, or until donuts are gold brown and a tester comes out clean. Remove from oven and let cool for 5 or so minutes on a wire rack before turning out of pan.%u00a0
If working with one pan, make sure to really clean the pan and re-grease before baking the second batch!
Serve donuts with a scoop of whipped cream and eat with your face.%u00a0
Every year my mom asks for the same cake. Strawberry with Lemon frosting. Then a few years ago, other people in the family started asking for the same one. Now there is a weird strawberry cake thing going on between some of my family members. They have taken claim of the strawberry cake and don’t want me to make it for anyone else but them. They think that because I make them this awesome cake that they are somehow special. Well guess what people.. Your only special for one day, then you go back to being normal.
I have a family full of a bunch of weirdoes.
Anyways, My mom said she wanted the usual strawberry cake, but as cup cakes, or actually she asked me to make the little square cakes. I was kind of confused when she said square cakes because well, what the hell was she talking about? But then I remembered that a long time ago I use to have a square cupcake pan. (I lost in somehow) So no, I couldn’t make the cakes square, but I sure could make them cute. And cute as hell is what I did.
Pour batter into well greased and parchment lined baking sheet (or pans). %u00a0Stick cake into preheated oven for about 35 minutes, rotating cakes after 15 minutes. Cake is done when it starts turning a light gold brown and a cake tester stuck in the middle comes out clean.%u00a0 Cake gets pulled from the oven and set on a rack to cool.
I actually wrapped the cake when it was cool enough and stuck outside for a few hours. It didn’t completely freeze, but it was close. Frozen cake is easier to cut then soft non frozen cake. No necessary, but if you have the time%u2026.%u00a0
While the cake is cooling, make the frosting. %u00a0Powdered Sugar, a stick of butter, cream cheese, lemon zest, lemon juice, and vanilla get mixed together until it turns into a big bowl of thick lemony frosting.%u00a0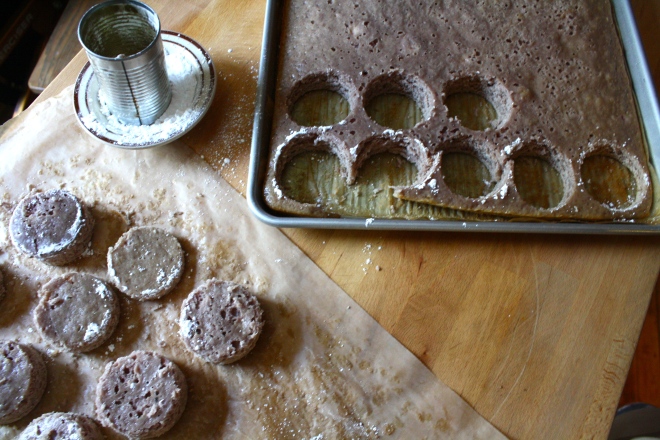 Tomato can cutout. (I couldn’t find my biscuit cutters) %u00a0A biscuit or cookie cutter would probably work a little better.. The cakes kept getting stuck in the can.
 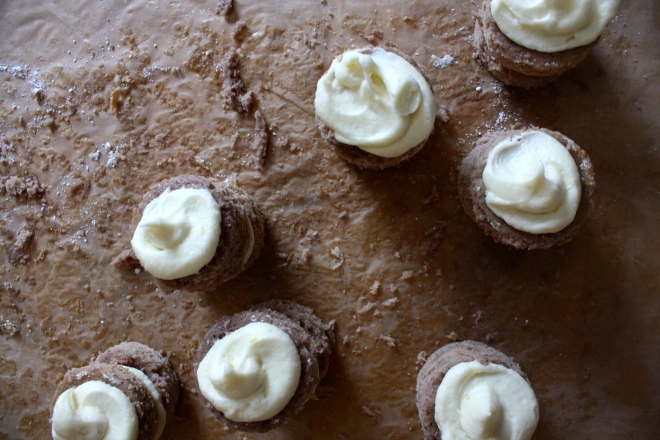 Frost the cake!! Place frosting into a piping bag or a big plastic zip lock with the tip cut off. %u00a02 rounds to a cake. A squeeze of frosting goes on one, topped with another and given a little smoosh. A nice big dollop of frosting on top then%u2026.
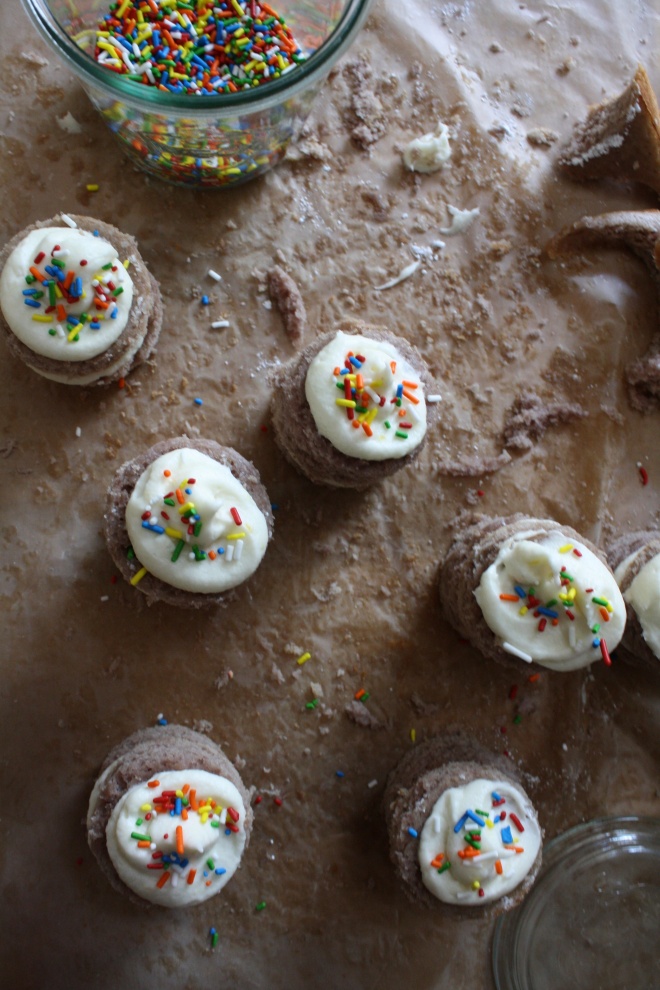 %u00a0Sprinkles!!!! %u00a0Or sliced %u00a0strawberries (my mom doesn’t like sprinkles..I know)
So freaking cute. I don’t know if I can make a normal cake again.
Mom gets the bigger 3 tiered cake.. and a few more of the little ones.%u00a0
HAPPY BIRTHDAY MOM!
-C
Strawberry Cake with Lemon Cream Cheese Frosting
makes 16 two tiers cupcakes or can be made in three 8 inch cake pans
The Cake
The Frosting
Preheat oven to 375
Grease a parchment lined %u00a013x18 high rimmed baking sheet and dust with flour. If you baking sheet isn’t as big as mine, use whatever size you have and make a few cupcakes on the side. Or make one , 3 tiered %u00a0cake with 8 inch cake pans. %u00a0I trust that you can find a way to bake all this cake batter.
Wash, trim and dice strawberries. Toss them in a medium sauce pan and sprinkle with 2 tablespoons of sugar. Place on low heat and cook for about 10 minutes %u00a0until %u00a0strawberries break down and turn into a thick syrup. Take of heat and let cool.
Combine flour, salt, baking powder and soda in a bowl and whisk together, In another large bowl, add butter and sugar together and beat on medium until light and fluffy. Add in oil, vanilla and eggs. Beat together. Now add the milk to the %u00a0strawberries and mix together. Beat in half the dry into the wet, add in half the strawberry mixture, then the rest of the dry, and finish off with the rest of the strawberry mixture.%u00a0
Pour batter into prepare baking sheet (or pans) and place in oven. Check cake after about 15 minutes and rotate to help insure an even bake. Bake for another 15- 20 minutes, or until cake %u00a0starts to turn golden brown and a tester (toothpick) comes out clean. %u00a0
Remove from oven and let completely cool. %u00a0(Not necessary, but once cake is cooled , wrap with plastic wrap and stick cake into the freezer of a little while before cutting the circles.. its makes it a little easier)
While cake is cooling, make the frosting. Place all ingredients in a big bowl and beat together until a nice soft but sturdy frosting forms. %u00a0If. you frosting seems to thick add in a %u00a0splash of milk. To thin.. add a little more sugar.%u00a0
When the cake is cooled, get to it. With you cookie or biscuit cuter dipped in powdered sugar, cut as many circles as you can.%u00a0
Fun Time!! Frost the cakes. Place frosting into a pastry bag, or like me, a large zip lock bag with the tip cut off. Partner up all the cake rounds and go through and give one of each of the pairs a good dollop of frosting. Top with the remaining cake, give it a lithe smooshto make sure they stick, and squeeze a nice dollop of frosting on top. Finish off with sliced strawberries and lots of sprinkles.
Sing Happy Birthday and eat!
So when my sister called and asked me to make something for my nephews bake sale to raise money for his basketball team, I couldn’t say no. (or I %u00a0didn’t want to say no cause any good excuse to bake right!) Plus I had just found this awesome recipe on one of my favorite blogs, my name is yeh, for home made Oreos that I have been super excited to try, so it kind of worked out. But before I committed to the Oreo, I wanted to just double check with my nephew and see what he might want me to make because it was his bake sale.%u00a0
This is the%u00a0conversation we had. And yes, it was through text.
Me- “Hey bud, what do you want me to make for your bake sale? Cupcakes, cookies, donuts, or brownies”
Jack- ” Yea!”
Me- “Yea what?”
Jack- “Make that.”
Me- “Make %u00a0what?%u2026.Hello!! What do you want me to make? Should I make Oreos?”
Jack- I WANT OREOS!”
Ok.. So it took a little while, but we got there. And after the %u00a0the basketball game and the super successful bake sale..
ME-“Did you see the Oreos?”
Jack- “What do you mean?”
Me- “The Oreos I made for the bake sale%u2026the ones you wanted me to make”
Jack- “There was a bake sale? I want Oreos”
Yup, that’s the attention span of my 13 year old nephew. Little shit head. But for real, I had so much fun making these cookies and I am definitely going to be making them again. Plus they were a super hit at the sale.
I am the best aunt! (and sister!)
When you have cut out your cookies, use a spatial and place them on a baking sheet. You can try to transfer with you hands, but you end up messing up the shape and most of them will break anyway.
Stick the cookies in the oven for about 15 minutes a batch and continute to roll and cut out the cookies until you have no dough left.%u00a0
Stacks of cookies%u2026 Sold to the highest bidder! I was told that they sold out within the first half hour at $1.50 a pop%u2026.Should have charged $5%u2026. for a good cause right?
And yes, even though he was being a space head and didn’t even care that I just %u00a0made him like 50 bucks for his team, I still saved the kid one.He just had to give me either a hug or 5 bucks for it.
I got a hug. (I really wanted the 5 dollars)
-C
From Scratch Oreo Cookies%u00a0
Adapted by Molly Yeh from My Name is Yeh!
The cookie (makes about 18 3 inch Oreos)
The filling
Cookies- In a large bowl cream together sugar and butter until light and fluffy. Add in vanilla and coffee and mix together. In another bowl, whisk together the flour, salt and cocoa powder. Add dry to wet and mix together unit a uniform dough forms. Dump out onto a lightly cocoa or powdered sugared surface and knead dough a few times. Split ball into two balls, place in bowl, and stick in the fridge for 15 or so minutes.
Preheat oven t0 325 degrees
When dough is chilled, remove one ball at a time, and roll dough out on a cocoa or powdered sugar dusted counter until its about 1/4 inch thick. With a round (any shape would work) cookie cutter, cut out as many cookies as you can. In between sits, dip cutter in a sugar and cocoa to keep the cookie from sticking. Transfer cut out cookies onto a baking sheet with a spatula. %u00a0Take scraps, roll into a ball, and roll out again. Keep doing that until you can’t cut out any more. (You can either bake a weird shape cookie or just eat the dough)
Bake cookies for about 15 minutes or until the cookie has risen a bit and the tops have lost their glossiness and look cooked. %u00a0Remove from oven and let cookies dry on a wire rack.
Make the filling
Filling- Beat together butter, sugar, vanilla, and cream until completely mixed and is at your optimal consistency. Add a drizzle more cream if you want to thin out or add more sugar for a thicker cream.%u00a0
Stick the filling into a piping bag or ziplock bag an snip the end. With cookies in pairs, pipe a big dollop of filling onto one of the two cookies. Place the naked cookie onto the filled cookie and give a smooth to distribute the filling.
lick your fingers and eat a cookie.%u00a0
If selling at a bake sale, charge $3 a cookie%u2026. If it’s for a good cause.%u00a0
First day of Spring!! Well kind of I guess. I think it actually starts at like 6:20 tonight, when the temperature is going to dip back done to 10.(Spring my ass) I don’t know about you people out there but here in Vermont, we are really hanging on to winter. I have to keep telling myself%u2026″ It will be warmer soon and you’ll be looking forward to this weather in a few months.. so stop bitching!” %u00a0I give myself good pep talks.
Anyway, last week at the farm share pick up, there was a nice little surprise. We got a few pounds of some sweet locally grown and milled whole wheat flour. There was a little sign with the information about the wheat and where it came from, but in my haste of gathering all of my other veggies, I failed to take notes and forgot the name of the farm that it came from. But I do know that my farm traded some celeriac for the wheat. %u00a0I was really excited because I am really into the idea of using locally grown grains and I don’t know, it just made me really happy, especially because it was a trade. %u00a0Food framing and local sharing is stuff that makes me happy.
I wanted to make something to kind of showcase the hearty, nutty flavor of the wheat and I also wanted to make something that my mister would eat for breakfast. Well what better way to do that then with muffins!%u00a0Banana coconut whole wheat%u00a0(that just happen to be vegan) Hearty, fruity, and smells like the word lovely and the color yellow.%u00a0A few to eat and a few to share. Hanging at home, running away or %u00a0getting ready for a day of spring cleaning%u2026.This is a great weekend to make muffins!%u00a0
The stuff%u2026 Light, nutty local whole wheat flour, ripe oh ripe bananas and coconut flakes are the stars in this muffin%u2026 But we need the other stuff too. Brown sugar, vanilla, coconut oil and a chia egg. %u00a0Baking powder, baking soda, and last but not least, salt.
%u00a0Yup, that sounds about right%u00a0 %u00a0The salt, baking soda, and baking powder are whisked together. The banana and all the rest of the stuff are mixed up%u2026 Then mix the wet mixture into the dry. Stir until combined and then add in the coconut flakes,Scoop mixture %u00a0into 12 lined muffin cups%u2026 A scoop like mine works very nicely. Don’t have one, well I recommend you get yourself one. Until then, use a spoon. Something I always do when baking any muffin is sprinkle the tops of each muffin with a bit of %u00a0sugar or brown sugar. It melts and caramelizes and adds a sweet little crunch to the tops.%u00a0
Now stick the muffins into the oven.%u00a0Remove from oven when they look like this, nice and golden brown. Also good idea to check with a tester stuck into the middle. When it comes out clean, they are done.12 happy little muffins cooling on a rack, waiting to be eaten with you mouth.%u00a0
Doesn’t the sight of pretty food make you happy, like sing a song happy?%u00a0Muffins, whoa yah!! %u00a0Friday yah yah!! %u00a0Spring%u2026What, Yah!! %u00a0Yah%u2026Yah Yah!!!
Terrible I know, but at least you were spared hearing my actual voice.%u00a0
Have a great weekend. Do lots of springy stuff!
-C
Preheat oven to 350
In a small bowl, mix 3 tablespoons warm water to the chia seeds and let sit for at least 5 minutes (10 is better) In a large bowl, peel and mash the bananas until they turn into a kind of chunky soupy puree. %u00a0Add in brown sugar, chia seed mixture, vanilla extract, and the melted coconut oil (make sure it’s melted or it won’t incorporate into the mixture) Mix together. In another bowl, whisk together the flour, baking soda, baking powder and salt. Mix the wet mixture with the dry until combined then mix in the coconut flakes.%u00a0
Line a 12 cup muffin tin and fill each cup about 3/4 the way up with batter. Sprinkle each muffin with brown sugar and place in oven on center rack. Bake for 25-30 minutes or until the tops 0f the muffins are golden brown and a tester inserted into the middle comes out clean.%u00a0
Remove muffins from tin and let cool.
Serve as is or maybe with a smudge of coconut butter, or anything you want really.
No need for fork, just use you mouth.
A few things I will bring in my hole:
But before I leave for my hole in the ground, I made these little cake bites to get my people through the weekend. Sweet little lemony bites of rich dense cake dipped into bittersweet chocolate. (I am just so nice) %u00a0They have all the pleasure or cake without the need of a fork and are much easier to give away then a big slice of cake. Plus, they are fun to make. My little sister helped and did most of the chocolate dipping. Then she and another little used their mouths to clean up the chocolate mess. It was an afternoon of chocolate all over the kitchen fun day.%u00a0
So make some bites to have and to share. Or if you, like me, are digging a hole to hide in, make a batch of bites to bring with you. That’s the beauty of cake covered in a harden chocolate shell, they travel really well.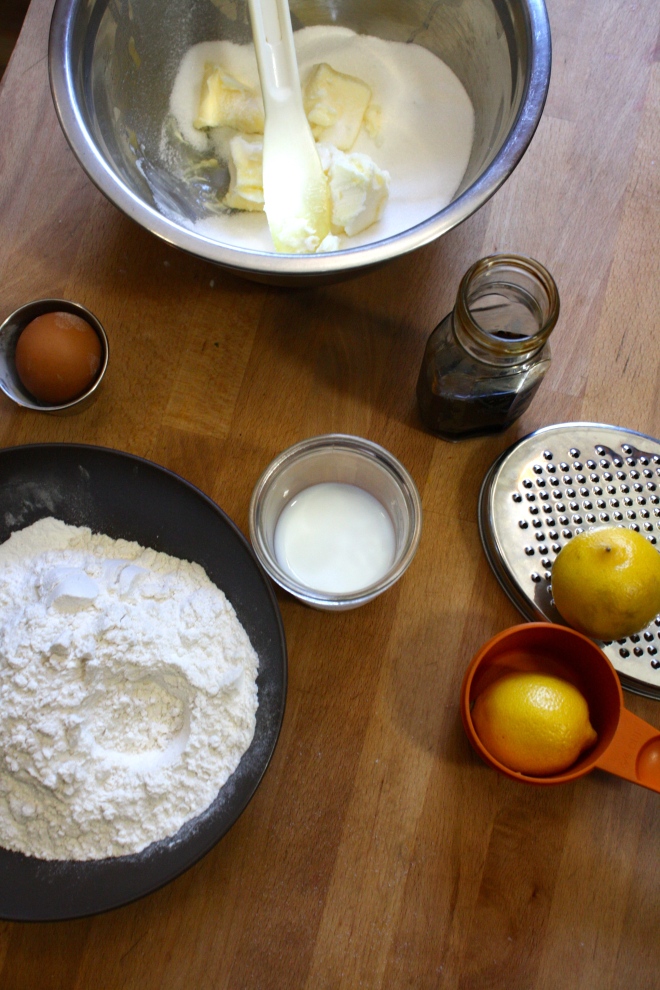 Simple lemon cake stuff. Flour, baking powder and salt whisked together, Sugar and soft butter in a bowl. An egg, some vanilla, milk, and of course, the lemon.%u00a0
To make the batter, cream the soften butter with the sugar until light and fluffy. Zest lemon(1 big or 2 small) into bowl with the juice of the lemon(s), the vanilla and the egg. Beat until combined. Now beat in the dry and then the milk. Keep beating for another minute until all mixed. Batter should be light and fluffy.
Batter goes into a greased and floured %u00a09x13 baking sheet and stuck into a 375 degree oven for about 30 minutes (You can use a 9×9 baking pan. Just bake fir another 10 minutes and you will end up with thicker bites). Remove from oven and let cool for a few minutes and flip to remove cake from baking sheet. Cut cake into small pieces (I cut 4×6%u00a0 %u00a0to get 24 bites) and place bake into sheet and into freezer (I stuck mine outside, it was -2 degrees ) for at least 2 hours.%u00a0
Oh what a lovely sister I have.. Look at her dunk%u2026.. like a boss! Fully coated and placed on a rack for the chocolate to harden. I %u00a0ended up sticking the rack in the freezer for 10 minutes%u2026They harder really fast in there.
And now you have some it, bites of cake covered in chocolate.%u00a01 bite, 2 bites%u20265 bites. Eat however many you want because its Friday and because there small little bites and just because you can.
Now if you need me, I’ll be in my hole.%u00a0
-C
Chocolate Lemon Cake Bite
Add butter %u00a0and sugar to a large bowl and beat on medium unit light and fluffy. Ass in vanilla egg, the zest of the lemon and the juice of the lemon. Beat to incorporate. Now beat in the dry and lastly the milk.
Grease and flour either a 9×9 pan or a 9×13 baking sheet. dump batter in and smooth out. %u00a0Stick in oven and bake for about 3o minutes or until a toothpick stuck into the middle comes out clean. Remove and let cool %u00a0for a few minutes on a %u00a0wire rack. Flip cake to remove from pan. Cut cake into bit sized pieces, 4×6 is a good size, and place back on baking sheet and stick into freezer for at least 2 hours.
When cake bites are as good as frozen, get the chocolate ready. Take the chocolate and the coconut oil and either melt in a double boiler or the microwave. Mix until smooth and make sure to full incorporate the oil. Now remove the cake bites from the freezer and dip each bite into chocolate, trying to full coat all sides. Stick onto a wire rack or a parchment lined pan to harden. They can be stuck back into the freezer to harden faster.
Once chocolate has harden, your good to go!