This past weekend was the annual Stem family reunion and I had signed up to bring a dessert to the circus, (circus being an event with lots of my family) I went out of my way to get the nieces, sweetest, most delicoius peaches and was planning on making them into some type of epic peachy peach cake, but being that the weekend turned into a shit storm, I didn’t get a chance to make that epic peach cake. So come Sunday morning, a few hours before we were suppose to leave for the reunion, I was deesertless.
So I did what anyone that has a bunch of the fruit, little time, and doesn’t want to make a big mess should do. I made a crisp.
And it was good. Gooey sweet and cardamon spiced peaches under a slightly sweet, oatie topping. A perfect dessert for a late summer afternoon. Served warm or at room tepature, add a little whipped cream or ice cream and a cup of coffee. Dessert time is perfect. And any left over makes for a fantastic breakfast treat….or just make it for breakfast, it’s totally a breakfast food too.
I am almost glad that I didn’t get a chance to make that cake.(although I really wanted to make a cake, just for shits and giggles) I’ll just make one later. But until then.
To the crisp!
The Stuff. Peaches of course and some old fashion rolled oats and a pinch of salt mixed with gluten free flour*. Some earth balance*, honey*, cardamon and cinnamon and a tiny bit or arrowroot powder
Notes.. You can totally use regular all purpose flour in place of gluten free. Also can sub regular butter for the earth balance and use maple syrup instead of honey..
In a bowl, mix/mush together the oats, flour, honey, half the cardamon and cinnamon, and earth balance. The mixture is going to be a little gloppy and wet, but that’s how you want it to be.
Toss the other half of the spices into the peaches with a bit of arrowroot powder or corn starch and mix all around.
If you peaches are not super yummy sweet, you can always drizzle in a little extra honey or maple here too.
Now place the peaches in a well greased oven safe skillet.
Distribute the topping all over.
And into the oven it goes..
After about 45 minutes, check for doneness. When top is all golden brown and nice… you are there!
. Ooey gooey peaches underneath all that golden crispy goodness….
Nailed it!
Have great day you guys! Crisp away!
-C
For the filling
4-5 Large ripe, but firm peaches
1 tablespoon corn or arrowroot starch
1 teaspoon cardamon
1/2 teaspoon cinnamon
tablespoon honey or maple (optional if peaches are not really sweet)
For the topping
1/3 earth balance or butter plus 1 tablespoon
1 1/2 cup old fashion rolled oats
1/2 cup gluten free flour or all purpose flour
1 teaspoon cardomon
1/2 teaspoon cinnamon
1/2 cup honey or maple
dash of salt
Preheat oven to 350
Slice peaches in half, remove pits, and cut into pieces and toss into a bowl with the cinnamon, cardamon and starch, In a large oven save skillet, smear or melt 1 tablespoon earth balance and cover bottom and sides of skillet. Add in the peach mixture. In a large mixing bowl, (using your hands if you don’t mind), mix together oats, flour, salt, spices, earth balance and honey. until a combined. Evenly disptuipt to the top of the peaches. Now place skillet into oven to bake. When the top golden brown and all crispy, remove from oven. Let cool for a few minutes and serve.
Some type of creamy situation like ice cream or whipped coconut cream would be extra nice here…but not necessary .
This past weekend, the mr, the pup, and I grabbed our stuff, chucked it into the back of the car and took of to the wood.
We ended up in Waterbury, at Little River State Park. Campsite 77 (the last one they had available!!) And from that we think, the best spot in the park.
First things first, set up camp. which involved the mr. popping up the tent and me making coffee and setting up the table.. Just cause we are in the woods doesn’t mean we can’t have a fruit bowl, right.
Then we spend the afternoon kicking around.. Into the woods we went. This place had so many hiking trails, we just let the pup lead the wayHe usually knows where he is going.
After a long afternoon of hiking and romping, we make our way back to our outdoor home for food. Dinner consisted of potato and sweet potato, squash and onions, kale, salsa and beans. It couldn’t have been any better. We did forget plates, but no matter, we managed.
Of course we needed to take an after dinner hike to the river and swim the pup. (We think he might be part fish)
He spent about an hour fetching stick and making sure that he couldn’t possibly smell any worse.
Playing with my camera and sticks. Then off to the tent for the three of us. (holy hell did the dog smell like shit)
Another morning hike and some time spent just hanging on the river. The mr fished, the pup swam and I collected rocks.
And then we went home, washed off the filth, and assed out…Then Washer got sick, but that’s a whole other story.
Camping is the best. I could live in a tent all year long. (not really all year long.. I would surely freeze to death)
So if you are thinking of camping, I highly recommend going to Little River State Park.
-C
This has been the week of broken things. My immersion blender broke. 2 of the 4 new bowls I bought were smashed. The hand mixer broke while I was making frosting (F**CK). The steam mop is finally completely broken and the mister smashed the screen on his phone. All in a weeks time. Oh, and not broken, but the front end of my car got stuck in a muddy sink hole. It took five badass farmers to help me push it out. It was crazy, but thankfully the car and I survived. But’s it cool. I can replace all that crap and my arms are getting a great workout now that I have to hand mix everything and hand wassh the floor on my hands and knees. ( I do it like a beast!) Because what I really am having a hard time with is that it is nearly April and still have most of my winter clothes out. I just want to but the boots away and get my chaco sandals out. It’s getting a bit ridiculous if you ask me.
Things I tell myself to keep from losing my shit
20 degrees.. That’t tropical compared to the -30 we were having
I will be bitching about how hot it is in just a few short months so try to enjoy the cold now.
Hopefully most of the mosquito population all dies this winter and only enough survive to be eaten by things that eat them
Because it still so cold, its ok to spend an entire day at home in my pjs baking cookies and bread and binge watching Kimmy Schmidt.
See.. there is a bright side.
Here is some cool internet stuff form the week
-Love this house and will some someday have plants in every nook and crank of my home. PEEK INSIDE WORLD’S END FARM + SAIPUA PLANT SALE
-I am ready to move into a tree, if only for a little while. This one would work for me
-I looked before I read. and didn’t realize what I was seeing. Behold! The Cosmos Created From The Contents Of A Kitchen
-The Most Effective Alarm Clock Ever Brews Your Morning Joe If only it came in jumbo size.
-I love/ hate this story. I get so excited for the produce that is marked down because its not perfect. If people realize how silly it is to look for “perfection in food” then I won’t get awesome stuff for cheap. Think Nobody Wants To Buy Ugly Fruits And Veggies? Think Again
And here are a few life pictures
WHAT WHAT!!! The first sign of green that I have seen in the neighborhood.
This little came over and hung out with me. I gave him a muffin and a bowl of “Carrot Chips” (really thinly sliced carrots) He at a few bites of the muffin but ate all the carrots and wanted more…… I love him!
Oh the old man trash dog. His butt hair is finally starting to grow back after he chewed himself a big hot spot. I love this pattern for a driveway.
March 29, 2011. Yeah sure we were in California, but still, we were camping outside.
COME ON SPRING!!!!And who doesn’t love a pineapple, or 4?
Have a fantastic Day!
We are looking at a high in the 30’s here in VT.. WA HOO!
-C
This week was the week. I am calling it (I know I shouldn’t, but I am) SPRING!!!!! I am so excited. Spring is my favorite season, full of warm sunny days, cold nights, lots of mud, lots of freshness, lots of new. Everything feels possible, not to mention all the spring cleaning! (I like to clean) And today we lost an hour of sleep but we gained an hour of sunshine. It”s all downhill from here.
A small list of happy spring stuff for the week
Start seeds
Open a window
Clean up the trash outside my house that was hidden by the snow
Pack away boots
Wash salt off of car
Eat dinner at 6 instead of 5
A bit of internet stuff from the week.
– I am a camper and need a new sleeping bags. I really want one of these bags SO BAD. Anyone is more than welcome to buy me one!
– Good stuff to know if. Snow Is Delicious. But Is It Dangerous To Eat?
– MOORTEN BOTANICAL GARDEN…Love
– Another one of those things I want but will never get. The Aether Cone.
-For India’s Widows, A Riot Of Color, An Act Of Liberation.. The pictures are beautiful, as is the story behind them.
-Ben and Jerry’s would consider making pot-flavored ice cream. Well yeah.
This weeks pictures are all old, but they make me happy.
One year ago.. Making snow people with some littles.
Holy cuties! They were so small and innocent. Now they are just little monsters (in the best way)The mister and the bees.
I am trying to find some cheap tickets fly out to the coast. Miss the big trees (that’s our old car, which I also miss)
No flowers this week, but for sure lots and lots of colorful veggies
That’s what I got, now get outside and enjoy the day!
Ugh. It has been so nasty gross out. A four day heat wave, and no, not just hot hot days, but those gross, hot hot with all the humidity in the world, kind of days. My body has rebelled and turned into a slug and my hair… well let’s not talk about my hair.
Yup, it’s been way to freaking hot to do anything, especially cook. And eating food is’t even especially appealing either (living off raw kale and, yes, lots of tomatoes at the moment) . What we all want is to drink something nice and cold and refreshing (and boozy). And what do I do when I want this, and have a lot of that? I turn that into this. That being tomatoes, and this, being a cold drink. Did that confuse you?
What I am trying to say is that I have a butt load of cherry tomatoes to eat but what I really want is a cold drink. So I took the tomatoes and make them into a lemonade. And it is amazing. It hits all the end of summer, super gross heatwave, I don’t want to move, spots that needed to be hit. And just in time for the weekend sow e get to add a little splash or two of something hard, cause we all know that after this past week, we all deserve it.
Think that combination sounds weird? Well don’t cause lemons and tomatoes are perfectly paired together. Tart and tangy, but still with a bit of sweetness from the tomatoes ( especially if using a sweeter variety like the sun-gold). It really is a great, refreshing drink, with or without the booze. A perfect match!
Tomato lemonade here we go!
The stuff. Tomatoes ( I used sun-gold cherry cause I have a buttload, but you can sure use whatever tomato you have to many of), lemons, water, and if your into it vodka.
Note. The mr. and I are not big on sweet drinks, so I didn’t add any sweetener, the tomatoes being sweet enough. But feel free to add a little sugar or honey to yours.
Start by dumping tomatoes into a pot with water. Stick on high heat and bring to boil, then turn heat to medium low,stick a lid on pot, and let tomatoes simmer for a little while.
About 30 ish minutes later, the tomatoes have reduced to about 1/3 of what you started with and have turned into a a chunky like syrup.
Strain the juice from the solids into a big pitcher.
Tomato juice! and it’s so pretty bright gold. Now let it cool far a little bit.
And while juice is cooling, juice your lemons
When the tomato juice is cooled off, add the lemon juice to the tomato.
Add water and stir
Taste, and if you think it need sweetener, by all means, add a drizzle or two of some honey or spoonful of sugar.
A couple of glasses of ice, and if you shall,, a shot of vodka (add the shot to the glass, not the pitcher)
Me being so fancy added a garnish/snack. Basil leaf and cherry tomato skewer looks so nice.
And sit back, put your feet up. and take it all in.
Weekend here we come!
-C
2 cups cherry tomatoes (can use 2 cups of any tomato)
1 cup fresh lemon juice (4-5 lemons)
1 cup water plus 3 1/2 -4 cups water
a few basil leaves and extra tomatoes for garnish (optional)
Note. I did not add any sweetener to my lemonade but you could totally add in a few tablespoons honey or sugar. Do what floats your boat.
Dump tomatoes into a pot with 1 cup of water. Bring to boil then cover and turn heat to a medium low heat. Cook tomatoes down for about 30 minutes or until the tomatoes have reduced about 1/3 and is almost sauce like.
Using a fine mesh strainer, strain the tomato mixture into pitcher or jug that you can serve your drinks from. Use a wood spoon or spatula to scrap the tomato around strainer to really make sure you get all the juicy goodness. Let tomato juice cool.
While cooling, juice lemons until you get a cup of fresh lemon juice. Add lemon juice to cool tomato juice along with 3 1/2 cups water. Mix and taste. If you think it needs a little sweetener, add a little in. If you think it tastes to strong, add in more water.
Good stir, ice in cups, a 2-3oz shot of vodka per 8-12oz cup of lemonade (the ratio is up to you my friend)… and your sitting pretty. Feeling a little fancy, take a basil leaf and wrap around a cherry tomato. Stab it with a tooth pick and garnish your drink. It ames for anise snack too.
I figured now is a good time to get this recipe out there before we get to far into spring and summer recipes because there is going to be a lot of banana ice cream filled recipe coming and I figured its a good idea to have the basic banana ice cream recipe ready for people to refer too. And because I made so much fantastic naner ice cream, I also made a cookies and cream naner ice cream for my sisters and the mister.
Comments that I got from my sisters and the mister when I made them this ice cream
-Sister one.”I give this my sister seal of approval.. It’s so good. The first dessert you have made that I liked! (not including all the other desserts that you have made that I liked)”
-Sister two- “Wow.. it looks like ice cream and feels like ice cream and tastes like ice cream.. You should make me this ice cream!” (I was confused too because I was pretty sure I just made her some)
-The mister- “I am so excited for my new fly fishing pole!”
Ok, so the naner ice cream isn’t new to the mister and he IS very much excited for his new fly fish pole. So excited that he forgot to tell me how amazing that I am and to thank me for making him a big bowl of yumminess. (It’s ok, I forgive him)
And yes, this is probably one of the easiest, most delicious, healthy and amazing frozen dessert that you will ever eat. You will probably find yourself buying mass amounts of bananas and stocking the freezer until things just start falling out. (which is also ok because it’s only bananas and you can’t have too many frozen bananas)
The stuff you need for this ice cream…. Nice and ripe bananas, peeled and then frozen* That’s it.
To make it, place frozen bananas into food processor and hit the on button. Process the crap out of the namers until nice and silky smooth.
*Note, the smaller the frozen chunks are , the faster and maybe a little easier for the blender to blend the naners into ice cream. So if you think of it, chop bananas into pieces before freezing or even after.
After all blended and smooth, either eat right away or scoop ice cream into a freezer safe container and stick in freezer. That’s the banana ice cream… And it is amazing and so so so so so addictive. I make a batch, think I am only going to eat a scoop, then find myself eating half of what I have made, but it’s ok cause it’s only bananas.
Now for the cookies and cream banana ice cream..One batch of banana ice cream, either freshly made, still in food processor or made ahead and placed in a food processor and given a good pulse to smooth it up.
Add cookies in, crushing a bit beforehand and pulse till combined. Now you have cookies and cream naner ice cream…. and everybody is happy.
Scoop into a cup, a bowl, a freezer safe container, or directly into your mouth. Be careful…. You can still get brain freeze from eating naner ice cream too fast!
Keep it real hump day drum bum!
-C
Basic Banana Ice Cream
Makes one batch. Good for 3-4 servings
4-5 ripe bananas peeled and frozen
Peel bananas and stick in a freezer bag or container and freeze. When bananas are completely frozen, break into pieces and stick into a food processor or blender and puree until silky smooth.
Eat right away or scoop into a freezer safe container for later.
Cookies and Cream Banana Ice Cream
1 batch banana ice cream
5-10 (depending on your cookie need) cream filled cookies like oreos or Trader Joe’s Joe Joe’s (These are gluten free)
In a food processor, blend banana ice cream with cookies.
Eat right away, with a utensil of choice in a container of choice.
I was informed yesterday that if I was going to make tortilla chips, that I better make some sweet ass dips to go with them. I kind of agree… tortilla chips need dip… or better yet, two dips. Queso and guacamole. It’s what needed to be done, and so I did it.
Guacamole is amazing… anything avocado is amazing…this guacamole is amazing. White bean guacamole is amazing. And not that we really care, but this guac is half the fat then straight up guacamole. Plus it’s packed full of protein making it a kind of super duper, must eat all of it, kind of dip. And sweet potato anything will make me happy. Making queso dip with sweet potato and cauliflower is probably one of my best food combos so far. (after eating a butt load, I felt like I was a genius and made an amazing discovery) Again, not that we need it to be, but this is also a fat-free, vegan, gluten-free, super healthy, packed full of B12, fiber and nutrients, dip for all kind of dip.…. just another reason why you cannot feel bad when you finish off half a batch before you get a chance to stick it in a serving bowl. (I might have done that)
Here is what you need for a good time:
−These tortilla chips ….Check.
−Some Chopped Veggies (I want the veggies)…..Check
−Cauliflower Sweet Potato Queso.…Check.
−White Bean Guacamole…Check.
You are now ready for it. It being this party, that party, the Super Bowl, or a Wednesday afternoon.
To the left we have the makings for the cauliflower sweet potato queso.. Steamed cauliflower, a baked sweet potato, nutritional yeast, garlic, and chopped up red onion, red bell pepper and jalapeño. To make all you need to do it take the chopped peppers, onion, and garlic and sauté for a few minutes just to slightly soften and bring out flavors. While that’s going on, take the steamed cauliflower and sweet potato(skin off..but eat it, or save it for soup or feed it to the dog) and puree together with a blender or food processor. Add in nutritional yeast, about a tablespoon or two of hot water and, salt and pepper to taste. Blend for about 5 minutes until super creamy smooth. Add in sautéed stuff and pulse just enough to incorporated the veggies but not complete blend in. Stick in a bowl.
To the right we have white bean guacamole stuff. Two cups (or one can) rinsed white beans, one ripe avocado, a lime, a few cloves of garlic,(I also added a bit of garlic powered…I like my garlic) and some chopped up red onion and tomato. Place beans, garlic, avocado and lime juice in a blender or food processor and blend until smooth. Add salt to taste and toss in the chopped tomato and onion. Blend for sec to mix that in…Stick in a bowl
Perfect…
To think that both of these dips took about 10 minutes total to make. (I had pre baked the cauliflower and sweet potato) And for real, I would spend much more time if I had too because both of these dips are so freaking good, I definitely will be making these on the regular.
So there , dips for those sweet ass chips or whatever you want to dip or them spread them on.
And he guys…It’s FRIDAY! Have a fantastic day!
-C
White Bean Guacamole
2 cups white beans (or 1 can) rinsed and drained
1 ripe avocado
3 cloves garlic
1 lime
1/4 small red onion
1 small tomato
1-2 teaspoons salt
Finley chop onion and tomato. Set aside. Place the beans, avocado, garlic, garlic powder, 1 teaspoon salt and the juice from one lime into a blender or food processor and blend until smooth. Add a splash of water if needed to help keep things moving. Taste and add more salt if needed. When smooth, add the onion and tomato and pulse a few times to mix in. Scoop into a serving dish and finish with a squeeze of lime and a bit of chopped onion and tomato.
Cauliflower Sweet Potato Queso
1 1/2 cups pre cooked steamed or roasted cauliflower
1 medium pre baked sweet potato
1/2 cup nutritional yeast
1-2 tablespoons hot water
1/2 a small red pepper
1/4 small red onion
1 jalapeño
3 cloves garlic
salt and pepper
Finely dice the red pepper, jalapeño, onion and garlic and sauté in a skillet for a few minutes until slightly soften and fragrant. Take the pre-cooked cauliflower, sweet potato (skin removed), and nutritional yeast and place in a blender or food processor. Blend for about 5 minutes until creamy and smooth. Add in a tablespoon of water to keep things moving. When completely smooth, add in sautéed veggies and pulse a few times to combine. Scoop into a serving dish. If your feeling it, top with scallions and cracked pepper.
Serve dips with chips, veggies or anything you want. Also make great spreads for sandwiches and crackers too!
Maybe you, like me, went a did a little strawberry picking this past weekend. And maybe you, like me, pick so so many that now you have an overload of the most perfect, if not slightly too ripe strawberries staring at you, waiting to be eaten or, at the very least, cooked into some magical cake, pie, cookie, or whatever. But lets face it, its Monday and maybe we do not exactly feel the need (or have the time) to make a cake, pie, cookie or whatever tonight. So that leaves us with a crap load of strawberries that need to be dealt with.
And sure, we can freeze them, but maybe you, like me, already have a freezer full of other stuff. And just because we don’t want to bake a cake, pie, cookies, or whatever tonight, doesn’t mean we don’t want something amazingly tasty and fantastic.
So that brings us to this super easy, oh so pretty, and ever so tasty way to move those strawberries….. Stick them in the oven and roast them. So simple and really truly amazing. When strawberries are roasted, they turn so tender and fall apart and release all of their juices that turn into a sweet syrup. They become almost jam like, but the flavors are way better, more complex. And there is no need for added sugar or any other stuff because the flavors and natural sweetness of the roasted strawberries stand on their own.
A few ways to which you might want to use roasted strawberries that will make your life better: Dump onto ice cream, yogurt, or make a strawberry shortcake or a strawberry fool. Scoop onto a green salad, mix into a bowl of quinoa, marinate some tofu, or add to roasted veggies. You can mix into muffin batter, into oatmeal, or add to a layer cake. They make a fantastic PB and J and the syrup in seltzer is a tasty drink. You can pretty much use them for anything. But MY favorite way to consume these…a bowl, a little spoon, and my mouth. Nothing else needed.
And if you didn’t happen to go strawberry picking this weekend. It’s cool, just pick some up from the closest farm stand near you. You can tell all your anyone thats asks that you picked them yourself. (not a lie, just a stretch cause you did, in fact, pick them up yourself)
Yea for Monday and for roasted strawberries! (Or at least yea for strawberries.)
All you need…A big (or small) bowl of strawberries.
Rinse those pretties and place them on a parchment lines baking sheet. (don’t skip parchment… these suckers get super thick and juicy.)
Here is the thing. These strawberries are picked from the lovely farm I get my CSA from.(How badass is it that we have a PYO part of the share). They are not like super market berries that are extra firm with dirty unappealing green tops. These little organic lovelys have tender little green tops…. I eat them. If you do not wish to eat the greens, just top the berry off before roasting.
So the berries, stick them in the oven at 450 degrees and roast them for about 35-45 minutes (depending on the size of your berries)
Pull them out when they start to get dark and slightly charred and the juice is thick and bubbly.
And scrap the berries, juice and all, right into a jar.
Eat with anything, everything and with nothing at all.
Happy Monday
-C
strawberries of any quantity
Place strawberries, with or without tops (your preference) on a parchment lined baking sheet. Place in a 450 degree oven and roasted foe about 45 minutes or until the berries are soft, mushy, starting to charr and have lots of bubbly juice, . When done, remove from oven and let cooll for for about 5 minutes. Transfer berries, juice and all, into jar.
Eat right away or stick in fridge. Juices thicken up when cooled.
Keeps about a week in fridge, but I highly doubt it will last the night.
And for your Friday, I made these awesome little raw/ vegan/ gluten free cookies.
Now wait a minute. Don’t let all the labels of what is not in these cookies scare you away. Just focus on all the stuff that these cookies are made of. Almonds, Cashews, Coconut, Cocoa, Oatmeal. They are cookies made with lots of good yummy stuff that just happened to be enjoyed by those with specific food diets as well as those who eat anything. A cookie for all! See, don’t they sound excellent? Yes, yes they do. And they are good. So, so, good. Even the mr. is into them. And he is far from being raw/vegan/ gluten free.
And because these cookies are made with all sorts of good for you stuff (lots of proteins, good healthy fats, and complex carbs) you can pretty much feel zero percent guilt eating them. They a are a no joke, healthy, energy packed cookies of goodness. A fantastic way to start the morning, eat with lunch, as dessert, post work out, or eat as a late night snack. (Just don’t eat them all at once)
Now go for it!
The raw stuff. A cup of old fashion rolled oat that have been soaking in water for about an hour. Almonds(which I spent 20 minutes deshelling) cashews, dehydrated coconut flakes, some cocoa powder and a few medjool date. If your nuts are unsalted, add a pinch of salt too.
Dump everything into a food processor. BUT WAIT! Make sure to remove the pits from the dates)I have broken a blade in the past form a date pit)
Blend unit combined and a kind of rough dough is formed. It will be a little sticky. If it;s to sticky to handle, place into the fridge for a few minutes to set up.
Now take blobs of mixture and roll into balls
And you could totally leave them as balls… you can even play with your balls….
But I think they look nicer squished flat and topped with pieces of nuts and coconut. They look almost fancy, if I do say so myself.
Now have yourself a cookie, and place the rest in the fridge (they get harder and, if you can imagine, taste even better after a few hours of cold)
Freak Yeah FRIDAY! Do fu stuff!
-C
Makes 15 normal sized cookies (you can make more or less, depending on the ball size)
1 cups oat fashion oats soaked in 1 cup water for at least an hour (use gluten free oats if needed)
1/2 cup raw almonds
1/2 cup raw cashews
5-6 medjool dates
1/2 cup dehydrated flaked coconut
1/4 cup cocoa powder
a pinch of salt (if your nuts are unsalted)
Add all the ingredients into a food processer and blend until the mixer forms a cohesive dough. It;s going to be a tad sticky, but if it seems to sticky to handle, refrigerate for a little bit so it’s easier to handle. (I have no problem handling right away)
Scoop and roll into balls and either leave them as is or squish them flat. Sprinkle with chopped nuts and coconut
Eat one or two right away, then stick the rest in fridge.
A ok to eat as breakfast, with lunch, at dinner, as as snack, a post workout protein, or when sitting on the couch and watching TV.
This week started with the notion that I was going to make a big dish of potato salad. I boiled the potatoes so that they would be ready when I needed them and stuck them in a bowl in fridge. That was Sunday. Monday was super busy and I didn’t get a chance to get to the potaoes, but that was ok, I figured I would just make it the for Tuesday. (which has officially been dubbed family dinner night). But for the first time, my sister declined potatoes and said she was already making goulash, which turned out that no one really wanted to eat. (I bet they would have eaten the potato salad) And Wednesday we were in Montreal so no go there.
So last night (now Thursday) when I opened the fridge to contemplate the dinner options, I knew that whatever I was going to make, the potatoes had to be used. I could have made the potato salad that I had been planning on making all week, but the potaotes were a little on the weird side, not bad, just not the best. They needed to be cooked. Plus, I had eaten the avocados and tomatoes that I had planned on using for the potatoes so I think it just wasn’t meant to be. I was tired, so nothing to elaborate was going to happen. I wasn’t feeling like spending too much time in the kitchen cause I really wanted to bike to the garden. I already had my giant dinner salad made and the mr. was pretty hungry, so split decision.
Cheesey nacho potatoes
That mr.. he has got it made with me.
The stuff. Sliced up cold boiled potatoes, cheese, garlic and onion powder, salt and pepper. and a little bit of oil. And we need guacamole, salsa, something spicy in the form of jalapeño jam (I use it on everything!) and a bunch of fresh cilantro.
Spread the sliced potatoes on a lightly oiled baking sheet and drizzle with a tad bit more oil. Sprinkle with the spices and salt and pepper and pop those suckers into the oven.
Once the poatoes turn a golden brown and are all crispy, remove from the oven and sprinkle on the shredded cheese. Toss on a few spoonfuls of salsa, and add on the jalapeños. Pop back into the oven for another minutes or two until the cheese is all melty.
And cover the potatoes with lots of freshly chopped cilantro.
Serve with extra salsa, guacamole and if you have it, more jalapeño jam.
I was thinking that I would totally make these for my dad this Sunday, if he didn’t live all the way in Michigan. (I think it’s time to move back!!!)
Happy Friday..Have an excellent weekend!
-C
4-5 boiled potatoes the size of lemons (or 2 big ones)
1/2 to 3/4 cups shredded cheese (I used cheddar and can easily be made with vegan cheese)
heaping teaspoon garlic powder
heaping teaspoon onion powder
salt and pepper
olive oil
salsa
fresh cilantro (or if you hate it, some kind of fresh herb)*
guacamole*
jalapeños (or something spicy)*
*note.. These last three ingredients are optional, but you should definitely use them all.
Turn the oven on to 425 degrees
Thinly slice potatoes and place on a lightly oiled baking sheet. Drizzle with a bit more oil and sprinkle with the garlic and onion powder, salt and pepper. Stick into oven until potatoes are brown and crispy. Remove from the oven, sprinkle on the cheese, toss on the jalapeños and some globs of salsa. Place back into oven for a minutes or two or until the cheese is all melty.
Remove from oven and cover with a handful of freshly chopped cilantro.
Serve with more salsa, guacamole, and more jalapeños.
If eating all yourself, eat directly from baking sheet or if sharing, transfer onto a plates. (or eat from the baking sheet..less dishes, more conversation) Forks and fingers work equally.
Last week I bought this nice hunk of locally made tofu to bring to my sisters for dinner. I was planning on making T.A.L.T.’s, but when I told her what I planned on making, she turned it down. She asked, ” is there bacon with that? If not, I don’t really feel like tofu”. And I was like, “No there is not F**king bacon….. when did I mention bacon?”
We still went over for dinner, Just me,her,and the Mr. I brought myself a big salad. The other two ended up eating a frozen pizza and blue cheese dressing (I think they might have eaten dressing with a little bit of pizza…barf) But whatever, her lose, cause I made the T.A.L.T.’s a few days later. They were amazing (the tofu was soo good!) and I am pretty sure she would have loved them. Oh well, now she will just have to make them for herself if she ever decided to she wants one.
So here.. To everyone and to Shannon….. How to make a T.A.L.T. .. There is NO BACON!
The stuff… Some nice firm tofu, half a ripe avocado,lettuce (I used baby greens), and some sliced up fresh and tasty tomato. To spice up the tofu, we use galic powder, salt pepper, and a nice smokey paprika. Oh.. and a big hunk of a soft and crusty baguette to stick it all in.
To get this TALT going, thinly slice up as about a 1/3 of a block of tofu. (for one sandwich) Or slice up the whole thing to make more sandwiches.
On a plate or in a bowl, mix together the garlic powder, paprika and a little salt and pepper. Gently dredge both sides of each piece in the mixute.
Paprika is so bright and pretty.
Place the tofu in a lightly oiled and preheated skillet on medium heat. Cook each side until crispy and golden brown.
Slice you bread open and toast if you want. Scoop avocado onto the bread( a little on both sides). Add the tomato and the seasoned tofu and last but not least, pile on the greens.
TA DA! A Sandwich… a damn good one at that .
-C
Makes on 6-8 inch sandwich
1/3 block of extra firm tofu*
1/2 of a ripe avocado
1 small tomato thinly slices
a handful of baby greens or a few lettuce leaves
A 6-8inch hunk of a soft and crusty baguette (use a gluten free bread of choice if needed)
1 tablespoon SMOKEY paprika*
1 tablespoon garlic powder*
salt and pepper.*
*Note.. This is enough for one sandwich. If making more then one, use the whole block, or even if you not, you might as well cook the whole thing for and have some extra for later use. If you do cook it all, just add another tablespoon or so of the paprika and the garlic powder.
Remove tofu from package and stick between a clean dish towel. Press as much liquid out as you can without smooshing it. Cut tofu into 1/4 inch thick slabs. Mix the spices with a pinch of salt and pepper in a shall bowl or plate and dredge both side of the tofu in the mixture. Lightly oil and preheat a skillet to medium heat. When the tofu is seasoned, stick onto skillet and cook each side until crispy and brown. Remove from heat and let cool for a minute. (If you like you tofu a little more on the crunchy and dried out side you can stick the tofu in the oven for a few minutes)
To assemble. Slice bread, toast if you want. Place equal amounts of avocado on each side of bread. Layer on the sliced tomatoes, the cooked tofu and add on the greens. Close up sandwich and place on a plate.
Bite, chew, swallow.
Smile
You ever make dish, completely on the fly, just to use something up (I have a lot of ripe tomatoes) with no real expectation, just because… Then have it be one of the best freaking things that you have ever made? This salad is one of those things.. maybe not the best thing I have ever made, but definitely the best salad I have ever made…. this week.
A salad compiled of all things amazing, taking just a few minutes to make and is the perfect balance of uber fresh with baby spinach, raw kale, and crunchy quick pickled onions. Then adding a touch of warmth with the sweet and juicy seared tomatoes and big chunks of creamy avocado.
I mean, for reals. ……Best Salad Ever !!!! (this week)
Now let’s do this.
The Stuff. A big bowl of baby spinach and chopped up kale, a few sliced up roma tomatoes, some super thinly sliced red onion, half an avocado, red wine vinegar and salt and pepper. Before you do anything, place the sliced onions into bowl, sprinkle with a pinch of salt and add a few glugs of the red wine vinegar. You want the onions to sit in the vinegar for at least 5 minutes on the counter cause the longer they sit the more crispy pickly they get. (after eating onions like this, you will never want to eat them any other way) Lightly oil a skillet and preheat to a medium heat. Once the skillet is hot, sprinkle the tomato slices with salt and pepper and place tomatoes right on in, snugly, but not overlapping. Let cook for about 3-4 minutes, or until the bottoms start to brown. Flip and cook other side for another few minutes.Once the tomatoes are seared on both sides, remove them gently from skillet and toss them on top of the bowl of greens.
Take the pickled onions and toss those right on top, with any of the residual vinegar, add dice and scoop the half of avocado and toss that on in as well.And now eat the best salad ever (this week).
Make the day good!
-C
Skillet Seared Tomato and Quick Pickled Onion Salad
Serves 2 as a side, 1 for a hungry eater
2 large or 3 smaller roma tomatoes
1/2 of a red onion
2-3 tablespoons red wine vinegar
1 1/2 cups baby spinach
1 1/2 cups chopped kale
salt pepper
1/2 a ripe avocado
olive oil (to grease pan)
Thinly slice red onion and place in a bowl. Add vinegar into a and sprinkle with salt. Let sit on counter for at least 5 minutes, if not longer,
Slice tomatoes into 1/2 inch thick rounds and sprinkle with a pitch or salt and pepper. Lightly oil a skillet and preheat it on medium heat. Once the skillet is preheated, stick the tomatoes on it (watch out for splattering tomato juice) Cook first side for about 3 minutes or until the bottom has browned, then flip and do the same for other side.
One tomatoes are seared, place directly onto the greens. Now dump the pickled onions and residual vinegar on top. And dice up avocado and add that on top too.
Now eat your salad, fork or fingers…
And I know, ba-daaaamn. So good.
A couple of days ago, during a grocery store porous, I stumbles upon a produce item that I have not seen sold in stores before, Broccoli leaf. And I was kind of surprised to see that they were selling bunches of the leaf, organic, at 2 bucks a bunch. I was very excited ! But wait.. You can eat broccoli leaves? Heck yes you can! Broccoli leaves are fantastic. They taste kind of like broccoli, have a hearty texture like a collard, and can be used raw or cooked just like any other green. Its just one more super yummy green to add to your repertoire. So when I bring home something that I find to be a good score, like a bunch of broccoli leaves, I feel like I have to share it with the mister. (I am so nice) And this dish was how I shared them…. Tossed into a bowl of garlic raging pasta. The stuff…. A bunch of broccoli leaves, lots of garlic, pasta, olive oil, salt and a lemon. Pretty simple right? Fist off, get your water boiling for the pasta. Once its ready, drop a pinch of salt into the water and stick pasta in for the amount of time recommend by pasta box people. While the pasta is boiling, mince up the garlic (I used my garlic press) into a skillet and add in the oil. Stick on a burner on medium for a few minutes, stirring around to make sure the garlic doesn’t stick and burn. Once you start to smell the garlic, turn heat onto low, chop up the broccoli leaves (stems and all) and stir around until wilted and add in the juice of half a the lemon.When the pasta is cooked, remove a few tablespoons of starchy water and strain the noodles. Add water and pasta right into the skillet with the other stuff. Toss around, taste, season with salt and pepper. Go ahead and add some chopped tomato and or parmesan cheese if you want. And serve your amazingly amazing pasta. And make sure that you are ok with really smelly garlic breath…Casue it’s going to happen. Keep it good! -C
2 servings of your favorite pasta (spaghetti, penne, vegan, gluten free…..)
8 or so fresh garlic cloves
1/4 cup olive oil
salt and pepper
lemon (optional)
parmesan cheese (optional)
Start by bringing a pot of water to a boil with a pinch of salt. Add in pasta and cook per instructions on box. While pasta is cooking, mined garlic and add to a skillet with the oil. Place on a burner on medium heat and cook and stir until the garlic becomes fragrant. Chop the broccoli leaves (stems and all) into bit sized pieces and add to the garlic oil and toss around to wilt the leaves. Squeeze in some lemon juice. Once the pasta is done cooking, remove a few tablespoons of the starchy water and strain the pasta. Add the water and the noodles to the skillet, toss to evenly coat the pasta and call it down. Serve in a bowl or on a plate, topped with freshly chopped tomatoes and parmesan cheese if you so shall please and another little squeeze of lemon juice if you like. Watch your mouth.. it will be breathing out garlic like whoa.
My contribution to last nights dinner at my sisters…. Freshy fresh veggies spring rolls.I had about 30 minutes between work and getting over to my sisters house to throw something together so it needed to be something fast, easy, and something I could make without going to the store. She was making the main course (some teriyaki situation and rice) so I was doing up the veggies.
I had just bought a package of spring roll wrappers…. Bingo! The perfect and logical choice. I grab the wrappers, a variety of veggies and after spending 12 of my 30 minutes trying to scrub the oil based paint off of my face and hands, I still managed to completely prepare, construct, and take pictures of these lovely tasty spring rolls. and get over to my sisters in time for dinner.
Impressed?
Damn right!
The stuff. Carrot, beet, asparagus, red cabbage, and kohlrabi, which all (except asparagus, which I just cut into thirds) got cut into matchstick sized pieces with my mandoiln. Then there are the rice spring roll wrappers that we need to make the veggies into rolls. Also a bit of red wine vinegar to drizzle onto the veggies for a little extra zing. And lastly, soy, fresh ginger, and a couple cloves of garlic for a spicy salty dipping sauce.Start by having everything set out and ready to assemble. Fill a large shallow dish or baking sheet with really warm water. Working with one at a time,place a rice wrapper into water and let sit for about 10 seconds or until the paper starts to soften. Remove from water and place on a damp surface (just splash a little water on the counter) Take a little bit of everything and and place on the lower middle part of the paper. Fold in the sides first, then tuck and roll the wrapper as tightly as you can without ripping the wrapper.
Repeat until you have used up all you veggies.For the dipping sauce. Finely grate ginger and garlic and add to soy sauce. Stir… and it’s done.Freshy, pretty and fantastically delicious. And for real, took about 8 minutes to make. (I even had enough time to wash the dishes before we left!)
I am so awesome!
Hump Day Pow!!!!!
-C
Fresh Veggies Spring Rolls
Makes 8-10 but can easily be increased or decreased to desired amount
8-1o rice spring roll papers
Splash of Red wine or rice vinegar
1/4 cup soy or tamari sauce
2 cloves of garlic
teaspoon freshly grated ginger
1 medium carrot
1 medium beet
1/4 head of purple cabbage
10 thin fresh asparagus
1 small kohlrabi
Note… I used the veggies that I had in the fridge at the moment. If you have a bunch of veggies but not these particular ones, use what you have. Pretty much all veggies taste good inside a spring roll!
Gather your veggies and prep by either using a mandolin, a grater, or some sick knife skills, and julienne, shred, or slice you veggies into thin match sticks. Once all the veggies are prepared, sprinkle a little vinegar over the top.
For the rolls…Grab a large shallow vessel (a rimmed baking sheet works great) and add in warm water. Working one at a time, place the wrapper into the water for about 10 seconds or until the wrapper starts to soften. Remove and spread onto a clean, damp work surface. Gather a bit of each veggie that you are adding and place towards the bottom middle of the wrapper. Now fold the sides in over the pile of veggies. Then with the side closest to you, tuck and roll wrapper away from you, trying to keep it tight, but not to tight that it rips.. (Hopefully that makes since.) Place finished rolls onto a damp surface to keep from sticking and if not serving right away, drape with a damp towel or paper towel to keep from drying out.
For the soy ginger dipping sauce. Add grated ginger, minced garlic, and soy into a bowl and mix together. Serve with spring rolls.
Eat one, two, or a plateful. It’s nice to share but not a necessity.
My winter farm share is coming to an end this week. One more pick and then a three week stretch until the summer share starts… WHAT AM I GOING TO DO!!! Stock up as much as I can is what.
I have been strategic about the roots and veggies that I have chosen to bring home the past few weeks.(My farm lets you pick what you want) I know what I can buy at the store, things like carrots and potatoes, so I have been passing those up, but the roots like beets and celeriac… I have been bringing home baskets of those and hoarding them in the fridge and basement in preparation for the laps in farm fresh food and knowing that if I want to by these at the store it s going to coast me a million dollars a pound. (a for real million dollars)
Yup, lots of roots around here, especially celeriac root which is fantastic. I am kind of obsessed with celeriac, with its fibrous, knobby exterior, soft but almost meaty texture inside, and a flavor that is close to celery but so much better. I don’t know why it has taken me so long to do a posting featuring this amazing root vegetable (I eat it almost every day)
So here, an amazingly tasty, hearty but not heavy, celeriac recipe. Perfect for spring and the change into summer…. Mustard roasted celeriac with an fanatic split peas gravy that will have you licking you bowl clean.
The stuff….For the split pea gravy we have a carrot, a parsnip and a large onion chopped into small chunks. Salt, thyme, a bay leaf and of course the split peas. Then there is the celeriac root* sliced into 1/2 inch thick rounds and some plain old yellow mustard .
*Note. I don’t peel my celeriac root. I really enjoy the fibrous exterior but realize that some don’t(The mister does not like it) so peel it if you want.
Toss the chopped parsnip, carrot, onion and the spices into a pot on medium heat and let veggies sweat a few minutes until tender. Add in the split peas and enough water to cover everything. Turn pot on high and bring to a boil, then cover and turn to low. Make sure to give the pot a good stir ever few minutes and add more water if needed
While the gravy is cooking, take the celeriac rounds and brush each side with yellow mustard, sprinkle with pepper, and place on a baking sheet. Stick into the oven to roast for about 25 minutes, flipping the rounds after about 10 minutes.
Once the peas have soften, remove the bay leaf and puree until smooth and oh so creamy. Taste and add more salt and pepper if needed. If you find that the gravy seems to thick, just add in more water until it’s the consistency that you want. The gravy is made, the celeriac is roasted… now we are ready to eat!! Stick the celeriac on a plate and dump good amount of that gravy right on top. Feel free to add a bed of spinach, or a grain or anything you want, because why not, and also some chopped tomatoes for a little acid and prettiness.
Serve with the fanciest knife and fork you can find. Extra yellow mustard and sriracha sauce are great condiments to have close by.
Happy Tuesday!
-C
Mustard Roasted Celeriac with Split Pea Gravy
2 medium celeriac roots
6 tablespoons mustard
1 large carrot
1 medium parsnip
1 large yellow onion
2/3 cup split peas
2-3 cups water
1 bay leaf
2 teaspoons thyme or italian spice mix
salt and pepper
spinach (optional)
diced tomatoes(optional)
Preheat oven to 400 degrees
Small dice the carrot, parsnip and onion and throw into a large pot. Spinkle with salt and pepper, add in the thyme and bay leaf and add a splash of water. Stick on stove on medium heat and stir. Let cook until the veggies become soft and fragrant. Now add in the split peas and 2 cups of water. Bring to a boil then cover and turn heat down to medium low. Let cook until the split peas become tender (about 25 minutes) string on occasion and adding more water if the peas are not completely summered while cooking.
Once the peas are tender, let cool for a few minutes, remove bay leaf, and either dump into a blender or blend with an immersion blender until nice and creamy. If gravy seems to thick, add in more water.
Scrub or peel celeriac roots and slice them into 1/2 inch think rounds. Place on a baking sheet and brush mustard on both sides and spindle with pepper. Stick into oven for about 10 minutes, flip, then back into the oven for another 15 or so minutes, or unit the celeriac is tender.
When the celeriac is done remove from oven and stick a few rounds on a bed of spinach (or not, or any kind of grain or green you like) Top with a hearty helping of the gravy and toss on some chopped up tomatoes.
Eat with at knife and fork like a fancy person.
Happy Cinco de Mayo! And what better day to share my version of my oh so fantastic pico de gallo, or as I call it, super freshy salsa.
I love me some freshy salsa, It makes me oh so happy.
I make this stuff all the time, especially during the warmer months and tomato season. I usually make a batch right before a meal, just enough to eat right away, but sometimes I ‘ll make a big batched of it, thinking I’ll save some for the next day. It never makes it past the second day in the fridge because it’s just one of those things that when you see it, you want to eat it. Weird but true. And it’s totally ok to do so cause it’s basically eating a big bowl of healthy goodness, so eat on!
It takes no time to prepare, tastes super refreshing, goes on everything, and it’s just so freaking tasty. You can eat it with tacos and chips (the mister) or like me, I like to add it to everything; salads, popcorn, or directly in my mouth.
Make one batch, make 4, it doesn’t matter cause you will eat it all, and need to make more.
The stuff. Chopped Roma tomatoes, chopped red onion, a diced jalapeño, lemon, a bunch of cilantro, and salt.
Stick all the chopped stuff into a jar and add in the juice of the lemon. Roughly chop the cilantro and add that on in with a sprinkle of salt.
Mix it up….And thats it. Now eat… with something or without.
A spoon out of the jar is one of my favorite ways to go at it.
Happy Cinco de Mayo, Happy Tuesday!
-C
Pico de Gallo… Freshy Salsa
4-5 Roma Tomatoes
1 small red onion
1-2 jalapeños (Depending on heat preference)
1 lemon or lime
salt
1 bunch of cilantro (don’t use it if you don’t like it)
Chop tomatoes and onion and toss into a bowl or jar. Cut seeds from jalapeño(s) and dice up into little bitty pieces and add that to the tomato and onion. Roughly chop the cilantro and toss that in as well with the juice of the lemon or lime. Sprinkle with salt. Stir, let sit for a minutes, taste and then add more salt if needed.
Eat right away or make ahead and store in the fridge until ready to use.
Goes great with corn chips, tacos, toss onto salads or eat as is standing in front of the fridge. If someone is judging you, they are stupid.
Every time I open the fridge, at least one (if not a few) come falling out from all the places that I have managed to squeeze them in. (the egg tray in the door is not a safe place for cucumbers) This is a slight problem, but a problem that I kind of like having.
This past weekend I had planned on doing a bunch of pickling and canning. Like a whole day of music blasting, dancing around the kitchen in a cute little apron with wooden spoon in hand, (pretending its a microphone) canning all sorts of fruits and veggies that a piling up in massive amounts for the winter months.
That didn’t happen, and I still have a million cucumbers and not a whole heck of a lot of time this week to inact my canning day day dream.
My simple solution. Cut um up, stick in a bowl with a some fresh dill, a lithe vinegar and leave them on the counter….. And watch as they disappear. It’s crazy. I find if you leave a bowl of cut up anything on the counter, anyone that walks by will stop and eat a few pieces (if not the whole bowl) It’s a scientific fact (no not really, but maybe)
As for my blissful canning day. It will be happening soon. But until then, this is the way to go with those all those cucks. (this works fantastic will zucchinis too!)
The stuff. Cucumbers, onion, fresh dill, salt, pepper, and red wine vinegar.
Slice up the cucumber and onion and toss into a bowl. Spinkle with salt, pepper, and lots of fresh chopped up dill. Splash in the vinegar and toss it all around.
Let it sit on the counter for at least 2 minutes, but the longer they sit, the more pickley they taste.
And eat. Leave on the counter until they are all gone..which won’t take too long.
Enjoy the Tuesday!
-C
2-3 medium to large cucumbers
1 medium sweet onion
a bunch of fresh dill
salt and pepper (fresh cracked is best)
red wine vinegar
Slice cucumber and onion into thin slices. and stick in a big bowl. Sprinkle with salt. pepper, chopped up dill. Pour on a few glugs of vinegar. Toss around, taste and adjust seasoning if needed and let sit on the counter for a few minute… or as long as you want*.
Eat all day long or until they are gone.
IF there are still cucumbers left over after 2 hours and you are worried about leaving food out all day (I don’t worry, but that’s me), stick in the fridge until you ar ready to eat them.
You ever make dish, completely on the fly, just to use something up (I have a lot of ripe tomatoes) with no real expectation, just because… Then have it be one of the best freaking things that you have ever made? This salad is one of those things.. maybe not the best thing I have ever made, but definitely the best salad I have ever made…. this week.
A salad compiled of all things amazing, taking just a few minutes to make and is the perfect balance of uber fresh with baby spinach, raw kale, and crunchy quick pickled onions. Then adding a touch of warmth with the sweet and juicy seared tomatoes and big chunks of creamy avocado.
I mean, for reals. ……Best Salad Ever !!!! (this week)
Now let’s do this.
The Stuff. A big bowl of baby spinach and chopped up kale, a few sliced up roma tomatoes, some super thinly sliced red onion, half an avocado, red wine vinegar and salt and pepper. Before you do anything, place the sliced onions into bowl, sprinkle with a pinch of salt and add a few glugs of the red wine vinegar. You want the onions to sit in the vinegar for at least 5 minutes on the counter cause the longer they sit the more crispy pickly they get. (after eating onions like this, you will never want to eat them any other way) Lightly oil a skillet and preheat to a medium heat. Once the skillet is hot, sprinkle the tomato slices with salt and pepper and place tomatoes right on in, snugly, but not overlapping. Let cook for about 3-4 minutes, or until the bottoms start to brown. Flip and cook other side for another few minutes.Once the tomatoes are seared on both sides, remove them gently from skillet and toss them on top of the bowl of greens.
Take the pickled onions and toss those right on top, with any of the residual vinegar, add dice and scoop the half of avocado and toss that on in as well.And now eat the best salad ever (this week).
Make the day good!
-C
Skillet Seared Tomato and Quick Pickled Onion Salad
Serves 2 as a side, 1 for a hungry eater
2 large or 3 smaller roma tomatoes
1/2 of a red onion
2-3 tablespoons red wine vinegar
1 1/2 cups baby spinach
1 1/2 cups chopped kale
salt pepper
1/2 a ripe avocado
olive oil (to grease pan)
Thinly slice red onion and place in a bowl. Add vinegar into a and sprinkle with salt. Let sit on counter for at least 5 minutes, if not longer,
Slice tomatoes into 1/2 inch thick rounds and sprinkle with a pitch or salt and pepper. Lightly oil a skillet and preheat it on medium heat. Once the skillet is preheated, stick the tomatoes on it (watch out for splattering tomato juice) Cook first side for about 3 minutes or until the bottom has browned, then flip and do the same for other side.
One tomatoes are seared, place directly onto the greens. Now dump the pickled onions and residual vinegar on top. And dice up avocado and add that on top too.
Now eat your salad, fork or fingers…
And I know, ba-daaaamn. So good.
As the weather gets warmer and the days get longer, my food brain turns to fresh colorful simple spring food. (which is totally a thing). Spring food is a combination of the last of the winters hardy root veggies combined with the springs bounty of fresh greens and early growers. Spring food is the best!
This lovely. oh so gorgeous salad has been on repeat in my meal repertoire. It’s so yummy and so simple. Beets and carrots roasted and sliced, tossed onto a bed of tender spinach and topped with a creamy, lemony avocado dressing. Fresh, fast, light, and filling. Everything a perfect spring salad needs. Not to mention it takes no time at all to make because with all this nice weather , we want to spend as much time basking in the warmth and glow of the sun. I might even take my spring salad outside today. Maybe.
Dressing stuff. A nice and ripe avocado, the juice of a juicy lemon, a bit of garlic powder (raw garlic is nice too, but grate it super fine) and salt. Simple simple and sometimes simple can be the best.All stuff get mashed super mashed until smooth and scooped into a jar with a lid. Add about 1/4- 1/2 cup water (depending on how thick you like it) and shake that jar all around.
That’s it. You now have super creamy avocado lemon dressing. Drizzle on anything and everything… especially this roasted carrot and beet salad..
A roasted beet and carrot, all sliced upTossed onto a bed of tender baby spinachAnd topped with creamy avocado dressing. Fantastic, so pretty, and makes the day super springy!
A salad suggestion…. Add some roasted chickpeas toasted nuts, or sunflower seeds to this or any salad. Adds a little proteins and the crispy crunch is a nice addition.
Enjoy the day..Smile lots
-C
Roasted Carrot Beet Salad and Avocado Lemon Dressing
Salad
2-3 cups Baby Spinach
1 large carrot
1 medium beet
Toasted nuts, beans, or seeds (Optional)
You can roast the veggies a few ways.. Slice the carrot and beet, place on a baking sheet and stick into the oven at 425 degrees until tender. Or you can just toss a the carrot and beet onto a baking sheet whole and roast.( What I usually do)
Once the veggies are roasted and cooled, thinly slice and toss onto the bed of baby spinach. Top with Avocado Lemon Dressing (recipe below) and some toasted crunchy thing.
Dressing
1 Ripe Avocado
1 lemon
1 teaspoon garlic powder
1 teaspoon salt
1/4- 1/2 cup water
Scoop avocado fruit into a bowl and mash with a fork until a paste is formed. Scoop mashed avocado into a jar and add remaining ingredients. Stick lid on jar and shake tip combined. Use on anything.
Dressing lasts a few days in the fridge. Should stay green, but add a layer of lemon juice to top to keep from browning.
When something goes on sale at the grocery store, I tend to buy it. Being that it is Valentines Day this week, all the stores are having specials on all sorts of sexy things… and strawberries are one of them. Now I am not a huge fan of buying produce that is terribly out of season, but I can’t help myself…a good deal is a good deal and the strawberries were a super good deal. I was just going to make some sweet ass strawberry jam or maybe a lovely strawberry cake with them (and I probably still will), but these strawberries are actually super juicy and full of flavor, and it’s always nice to eat some full flavor freshy strawberries… especially soaked in balsamic vinegar. And yeah, I think that this salad is pretty sexy, so it makes for a perfect Valentines day dish.
A handful of ingredients and 5 minutes will get you to a fantastic salad experience.
A bowl of baby spinach, a few chopped up strawberries*, half a sliced avocado and a small handful of toasted almonds.. Oh, and don’t forget the balsamic vinegar….
*Note.. Strawberries are kind of heart shaped already so if you want, reserve a few slices to fancy up you salad presentation, but chop up the rest into smaller pieces.
Pour the vinegar on the strawberries and let sit for at least 5 minutes. (the longer the strawberries can sit with the vinegar, the better)
Pile it on.. thinly slice avocado.. rough chopped toasted almonds… It’s pretty much as easy as it can get.And last but not least, toss on the balsamic soaked strawberries and drizzle the remaining vinegar. (if you made hearts, place on top to make pretty) Sprinkle with a pitch of salt and pepper and pow! Fancy, sexy, delicious salad.
Not to shabby for 5 minutes and a handful of ingredients. Anyone (don’t feed to a person with nut allergies) would be so syked to be fed a salad like this… You yourself should be pretty excited to eat a salad like this. Heck, I am excited to eat a salad like this!
A love salad for everyone and everyday!
YAY for Thursday and Happy meal planning!!!!
-C
♥ Balsamic Strawberries on Spinach Almond Avocado Salad ♥
Ingredients for 1 large or 2 small salads
3-4 ripe strawberries
handful of roasted almonds (slivers or whole)
1/2 avocado
2 tablespoons Balsamic Vinegar
3 cups baby spinach
Pinch of salt and pepper
Dice strawberries into small pieces (reserve a few whole slices for heart shapes if you want) and toss in a small bowl with the balsamic vinegar. Let sit for at least 5 minutes. Rinse and dry spinach. Place in a bowl(s) and top with thinly sliced avocado, chopped almonds and balsamic soaked strawberries. Drizzle the residual vinegar on top and sprinkle with a pinch of salt and pepper.
Eat with a fork
I am such a sucker for the reduced price produce at the grocery store. I save at least half of the original price for stuff that might look a little weird or have a brown spot or something. Sometimes I can’t believe what ends up on in the bin, stuff that I wouldn’t consider reduced bin material, but hey, if they want to stick it in there, then I will be more than happy to buy it. A couple days ago I found some good looking roma tomatoes in that said reduced produce bin..the skins the tiniest bit wrinkled (like I could care less), least hen 50 cents a pound. Um, yea, I bought those and put them to good use.
Tomatoes roasted until they fell apart with a few other chunks of stuff, then piled onto a base of spinach and couscous. This meal cost me pennies and was stupid easy and fast to make. And pretty to boot. Perfect for a quick healthy meal on a busy day or maybe for those people looking for a tasty, not too completed dinner to make for a special someone for Valentines day? Or make just for yourself…its pretty much the perfectly dish. Anyone can get into it. And if you don’t happen to have a grocery store with a reduced produce bin full of tomatoes…it’s cool, you’ll just have to pay full price for the perfect ones.
So simple. A little olive oil in pan. Chunk the tomatoes and throw in pan with the chopped onion, carrot, cauliflower, garlic and chick peas. Drizzle a bit more oil and top with salt and pepper. Give it all a toss and stick into oven. That’s that. Just leave it in there until everything is so nice and soft and falling apart.
One of the best things about couscous is that you don’t even need to dirty a pot or a bowl to make it, just add dried couscous to the bowl you are going to eat out of with a cup of boiling water and a pinch of salt. (I added the spinach with the water too) After about 8 minutes, the couscous absorbs all the water and you just fluff it up with a fork. Easy, freaking Peasy!!! Out of the oven and piled on…..
I mean, if this isn’t one classy looking meal, then I don’t know what is.
Sprinkle with a little parmesan or nutritional yeast if you want and step back and admire. And now eat it to you face.
And barely any dishes to wash. No big mess to clean up. I could get used to that.
-C
Chunky Tomato and Stuff Couscous
Ingredients
Serves 2
3/4 cup Couscous
1 cup boiling water
Handful of chopped spinach
4-5 roma tomatoes chopped
1 medium carrot diced
Half of an onion diced
Cup or so of cauliflower (fresh or frozen)
Cup of prepared chick peas
4 or 5 cloves garlic minced
Olive oil to drizzle
Salt and pepper
Preheat oven to 400
Place onion, carrot, cauliflower,tomatoes, chick peas and garlic into a large skillet. Drizzle with olive oil, sprinkle with salt and pepper, and give everything a light toss. Stick into oven for 35-40 minutes until tomatoes are falling apart and everything is nice and roasted.
In a medium bowl, (or serving bowl) add cup of boiling water to dry couscous and spinach. Sprinkle with salt and cover. Let sit for at about 8 minutes, or until the couscous had fully absorbed all the water. Fluff with a fork and top with roasted tomato stuff.
Top with parmesan or nutritional yeast if you are into it.


 This has been the week of broken things. My immersion blender broke. 2 of the 4 new bowls I bought were smashed. The hand mixer broke while I was making frosting (F**CK). The steam mop is finally completely broken and the mister smashed the screen on his phone. All in a weeks time. Oh, and not broken, but the front end of my car got stuck in a muddy sink hole. It took five badass farmers to help me push it out. It was crazy, but thankfully the car and I survived. But’s it cool. I can replace all that crap and my arms are getting a great workout now that I have to hand mix everything and hand wassh the floor on my hands and knees. ( I do it like a beast!) Because what I really am having a hard time with is that it is nearly April and still have most of my winter clothes out. I just want to but the boots away and get my chaco sandals out. It’s getting a bit ridiculous if you ask me.
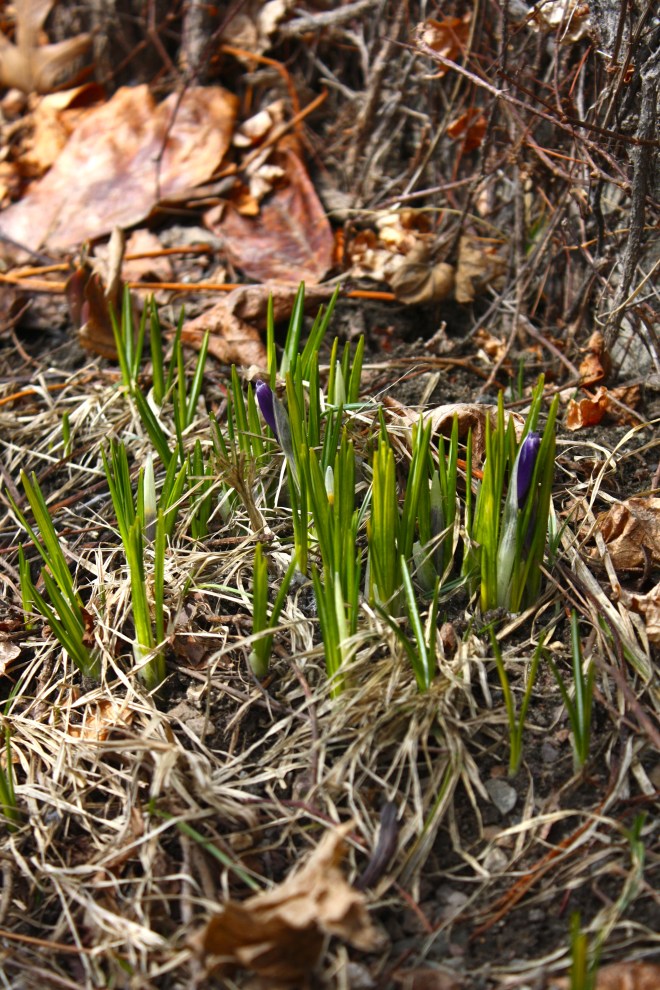 WHAT WHAT!!! The first sign of green that I have seen in the neighborhood.
  This little came over and hung out with me. I gave him a muffin and a bowl of “Carrot Chips” (really thinly sliced carrots) He at a few bites of the muffin but ate all the carrots and wanted more…… I love him!
 Oh the old man trash dog. His butt hair is finally starting to grow back after he chewed himself a big hot spot.
  I love this pattern for a driveway.
  March 29, 2011. Yeah sure we were in California, but still, we were camping outside.
 And who doesn’t love a pineapple, or 4?
  This week was the week. I am calling it (I know I shouldn’t, but I am) SPRING!!!!! I am so excited. Spring is my favorite season, full of warm sunny days, cold nights, lots of mud, lots of freshness, lots of new. Everything feels possible, not to mention all the spring cleaning! (I like to clean) And today we lost an hour of sleep but we gained an hour of sunshine. It”s all downhill from here.
 One year ago.. Making snow people with some littles.
 Holy cuties! They were so small and innocent. Now they are just little monsters (in the best way)
 The mister and the bees.
 No flowers this week, but for sure lots and lots of colorful veggies
 I figured now is a good time to get this recipe out there before we get to far into spring and summer recipes because there is going to be a lot of banana ice cream filled recipe coming and I figured its a good idea to have the basic banana ice cream recipe ready for people to refer too. And because I made so much fantastic naner ice cream, I also made a cookies and cream naner ice cream for my sisters and the mister.
 The stuff you need for this ice cream…. Nice and ripe bananas, peeled and then frozen* That’s it.
 After all blended and smooth, either eat right away or scoop ice cream into a freezer safe container and stick in freezer. That’s the banana ice cream… And it is amazing and so so so so so addictive. I make a batch, think I am only going to eat a scoop, then find myself eating half of what I have made, but it’s ok cause it’s only bananas.
  One batch of banana ice cream, either freshly made, still in food processor or made ahead and placed in a food processor and given a good pulse to smooth it up.
 Now you have cookies and cream naner ice cream…. and everybody is happy.
 I was informed yesterday that if I was going to make tortilla chips, that I better make some sweet ass dips to go with them. I kind of agree… tortilla chips need dip… or better yet, two dips. Queso and guacamole. It’s what needed to be done, and so I did it.

 Perfect…
 To think that both of these dips took about 10 minutes total to make. (I had pre baked the cauliflower and sweet potato) And for real, I would spend much more time if I had too because both of these dips are so freaking good, I definitely will be making these on the regular.


 A couple of days ago, during a grocery store porous, I stumbles upon a produce item that I have not seen sold in stores before, Broccoli leaf. And I was kind of surprised to see that they were selling bunches of the leaf, organic, at 2 bucks a bunch. I was very excited ! But wait.. You can eat broccoli leaves? Heck yes you can! Broccoli leaves are fantastic. They taste kind of like broccoli, have a hearty texture like a collard, and can be used raw or cooked just like any other green. Its just one more super yummy green to add to your repertoire. So when I bring home something that I find to be a good score, like a bunch of broccoli leaves, I feel like I have to share it with the mister. (I am so nice) And this dish was how I shared them…. Tossed into a bowl of garlic raging pasta.
  The stuff…. A bunch of broccoli leaves, lots of garlic, pasta, olive oil, salt and a lemon. Pretty simple right?
  Fist off, get your water boiling for the pasta. Once its ready, drop a pinch of salt into the water and stick pasta in for the amount of time recommend by pasta box people. While the pasta is boiling, mince up the garlic (I used my garlic press) into a skillet and add in the oil. Stick on a burner on medium for a few minutes, stirring around to make sure the garlic doesn’t stick and burn.
 Once you start to smell the garlic, turn heat onto low, chop up the broccoli leaves (stems and all) and stir around until wilted and add in the juice of half a the lemon.When the pasta is cooked, remove a few tablespoons of starchy water and strain the noodles. Add water and pasta right into the skillet with the other stuff. Toss around, taste, season with salt and pepper. Go ahead and add some chopped tomato and or parmesan cheese if you want.
  And serve your amazingly amazing pasta. And make sure that you are ok with really smelly garlic breath…Casue it’s going to happen. Keep it good! -C


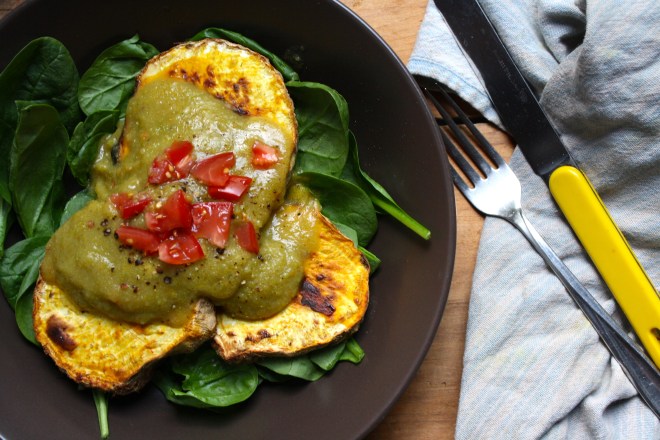 My winter farm share is coming to an end this week. One more pick and then a three week stretch until the summer share starts… WHAT AM I GOING TO DO!!! Stock up as much as I can is what.
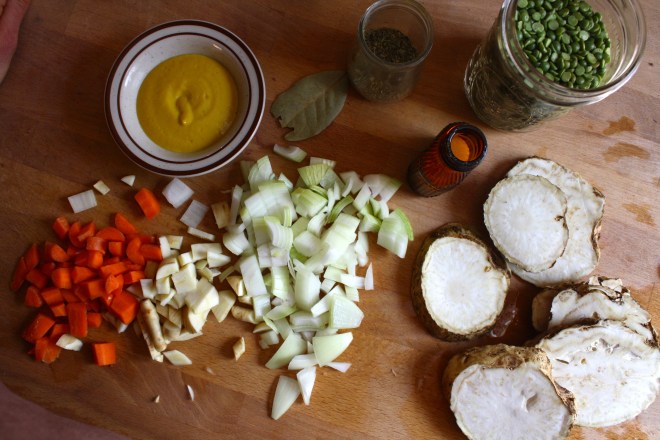 The stuff….For the split pea gravy we have a carrot, a parsnip and a large onion chopped into small chunks. Salt, thyme, a bay leaf and of course the split peas. Then there is the celeriac root* sliced into 1/2 inch thick rounds and some plain old yellow mustard .
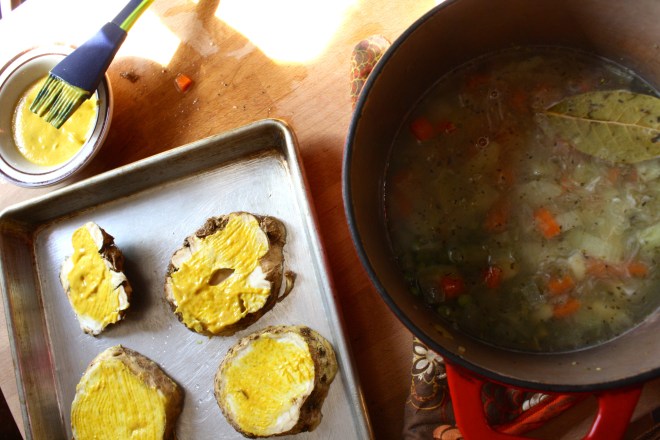 Toss the chopped parsnip, carrot, onion and the spices into a pot on medium heat and let veggies sweat a few minutes until tender. Add in the split peas and enough water to cover everything. Turn pot on high and bring to a boil, then cover and turn to low. Make sure to give the pot a good stir ever few minutes and add more water if needed
 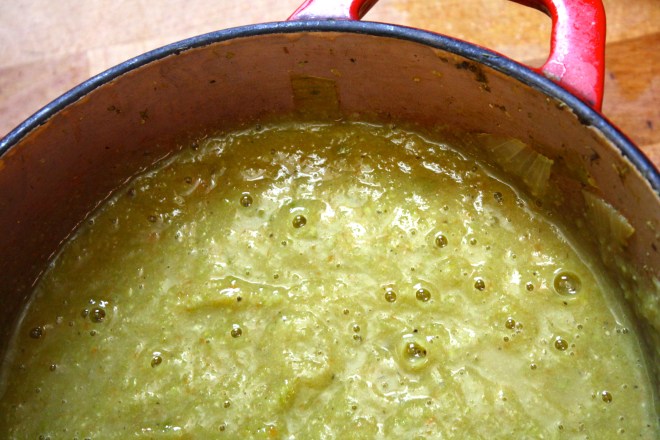 Once the peas have soften, remove the bay leaf and puree until smooth and oh so creamy. Taste and add more salt and pepper if needed. If you find that the gravy seems to thick, just add in more water until it’s the consistency that you want.
 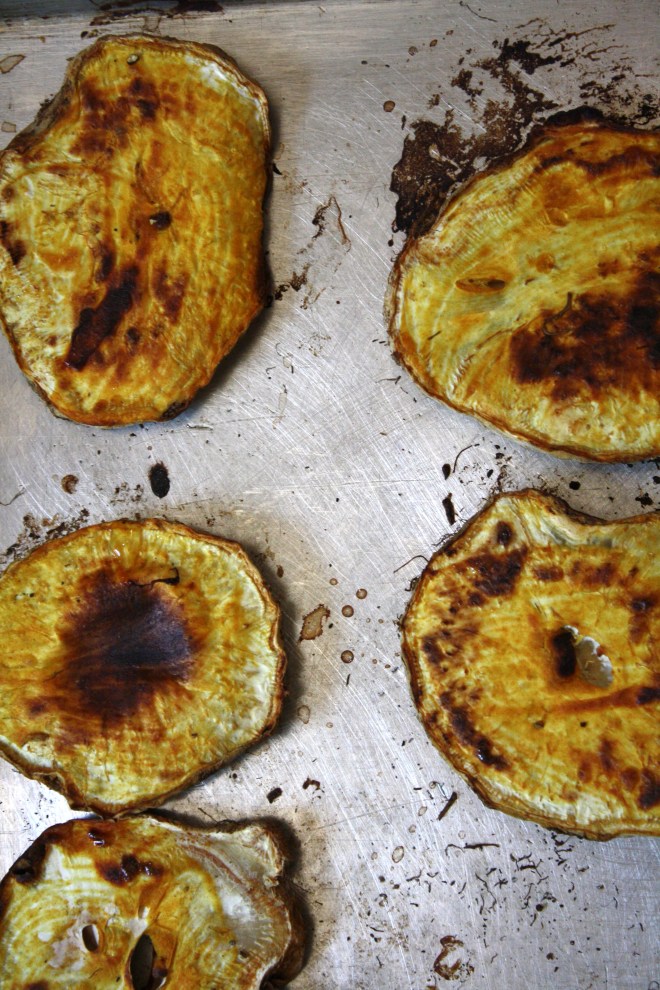 The gravy is made, the celeriac is roasted… now we are ready to eat!!
 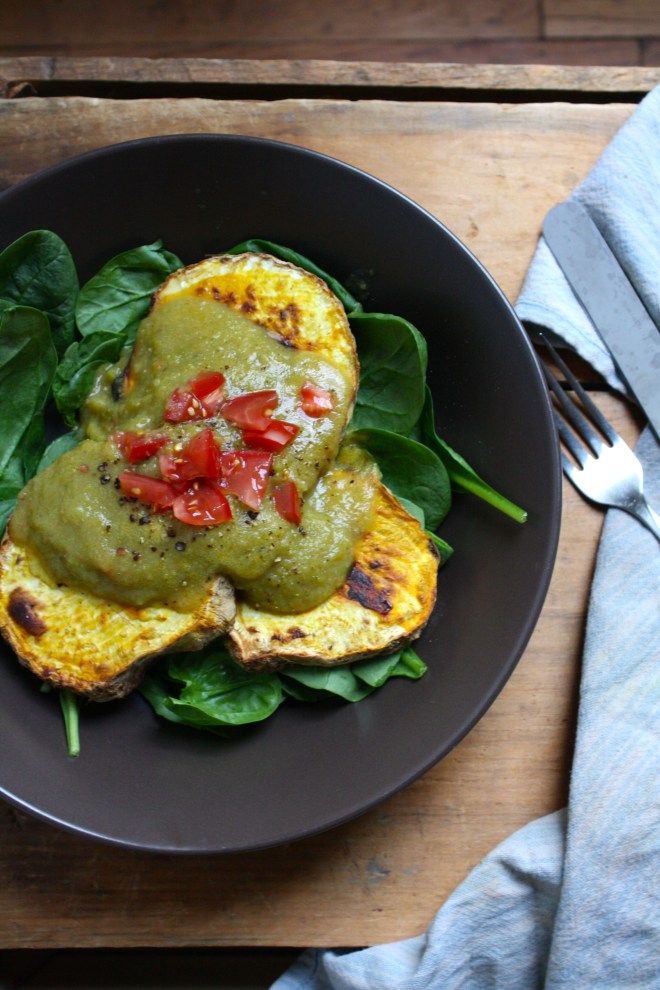 Stick the celeriac on a plate and dump good amount of that gravy right on top. Feel free to add a bed of spinach, or a grain or anything you want, because why not, and also some chopped tomatoes for a little acid and prettiness.
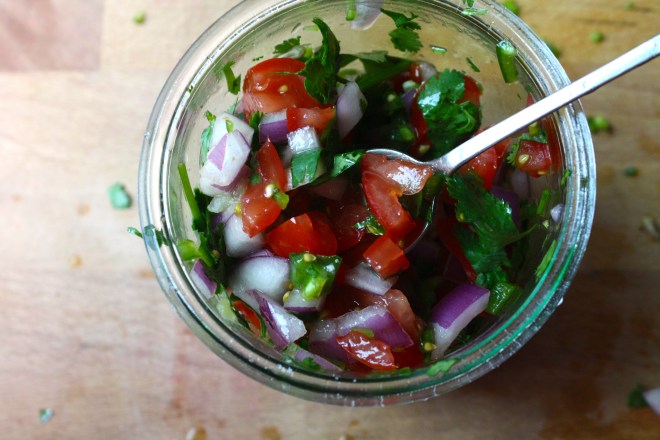 Happy Cinco de Mayo! And what better day to share my version of my oh so fantastic pico de gallo, or as I call it, super freshy salsa.
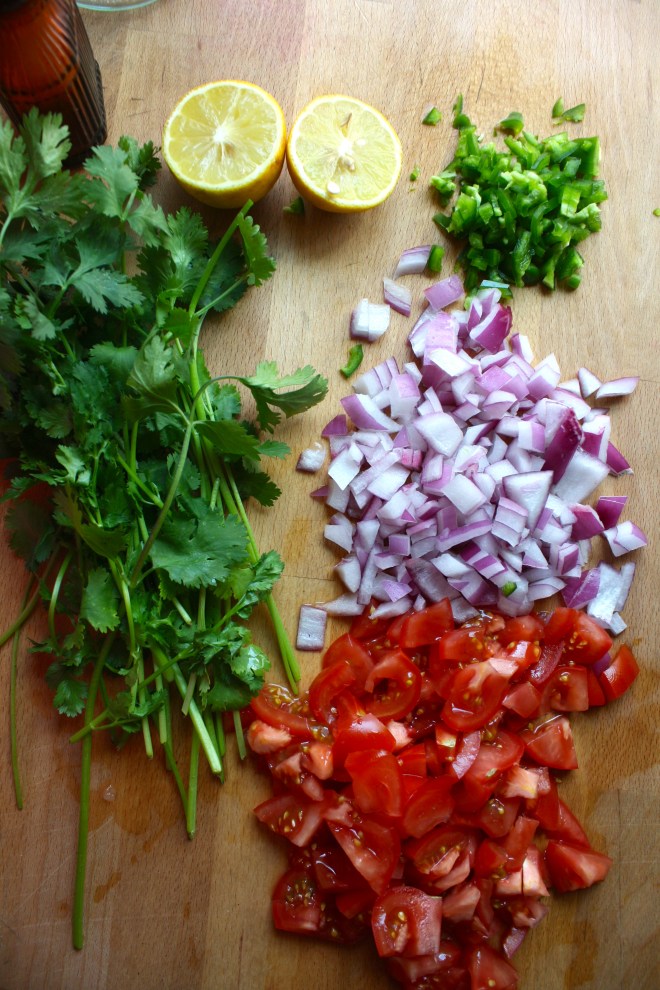 The stuff. Chopped Roma tomatoes, chopped red onion, a diced jalapeño, lemon, a bunch of cilantro, and salt.
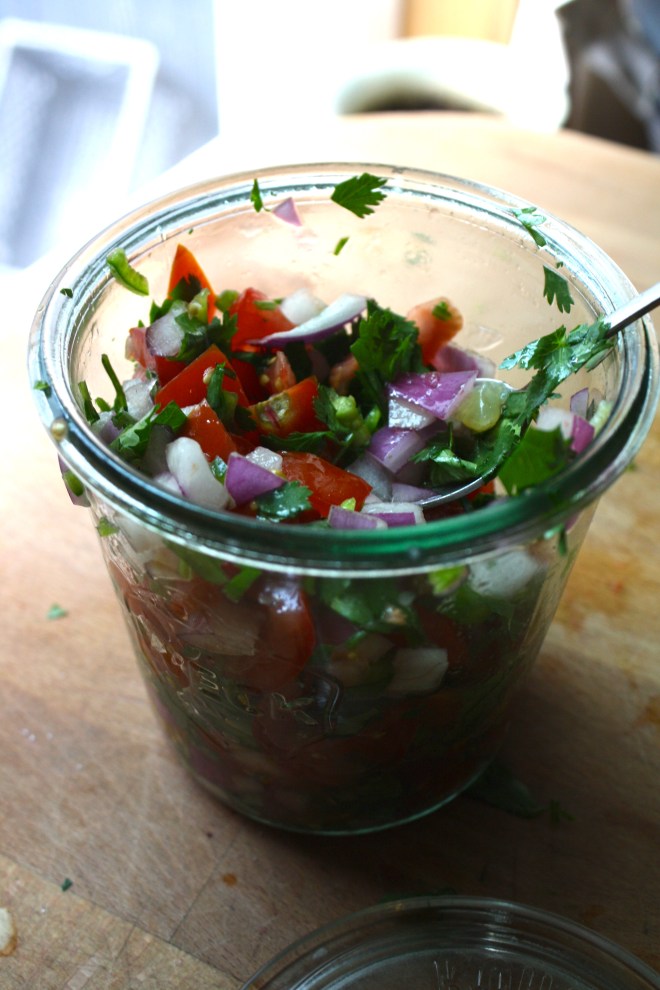 And thats it. Now eat… with something or without.
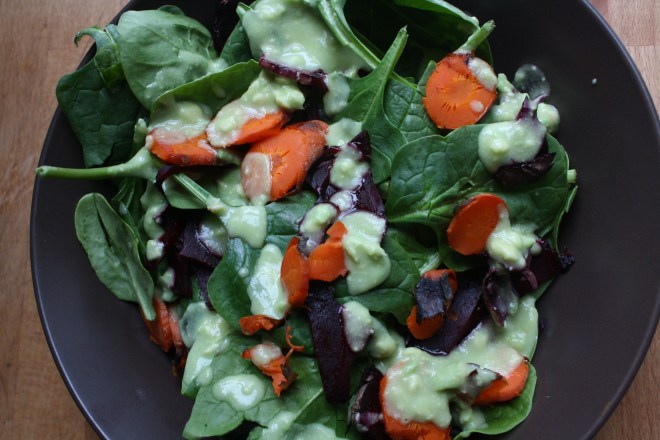 As the weather gets warmer and the days get longer, my food brain turns to fresh colorful simple spring food. (which is totally a thing). Spring food is a combination of the last of the winters hardy root veggies combined with the springs bounty of fresh greens and early growers. Spring food is the best!
 Dressing stuff. A nice and ripe avocado, the juice of a juicy lemon, a bit of garlic powder (raw garlic is nice too, but grate it super fine) and salt. Simple simple and sometimes simple can be the best.
 All stuff get mashed super mashed until smooth and scooped into a jar with a lid. Add about 1/4- 1/2 cup water (depending on how thick you like it) and shake that jar all around.
 A roasted beet and carrot, all sliced up
 Tossed onto a bed of tender baby spinach
 And topped with creamy avocado dressing. Fantastic, so pretty, and makes the day super springy!
 When something goes on sale at the grocery store, I tend to buy it. Being that it is Valentines Day this week, all the stores are having specials on all sorts of sexy things… and strawberries are one of them. Now I am not a huge fan of buying produce that is terribly out of season, but I can’t help myself…a good deal is a good deal and the strawberries were a super good deal. I was just going to make some sweet ass strawberry jam or maybe a lovely strawberry cake with them (and I probably still will), but these strawberries are actually super juicy and full of flavor, and it’s always nice to eat some full flavor freshy strawberries… especially soaked in balsamic vinegar. And yeah, I think that this salad is pretty sexy, so it makes for a perfect Valentines day dish.
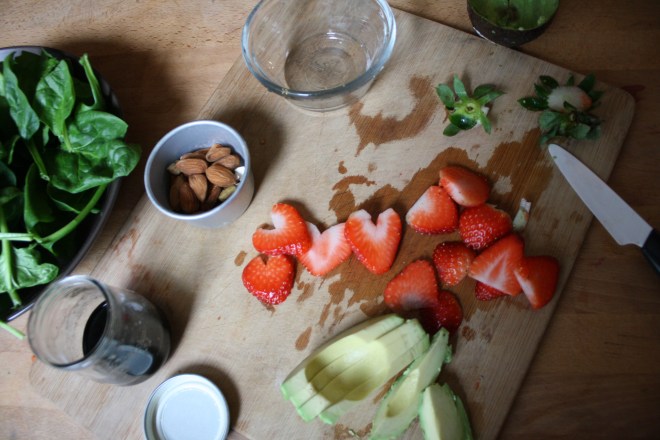 A handful of ingredients and 5 minutes will get you to a fantastic salad experience.
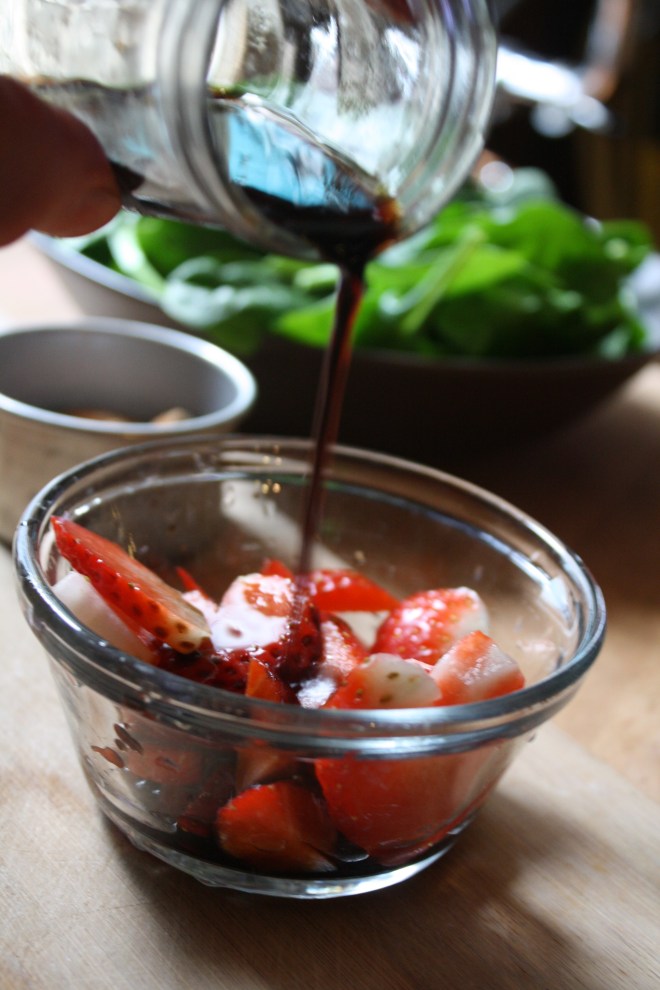 Pour the vinegar on the strawberries and let sit for at least 5 minutes. (the longer the strawberries can sit with the vinegar, the better)
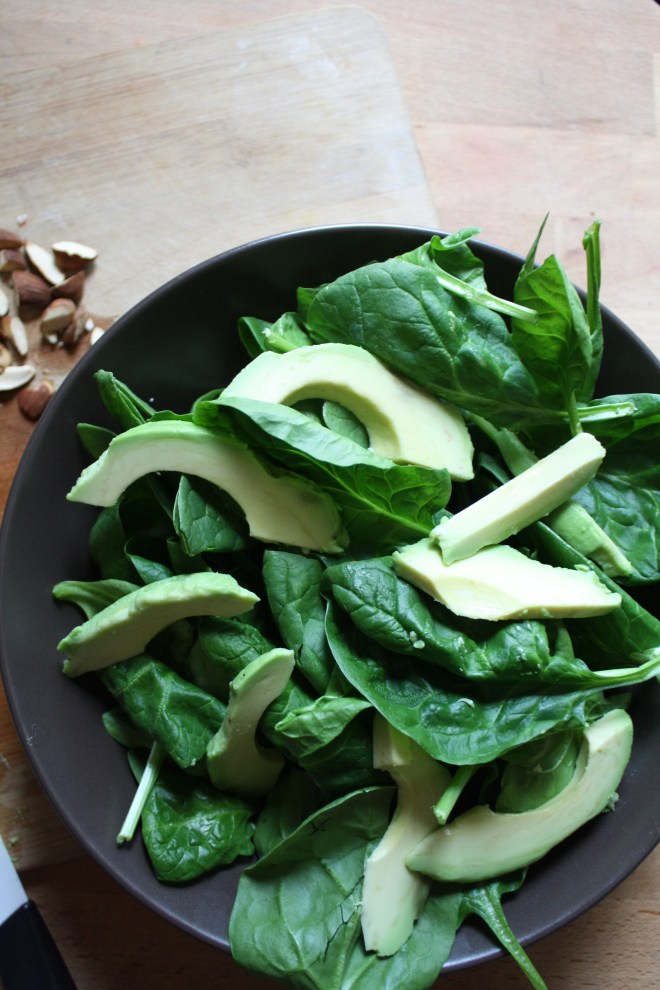
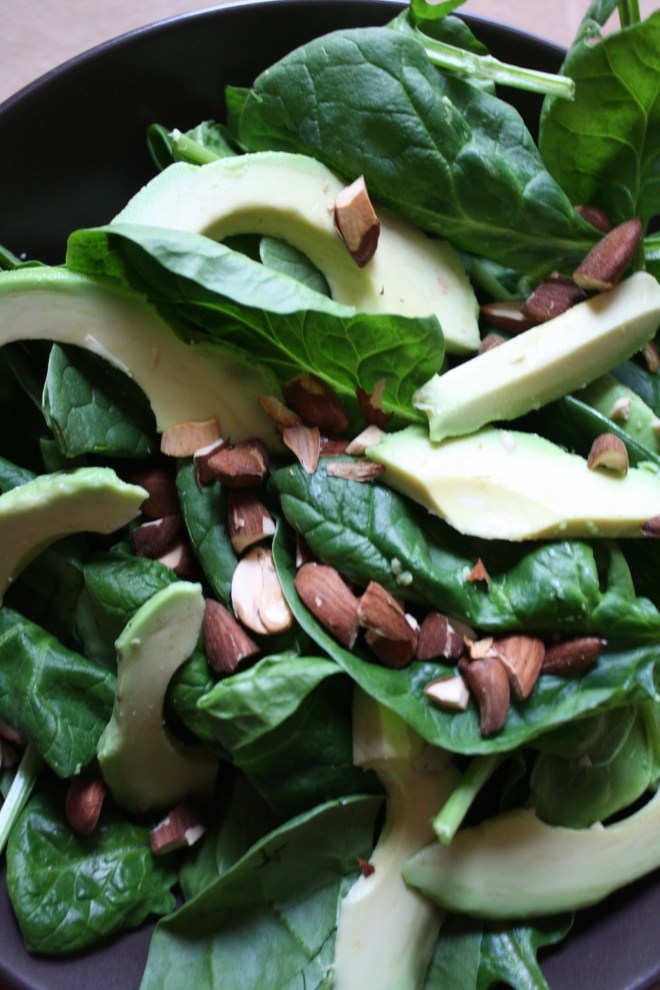 Pile it on.. thinly slice avocado.. rough chopped toasted almonds… It’s pretty much as easy as it can get.
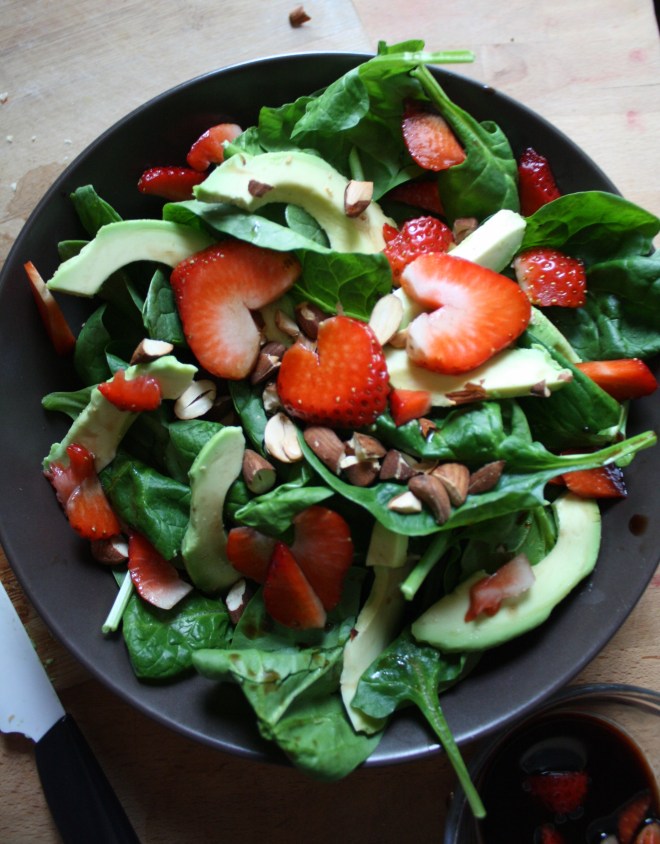 And last but not least, toss on the balsamic soaked strawberries and drizzle the remaining vinegar. (if you made hearts, place on top to make pretty) Sprinkle with a pitch of salt and pepper and pow! Fancy, sexy, delicious salad.
 I am such a sucker for the reduced price produce at the grocery store. I save at least half of the original price for stuff that might look a little weird or have a brown spot or something. Sometimes I can’t believe what ends up on in the bin, stuff that I wouldn’t consider reduced bin material, but hey, if they want to stick it in there, then I will be more than happy to buy it. A couple days ago I found some good looking roma tomatoes in that said reduced produce bin..the skins the tiniest bit wrinkled (like I could care less), least hen 50 cents a pound. Um, yea, I bought those and put them to good use.
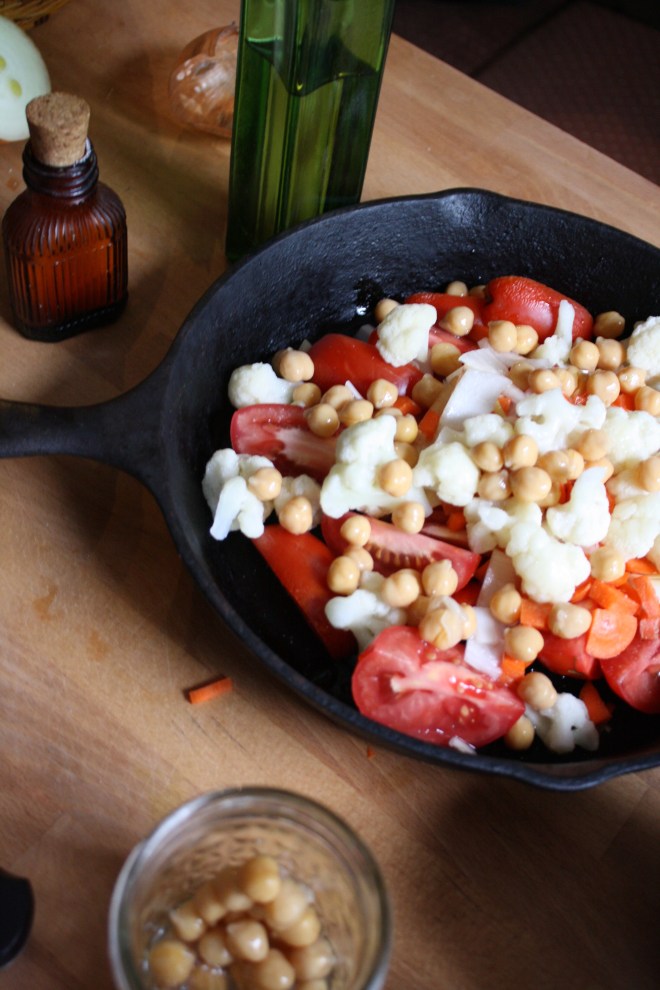 So simple. A little olive oil in pan. Chunk the tomatoes and throw in pan with the chopped onion, carrot, cauliflower, garlic and chick peas. Drizzle a bit more oil and top with salt and pepper. Give it all a toss and stick into oven. That’s that. Just leave it in there until everything is so nice and soft and falling apart.
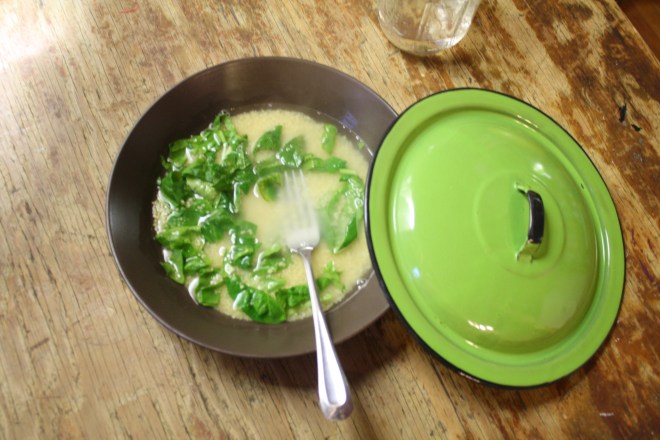 One of the best things about couscous is that you don’t even need to dirty a pot or a bowl to make it, just add dried couscous to the bowl you are going to eat out of with a cup of boiling water and a pinch of salt. (I added the spinach with the water too) After about 8 minutes, the couscous absorbs all the water and you just fluff it up with a fork. Easy, freaking Peasy!!!
 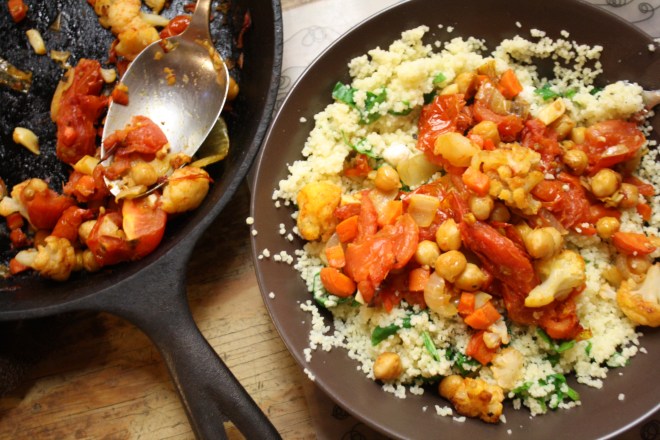 Out of the oven and piled on…..
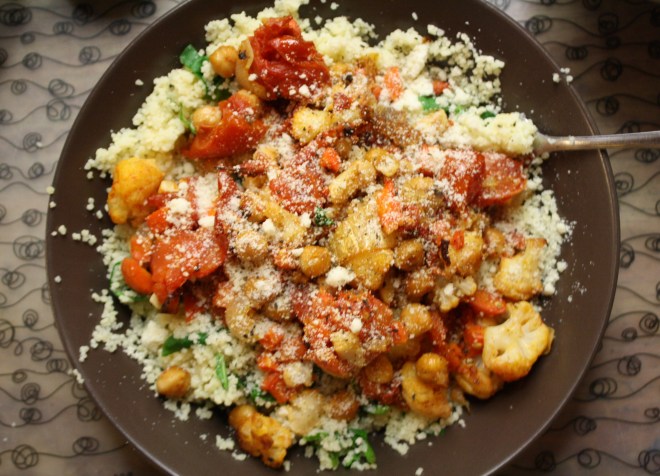 I mean, if this isn’t one classy looking meal, then I don’t know what is.
THE LOVELY CRAZY
September 19, 2015 by maximios • Blog
This past weekend was the annual Stem family reunion and I had signed up to bring a dessert to the circus, (circus being an event with lots of my family) I went out of my way to get the nieces, sweetest, most delicoius peaches and was planning on making them into some type of epic peachy peach cake, but being that the weekend turned into a shit storm, I didn’t get a chance to make that epic peach cake. So come Sunday morning, a few hours before we were suppose to leave for the reunion, I was deesertless.
So I did what anyone that has a bunch of the fruit, little time, and doesn’t want to make a big mess should do. I made a crisp.
And it was good. Gooey sweet and cardamon spiced peaches under a slightly sweet, oatie topping. A perfect dessert for a late summer afternoon. Served warm or at room tepature, add a little whipped cream or ice cream and a cup of coffee. Dessert time is perfect. And any left over makes for a fantastic breakfast treat….or just make it for breakfast, it’s totally a breakfast food too.
I am almost glad that I didn’t get a chance to make that cake.(although I really wanted to make a cake, just for shits and giggles) I’ll just make one later. But until then.
To the crisp!
The Stuff. Peaches of course and some old fashion rolled oats and a pinch of salt mixed with gluten free flour*. Some earth balance*, honey*, cardamon and cinnamon and a tiny bit or arrowroot powder
Notes.. You can totally use regular all purpose flour in place of gluten free. Also can sub regular butter for the earth balance and use maple syrup instead of honey..
In a bowl, mix/mush together the oats, flour, honey, half the cardamon and cinnamon, and earth balance. The mixture is going to be a little gloppy and wet, but that’s how you want it to be.
Toss the other half of the spices into the peaches with a bit of arrowroot powder or corn starch and mix all around.
If you peaches are not super yummy sweet, you can always drizzle in a little extra honey or maple here too.
Now place the peaches in a well greased oven safe skillet.
Distribute the topping all over.
And into the oven it goes..
After about 45 minutes, check for doneness. When top is all golden brown and nice… you are there!
. Ooey gooey peaches underneath all that golden crispy goodness….
Nailed it!
Have great day you guys! Crisp away!
-C
For the filling
For the topping
Preheat oven to 350
Slice peaches in half, remove pits, and cut into pieces and toss into a bowl with the cinnamon, cardamon and starch, In a large oven save skillet, smear or melt 1 tablespoon earth balance and cover bottom and sides of skillet. Add in the peach mixture. In a large mixing bowl, (using your hands if you don’t mind), mix together oats, flour, salt, spices, earth balance and honey. until a combined. Evenly disptuipt to the top of the peaches. Now place skillet into oven to bake. When the top golden brown and all crispy, remove from oven. Let cool for a few minutes and serve.
Some type of creamy situation like ice cream or whipped coconut cream would be extra nice here…but not necessary .