Do you have a winter you and a summer you? I do for sure. Winter Colleen is more reserved and spends most of her time alone. Winter Colleen lives a little slower, a little calmer. She goes to bed at six thirty and doesn’t think twice about it. And she is always wearing wool socks. Summer Colleen, well she is crazy. Always running around outside like a feral beast, face and hands covered in dirt. Twigs in her hair. No shoes. Summer Colleen is always trying to do everything and all at once. Thinks she can climb a mountain and go for a thirty mile bike ride all before lunch time. (I so can) She is louder, more exposed and might not run in the opposite direction if she sees you coming down the street. (might%u2026 A small conversation is ok, other then that, I run!) She also goes to bed much later and likes to wear overall all summer long.
I am full on Summer Colleen. Watch out!
It has been one of those weeks that has just flown by. Lots of stuff going on all the time. The normal stuff, but because it finally feeling like summer, there is the added need of being able to be outside and do stuff. And we have been doing stuff. And it has been great. But not all fun fun. Work still goes on. Apartment stuff is still in need of doing, although it is not as crazy as it was last week. And YAY!! We finally got the car back. The only took them a week to fix but I am not complaining especially since it would have cost us more then a grand if we didn%u2019t have a warranty on the car. And as a thank you to my mom for letting us borrow her truck all last week, we went over to her house and I made her dinner, even after Sophia accidentally locked us out of the house for an hour. (Oops.)
We spent a lot of time with the littles the week. Feeding them, biking around with them. Fighting with them. The girl has a phone now. It doesn%u2019t have service but it picks up internet. And I can%u2019t even. She will be lucky if it doesn%u2019t %u201caccidentally%u201d gets smashed by the end of the month. What else%u2026 I worked at the studio and remembered to wear an apron when sticking my whole body into the garbage can full of slip. That was good on me. The mr fixed the lawn mower so we don%u2019t have buy a new one yet, and mosquitoes are not as bad as they have been. I only get like 100 bites a day now.
Yesterday was a gem of a day. A day that was so productive, and fun, and beautiful. I woke up did my writing, grabbed coffee and a book, and sat outside and watched the sun come up. Then I got the grocery shopping done by 8am. I weeded and weed wacked the garden and oohed and aahed at all the plants that are finally coming up ad starting to grown. After cleaning up the yard a bit, the mr ans I jumped on our bikes and bike over to Erins We then grab the littles and went for a great bike ride and picnic at the park. After biking home I moved a ton of plants outside to the porch and moved furniture and stuff around the house on on both porched. Then I cleaned the freaking crap out of the house. Plus I got a jump on laundry. Ate dinner. went for a nice walk, came home, read some more and passes out. Again, it was a gem.
Today, after a bike ride to the gym and a few little things that I need to do, the mr and I are going to do a lunch picnic by a river where I can sit and spend the rest of the day reading and drink coffee and he can fish. I can%u2019t think of much more that I want to do. It%u2019s going to be wonderful.
Reading and looking from the internet this week.
-The Myth of Period Syncing. I thought for sure. And I am still not convinced it isn%u2019t true. Yeah, I still think it is true,
-One more amazing thing a tree can do. Getting Fire From A Tree Without Burning The Wood
-There defintailyl something right about this. Kind of like how you can want something that you don%u2019t know you want. Does that make since? And not always is being oblivious good, but sometimes. How to Accomplish Disappointment
-Want ever single one of these paintings. Thick Brushstrokes Form Plump Songbirds in Oil Paintings by Angela Moulton
–Charmin%u2019s Massive %u201cForever Roll%u201d Points the Way to a World of Products Right-Sized for Singles. Giant ass rolls of T.P. What do I think? I think %u201cWhere do I store huge ass rolls? %u201c I think I will stick with the regular sized ones. For now.
–See the drastic toll climate change is taking on our oceans. Not good guys. Not good.
-I think this is brilliant. I would definitely punch one and I bet it actually will keep some people from punching one another. Need to Blow Off Steam? Public Punching Bags Pop Up Around NYC.
–How duct tape can help you survive almost anything. I have seen many a things done with duck tape. #8 has been put to use a time or two.
-If I were to live in an English cottage, this would be the one. Inside a Florist%u2019s 1850s-Era English Cottage
–The tooth fairy economy, explained. I know one of my sisters is giving out $5 a tooth, on top little presents and shit. I got a buck%u2026 if I was lucky.
Just about every night I make some type of side salad for the mr with dinner. Its usually just whatever veggies I am eating on a bed of kale with s splash of vinegar. I used to add chunks of fruit, but he kept saying that he really hated when I stuck fruit in his salad. HATED. So I stopped, kinda. I never really believed he hates fruit in the salads, I just think he was confused or something……
But being the sweet guy that he is, and always down to try anything, he was cool with it when I told him I was making a fancy (not fancy) salad with pears. He told me he would go with me on my fantastical salad journey.. and guess what. He ate the crap out of it.. said it was fantastic.I mean, how could anyone not get down with this combo. Sweet pears slightly soften with sweet maple and balanced out with a nice acidic vinegar. Walnuts for crunch and creaminess all on a bed of bitter greens…. My mouth is watering just thinking about it. And you know how the internet is all abuzz about eating salads for breakfast (if you didn’t you do know) this would be a great salad to start out your day.
So greens with fruit… Always a good idea.%u00a0 As for the mr, I knew that he was bull shitting me about the fruit, or at least I hoped he was cause its go time and there is going to be all sorts of crazy salad stuff going on in here!
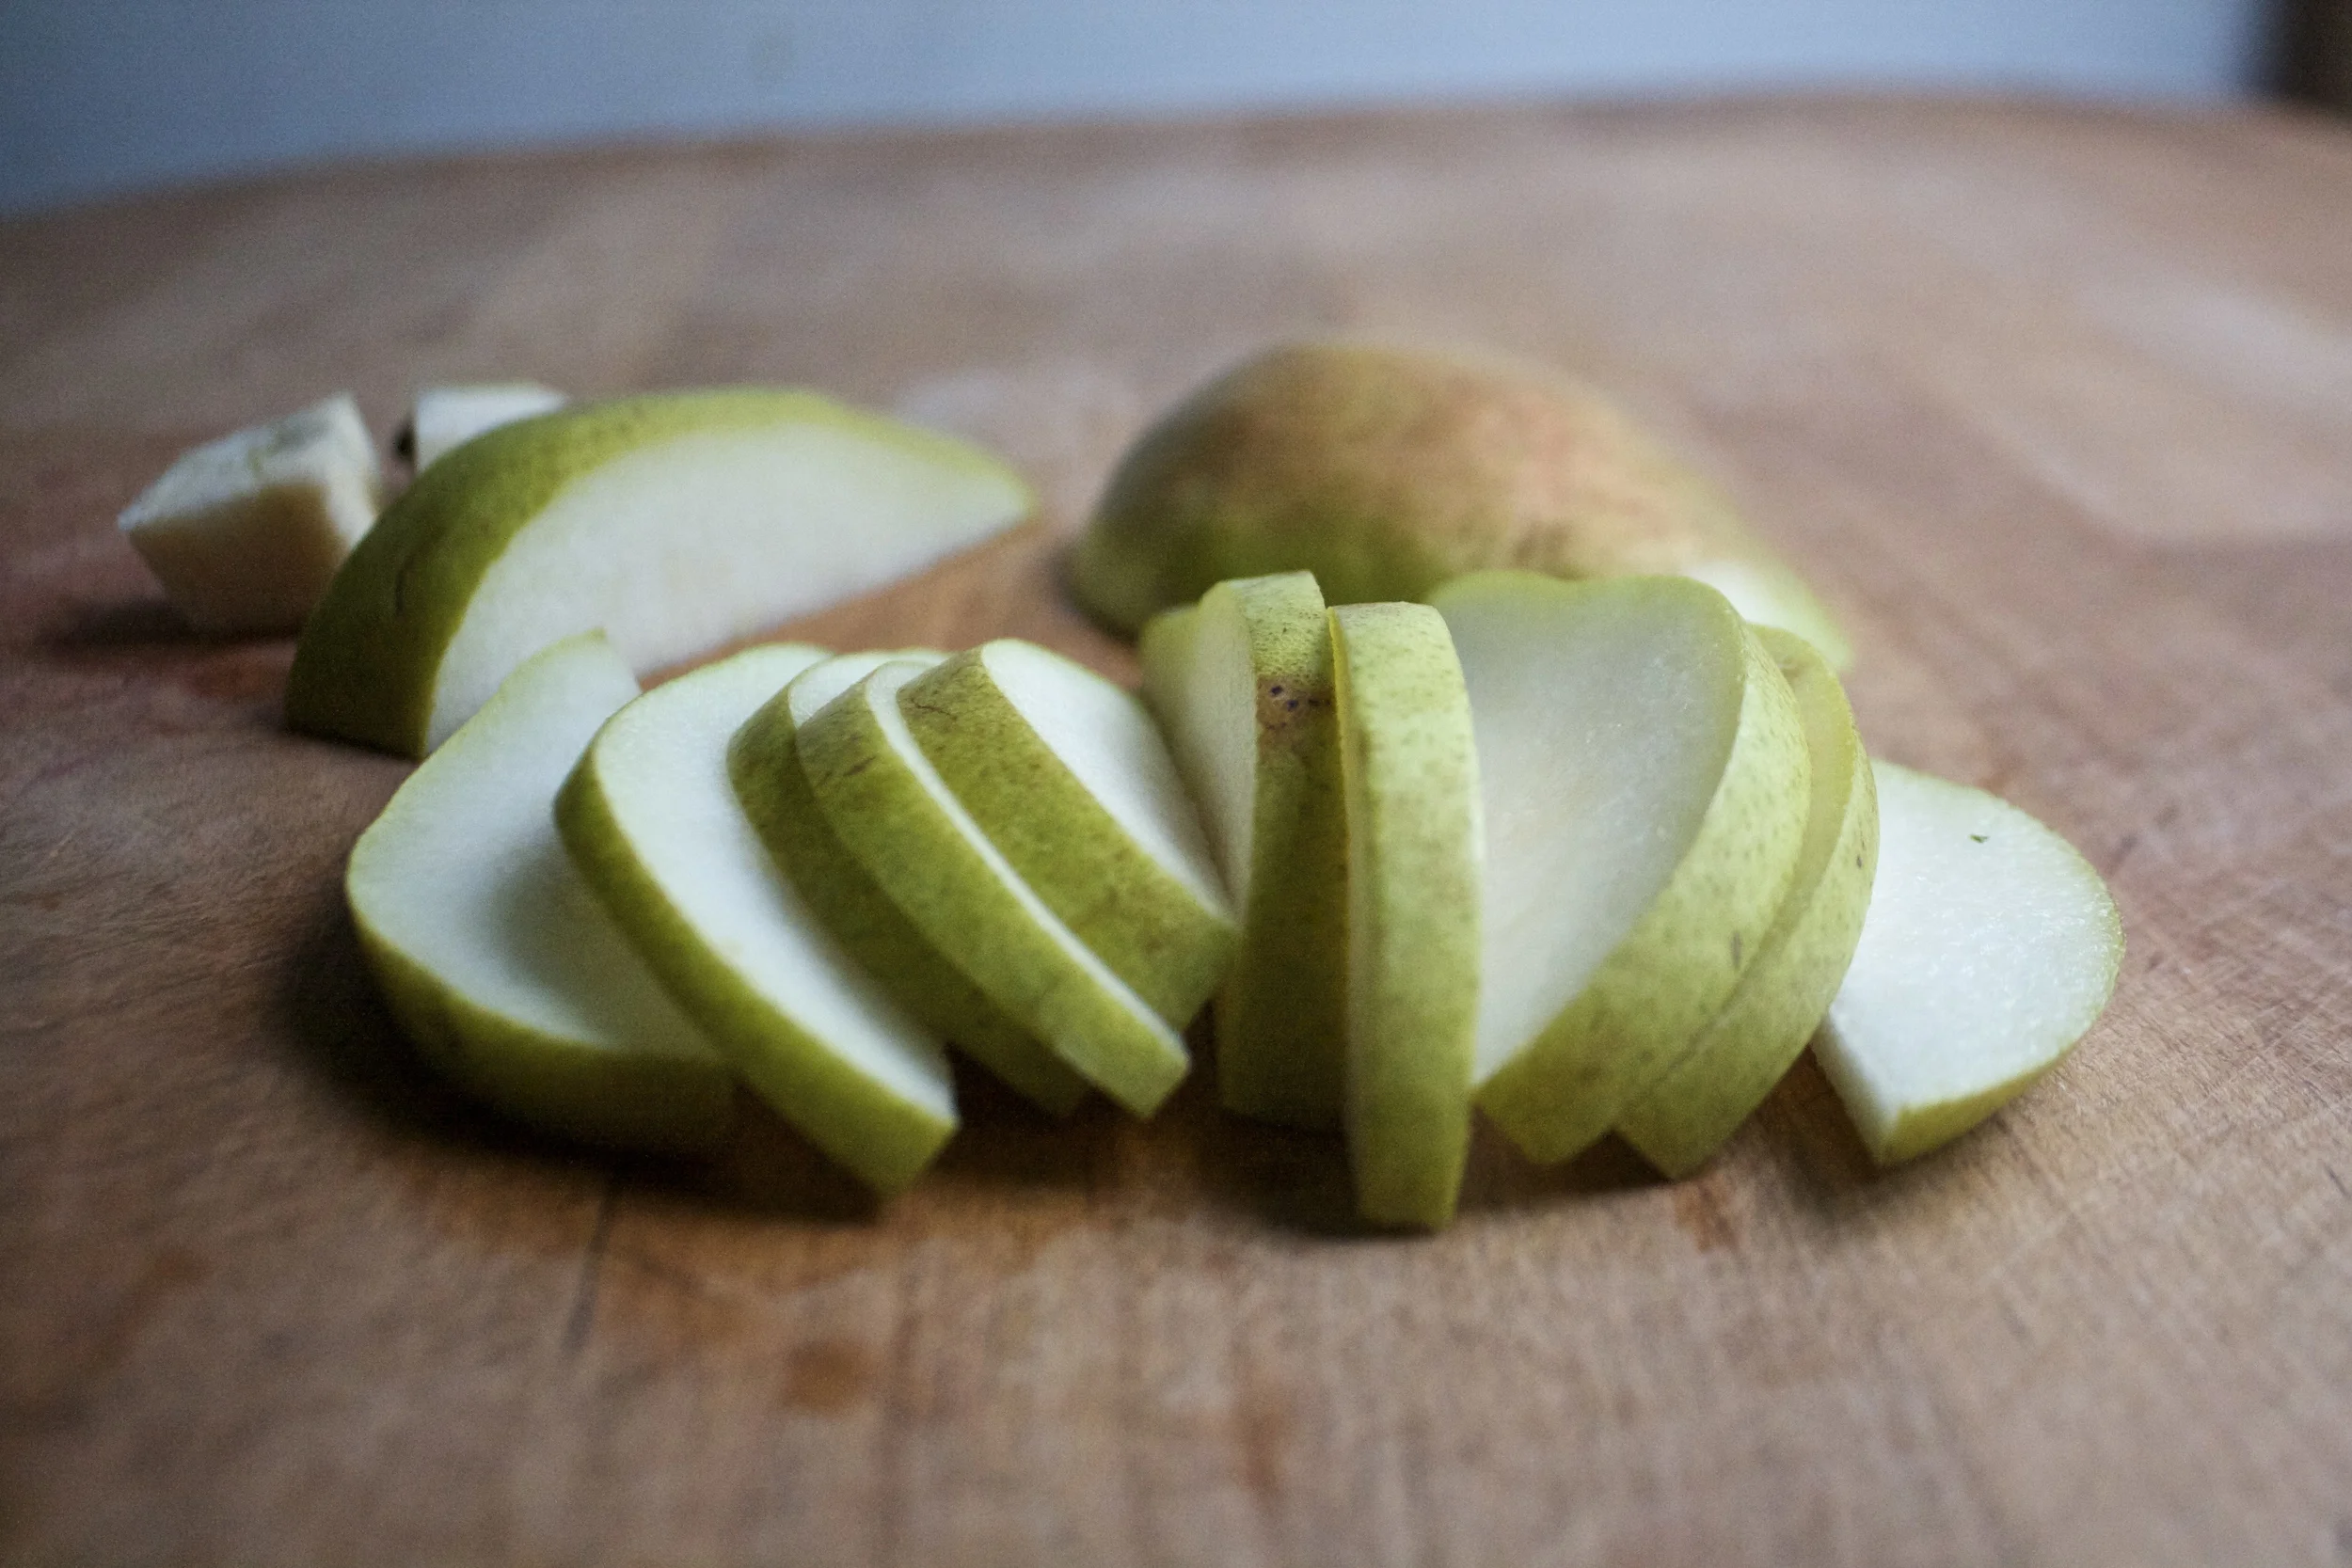
The stuff. A big bowl of a some bitter spicy arugula (you can use any greens you like, but the more bitter ones pair well with the sweetness of the pear) A nice firm pear, some walnuts, a little maple syrup,some balsamic vinegar, and salt and pepper.
Cut the pear in half, remove seeds and stem and slice the pear into slices, not to thick, or to thin.
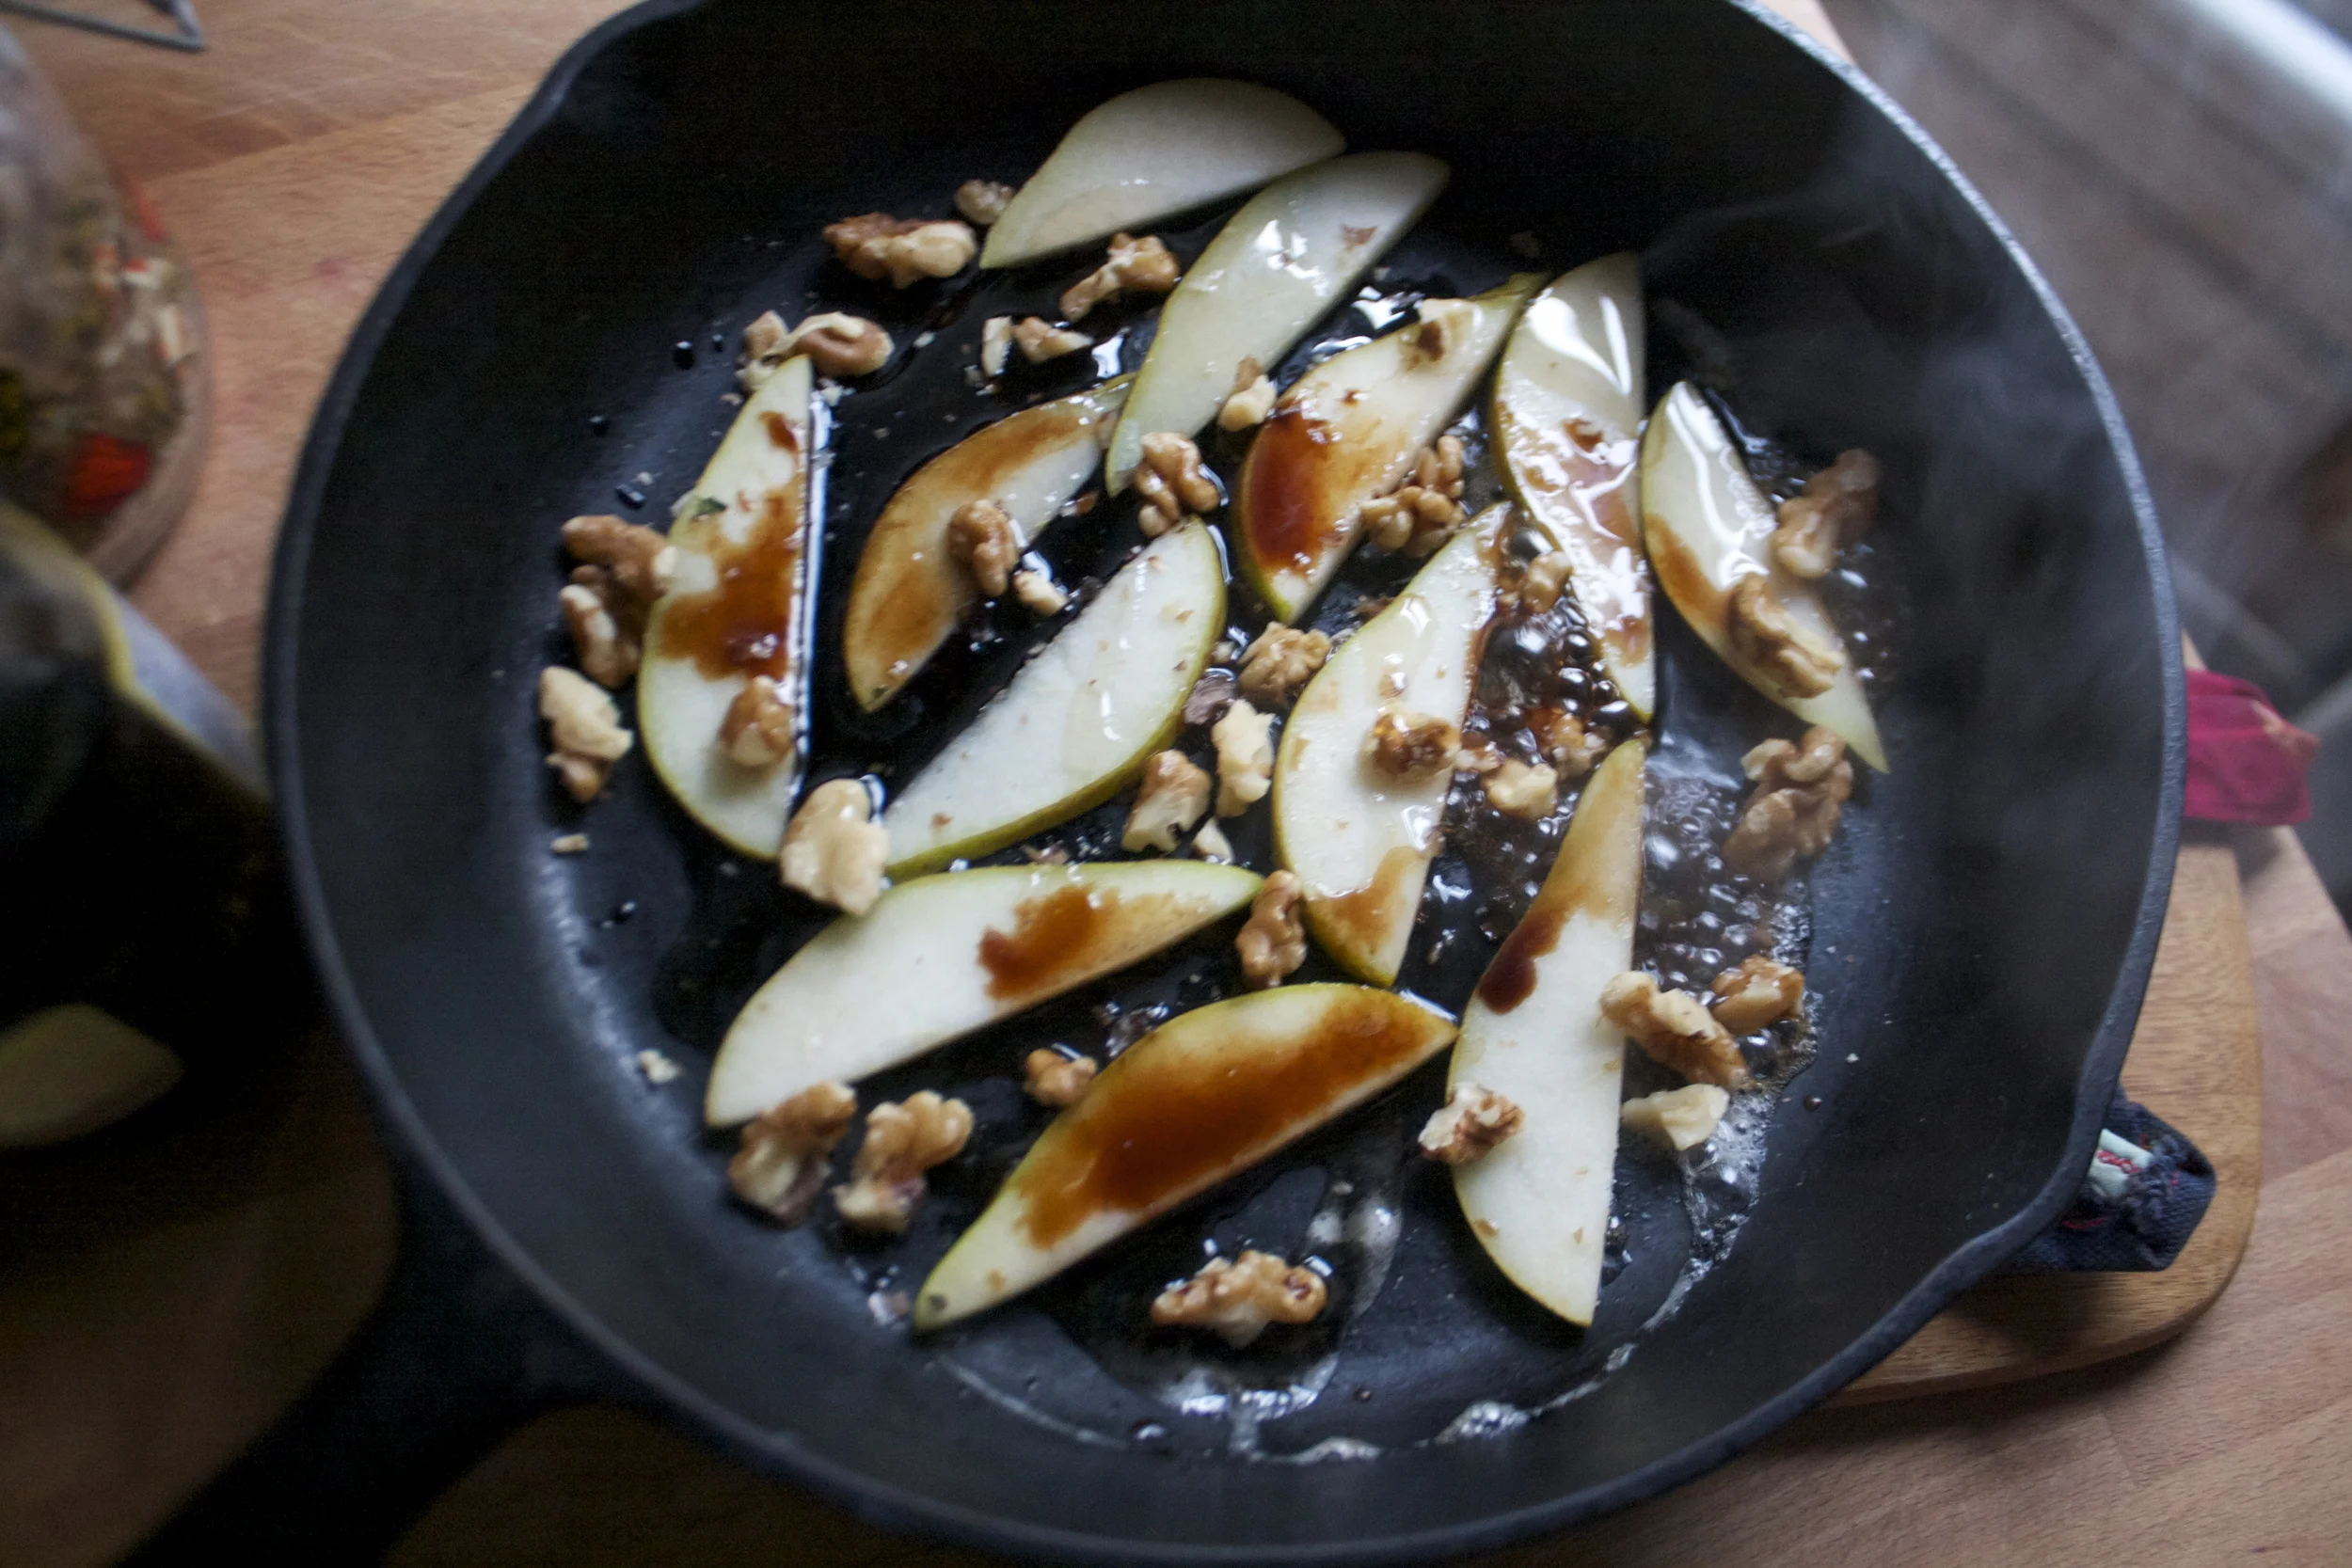
Place those slices into a preheated,%u00a0 dry skillet with a handful of walnuts. to start toasting the walnuts and the pear slices get a little seared.
Note..If your pear is really ripe, skip the sear….i will get mushy and fall apart.
After a minutes or two of searing the pears on each side pour in the maple and vinegar and turn heat down to medium low.%u00a0
Continue to cook for just a few more minutes until the liquid starts to thicken a bit. Look at those beauts….ready for action.
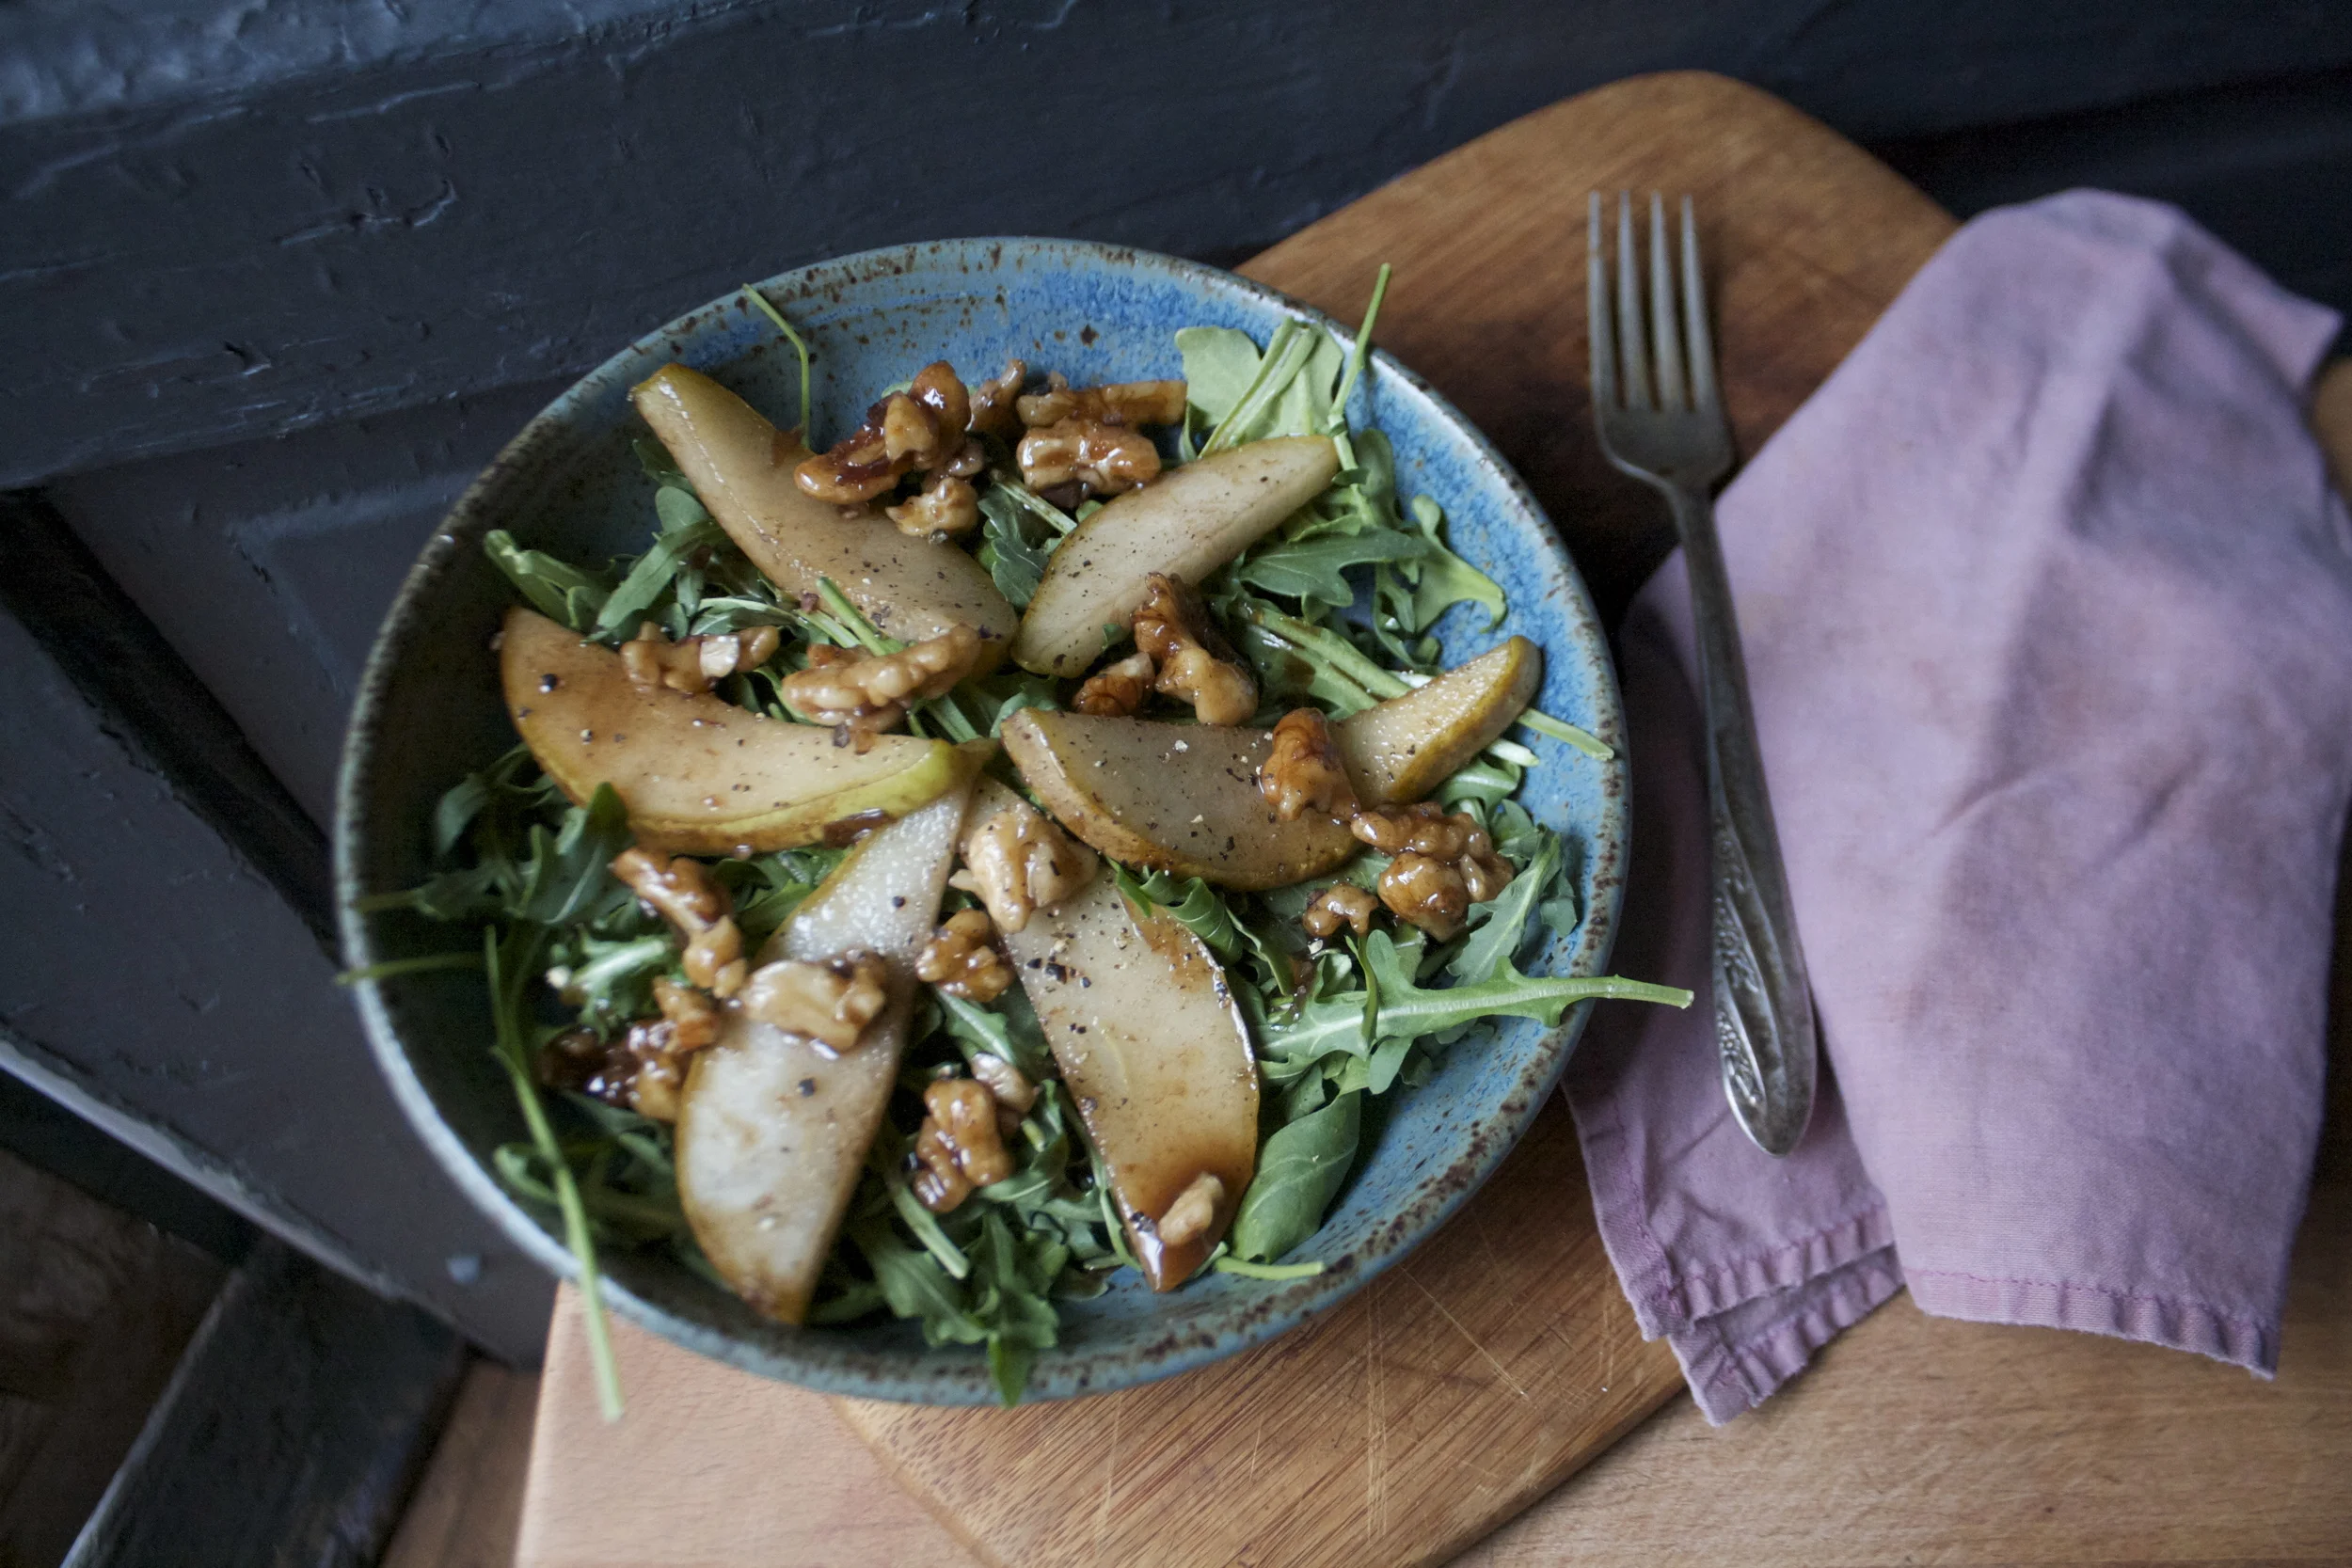
Grab a bowl, fill it with greens and top (dump) with the pears, walnuts and all the liquid in the pan. Sprinkle with salt and pepper and call it..Time to eat.
Such a good bowl of stuff.
Happy Thursday!
-C
Serves 2
1/4 lb (a few big handfuls ) of arugula ….Any green works, but the more bitter the better
1 large firm pear (I used an anjou but any type would work)
2-3 tablespoons maple syrup
3-4 tablespoons balsamic vinegar
good handful of walnuts
salt and pepper to taste
Stick a large fry skillet on the stove and preheat to medium heat.
Now grab yourself a nice firm pear, cut it in half, remove the seed and slice into thin pieces. Place the slices into the preheated dry skillet with the walnuts. The pear slices can touch, but make sure they do not overlap. Sear(they wont turn brown) each side of the pears for about 2 minutes, just to soften it a bit but not to soft or they will get mushy. Also, toss around those nuts a bit to give them a little toast. Once both sides are seared, turn heat to medium low and dump maple and the balsamic vinegar. Cook for another few minutes until the liquid starts to slightly thicken then remove from heat. Place the greens into a bowl and top with the pears, walnuts, and all the liquid left in the pan. Sprinkle with salt ans pepper.
Grab a fork cause a spoon wont work here and eat yourself full of goodness.
Peaches are here. YAY!!! Peaches are for sure one of those fleeting fruits, one that once in season, you need to eat as many fresh as you can because once they are out of season, they are not good. Not good at all. And me being me, I see peaches, I buy a shit load, and now I have a fridge drawer full. Not complaining in the slightest, but peaches cannot sit around all summer waiting to be eaten. So if you are going to buy a shit load, know what you are going to do with them all.
My peaches, well they haven%u2019t had to wait long. I have been eating at least a peach a day and%u2026 I made these bars with a few. Sharing my peaches, thats what I do. HA.
These almond peach shortbread bars. Fantastic A+ on all fronts. Easy to make, not a whole heck of a lot of ingredients, make the house smell amazing, and really kick off the peach, summer vibe thing that goes on around here.
‘%u201cMillions of peaches, peaches for me. Millions of Peaches, peaches for free%u201d %ud83c%udfb6 (Peaches by The Presidents of the United States of America. If you have%u2019t head the song, look it up. I don%u2019t think I can even look at a peach without hearing the song in my head.)
Now to the peach almond shortbread bars!
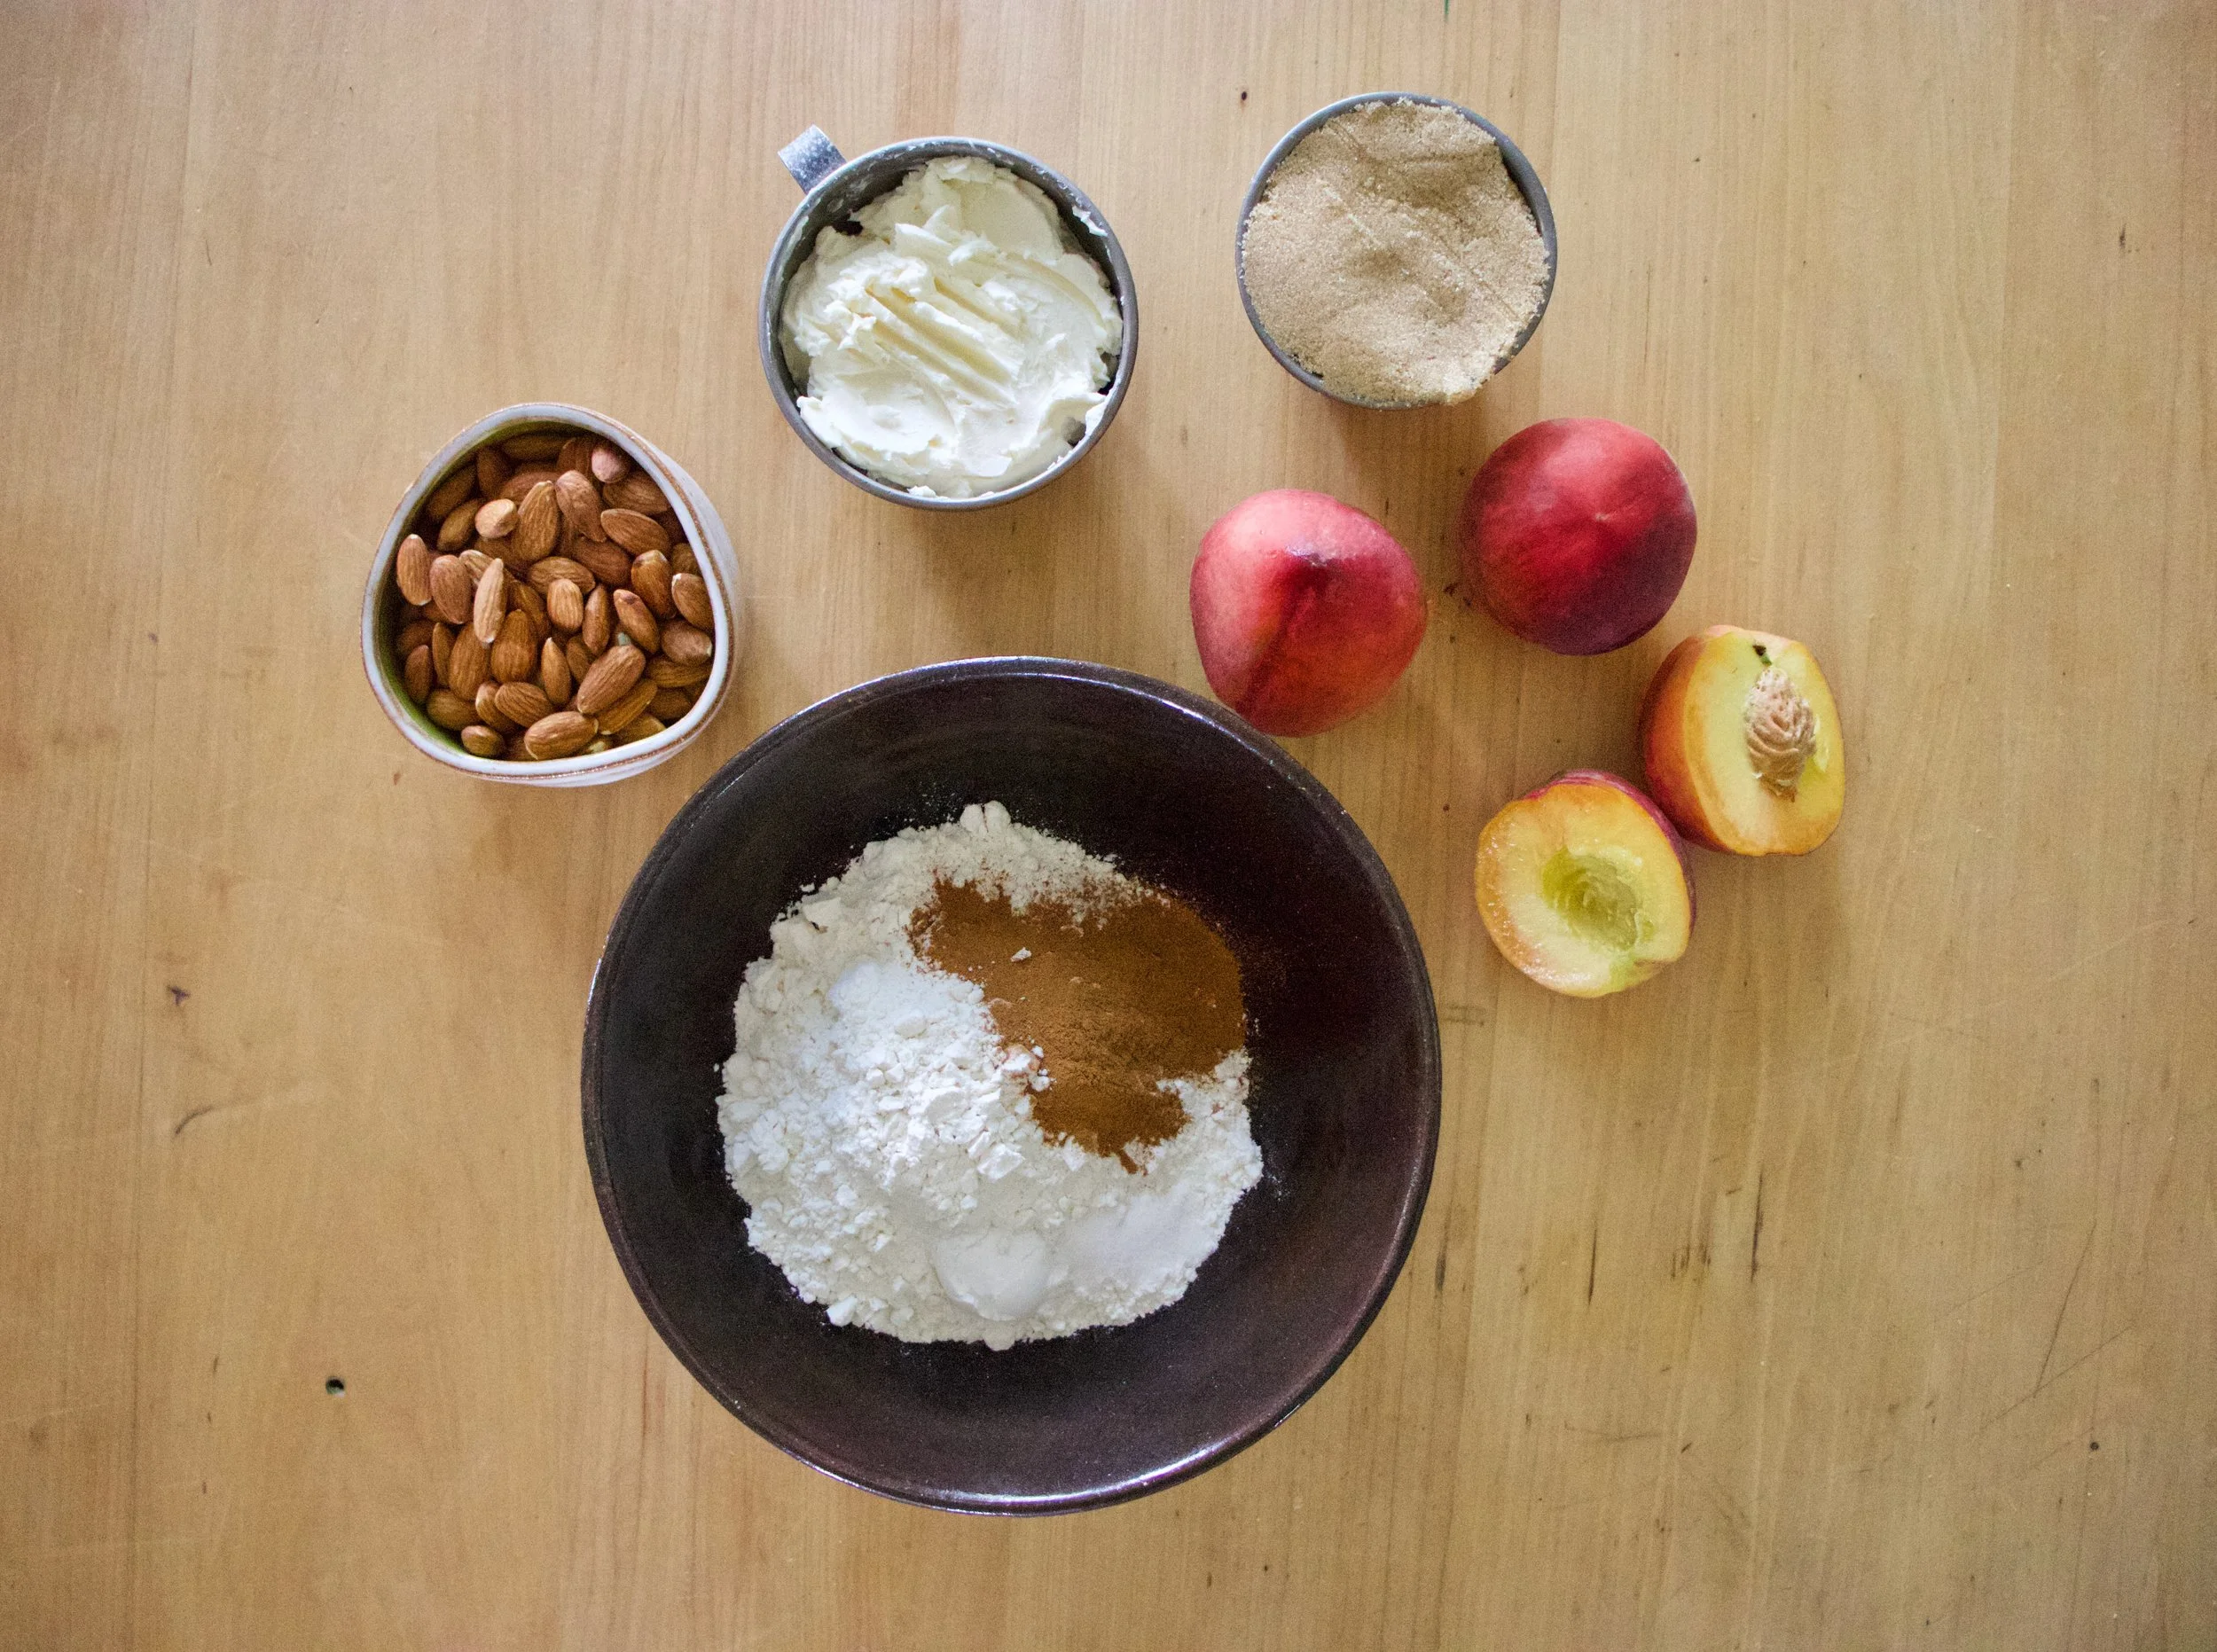
The stuff. Peaches, almonds, vegan butter, brown sugar, flour, cinnamon, salt, and baking powder.
Easy peasy. Almonds go in to food processor first. Blend and pulse for a minute or two until they turn into a medium fine almond meal. (Don%u2019t over blend or you will end up with almond butter.) When almonds are ground, add in the flour, baking powder, salt, cinnamon, and sugar. Pulse until combined. Then add in the butter in chunks and pulse until dough just starts to come together.
Half the dough goes into a 9×9 baking pan. Smooshed evenly all over the bottom poke it with a fork. Then it just needs to go into the oven to bake. 15-18 minutes or so, just until it starts to brown a bit.
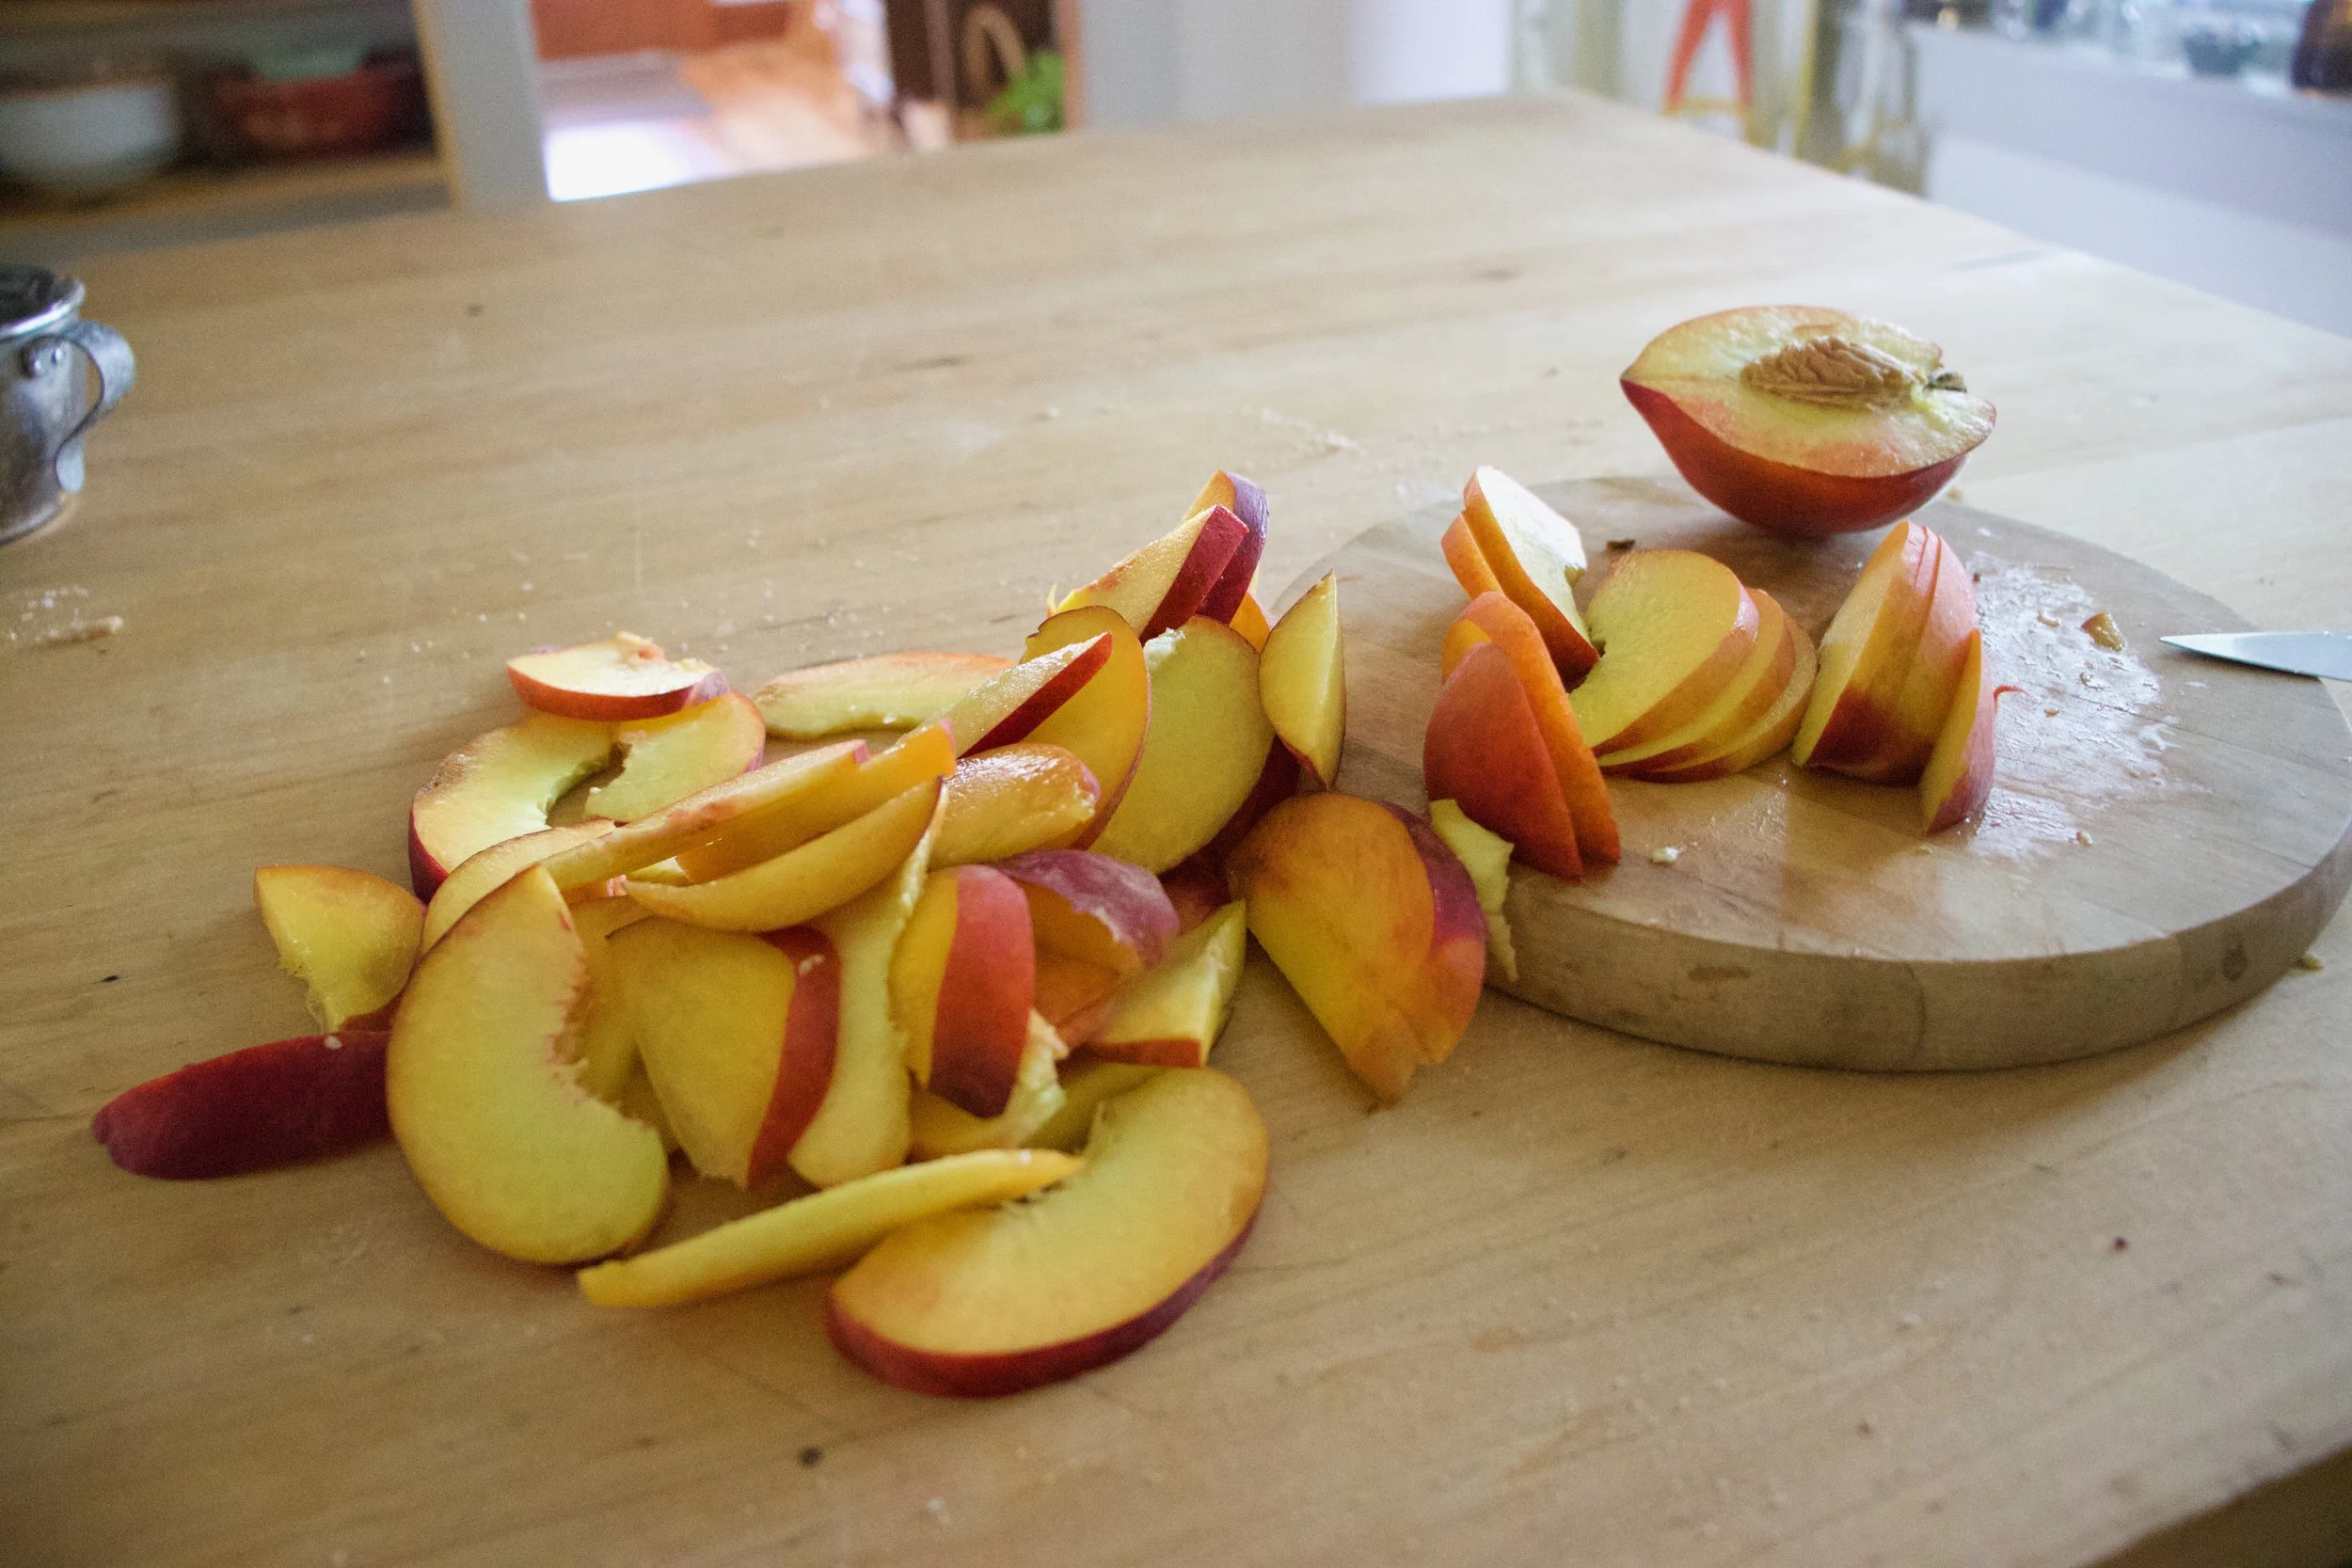
Peaches need to be cut so cut them up. !/2 inch thick slices, after the pits be removed of course.
Blinded baked bottom. Looks good yeah? Let it cool for a few minutes and then it gets peaches. Three rows, all over lapping and nestled together.
The top gets the remaining half of dough and is now it%u2019s ready for the oven. Another 40-ish minutes or so to really seal the deal.
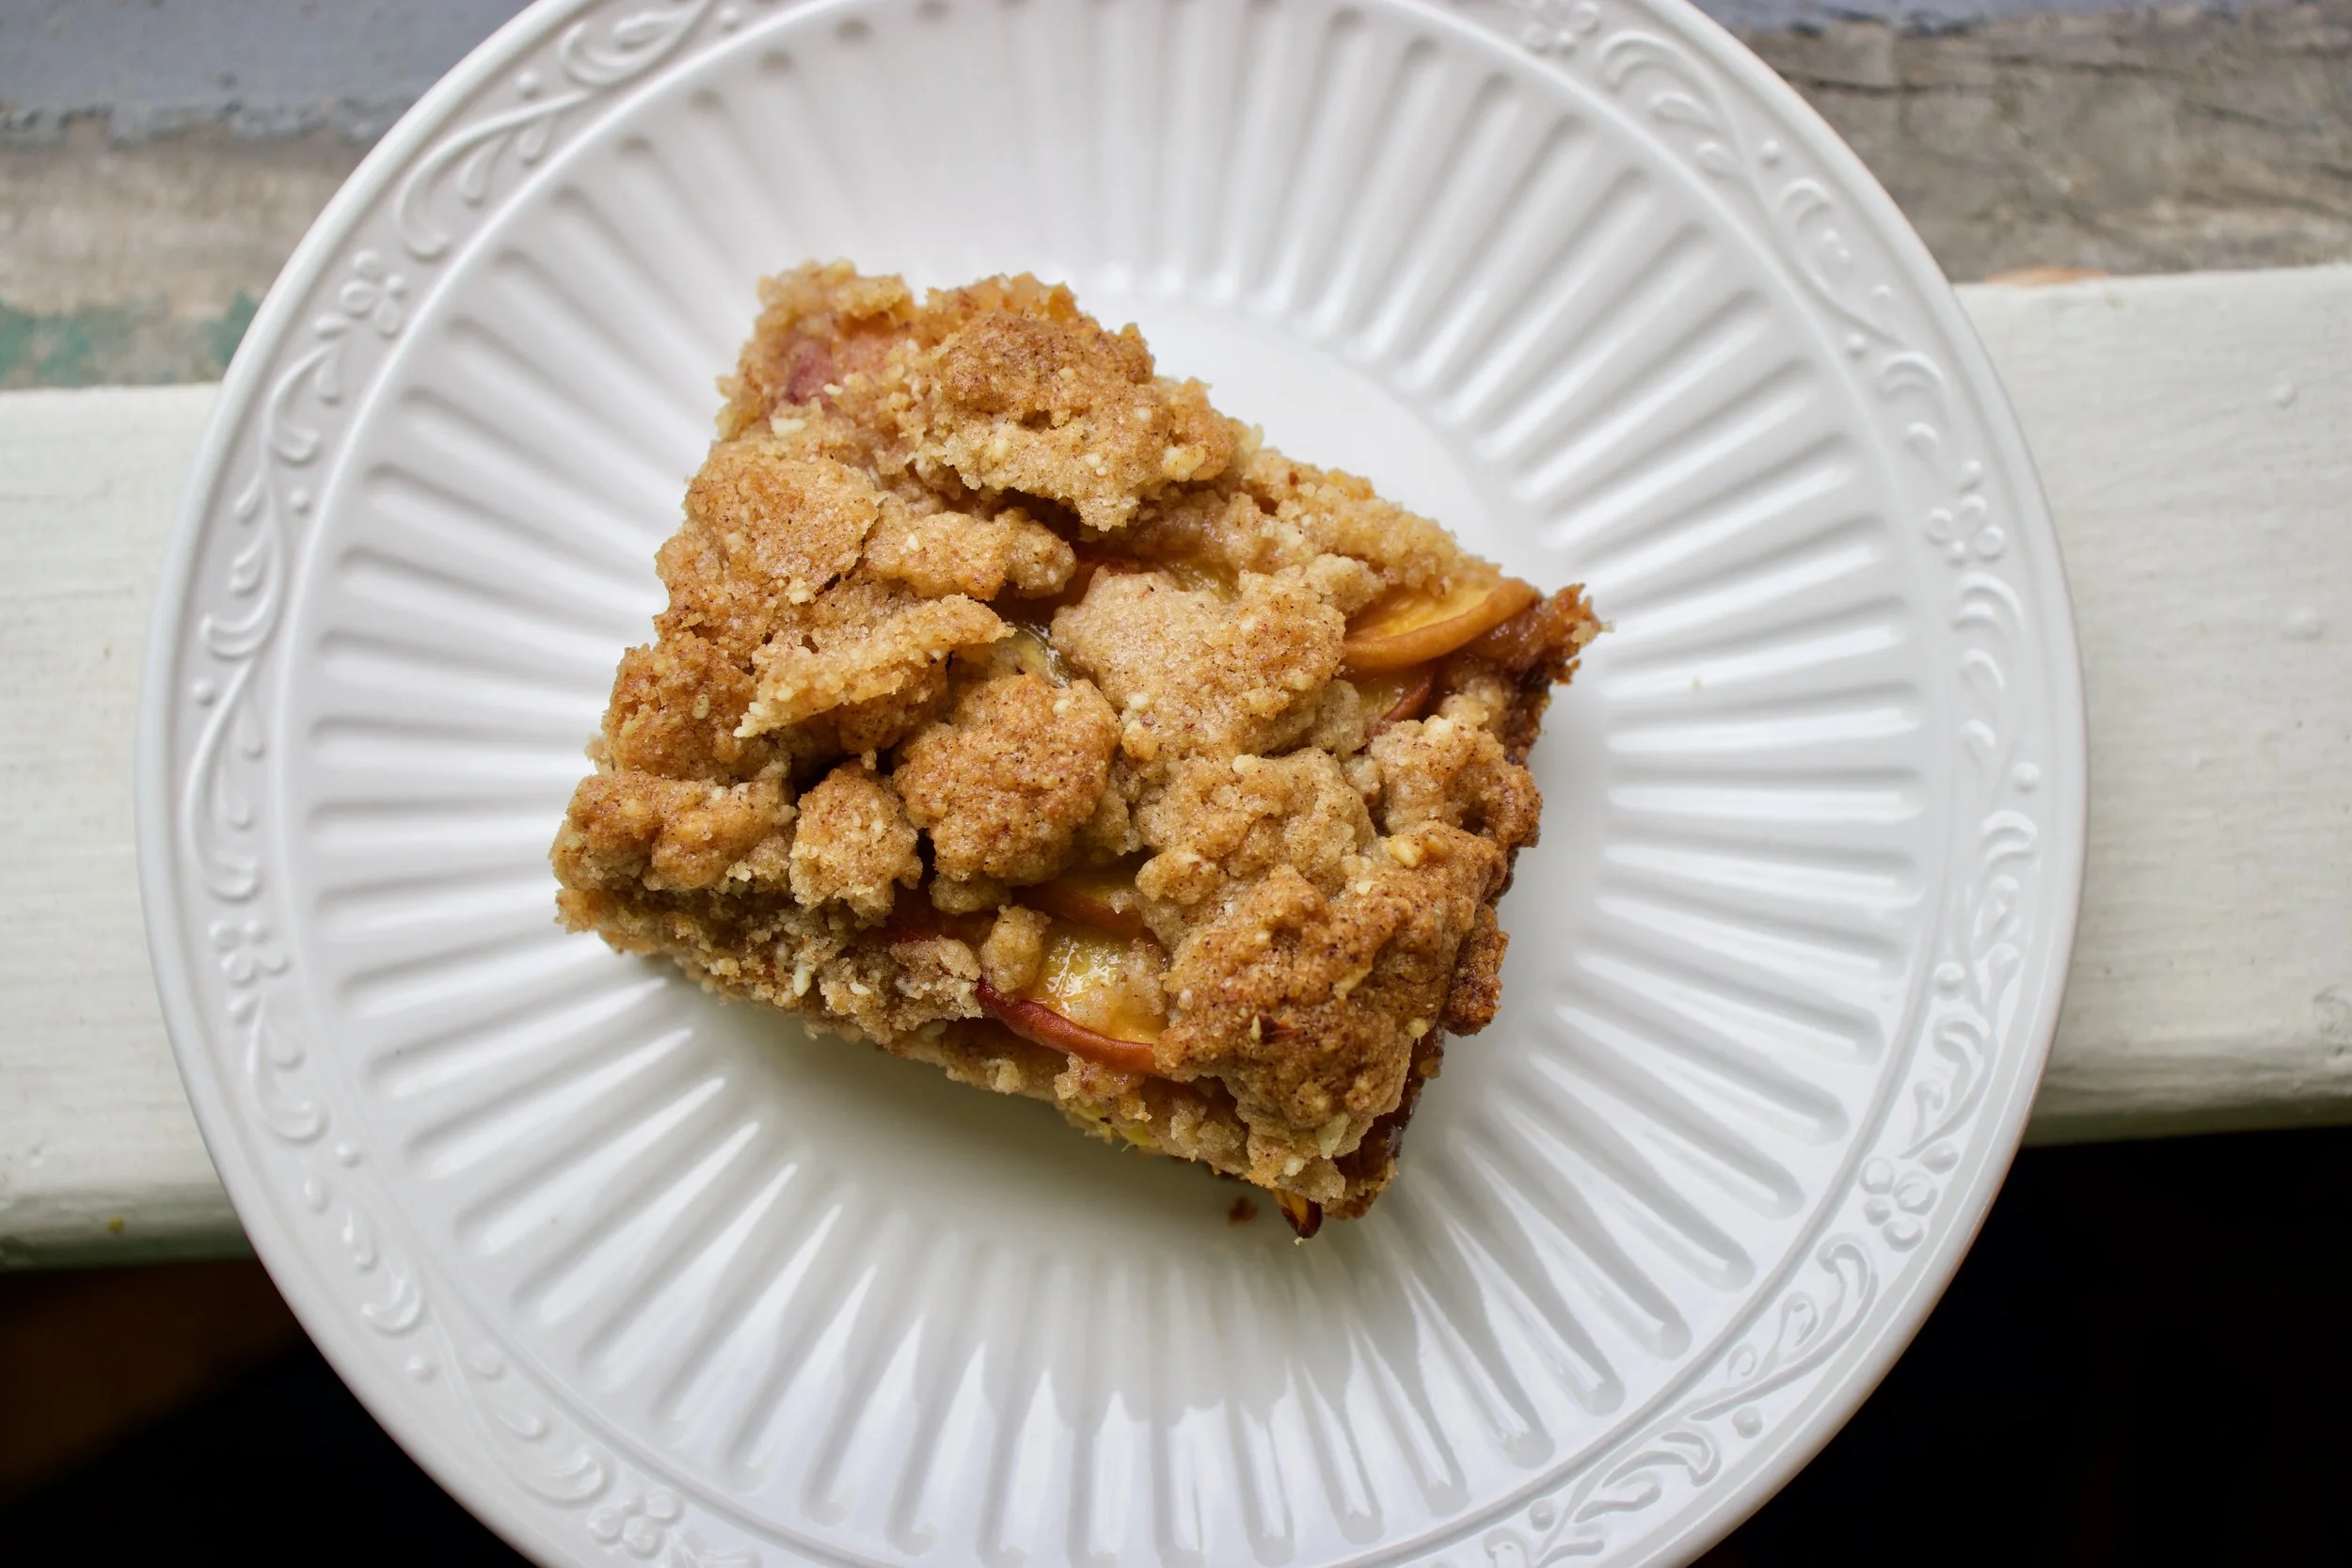
Taken from the oven when golden brown, cooled, cut up, and placed on a pretty plate because pretty is nice.
I am pretty sure you figured out what to do next%u2026. EAT IT!
-C
makes a 9×9 pan which can be cut Into the sizes of your choice
1 cup vegan butter
1 cup packed brown sugar
2 cup cup all purpose flour
1 cups raw almonds
1 teaspoon baking powder
1 teaspoon salt
3 large firm peaches
1 heaping teaspoon cinnamon
Preheat oven 350
Place almonds into a food processor and pulse and blend until a fine meal has formed. It should take only a minute or two and stop half way and scrape the edges and sides do the almonds don%u2019t start to form a paste. Add in the flour, salt, baking powder, cinnamon,and sugar and pulse until combined. Add in the vegan butter in a few chunks and pulse until the mixture turns into a crumbly dough. Stop pulsing and dump mixture into big bowl.
Take half of the mixture and place into a 9×9 baking pan. Evenly distribute and press the dough into the bottom. Take a fork and poke the dough all over then place the pan in the oven. Bake for 15-17 minutes or until the dough just starts to lighly brown. Remove from oven.
While the bottom crust is cooling off for a few minutes, slice peaches into 1/2 inch slices. Obviously make sure to remove pit.
Now take your half baked crust and layer peaches evenly on top. It is easies to start at the top, make three rows across and then layer the peaches down (like in the picture above). Once peaches are layered, grab the remaining half of dough and evenly distribute on top. Place back into oven and bake for another 40-45 minutes or until the crumble on top is a nice deep golden brown.
Remove from oven, let coo completely (or as completely as you can) cut into pieces, and then you eat it.
Left over pieces should be placed in an airtight container in the fridge for up to 5 days. They freeze well individually wrapped too.
blind back for about 15 minutes of until the crust is starting to brown around the edges
bake for another 30 minutes
I found another bag of frozen rhubarb in the chest freezer which is never a bad thing, but my rhubarb patch outside is growing strong and I will have all the fresh rhubarb I could possible eat within the next few weeks. So found rhubarb just means I need to eat it right fast before the fresh stuff comes in. (I haven%u2019t had a problem with that. it%u2019s almost gone already). Plus the other day while I was digging up and transplanting raspberry bushes to the back yard, my neighbor came over and gave me a gallon of frozen raspberries, harvested from said bushes that I was currently planting in my yard. Score for me! Free bushes and berries%u2026I have such nice neighbors.
So the logical thing to do with my new found and giving bounty was of course to hurry up and bake something. Cobbler. Why cobbler? Well, why not? I figured the mr would really like it and eat it and I also didn%u2019t want to make anything to fussy because I was just to dang busy spending all of my extra time outside doing outside things. And cobbler, it%u2019s not fussy because it is basically biscuits and jam baked up all together. Not a lot to think about and comes out looking all homey and sweet and smelling all nice and cozy. Doesn%u2019t that sound nice? And not a pain in the ass?
And best part. A made cobbler works as dessert or breakfasts or just a snack. Just asked the mr. He ate it for all the reasons. With a dollop of yogurt or cream of course because he is fancy like that.
And yeah the fruit I used was frozen, but fresh works just the same here too.
Now, lets get to that cobbler.
The stuff. Raspberries (frozen), rhubarb (frozen), sugar, flour, salt, baking power, cinnamon ,almond milk, apple cider vinegar, cornstarch, and oil.
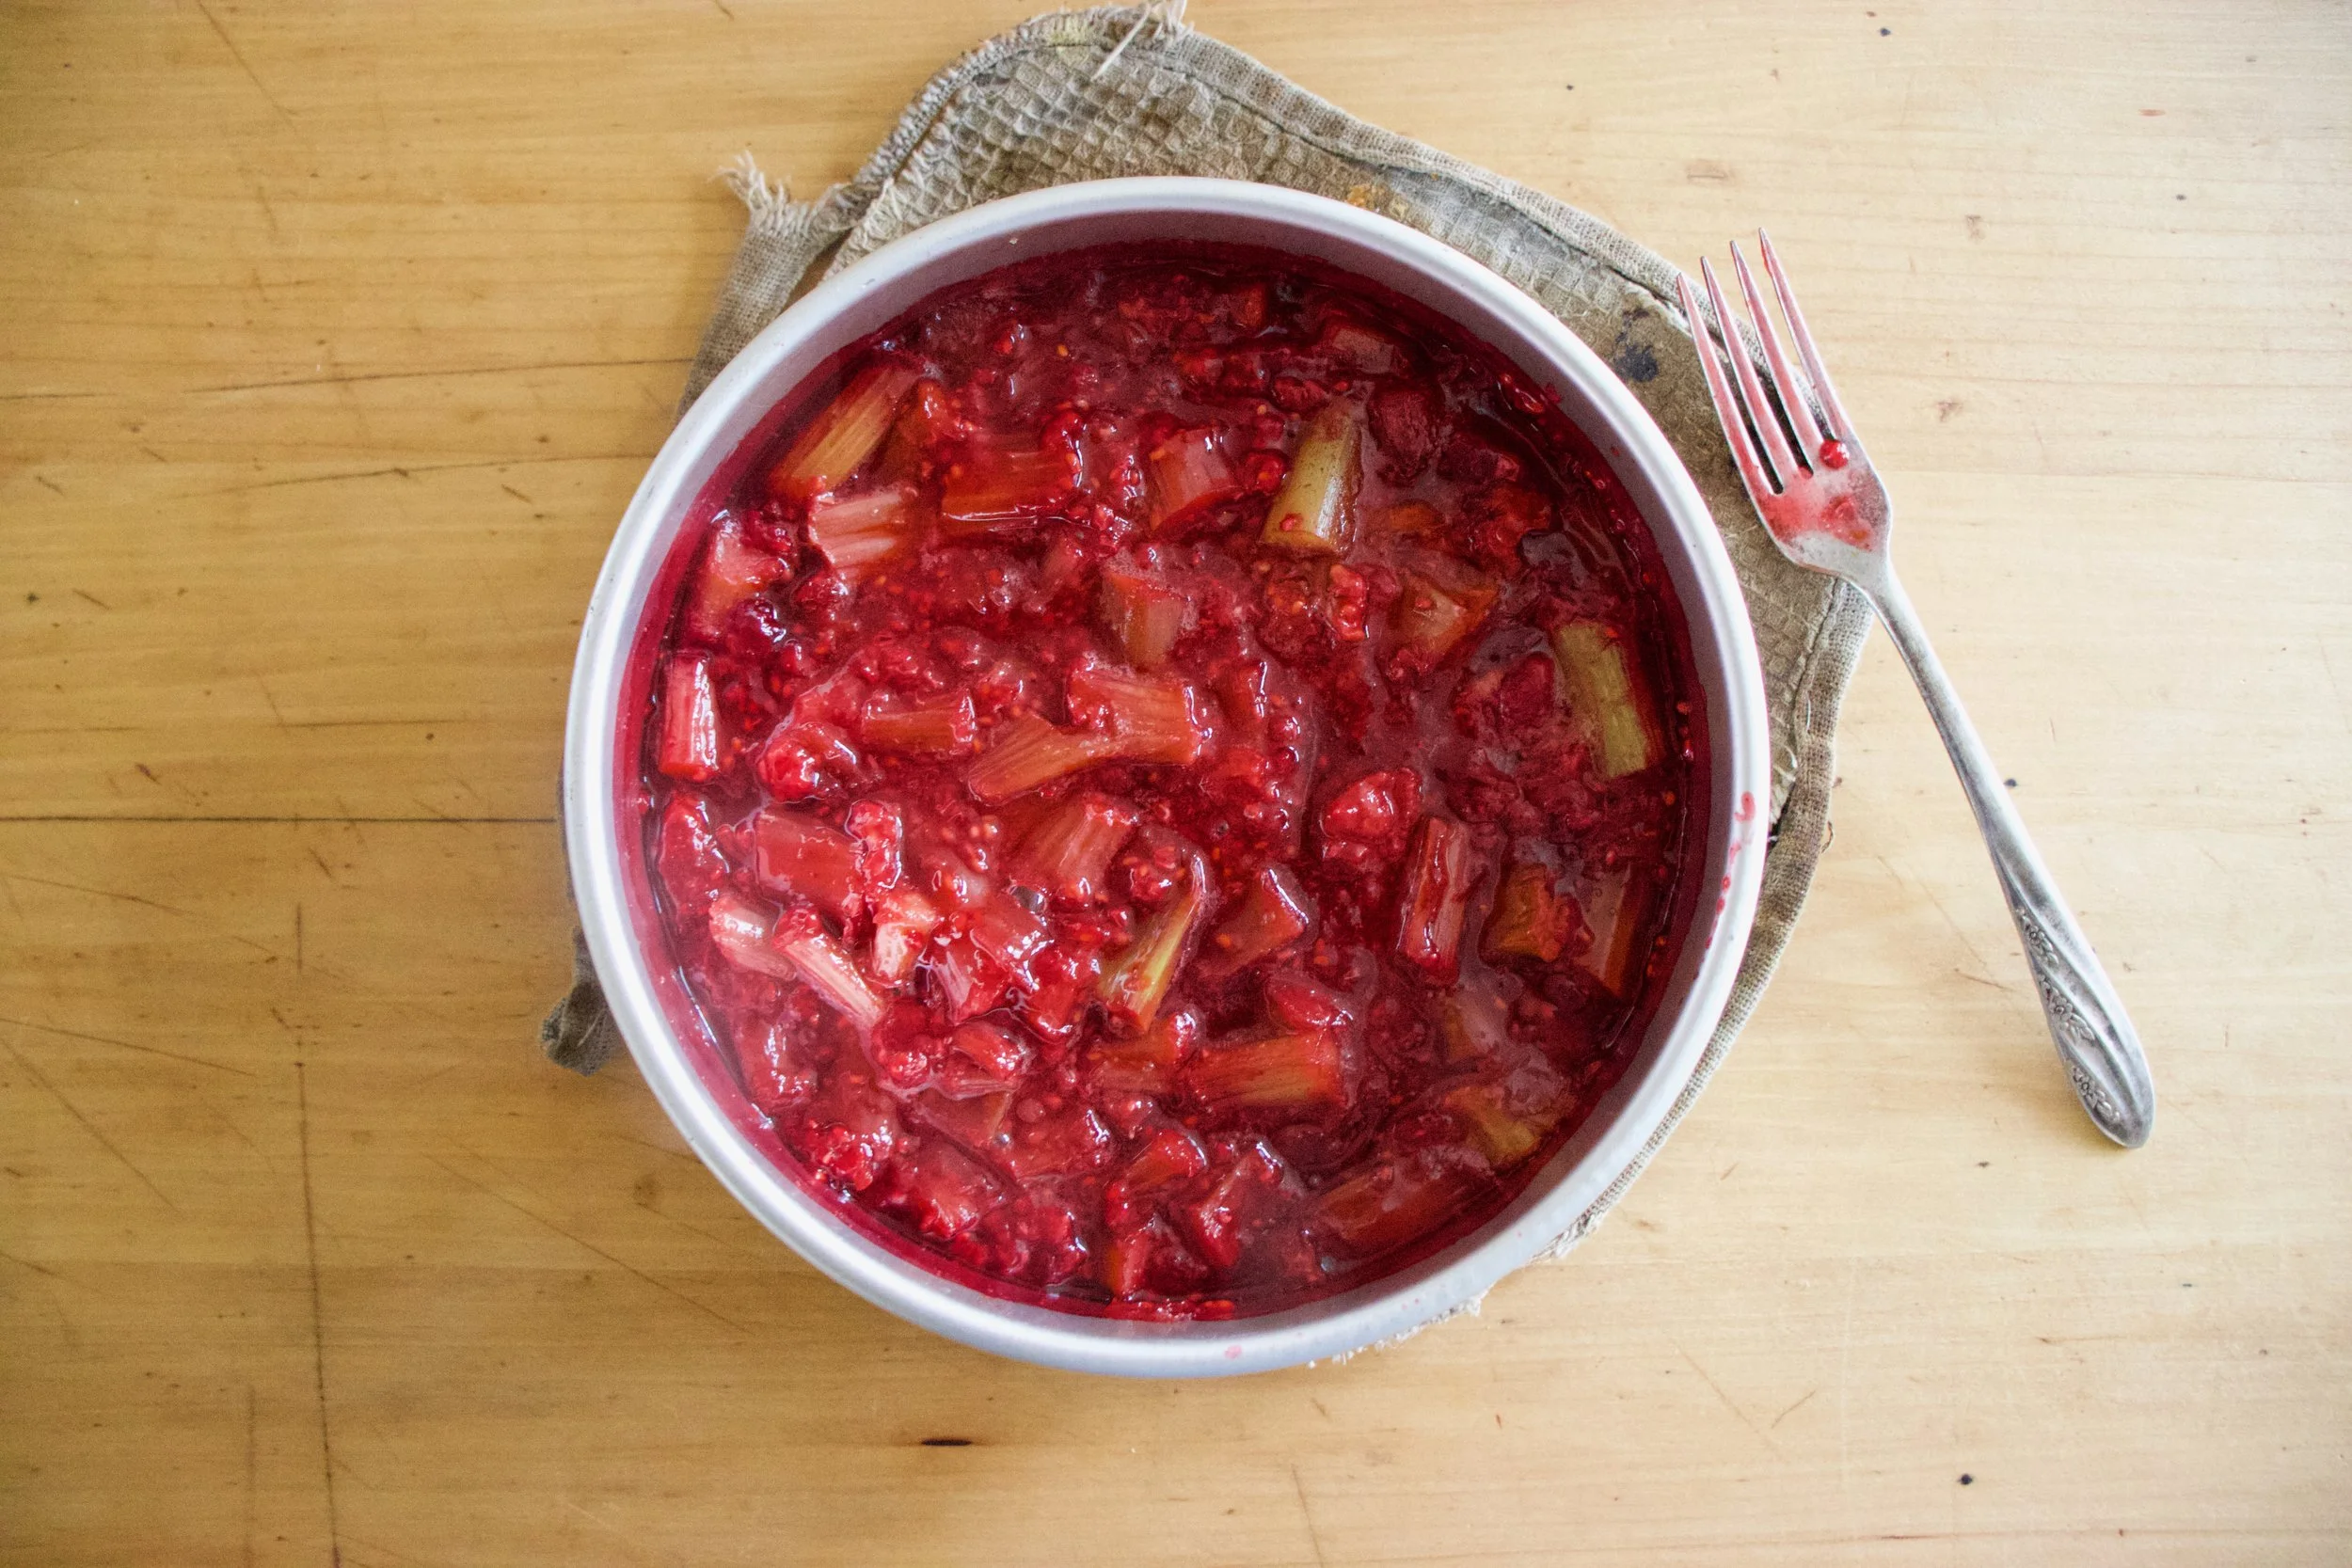
Raspberries, rhubarb, sugar, cinnamon, cornstarch. Its all there in the bowl. Just needs to be mixed. So mix it.
Dump fruit mixture into well greased 8 inch pan and pop it into a hot oven to get a head start on baking.
While the fruits in the oven, make the biscuit dough. Mix the dry together then mix in the wet until just incorporated and a sticky dough forms.
Pulled from the oven, the fruit is starting to cook down and whoa, it just smells so good!
Drop on the biscuits dough on top of the fruit (careful of the hot pan). Evenly if possible, but don%u2019t work to hard to make it look perfect. Imperfection makes it look perfect, you know?
Once biscuits are on, lightly brush the tops with a little milk and sprinkle with more sugar then pop it back into the oven for another 25-30 minutes or until the biscuits are baked.
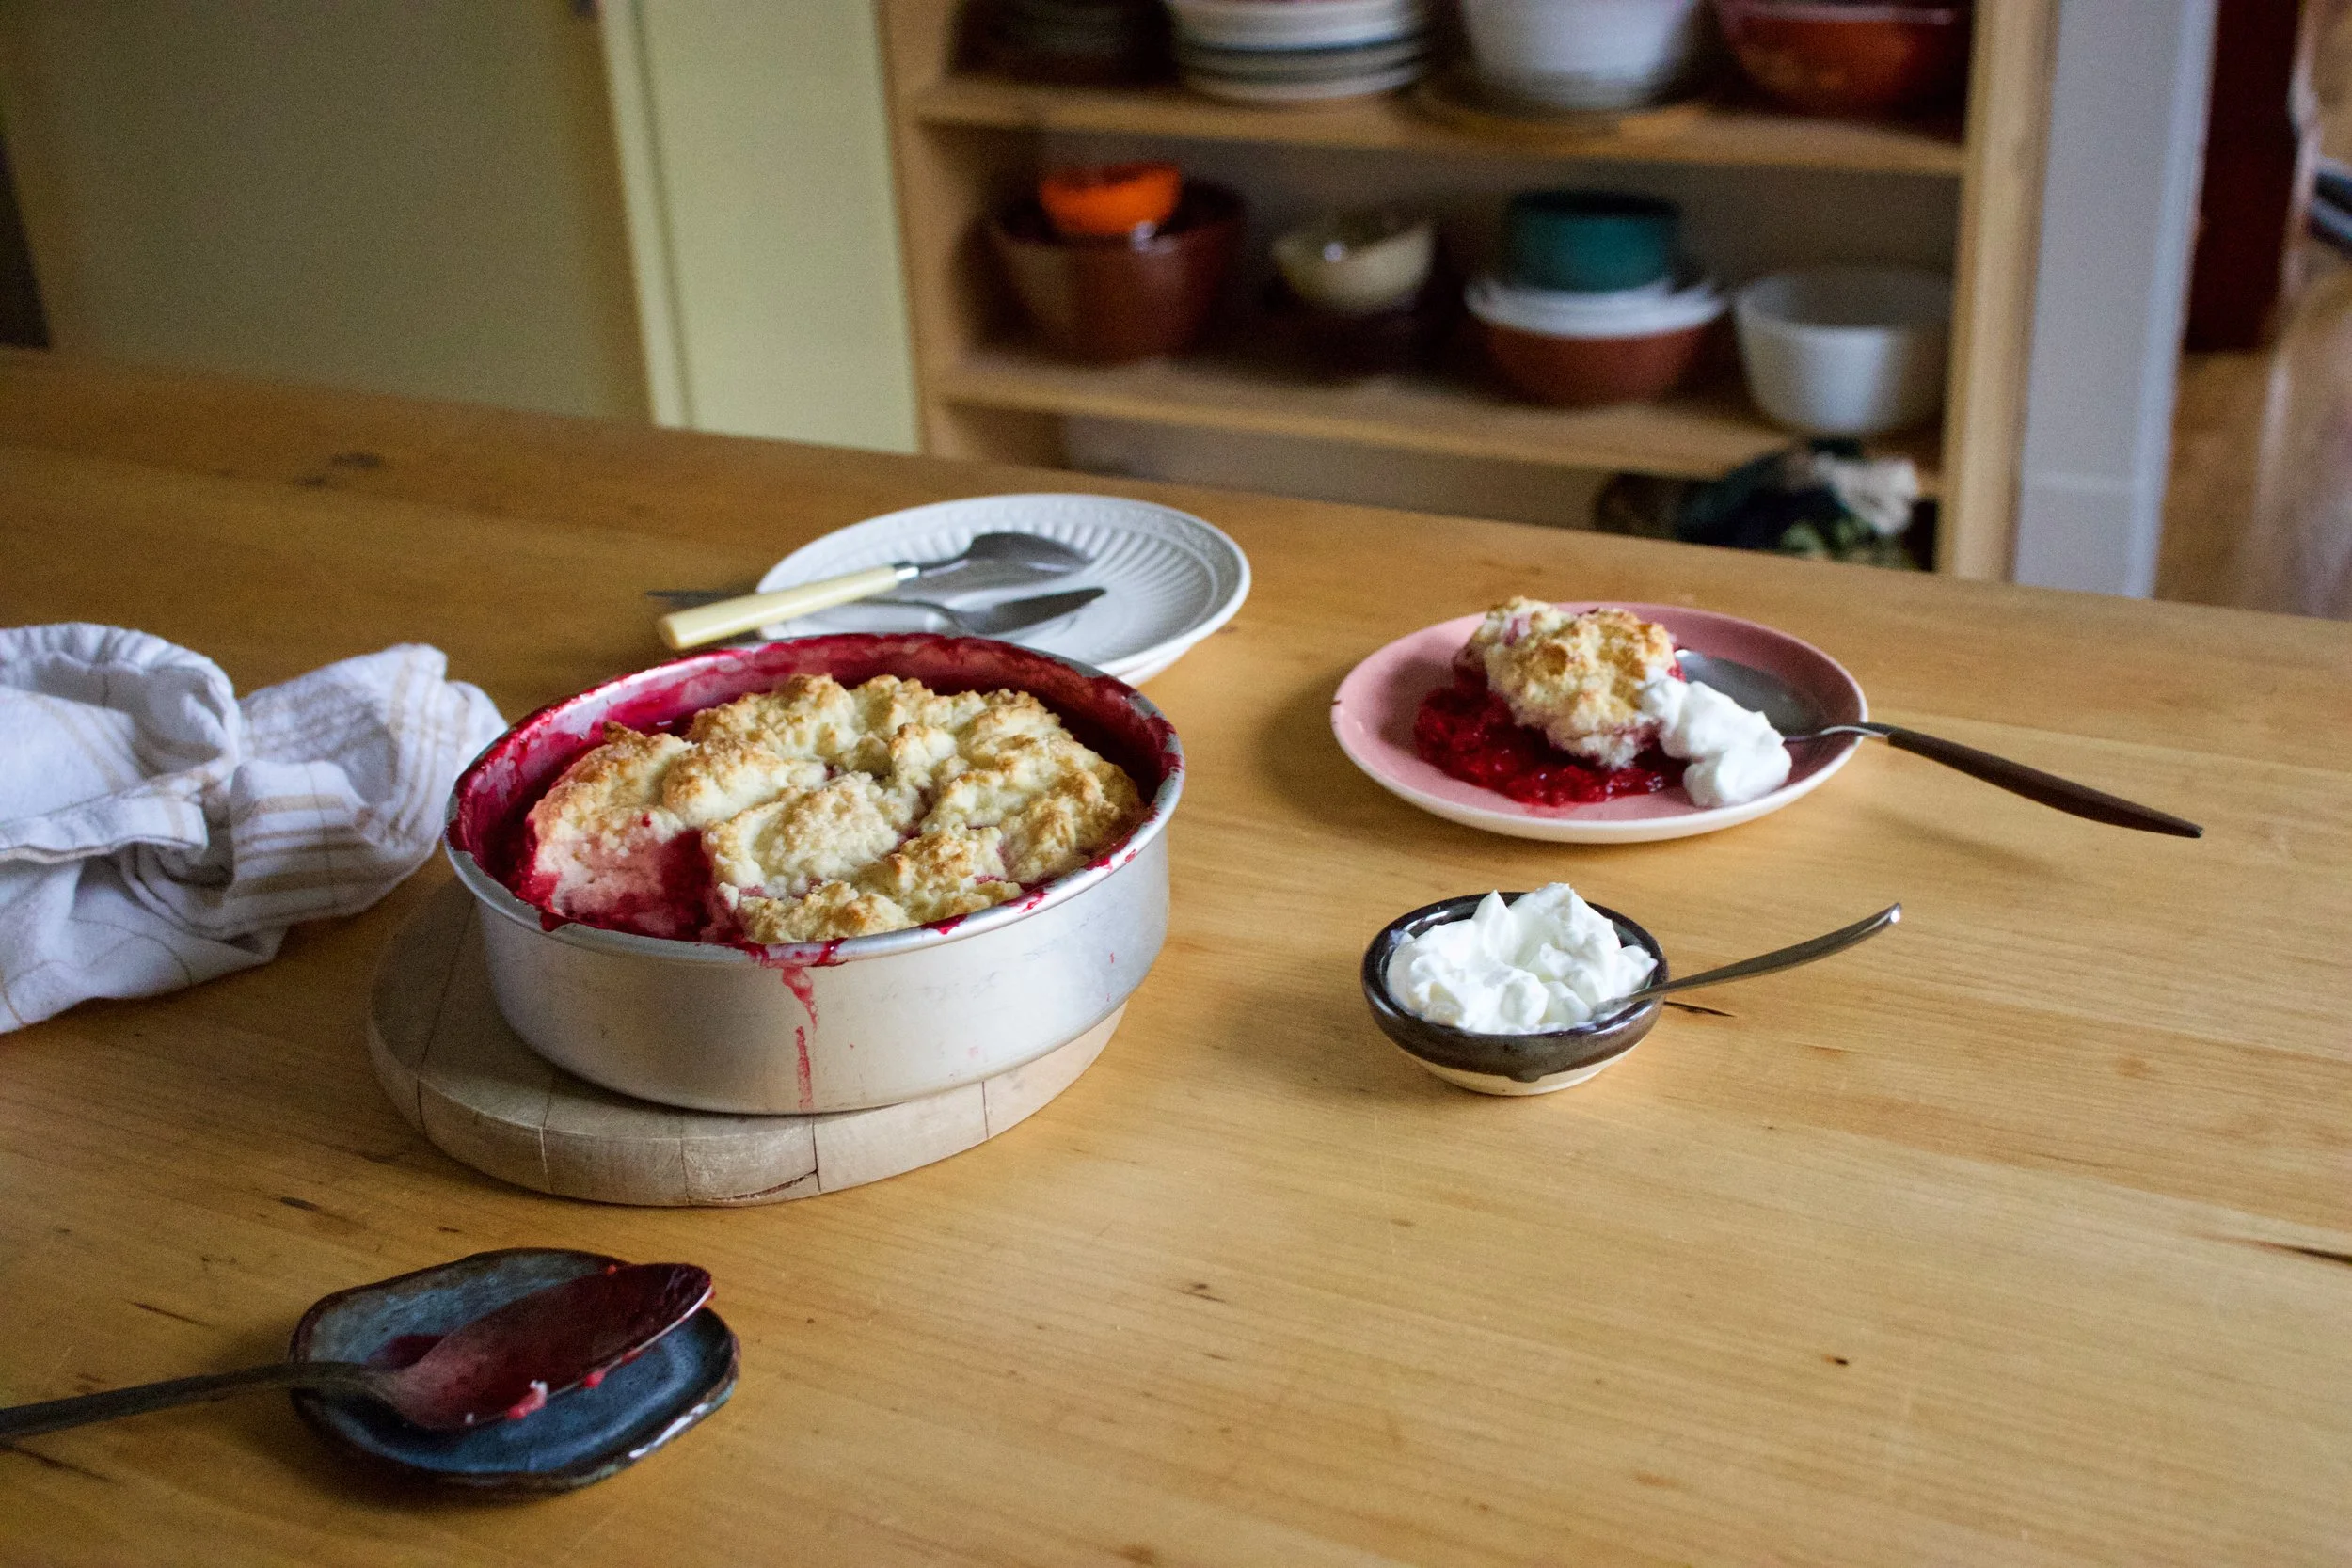
Pulled from the oven with a bubbly filling and a golden brown biscuity top. Things are looking good here.
And now it%u2019s time.
Dig on in my friend. Sever with something creamy like whipped coconut cream or some type of yogurt or ice cream situation of your choice. And again, this can be your breakfast.
Happy spring people!
-C
make a a 8 inch round which serves 5-6
For the Filling
2 cups raspberries (fresh or frozen)
2 cups rhubarb chopped into 1/2 inch to inch long pieces (fresh or frozen)
1 1/2 tablespoons corn starch
3/4 -1 cup sugar (lesser amount if you like a little more tartness. I used lesser amount)
1 teaspoon cinnamon
For the dough
1 cups all purpose flour
1 1/2 teaspoon baking powder
1/2 teaspoon salt
3 tablespoons sugar
3 tablespoons neutral flavored oil
1/2 cup plant based milk
1 teaspoon apple cider vinegar
Preheat oven to 350.
In a large bowl mix together the rhubarb and raspberries with the corn starch, sugar, and cinnamon. Grease a 8 inch round pan the is at least 2 inches deep (can use a slightly large pan or a square) and dump in fruit mixture. Place into oven to bake for about 15 minutes or the fruit starts to break down.
While fruit is baking, mix up biscuit dough. Flour, salt, 2 tablespoons sugar, and baking powder go in a large bowl and mixed until combined. Add in the oil, the milk, and the vinegar. Mix until just incorporated and a dough has formed.
Remove the fruit cooking from the oven. Turn heat up to 375.
Carefully drop spoonfuls of biscuit batter on top of fruit. Brush the top of the biscuits with a little milk and sprinkle with remaining tablespoon sugar. Place the pan back into the oven and bake for another 25-30 minutes or until the biscuits are all nice and golden brown on top.
Remove from oven and let cool for a few minutes before serving. Serve warm with a scoop or dollop of soothing creamy (coconut cream, yogurt, ice cream%u2026..whatever floats your boat.)
Left overs can be stored in pan, just cover it with something and place in fridge. Can be eaten cold to or reheated in microwave or oven.
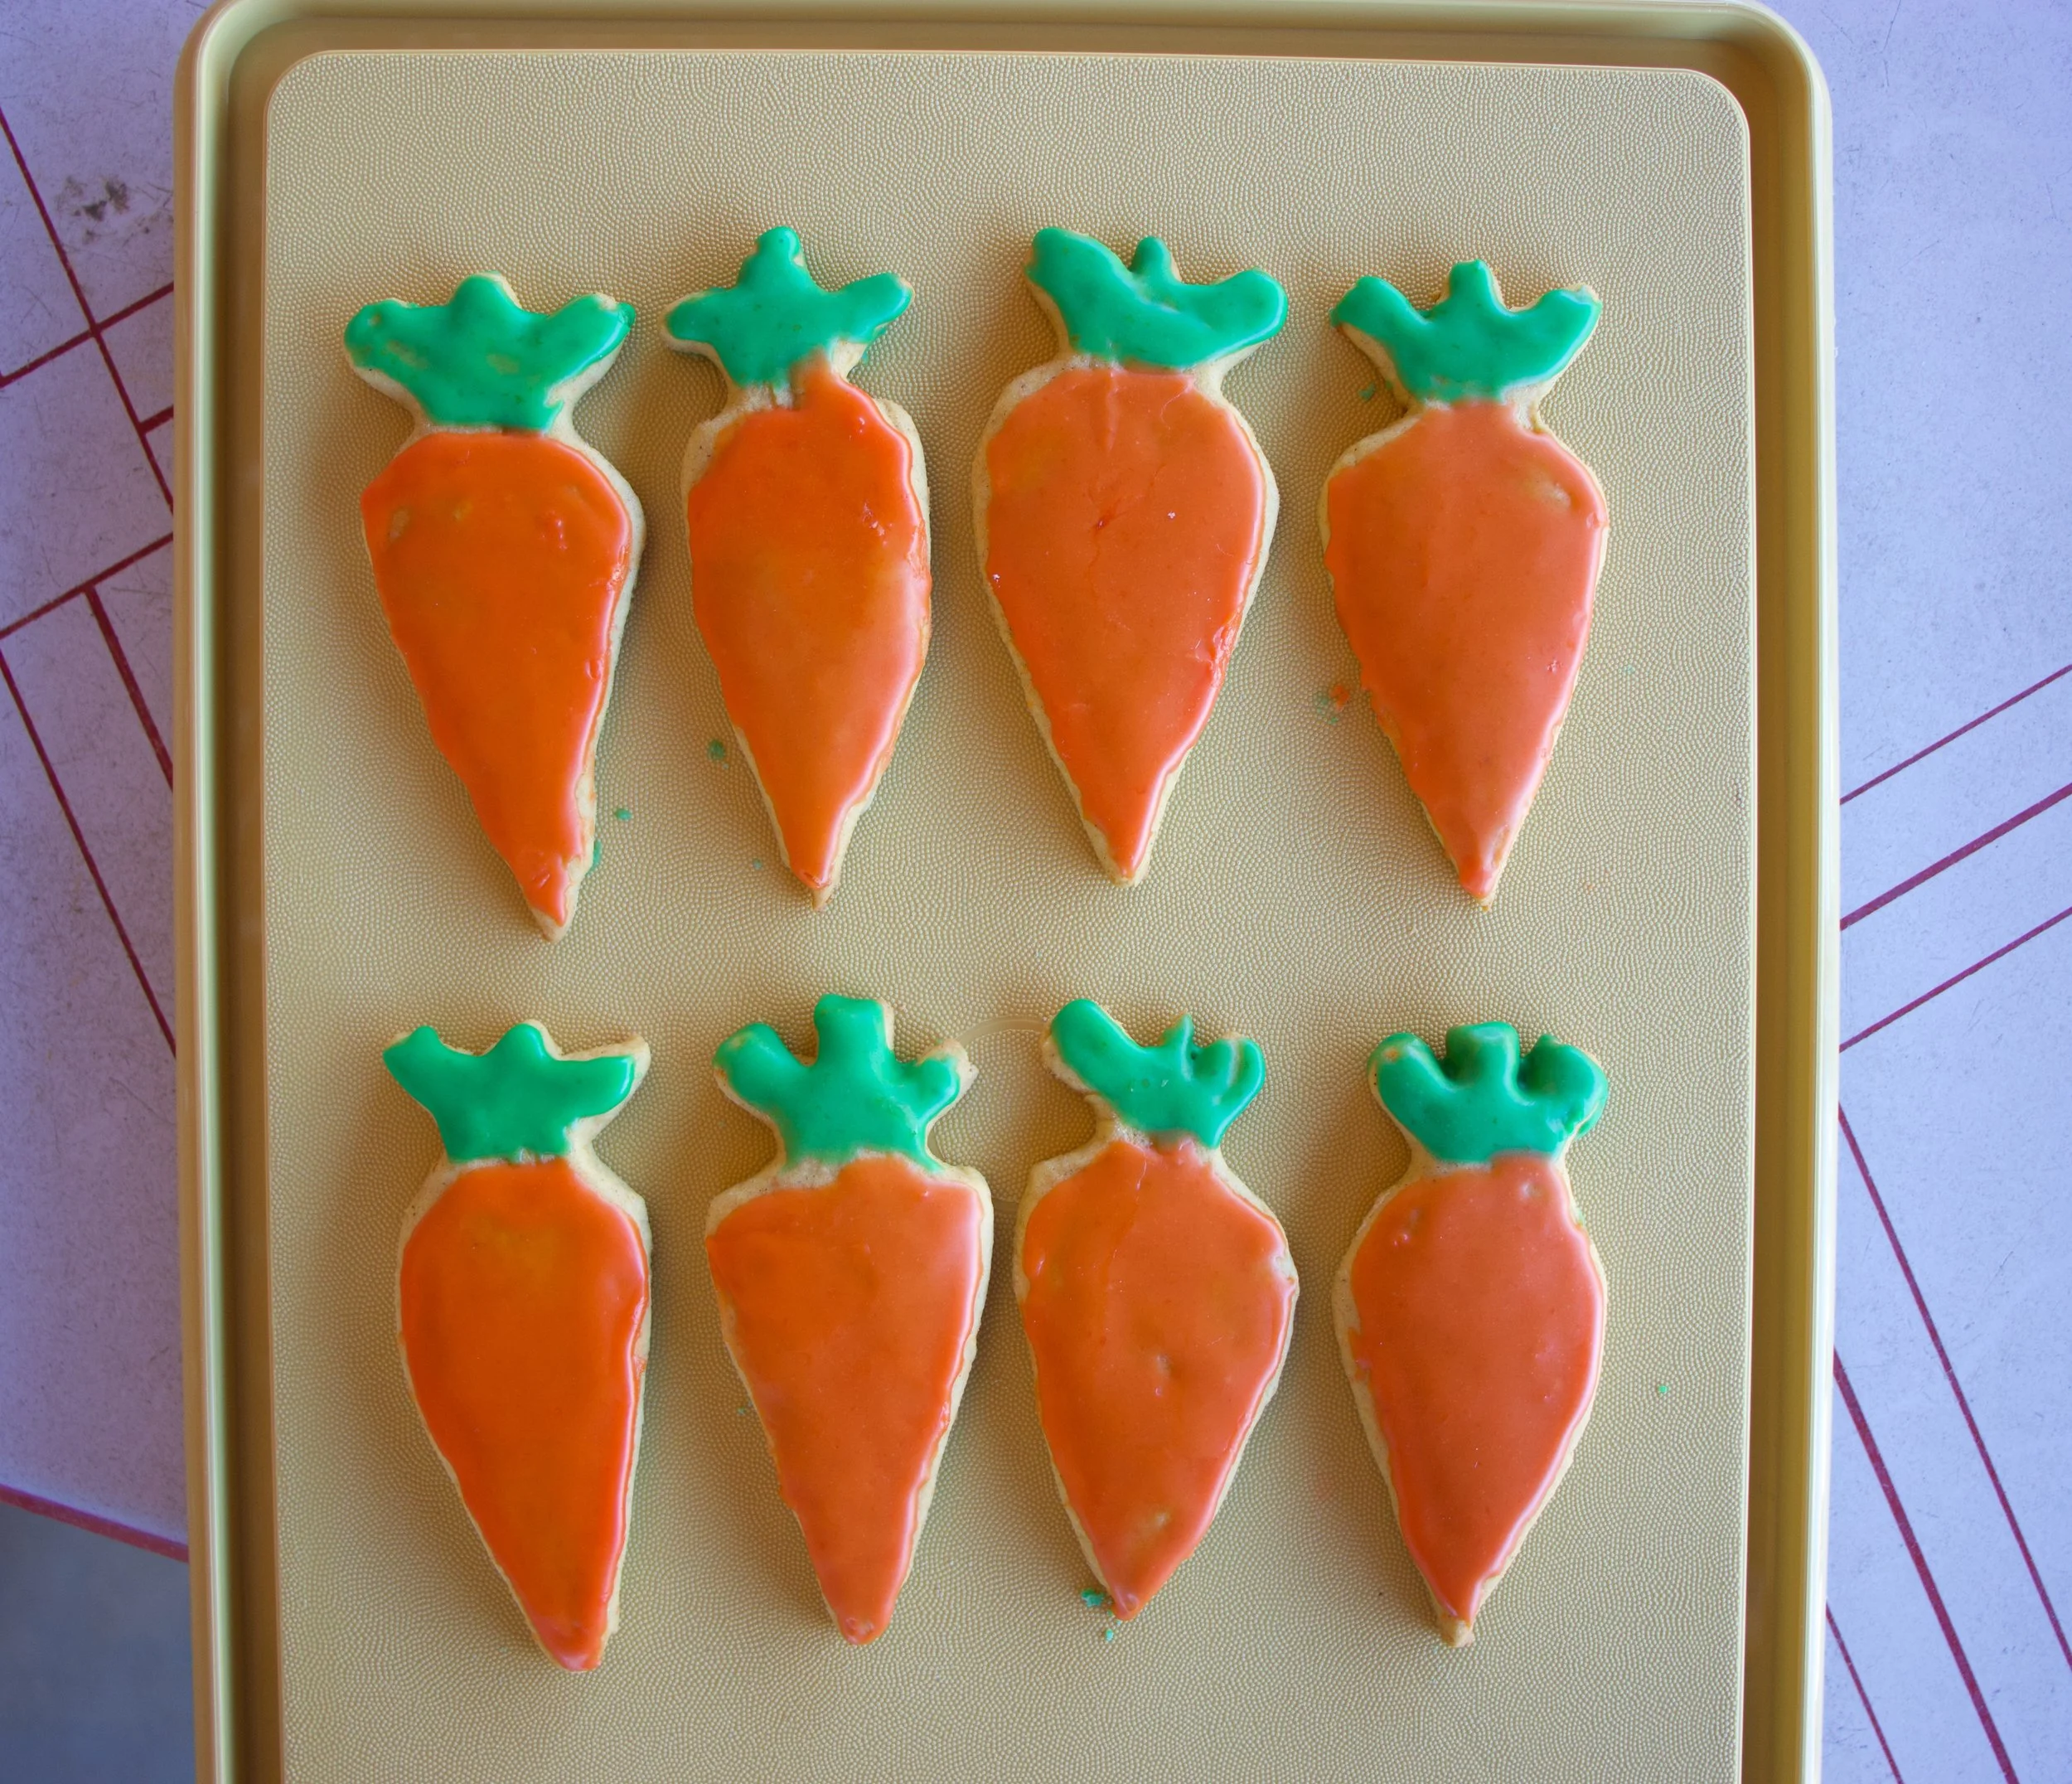
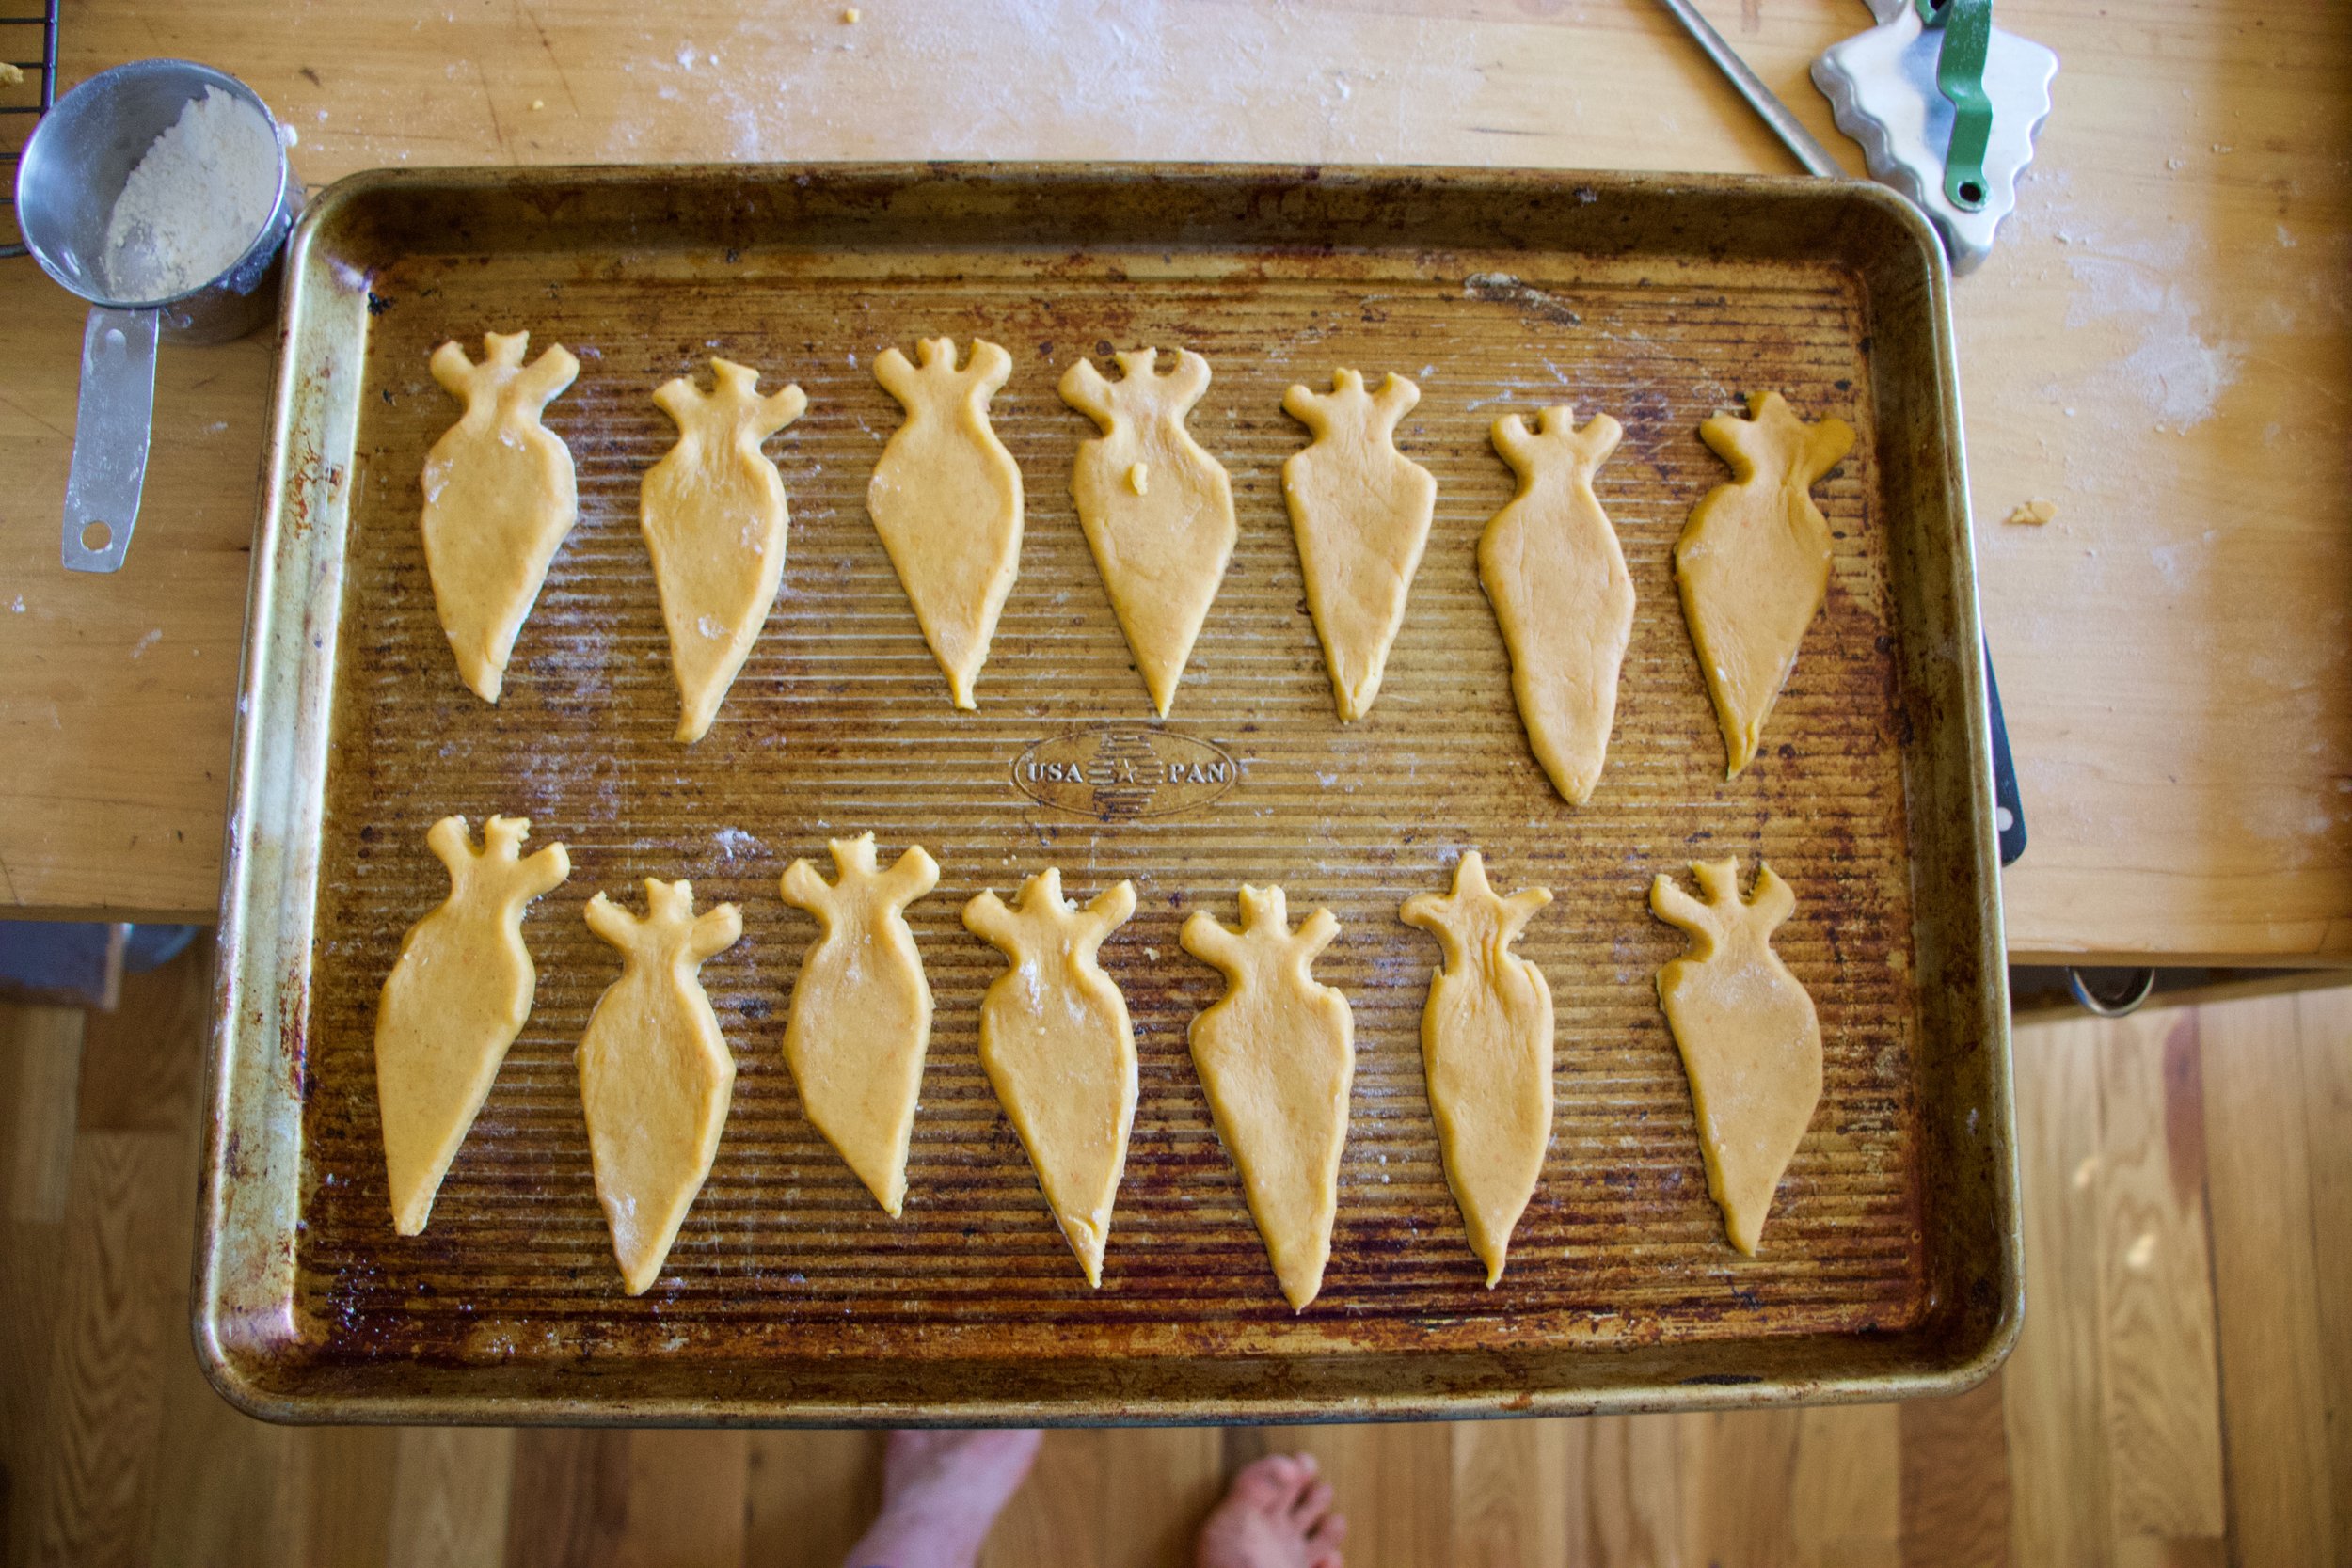
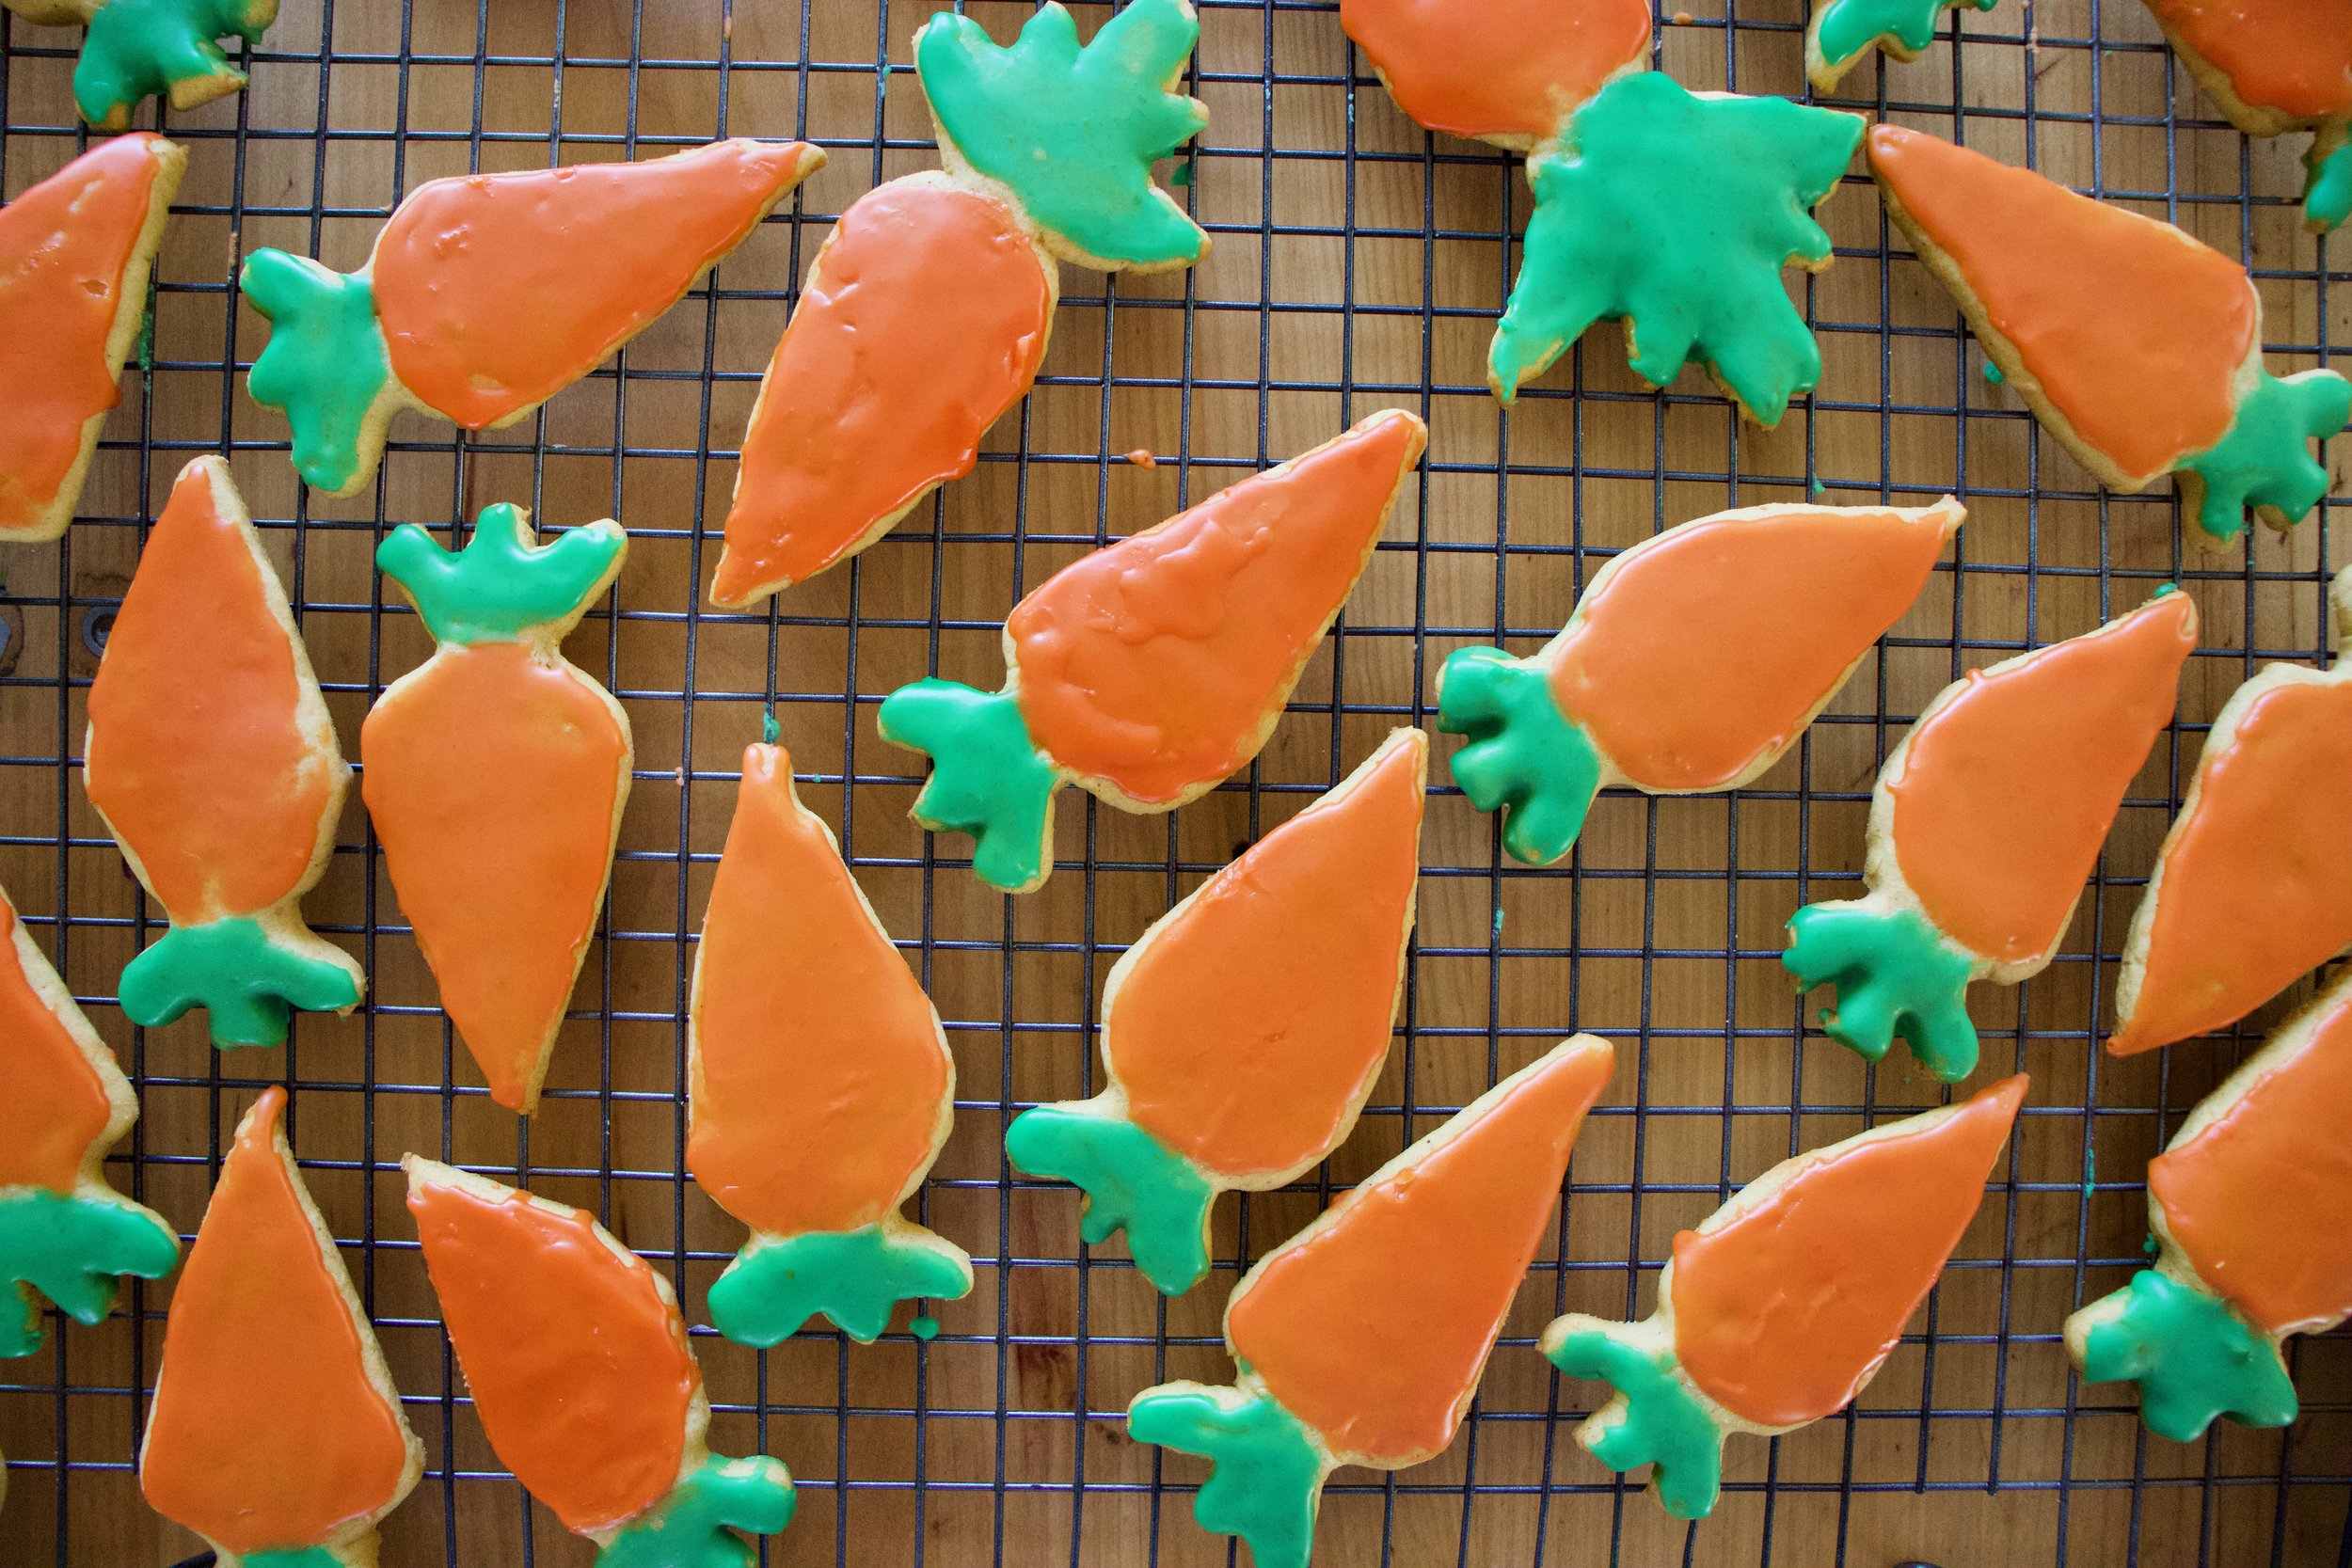
These are definitely my favorite shaped cutout cookies I have ever made. I mean seriously, carrot shaped carrot cookies, what could possibly ever be better? Nothing, and that%u2019s truth for you.
Not only are they carrot shaped, they are also carrot flavored. Yup, Carrot shaped, carrot flavored, awesomeness. A little cinnamon added to the cookie for little extra boost of flavor and an orange glaze because it works and orange is good and fresh and springing. All good stuff.
You might be thinking, huh, carrot puree in a cookie, well that doesn%u2019t sound right. But it is, it is right. And you know how I know that these cookies are awesome? Well I packed them up, (2 dozen of them) and took them over to the littles house for an after school treat. When I got there, the two older ones had friends over. I asked them if they wanted a carrot which earned me that look that said %u201care you serious%u201d but them showed them the cookies. Of course the wanted a carrot so I gave them each one. They ate their cookies then proceeded to beat the shit out of the mr. Then they asked for another cookies and beat the shit out of the mr some more. This when on and on for about a 1/2 hour until all the cookies were gone and the mr was crouched in the corner with a broom trying to defend himself against 4 rulely kids who where slashing at him with light sabers and spraying him in he face with kitchen cleaner. It%u2019s because they wanted more cookies. (and yes, the littles are getting crazy). So yeah, the cookies are good. Ass kicking good.
Anyway, a cookie with some goodness mix into it, shaped into a great shape, that will make everyone smile and happy. You could make them by yourself, make them with your friends, make them with some kids, with some old people. They are the perfect cookie to leave out for the easter bunny(do you leave carrots out for the easter bunny?) or to serve up at any easter party, spring party, or any garden party you might be attending. This cookie is pretty much perfect for any and every occasion that required a cookie. Or a carrot because carrots are always welcome.
To the carrots! I mean, the cookies!
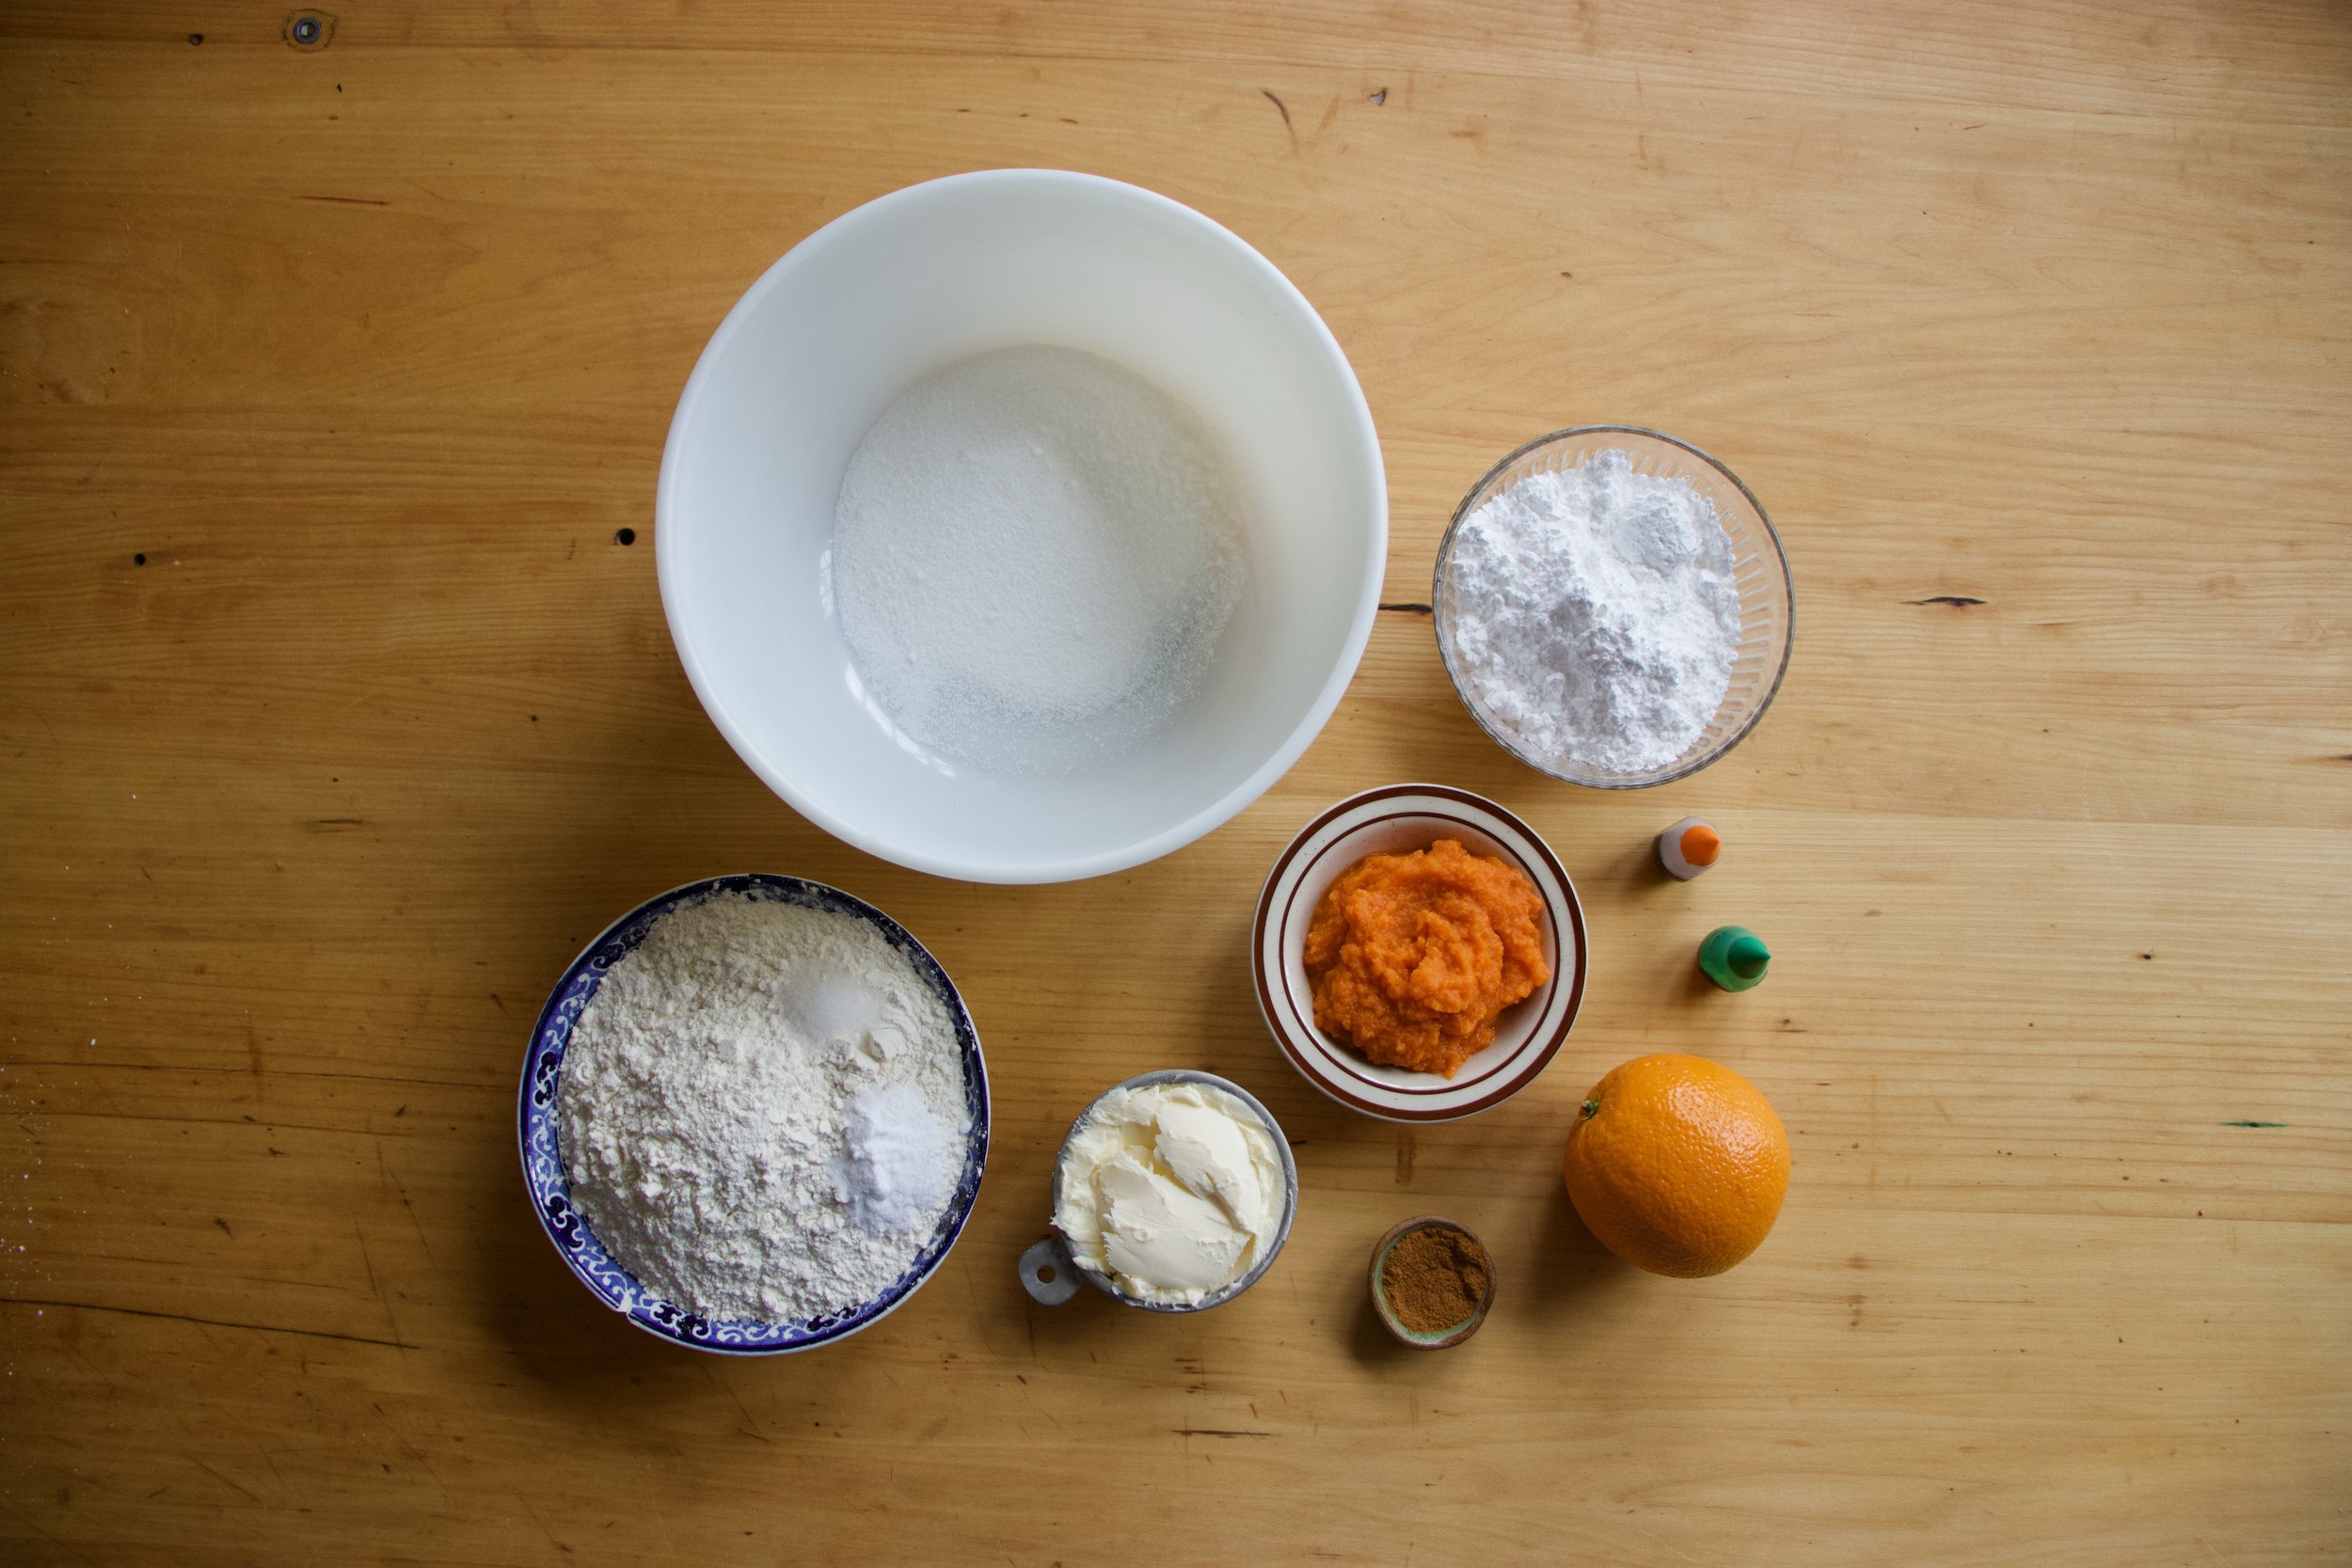
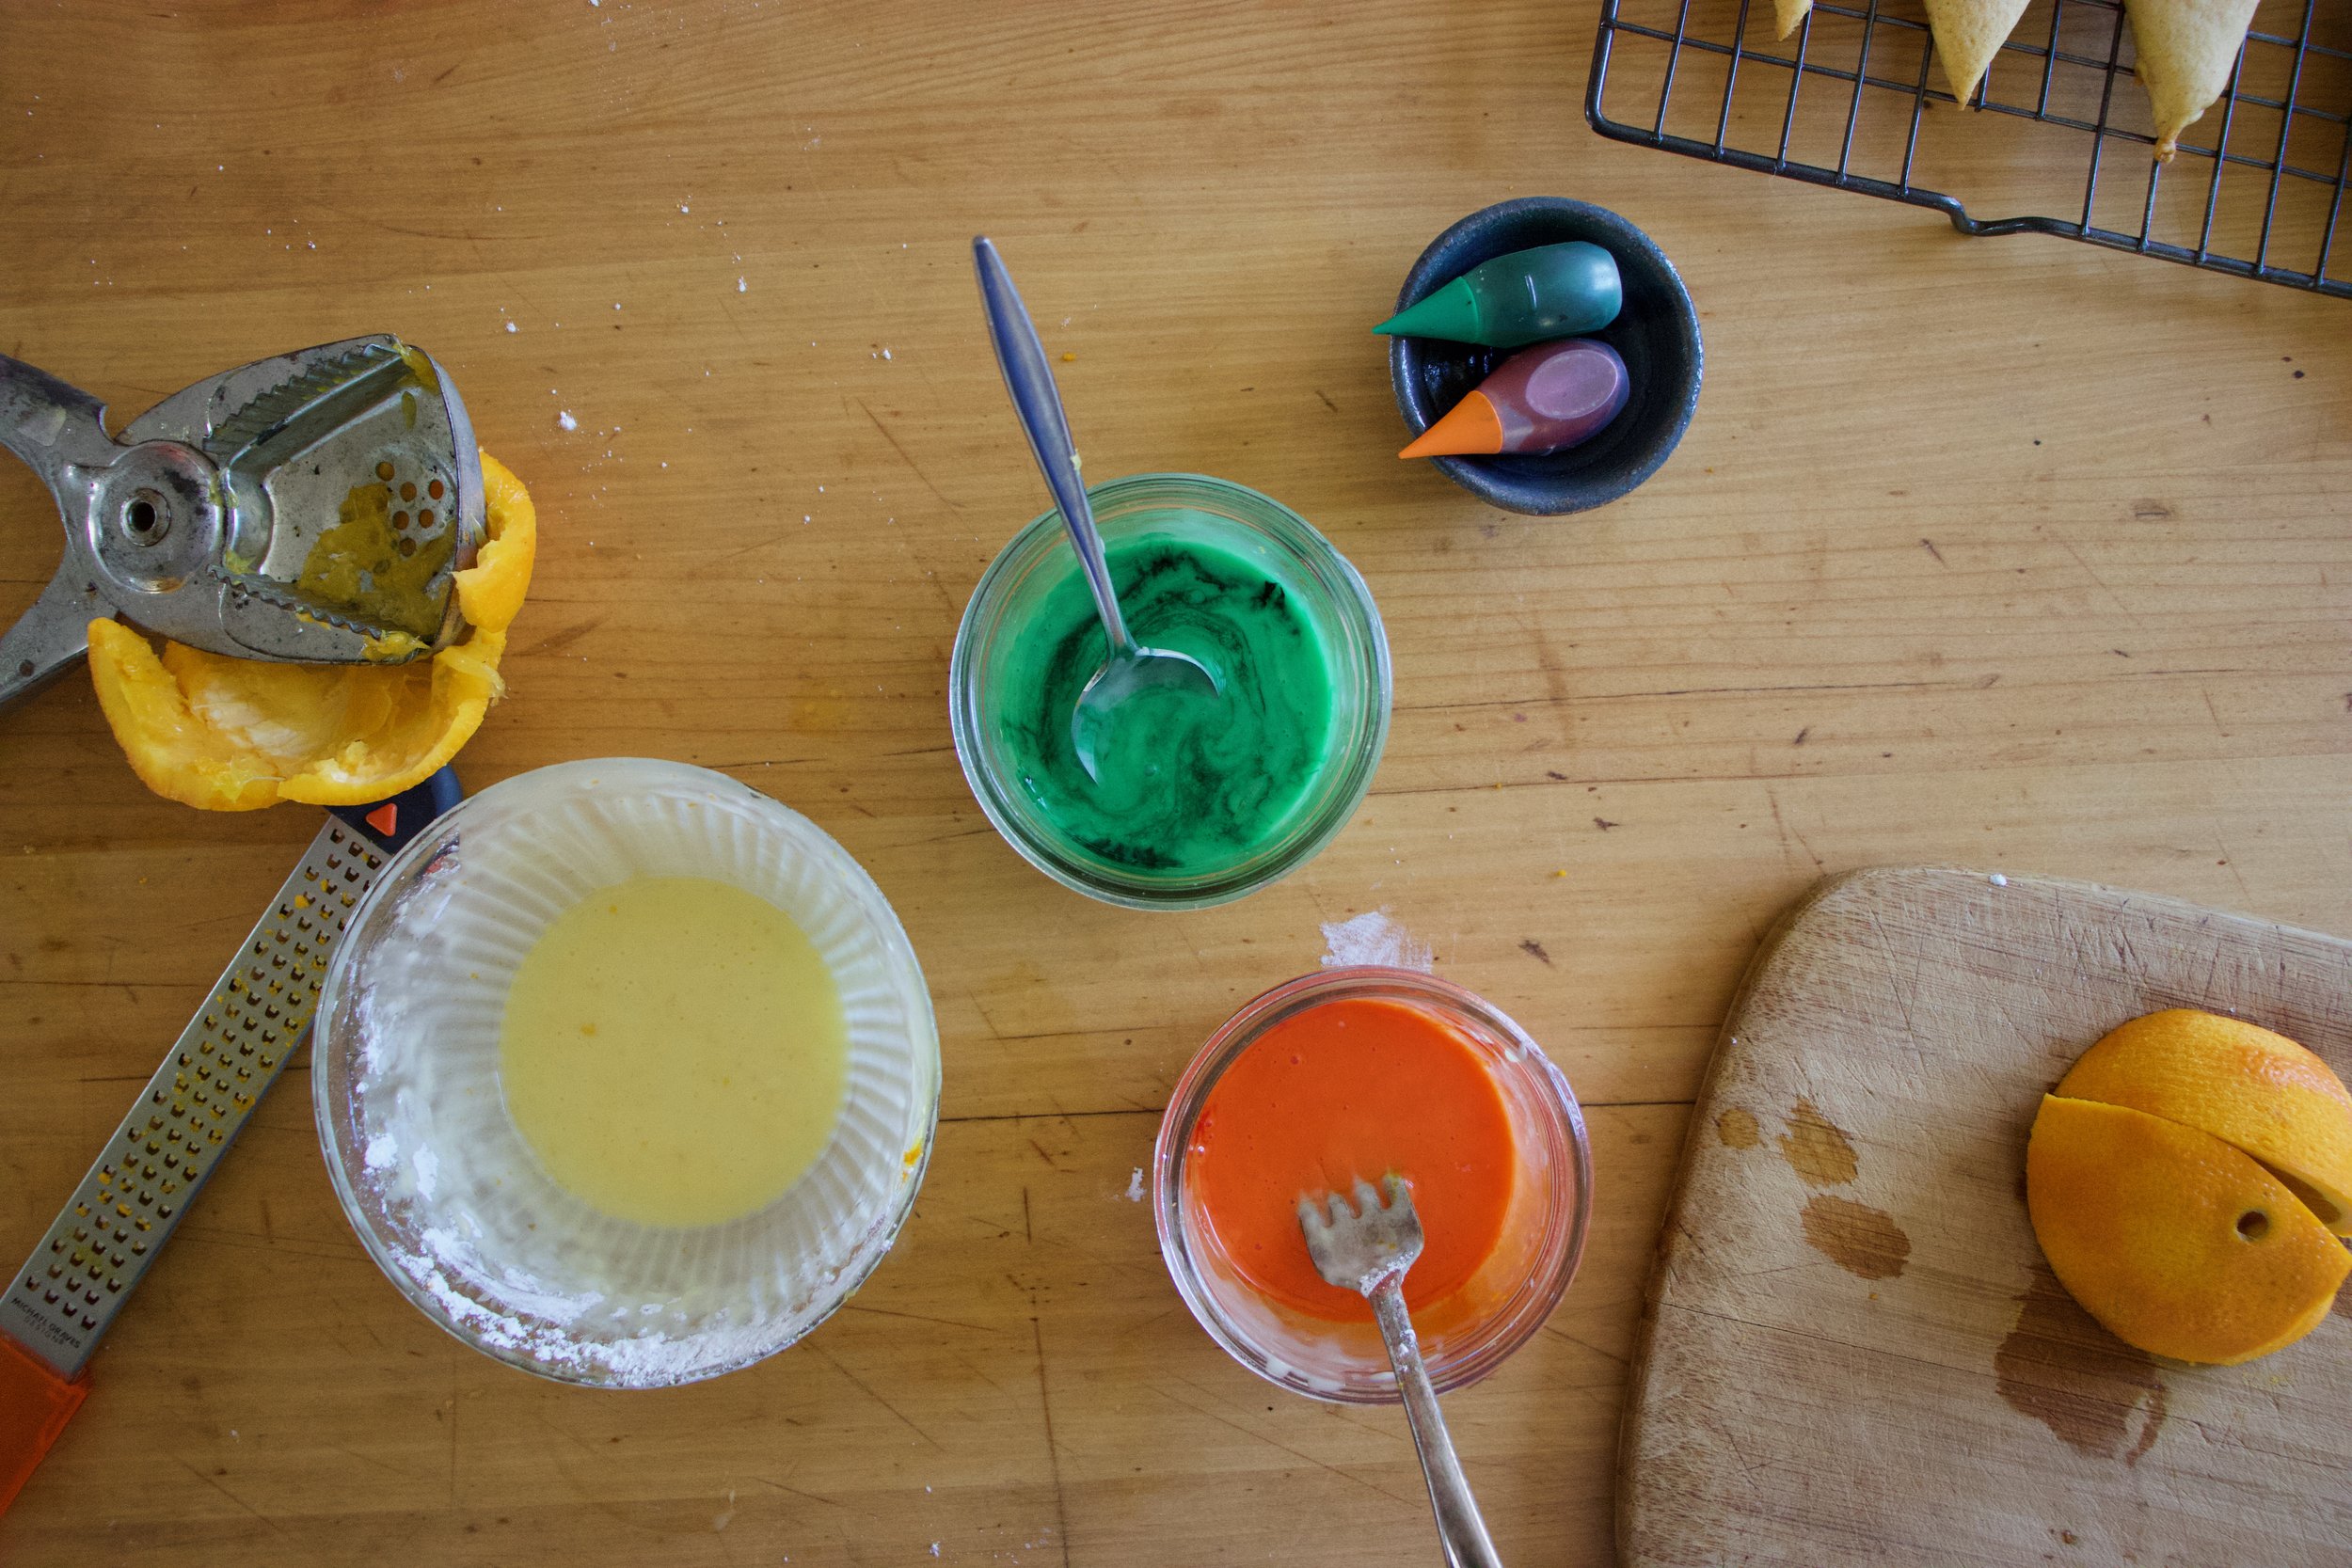
The stuff. Flour, baking soda, salt, sugar, vegan butter, carrot puree, cinnamon, an orange, some powdered sugar, and food coloring.
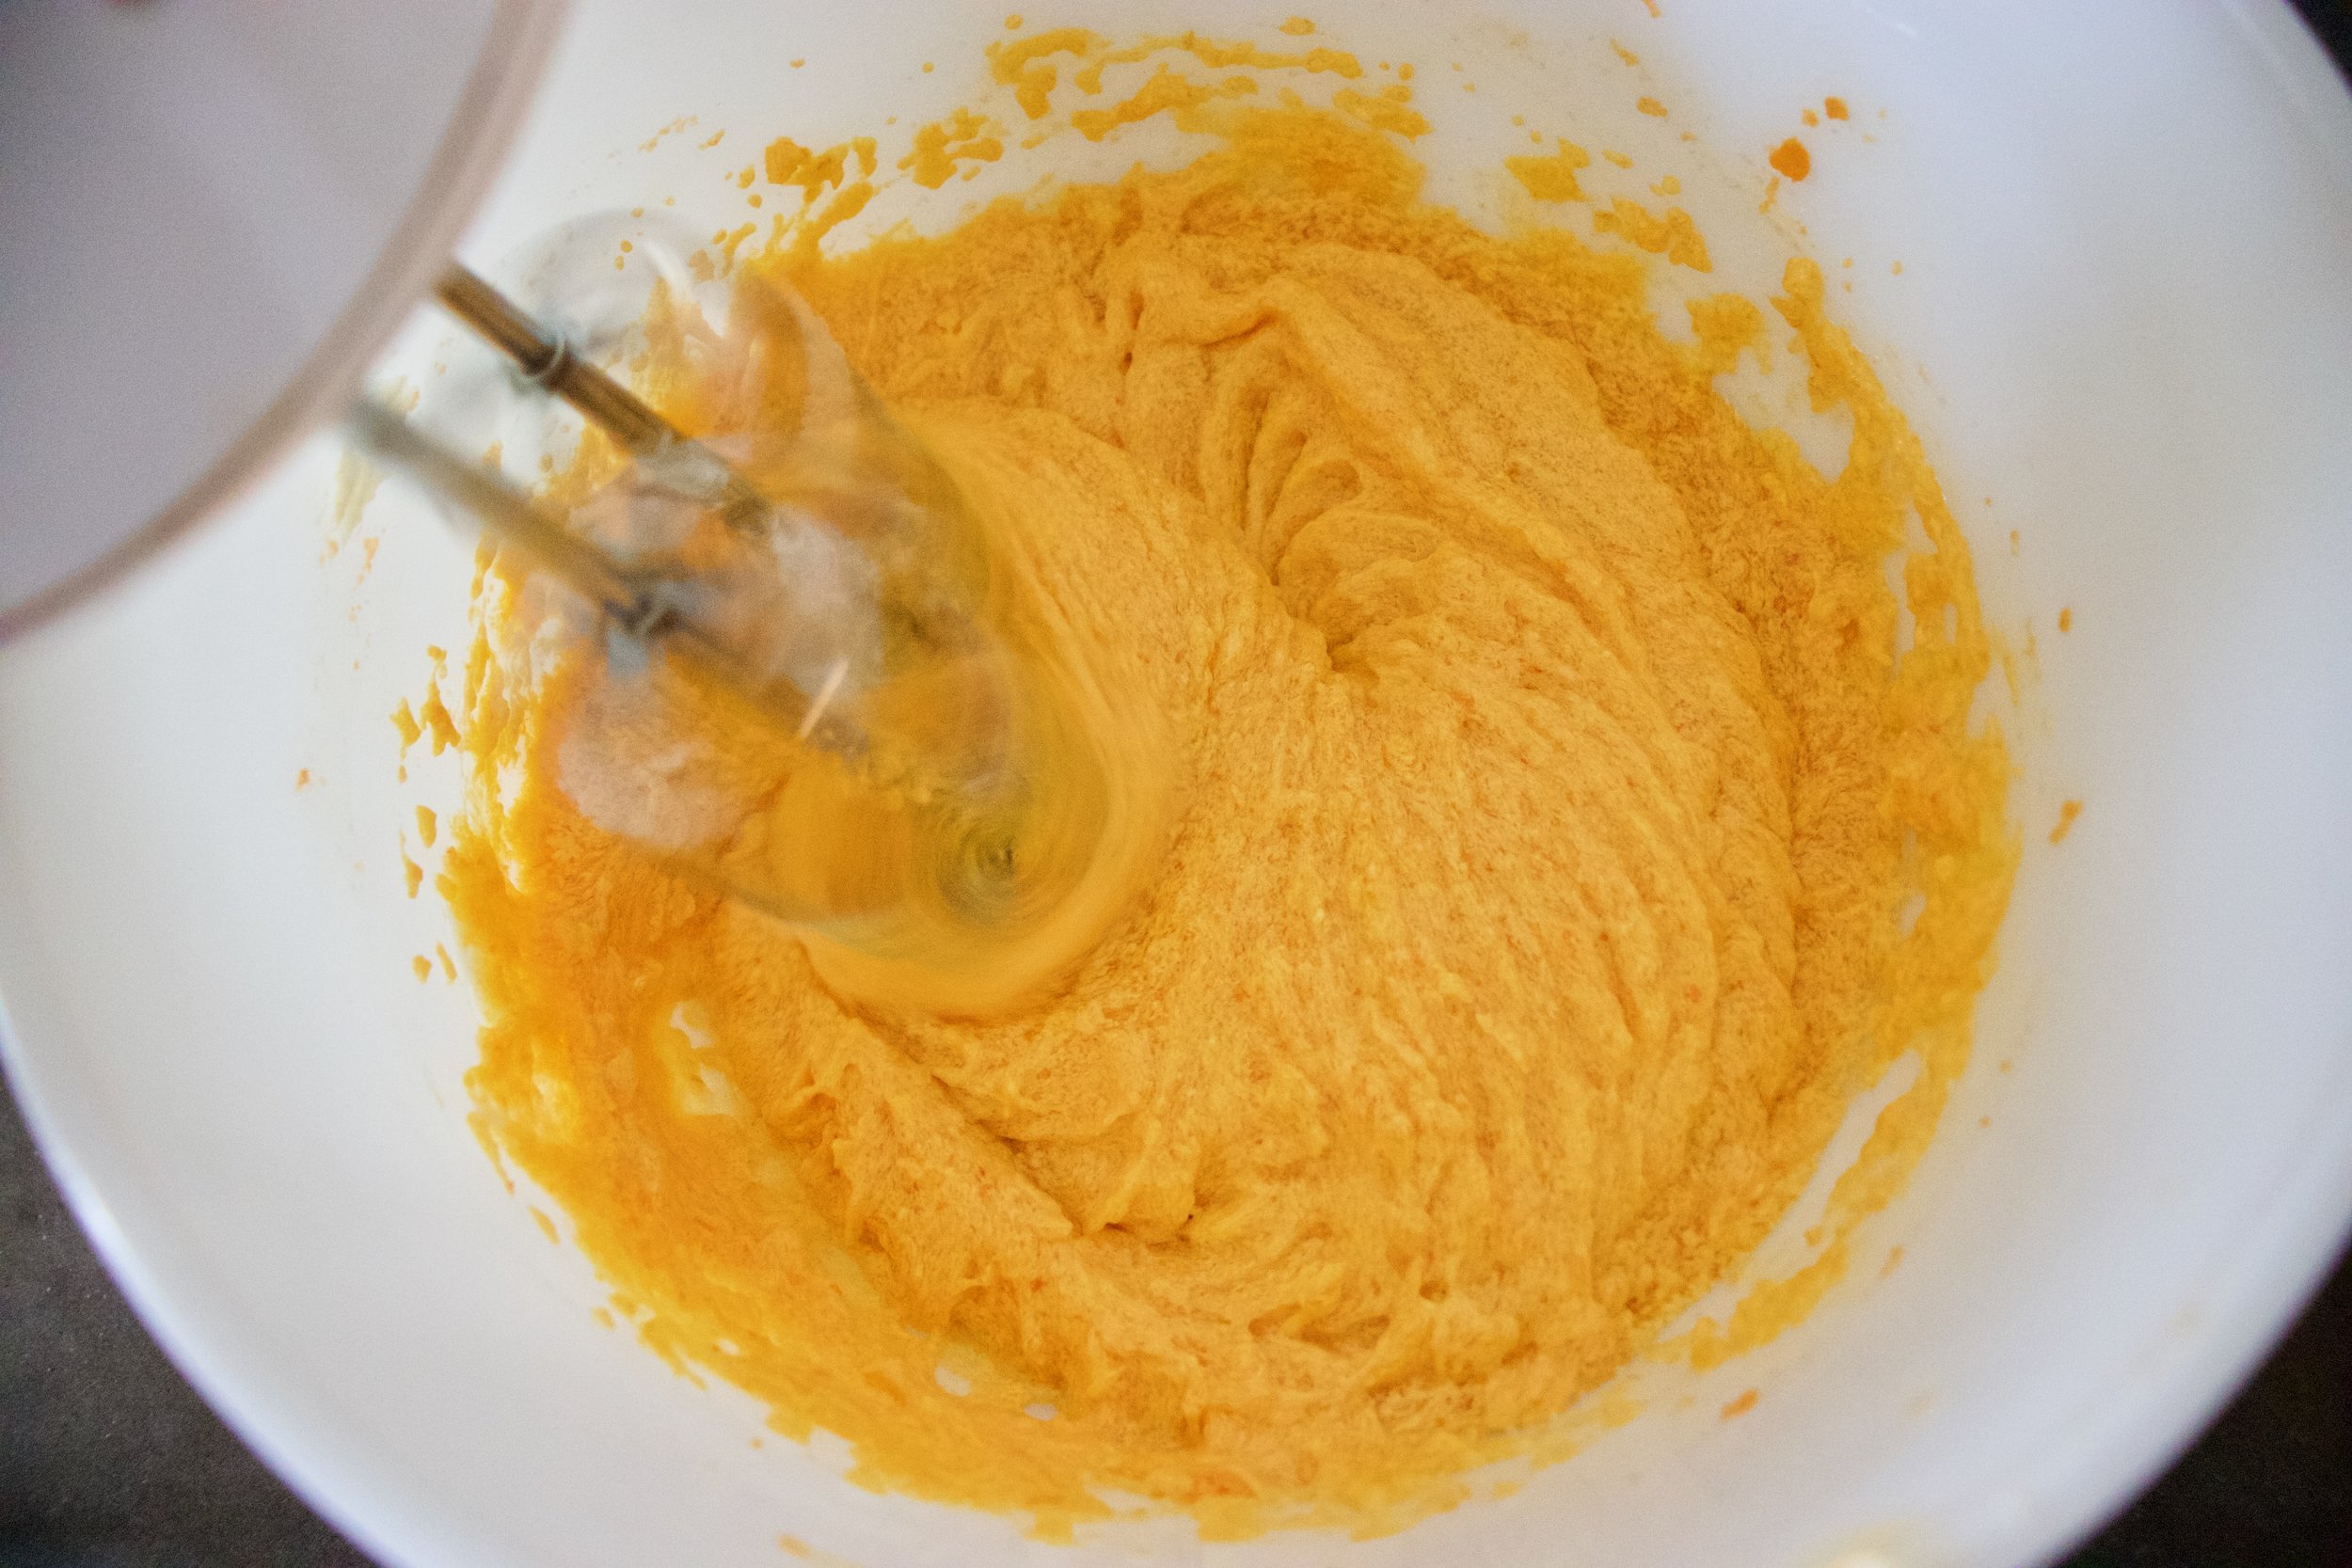
Into a big bowl the sugar, vegan butter, and carrot puree go.
Beat for a minute or two until completely incorporated.
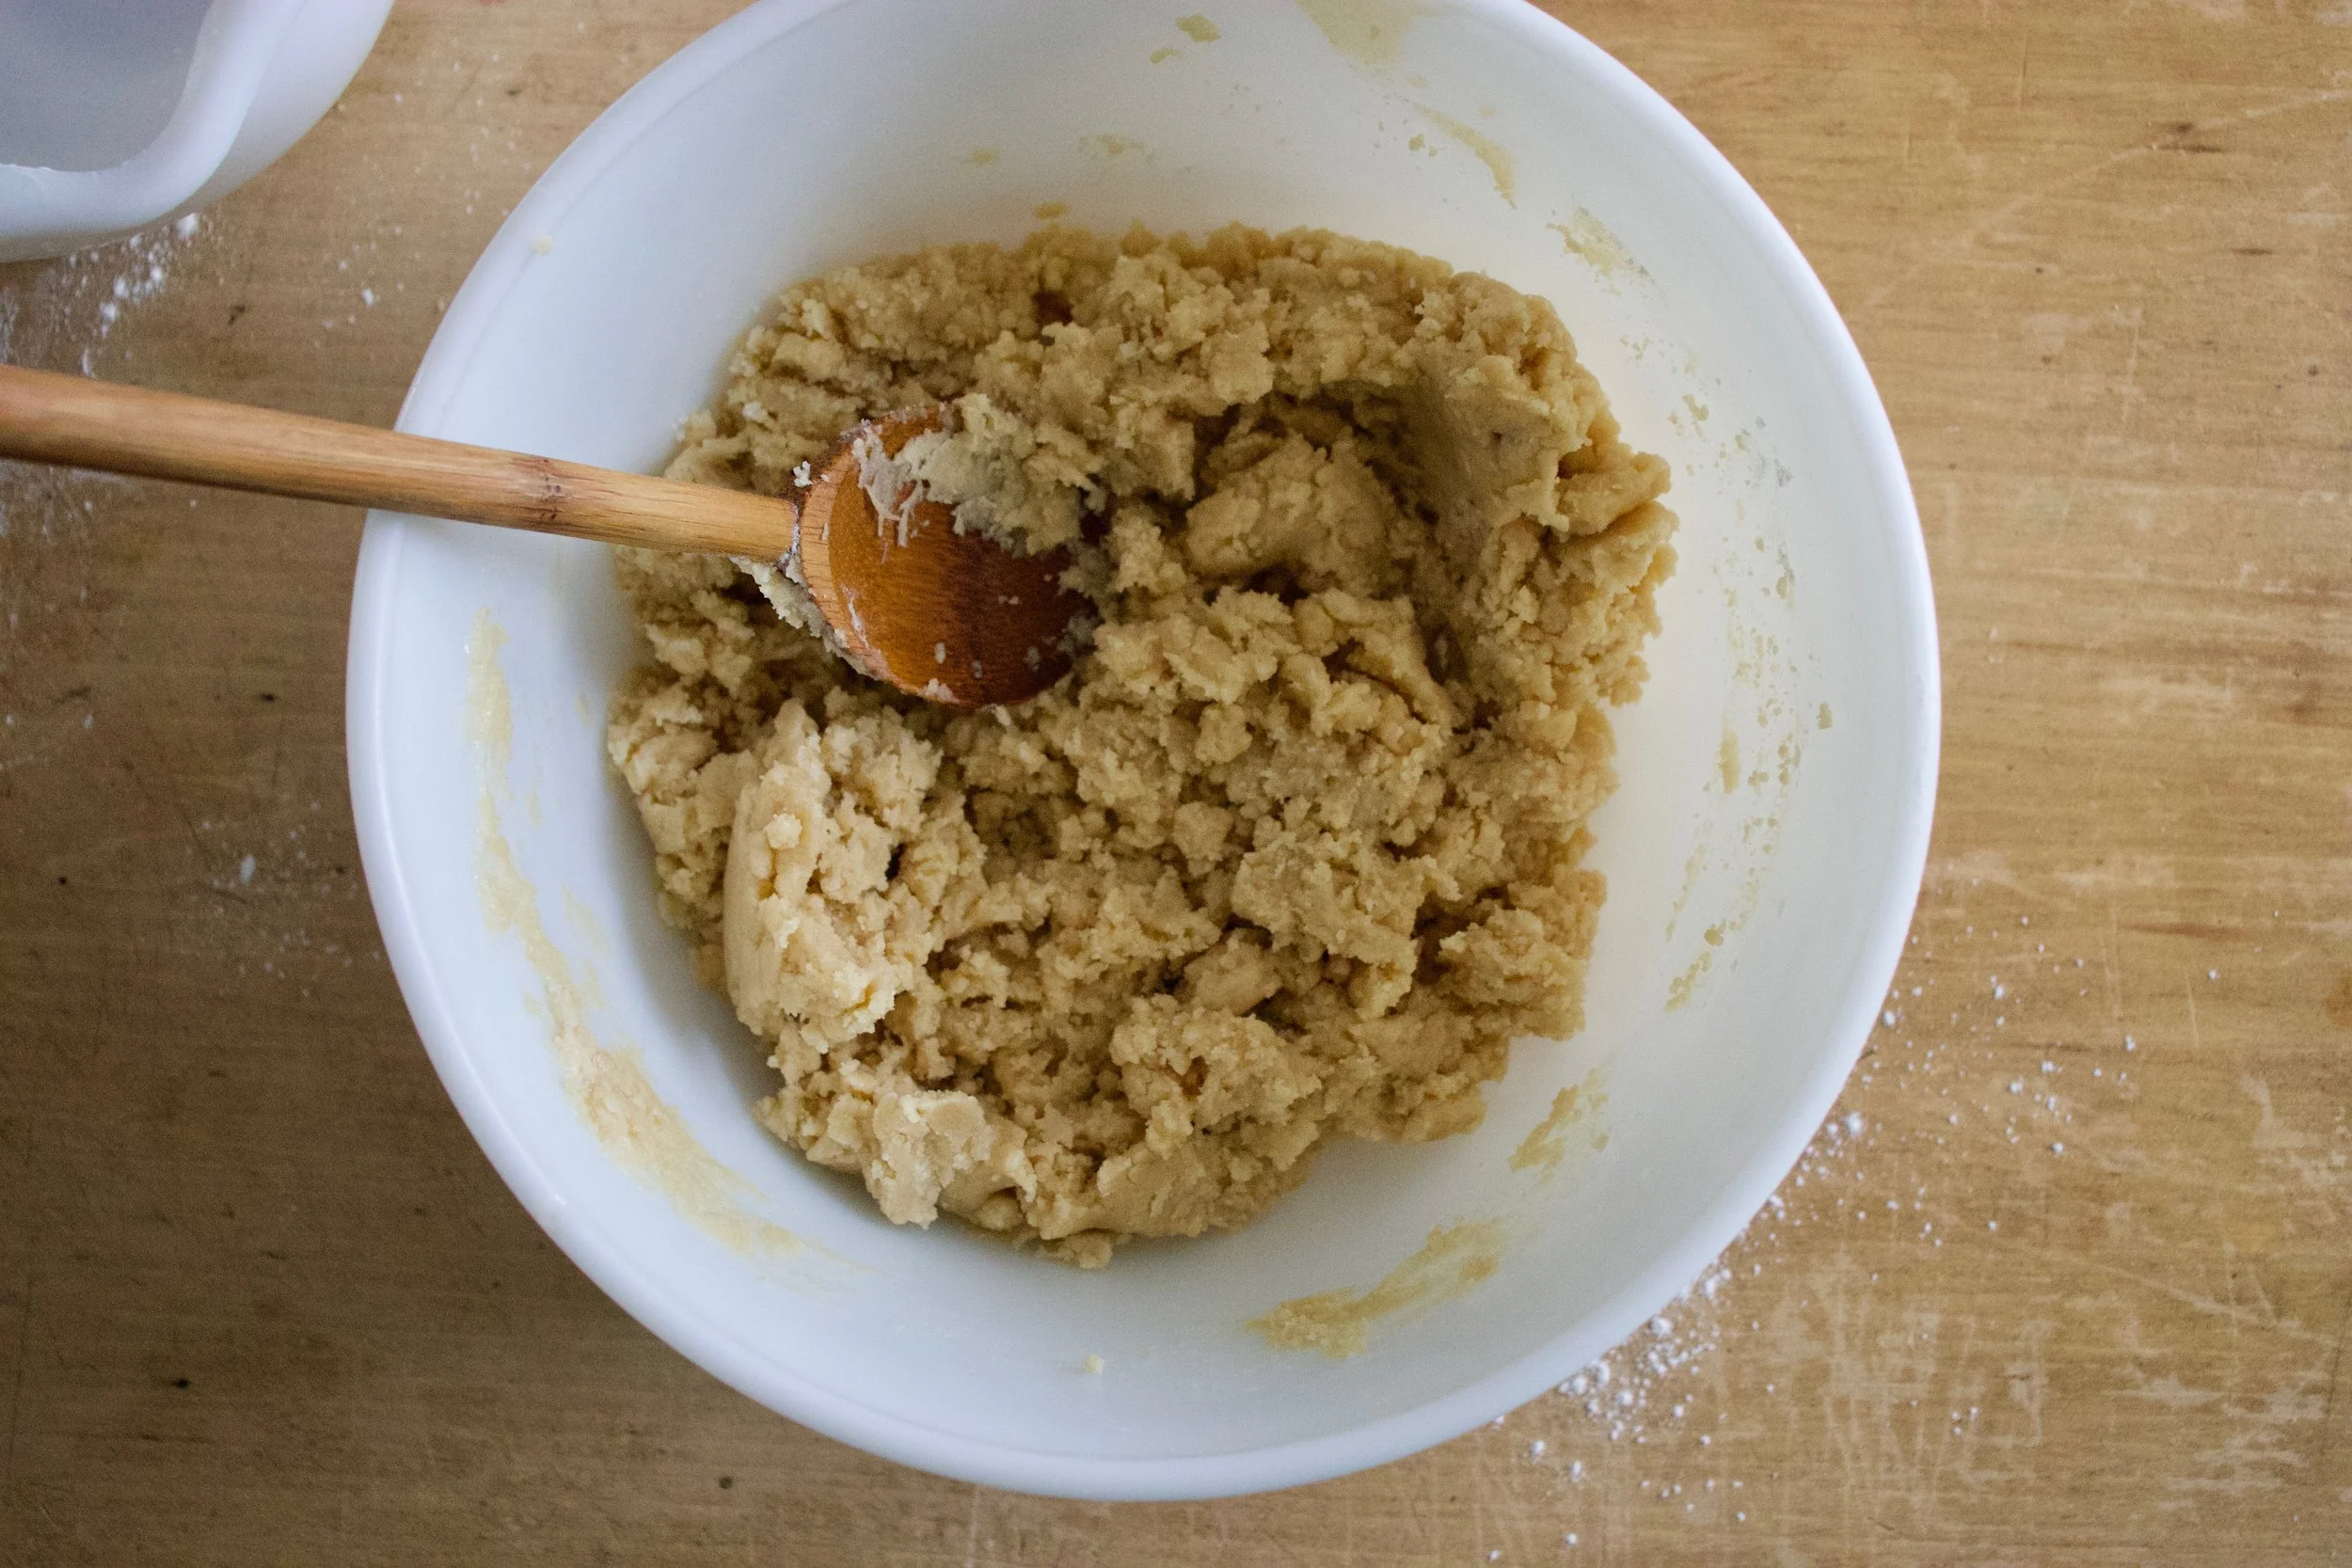
Add in all the rest of the dry stuff and mix by hand until it turns to dough.
This is the dough it turned into.
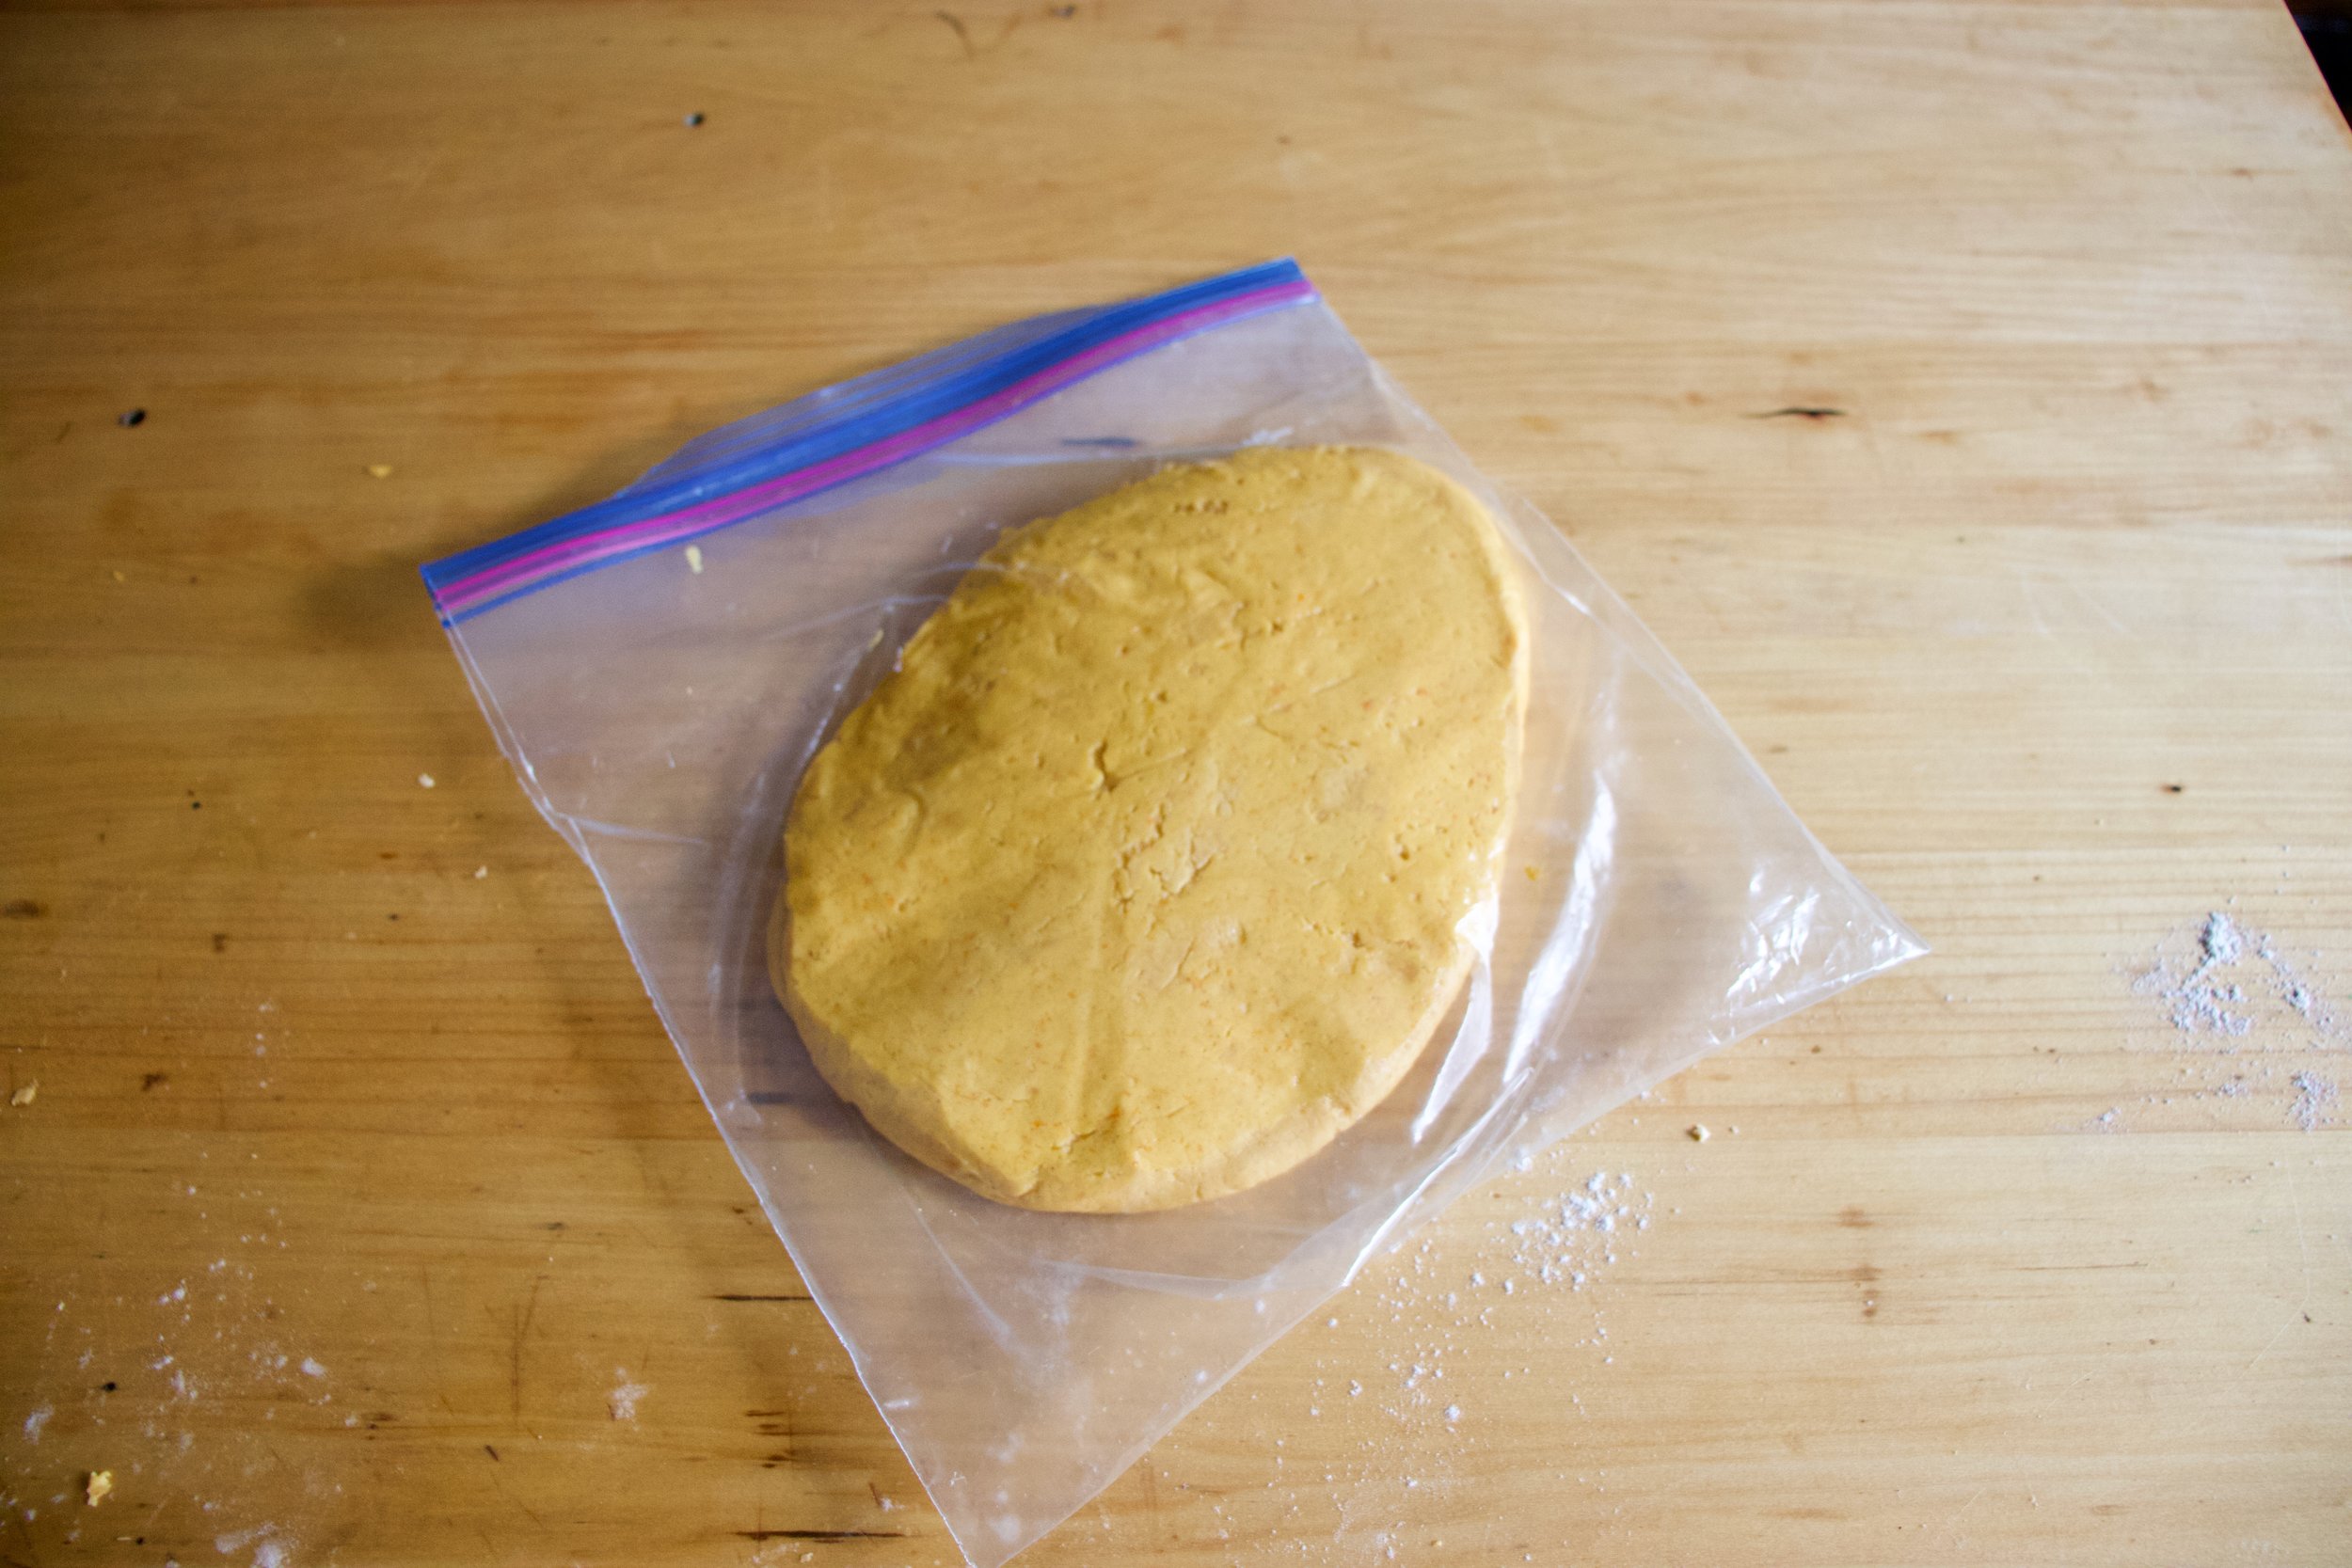
Gather the dough and wrap it or place in a plastic bag and stick it Into the fridge for a few hours or overnight. The dough NEEDS to chill.
After you let the dough be, remove from fridge, liberally dust counter, and roll out dough about 1/4 inch thick.
And then it%u2019s time to cut the cookies out. I unfortunately do not have a cookie cutter so I improvised and make 2 carrot cutouts from paper and hand cut each cookie. That worked but took forever so I got crafty and used a fat Christmas tree cookie cutter then just did a little trim and pinch to make it into a cookie. (I am a genius for that). Any way works, and you can also do other shapes too, the cookies don%u2019t change taste in different shapes. (but that would be so cool if they did)
Carefully place cut out cookies onto a baking sheet, giving them a little space because they do spread a tiny bit.
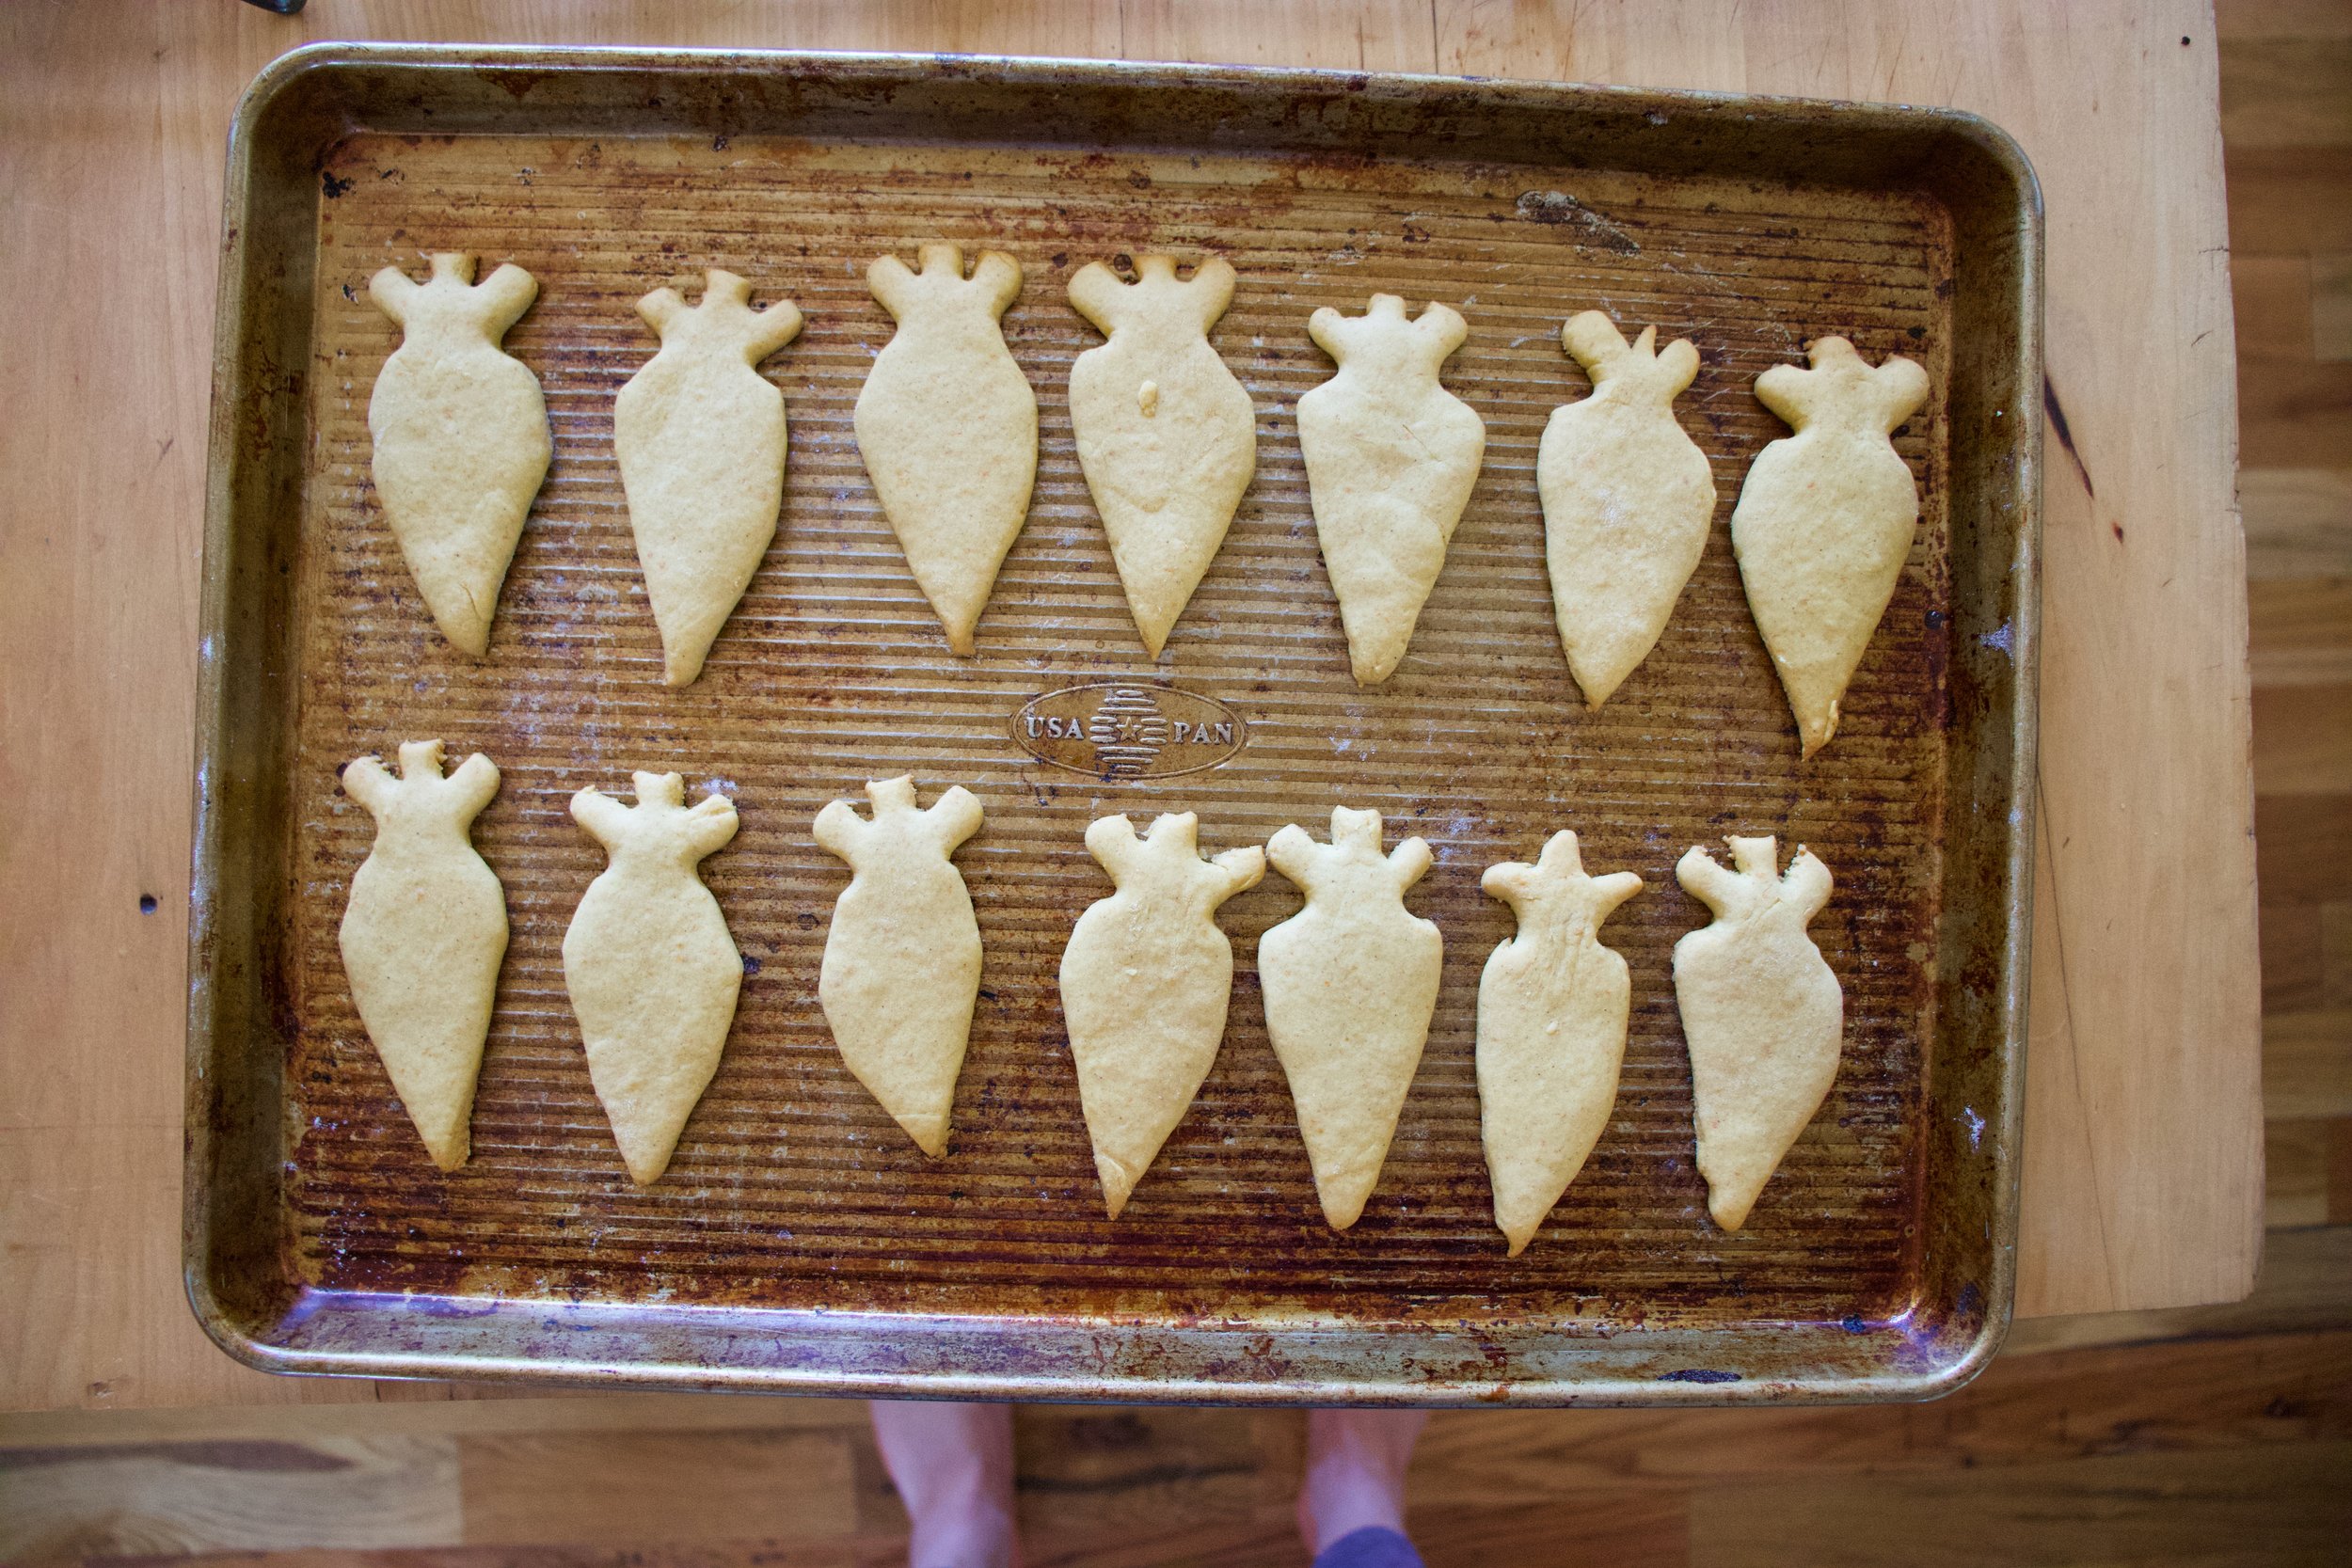
And into the oven to bake they go.
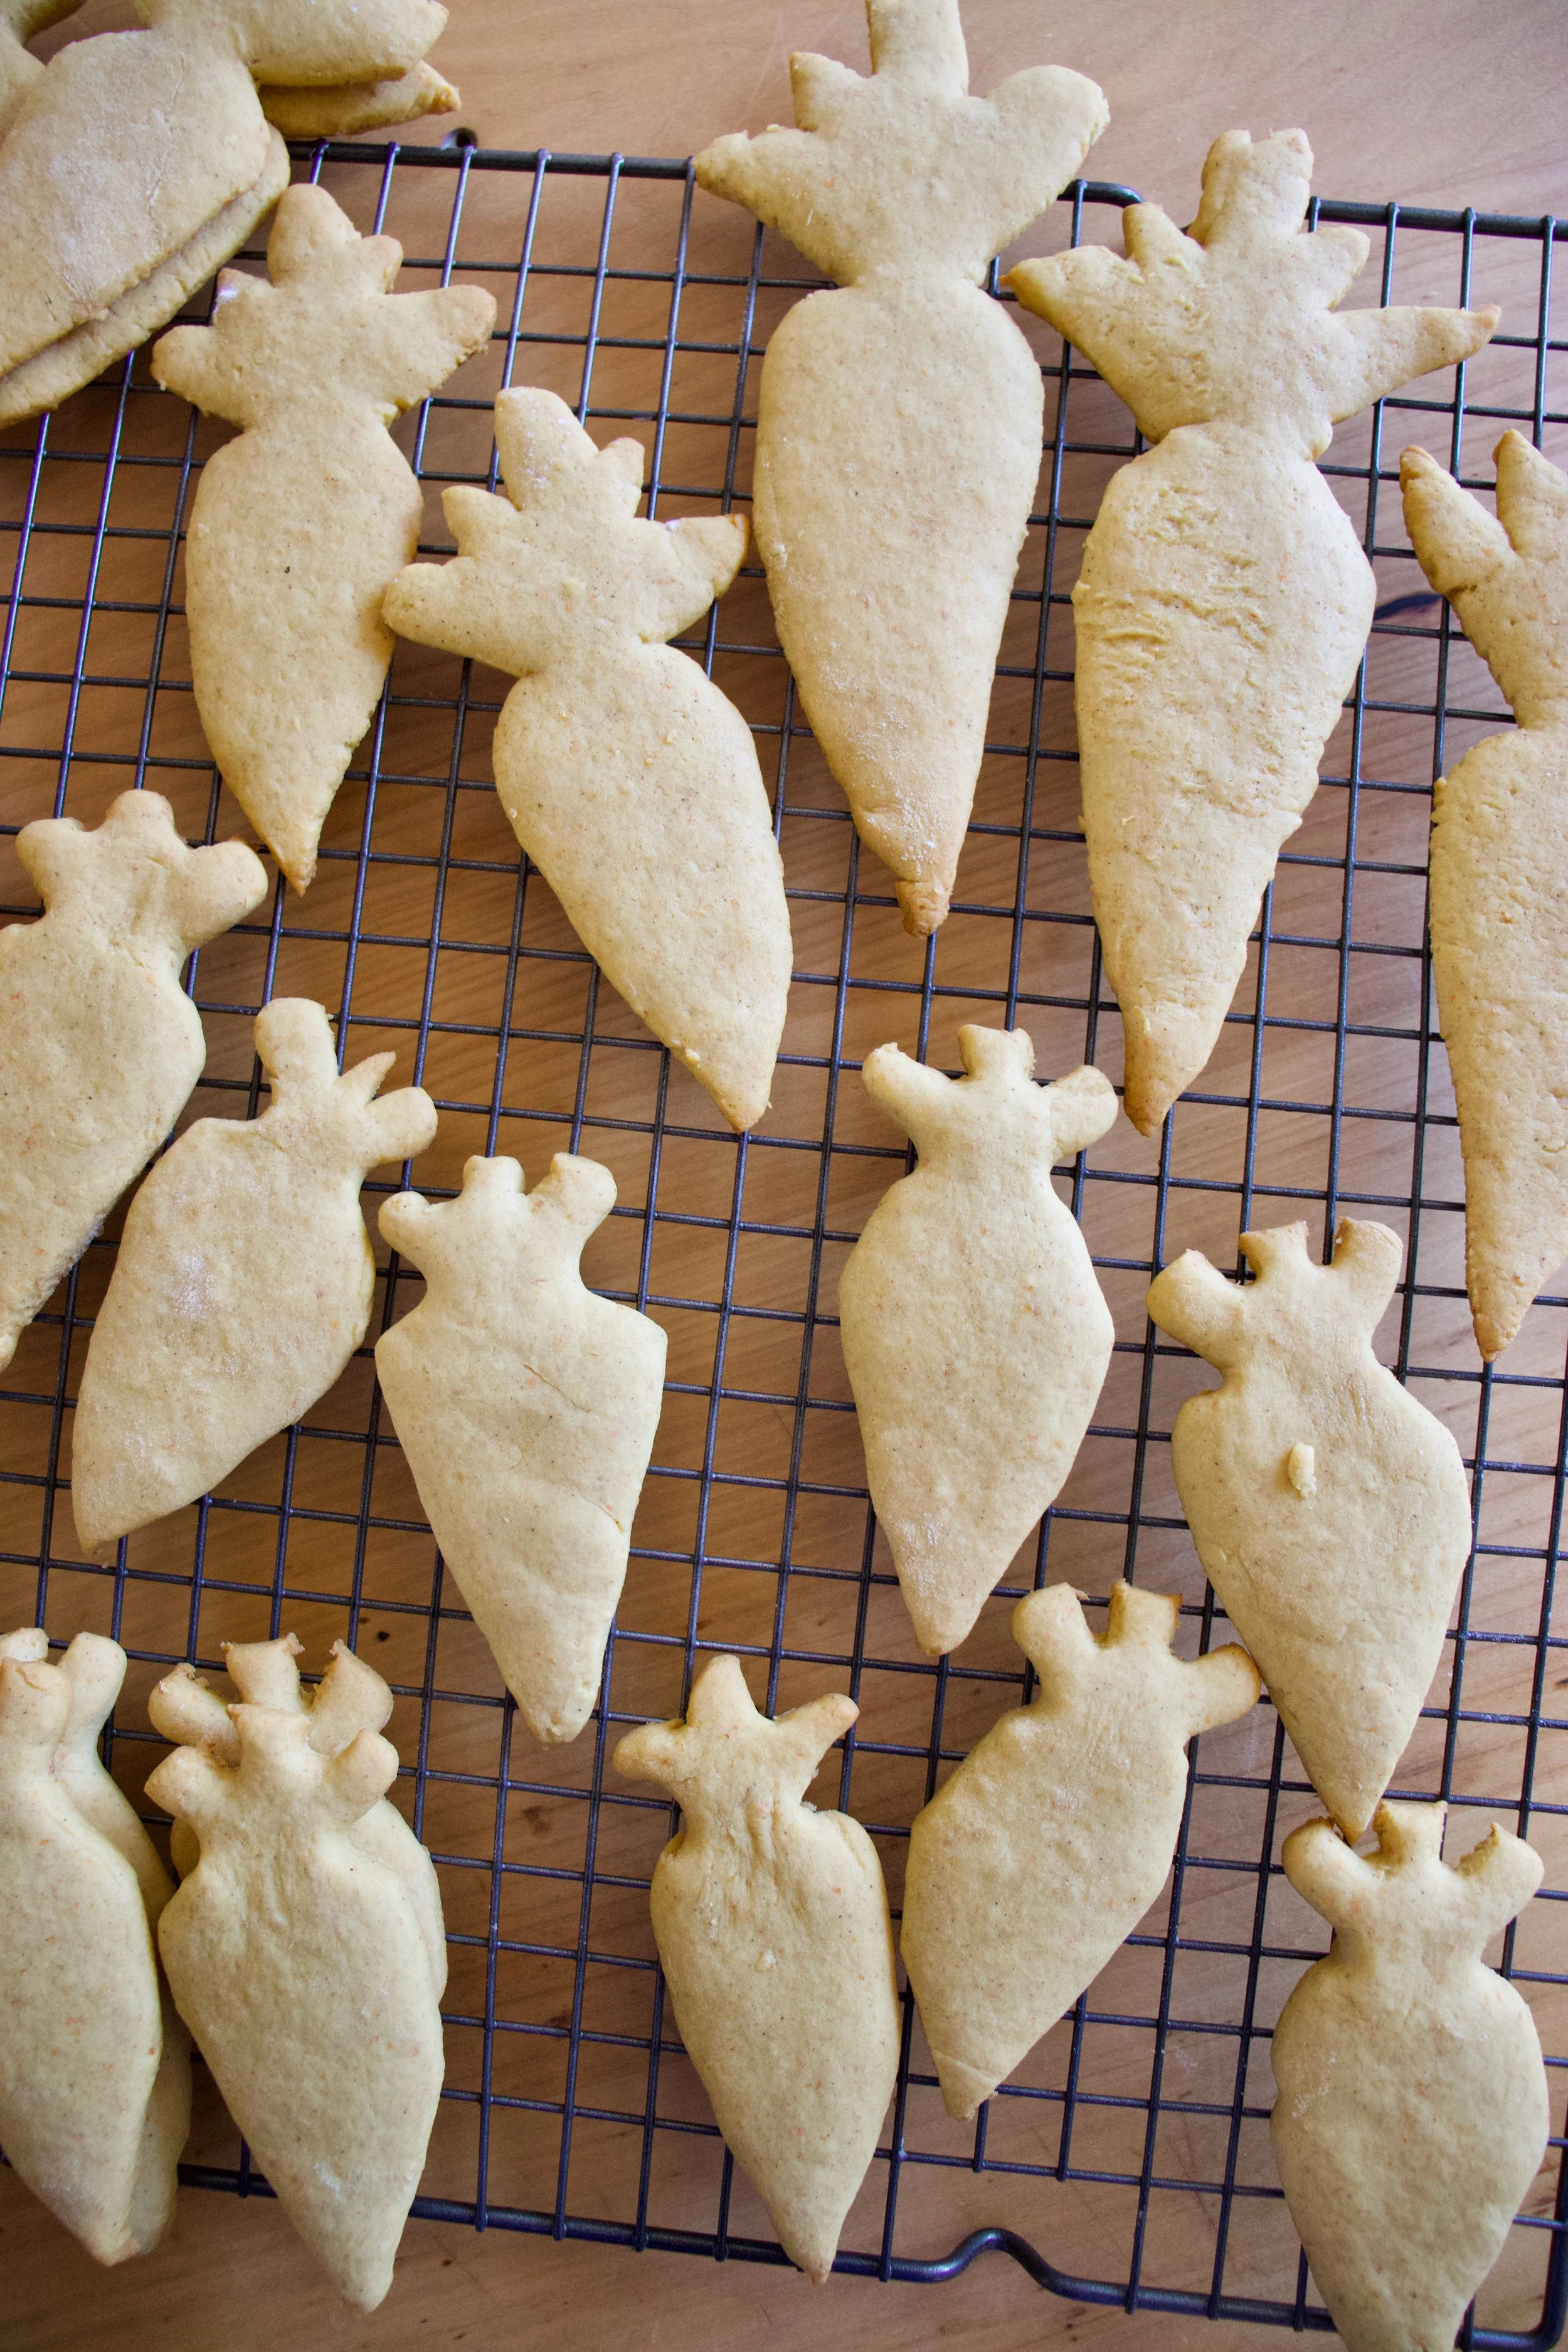
Out in 10 minutes looking all carrot like.
Carrots waiting to cool so they can be glazed.
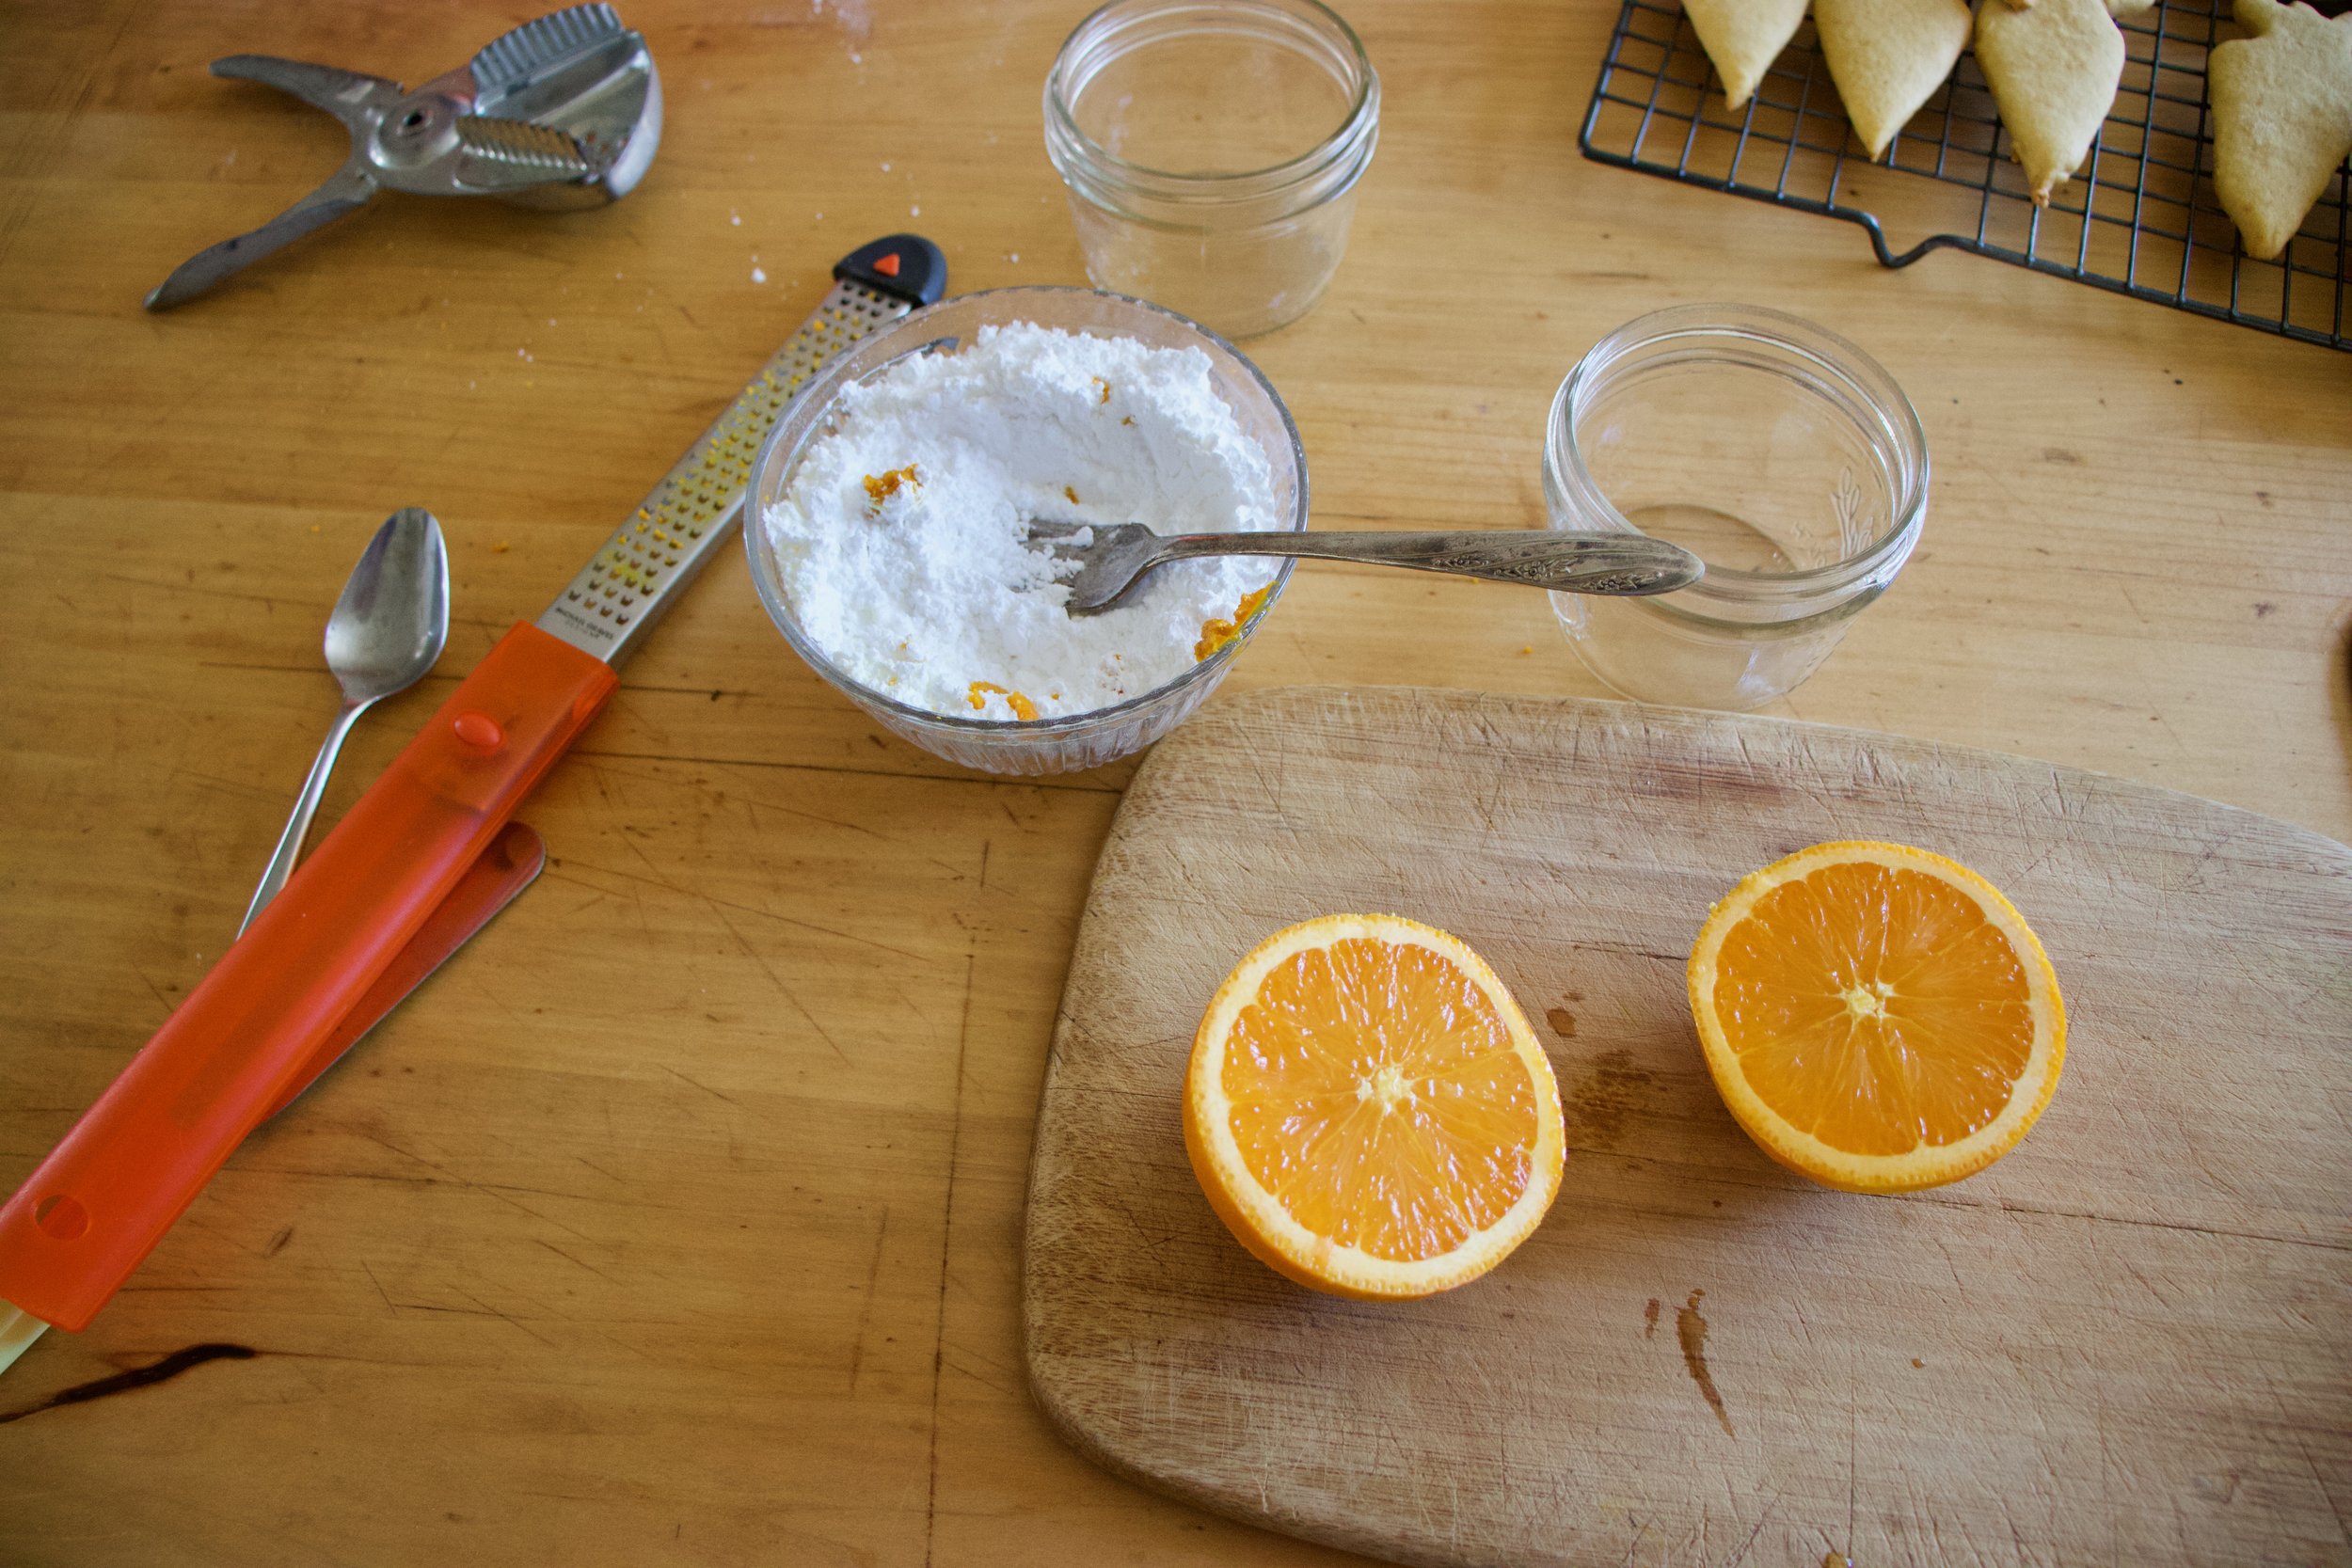
The glaze. Pretty straight forward. Just zest orange into powdered sugar and juice the orange into the sugar and mix.
Divide glaze and dye one orange and one green
And glaze away. I recommend doing it over a rack and baking sheet to minimize mess because they do drip a bit.
Now just you look at that, carrot shaped carrot sugar cookies .What a sight!
And of course, carrots come in bunches. HA
Enjoy some carrots!
-C
makes about 2 and a half dozen (depending on size)
2 1/4 cups all purpose flour plus more for dusting
1 teaspoon baking soda
1/2 teaspoon salt
1 teaspoon cinnamon
1/2 cup vegan butter
3/4 cup granulated sugar
1/2 cup carrot puree ( see note about how to make puree)
For the glaze
2 to 3 cups powdered sugar
on orange
orange and green food coloring
Note. To make carrot puree, steam a couple carrots until completely soft them blend until smooth.
Place sugar, vegan butter, and carrot puree into a big bowl. Beat with a beater until light and fluffy. Add in the flour, baking soda, salt, and cinnamon and mix by hand until completely incorporated and mixture tunes into dough. Gather dough into a disk and wrap in plastic or place in a plastic bag and refrigerate for at least 2 hours or up to overnight.
Once dough has chilled enough and you are ready to go, preheat the oven to 350.
Place dough on a flour dusted counter and roll out about 1/4 inch thick. Cut out the cookies with a cutter or by hand and place on a baking sheet. Bake cookies for 10-11 minutes or until just starting to turn slightly brown around the edges. Remove from oven and place on a wire rack to cool.
Once cookies are all baked and cooling, make the glaze. Place powered sugar into a big bowl, zest in the orange then add in the juice od half the orange. Mix completely and check consistency. You want it to be slightly running but not liquid, but also not to stiff. Add more juice or more sugar to get it right. Once it is the right consistency, separate into 2 bowls. Dye one green and one orange. Now glaze you cookies. A knife or small spatula works best and yes, the glaze drips a little so do it over a baking sheet, but after about 10 minutes the glaze hardens.
And then you have carrot cookies and all is good. Now go eat a carrot cookie!
Store uneaten cookies in an airtight container for up to 5 days. They can be frozen too.
I am sadly at my last few bags of frozen garden foods from last season. As of now I have a bag of tomatoes, a couple bags of shredded zucchini, and a bag of rhubarb. Well, had a bag of rhubarb. I think I have eaten almost all of it already. My rhubarb patch better get up and producing stalks soon. And as for the rest of the veggies that I will require. Guess I am going to be surviving mostly on roots from farm share (we are getting a lot more greens though!!!!) and probably doing a bit more grocery shopping then I care too. A few more months. I can do it.
Anyway, enough about my freezer and lack of fresh produce problems.
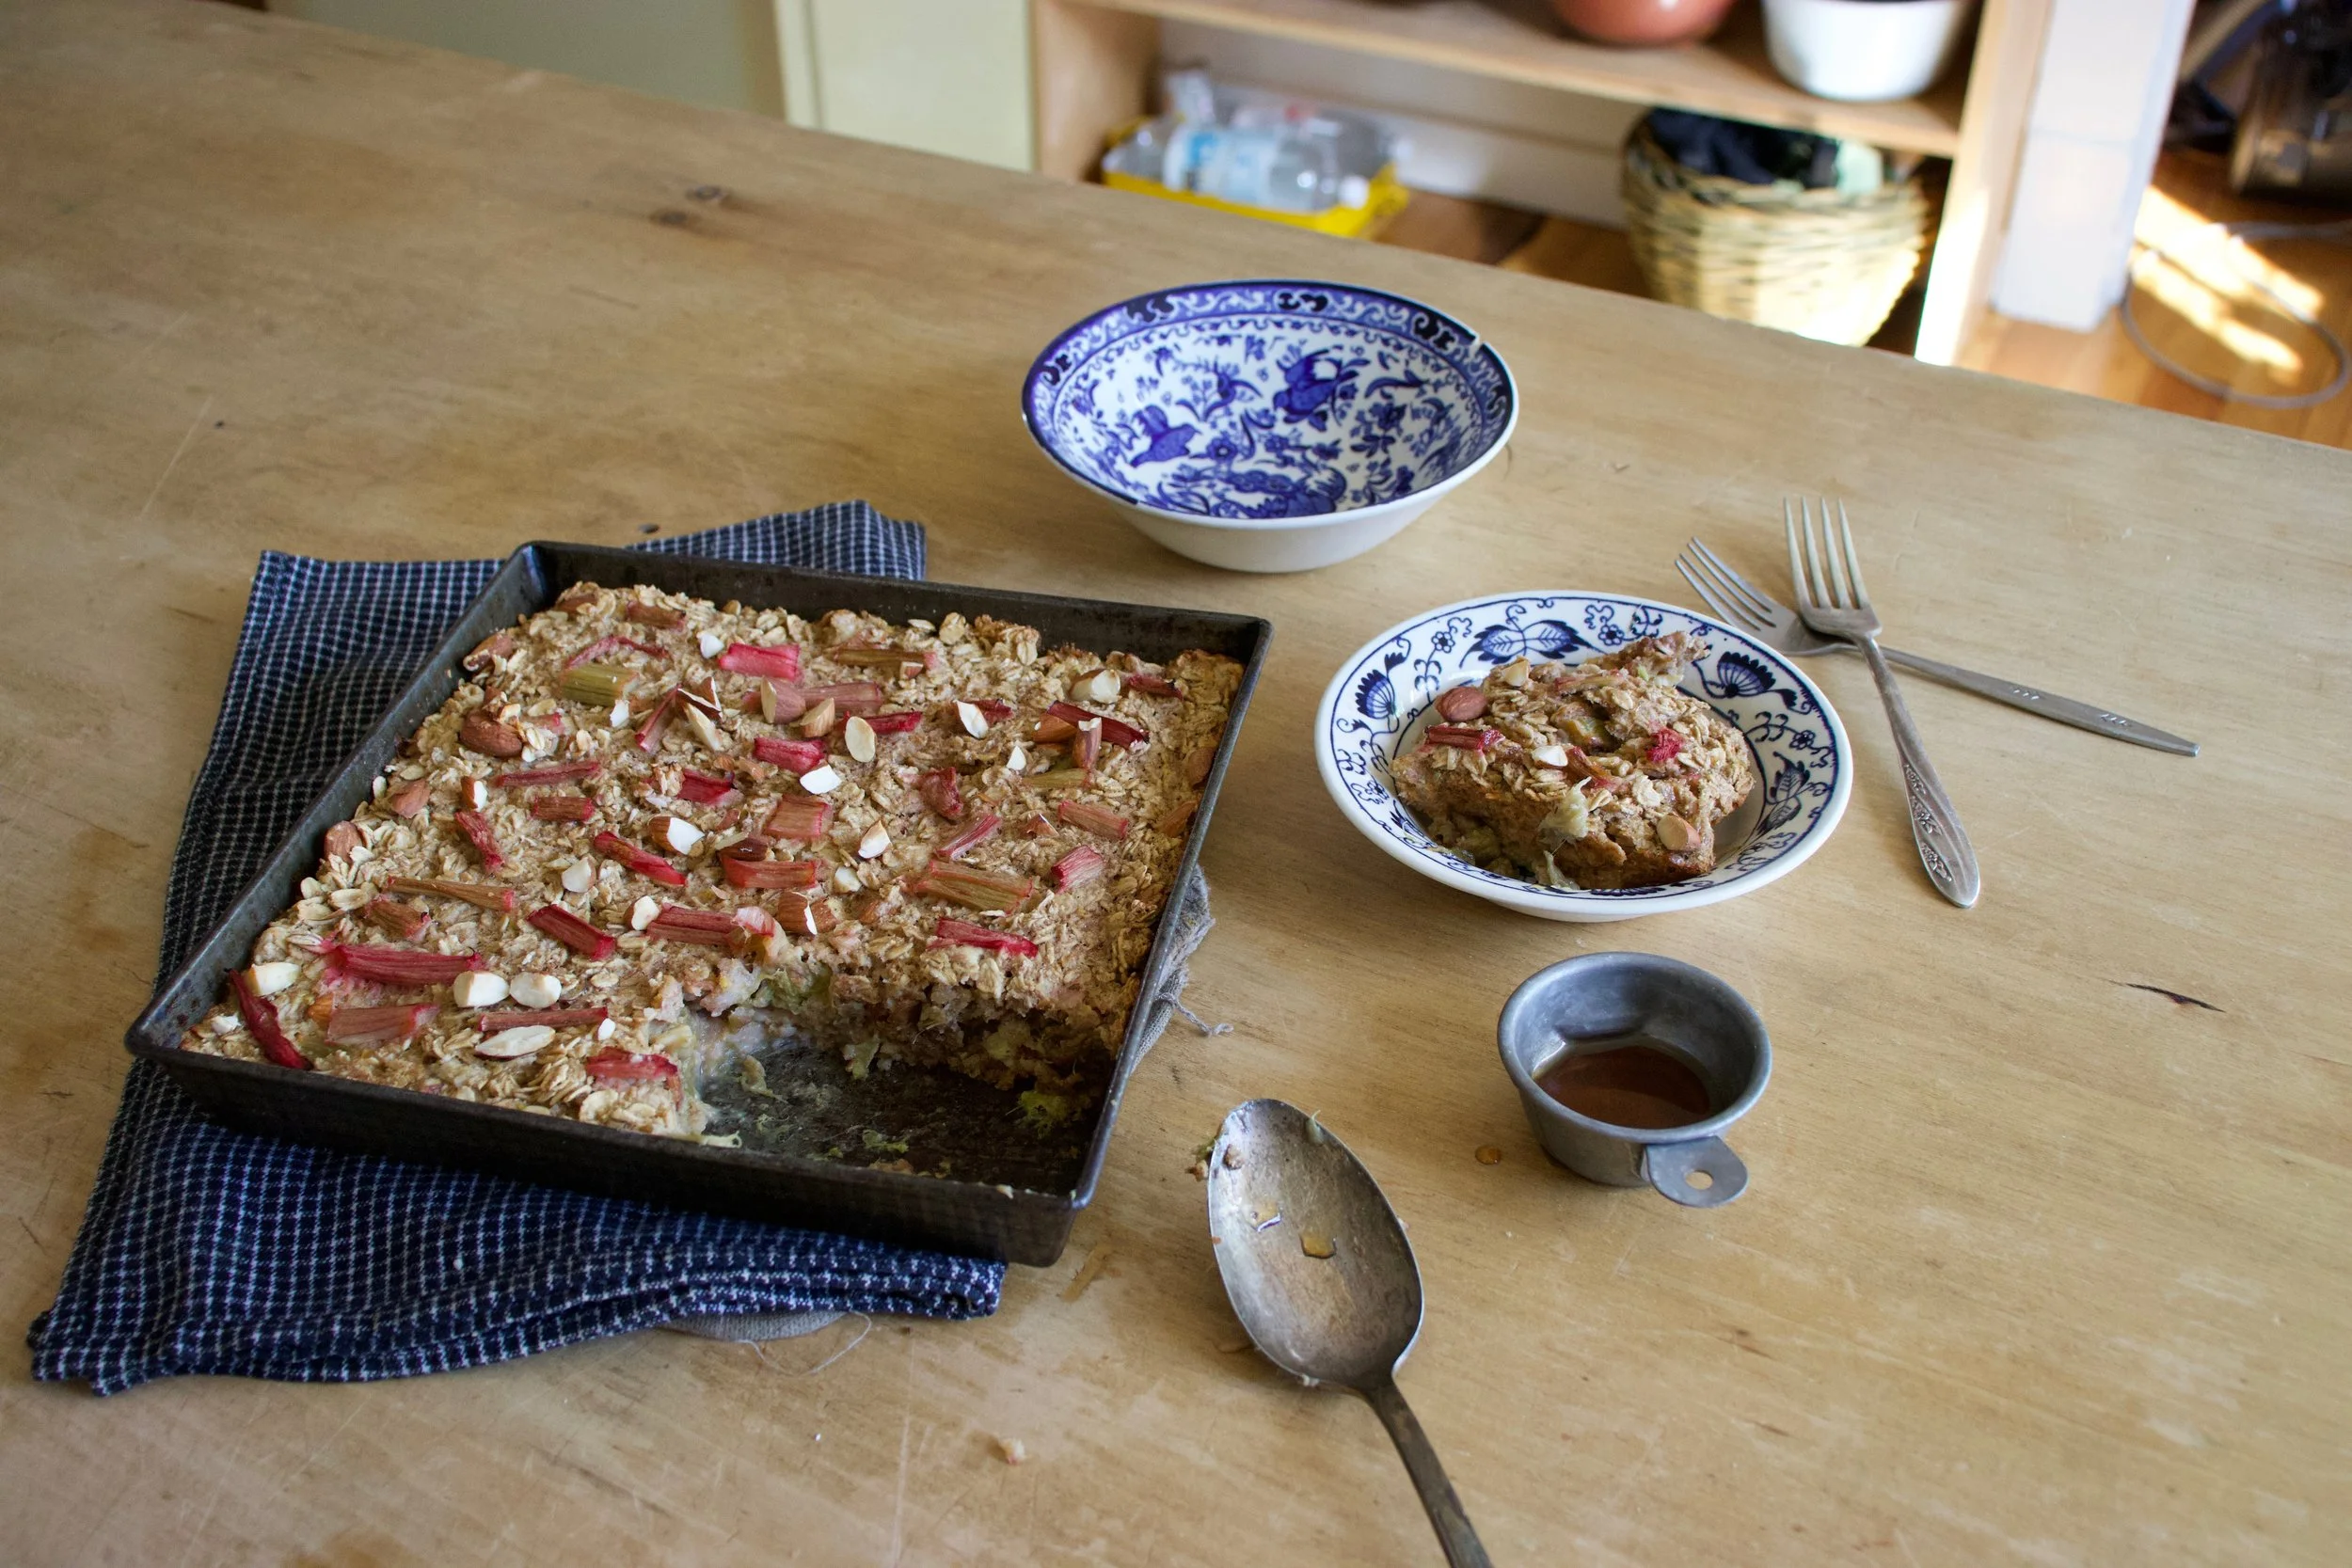
Here in Vermont maple season is well on it%u2019s way making it a perfect time for anything maple. And rhubarb. Yeah I am using my frozen rhubarb from last year, but any time now (after the snow melts) there will be plenty of stalks for the taking. There will be so much maple and so much fresh rhubarb which are the perfect taste combination. Exciting times! And when added to oatmeal, things just get more gooder. (I know gooder is not a word but I think it should be) Oatmeal, especially baked, is the stuff where all gooder things start.
Have you had baked oatmeal yet? It truly is fantastic. Not at all gummy and gloopy like stove topped cooked oatmeal (but I like it like that too). It still has a good bite to it while still being soft and creamy and boy oh boy is it just the bees knees. With the addition of some crunchy almond friends, well even better. Trust me. If you are a oatmeal eater, you must try it baked. Best part is that it can be eaten as breakfast but also I have been serving it to the mr for dessert with a healthy drizzle of more maple. It%u2019s that good friends. From breakfast to dessert. Everyone is happy.
To the baked oatmeal.
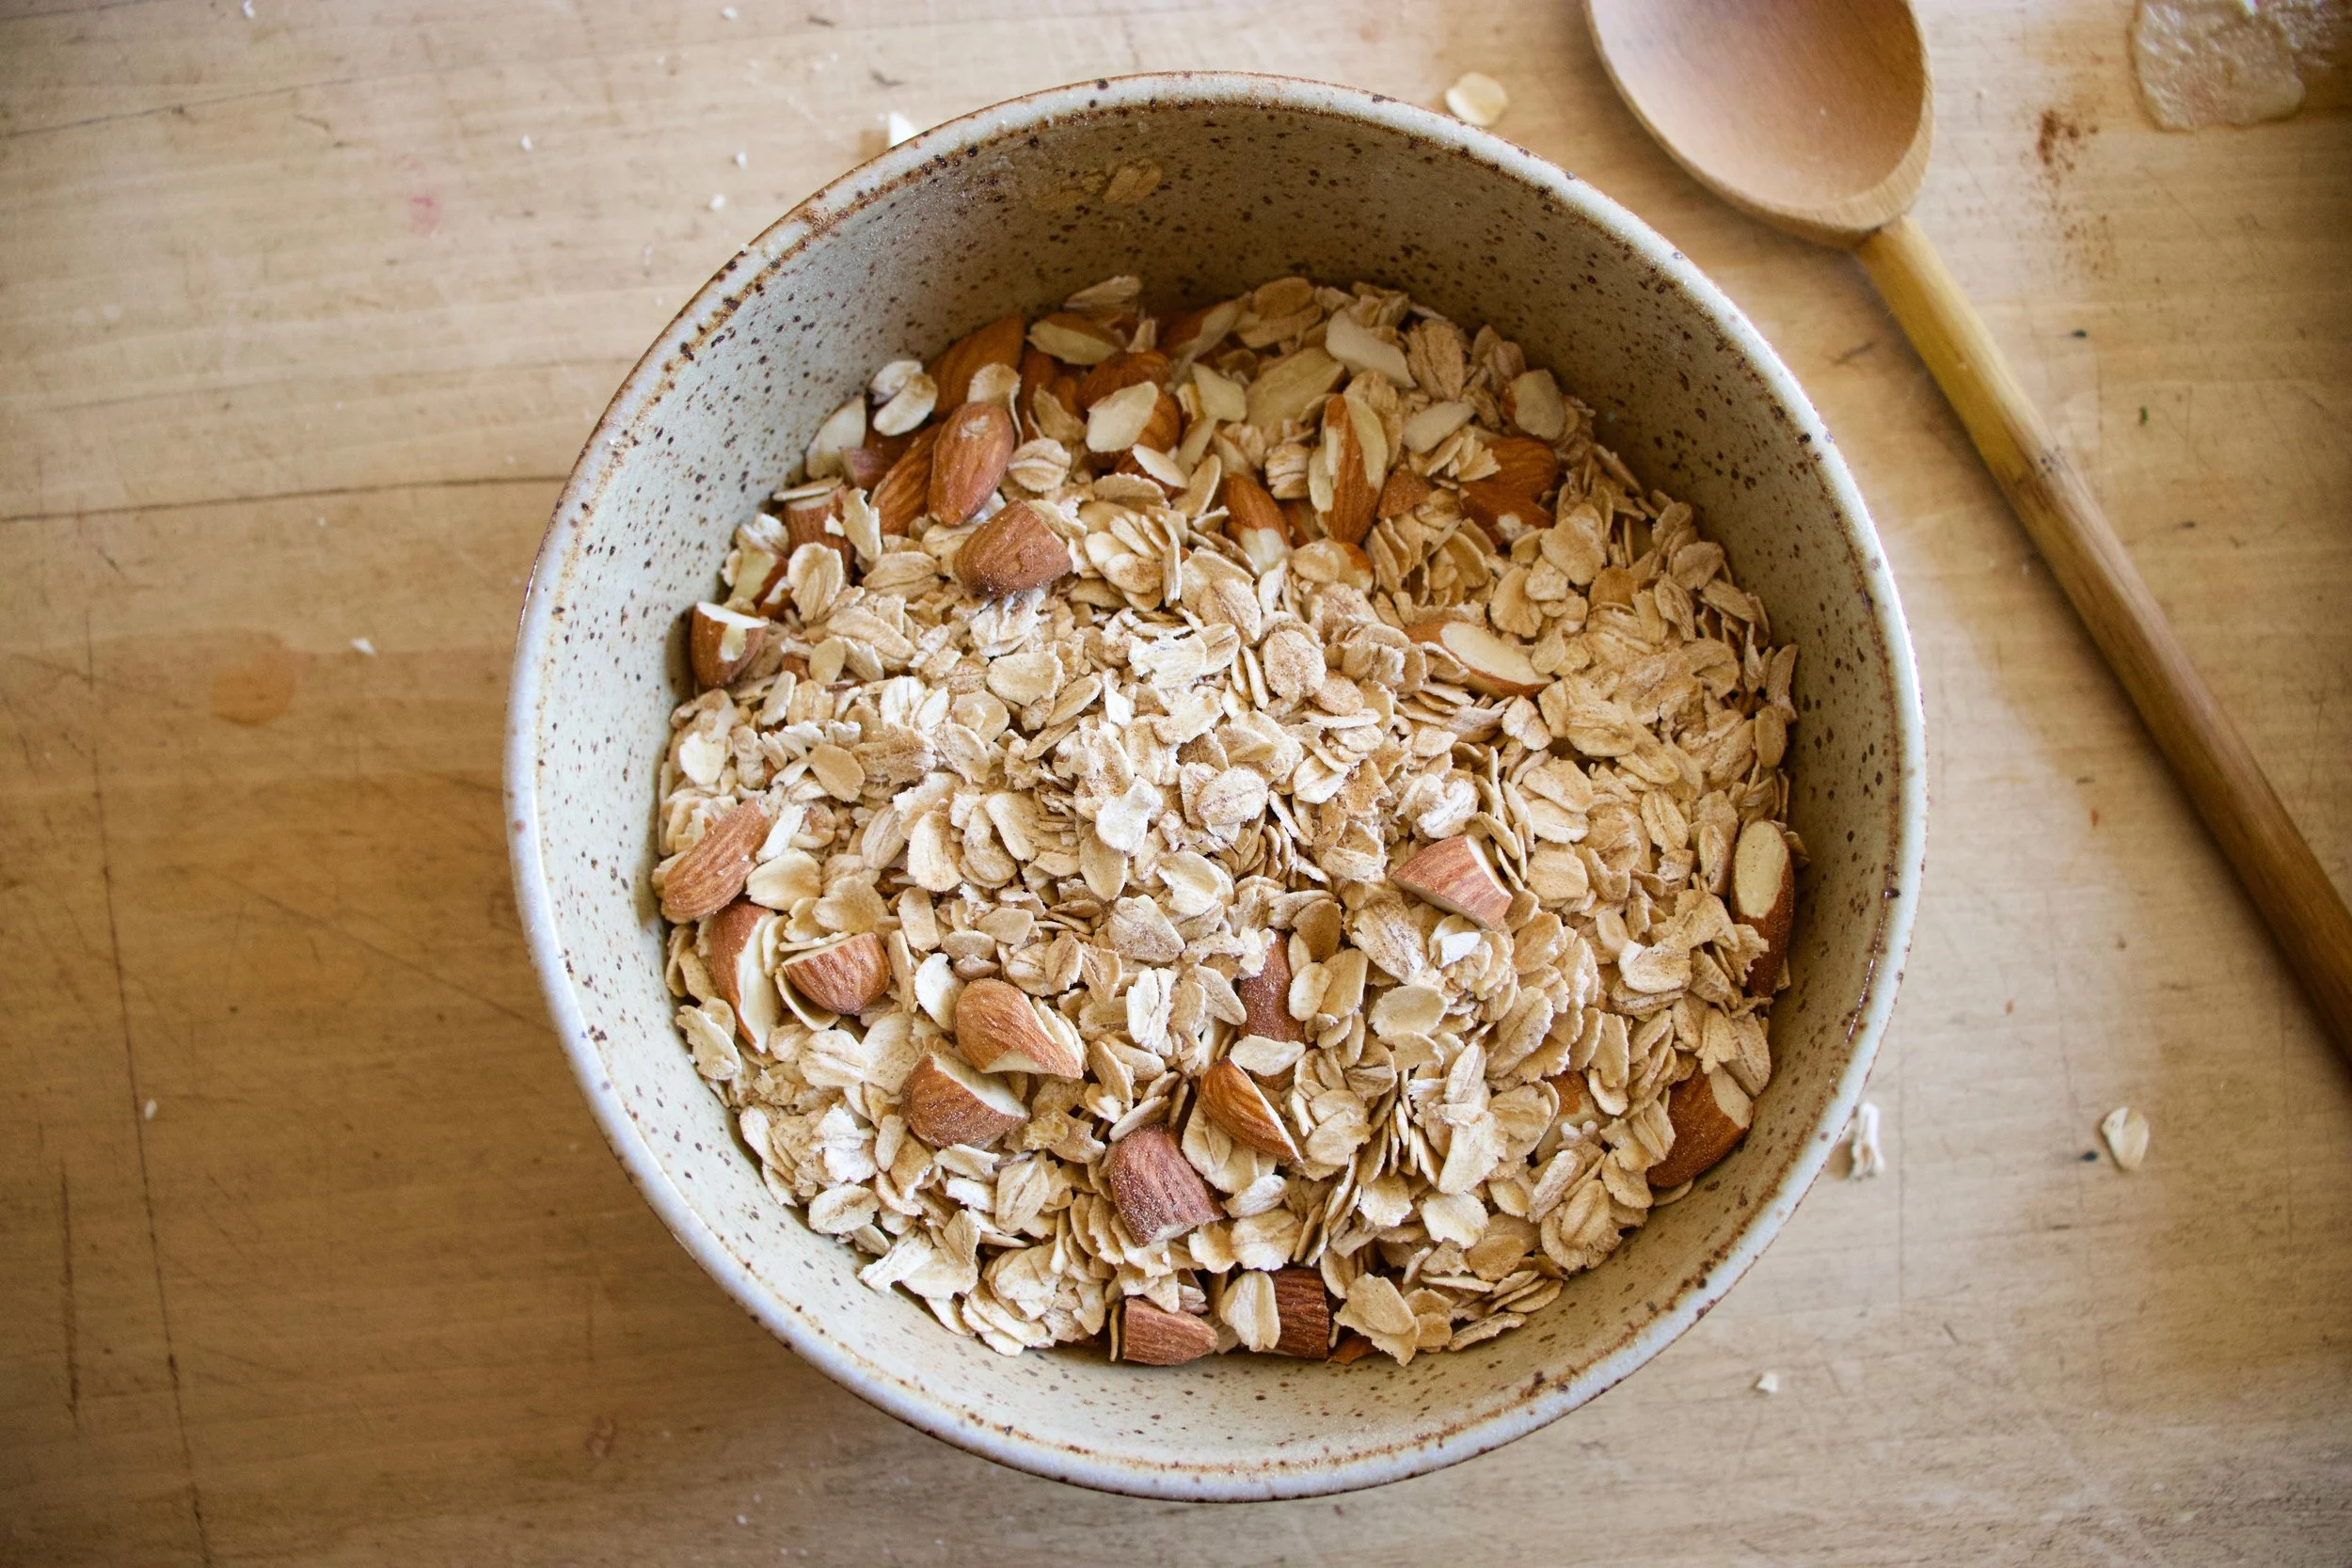
The stuff. Old fashion oats, cinnamon, salt, baking powder, rhubarb (fresh or frozen), REAL maple syrup, some plant milk, a few flax eggs, a bit of tahini, and some almonds.
To start. Oats, cinnamon. salt, baking powder and almonds get a quick toss together in a big bowl.
If you rhubarb is not already chopped up into inch long pieces, do that. I already did before freezing it so yea me. Once its chopped, layer almost all of it (reserve a few small needful to toss on top) into a lightly greased 9×9 inch baking dish then cover evenly with the oat mixture.
In now empty bowl mix together the milk, the flax eggs, the tahini, and the maple until evenly incorporated.
Pour the wet mixture all over the oats and let it absorb.
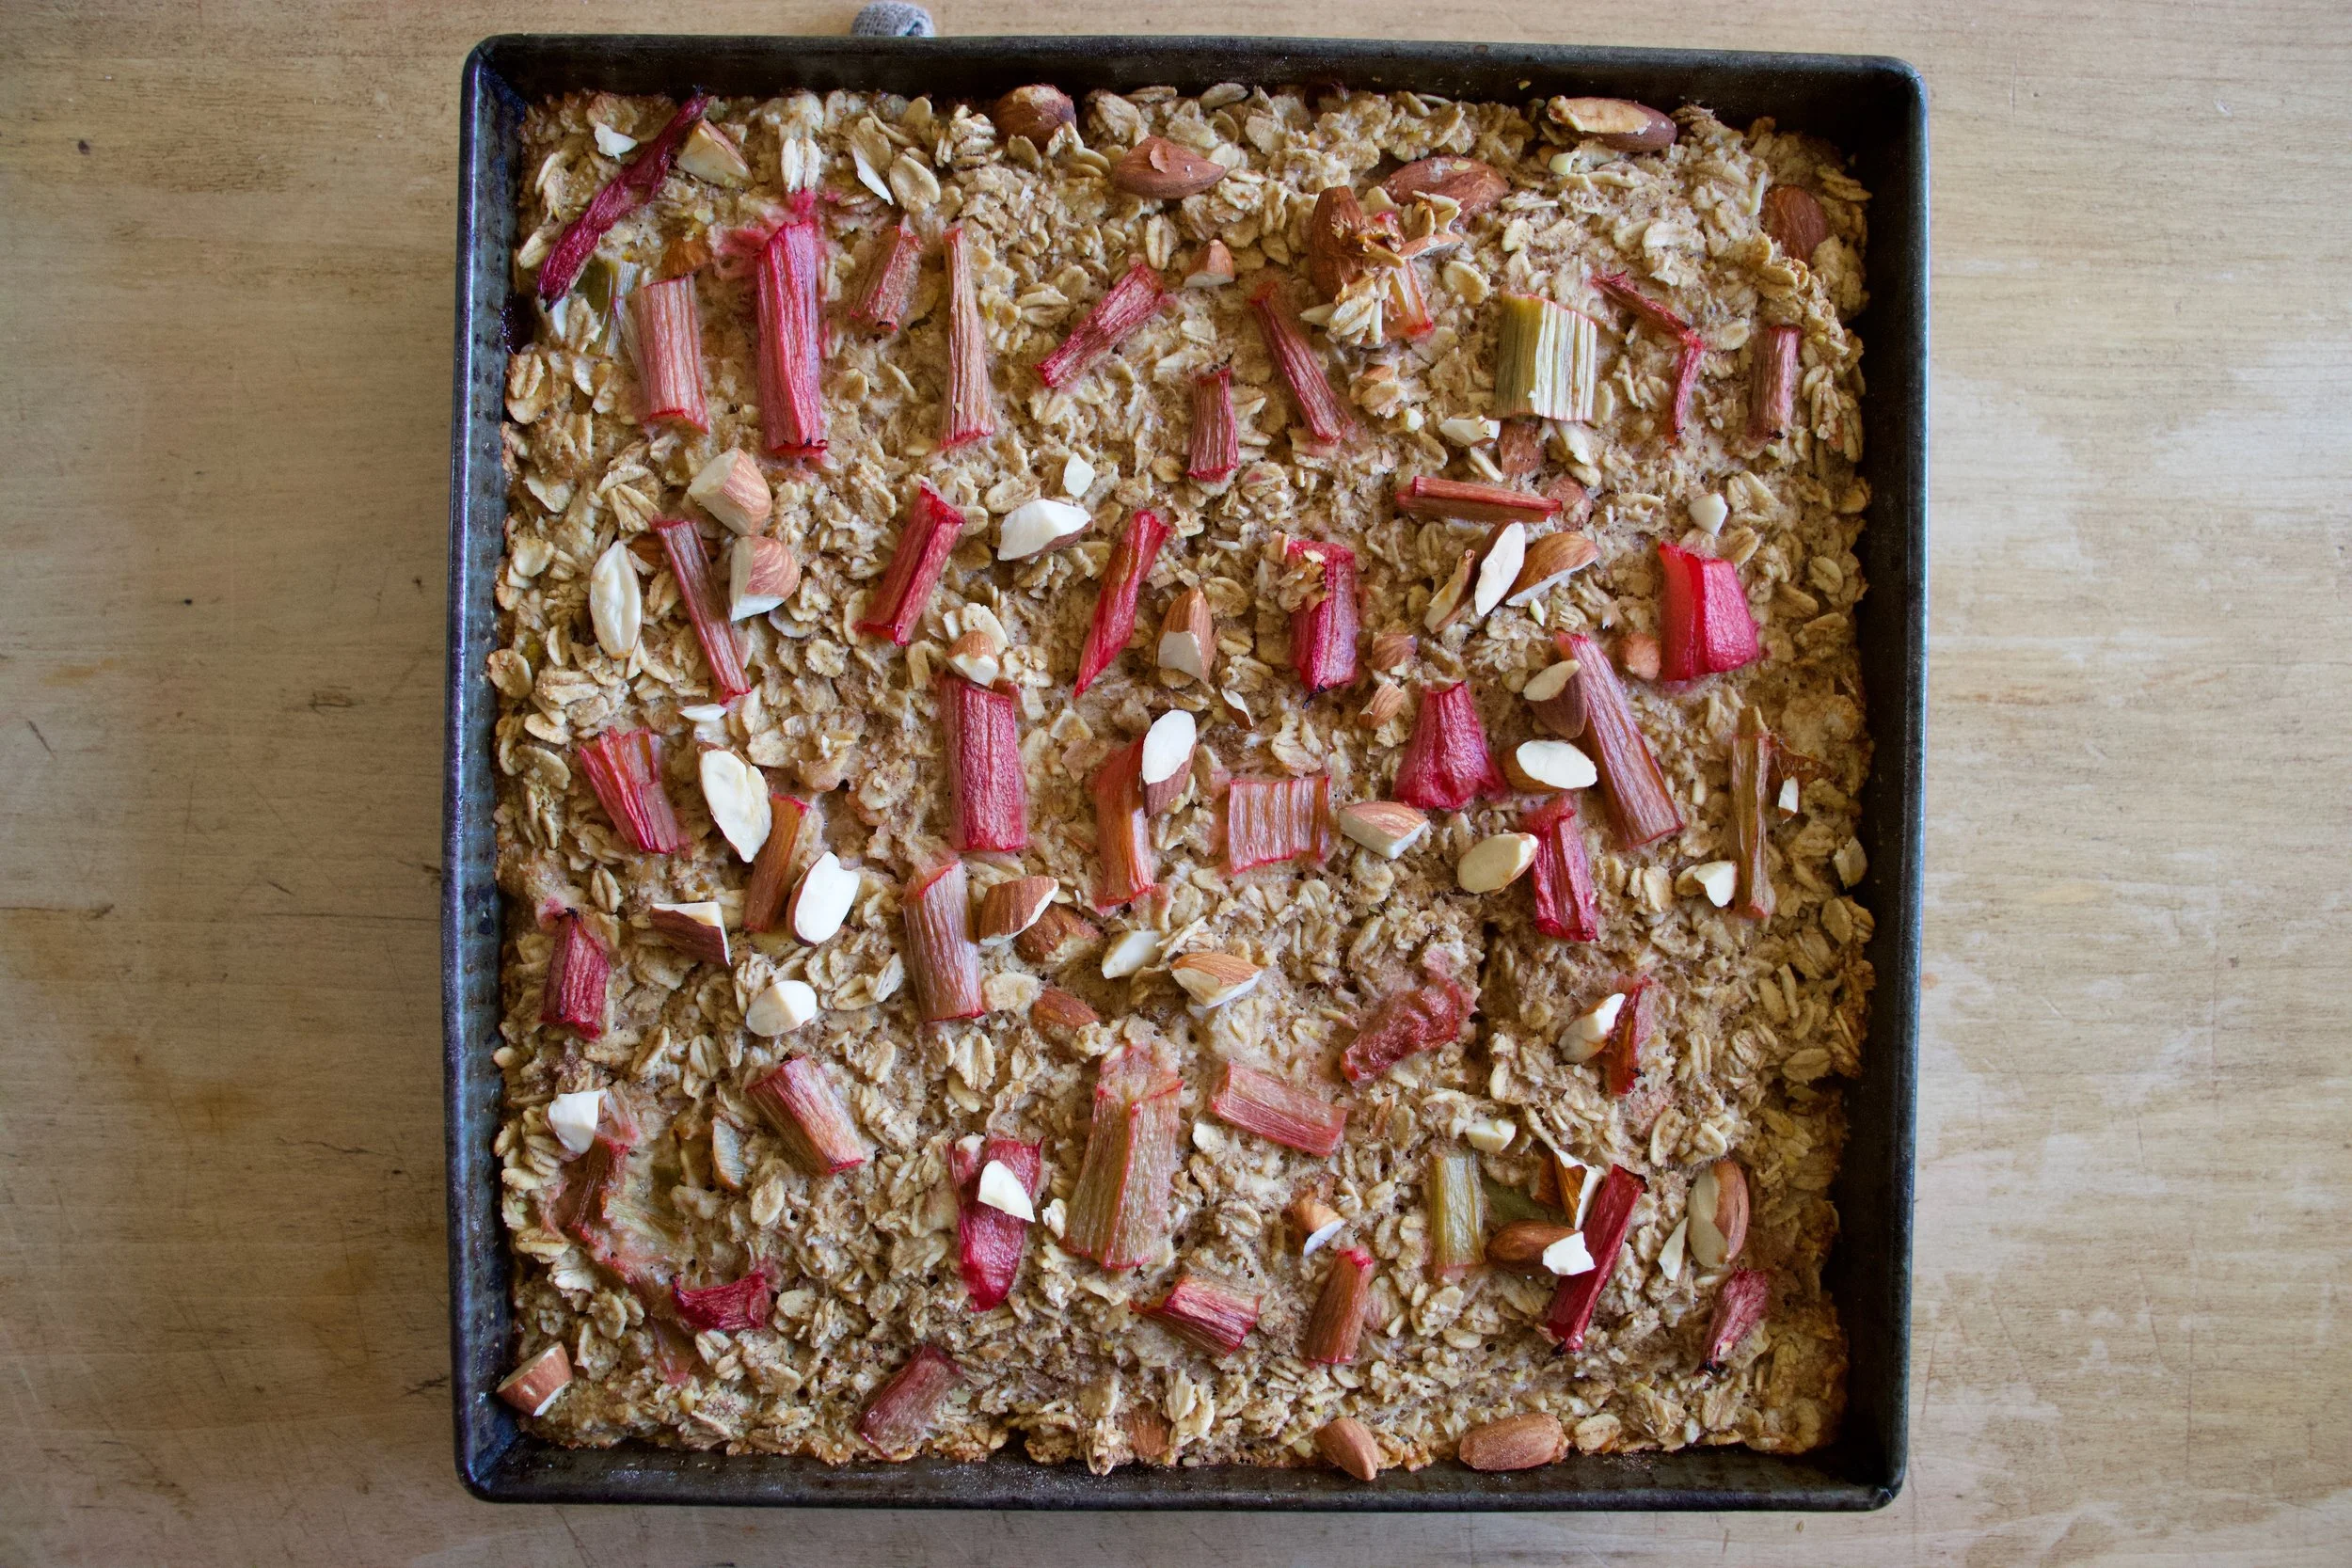
Once the liquid is all absorbed , top with any left over almonds and the left over rhubarb. For good looks.
Pop into a hot oven to bake.
Golden brown with crispy edges. Rhubarb and maple baked oatmeal for all your maple, oaty and rhubarbie needs.
Fresh from the oven scooped warm into bowls. Top with extra maple if thats what you should want do.
Enjoy and happy maple season!
-C
Make a 9×9 pan of oatmeal
2 1/2 cups old fashion oats (make sure gluten free if need be)
2 1/2 cups fresh or frozen rhubarb chopped into inch long pieces
1 1/2 cup plant milk (water works but it won%u2019t be as creamy)
1/2 cup chopped almonds (optional)
Preheat oven to 375
Lightly grease a 9×9 inch baking pan (I used metal because it makes for crisper edges but glass works too) and dump 2 cups of the rhubarb in and evenly distribute on the bottom. In a large bowl mis the oats, the baking powder, salt, and cinnamon together. Mix in chopped nuts if you are using. Evenly cover rhubarb with oat mixture. In now empty bowl mix together the milk, flax eggs, maple syrup, and tahini until evenly incorporated. Pour mixture over oats. Let the mixture sit for a few minutes until the oats have abosbed all the liquid. Toss the rest of the diced rhubarb and a few more chop nuts to the top and pop into the oven to bake.
Bake for 30-40 minutes (shorter time for a wetter oatmeal, longer for a denser crispier oatmeal)
Once baked to your likeness, remove from oven and let cool for a few minutes just so it is not super hot. Scoop into bowls and serve warm with extra maple and milk or whatever you might want to serve with it.
Left overs last great in fridge for 3-4 days or individual portions can be frozen for a month or two. Just pop into microwave for a couple minutes to warm up.
I have a bag of coconut flour that I need to use up so I have made coconut snack cake a few times the past couple weeks. Once with orange instead of lime. Once I added chocolate chips. This time I stepped it up made a little glaze action, toasted a little coconut for some extra coconutiness and took these here pictures and wrote down the recipe. Just. For. You.
Not that I don%u2019t know already that my snack cake creation is good, but I guess it was just super A+++. I threw this one together right before the mr and I headed down to PA to hang with my dad. As soon as he (and sister and nephews) started in on it, well the responses were more then average. My dad even snuck a piece off and hid it for later. They really, really, really were into it. Wanted me to make another right then and there. Normally I would but my dad doesn%u2019t keep coconut flour on hand and I don%u2019t make it a habit to travel with any myself. (I might have to change that.) Next time he will know to stock the coconut flour.
I didn%u2019t realize my people were such coconut people. Good thing for them that I like coconut people. As a matter of fact, I consider myself a coconut person. And coconut is not code for awesome, but I am that too. HA
Anyway enough about me. Coconut snack cake is what you want to know about. It is soft and dense. Moist, not overly sweet. Lots of lime and coconut flavor and is just perfect for snack time. Eat it with a fork on a plate with coffee or tea or grab an piece and eat it walking down the street while thinking about green leaves and warmer weather. Or wherever and whenever. If you make it then it%u2019s up to you when and where you eat it. That only seems fair.
Now to the snack cake of your coconut lime dreams.
The stuff. Gonna need all purpose flour, coconut flour, salt, baking soda, baking powder, a couple flax eggs, some warmed coconut oil, plant milk, brown sugar, vanilla extra, apple sider vinegar, a couple lime, some powdered sugar, and some lightly toasted shredded coconut.
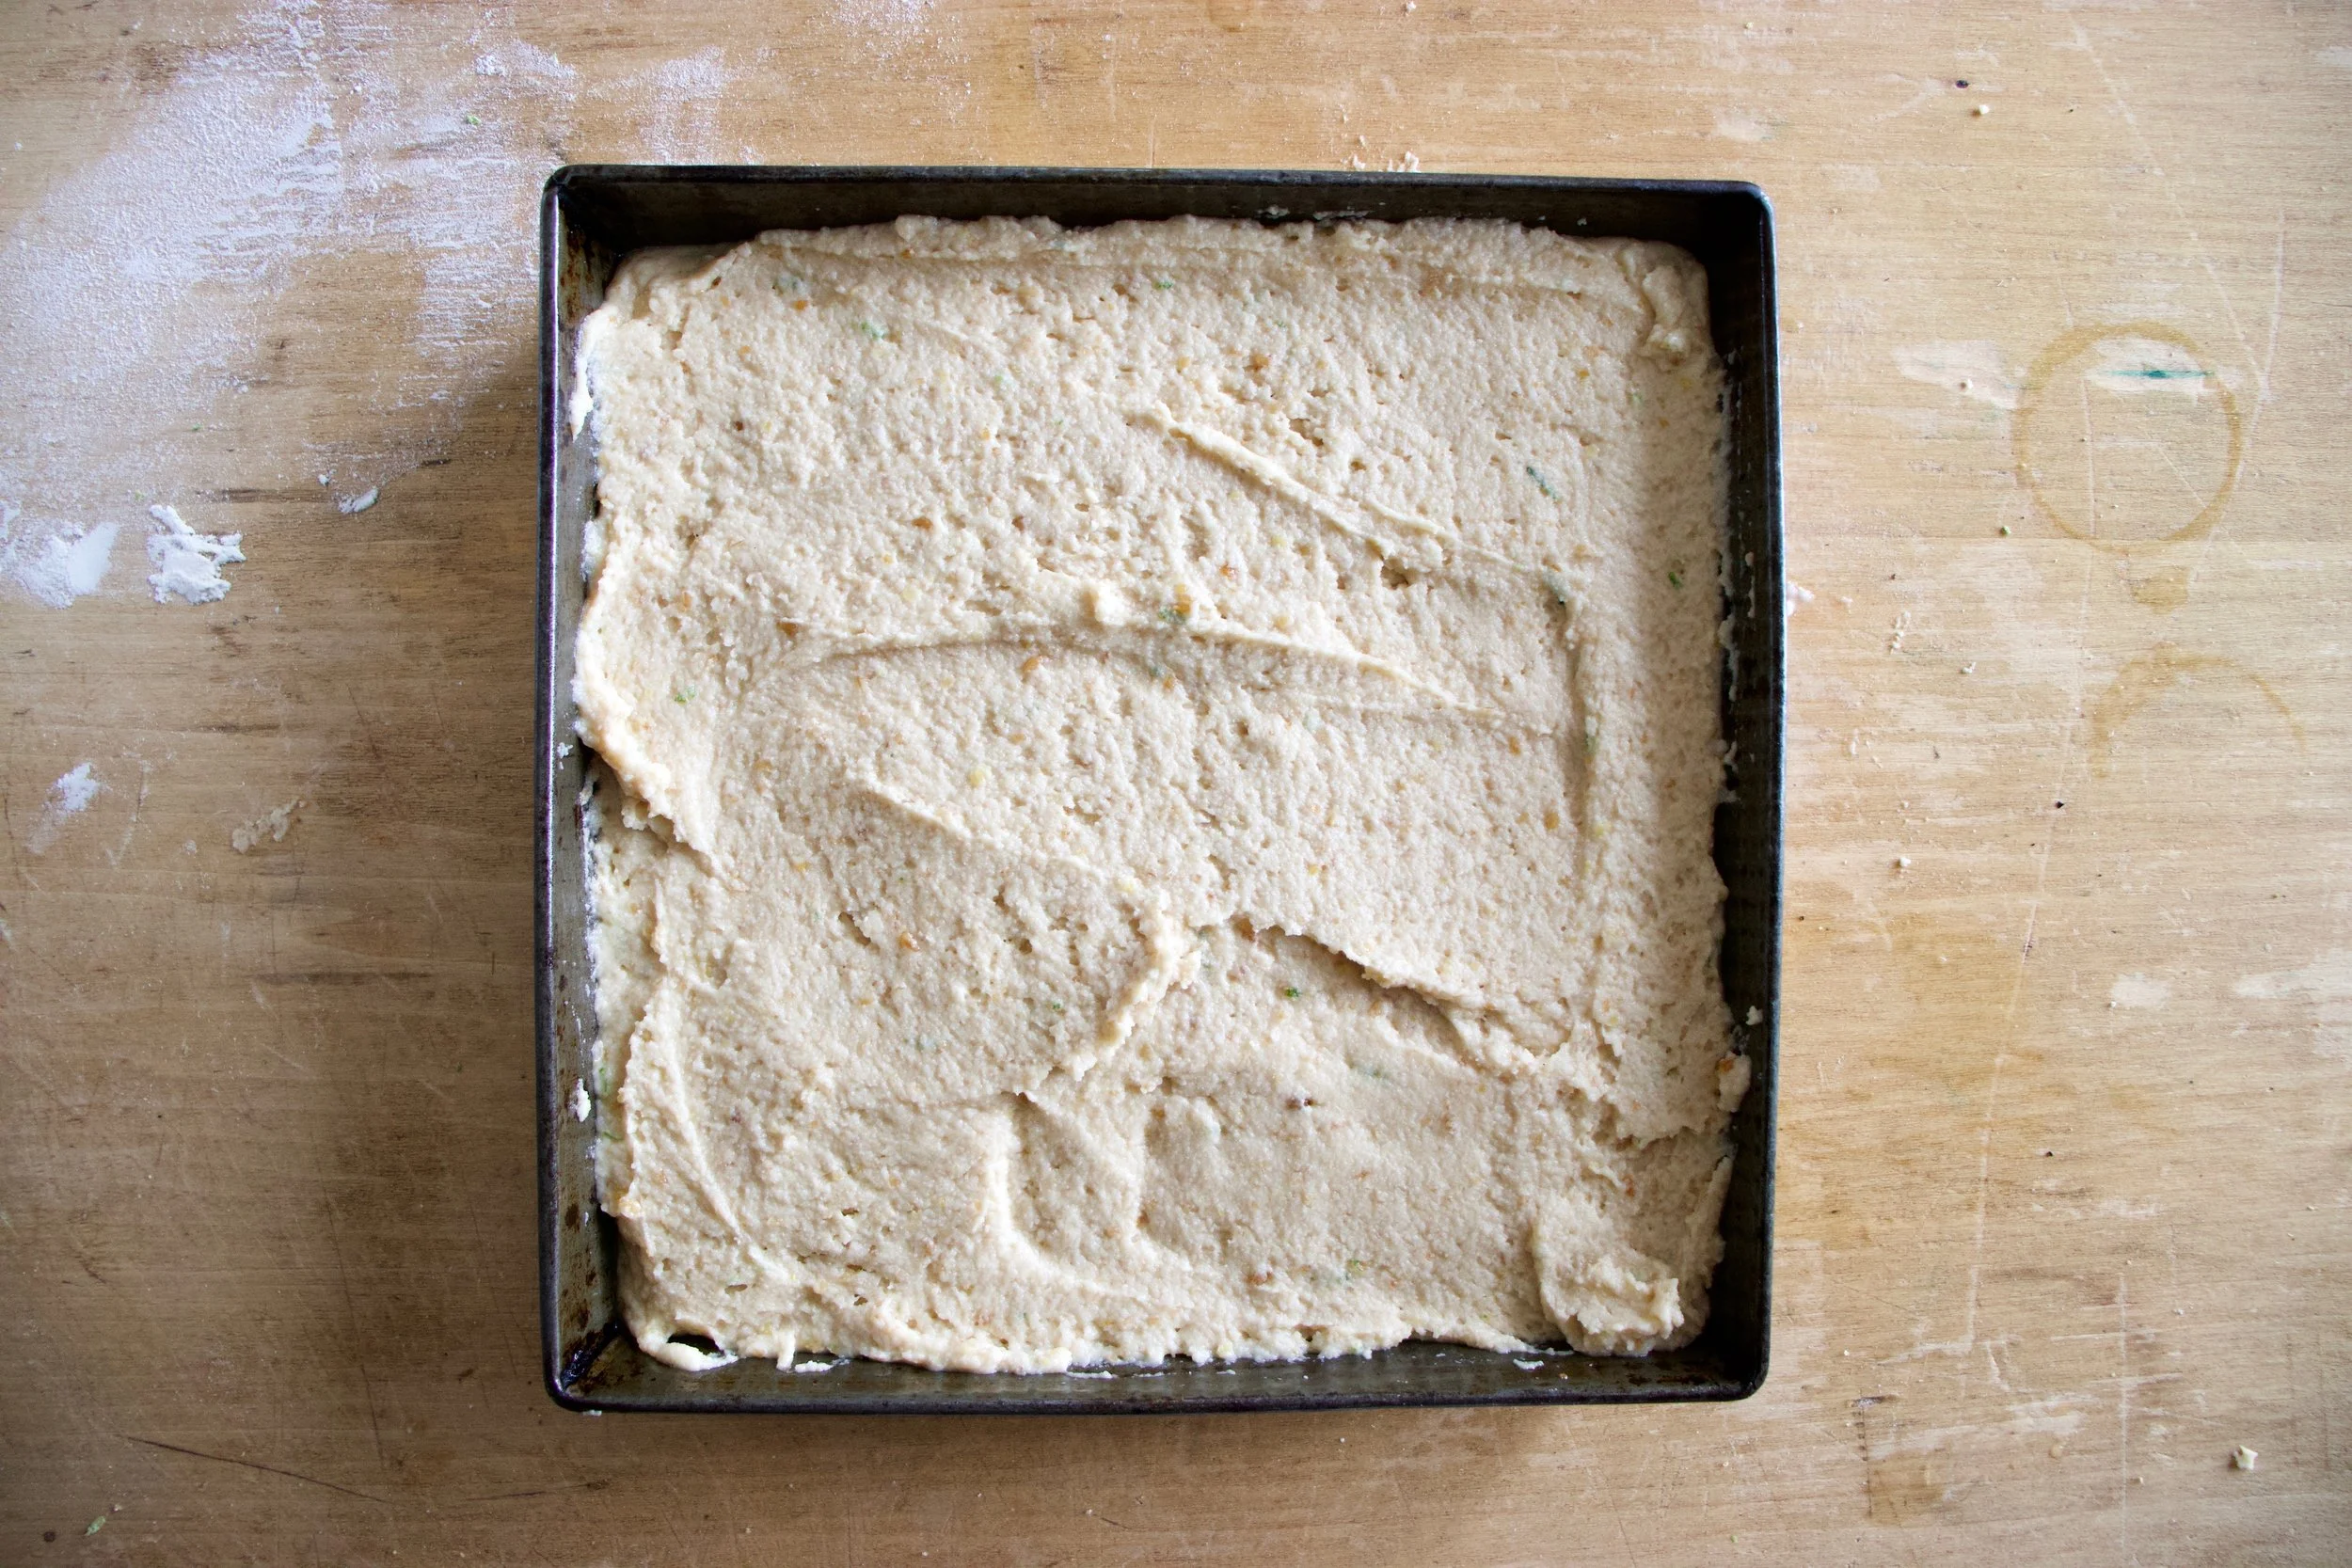
Grab a big bowl. Add in the brown sugar, flax eggs, warmed coconut oil, apple cider vinegar, and vanilla. Mix it all up until evenly incorporated.
Dump in the flours, baking soda and powder, and salt. Zest in lime, squeeze in lime juice and start to mix. Add in the milk as you are mixing.
Cake batter mixed and done. Now to bake it.
Dump the cake batter into a well greased baking pan and level it off with a spoon or spatula.
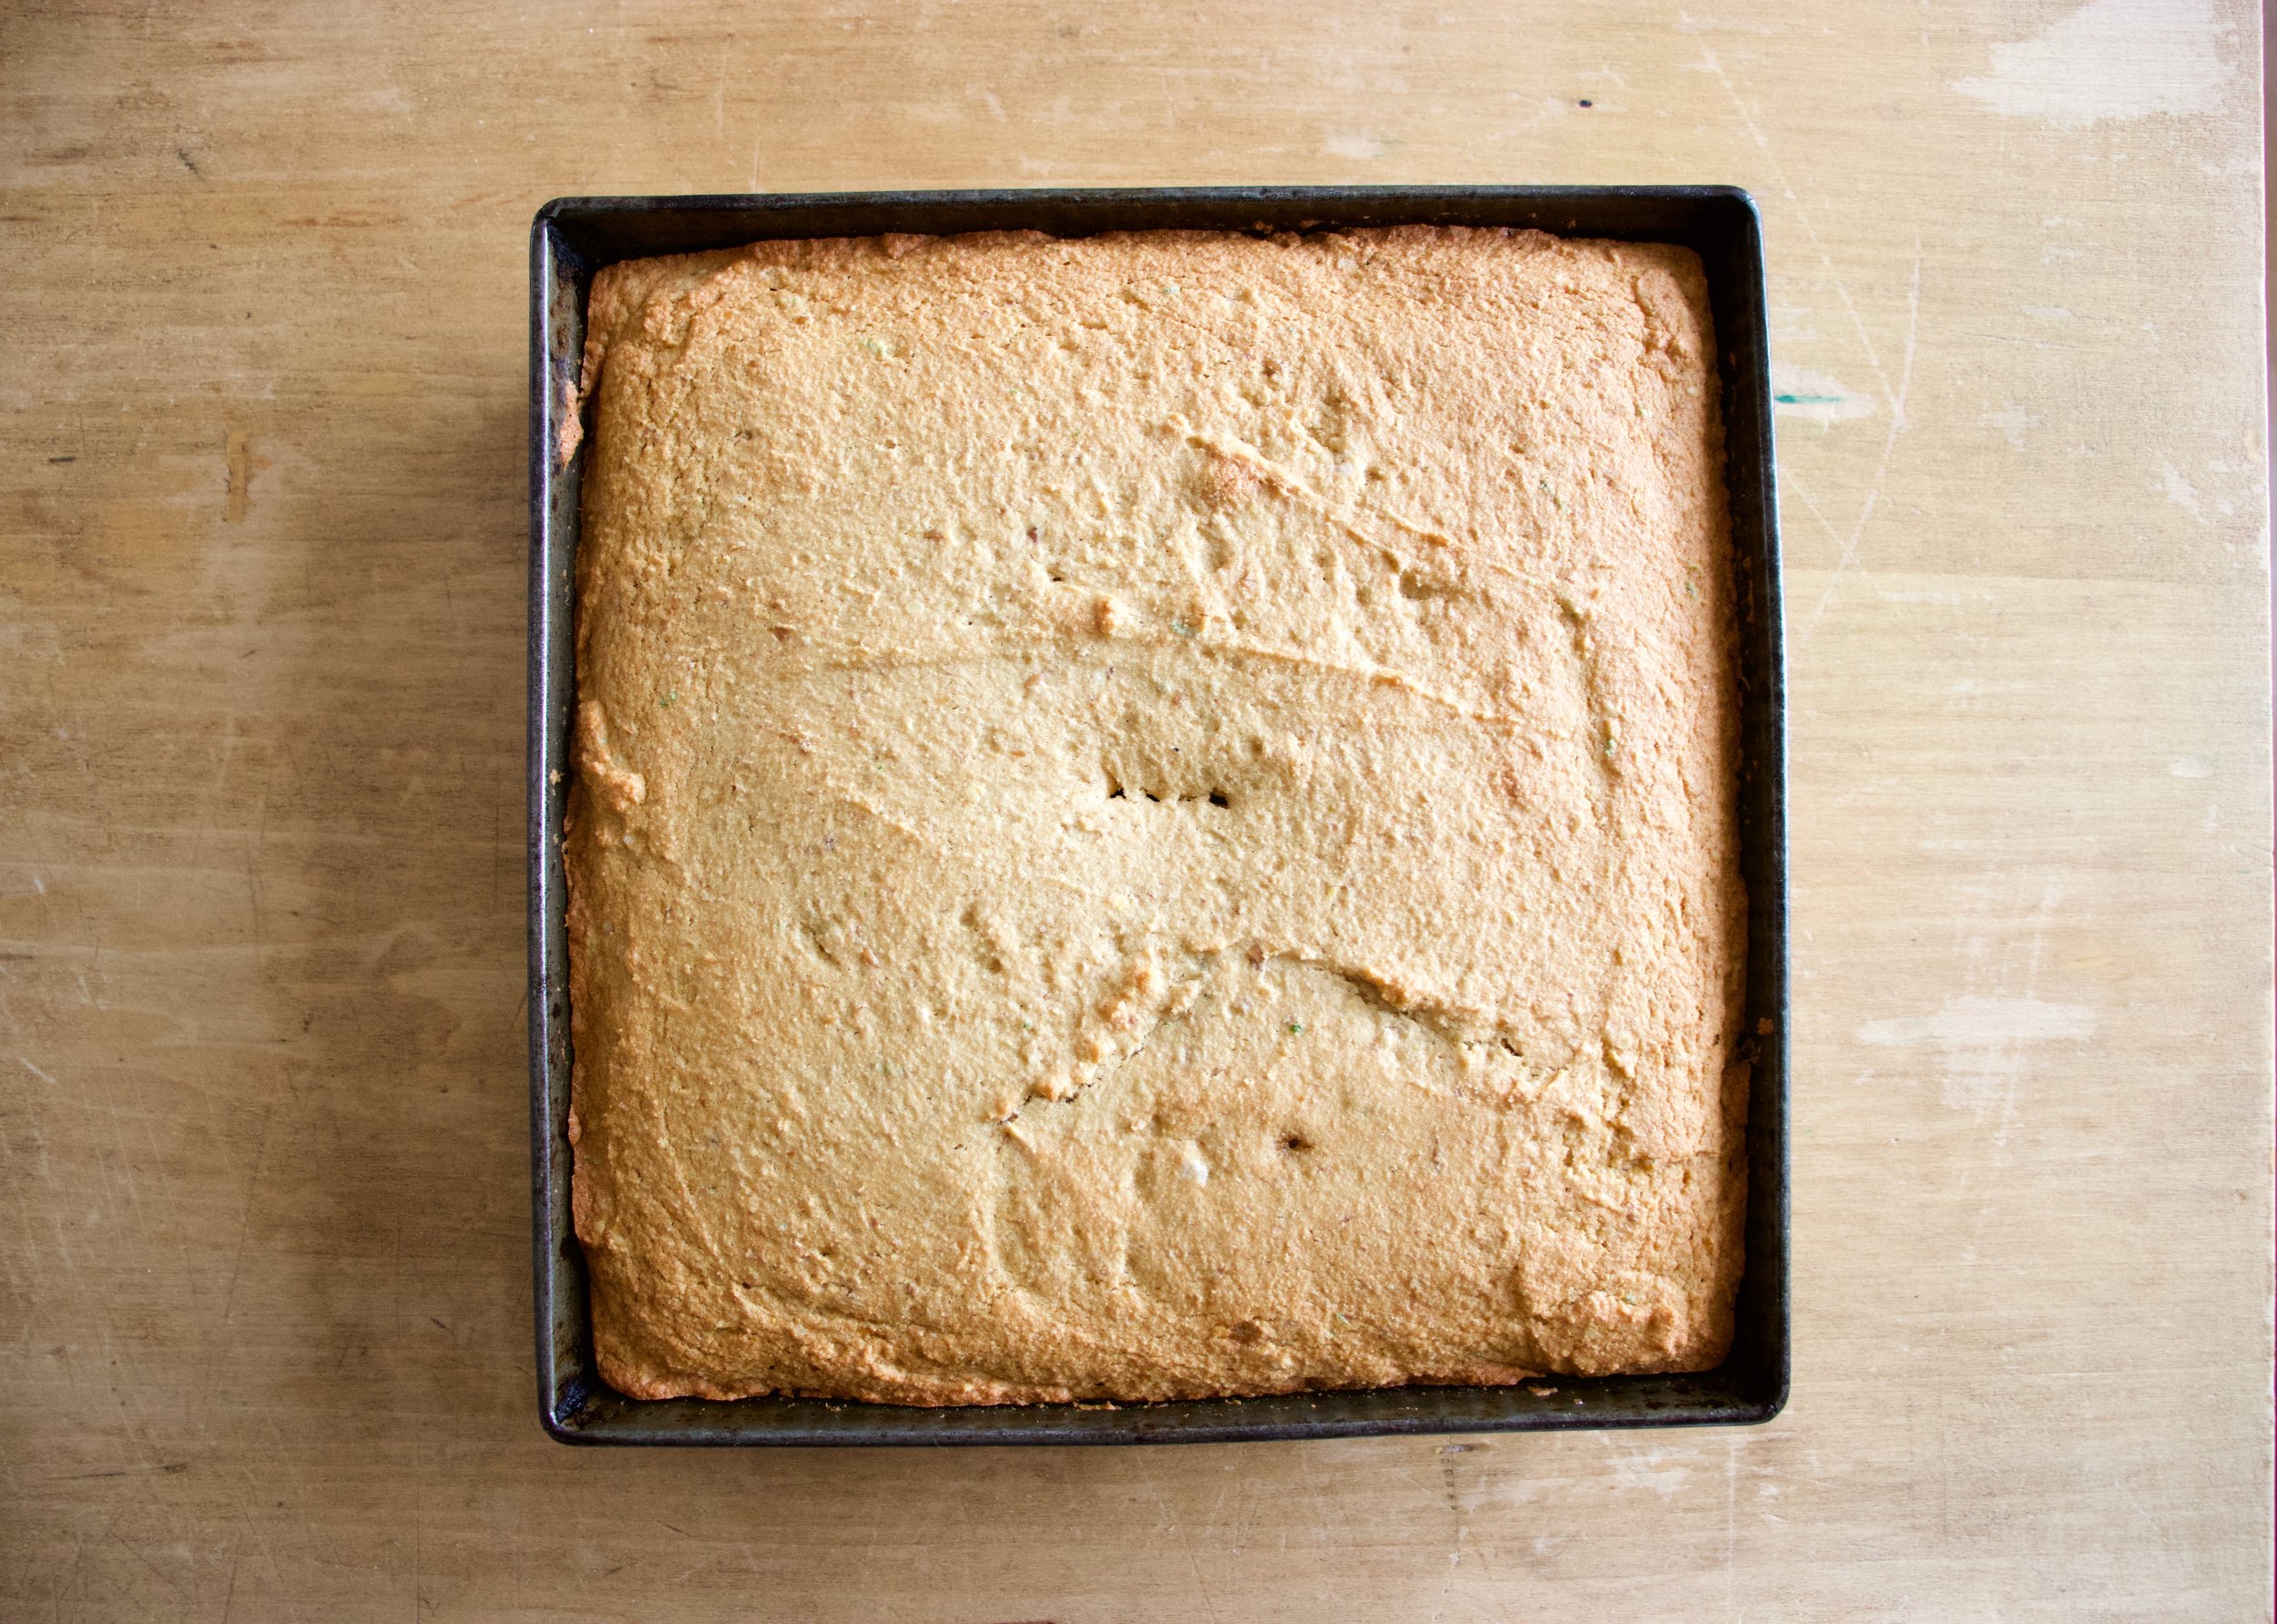
Now it%u2019s oven time to bake into a great and well cake.
A cake out of the oven, great and well. Golden brown and smells of all the goodness that a coconut cake could possible smell.
While cake is cooling, which it should be now, make the glaze. Powdered sugar, lime zest, and lime juice. Mix until it%u2019s glazy.
Pour the glaze all over cooled cake.
Don%u2019t forget the shredded coconut. Get it on before the glaze starts to set.
And then it%u2019s just the matter of cutting cake%u2026%u2026.
You know once you cut it, that means snack time right? Coconut lime snack cake for all of your coconut time, lime time, hungry snack time needs.
Keep it good.
-C
Makes a 9×9 cake
1 1/2 cups all purpose flour
1/2 cup coconut flour
3/4 packed cup brown sugar
1 teaspoon salt
1 teaspoon baking soda
1 teaspoon baking powder
1/2 cup coconut oil (warmed to liquid)
1 1/4 cup plant milk (I used almond)
2 flax eggs (2 tablespoons ground flax seeds with 1/2 cup warm water)
1 teaspoon vanilla
1 tablespoon apple cider vinegar
A lime
For the glaze
3/4 cup powdered sugar
a lime
1/4 cup or so toasted shredded coconut to sprinkle on top (optional)
Preheat oven to 350
In a large bowl, mix together the bbrown sugar, flax eggs, warmed coconut oil, vanilla, and apple cider vinegar until completely incorporated. Next dump in the flour, coconut flour, salt, baking soda and baking powder. Zest the lime into bowl. Start mixing, adding in the juice of the lime and the plant milk. Mix it all together until completely incorporated.
Dump mixture into a well greases 9×9 baking pan and level off with a spoon or spatula. Place into oven and bake for 30-35 minutes or until golden brown and a tester stuck into the middle of cake comes out clean.
Once baked, remove from oven, let cool in pan for a few minutes then carefully remove cake from pan and let cool on a wire rack.
While cake is cooling, make the glaze. Just zest other lime into powered sugar then add the juice (or as much juice as you needed) of the lime until a pourable glaze forms. If your lime is not particularly juicy enough and the glaze is still really thin, just add a splash of water to thin out as needed.
And when cake is completely cooled, pour glaze all over cake and cover with toasted coconut flakes.
Now cut. And eat.
Store left over cake in a air tight container for 3-4 days. Individual pieces freeze well for all your future snacking needs.
I have very strong feelings for heart shaped baked goods. I think that everything, all year round, should be heart shaped. How lovely would that be? It would be ever so lovely, or I would think so anyway. And yes, ok, I was thinking about Valentines Day when I made these cupcakes but don%u2019t let that be the only reason you make a cupcake, cake, or any other baked good into the shape of a heart or pink for that matter.. Hearts are just so sweet and cute and dare I say cuddly? (Can you cuddle baked goods? Let me know if you have and do. We should talk about that). And pink is just a fantastic color, especially when it is the color of the flavor. Purple-y pink equals a taste like berry so all just makes sense.
Anyways. Cupcakes. Made with nutty almond meal to taste all nutty, frosted with blackberry and clementine frosting which is a pairing that all party and non party people will love. A down right deeelightful combination that will, no matter your circumstance in life, make you smile. Because lets get this clear, these cupcakes might look all lovey dovey and Valentines Day-e and are very much a perfect Valentines Day treat, but also can be an everyday, run of the milll, straight up any day, all day cupcakes. Valentines Day does not own the heart or pink.
These cupcakes are for you to love and you don%u2019t need to worry if they love you back. That would be weird.
Slightly off topic thought. How awesome would it be if someone made a cute little teddy bear that when you squeezed it it would scream %u201cWHAT THE HELL! GET OFF ME!%u201d Hahahaha. That would be amazing.
To the cupcakes!
The stuff. Flour, almond meal, baking soda, baking powder, salt, sugar, soy milk, oil, vanilla extract, and apple cider vinegar. Also some blackberry jam, powdered sugar, some vegan butter, and a clementine.
In a big bowl, whisk together the granulated sugar, flour, almond meal, salt, baking powder, and baking soda.
Add in the oil, vanilla, milk, and apple cider vinegar. Mix until fully incorporated.
And that is some mixed batter.
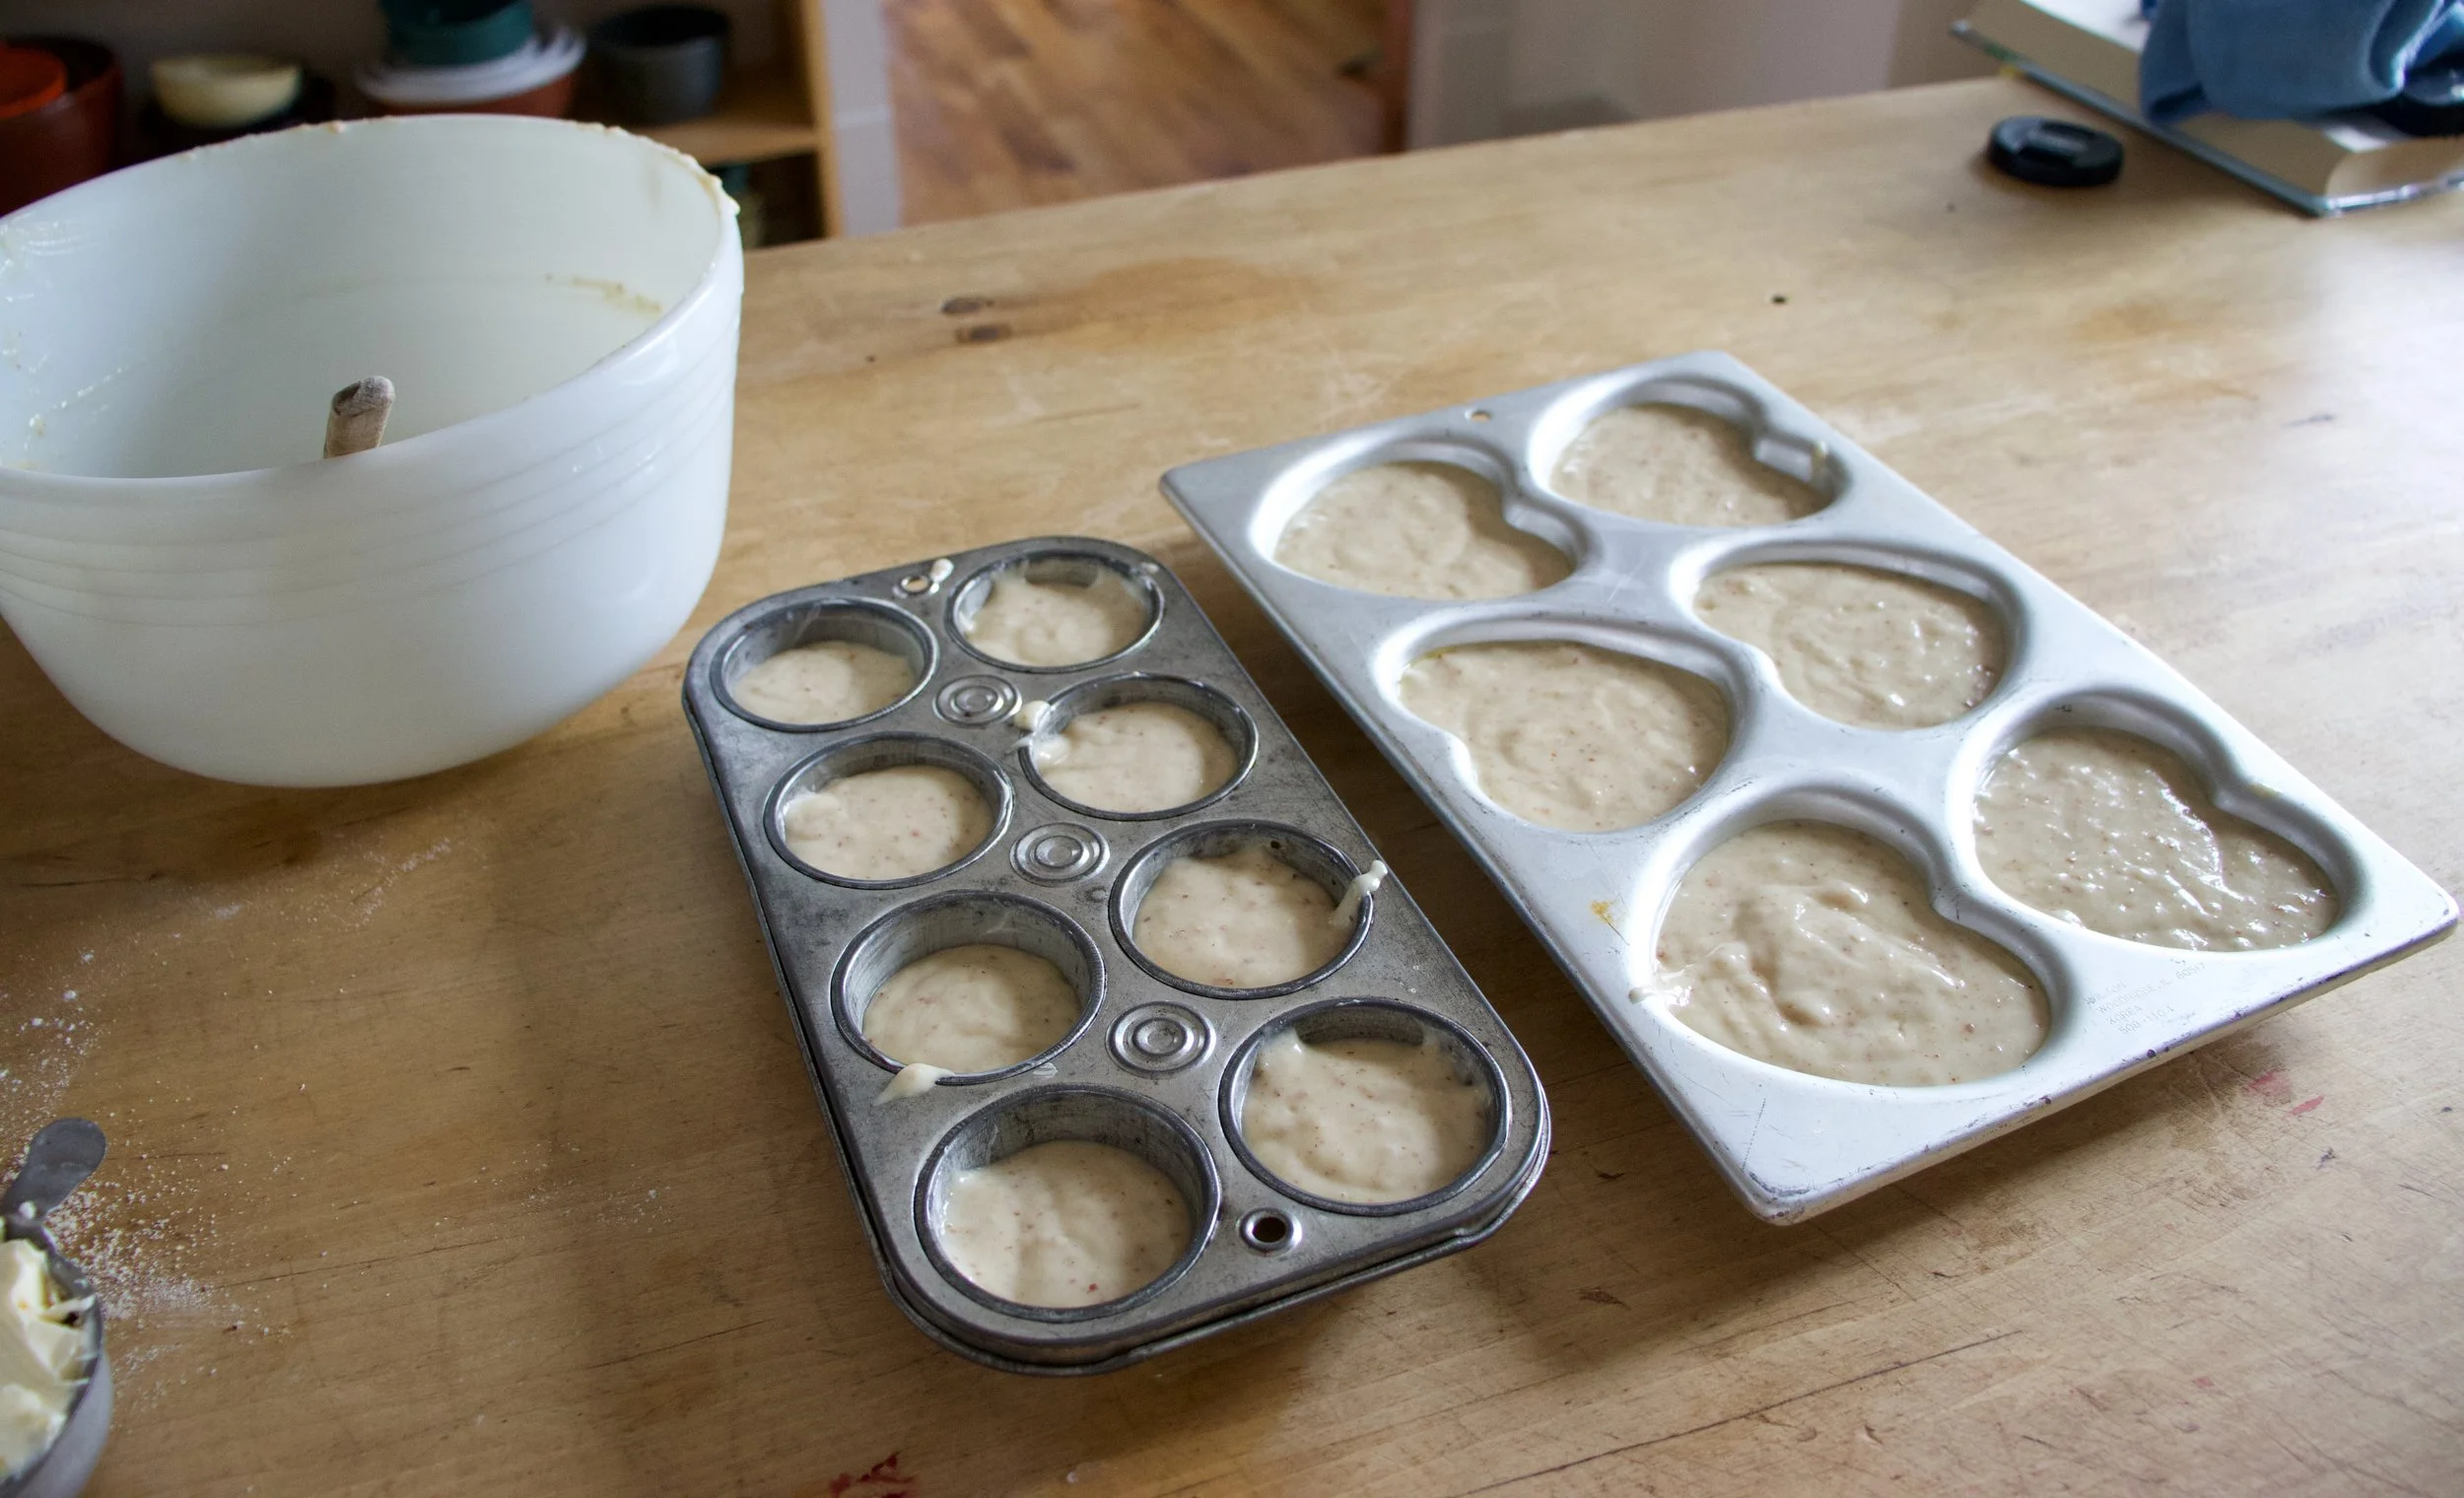
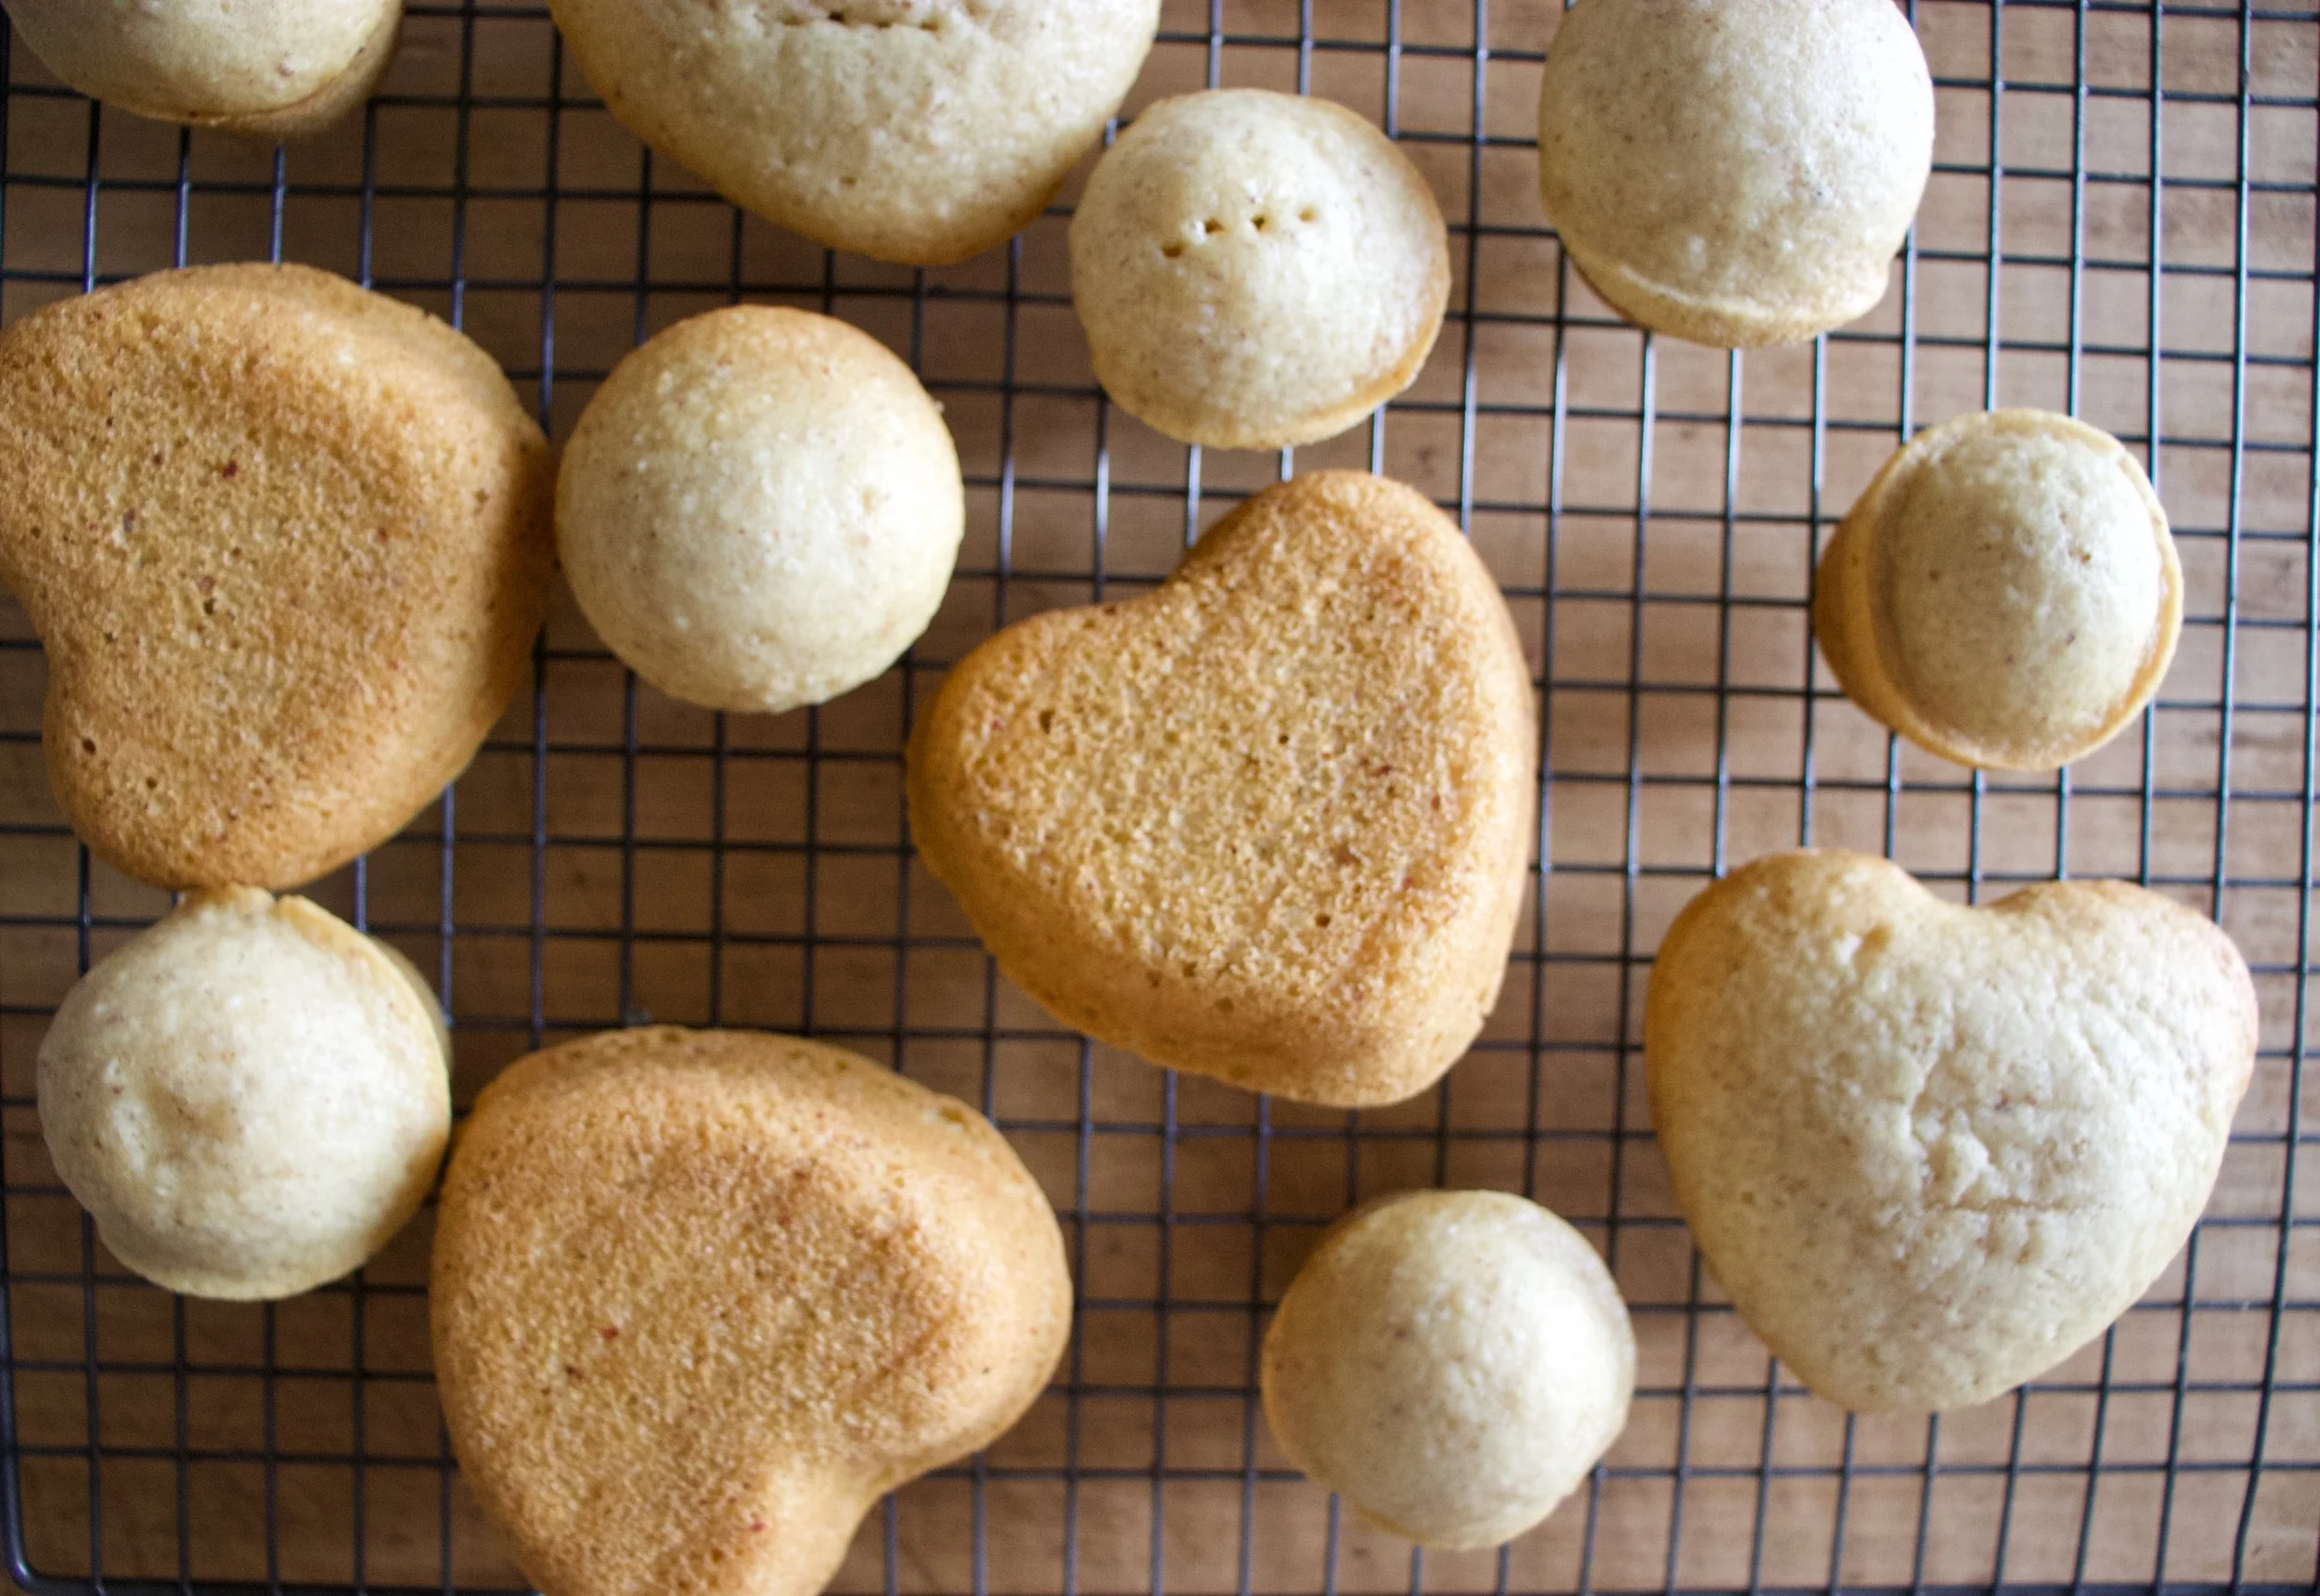
Scoop the batter into well greased muffin tins. I used to different shapes and sizes because I wanted too. You can do the same, just be aware different sizes will cook at different times.
And into the hot oven they go.
Baked, popped out of the tins, and cooling to cool.
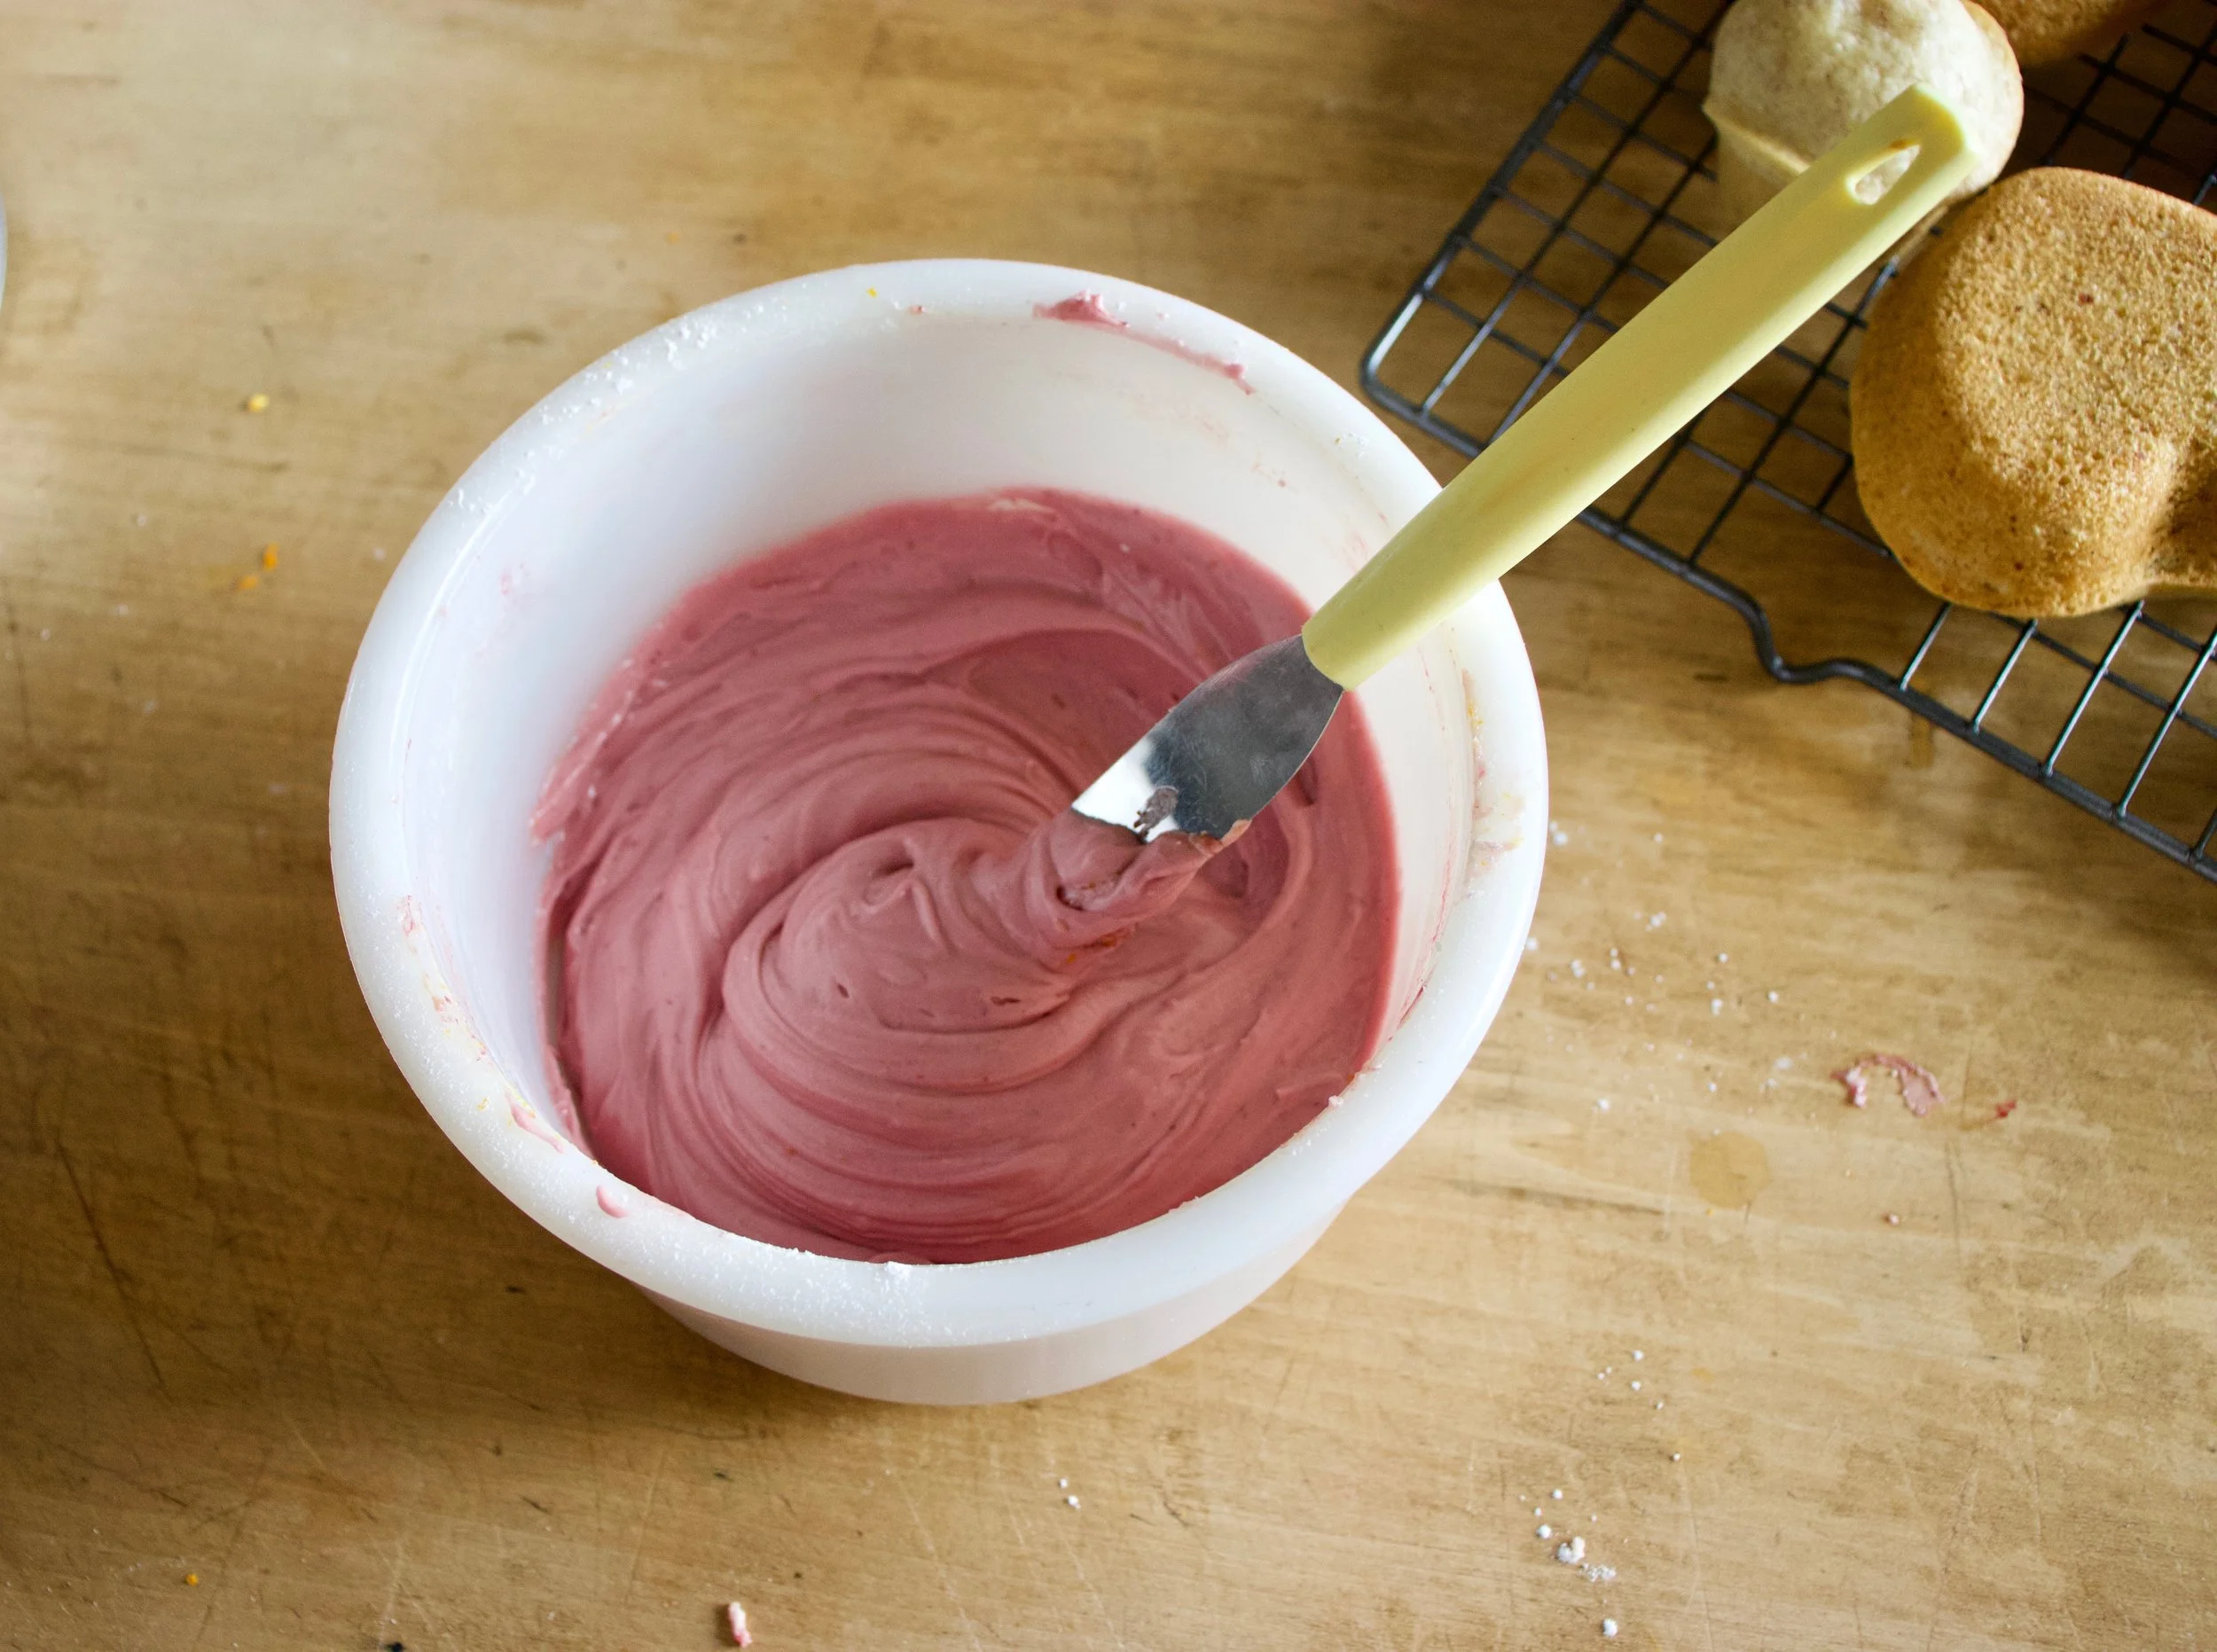
Frosting time. Butter, clementine zest, and jam mixed together makes for the prettiest color.
Add in the powdered sugar and juice of the clementine and beat with a beater.
Pretty pink frosting. All natural.
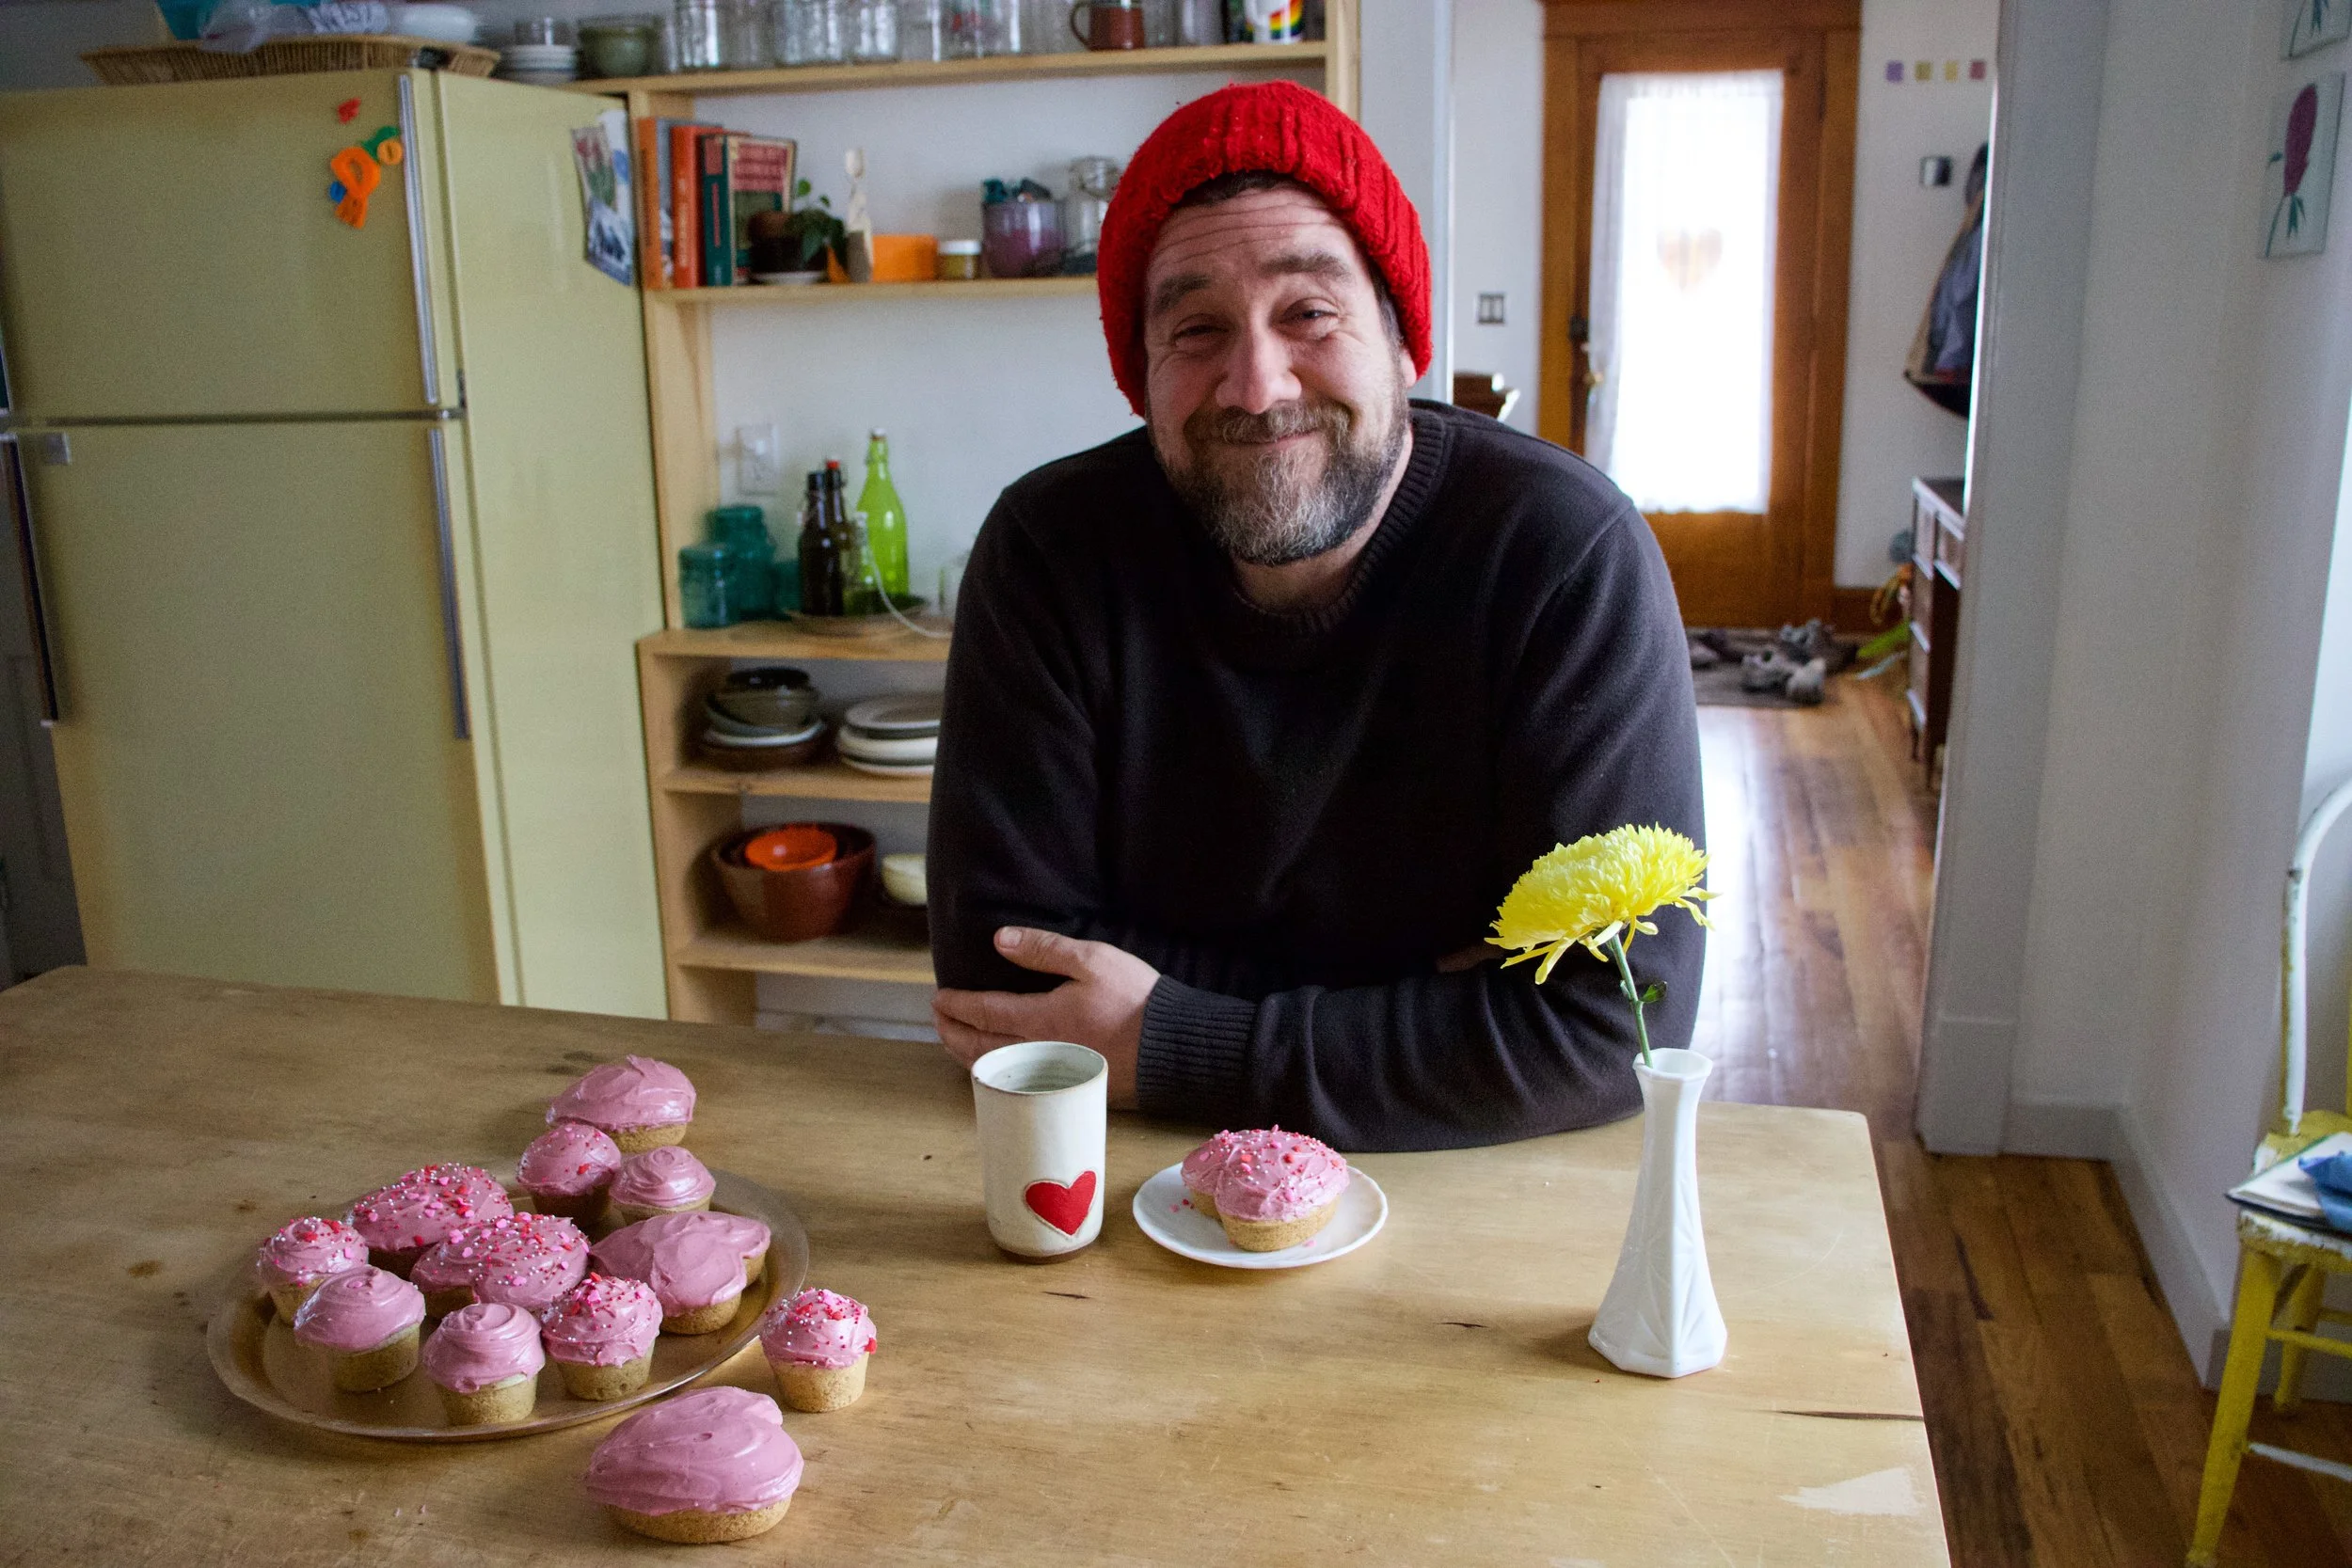
And now that the cupcakes are cooled (you must wait until they are completely cooled) get them frosted.
And of course, adding sprinkles will only make them that much better.
And now you got the cupcakes which makes it cupcake time.
Look at that smile. Thats a smile just for cupcakes, not at all because I told him too.
Happy happy.
-C
Makes 12-16 cupcakes (depending on size)
1 1/2 cups all purpose flour
1/2 cup almond meal
1/3 cup neutral oil
1 1/4 cup almond milk
3/4 cup white sugar
1 teaspoon baking soda
1 teaspoon baking powder
1 tablespoon apple cider vinegar
1/2 teaspoon salt
1 teaspoon vanilla or almond extract
For the frosting
3 tablespoons blackberry jam or preserves with or without seeds
2- 2 1/2 cups powdered sugar
4 tablespoon vegan butter
1 clementine (zest and some juice)
Preheat oven to 350.
In a large bowl whisk together the flours, salt, baking soda and powder and sugar until fully combines. In a separate bowl mix together the oil, milk, vinegar, and vanilla. Pour into the dry and mix, by hand, until full incorporated. Scoop batter into well greased muffin tins (heart or other shape up to you) and place into oven for 13-18 minutes (shorter time for smaller cupcakes, longer for larger sized) or until lightly browned and a tester stuck into a cake comes out clean. Pull from oven when done and pop from tin. Place on a wire rack to cool.
While cakes are cooling, make frosting. Beat together the butter, zest of the clementine, and jam. Add in the sugar and the juice and beat until fully incorporated. If the consistency is to thin, add a little more sugar, to thick, more clementine juice or if out of juice, a splash of milk.
Once cupcakes are full cooled, frost, add sprinkle if you would like, and then the only thing left to do is eat them.
Eat cupcakes, store left overs in an air tight container in the fridge for up to a week.
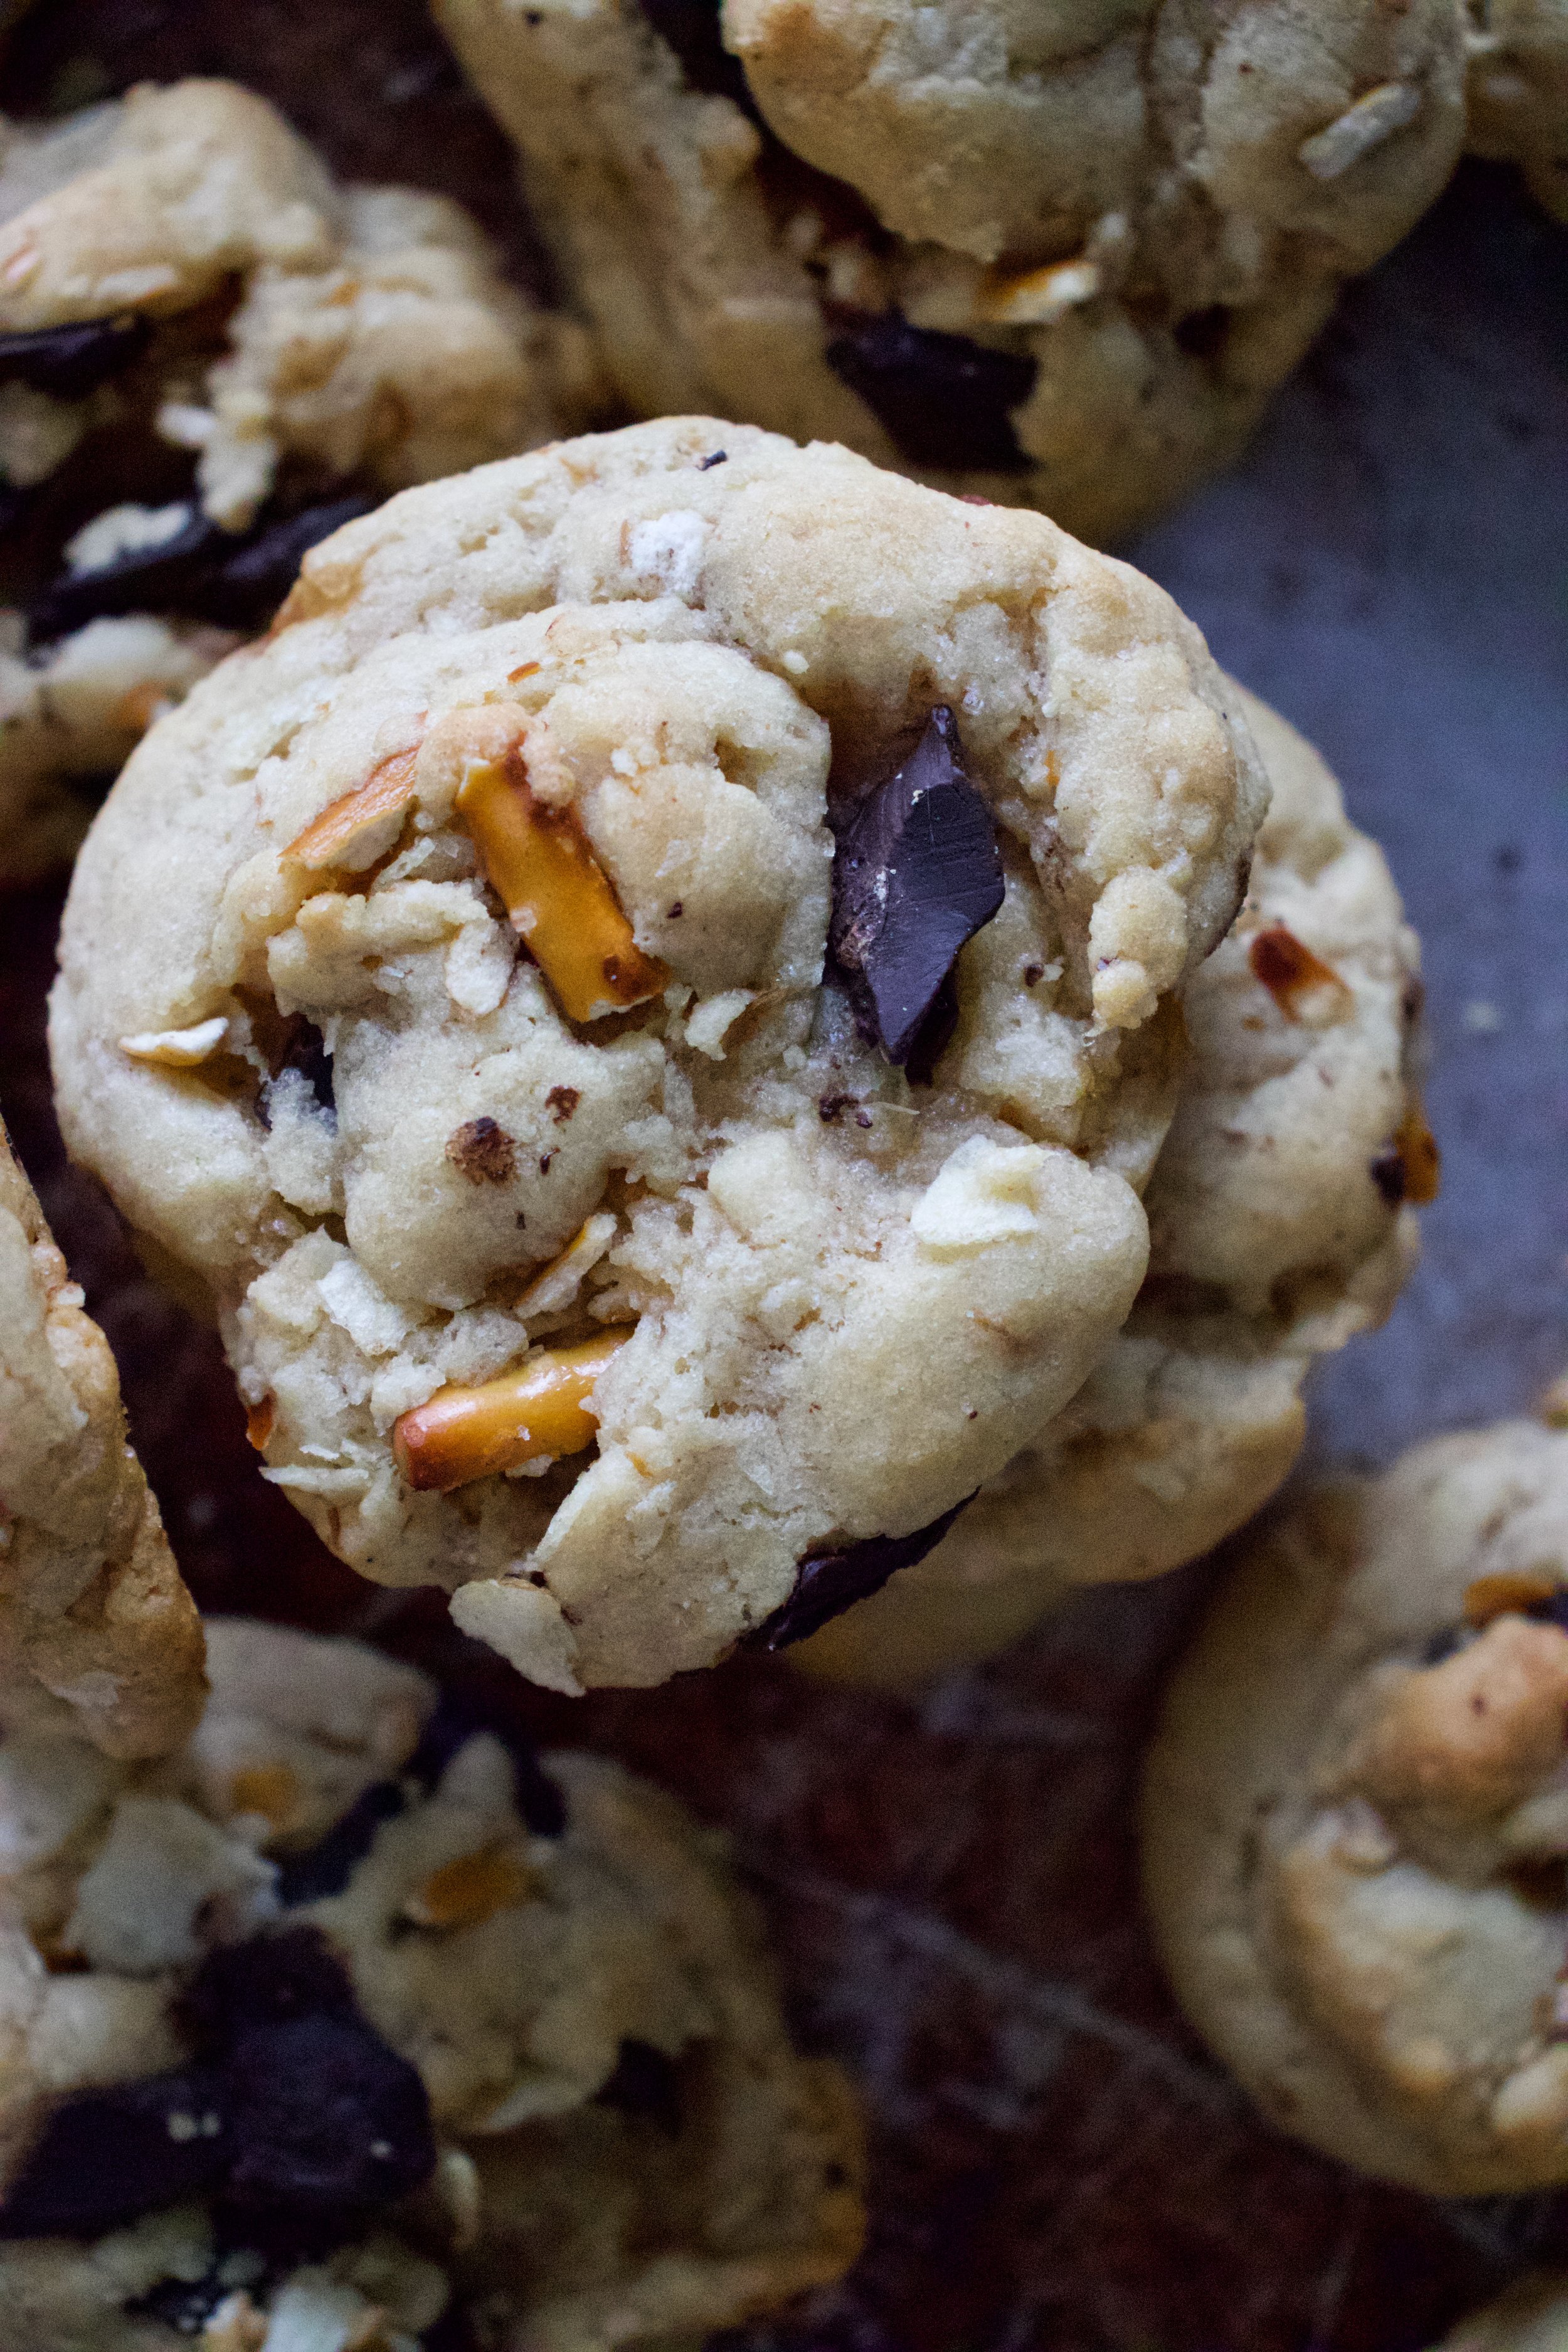
What with all the holiday and family get togethers we have had over here at my house the past few week, we have had quite a few bags of chips and pretzels left over. Always almost empty%u2026 Always dumped into the compost because I mean, I am not so keen on seeing bags of little bits of chips and pretzels in the pantry that I know will never get eaten. Plus it is not like I am saving carrots or grapes or anything I would eat, it%u2019s junk food. But still. I hate the food waste. That is why I made these cookies. To not waste food. And because we had people coming over to the house for dinner and I cannot not have something for dessert. That would be just wrong. And lastly because I am pretty sure that chips and pretzel pieces only make a plain chocolate chunk cookie into an amazing sweet and salty cookie that will just blow your mind.
And I was right. I made the cookies, I feed them to the mr, the sister, friends and all the littles and they just couldn%u2019t get enough.
Current thought. I am sitting here typing and have come to the conclusion that I should start a bakery that makes cookies out of people almost empty bags of chips, like a Cheeto dust cookie, or a peanut butter Funyun cookie or chocolate chocolate chip Dorito cookie.
Yes. this is a good idea. Oh man, I am a genius.
But back to theeese cookies. Start with these. I%u2019ll let you know when I open the storefront to Garbage Cookies (that is what I’ll call the place) You can stand in line for the peanut butter Funyun cookies. I have a feeling about that flavor. Until then%u2026
To the cookies!
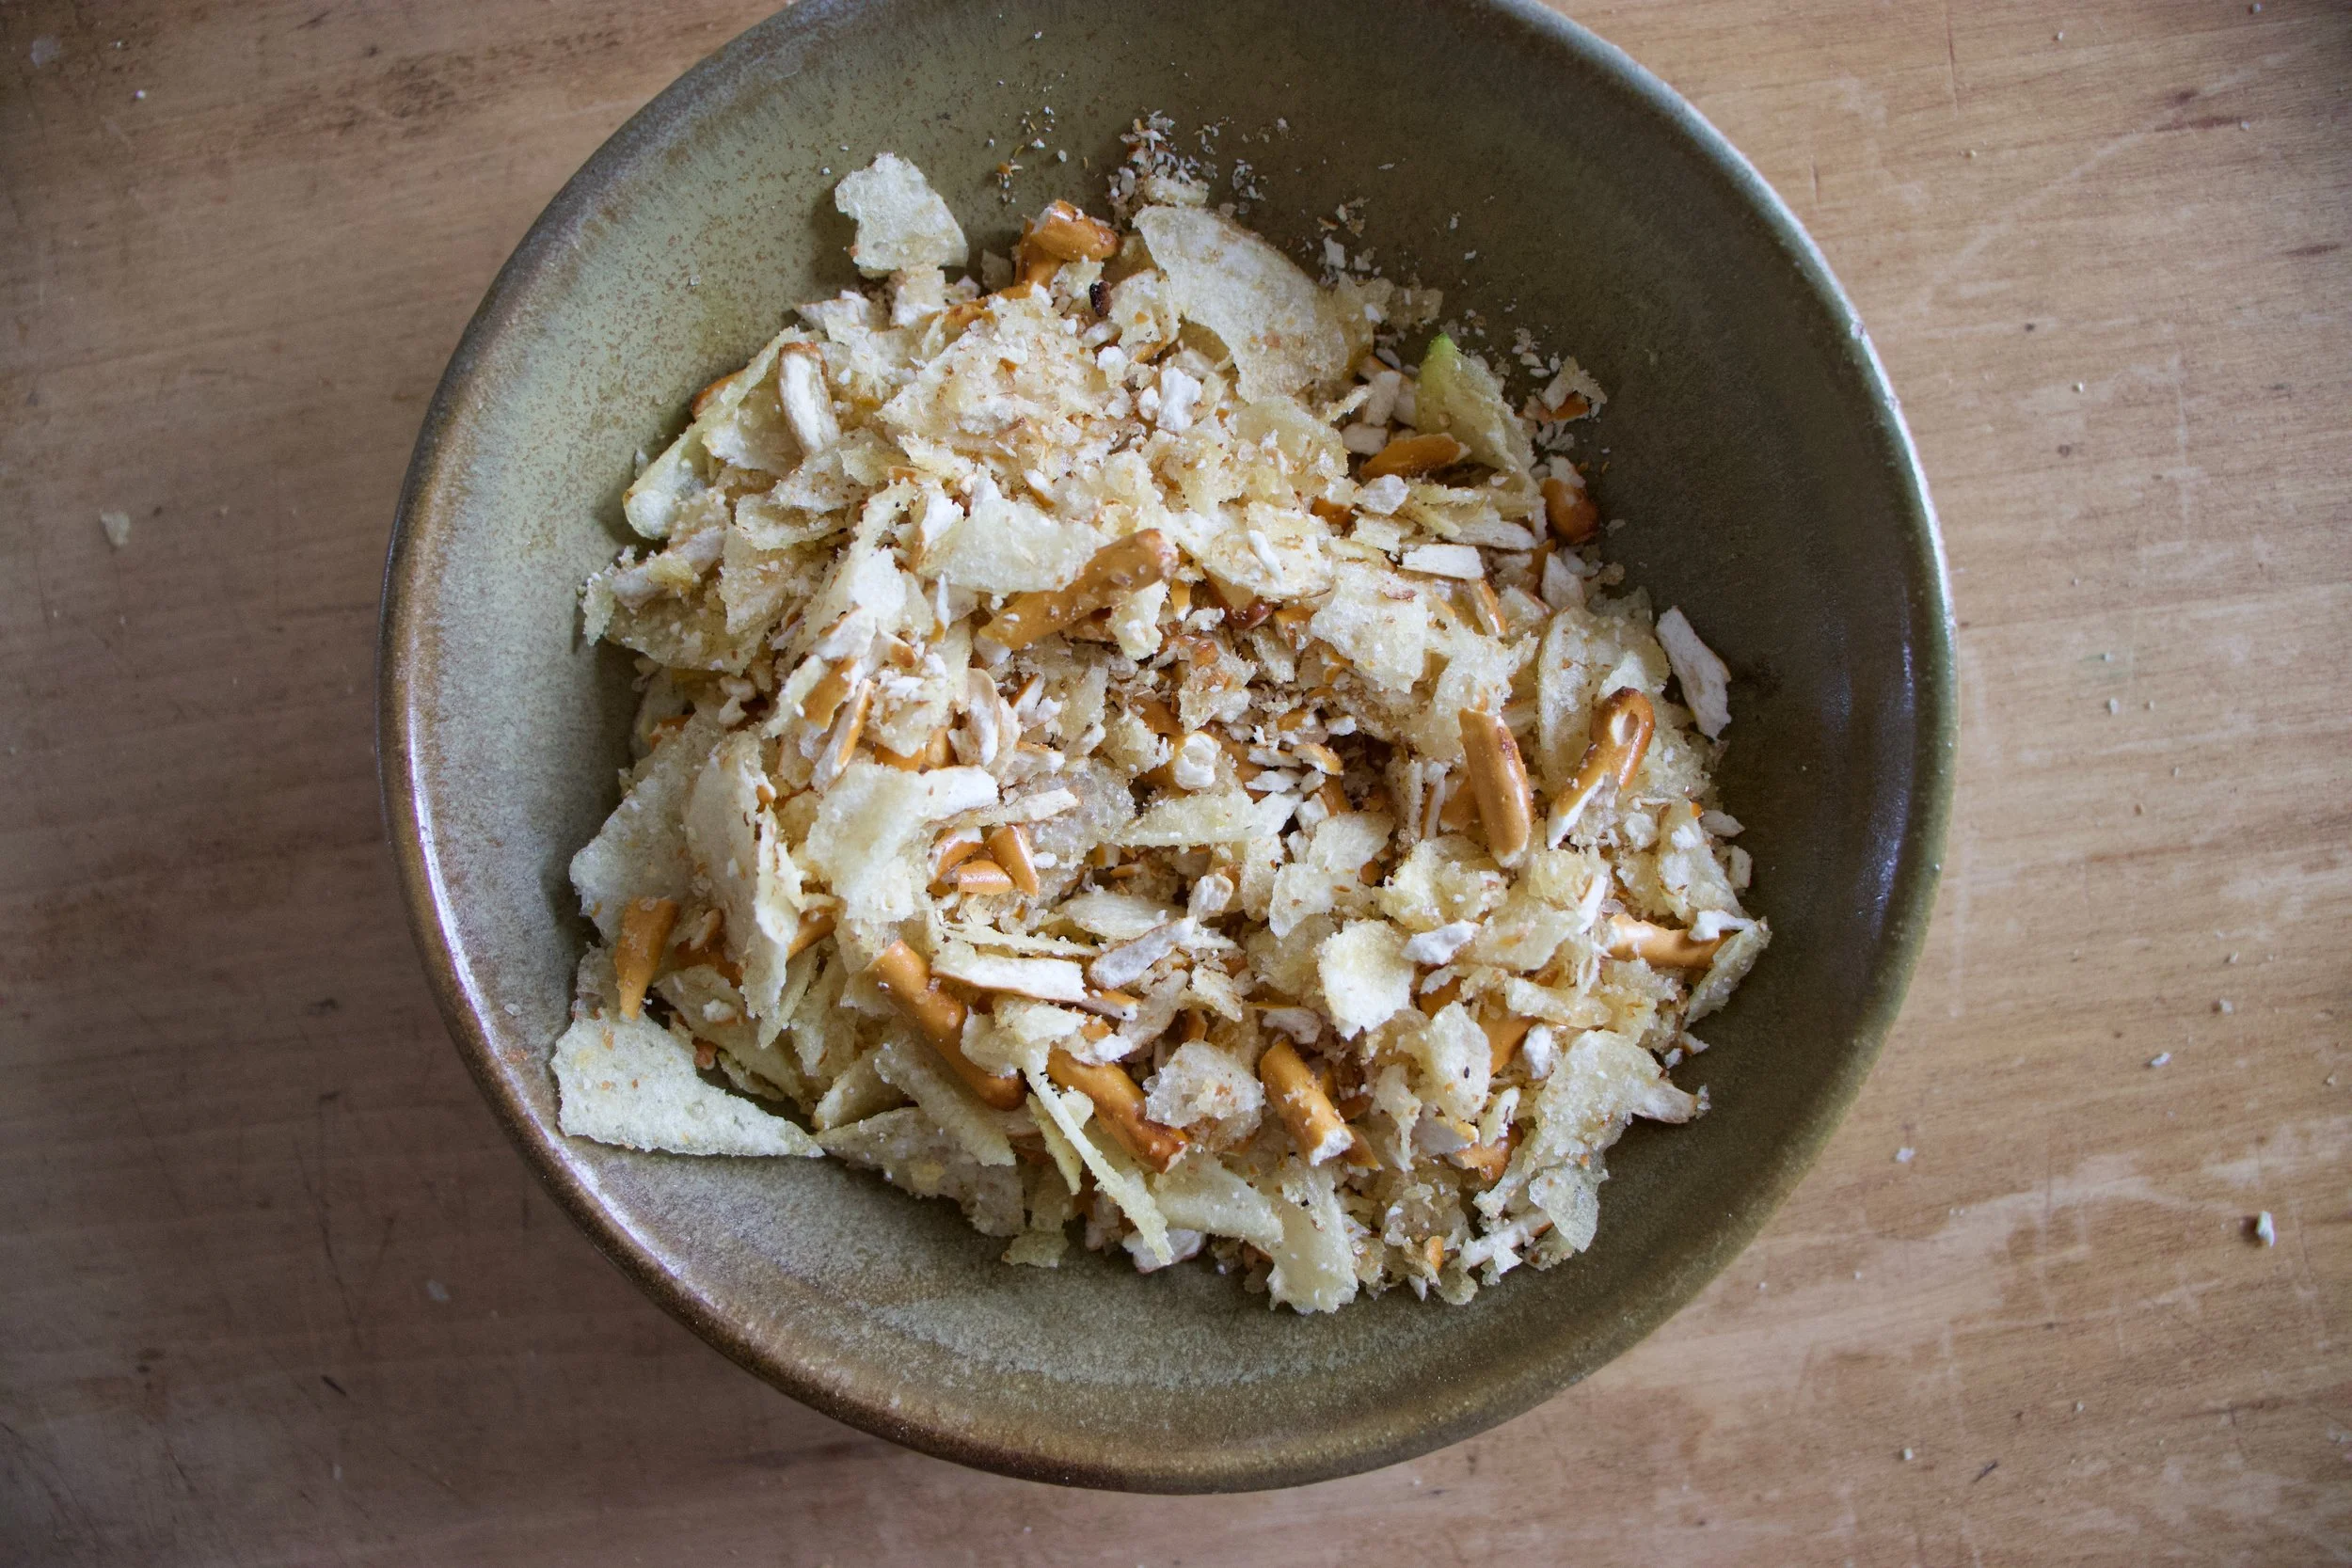
The stuff. The small bowl has flour, baking powder and baking soda. The big bowl has brown and white sugar. Then you need oil, almond milk, vanilla, chocolate chunks, some pretzels and some plain salted potatoes chips.
Start with the wet. Mix the oil, the milk, and the vanilla into the sugars until completely smooth
Whisk together the dry stuff.
And mix until its a cookie dough. Now here is the thing, you need to stick the dough in the fridge for a couple hours and if you mix in the chips and pretzels now, well I think that might make them extrealemy soggy, so hold off. For now, cover dough and refrigerate for 2-4 hours.
When the time comes for baking, grab the mix ins and with whatever method you chose, crush the chips and pretzels into small bits. (avoid turning into a dust, you want bits)
All salty and crumbly and ready to go
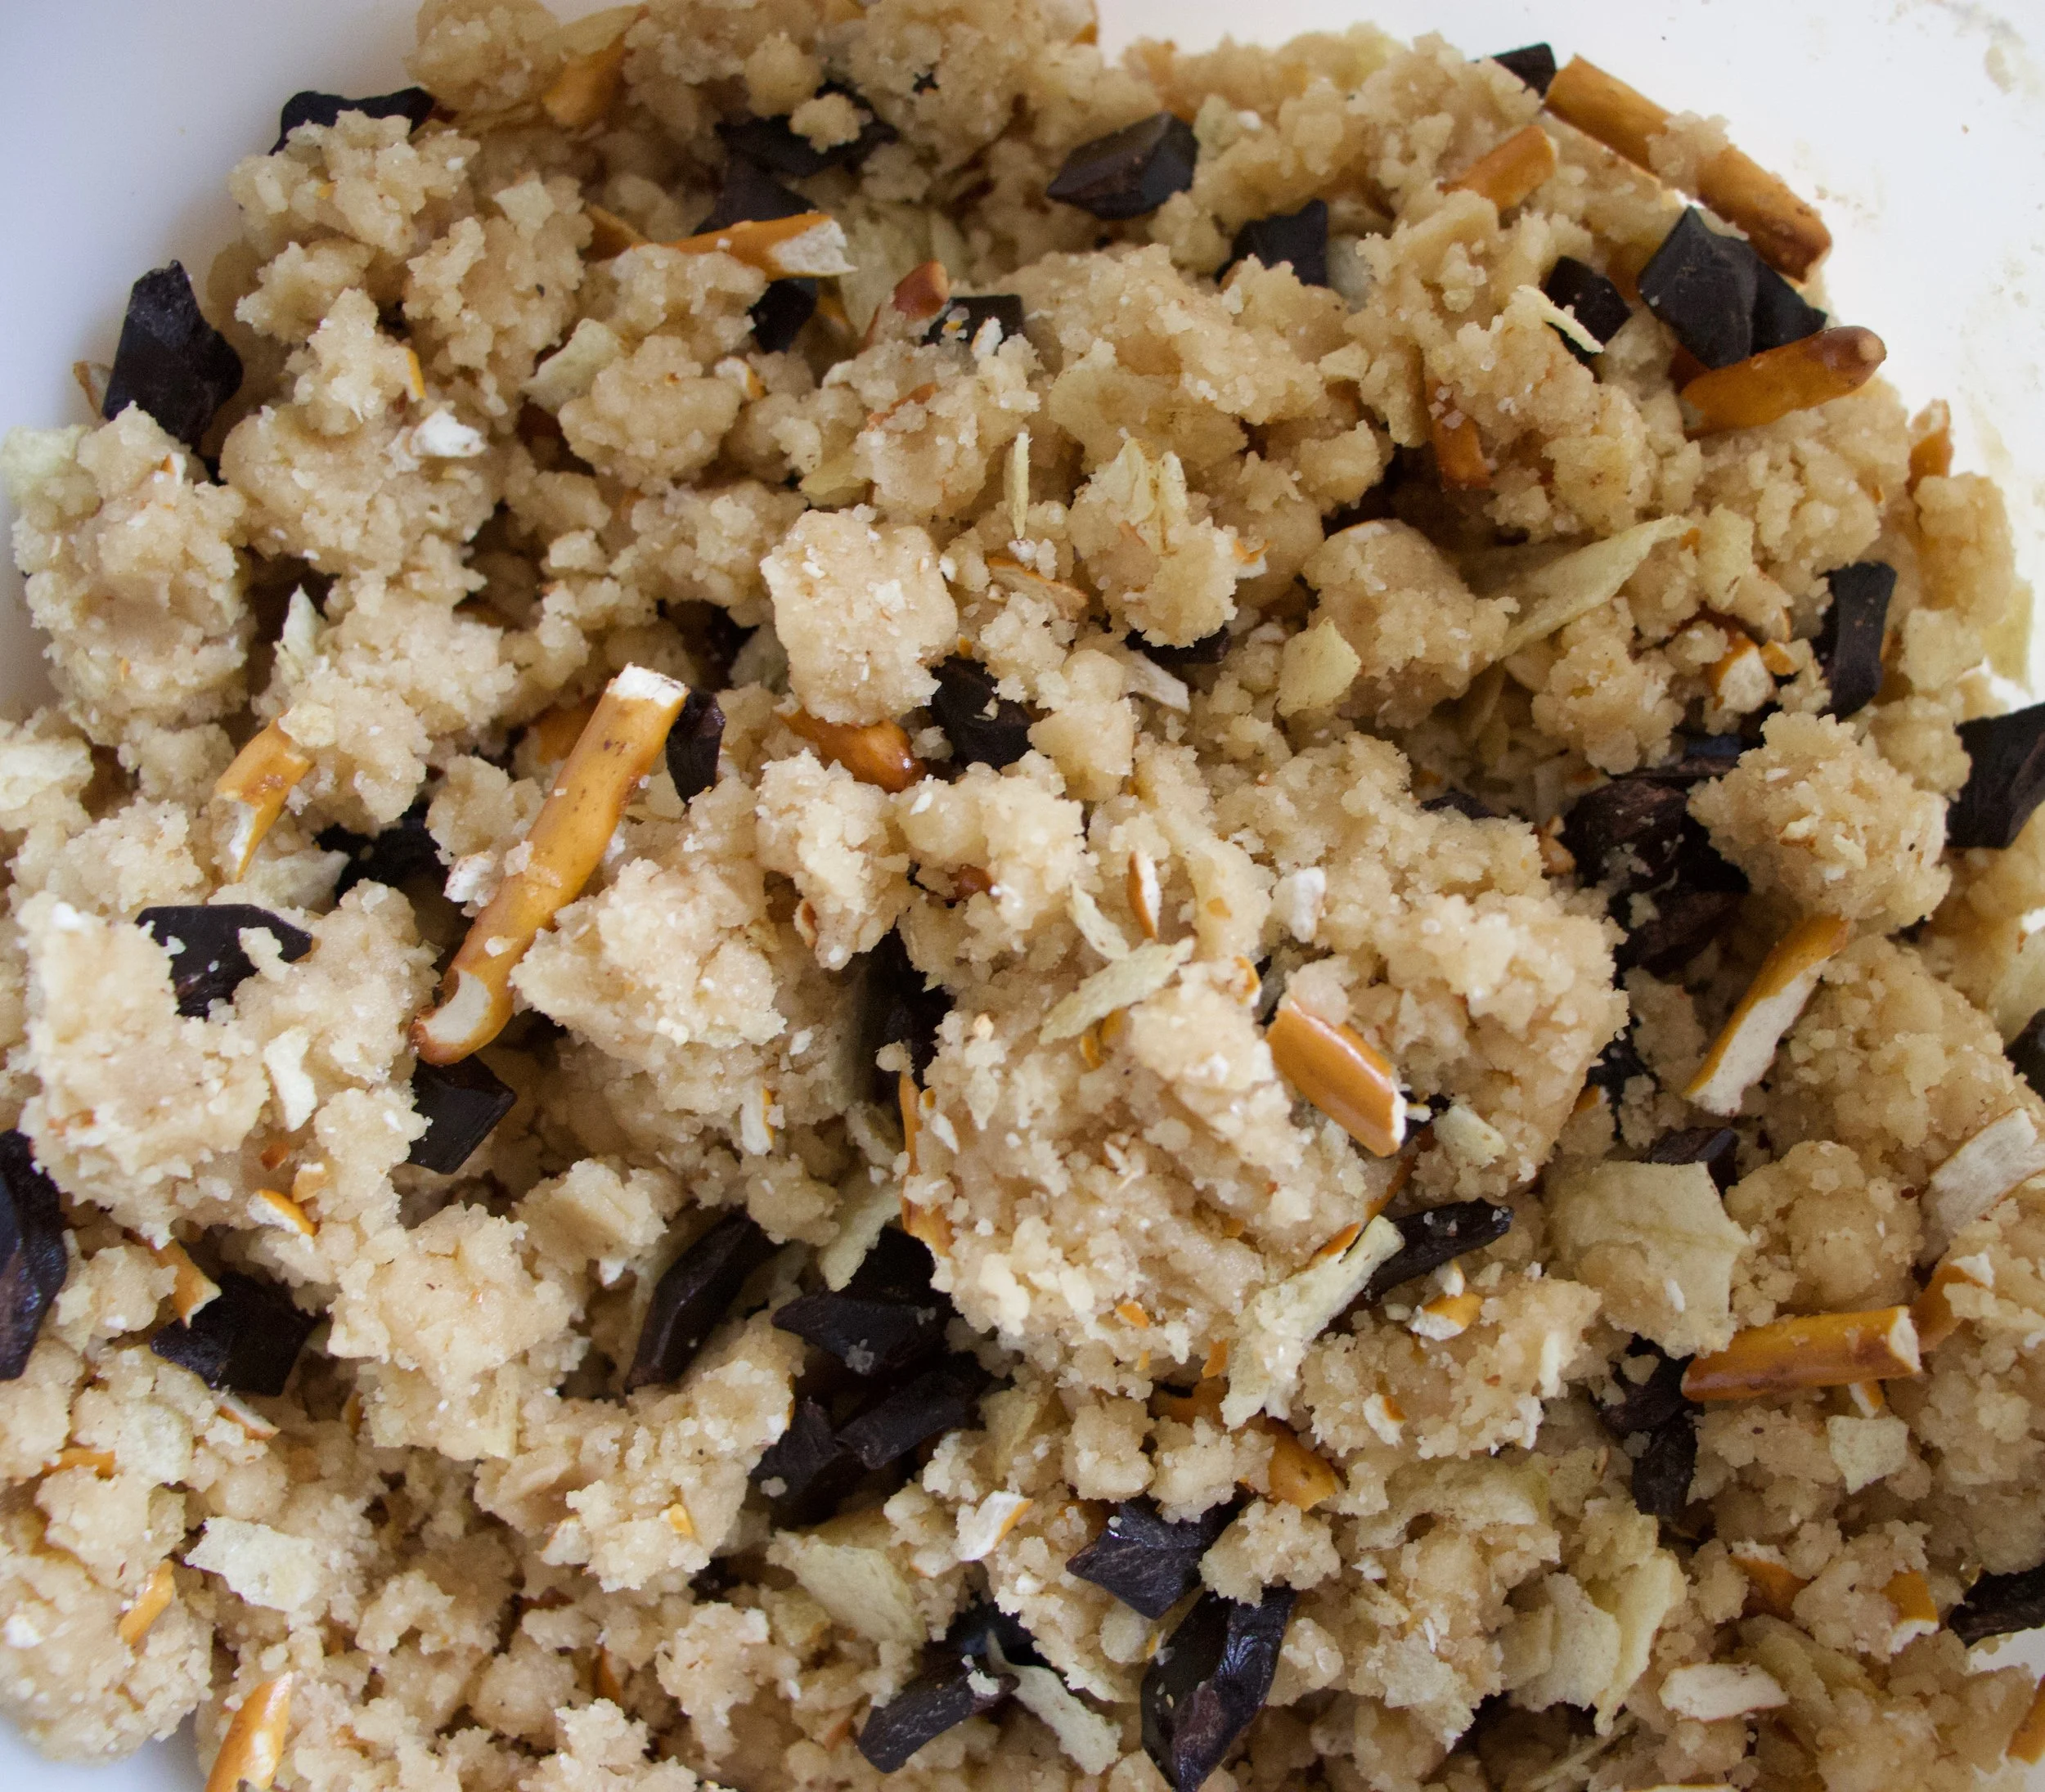
Grab the dough from fridge and dump in the stuff that needs to go in (crushed chips and pretzels and chocolate chunks).
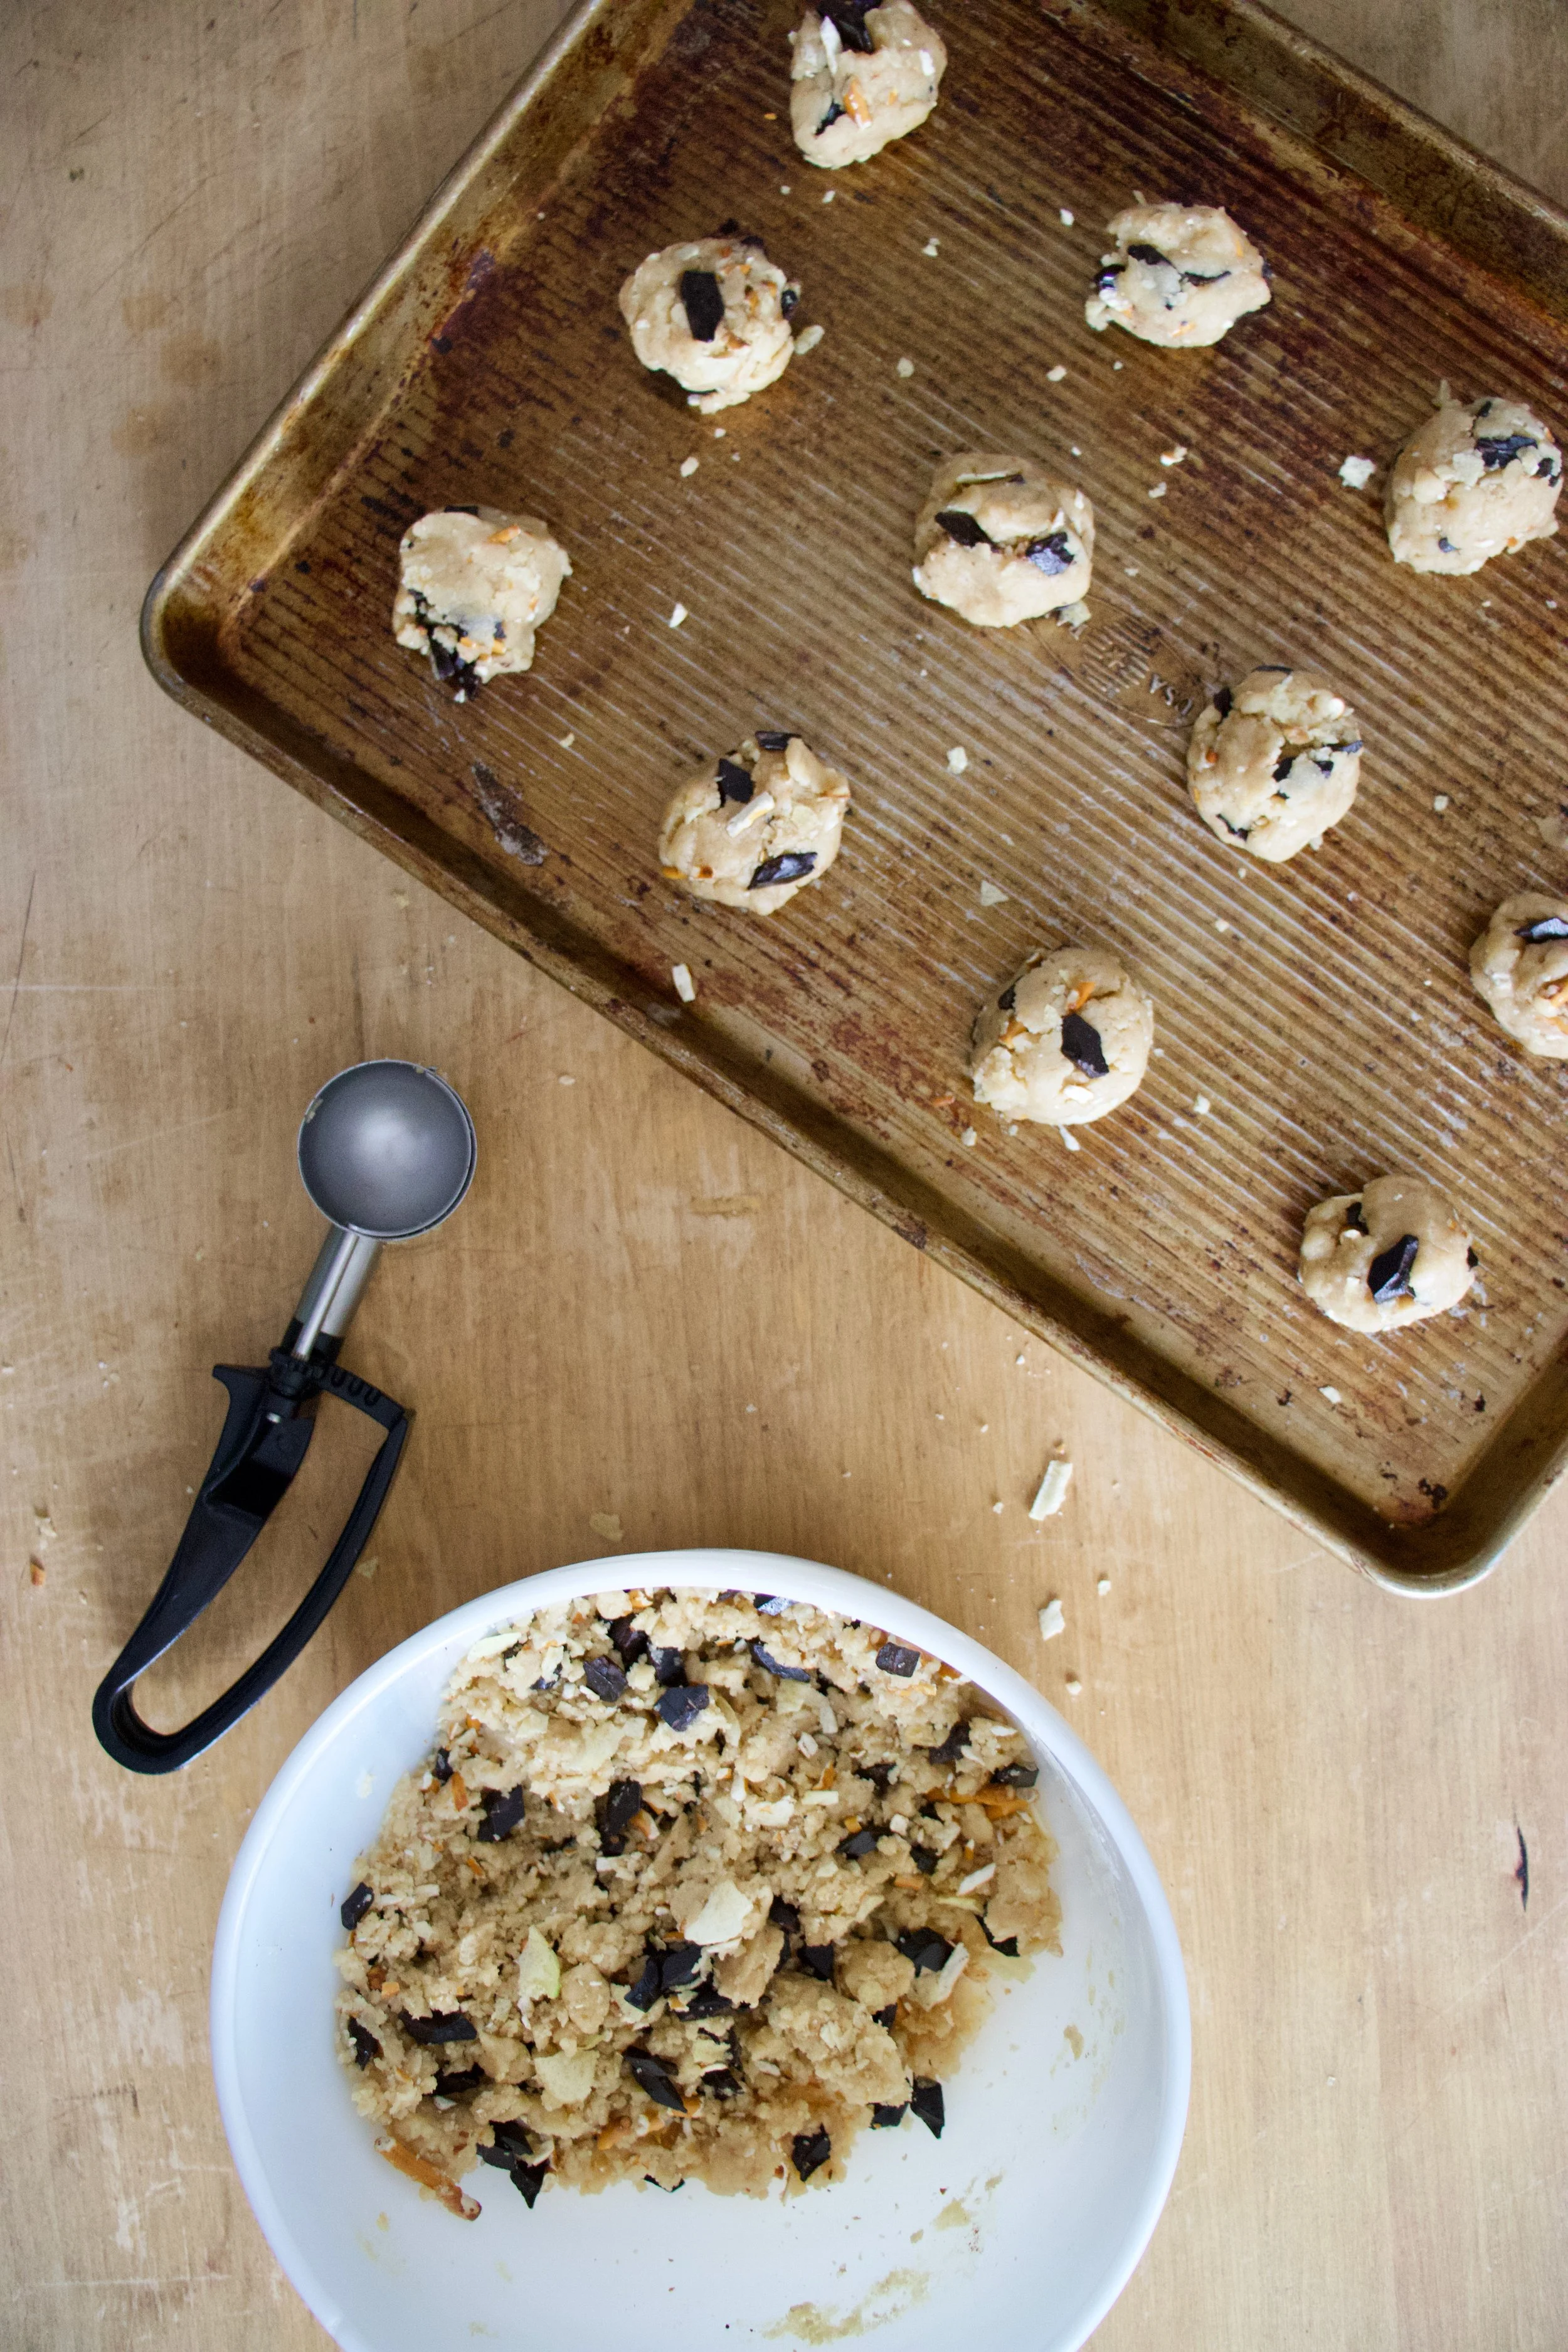
Scoop dough into balls and place on a baking sheet.
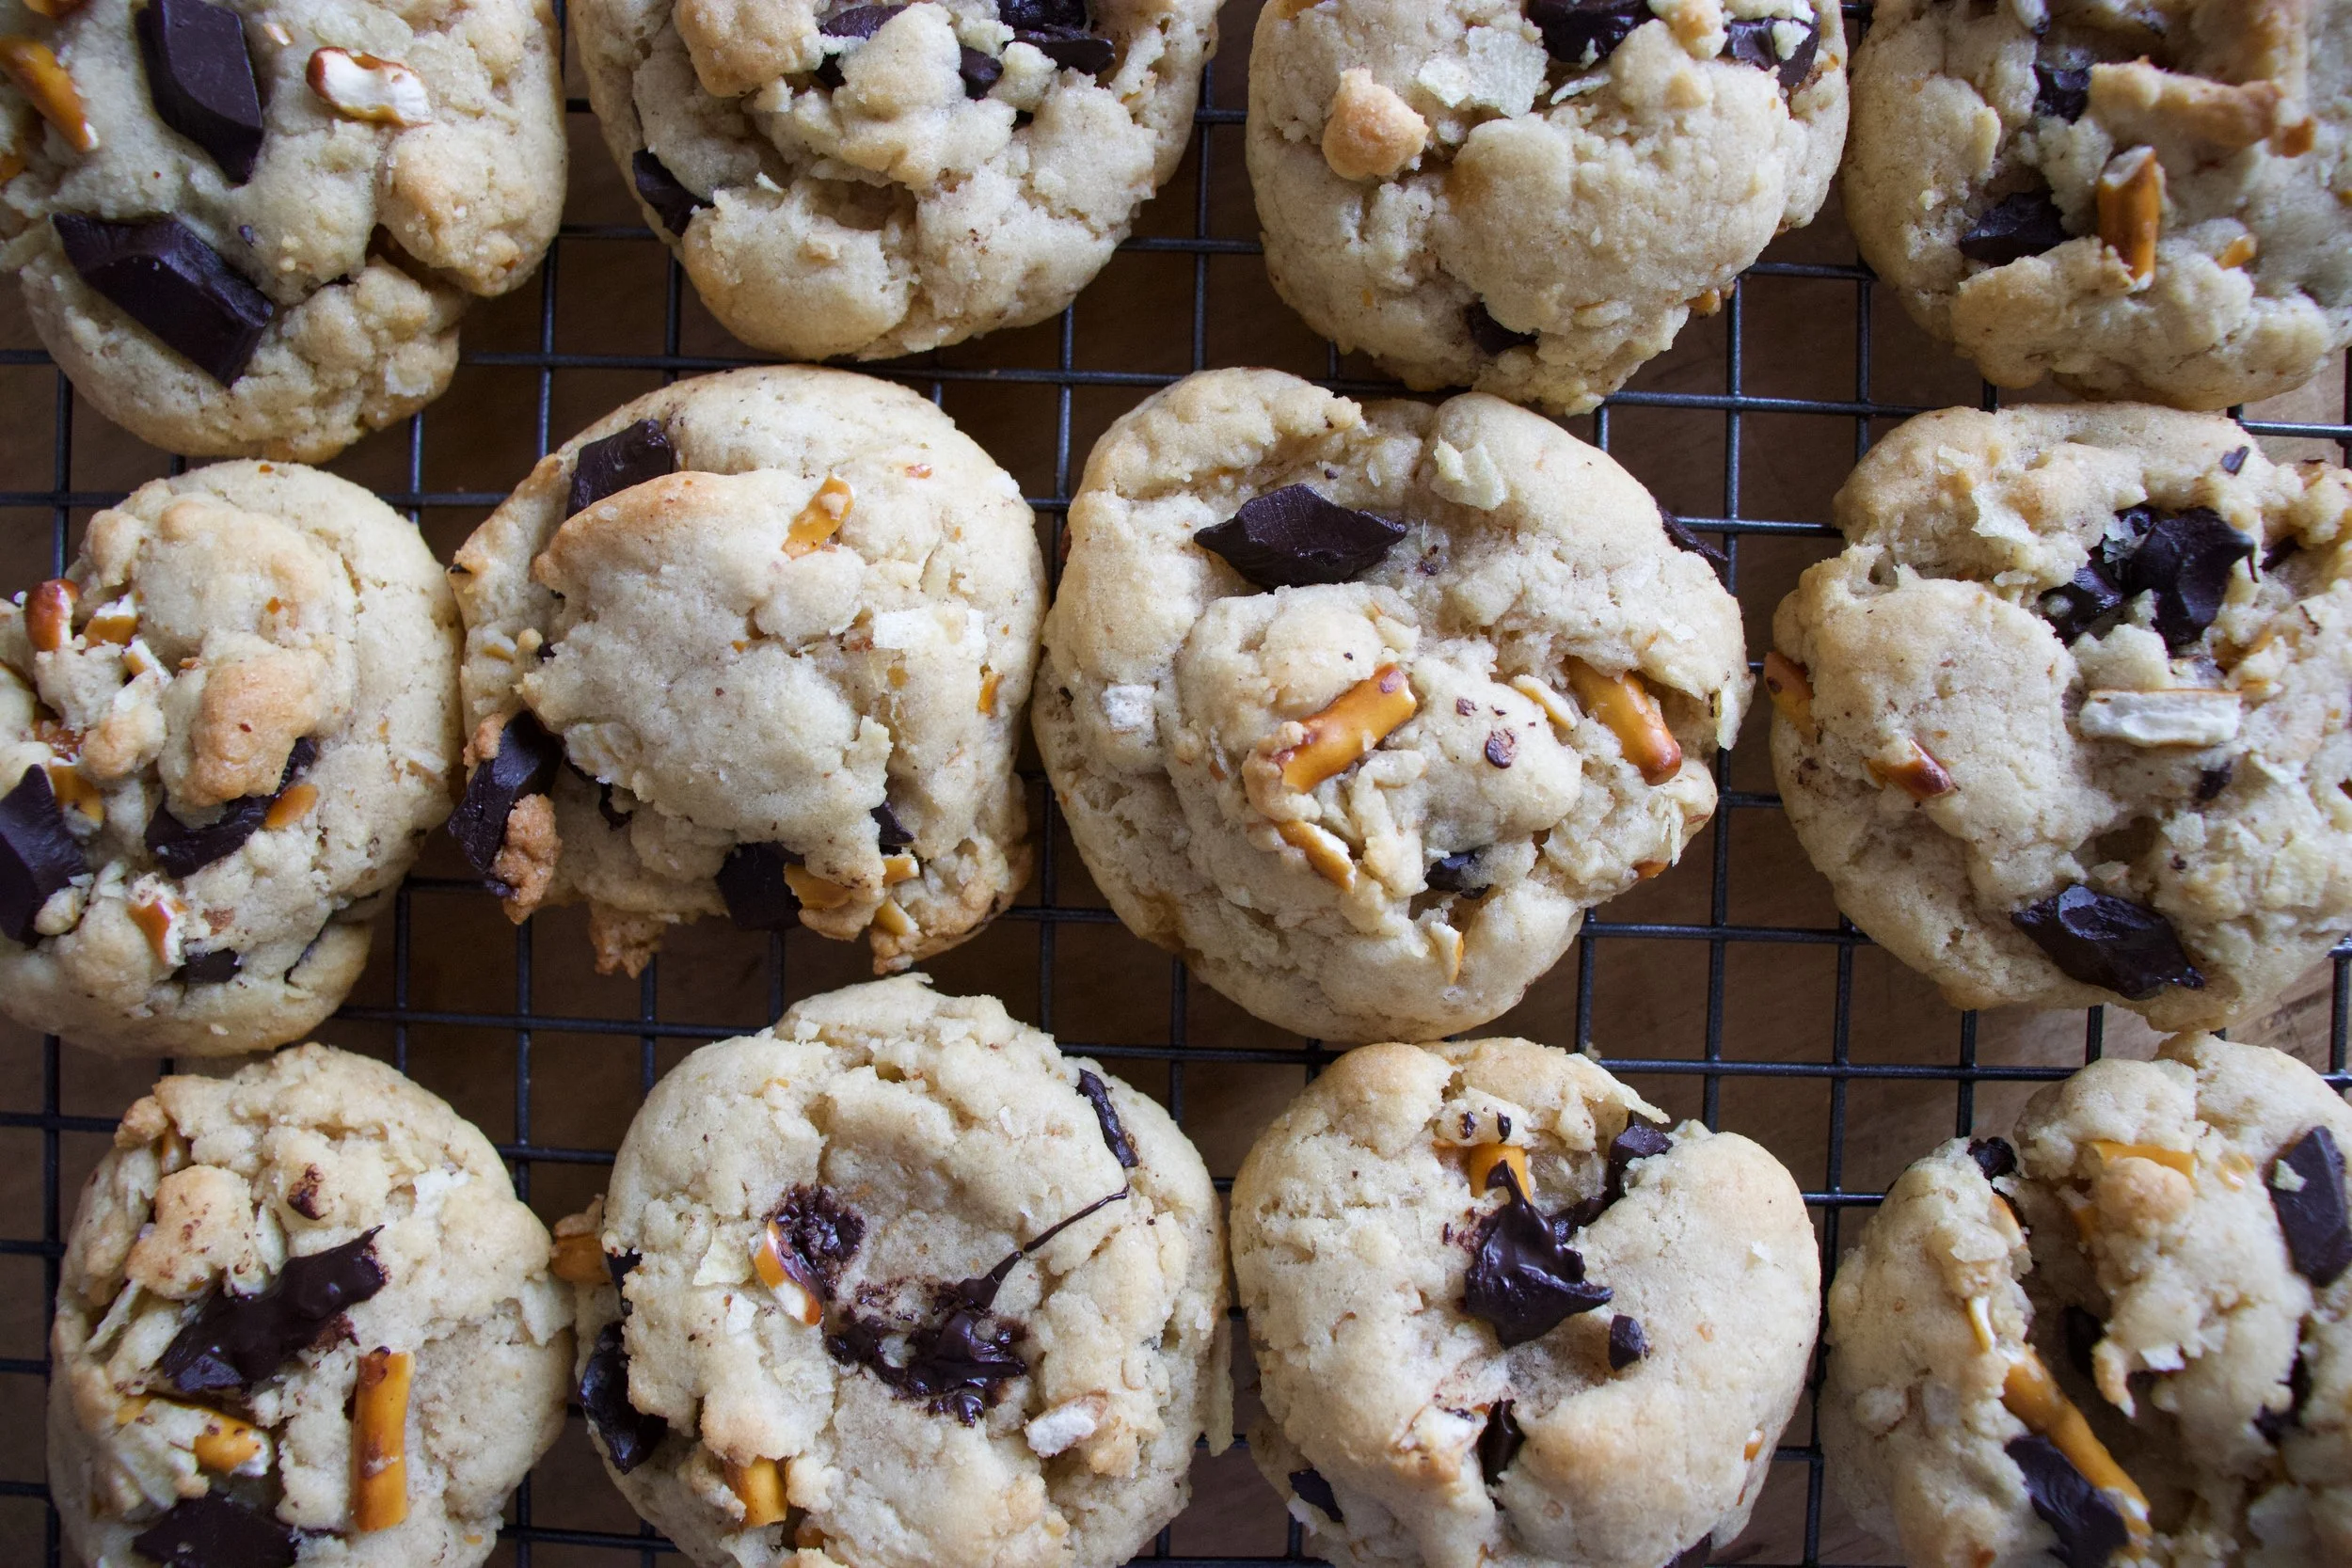
Into the oven and out they come all golden brown and smelling like yes and mmmmmm.
Get those cookies on a wire rack to cool and to free up the baking sheet to keep baking.
Look at this proud cookie. Chips, pretzels, and chocolate chunks all on display.
Now is when you get yourself a plate, pile it up high, and eat.
Remember, sharing is caring so maybe share a cookie or two. (but like you don%u2019t HAVE to)
Stay happy this weekend.
-C
makes about 2 dozen cookies
2 cup all purpose flour
1 teaspoon baking soda
1/2 teaspoon baking powder
1/2 cup packed brown sugar
1/2 cup white sugar
1/2 cup canola oil
1 teaspoon vanilla
6 tablespoons plant milk
1/2 cup crushed potato chip
1/2 cup crushed pretzels pieces
3/4 cup chocolate chunks or chips
In a large bowl, mix together the sugars, oil, milk, and vanilla until completely combined. In a separate bowl, whisk together the flour, baking powder and soda. Dump the dry into the wet and mix until the dough comes together. Gather the dough together in the bowl and cover with plastic and stick in the fridge to rest for at least 2 hour and up to a day.
When ready to bake, preheat oven to 350
Right before you take the dough from fridge, get your chocolate chunks, pretzels, and chips out. If the chips and pretzels are not already in little bits, place them in a bag (just use the chip bag if you have it) and smash with a heavy object until you turn the chips and pretzels into bits. Be carful that you don%u2019t turn it all into a dust, look for small bits. Pull dough from fridge and mix the stuff in. Scoop out balls of dough and place on baking sheets. Bake cookies in oven for 11-12 minutes or until lightly browed. Remove from oven and immediately transfer cookies to a wire rack to cool.
And now you eat.
Store uneaten cookie in a airtight container for up to a week or freeze them but I doubt you will have too. The cookies went fast.
Currently it is like 50 degrees outside and raining buckets of cats and frogs and what not. I live in Vt for a few reasons, and one of them is winter, so the warm rain is just not nice. Apparently these cookies are the closest thing to snowflakes I will be seeing for a little while%u2026(sad face inserted here) But I am hoping that juuuust maybe it will turn, and all of a sudden it will be snow coming down and not rain. And that it snows and snows and snows, like a foot or 2 of it. I want so much snow that I am stuck in my house for a least a solid 24 hours (of course with the power still on and all the necessities I would need) and the only way out being by foot or sled. And you know what I would do if I was snowed in? Lounge around in my pj%u2019s all day (or at least until like 10 am), have a never emptying cup of hot coffee in hand, play around outside and make a snow fort, and definitely make cookies. Doesn’t that just sound so nice?
But I am not snowed in, and wasn%u2019t snowed in and probably will not be snowed in for the foreseeable future. But I can still, and did make cookies so there is that. Chocolate cut out snowflakes with orange glaze to be exact. A good all around chocolate cookie jazzed up with a citrus kick. Simple, elegant and perfect for all of your holiday cookie needs. Plus it is just a really pretty cookie. I just might make a few more batches and liter the front yard with them. I%u2019ll make my own freaking snow, even if it is out of cookies. Then I really wouldn%u2019t be able to leave my house due to the crazy fat squirrels attacking the lawn. That would be something. HA.
To the snowflake cookies! (They can be any shape really, but snowflakes are so nice)
The stuff. Sugar, vegan butter, flour, cocoa powder, baking powder, salt, canola oil, brewed coffee, grind chia seeds, vanilla extract, an orange, and some powdered sugar.
First, mix the ground chia seeds with the coffee for caffeinated chia eggs.
Beat the butter with the sugar to give it a good fluff, then add in the oil, vanilla, and chia eggs to the mix.
Place all the dry into a bowl and whisk together until fully incorporated.
Dump the mixed dry into the were and grab a wooden spoon. Start mixing.
Cookie dough is a-formin.
Collect the dough in some plastic and smash into a disk. Place in fridge to rest for at least a few hours, but a day is good too.
Chilled dough, flour, a cookie cutter, and a rolling pin. I think you know what to do. Just really make sure to keep the counter and rolling pin floured or else the dough will stick and that is just so annoying.
Yes this dough is a little delicate, but not in a bad way. It might tear or slightly crumble but you just smoosh it back in there and you are all set. Anyway, after rolling dough out to about 1/2 inch thick, cut cookies out with a well floured cutter.
Cookies on the baking sheet ready for the oven.
Cookies on a baking sheet right out of the oven.
Now those cookies got to cool so get them on a rack.
While cookies are cooling, fix yourself some glaze. The powdered sugar, zest of orange and juice of orange will do the trick.
A good looking glaze. Thick put drizzable consistency.
And to finish. Drizzle the cookies with glaze, dunk the tops in the glaze, or do a little of both (I say both). The glaze does harden after a few minutes so these are very much stackable cookies.
And then what you do with the finished cookies is up to you. I let the mr eat a good few, saved a few for Christmas and dropped some off to some peps. They were well received for sure.
Hope you are enjoying the weekend and are able to get in on some cookie making.
-C
makes about 3 dozen cookies
2 1/2 cups flour
1/2 cup cocoa powder
1 teaspoon baking powder
1/2 teaspoon salt
1/3 cup vegan butter
1/2 cup oil
1 cup white sugar
1 teaspoon vanilla
2 tablespoons ground chia seeds
6 tablespoon coffee or water (coffee brings out the chocolate flavor more)
1 orange
1 cup powdered sugar
In a large bowl, cream together the white sugar and butter until light and fluffy. Add in the oil, vanilla, and coffee chia eggs. Mix until incorporated. In a separate bowl mix together the flour, cocoa. salt. and baking powder. Dump dry into wet and mix until a dough forms. Gather dough into a ball and place in plastic and flatten into a disk. Place in fridge for at least an hour or overnight.
When you are ready to bake, preheat oven to 350
Take dough from fridge and unwrap. Place on a well floured surface and roll until it is about 1/4 inch thick. The dough is delicate and a little crumbly, but don%u2019t worry to much, just squish it back together and keep rolling it out. With a floured cookie cutter, cut your shapes and gently place them on a cookie sheet. Gather remnants of dough back into a ball and re-roll out and cut more cookies until you have used up all the dough. Place cookies into oven and bake for 11-12 minutes or until the cookies have puffed up a bit and the bottoms are slightly browned. Once cookies are cooked, let cool on a wire rack.
While cookies are cooling make the glaze. Mix about a tablespoon of the zest of the orange with the powdered sugar and add in a few tablespoons of the juice of the orange until the glaze is slightly runny. Once cookies are cooled either dip the tops in the glaze or drizzle the glaze on top of cookies (or do some of both). Then eat. If you wait a little while, the glaze will harden and then you can stack them and then if you want, maybe wrap on a few in little packages to give to someone you like. Either way, place uneaten cookies in a airtight container. Should last about a week, but can you not eat them for that long?
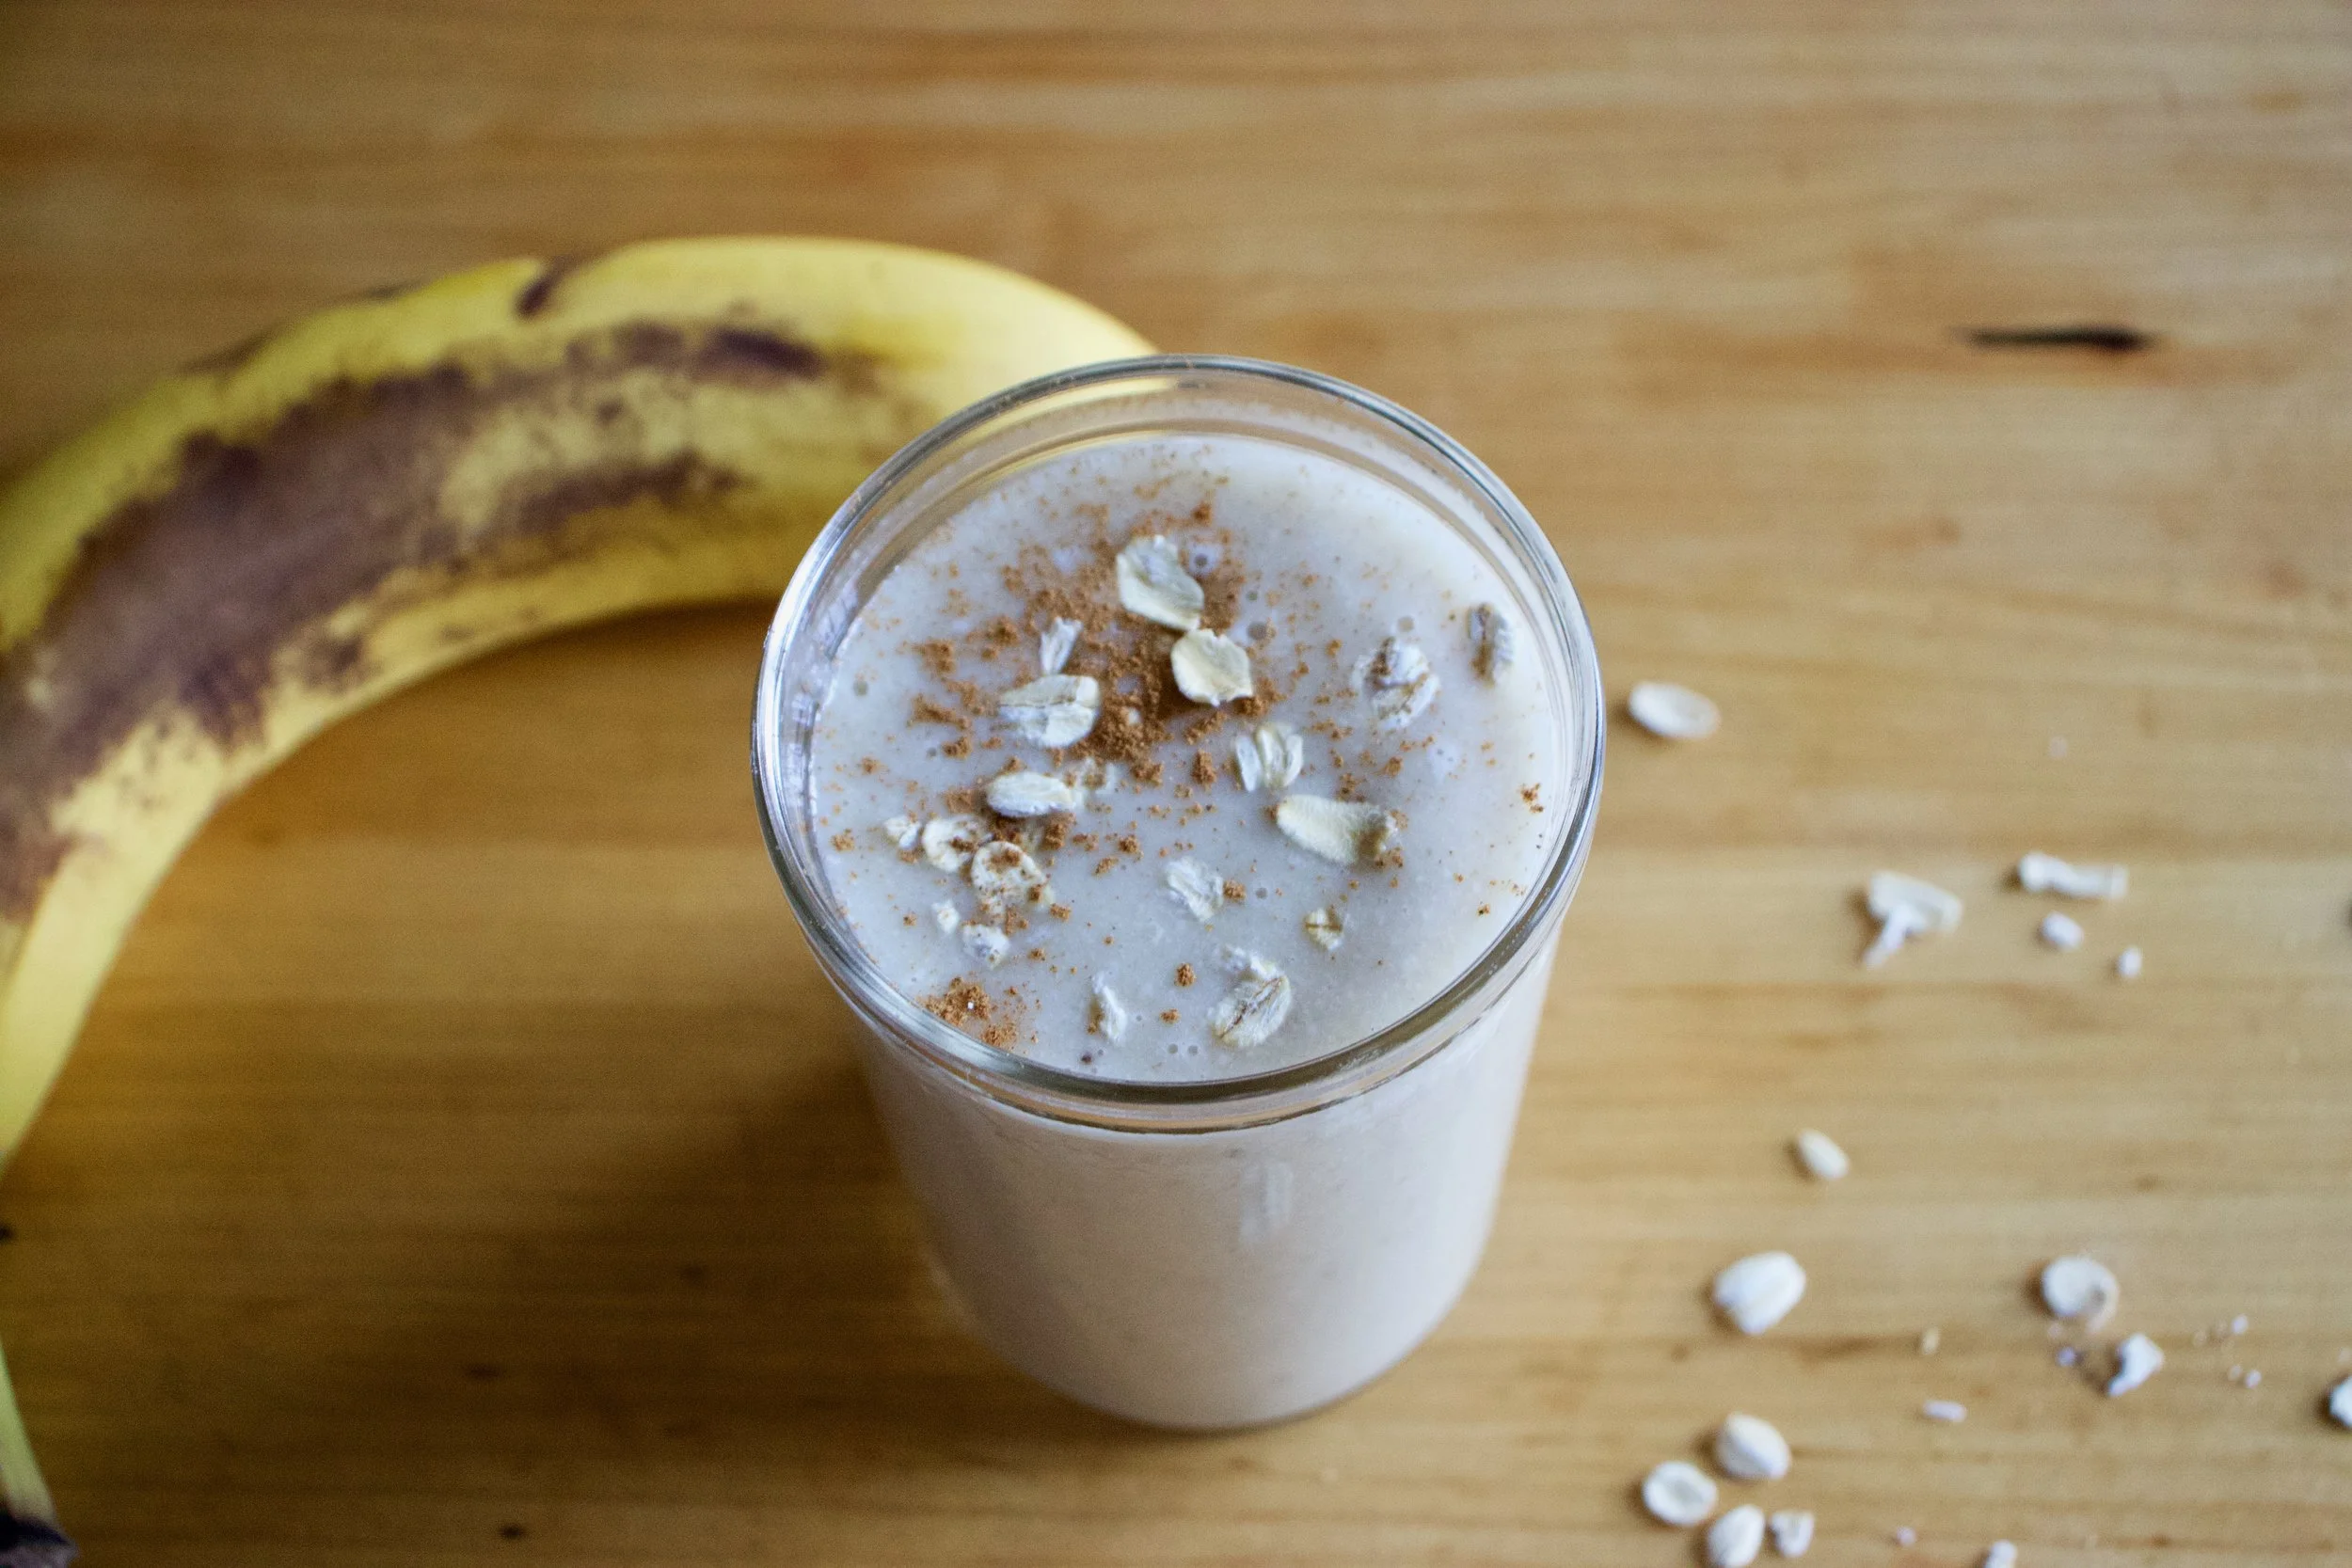
It%u2019s a smoothie. And no, we have never really been smoothie people in this house, but what can I say, sometimes smoothies happen, especially when you have about 20 ripe bananas in the fruit bowl with no room in the freezer and no need for 7 loafs of banana bread.
So I smoothied. And I like it (a lot).
This is a smoothie of simplicity. Nothing fancy. Simplest of simple. Straight to the point. And all sorts of good.
You might think, does this simple smoothie you speak of taste very good? Yes, yes indeed it does. It is all sorts of fantastic. Basically if you like creamy, nutty, oaty, bananery things, you will like this. And it%u2019s a perfect breakfast, snack, dessert, or just wanting a little treat like thing that is not garbage food. A smoothie of all smoothies with the most basic ingredients. And takes about 15 seconds to whip up. Can%u2019t complain about that.
To the smoothie goodness!
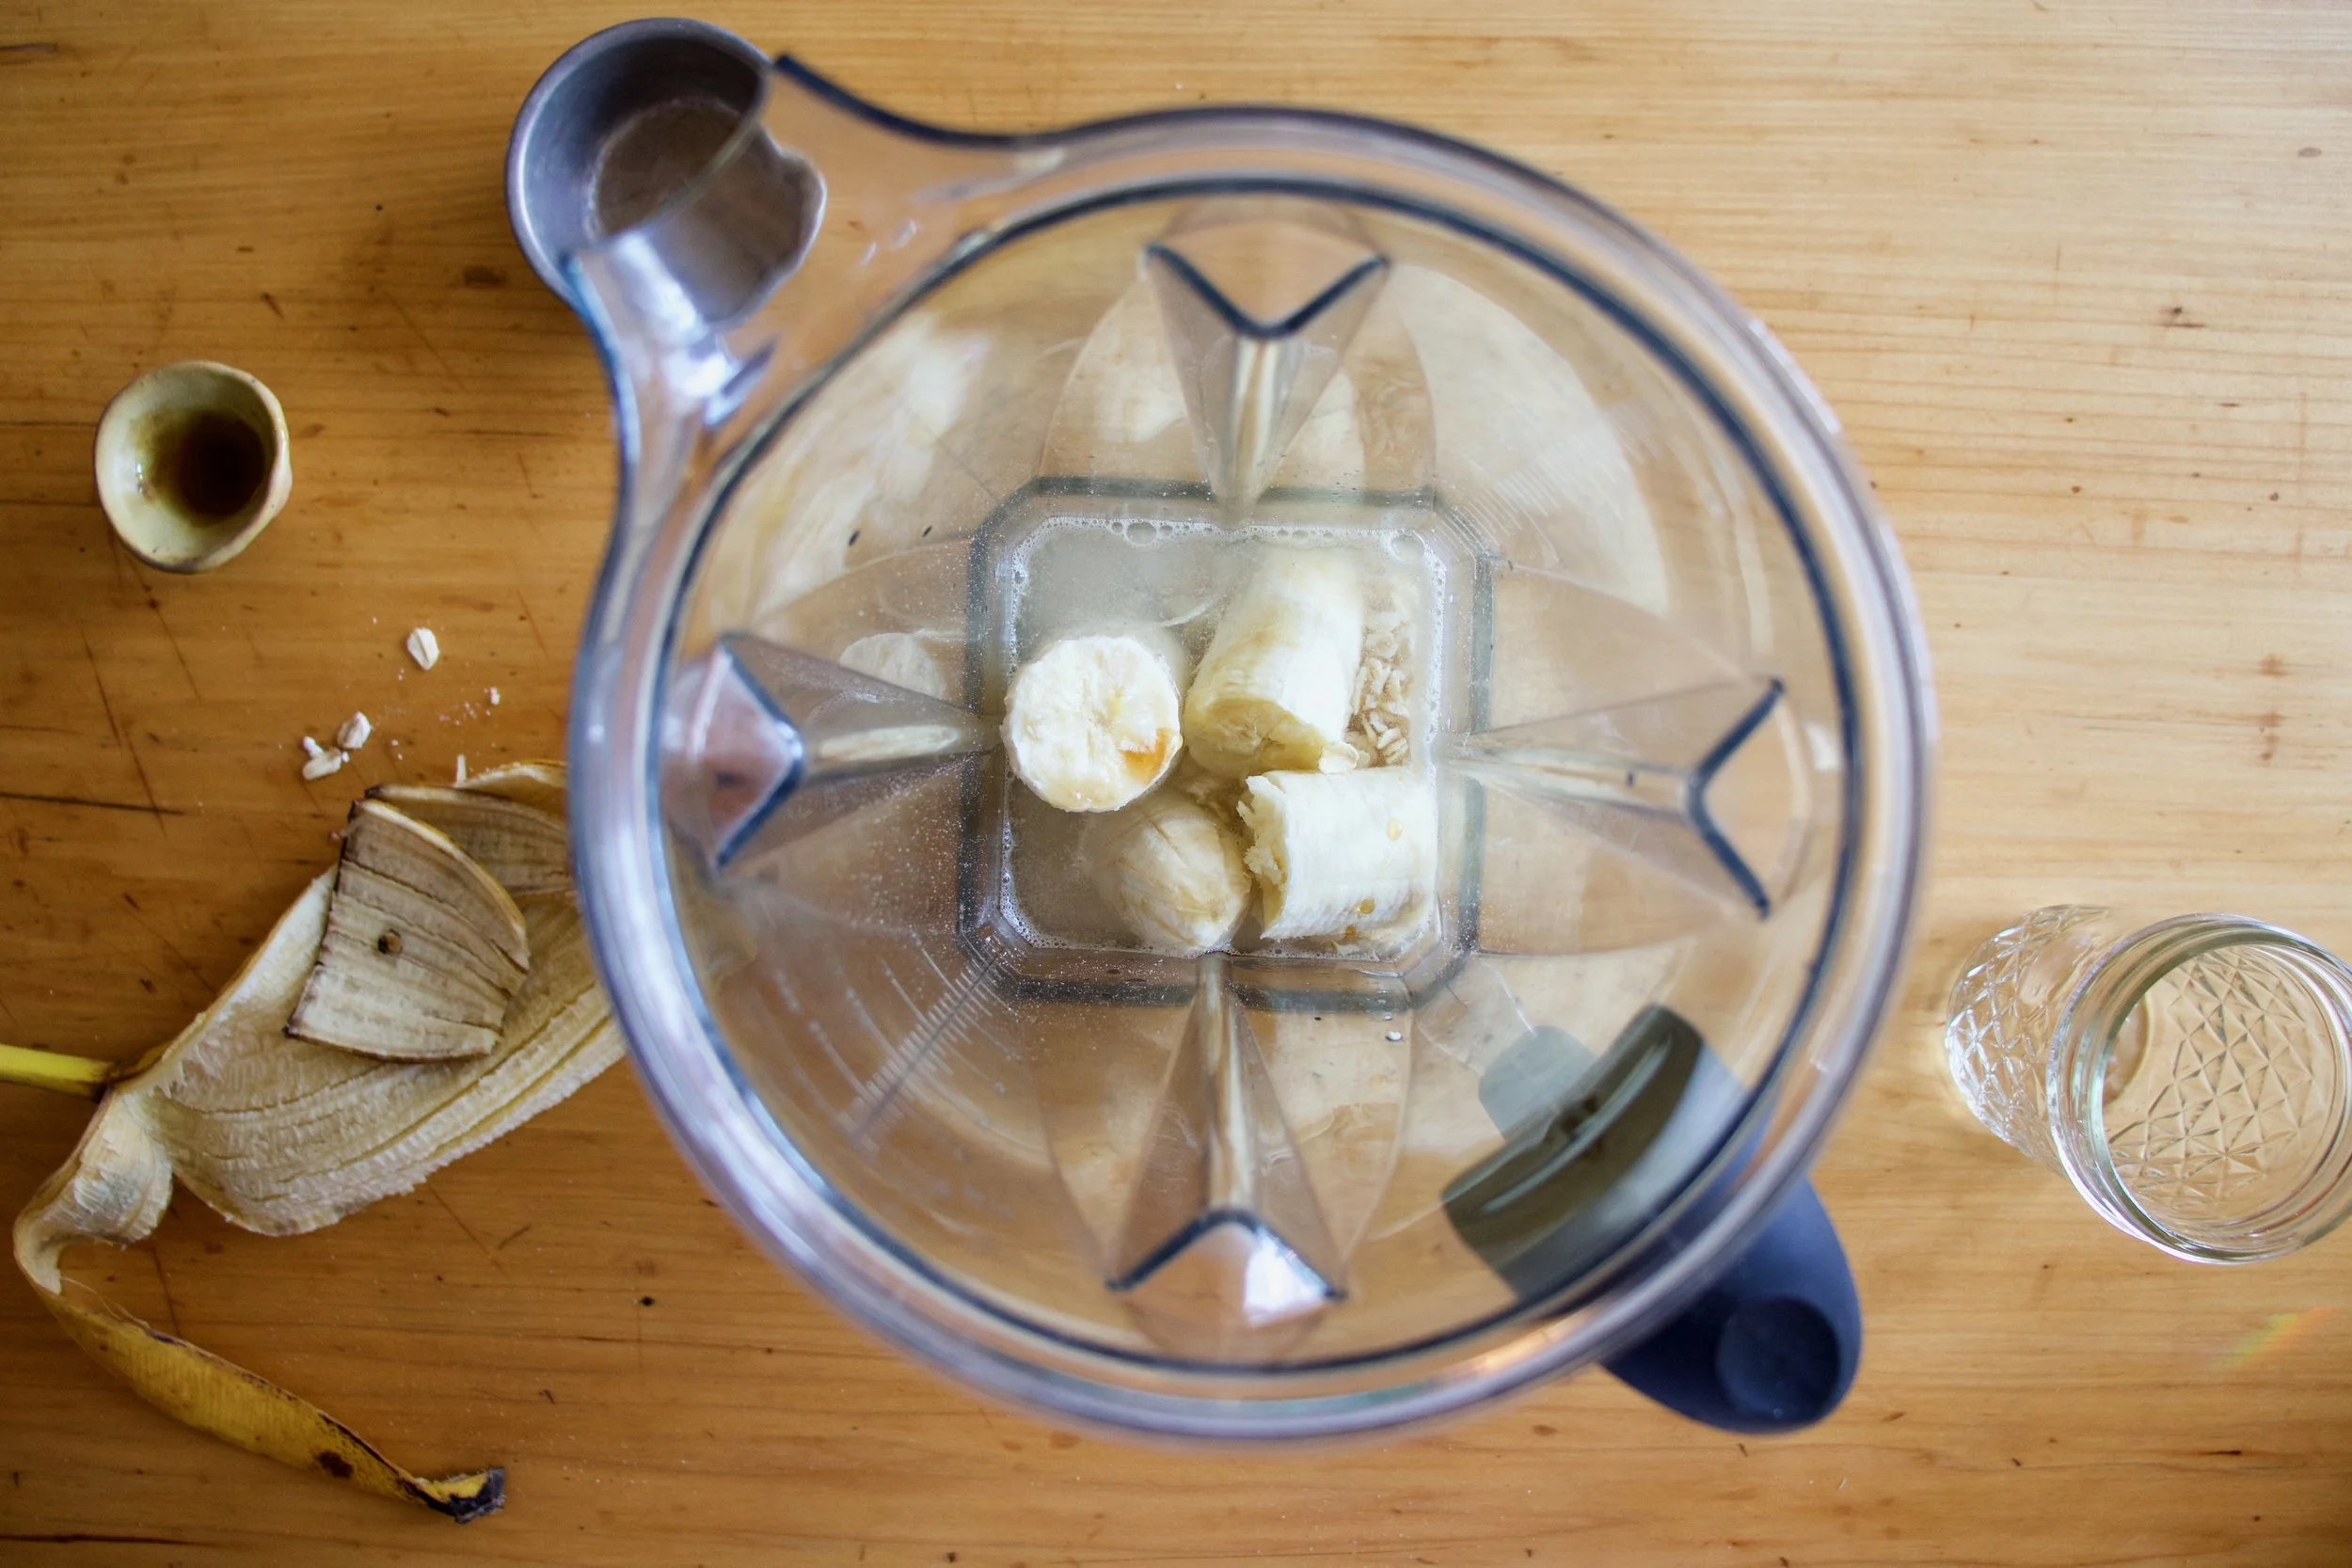
The stuff. A ripe banana, some old fashion rolled oats, a pinch of salt, water, and a smidge of maple syrup if you want it.
Everything goes into blender.
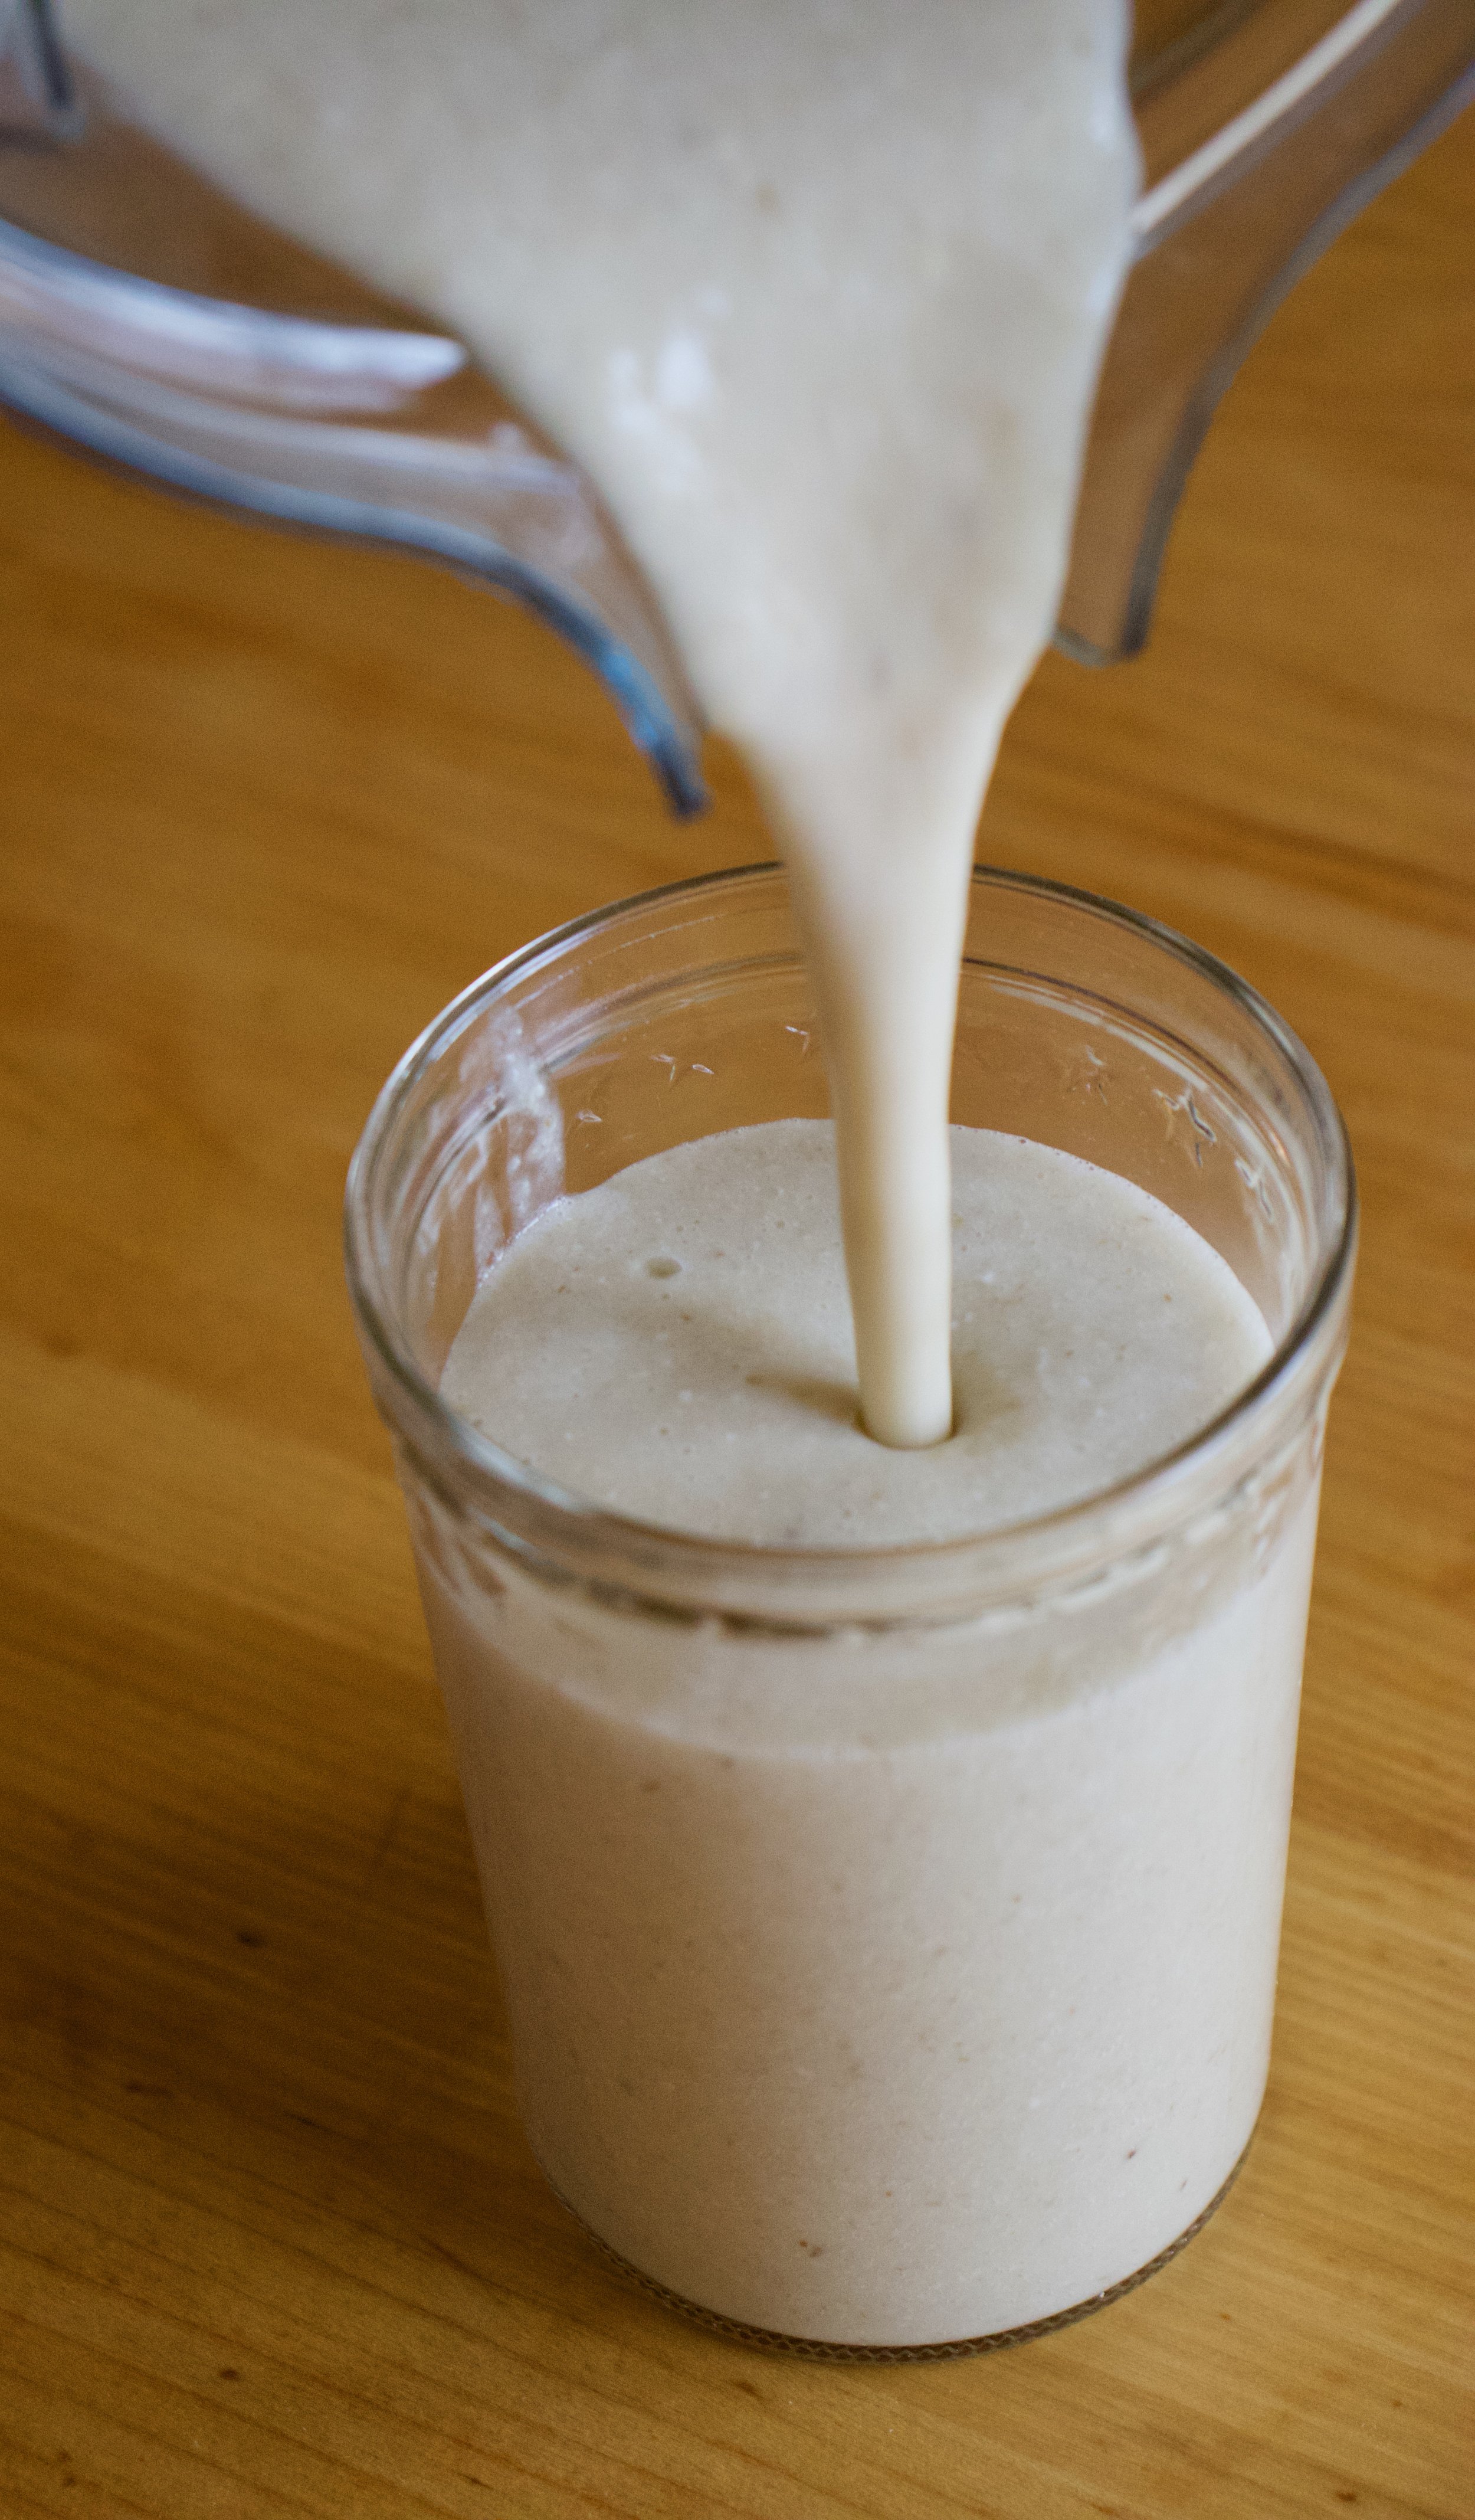
And blended until smooth. Hence the word smoothie.
Pour it into a cup (or if you are feeling primal, drink it straight from the blender%u2026 it%u2019s totally cool)
And done.
A banana oat smoothie.
Let the good time roll!
-C
makes 1 smoothie
1 very ripe banana
1/3 cup raw old fashion oats
1 1/2 cups water
pinch of salt
a tablespoon or two of any sweetener you like (optional)
a pinch of cinnamon (optional)
Place everything into a blender and blend until smooth. Pour into a cup, sprinkle with cinnamon if you wish, and drink right away.
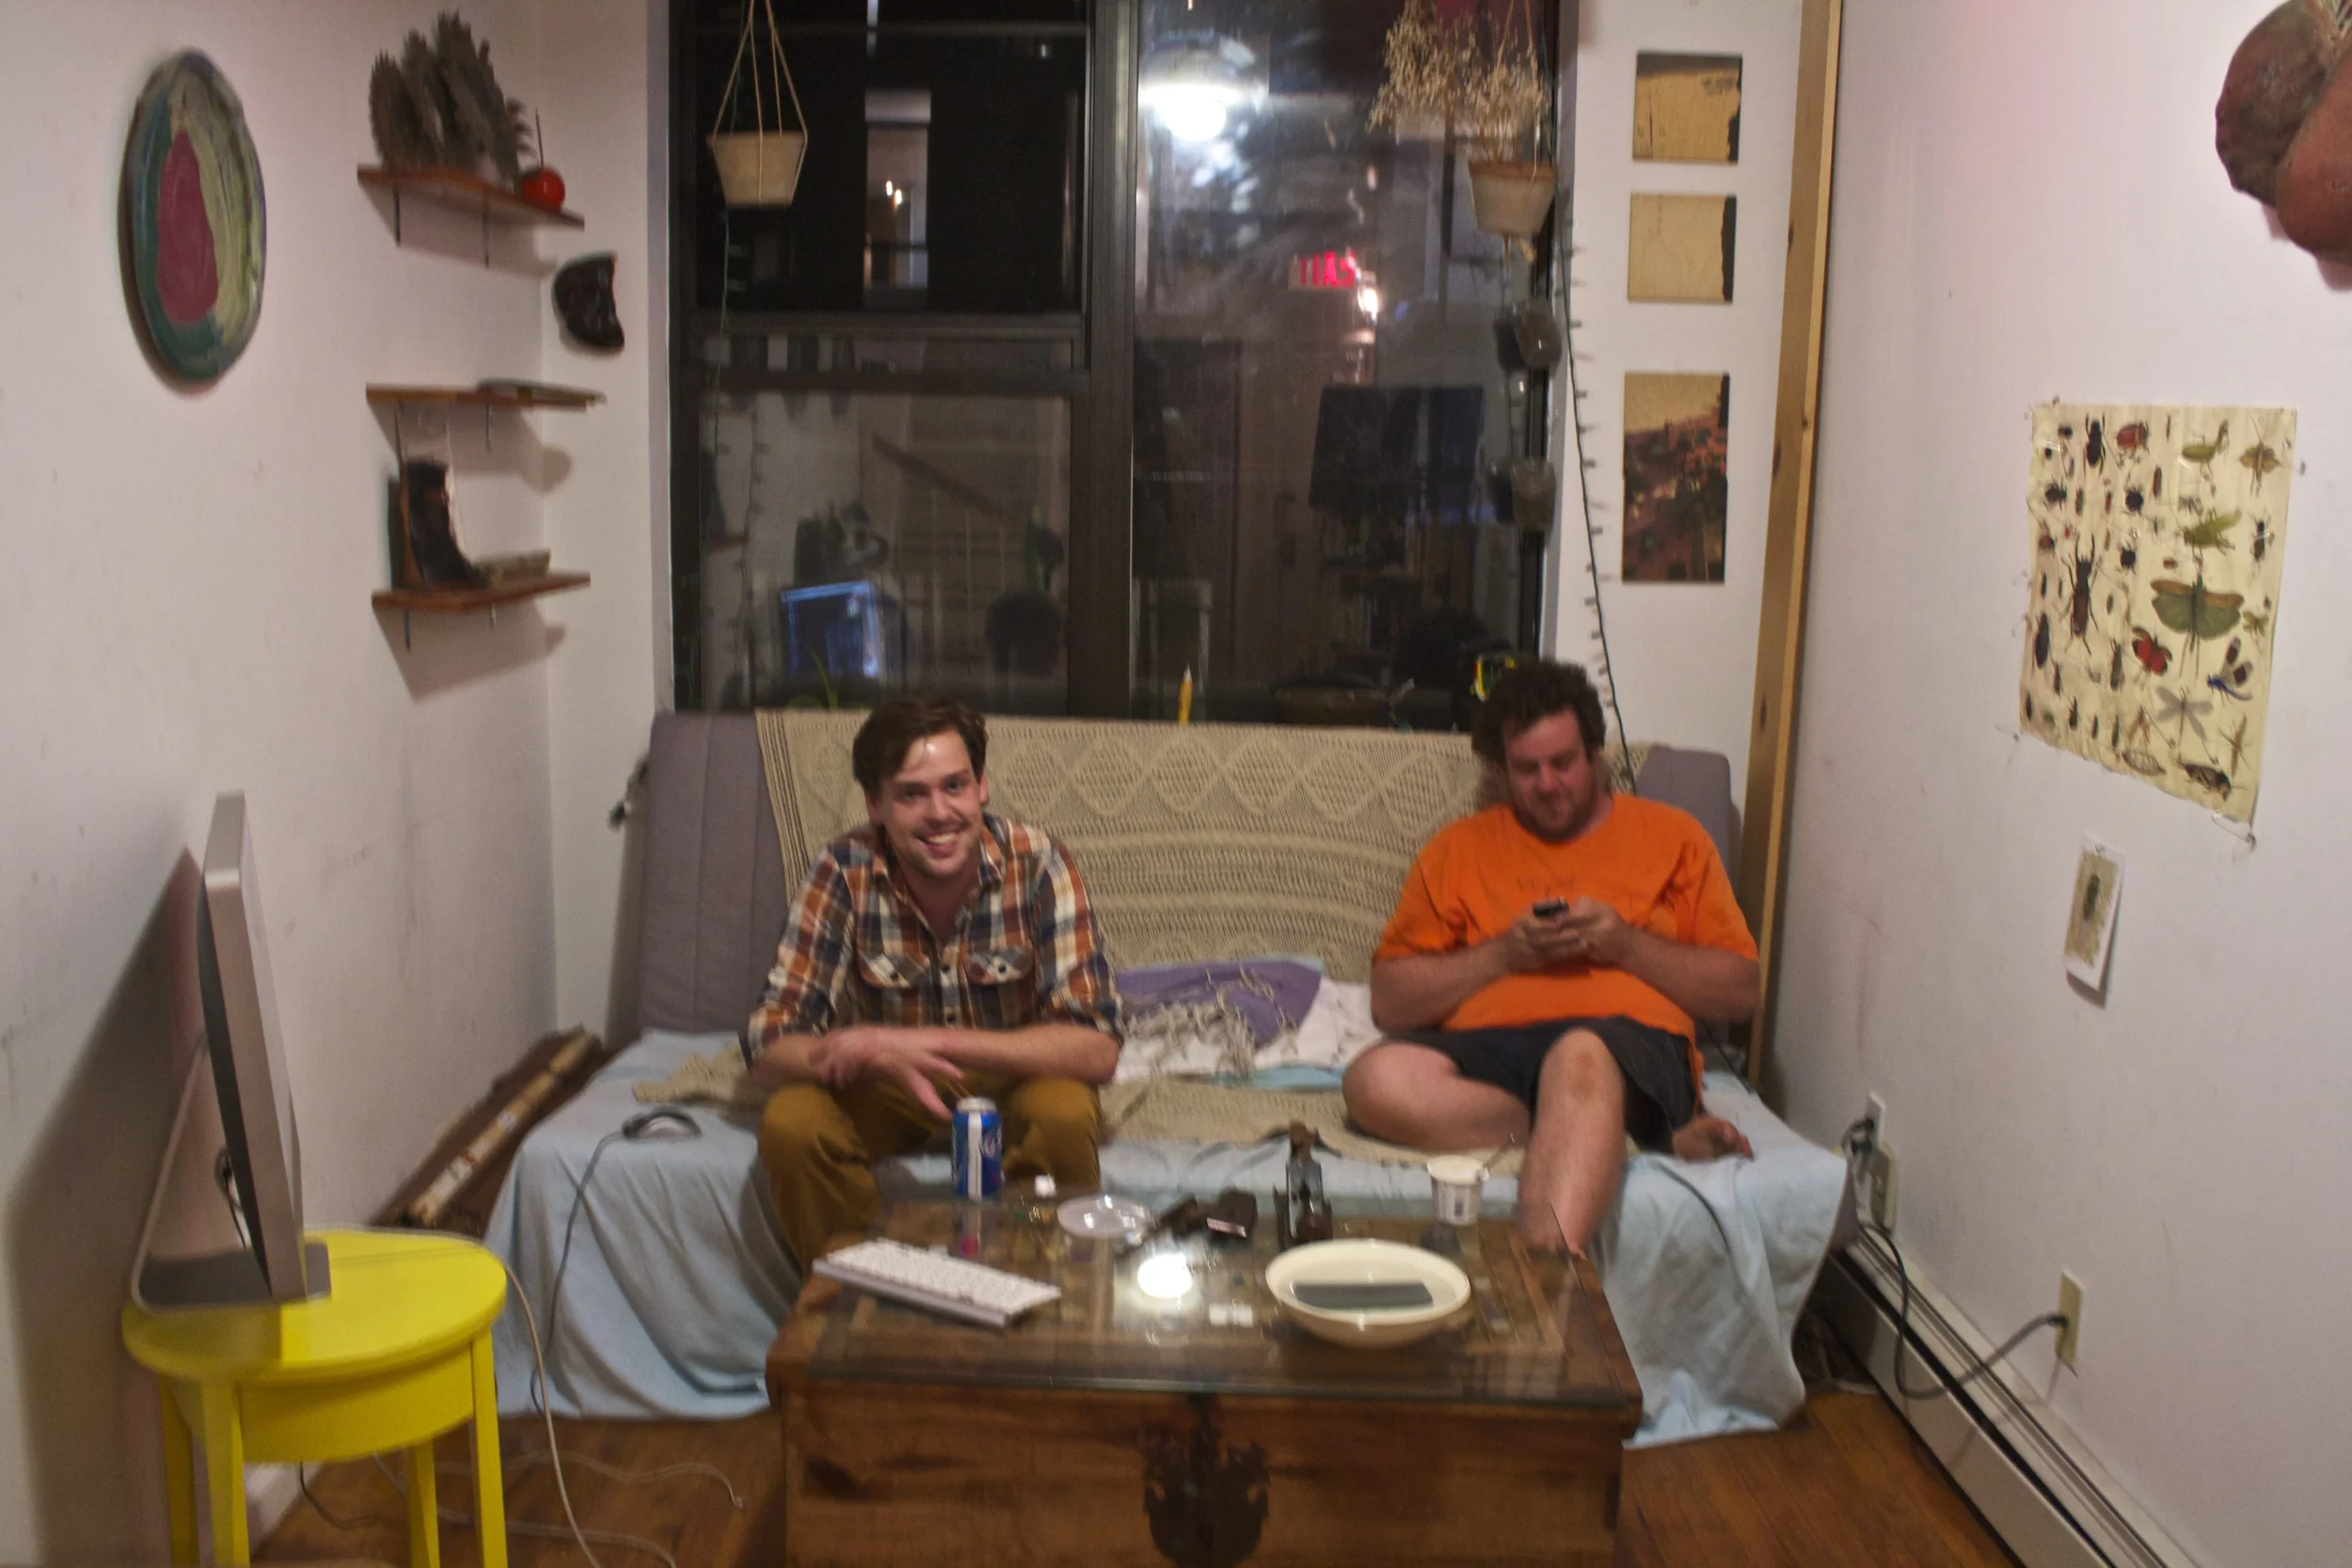
The mr and I took off for NYC for the weekend to get us in some fun times, to hang with his brother, see some art, and basically just to get out of town.%u00a0
What we do when we go down is pretty much %u00a0always the same. We are big into art, and the mr is especially into street art (or “graffiti” as some may call it), and what better city is there to see amazing art? So when we are there, most of our time consists of walking around and taking in the sense. And walk we did. The second day were were there, we ended up walking from the east village, across to the west, all the way up to central park, and back down again. The little walking guy on google map said that our route (without all the side streets that we weaved through)%u00a0was 11.5 miles. So yeah, we walked our asses off. %u00a0But it felt good cause, well,%u00a0I like to walk and after the past few visits I feel like I am starting to get the hang of where I am and where I am going. (as a friend pointed out, the city is a grid.. but still)
We also got to spend a little quality time hanging with the mr’s little brother. He has been living in NYC for a few years now and has gradually turned unto a cool dude hipster that works like crazy running his own online business, but plays just as nuts. His friends came over for the “pre game” and left us for sleep at around 1 in the am%u2026 and his return home was a bit later.%u00a0%u00a0I mean, 5:30 am is a normal time to come home right? And of course when you get home, you must play some mid 90’s Seal %u00a0before drifting off to sleep. Mind you, he lives in a one room tiny apartment,%u00a0Oh Ev.. you are such a little shit, but I love you.%u00a0
To list a few of the highlights.%u00a0Osgemos street art (the mr has a hug boy crush on these guys) and all the other ssrteet art around the city. Seeing some live action taping of the new Ghost Busters movie which was cool las hell. Walking the high line (again, but I will do it every time I go)%u00a0Strands book store, Dick Blick art store and all the little shops and coffee shops we stopped in along the way. Oh, and shaving the ass of his brothers cat (it needed to be done, the knots were just out of control!)%u00a0
All in all, another successful trip to the city. Nothing was lost, no one was hurt, %u00a0we did what we wanted to do.
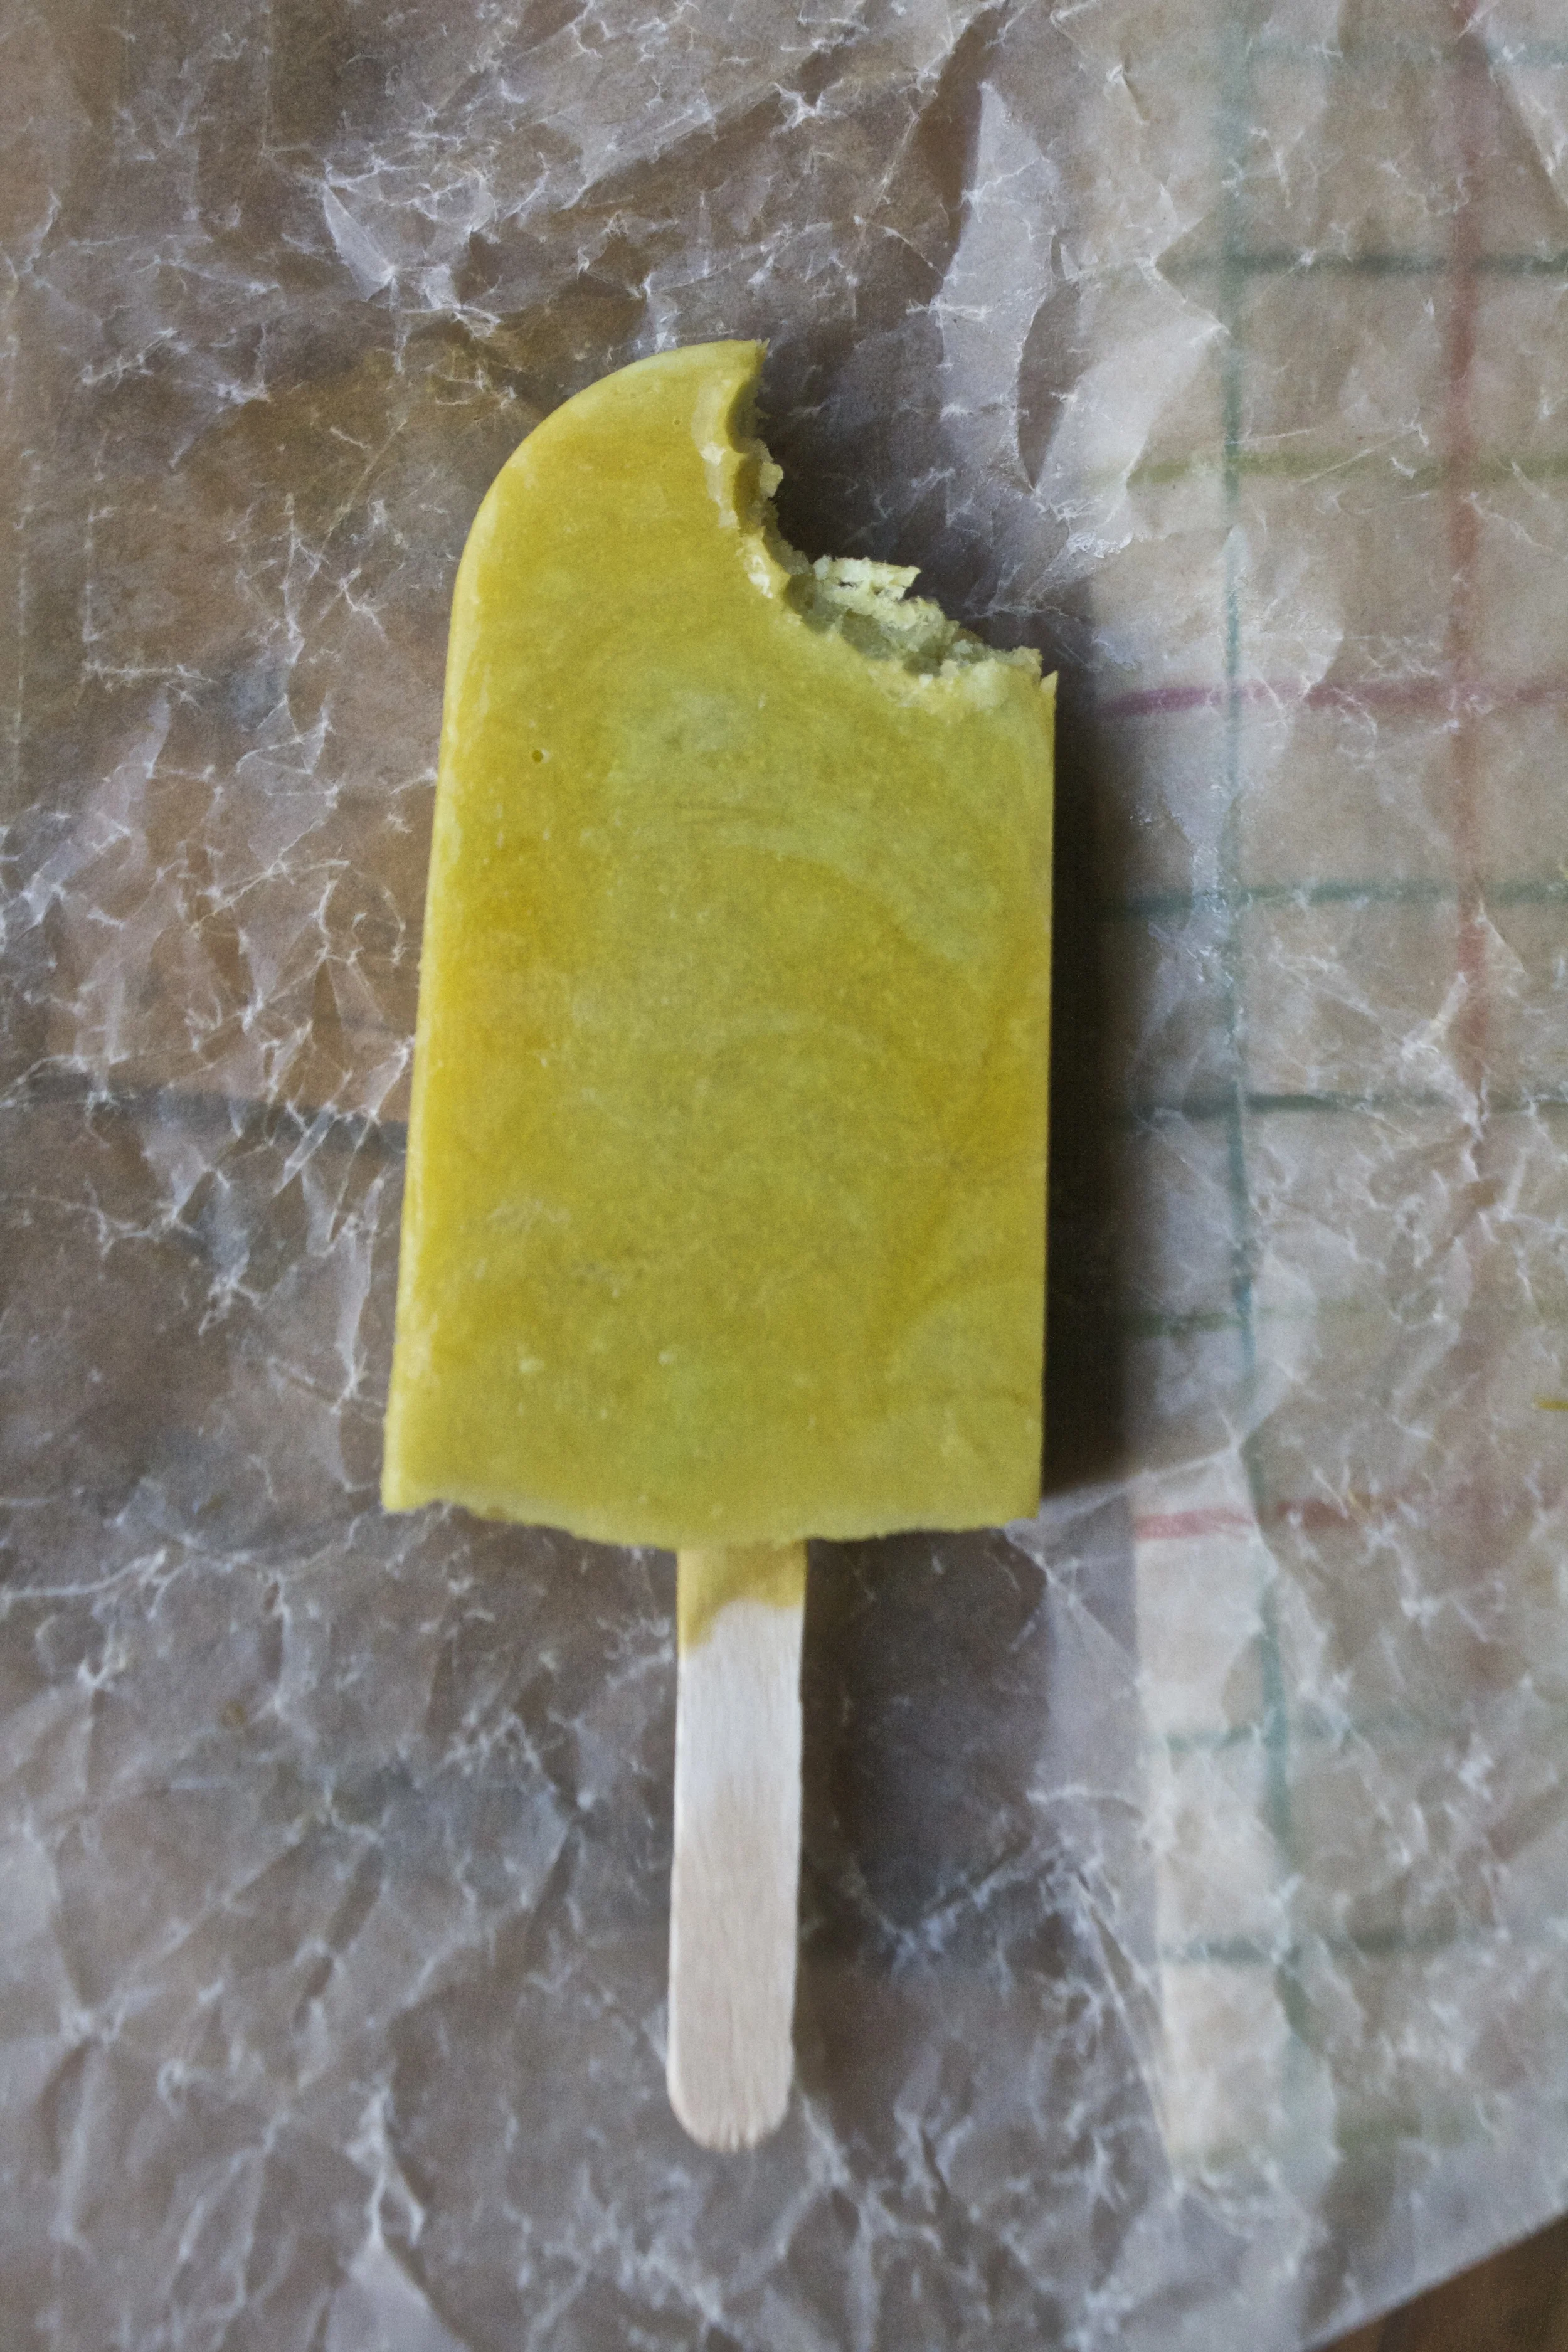
I was cleaning out the fridge and found that I had a good few really ripe avocados that were in need of eating ASAP. (I bought like 8 at once… super sale!) My first thought was I wish I could freeze these and save them for later. Then I thought well why the heck don’t I freeze them. So that’s what I did. I pureed them up, added a little lemon juice and stuck a jar of tangy green creamy goodness into the freezer and all throughout the week found myself standing in front of the fridge with a spoon scraping at the jar of avocado. It was so good. I even added a little fruit to it toward the end. Avocado and fruit = oh hell yes.
And now that is is officially spring we should be eating popsicles (right?!). I figured you guys are cool enough that I would share my new found love of frozen avocados and you would be down with it.
I know, some might think that plain old frozen avocado doesn’t sound amazing, but when you add a little sweetness and swirl it around with super sweet and creamy mango. Trust me, it’s freaking amazing. The flavors go perfectly together, and the texture, it’s almost like ice cream… SO GOOD! Anyway, I know that it might not be the perfect spring weather as of today, but the beauty of these is that you make them, freeze them and leave them until the perfect moment. Say a good long day of raking up all the cat poop that the neighbors cat has left in all your spring flower beds, or picking up all the recycling that has blow into the bushes all winter long. Maybe a day of cleaning out the closet or dusting the ceilings. Make these popsicles now and treat yourself to one after doing some kind of crappy spring chores, its what you need to do.. Or better yet, bribe a little with a popsicle to do your spring cleaning….. Yeah, I might just do that.
Or just make them and eat them… no spring chores required.
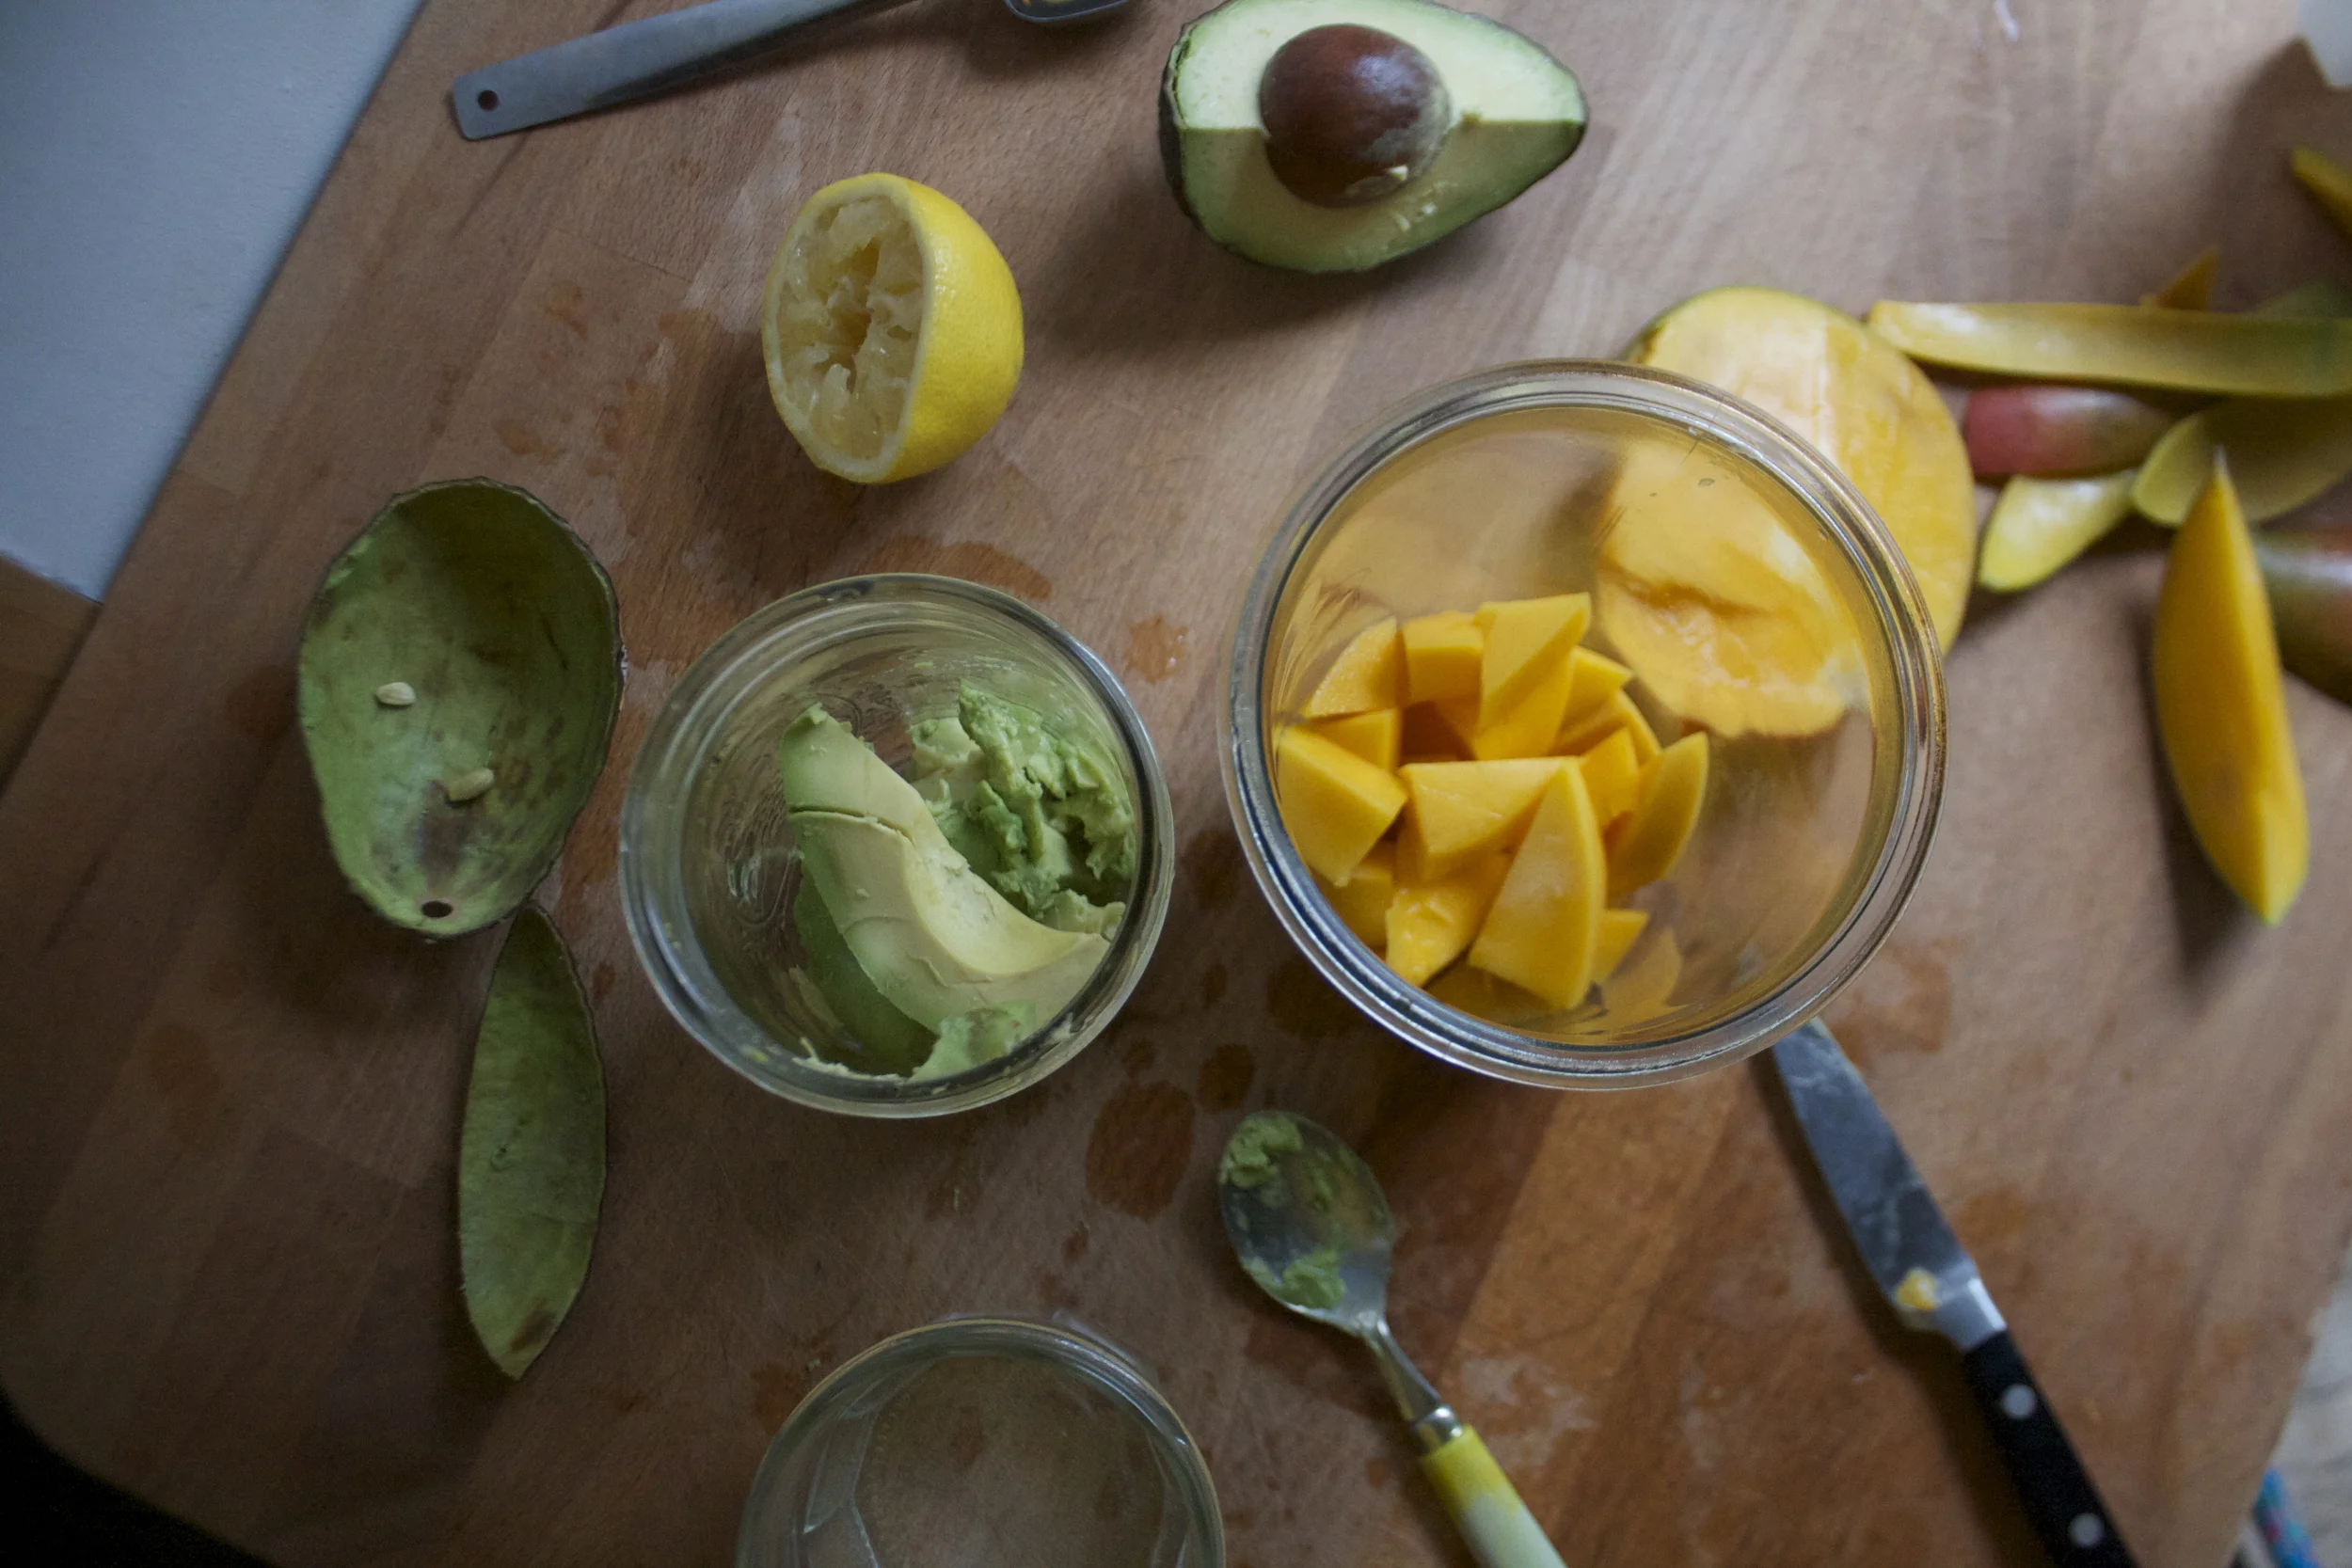
The stuff. A nice ripe mango and a nice ripe avocado. A bit of lemon juice (from half a lemon),%u00a0 a little maple syrup, and a some water.
Scoop the avocado into a jar and cut up the mango ans stick into a jar…..
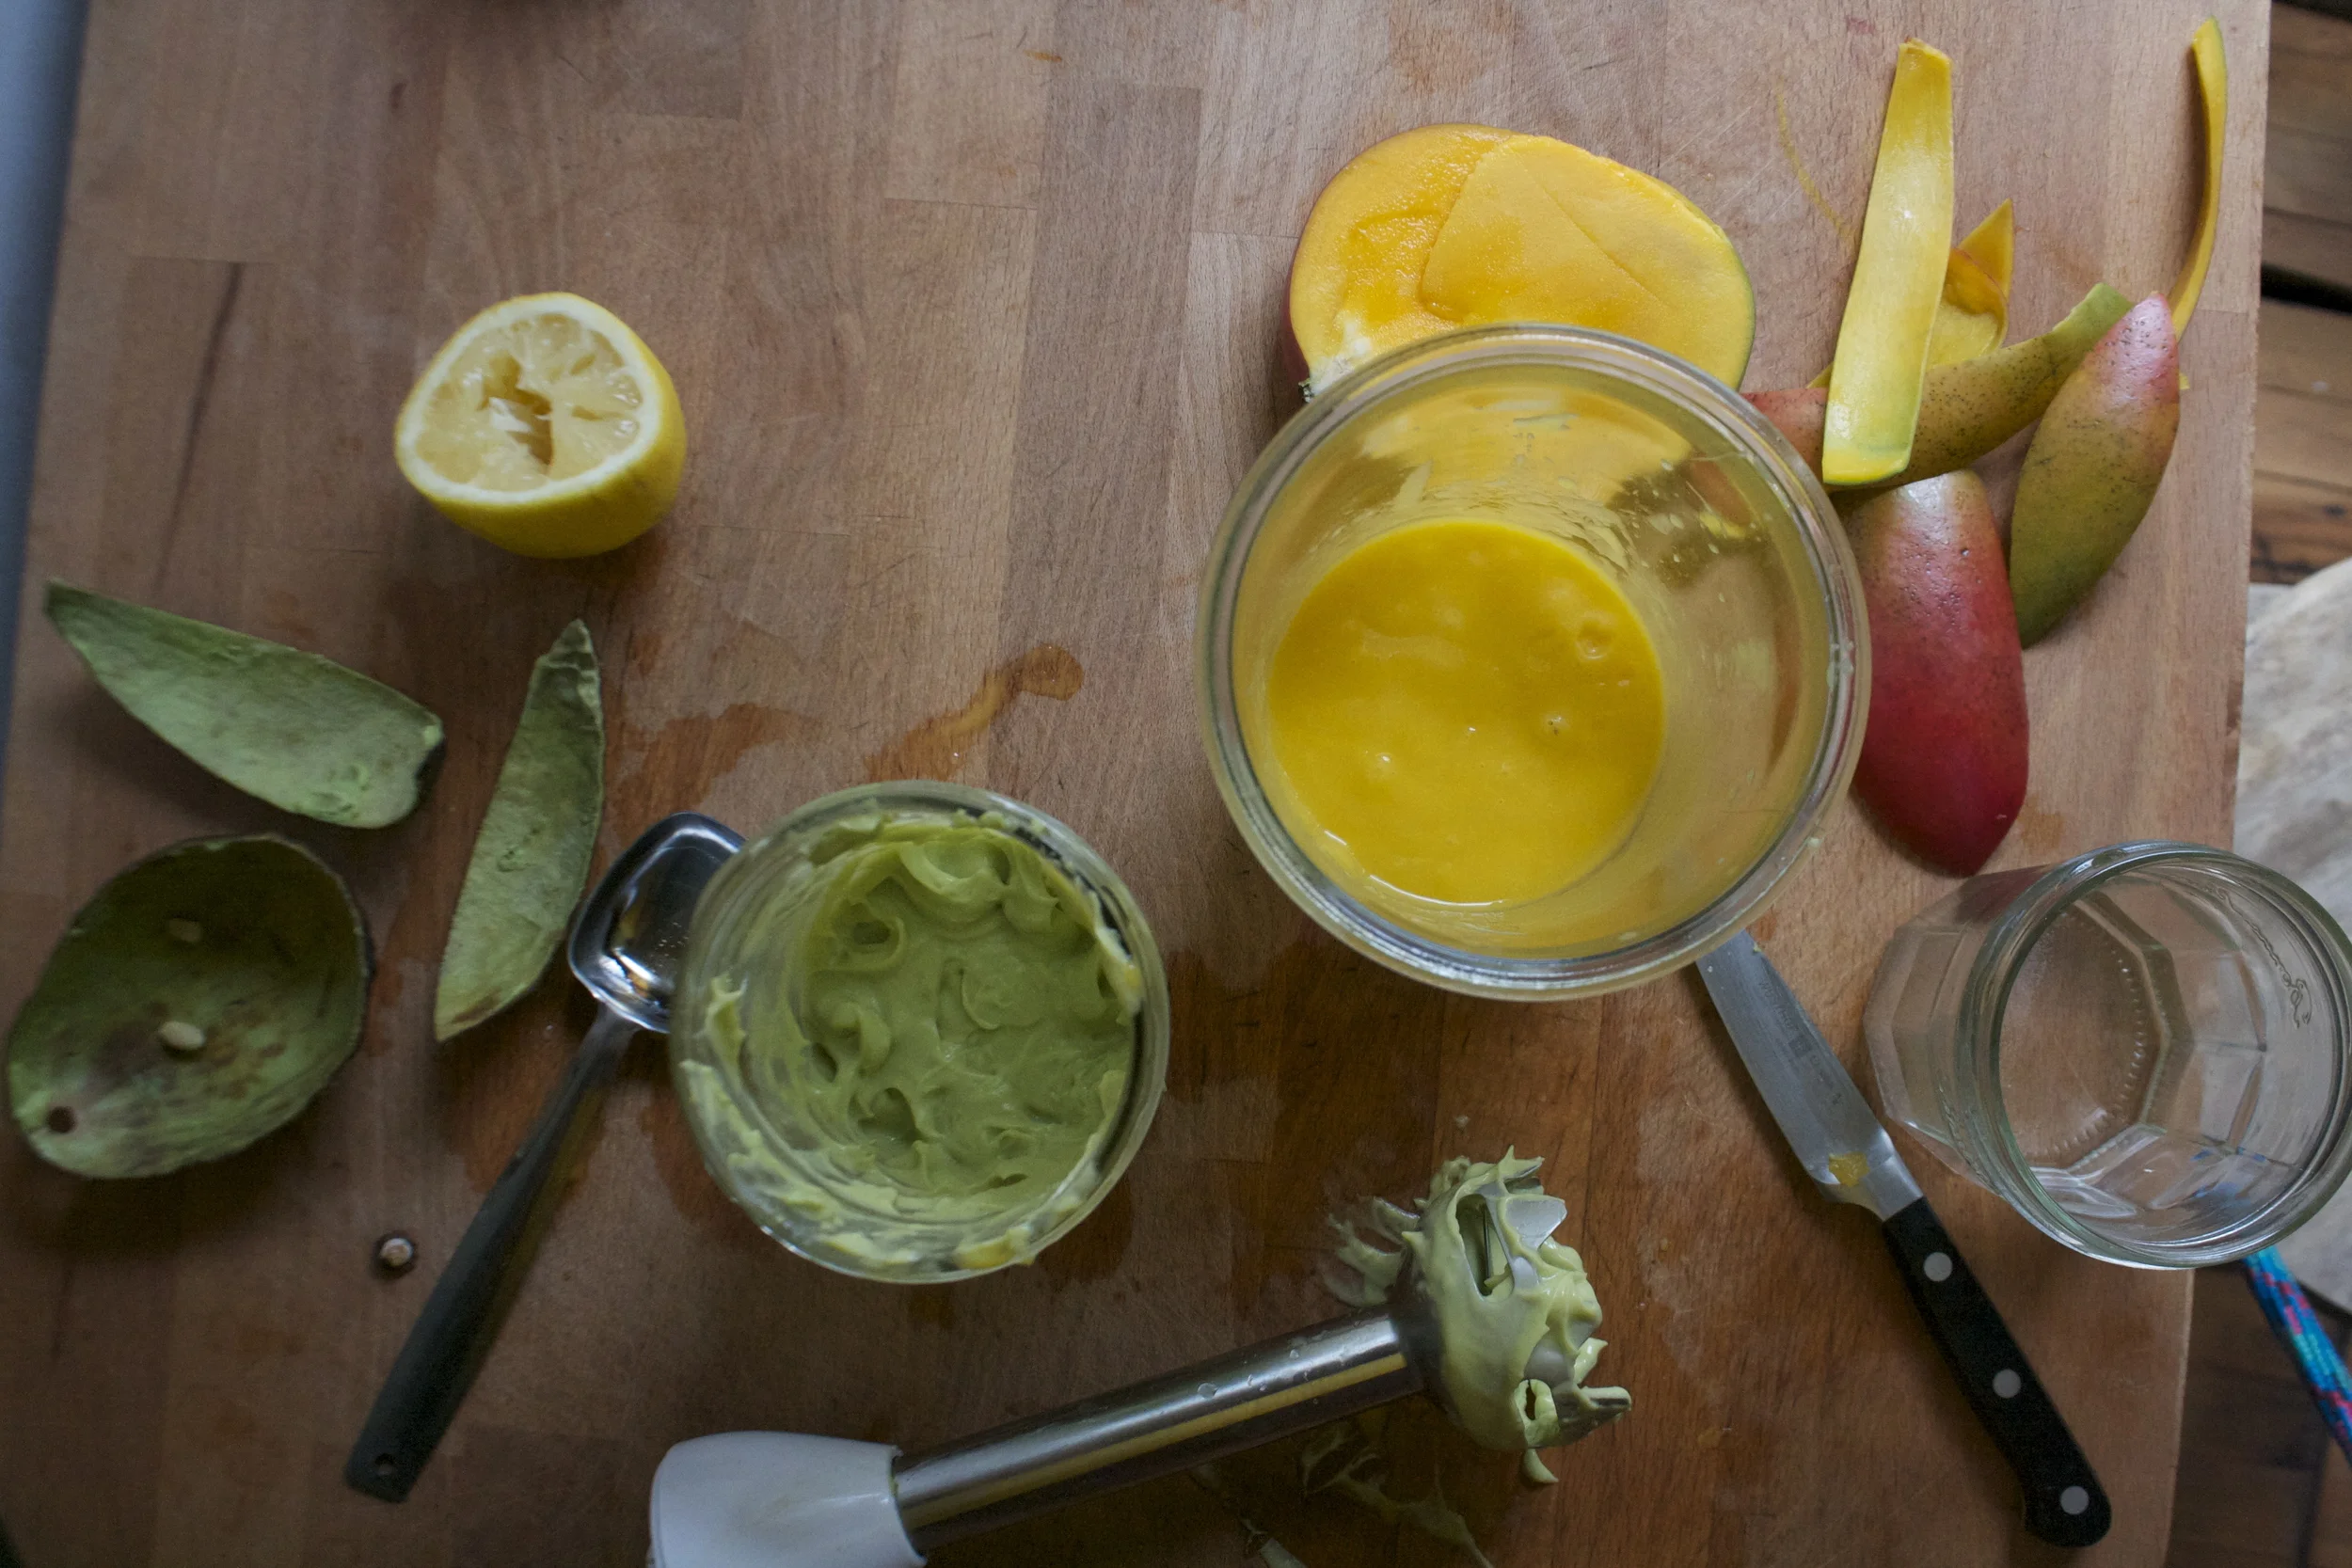
Splash a little water into each jar and blend them up. (I used my hand blender. but use the blending device of your choice) Add the maple syrup to the avocado.. as much as you need, and if your mango is not super sweet, you can add a little to that too.
Scoop the avocado puree into the mango and gently swirl it around
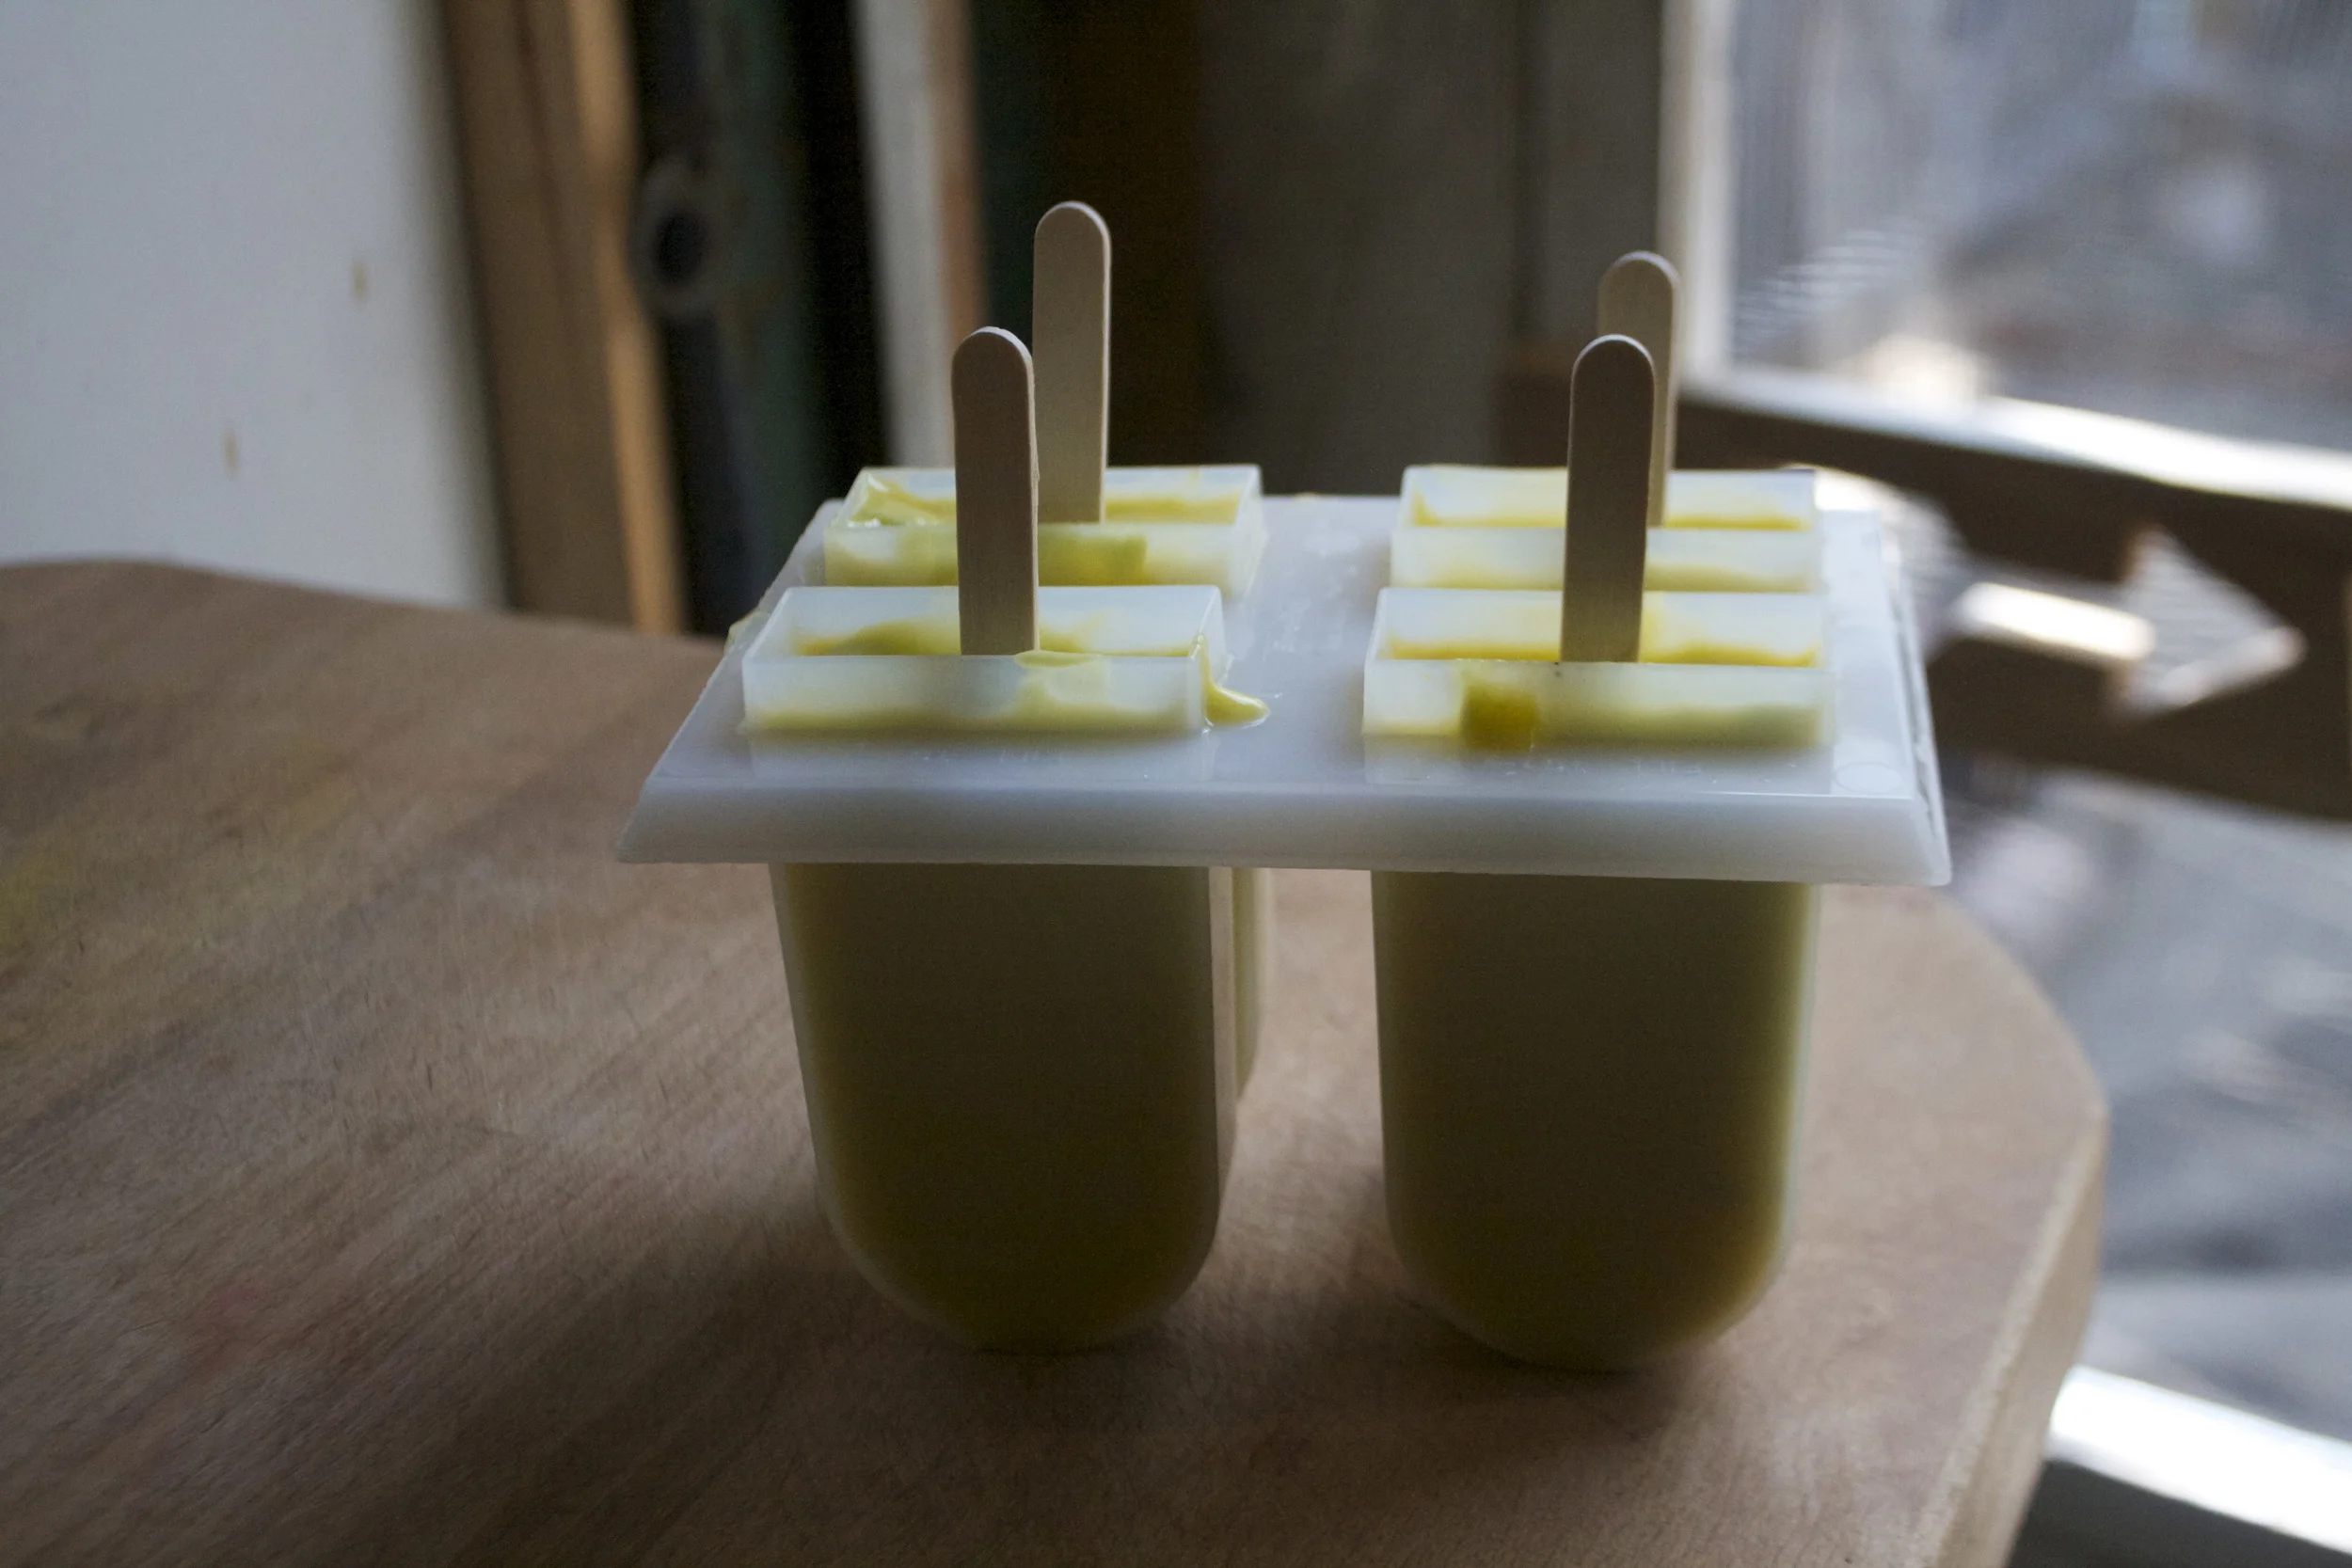
Now pour/scoop the mixture into your popsicle molds. And because mine was thick enough, I was able to stick the wood sticks without them sinking.
Noe get them quick into the freezer
A good few hours (I didn’t even check until the next day but I bet 4-5 hours in a good freezer will do) the popsicles are nowposicles!!!!!
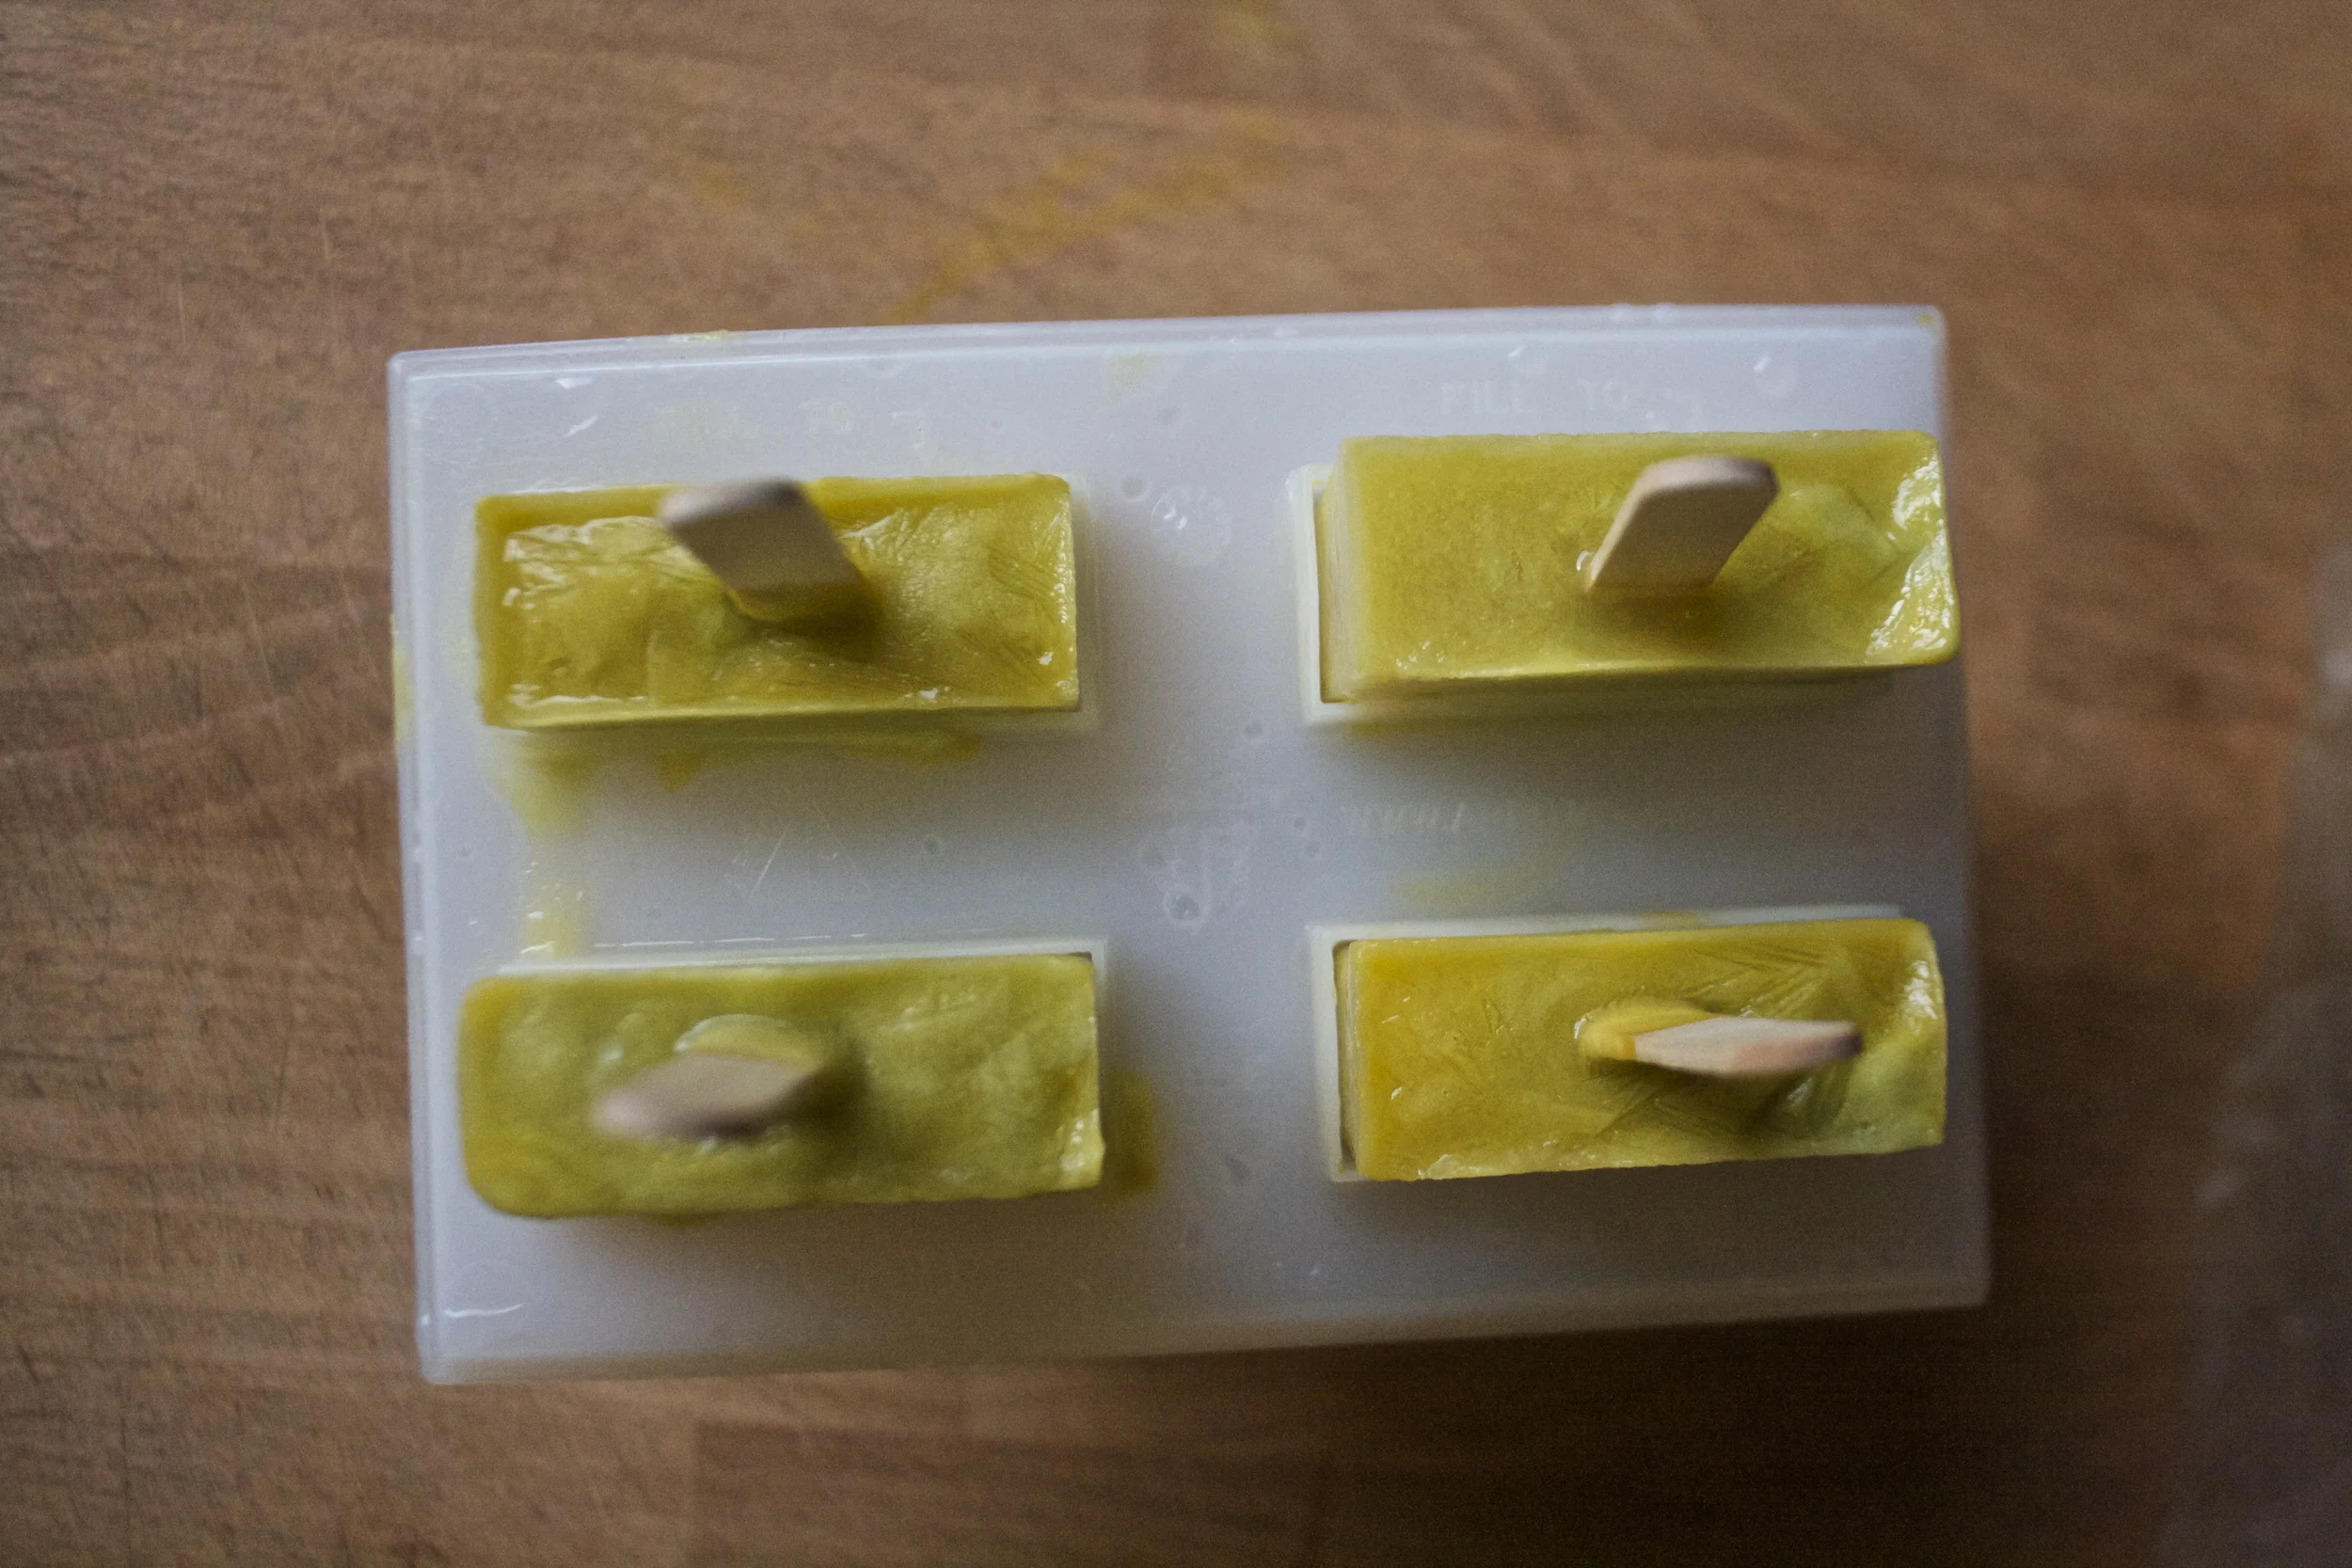
Pop them out of the mold (a few minutes on the counter and or a quick rinse under warm water) and do what needs to be done.
So creamy sweet and refreshing… This is a happy spring popsicle for sure.
Have a great day!
-C
Makes four 4oz popsicles
1 ripe avocado
1 ripe mango
1/2 a lemon or lime
1-2 tablespoons maple syrup (or any sweetener of you liking)
about 1/2 cup of water
Note.sIF your mango is not super sweet you might want to add a little maple syrup to thatto that as well. And depending on the actual size of your mango and avocado, you might find yourself with a little extra fruit puree…. so maybe an extra popsicle can be made or you can just eat it now.
Scoop avocado into a jar and cut and dice mango and place in a separate jar. Add maple to the avocado (and the mango if you want) and about 1/4 cup of water to each.%u00a0 With a hand blender, blend each until smooth ( or use a regular blender) Once both are blended, dump one into the other and gently swirl around. Pour mixture into popsicle molds, add the sticks and stick into the freeze. Keep freezing until frozen which should take at least 4-5 hours.
And once frozen, pop out of molds (run mold under warm water or just leave on counter for a few minutes) and eat them like it hot!
We are back.. Woo hoo!! Did you miss me? cause I missed you guys.
The past two weeks we nutters. We traveled so hard, did and saw so much stuff. We had such a blast. I will tell you all about it with lots of pictures, but give me a few days cause I am still on crazy, sleep deprived, jet lagged brain and am still having a hard time comprehending normal world activity.. I think I am going to need the rest of the week to recover and get my head back into the real world. ( I don’t mind living in a fog for a little while, it suits me) And if my writing is a little wonky or maybe doesn’t make sense.. again, jet lag brain.
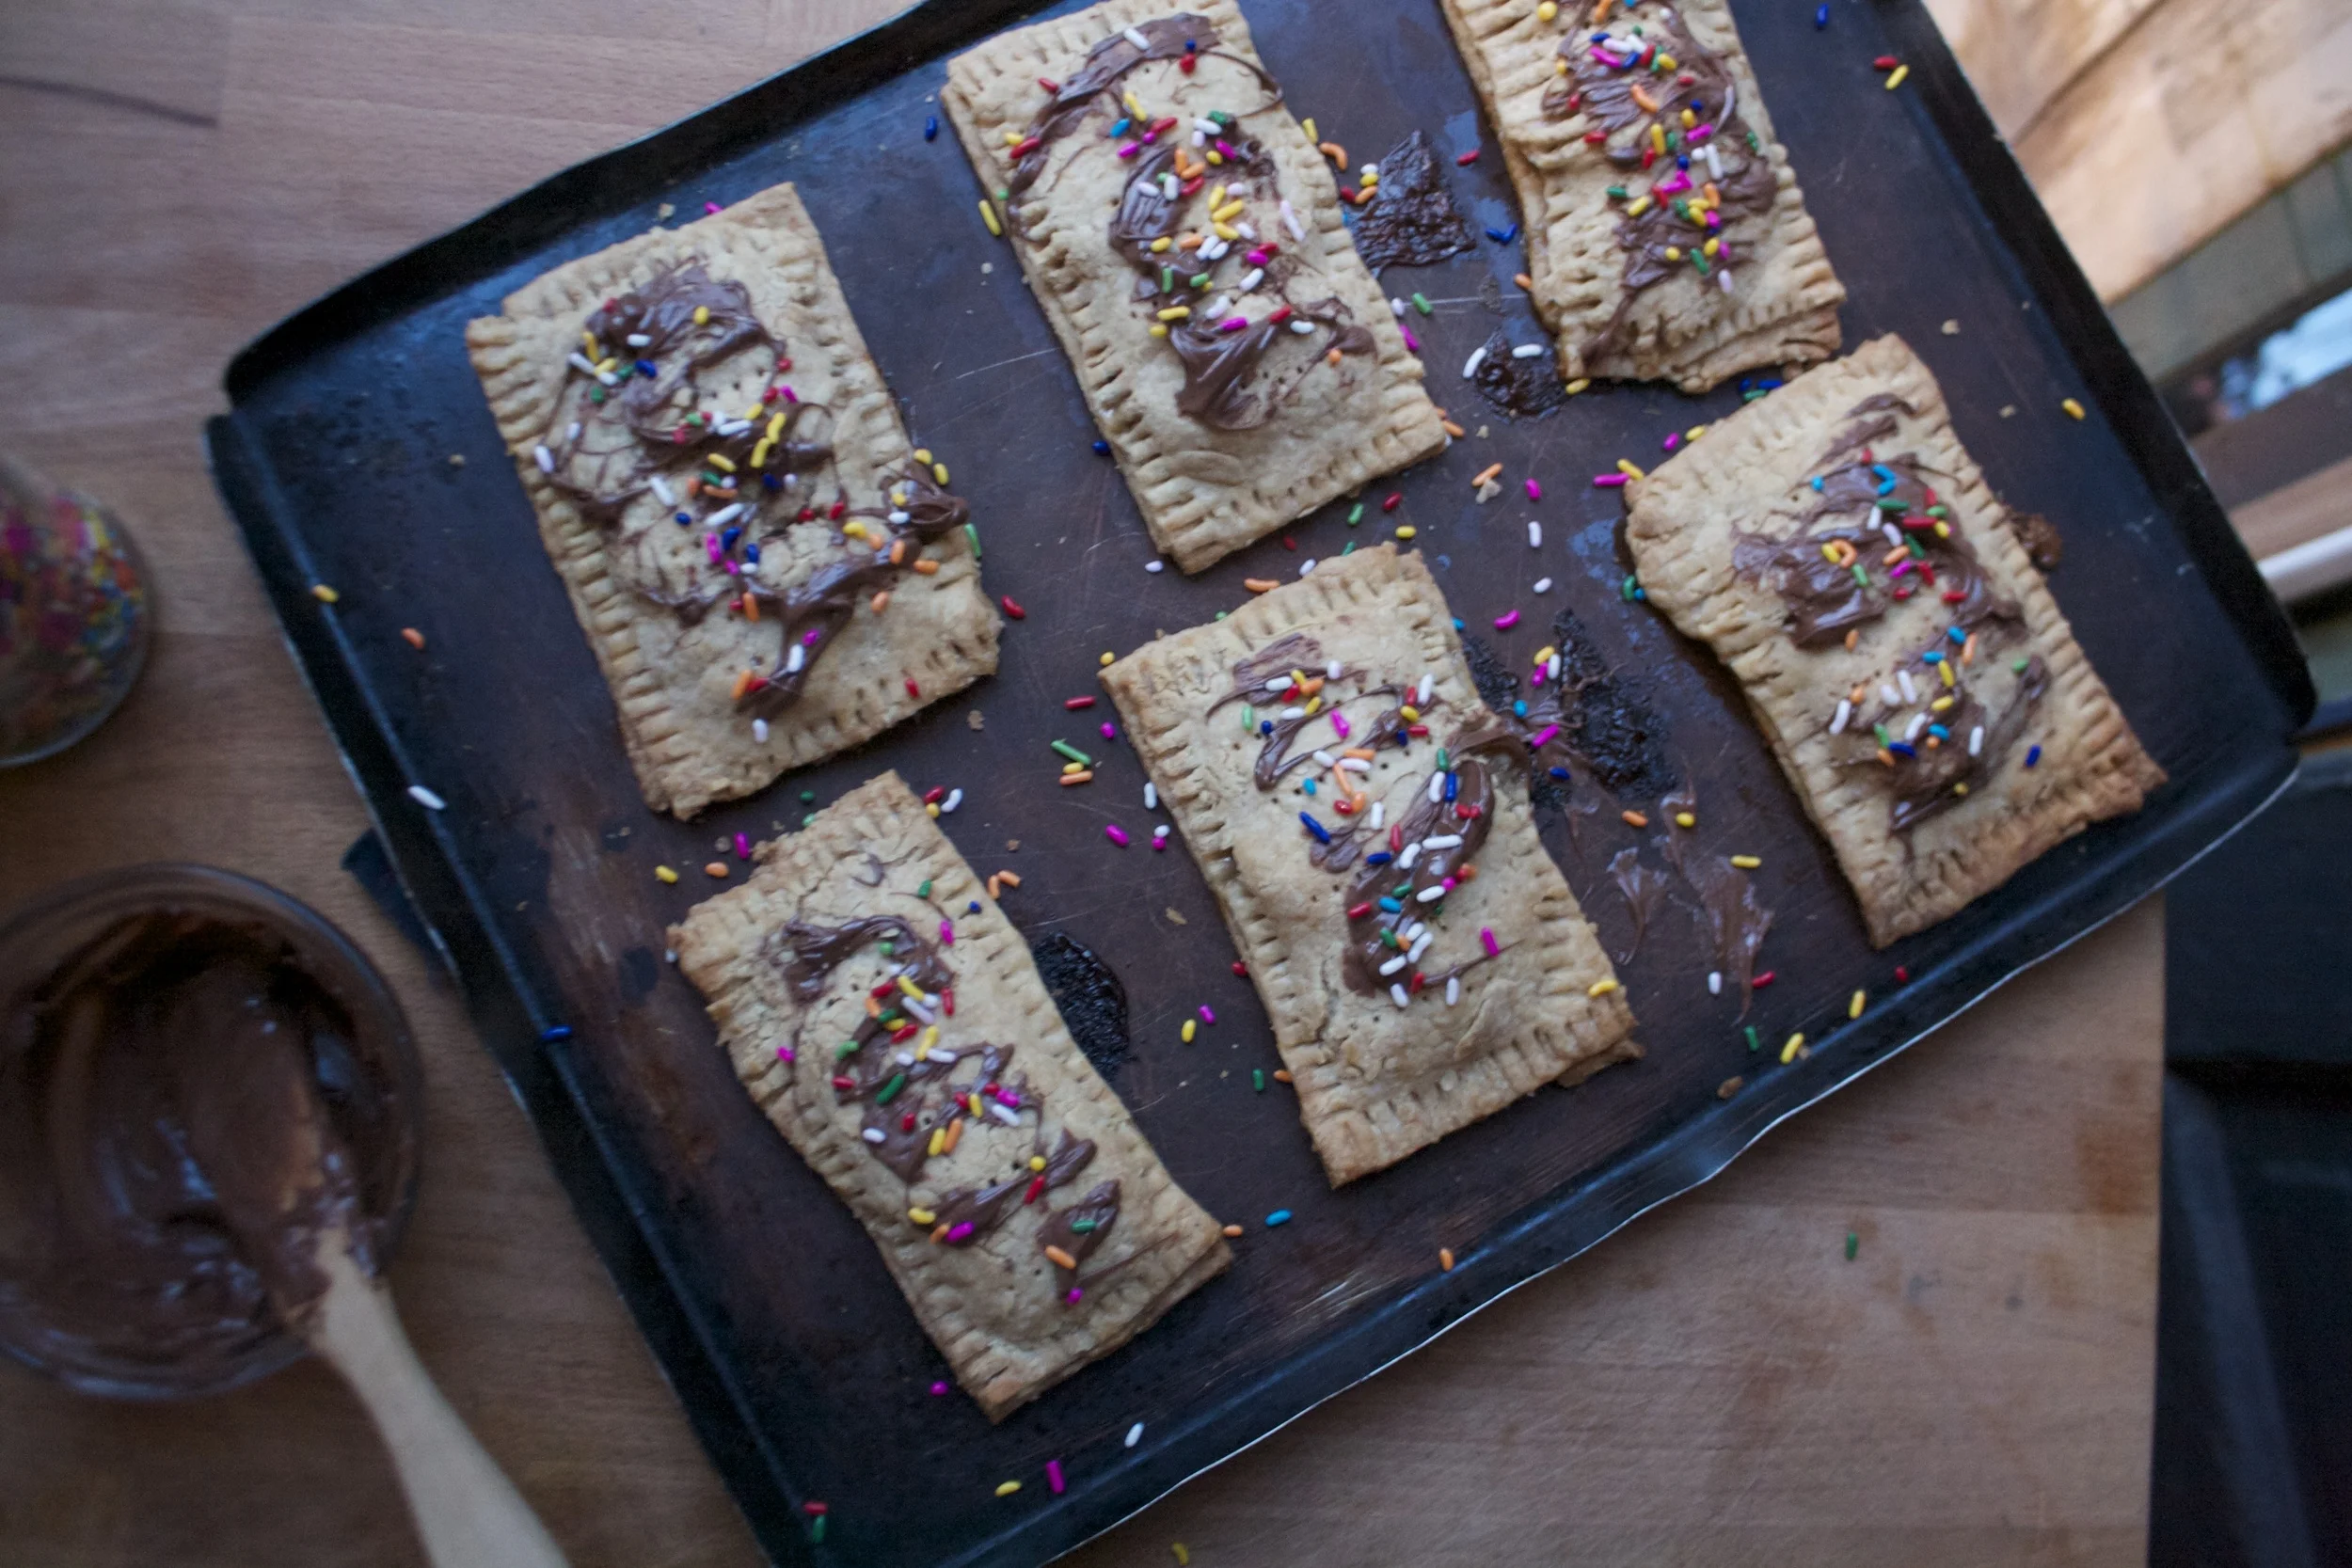
So anyways, lets talk about food. Right before we left we had a sleep over with the littles. I figured I would make them something kind of special for breakfast because I am awesome ans because we weren’t going to see them for a while. Pop tarts. Who doesn’t like a pop tart?%u00a0 These littles, they love them a pop tart. Not that long ago they went through a phase where all they wanted to eat were pop tarts (I did not support that habit). So that is what I made (a bit more healthy then the store bough ones) and yup, they were amazing (so I was told) and devoured with every sprinkle eaten and fingers licked clean. I mean, peanut butter anything is good, and banana with that is even better. Stick a little chocolate and sprinkles into with that…Everyone can get down with these
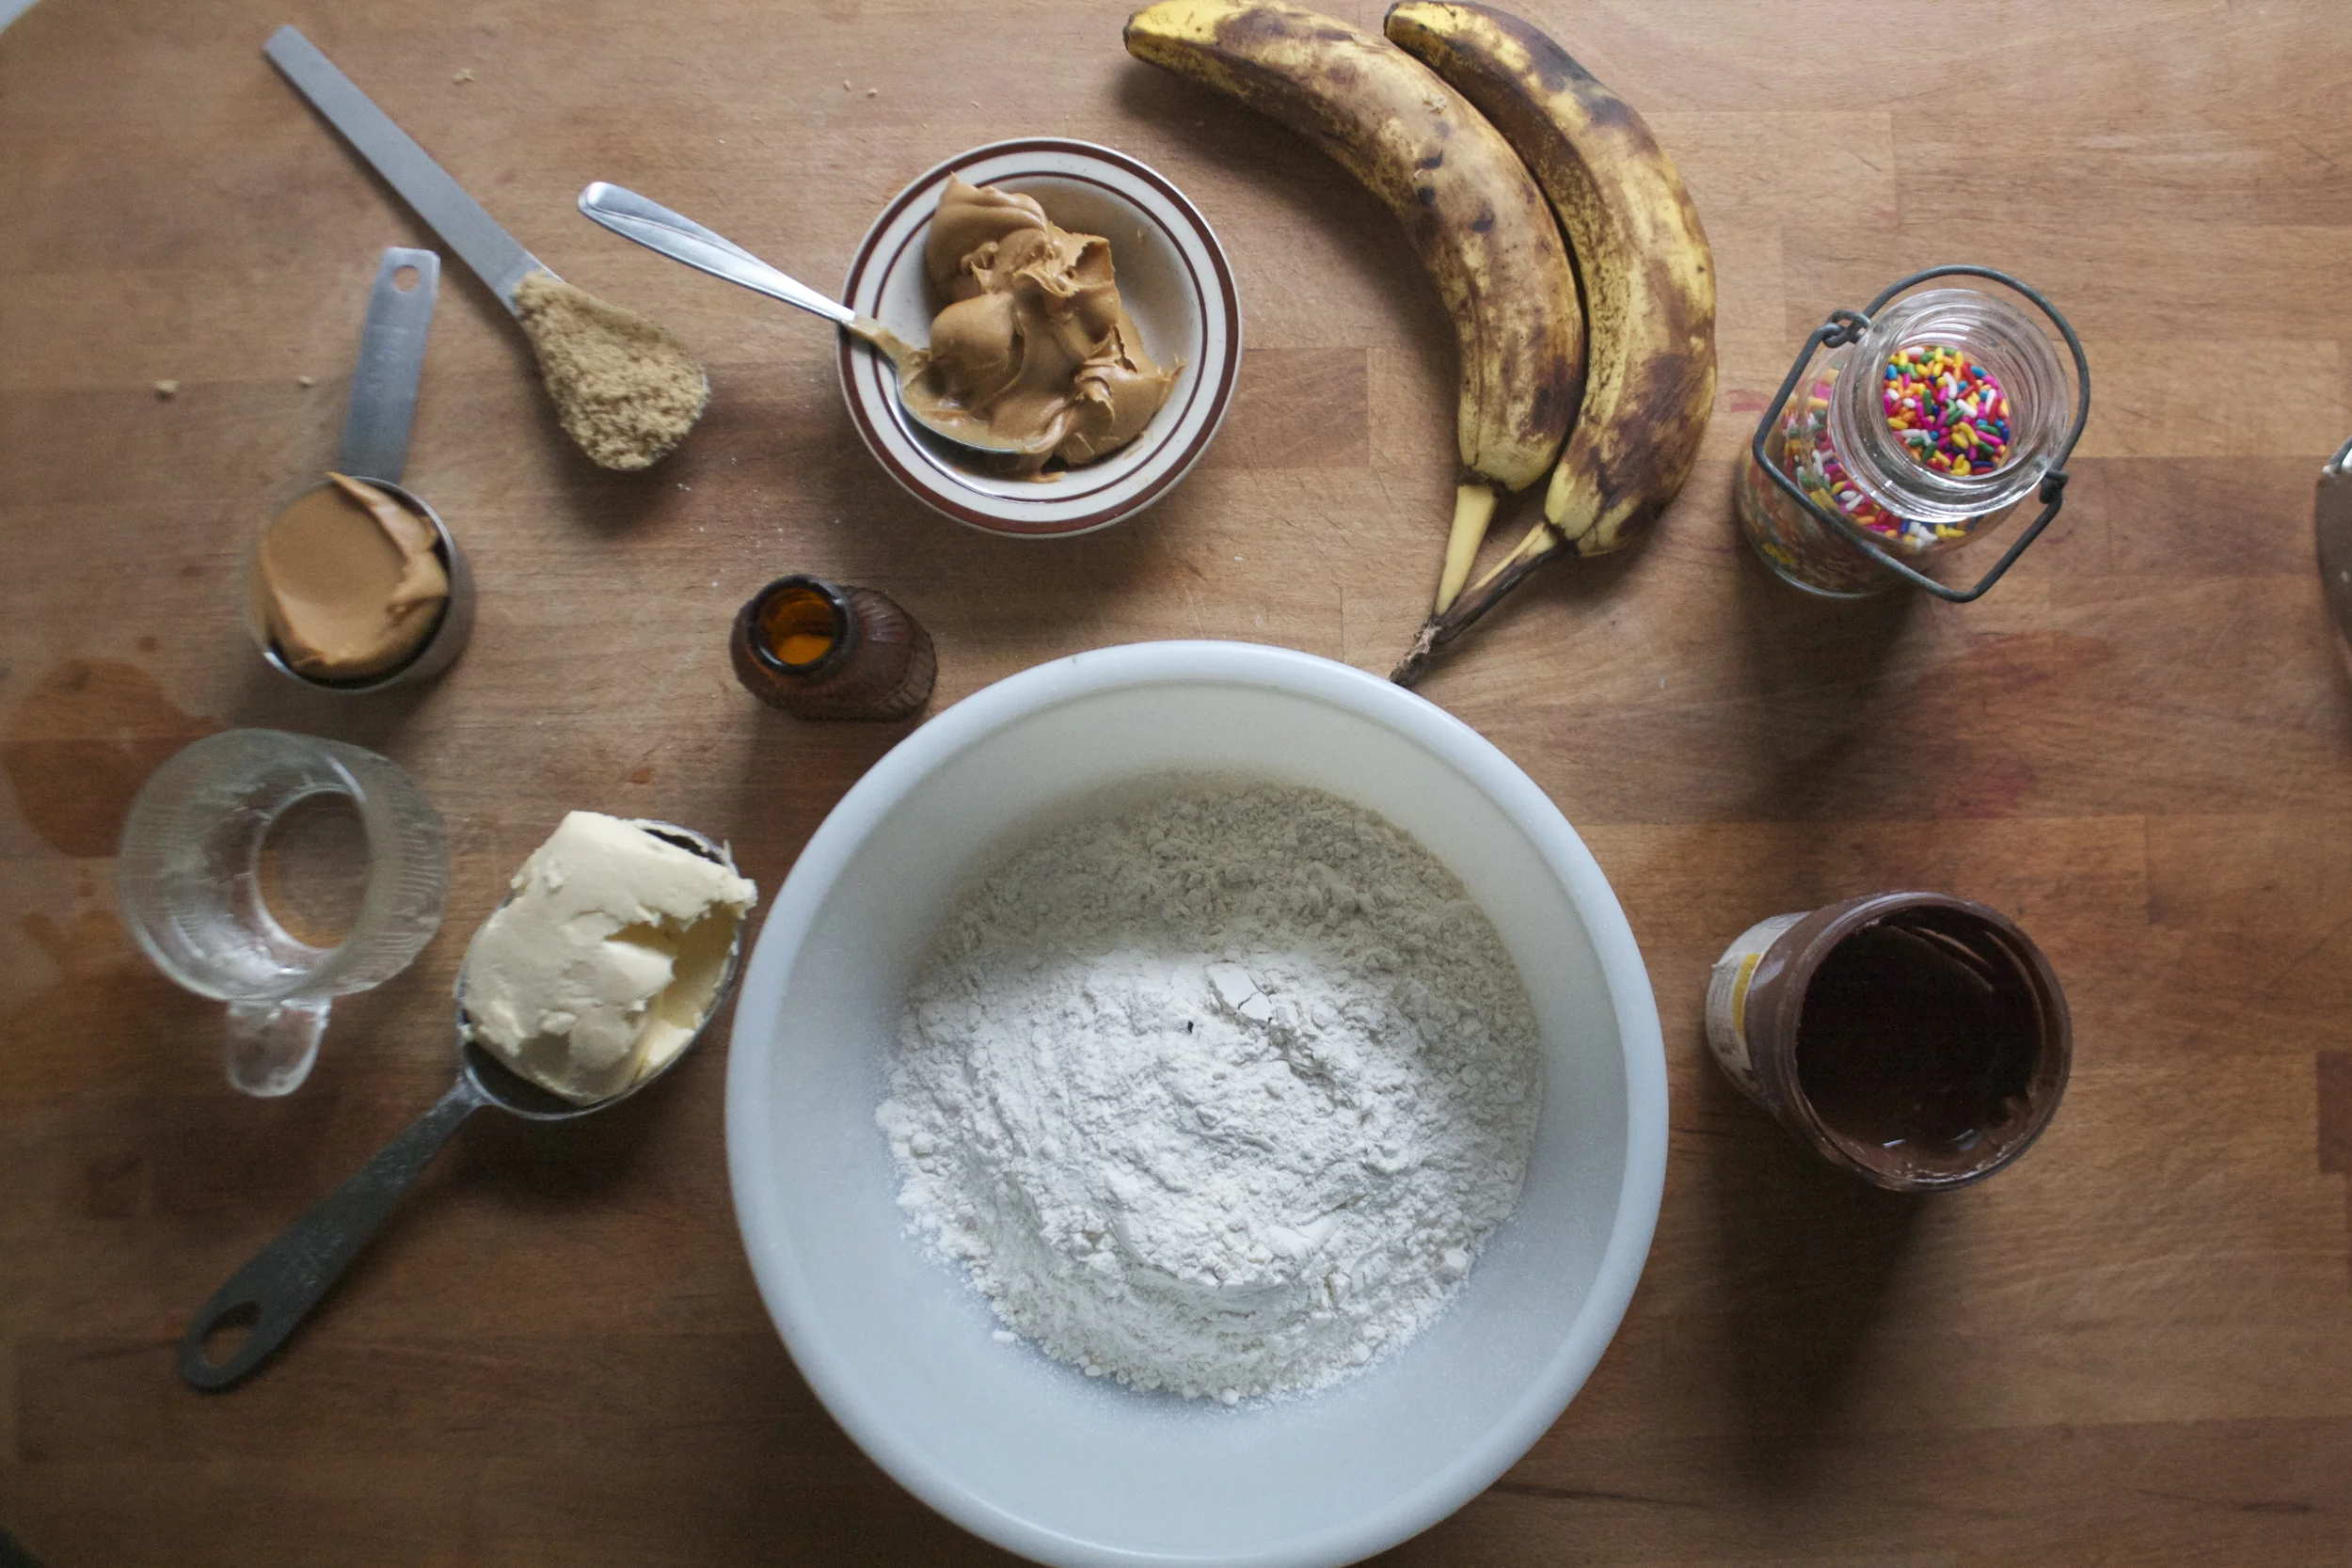
The stuff. For the crust we need some flour, a little brown sugar, salt, cold earth balance, some peanut butter, and some ice cold water. For the filling, just some more peanut butter and a couple of ripe bananas. And completely optional( kinda) chocolate spread and sprinkles to top with afterword.
Start with the crust. A big bowl with the flour, salt and brown sugar that all gets whisked together. Then cold peanut butter and earth balance go in.
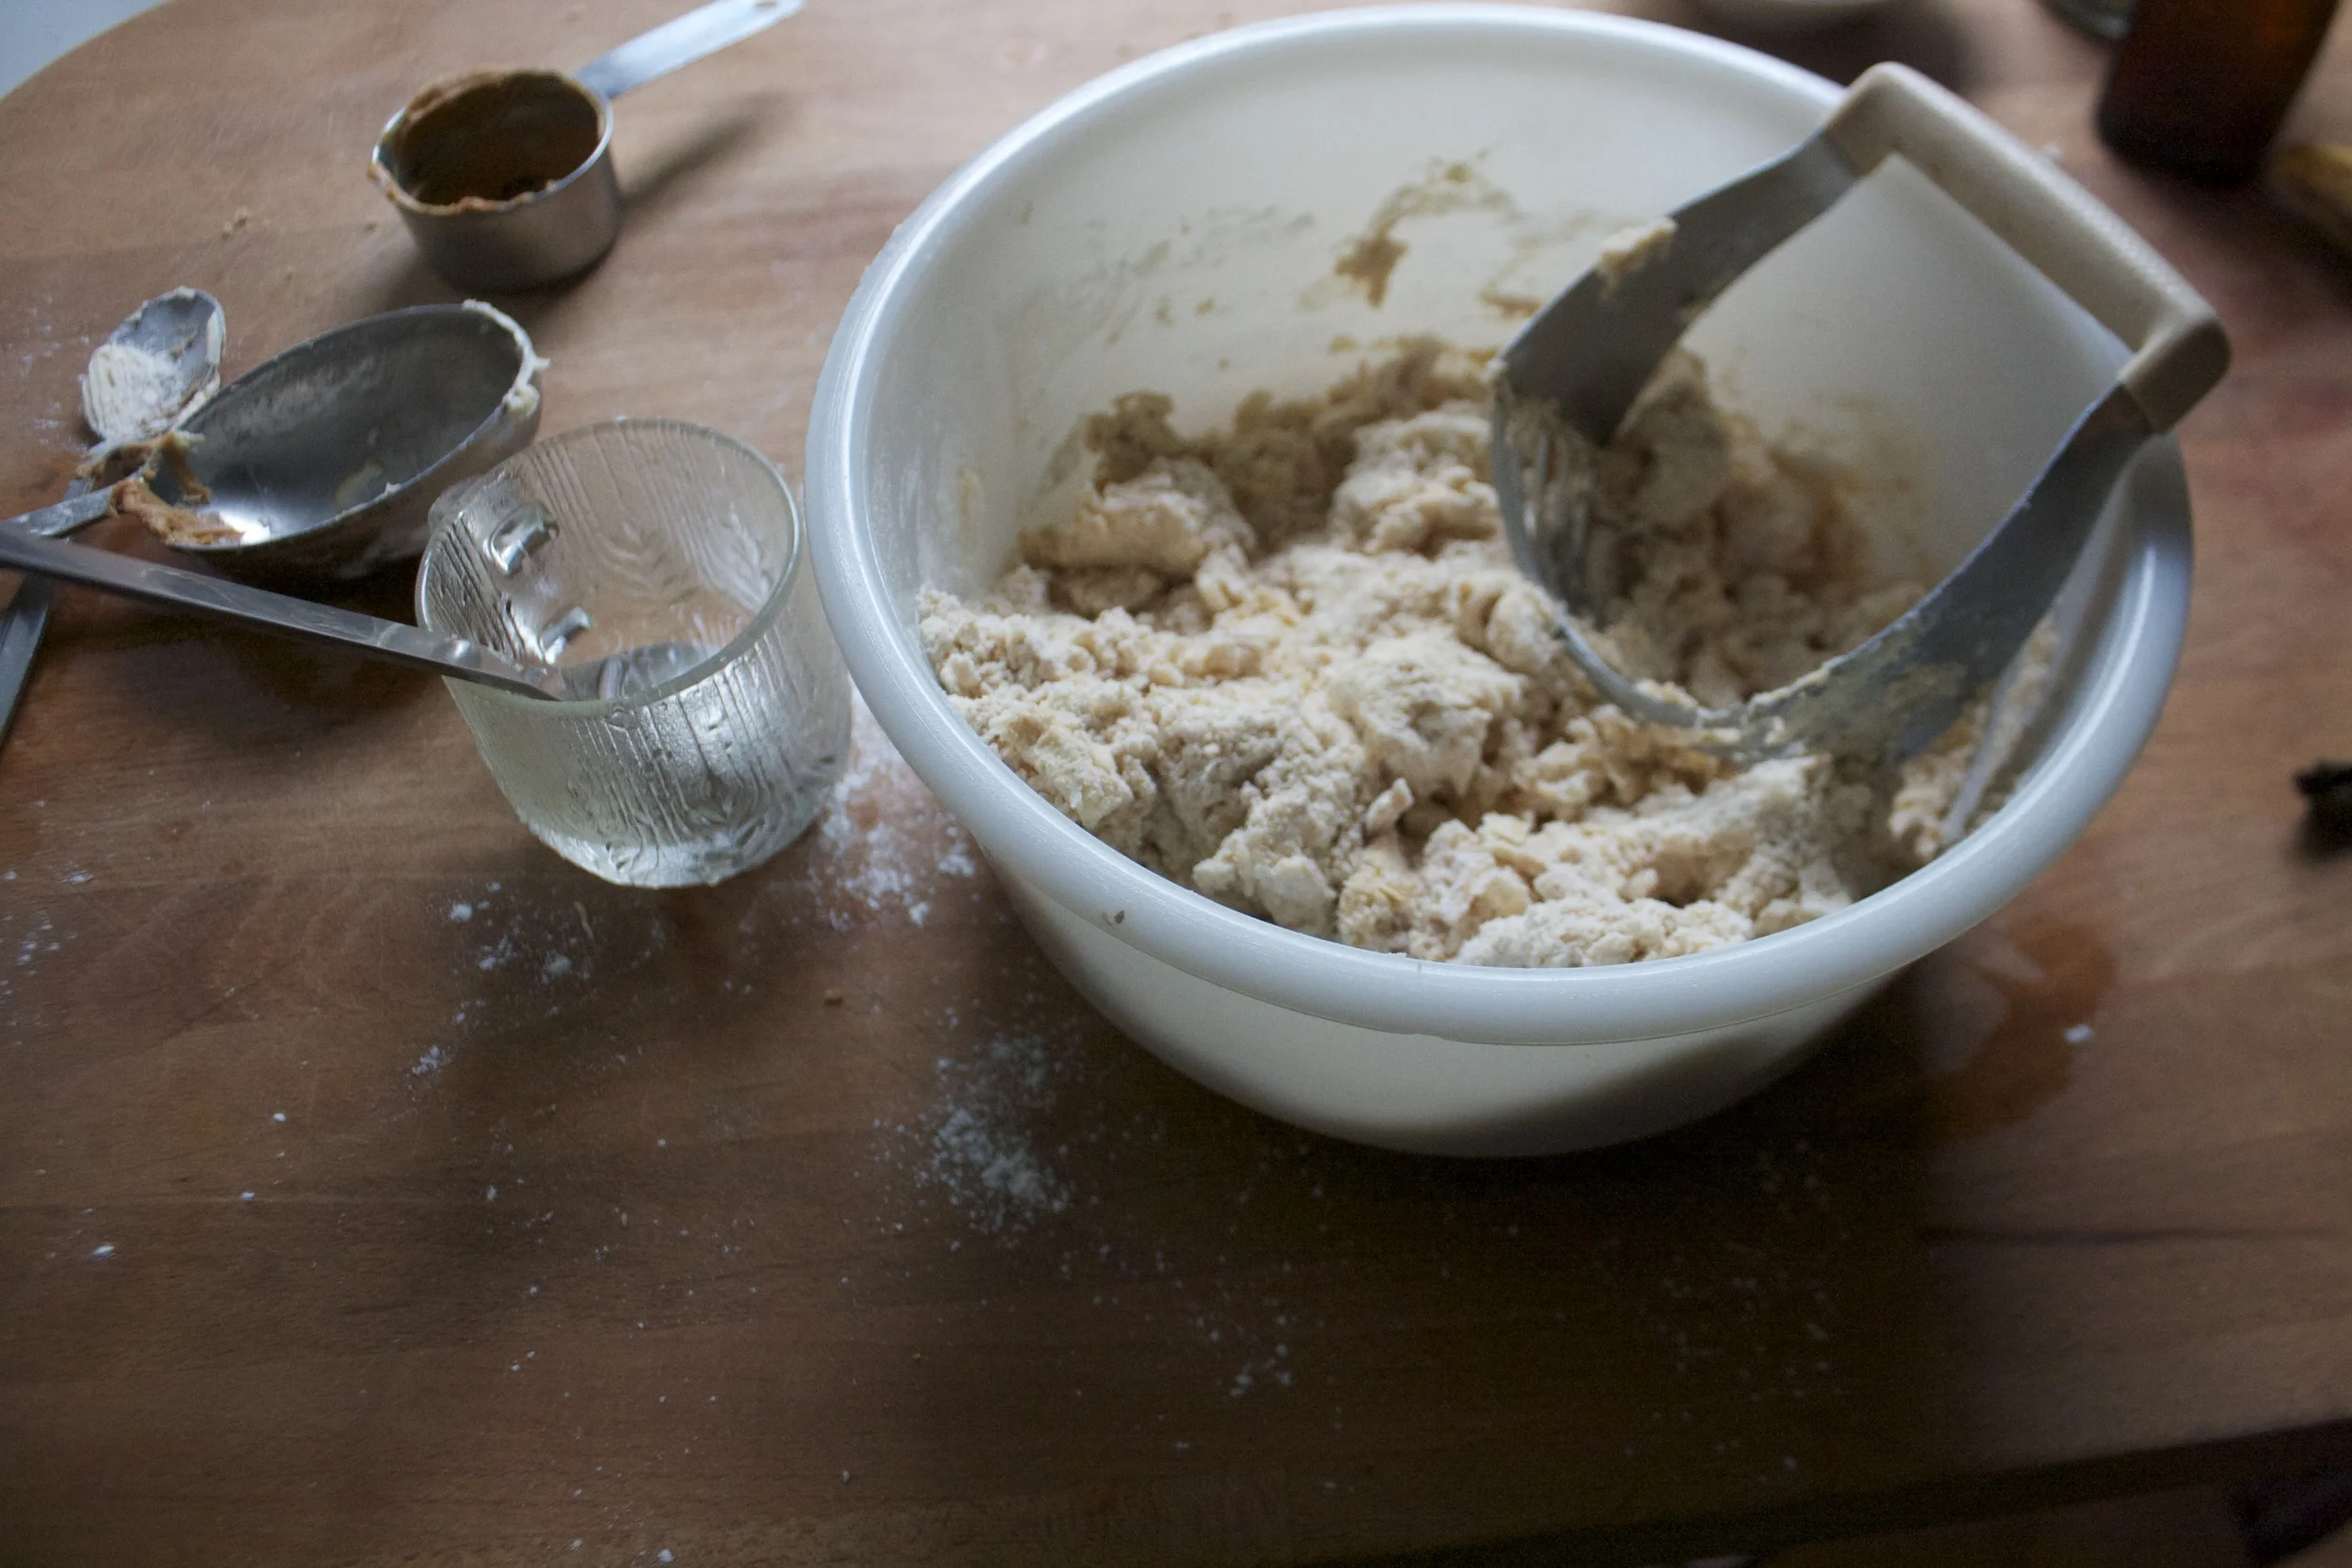
Just like a normal pie crust, use a a pastry cutter or fork to cut in the fat until a crumbly mixture forms.
Then, a few tablespoons at a time, add in he ice water until the mixture starts to come together into a dough.
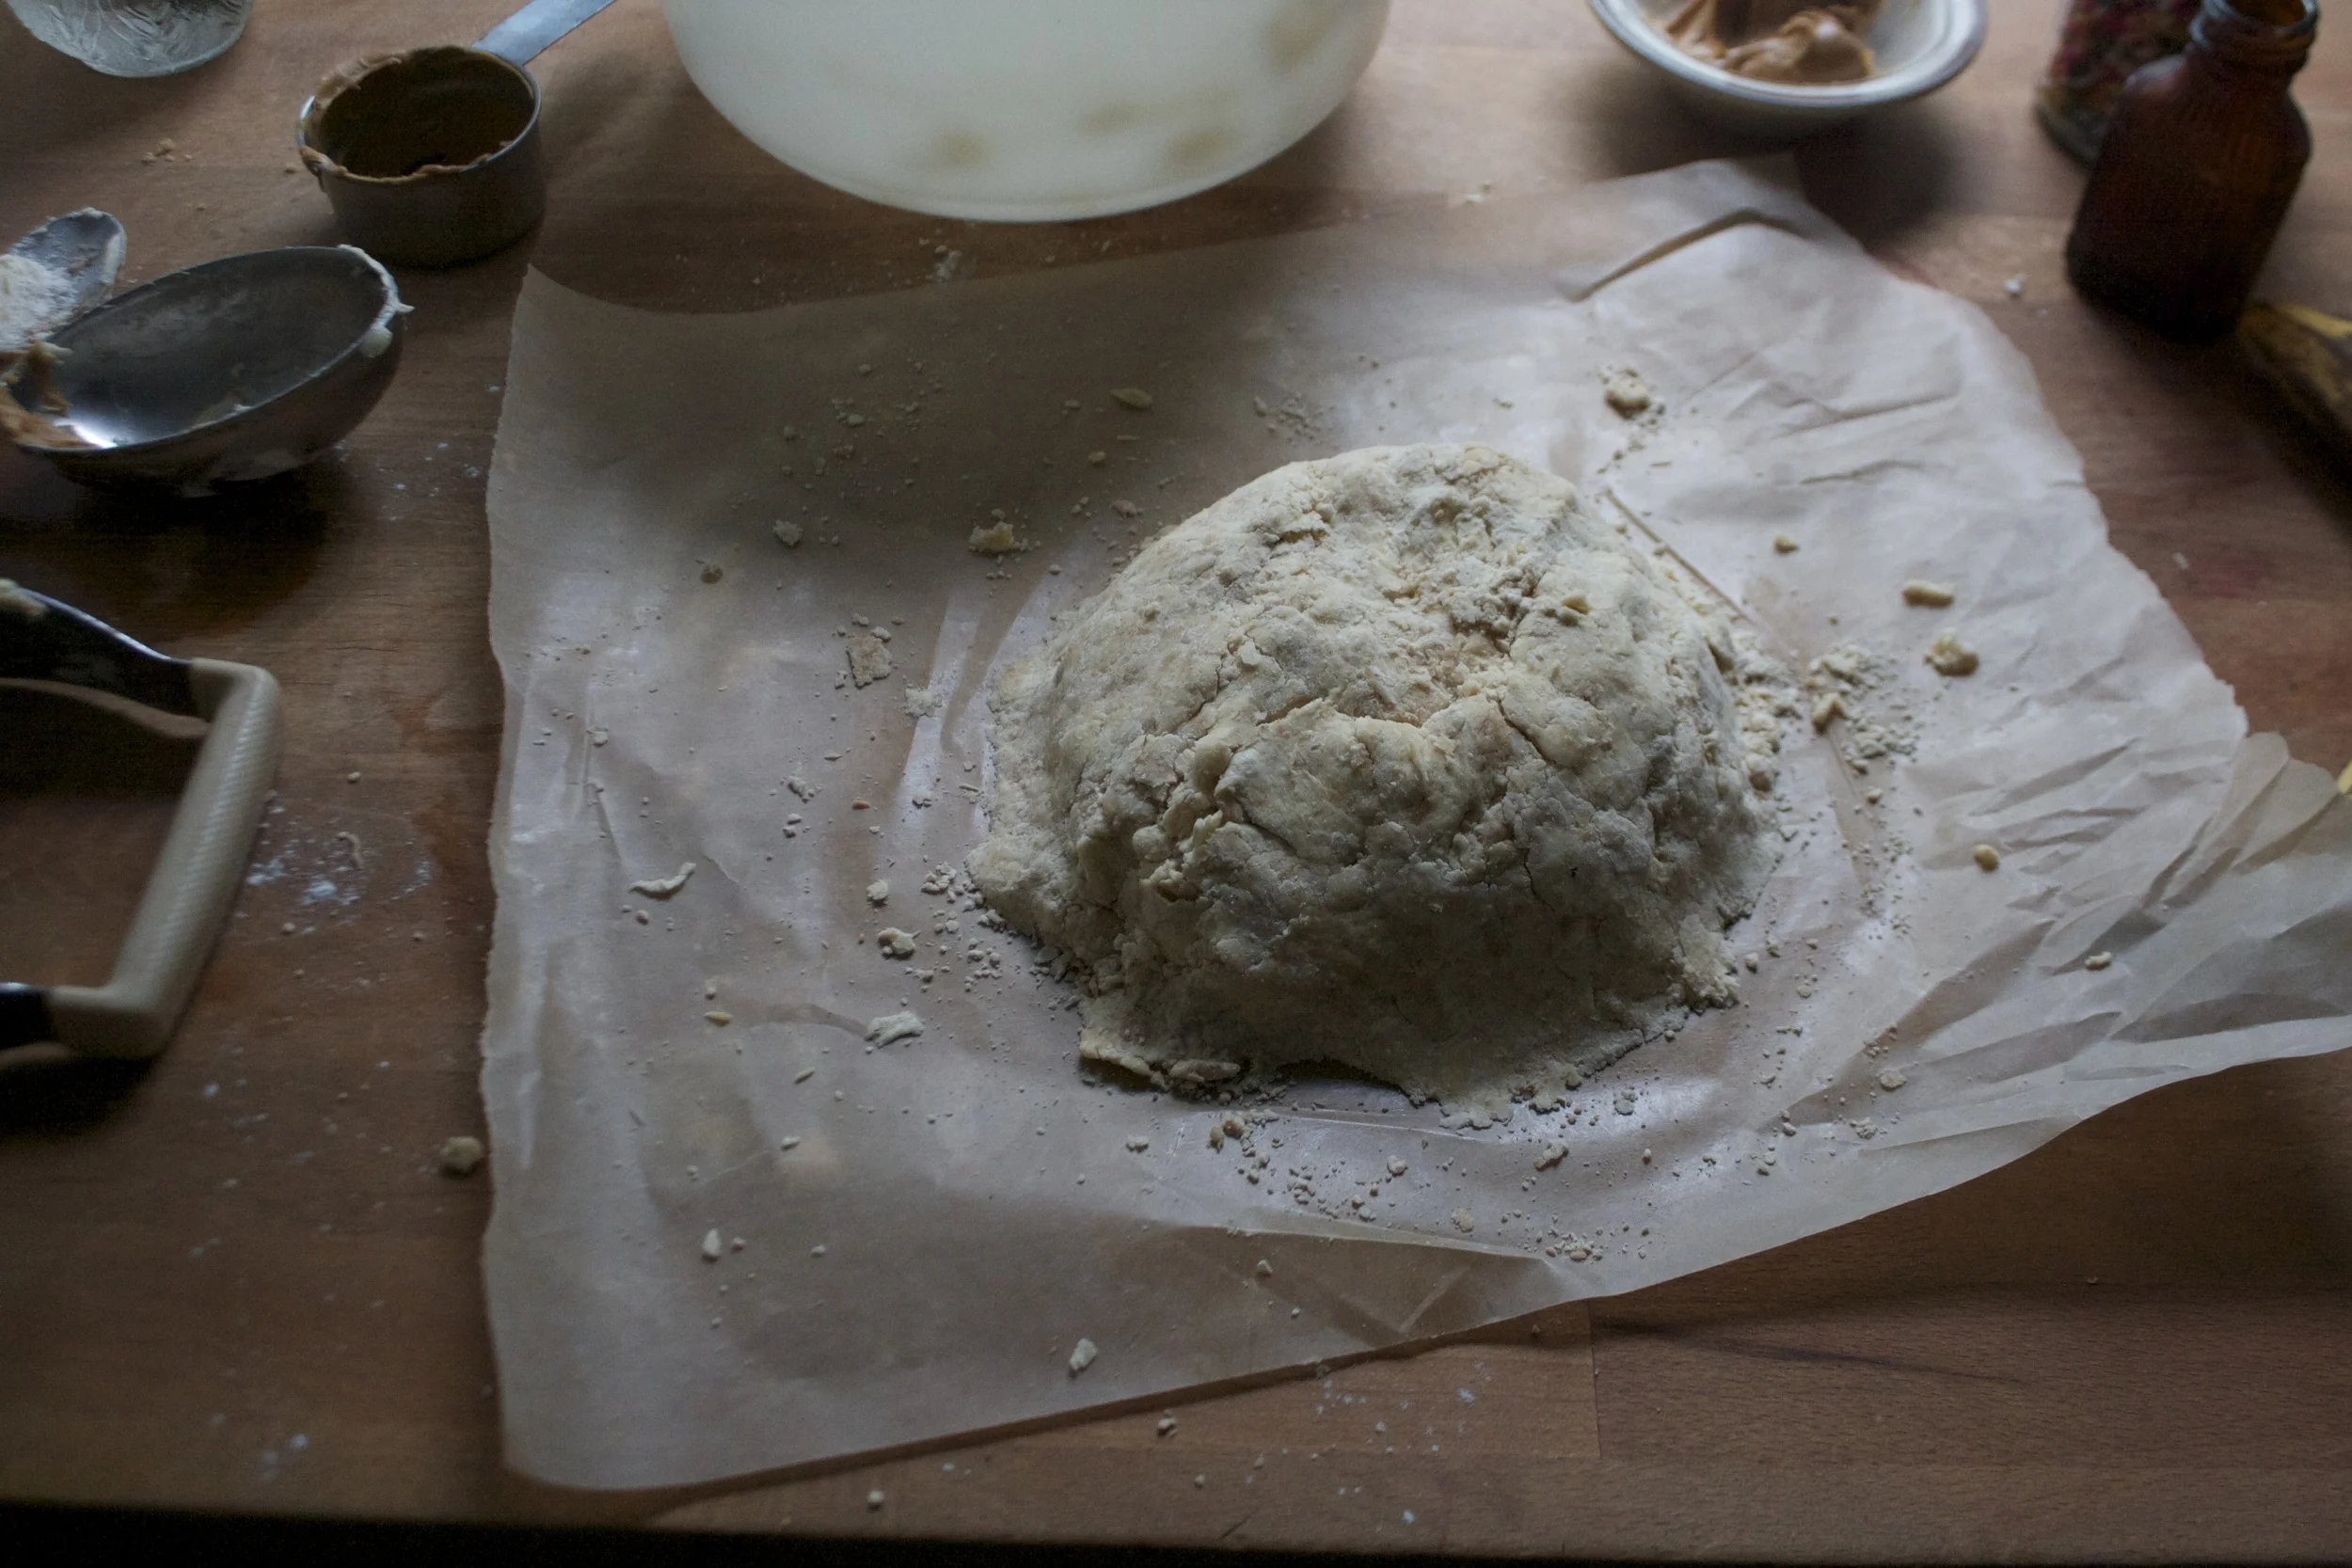
Dump it onto a piece of wax paper or plastic wrap and gather it together into a ball. Wrap it really tight and stick the dough in the fridge (for a least an hour, but a few hours or over night would be good)
When the dough has chilled and you are ready to proceed, grab the dough and roll it out onto a lightly floured surface. You want to try and keep it a kind of a rectangular shape and rolled about 1/2 an inch thick.
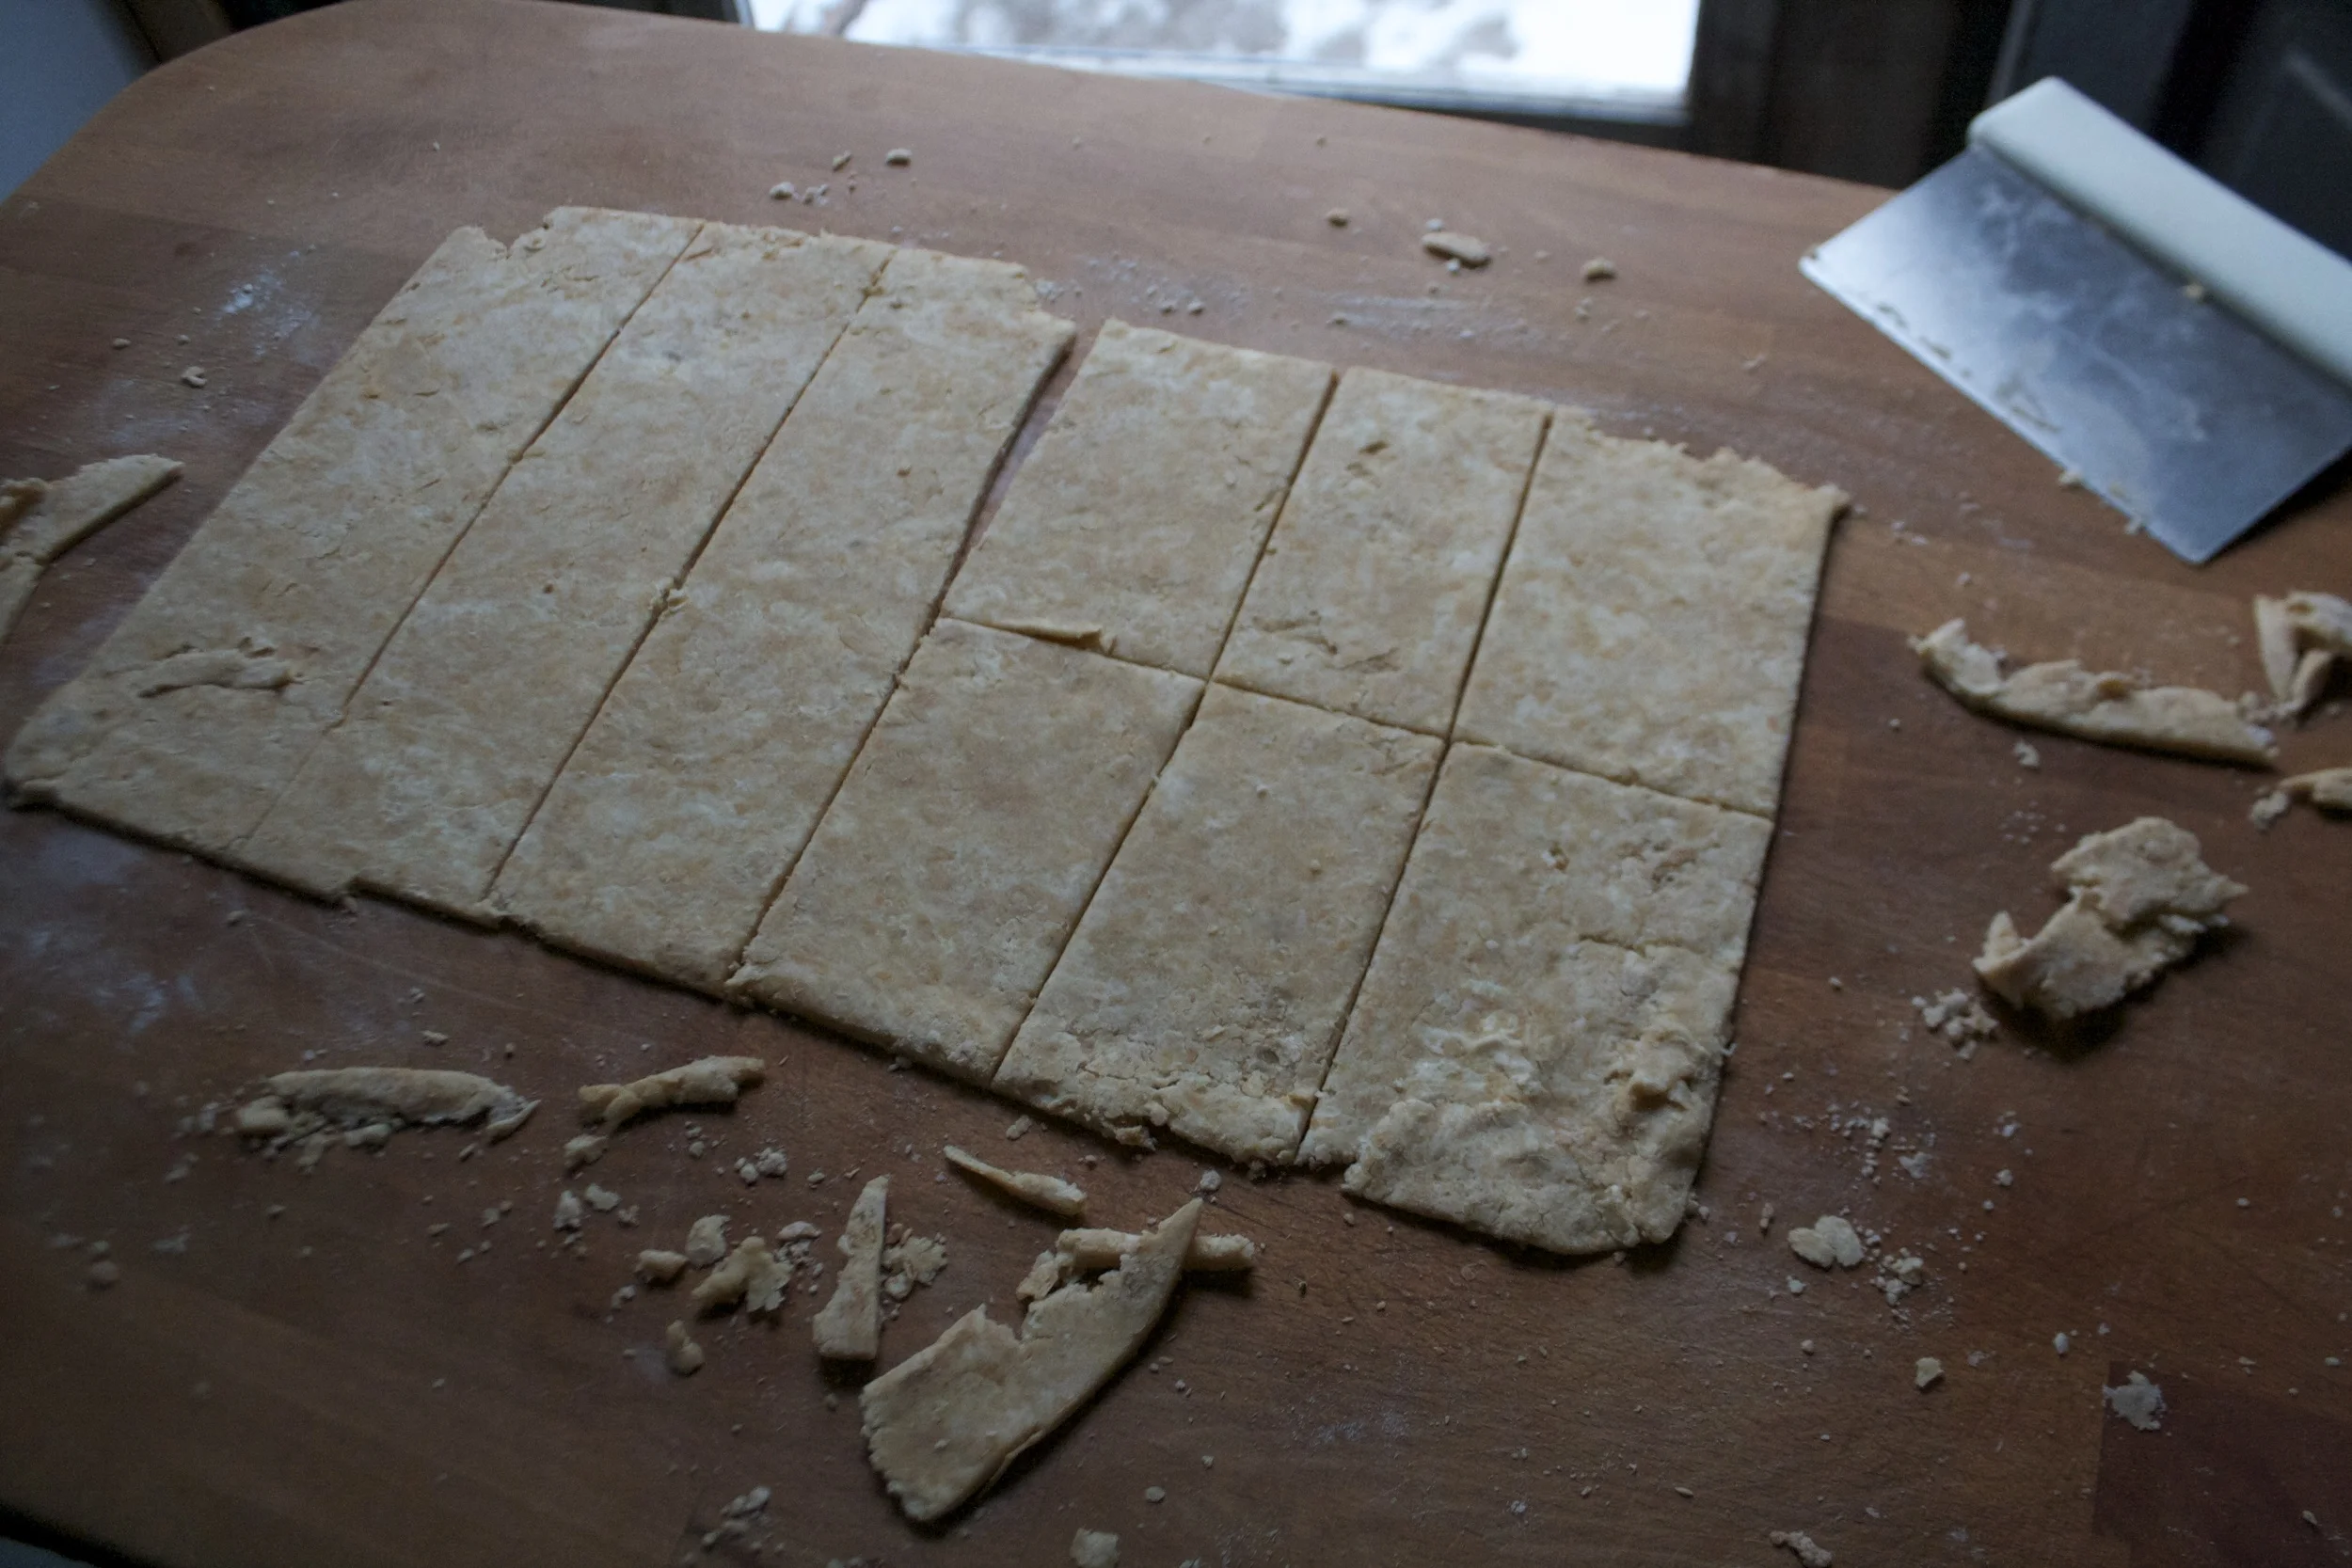
Trim the edges (bake off scraps for a little extra treat) and cut the dough in half length wise then in 6 equal sizes width wise.(you should wind up with 12 pieces)
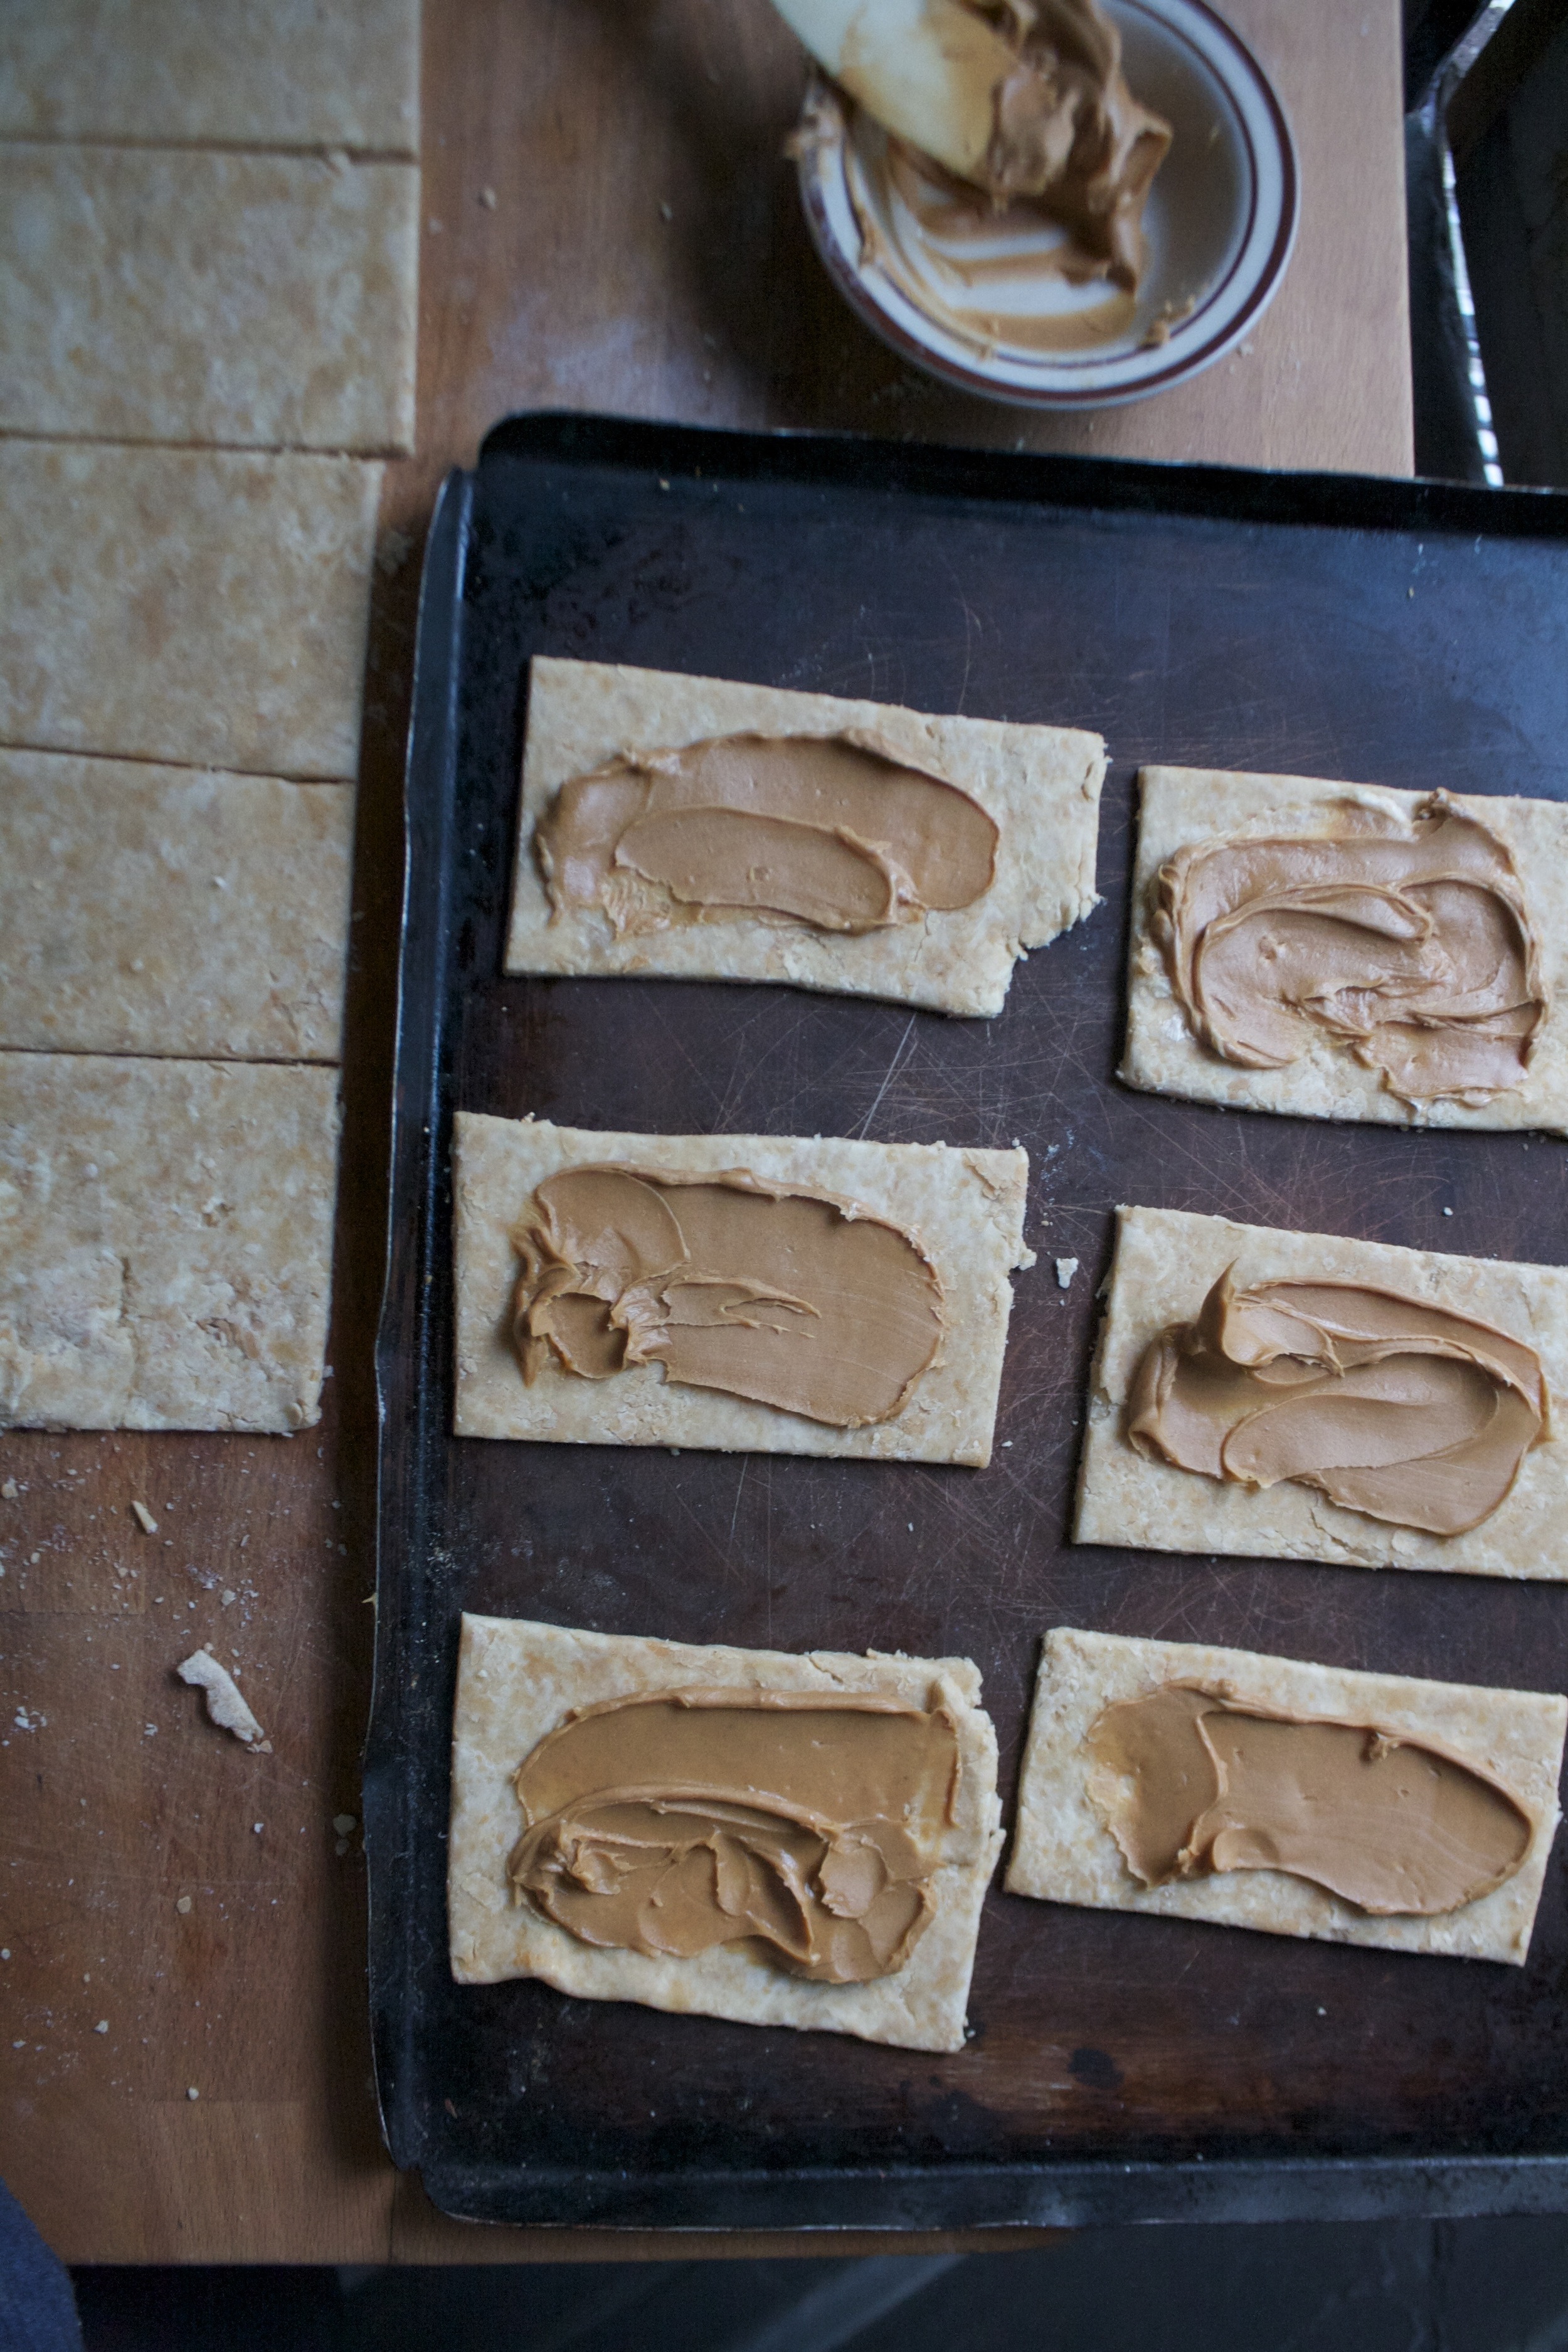
Take one side of each pair and place on a a baking sheet. Smear each piece with a good glob of peanut butter but leaving a little boarder.
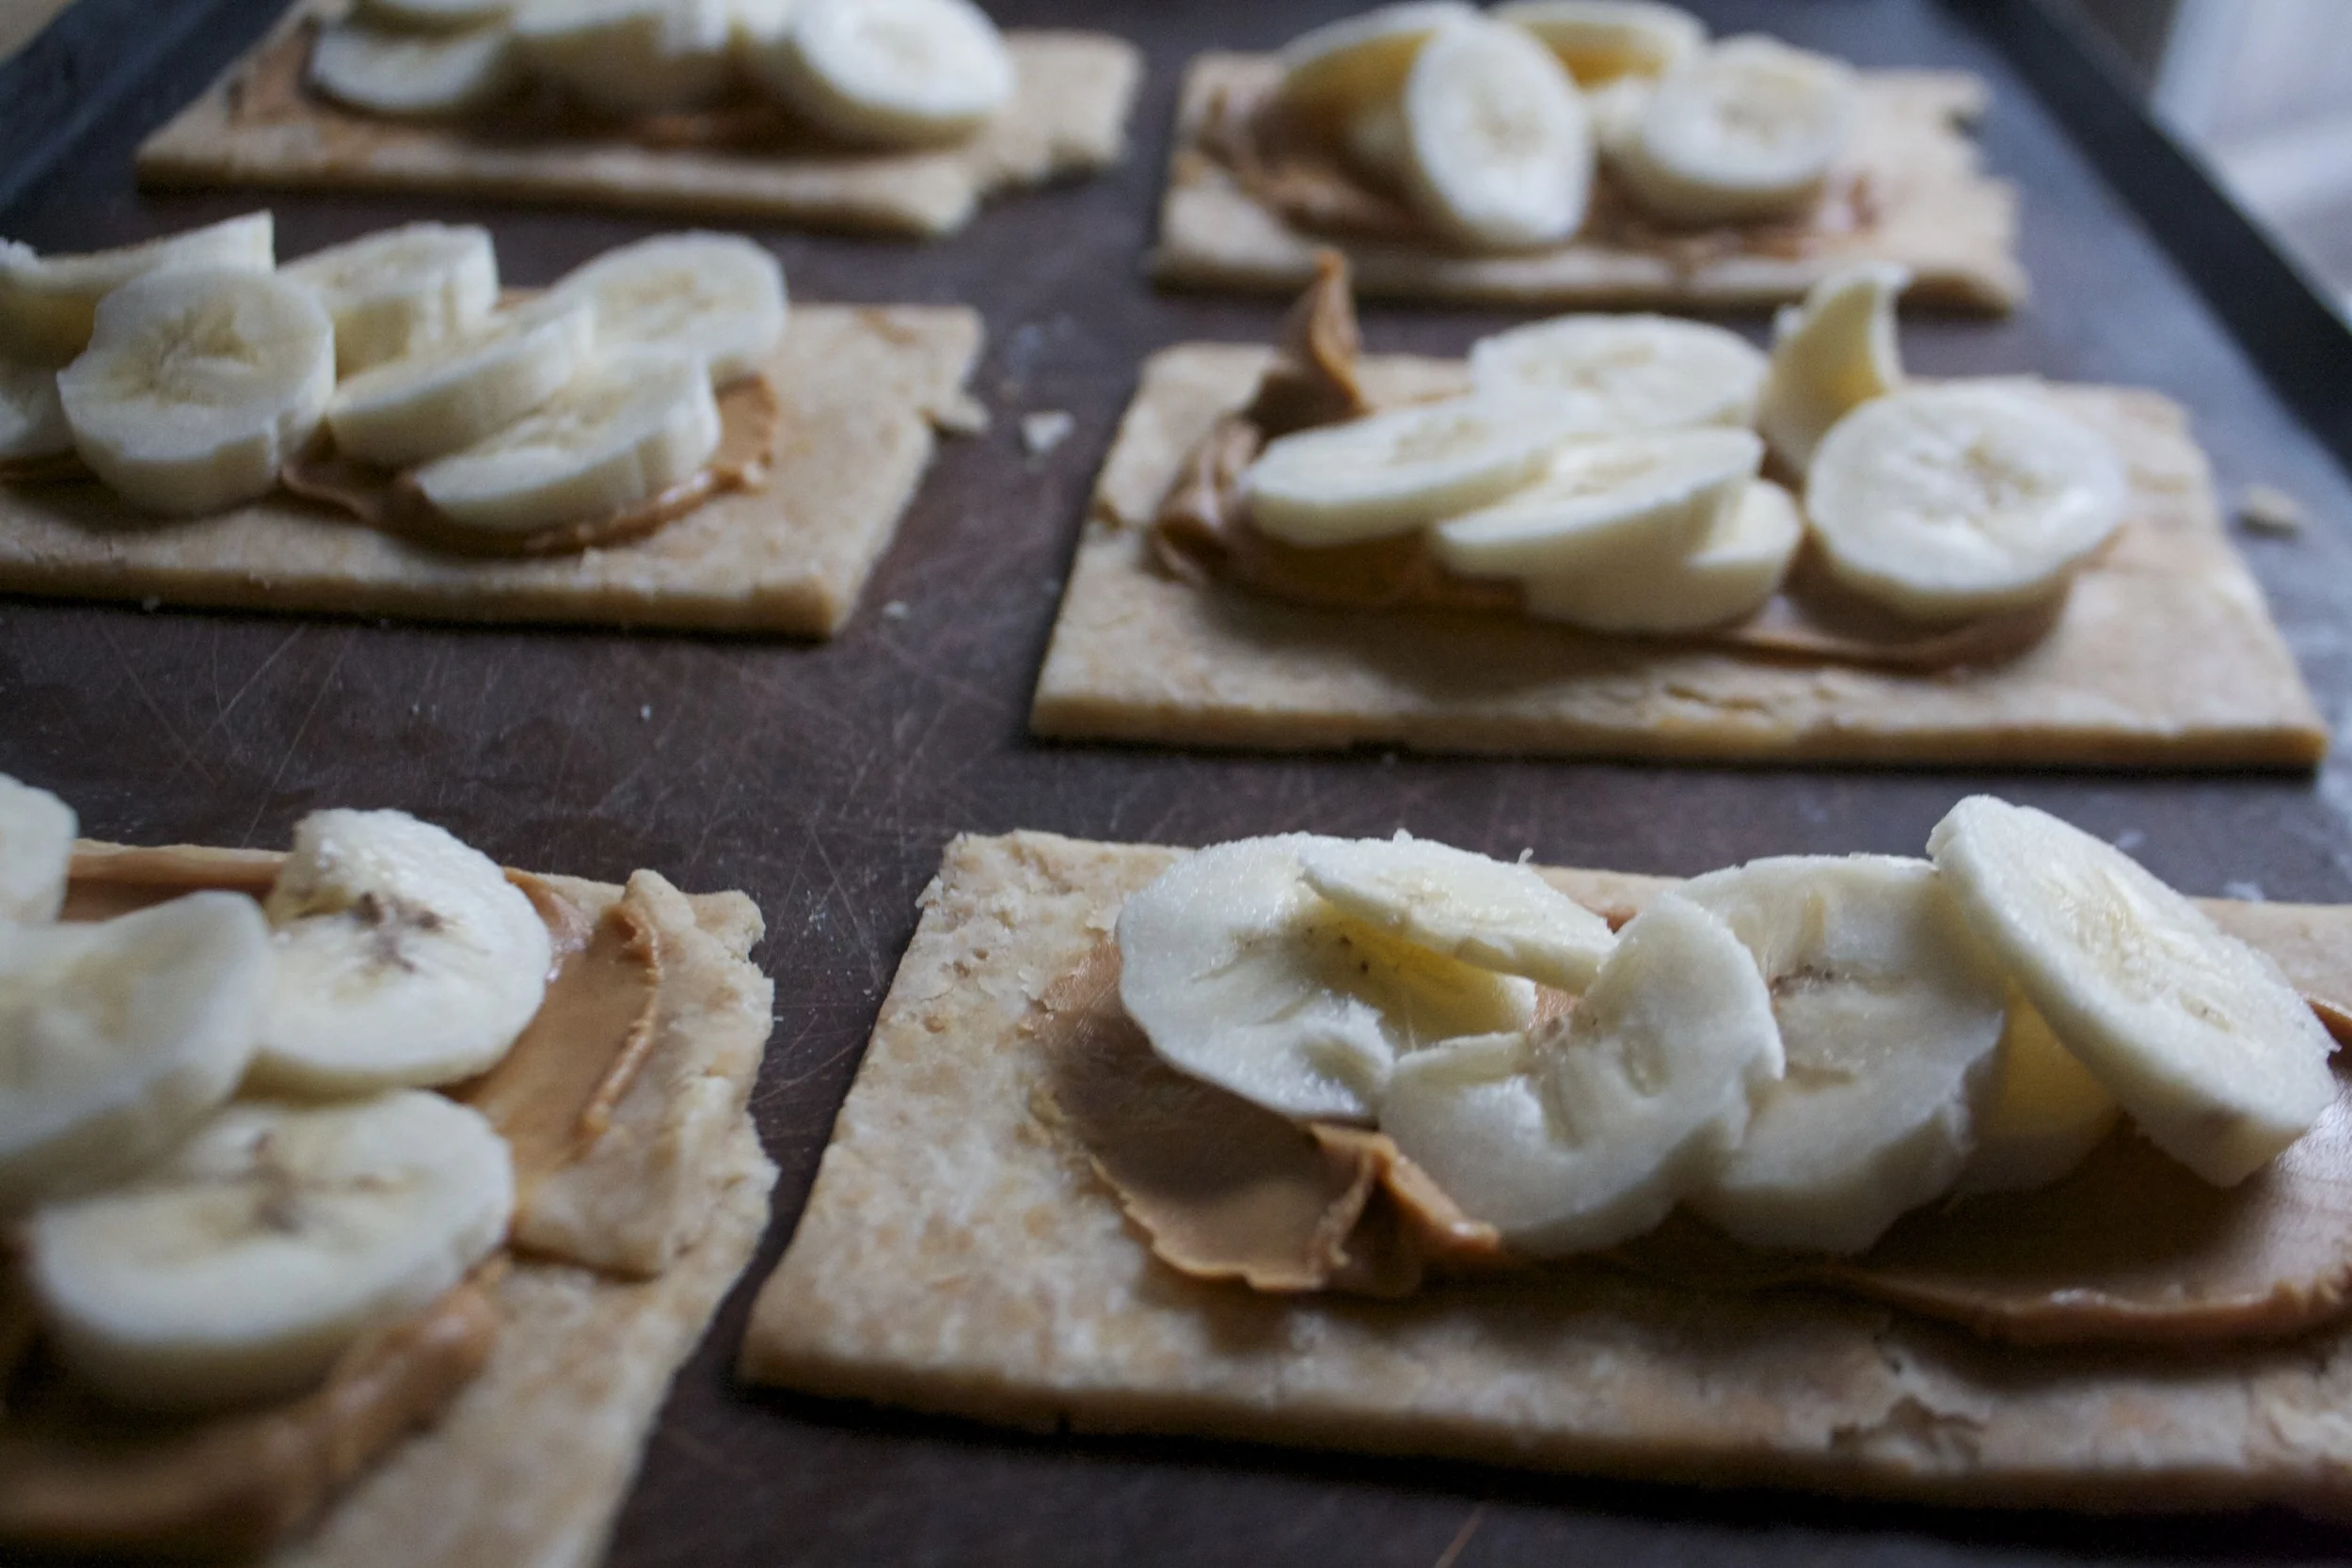
Then slice up the bananas and layer those on of of the peanut butter.
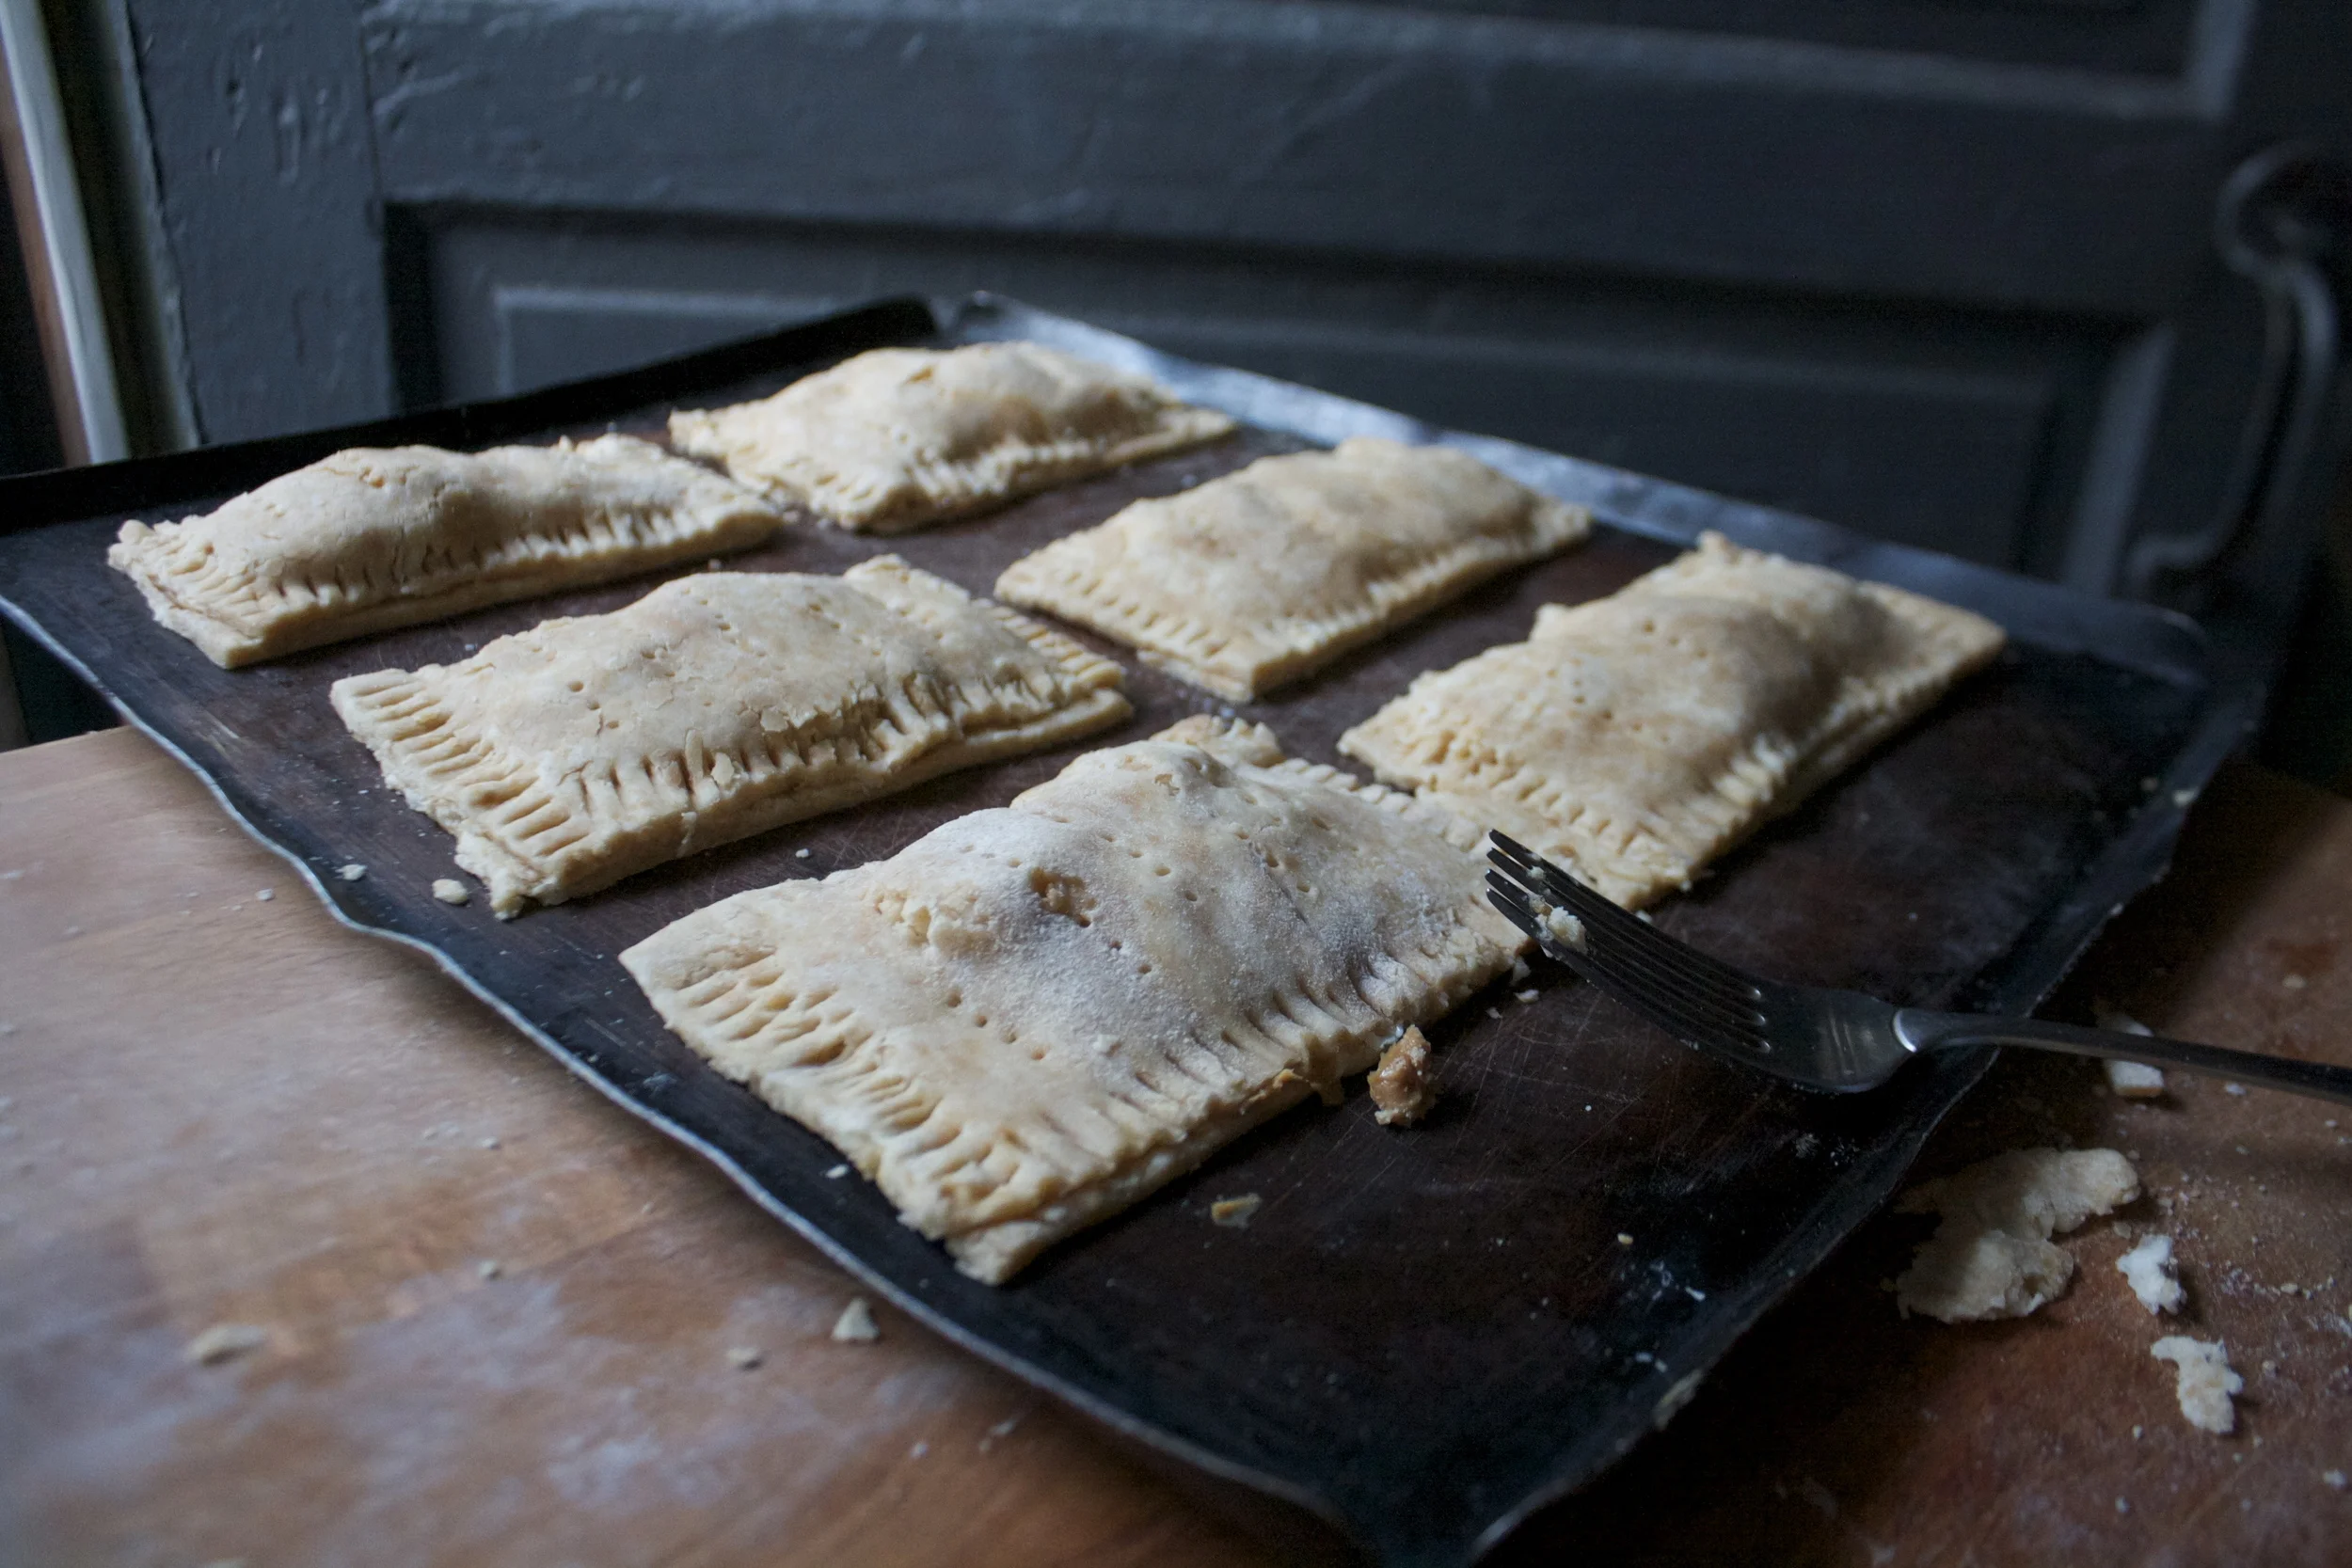
Place the tops onto the bottoms (gently) and with a fork, crimp the edges of the tarts closed. Then take the fork and poke a few holes into the tops.
Now into the oven they go.
After about 25 minutes or so, you end up with the most magical smelling, golden brown pop tart.
And because it’s a pop tart, you must drizzle on a little some thing something (nutella or chocolate spread of any kind) and sprinkles. Do not forget the sprinkles.
Ready for eating.. Peanut Butter banana greatness. Best served a little warm and with some type of cold milk (plant, nut, or cow) and eaten in front of tv watching cartoons.
These will ruin store bough pop tarts for you. Sorry (not sorry)
Have a great day guys.. Really am happy to be back!
-C
The Crust
2 cups all purpose flour
1/2 cup earth balance
1/3 cup smooth peanut butter
1 teaspoon salt
2 tablespoons brown sugar
7-8 tablespoons cold water
The filling
2 ripe bananas thinly sliced
6-8 tablespoon peanut butter
Optional toppings
chocolate spread or Nutella
sprinkles
Start by making the crust. Grab a big bowl, add in the flour, salt, and brown sugar ans whisk together. Then add in cold earth balance and if you think of it, cold peanut butter. Cut that into the flour with a pastry cutter or a fork and when the mixture is kinda crumbly start adding in tablespoons of ice water until the mixture starts to come together then dump the dough onto a piece of wax paper or plastic wrap, press together, wrap it all up, and stick it into the fridge. Let chill for at least ans hour or up to over night.
When you are ready for pop tarts, preheat oven to 375 and grab dough from fridge and roll it out on a lightly floured surface,%u00a0 into a large, 1/2 inch thick rectangle. Trim the sides of the rectangle and cut in half length wise. Then cut that into 6 even pieces width wise, giving you 12 pieces.
Place the 6 bottom pieces of the dough onto a baking sheet. Smear each piece with about a tablespoon of peanut butter and then top with a few pieces if thinly sliced banana. Place the top pieces on each bottom and using a fork, press the edges of the dough together. Then take fork and pop a few holes into the top to let the steam escape.
Place into the oven and bake for about 20-25 minutes or until the tarts are nice and golden brown. Remove from oven, drizzle with nutella or chocolate and cover with sprinkles.
Eat right away with a tall glass of some kind of milk
Any left over (if that happens) can be stored in the fridge for a day or two or frozen to be enjoyed whenever the craving hits you.
My winter farm share is coming to an end this week. One more pick and then a three week stretch until the summer share starts… WHAT AM I GOING TO DO!!!
Stock up as much as I can is what.
I have been strategic about the roots and veggies that I have chosen to bring home the past few weeks.(My farm lets you pick what you want) I know what I can buy at the store, things like carrots and potatoes, so I have been passing those up, but the roots like beets and celeriac… I have been bringing home baskets of those and hoarding them in the fridge and basement in preparation for the laps in farm fresh food and knowing that if I want to by these at the store it s going to coast me a million dollars a pound. (a for real million dollars)
Yup, lots of roots around here, especially celeriac root which is fantastic. I am kind of obsessed with celeriac, with its fibrous, knobby exterior, soft but almost meaty texture inside, and a flavor that is close to celery but so much better. I don’t know why it has taken me so long to do a posting featuring this amazing root vegetable (I eat it almost every day)
So here, an amazingly tasty, hearty but not heavy, celeriac recipe. Perfect for spring and the change into summer…. Mustard roasted celeriac with an fanatic split peas gravy that will have you licking you bowl clean.
The stuff….For the split pea gravy we have a carrot, a parsnip and a large onion chopped into small chunks. Salt, thyme, a bay leaf and of course the split peas. Then there is the celeriac root* sliced into 1/2 inch thick rounds and some plain old yellow mustard .
*Note. I don’t peel my celeriac root. I really enjoy the fibrous exterior but realize that some don’t(The mister does not like it) so peel it if you want.
Toss the chopped parsnip, carrot, onion and the spices into a pot on medium heat and let veggies sweat a few minutes until tender. Add in the split peas and enough water to cover everything. Turn pot on high and bring to a boil, then cover and turn to low. Make sure to give the pot a good stir ever few minutes and add more water if needed
While the gravy is cooking, take the celeriac rounds and brush each side with yellow mustard, sprinkle with pepper, and place on a baking sheet. Stick into the oven to roast for about 25 minutes, flipping the rounds after about 10 minutes.
Once the peas have soften, remove the bay leaf and puree until smooth and oh so creamy. Taste and add more salt and pepper if needed. If you find that the gravy seems to thick, just add in more water until it’s the consistency that you want. The gravy is made, the celeriac is roasted… now we are ready to eat!! Stick the celeriac on a plate and dump good amount of that gravy right on top. Feel free to add a bed of spinach, or a grain or anything you want, because why not, and also some chopped tomatoes for a little acid and prettiness.
Serve with the fanciest knife and fork you can find. Extra yellow mustard and sriracha sauce are great condiments to have close by.
Happy Tuesday!
-C
Mustard Roasted Celeriac with Split Pea Gravy
2 medium celeriac roots
6 tablespoons mustard
1 large carrot
1 medium parsnip
1 large yellow onion
2/3 cup split peas
2-3 cups water
1 bay leaf
2 teaspoons thyme or italian spice mix
salt and pepper
spinach (optional)
diced tomatoes(optional)
Preheat oven to 400 degrees
Small dice the carrot, parsnip and onion and throw into a large pot. Spinkle with salt and pepper, add in the thyme and bay leaf and add a splash of water. Stick on stove on medium heat and stir. Let cook until the veggies become soft and fragrant. Now add in the split peas and 2 cups of water. Bring to a boil then cover and turn heat down to medium low. Let cook until the split peas become tender (about 25 minutes) string on occasion and adding more water if the peas are not completely summered while cooking.
Once the peas are tender, let cool for a few minutes, remove bay leaf, and either dump into a blender or blend with an immersion blender until nice and creamy. If gravy seems to thick, add in more water.
Scrub or peel celeriac roots and slice them into 1/2 inch think rounds. Place on a baking sheet and brush mustard on both sides and spindle with pepper. Stick into oven for about 10 minutes, flip, then back into the oven for another 15 or so minutes, or unit the celeriac is tender.
When the celeriac is done remove from oven and stick a few rounds on a bed of spinach (or not, or any kind of grain or green you like) Top with a hearty helping of the gravy and toss on some chopped up tomatoes.
Let%u2019s talk about how soup is the perfect food. It can be light and fresh, hearty and deep, chunky or smooth. You can eat it with a spoon, or somtime a fork if warranted, or just drink it from a mug. It%u2019s usually a one pot meal, a small pot for one, a big pot for many. Make a pot of soup and eat some now and save some for later. It freezes amazingly well. Got a few extra sad carrots and wilted greens? Toss them into a pot with whatever you have on hand, maybe those veggies scraps and you got yourself a meal. Want something more filling, just add in some grains. Feeling sick, warm soup will make it all better. Feeling fresh and springy, well soup is there for you too. Seriously soup, you can do anything. If I could, I would marry you. %u2665%ufe0f
This soup is one of this velvety smooth, light but rich, delicious beyond delicious soups. A fresh spring time soup. Not to hearty or heavily spiced. Super rich and creamy and flavorful. Bright ass green which makes it amazing in itself, but then with a nice tangy sumac tahini swirl on top, well it is just about the most perfect soup. I made to share, which I did, (and everyone licked their bowls clean) but then hoarded the little bit left over and ate it cold for a late afternoon snack. That is another thing about soup, you can eat is cold and it is still amazing.
Tasty and delicious, and nutritious. This soup does it all.
To the soup!
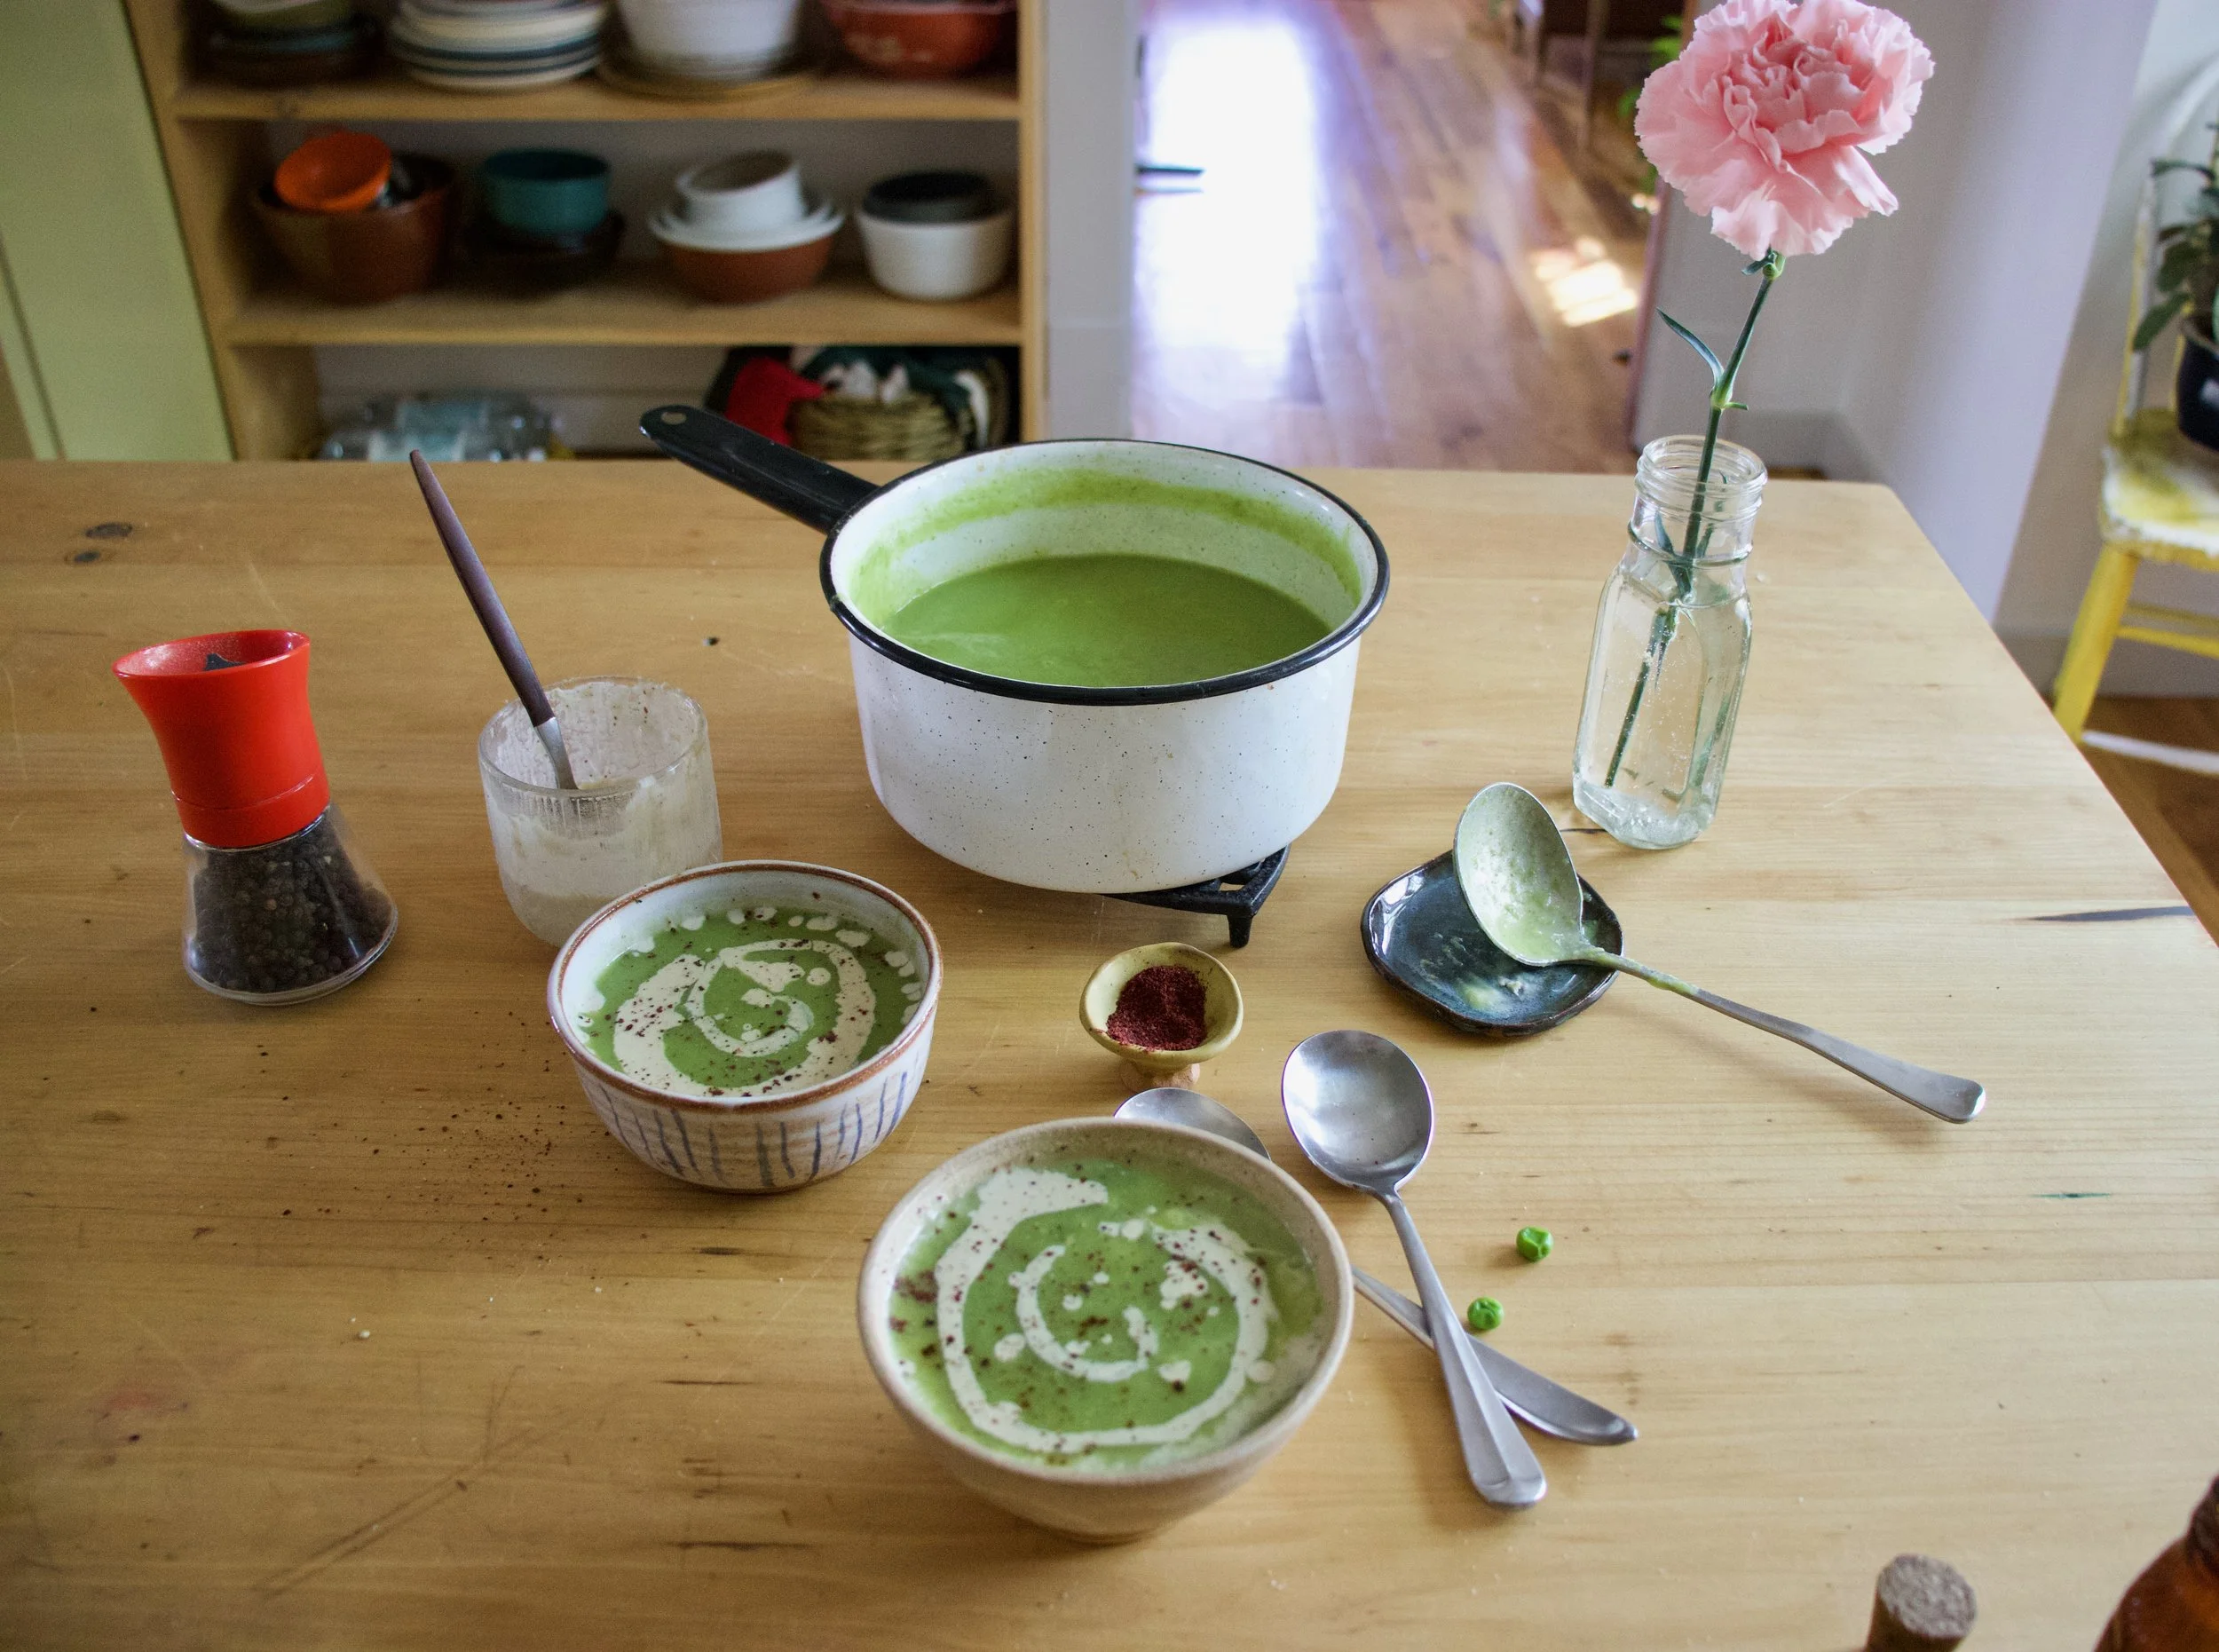
The stuff. Peas, chopped broccoli, and chopped cauliflower which are all frozen and slightly thawed. You can totally use fresh here too, but I just so happen to have it frozen so you might as well save the fresh stuff for fresh eating. Also have a big yellow onion, a few cloves garlic, some tahini, a lemon, sumac, and salt and pepper. You need water which I did not picture here.
A pot, some water and a roughly chopped onion and the garlic start off this soup. Bring the pot to a boil, then turn to medium and let the onion and garlic cook until very tender. I have been making a lot of soups starting with this step lately. Boiling the onion and garlic until tender and fragrant really make for a super flavorful and clean soup base. Or soup in itself.
Now add in the broccoli and cauliflower to the pot and cook until tender.
Mid soup cooking time is a good time to make the sumac tahini sauce for the swirl. Basics here, just mix the tahini, the sumac, a pinch of salt and pepper, the juice of the lemon and a tablespoon of warm water together until smooth.
Last but not least, the peas. Add them in and they just need a few minutes to cook through.
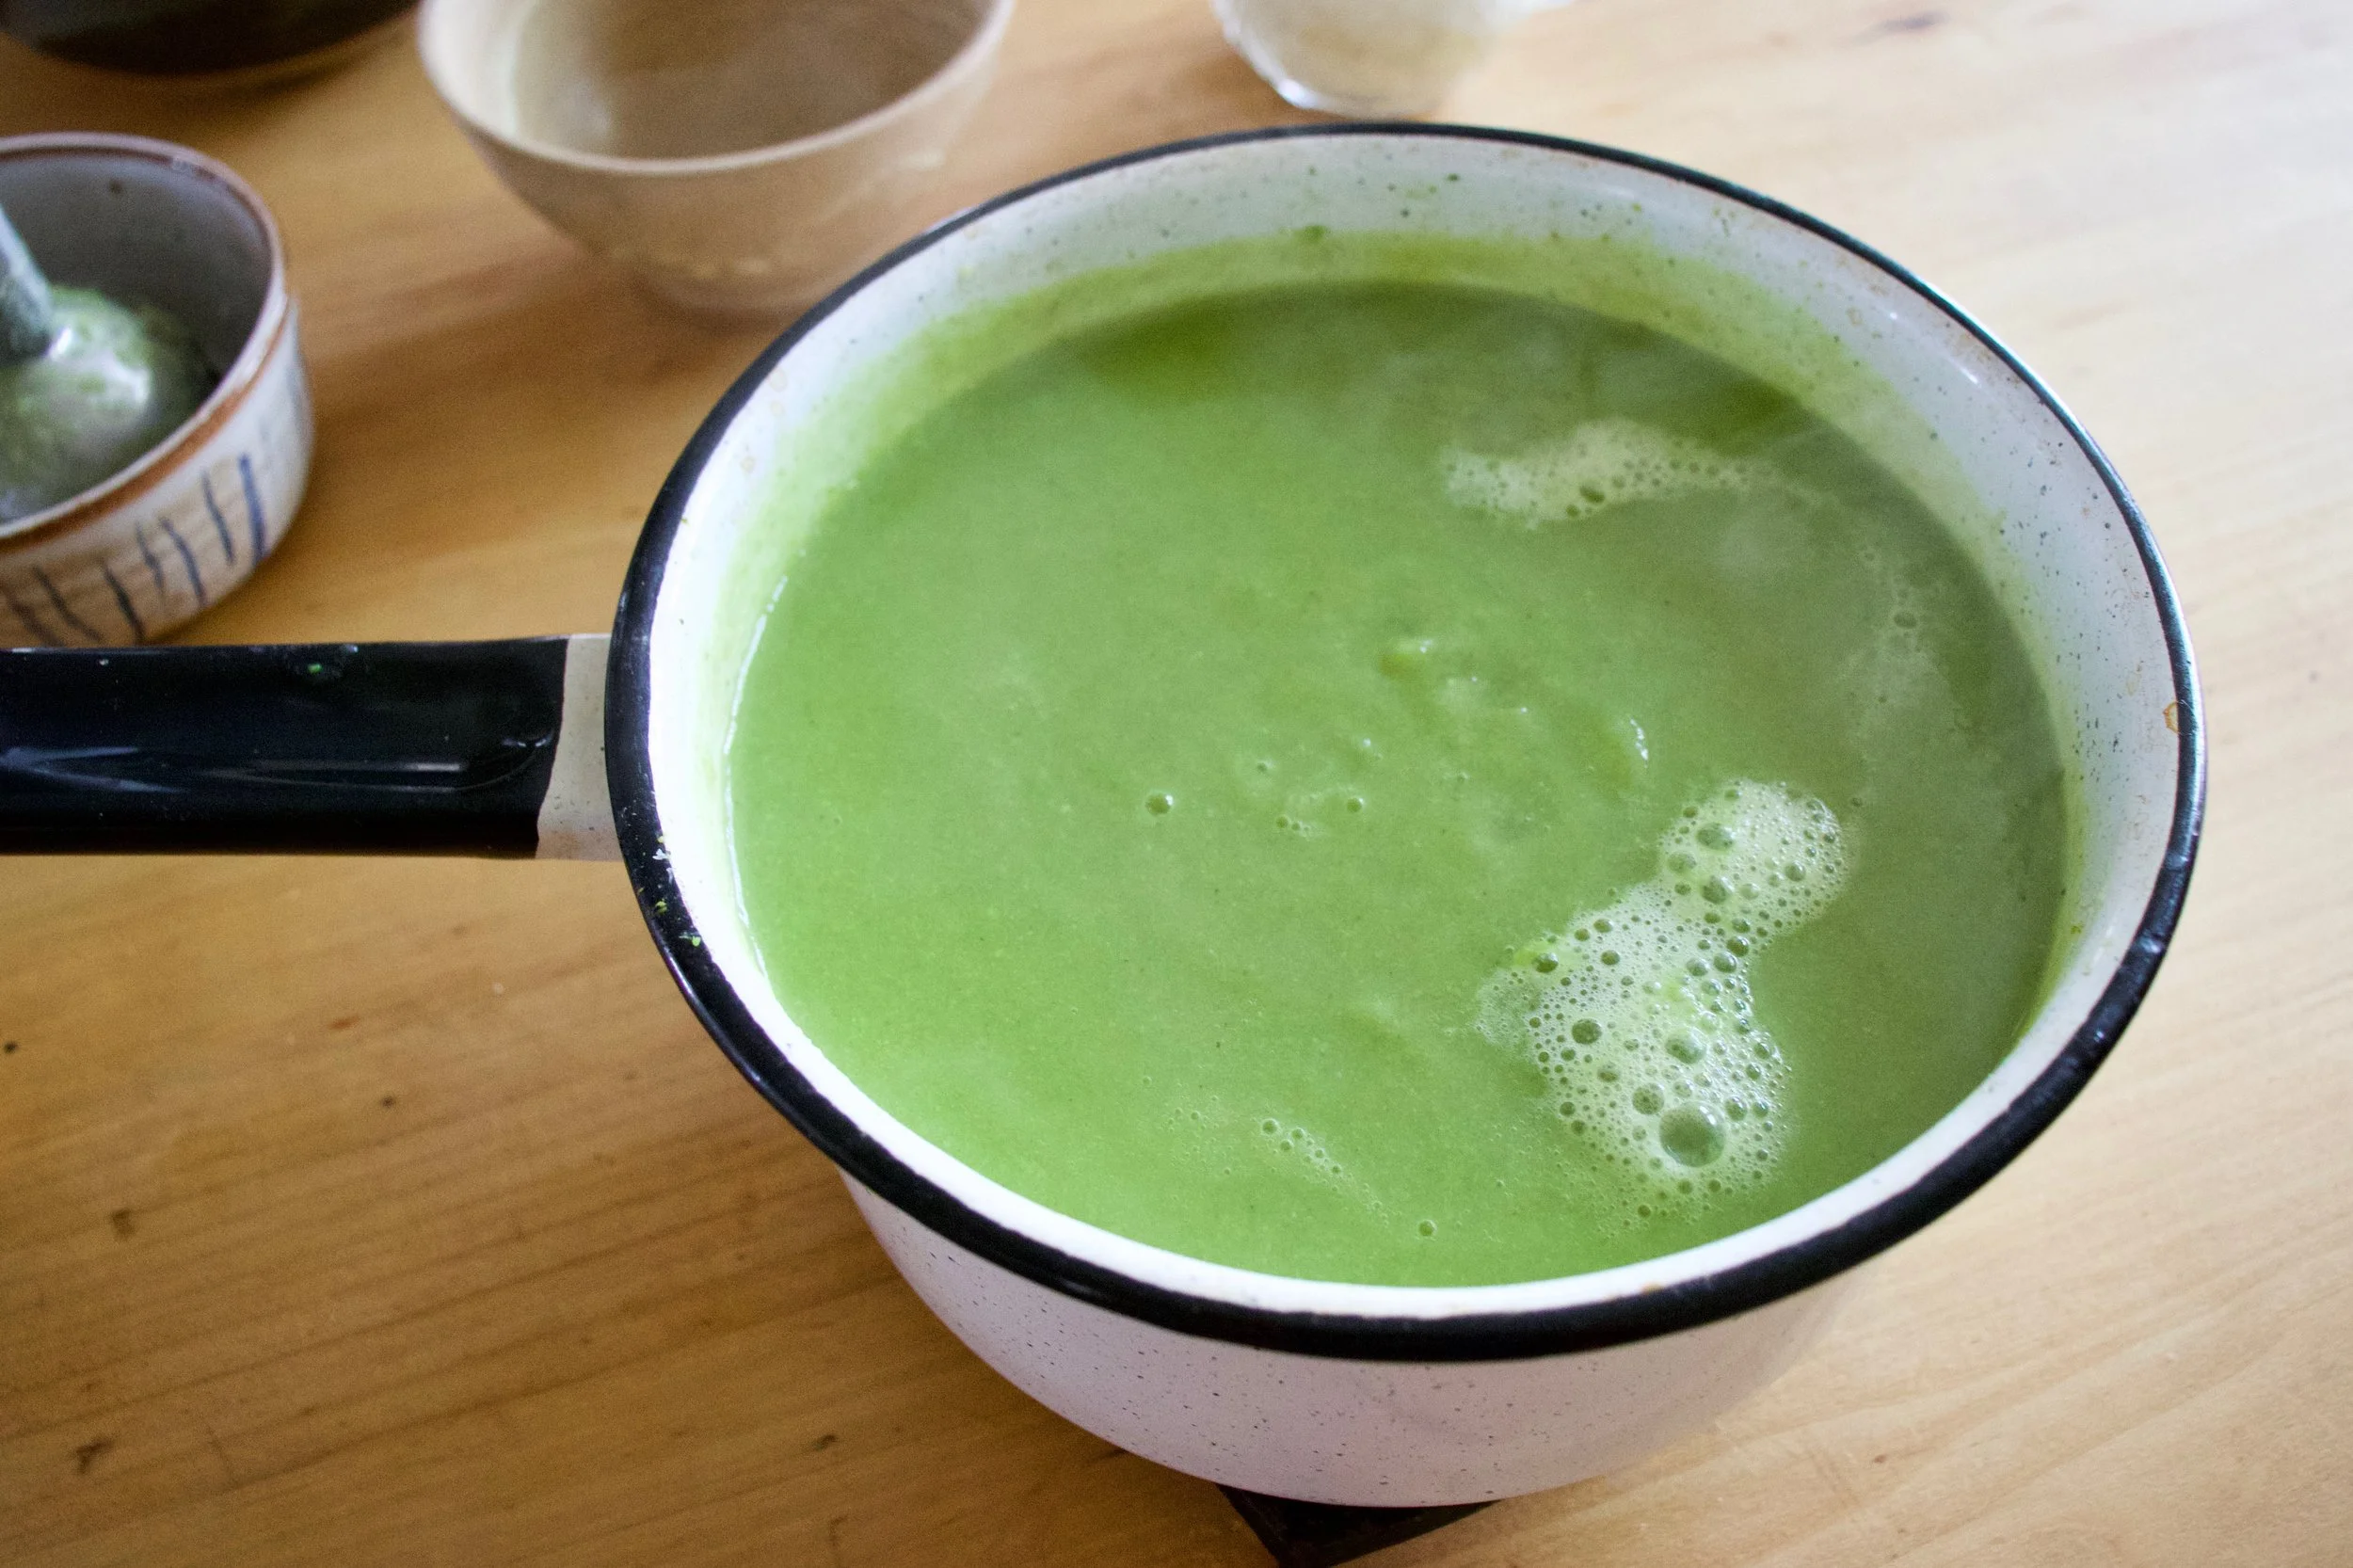
And then it all gets blended to become this green creamy goodness.
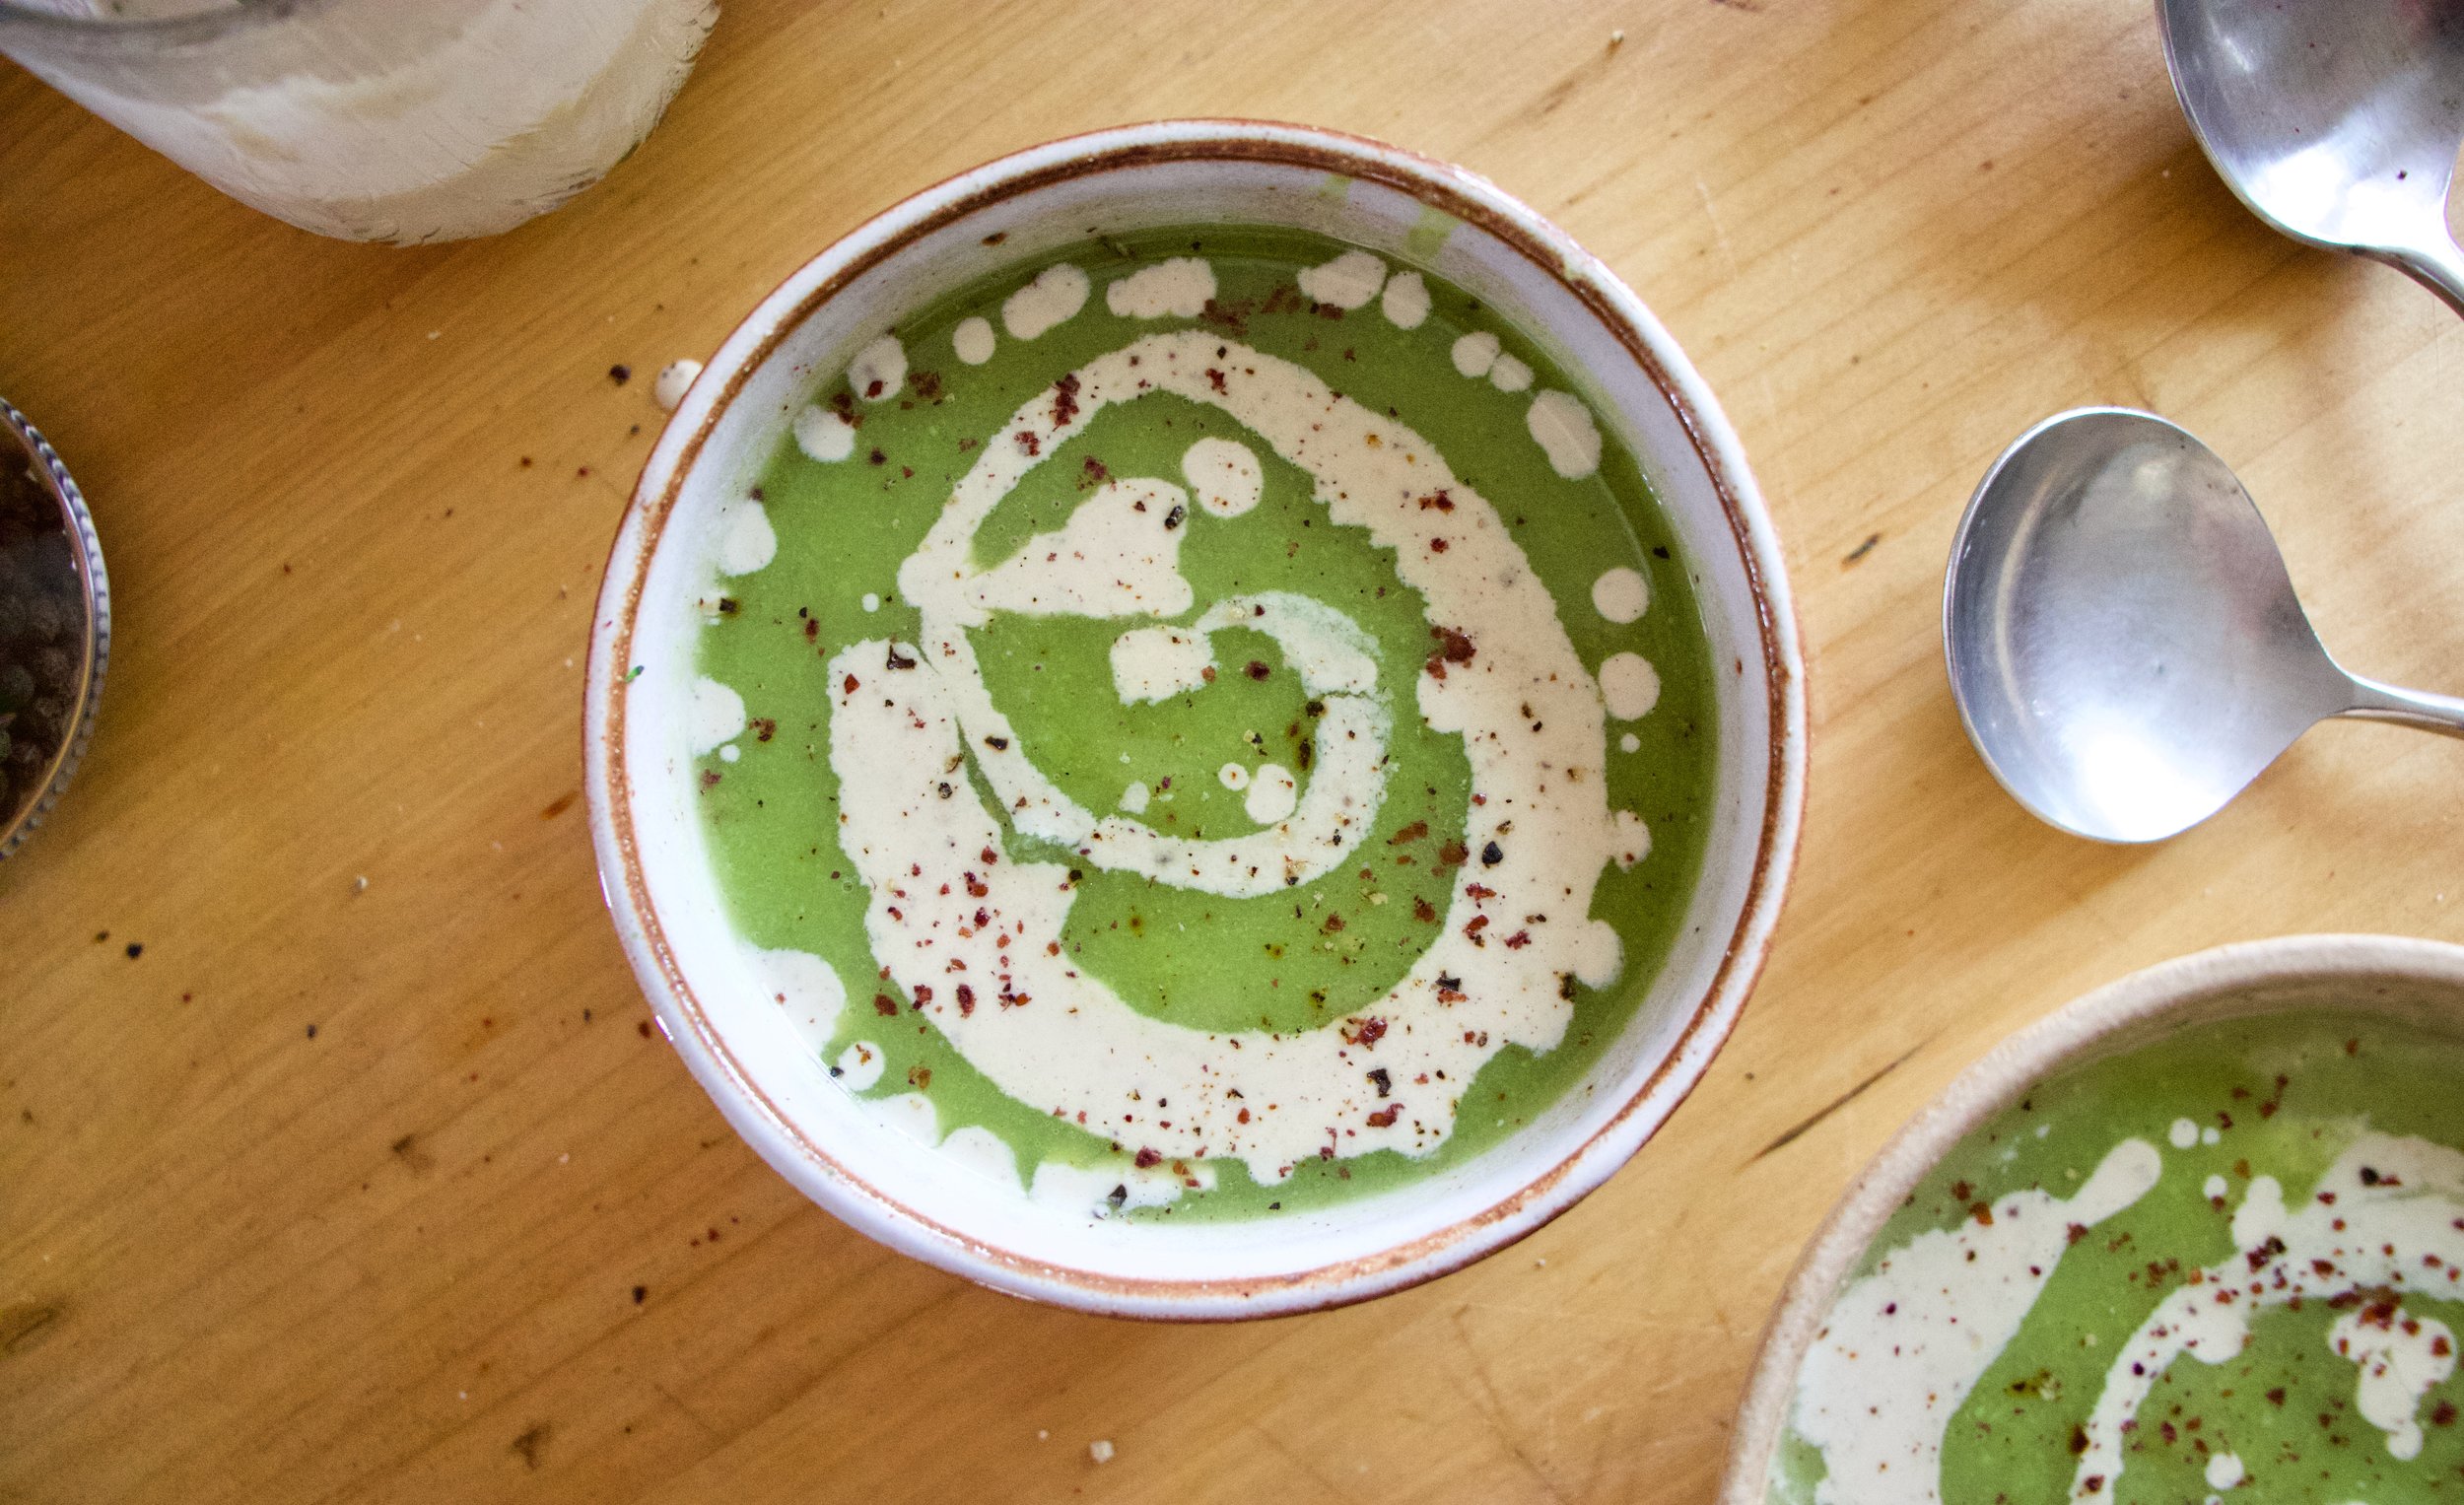
Ladle into bowls, grab the sumac tahini sauce and swirl it on in. A tablespoon or so is good. And don%u2019t forget a little more pepper and another pinch of sumac for good measure.
Just appreciate for a moment. That is one good looking bowl of soup. And it taste even better then it looks.
-C
Makes about 4 serving
1 1/2 cups fresh or frozen peas
1 1/2 cup chopped fresh or frozen cauliflower
1 1/2 cup chopped fresh or frozen broccoli
1 large onion
3-4 cloves garlic
4-5 cups water
Salt and pepper
1 teaspoon sumac
2 tablespoons tahini
2-4 tablespoons warm water
Start by removing the papery skin from the onion and chop into a few big chunks. Remove the skin from garlic too. Place into pot with 4 cups water. Turn heat on high and bring to a boil then turn heat to medium and let onion are garlic cook until tender which should take about 15-20 minutes
Once the onion is cooked, add in the broccoli and cauliflower. Turn heat back to high and bring to a boil again then turn back down to medium heat. Keep cooking until tender (another 15 minutes or so) then add in the peas. Keep on heat until peas are cooked through then remove the pot from heat and either transfer to a blender or use a immusrian blender to blend the soup until smooth. Add a little more water if needed to get to the right consistency to blend right. Or if you want a thinner soup.
For the tahini sumac swirl just mix the tahini and sumac together along with the juice of the lemon, two tablespoon warm water and a pinch of salt. Mix together until smooth. If the mixture is to thick, add another tablespoon of water.
To serve. Ladle or pour soup into bowls and drizzle and swirl the tahini sumac on top. Sprinkle with pepper and a pinch more sumac and you are good to go.
Kind of a spur of the moment cake situation. I was in the middle of doing some paper work and remembered that I had made plans with the littles to go bike shopping and do dinner. Usually when they come over for dinner I don%u2019t make a point to have a dessert (they are happy with a handful of chocolate chips if I have nothing) but I felt the need to have something special. I mean, bike shopping, that%u2019s a big deal and they were so excited so I wanted to have a little celebration cake thing. A, YIPPIE YOU GOT BIKES! cake. It just seemed like the right thing to do.
So I made cake. I running a little short on time (yet I still had time to take pictures%u2026.) so I went with my trusty one bowl, super easy chocolate cake. (This is everyone in my families favorite cake). Peanut butter frosting because it was right in from of me and really, it was for Coco the fat baby. He basically eats nothing but peanut butter these days. And of course because peanut butter and chocolate together are never going out of style. I cooked the cake in a loaf pan because I was just feeling loafy I guess. But This cake could totally be cooked into a cake round or square if you wanted to.
And that was that. I made that cake, they got the bikes (YEA!!!!, although I told them both that they sucked because they walked into a store and picked out bikes in less then an hour. I on the other hand have been bike shopping for more then a month and still haven%u2019t made a decision.) We then came back here to my house, biked around for a while, then ate cake (after dinner of course.)
Anyways. This cake. Rich, dense, chocolatey peanut butter goodness. Has been described as the best cake ever and like a Reese peanut butter cup. If you are into any of that, well this is the cake for you.
To the cake.
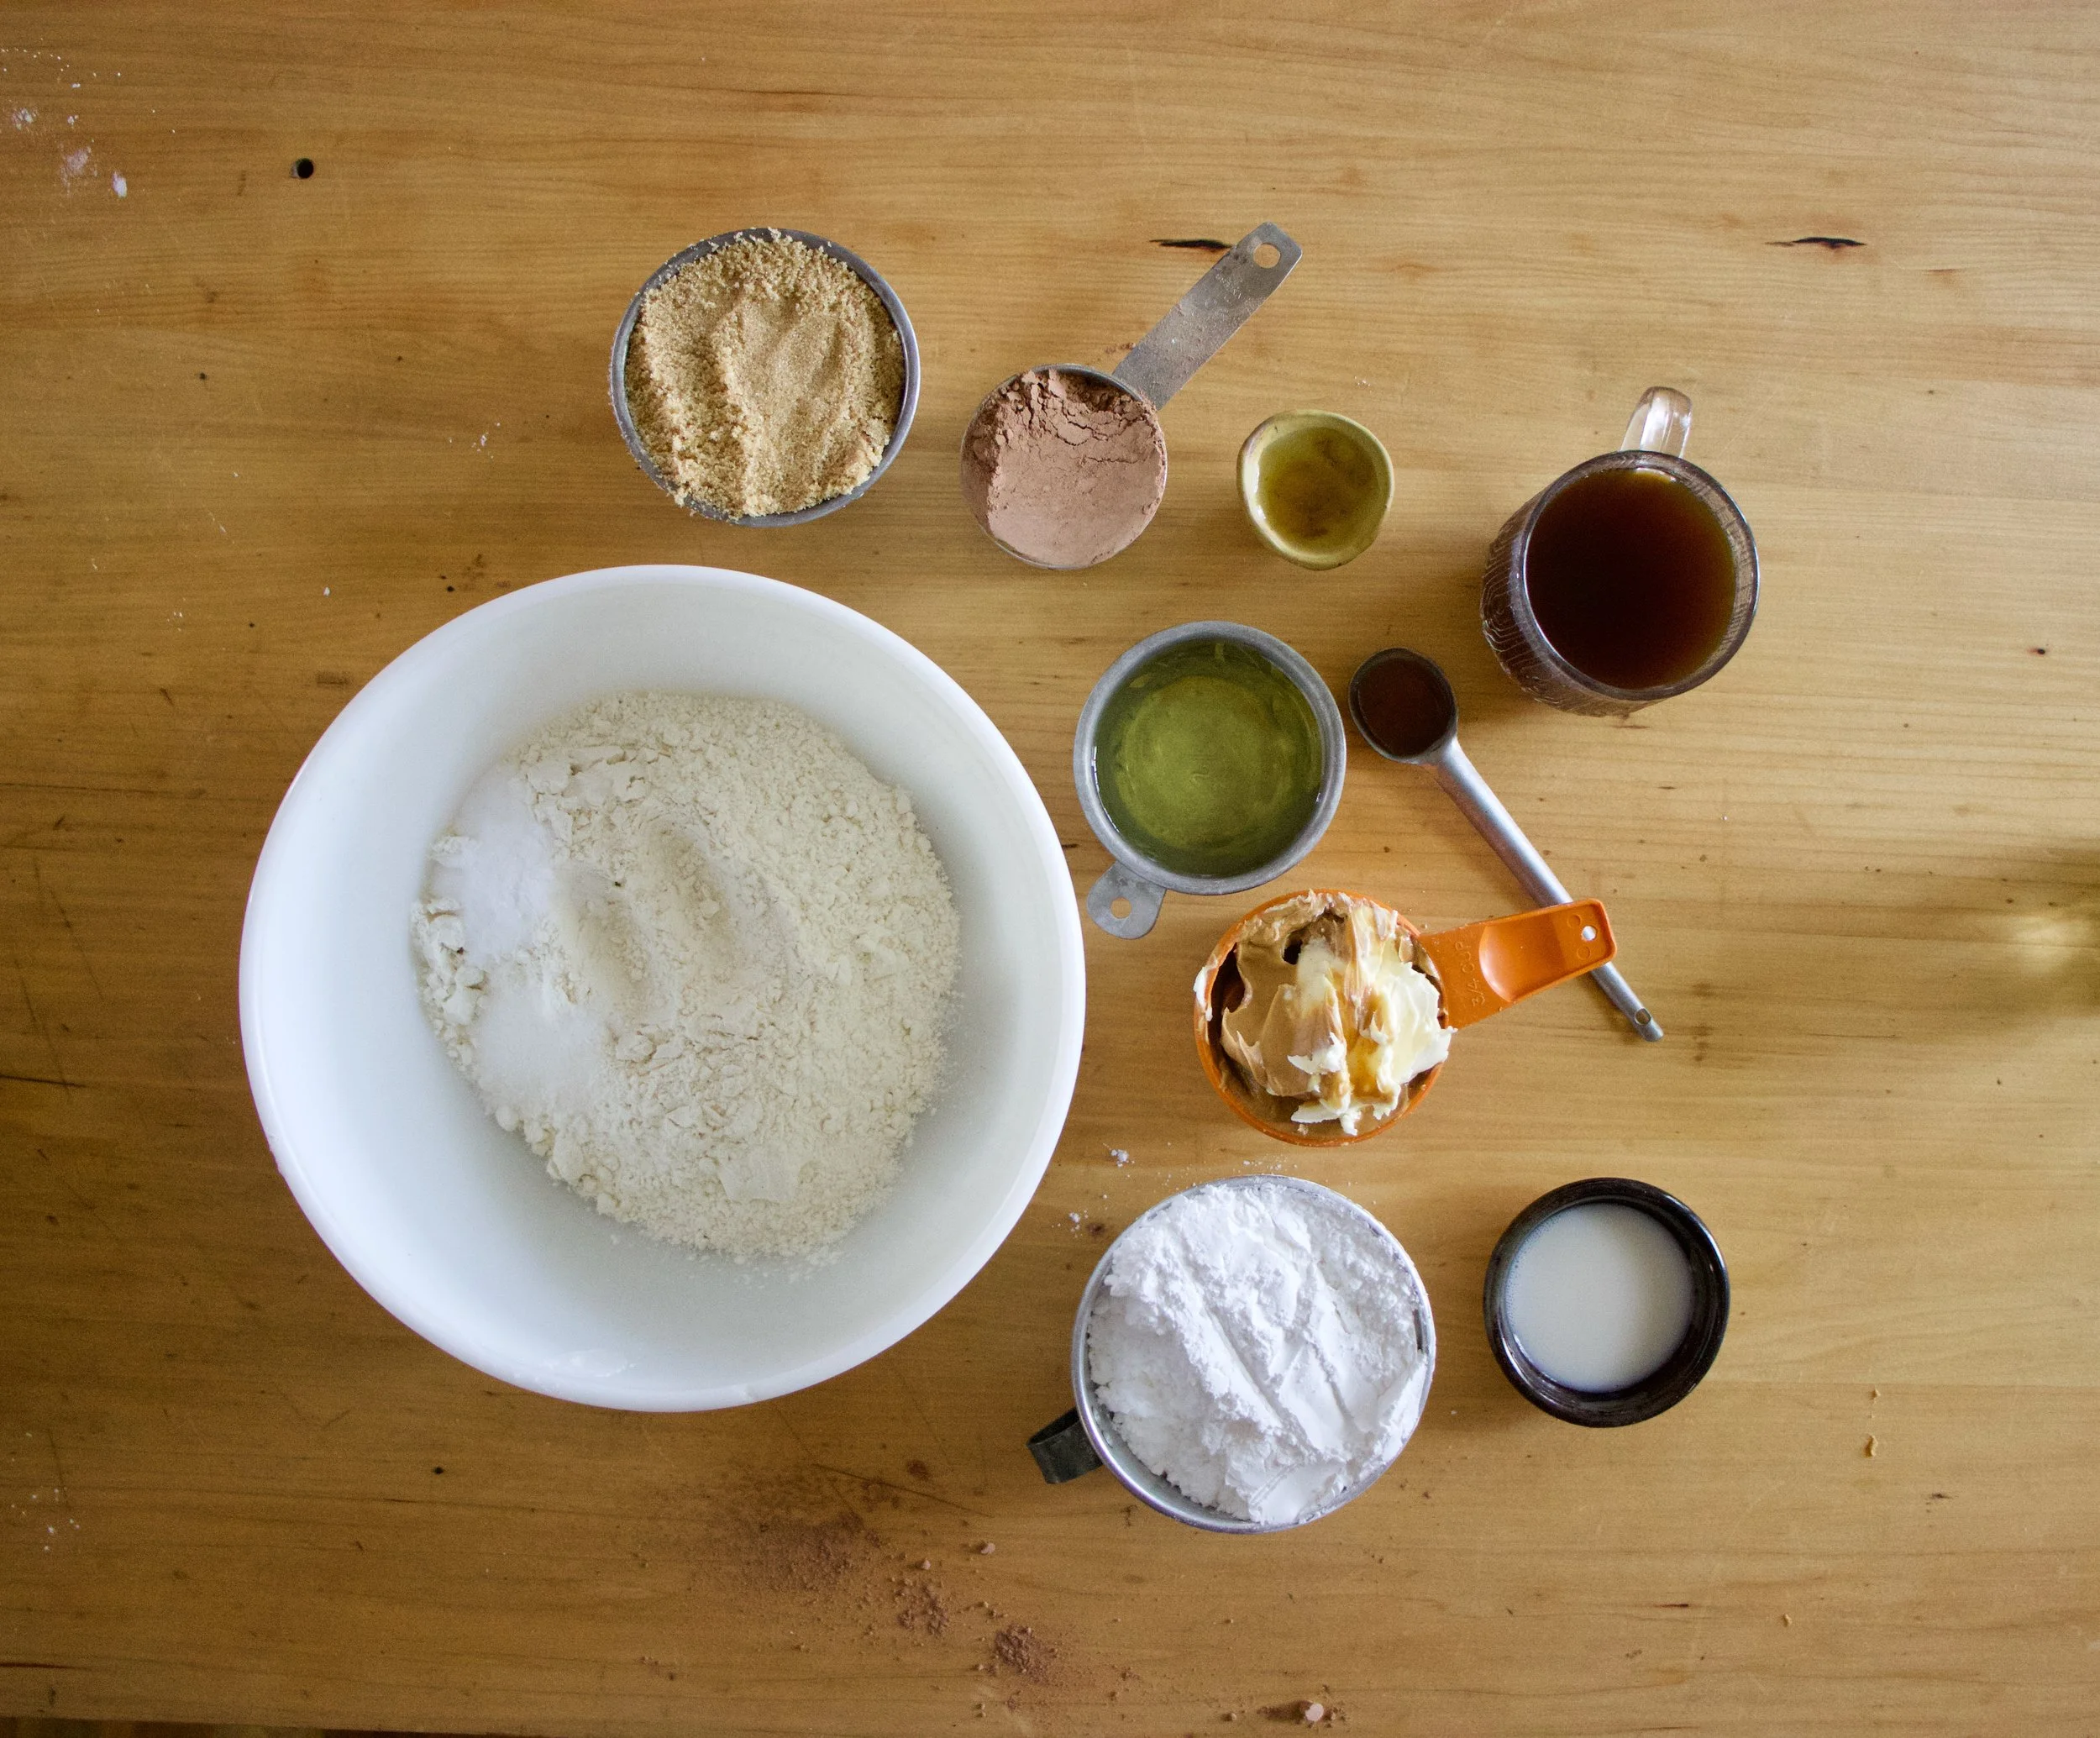
The stuff for the cake.. Flour, baking soda, salt, cocoa powder, oil, coffee, vanilla. brown sugar, and apple cider vinegar. And the stuff for the frosting. Peanut butter, butter, powdered sugar, and almond milk.
In a big bowl, whisk together the dry stuff, pinching and breaking apart any big clumps of cocoa or sugar. Then just dump in the wet.
Whisked until glossy and smooth. A perfectly perfect chocolate cake batter.
Pour batter into a greased and lined loaf pan and into the oven it goes. 50-60 minutes or so or until a tester poked in the middle comes out clean. Then pop the cake right on out. Remove cake from tin and let cool on a wire rack.
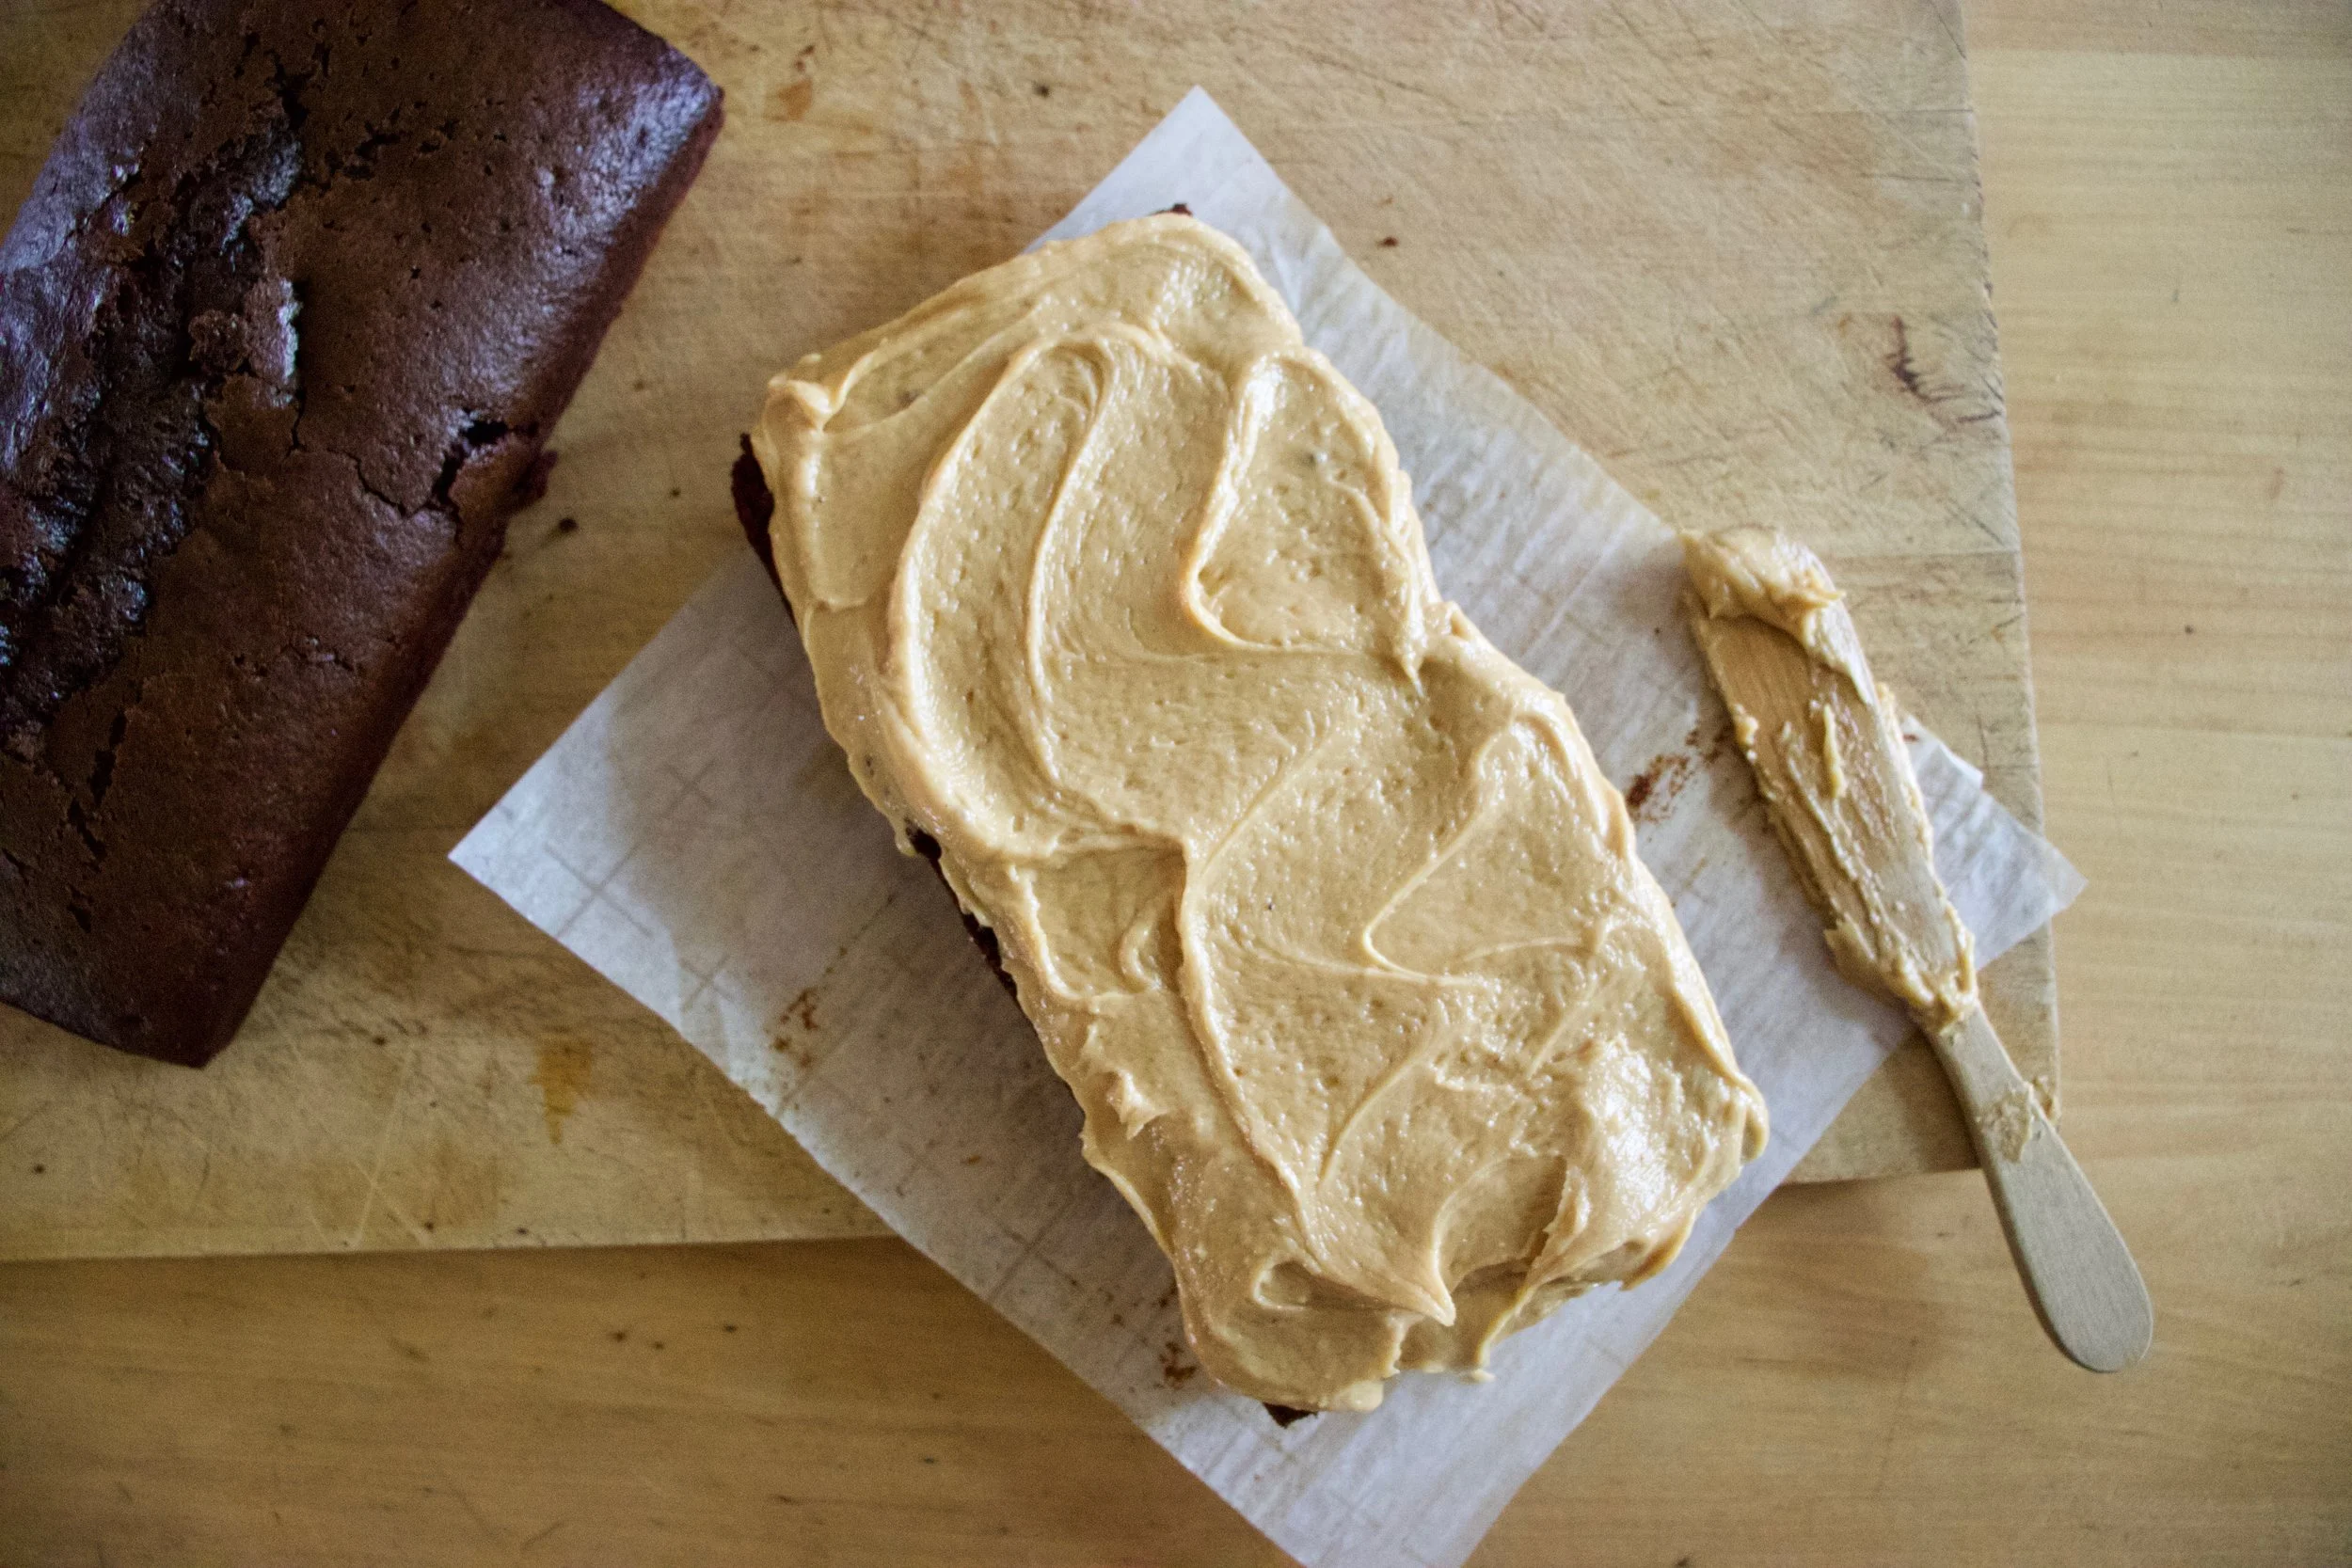
While cake is cooling, make frosting. Beat together powdered sugar, peanut butter, butter, and milk.
Fully beaten. Ready to frost a cake.
Once cake is cooled, cut in half down the middle, length wise. Then frosting the middle. (Make sure it is cooled in the middle before frosting. If it is still warm, let it cool)
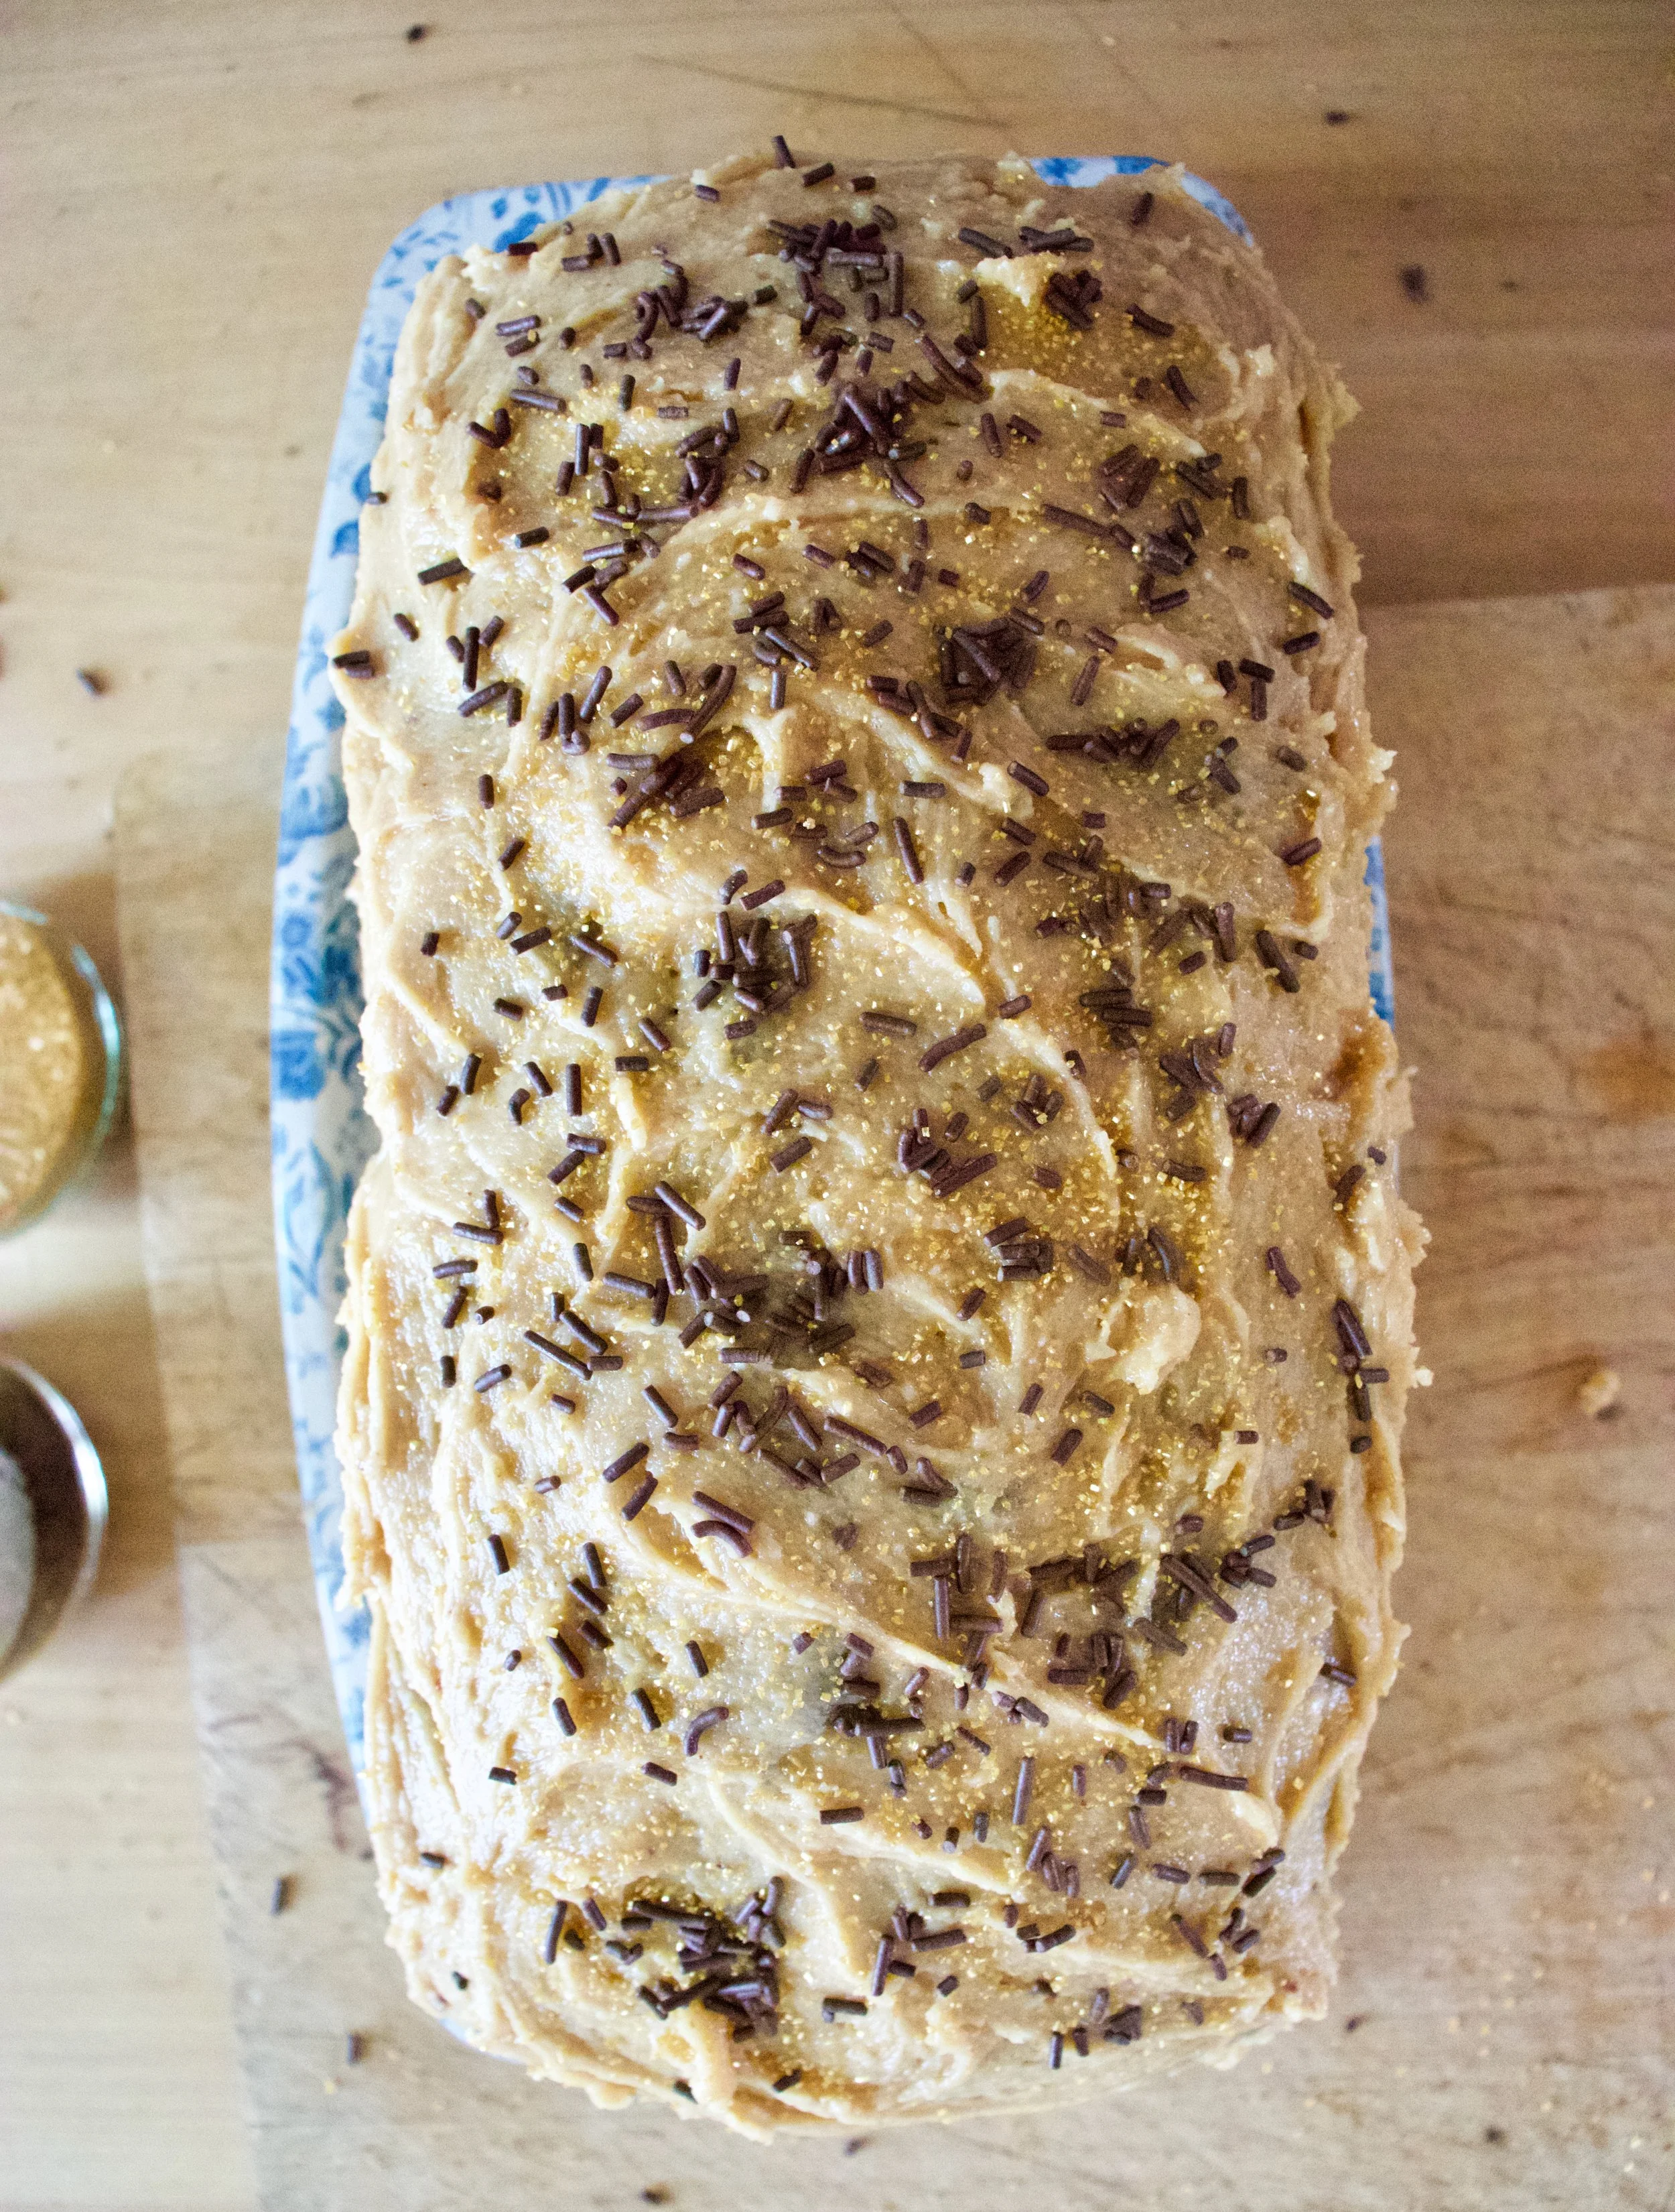
Pop the top back on and frost the rest.
And don%u2019t forget the sprinkles. Went with chocolate and gold because. But you do you and use whatever sprinkles you want.
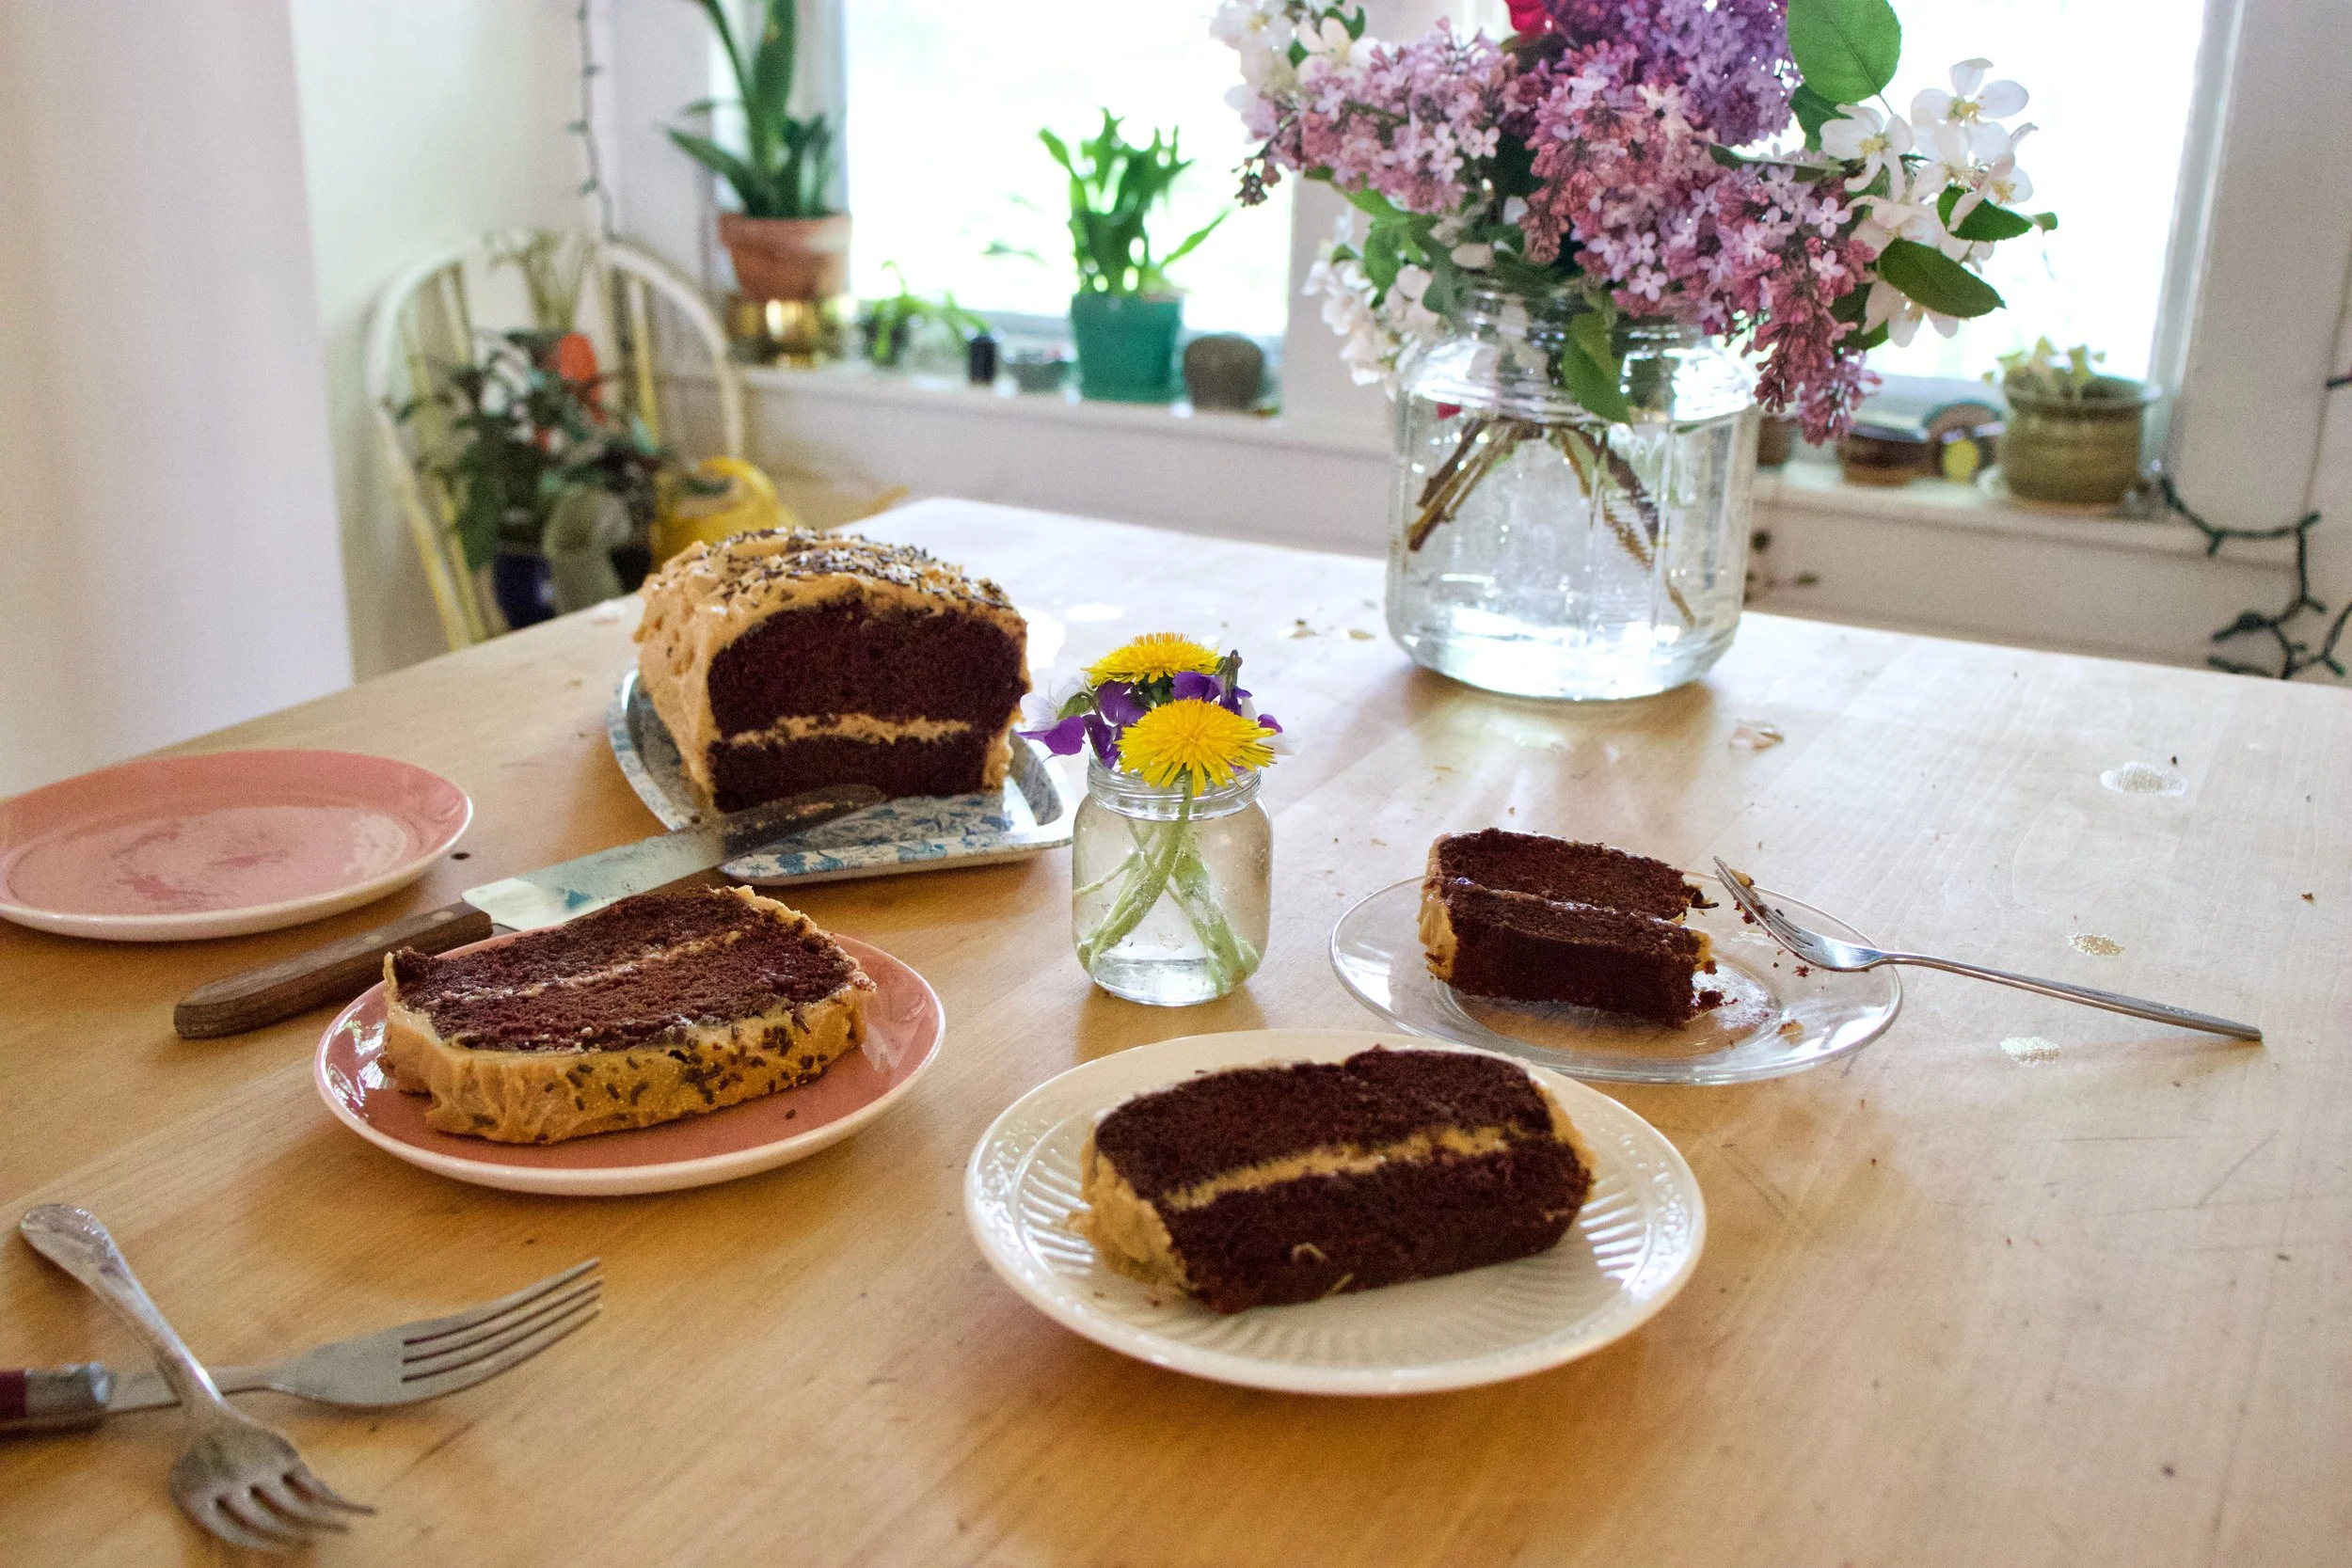
And then you eat the cake.
I ended up stick it in the freezer to hide for a while%u2026 I guess this cake cold or slightly frozen is just about the best thing ever. The littles damn near ripped my arm off trying to get seconds.
-C
makes 1 loaf cake
For the Cake
1 3/4 cup all purpose flour
1 cup packed light brown sugar
1/3 cup cocoa powder
1 teaspoon baking soda
1/2 teaspoon salt
1/2 cup neutral oil
1 1/2 cups warm coffee
1 teaspoon vanilla
1 tablespoon apple cider vinegar
For frosting
3/4 cup minus 2 tablespoons peanut butter
2 tablespoons vegan butter
1/4 cup plant based milk
1 1/2 cups powdered sugar
Preheat oven to 350 and grease and line a loaf pan.
In a large bowl mix together the flour, baking soda, salt, cocoa powder, and brown sugar. Break apart any big clumps of sugar or cocoa with your fingers. When that%u2019s mixed, dump in the wet and whisk together until just fully incorporated. Pour batter into the greased pan and stick into oven.
Bake for 55- 60 minutes or until a tester poked into the middle comes out clean.
Once cooked, remove from oven and carefully remove from pan. Place on a wire rack to cool.
While cake is cooling, make the frosting. Just beat together the butter, peanut butter, and milk until nice and creamy. If you find your frosting be too thin, add in more powdered sugar, too thick, a splash more milk.
When it is cooled, cut the loaf in half length wise. Make sure the inside is complete cooled as well. I totally stuck my cake in the freezer for little bit to speed up the cooling process%u2026..
When the cake is cut and completely cooled, frost it. Spread a little less then half the frosting on the bottom layer, stick top back on, and finish the frosting. Cover with sprinkles (if you want) and then that is it.
Serve room temperature or what my people really like is served slightly frozen, which is great because I just cut the cake up and froze individual pieces making for a perfect quick dessert.


Sunday Happy — The Lovely Crazy
August 19, 2019 by maximios • Blog
Do you have a winter you and a summer you? I do for sure. Winter Colleen is more reserved and spends most of her time alone. Winter Colleen lives a little slower, a little calmer. She goes to bed at six thirty and doesn’t think twice about it. And she is always wearing wool socks. Summer Colleen, well she is crazy. Always running around outside like a feral beast, face and hands covered in dirt. Twigs in her hair. No shoes. Summer Colleen is always trying to do everything and all at once. Thinks she can climb a mountain and go for a thirty mile bike ride all before lunch time. (I so can) She is louder, more exposed and might not run in the opposite direction if she sees you coming down the street. (might%u2026 A small conversation is ok, other then that, I run!) She also goes to bed much later and likes to wear overall all summer long.
I am full on Summer Colleen. Watch out!
It has been one of those weeks that has just flown by. Lots of stuff going on all the time. The normal stuff, but because it finally feeling like summer, there is the added need of being able to be outside and do stuff. And we have been doing stuff. And it has been great. But not all fun fun. Work still goes on. Apartment stuff is still in need of doing, although it is not as crazy as it was last week. And YAY!! We finally got the car back. The only took them a week to fix but I am not complaining especially since it would have cost us more then a grand if we didn%u2019t have a warranty on the car. And as a thank you to my mom for letting us borrow her truck all last week, we went over to her house and I made her dinner, even after Sophia accidentally locked us out of the house for an hour. (Oops.)
We spent a lot of time with the littles the week. Feeding them, biking around with them. Fighting with them. The girl has a phone now. It doesn%u2019t have service but it picks up internet. And I can%u2019t even. She will be lucky if it doesn%u2019t %u201caccidentally%u201d gets smashed by the end of the month. What else%u2026 I worked at the studio and remembered to wear an apron when sticking my whole body into the garbage can full of slip. That was good on me. The mr fixed the lawn mower so we don%u2019t have buy a new one yet, and mosquitoes are not as bad as they have been. I only get like 100 bites a day now.
Yesterday was a gem of a day. A day that was so productive, and fun, and beautiful. I woke up did my writing, grabbed coffee and a book, and sat outside and watched the sun come up. Then I got the grocery shopping done by 8am. I weeded and weed wacked the garden and oohed and aahed at all the plants that are finally coming up ad starting to grown. After cleaning up the yard a bit, the mr ans I jumped on our bikes and bike over to Erins We then grab the littles and went for a great bike ride and picnic at the park. After biking home I moved a ton of plants outside to the porch and moved furniture and stuff around the house on on both porched. Then I cleaned the freaking crap out of the house. Plus I got a jump on laundry. Ate dinner. went for a nice walk, came home, read some more and passes out. Again, it was a gem.
Today, after a bike ride to the gym and a few little things that I need to do, the mr and I are going to do a lunch picnic by a river where I can sit and spend the rest of the day reading and drink coffee and he can fish. I can%u2019t think of much more that I want to do. It%u2019s going to be wonderful.
Reading and looking from the internet this week.
-The Myth of Period Syncing. I thought for sure. And I am still not convinced it isn%u2019t true. Yeah, I still think it is true,
-One more amazing thing a tree can do. Getting Fire From A Tree Without Burning The Wood
-There defintailyl something right about this. Kind of like how you can want something that you don%u2019t know you want. Does that make since? And not always is being oblivious good, but sometimes. How to Accomplish Disappointment
-Want ever single one of these paintings. Thick Brushstrokes Form Plump Songbirds in Oil Paintings by Angela Moulton
–Charmin%u2019s Massive %u201cForever Roll%u201d Points the Way to a World of Products Right-Sized for Singles. Giant ass rolls of T.P. What do I think? I think %u201cWhere do I store huge ass rolls? %u201c I think I will stick with the regular sized ones. For now.
–See the drastic toll climate change is taking on our oceans. Not good guys. Not good.
-I think this is brilliant. I would definitely punch one and I bet it actually will keep some people from punching one another. Need to Blow Off Steam? Public Punching Bags Pop Up Around NYC.
–How duct tape can help you survive almost anything. I have seen many a things done with duck tape. #8 has been put to use a time or two.
-If I were to live in an English cottage, this would be the one. Inside a Florist%u2019s 1850s-Era English Cottage
–The tooth fairy economy, explained. I know one of my sisters is giving out $5 a tooth, on top little presents and shit. I got a buck%u2026 if I was lucky.
And pictures from the week.