alz-il.net
  • Home
  • Blog
  • YouTube
  • TikTok
  • Instagram
RSS

THE LOVELY CRAZY

August 12, 2016 by maximios • Blog

Every year I look forward to St Patrick’s day.. And not because I am Irish, (which I am) or because I want to drink on excess (which I do not) and no,  green eggs and ham are not something that I plan on making. No Ido not look forward to any of those things (although I actually do like to pinch the littles that wear no green and talk about pots of gold and rainbows) I love this time of year because cabbage is always on a freaking super sale everywhere you go.  Something that is usually 80-99 cents a pound goes down to like 20 cents a pound. And for someone that eats like 10 heads of cabbage a week, this is a hug savings. SO yeah, I buy so so much (I have already bought 12 heads, but I actually plan on buying a full case before the sale is over)

No, I am not crazy, I will eat it all….. and I am going to be making so much sauerkraut. Woo hoo!

But until then. A cabbage pot roast. Yes. I remember growing up my mom would make pot roasts once in a while. A big pot full of big chunks of veggies topped with a big slab of some kind of meat. I never liked the meat, but I always loved the big chunks of the veggies at the bottom of the pot. So I figured I would make a big pot roast, replace the meat with a head of cabbage (I have so much) and add beans because protein and because they are just so good. . And when it’s all cooked and said and done, you end up with a big pot of plump and so flavorful veggies and beans and the most tender wedged of roasted braised cabbage.  This is my kind of pot roast.

Now go quick.. the cabbage sales will be over soon.

The stuff. One good sized head of cabbage, a few carrots, a big onion, and a hunk of rutabaga. Also have some dried kidney beans, caraway and fennel seeds, dried ground mustard, a bay leaf, some garlic, and salt and pepper. And water… water is needed.

Note. You can use just caraway or just fennel and you can replace or even add a potato in place of the rutabaga.

Dried beans, fennel and caraway into a pot with water. Stick the pot on the stove ans bring to a boil, then to a simmer to give the beans a quick head start before going into the oven.

While the beans are simmering, dice up the garlic and chop up the veggies into big chunks… you don’t want small chunks or they will kind of turn to mush while cooking.

And turn over the cabbage head, take a knife, and slice a deep x into the core. DO THIS or else the inside of the cabbage will not cook through. Oh and preheat the oven to 375.

Beans looking a bit plumped..

Top those beans with all the chopped veggies,(don’t stir them in., you want to keep the bean under submerged in the water) sprinkle those with the mustard, salt and pepper and place that lovely cabbage head right on top…

Place a lid on the pot and slide it into the oven to cook away. It’s going to take a bit of time (about an hour) but it’s pretty much hands off. Just take a look after about 45 minutes, check the bean doneness, add in another cup or so of water and place lid bacck on and cook for another 12-20 minutes until the beans are done. When they are, take the lid off, crank the oven to 450 and cook for another 15 or so minutes until the cabbage gets all golden brown

Look at that… Tender roasted veggies, plump beans. Everything about this is right.

Grab a knife and cut the cabbage (its so tender) into big wedges.

A wedge into a bowl along with a big spoonful or two of the beans and veggies..

Finished with a dash of salt and pepper and (not shown here,) lots of mustard.. Oh cabbage… you are so good!

Eat away and Happy St Patrick’s Day.

-C

serves 3-4

  • 1 cup dried kidney beans
  • 3-4 cups water
  • a medium sized head of cabbage
  • 2-3 carrots
  • 1 large onion
  •  a potato or a a small rutabaga(or both)
  • 1 heaping teaspoon caraway seeds
  • 1 heaping teaspoon fennel seeds
  • 1 heaping teaspoon ground mustard
  • a bay leaf
  • salt and pepper

Place the fennel, the caraway, and the bay leaf into a large dutch oven along with the dried beans and 3 cups of water. Place on the stove and being to a boil then, turn heat to low and simmer the beans for about 15 minutes.

While beans are simmering, chop up the carrot, onion and rutabaga into big chunks and dice up the garlic. Take head of cabbage and slice a deep x into the core.

Preheat oven to 375

Once the beans have simmered a bit, add in the chunks of veggies, the ground mustard and salt and pepper (Don’t stir, you want to keep the bean submerged in the water). Place the head of cabbage right on top of the veggies and sprinkle with salt and pepper.

Place a lid on the pot and stick the whole thing into the oven. After about 45 minutes, check the roast and the beans for doneness and adding in another cup of water id needed. Back into oven with the lid for another 15-20 minutes or until the beans are tender Onnce they are, remove the lid form the pot and crank the oven up to 425. Cook for another 15 minutes or so until the cabbage turns a nice golden brown.

Remove from oven, let cool for a few minutes, cut the cabbage head into wedges and serve it up with big spoonfuls of beans and veggies.

Eat until your full.

.

THE LOVELY CRAZY

August 12, 2016 by maximios • Blog

My fingers are almost always stained a bright pink. My cutting board and counter tops, pink. Look closely at at dish towels and you will find pink blotches all over them as with any of my light colored clothes. You would think after years of trying to remove beet stains form everything that I would have gotten a system down or at least had a designated cutting board for them, but no. That would be to easy and really,  I think I kinda don’t care.  So pink my things will be.

Beets. You either love them or you hate them. I love them (so much), the mr, well I am making him love them. He needs to love them because I end up putting beets in everything. If you are a hater, there is still turn into a lover. But maybe you have never even eaten a beet or haven’t in a long long time.  I am actually surprised at how many people I have talked to that have never tried beets before. If you are one of those people, stop being that person and eat one already. OR if you think you hate them, why don’t you give them a second try, I bet you will change your mind. Sweet but earthy and nice and crisp but kind of juicy..they really are super tasty. And not to mention all the great health benefits(you can look those up yourself) Yup, beets be the shit!

 And I love a good roasted beet, but really, I prefer my beets raw. Which brings us to this salad. A simple salad of grated up beets, orange juice and toasted hazelnuts. Fast, easy, and tummy satisfying.  As long as you don’t hate beets (how could you) then you will love it.

Now you get those beets!

The stuff. A big beet, (or two smaller ones) an orange,( I bought navel oranges and sliced into this one to find it was a blood orange… not complaining), hazelnuts (raw or toasted) apple cider vinegar, and salt and pepper. Optional but also very nice, some greens and or some type of grain. (I happen to have a some quinoa in the fridge)

Hazelnuts. If yours are already toasted, then no need to do it again, but if they are raw, toss them into the oven for a few minutes (hazelnuts taste so much better toasted)

And grab the beet and a shallow dish and grate it all up.

Add to the beet the juice of the orange, a small splash of vinegar to cut the sweetness, and salt and pepper to taste. Give it a good toss and let it sit for at least 5 minutes, if not longer.

And if the hazelnuts are in the oven, take them out when they are slight golden brown. If you want to remove the skins, just stick them in a clean towel and rub it off.

Everything all ready to go.. Any extras are added to bowls.

Beets into bowls, topped with toasted nuts and a cute little orange segment.(if you happen to have one lying around)

Isn’t that just something. Beets are so pretty,, but more importantly, so freaking tasty good.

Enjoy Today!

-C

makes enough for 2 people as a side

  • 1 large beet or 2 smaller beets
  • 1 orange (I used blood orange but any orange would be good)
  • handful of hazelnuts (either already roasted or raw that need to be roasted)
  • apple cider vinegar
  • salt and pepper
  • Optional – quinoa (any grain would work) and or greens

If you hazelnuts are raw, toss them onto a baking sheet ans place them into the oven at 300 for about 6-8 minutes until slightly golden brown and smell so nice. When done remove and if you don’t like the skins, place nuts in a clean towel and rub the skins right off.

Wash beet(s) and grate into a swallow bowl. I don’t peel mine, but peel if you must. Add in the juice of the orange, a splash of vinegar and a dash of salt and pepper. Mix around and let sit for at least 5 minutes (the longer the better)

When you are ready for food, grab a bowl (add anything you want to add to the bottom, like quinoa or greens) and fill that bowl up with the beet salad and top with roasted hazelnuts.

Grab a fork and eat.

Three things… One. I have a ton of beets, but that is because I have been taking mostly beets at the farm share pickup (I am scared I will run out so I hoard them) Two.  See that roasting pan? I got it a couple weekends ago  at a barn sale for 75 cents. Isn’t it awesome! (it is so awesome) So I really wanted to roast something in it. And three. Roasting means the oven is on and it has been chilly chilly at night (LOVE IT) but I am not willing to turn the heater on in my house until at least the first  of November. Until then, we will just roast all of our food for warmth.

But really, there is no better reason then that beets are tasty and potatoes are tasty. Together, they are super duper tasty. The combination, with the lemon and rosemary giving the dish  a fresh and vibrant boast,  satisfies that person who says he doesn’t like beets (the mr, but he eats them so yeah.) and me, who would rather just eat all beets (I ate some of the potatoes)  

Yup, rosemary lemon beets and potatoes.  A simple dish that screams fall, warm comfort food, and just happens to be really pretty too. (especially served in my awesome roasting pan)

The stuff. A couple of beets and a couple of potatoes. Some fresh rosemary (can use dried), a lemon, salt and pepper and olive oil. 

Preheat the oven to 450 and chop up the potato and beets into chunks that will fit in your mouth and dump the chunks into a bowl. 

Mince up the rosemary.. unless you don’t mind eating long, kind sharp pieces

Drizzle a bit of olive oil, add in the zest of the lemon, add a good few pinches of salt and pepper and toss in the rosemary and give it a good mix.

Dump onto a baking sheet or in a roasting pan (seriously, this roasting pan is SO PRETTY) Cut the lemon in half and squeeze on half of the lemon juice on the veggies. 

And into the oven it goes. 

All roasted up and ready to go.

 Those colors.. the smell. So good!

Happy weekend people! 

-C

Serves 2-3 as a side 

  • 2-3 large beets
  • 2-3 large white or red potatoes 
  • a few sprigs of fresh rosemary( about 2 tablespoons.. can used dried, just decrease quantity a little)
  • 1 lemon
  • salt and pepper to taste
  • olive oil

Preheat oven to 450

Wash beets and potatoes well then dice them up into mouth sized pieces and toss into a bowl. Drizzle with  enough olive oil to coat the stuff, zest the lemon and add the zest to the bowl, and  cut lemon in half and squeeze half of the lemon juice in.  Oh, and mince up the rosemary and toss that in too. Season with salt and pepper to taste (potatoes like salt) toss it all around until everything is all coated and dump onto a baking sheet or into a roasting pan and stick into the oven for about 45-50 minutes or until golden brown and crunchy tender.

Remove, squeeze the remaining half of lemon on top and serve!

Guess what guys ….I got myself a sick vintage waffle/ griddle iron. I couldn’t be more thrilled!!! I found this thing at the local recycled goods store the other day, along with a very beautiful old white pyrex mixing bowl. It was one of my best thrift store scores! (Checking out the inventory and the condition of all the old things that day, I would say an old lady had just died and all her perfectly keep, mint condition kitchen stuff had just been donated.  But it’s cool, cause I get the feeling that she was at least 90, with a big loving family, and was happy until the day she died. And I am sure she would be pleased that I have taken over the waffle maker. Thanks old lady!)

 And now I am pretty sure that  everything I make for the next week will be cooked on said waffle/griddle. I am serious, I already have a list of things to try and cook on it; cookies, biscuits, granola bars, potatoes, fruit, some type of pasta situations…. the list of possibilities is endless and I bet that at least 1/2 of these things will be totally awesome and amazing.

But first thing first. I need to make dinner.

So waffles for dinner!! 

Note. These waffles are completely 100% fantastic for any meal you want to make them for. They consist of nothing more then beans, a shit ton of veggies, and just a bit of cornmeal. But don’t let that fool you because they are super packed full of so much flavor, have a really soft tender inside, with a nice crispy outside and are so super pretty. They are wonderful! The stuff. First, we got a big old pile of shredded up veggies which include; carrot, beet, sweet potato, onion, parsnip, celeriac, and a little bit of kale.  A we got a bowl of rinsed and strained white beans, a little bit of cornmeal and salt, pepper, and garlic powder. 

The makings of something amazing!Before you do anything. get your waffle iron out and preheat it. 

While thats going on, take you beans,  add 3/4 cup water and puree until smooth with whatever blending device want to like to use. (I used my hand blender…less to clean)Now collect all the shredded veggies and dump into a big bowl with the bean puree, the spices and the cornmeal. Mix until combined. The batter should be thick, but not dry. If its seems to wet, add more corn meal, or too dry, add a little more water.

Note how my batter turned a magical pink… I love beets, they make everything pretty! And check out that bowl!When your waffle iron is preheated, oil it if needed (if your not sure, add a little oil just to really make sure your waffles don’t stick) and take appropriate size spoonfuls of the batter and stick on iron. Close it and wait…..My iron has a little light that turns on when the waffles are done cooking, so I waited patiently (ok iI did open it a few time) until light tuned on and removed the perfectly cooked waffles.

Did I mention how awesome my new/old vintage iron is?

SO AWESOME!!

I made a little gaucamole and gave the mister and little bowl of plain Greek yogurt with lemon juice, but feel free to top, drizzle, or dump whatever you want onto these beauties… 

Happy waffle Wednesday!!!

-C

Veggie Bean Wonder Waffles

Makes 8-10 waffles (in my iron) feeds 2-3 peeps

  • 1 small carrot shredded
  • 1 small parsnip shredded
  • 1/2 a small celeriac root
  • 1 small beet shredded
  • 2 kale leaves chopped into tiny bits
  • 1/2 an onion, shredded
  • 1/2 a small sweet potato shredded
  • 1/2 cup cornmeal
  • 2 cups(or 1 can) cooked, rinsed and strained white beans
  • 2 teaspoons garlic powder
  • teaspoon each salt and pepper
  • oil for iron(if needed)

Note on veggies… I used what I had in the fridge and shredded, it came to about 3 cups. If you don’t have these specific veggies or only want to use a few.. go for it. Just make sure to have 3 cups of whatever veggies you use.

Take you beans and blend them up with whatever device you would like to use. Once creamy, add to a bowl with the rest of the ingredients. Stir until combined.

Once the waffle iron is preheated, oil it( if needed) and place the recommended amount of batter right on it there. Close and cook until golden brown and waffly.

Serve on a plate with topping of your choice, A few suggestions.. Guacamole, salsa, hummus, mustard, greek yogurt… anything that tastes good to you.

Eat as breakfast, lunch or dinner…

Fork into face

My contribution to last nights dinner at my sisters…. Freshy fresh veggies spring rolls.I had about 30 minutes between work and getting over to my sisters house to throw something together so it needed to be something fast, easy, and something I could make without going to the store. She was making the main course (some teriyaki situation and rice) so I was doing up the veggies.

I had just bought a package of spring roll wrappers…. Bingo! The perfect and logical choice. I grab the wrappers, a variety of veggies and after spending 12 of my 30 minutes trying to scrub the oil based paint off of my face and hands, I still managed to completely prepare, construct, and take pictures of these lovely tasty spring rolls. and get over to my sisters in time for dinner.

Impressed?  

Damn right!

The stuff. Carrot, beet, asparagus, red cabbage, and kohlrabi, which all (except asparagus, which I just cut into thirds) got cut into matchstick sized pieces with my mandoiln. Then there are the rice spring roll wrappers that we need to make the veggies into rolls. Also a bit of red wine vinegar to drizzle onto the veggies for a little extra zing. And lastly, soy, fresh ginger, and a couple cloves of garlic for a spicy salty dipping sauce.Start by having everything set out and ready to assemble. Fill a large shallow dish or baking sheet with really warm water. Working with one at a time,place a rice wrapper into water and let sit for about 10 seconds or until the paper starts to soften. Remove from water and place on a damp surface (just splash a little water on the counter) Take a little bit of everything and and place on the lower middle part of the paper. Fold in the sides first, then tuck and roll the wrapper as tightly as you can without ripping the wrapper.

Repeat until you have used up all you veggies.For the dipping sauce. Finely grate ginger and garlic and add to soy sauce. Stir… and it’s done.Freshy, pretty and fantastically delicious. And for real, took about 8 minutes to make. (I even had enough time to wash the dishes before we left!)

I am so awesome!

Hump Day Pow!!!!!

-C

Fresh Veggies Spring Rolls 

Makes 8-10 but can easily be increased or decreased to desired amount 

  • 8-1o rice spring roll papers
  • Splash of Red wine or rice vinegar
  • 1/4 cup soy or tamari sauce
  • 2 cloves of garlic
  • teaspoon  freshly grated ginger
  • 1 medium carrot
  • 1 medium beet
  • 1/4 head of purple cabbage
  • 10 thin fresh asparagus
  • 1 small kohlrabi

Note… I used the veggies that I had in the fridge at the moment. If you have a bunch of veggies but not these particular ones, use what you have. Pretty much all veggies taste good inside a spring roll!

Gather your veggies and prep by either using a mandolin, a grater, or some sick knife skills, and julienne, shred, or slice you veggies into thin match sticks. Once all the veggies are prepared, sprinkle a little vinegar over the top.

For the rolls…Grab a large shallow vessel  (a rimmed baking sheet works great) and add in warm water. Working  one at a time, place the wrapper into the water for about 10 seconds or until the wrapper starts to soften. Remove and spread onto a clean, damp work surface. Gather a bit of each veggie that you are adding and place towards the bottom  middle of the wrapper. Now fold the sides in over the pile of veggies. Then with the side closest to you, tuck and roll wrapper away from you, trying to keep it tight, but not to tight that it rips.. (Hopefully that makes since.) Place finished rolls onto a damp surface to keep from sticking and if not serving right away, drape with  a damp towel or paper towel to keep from drying out.

For the soy ginger dipping sauce. Add grated ginger,  minced garlic, and soy into a bowl and mix together.  Serve with spring rolls. 

Eat one, two, or a plateful. It’s nice to share but not a necessity.

Yesterday I spent the entire day (ok maybe not the entire day), but a the better part of the afternoon defrosting my freezer. Sure, I do the occasional chip chop here and there, just enough from around the freezer door so it will close, but ever few months I notice that everything in the fridge is not staying cold and that the freezer is not freezing stuff. Thats when I know its for real time to defrost. So a few days ago when I noticed my bananas were turing to liquid in the freezer, I knew it what I had to do….Completely empty the fridge  and melt/hack away the 2-4 inches of ice build up that accumulated. It is such a freaking pain in the ass.So on this defrosting day, I took all the stuff from the freezer, stuck it in a cooler, and the rest of the stuff, which is basically all veggies, I just tossed on the table. As I am hacking away with a metal spatual, a wooden spoon, and a constant rotation of pots of boiling water, I was thinking about dinner. I figured I might as well just eat up as much of the veggies as I could, you know, so I didn’t have to put them back in the fridge. And also, I was getting pretty annoyed because this particular defrosting session was taking way longer the anticipated, which made making dinner seem like another pain in the ass.  I figured I might as well just eat everything that is already out on the table, which pretty much narrowed down the “whats for dinner” conversations because it was already all over the place. And so dinner was a humongo salad for me, and for the mister, I made him a monster of a veggie sandwich. (my salad was exactly the same stuff as the sandwich, minus the bagel) Easy, fast, super duper yummy, pretty and piled so high with tons of veggies that the fridge is pretty much empty now. 

Look at the is beast. I don’t call it a monster sandwich for nothing.

The stuff included in this monster veggie sandwich..

Romaine lettuce, tomato, avocado for there is not real sandwich without them. Thinly sliced radishes, cucumber,a and onion for nice crispy crunch. Shredded beets, carrots, and purple cabbage to give  more crunch and a bit of sweetness. Then of course there needs to be something pickled, so I used banana peppers cause they are the SHIT!! And lastly some hummus for a nice creamy finish (plus a bit of protein) and yellow mustard because mustard on everything is just right.  Heres to a mountain if goodness that is no longer in the fridge! Served with a another mountain of roasted parsnips and carrots (more stuff from the fridge) and a tall glass of iced tea.

Lucky that today is farm share pick up cause the fridge is pretty much on empty. 

Yea it’s Thursday!!!!

-C

A Monster Veggie Sandwich

Note. This is just a guide.. Feel free to use whatever veggies you fancy. 

  • Either a bagel, 2 slices of bread, or a big chunk of baguette (use a gluten free bread if you want or need too)
  • Hummus- Homemade or store bought
  • Mustard
  • Something pickled like pickles, banana peppers , jalapeños or all three 
  • Lettuce, spinach or some kind of leafy green
  • Tomato
  • Avocado
  • Onion
  • Radishes
  • Cucumber
  • Shredded Carrots
  • Shredded Beets
  • Shredded Cabbage

To assemble. Ready your bread.. Toast if you want, and stick it on a plate

On either side, smear the hummus and the mustard.  

Pick a side, start to stack by evenly disrupting veggies on top of veggies. Place the second piece of bread on top and  giving a little smooth to keep it together.

And go at it. Cut in half or don’t. Have a napkin or a long sleeve ready to wipe your face.

 Being that it was St. Patricks day this week and lots of folks buy up a good amount of cabbage, I figured that this is a good time to get people to try one of my most favorite of favorite meals…..Beet bean and cabbage steaks. I love to play around with food, how to pair textures and colors plus tastes while trying to make whatever I am making healthy and balanced. This is one of my fav creations. And sure,  this may seem like a somewhat weird combo, maybe a little like a extremely hippy dippy vegan fake meat thing, and you might be kind of right, but screw if it doesn’t taste like A-mazing. First off, notice how freaking dang pretty this thing is. The roasted beets bring a earthy hearty flavor but also pack a huge punch of color, especially when blended together with the ever so sweet white bean, which  brings a nice mellow taste and a great serving of protein. (Beets and beans are meant for each other). Spread that  brightly colored, tasty mixture onto of a huge slab of one of my favorites, roasted cabbage with all its crunch and cabbagy flavor and you got yourself a hearty healthy meal of deliciousness.  

So maybe this might seem a little out of your normal food routine, but why not try it? Trust me….you will love it and everyone you make it for will think you are a number 1 badass too.

Cabbage, white beans, and beets. There is a lemon involved, but it didn’t make it into the picture.

Notes…. I used white beans, but I have also done this with chick peas and lentils. All are fantastic. Also, I did not peel my beets because I never do.(I do not peel anything the skin is full of goodness and I love the taste) If you don’t want to eat the skin, then peel them. Cabbage is cut into inch thick slabs… I like to us the inter most part of a cabbage head cause I like the core. But use any cut that you want.  2 beets are chopped into chunkers and both the cabbage and the beets are placed on a lightly oiled baking sheets, seasoned with salt and pepper,  and stuck into the oven for 20-25 minutes at 400 degrees.

Once the beets are tender and the cabbage is cooked to a nice withered golden pretty, take out of the oven, but leave the oven on.  Leave the cabbage on the pan but throw the beets into a blender or a big bowl if using a hand blender  with the white beans

    Beans and beets get pureed together. Add the juice of 1/2 a lemon (or the whole lemon, depending on your taste) and a pinch of salt and pepper. With a big spoon or spatula, scoop equal amounts of the bean/beet mixture on top of the cabbage steaks and spread around. Sprinkle with cracked pepper and place back into oven for another 5-10 minutes. (You could totally skip the second bake, but I like my cabbage well done and crispy)

Oh ho boy… And with a good squirt of mustard to finish off… I could eat this all day, everyday 

And now I am #1

Happy Wednesday… Keep it good!

-C

Beet and Bean Cabbage Steaks 

Makes 2 Thick Cut Steaks

  • 1/2 head of cabbage (green or red)
  • 2 cups or 1 can of cooked white beans
  • 2 medium beets
  • 1 lemon
  • salt and pepper
  • Mustard (Optional)

Preheat Oven to 4oo degrees

Cut two 1 ish inch thick rounds of cabbage from the widest part of the head. Place on a lightly oiled baking sheet. Chop beets into chunks and toss on same baking sheet.(Peel if you want) Sprinkle everything with salt and pepper. Stick into oven for 20-25 minutes or until the beets and cabbage  are tender. Remove veggies from oven and place roasted beets into a  blender (or bowl if using a hand blender) but leave the cabbage on the baking sheet. Add the white beans, the juice of half a lemon, and salt and pepper to the beets and puree until smooth. Scoop equal amounts of the mixture to each cabbage steak, sprinkle with pepper and place back into oven for another 5-10 minutes to give the beans and beets a nice crunchy crust (You can skip this step if you don’t want to be crusty)

Remove from oven, stick on a plate and drizzle with mustard….Fork and knife are good ways to eat it, but eating it with you fingers makes less dirty dishes.

As the weather gets warmer and the days get longer, my food brain turns to fresh colorful simple spring food. (which is totally a thing). Spring food is a combination of the last of the winters hardy root veggies combined with the springs bounty of fresh greens and early growers. Spring food is the best!

This lovely. oh so gorgeous salad has been on repeat in my meal repertoire. It’s so yummy and so simple. Beets and carrots roasted and sliced, tossed onto a bed of tender spinach and topped with a creamy, lemony avocado dressing. Fresh, fast, light, and filling. Everything a perfect  spring salad needs. Not to mention it takes no time at all to make because with all this nice weather , we want to spend as much time basking in the warmth and glow of the sun. I might even take my spring salad outside today. Maybe.

Dressing stuff. A nice and ripe avocado, the juice of a juicy lemon, a bit of garlic powder (raw garlic is nice too, but grate it super fine) and salt. Simple simple and sometimes simple can be the best.All stuff get mashed super mashed until smooth and scooped into a jar with a lid. Add about 1/4- 1/2 cup water (depending on how thick you like it) and shake that jar all around.

That’s it. You now have super creamy avocado lemon dressing. Drizzle on anything and everything… especially this roasted carrot and beet salad..

A roasted beet and carrot, all sliced upTossed onto a bed of tender baby spinachAnd topped with creamy avocado dressing. Fantastic, so pretty, and makes the day super springy!

A salad suggestion….  Add some roasted chickpeas toasted nuts, or sunflower seeds to this or any salad. Adds a little proteins and the crispy crunch is a nice addition. 

Enjoy the day..Smile lots 

-C

Roasted Carrot Beet Salad and Avocado Lemon Dressing

Salad

  • 2-3 cups Baby Spinach
  • 1 large carrot
  • 1 medium beet
  • Toasted nuts, beans, or seeds (Optional)

You can roast the veggies a few ways.. Slice the carrot and beet, place on a baking sheet and  stick into the oven at 425 degrees until tender. Or you can just toss a the carrot and beet onto a baking sheet whole and roast.( What I usually do)

Once the veggies are roasted and cooled, thinly slice and toss onto the bed of baby spinach. Top with Avocado Lemon Dressing (recipe below) and some toasted crunchy thing.

Dressing

  • 1 Ripe Avocado
  • 1 lemon
  • 1 teaspoon garlic powder
  • 1 teaspoon salt
  • 1/4- 1/2  cup water

Scoop avocado fruit into a bowl and mash with a fork until a paste is formed. Scoop mashed avocado into a jar and add remaining ingredients. Stick lid on jar and shake tip combined. Use on anything. 

Dressing lasts a few days in the fridge. Should stay green, but add a layer of lemon juice to top to keep from browning.


Because I love beets, I love celeriac and I love to pickle things…. And I love hearts. And Valentines Day is just around the corner so I though it appropriate to share these little darlings with you because even if you are not a fan of pickled beets or celeriac, you have to admit that these are just the cutest pickles you have ever seen. I have made a batch, sitting in the fridge, awaiting some sweet little dinner date that me and the mister will have come Valentines day. Or not, we might just eat them all before hand… because everyday is like Valentines day for us! (blah, barf, but awe, we are so cute!)

This is my basic pickling recipe….I figured you will want to pickle everything and anything once you realize (if you haven’t already) how amazing pickled everything is! And how easy it is to do it yourself.

My Pickling method……

  1. Choose the jar that the pickles will live in
  2. Prepare and pack the stuff  that is going to be pickled into the jar… leave about and inch of head space
  3. Fill the jar to the top with a half water and half vinegar solution (I usually use apple cider vinegar because I think it adds a bit of sweetness.. I don’t like to pickle with sugar)
  4. If going for a crispy pickle (like green beans or crunchy carrots)…. strain liquid into a pot with a teaspoon of salt per cup of liquid and any spices* that you want to use and bring to a boil  Add back to jar
  5. If going for a more tender pickle (like beets or celeriac), dump the liquid and the veggies into a pot with a teaspoon of salt per cup of liquid and any spices* you want to use. Bring to a boil for a few minutes, then remove and replace back into jar.
  6. Place lid and stick in fridge for at least a day….(I alway cheat and end up taking a bite within the first few hours) The flavor only gets better after being in the fridge for a couple of days.

*You can spice your pickles anyway you see fit…. I like to use peppercorns, garlic, mustard seeds, celery seeds red pepper flakes. Or for a little sweeter and more fragrant pickle, cinnamon stick, cardamom pods or star anise…the possibilities are endless.

Pickles are usually good for about a month, but I have never been able to keep them that long!

A little about these specific pickles……

I used one medium celeriac root, and 2 small beets. Sliced about a 1/4 inch thick and then used a cookie cutter to make the hearts.  The chosen vinegar was apple cider, and yeah ,you must pickle both the inner and outer hearts….don’t waste the outer heart! And the spices I used were black mustard seed and peppercorns. 

And they be amazing!!!!

Have a Fantastic Weekend!! Hopefully full of  warm weather, fluffy clouds, and lots of pickles!

-C


THE LOVELY CRAZY

August 12, 2016 by maximios • Blog

My fingers are almost always stained a bright pink. My cutting board and counter tops, pink. Look closely at at dish towels and you will find pink blotches all over them as with any of my light colored clothes. You would think after years of trying to remove beet stains form everything that I would have gotten a system down or at least had a designated cutting board for them, but no. That would be to easy and really,  I think I kinda don’t care.  So pink my things will be.

Beets. You either love them or you hate them. I love them (so much), the mr, well I am making him love them. He needs to love them because I end up putting beets in everything. If you are a hater, there is still turn into a lover. But maybe you have never even eaten a beet or haven’t in a long long time.  I am actually surprised at how many people I have talked to that have never tried beets before. If you are one of those people, stop being that person and eat one already. OR if you think you hate them, why don’t you give them a second try, I bet you will change your mind. Sweet but earthy and nice and crisp but kind of juicy..they really are super tasty. And not to mention all the great health benefits(you can look those up yourself) Yup, beets be the shit!

 And I love a good roasted beet, but really, I prefer my beets raw. Which brings us to this salad. A simple salad of grated up beets, orange juice and toasted hazelnuts. Fast, easy, and tummy satisfying.  As long as you don’t hate beets (how could you) then you will love it.

Now you get those beets!

The stuff. A big beet, (or two smaller ones) an orange,( I bought navel oranges and sliced into this one to find it was a blood orange… not complaining), hazelnuts (raw or toasted) apple cider vinegar, and salt and pepper. Optional but also very nice, some greens and or some type of grain. (I happen to have a some quinoa in the fridge)

Hazelnuts. If yours are already toasted, then no need to do it again, but if they are raw, toss them into the oven for a few minutes (hazelnuts taste so much better toasted)

And grab the beet and a shallow dish and grate it all up.

Add to the beet the juice of the orange, a small splash of vinegar to cut the sweetness, and salt and pepper to taste. Give it a good toss and let it sit for at least 5 minutes, if not longer.

And if the hazelnuts are in the oven, take them out when they are slight golden brown. If you want to remove the skins, just stick them in a clean towel and rub it off.

Everything all ready to go.. Any extras are added to bowls.

Beets into bowls, topped with toasted nuts and a cute little orange segment.(if you happen to have one lying around)

Isn’t that just something. Beets are so pretty,, but more importantly, so freaking tasty good.

Enjoy Today!

-C

makes enough for 2 people as a side

  • 1 large beet or 2 smaller beets
  • 1 orange (I used blood orange but any orange would be good)
  • handful of hazelnuts (either already roasted or raw that need to be roasted)
  • apple cider vinegar
  • salt and pepper
  • Optional – quinoa (any grain would work) and or greens

If you hazelnuts are raw, toss them onto a baking sheet ans place them into the oven at 300 for about 6-8 minutes until slightly golden brown and smell so nice. When done remove and if you don’t like the skins, place nuts in a clean towel and rub the skins right off.

Wash beet(s) and grate into a swallow bowl. I don’t peel mine, but peel if you must. Add in the juice of the orange, a splash of vinegar and a dash of salt and pepper. Mix around and let sit for at least 5 minutes (the longer the better)

When you are ready for food, grab a bowl (add anything you want to add to the bottom, like quinoa or greens) and fill that bowl up with the beet salad and top with roasted hazelnuts.

Grab a fork and eat.

My winter farm share is coming to an end this week. One more pick and then a three week stretch until the summer share starts… WHAT AM I GOING TO DO!!! Stock up as much as I can is what.

I have been strategic about the roots and veggies that I have chosen to bring home the past few weeks.(My farm lets you pick what you want)  I know what I can buy at the store, things like carrots and potatoes, so I have been passing those up, but the roots like beets and celeriac… I have been bringing home baskets of those and hoarding them in the fridge and basement in preparation for the laps in farm fresh food and knowing that if I want to by these at the store it s going to coast me a million dollars  a pound. (a for real million dollars)

Yup, lots of roots around here, especially celeriac root which is fantastic. I am kind of obsessed with celeriac, with its fibrous, knobby exterior, soft but almost meaty texture inside, and a flavor that  is close to celery but so much better.  I don’t know why it has taken me so long to do a posting featuring this amazing root vegetable  (I eat it almost every day)

So here, an amazingly tasty, hearty but not heavy, celeriac recipe.  Perfect for spring and the change into summer…. Mustard roasted celeriac with an fanatic split peas gravy that will have you licking you bowl clean.

 The stuff….For the split pea gravy we have a carrot, a parsnip and a large onion chopped into small chunks.  Salt, thyme, a bay leaf and of course the split peas. Then there is the celeriac root* sliced into 1/2 inch thick rounds and some plain old yellow mustard .

*Note. I don’t peel my celeriac root. I really enjoy the fibrous exterior but realize that some don’t(The mister does not like it) so peel it if you want. 

Toss the chopped parsnip, carrot, onion and the spices into a pot on medium heat and let veggies sweat a few minutes until tender.  Add in the split peas and enough water to cover everything.  Turn pot on high and bring to a boil, then cover and turn to low. Make sure to give the pot a good stir ever few minutes and add more water if needed 

While the gravy is cooking,  take the celeriac rounds and brush each side with yellow mustard, sprinkle with pepper, and place on a baking sheet. Stick into the oven to roast for about 25 minutes, flipping the rounds after about 10 minutes.

Once the peas have soften, remove the bay leaf and puree until smooth and oh so creamy. Taste and add more salt and pepper if needed. If you find that the gravy seems to thick, just add in more water until it’s the consistency that you want. The gravy is made, the celeriac is roasted… now we are ready to eat!! Stick the celeriac on a plate and dump good amount of that gravy right on top. Feel free to add a bed of spinach, or a grain or anything you want, because why not, and also some chopped tomatoes for a little acid and prettiness.

Serve with the fanciest knife and fork you can find. Extra yellow mustard and sriracha sauce are great condiments to have close by.

Happy Tuesday!

-C

Mustard Roasted Celeriac with Split Pea Gravy

  • 2 medium celeriac roots
  • 6 tablespoons mustard
  • 1 large carrot
  • 1 medium parsnip
  • 1 large yellow onion
  • 2/3 cup split peas
  • 2-3 cups water 
  • 1 bay leaf
  • 2 teaspoons thyme or italian spice mix
  • salt and pepper
  • spinach (optional)
  • diced tomatoes(optional)

Preheat oven to 400 degrees

Small dice the carrot, parsnip and onion and throw into a large pot. Spinkle with salt and pepper, add in the thyme and bay leaf and add a splash of water. Stick on stove on medium heat and stir. Let cook until the veggies become soft and fragrant. Now add in the split peas and 2 cups of water. Bring to a boil then cover and turn heat down to medium low. Let cook until the split peas become tender (about 25 minutes) string on occasion and adding more water if the peas are not completely summered while cooking.

Once the peas are tender, let cool for a few minutes, remove bay leaf, and either dump into a blender or blend with an immersion blender until nice and creamy. If gravy seems to thick, add in more water. 

Scrub or peel celeriac roots and slice them into 1/2 inch think rounds. Place on a baking sheet and brush mustard on both sides and spindle with pepper. Stick into oven for about 10 minutes, flip, then back into the oven for another 15 or so minutes, or unit the celeriac is tender.

When the celeriac is done remove from oven and  stick a few rounds on a bed of spinach (or not, or any kind of grain or green you like) Top with a hearty helping of the gravy and toss on some chopped up tomatoes.

Eat with at knife and fork like a fancy person.

 I’ll let you know now, I am a make and eat soup all year long person. I can think of few things better then sitting outside, basking in the sun, hopefully with a light wind, a book in hand, enjoying a nice big cup of some good homemade soup. (Doesn’t that sound so freaking lovely?) This soup right here is perfect for just that. Parsnips are the best, kind of like a big white sweet, yet starchy carrots. And cooked together with a little bit of light and lemony thyme, rich earthy turmeric and a couple more chopped veggie….. you got yourself a nice thick and fragrant bowl of happiness that fills you up without weighing you down. It’s food you can eat that fills you up, leaves you feeling cozy, yet still wanting to hop on a bike or lace up the running shoes.  Hearty without the feeling of all the heaviness.

A perfect soup for spring! (or summer, winter, or fall)

The stuff. Parsnips, carrots, onion and garlic. Thyme and turmeric, salt and pepper. the tinniest bit of oil and water (water not shown)Chop all the veggies and the garlic, drizzle a dutch oven or a pot with oil, toss in the veggies. Add the turmeric, the thyme, and 1/2 cup of water. Sweet sweating the veggies. Turn pot on medium and cook until the water completely cooks out. When the veggies start to brown and stick to the pot, deglaze with water. Give a good stir and keep cooking. Repeat the deglazing process until the veggies are super soft and ready to blend. (I did this 4 times.. it only took 10 minutes)Add enough water to cover the cooked veggies. And now blend the heck out of it.. Go as smooth or chunky as you want. I blended as smooth as I could get with this crappy immersion blender. (Blender on loan until I finally decide on, and buy a new one)And there you have it. Scoop into bowls, add lots of cracked black pepper, and go to town. I made enough to save a bowl for later…  it didn’t last for later. 

Soup so good. 

-C

Parsnip Thyme and Turmeric Soup 

  • 4 large parsnips
  • 2 carrots
  • 1 whole onion
  • 3-4 cloves garlic
  • 2 teaspoons thyme
  • 2 teaspoons turmeric 
  • salt and pepper
  • olive oil
  • water

Dice up the parsnips, carrots, garlic and onion and place into a large dutch oven or pot. Drizzle with a bit of olive oil,  sprinkle on the spices, salt and pepper and add about 1/2 cup of water. Turn heat on medium and start cooking down the veggies. Once the water evaporates and the veggies start to caramelize, deglaze pot with about a 1/2 cup of water. Give pot a stir, and continue to cook until water evaporates.  Repeat this 2-3 more times until the veggies are super soft and fragrant. 

When the  veggies are ready, add enough water to the pot to submerge the veggies. Bust out the immersion blender or dump into a blending device and blend until smooth (or the consistency that you want) Have a cup of water ready to thin out if needed. When blended, taste for salt and pepper, add more if you want, and cook on low heat until you are ready to serve.

Garnish with a lot of good cracked pepper

Eat from a vessel, use a spoon

 I spent a lot of time indoors this week, due to the fact that my eyelids would freeze shut when going out for more than a few minute..(for real, walking to the gym the other day, I had my head tightly wrapped and the condensation from my breath went up, into my eyes, and froze.)  I mean, I love winter, I love the cold, but I am not a huge fan of -30 with wind chill… I get cold bones.  After that morning, the mister insisted on diving me…Love. So we (me, Nick, and especially Washer) might have felt a little trapped this week, and when trapped inside, we get a little antsy, but we have been trying to make the most of it. Cooking, baking, cleaning, drawing, reading, knitting, drinking lots of coffee and tea, and overall trying to stay warm (and sane) Yup. trying to ward of the cabin fever, especially this year, living in a little tiny bit of a room with one window..has been a little difficult. And I know it’s going to be a bitch when it hits. But it’s all cool, We have plans in the making, places to look forward to, things to see. It always helps to have an adventure awaiting to keep the fever at bay.

Anyway, not a bad week, maybe a little stuffy, but nothing to complain to much about. Here are a few of highlights that made(make) me happy.

The kitchen, living room, dinning room, office…all over great room., covered in piles of clothes. Sometimes listening to music and folding laundry can be so, I don’t know, peaceful. I just felt happy at this moment. (might be the fact that I know have some clean clothes and dish cloths)


The trash dog and I went for a lovely little hike by ourselves…It was so nice to get out of the house. We both really really really needed it that day. And look how handsome he looks.. so red against the world. 

 Standing in line at the grocery store, saw this magazine and started to laugh. I love Oprah…but now…I really love Oprah. Best magazine cover ever!

Another picture of the pup. Letting his rino toy have the bed. A little pathetic…A lot cute

  I am doing little recipe testing and this situation in this pot is so freaking good! Just trying to work out a  few technical kinks. 

I love to look up… don’t forget to look up.


I made a large quantity of banana dream (what I call banana ice cream). This stuff is like crack.. Once I start eating it, I can’t stop. I might overdose on bananas but I am ok with that. 


I went to a granite and marble showroom this week. And like whoa, so freaking cool. Walking among huge pieces  of gorgeous slabs of stone is kind of magical… and a little cold.

A basket of roots….More like a basket of rainbows. 


I currently don’t have a pretty vase of zinnias on my table, (these beauts are from this past summer) but I really wish I did. Fresh flowers are one of my favorite  things. This picture has inspired me, I am on the hunt for some pretty fresh. 

That sums up the week…Stay warm!

-C

THE LOVELY CRAZY

August 12, 2016 by maximios • Blog

Every year I look forward to St Patrick’s day.. And not because I am Irish, (which I am) or because I want to drink on excess (which I do not) and no,  green eggs and ham are not something that I plan on making. No Ido not look forward to any of those things (although I actually do like to pinch the littles that wear no green and talk about pots of gold and rainbows) I love this time of year because cabbage is always on a freaking super sale everywhere you go.  Something that is usually 80-99 cents a pound goes down to like 20 cents a pound. And for someone that eats like 10 heads of cabbage a week, this is a hug savings. SO yeah, I buy so so much (I have already bought 12 heads, but I actually plan on buying a full case before the sale is over)

No, I am not crazy, I will eat it all….. and I am going to be making so much sauerkraut. Woo hoo!

But until then. A cabbage pot roast. Yes. I remember growing up my mom would make pot roasts once in a while. A big pot full of big chunks of veggies topped with a big slab of some kind of meat. I never liked the meat, but I always loved the big chunks of the veggies at the bottom of the pot. So I figured I would make a big pot roast, replace the meat with a head of cabbage (I have so much) and add beans because protein and because they are just so good. . And when it’s all cooked and said and done, you end up with a big pot of plump and so flavorful veggies and beans and the most tender wedged of roasted braised cabbage.  This is my kind of pot roast.

Now go quick.. the cabbage sales will be over soon.

The stuff. One good sized head of cabbage, a few carrots, a big onion, and a hunk of rutabaga. Also have some dried kidney beans, caraway and fennel seeds, dried ground mustard, a bay leaf, some garlic, and salt and pepper. And water… water is needed.

Note. You can use just caraway or just fennel and you can replace or even add a potato in place of the rutabaga.

Dried beans, fennel and caraway into a pot with water. Stick the pot on the stove ans bring to a boil, then to a simmer to give the beans a quick head start before going into the oven.

While the beans are simmering, dice up the garlic and chop up the veggies into big chunks… you don’t want small chunks or they will kind of turn to mush while cooking.

And turn over the cabbage head, take a knife, and slice a deep x into the core. DO THIS or else the inside of the cabbage will not cook through. Oh and preheat the oven to 375.

Beans looking a bit plumped..

Top those beans with all the chopped veggies,(don’t stir them in., you want to keep the bean under submerged in the water) sprinkle those with the mustard, salt and pepper and place that lovely cabbage head right on top…

Place a lid on the pot and slide it into the oven to cook away. It’s going to take a bit of time (about an hour) but it’s pretty much hands off. Just take a look after about 45 minutes, check the bean doneness, add in another cup or so of water and place lid bacck on and cook for another 12-20 minutes until the beans are done. When they are, take the lid off, crank the oven to 450 and cook for another 15 or so minutes until the cabbage gets all golden brown

Look at that… Tender roasted veggies, plump beans. Everything about this is right.

Grab a knife and cut the cabbage (its so tender) into big wedges.

A wedge into a bowl along with a big spoonful or two of the beans and veggies..

Finished with a dash of salt and pepper and (not shown here,) lots of mustard.. Oh cabbage… you are so good!

Eat away and Happy St Patrick’s Day.

-C

serves 3-4

  • 1 cup dried kidney beans
  • 3-4 cups water
  • a medium sized head of cabbage
  • 2-3 carrots
  • 1 large onion
  •  a potato or a a small rutabaga(or both)
  • 1 heaping teaspoon caraway seeds
  • 1 heaping teaspoon fennel seeds
  • 1 heaping teaspoon ground mustard
  • a bay leaf
  • salt and pepper

Place the fennel, the caraway, and the bay leaf into a large dutch oven along with the dried beans and 3 cups of water. Place on the stove and being to a boil then, turn heat to low and simmer the beans for about 15 minutes.

While beans are simmering, chop up the carrot, onion and rutabaga into big chunks and dice up the garlic. Take head of cabbage and slice a deep x into the core.

Preheat oven to 375

Once the beans have simmered a bit, add in the chunks of veggies, the ground mustard and salt and pepper (Don’t stir, you want to keep the bean submerged in the water). Place the head of cabbage right on top of the veggies and sprinkle with salt and pepper.

Place a lid on the pot and stick the whole thing into the oven. After about 45 minutes, check the roast and the beans for doneness and adding in another cup of water id needed. Back into oven with the lid for another 15-20 minutes or until the beans are tender Onnce they are, remove the lid form the pot and crank the oven up to 425. Cook for another 15 minutes or so until the cabbage turns a nice golden brown.

Remove from oven, let cool for a few minutes, cut the cabbage head into wedges and serve it up with big spoonfuls of beans and veggies.

Eat until your full.

.

Are you ready for this weekend? You know what’s coming right? Yup, another arctic blast. -30 degree temperatures, windchill warnings and local news forecasters warning of dangerously cold conditions. “Don’t go outside , your face will freeze off”

Oh yeah, and Valentine Day.

What are your thoughts on the V day? The mr and I, well we could kind of care less, but at the same time, we like the excuse to spend the day together, traditionally going for a hike with the pup (not this year… we would die) and just spending the day together being sweet (pretty much the same way we spend any days off together) We don’t get fancy with dinner dates or overly large stuffed animals. No boxes of chocolate, bottles of champagne or fancy undies.  We keep it caj, maybe a sweet hand made card covered in glitter (never a store bought.) a stop for a good cup of coffee and an afternoon trip to the plant store to by a new pretty house plant (1. I really hate red roses and 2. I would much rather get a house plant then flowers that will die) But honesty, we just use V day as an excuse to not work and spend the day together, being left alone, eating whatever we want and doing whatever fun stuff we want.

This dish was kinda inspired by being so pretty bright pink, but also it was just what I wanted to eat for dinner. Spaghetti squash doesn’t get as much play as it should. Sure it’s not the most sweet and nutty of the squashes, but it has a really nice subtle flavor that makes it a fantastic base for pretty much anything. And the beet sauce. Again, it’s such a pretty color, but beside that, I can’t get enough of them. I love me some roasted beets (way better then any chocolate or sweet treat)

I could lie to you and say that this is the dish that I will be making for me and the mr on Valentines day, but no,this dish already happened this week and the mr got into it, but would rather eat his favorite meal (pizza) for dinner.  And I will be eating the left over beet sauce with carrot sticks (this beet sauce id for real.. topped with a little yellow mustard… I could eat it for life)  then make a hugmongo batch of popcorn covered in peanut butter. We wiil sit on he couch and watch a lot of Netflix (still working my way through the fresh prince) and maybe a cute Wes Anderson movie. I will be in bed by 9.

But don’t mind us old folks here. Go for it. Do up the Valentines Day. Make a pretty dish of food for your sweetheart, or if alone, make it for yourself, especiallyif you are hanging by your lonesome. Valentinesday is about being happy and this dish will make you happy, whether or not you plan on sharing it.

The stuff. One spaghetti squash big enough for at least 2 people (I love left overs so maybe big enough for 4), 2 largish beets, a a small onion. Also grab a clove of garlic of 4, a lemon, the salt and pepper, and some olive oil. Optional, but a very nice addition is a handful of tasted walnuts.

Quick and crank up the oven (make sure you take out the cast iron you left in there from last night), then stick the squash, beets and onion into the hot oven to roast. I stuck them all on a baking sheet and left them completely whole, but if you want, you could chop the beet and onion into chunks and drizzle with oil or you could wrap the beets in foil and bake them that way but really, why go through all that when you can just not? And don’t bother peeling them.(unless you think you must.. but you really really don’t need too)

And same for the squash. You could cut in half and roast it that way, but again, why when you don’t need to.

So anyway, roast the beets and onion until fork tender. And the squash as well (check by stabbing with a fork) All my stuff roasted up pretty much perfectly at the exact same time, but it really depends on the size of your stuff. So check after 40ish minutes.

And once you pull that roasted stuff from the oven, let it cool just enough where you can handle it. Chop the onion into a couple chunks, the beets into smaller chunks and slice the squash in half length wise and set aside.

Grab a blender and toss in the onion, beets the juice of the lemon (start with half) apinch of salt, a few pinches of pepper, and a clove or 2 of garlic (ok, I love raw garlic and used a lot. If you do not like the taste of raw garlic, just toss it with a little oil and stick into the oven with the beets for about 10 minutes. Or you could omit the garlic entirely)

Once all the stuff is in the blender, turn it on. Drizzle in about a tablespoon or two of olive oil and blend until a nice smooth sauce has formed. Taste, season with more salt and pepper if needed. Add the other half of lemon if you think it needs it. You can also add a bit of water to thin it out more.. if you want

So now the squash should be cool enough to handle. Scoop out the seeds and with a fork, scrape up into spaghetti!

Heaps of squash go into bowls then topped with a generous mound of beet sauce. Topped with some roughly chopped toasted walnuts, a sprinkle of pepper and some bits of green stuff (I just diced up some kale)

Look at that. So pretty, so pink and all ready to go. Dinner for 2 with a good bit of left overs for later!

Happy weekend! And Happy Valentines Day if you do it, or if you don’t!

-C

makes 3-4 servings

  • 1 medium sized spaghetti squash
  • 2 large beets
  • 1 small onion
  • 1 lemon
  • 2-4 cloves garlic
  • handful of toasted walnuts (optional)
  • olive oil
  • salt and pepper to taste

Note. You might want to thin out sauce out a bit without the use of a ton of oil. Go ahead and add a little water. Also, I used raw garlic in mine, but some people might not like it raw. Just toss a few cloves of garlic in a bit of oil and stick into the oven for 10-15 minutes with the other stuff to give it a little roast. OR just omit.

Preheat oven to 425.

Stick the onion, beets and squash onto a baking sheet, drzzle the beet and onion with a tiny bit of oil and stick the sheet into the oven. Roast everything until fork tender which should take around 45-50 minutes. (depending on the size of your produce, some thing might take longer or shorter, so just check after 40ish minutes)

Once everything is roasted, let the beets and onion cool just enough to handle and cut into chunks and toss into a blender. Add in the garlic, the juice of the lemon, a few drizzles of olive oil and a pinch of salt and pepper. Now turn blender on and blend until smooth.

And the squash. Cut the thing in half and remove the seeds.  Then with a fork, scrap the squash from the skin into spaghetti like strands.

Place squash into bowls, sprinkle with salt and pepper, add a drizzle of oil if you want and top with a good hearty heap of beet sauce. Top with more cracked pepper and a few chopped walnuts and maybe add a little something green, you know, to make it pretty.

Serve warm with love and a fork.. your lips might turn pink with beet love.

Once in a while I make a dinner that the mr does not want to eat, like anything with too much corn or things made with lots of vinegar… not his taste. Don’t get me wrong, most of the time, he will eat what I make (casue he loves me) but he clearly doesn’t really like it. And that’s when pup usually gets left over for dinner. (He always likes everything that I cook)

One of those things that I know the mr doesn’t like are beets. Sure, he will eat things that has a few beets in it, but once he found out that this casserole starred beets, his eyes widened and he looked worried, like “oh great, but please don’t make me eat this”. Not to worry. He was getting pasta for dinner because this casserole was not for him. It was for me. It has everything that I love in the word (food wise ) tossed together and baked into a pretty skillet, just for me. Plus the beets, sweet potato and kale were the last from the farm share.  So it was my good by farm food, casserole of greatness. And I didn’t want to share.

So yeah, if you are not a fan of beets, or any of the other stuff in this casserole for that matter, then don’t make it. But if you are awesome and know the greatness of the beet, especially paired with lentils and sweet potato, well I suggest you go and make this right away. And bonus… it’s super healthy and hardy which make for a great dinner on a cold night and after all the holiday food last week. 

The stuff. A large sweet potato, a couple of big beets and some dried lentils.  Gonna want some veggies, like an onion, carrots, cabbage and kale. Also want garlic, some salt and pepper, water and tiny bit of olive oil.

First thing first, get the beets and the sweet potato in a pot to boil* Just dice then up and toss into a pot with enough water to submerge the roots. Sprinkle in a bit of water ad bring to a boil, stick a lid on pot, and turn hat to medium. 

*Note. I boiled my beets and sweet potato in one pot because well, I just didn’t want to have one more pot to wash. But if you do this, your sweet potato will turn slightly pink, whichI think is really pretty. If you want your sweet potato puree to look orange, gonna have to dirty another pot and boil the beets separately.

And chop up our veggies and mince the garlic. Drizzle a tiny amount of oil into a skillet or pot, toss in veggies (minus the kale) and cook on medium heat just until they start to soften a tiny bit. Once the veggies are cooked, remove them from heat, add in chopped kale, and set aside.

And make your lentils. (i used the pot I just cooked the veggies in. The less dishes the better!) Water and lentils into pot with a pinch of salt, bring to boil, cover and place on low until lentils are tender.

When the beets and sweet potato are fork tender, drain water into a jar and separate the beets from the potato (if you boiled them together). Blend the beets then the sweet potato until it’s the consistency that you would enjoy eating it (I like a little bit of chunk, not completely smooth) Use the drained water to thin out as much as you need/want.

All the stuff ready to compile.

Grab the cooked veggies and toss them into a oven safe skillet or casserole dish and mix together with the lentils. Sprinkle with salt and pepper.

Now evenly spread the beet puree on top of the veggies

Then ever so gently, spread the sweet potato on top of that.

Give the top a good pinch of salt and pepper and stick the thing into the oven.

Remove from oven when the sweet potato has browned andis slightly crispy.

And scoop a big old scoop into a bowl, grab a fork, and stuff your face!

Happy today day!

-C

Remove from oven, let cook for a few minutes then eat it with a fork, a spoon, or your fingers.

Beet Sweet Potato and Lentil Casserole

Make 3-4 servings (or one serving for me!)

  • 1 large sweet potato
  • 2 medium beets
  • 1 cup cried lentils
  • 2 cups water
  • 3-4 cloves garlic
  • a medium yellow onion
  • 2 carrots
  • ¼ head of cabbage
  • a few kale leaves
  • salt and pepper
  • olive oil

Note.. I did not add extra seasoning to this because I love the taste just as it is. But if you are feeling like it needs some seasoning, just add some in.

Start by chopping the beets and sweet potato into medium sized chunks and boiling them until they are fork tender. You can do this either in two separate pots or in one large pot. (if in one pot, the sweet potato will turn a little pink)

Once those are boiling, chop up all the veggies (not the kale yet) and the garlic and toss into a pot or skillet with a drizzle of olive oil and cook on medium heat until the veggies are slightly tender. Remove from heat, add in chopped kale and set aside.

And make the lentils ( I cooked the veggies in the pot, removed them ans used the pot to make the lentils… less dishes). Dump the 2 cups water, a pinch of salt, and the lentils into a pot.  Bring to boil, cover, then turn heat to low. Cook for about 20 minutes until the lentil are tender.

Preheat oven to 400

Once everything is cooked and ready to go, dump the lentils and the veggies into oven safe skillet or casserole dish and mix around. Take beet puree and spread evenly over the mixture. Then do the same with the sweet potato puree.  Sprinkle the top with salt and pepper and stick the casserole into the oven to bake until the top is all browned and slightly crunchy (about 30 minutes)

Remove from the oven, let it cool for a few minutes, then eat it. Fork, spoon, or your fingers work.

Last week pineapples were on sale everywhere……So I bought 5. Don’t judge 

And I bet I am not the only one that got overly excited at $1.50 pineapple and bough themselves a few. We will just call ourselves opportunists.  Now we have plenty of pineapples and don’t have to pay  the $4 a piece prices. (Justification)  

But if you don’t have a pineapple laying around, you must go get one. (Maybe if your lucky, there might still be some sales going on) because you must make this salad. I am on a mission to make everyone I know eat it because, for lake of a better way to say it…….It will rock your world.

Dill and pineapple are a serious match made in heaven. Pineapple, with its sweet, tangy, citrusness  and dill with it’s super fresh earthiness. Mixed together with a few other helpers to create a fresh, clean, chunky, tangy, over the top, flavor. I could stop right there, but toss in a handful of lentils, some creamy avocado and a bed of kale…It’s like the best spring time, celebration on you tongue, happiness in you tummy, kind of salad.

A salad that will make you smile. (and maybe buy  5 pineapples) 

 Stuff for the goodness. We got the kale, some avocado because all salads should have avocado and some cooked lentils because, well, all salads should have lentils (or beans or nuts.. so you could totally something else) Then a few sprigs of fresh dill, a clove of garlic, red wine vinegar, salt and a bowl of chunked up pineapple. The pineapple, dill, garlic, red wine vinegar, a splash of water and a pinch of salt get blended in a blender or whatever blending device you use. Go as smooth or chunky as you like, I recommend going smooth, but leaving a little chunk, like half blended.

The prep is done, now compile.  Kale in bowl, top with lentils,. Toss on avocado chunks, and, last but not least, the blended pineapple dill mixture.So good……So so good.

Happy Friday!!

-C

So Good Pineapple Dill Kale Salad

Serves Two

  • 3 cups washed and chopped Kale
  • 1/2 a avocado, diced
  • 1 cup fresh pineapple chunks
  • 1-2 springs fresh dill
  • 1 tablespoon Red Wine Vinegar
  • Salt 
  • 1/2 cup cooked lentils (or any bean or nut will do)

Note. No fresh dill? You can use dried, just sub in 1 teaspoon for the fresh and after blending with the pineapple, let sit a little longer to really let the flavors meld together. 

Place pineapple, dill, pinch of salt, vinegar and garlic into a blender or whatever you own that blends and blend stuff together, leaving it a little chunky. Let sit for 5-10 minutes.

Kale goes into a bowl and add the lentils and diced avocado. Pour the blended pineapple on. Toss around. 

Now eat.

THE LOVELY CRAZY

August 12, 2016 by maximios • Blog

Every year I look forward to St Patrick’s day.. And not because I am Irish, (which I am) or because I want to drink on excess (which I do not) and no,  green eggs and ham are not something that I plan on making. No Ido not look forward to any of those things (although I actually do like to pinch the littles that wear no green and talk about pots of gold and rainbows) I love this time of year because cabbage is always on a freaking super sale everywhere you go.  Something that is usually 80-99 cents a pound goes down to like 20 cents a pound. And for someone that eats like 10 heads of cabbage a week, this is a hug savings. SO yeah, I buy so so much (I have already bought 12 heads, but I actually plan on buying a full case before the sale is over)

No, I am not crazy, I will eat it all….. and I am going to be making so much sauerkraut. Woo hoo!

But until then. A cabbage pot roast. Yes. I remember growing up my mom would make pot roasts once in a while. A big pot full of big chunks of veggies topped with a big slab of some kind of meat. I never liked the meat, but I always loved the big chunks of the veggies at the bottom of the pot. So I figured I would make a big pot roast, replace the meat with a head of cabbage (I have so much) and add beans because protein and because they are just so good. . And when it’s all cooked and said and done, you end up with a big pot of plump and so flavorful veggies and beans and the most tender wedged of roasted braised cabbage.  This is my kind of pot roast.

Now go quick.. the cabbage sales will be over soon.

The stuff. One good sized head of cabbage, a few carrots, a big onion, and a hunk of rutabaga. Also have some dried kidney beans, caraway and fennel seeds, dried ground mustard, a bay leaf, some garlic, and salt and pepper. And water… water is needed.

Note. You can use just caraway or just fennel and you can replace or even add a potato in place of the rutabaga.

Dried beans, fennel and caraway into a pot with water. Stick the pot on the stove ans bring to a boil, then to a simmer to give the beans a quick head start before going into the oven.

While the beans are simmering, dice up the garlic and chop up the veggies into big chunks… you don’t want small chunks or they will kind of turn to mush while cooking.

And turn over the cabbage head, take a knife, and slice a deep x into the core. DO THIS or else the inside of the cabbage will not cook through. Oh and preheat the oven to 375.

Beans looking a bit plumped..

Top those beans with all the chopped veggies,(don’t stir them in., you want to keep the bean under submerged in the water) sprinkle those with the mustard, salt and pepper and place that lovely cabbage head right on top…

Place a lid on the pot and slide it into the oven to cook away. It’s going to take a bit of time (about an hour) but it’s pretty much hands off. Just take a look after about 45 minutes, check the bean doneness, add in another cup or so of water and place lid bacck on and cook for another 12-20 minutes until the beans are done. When they are, take the lid off, crank the oven to 450 and cook for another 15 or so minutes until the cabbage gets all golden brown

Look at that… Tender roasted veggies, plump beans. Everything about this is right.

Grab a knife and cut the cabbage (its so tender) into big wedges.

A wedge into a bowl along with a big spoonful or two of the beans and veggies..

Finished with a dash of salt and pepper and (not shown here,) lots of mustard.. Oh cabbage… you are so good!

Eat away and Happy St Patrick’s Day.

-C

serves 3-4

  • 1 cup dried kidney beans
  • 3-4 cups water
  • a medium sized head of cabbage
  • 2-3 carrots
  • 1 large onion
  •  a potato or a a small rutabaga(or both)
  • 1 heaping teaspoon caraway seeds
  • 1 heaping teaspoon fennel seeds
  • 1 heaping teaspoon ground mustard
  • a bay leaf
  • salt and pepper

Place the fennel, the caraway, and the bay leaf into a large dutch oven along with the dried beans and 3 cups of water. Place on the stove and being to a boil then, turn heat to low and simmer the beans for about 15 minutes.

While beans are simmering, chop up the carrot, onion and rutabaga into big chunks and dice up the garlic. Take head of cabbage and slice a deep x into the core.

Preheat oven to 375

Once the beans have simmered a bit, add in the chunks of veggies, the ground mustard and salt and pepper (Don’t stir, you want to keep the bean submerged in the water). Place the head of cabbage right on top of the veggies and sprinkle with salt and pepper.

Place a lid on the pot and stick the whole thing into the oven. After about 45 minutes, check the roast and the beans for doneness and adding in another cup of water id needed. Back into oven with the lid for another 15-20 minutes or until the beans are tender Onnce they are, remove the lid form the pot and crank the oven up to 425. Cook for another 15 minutes or so until the cabbage turns a nice golden brown.

Remove from oven, let cool for a few minutes, cut the cabbage head into wedges and serve it up with big spoonfuls of beans and veggies.

Eat until your full.

.

 Being that it was St. Patricks day this week and lots of folks buy up a good amount of cabbage, I figured that this is a good time to get people to try one of my most favorite of favorite meals…..Beet bean and cabbage steaks. I love to play around with food, how to pair textures and colors plus tastes while trying to make whatever I am making healthy and balanced. This is one of my fav creations. And sure,  this may seem like a somewhat weird combo, maybe a little like a extremely hippy dippy vegan fake meat thing, and you might be kind of right, but screw if it doesn’t taste like A-mazing. First off, notice how freaking dang pretty this thing is. The roasted beets bring a earthy hearty flavor but also pack a huge punch of color, especially when blended together with the ever so sweet white bean, which  brings a nice mellow taste and a great serving of protein. (Beets and beans are meant for each other). Spread that  brightly colored, tasty mixture onto of a huge slab of one of my favorites, roasted cabbage with all its crunch and cabbagy flavor and you got yourself a hearty healthy meal of deliciousness.  

So maybe this might seem a little out of your normal food routine, but why not try it? Trust me….you will love it and everyone you make it for will think you are a number 1 badass too.

Cabbage, white beans, and beets. There is a lemon involved, but it didn’t make it into the picture.

Notes…. I used white beans, but I have also done this with chick peas and lentils. All are fantastic. Also, I did not peel my beets because I never do.(I do not peel anything the skin is full of goodness and I love the taste) If you don’t want to eat the skin, then peel them. Cabbage is cut into inch thick slabs… I like to us the inter most part of a cabbage head cause I like the core. But use any cut that you want.  2 beets are chopped into chunkers and both the cabbage and the beets are placed on a lightly oiled baking sheets, seasoned with salt and pepper,  and stuck into the oven for 20-25 minutes at 400 degrees.

Once the beets are tender and the cabbage is cooked to a nice withered golden pretty, take out of the oven, but leave the oven on.  Leave the cabbage on the pan but throw the beets into a blender or a big bowl if using a hand blender  with the white beans

    Beans and beets get pureed together. Add the juice of 1/2 a lemon (or the whole lemon, depending on your taste) and a pinch of salt and pepper. With a big spoon or spatula, scoop equal amounts of the bean/beet mixture on top of the cabbage steaks and spread around. Sprinkle with cracked pepper and place back into oven for another 5-10 minutes. (You could totally skip the second bake, but I like my cabbage well done and crispy)

Oh ho boy… And with a good squirt of mustard to finish off… I could eat this all day, everyday 

And now I am #1

Happy Wednesday… Keep it good!

-C

Beet and Bean Cabbage Steaks 

Makes 2 Thick Cut Steaks

  • 1/2 head of cabbage (green or red)
  • 2 cups or 1 can of cooked white beans
  • 2 medium beets
  • 1 lemon
  • salt and pepper
  • Mustard (Optional)

Preheat Oven to 4oo degrees

Cut two 1 ish inch thick rounds of cabbage from the widest part of the head. Place on a lightly oiled baking sheet. Chop beets into chunks and toss on same baking sheet.(Peel if you want) Sprinkle everything with salt and pepper. Stick into oven for 20-25 minutes or until the beets and cabbage  are tender. Remove veggies from oven and place roasted beets into a  blender (or bowl if using a hand blender) but leave the cabbage on the baking sheet. Add the white beans, the juice of half a lemon, and salt and pepper to the beets and puree until smooth. Scoop equal amounts of the mixture to each cabbage steak, sprinkle with pepper and place back into oven for another 5-10 minutes to give the beans and beets a nice crunchy crust (You can skip this step if you don’t want to be crusty)

Remove from oven, stick on a plate and drizzle with mustard….Fork and knife are good ways to eat it, but eating it with you fingers makes less dirty dishes.

Happy St Patricks Day!!!! As a kid, St Patricks day always meant green milk, green eggs, and those nasty gold foil covered chocolate coins. (you know, from the pot of gold) Not to mention all the leprechaun hunting and  pinching.  In my family, if you were unlucky enough to forget to wear green, you ended up as a walking target. It all started out nice an innocent, a pinch here or there, but by the end of the day, someone would end up pinching a little to hard or maybe just one too many times and the game would go from pinches to punches.   

Ahh, memories. 

Now as an adult (kinda adult) St Patricks is celebrated a little differently. The little ones in the family still get their green milk (which they are told is leprechaun pee) and those nasty gold coins, but I think the pinching has stopped.( a great tradition lost)  I myself don’t have any littles at home so no little leprechaun games or gross dyed food for me.  Nope, in my house we celebrate with a few beers and a more traditional irish dish, Colcannon. Mashed up potatoes with cabbage and kale… I mean, can it get much better? It can when you use red potatoes and red cabbage. Not only is it so tasty tasty, but it is so pretty pretty. No need for green milk or nasty candy. 

But I still make sure to wear green and you might find me doling out a pinch or two. 

  The stuff…. Super pretty red potatoes, red cabbage, shallots, kale, salt and pepper, and olive oil.

Note. If you do not have or want to use red potatoes, russet or white will work, it just won’t be as pretty. 

   Dice up the pretty potatoes and stick them into a pot and fill up with water and add in a good tablespoon of salt.  Stick on high heat and bring to a boil, then turn the heat down to medium  and cook those taters until super fork tender. (bring them to the edge of falling apart)

While the potatoes are boiling, chop up the cabbage, shallots, and the kale and stick into a big skillet with a good drizzle of olive oil. Sauté on medium heat until soft and tender.

Once the potatoes are super tender, drain the water and dump them into the pan with the sautéed veggies. With a potato masher or a fork, mash up the potatoes and mix in the veggies, adding a drizzle or more of olive oil as you go. (Start with a drizzle and work your way up until it tastes good to you) Salt and pepper to  taste. 

The most pretty pan of smashed up potatoes that I have ever seen. Eat as a side dish or even a light main dish. Fork is a good utensil to use, but I found that my fingers worked just as well.

Have a great happy day full of green, potatoes, and pinches. Maybe even a leprechaun or two!

-C

Red Potato Colcannon

  • 5-10 Red potatoes Red Potatoes depending on the size (about 3 1/2 – 4 chops chopped)
  • 1 Cup Chopped Red or Green Cabbage
  • 1 Cup Chopped Kale
  • 1-2 Shallots
  • Olive Oil
  • Salt and Pepper

Rinse and dice potatoes and place into big pot. Cover potatoes with water and add about a tablespoon of salt. Place on high high heat and bring to a boil. Turn heat to medium low and let potatoes cook until super fork tender. While potatoes are boiling, chop up cabbage, shallots and kale and sauté in a large cast iron skillet (or any skillet) with a good drizzle of olive oil.  Once the potatoes are done, drain water and add potatoes to the skillet with the sautéed veggies. With a potato masher or fork, mash the potatoes and mix with the veggies, adding a drizzle or two (depending on your taste) of olive oil as you go. Salt and pepper to taste.

Serve from skillet or dump into a fancy dish with a big spoon.

Eat as a main dish or as a side….Good hot, warm and cold.

Yay Tuesday! Which means its lentil day in my house. Ok not really, because everyday is lentil day in my house. Why? Because they are pretty much the best.  And with the addition of lots of garlic and lemon…..whoa nelly!!! Eat your heart out.But for serious, not only are these little bits of happy legumes oh so tasty, they also are a nutritional whomper.  So much protein, iron and zinc, magnesium and a bunch of other good stuff. Low in calorie and fat. Shelf stable, cheap, and fast and easy to cook. They are fantastic in soups, sauces, casseroles and salads. Eat them warm, cold, plain or covered in mustard. There possibilities with these little guys are endless. If you do not have lentils in your pantry right now, you are crazy. Make it  priority to get some. Do it today, and make these fantastically yummy lentils for dinner. Trust, you won’t be sorry.

Lentils, water (not shown but I think you know what it looks like) lemon, garlic, and some salt and pepper. Cabbage and kale to make it that much better.

Add a cup of lentils to a pot with minced or pressed garlic, the zest of the lemon and the juice of half the lemon. (save the other half to squeeze on top later) Add in 2 1/4 cups water , a sprinkle of salt and pepper, and bring to a boil. Place a lid on pot and turn heat down to low. Let cook for about 15 – 20 minutes or until lentils are just about done.

Now top the almost done lentils with  the cabbage and the kale. Add a splash of water and a pinch of salt  and replace lid. Keep pot on simmer for another 5-8 minutes until the veggies are wilted.  This gives you a slightly cooked, but still nice and crisp veggie. If you like you veggies a bit more soft, just add them into the lentils a little earlier or don’t even cook them at all. It’s whatever you want.

After a few minutes take the lid off and…aahh. Smells like cozy lemony garlicy happiness. 

 A big steaming bowl of everything that is good. Serve with an extra wedge of lemon to squeeze on top!

Tuesday Ah HA!

Make your day AWESOME!!!

  • 1 cup dry lentils
  • 2 1/4 cups water
  • 4-5 cloves garlic
  • 1 lemon (juice and zest)
  • Salt and pepper
  • some shredded cabbage
  • a few kale leaves

Add water, lentils, the zest and juice of 1 lemon and about a teaspoon of salt and pepper to a pot. Mince garlic and add that in too.  Bring to a boil then place a lid on it and turn down to simmer. After about 15 minutes, give lentils a stir. At this point the lentils should be a al denta, but just about done.( If you notice the lentils seem dry, just add a bit more water) Layer on the cabbage and kale, adding in a splashof water. Replace lid and let simmer of another 5-8 , or until lentils are cooked and the veggies are you cooked to your liking. 

No matter what is going on in my day, seeing a blue sky like this puts a smile on my face….To bad that smile turned to ice and my face froze in place. Because for some reason, winter around here now means below zero all the time. I mean, I love winter, but I am not going to lie… I wouldn’t mind if the wind would stop blowing and we had a couple of days of above zero weather.. and maybe a good foot of snow. I guess I’ll just have to be patient, cause its bound to happen. I mean, we live in Vermont, and if nothing else, we get weather. 

Anyways.. another week full of stuff that fills. I am a little taken aback that its already February… when was it January? Time just keeps going by fast and faster, (especially when I get cabin fever) and I think, “What have I done in the past year?” Well, I have done a lot. I was just looking through pictures from a year ago and found some of our tiny home in working progress. Not to many people can remodel a five unit house and a meat locker to live in, within a year.. by ourselves. (ourselves being Nick and I)..So yeah, that made me feel pretty freaking awesome and accomplished. (I needed to remember that because I haven’t been feeling it) But now I am feeling inspired and am looking forward to some new projects and fun things to come! (hopefully getting my pottery studio up and running, maybe another house remodel and lots of traveling!!…. take that winter blues!) 

Anyway.. here are a few little bits from my week that made me happy.

The mister called these snow mounds goosebumps… I think that is exactly what they are 

The only warm day this week. (20..woo whoo!) Took the little out for a sled ride. She spent the entire time dragging her hands in the fresh snow. 

And oh how I cannot  handle how freaking cute she is!! Plus, a shout out to my brother in law….MADLOVE!

Fresh snow..Even though it was -15, I had to stop and take this picture. The colors were amazing

Cabbage at the farm share pick up! Love ICF!!!

89 cents a pound for fresh organic cranberries. Score!! Made these Oatmeal fresh cranberry coconut chocolate chip cookies with them. Big hit.

This picture was taken exactly a year ago…..The mister and I were finally putting in the bathroom of our tiny little home…. And look at that awesome sink! (another amazing salvage yard find) If you ever need or want to remodel a bathroom, I suggest using a old cast iron utility sink. So practical, so functional, so pretty.….it makes me happy everyday!

Happy Sunday!

Happy February!

And if you are into it….

Happy Football Super bowl Game and or party! ( If you need any awesome fast party recipes, I have bunch, just check out the recipes page!)

-C

I eat vegetables like I breath air… constantly and almost mindlessly.  Some people are addicted to sugar or coffee, but me, I am addicted to veggies. ( I am also extremely addicted to coffee) This is my truth, but I am ok with it.  

All week long I have been hearing about this big game going on this weekend, something to do with a ball and running up and down a field….not quite sure, but I think it might be a big deal to some people.(I know it’s the Super Bowl, and I have heard about some deflated balls, but that’s the extent of my knowledge)  I have also have been hearing a lot of party planning around this game, food planning, which is something that I do understand. So I wanted to bring a party snack to the mix, and because of my addiction, my mind goes straight to vegetable. I know that there is traditionally a lot of meat, cheese and hot sauce at these said parties, and that’s totally cool, but I think everyone wants to have a least one awesome meatless cheese-less piece of food to snack on during half time.  So I give the people what they want. 

So simple, fast and easy to make. Tasty and healthy as can be. Grab and eat with you hands…. and nice to look at. We got the whole package here.   

Pretty much a little bit of everything that I have in my fridge….Shredded red cabbage, carrots, beets. Some sliced of red onion, tomato and red pepper. Hummus and a little mashed avocado

Yes, it may look like a mess, but that’s just me trying to make five different things at once. But really, making  these wraps are simple simple. Just take rinsed and dried green or red leaf lettuce, smear on hummus and mashed avocado and pile on the veggies. Roll and stick with a toothpick to keep from unrolling. See…. simple.So many colors…… so much pretty. Wrapped and rolled…Sliced down the middle, just to see all the pretty inside.

These might be veggie wraps, but man, look at those sausage fingers…(hehehe)

Make for lunch, dinner, party, or snack. Eat them for breakfast, dessert or midnight nosh. Whenever, wherever…..YUMMY YUMMY YUM! 

Happy hump day! 

-C

Lettuce Wraps 

Ingredients

Use whatever you want… but this is what I included in mine

  • Green leaf lettuce
  • Shredded red cabbage
  • shredded  beets
  • shredded carrots
  •  thinly sliced tomato
  • thinly sliced red pepper
  • thinly sliced red onion
  • hummus
  • avocado

With each wrap, take a large lettuce leaf and cut out the crunchy rib.(you can slice it up thinly and add to wrap. Smear  leaf with hummus and smashed avocado, then layer on a bit of each of the veggies. Wrap or roll leaf in on the veggies and stick a toothpick in center to keep from unrolling. 

Place on a plate and eat or share… Extras are fantastic to have in the fridge!

What a week. It was my birthday, which if you know me, is not usually something I like to talk about. I’m not sure exactly why, but I am not really big on celebrating my own birthday. Or its more like I hide away from everyone around my birthday.  ( I am not good with attention) But this year I tried. I had a couple little dinners with family, went on a few good hikes, gave the dog a bath (had to mention it because it was so needed and I was so happy to have a cleaner, less smelly dog..which lasted all of about 12 hours)  and tried to relax and enjoy myself. The mister and I also did a bunch of little house repair projects that have been needed to be done (Birthday wish list). All and all, I had a good week. And now the birthday week is over and we can get back to normal, not bugging me, hectic, crazy, life. That makes me happy. Here are a few of my happy bits from the big week.

 A birthday bouquet of veggies. My lover knows me oh so well.

I went to get myself a new skien if yarn and stumbled upon this wall display of sprinkles.. It took a lot to not buy a bunch.

 Every year I buy myself some special food for my birthday week. This is the bulk section at the local coop. They got in a bunch of new local dried beans!!!!  Local birthday week beans. ( yes, beans make me happy)

This hike was pretty treacherous, the whole trail was covered in this ice…. but look how cool it is. 

Huggable mountains

Birthday hike with big trees and a happy dog. 

 Split peas with tons of purple cabbage and purple onions plus chunks or bright orange carrots.. So freaking pretty and so freaking tasty!

And last but not least..a throw back that made me smile…Moving day last summer. Our truck full of my house plants. I love my plants. 

So now we go onto the last week of January! (holy crap, where has the time go?)

Have a great week!

-C

CHILI MONDAY!Well it is, but I am talking about making some super duper, yes I’ll have seconds, tummy filling, bone warming, pumpkin chili.. And heathy oh so healthy to boot. Reals, it’s the best.

This pumpkin chili recipe had evolved over the years. The first time I made pumpkin chili was for my very first dinner party that I  threw back in college.  Instead of cutting the pumpkin and adding it into the chili, I chopped the little pumpkins in half, roasted them, and used the halves as bowls..A good idea except no one at the pumpkin and I was left with a bunch of slobbered on roasted pumpkin halves. ( I probably should have said something, but being a few drinks in, I didn’t think to say anything about the edible bowls and I don’t think I noticed the abandoned pumpkins until the next morning). After that somewhat failed attempt, I started adding the pumpkin to the chili and left the drinking tip after the food is served. ( I learned so much in college)

But yeah, this recipe has traveled a few years with me and every time I make it, I always think, jeez, why don’t I make this every weekend.  Well maybe now I will.

Don’t let this spread scare you.. it’s just veggies from the fridge, a chopped up pie pumpkin and pre soaked beans. Oh and some canned tomato and spices. It took about 10 minutes of hands on time and one big pot. No big mess to clean up and you can get rid of those veggies in the fridge that are on the way out. WIN WIN WIN!

All the chopped veggies, the chopped pumpkin go into the pot with salt. pepper , and spices.( I added a fresh jalapeno and about 5 cloves of garlic to this mixture) Let the mixture sweat for about 5 minutes, giving it a  quick stir or two.

Now toss in the beans and the tomatoes… Add a cans worth of water as well. Bring to a boil, then turn to low heat and cover.

A last minute addition.. I added a few chopped up kale leaves. I wanted a little more bright color and adding kale to anything is a good idea.

I added a little sliced avocado to one of the bowls (I only had enough for one) and cut up some lime wedges to squeeze on top. (I did, Nick didn’t) 

Best chili I have made in a long time…and yes, there is a bunch of left over which is fantastic because now I have lunch for the next couple days… 

HOORAY FOR FOOD!!!

Have a good Monday!

-C

  •  small sugar pie pumpkin
  • 2 cups dried beans..I used a 1 1/2 cups black and 1/2 cup kidney or 2 cans of beans
  • 28 oz can of crushed or diced tomatoes
  • 1 small onion
  • 1 small
  • 1 carrot
  • 1 /4 head of cabbage
  • a small broccoli crown
  • 1/4 head of cauliflower
  • a few kale leaves
  • 1 jalapeño 
  • 5 cloves garlic
  • 2 tablespoons chili powder
  • 2 tablespoons cumin
  • 1 tablespoon coriander
  • salt and pepper

Either the night before or morning of, presoak dried beans..(beans in pot with about 4 cups water and a sprinkle of salt)

Take pumpkin and slice in half, de-seed and chop flesh into little chunks. (You can peel it if you want, but really, there is no reason to) Rough chop all the veggies (minus the kale) and stick into a large pot with the pumpkin. Pot on medium heat.. let the veggies sweat for about five minutes.  Now add the garlic and the spices and let cook for a few more minutes.

When the mixture starts to become fragrant… drain, rinse and add presoaked (or canned) beans. Then the tomatoes, and 1 1/2 cans worth of water. 

Bring chili to a boil then cover and reduce heat to low. Let cook for about an hour, giving it a stir every now and then………

Add in chopped kale a few minutes before serving

Serve in a bowl and top with sliced lime, avocado, a sprinkle of cheese….Whatever you want. 

THE LOVELY CRAZY

August 12, 2016 by maximios • Blog

As a kid, my favorite holiday was Easter. Every year my parents would fill up brightly colored plastic baskets with handfuls of neon colored plastic “grass” and top it with all sorts of candy, coloring books, bubble, and sidewalk chalk. They were beautiful and amazing.  It was like getting a basket of fun and a bunch of sugary candy to keep you going to have all that fun all day long. And the egg hunts. Plastic eggs full of candy hidden all over the house ans yard. We would all have our emptied out baskets running around full of excitement, ready to take out any sibling in our path just to be the one to get the next egg. We were ruthless and I am pretty sure every year someone would end up crying. Now, as an adult, I am not allowed to participate in the egg hunt. (but I still try to make my sibling cry)  Nope, now I get to hide the eggs and sit back and watch the new generation of littles tripping each other and stealing eggs from one another. The carnage!

And also at Easter there is cake. Is there a rule that says you have to make carrot cake for Easter? I think there must be because it is when everyone and their moms busts this cake out. And everyone’s carrot cake it the best because they made it the right way, like with raisins or pineapple or walnuts. There are so many things that can be added to this cake that it’s a little overwhelming. So I made a carrot cake that was mainly about the carrots. Nothing added, no nuts raisins or coconut (although you could add i if you wanted) and it’s made into a pretty bundt cake, which in turn makes mine the best.

This here cake was destined for tomorrows Easter table. I made it with no nut produces cause the nephew has the deadly nut allergy. But when I went and made the date sauce, I kinda let that slip and used almond milk. Oops. So now I have a whole big carrot cake sitting on the counter with it’s destiny shattered. So sad, but I think its will survive cause the mris really into it and has already eaten a few pieces. I figure that because it’s a carrot cake, he can eat a few more. It’s almost like eating a vegetable….almost. And now I need to make a new cake to bring over or I might just stop at the store and buy some oreos on my way over tomorrow. The littles will like that.

The stuff. A bowl containing flour, salt, baking powder ans baking soda.  Also need a few really big carrots, a bit of brown sugar, and ground up cinnamon and ginger. Coconut oil, soy milk, an orange (for it’s zest) and a little apple cider vinegar are going into this cake too.

Start by chopping up 2 of the biggest carrots and tossing the into a pot with about an inch of water. Stick the pot on the stove and cook until the carrots are nice and tender. Then blend those tender carrots up.

I had a hard time not eating all of the carrot puree, so maybe if you want, cook up a few extra carrots ans have yourself a pre-carrot cake carrot snack.

And while the carrot puree is still warm, add in the coconut oil and the sugar. Mix it until the oil is melted ans it’s one cohesive mixture.

And take that last carrot ans grate it up into the flour. Also add in the spices and the zest of the orange.

Note. I used a small holed grater so that the carrot shreds would be small and add texture to the cake but not make it too chunky. But use a normal grater..it’s all about your carrots chunk prefernce here.

Now dump the wet carrot mixture into the dry and start to mix

Adding in the soy and the vinegar to complete the batter.

And scooped that batter into a oiled bundt pan and get it into the (preheated) oven to bake.

After about an hour, the cake is ready, golden brown and smelling like any good carrot cake should. Remove from the oven and turn the cake out from the cake pan and stick on on a rack to cool. This cake is waiting for me to decide what, or if I want to frost, drizzle, or sauce it up….. I think it wants as little something.

Ok, I figured it out. Date sauce.

The stuff. Fresh medjool dates, almond milk and sea salt.

Date (pits removed) into the food processor along with the milk and a good pinch of sea salt.  Blend until it turns into a nice smooth, fluffy sauce.

Take that sauce and spread it all over the cake. As much or as little as you want (you might have left over date sauce but its ok, you can just eat. It will last for about a week in the fridge and goes great with just about anything) Once fully sauced, sprinkle the cake with flaked sea salt.

Sliced, plated, and ready. It’s carrot cake time.

Have a great weekend, eat all your candy at once!

-C

Makes a bundt cake (but could be made into a 9×13 sheet cake)

  • 2 1/2 cups flour
  • 1 teaspoon baking soda
  • 2 teaspoons baking powder
  • 1 teaspoon salt
  • 3/4 cup brown sugar
  • 1/3 coconut cup oilany oil works)
  • 1 tablespoon apple cider vinegar
  • 3 large carrots (makes about 2 cups carrot puree and 1/2 cup of raw grated carrot)
  • 1 heaping tablespoon cinnamon
  • 1 teaspoon ginger

Salted Date Caramel

  • 1 cup medjool dates (pitted)
  • 1 cup almond milk (or any milk you want to use)
  • sea salt

Start by chopping up 2 of the biggest carrots and placing them into a pot with water about an inch of water. Stick on stove and bring to a boil then reduce to a simmer until the carrots are fork tender. When done, puree them with any means nessasary (hand blender, regular blender, food processor) Add the coconut oil and sugar to the warm carrot puree and mix until oil is melted.

Preheat oven to 350

In a large separate bowl, mix together the flour, baking soda and powder, salt, and the spices. Grate the smallest carrot in with the dry.

Take the wet carrot mixture and dump into the dry and mix, adding in the soy milk and the vinegar as you mix. Once everything is completely incorporated, pour mixture into a well oiled bundt pan and stick the cake into the preheated oven

While the cake is baking, make the date sauce. Just take the dates, remove pits if they have any and place in a food processor with a good pinch of sea salt and the almond milk. Pulse a few times, scrap down the sides, and keep blended, stopping to scrap sides if needed, until a nice thick smooth sauce is formed. If you want a thinner sauce, just add more milk til you get your desired consistency.

Now check cake. Once it’s golden brown and a tester comes out clean (between 50 minutes to an hour) remove from oven. Let cool for a few minutes in pan the then turn it over onto a wire rack to finish cooling off. Once the cake is cool, dump the date sauce all over it then sprinkle with another good few pinches of the sea salt.

And now eat it. This is a cake that needs no fork, but you can go ahead and use one if you must.

Last night I had my sister and her kiddos come over for dinner. Nothing fancy, nothing to complicated,  just something  fast and something that I knew the littles would eat.  Spaghetti and meatballs, except replace meatballs were bean balls So they came, we played, did a little drawing and had a bit of first grad gossip. Then came  dinner time  when I was told by one little that she was not going to eat.. She had pasta for lunch. Well I made her sit anyway and she mainly just ate carrots (I was ok with that) Then the other little was all into his pasta and bean balls, 1 down, 3 more to go, when the mister let slip that the meatballs were not really meat. He ate around the remaining balls, said he didn’t want them anymore. And my sister, well she doesn’t eat anything that is not pizza.

Good thing a neighbor stopped by while we were eating. He had a few of the balls and told me that they were amazing. I needed someone to tell me that.  

So yeah, the littles were not overly enthused with the ball, but the Mister the Neighbor, and I thought that they were awesome and delicious. Maybe next time I will make sure that  pasta was not lunch and tell Nick to keep his mouth shut and stop talking about balls at the dinner table.

I feel like I don’t need to tell you how to boil pasta or heat up the sauce, so I left that portion of the recipe out. I have faith that you are capable in doing that part without my instruction.

The bean ball stuff. Chickpeas (soaked and cooked or canned), sweet potato, carrot, onion, and some chick pea flour. Dried garlic, basil and oregano. Salt and pepper and a little bit of olive oil. Small chop all the veggies and toss them and the dry spices into a skillet with a drizzle or two of olive oil. Stick on medium  heat and add about 1/4 cup of water to pan. Top with  slid and let veggies cook down until soft and fragrant.

Add the cooked veggies to a food processor or blender with  the rinsed and drained chickpeas. The mixture gets pulsed until combined,  keeping a little bit of chunkiness.  Now go warhead and taste  the mixture. Add another pinch or two of salt , pepper or any of the spices that you think it need.  Dump the mixture into a bowl and mix in the chickpea flour than stink the mixture into the fridge for a least a 1/2 hour. Cooling to off is really important to forming the balls. If you don’t, it’s much harder to keep mixture from falling apart and sticking to your hands.

After the mixture has had time to cool and set, start rolling the mixture into balls roughly the size of ping pong balls. In a shallow bowl, add a few tablespoons of the chickpea flour with a pinch of salt, pepper and garlic powder. Take each ball and roll in flour and place each ball on a well oiled baking sheet. When the balls are all rolled, stick into the oven and bake away for about 30-40 minutes, flipping balls after about 20.  After you flip the balls, get the pasta ready so its finished about the same time the balls are done.You pasta and sauce is cooked and the balls are all crispy and oh so nice.

Serve balls over pasta with sauce and eat with a fork.

Your day is now complete.. balls and all.

Happy Weekend!

-C

Spaghetti and Bean Balls

makes about 20 balls

  • 4 Cups (or 2 cans) Cooked, Rinsed and Drained ChickPeas
  • 1 Small Sweet Potato
  • 1 Small Onion
  • 1 Carrot
  • 1/4 Cup Chickpea Flour plus extra to roll balls in
  • 1 Heaping Teaspoon Basil
  • 1 Heaping Teaspoon Oregano
  • 1 Heaping Teaspoon Garlic Powder
  • Olive or Vegetable Oil
  • Salt and Pepper
  • Your choice of Spaghetti (Use Vegan and or Gluten Free if needed)  Prepared as package recommends
  • Marinara or Pasta Sauce of your choice

Preheat Oven to 425 degrees

Small dice the carrot, onion and sweet potato and toss into a skillet on medium high heat with a splash of oil. Add in the dry spices and add in about a quarter cup of water. stir and cover the skillet with a lid and let the veggies cook down until the water has evaporated and the veggies are tender. 

Add rinsed and drained chickpeas to a food processor with the cooked veggie mixture. Pulse together until the mixture is combined and slightly smooth, but still with a little bit of texture left.Place bean mixture in a bowl  and mix in the 1/4 cup of chickpea flour. and stick in the fridge for a least a 1/2 hour to cool. (Mixture can be made a day ahead if you want)

Once the mixture has time to cool and set up , remove from fridge and with a light head, roll mixture into ping-pong sized balls. In a separate shallow dish add a bit of chickpea flour with a pinch of salt and pepper. Roll each ball in the flour mixture and place balls on a well oiled baking sheet. Once balls ae made, stick into the oven and bake for about 30-40 minutes, flipping after about 20 minutes. The balls are done when the outsides are once and golden brown and crispy. After about 30 minutes, get to cooking your pasta and mariana sauce.

Once the pasta and sauce is done, plate it and toss on some of those awesome bean balls!

Bean balls also make fantastic bean ball sandwiches or bean balls on a toothpick. 

As the weather gets warmer and the days get longer, my food brain turns to fresh colorful simple spring food. (which is totally a thing). Spring food is a combination of the last of the winters hardy root veggies combined with the springs bounty of fresh greens and early growers. Spring food is the best!

This lovely. oh so gorgeous salad has been on repeat in my meal repertoire. It’s so yummy and so simple. Beets and carrots roasted and sliced, tossed onto a bed of tender spinach and topped with a creamy, lemony avocado dressing. Fresh, fast, light, and filling. Everything a perfect  spring salad needs. Not to mention it takes no time at all to make because with all this nice weather , we want to spend as much time basking in the warmth and glow of the sun. I might even take my spring salad outside today. Maybe.

Dressing stuff. A nice and ripe avocado, the juice of a juicy lemon, a bit of garlic powder (raw garlic is nice too, but grate it super fine) and salt. Simple simple and sometimes simple can be the best.All stuff get mashed super mashed until smooth and scooped into a jar with a lid. Add about 1/4- 1/2 cup water (depending on how thick you like it) and shake that jar all around.

That’s it. You now have super creamy avocado lemon dressing. Drizzle on anything and everything… especially this roasted carrot and beet salad..

A roasted beet and carrot, all sliced upTossed onto a bed of tender baby spinachAnd topped with creamy avocado dressing. Fantastic, so pretty, and makes the day super springy!

A salad suggestion….  Add some roasted chickpeas toasted nuts, or sunflower seeds to this or any salad. Adds a little proteins and the crispy crunch is a nice addition. 

Enjoy the day..Smile lots 

-C

Roasted Carrot Beet Salad and Avocado Lemon Dressing

Salad

  • 2-3 cups Baby Spinach
  • 1 large carrot
  • 1 medium beet
  • Toasted nuts, beans, or seeds (Optional)

You can roast the veggies a few ways.. Slice the carrot and beet, place on a baking sheet and  stick into the oven at 425 degrees until tender. Or you can just toss a the carrot and beet onto a baking sheet whole and roast.( What I usually do)

Once the veggies are roasted and cooled, thinly slice and toss onto the bed of baby spinach. Top with Avocado Lemon Dressing (recipe below) and some toasted crunchy thing.

Dressing

  • 1 Ripe Avocado
  • 1 lemon
  • 1 teaspoon garlic powder
  • 1 teaspoon salt
  • 1/4- 1/2  cup water

Scoop avocado fruit into a bowl and mash with a fork until a paste is formed. Scoop mashed avocado into a jar and add remaining ingredients. Stick lid on jar and shake tip combined. Use on anything. 

Dressing lasts a few days in the fridge. Should stay green, but add a layer of lemon juice to top to keep from browning.

You ever have one of those days where its  9 am and your ready to call it a day? . Yesterday was one of those day for me. Its spring vacation around here (more like an  arctic vacation) and I had volunteered my day to babysitting/ hanging out with 2 of my nephews, ages 11 and 13. (I know, I am the greatest sister). I had all of these great ideas and plans of things to do, but when it came down to it, they wanted to do nothing but play video games and not really listen to anything I said. I basically had to drag them outside to go for a walk we me and that’s all I could get them to do  My great little nephews, I love them so much, but yesterday they had their minds set on being little monsters.

I needed a drink. And I needed lunch. And so I was inspired to make this bloody mary tomato soup. Its got all the essentials to a great drink, the tomato, the spice, the zingy flavors, but warm and thick to eat as soup which was a perfect lift for a freezing cold dragging day. And no, I didn’t add the vodka to it because that would be irresponsible of me.  I am not about to serve up lunch soup to a couple  young boys with alcohol in it. I am not a dumb ass…Save the vodka for when the kids go home!

 What we have going here…… Chopped up onion, celery, and carrot in a pot. Stick that pot on the stove for a few minutes on medium heat to start the cooking process.  While that happening get the other stuff ready.  A big can of diced tomatoes, hot sauce, worcestershire sauce*,  prepared horseradish*, celery salt, garlic powder, salt and pepper And last but not least a good squirt of yellow mustard. Now add it all to the pot and bring to a boil. Turn down to low and stick a lid on it.

*I used  the horseradish that is made with only horseradish and vinegar…..You can use the other stuff that contains sugars and milk, but I don’t know how tastes. And the worcestershire sauce I used did not contain fish but be aware that a lot of the popular brands do, so if you care, check labels!

After about 20 minutes the veggies should be soft and the flavors should all have melded together. Taste  soup as it is cooking and add any more spice that you want.

Now in goes the emulsifying stick of fun! (Or dump in a blender) Blend blend blend!  

I stopped when I got to a smooth consistency with the littlest bit of texture.

And now the soup is now ready for the bowls!

And there it is…served with a stock of celery and a wedge of lemon (I forgot to add them to the pictures!)  A bloody Mary to take the edge off any drag of a cold weather day. And best part..   left over soup is great served chilled with a shot of vodka to loosen this Mary up!

Have a Happy Day!

-C

Bloody Mary Tomato Soup

The Stuff

Side note…The spicier ingredients…hot sauce, horseradish, and worcestershire sauce are pretty flexible. My advice is to start with the lesser amounts of the ingredient and work your way up until you get to your happy soup place.

  • 32 oz can of crushed or diced tomatoes
  • 2 medium carrots
  • 1 small onion
  • 2 stalks or celery plus more for garnish
  • 1-2 teaspoons horseradish
  • 1-2 teaspoons worcestershire sauce
  • 1-2 teaspoons hot sauce or  ground cayenne pepper
  • 1 tablespoon yellow mustard 
  • A lemon cut into wedges (To squeeze on as a garnish)
  • 2 teaspoons celery salt
  • 1 teaspoon garlic powder
  • Salt and cracked pepper to taste

Dice up carrots, onion and celery and place in a large pot and cook on medium heat for about 5 minutes. Once the  veggies are slightly soft, add in the rest of the ingredients plus one tomato can  worth of water. Bring to boil, cover and turn heat down to low. Cook for another 15-20 minutes or until all the veggies are super soft and the flavor have all developed.  Add salt and pepper, taste and add any additional spicier spices that you want.

When happy with taste, either  in a blender or with a hand emulsifier, blend soup until smooth (or to your desired constancy) Soup is now ready to serve.

Ladle or pour into bowls  and serve with a stalk of celery and maybe a wedge of lemon. Crackers or croutons are welcome too.

Eat with a Spoon

Soup left overs are great refrigerated and served cold. Add a splash of vodka to make it fun.

     Before we get to the fries, I just want to mention that  yesterday was one of those fantastic winter days that reminds me why I love living in Vermont.  Pretty white snow everywhere, the sun was out, and 20 degrees without a gust of wind. The trash dog an I were even able to go for a little hike.  It was so nice and soooo sooo needed!  Anyways, the other day as me, my sister and the mister where putting together  one more piece of Ikea furniture, (I am the master at Ikea assembling!)  a little runs into the room and presents the mister with a Dominos pizza. Yup, a whole pizza just for him. Why you might ask? Well I guess my sister was  delivered the wrong pizza and the place didn’t want it back and she didn’t want it, so she gave it to him.

A whole pizza to himself. I didn’t mind too much..he was just going to be eating it for lunch and dinner until it was out of the fridge. But for dinner I did want him to eat something of the vegetable matter that didn’t come out of a box. I was going to make him a big salad, but then realized that would mean sharing the last of the greens that I had for MY dinner and I was not about to do that, so I made him parsnip and carrot fries instead. No biggy, just some slicing, a little tossing and a bit of time in the old oven. And I figured I might as well make a nice sauce for those fries because I be so very nice.

The biggest problem that I ran into when I made these fries was that I didn’t make enough, so you should probably make twice as many as you think you will eat. If you end up not eating them all (which you probably will), well then you now have a great start for a soup or a nice addition to a salad. Either way, you will eat them because they are amazing and addicting… and as healthy as can be!

The carrots and the parsnips are all sliced up into big matchsticks and ready to be baked to crispy browned perfection.  I added the oil to the pan to toss the fries in and then sprinkled with a fair amount of salt and pepper.  If you don’t have and or want to use a cast iron pan, a baking sheet works just the same.

   Oh saucy sauce stuff. Tomato puree, sriracha, and yellow mustard. Add a little bit of honey to lighten it up (can use brown sugar if keeping it vegan), a splash of apple cider vinegar and a couple minced cloves of garlic. Topped off with the smokey delightful spice of cumin. I cold eat this on everything…and I kind of did. 

All mixed up in an oven safe dish, I stuck it into the oven for a about 8 minutes until it got a little bubbly, just to let all the flavors fuse together…

Fries are done, Sauce is ready. Served in super cute tea cups.(from now on I want to serve everything in tea cups.) A perfect side dish, snack, or even a light meal.  It lead the mister to ask the question…What pizza? 

Happy Day!

-C

Parsnip and Carrot Fries with Smokey Sriracha Sauce

The Stuff

For the Fries

  • 2 large parsnips
  • 2 large carrot
  • salt and pepper
  • 1 tablespoon oil

For the Sauce

  • 1 tablespoon Sriracha
  • 1 tablespoon mustard
  • 2 tablespoon tomato puree (or 1 tablespoon tomato paste and 1 tablespoon water)
  • 2 cloves or garlic
  • 1 teaspoon honey or brown sugar
  • 1 teaspoon cumin
  • a splash of apple cider vinegar
  • a pinch of salt

Preheat oven to 425.

Wash and trim carrots and parsnips and cut into large matchsticks (any shape is good, just make them all uniform) Toss with oil and sprinkle with salt and pepper. Place on cast iron pan or baking sheet and stick in oven for 30 or so minutes, and rotating after about 20. The fries are done when  crispy and brown.

For the sauce. Mince garlic and add to all the sauce ingredients in an oven safe bowl. stick into oven for about 8 minutes until slightly bubbly and hot.

Dip fries in sauce

I am such a sucker for the reduced price produce at the grocery store. I save at least half of the original price for stuff that might look a little weird or have a brown spot or something. Sometimes I can’t believe what ends up on in the bin, stuff that I wouldn’t consider reduced bin material, but hey, if they want to stick it in there, then I will be more than happy to buy it.A couple days ago I found some good looking roma tomatoes in that said reduced produce bin..the skins the tiniest bit wrinkled (like I could care less), least hen 50 cents a pound. Um, yea, I bought those and put them to good use. 

Tomatoes roasted until they fell apart with a few other chunks of stuff, then piled onto a base of spinach and couscous.  This meal cost me pennies and was stupid easy and fast to make. And pretty to boot. Perfect for a quick healthy meal on a busy day or maybe for those people looking for a tasty, not too completed dinner to make for  a special someone for Valentines day? Or make just for yourself…its pretty much the perfectly dish. Anyone can get into it. And if you don’t happen to have a grocery store with a reduced produce bin full of tomatoes…it’s cool, you’ll just have to pay full price for the perfect ones.

So simple. A little olive oil in pan. Chunk the tomatoes and throw in pan with the chopped onion, carrot, cauliflower, garlic and chick peas. Drizzle a bit more oil and top with salt and pepper. Give it all a toss and stick into oven. That’s that. Just leave it in there until everything is so nice and soft and falling apart.

One of the best things about couscous is that you don’t even need to dirty a pot or a bowl to make it,  just add dried couscous to the bowl you are going to eat out of with a cup of boiling water and a pinch of salt.  (I added the spinach with the water too) After about 8 minutes, the couscous absorbs all the water and you just fluff it up with a fork. Easy, freaking Peasy!!! Out of the oven and piled on…..

I mean, if this isn’t one classy looking meal, then I don’t know what is.

Sprinkle with a little parmesan or nutritional yeast if you want and step back and admire. And now eat it to you face.

And barely any dishes to wash. No big mess to clean up.  I could get used to that. 

-C 

Serves 2

  • 3/4 cup Couscous
  • 1 cup boiling water
  • Handful of chopped spinach
  • 4-5 roma tomatoes chopped
  • 1 medium carrot diced
  • Half of an onion diced
  • Cup or so of cauliflower (fresh or frozen)
  • Cup of prepared chick peas
  • 4 or 5 cloves garlic minced
  • Olive oil to drizzle
  • Salt and pepper

Preheat oven to 400

Place onion, carrot, cauliflower,tomatoes, chick peas and garlic into a large skillet. Drizzle with olive oil, sprinkle with salt and pepper, and give everything a light toss. Stick into oven for 35-40 minutes until tomatoes are falling apart and everything is nice and roasted.

In a medium bowl, (or serving bowl) add cup of boiling water to dry couscous and spinach. Sprinkle with salt and cover. Let sit for at about 8 minutes, or until the couscous had fully absorbed all the water. Fluff with a fork and top with roasted tomato stuff.

Top with parmesan or nutritional yeast if you are into it.

Enjoy!

Mustard and carrots.  It’s that simple.

Yup, I eat this at least once a day. It’s that good (and easy).  Now I must admit that I don’t usually have such pretty carrots (The mister gave me this rainbow of carrots for my birthday) and I usually don’t chop the carrots oh so nicely or have a little vessel of mustard, but I figured for the sake of a picture, you would rather see this then a picture of me standing with the fridge open, chomping on a huge unpeeled carrot, squirting mustard directly in my mouth. (that’s how I usually eat most of my snacks)

Today I kept it simple with plain yellow mustard,  but I sometimes spice it up with horseradish or jalapeno mustard. Or once in a while I’ll do mustard and sprinkle on (or in my mouth) some nutritional yeast, garlic powder or even red pepper flakes for a little kick. The possibilities of mustard on carrots it endless.

You might be saying to yourself that this is crazy, but really, is it any weirder then some of the things that you eat that others find kind of strange? So maybe just try it.  I promise, you won’t be disappointed.

Happy Monday!

-C

For the past few days I have heard more complaining then happy. The biggest complaint…tummy issues.  A week of gorging on heavy, rich, and indulgent foods is finally catching up with people, turning them into grump asses. I can handle a little grump,  but its time to get get out of that funk and take care and stop bitching. May I make a suggestion? Eat this… You will be happy.  Your body will feel clean and nurised. Your tummy will get back on track.   It what I call satisfaction This salad is a complete meal .Chopped and shredded veggies atop a small heap of quinoa, tossed on a handful of lentils and topped with a dollop of lime avocado… Thats it and it is good. For the sake of picture-taking, I made a plate look all nice and pretty, with layers of  colors, but to be honest with you, I rather toss into a big bowl, grab a moderately large-sized fork and  food to face… and it’s just as pretty.(the bowl of food is pretty, not food on my face) Quick note: the vegetables that I used here  are what I had at home. If you don’t have one or two of these specific veggies, don’t worry about it. Sub in something else, like pepper or spinach., Still have extra brussel sprouts, green beans or asparagus from thanksgiving? Go ahead and use those. If there is a specific veggie you know your stomach doesn’t tolerate well, then maybe avoid using it. This is a happy feel good salad!A pile of vegetables is always a good start to any meal, especially these veggies.. All but the avocado came from my farm share. This is one  local organic meal of love.

Green Kale, purple cabbage, beets, red onion, carrots…I did a little shredding and some grating. I like to have different sized and textures in a salad.

Oh whats this? Diced butternut squash(from farm) sprinkle with salt and pepper waiting to be roasted. I am a huge believer in squash on salads…especially in a cold Vermont winter. A little bit of heartiness can really go along way. Quinoa.. 1 part quinoa to 2 parts water..Bring to a boil and let simmer until light and fluffy. When I make quinoa, I always make more than is going to be eaten, its great to have pre made for any meal.  Quinoa goes with everything, even a sprinkle of cinnamon and diced up apple for a nice breakfast or snack. I was making this for dinner for my mister who sometimes doesn’t tolerate so many super raw veggies. So what I did and I recommend doing if you are worried about to many raw veggies at once, is to give them a really quick vinegar braise. I throw the veggie in a pan and drizzled red wine vinegar(you can use any vinegar you like) . Stuck a top on it and stuck it on the burner for a few minutes until the vinegar was gone. It just barely softens the veggies and  helps infuse the vinegar.Also a little easier for some to digest. Me, I like to eat it completely raw. Barely steamed kale, just enough to soften it. Again. raw is awesome too. Half a lime, half an avocado and a clove or two of garlic… guacamole…Call it what you will.

Salad contstruction… Quinoa. Kale. Cabbage, onion and beets.  Butternut squash. Carrots. Lentils and a nice sized scoop of avocado. But like I said, Bowl…,fork….. face. Tastes just as good. A super salad, full of flavor and healthy stuff, A salad that will  fill you up, leave you feeling full,  not gross. and is quite the looker if you ask me.

Super Salad

  • 1/4 cup Quinoa
  • 1/4 roasted Butternut squash
  • 2-3 large Kale leaves
  • 1/2 cup shredded Red Cabbage
  • 1/4  grated Beet
  • 1/8 cup sliced Red onion
  • 1/4 cup grated Carrot
  • 1/4 prepared lentils
  • 1/4 of an Avocado
  • 1/2 a lime
  • garlic
  • vinegar
  • salt and pepper

This is the list of stuff that is in this salad. This is not a recipe that need to be exact.. Use more of something you like, omit whatever you don’t. Just keep it simple and delicious. Dice up butternut into small pieces, place on baking sheet and roast till tender.  Add quinoa to water, bring to boil, then turn down to simmer  tip light ad fluffy. If you want steamed kale, stick kale in pot with a i/2 inch water and lid, and place on high for about 2 minutes, just until kale ha soften. The squash is roasting,(the smaller the pieces, the faster it goes)  quinoa is cooking and kale is soften,. Now grate or chop you veggies. Want them less than raw, place in pan with a bit of vinegar or just water and stick a lid on it. Medium heat for a few minutes, or until the veggies are slightly soften.. Dont over cook, you still want the veggies to have a bite and keep the good for you stuff.  Take avocado, chopped garlic and half lime and mash together.  Now everything is prepared and ready..Place strategically in a bowl or plate, quinoa, kale, squab, cabbage,beets, onion, carrots, lentils, avocado, drizzle with straight up vinegar.……..Or just throw it all together. Fork to FACE!!!

THE LOVELY CRAZY

August 12, 2016 by maximios • Blog

As a kid, my favorite holiday was Easter. Every year my parents would fill up brightly colored plastic baskets with handfuls of neon colored plastic “grass” and top it with all sorts of candy, coloring books, bubble, and sidewalk chalk. They were beautiful and amazing.  It was like getting a basket of fun and a bunch of sugary candy to keep you going to have all that fun all day long. And the egg hunts. Plastic eggs full of candy hidden all over the house ans yard. We would all have our emptied out baskets running around full of excitement, ready to take out any sibling in our path just to be the one to get the next egg. We were ruthless and I am pretty sure every year someone would end up crying. Now, as an adult, I am not allowed to participate in the egg hunt. (but I still try to make my sibling cry)  Nope, now I get to hide the eggs and sit back and watch the new generation of littles tripping each other and stealing eggs from one another. The carnage!

And also at Easter there is cake. Is there a rule that says you have to make carrot cake for Easter? I think there must be because it is when everyone and their moms busts this cake out. And everyone’s carrot cake it the best because they made it the right way, like with raisins or pineapple or walnuts. There are so many things that can be added to this cake that it’s a little overwhelming. So I made a carrot cake that was mainly about the carrots. Nothing added, no nuts raisins or coconut (although you could add i if you wanted) and it’s made into a pretty bundt cake, which in turn makes mine the best.

This here cake was destined for tomorrows Easter table. I made it with no nut produces cause the nephew has the deadly nut allergy. But when I went and made the date sauce, I kinda let that slip and used almond milk. Oops. So now I have a whole big carrot cake sitting on the counter with it’s destiny shattered. So sad, but I think its will survive cause the mris really into it and has already eaten a few pieces. I figure that because it’s a carrot cake, he can eat a few more. It’s almost like eating a vegetable….almost. And now I need to make a new cake to bring over or I might just stop at the store and buy some oreos on my way over tomorrow. The littles will like that.

The stuff. A bowl containing flour, salt, baking powder ans baking soda.  Also need a few really big carrots, a bit of brown sugar, and ground up cinnamon and ginger. Coconut oil, soy milk, an orange (for it’s zest) and a little apple cider vinegar are going into this cake too.

Start by chopping up 2 of the biggest carrots and tossing the into a pot with about an inch of water. Stick the pot on the stove and cook until the carrots are nice and tender. Then blend those tender carrots up.

I had a hard time not eating all of the carrot puree, so maybe if you want, cook up a few extra carrots ans have yourself a pre-carrot cake carrot snack.

And while the carrot puree is still warm, add in the coconut oil and the sugar. Mix it until the oil is melted ans it’s one cohesive mixture.

And take that last carrot ans grate it up into the flour. Also add in the spices and the zest of the orange.

Note. I used a small holed grater so that the carrot shreds would be small and add texture to the cake but not make it too chunky. But use a normal grater..it’s all about your carrots chunk prefernce here.

Now dump the wet carrot mixture into the dry and start to mix

Adding in the soy and the vinegar to complete the batter.

And scooped that batter into a oiled bundt pan and get it into the (preheated) oven to bake.

After about an hour, the cake is ready, golden brown and smelling like any good carrot cake should. Remove from the oven and turn the cake out from the cake pan and stick on on a rack to cool. This cake is waiting for me to decide what, or if I want to frost, drizzle, or sauce it up….. I think it wants as little something.

Ok, I figured it out. Date sauce.

The stuff. Fresh medjool dates, almond milk and sea salt.

Date (pits removed) into the food processor along with the milk and a good pinch of sea salt.  Blend until it turns into a nice smooth, fluffy sauce.

Take that sauce and spread it all over the cake. As much or as little as you want (you might have left over date sauce but its ok, you can just eat. It will last for about a week in the fridge and goes great with just about anything) Once fully sauced, sprinkle the cake with flaked sea salt.

Sliced, plated, and ready. It’s carrot cake time.

Have a great weekend, eat all your candy at once!

-C

Makes a bundt cake (but could be made into a 9×13 sheet cake)

  • 2 1/2 cups flour
  • 1 teaspoon baking soda
  • 2 teaspoons baking powder
  • 1 teaspoon salt
  • 3/4 cup brown sugar
  • 1/3 coconut cup oilany oil works)
  • 1 tablespoon apple cider vinegar
  • 3 large carrots (makes about 2 cups carrot puree and 1/2 cup of raw grated carrot)
  • 1 heaping tablespoon cinnamon
  • 1 teaspoon ginger

Salted Date Caramel

  • 1 cup medjool dates (pitted)
  • 1 cup almond milk (or any milk you want to use)
  • sea salt

Start by chopping up 2 of the biggest carrots and placing them into a pot with water about an inch of water. Stick on stove and bring to a boil then reduce to a simmer until the carrots are fork tender. When done, puree them with any means nessasary (hand blender, regular blender, food processor) Add the coconut oil and sugar to the warm carrot puree and mix until oil is melted.

Preheat oven to 350

In a large separate bowl, mix together the flour, baking soda and powder, salt, and the spices. Grate the smallest carrot in with the dry.

Take the wet carrot mixture and dump into the dry and mix, adding in the soy milk and the vinegar as you mix. Once everything is completely incorporated, pour mixture into a well oiled bundt pan and stick the cake into the preheated oven

While the cake is baking, make the date sauce. Just take the dates, remove pits if they have any and place in a food processor with a good pinch of sea salt and the almond milk. Pulse a few times, scrap down the sides, and keep blended, stopping to scrap sides if needed, until a nice thick smooth sauce is formed. If you want a thinner sauce, just add more milk til you get your desired consistency.

Now check cake. Once it’s golden brown and a tester comes out clean (between 50 minutes to an hour) remove from oven. Let cool for a few minutes in pan the then turn it over onto a wire rack to finish cooling off. Once the cake is cool, dump the date sauce all over it then sprinkle with another good few pinches of the sea salt.

And now eat it. This is a cake that needs no fork, but you can go ahead and use one if you must.

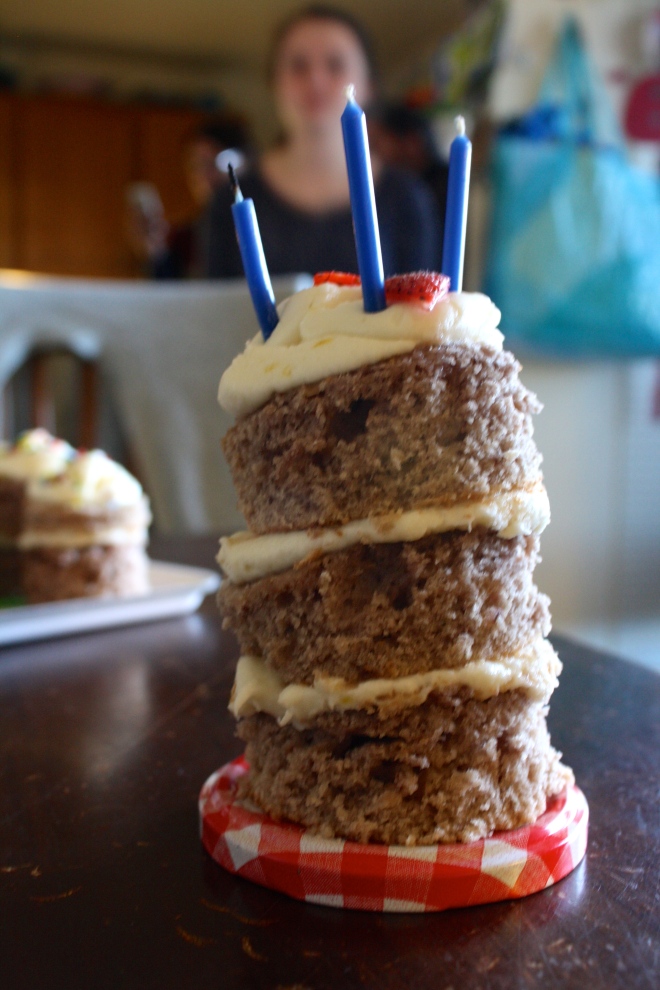
      My Moms birthday was this past week, and naturally, I made the cake for our big family birthday gathering. (and I bought and made dinner and cleaned everything up, although the mister did do all the dinner dishes) Word to my sisters… You guys suck! (but I still love you)

Every year my mom asks for the same cake. Strawberry with Lemon frosting. Then a few years ago, other people in the family started asking for the same one. Now there is a weird strawberry cake thing going on between some of my family members. They have taken claim of the strawberry cake and don’t want me to make it for anyone else but them. They think that because I make them this awesome cake that they are somehow special. Well guess what people.. Your only special for one day, then you go back to being normal.

I have a family full of a bunch of weirdoes.

Anyways, My mom said she wanted the usual strawberry cake, but as cup cakes, or actually she asked me to make the little square cakes. I was kind of confused when she said square cakes because well, what the hell was she talking about? But then I remembered that a long time ago I use to have a square cupcake pan. (I lost in somehow) So no, I couldn’t make the cakes square, but I sure could make them cute. And cute as hell is what I did.

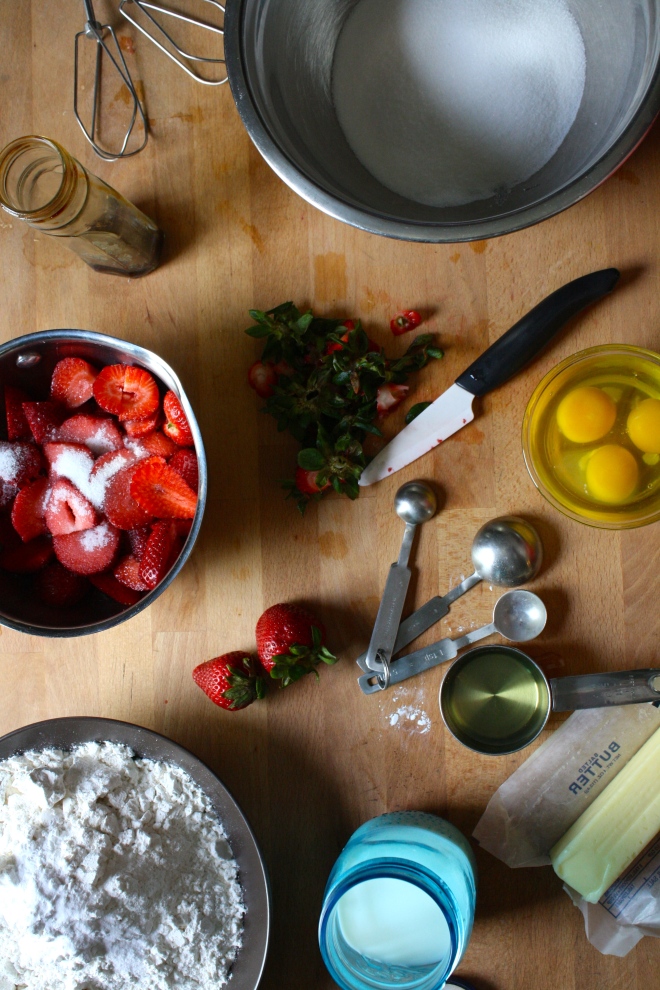
Cake Stuff. Flour, baking soda, baking powder, and salt whisked together in a bowl. Butter, a little oil, vanilla, eggs and buttermilk. Then of course we have strawberries cause it wouldn’t be a strawberry cake with out them.First things first. Wash, trim and dice up the strawberries. Stick them into a pot and sprinkle with a few tablespoons of sugar. Heat on low and let the strawberries cook for about 10 minutes, stirring frequently, until they turn into a thick syrup. The sugar and the butter get beaten together until light and fluffy. Then goes in the oil, eggs, and vanilla. The milk is then added to the strawberry mixture. Add half the dry mixture to the wet, mix, then mix in half the strawberry mixture to that. Mix the rest of the dry in and finish off with the strawberry mixture.

Pour batter into well greased and parchment lined baking sheet (or pans).  Stick cake into preheated oven for about 35 minutes, rotating cakes after 15 minutes. Cake is done when it starts turning a light gold brown and a cake tester stuck in the middle comes out clean. Cake gets pulled from the oven and set on a rack to cool.

I actually wrapped the cake when it was cool enough and stuck outside for a few hours. It didn’t completely freeze, but it was close. Frozen cake is easier to cut then soft non frozen cake. No necessary, but if you have the time…. 

While the cake is cooling, make the frosting.  Powdered Sugar, a stick of butter, cream cheese, lemon zest, lemon juice, and vanilla get mixed together until it turns into a big bowl of thick lemony frosting. 
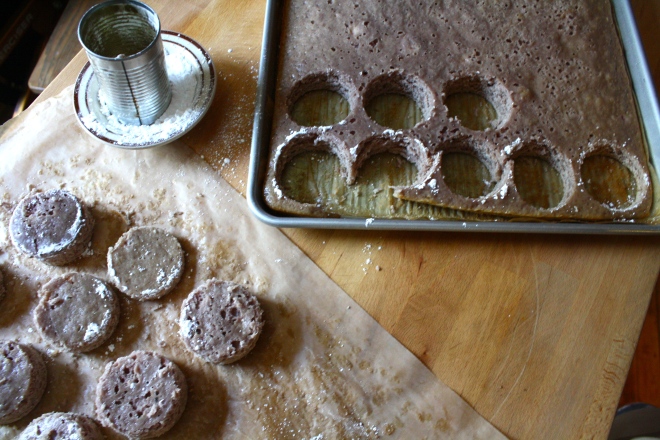
Tomato can cutout. (I couldn’t find my biscuit cutters)  A biscuit or cookie cutter would probably work a little better.. The cakes kept getting stuck in the can. Frost the cake!! Place frosting into a piping bag or a big plastic zip lock with the tip cut off.  2 rounds to a cake. A squeeze of frosting goes on one, topped with another and given a little smoosh. A nice big dollop of frosting on top then…. Sprinkles!!!!  Or sliced  strawberries (my mom doesn’t like sprinkles..I know)

So freaking cute. I don’t know if I can make a normal cake again.

Mom gets the bigger 3 tiered cake.. and a few more of the little ones. 

HAPPY BIRTHDAY MOM!

-C

Strawberry Cake with Lemon Cream Cheese Frosting

makes 16 two tiers cupcakes or can be made in three 8 inch cake pans

The Cake

  • 3 Cups All Purpose Flour
  • 1 Teaspoon Salt
  • 1 Teaspoon Baking Soda
  • 1 Teaspoon Baking Powder
  • 1/2 Cup or  one Stick Soften Butter
  • 1/3 Cup Vegetable Oil
  • 3 Eggs
  • 1 teaspoon Vanilla
  • 1 Cup milk
  • 1 Cup Sugar plus 2 Tablespoons
  • 1 lb Fresh Strawberries (Can use Frozen, just let them thaw )

The Frosting

  • 4 1/2 Cups Powdered Sugar
  • 1 Stick Soften Butter
  • 4 oz Cream Cheese (Half a block)
  • Zest of a Lemon
  • 1-2 Tablespoons Lemon Juice
  • 1 teaspoon Vanilla
  • pinch of salt

Preheat oven to 375

Grease a parchment lined  13×18 high rimmed baking sheet and dust with flour. If you baking sheet isn’t as big as mine, use whatever size you have and make a few cupcakes on the side. Or make one , 3 tiered  cake with 8 inch cake pans.  I trust that you can find a way to bake all this cake batter.

Wash, trim and dice strawberries. Toss them in a medium sauce pan and sprinkle with 2 tablespoons of sugar. Place on low heat and cook for about 10 minutes  until  strawberries break down and turn into a thick syrup. Take of heat and let cool.

Combine flour, salt, baking powder and soda in a bowl and whisk together, In another large bowl, add butter and sugar together and beat on medium until light and fluffy. Add in oil, vanilla and eggs. Beat together. Now add the milk to the  strawberries and mix together. Beat in half the dry into the wet, add in half the strawberry mixture, then the rest of the dry, and finish off with the rest of the strawberry mixture. 

Pour batter into prepare baking sheet (or pans) and place in oven. Check cake after about 15 minutes and rotate to help insure an even bake. Bake for another 15- 20 minutes, or until cake  starts to turn golden brown and a tester (toothpick) comes out clean.  

Remove from oven and let completely cool.  (Not necessary, but once cake is cooled , wrap with plastic wrap and stick cake into the freezer of a little while before cutting the circles.. its makes it a little easier)

While cake is cooling, make the frosting. Place all ingredients in a big bowl and beat together until a nice soft but sturdy frosting forms.  If. you frosting seems to thick add in a  splash of milk. To thin.. add a little more sugar. 

When the cake is cooled, get to it. With you cookie or biscuit cuter dipped in powdered sugar, cut as many circles as you can. 

Fun Time!! Frost the cakes. Place frosting into a pastry bag, or like me, a large zip lock bag with the tip cut off. Partner up all the cake rounds and go through and give one of each of the pairs a good dollop of frosting. Top with the remaining cake, give it a lithe smooshto make sure they stick, and squeeze a nice dollop of frosting on top. Finish off with sliced strawberries and lots of sprinkles.

Sing Happy Birthday and eat!

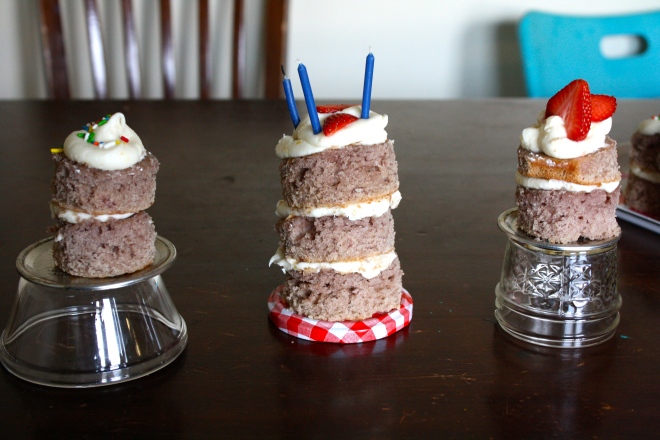
 What is better for a bake sale then Oreo cookies?  Oreo cookies made from scratch!.

So when my sister called and asked me to make something for my nephews bake sale to raise money for his basketball team, I couldn’t say no. (or I  didn’t want to say no cause any good excuse to bake right!) Plus I had just found this awesome recipe on one of my favorite blogs, my name is yeh, for home made Oreos that I have been super excited to try, so it kind of worked out. But before I committed to the Oreo, I wanted to just double check with my nephew and see what he might want me to make because it was his bake sale. 

This is the conversation we had. And yes, it was through text.

Me- “Hey bud, what do you want me to make for your bake sale? Cupcakes, cookies, donuts, or brownies”

Jack- ” Yea!”

Me- “Yea what?”

Jack- “Make that.”

Me- “Make  what?….Hello!! What do you want me to make? Should I make Oreos?”

Jack- I WANT OREOS!”

Ok.. So it took a little while, but we got there. And after the  the basketball game and the super successful bake sale..

ME-“Did you see the Oreos?”

Jack- “What do you mean?”

Me- “The Oreos I made for the bake sale…the ones you wanted me to make”

Jack- “There was a bake sale? I want Oreos”

Yup, that’s the attention span of my 13 year old nephew. Little shit head. But for real, I had so much fun making these cookies and I am definitely going to be making them again. Plus they were a super hit at the sale.

I am the best aunt! (and sister!)

Cookie Time! Whats going on here is brown sugar and butter  have be beaten together until nice and fluffy Then a good big splash of vanilla and another 2 big splashes of coffee are added to that.(I sacrificed my last few sips of my coffee for these cookies)  The dry stuff, flour, salt and cocoa powder, are whisked together, waiting to be added to the wet.  Mix the dry ingredients into the wet and mix. I ended up just using my hand and kind of squish mixing everything together until in tuned into a nice lovely uniformed dough.  Form the dough into 2 balls and give each a few kneads to get any air bubbles out. Place dough back into bowl and stick in the fridge to sit for 10-15 minutes( it makes the dough a little easier to work with)

Once the dough has had a little time to rest and cool, remove from fridge, one ball at a time. Place on a lightly cocoa or powdered sugar dusted surface and roll out the dough. Grab any size circle (or other shape) cookie cutter and get to shaping the cookies. Notice the tin can in the bowl? I could’t find my biscuit cutters anywhere but the can was the perfect size, and it worked really well. Keep a little bowl of either powered sugar of cocoa to dip the cutter in in between making the cookies. It really helps the dough from sticking and breaking. 

When you have cut out your cookies, use a spatial and place them on a baking sheet. You can try to transfer with you hands, but you end up messing up the shape and most of them will break anyway.

Stick the cookies in the oven for about 15 minutes a batch and continute to roll and cut out the cookies until you have no dough left. 

 While the cookies are getting their cool on, make the cream filling. All you need is a stick of butter, about 4 cups of powdered sugar, some vanilla and a few splashes of heavy cream. Beat that all up until nice and creamy thick and spoon it into a pastry bag (I used a big old ziplock bag) to be piped on the cookies. Filling the cookies is for sure the best part. Separate the cookies into pairs and pipe a big blob of filling onto one of the two cookies. Take the names cookie and place on top, giving it a little smooth to the disperse the cream. Keep doing that until the cookies are all filled.

Stacks of cookies… Sold to the highest bidder! I was told that they sold out within the first half hour at $1.50 a pop….Should have charged $5…. for a good cause right?

And yes, even though he was being a space head and didn’t even care that I just  made him like 50 bucks for his team, I still saved the kid one.He just had to give me either a hug or 5 bucks for it.

I got a hug. (I really wanted the 5 dollars)

-C

From Scratch Oreo Cookies 

Adapted by Molly Yeh from My Name is Yeh!

The cookie (makes about 18 3 inch Oreos)

  • 2 cups all purpose flour
  • 1 cup cocoa powder
  • 3/4 cup brown sugar
  • 1 cup or 2 sticks soften butter (use earth balance for vegan)
  • 1 teaspoon salt
  • 1 teaspoon vanilla extract
  • 2 tablespoons brewed coffee

The filling

  • 1 stick soft butter (us earth balance for vegan)
  • 2 tablespoons heavy or whipping cream (use a nut or soy milk for vegan)
  • 4 cups powdered sugar
  • 2 teaspoons vanilla extract

Cookies- In a large bowl cream together sugar and butter until light and fluffy. Add in vanilla and coffee and mix together. In another bowl, whisk together the flour, salt and cocoa powder. Add dry to wet and mix together unit a uniform dough forms. Dump out onto a lightly cocoa or powdered sugared surface and knead dough a few times. Split ball into two balls, place in bowl, and stick in the fridge for 15 or so minutes.

Preheat oven t0 325 degrees

When dough is chilled, remove one ball at a time, and roll dough out on a cocoa or powdered sugar dusted counter until its about 1/4 inch thick. With a round (any shape would work) cookie cutter, cut out as many cookies as you can. In between sits, dip cutter in a sugar and cocoa to keep the cookie from sticking. Transfer cut out cookies onto a baking sheet with a spatula.  Take scraps, roll into a ball, and roll out again. Keep doing that until you can’t cut out any more. (You can either bake a weird shape cookie or just eat the dough)

Bake cookies for about 15 minutes or until the cookie has risen a bit and the tops have lost their glossiness and look cooked.  Remove from oven and let cookies dry on a wire rack.

Make the filling

Filling- Beat together butter, sugar, vanilla, and cream until completely mixed and is at your optimal consistency. Add a drizzle more cream if you want to thin out or add more sugar for a thicker cream. 

Stick the filling into a piping bag or ziplock bag an snip the end. With cookies in pairs, pipe a big dollop of filling onto one of the two cookies. Place the naked cookie onto the filled cookie and give a smooth to distribute the filling.

lick your fingers and eat a cookie. 

If selling at a bake sale, charge $3 a cookie…. If it’s for a good cause. 

I don’t know if I have bitched enough about it, but I only have one window in my living space. And as much as I love love love our little tiny loft, I am a person who needs the sun. So when I am home I spend a lot of time siting in front of the window.  Over the past few weeks I have been doing a lot of watercolor painting in front of that window and somehow  between drawings of carrots and  vintage fans, I ended up making these marbled window stained glass hoops. And I am glade I did because these little watercolor gems really do make a big impact on my one source of sunlight. Even when the day is kind of gray and gloomy, having these in the window make the light seem brighter and happy. 

We can all use a bright happy window.

So this project is really easy and fast. I recommend that if you are going to go to the trouble (it’s really no trouble) of making one, you might as well make 2 or 5. I actually made a bunch (think Mothers day or Easter presents) and ended up only keeping a s couple. I am going to have to make a few more soon.

You will need-

  • Watercolors 
  • water
  • paintbrush
  • Sketch paper*
  • A pan or tray with a bit of water 
  • Embroidery Circles * (As many as you want to make)

*Notes

  • -I tried to use a few different types of paper and found that the sketch works the best. Watercolor paper was a bit to thick and printer paper just kept ripping.
  • -You can buy embroidery circles at any craft store and they usually have a good variety of sizes. Use the sizes that you like.

Take a piece(s) of paper a little bit bigger then the hoop you are working with and stick it into a pan or tray of water. Let it sit there for a few minutes until the paper is completely soaked.Take the wet paper and, oh so gently, crumple into a ball. This part can be a little tricky. You want to make as many creases as possible without ripping that paper. (I ripped a few pieces) I found that if I folded that paper a few time, then crumpled that it was less likely to rip.

Uncrumple the paper and lay it gently onto the inner part of the hoop. Now the fun part. Go to town with the watercolors. I used 2 colors per piece, but you could do 1 or 3, or more. When applying the color, use big gentle strokes and let the colors kind of meld together. Watch as all the crumple veins soak up the paint. Try using different dilutions of color. I applied some color on thinly and some on the thicker side. But really, you can’t go wrong, just keep applying paint until you are happy. I stopped a few times and held it up to the window just to see what it looked like. When it looked good, I was done.

When you are happy with the colors, let the paper dry for a while on the hoop  until it is not longer super wet. I would say about an hour or so, but if you stick it near the heater, it might dry faster. (Just don’t stick it in the oven while you are making bread like I did with one.. It just ended up setting on fire. Oops)

Once its pretty much dry, take the outer ring of the hoop and gently place around the inner hoop and tighten. Being super careful, trim the extra paper from the back of the hoop.

Place your pieces in a window and watch them glow.  Yow now have a happy window.

-C

THE LOVELY CRAZY

August 12, 2016 by maximios • Blog

As a kid, my favorite holiday was Easter. Every year my parents would fill up brightly colored plastic baskets with handfuls of neon colored plastic “grass” and top it with all sorts of candy, coloring books, bubble, and sidewalk chalk. They were beautiful and amazing.  It was like getting a basket of fun and a bunch of sugary candy to keep you going to have all that fun all day long. And the egg hunts. Plastic eggs full of candy hidden all over the house ans yard. We would all have our emptied out baskets running around full of excitement, ready to take out any sibling in our path just to be the one to get the next egg. We were ruthless and I am pretty sure every year someone would end up crying. Now, as an adult, I am not allowed to participate in the egg hunt. (but I still try to make my sibling cry)  Nope, now I get to hide the eggs and sit back and watch the new generation of littles tripping each other and stealing eggs from one another. The carnage!

And also at Easter there is cake. Is there a rule that says you have to make carrot cake for Easter? I think there must be because it is when everyone and their moms busts this cake out. And everyone’s carrot cake it the best because they made it the right way, like with raisins or pineapple or walnuts. There are so many things that can be added to this cake that it’s a little overwhelming. So I made a carrot cake that was mainly about the carrots. Nothing added, no nuts raisins or coconut (although you could add i if you wanted) and it’s made into a pretty bundt cake, which in turn makes mine the best.

This here cake was destined for tomorrows Easter table. I made it with no nut produces cause the nephew has the deadly nut allergy. But when I went and made the date sauce, I kinda let that slip and used almond milk. Oops. So now I have a whole big carrot cake sitting on the counter with it’s destiny shattered. So sad, but I think its will survive cause the mris really into it and has already eaten a few pieces. I figure that because it’s a carrot cake, he can eat a few more. It’s almost like eating a vegetable….almost. And now I need to make a new cake to bring over or I might just stop at the store and buy some oreos on my way over tomorrow. The littles will like that.

The stuff. A bowl containing flour, salt, baking powder ans baking soda.  Also need a few really big carrots, a bit of brown sugar, and ground up cinnamon and ginger. Coconut oil, soy milk, an orange (for it’s zest) and a little apple cider vinegar are going into this cake too.

Start by chopping up 2 of the biggest carrots and tossing the into a pot with about an inch of water. Stick the pot on the stove and cook until the carrots are nice and tender. Then blend those tender carrots up.

I had a hard time not eating all of the carrot puree, so maybe if you want, cook up a few extra carrots ans have yourself a pre-carrot cake carrot snack.

And while the carrot puree is still warm, add in the coconut oil and the sugar. Mix it until the oil is melted ans it’s one cohesive mixture.

And take that last carrot ans grate it up into the flour. Also add in the spices and the zest of the orange.

Note. I used a small holed grater so that the carrot shreds would be small and add texture to the cake but not make it too chunky. But use a normal grater..it’s all about your carrots chunk prefernce here.

Now dump the wet carrot mixture into the dry and start to mix

Adding in the soy and the vinegar to complete the batter.

And scooped that batter into a oiled bundt pan and get it into the (preheated) oven to bake.

After about an hour, the cake is ready, golden brown and smelling like any good carrot cake should. Remove from the oven and turn the cake out from the cake pan and stick on on a rack to cool. This cake is waiting for me to decide what, or if I want to frost, drizzle, or sauce it up….. I think it wants as little something.

Ok, I figured it out. Date sauce.

The stuff. Fresh medjool dates, almond milk and sea salt.

Date (pits removed) into the food processor along with the milk and a good pinch of sea salt.  Blend until it turns into a nice smooth, fluffy sauce.

Take that sauce and spread it all over the cake. As much or as little as you want (you might have left over date sauce but its ok, you can just eat. It will last for about a week in the fridge and goes great with just about anything) Once fully sauced, sprinkle the cake with flaked sea salt.

Sliced, plated, and ready. It’s carrot cake time.

Have a great weekend, eat all your candy at once!

-C

Makes a bundt cake (but could be made into a 9×13 sheet cake)

  • 2 1/2 cups flour
  • 1 teaspoon baking soda
  • 2 teaspoons baking powder
  • 1 teaspoon salt
  • 3/4 cup brown sugar
  • 1/3 coconut cup oilany oil works)
  • 1 tablespoon apple cider vinegar
  • 3 large carrots (makes about 2 cups carrot puree and 1/2 cup of raw grated carrot)
  • 1 heaping tablespoon cinnamon
  • 1 teaspoon ginger

Salted Date Caramel

  • 1 cup medjool dates (pitted)
  • 1 cup almond milk (or any milk you want to use)
  • sea salt

Start by chopping up 2 of the biggest carrots and placing them into a pot with water about an inch of water. Stick on stove and bring to a boil then reduce to a simmer until the carrots are fork tender. When done, puree them with any means nessasary (hand blender, regular blender, food processor) Add the coconut oil and sugar to the warm carrot puree and mix until oil is melted.

Preheat oven to 350

In a large separate bowl, mix together the flour, baking soda and powder, salt, and the spices. Grate the smallest carrot in with the dry.

Take the wet carrot mixture and dump into the dry and mix, adding in the soy milk and the vinegar as you mix. Once everything is completely incorporated, pour mixture into a well oiled bundt pan and stick the cake into the preheated oven

While the cake is baking, make the date sauce. Just take the dates, remove pits if they have any and place in a food processor with a good pinch of sea salt and the almond milk. Pulse a few times, scrap down the sides, and keep blended, stopping to scrap sides if needed, until a nice thick smooth sauce is formed. If you want a thinner sauce, just add more milk til you get your desired consistency.

Now check cake. Once it’s golden brown and a tester comes out clean (between 50 minutes to an hour) remove from oven. Let cool for a few minutes in pan the then turn it over onto a wire rack to finish cooling off. Once the cake is cool, dump the date sauce all over it then sprinkle with another good few pinches of the sea salt.

And now eat it. This is a cake that needs no fork, but you can go ahead and use one if you must.

THE LOVELY CRAZY

August 12, 2016 by maximios • Blog

I was cleaning out the fridge and found that I had a good few really ripe avocados that were in need of eating ASAP. (I bought like 8 at once… super sale!) My first thought was I wish I could freeze these and save them for later. Then I thought well why the heck don’t I freeze them. So that’s what I did. I pureed them up, added a little lemon juice and stuck a jar of tangy green creamy goodness into the freezer and all throughout the week found myself standing in front of the fridge with a spoon scraping at the jar of avocado. It was so good. I even added a little fruit to it toward the end. Avocado and fruit = oh hell yes.

And now that is is officially spring we should be eating popsicles (right?!). I figured you guys are cool enough that I would share my new found love of frozen avocados and you would be down with it.

I know, some might think that plain old frozen avocado doesn’t sound amazing, but when you add a little sweetness and swirl it around with super sweet and creamy mango. Trust me, it’s freaking amazing. The flavors go perfectly together, and the texture, it’s almost like ice cream… SO GOOD! Anyway, I know that it might not be the perfect spring weather as of today, but the beauty of these is that you make them, freeze them and leave them until the perfect moment. Say a good long day of raking up all the cat poop that the neighbors cat has left in all your spring flower beds, or picking up all the recycling that has blow into the bushes all winter long. Maybe a day of cleaning out the closet or dusting the ceilings. Make these popsicles now and treat yourself to one after doing some kind of crappy spring chores, its what you need to do.. Or better yet, bribe a little with a popsicle to do your spring cleaning….. Yeah, I might just do that.

Or just make them and eat them… no spring chores required.

The stuff. A nice ripe mango and a nice ripe avocado. A bit of lemon juice (from half a lemon),  a little maple syrup, and a some water.

Scoop the avocado into a jar and cut up the mango ans stick into a jar…..

Splash a little water into each jar and blend them up. (I used my hand blender. but use the blending device of your choice) Add the maple syrup to the avocado.. as much as you need, and if your mango is not super sweet, you can add a little to that too.

Scoop the avocado puree into the mango and gently swirl it around

Now pour/scoop the mixture into your popsicle molds. And because mine was thick enough, I was able to stick the wood sticks without them sinking.

Noe get them quick into the freezer

A good few hours (I didn’t even check until the next day but I bet 4-5 hours in a good freezer will do) the popsicles are nowposicles!!!!!

Pop them out of the mold (a few minutes on the counter and or a quick rinse under warm water) and do what needs to be done.

So creamy sweet and refreshing… This is a happy spring popsicle for sure.

Have a great day!

-C

Makes four 4oz popsicles

  • 1 ripe avocado
  • 1 ripe mango
  • 1/2 a lemon or lime
  • 1-2 tablespoons maple syrup (or any sweetener of you liking)
  • about 1/2 cup of water

Note.sIF your mango is not super sweet you might want to add a little maple syrup to thatto that as well. And depending on the actual size of your mango and avocado, you might find yourself with a little extra fruit puree…. so maybe an extra popsicle can be made or you can just eat it now.

Scoop avocado into a jar and cut and dice mango and place in a separate jar. Add maple to the avocado (and the mango if you want) and about 1/4 cup of water to each.  With a hand blender, blend each until smooth ( or use a regular blender) Once both are blended, dump one into the other and gently swirl around. Pour mixture into popsicle molds, add the sticks and stick into the freeze. Keep freezing until frozen which should take at least 4-5 hours.

And once frozen, pop out of molds (run mold under warm water or just leave on counter for a few minutes) and eat them like it hot!

THE LOVELY CRAZY

August 12, 2016 by maximios • Blog

What a week, what a week. I have barely had time to think, let alone cook food. 

I had the rhubarb that was in need of cooking, the corn is all over the place all super fresh, and I had me a few minutes in between running around to make some food.

 I made this (what I now realize is succotash, which is such a fantastic word for food) a few weeks back, fell in love with it so I wanted to make it again. I also wanted to see if the mr would like it this time (he didn’t so much the last time) Says he is not a corn fan. But I don’t know, I still think he loves corn and just wants to be a pain in my ass and tell me he doesn’t. I figured that this time I made it, he would finally declare his love of corn, I mean, there is butt load of rhubarb in it too. And big creamy lima beans and nice sweet onion, and tomatoes. Yes it has a lot of corn, but it has so much more.

Well, he didn’t declare his love of corn.  He did have a big scoop on his dinner plate, ate a bite or two then, picked out all the lima beans and chunks of rhubarb then told me that corn love wasn’t going to happen. He also aid that I should stop messing with the rhubarb and just make another pie.

What a butt face.

Whatever, more for me! And if you are awesome and you like sweet corn, tart rhubarb (corn and rhubarb together is the best) ,and are in need of a great summer side for any and all of your summertime food time needs, this is a winner.  Super fast and easy to make, eaten warm or cold, and keeps well. It screams BBQ time. (Or 10 o’clock at night, standing in front of the fridge, eaten with a big spoon) It’s good whenever.

The stuff. Rhubarb, fresh corn, and some cooked lima beans. Also need a tomato, a sweet onion, red wine vinegar, salt ans pepper, a little olive oil and water (not pictured) and a few sprigs of fresh parsley.

The onion and rhubarb gets chopped up and tossed into a big skillet with a tiny bit of olive oil and a few splashes of water and place on the stove to cook a bit.

Corn needs to come off the cob. Do it the way you like, but I find holding corn vertical in a big bowl and cutting it down works best.

Slightly soft rhubarb and onions, ready for the other stuff.

Dump the corn, the tomato (chop it up first) the lima beans(drained) and a few splashes of vinegar into the skillet. Stir it all up and keep on heat for a few more minutes until the corn is just barely cooked and all the flavors have had a few minutes to meld.

Toss in some fresh chopped up parsley and season with salt and pepper…..

Into a pretty bowl for eating now or eating later.

This big ass bowl is all for me!!!!

Have the greatest weekend!

-C

  • 2 ears of corn
  • 4 fat stalks rhubarb (mine where about 10 inches long)
  • 2 cups cooked lima beans
  • 1/2 a sweet onion
  • 1 tomato
  • fresh parsley
  • salt and pepper
  • few tablespoons red wine vinegar
  • olive oil
  • a few splashes of water

Chop the onion into small pieces then chop the rhubarb into smallish chunks. Toss the rhubarb and onion into a skillet with just a tiny bit of olive oil and a few splashes water. Place on the stove on medium heat and cook until the onion and rhubarb are slightly tender, but not to soft.  If you need to, add a bit more water to the skillet to keep the stuff from browning or burning.

While the rhubarb is cooking, remove the corn from the cob and chop up the tomato into small chunks.  Toss the corn, the tomato, the lima beans (drained) into the skillet with the rhubarb and onion. Pour in about 2-3 tablespoons of vinegar and season with salt and pepper. Mix and cook for another few minutes just until the corn get slightly cooked and all the flavors have had a few minutes to meld.

Remove from heat and dump into a bowl. Chop up a handful of fresh parsley and sprinkle all over

Serve right away warm or stick in the fridge and serve cold later.

Not only is it the first week of summer, it’s also popsicle week! Billy over at the sweet ass blog Wit and Vinegar hosts a little (actually quite large) bloggers party that share all sorts of fun and fantastic popsicle recipes and presents that list to the world. There are popsicle flavors up the wazoo…Pretty stinkin cool right.

So my contribution to the world of popsicle eaters is one of my all time favorites (maybe the absolute best one yet).. Carrot Ginger Orange.

For those who know me, this flavor combination should come as no surprise. Carrots are my thing. I eat them all day, every day. Sure I eat a shit ton of other stuff, but always carrots. Carrots are in my breakfast,lunch, and dinner. If I need a snack, I grab a carrot. There is just something so satisfying not to mention so easy about carrots. Eaten alone, with mustard or hummus, or dipped in peanut butter of cinnamon..Carrots can do just about anything. I mean I eat so many carrots that no shit, my skin is a slight tint of orange (seriously for reals. Something about an abundance of carotene) Crazy I know, but what can I say. I really like carrots.         (that’s what I say when people ask me why I am glowing orange)

So naturally the carrot made it’s way into my popscile mold. And now it’s for real. Carrots really can do anything.

Another win for carrots everywhere.

And popsicles.. Just in time for that hot as shit weekend we are about to have.

GO POPSICLES CO!

The stuff. Carrots, an orange, some fresh ginger, and some water. Simple simple and no, I didn’t forget the sweetener… these pops have no need (although if you want, go ahead and add a smidge or splash of something sweet)

Start by chopping up the carrots and sticking them into a pot with some water. Not a lot, just enough that it almost cover the carrots, and stick that pot onto the stove, cover and cook on medium heat until tender. Make sure to check that the water doesn’t completely evaporate or you will have burnt carrots which taste just fine, but not as a sweet popsicle

While the carrots are tenderizing, zest the orange then juice it and grate up some fresh ginger.

Once the carrots are fork tender, dump in the juice, the zest, and the ginger. Stick pot back on heat for just a few more minutes to meld the flavor together.

Dump the contents of the pot into the blender and blend blend blend until smooth.

Grab your mold and pour blended mixture into it.. Because the mixture is thick, you don’t have to wait to stick the sticks in so go ahead and do that now.

And into the freezer they go!

Serious popsicle goodness right there.

Happy Popsicle Week. Go ahead and make them all!

-C

Makes about four or five 3.5 oz popsicles

  • 3 medium sized carrots
  • 1 orange (zest and juice)
  • 1-2 teaspoons fresh ginger
  • water

Note. I did not use and sweetener and did not miss it but if you really think you need it, add a little bit of honey or sugar. But really, they are sweet enough so maybe give them a chance without it.

Start by chopping the carrots up into coins and stick them into a pot with enough water to just about cover the carrots. Stick on stove on medium heat and place a lid on the pot. Cook carrots until tender.

While that’s happening, zest and juice orange and grate up the fresh ginger. (I used 1 teaspoon of ginger at first, but after I blended it, I decided that I wanted a little more so I added another teaspoon)  Once the carrots are soft, dump in all the juice, zest and ginger. keep on heat for a few more minutes to let the flavors all meld together.

 And now dump the pot of carrot goods into the blender and blend the crap out of it until smooth. (add in a splash or two of water if needed. Taste your puree and if you want more ginger, add it it.( can also decide now if you want any sweetener..

Now pour the mixture into you popsicle molds and follow the mold directions on how to use it (add popsicle sticks and stick it in the freezer)

Freeze until frozen.

Remove from freezer and let sit until pops slip from mold.

Eat until gone.

Make more popsicle.

Whats summer without some ice cream?  That is no summer, that just sounds like Hell. And this past weekend I was pretty sure I was in hell because it was so mother f*ing hot and for a while, I had no ice cream (and no air conditioner)

We used to have an air conditioner. My mom gave us one a few years back because she was worried about washer (so nice she was worried about the dog and not me, but that’s cool) And we used it, not often, but when the temps got above 90, we would bust that mother out, hang blankets from the ceiling and create a little frozen ice box. Washers bed, the couch, and the tv were the only things in the box and it was fantastic.We would spend all day hanging out in the dark little ice box, cuddled on the couch watching tv. Washer would just lay there and I am pretty sure that he loved it just as much. But a couple years ago that air conditioner broke so now we don’t have one. So now when it’s mother f*ing hot, we are just really fucking hot. As for Washer, I send him over to my moms house. She has like 10 air conditioners. And the mr and I.. we bitch and complain and sweat and eat ice cream.

So I made this is my ice cream, a Colleen approved, oh so good I want to eat it for ever meal, type of ice cream. Nice and creamy with nice coconut oatiness. Its really pretty great.

And if there was ever a time when you woke up so hot that all you for wanted for breakfast was ice cream, well that’s completely cool, especially with this kind cause it’s kinda really healthy and made with oats and so it it definitely ok.

Here’s to ice cream all day, every day.

The stuff. We got a can of coconut milk, some old fashion oats, a few dates and salt. ( we need just a pinch) Also need a little water.

Pretty simple here, just dump the coconut milk, oats,the dates(make sure they are pitted) and a pinch of salt to a blender and blend the crap out of it. And keep blending until its all creamy smooth and oh so nice then stick the blender in the fridge.

After about an hour or so the mixture becomes super thick. Stick it back on the blender stand and give it one last swirl to make sure it’s all mixed up.

Pour/scrap mixture into a freezer safe container and stick it into the freezer… lick blender clean, watch you tongue and fingers.

After a hour or so, remove the kinda frozen ice cream and give it a good whip with a stick blender or if you don’t have, scrap the ice cream back into the blender, and give it a swirl, stick back into freezer container hen back into the freezer until frozen.

And when you are ready to eat, remove from freezer, let sit out for 5-10 minutes to soften enough to scoop and do what needs to be done.

Look at that. So good.

And not only dessert, but this could be your breakfast tomorrow….and every day from now on.

-C

  • 1 can coconut milk
  • 1/2 cup water
  • 1 1/2 cups oats (gluten free if needed)
  • 3-5 dates*
  • pinch of salt

*Note. I used 3 dates and found it sweet enough but I don’t like things too sweet. If you know you like things sweet, do 5. Also, if the dates are not super soft, soak them water for a little bit.

Grab your blender and place all the ingredients in it. Start blending and blend and blend and blend until all smooth and creamy. (It might take a few minutes.) And once it’s all blended up, stick the blender into the fridge .

After about an hour or so the mixture should have gotten nice and thick .Remove and blend the whole thing up once again and transfer the mixture to a freezer safe container. Place said container into the freezer. Let the mixture set up and get pretty close to frozen and remove from fridge and give it another good blend (I use my hand blender, but you can always scoop back into the regular blender to do it) Place back into freezer until frozen.

When you are ready for ice cream, remove for freezer and let sit out for 5-10 minutes until soft enough to scoop.  It might be super hard at first but don’t worry, it soften up quick enough. I find scooping it easier with a ice cream scooper dipped in hot water….

Scoop it, add any toppings you want (toasted coconut and toasted oats are great) and then eat it.

Store left overs in freezer (duh) but place a piece of wax paper over the top to keep from freezer burn.

My rhubarb patch has turned into a rhubarb jungle and I couldn’t be happier. At the beginning of the spring I moved like 10 of the plants to the new patch location and was wondering if I would even get a small crop this year. Guess my soil is premo cause those plants be ginormous.

And now I am harvesting the stalks from that jungle and I have rhubarb coming out of my ears. (I will be eating rhubarb all summer long) It’s not really a problem per say, but there is so much, so it’s time to get a little crafty with the tangy sour veggie stalk.(rhubarb sword fight anyone?)  One of the first things I made with some of it was a salad that consisted of roasted and slightly charred zucchini, onions, corn and rhubarb. I made it for the mr thinking that he was going to love it because he loves rhubarb so much. Well he didn’t love it because of all the corn. (Such a weird egg that boy) But me,I loved it, like ate it all and then some. Corn and rhubarb are such a good combination and if the mr wasn’t being such a weirdo, he should have liked that salad too. But it gave me the inspiration for the cake . A cornbread cake ( he loves cornbread) sweetened just the right amount with maple. Not exactly a rhubarb corn salad, but you get the idea. And this cake is totally multi purpose. Made as dessert and would go extremely well with a scoop of your favorite vanilla ice cream but would work equally as well served with a bowl of baked beans. I mean, can cake for dinner get any better?

The stuff. A bowl with cornmeal, flour, baking soda, baking powder, along with a little salt. Also need some maple syrup, soy milk, earth balance and apple cider vinegar.And of course we have a few rhubarb stocks,

Start with melting the earth balance and maple syrup together on the stove and letting it thicken up a bit. While it’s thickening, think about the shape of you skillet and haw you want to layer you rhubarb, like the design of it.

Then when the maple is thickened and you know how you want to layer it, chop up your rhubarb and start placing in into the bottom of the skillet. Any way you do it, just make sure that the bottom is pretty much covered in rhubarb and that its only on stalk deep.

Now for the batter. Easy easy. Just whisk together the dry and combine all of the wet into a bowl.

Wet and dried mixed together.

Pour the batter gently onto the rhubarb and smooth the batter out.

And into the oven it goes.

Pulled from the oven when the cornbread is golden brown and a tester stuck into it comes out clean. Let it cool just as it is for about 10 minutes… (give the maple time to cool and set up so it doesn’t just get sucked into the cake) then flip in. I flipped mine onto a piece of parchment and a cutting board . You could try to go directly onto a cake stand or plate, but It might get a little messy. I like to play it safe when flipping things and just use a big cutting board. Now get ready to cross your fingers…..

Ta da!. Ain’t it a beaut? And don’t worry if a little piece or two get stuck in the pan. Either scrape it out and place it back on the cake or consider it a little snack.

There you have it. A cake good to go for all your meal eating needs.

Go rhubarb GO!

-C

  • 1 1/4 cup flour
  • 1 1/4 cup cornmeal
  • 1 teaspoon baking soda
  • 1 tablespoon baking powder
  • 1 teaspoon salt
  • 1/3 cup melted earth balance + 2 tablespoons
  • 1/3 cup maple syrup + 2-3 tablespoons
  • 1 1/2 cups soy milk (or any plant based milk)
  • 1 tablespoon apple cider vinegar
  • 2-3 stalks rhubarb (enough to cover bottom of skillet)

Note. I baked this in a 10 inch cast iron skillet. If you don’t have one, a 9 inch circle or square pan will do the trick, you are just going to have to simmer the maple in a pot ans pour in into the pan you are using…and maker sure to grease it!

Preheat oven to 350.

Place the 2 tablespoons of earth balance and the 1/3 cup of maple into a 10 inch skillet and place on medium heat. Stir around until earth balance is melted and the maple starts to thicken. Remove from heat. Now grab rhubarb cut into pieces and layer it any way you see fit, making sure to cover the bottom of the skillet but not layering it in to thick.

In a large bowl mix together the flour corn meal, salt, baking soda and powder. Then In a separate bowl, mix together the apple cider vinegar, soy, melted and cooled earth balance and the remaining maple. Pour wet into dry ans mix until even;y incorporated.

Pour batter gently on top of rhubarb, leveling out if need be, then slide it on into the oven to bake for 25-30 minutes or until the cake is golden brown and a tester stuck into the middle come out clean.

Remove cake ans let cool for for about 10 minutes. This is really important,because flipping to soon and all the rhubarb maple will just absorb and soggy up the cake and if you wait to long, all that goodness willl harden up and get stuck. SO 10 minutes.

Now when your ready yo flip, think about size. I used a big cutting board that , but a plate would work to, just make sure it;s slightly bigger then the skillet. Then just do it flip and lift the skillet away. Any pieces that might have gotten stuck can be scraped off and placed back where they belong.

Now your cake is ready and waiting for you to eat. Sweet enough for dessert, not to sweet that you couldn’t serve it with dinner. Multi purpose cake.. the best kind!

 I remember long ago, when I was just a little, my mom would take me to the health food store with her to get whatever new fancy snack that she was obsessed with or to stock up on way to expensive jams and her very specific boxes of teas that she could not find anywhere else. Those were the days (when mom was buying the groceries) And I loved going to the store with here because well, bulk bins! Oh the bulk section, it had all the best stuff like sesame sticks and granola chunks.  It was a free for all,, grabbing a piece dried mango here or a handful of almonds there. (don’t judge, I as just a sweet little little, I don’t do that anymore…often)   This store had a pretty impressive bulk section and includedtwo bins of carob covered rice cakes. One was plain, one was mint, both freaking delicious. Up until the first time I ate one of those rice cakes I had no clue what carob was or that those rice cakes were not chocolate. I just remember that they were super tasty and that my mom always got one for me.  She wold buy a dozen and I might have gotten to eat another one of those too.  I loved those rice cakes.

I haven’t seen a carob covered rice cake in years.  I think that they stopped carrying them or maybe it’s because the store has changed a lot and I don’t often go there anymore, but either way, it’s been a while. So anyway, last week I spur of the moment bought a package of (unsalted plain) rice cakes, then realized that the mr wasn’t to into rice cakes anymore (there was a long period of time where I made him peanut butter banana rice cakes for lunch everyday). But I bought them and they need to be eaten, and that’s when it came to me.. Make the carob covered rice cakes from the old days. Something new and different for the mr and something super nostalgic for me.

And it helped that it has been way to freakin deakin hot and all the things that I have been wanting to bake (cherry pie, rhubarb cake, food in general) just wasn’t happening. . But these sweet treats take 2 minutes to make and require no heat whatsoever (my coconut was already melted.) Can you really ask for more?

The stuff. Carob powder, coconut oil and rice cakes. I should have stuck the sea salt in the picture, but it is kind of optional..

Simple as can be. Th oil and carob powder get combined in a bowl of some kind.

Mixed together until silky smooth and BLING BLING shiny.

Rice cakes all ready to get decked out ( doing this on wax paper to make life much easier)

Smothered with the carob all over. You can do one side at a time, sticking it into the freezer to set for a minute or just get a little messy and do it all at once. Up to you. But wither way, it need to go in the freezer for just a few minute to get hard.

And right before you stick them in the freezer, sprinkled with sea salt.

Uh huh.. Looking good. And taste ever better then I remembered. (it’s the salt. Salt makes everything better)

-C

Makes 2 (why make only 1)

  • 2 tablespoons coconut oil
  • 4 heaping tablespoons carob powder
  • 2 plain rice cakes
  • Sea salt

In a bowl mix together melted coconut oil with the carob powder until a smooth and shinny consistency. With a spatula, smother the top and the sides of the rice cakes with the mixture. Place on wax wax paper, un-carobed bottom down, and stick in freezer for a few minutes until carob has harden. Remove, flip, and smother remaining side. (you can do both sided at once, but it’s a little messier) Sprinkle salt on now and back into freezer until hard. Remove and eat.

Note. If you make two and have one left over for late, keep it in an air tight container in the fridge or freezer. It will melt just like chocolate.

I know what you are thinking, you are thinking “It’s Memorial Day weekend. Unofficial start of summer. Lots of BBQ’s now I have to make a potato salad!” (it’s a law right?) and “I want a pickle, dill to be specific”. Ok, maybe you weren’t thinking that, but I was. (I often think about pickles…)

Pickles. And potato salad. It only made sense to make a pickled potato salad. So make it I did. And oh boy oh boy, there is nothing better then a rich and creamy salad consisting of potatoes other then a rich and creamy and pickle tart salad of potatoes. I hit the nail right on the head with this one. The mr and I ate the entire salad all to ourselves and way to fast. Now it is gone and I didn’t get a chance to share with anyone. But it’s ok, cause this is definitely going into the summertime potato salad rotation.

Now you are thinking “creamy dill pickle potato salad.. this girl is a genius!” and to that, I say yes. I would have to agree with you on that. (hehe)

And to all who may not be a pickle fan, or need to make 2 potato salads, (it is always good to have a variety of potato dishes at any BBQ ) try this guacamole potato salad, another favorite.

The stuff. Potatoes of course and half a sweet onion, a cup or so of navy beans in the aquafaba ( bean water), left over pickle juice, fresh dill, dried dill, garlic, olive oil ,salt and a pepper. 

Yes there is a lemon pictured, but I was actually using that to squeeze into my water so yeah, not needed in the potato salad but you should grab a lemon and a big tall glass of water and drink it. Keep yourself hydrated.

Get the potatoes going. Chop them up into small piece and place into a big pot. Cover with cold water and add in a good bit of salt. Stick the pot on the stove and boil those taters.

While potatoes are boiling, strain the aquafaba (bean water) from the beans.

And chop the onion into little pieces and stick into a big bowl along with the strained (and now rinsed) beans.  Pour in half the pickle juice and give it a good toss then set aside and let the pickle juice do it’s thing.

Now it’s the sauce time. Blend up aquafaba, garlic,  dried dill, a little pickle juice and pinch of salt. As your blending, pour in olive oil until the sauce becomes rich and creamy dill sauce (vegan mayo my friends)

The potatoes are boiled until fork tender and drained..

Toss the strained potatoes back into the pot and add in the bean/ onion mix and the rest of the pickle juice. Give it all a good toss and stick the pot into the fridge for about an hour until the potatoes are cool.

And now we assemble. The cooled off pickle juice infused potatoes, beans, and onions are stuck into a bowl (or just leave in the pot if you want) and slathered with the creamy dill sauce and mixed with as much fresh dill as you want and lots of freshly cracked pepper

And a pickle. If you have one, I highly, HIGHLY, recommend chopping one up and adding it… I mean it is a pickled potato salad after all.

So now you have a great,  fantastic, knock your socks off, salad to make for any of your weekend BBQ needs.

Your welcome.

Now have a great, extra long weekend!

-C

Serve 4-6

  • 5-6 red potatoes
  • 1 cup pickle juice (use a good pickle juice that you like the taste of)
  • A small sweet yellow onion (or half a big one)
  • 1 cup navy beans
  • 3-4 tablespoons aquafaba (bean water)
  • 1/2 cup olive oil
  • 2-3 cloves garlic
  • 1 tablespoon dried dill
  • a handful of fresh dill
  • salt and pepper
  • pickles (optional)

Chop up the potatoes into mouth little chunks ans place into a pot . Rinse them and them cover about with about an extra inch of cold water, Ad d in a a good sprnkle of salt (like a tablespoon) and stick on the stove. Bring the pot to a rapid boil then turn heat down a bit to a low boil and cook until the potatoes are fork tender.

While potatoes are boils, strain you beans away from the aquafaba, and keeping about 3-4 tablespoons of the liquid. Rinse the beans and place into a big bowl. Chop the onion into little pieces and add that in with the beans and about 1/2 of the pickle juice. Set aside

Now grab the strained bean juice, about a tablespoon of pickle juice, the garlic, and the dried dill,  Either with a hand blender or regular blender, start blending all that together while slowly pouring in olive oil (about 1/2 a cup ) until the sauce is thick and creamy. Season with salt and pepper to taste and place in fridge to hang until you need it.

And once the potatoes are cooked, strain them then add them back to the pot along with the bean/onion mixture and the rest of the pickle juice. Toss around to coat evenly and place into the fridge to cool. After about a half hour its a good idea to give it a toss to make sure the juice is getting to all the potatoes.

Once potatoes are cooled, dump into a serving bowl. (or just keep in pot) It’s ok if there is a little remaining liquid.. it will get sucked up by the potatoes. Get the sauce from the fridge and pour it and toss it around to evenly coat all those yummy potatoes. Chop up fresh dill and toss that in too (as much fresh dill as you like.. more is better!) And lately, if you have a spare pickle or two, chop it up and add it on in (or place in a bowl on the side for people add in themselves)

I added the pickle. You should add the pickle. It is so good with the pickle

Like any potato salad, serve with your favorite foods and keep in the fridge when not being eaten.

Yesterday we had a few pieces of really log ass metal roofing delivered to the new house so we can finish the little side parts of the roof off. The funny thing is we ended up with way more wood then metal. The roofing is super light and flexible so it has to be strapped to a super long wooden structure. And it was perfect. The mr and I have pretty much finished the fence except for the gate from the driveway which sucks because we still can’t bring Washer over to play without it ans we pretty much fenced the yard in for him. But the long ass wooded palette things.. IT was perfect. Well a perfect for now solution. A Already constructed tall and long (too long, we had to cut it down) wooded wall that is now our temporary gate.What a score! And now the pup can spend all day long laying around outside and not getting into any neighborhood fights with the other dogs. And look at us making use of all the scraps. We are so awesome.

Ok, so besides our awesomeness and the new temp gate, let talk about this greenest freaking soup that there ever was. It is probably the best green soup that I have ever tasted. (I know,  I have habit of proclaiming all of my soups as the best soup ever, mostly because they are.) It’s one of those soups that is super fast and so simple to make and is perfect for all the spring and summer time eating that will be going on. Eaten hot or cold and out of a bowl or a drank out of a glass. A soup for any time, any place. The mr even liked it and he says he doesn’t like peas. (but he so does). Who doesn’t like the best soup ever?

Now here is how to make it.

The stuff. A big bowl of fresh spinach and a bowl of peas (fresh or frozen.. mine were frozen) Also need an onion, a carrot, a few cloves or garlic, water, olive oil, and salt and pepper.

First thing first. Get the onion and carrot all nice and chopped up and tossed into a big pot with a drizzle of olive oil, a little splash of water,and salt and pepper. Stick that pot on the stove on medium high heat and start to cook cook.

Soften and yummy carrots and onion. I am not exactly sure if my carrots turned the onion orange or if my pot because it is so stained with turmeric that it turns everything yellow. Keep the pot on low heat and mince and stir in the garlic.

And for magic. The pot is sill on low and you are going to pile all the fresh spinach right on in to the pot. Add a few splashes of water and a lid and let it cook for a few minutes. And when you go back and remove the lid..Ca bang ! All the spinach is gone (not really, it just wilted).

It’s time for the peas and water to be added.The blender comes out and the soup gets blended until super smooth.

So green, so good.. This soup is all ready to go. But here is the thing, you can eat it at any temperature and it will be amazing so if you want to heat it up a little more, go for it. Cold soup shooters, just stick it in the fridge for a while and wait until its chilled. Or both. I ate a bowl warm then had cold soup for dessert.

And to finish, you must serve with fresh lemon and if you have it, a pretty little mint plant. I love the flavor of a little fresh mint added, but not all do. So mint if you like( it really is so good) but lemon in a must!

Enjoy all the green things!

-C

serves 3-4

  • 2 cup peas (fresh or frozen.. I used frozen)
  • 3 packed cups fresh spinach
  • a few sprigs of fresh mint (optional)
  • 3 cups water
  • 1 small onion
  • a carrot
  • 3 cloves garlic
  • 1 lemon
  • olive oil
  • salt and pepper

Small chop onion and carrot and toss into a big heavy bottom pot with a drizzle of olive oil and salt and pepper. Stick on stove on medium heat and cook until it becomes soft and fragrant. Now mince garlic and add that it too. Stir and cook for another minute or two then add in all the spinach and a splash of water. Place o lid on pot and let until cook until spinach is all wilted. (give it a stir to get it all cooked down). Once wilted, add the peas and the water. Stir all together and let simmer for a few minutes then remove from heat. Now blend the crap out of it until silky smooth.(use your blending device of choice).

And it’s done. You can either serve right away as a hot soup or sick it in the fridge and serve cold! Just remember that you need to serve it with cracked pepper, a squeeze of fresh lemon and some chopped up fresh mint(mint it optional but so good)

Eat with a spoon or forget the spoon and slurp out a a cup like the cool kids.

I eat a lot of hummus. Like a lot. Every day, all day long. (seriously, I am always snacking on veggies dipped in hummus) So I am sorry to all around me that my breath always smells.. (I blame all the garlic in the hummus.)

Recently, during a particularly browsey grocery shop, I ended up in the hummus case (I always end up there) and found a new hummus flavor.  Pineapple jalapeno, WHAT.  I grabbed it right then and there, convinced that hummus gods were rewarding me for all of my hummus eating and have made me my very own flavor.

Got home, tossed all the groceries into the fridge and busted open the new hummus, a bag of carrots, and went at it. Oh man, it was good.(to often the store bought hummus flavors are not so great) The flavors were all there, sweet and spicy, and creamy.  It was fantastic, I ate almost all of it and I knew I had to make my own.

And I did and you know what, it was even freaking better! (Fresh it the best!)

So If you are a hummus person of any kind, this is a fantastic exciting flavor that will make you all sorts of happy.

The stuff for the hummus:  chickpeas, tahini, olive oil, garlic, and salt and pepper. And for flavor add ins,  fresh pineapple and a jalapeno pepper.

Chickpeas (rinsed and drained) go into the food processor with some tahini, the juice of the lemon and salt and pepper.. The garlic I actually pulsed in the processor first (to avoid big raw hunks) and some olive oil are also going in on this.

Blended until a smooth, creamy perfection.

Now for the fun stuff. Dice up the pineapple and remove seeds (or not) from the jalapeno and dice that up too

Toss it all (minus a few little pieces of garnish if you want) into that creamy dreamy hummus.

Pulse pulse pulse until the chunks of stuff are all incorporated . Make it super chunky or super smooth, up to you. I like mine kinda chunky, but not too chunky, if you know what I mean.

Into a big bowl, topped with a few little diced up pieces of jalapeno and pineapple, you know, for prettiness. And lots of cracked pepper.. Lots.

Now eat. With whatever ( I like veggies or just give me a spoon, Ican eat hummus all by itself)

Hummus for life!

-C

Makes about 2 1/2cups

  • 2 1/2 chickpeas
  • 2-3 cloves garlic
  • 2 tablespoons tahini
  • 1 lemon
  • 2 tablespoons olive oil
  • 3/4 cup fresh pineapple
  • 1-2 jalapenos
  • salt and pepper

Rinsed and drain chickpeas. Add garlic and a little olive oil to the food processor and pulse until the garlic is a little minced. Add in the drained chickpeas,  tahini, a sprinkle of salt ans pepper, the juice of the lemon and another tablespoon of olive oil and blend until smooth.

Dice up pineapple into smaller chunks and remove seeds (if you want) from the jalapeno and chop that into smaller pieces . Add to the hummus and pulse until combined. You can leave it chunky or blend until smooth. Just stop blending when you reach you desired consistency . Garnish with more chopped pineapple and jalapeno and lots of freshly ground pepper.

Serve with whatever you eat your hummus with.

Store left over (there probably won’t be any) in a container in the fridge.

«‹ 147 148 149 150›»

Recent Posts

  • Super Cute DIY Heart Pins — STEM+NODE CERAMICS
  • Pineapple Jalapeño Hot Sauce — STEM+NODE CERAMICS
  • Mulled Licorice Spice Tea — STEM+NODE CERAMICS
  • Spring Cleaning the Refrigerator and Use it up Soup — STEM+NODE CERAMICS
  • Cinnamon Star Bread — STEM+NODE CERAMICS
@lonelyplanet
STUDIO ESCAPE Creative Getaways Quiet stays and bright worktables for a weekend reset. See Places
MAKER ROUTE World Nomads Travel-ready planning and practical coverage for makers. Read Tips

Flere spillere vælger en velkomstbonus uden indbetaling for at prøve casinoet gratis.